();
public SecurityMonitorWindow()
{
InitializeComponent();
// Set up 2x2 grid of camera views
for (int row = 0; row < 2; row++)
{
for (int col = 0; col < 2; col++)
{
var view = new VisioForge.Core.UI.WPF.VideoView();
Grid.SetRow(view, row);
Grid.SetColumn(view, col);
mainGrid.Children.Add(view);
cameraViews.Add(view);
// Create and configure camera
var camera = new VideoCapture();
camera.OnVideoFrameBuffer += (s, e) => view.RenderFrame(e);
cameras.Add(camera);
}
}
}
public async Task StartCamerasAsync()
{
for (int i = 0; i < cameras.Count; i++)
{
cameras[i].VideoSource = VideoSource.CameraSource;
cameras[i].CameraDevice = new CameraDevice(i); // Assuming cameras are indexed 0-3
await cameras[i].StartAsync();
}
}
}
```
## Troubleshooting Common Issues
### Handling Frame Synchronization
If you experience frame timing issues across multiple displays:
```cs
private readonly object syncLock = new object();
private void VideoCapture1_OnVideoFrameBuffer(object sender, VideoFrameBufferEventArgs e)
{
lock (syncLock)
{
foreach (var view in videoViews)
{
view.RenderFrame(e);
}
}
}
```
---
For more code samples and advanced implementation techniques, visit our [GitHub repository](https://github.com/visioforge/.Net-SDK-s-samples).
---END OF PAGE---
# Local File: .\dotnet\general\code-samples\onvideoframebitmap-usage.md
---
title: Mastering OnVideoFrameBitmap in .NET Video Processing
description: Learn how to manipulate video frames in real-time with OnVideoFrameBitmap events in .NET applications. This detailed guide provides practical code examples, performance tips, and advanced techniques for C# developers working with video processing in .NET SDK environments.
sidebar_label: OnVideoFrameBitmap Event Usage
---
# Mastering Real-Time Video Frame Manipulation with OnVideoFrameBitmap
[!badge size="xl" target="blank" variant="info" text="Video Capture SDK .Net"](https://www.visioforge.com/video-capture-sdk-net) [!badge size="xl" target="blank" variant="info" text="Video Edit SDK .Net"](https://www.visioforge.com/video-edit-sdk-net) [!badge size="xl" target="blank" variant="info" text="Media Player SDK .Net"](https://www.visioforge.com/media-player-sdk-net)
The `OnVideoFrameBitmap` event is a powerful feature in .NET video processing libraries that allows developers to access and modify video frames in real-time. This guide explores the practical applications, implementation techniques, and performance considerations when working with bitmap frame manipulation in C# applications.
## Understanding OnVideoFrameBitmap Events
The `OnVideoFrameBitmap` event provides a direct interface to access video frames as they're processed by the SDK. This capability is essential for applications that require:
- Real-time video analysis
- Frame-by-frame manipulation
- Dynamic overlay implementation
- Custom video effects
- Computer vision integration
When the event fires, it delivers a bitmap representation of the current video frame, allowing for pixel-level access and manipulation before the frame continues through the processing pipeline.
## Basic Implementation
To begin working with the `OnVideoFrameBitmap` event, you'll need to subscribe to it in your code:
```csharp
// Subscribe to the OnVideoFrameBitmap event
videoProcessor.OnVideoFrameBitmap += VideoProcessor_OnVideoFrameBitmap;
// Implement the event handler
private void VideoProcessor_OnVideoFrameBitmap(object sender, VideoFrameBitmapEventArgs e)
{
// Frame manipulation code will go here
// e.Frame contains the current frame as a Bitmap
}
```
## Manipulating Video Frames
### Simple Bitmap Overlay Example
The following example demonstrates how to overlay an image on each video frame:
```csharp
Bitmap bmp = new Bitmap(@"c:\samples\pics\1.jpg");
using (Graphics g = Graphics.FromImage(e.Frame))
{
g.DrawImage(bmp, 0, 0, bmp.Width, bmp.Height);
e.UpdateData = true;
}
bmp.Dispose();
```
In this code:
1. We create a `Bitmap` object from an image file
2. We use the `Graphics` class to draw onto the frame bitmap
3. We set `e.UpdateData = true` to inform the SDK that we've modified the frame
4. We dispose of our resources properly to prevent memory leaks
> **Important:** Always set `e.UpdateData = true` when you modify the frame bitmap. This signals the SDK to use your modified frame instead of the original.
### Adding Text Overlays
Text overlays are commonly used for timestamps, captions, or informational displays:
```csharp
using (Graphics g = Graphics.FromImage(e.Frame))
{
// Create a semi-transparent background for text
using (SolidBrush brush = new SolidBrush(Color.FromArgb(150, 0, 0, 0)))
{
g.FillRectangle(brush, 10, 10, 200, 30);
}
// Add text overlay
using (Font font = new Font("Arial", 12))
using (SolidBrush textBrush = new SolidBrush(Color.White))
{
g.DrawString(DateTime.Now.ToString(), font, textBrush, new PointF(15, 15));
}
e.UpdateData = true;
}
```
## Performance Considerations
When working with `OnVideoFrameBitmap`, it's crucial to optimize your code for performance. Each frame processing operation must complete quickly to maintain smooth video playback.
### Resource Management
Proper resource management is essential:
```csharp
// Poor performance approach
private void VideoProcessor_OnVideoFrameBitmap(object sender, VideoFrameBitmapEventArgs e)
{
Bitmap overlay = new Bitmap(@"c:\logo.png");
Graphics g = Graphics.FromImage(e.Frame);
g.DrawImage(overlay, 0, 0);
e.UpdateData = true;
// Memory leak! Graphics and Bitmap not disposed
}
// Optimized approach
private Bitmap _cachedOverlay;
private void InitializeResources()
{
_cachedOverlay = new Bitmap(@"c:\logo.png");
}
private void VideoProcessor_OnVideoFrameBitmap(object sender, VideoFrameBitmapEventArgs e)
{
using (Graphics g = Graphics.FromImage(e.Frame))
{
g.DrawImage(_cachedOverlay, 0, 0);
e.UpdateData = true;
}
}
private void CleanupResources()
{
_cachedOverlay?.Dispose();
}
```
### Optimizing Processing Time
To maintain smooth video playback:
1. **Pre-compute where possible**: Prepare resources before processing begins
2. **Cache frequently used objects**: Avoid creating new objects for each frame
3. **Process only when necessary**: Add conditional logic to skip frames or perform less intensive operations when needed
4. **Use efficient drawing operations**: Choose appropriate GDI+ methods based on your needs
```csharp
private void VideoProcessor_OnVideoFrameBitmap(object sender, VideoFrameBitmapEventArgs e)
{
// Only process every second frame
if (_frameCounter % 2 == 0)
{
using (Graphics g = Graphics.FromImage(e.Frame))
{
// Your frame processing code
e.UpdateData = true;
}
}
_frameCounter++;
}
```
## Advanced Frame Manipulation Techniques
### Applying Filters and Effects
You can implement custom image processing filters:
```csharp
private void ApplyGrayscaleFilter(Bitmap bitmap)
{
Rectangle rect = new Rectangle(0, 0, bitmap.Width, bitmap.Height);
BitmapData bmpData = bitmap.LockBits(rect, ImageLockMode.ReadWrite, bitmap.PixelFormat);
IntPtr ptr = bmpData.Scan0;
int bytes = Math.Abs(bmpData.Stride) * bitmap.Height;
byte[] rgbValues = new byte[bytes];
Marshal.Copy(ptr, rgbValues, 0, bytes);
// Process pixel data
for (int i = 0; i < rgbValues.Length; i += 4)
{
byte gray = (byte)(0.299 * rgbValues[i + 2] + 0.587 * rgbValues[i + 1] + 0.114 * rgbValues[i]);
rgbValues[i] = gray; // Blue
rgbValues[i + 1] = gray; // Green
rgbValues[i + 2] = gray; // Red
}
Marshal.Copy(rgbValues, 0, ptr, bytes);
bitmap.UnlockBits(bmpData);
}
```
## Integration with Computer Vision Libraries
The `OnVideoFrameBitmap` event can be combined with popular computer vision libraries:
```csharp
// Example using a hypothetical computer vision library
private void VideoProcessor_OnVideoFrameBitmap(object sender, VideoFrameBitmapEventArgs e)
{
// Convert bitmap to format needed by CV library
byte[] imageData = ConvertBitmapToByteArray(e.Frame);
// Process with CV library
var results = _computerVisionProcessor.DetectFaces(imageData, e.Frame.Width, e.Frame.Height);
// Draw results back onto frame
using (Graphics g = Graphics.FromImage(e.Frame))
{
foreach (var face in results)
{
g.DrawRectangle(new Pen(Color.Yellow, 2), face.X, face.Y, face.Width, face.Height);
}
e.UpdateData = true;
}
}
```
## Troubleshooting Common Issues
### Memory Leaks
If you experience memory growth during prolonged video processing:
1. Ensure all `Graphics` objects are disposed
2. Properly dispose of any temporary `Bitmap` objects
3. Avoid capturing large objects in lambda expressions
### Performance Degradation
If frame processing becomes sluggish:
1. Profile your event handler to identify bottlenecks
2. Consider reducing processing frequency
3. Optimize GDI+ operations or consider DirectX for performance-critical applications
## SDK Integration
The `OnVideoFrameBitmap` event is available in the following SDKs:
## Required Dependencies
To use the functionality described in this guide, you'll need:
- SDK redistribution package
- System.Drawing (included in .NET Framework)
- Windows GDI+ support
---
Visit our [GitHub](https://github.com/visioforge/.Net-SDK-s-samples) page to get more code samples and projects demonstrating these techniques in action.
---END OF PAGE---
# Local File: .\dotnet\general\code-samples\read-file-info.md
---
title: Reading Media File Information in C# for Developers
description: Learn how to extract detailed information from video and audio files in C# with step-by-step code examples. Discover how to access codecs, resolution, frame rate, bitrate, and metadata tags for building robust media applications.
sidebar_label: Reading Media File Information
---
# Reading Media File Information in C#
[!badge size="xl" target="blank" variant="info" text="Video Capture SDK .Net"](https://www.visioforge.com/video-capture-sdk-net) [!badge size="xl" target="blank" variant="info" text="Video Edit SDK .Net"](https://www.visioforge.com/video-edit-sdk-net) [!badge size="xl" target="blank" variant="info" text="Media Player SDK .Net"](https://www.visioforge.com/media-player-sdk-net)
## Introduction
Accessing detailed information embedded within media files is essential for developing sophisticated applications like media players, video editors, content management systems, and file analysis tools. Understanding properties such as codecs, resolution, frame rate, bitrate, duration, and embedded tags allows developers to build more intelligent and user-friendly software.
This guide demonstrates how to read comprehensive information from video and audio files using C# and the `MediaInfoReader` class. The techniques shown are applicable across various .NET projects and provide a foundation for handling media files programmatically.
## Why Extract Media File Information?
Media file information serves multiple purposes in application development:
- **User Experience**: Display technical details to users in media players
- **Compatibility Checks**: Verify if files meet required specifications
- **Automated Processing**: Configure encoding parameters based on source properties
- **Content Organization**: Catalog media libraries with accurate metadata
- **Quality Assessment**: Evaluate media files for potential issues
## Implementation Guide
Let's explore the process of extracting media file information in a step-by-step approach. The examples assume a WinForms application with a `TextBox` control named `mmInfo` for displaying the extracted information.
### Step 1: Initialize the Media Information Reader
The first step involves creating an instance of the `MediaInfoReader` class:
```csharp
// Import the necessary namespace
using VisioForge.Core.MediaInfo; // Namespace for MediaInfoReader
using VisioForge.Core.Helpers; // Namespace for TagLibHelper (optional)
// Create an instance of MediaInfoReader
var infoReader = new MediaInfoReader();
```
This initialization prepares the reader to process media files.
### Step 2: Verify File Playability (Optional)
Before diving into detailed analysis, it's often useful to check if the file is supported:
```csharp
// Define variables to hold potential error information
FilePlaybackError errorCode;
string errorText;
// Specify the path to the media file
string filename = @"C:\path\to\your\mediafile.mp4"; // Replace with your actual file path
// Check if the file is playable
if (MediaInfoReader.IsFilePlayable(filename, out errorCode, out errorText))
{
// Display success message
mmInfo.Text += "Status: This file appears to be playable." + Environment.NewLine;
}
else
{
// Display error message including the error code and description
mmInfo.Text += $"Status: This file might not be playable. Error: {errorCode} - {errorText}" + Environment.NewLine;
}
mmInfo.Text += "------------------------------------" + Environment.NewLine;
```
This verification provides early feedback on file integrity and compatibility.
### Step 3: Extract Detailed Stream Information
Now we can extract the rich metadata from the file:
```csharp
try
{
// Assign the filename to the reader
infoReader.Filename = filename;
// Read the file information (true for full analysis)
infoReader.ReadFileInfo(true);
// Process Video Streams
mmInfo.Text += $"Found {infoReader.VideoStreams.Count} video stream(s)." + Environment.NewLine;
for (int i = 0; i < infoReader.VideoStreams.Count; i++)
{
var stream = infoReader.VideoStreams[i];
mmInfo.Text += Environment.NewLine;
mmInfo.Text += $"--- Video Stream #{i + 1} ---" + Environment.NewLine;
mmInfo.Text += $" Codec: {stream.Codec}" + Environment.NewLine;
mmInfo.Text += $" Duration: {stream.Duration}" + Environment.NewLine;
mmInfo.Text += $" Dimensions: {stream.Width}x{stream.Height}" + Environment.NewLine;
mmInfo.Text += $" FOURCC: {stream.FourCC}" + Environment.NewLine;
if (stream.AspectRatio != null && stream.AspectRatio.Item1 > 0 && stream.AspectRatio.Item2 > 0)
{
mmInfo.Text += $" Aspect Ratio: {stream.AspectRatio.Item1}:{stream.AspectRatio.Item2}" + Environment.NewLine;
}
mmInfo.Text += $" Frame Rate: {stream.FrameRate:F2} fps" + Environment.NewLine;
mmInfo.Text += $" Bitrate: {stream.Bitrate / 1000.0:F0} kbps" + Environment.NewLine;
mmInfo.Text += $" Frames Count: {stream.FramesCount}" + Environment.NewLine;
}
// Process Audio Streams
mmInfo.Text += Environment.NewLine;
mmInfo.Text += $"Found {infoReader.AudioStreams.Count} audio stream(s)." + Environment.NewLine;
for (int i = 0; i < infoReader.AudioStreams.Count; i++)
{
var stream = infoReader.AudioStreams[i];
mmInfo.Text += Environment.NewLine;
mmInfo.Text += $"--- Audio Stream #{i + 1} ---" + Environment.NewLine;
mmInfo.Text += $" Codec: {stream.Codec}" + Environment.NewLine;
mmInfo.Text += $" Codec Info: {stream.CodecInfo}" + Environment.NewLine;
mmInfo.Text += $" Duration: {stream.Duration}" + Environment.NewLine;
mmInfo.Text += $" Bitrate: {stream.Bitrate / 1000.0:F0} kbps" + Environment.NewLine;
mmInfo.Text += $" Channels: {stream.Channels}" + Environment.NewLine;
mmInfo.Text += $" Sample Rate: {stream.SampleRate} Hz" + Environment.NewLine;
mmInfo.Text += $" Bits Per Sample (BPS): {stream.BPS}" + Environment.NewLine;
mmInfo.Text += $" Language: {stream.Language}" + Environment.NewLine;
}
// Process Subtitle Streams
mmInfo.Text += Environment.NewLine;
mmInfo.Text += $"Found {infoReader.Subtitles.Count} subtitle stream(s)." + Environment.NewLine;
for (int i = 0; i < infoReader.Subtitles.Count; i++)
{
var stream = infoReader.Subtitles[i];
mmInfo.Text += Environment.NewLine;
mmInfo.Text += $"--- Subtitle Stream #{i + 1} ---" + Environment.NewLine;
mmInfo.Text += $" Codec/Format: {stream.Codec}" + Environment.NewLine;
mmInfo.Text += $" Name: {stream.Name}" + Environment.NewLine;
mmInfo.Text += $" Language: {stream.Language}" + Environment.NewLine;
}
}
catch (Exception ex)
{
// Handle potential errors during file reading
mmInfo.Text += $"{Environment.NewLine}Error reading file info: {ex.Message}{Environment.NewLine}";
}
finally
{
// Important: Dispose the reader to release file handles and resources
infoReader.Dispose();
}
```
The code iterates through each collection (`VideoStreams`, `AudioStreams`, and `Subtitles`), extracting and displaying relevant information for every stream found.
### Step 4: Extract Metadata Tags
Beyond technical stream information, media files often contain metadata tags:
```csharp
// Read Metadata Tags
mmInfo.Text += Environment.NewLine + "--- Metadata Tags ---" + Environment.NewLine;
try
{
// Use TagLibHelper to read tags from the file
var tags = TagLibHelper.ReadTags(filename);
// Check if tags were successfully read
if (tags != null)
{
mmInfo.Text += $"Title: {tags.Title}" + Environment.NewLine;
mmInfo.Text += $"Artist(s): {string.Join(", ", tags.Performers ?? new string[0])}" + Environment.NewLine;
mmInfo.Text += $"Album: {tags.Album}" + Environment.NewLine;
mmInfo.Text += $"Year: {tags.Year}" + Environment.NewLine;
mmInfo.Text += $"Genre: {string.Join(", ", tags.Genres ?? new string[0])}" + Environment.NewLine;
mmInfo.Text += $"Comment: {tags.Comment}" + Environment.NewLine;
}
else
{
mmInfo.Text += "No standard metadata tags found or readable." + Environment.NewLine;
}
}
catch (Exception ex)
{
// Handle errors during tag reading
mmInfo.Text += $"Error reading tags: {ex.Message}" + Environment.NewLine;
}
```
## Best Practices for Media File Analysis
When implementing media file analysis in your applications, consider these best practices:
### Error Handling
Always wrap file operations in appropriate try-catch blocks. Media files can be corrupted, inaccessible, or in unexpected formats, which might cause exceptions.
```csharp
try {
// Media file operations
}
catch (Exception ex) {
// Log error and provide user feedback
}
```
### Resource Management
Properly dispose of objects that access file resources to prevent file locking issues:
```csharp
using (var infoReader = new MediaInfoReader())
{
// Use the reader
}
// Or manually in a finally block
try {
// Operations
}
finally {
infoReader.Dispose();
}
```
### Performance Considerations
For large media libraries, consider:
1. Implementing caching mechanisms for repeated analysis
2. Using background threads for processing to keep UI responsive
3. Limiting the depth of analysis for initial quick scans
## Required Components
For successful implementation, ensure your project includes the necessary dependencies as specified in the SDK documentation.
## Conclusion
Extracting information from media files is a powerful capability for developers building applications that work with audio and video content. With the techniques outlined in this guide, you can access detailed technical properties and metadata tags to enhance your application's functionality.
The `MediaInfoReader` class provides a convenient and efficient way to extract the necessary metadata, allowing you to build more sophisticated media handling features in your C# applications.
For more advanced scenarios, explore the full capabilities of the SDK and consult the detailed documentation. You can find additional code samples and examples on GitHub to further expand your media file processing capabilities.
---END OF PAGE---
# Local File: .\dotnet\general\code-samples\select-video-renderer-winforms.md
---
title: Video Renderer Selection Guide for .NET Applications
description: Learn how to implement and optimize video renderers in .NET applications using DirectShow-based SDK engines. This in-depth guide covers VideoRenderer, VMR9, and EVR with practical code examples for WinForms development.
sidebar_label: Select Video Renderer (WinForms)
---
# Video Renderer Selection Guide for WinForms Applications
[!badge size="xl" target="blank" variant="info" text="Video Capture SDK .Net"](https://www.visioforge.com/video-capture-sdk-net) [!badge size="xl" target="blank" variant="info" text="Video Edit SDK .Net"](https://www.visioforge.com/video-edit-sdk-net) [!badge size="xl" target="blank" variant="info" text="Media Player SDK .Net"](https://www.visioforge.com/media-player-sdk-net)
## Introduction to Video Rendering in .NET
When developing multimedia applications in .NET, selecting the appropriate video renderer is crucial for optimal performance and compatibility. This guide focuses on DirectShow-based SDK engines: VideoCaptureCore, VideoEditCore, and MediaPlayerCore, which share the same API across all SDKs.
Video renderers serve as the bridge between your application and the display hardware, determining how video content is processed and presented to the user. The right choice can significantly impact performance, visual quality, and hardware resource utilization.
## Understanding Available Video Renderer Options
DirectShow in Windows offers three primary renderer options, each with distinct characteristics and use cases. Let's explore each renderer in detail to help you make an informed decision for your application.
### Legacy Video Renderer (GDI-based)
The Video Renderer is the oldest option in the DirectShow ecosystem. It relies on GDI (Graphics Device Interface) for drawing operations.
**Key characteristics:**
- Software-based rendering without hardware acceleration
- Compatible with older systems and configurations
- Lower performance ceiling compared to modern alternatives
- Simple implementation with minimal configuration options
**Implementation example:**
```cs
VideoCapture1.Video_Renderer.VideoRenderer = VideoRendererMode.VideoRenderer;
```
**When to use:**
- Compatibility is the primary concern
- Application targets older hardware or operating systems
- Minimal video processing requirements
- Troubleshooting issues with newer renderers
### Video Mixing Renderer 9 (VMR9)
VMR9 represents a significant improvement over the legacy renderer, introducing support for hardware acceleration and advanced features.
**Key characteristics:**
- Hardware-accelerated rendering through DirectX 9
- Support for multiple video streams mixing
- Advanced deinterlacing options
- Alpha blending and compositing capabilities
- Custom video effects processing
**Implementation example:**
```cs
VideoCapture1.Video_Renderer.VideoRenderer = VideoRendererMode.VMR9;
```
**When to use:**
- Modern applications requiring good performance
- Video editing or composition features are needed
- Multiple video stream scenarios
- Applications that need to balance performance and compatibility
### Enhanced Video Renderer (EVR)
EVR is the most advanced option, available in Windows Vista and later operating systems. It leverages the Media Foundation framework rather than pure DirectShow.
**Key characteristics:**
- Latest hardware acceleration technologies
- Superior video quality and performance
- Enhanced color space processing
- Better multi-monitor support
- More efficient CPU usage
- Improved synchronization mechanisms
**Implementation example:**
```cs
VideoCapture1.Video_Renderer.VideoRenderer = VideoRendererMode.EVR;
```
**When to use:**
- Modern applications targeting Windows Vista or later
- Maximum performance and quality are required
- Applications handling HD or 4K content
- When advanced synchronization is important
- Multiple display environments
## Advanced Configuration Options
Beyond just selecting a renderer, the SDK provides various configuration options to fine-tune video presentation.
### Working with Deinterlacing Modes
When displaying interlaced video content (common in broadcast sources), proper deinterlacing improves visual quality significantly. The SDK supports various deinterlacing algorithms depending on the renderer chosen.
First, retrieve the available deinterlacing modes:
```cs
VideoCapture1.Video_Renderer_Deinterlace_Modes_Fill();
// Populate a dropdown with available modes
foreach (string deinterlaceMode in VideoCapture1.Video_Renderer_Deinterlace_Modes())
{
cbDeinterlaceModes.Items.Add(deinterlaceMode);
}
```
Then apply a selected deinterlacing mode:
```cs
// Assuming the user selected a mode from cbDeinterlaceModes
string selectedMode = cbDeinterlaceModes.SelectedItem.ToString();
VideoCapture1.Video_Renderer.DeinterlaceMode = selectedMode;
VideoCapture1.Video_Renderer_Update();
```
VMR9 and EVR support various deinterlacing algorithms including:
- Bob (simple line doubling)
- Weave (field interleaving)
- Motion adaptive
- Motion compensated (highest quality)
The availability of specific algorithms depends on the video card capabilities and driver implementation.
### Managing Aspect Ratio and Stretch Modes
When displaying video in a window or control that doesn't match the source's native aspect ratio, you need to decide how to handle this discrepancy. The SDK provides multiple stretch modes to address different scenarios.
#### Stretch Mode
This mode stretches the video to fill the entire display area, potentially distorting the image:
```cs
VideoCapture1.Video_Renderer.StretchMode = VideoRendererStretchMode.Stretch;
VideoCapture1.Video_Renderer_Update();
```
**Use cases:**
- When aspect ratio is not critical
- Filling the entire display area is more important than proportions
- Source and display have similar aspect ratios
- User interface constraints require full-area usage
#### Letterbox Mode
This mode preserves the original aspect ratio by adding black borders as needed:
```cs
VideoCapture1.Video_Renderer.StretchMode = VideoRendererStretchMode.Letterbox;
VideoCapture1.Video_Renderer_Update();
```
**Use cases:**
- Maintaining correct proportions is essential
- Professional video applications
- Content where distortion would be noticeable or problematic
- Cinema or broadcast content viewing
#### Crop Mode
This mode fills the display area while preserving aspect ratio, potentially cropping some content:
```cs
VideoCapture1.Video_Renderer.StretchMode = VideoRendererStretchMode.Crop;
VideoCapture1.Video_Renderer_Update();
```
**Use cases:**
- Consumer video applications where filling the screen is preferred
- Content where edges are less important than center
- Social media-style video display
- When trying to eliminate letterboxing in already letterboxed content
### Performance Optimization Techniques
#### Adjusting Buffer Count
For smoother playback, especially with high-resolution content, adjusting the buffer count can help:
```cs
// Increase buffer count for smoother playback
VideoCapture1.Video_Renderer.BuffersCount = 3;
VideoCapture1.Video_Renderer_Update();
```
#### Enabling Hardware Acceleration
Ensure hardware acceleration is enabled for maximum performance:
```cs
// For VMR9
VideoCapture1.Video_Renderer.VMR9.UseOverlays = true;
VideoCapture1.Video_Renderer.VMR9.UseDynamicTextures = true;
// For EVR
VideoCapture1.Video_Renderer.EVR.EnableHardwareTransforms = true;
VideoCapture1.Video_Renderer_Update();
```
## Troubleshooting Common Issues
### Renderer Compatibility Problems
If you encounter issues with a specific renderer, try falling back to a more compatible option:
```cs
try
{
// Try using EVR first
VideoCapture1.Video_Renderer.VideoRenderer = VideoRendererMode.EVR;
VideoCapture1.Video_Renderer_Update();
}
catch
{
try
{
// Fall back to VMR9
VideoCapture1.Video_Renderer.VideoRenderer = VideoRendererMode.VMR9;
VideoCapture1.Video_Renderer_Update();
}
catch
{
// Last resort - legacy renderer
VideoCapture1.Video_Renderer.VideoRenderer = VideoRendererMode.VideoRenderer;
VideoCapture1.Video_Renderer_Update();
}
}
```
### Display Issues on Multi-Monitor Systems
For applications that might run on multi-monitor setups, additional configuration might be necessary:
```cs
// Specify which monitor to use for full-screen mode
VideoCapture1.Video_Renderer.MonitorIndex = 0; // Primary monitor
VideoCapture1.Video_Renderer_Update();
```
## Best Practices and Recommendations
1. **Choose the right renderer for your target environment**:
- For modern Windows: EVR
- For broad compatibility: VMR9
- For legacy systems: Video Renderer
2. **Test on various hardware configurations**: Video rendering can behave differently across GPU vendors and driver versions.
3. **Implement renderer fallback logic**: Always have a backup plan if the preferred renderer fails.
4. **Consider your video content**: Higher resolution or interlaced content will benefit more from advanced renderers.
5. **Balance quality vs. performance**: The highest quality settings might not always deliver the best user experience if they impact performance.
## Required Dependencies
To ensure proper functionality of these renderers, make sure to include:
- SDK redistributable packages
- DirectX End-User Runtime (latest version recommended)
- .NET Framework runtime appropriate for your application
## Conclusion
Selecting and configuring the right video renderer is an important decision in developing high-quality multimedia applications. By understanding the strengths and limitations of each renderer option, you can significantly improve the user experience of your WinForms applications.
The optimal choice depends on your specific requirements, target audience, and the nature of your video content. In most modern applications, EVR should be your first choice, with VMR9 as a reliable fallback option.
---
Visit our [GitHub](https://github.com/visioforge/.Net-SDK-s-samples) page to get more code samples.
---END OF PAGE---
# Local File: .\dotnet\general\code-samples\text-onvideoframebuffer.md
---
title: Text Overlay Implementation with OnVideoFrameBuffer
description: Learn how to create custom text overlays in video applications using the OnVideoFrameBuffer event in .NET video processing. This detailed guide with C# code examples shows you how to implement dynamic text elements on video frames for professional applications.
sidebar_label: Draw Text Overlay Using OnVideoFrameBuffer Event
---
# Creating Custom Text Overlays with OnVideoFrameBuffer in .NET
[!badge size="xl" target="blank" variant="info" text="Video Capture SDK .Net"](https://www.visioforge.com/video-capture-sdk-net) [!badge size="xl" target="blank" variant="info" text="Video Edit SDK .Net"](https://www.visioforge.com/video-edit-sdk-net) [!badge size="xl" target="blank" variant="info" text="Media Player SDK .Net"](https://www.visioforge.com/media-player-sdk-net)
## Introduction to Text Overlays in Video Processing
Adding text overlays to video content is a common requirement in many professional applications, from video editing software to security camera feeds, broadcasting tools, and educational applications. While the standard video effect APIs provide basic text overlay capabilities, developers often need more control over how text appears on video frames.
This guide demonstrates how to manually implement custom text overlays using the OnVideoFrameBuffer event available in VideoCaptureCore, VideoEditCore, and MediaPlayerCore engines. By intercepting video frames during processing, you can apply custom text and graphics with precise control over positioning, formatting, and animation.
## Understanding the OnVideoFrameBuffer Event
The OnVideoFrameBuffer event is a powerful hook that gives developers direct access to the video frame buffer during processing. This event fires for each frame of video, providing an opportunity to modify the frame data before it's displayed or encoded.
Key benefits of using OnVideoFrameBuffer for text overlays include:
- **Frame-level access**: Modify individual frames with pixel-perfect precision
- **Dynamic content**: Update text based on real-time data or timestamps
- **Custom styling**: Apply custom fonts, colors, and effects beyond what built-in APIs offer
- **Performance optimizations**: Implement efficient rendering techniques for high-performance applications
## Implementation Overview
The technique presented here uses the following components:
1. An event handler for OnVideoFrameBuffer that processes each video frame
2. A VideoEffectTextLogo object to define text properties
3. The FastImageProcessing API to render text onto the frame buffer
This approach is particularly useful when you need to:
- Display dynamic data like timestamps, metadata, or sensor readings
- Create animated text effects
- Position text with pixel-perfect accuracy
- Apply custom styling not available through standard APIs
## Sample Code Implementation
The following C# example demonstrates how to implement a basic text overlay system using the OnVideoFrameBuffer event:
```cs
private void SDK_OnVideoFrameBuffer(object sender, VideoFrameBufferEventArgs e)
{
if (!logoInitiated)
{
logoInitiated = true;
InitTextLogo();
}
FastImageProcessing.AddTextLogo(null, e.Frame.Data, e.Frame.Width, e.Frame.Height, ref textLogo, e.Timestamp, 0);
}
private bool logoInitiated = false;
private VideoEffectTextLogo textLogo = null;
private void InitTextLogo()
{
textLogo = new VideoEffectTextLogo(true);
textLogo.Text = "Hello world!";
textLogo.Left = 50;
textLogo.Top = 50;
}
```
## Detailed Code Explanation
Let's break down the key components of this implementation:
### The Event Handler
```cs
private void SDK_OnVideoFrameBuffer(object sender, VideoFrameBufferEventArgs e)
```
This method is triggered for each video frame. The VideoFrameBufferEventArgs provides access to:
- Frame data (pixel buffer)
- Frame dimensions (width and height)
- Timestamp information
### Initialization Logic
```cs
if (!logoInitiated)
{
logoInitiated = true;
InitTextLogo();
}
```
This code ensures the text logo is only initialized once, preventing unnecessary object creation for each frame. This pattern is important for performance when processing video at high frame rates.
### Text Logo Setup
```cs
private void InitTextLogo()
{
textLogo = new VideoEffectTextLogo(true);
textLogo.Text = "Hello world!";
textLogo.Left = 50;
textLogo.Top = 50;
}
```
The VideoEffectTextLogo class is used to define the properties of the text overlay:
- The text content ("Hello world!")
- Position coordinates (50 pixels from both left and top)
### Rendering the Text Overlay
```cs
FastImageProcessing.AddTextLogo(null, e.Frame.Data, e.Frame.Width, e.Frame.Height, ref textLogo, e.Timestamp, 0);
```
This line does the actual work of rendering the text onto the frame:
- It takes the frame data buffer as input
- Uses the frame dimensions to properly position the text
- References the textLogo object containing text properties
- Can utilize the timestamp for dynamic content
## Advanced Customization Options
While the basic example demonstrates a simple static text overlay, the VideoEffectTextLogo class supports numerous customization options:
### Text Formatting
```cs
textLogo.FontName = "Arial";
textLogo.FontSize = 24;
textLogo.FontBold = true;
textLogo.FontItalic = false;
textLogo.Color = System.Drawing.Color.White;
textLogo.Opacity = 0.8f;
```
### Background and Borders
```cs
textLogo.BackgroundEnabled = true;
textLogo.BackgroundColor = System.Drawing.Color.Black;
textLogo.BackgroundOpacity = 0.5f;
textLogo.BorderEnabled = true;
textLogo.BorderColor = System.Drawing.Color.Yellow;
textLogo.BorderThickness = 2;
```
### Animation and Dynamic Content
For dynamic content that changes per frame:
```cs
private void SDK_OnVideoFrameBuffer(object sender, VideoFrameBufferEventArgs e)
{
if (!logoInitiated)
{
logoInitiated = true;
InitTextLogo();
}
// Update text based on timestamp
textLogo.Text = $"Timestamp: {e.Timestamp.ToString("HH:mm:ss.fff")}";
// Animate position
textLogo.Left = 50 + (int)(Math.Sin(e.Timestamp.TotalSeconds) * 50);
FastImageProcessing.AddTextLogo(null, e.Frame.Data, e.Frame.Width, e.Frame.Height, ref textLogo, e.Timestamp, 0);
}
```
## Performance Considerations
When implementing custom text overlays, consider these performance best practices:
1. **Initialize objects once**: Create the VideoEffectTextLogo object only once, not per frame
2. **Minimize text changes**: Update text content only when necessary
3. **Use efficient fonts**: Simple fonts render faster than complex ones
4. **Consider resolution**: Higher resolution videos require more processing power
5. **Test on target hardware**: Ensure your implementation performs well on production systems
## Multiple Text Elements
To display multiple text elements on the same frame:
```cs
private VideoEffectTextLogo titleLogo = null;
private VideoEffectTextLogo timestampLogo = null;
private void InitTextLogos()
{
titleLogo = new VideoEffectTextLogo(true);
titleLogo.Text = "Camera Feed";
titleLogo.Left = 50;
titleLogo.Top = 50;
timestampLogo = new VideoEffectTextLogo(true);
timestampLogo.Left = 50;
timestampLogo.Top = 100;
}
private void SDK_OnVideoFrameBuffer(object sender, VideoFrameBufferEventArgs e)
{
if (!logosInitiated)
{
logosInitiated = true;
InitTextLogos();
}
// Update dynamic content
timestampLogo.Text = e.Timestamp.ToString("yyyy-MM-dd HH:mm:ss.fff");
// Render both text elements
FastImageProcessing.AddTextLogo(null, e.Frame.Data, e.Frame.Width, e.Frame.Height, ref titleLogo, e.Timestamp, 0);
FastImageProcessing.AddTextLogo(null, e.Frame.Data, e.Frame.Width, e.Frame.Height, ref timestampLogo, e.Timestamp, 0);
}
```
## Required Components
To implement this solution, you'll need:
- SDK redist package installed in your application
- Reference to the appropriate SDK (.NET Video Capture, Video Edit, or Media Player)
- Basic understanding of video frame processing concepts
## Conclusion
The OnVideoFrameBuffer event provides a powerful mechanism for implementing custom text overlays in video applications. By directly accessing the frame buffer, developers can create sophisticated text effects with precise control over appearance and behavior.
This approach is particularly valuable when standard text overlay APIs don't provide the flexibility or features required for your application. With the techniques demonstrated in this guide, you can implement professional-quality text overlays for a wide range of video processing scenarios.
---
Visit our [GitHub](https://github.com/visioforge/.Net-SDK-s-samples) page to get more code samples.
---END OF PAGE---
# Local File: .\dotnet\general\code-samples\uninstall-directshow-filter.md
---
title: Uninstalling DirectShow Filters in Windows Applications
description: Learn how to properly uninstall DirectShow filters from your system using multiple methods. This guide explains manual uninstallation techniques, troubleshooting steps, and best practices for .NET developers working with multimedia applications.
sidebar_label: Uninstall DirectShow Filters
---
# Uninstalling DirectShow Filters in Windows Applications
[!badge size="xl" target="blank" variant="info" text="Video Capture SDK .Net"](https://www.visioforge.com/video-capture-sdk-net) [!badge size="xl" target="blank" variant="info" text="Video Edit SDK .Net"](https://www.visioforge.com/video-edit-sdk-net) [!badge size="xl" target="blank" variant="info" text="Media Player SDK .Net"](https://www.visioforge.com/media-player-sdk-net)
DirectShow filters are essential components for multimedia applications in Windows environments. They enable software to process audio and video data efficiently. However, there may be situations where you need to uninstall these filters, such as when upgrading your application, resolving conflicts, or completely removing a software package. This guide provides detailed instructions on how to properly uninstall DirectShow filters from your system.
## Understanding DirectShow Filters
DirectShow is a multimedia framework and API designed by Microsoft for software developers to perform various operations with media files. It's built on the Component Object Model (COM) architecture and uses a modular approach where each processing step is handled by a separate component called a filter.
Filters are categorized into three main types:
- **Source filters**: Read data from files, capture devices, or network streams
- **Transform filters**: Process or modify the data (compression, decompression, effects)
- **Rendering filters**: Display video or play audio
When SDK components are installed, they register DirectShow filters in the Windows Registry, making them available to any application that uses the DirectShow framework.
## Why Uninstall DirectShow Filters?
There are several reasons why you might need to uninstall DirectShow filters:
1. **Version conflicts**: Newer versions of the SDK might require removing older filters
2. **System cleanup**: Removing unused components to maintain system efficiency
3. **Troubleshooting**: Resolving issues with multimedia applications
4. **Complete software removal**: Ensuring no components remain after uninstalling the main application
5. **Re-registration**: Sometimes uninstalling and reinstalling filters can resolve registration issues
## Methods for Uninstalling DirectShow Filters
### Method 1: Using the SDK Installer (Recommended)
The most straightforward way to uninstall DirectShow filters is through the SDK (or redist) installer itself. SDK packages include uninstallation routines that properly remove all components, including DirectShow filters.
### Method 2: Manual Unregistration with regsvr32
If automatic uninstallation isn't possible or you need to unregister specific filters, you can use the `regsvr32` command-line tool:
1. Open Command Prompt as Administrator (right-click on Command Prompt and select "Run as administrator")
2. Use the following command syntax to unregister a filter:
```cmd
regsvr32 /u "C:\path\to\filter.dll"
```
3. Replace `C:\path\to\filter.dll` with the actual path to the DirectShow filter file
4. Press Enter to execute the command
For example, to unregister a filter located at `C:\Program Files\Common Files\FilterFolder\example_filter.dll`, you would use:
```cmd
regsvr32 /u "C:\Program Files\Common Files\FilterFolder\example_filter.dll"
```
You should see a confirmation dialog indicating successful unregistration.
## Finding DirectShow Filter Locations
Before you can manually unregister filters, you need to know their locations. Here are several methods to find installed DirectShow filters:
### Using GraphStudio
[GraphStudio](https://github.com/cplussharp/graph-studio-next) is a powerful open-source tool for working with DirectShow filters. To find filter locations:
1. Download and install GraphStudio
2. Launch the application with administrator privileges
3. Go to "Graph > Insert Filters"
4. Browse through the list of installed filters
5. Right-click on a filter and select "Properties"
6. Note the "File:" path shown in the properties dialog
This method provides the exact file path needed for manual unregistration.
### Using System Registry
You can also find DirectShow filters through the Windows Registry:
1. Press `Win + R` to open the Run dialog
2. Type `regedit` and press Enter to open Registry Editor
3. Navigate to `HKEY_CLASSES_ROOT\CLSID`
4. Use the Search function (Ctrl+F) to find filter names
5. Look for the "InprocServer32" key under the filter's CLSID, which contains the file path
## Platform Considerations (x86 vs x64)
DirectShow filters are platform-specific, meaning 32-bit (x86) and 64-bit (x64) versions are separate components. If you've installed both versions, you need to unregister each one separately.
For x64 systems:
- 64-bit filters are typically installed in `C:\Windows\System32`
- 32-bit filters are typically installed in `C:\Windows\SysWOW64`
Use the appropriate version of `regsvr32` for each platform:
- For 64-bit filters: `C:\Windows\System32\regsvr32.exe`
- For 32-bit filters: `C:\Windows\SysWOW64\regsvr32.exe`
## Troubleshooting Filter Uninstallation
If you encounter issues during filter uninstallation, try these troubleshooting steps:
### Unable to Unregister Filter
If you receive an error like "DllUnregisterServer failed with error code 0x80004005":
1. Ensure you're running Command Prompt as Administrator
2. Verify that the path to the filter is correct
3. Check if the filter file exists and isn't in use by any application
4. Close any applications that might be using DirectShow filters
5. In some cases, a system restart may be necessary before unregistration
### Filter Still Present After Unregistration
If a filter appears to be still registered after attempting to unregister it:
1. Use GraphStudio to check if the filter is still listed
2. Look for multiple instances of the filter in different locations
3. Check both 32-bit and 64-bit registry locations
4. Try using the Microsoft-provided tool "OleView" to inspect COM registrations
## Verifying Successful Uninstallation
After uninstalling DirectShow filters, verify the removal was successful:
1. Use GraphStudio to check if the filters no longer appear in the available filters list
2. Check the registry for any remaining entries related to the filters
3. Test any applications that previously used the filters to ensure they handle the absence gracefully
---
Visit our [GitHub](https://github.com/visioforge/.Net-SDK-s-samples) page to get more code samples and implementation examples for working with DirectShow and multimedia applications in .NET.
---END OF PAGE---
# Local File: .\dotnet\general\code-samples\video-view-set-custom-image.md
---
title: Setting Custom Images for VideoView in .NET SDKs
description: Learn how to implement custom image display in VideoView controls when no video is playing. This detailed guide includes code examples, troubleshooting tips, and best practices for .NET developers working with video display components.
sidebar_label: Setting Custom Image for VideoView
---
# Setting Custom Images for VideoView Controls in .NET Applications
[!badge size="xl" target="blank" variant="info" text="Video Capture SDK .Net"](https://www.visioforge.com/video-capture-sdk-net) [!badge size="xl" target="blank" variant="info" text="Video Edit SDK .Net"](https://www.visioforge.com/video-edit-sdk-net) [!badge size="xl" target="blank" variant="info" text="Media Player SDK .Net"](https://www.visioforge.com/media-player-sdk-net)
## Introduction
When developing media applications in .NET, it's often necessary to display a custom image within your VideoView control when no video content is playing. This capability is essential for creating professional-looking applications that maintain visual appeal during inactive states. Custom images can serve as placeholders, branding opportunities, or informational displays to enhance the user experience.
This guide explores the implementation of custom image functionality for VideoView controls across various .NET SDK applications.
## Understanding VideoView Custom Images
The VideoView control is a versatile component that displays video content in your application. However, when the control is not actively playing video, it typically shows a blank or default display. By implementing custom images, you can:
- Display your application or company logo
- Show preview thumbnails of available content
- Present instructional information to users
- Maintain visual consistency across your application
- Indicate the video's status (paused, stopped, loading, etc.)
It's important to note that the custom image is only visible when the control is not playing any video content. Once playback begins, the video stream automatically replaces the custom image.
## Implementation Process
The process of setting a custom image for a VideoView control involves three primary operations:
1. Creating a picture box with appropriate dimensions
2. Setting the desired image
3. Cleaning up resources when no longer needed
Let's explore each of these steps in detail.
## Step 1: Creating the Picture Box
The first step is to initialize a picture box within your VideoView control with the appropriate dimensions. This operation should be performed once during the setup phase:
```csharp
VideoView1.PictureBoxCreate(VideoView1.Width, VideoView1.Height);
```
This method call creates an internal picture box component that will host your custom image. The parameters specify the width and height of the picture box, which should typically match the dimensions of your VideoView control to ensure proper display without stretching or distortion.
### Best Practices for Picture Box Creation
- **Timing Considerations**: Create the picture box during form initialization or after the control has been sized appropriately
- **Dynamic Sizing**: If your application supports resizing, consider recreating the picture box when the control size changes
- **Error Handling**: Implement try-catch blocks to handle potential exceptions during creation
## Step 2: Setting the Custom Image
After creating the picture box, you can set your custom image. Note that there appears to be a duplication in the original documentation - the correct code for setting the image should use the `PictureBoxSetImage` method:
```csharp
// Load an image from a file
Image customImage = Image.FromFile("path/to/your/image.jpg");
VideoView1.PictureBoxSetImage(customImage);
```
Alternatively, you can use built-in resources or dynamically generated images:
```csharp
// Using a resource image
VideoView1.PictureBoxSetImage(Properties.Resources.MyCustomImage);
// Or creating a dynamic image
using (Bitmap dynamicImage = new Bitmap(VideoView1.Width, VideoView1.Height))
{
using (Graphics g = Graphics.FromImage(dynamicImage))
{
// Draw on the image
g.Clear(Color.DarkBlue);
g.DrawString("Ready to Play", new Font("Arial", 24), Brushes.White, new PointF(50, 50));
}
VideoView1.PictureBoxSetImage(dynamicImage.Clone() as Image);
}
```
### Image Format Considerations
The image format you choose can impact performance and visual quality:
- **PNG**: Best for images with transparency
- **JPEG**: Suitable for photographic content
- **BMP**: Uncompressed format with higher memory usage
- **GIF**: Supports simple animations but with limited color depth
### Image Size Optimization
For optimal performance, consider these factors when preparing your custom images:
1. **Match Dimensions**: Resize your image to match the VideoView dimensions to avoid scaling operations
2. **Resolution Awareness**: Consider display DPI for crisp images on high-resolution displays
3. **Memory Consumption**: Large images consume more memory, which may impact application performance
## Step 3: Cleaning Up Resources
When the custom image is no longer required, it's important to clean up the resources to prevent memory leaks:
```csharp
VideoView1.PictureBoxDestroy();
```
This method should be called when:
- The application is closing
- The control is being disposed
- You're switching to video playback mode and won't need the custom image anymore
### Resource Management Best Practices
Proper resource management is crucial for maintaining application stability:
- **Explicit Cleanup**: Always call `PictureBoxDestroy()` when you're done with the custom image
- **Disposal Timing**: Include the cleanup call in your form's `Dispose` or `Closing` events
- **State Tracking**: Keep track of whether a picture box has been created to avoid destroying a non-existent resource
## Advanced Scenarios
### Dynamic Image Updates
In some applications, you may need to update the custom image dynamically:
```csharp
private void UpdateCustomImage(string imagePath)
{
// Ensure picture box exists
if (VideoView1.PictureBoxExists())
{
// Update image
Image newImage = Image.FromFile(imagePath);
VideoView1.PictureBoxSetImage(newImage);
}
else
{
// Create picture box first
VideoView1.PictureBoxCreate(VideoView1.Width, VideoView1.Height);
Image newImage = Image.FromFile(imagePath);
VideoView1.PictureBoxSetImage(newImage);
}
}
```
### Handling Control Resizing
If your application allows resizing of the VideoView control, you'll need to handle image scaling:
```csharp
private void VideoView1_SizeChanged(object sender, EventArgs e)
{
// Recreate picture box with new dimensions
if (VideoView1.PictureBoxExists())
{
VideoView1.PictureBoxDestroy();
}
VideoView1.PictureBoxCreate(VideoView1.Width, VideoView1.Height);
// Set image again with appropriate scaling
SetScaledCustomImage();
}
```
### Multiple VideoView Controls
When working with multiple VideoView controls, ensure proper management for each:
```csharp
private void InitializeAllVideoViews()
{
// Initialize each VideoView with appropriate custom images
VideoView1.PictureBoxCreate(VideoView1.Width, VideoView1.Height);
VideoView1.PictureBoxSetImage(Properties.Resources.Camera1Placeholder);
VideoView2.PictureBoxCreate(VideoView2.Width, VideoView2.Height);
VideoView2.PictureBoxSetImage(Properties.Resources.Camera2Placeholder);
// Additional VideoView controls...
}
```
## Troubleshooting Common Issues
### Image Not Displaying
If your custom image isn't appearing:
1. **Check Timing**: Ensure you're setting the image after the picture box is created
2. **Verify Video State**: Confirm the control isn't currently playing video
3. **Image Loading**: Verify the image path is correct and accessible
4. **Control Visibility**: Ensure the VideoView control is visible in the UI
### Memory Leaks
To prevent memory leaks:
1. **Dispose Images**: Always dispose Image objects after they're no longer needed
2. **Destroy Picture Box**: Call `PictureBoxDestroy()` when appropriate
3. **Resource Tracking**: Implement proper tracking of created resources
## Complete Implementation Example
Here's a complete implementation example that demonstrates the proper lifecycle management:
```csharp
public partial class VideoPlayerForm : Form
{
private bool isPictureBoxCreated = false;
public VideoPlayerForm()
{
InitializeComponent();
this.Load += VideoPlayerForm_Load;
this.FormClosing += VideoPlayerForm_FormClosing;
}
private void VideoPlayerForm_Load(object sender, EventArgs e)
{
InitializeCustomImage();
}
private void InitializeCustomImage()
{
try
{
VideoView1.PictureBoxCreate(VideoView1.Width, VideoView1.Height);
isPictureBoxCreated = true;
using (Image customImage = Properties.Resources.VideoPlaceholder)
{
VideoView1.PictureBoxSetImage(customImage);
}
}
catch (Exception ex)
{
// Handle exceptions
MessageBox.Show($"Error setting custom image: {ex.Message}");
}
}
private void btnPlay_Click(object sender, EventArgs e)
{
// Play video logic here
// The custom image will automatically be replaced during playback
}
private void VideoPlayerForm_FormClosing(object sender, FormClosingEventArgs e)
{
CleanupResources();
}
private void CleanupResources()
{
if (isPictureBoxCreated)
{
VideoView1.PictureBoxDestroy();
isPictureBoxCreated = false;
}
}
}
```
## Conclusion
Implementing custom images for VideoView controls enhances the user experience and professional appearance of your .NET media applications. By following the steps outlined in this guide, you can effectively display branded or informative content when videos aren't playing.
Remember the key points:
1. Create the picture box with the appropriate dimensions
2. Set your custom image with proper resource management
3. Clean up resources when they're no longer needed
4. Handle resizing and other special scenarios as required
With these techniques, you can create more polished and user-friendly video applications in .NET.
---
Visit our [GitHub](https://github.com/visioforge/.Net-SDK-s-samples) page to get more code samples and implementation examples.
---END OF PAGE---
# Local File: .\dotnet\general\code-samples\vu-meters.md
---
title: Implementing Audio VU Meters & Waveform Visualizers
description: Complete guide to implementing VU meters and waveform visualizers in .NET applications. Learn how to display real-time audio levels with WinForms and WPF, including code examples for mono and stereo channel visualization.
sidebar_label: VU Meter and Waveform Painter
---
# Audio Visualization: Implementing VU Meters and Waveform Displays in .NET
[!badge size="xl" target="blank" variant="info" text="Video Capture SDK .Net"](https://www.visioforge.com/video-capture-sdk-net) [!badge size="xl" target="blank" variant="info" text="Video Edit SDK .Net"](https://www.visioforge.com/video-edit-sdk-net) [!badge size="xl" target="blank" variant="info" text="Media Player SDK .Net"](https://www.visioforge.com/media-player-sdk-net)
Audio visualization is a crucial component of modern media applications, providing users with visual feedback about audio levels and waveform patterns. This guide demonstrates how to implement VU (Volume Unit) meters and waveform visualizers in both WinForms and WPF applications.
## Understanding Audio Visualization Components
Before diving into implementation, it's important to understand the two main visualization tools we'll be working with:
### VU Meters
VU meters display the instantaneous audio level of a signal, typically showing how loud the audio is at any given moment. They provide real-time feedback about audio levels, helping users monitor signal strength and prevent distortion or clipping.
### Waveform Painters
Waveform visualizers display the audio signal as a continuous line that represents amplitude changes over time. They provide a more detailed representation of the audio content, showing patterns and characteristics that might not be apparent from listening alone.
## Implementation in WinForms Applications
WinForms provides a straightforward way to implement audio visualization components with minimal code. Let's explore the implementation of both VU meters and waveform painters.
### WinForms VU Meter Implementation
Implementing a VU meter in WinForms requires just a few steps:
1. **Add the VU Meter Control**: First, add the VU meter control to your form. For stereo audio, you'll typically add two controls—one for each channel.
```cs
// Add this to your form design
VisioForge.Core.UI.WinForms.VolumeMeterPro.VolumeMeter volumeMeter1;
VisioForge.Core.UI.WinForms.VolumeMeterPro.VolumeMeter volumeMeter2; // For stereo
```
2. **Enable VU Meter in Your Media Control**: Before starting playback or capture, enable the VU meter functionality in your media control.
```cs
// Enable VU meter before starting playback/capture
mediaPlayer.Audio_VUMeterPro_Enabled = true;
```
3. **Implement the Event Handler**: Add an event handler to process the audio level data and update the VU meter display.
```cs
private void VideoCapture1_OnAudioVUMeterProVolume(object sender, AudioLevelEventArgs e)
{
volumeMeter1.Amplitude = e.ChannelLevelsDb[0];
if (e.ChannelLevelsDb.Length > 1)
{
volumeMeter2.Amplitude = e.ChannelLevelsDb[1];
}
}
```
With these steps, your VU meter will dynamically update based on the audio levels of your media playback or capture.
### WinForms Waveform Painter Implementation
The waveform painter implementation follows a similar pattern:
1. **Add the Waveform Painter Control**: Add the waveform painter control to your form. For stereo audio, add two controls.
```cs
// Add this to your form design
VisioForge.Core.UI.WinForms.VolumeMeterPro.WaveformPainter waveformPainter1;
VisioForge.Core.UI.WinForms.VolumeMeterPro.WaveformPainter waveformPainter2; // For stereo
```
2. **Enable VU Meter Processing**: Enable the VU meter functionality to provide data for the waveform painter.
```cs
// Enable VU meter before starting playback/capture
mediaPlayer.Audio_VUMeter_Pro_Enabled = true;
```
3. **Implement the Event Handler**: Add an event handler to process the audio data and update the waveform display.
```cs
private void VideoCapture1_OnAudioVUMeterProVolume(object sender, AudioLevelEventArgs e)
{
waveformPainter1.AddMax(e.ChannelLevelsDb[0]);
if (e.ChannelLevelsDb.Length > 1)
{
waveformPainter2.AddMax(e.ChannelLevelsDb[1]);
}
}
```
## Implementation in WPF Applications
WPF requires a slightly different approach due to its threading model and UI framework. Let's look at how to implement both visualization types in WPF.
### WPF VU Meter Implementation
1. **Add the VU Meter Control**: Add the VU meter control to your XAML layout. For stereo audio, add two controls.
```xml
```
2. **Enable VU Meter Processing and Start the Meters**:
```cs
VideoCapture1.Audio_VUMeter_Pro_Enabled = true;
volumeMeter1.Start();
volumeMeter2.Start();
```
3. **Implement the Event Handler with Dispatcher**: In WPF, you need to use the Dispatcher to update UI elements from non-UI threads.
```cs
private delegate void AudioVUMeterProVolumeDelegate(AudioLevelEventArgs e);
private void AudioVUMeterProVolumeDelegateMethod(AudioLevelEventArgs e)
{
volumeMeter1.Amplitude = e.ChannelLevelsDb[0];
volumeMeter1.Update();
if (e.ChannelLevelsDb.Length > 1)
{
volumeMeter2.Amplitude = e.ChannelLevelsDb[1];
volumeMeter2.Update();
}
}
private void VideoCapture1_OnAudioVUMeterProVolume(object sender, AudioLevelEventArgs e)
{
Dispatcher.BeginInvoke(new AudioVUMeterProVolumeDelegate(AudioVUMeterProVolumeDelegateMethod), e);
}
```
4. **Clean Up After Playback**: When playback stops, clean up the VU meters to release resources.
```cs
volumeMeter1.Stop();
volumeMeter1.Clear();
volumeMeter2.Stop();
volumeMeter2.Clear();
```
### WPF Waveform Painter Implementation
1. **Add the Waveform Painter Control**: Add the waveform painter control to your XAML layout.
```xml
```
2. **Enable VU Meter Processing and Start the Waveform Painter**:
```cs
VideoCapture1.Audio_VUMeter_Pro_Enabled = true;
waveformPainter.Start();
```
3. **Implement the Maximum Calculated Event Handler**: For waveform painters in WPF, we use a different event.
```cs
private delegate void AudioVUMeterProMaximumCalculatedDelegate(VUMeterMaxSampleEventArgs e);
private void AudioVUMeterProMaximumCalculatedelegateMethod(VUMeterMaxSampleEventArgs e)
{
waveformPainter.AddValue(e.MaxSample, e.MinSample);
}
private void VideoCapture1_OnAudioVUMeterProMaximumCalculated(object sender, VUMeterMaxSampleEventArgs e)
{
Dispatcher.BeginInvoke(new AudioVUMeterProMaximumCalculatedDelegate(AudioVUMeterProMaximumCalculatedelegateMethod), e);
}
```
4. **Clean Up After Playback**: When playback stops, clean up the waveform painter.
```cs
waveformPainter.Stop();
waveformPainter.Clear();
```
## Advanced Customization Options
Both the VU meter and waveform painter controls offer extensive customization options to match your application's design and user experience requirements.
### Customizing VU Meters
You can customize various aspects of the VU meter appearance:
- **Color Scheme**: Modify the colors used for different audio levels (low, medium, high)
- **Response Time**: Adjust how quickly the meter responds to level changes
- **Scale**: Configure the decibel scale and range
- **Orientation**: Set horizontal or vertical orientation
Example of customizing a VU meter:
```cs
volumeMeter1.PeakHoldTime = 500; // Hold peak for 500ms
volumeMeter1.ColorNormal = Color.Green;
volumeMeter1.ColorWarning = Color.Yellow;
volumeMeter1.ColorAlert = Color.Red;
volumeMeter1.WarningThreshold = -12; // dB
volumeMeter1.AlertThreshold = -6; // dB
```
### Customizing Waveform Painters
Waveform painters can be customized to provide different visual representations:
- **Line Thickness**: Adjust the thickness of the waveform line
- **Color Gradient**: Apply color gradients based on amplitude
- **Time Scale**: Modify how much time is represented in the visible area
- **Rendering Mode**: Choose between different rendering styles (line, filled, etc.)
Example of customizing a waveform painter:
```cs
waveformPainter.LineColor = Color.SkyBlue;
waveformPainter.BackColor = Color.Black;
waveformPainter.LineThickness = 2;
waveformPainter.ScrollingSpeed = 50;
waveformPainter.RenderMode = WaveformRenderMode.FilledLine;
```
## Performance Considerations
When implementing audio visualization, consider these performance tips:
1. **Update Frequency**: Balance visual responsiveness with CPU usage by adjusting how frequently you update the visuals
2. **UI Thread Management**: Always update UI elements on the appropriate thread (especially important in WPF)
3. **Resource Cleanup**: Properly stop and clear visualization controls when not in use
4. **Buffering**: Consider implementing buffering for smoother visualization during high CPU usage
## Conclusion
Implementing VU meters and waveform painters adds valuable visual feedback to media applications. Whether you're developing in WinForms or WPF, these audio visualization components help users monitor and understand audio levels and patterns more intuitively.
By following the implementation steps outlined in this guide, you can enhance your .NET media applications with professional-quality audio visualization features that improve the overall user experience.
---
For more code examples and related SDKs, visit our [GitHub repository](https://github.com/visioforge/.Net-SDK-s-samples).
---END OF PAGE---
# Local File: .\dotnet\general\code-samples\zoom-onvideoframebuffer.md
---
title: Implementing Custom Zoom Effects in .NET Video Apps
description: Learn how to create custom zoom effects using the OnVideoFrameBuffer event in .NET video applications. This step-by-step guide provides detailed C# code examples, implementation techniques, and best practices for video frame manipulation in your applications.
sidebar_label: Custom Zoom Implementation with OnVideoFrameBuffer
---
# Implementing Custom Zoom Effects with OnVideoFrameBuffer in .NET
[!badge size="xl" target="blank" variant="info" text="Video Capture SDK .Net"](https://www.visioforge.com/video-capture-sdk-net) [!badge size="xl" target="blank" variant="info" text="Video Edit SDK .Net"](https://www.visioforge.com/video-edit-sdk-net) [!badge size="xl" target="blank" variant="info" text="Media Player SDK .Net"](https://www.visioforge.com/media-player-sdk-net)
## Introduction
Implementing custom zoom effects in video applications is a common requirement for developers working with video processing. This guide explains how to manually create zoom functionality in your .NET video applications using the OnVideoFrameBuffer event. This technique works across multiple SDK platforms, including Video Capture, Media Player, and Video Edit SDKs.
## Understanding the OnVideoFrameBuffer Event
The OnVideoFrameBuffer event is a powerful feature that gives developers direct access to video frame data during playback or processing. By handling this event, you can:
- Access raw frame data in real-time
- Apply custom modifications to individual frames
- Implement visual effects like zooming, rotation, or color adjustments
- Control video quality and performance
## Implementation Steps
The process of implementing a zoom effect involves several key steps:
1. Allocating memory for temporary buffers
2. Handling the OnVideoFrameBuffer event
3. Applying the zoom transformation to each frame
4. Managing memory to prevent leaks
Let's break down each of these steps with detailed explanations.
## Memory Management for Frame Processing
When working with video frames, proper memory management is critical. You'll need to allocate sufficient memory to handle frame data and temporary processing buffers.
```cs
private IntPtr tempBuffer = IntPtr.Zero;
IntPtr tmpZoomFrameBuffer = IntPtr.Zero;
private int tmpZoomFrameBufferSize = 0;
```
These fields serve the following purposes:
- `tempBuffer`: Stores the processed frame data
- `tmpZoomFrameBuffer`: Holds the intermediary zoom calculation results
- `tmpZoomFrameBufferSize`: Tracks the required size for the zoom buffer
## Detailed Code Implementation
Below is a complete implementation of the zoom effect using the OnVideoFrameBuffer event in a Media Player SDK .NET application:
```cs
private IntPtr tempBuffer = IntPtr.Zero;
IntPtr tmpZoomFrameBuffer = IntPtr.Zero;
private int tmpZoomFrameBufferSize = 0;
private void MediaPlayer1_OnVideoFrameBuffer(object sender, VideoFrameBufferEventArgs e)
{
// Initialize the temporary buffer if it hasn't been created yet
if (tempBuffer == IntPtr.Zero)
{
tempBuffer = Marshal.AllocCoTaskMem(e.Frame.DataSize);
}
// Set the zoom factor (2.0 = 200% zoom)
const double zoom = 2.0;
// Apply the zoom effect using the FastImageProcessing utility
FastImageProcessing.EffectZoom(
e.Frame.Data, // Source frame data
e.Frame.Width, // Frame width
e.Frame.Height, // Frame height
tempBuffer, // Output buffer
zoom, // Horizontal zoom factor
zoom, // Vertical zoom factor
0, // Center X coordinate (0 = center)
0, // Center Y coordinate (0 = center)
tmpZoomFrameBuffer, // Intermediate buffer
ref tmpZoomFrameBufferSize); // Buffer size reference
// Allocate the zoom frame buffer if needed and return to process in next frame
if (tmpZoomFrameBufferSize > 0 && tmpZoomFrameBuffer == IntPtr.Zero)
{
tmpZoomFrameBuffer = Marshal.AllocCoTaskMem(tmpZoomFrameBufferSize);
return;
}
// Copy the processed data back to the frame buffer
FastImageProcessing.CopyMemory(tempBuffer, e.Frame.Data, e.Frame.DataSize);
}
```
## Customizing the Zoom Effect
The code above uses a fixed zoom factor of 2.0 (200%), but you can modify this to create various zoom effects:
### Dynamic Zoom Levels
You can implement user-controlled zoom by replacing the constant zoom value with a variable:
```cs
// Replace this:
const double zoom = 2.0;
// With something like this:
double zoom = this.userZoomSlider.Value; // Get zoom value from UI control
```
### Zoom with Focus Point
The `EffectZoom` method accepts X and Y coordinates to set the center point of the zoom. Setting these to non-zero values allows you to focus the zoom on specific areas:
```cs
// Zoom centered on the top-right quadrant
FastImageProcessing.EffectZoom(
e.Frame.Data,
e.Frame.Width,
e.Frame.Height,
tempBuffer,
zoom,
zoom,
e.Frame.Width / 4, // X offset from center
-e.Frame.Height / 4, // Y offset from center
tmpZoomFrameBuffer,
ref tmpZoomFrameBufferSize);
```
## Performance Considerations
When implementing custom video effects like zooming, consider these performance tips:
1. **Memory Management**: Always free allocated memory when your application closes to prevent leaks
2. **Buffer Reuse**: Reuse buffers when possible rather than reallocating for each frame
3. **Processing Time**: Keep processing time minimal to maintain smooth video playback
4. **Resolution Impact**: Higher resolution videos require more processing power for real-time effects
## Cleaning Up Resources
To properly clean up resources when your application closes, implement a cleanup method:
```cs
private void CleanupZoomResources()
{
if (tempBuffer != IntPtr.Zero)
{
Marshal.FreeCoTaskMem(tempBuffer);
tempBuffer = IntPtr.Zero;
}
if (tmpZoomFrameBuffer != IntPtr.Zero)
{
Marshal.FreeCoTaskMem(tmpZoomFrameBuffer);
tmpZoomFrameBuffer = IntPtr.Zero;
}
}
```
Call this method when your form or application closes to prevent memory leaks.
## Troubleshooting Common Issues
When implementing the zoom effect, you might encounter these issues:
1. **Distorted Image**: Check that your zoom factors for width and height are equal for uniform scaling
2. **Blank Frames**: Ensure proper memory allocation and buffer sizes
3. **Poor Performance**: Consider reducing the frame processing complexity or the video resolution
4. **Memory Errors**: Verify that all memory is properly allocated and freed
## Conclusion
Implementing custom zoom effects using the OnVideoFrameBuffer event gives you precise control over video appearance in your .NET applications. By following the techniques outlined in this guide, you can create sophisticated zoom functionality that enhances the user experience in your video applications.
Remember to properly manage memory resources and optimize for performance to ensure smooth playback with your custom effects.
---
Visit our [GitHub](https://github.com/visioforge/.Net-SDK-s-samples) page to get more code samples.
---END OF PAGE---
# Local File: .\dotnet\general\code-samples\zoom-video-multiple-renderer.md
---
title: Setting Zoom Parameters for Multiple Video Renderers
description: Learn how to configure zoom settings for multiple video renderers in .NET applications. This guide provides detailed code samples, implementation tips, and best practices for optimizing video display across multiple screens.
sidebar_label: Configuring Zoom for Multiple Video Renderers
---
# Configuring Zoom Settings for Multiple Video Renderers in .NET
[!badge size="xl" target="blank" variant="info" text="Video Capture SDK .Net"](https://www.visioforge.com/video-capture-sdk-net) [!badge size="xl" target="blank" variant="info" text="Video Edit SDK .Net"](https://www.visioforge.com/video-edit-sdk-net) [!badge size="xl" target="blank" variant="info" text="Media Player SDK .Net"](https://www.visioforge.com/media-player-sdk-net)
When developing multimedia applications that utilize multiple video renderers, controlling the zoom and position parameters independently for each display is essential for creating professional-quality user interfaces. This guide covers the implementation details, parameter configurations, and best practices for setting up multiple video renderers with customized zoom settings in your .NET applications.
## Understanding Multiple Renderer Configurations
Multiple renderer support (also known as multiscreen functionality) allows your application to display video content across different display areas simultaneously. Each renderer can be configured with its own:
- Zoom ratio (magnification level)
- Horizontal shift (X-axis positioning)
- Vertical shift (Y-axis positioning)
This capability is particularly valuable for applications such as:
- Video surveillance systems displaying multiple camera feeds
- Media production software with preview and output windows
- Medical imaging applications requiring different zoom levels for analysis
- Multi-display kiosk systems with synchronized content
## Implementing the MultiScreen_SetZoom Method
The SDK provides the `MultiScreen_SetZoom` method which takes four key parameters:
1. **Screen Index** (zero-based): Identifies which renderer to configure
2. **Zoom Ratio**: Controls the magnification percentage
3. **Shift X**: Adjusts the horizontal positioning (pixels or percentage)
4. **Shift Y**: Adjusts the vertical positioning (pixels or percentage)
### Method Signature and Parameters
```cs
// Method signature
void MultiScreen_SetZoom(int screenIndex, int zoomRatio, int shiftX, int shiftY);
```
| Parameter | Description | Valid Range |
|-----------|-------------|-------------|
| screenIndex | Zero-based index of the target renderer | 0 to (number of renderers - 1) |
| zoomRatio | Magnification percentage | 1 to 1000 (%) |
| shiftX | Horizontal offset | -1000 to 1000 |
| shiftY | Vertical offset | -1000 to 1000 |
## Code Sample: Configuring Multiple Renderers
The following example demonstrates how to set different zoom and positioning values for three separate renderers:
```cs
// Configure the primary renderer (index 0)
// 50% zoom with no horizontal or vertical shift
VideoCapture1.MultiScreen_SetZoom(0, 50, 0, 0);
// Configure the secondary renderer (index 1)
// 20% zoom with slight horizontal and vertical shift
VideoCapture1.MultiScreen_SetZoom(1, 20, 10, 20);
// Configure the tertiary renderer (index 2)
// 30% zoom with no horizontal shift but significant vertical shift
VideoCapture1.MultiScreen_SetZoom(2, 30, 0, 30);
```
## Best Practices for Multiple Renderer Management
When implementing multiple renderer configurations, consider these best practices:
### 1. Initialize All Renderers Before Setting Zoom
Always ensure that all renderers are properly initialized before applying zoom settings:
```cs
// Initialize multiple renderers
VideoCapture1.MultiScreen_Enabled = true;
// Add 3 renderers
VideoCapture1.MultiScreen_AddScreen(videoView1, 1280, 720);
VideoCapture1.MultiScreen_AddScreen(videoView2, 1920, 1080);
VideoCapture1.MultiScreen_AddScreen(videoView3, 1280, 720);
// Now safe to configure zoom settings
VideoCapture1.MultiScreen_SetZoom(0, 50, 0, 0);
VideoCapture1.MultiScreen_SetZoom(1, 20, 10, 20);
VideoCapture1.MultiScreen_SetZoom(2, 30, 0, 30);
// Additional configurations...
```
### 2. Handle Resolution Changes Appropriately
When the input source resolution changes, you may need to recalculate zoom values:
```cs
private void VideoCapture1_OnVideoSourceResolutionChanged(object sender, EventArgs e)
{
// Recalculate and apply zoom settings based on new resolution
int newZoom = CalculateOptimalZoom(VideoCapture1.VideoSource_ResolutionX,
VideoCapture1.VideoSource_ResolutionY);
// Apply to all renderers
for (int i = 0; i < VideoCapture1.MultiScreen_Count; i++)
{
VideoCapture1.MultiScreen_SetZoom(i, newZoom, 0, 0);
}
}
```
### 3. Provide User Controls for Zoom Adjustment
For interactive applications, consider implementing UI controls that allow users to adjust zoom settings:
```cs
private void zoomTrackBar_ValueChanged(object sender, EventArgs e)
{
int selectedRenderer = rendererComboBox.SelectedIndex;
int zoomValue = zoomTrackBar.Value;
int shiftX = horizontalShiftTrackBar.Value;
int shiftY = verticalShiftTrackBar.Value;
// Apply new zoom settings to selected renderer
VideoCapture1.MultiScreen_SetZoom(selectedRenderer, zoomValue, shiftX, shiftY);
}
```
## Advanced Zoom Configurations
### Dynamic Zoom Transitions
For smooth zoom transitions, consider implementing gradual zoom changes:
```cs
async Task AnimateZoomAsync(int screenIndex, int startZoom, int targetZoom, int duration)
{
int steps = 30; // Number of animation steps
int delay = duration / steps; // Milliseconds between steps
for (int i = 0; i <= steps; i++)
{
// Calculate intermediate zoom value
int currentZoom = startZoom + ((targetZoom - startZoom) * i / steps);
// Apply current zoom value
VideoCapture1.MultiScreen_SetZoom(screenIndex, currentZoom, 0, 0);
// Wait for next step
await Task.Delay(delay);
}
}
// Usage
await AnimateZoomAsync(0, 50, 100, 1000); // Animate from 50% to 100% over 1 second
```
## Optimizing Performance with Multiple Renderers
When working with multiple renderers, be mindful of performance implications:
1. **Limit Frequent Updates**: Avoid rapidly changing zoom settings as it can impact performance
2. **Consider Hardware Acceleration**: Enable hardware acceleration when available
3. **Monitor Memory Usage**: Multiple high-resolution renderers can consume significant memory
```cs
// Enable hardware acceleration for better performance
VideoCapture1.Video_Renderer = VideoRendererType.EVR;
VideoCapture1.Video_Renderer_EVR_Mode = EVRMode.Optimal;
```
## Troubleshooting Common Issues
### Issue: Renderers Show Black Screen After Zoom Changes
This can occur when zoom values exceed valid ranges or when renderers aren't properly initialized:
```cs
// Reset zoom settings to default for all renderers
public void ResetZoomSettings()
{
for (int i = 0; i < VideoCapture1.MultiScreen_Count; i++)
{
VideoCapture1.MultiScreen_SetZoom(i, 100, 0, 0); // 100% zoom, no shift
}
}
```
### Issue: Distorted Image After Zoom
Extreme zoom values can cause distortion. Implement boundaries for zoom values:
```cs
public void SetSafeZoom(int screenIndex, int requestedZoom, int shiftX, int shiftY)
{
// Clamp values to safe ranges
int safeZoom = Math.Clamp(requestedZoom, 10, 200); // 10% to 200%
int safeShiftX = Math.Clamp(shiftX, -100, 100);
int safeShiftY = Math.Clamp(shiftY, -100, 100);
VideoCapture1.MultiScreen_SetZoom(screenIndex, safeZoom, safeShiftX, safeShiftY);
}
```
## Conclusion
Properly configured multiple video renderers with independent zoom settings can significantly enhance the user experience in multimedia applications. By following the guidelines and best practices outlined in this document, you can implement sophisticated video display configurations tailored to your specific application requirements.
For additional code examples and implementation guidance, visit our [GitHub repository](https://github.com/visioforge/.Net-SDK-s-samples).
---END OF PAGE---
# Local File: .\dotnet\general\guides\video-capture-to-mpegts.md
---
title: Video Capture to MPEG-TS Files in C# and .NET
description: Learn how to capture video and audio to MPEG-TS files in C# applications. Step-by-step guide with code samples covering hardware acceleration, format selection, and cross-platform considerations for .NET developers.
sidebar_label: Video Capture to MPEG-TS
---
# Video Capture to MPEG-TS in C# and .NET: Complete Guide
## Introduction
This technical guide demonstrates how to capture C# TS video from cameras and microphones using two powerful VisioForge multimedia solutions: Video Capture SDK .NET with VideoCaptureCoreX engine and Media Blocks SDK .NET with MediaBlocksPipeline engine. Both SDKs provide robust capabilities for capturing, recording, and editing TS (MPEG Transport Stream) files in .NET applications. We'll explore detailed code samples for implementing video/audio capture to TS in C# with optimized performance and quality.
## Installation and deployment
Please refer to the [installation guide](../../install/index.md) for detailed instructions on how to install the VisioForge .NET SDKs on your system.
## Video Capture SDK .NET (VideoCaptureCoreX) - Capture MPEG-TS in C#
VideoCaptureCoreX provides a streamlined approach to capture TS video and audio in C#. Its component-based architecture handles the complex media pipeline, allowing developers to focus on configuration rather than lower-level implementation details when working with TS files in .NET.
### Core Components
1. **VideoCaptureCoreX**: Main engine for managing video capture, rendering, and TS output.
2. **VideoView**: UI component for real-time video rendering during capture.
3. **DeviceEnumerator**: Class for discovering video/audio devices.
4. **VideoCaptureDeviceSourceSettings**: Configuration for camera input when capturing MPEG-TS.
5. **AudioRendererSettings**: Configuration for audio playback with AAC support.
6. **MPEGTSOutput**: Configuration specifically for MPEG-TS file output.
### Implementation Example
Here's a complete C# implementation to capture and record MPEG-TS files:
```csharp
// Class instance for video capture engine
VideoCaptureCoreX videoCapture;
private async Task StartCaptureAsync()
{
// Initialize the VisioForge SDK
await VisioForgeX.InitSDKAsync();
// Create VideoCaptureCoreX instance and associate with UI VideoView control
videoCapture = new VideoCaptureCoreX(videoView: VideoView1);
// Get list of available video capture devices
var videoSources = await DeviceEnumerator.Shared.VideoSourcesAsync();
// Initialize video source settings
VideoCaptureDeviceSourceSettings videoSourceSettings = null;
// Get first available video capture device
var videoDevice = videoSources[0];
// Try to get HD resolution and frame rate capabilities from device
var videoFormat = videoDevice.GetHDVideoFormatAndFrameRate(out VideoFrameRate frameRate);
if (videoFormat != null)
{
// Configure video source with HD format
videoSourceSettings = new VideoCaptureDeviceSourceSettings(videoDevice)
{
Format = videoFormat.ToFormat()
};
// Set capture frame rate
videoSourceSettings.Format.FrameRate = frameRate;
}
// Configure video capture device with settings
videoCapture.Video_Source = videoSourceSettings;
// Configure audio capture (microphone)
// Initialize audio source settings
IVideoCaptureBaseAudioSourceSettings audioSourceSettings = null;
// Get available audio capture devices using DirectSound API
var audioApi = AudioCaptureDeviceAPI.DirectSound;
var audioDevices = await DeviceEnumerator.Shared.AudioSourcesAsync(audioApi);
// Get first available audio capture device
var audioDevice = audioDevices[0];
if (audioDevice != null)
{
// Get default audio format supported by device
var audioFormat = audioDevice.GetDefaultFormat();
if (audioFormat != null)
{
// Configure audio source with default format
audioSourceSettings = audioDevice.CreateSourceSettingsVC(audioFormat);
}
}
// Configure audio capture device with settings
videoCapture.Audio_Source = audioSourceSettings;
// Configure audio playback device
// Get first available audio output device
var audioOutputDevice = (await DeviceEnumerator.Shared.AudioOutputsAsync())[0];
// Configure audio renderer for playback through selected device
videoCapture.Audio_OutputDevice = new AudioRendererSettings(audioOutputDevice);
// Enable audio monitoring and recording
videoCapture.Audio_Play = true; // Enable real-time audio monitoring
videoCapture.Audio_Record = true; // Enable audio recording to output file
// Configure MPEG Transport Stream output
var mpegtsOutput = new MPEGTSOutput("output.ts");
// Configure video encoder with hardware acceleration if available
if (NVENCH264EncoderSettings.IsAvailable())
{
// Use NVIDIA hardware encoder
mpegtsOutput.Video = new NVENCH264EncoderSettings();
}
else if (QSVH264EncoderSettings.IsAvailable())
{
// Use Intel Quick Sync hardware encoder
mpegtsOutput.Video = new QSVH264EncoderSettings();
}
else if (AMFH264EncoderSettings.IsAvailable())
{
// Use AMD hardware encoder
mpegtsOutput.Video = new AMFH264EncoderSettings();
}
else
{
// Fallback to software encoder
mpegtsOutput.Video = new OpenH264EncoderSettings();
}
// Configure audio encoder for MPEG-TS output
// mpegtsOutput.Audio = ...
// Add MPEG-TS output to capture pipeline
// autostart: true means output starts automatically with capture
videoCapture.Outputs_Add(mpegtsOutput, autostart: true);
// Start the capture process
await videoCapture.StartAsync();
}
private async Task StopCaptureAsync()
{
// Stop all capture and encoding
await videoCapture.StopAsync();
// Clean up resources
await videoCapture.DisposeAsync();
}
```
### VideoCaptureCoreX Advanced Features for MPEG-TS Recording
1. **Hardware Acceleration**: Support for NVIDIA (NVENC), Intel (QSV), and AMD (AMF) hardware encoding.
2. **Format Selection**: The SDK provides access to the native camera formats and frame rates.
3. **Audio Configuration**: Provides volume control and format selection.
4. **Multiple Outputs**: Ability to add multiple output formats simultaneously.
## Media Blocks SDK .NET (MediaBlocksPipeline) - Capture TS in C#
The MediaBlocksPipeline engine in Media Blocks SDK .Net takes a different architectural approach, focusing on a modular block-based system where each component (block) has specific responsibilities in the media processing pipeline.
### Core Blocks
1. **MediaBlocksPipeline**: The main container and controller for the media blocks pipeline.
2. **SystemVideoSourceBlock**: Captures video from webcams.
3. **SystemAudioSourceBlock**: Captures audio from microphones.
4. **VideoRendererBlock**: Renders the video to a VideoView control.
5. **AudioRendererBlock**: Handles audio playback.
6. **TeeBlock**: Splits media streams for simultaneous processing (e.g., display and encoding).
7. **H264EncoderBlock**: Encodes video using H.264.
8. **AACEncoderBlock**: Encodes audio using AAC.
9. **MPEGTSSinkBlock**: Saves encoded streams to an MPEG-TS file.
### Implementation Example
Here's how to implement advanced capture of TS files in C#:
```csharp
// Pipeline instance
MediaBlocksPipeline pipeline;
private async Task StartCaptureAsync()
{
// Initialize the SDK
await VisioForgeX.InitSDKAsync();
// Create new pipeline instance
pipeline = new MediaBlocksPipeline();
// Get first available video device and configure HD format
var device = (await DeviceEnumerator.Shared.VideoSourcesAsync())[0];
var formatItem = device.GetHDVideoFormatAndFrameRate(out VideoFrameRate frameRate);
var videoSourceSettings = new VideoCaptureDeviceSourceSettings(device)
{
Format = formatItem.ToFormat()
};
videoSourceSettings.Format.FrameRate = frameRate;
// Create video source block with configured settings
var videoSource = new SystemVideoSourceBlock(videoSourceSettings);
// Get first available audio device and configure default format
var audioDevice = (await DeviceEnumerator.Shared.AudioSourcesAsync())[0];
var audioFormat = audioDevice.GetDefaultFormat();
var audioSourceSettings = audioDevice.CreateSourceSettings(audioFormat);
var audioSource = new SystemAudioSourceBlock(audioSourceSettings);
// Create video renderer block and connect to UI VideoView control
var videoRenderer = new VideoRendererBlock(pipeline, videoView: VideoView1) { IsSync = false };
// Create audio renderer block for playback
var audioRenderer = new AudioRendererBlock() { IsSync = false };
// Note: IsSync is false to maximize encoding performance
// Create video and audio tees
var videoTee = new TeeBlock(2, MediaBlockPadMediaType.Video);
var audioTee = new TeeBlock(2, MediaBlockPadMediaType.Audio);
// Create MPEG-TS muxer
var muxer = new MPEGTSSinkBlock(new MPEGTSSinkSettings("output.ts"));
// Create video and audio encoders with hardware acceleration if available
var videoEncoder = new H264EncoderBlock();
var audioEncoder = new AACEncoderBlock();
// Connect video processing blocks:
// Source -> Tee -> Renderer (preview) and Encoder -> Muxer
pipeline.Connect(videoSource.Output, videoTee.Input);
pipeline.Connect(videoTee.Outputs[0], videoRenderer.Input);
pipeline.Connect(videoTee.Outputs[1], videoEncoder.Input);
pipeline.Connect(videoEncoder.Output, (muxer as IMediaBlockDynamicInputs).CreateNewInput(MediaBlockPadMediaType.Video));
// Connect audio processing blocks:
// Source -> Tee -> Renderer (playback) and Encoder -> Muxer
pipeline.Connect(audioSource.Output, audioTee.Input);
pipeline.Connect(audioTee.Outputs[0], audioRenderer.Input);
pipeline.Connect(audioTee.Outputs[1], audioEncoder.Input);
pipeline.Connect(audioEncoder.Output, (muxer as IMediaBlockDynamicInputs).CreateNewInput(MediaBlockPadMediaType.Audio));
// Start the pipeline processing
await pipeline.StartAsync();
}
private async Task StopCaptureAsync()
{
// Stop all pipeline processing
await pipeline.StopAsync();
// Clean up resources
await pipeline.DisposeAsync();
pipeline = null;
}
```
### MediaBlocksPipeline Advanced Features
1. **Fine-Grained Control**: Direct control over each processing step in the pipeline.
2. **Dynamic Pipeline Construction**: Ability to create complex processing pipelines by connecting blocks.
3. **Multiple Processing Paths**: Using TeeBlock to split streams for different processing paths.
4. **Custom Blocks**: Ability to create and integrate custom processing blocks.
5. **Granular Error Handling**: Error events at each block level.
## TS Output Configuration with AAC Audio
Both SDKs provide robust support for MPEG-TS output, which is particularly useful for broadcasting and streaming applications due to its error resilience and low latency characteristics.
Read more about video and audio encoders available for TS capture in .NET:
- [H264 encoders](../video-encoders/h264.md)
- [HEVC encoders](../video-encoders/hevc.md)
- [AAC encoders](../audio-encoders/aac.md)
- [MP3 encoders](../audio-encoders/mp3.md)
- [MPEG-TS output](../output-formats/mpegts.md)
## Cross-Platform Considerations
Both SDKs offer cross-platform capabilities, but with different approaches:
1. **VideoCaptureCoreX**: Provides a unified API across platforms with platform-specific implementations.
2. **MediaBlocksPipeline**: Uses a consistent block-based architecture across platforms, with blocks handling platform differences internally.
## Sample applications
- [VideoCaptureCoreX Sample Application](https://github.com/visioforge/.Net-SDK-s-samples/tree/master/Video%20Capture%20SDK%20X/WPF/CSharp/Simple%20Video%20Capture)
- [MediaBlocksPipeline Sample Application](https://github.com/visioforge/.Net-SDK-s-samples/tree/master/Media%20Blocks%20SDK/WPF/CSharp/Simple%20Capture%20Demo)
## Conclusion: Choosing the Right SDK for C# MPEG-TS Capture
VisioForge offers two powerful solutions for recording MPEG-TS files in C# and .NET:
- **VideoCaptureCoreX** provides a streamlined API for quick implementation of MPEG-TS capture in C#, ideal for projects where ease of use is essential.
- **MediaBlocksPipeline** offers maximum flexibility for complex MPEG-TS recording and editing scenarios in .NET through its modular block architecture.
Both SDKs excel at capturing video from cameras and audio from microphones, with comprehensive support for MPEG-TS output, making them valuable tools for developing a wide range of multimedia applications.
Choose VideoCaptureCoreX for rapid implementation of standard TS capture scenarios, or MediaBlocksPipeline for advanced editing and custom processing workflows with TS files in your .NET applications.
---END OF PAGE---
# Local File: .\dotnet\general\network-streaming\adobe-flash.md
---
title: Network Video Streaming to Flash Media Server
description: Learn how to implement network video streaming to Adobe Flash Media Server in .NET applications. Tutorial covers real-time effects, quality settings, and device switching for professional video streaming solutions.
sidebar_label: Adobe Flash Media Server
---
# Streaming to Adobe Flash Media Server: Advanced Implementation Guide
[!badge size="xl" target="blank" variant="info" text="Video Capture SDK .Net"](https://www.visioforge.com/video-capture-sdk-net) [!badge size="xl" target="blank" variant="info" text="Video Edit SDK .Net"](https://www.visioforge.com/video-edit-sdk-net)
## Introduction
Adobe Flash Media Server (FMS) remains a powerful solution for streaming video content across various platforms. This guide demonstrates how to implement high-quality video streaming to Adobe Flash Media Server using VisioForge's .NET SDKs. The integration supports real-time video effects, quality adjustment, and seamless device switching during streaming sessions.
## Prerequisites
Before implementing the streaming functionality, ensure you have:
- VisioForge Video Capture SDK .NET or Video Edit SDK .NET installed
- Adobe Flash Media Server (or a compatible service like Wowza with RTMP support)
- Adobe Flash Media Live Encoder (FMLE)
- .NET Framework 4.7.2 or later
- Visual Studio 2022 or newer
- Basic understanding of C# programming
## Demo Application Walkthrough
The demo application provided with VisioForge SDKs offers a straightforward way to test streaming functionality. Here's a detailed walkthrough:
1. Start the Main Demo application
2. Navigate to the "Network Streaming" tab
3. Enable streaming by selecting the "Enabled" checkbox
4. Select the "External" radio button for external encoder compatibility
5. Start preview or capture to initialize the video stream
6. Open Adobe Flash Media Live Encoder
7. Configure FMLE to use "VisioForge Network Source" as the video source
8. Configure video parameters:
- Resolution (e.g., 1280x720, 1920x1080)
- Frame rate (typically 25-30 fps for smooth streaming)
- Keyframe interval (recommend 2 seconds)
- Video quality settings
9. Select "VisioForge Network Source Audio" as the audio source
10. Configure your connection to Adobe Flash Media Server
11. Press Start to initiate streaming
The video from the SDK is now being streamed to your FMS instance. You can apply real-time effects, adjust settings, or even stop the SDK to switch input devices without terminating the streaming session on the server side.
## Implementation in Custom Applications
### Required Components
To implement this functionality in your custom application, you'll need:
- SDK redistributables (available in the SDK installation package)
- References to the VisioForge SDK assemblies
- Proper firewall and network configurations to allow streaming
## Required Redistributables
Ensure the following components are included with your application:
- VisioForge SDK redistributable packages
- Microsoft Visual C++ Runtime (appropriate version for your SDK)
- .NET Framework runtime (if not using self-contained deployment)
## Conclusion
Streaming to Adobe Flash Media Server using VisioForge's Video Capture or Edit SDKs offers a flexible and powerful solution for implementing high-quality video streaming in .NET applications. The implementation supports real-time effects, quality adjustments, and seamless device switching, making it suitable for a wide range of streaming applications.
By following this guide, developers can implement robust streaming solutions that leverage the powerful features of both the VisioForge SDKs and Adobe's streaming platform.
---
Visit our [GitHub](https://github.com/visioforge/.Net-SDK-s-samples) page to get more code samples and example projects.
---END OF PAGE---
# Local File: .\dotnet\general\network-streaming\aws-s3.md
---
title: Stream Video and Audio to Amazon S3 Storage
description: Learn how to implement AWS S3 video and audio streaming in .NET applications. Step-by-step guide for developers covering configuration, encoding settings, error handling, and best practices for S3 media output integration.
sidebar_label: AWS S3
---
# AWS S3 Output
[!badge size="xl" target="blank" variant="info" text="Video Capture SDK .Net"](https://www.visioforge.com/video-capture-sdk-net) [!badge size="xl" target="blank" variant="info" text="Video Edit SDK .Net"](https://www.visioforge.com/video-edit-sdk-net) [!badge size="xl" target="blank" variant="info" text="Media Blocks SDK .Net"](https://www.visioforge.com/media-blocks-sdk-net)
[!badge variant="dark" size="xl" text="VideoCaptureCoreX"] [!badge variant="dark" size="xl" text="VideoEditCoreX"] [!badge variant="dark" size="xl" text="MediaBlocksPipeline"]
The AWS S3 Output functionality in VisioForge SDKs enables direct video and audio output streaming to Amazon S3 storage. This guide will walk you through setting up and using AWS S3 output in your applications.
## Overview
The `AWSS3Output` class is a specialized output handler within the VisioForge SDKs that facilitates video and audio output streaming to Amazon Web Services (AWS) S3 storage. This class implements multiple interfaces to support both video editing (`IVideoEditXBaseOutput`) and video capture (`IVideoCaptureXBaseOutput`) scenarios, along with processing capabilities for both video and audio content.
## Class Implementation
```csharp
public class AWSS3Output : IVideoEditXBaseOutput, IVideoCaptureXBaseOutput, IOutputVideoProcessor, IOutputAudioProcessor
```
## Key Features
The `AWSS3Output` class provides a comprehensive solution for streaming media content to AWS S3 by managing:
- Video encoding configuration
- Audio encoding configuration
- Custom media processing
- AWS S3-specific settings
## Properties
### Video Encoder Settings
```csharp
public IVideoEncoder Video { get; set; }
```
Controls the video encoding process. The selected video encoder must be compatible with the configured sink settings. This property allows you to specify compression methods, quality settings, and other video-specific parameters.
### Audio Encoder Settings
```csharp
public IAudioEncoder Audio { get; set; }
```
Manages audio encoding configuration. Like the video encoder, the audio encoder must be compatible with the sink settings. This property enables control over audio quality, compression, and format settings.
### Sink Settings
```csharp
public IMediaBlockSettings Sink { get; set; }
```
Defines the output destination configuration. In this context, it contains AWS S3-specific settings for the media output stream.
### Custom Processing Blocks
```csharp
public MediaBlock CustomVideoProcessor { get; set; }
```
```csharp
public MediaBlock CustomAudioProcessor { get; set; }
```
Allow for additional processing of video and audio streams before they are encoded and uploaded to S3. These blocks can be used for implementing custom filters, transformations, or analysis of the media content.
### AWS S3 Configuration
```csharp
public AWSS3SinkSettings Settings { get; set; }
```
Contains all AWS S3-specific configuration options, including:
- Access credentials (Access Key, Secret Access Key)
- Bucket and object key information
- Region configuration
- Upload behavior settings
- Error handling preferences
## Constructor
```csharp
public AWSS3Output(AWSS3SinkSettings settings,
IVideoEncoder videoEnc,
IAudioEncoder audioEnc,
IMediaBlockSettings sink)
```
Creates a new instance of the `AWSS3Output` class with the specified configuration:
- `settings`: AWS S3-specific configuration
- `videoEnc`: Video encoder settings
- `audioEnc`: Audio encoder settings
- `sink`: Media sink configuration
## Methods
### File Management
```csharp
public string GetFilename()
```
```csharp
public void SetFilename(string filename)
```
These methods manage the URI of the S3 object:
- `GetFilename()`: Returns the current S3 URI
- `SetFilename(string filename)`: Sets the S3 URI for the output
### Encoder Support
All encoders are supported. Be sure that encoder settings are compatible with the sink settings.
## Usage Example
```csharp
// Create AWS S3 sink settings
var s3Settings = new AWSS3SinkSettings
{
AccessKey = "your-access-key",
SecretAccessKey = "your-secret-key",
Bucket = "your-bucket-name",
Key = "output-file-key",
Region = "us-west-1"
};
// Configure encoders
IVideoEncoder videoEncoder = /* your video encoder configuration */;
IAudioEncoder audioEncoder = /* your audio encoder configuration */;
IMediaBlockSettings sinkSettings = /* your sink settings */;
// Create the AWS S3 output
var s3Output = new AWSS3Output(s3Settings, videoEncoder, audioEncoder, sinkSettings);
// Optional: Configure custom processors
s3Output.CustomVideoProcessor = /* your custom video processor */;
s3Output.CustomAudioProcessor = /* your custom audio processor */;
```
## Best Practices
1. Always ensure your AWS credentials are properly secured and not hard-coded in the application.
2. Configure appropriate retry attempts and request timeouts based on your network conditions and file sizes.
3. Select compatible video and audio encoders for your target use case.
4. Consider implementing custom processors for specific requirements like watermarking or audio normalization.
## Error Handling
The class works in conjunction with the `S3SinkOnError` enumeration defined in `AWSS3SinkSettings`, which provides three error handling strategies:
- Abort: Stops the upload process on error
- Complete: Attempts to complete the upload despite errors
- DoNothing: Ignores errors during upload
## Related Components
- AWSS3SinkSettings: Contains detailed configuration for AWS S3 connectivity
- IVideoEncoder: Interface for video encoding configuration
- IAudioEncoder: Interface for audio encoding configuration
- IMediaBlockSettings: Interface for media output configuration
---END OF PAGE---
# Local File: .\dotnet\general\network-streaming\facebook.md
---
title: Facebook Live Integration for .NET Development
description: Learn how to implement Facebook Live streaming in .NET applications with hardware-accelerated video encoding, real-time broadcasting, and platform-specific optimizations. Master RTMP streaming with code examples and best practices.
sidebar_label: Facebook Live
---
# Facebook Live Streaming with VisioForge SDKs
[!badge size="xl" target="blank" variant="info" text="Video Capture SDK .Net"](https://www.visioforge.com/video-capture-sdk-net) [!badge size="xl" target="blank" variant="info" text="Video Edit SDK .Net"](https://www.visioforge.com/video-edit-sdk-net) [!badge size="xl" target="blank" variant="info" text="Media Blocks SDK .Net"](https://www.visioforge.com/media-blocks-sdk-net)
## Introduction to Facebook Live Streaming
Facebook Live provides a powerful platform for real-time video broadcasting to global audiences. Whether you're developing applications for live events, video conferencing, gaming streams, or social media integration, VisioForge SDKs offer robust solutions for implementing Facebook Live streaming in your .NET applications.
This comprehensive guide explains how to implement Facebook Live streaming using VisioForge's suite of SDKs, with detailed code examples and configuration options for different platforms and hardware configurations.
## Core Components for Facebook Live Integration
[!badge variant="dark" size="xl" text="VideoCaptureCoreX"] [!badge variant="dark" size="xl" text="VideoEditCoreX"] [!badge variant="dark" size="xl" text="MediaBlocksPipeline"]
The cornerstone of Facebook Live integration in VisioForge is the `FacebookLiveOutput` class, which provides a complete implementation of the RTMP protocol required for Facebook streaming. This class implements multiple interfaces to ensure compatibility across various SDK components:
- `IVideoEditXBaseOutput` - For Video Edit SDK integration
- `IVideoCaptureXBaseOutput` - For Video Capture SDK integration
- `IOutputVideoProcessor` - For video stream processing
- `IOutputAudioProcessor` - For audio stream processing
This multi-interface implementation ensures seamless operation across the entire VisioForge ecosystem, allowing developers to maintain consistent code while working with different SDK components.
## Setting Up Facebook Live Streaming
### Prerequisites
Before implementing Facebook Live streaming in your application, you'll need:
1. A Facebook account with permissions to create Live streams
2. A valid Facebook streaming key (obtained from Facebook Live Producer)
3. VisioForge SDK installed in your .NET project
4. Sufficient bandwidth for the chosen quality settings
### Basic Implementation
The most basic implementation of Facebook Live streaming requires just a few lines of code:
```csharp
// Create Facebook Live output with your streaming key
var facebookOutput = new FacebookLiveOutput("your_facebook_streaming_key_here");
// Add to your VideoCaptureCoreX instance
captureCore.Outputs_Add(facebookOutput, true);
// Or set as output format for VideoEditCoreX
editCore.Output_Format = facebookOutput;
```
This minimal setup uses the default encoders, which VisioForge selects based on your platform for optimal performance. For most applications, these defaults provide excellent results with minimal configuration overhead.
## Optimizing Video Encoding for Facebook Live
### Supported Video Encoders
Facebook Live requires H.264 or HEVC encoded video. VisioForge supports multiple encoder implementations to leverage different hardware capabilities:
#### H.264 Encoders
| Encoder | Platform Support | Hardware Acceleration | Performance Characteristics |
|---------|------------------|------------------------|----------------------------|
| OpenH264 | Cross-platform | Software-based | CPU-intensive, universal compatibility |
| NVENC H264 | Windows, Linux | NVIDIA GPU | High performance, low CPU usage |
| QSV H264 | Windows, Linux | Intel GPU | Efficient on Intel systems |
| AMF H264 | Windows | AMD GPU | Optimized for AMD hardware |
#### HEVC Encoders
| Encoder | Platform Support | Hardware Acceleration |
|---------|------------------|------------------------|
| MF HEVC | Windows only | DirectX Video Acceleration |
| NVENC HEVC | Windows, Linux | NVIDIA GPU |
| QSV HEVC | Windows, Linux | Intel GPU |
| AMF H265 | Windows | AMD GPU |
### Selecting the Optimal Video Encoder
VisioForge provides utility methods to check hardware encoder availability before attempting to use them:
```csharp
// Video encoder selection with fallback options
IVideoEncoderSettings GetOptimalVideoEncoder()
{
// Try NVIDIA GPU acceleration first
if (NVENCH264EncoderSettings.IsAvailable())
{
return new NVENCH264EncoderSettings();
}
// Fall back to Intel Quick Sync if available
if (QSVH264EncoderSettings.IsAvailable())
{
return new QSVH264EncoderSettings();
}
// Fall back to AMD acceleration
if (AMFH264EncoderSettings.IsAvailable())
{
return new AMFH264EncoderSettings();
}
// Finally fall back to software encoding
return new OpenH264EncoderSettings();
}
// Apply the optimal encoder to Facebook output
facebookOutput.Video = GetOptimalVideoEncoder();
```
This cascading approach ensures your application uses the best available encoder on the user's system, maximizing performance while maintaining compatibility.
## Audio Encoding Configuration
Audio quality significantly impacts the viewer experience. VisioForge supports multiple AAC encoder implementations to ensure optimal audio for Facebook streams:
### Supported Audio Encoders
1. **VO-AAC** - VisioForge's optimized AAC encoder (default for non-Windows platforms)
2. **AVENC AAC** - FFmpeg-based AAC encoder with wide platform support
3. **MF AAC** - Microsoft Media Foundation AAC encoder (Windows-only, hardware-accelerated)
```csharp
// Platform-specific audio encoder selection
IAudioEncoderSettings GetOptimalAudioEncoder()
{
IAudioEncoderSettings audioEncoder;
#if NET_WINDOWS
// Use Media Foundation on Windows
audioEncoder = new MFAACEncoderSettings();
// Configure for stereo, 44.1kHz sample rate
((MFAACEncoderSettings)audioEncoder).Channels = 2;
((MFAACEncoderSettings)audioEncoder).SampleRate = 44100;
#else
// Use VisioForge optimized AAC on other platforms
audioEncoder = new VOAACEncoderSettings();
// Configure for stereo, 44.1kHz sample rate
((VOAACEncoderSettings)audioEncoder).Channels = 2;
((VOAACEncoderSettings)audioEncoder).SampleRate = 44100;
#endif
return audioEncoder;
}
// Apply the optimal audio encoder
facebookOutput.Audio = GetOptimalAudioEncoder();
```
## Advanced Facebook Live Features
### Custom Media Processing Pipeline
For applications requiring advanced video or audio processing before streaming, VisioForge supports insertion of custom processors:
```csharp
// Add text overlay to video stream
var textOverlay = new TextOverlayBlock(new TextOverlaySettings("Live from VisioForge SDK"));
// Add the video processor to Facebook output
facebookOutput.CustomVideoProcessor = textOverlay;
// Add audio volume boost
var volume = new VolumeBlock();
volume.Level = 1.2; // Boost 20% volume
// Add the audio processor to Facebook output
facebookOutput.CustomAudioProcessor = volume;
```
### Platform-Specific Optimizations
VisioForge automatically applies platform-specific optimizations:
- **Windows**: Leverages Media Foundation for AAC audio and DirectX Video Acceleration
- **macOS**: Uses Apple Media frameworks for hardware-accelerated encoding
- **Linux**: Employs VAAPI and other platform-specific acceleration when available
These optimizations ensure your application achieves maximum performance regardless of the deployment platform.
## Complete Implementation Example
Here's a comprehensive example showing how to set up a complete Facebook Live streaming pipeline with error handling and optimal encoder selection:
```csharp
public FacebookLiveOutput ConfigureFacebookLiveStream(string streamKey, int videoBitrate = 4000000)
{
// Create the Facebook output with the provided stream key
var facebookOutput = new FacebookLiveOutput(streamKey);
try {
// Configure optimal video encoder with fallback strategy
if (NVENCH264EncoderSettings.IsAvailable())
{
var nvencSettings = new NVENCH264EncoderSettings();
nvencSettings.BitRate = videoBitrate;
facebookOutput.Video = nvencSettings;
}
else if (QSVH264EncoderSettings.IsAvailable())
{
var qsvSettings = new QSVH264EncoderSettings();
qsvSettings.BitRate = videoBitrate;
facebookOutput.Video = qsvSettings;
}
else
{
// Software fallback
var openH264 = new OpenH264EncoderSettings();
openH264.BitRate = videoBitrate;
facebookOutput.Video = openH264;
}
// Configure platform-optimal audio encoder
#if NET_WINDOWS
facebookOutput.Audio = new MFAACEncoderSettings();
#else
facebookOutput.Audio = new VOAACEncoderSettings();
#endif
// Set additional stream parameters
facebookOutput.Sink.Key = streamKey;
return facebookOutput;
}
catch (Exception ex)
{
Console.WriteLine($"Error configuring Facebook Live output: {ex.Message}");
throw;
}
}
// Usage with VideoCaptureCoreX
var captureCore = new VideoCaptureCoreX();
var facebookOutput = ConfigureFacebookLiveStream("your_streaming_key_here");
captureCore.Outputs_Add(facebookOutput, true);
await captureCore.StartAsync();
// Usage with VideoEditCoreX
var editCore = new VideoEditCoreX();
// Add sources
// ...
// Set output format
editCore.Output_Format = ConfigureFacebookLiveStream("your_streaming_key_here");
// Start
await editCore.StartAsync();
```
## Media Blocks SDK Integration
For developers requiring even more granular control, the Media Blocks SDK provides a modular approach to Facebook Live streaming:
```csharp
// Create a pipeline
var pipeline = new MediaBlocksPipeline();
// Add video source (camera, screen capture, etc.)
var videoSource = new SomeVideoSourceBlock();
// Add audio source (microphone, system audio, etc.)
var audioSource = new SomeAudioSourceBlock();
// Add video encoder (H.264)
var h264Encoder = new H264EncoderBlock(videoEncoderSettings);
// Add audio encoder (AAC)
var aacEncoder = new AACEncoderBlock(audioEncoderSettings);
// Create Facebook Live sink
var facebookSink = new FacebookLiveSinkBlock(
new FacebookLiveSinkSettings("your_streaming_key_here")
);
// Connect blocks
pipeline.Connect(videoSource.Output, h264Encoder.Input);
pipeline.Connect(audioSource.Output, aacEncoder.Input);
pipeline.Connect(h264Encoder.Output, facebookSink.CreateNewInput(MediaBlockPadMediaType.Video));
pipeline.Connect(aacEncoder.Output, facebookSink.CreateNewInput(MediaBlockPadMediaType.Audio));
// Start the pipeline
pipeline.Start();
```
## Troubleshooting and Best Practices
### Common Issues and Solutions
1. **Stream Connection Failures**
- Verify Facebook stream key validity and expiration status
- Check network connectivity and firewall settings
- Facebook requires port 80 (HTTP) and 443 (HTTPS) to be open
2. **Encoder Initialization Problems**
- Always check hardware encoder availability before attempting to use them
- Ensure GPU drivers are up-to-date for hardware acceleration
- Fall back to software encoders when hardware acceleration is unavailable
3. **Performance Optimization**
- Monitor CPU and GPU usage during streaming
- Adjust video resolution and bitrate based on available bandwidth
- Consider separate threads for video capture and encoding operations
### Quality and Security Best Practices
1. **Stream Key Security**
- Never hardcode stream keys in your application
- Store keys securely and consider runtime key retrieval from a secure API
- Implement key rotation mechanisms for enhanced security
2. **Quality Settings Recommendations**
- For HD streaming (1080p): 4-6 Mbps video bitrate, 128-192 Kbps audio
- For SD streaming (720p): 2-4 Mbps video bitrate, 128 Kbps audio
- Mobile-optimized: 1-2 Mbps video bitrate, 64-96 Kbps audio
3. **Resource Management**
- Implement proper disposal of SDK resources
- Monitor memory usage for long-running streams
- Implement graceful error recovery mechanisms
By implementing these best practices, your application will deliver reliable, high-quality Facebook Live streaming across a wide range of devices and network conditions.
---END OF PAGE---
# Local File: .\dotnet\general\network-streaming\hls-streaming.md
---
title: Implementing HLS Network Streaming in .NET
description: Learn how to build HTTP Live Streaming (HLS) applications in .NET. Step-by-step guide covering adaptive bitrate streaming, video encoding, server setup, and cross-platform playback integration for modern streaming solutions.
sidebar_label: HLS Network Streaming
---
# Complete Guide to HLS Network Streaming Implementation in .NET
[!badge size="xl" target="blank" variant="info" text="Video Capture SDK .Net"](https://www.visioforge.com/video-capture-sdk-net) [!badge size="xl" target="blank" variant="info" text="Video Edit SDK .Net"](https://www.visioforge.com/video-edit-sdk-net) [!badge size="xl" target="blank" variant="info" text="Media Blocks SDK .Net"](https://www.visioforge.com/media-blocks-sdk-net) [!badge size="xl" target="blank" variant="info" text="Media Player SDK .Net"](https://www.visioforge.com/media-player-sdk-net)
## What is HTTP Live Streaming (HLS)?
HTTP Live Streaming (HLS) is an adaptive bitrate streaming communications protocol designed and developed by Apple Inc. First introduced in 2009, it has since become one of the most widely adopted streaming protocols across various platforms and devices. HLS works by breaking the overall stream into a sequence of small HTTP-based file downloads, each containing a short segment of the overall content.
### Key Features of HLS Streaming
- **Adaptive Bitrate Streaming**: HLS automatically adjusts video quality based on the viewer's network conditions, ensuring optimal playback quality without buffering.
- **Cross-Platform Compatibility**: Works across iOS, macOS, Android, Windows, and most modern web browsers.
- **HTTP-Based Delivery**: Leverages standard web server infrastructure, allowing content to pass through firewalls and proxy servers.
- **Media Encryption and Authentication**: Supports content protection through encryption and various authentication methods.
- **Live and On-Demand Content**: Can be used for both live broadcasting and pre-recorded media.
### HLS Technical Structure
HLS content delivery relies on three key components:
1. **Manifest File (.m3u8)**: A playlist file that contains metadata about the various streams available
2. **Segment Files (.ts)**: The actual media content, divided into small chunks (typically 2-10 seconds each)
3. **HTTP Server**: Responsible for delivering both manifest and segment files
Since HLS is entirely HTTP-based, you'll need either a dedicated HTTP server or can use the lightweight internal server provided by our SDKs.
## Implementing HLS Streaming with Media Blocks SDK
The Media Blocks SDK offers a comprehensive approach to HLS streaming through its pipeline architecture, giving developers granular control over each aspect of the streaming process.
### Creating a Basic HLS Stream
The following example demonstrates how to set up an HLS stream using Media Blocks SDK:
```csharp
// Set URL
const string URL = "http://localhost:8088/";
// Create H264 encoder
var h264Settings = new OpenH264EncoderSettings();
var h264Encoder = new H264EncoderBlock(h264Settings);
// Create AAC encoder
var aacEncoder = new AACEncoderBlock();
// Create HLS sink
var settings = new HLSSinkSettings
{
Location = Path.Combine(AppContext.BaseDirectory, "segment_%05d.ts"),
MaxFiles = 10,
PlaylistLength = 5,
PlaylistLocation = Path.Combine(AppContext.BaseDirectory, "playlist.m3u8"),
PlaylistRoot = URL,
SendKeyframeRequests = true,
TargetDuration = 5,
Custom_HTTP_Server_Enabled = true, // Use internal HTTP server
Custom_HTTP_Server_Port = 8088 // Port for internal HTTP server
};
var hlsSink = new HLSSinkBlock(settings);
// Connect video and audio sources to encoders (we assume that videoSource and audioSource are already created)
pipeline.Connect(videoSource.Output, h264Encoder.Input);
pipeline.Connect(audioSource.Output, aacEncoder.Input);
// Connect encoders to HLS sink
pipeline.Connect(h264Encoder.Output, hlsSink.CreateNewInput(MediaBlockPadMediaType.Video));
pipeline.Connect(aacEncoder.Output, hlsSink.CreateNewInput(MediaBlockPadMediaType.Audio));
// Start
await pipeline.StartAsync();
```
### Advanced Configuration Options
The Media Blocks SDK offers several advanced configuration options for HLS streaming:
- **Multiple Bitrate Variants**: Create different quality levels for adaptive streaming
- **Custom Segment Duration**: Optimize for different types of content and viewing environments
- **Server-Side Options**: Configure cache control headers and other server behaviors
- **Security Features**: Implement token-based authentication or encryption
You can use this SDK to stream both live video capture and existing media files to HLS. The flexible pipeline architecture allows for extensive customization of the media processing workflow.
## HLS Streaming with Video Capture SDK .NET
Video Capture SDK .NET provides a streamlined approach to HLS streaming specifically designed for live video sources like webcams, capture cards, and other input devices.
### VideoCaptureCoreX Implementation
The VideoCaptureCoreX engine offers a modern, object-oriented approach to video capture and streaming:
```csharp
// Create HLS sink settings
var settings = new HLSSinkSettings
{
Location = Path.Combine(AppContext.BaseDirectory, "segment_%05d.ts"),
MaxFiles = 10,
PlaylistLength = 5,
PlaylistLocation = Path.Combine(AppContext.BaseDirectory, "playlist.m3u8"),
PlaylistRoot = edStreamingKey.Text,
SendKeyframeRequests = true,
TargetDuration = 5,
Custom_HTTP_Server_Enabled = true,
Custom_HTTP_Server_Port = new Uri(edStreamingKey.Text).Port
};
// Create HLS output
var hlsOutput = new HLSOutput(settings);
// Create video and audio encoders with default settings
hlsOutput.Video = new OpenH264EncoderSettings();
hlsOutput.Audio = new VOAACEncoderSettings();
// Add HLS output to video capture object
videoCapture.Outputs_Add(hlsOutput, true);
```
### VideoCaptureCore Implementation
For those working with the traditional VideoCaptureCore engine, the implementation is slightly different but equally straightforward:
```csharp
VideoCapture1.Network_Streaming_Enabled = true;
VideoCapture1.Network_Streaming_Audio_Enabled = true;
VideoCapture1.Network_Streaming_Format = NetworkStreamingFormat.HLS;
var hls = new HLSOutput
{
HLS =
{
SegmentDuration = 10, // Segment duration in seconds
NumSegments = 5, // Number of segments in playlist
OutputFolder = "c:\\hls\\", // Output folder
PlaylistType = HLSPlaylistType.Live, // Playlist type
Custom_HTTP_Server_Enabled = true, // Use internal HTTP server
Custom_HTTP_Server_Port = 8088 // Port for internal HTTP server
}
};
VideoCapture1.Network_Streaming_Output = hls;
```
### Performance Considerations
When streaming with Video Capture SDK, consider these performance optimization techniques:
- Keep segment durations between 2-10 seconds (10 seconds is optimal for most use cases)
- Adjust the number of segments based on expected viewing patterns
- Use hardware acceleration when available for encoding
- Configure appropriate bitrates based on your target audience's connection speeds
## Converting Media Files to HLS with Video Edit SDK .NET
The Video Edit SDK .NET enables developers to convert existing media files into HLS format for streaming, ideal for video-on-demand applications.
### VideoEditCore Implementation
```csharp
VideoEdit1.Network_Streaming_Enabled = true;
VideoEdit1.Network_Streaming_Audio_Enabled = true;
VideoEdit1.Network_Streaming_Format = NetworkStreamingFormat.HLS;
var hls = new HLSOutput
{
HLS =
{
SegmentDuration = 10, // Segment duration in seconds
NumSegments = 5, // Number of segments in playlist
OutputFolder = "c:\\hls\\", // Output folder
PlaylistType = HLSPlaylistType.Live, // Playlist type
Custom_HTTP_Server_Enabled = true, // Use internal HTTP server
Custom_HTTP_Server_Port = 8088 // Port for internal HTTP server
}
};
VideoEdit1.Network_Streaming_Output = hls;
```
### File Format Considerations
When converting files to HLS, consider these factors:
- Not all input formats are equally efficient for conversion
- MP4, MOV, and MKV files typically provide the best results
- Highly compressed formats may require more processing power
- Consider pre-transcoding very large files to an intermediate format
## Playback and Integration
### HTML5 Player Integration
All applications implementing HLS streaming should include an HTML file with a video player. Modern HTML5 players like HLS.js, Video.js, or JW Player provide excellent support for HLS streams.
Here's a basic example using HLS.js:
```html
HLS Player
```
For a complete example player, refer to our [GitHub repository](https://github.com/visioforge/.Net-SDK-s-samples/blob/master/Media%20Blocks%20SDK/Console/HLS%20Streamer/index.htm).
### Mobile App Integration
Our SDKs also support integration with mobile applications through:
- Native iOS playback using AVPlayer
- Android playback via ExoPlayer
- Cross-platform options like Xamarin or MAUI
## Troubleshooting Common Issues
### CORS Configuration
When serving HLS content to web browsers, you may encounter Cross-Origin Resource Sharing (CORS) issues. Ensure your server is configured to send the proper CORS headers:
```
Access-Control-Allow-Origin: *
Access-Control-Allow-Methods: GET, HEAD, OPTIONS
Access-Control-Allow-Headers: Range
Access-Control-Expose-Headers: Accept-Ranges, Content-Encoding, Content-Length, Content-Range
```
### Latency Optimization
HLS inherently introduces some latency. To minimize this:
- Use shorter segment durations (2-4 seconds) for lower latency
- Consider enabling Low-Latency HLS (LL-HLS) if supported
- Optimize your network infrastructure for minimal delays
## Conclusion
HLS streaming provides a robust, cross-platform solution for delivering both live and on-demand video content to a wide range of devices. With VisioForge's .NET SDKs, implementing HLS in your applications becomes straightforward, allowing you to focus on creating compelling content rather than wrestling with technical details.
For more code samples and advanced implementations, visit our [GitHub repository](https://github.com/visioforge/.Net-SDK-s-samples).
---
## Additional Resources
- [HLS Specification](https://developer.apple.com/streaming/)
---END OF PAGE---
# Local File: .\dotnet\general\network-streaming\http-mjpeg.md
---
title: HTTP MJPEG Video Streaming Implementation Guide
description: Learn how to implement HTTP MJPEG video streaming in .NET applications. Step-by-step guide for setting up real-time video feeds, handling client connections, and managing stream delivery with code examples and best practices.
sidebar_label: HTTP MJPEG
---
# HTTP MJPEG streaming
[!badge size="xl" target="blank" variant="info" text="Video Capture SDK .Net"](https://www.visioforge.com/video-capture-sdk-net) [!badge size="xl" target="blank" variant="info" text="Video Edit SDK .Net"](https://www.visioforge.com/video-edit-sdk-net) [!badge size="xl" target="blank" variant="info" text="Media Blocks SDK .Net"](https://www.visioforge.com/media-blocks-sdk-net)
The SDK's feature of streaming video encoded as Motion JPEG (MJPEG) over HTTP is advantageous for its simplicity and broad compatibility. MJPEG encodes each video frame individually as a JPEG image, which simplifies decoding and is ideal for applications like web streaming and surveillance. The use of HTTP ensures easy integration and high compatibility across different platforms and devices and is effective even in networks with strict configurations. This method is particularly suitable for real-time video feeds and applications requiring straightforward frame-by-frame analysis. With adjustable frame rates and resolutions, the SDK offers flexibility for various network conditions and quality requirements, making it a versatile choice for developers implementing video streaming in their applications.
## Cross-platform MJPEG output
[!badge variant="dark" size="xl" text="VideoCaptureCoreX"] [!badge variant="dark" size="xl" text="VideoEditCoreX"] [!badge variant="dark" size="xl" text="MediaBlocksPipeline"]
The streaming functionality is implemented through two main classes:
1. `HTTPMJPEGLiveOutput`: The high-level configuration class that sets up the streaming output
2. `HTTPMJPEGLiveSinkBlock`: The underlying implementation block that handles the actual streaming process
### HTTPMJPEGLiveOutput Class
This class serves as the configuration entry point for setting up an MJPEG HTTP stream. It implements the `IVideoCaptureXBaseOutput` interface, making it compatible with the video capture pipeline system.
#### Key Properties
- `Port`: Gets the network port number on which the MJPEG stream will be served
#### Usage
```csharp
// Create a new MJPEG streaming output on port 8080
var mjpegOutput = new HTTPMJPEGLiveOutput(8080);
// Add the MJPEG output to the VideoCaptureCoreX engine
core.Outputs_Add(mjpegOutput, true);
```
#### Implementation Details
- The class is designed to be immutable, with the port being set only through the constructor
- It does not support video or audio encoders, as MJPEG uses direct JPEG encoding
- The filename-related methods return null or are no-ops, as this is a streaming-only implementation
### HTTPMJPEGLiveSinkBlock Class
This class handles the actual implementation of the MJPEG streaming functionality. It's responsible for:
- Setting up the pipeline for video processing
- Managing the HTTP server for streaming
- Handling input video data and converting it to MJPEG format
- Managing client connections and stream delivery
#### Key Features
- Implements multiple interfaces for integration with the media pipeline:
- `IMediaBlockInternals`: For pipeline integration
- `IMediaBlockDynamicInputs`: For handling dynamic input connections
- `IMediaBlockSink`: For sink functionality
- `IDisposable`: For proper resource cleanup
#### Input/Output Configuration
- Accepts a single video input through the `Input` pad
- No output pads (as it's a sink block)
- Input pad configured for video media type only
### Implementation Notes
#### Initialization
```csharp
// The block must be initialized with a port number
var mjpegSink = new HTTPMJPEGLiveSinkBlock(8080);
pipeline.Connect(videoSource.Output, mjpegSink.Input);
// "IMG tag URL is http://127.0.0.1:8090";
```
#### Resource Management
- The class implements proper resource cleanup through the `IDisposable` pattern
- The `CleanUp` method ensures all resources are properly released
- Event handlers are properly connected and disconnected during the pipeline lifecycle
#### Pipeline Integration
The `Build` method handles the critical setup process:
1. Creates the underlying HTTP MJPEG sink element
2. Initializes the sink with the specified port
3. Sets up the necessary GStreamer pad connections
4. Connects pipeline event handlers
### Error Handling
- The implementation includes comprehensive error checking during the build process
- Failed initialization is properly reported through the context error system
- Resource cleanup is handled even in error cases
### Technical Considerations
#### Performance
- The implementation uses GStreamer's native elements for optimal performance
- Direct pad connections minimize copying and overhead
- The sink block is designed to handle multiple client connections efficiently
#### Memory Management
- Proper disposal patterns ensure no memory leaks
- Resources are cleaned up when the pipeline stops or the block is disposed
- The implementation handles GStreamer element lifecycle correctly
#### Threading
- The implementation is thread-safe for pipeline operations
- Event handlers are properly synchronized with pipeline state changes
- Client connections are handled asynchronously
#### Client Usage
To consume the MJPEG stream:
1. Initialize the streaming output with desired port
2. Connect it to your video pipeline
3. Access the stream through a web browser or HTTP client at:
```
http://[server-address]:[port]
```
#### Example Client HTML
```html
 ```
### Limitations and Considerations
1. Bandwidth Usage
- MJPEG streams can use significant bandwidth as each frame is a complete JPEG
- Consider frame rate and resolution settings for optimal performance
2. Browser Support
- While MJPEG is widely supported, some modern browsers may have limitations
- Mobile devices may handle MJPEG streams differently
3. Latency
- While MJPEG provides relatively low latency, it's not suitable for ultra-low-latency requirements
- Network conditions can affect frame delivery timing
### Best Practices
1. Port Selection
- Choose ports that don't conflict with other services
- Consider firewall implications when selecting ports
2. Resource Management
- Always dispose of the sink block properly
- Monitor client connections and resource usage
3. Error Handling
- Implement proper error handling for network and pipeline issues
- Monitor the pipeline status for potential issues
### Security Considerations
1. Network Security
- The MJPEG stream is unencrypted by default
- Consider implementing additional security measures for sensitive content
2. Access Control
- No built-in authentication mechanism
- Consider implementing application-level access control if needed
3. Port Security
- Ensure proper firewall rules are in place
- Consider network isolation for internal streams
## Windows-only MJPEG output
[!badge variant="dark" size="xl" text="VideoCaptureCore"] [!badge variant="dark" size="xl" text="VideoEditCore"]
Set the `Network_Streaming_Enabled` property to true to enable network streaming.
```cs
VideoCapture1.Network_Streaming_Enabled = true;
```
Set the HTTP MJPEG output.
```cs
VideoCapture1.Network_Streaming_Format = NetworkStreamingFormat.HTTP_MJPEG;
```
Create the settings object and set the port.
```cs
VideoCapture1.Network_Streaming_Output = new MJPEGOutput(8080);
```
---
Visit our [GitHub](https://github.com/visioforge/.Net-SDK-s-samples) page to get more code samples.
---END OF PAGE---
# Local File: .\dotnet\general\network-streaming\iis-smooth-streaming.md
---
title: Guide to IIS Smooth Streaming Implementation
description: Complete tutorial for implementing Microsoft IIS Smooth Streaming in .NET applications with VisioForge SDKs. Learn step-by-step configuration, adaptive bitrate streaming setup, mobile compatibility, and troubleshooting for high-quality video delivery across all devices.
sidebar_label: IIS Smooth Streaming
---
# Comprehensive Guide to IIS Smooth Streaming Implementation
IIS Smooth Streaming is Microsoft's implementation of adaptive streaming technology that dynamically adjusts video quality based on network conditions and CPU capabilities. This guide provides detailed instructions on configuring and implementing IIS Smooth Streaming using VisioForge SDKs.
## Compatible VisioForge SDKs
[!badge size="xl" target="blank" variant="info" text="Video Capture SDK .Net"](https://www.visioforge.com/video-capture-sdk-net) [!badge size="xl" target="blank" variant="info" text="Video Edit SDK .Net"](https://www.visioforge.com/video-edit-sdk-net)
[!badge variant="dark" size="xl" text="VideoCaptureCore"] [!badge variant="dark" size="xl" text="VideoEditCore"]
## Overview of IIS Smooth Streaming
IIS Smooth Streaming provides several key advantages for developers and end-users:
- **Adaptive bitrate streaming**: Automatically adjusts video quality based on available bandwidth
- **Reduced buffering**: Minimizes playback interruptions during network fluctuations
- **Broad device compatibility**: Works across desktops, mobile devices, smart TVs, and more
- **Scalable delivery**: Handles large numbers of concurrent viewers efficiently
This technology is particularly valuable for applications requiring high-quality video delivery across varied network conditions, such as live events, educational platforms, and media-rich applications.
## Prerequisites
Before implementing IIS Smooth Streaming with VisioForge SDKs, ensure you have:
1. Windows Server with IIS installed
2. Administrative access to the server
3. Relevant VisioForge SDK (Video Capture SDK .Net or Video Edit SDK .Net)
4. Basic understanding of .NET development
## Step-by-Step IIS Configuration
### Installing Required Components
1. Install [Web Platform Installer](https://www.microsoft.com/web/downloads/platform.aspx) on your server.
2. Through the Web Platform Installer, search for and install IIS Media Services.
This component package includes all necessary modules for Smooth Streaming functionality, including the Live Smooth Streaming Publishing service.
### Configuring IIS Manager
1. Open IIS Manager on your server through the Start menu or by running `inetmgr` in the Run dialog.
2. In the left navigation pane, locate and expand your server name, then select the site where you want to enable Smooth Streaming.
### Creating a Publishing Point
1. Within the selected site, find and open the "Live Smooth Streaming Publishing Points" feature.
2. Click "Add" to create a new publishing point.
3. Configure the basic settings for your publishing point:
- **Name**: Provide a descriptive name for your publishing point (e.g., "MainStream")
- **Path**: Specify the file path where the Smooth Streaming content will be stored
4. Configure additional parameters by enabling the "Allow clients to connect to this publishing point" checkbox. This ensures that clients can connect and receive the streamed content.
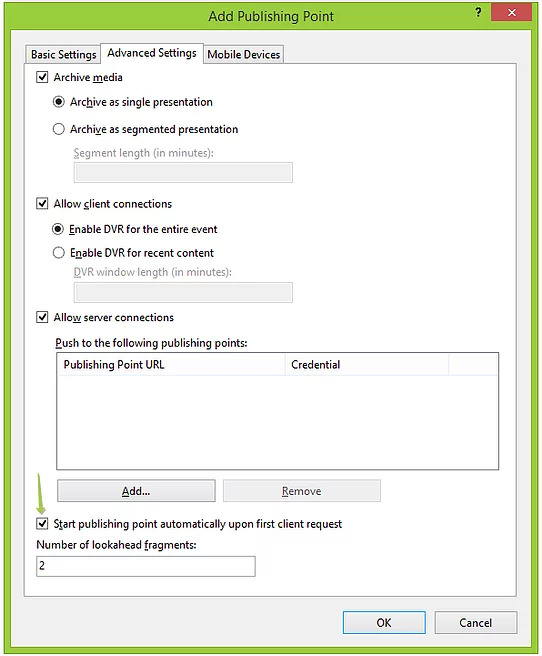
### Enabling Mobile Device Support
To ensure your Smooth Streaming content is accessible on mobile devices:
1. In the publishing point configuration, navigate to the "Mobile Devices" tab.
2. Enable the checkbox for "Allow playback on mobile devices."
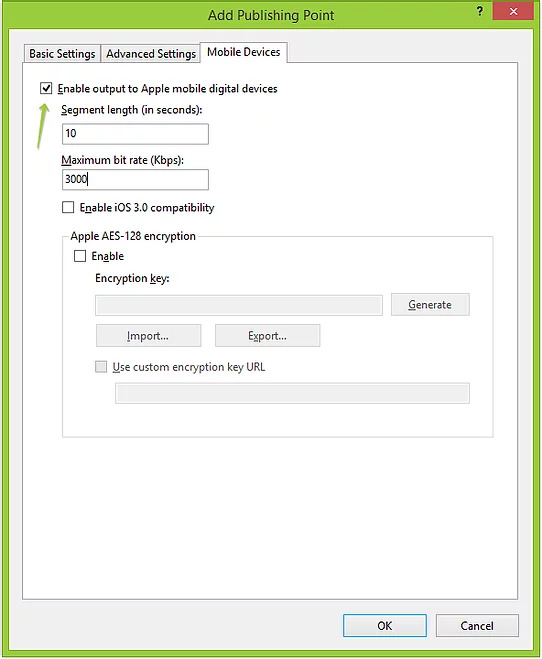
This setting generates the necessary formats and manifests for mobile playback, significantly expanding your content's reach.
### Setting Up the Player
To provide viewers with a way to watch your Smooth Streaming content:
1. Download the Smooth Streaming Player Silverlight control provided by Microsoft.
2. Extract the downloaded files and locate the `.xap` file.
3. Copy this `.xap` file to your website's directory.
4. Copy the included HTML file to the same directory and rename it to `index.html`.
5. Open `index.html` in a text editor and replace the "initparams" section with the following configuration:
```html
```
This configuration initializes the Silverlight player with optimal settings for Smooth Streaming playback. The `mediaurl` parameter should point to your publishing point's manifest.
### Starting the Publishing Point
1. Return to IIS Manager and select your configured publishing point.
2. Click the "Start" action in the right-hand panel.
The publishing point will now be active and ready to receive content from your application.
## Implementing Smooth Streaming in VisioForge SDK Applications
### Basic Configuration
To implement IIS Smooth Streaming in your VisioForge SDK application:
1. Open your application built with Video Capture SDK .Net or Video Edit SDK .Net.
2. Navigate to the network streaming settings section.
3. Enable network streaming functionality.
4. Select "Smooth Streaming" as the streaming method.
5. Enter the publishing point URL (e.g., `http://localhost/mainstream.isml`).
6. Configure additional streaming parameters as needed (bitrate, resolution, etc.).
7. Start the stream.
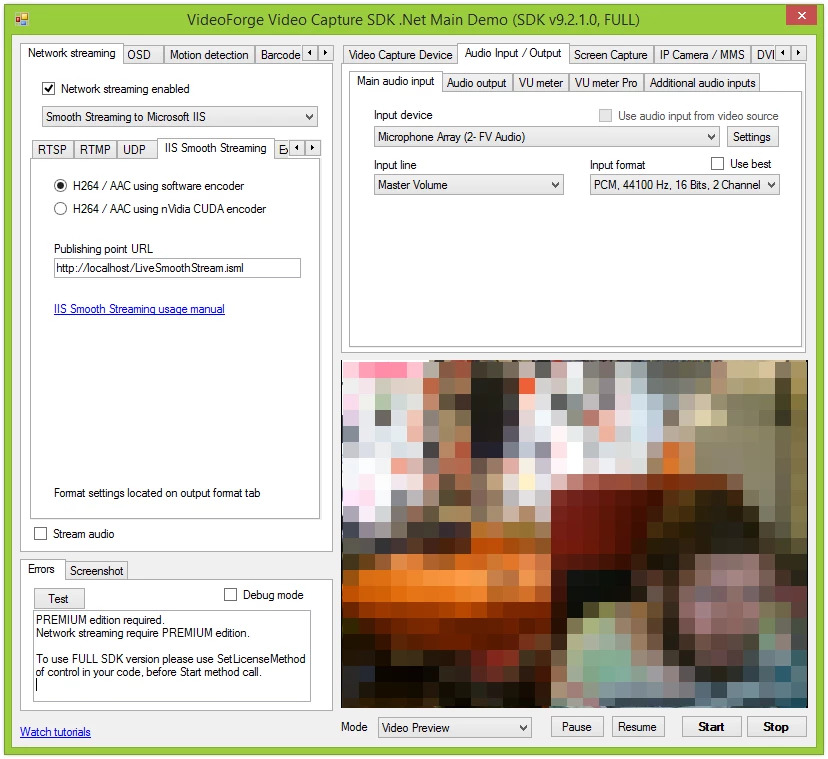
### Verifying the Connection
Once your application is configured:
1. Check the connection status in your application. You should see confirmation that the SDK has successfully connected to IIS.
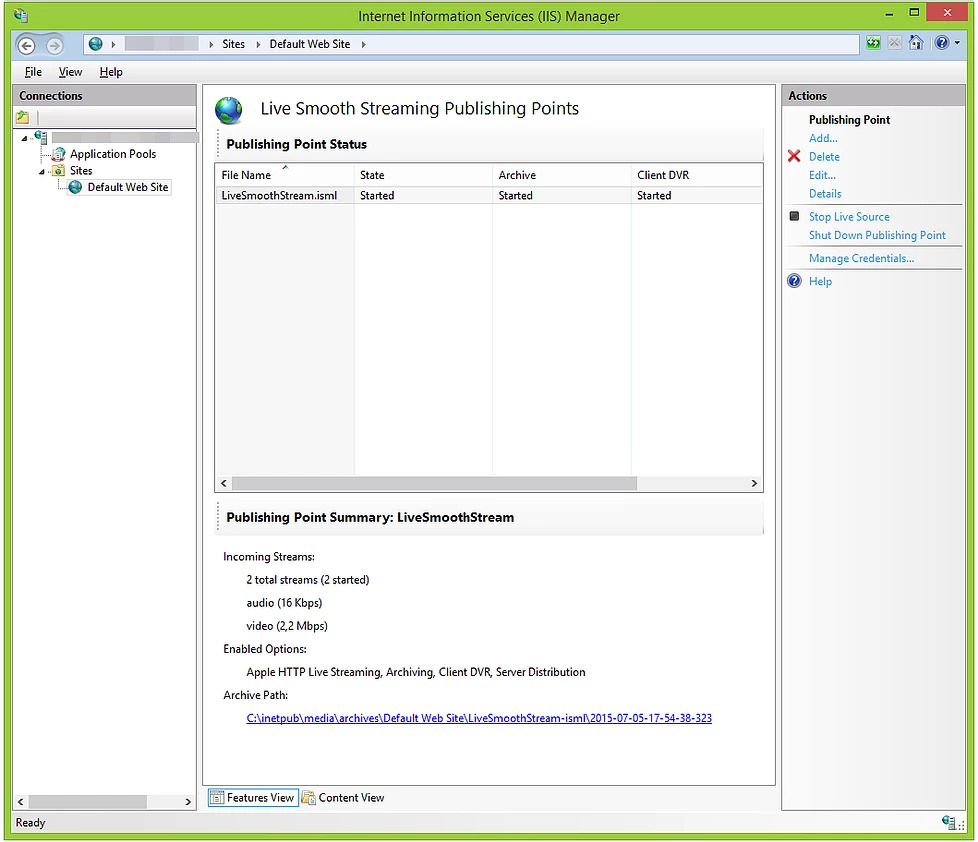
2. Open a web browser and navigate to `http://localhost` (or your server address).
3. The Silverlight player should load and begin playing your stream.

### HTML5 Streaming for iOS Devices
For broader device compatibility, particularly iOS devices that don't support Silverlight, create an HTML5 player:
1. Create a new HTML file in your website's directory.
2. Include the following code in the file:
```html
Smooth Streaming HTML5 Player
```
### Limitations and Considerations
1. Bandwidth Usage
- MJPEG streams can use significant bandwidth as each frame is a complete JPEG
- Consider frame rate and resolution settings for optimal performance
2. Browser Support
- While MJPEG is widely supported, some modern browsers may have limitations
- Mobile devices may handle MJPEG streams differently
3. Latency
- While MJPEG provides relatively low latency, it's not suitable for ultra-low-latency requirements
- Network conditions can affect frame delivery timing
### Best Practices
1. Port Selection
- Choose ports that don't conflict with other services
- Consider firewall implications when selecting ports
2. Resource Management
- Always dispose of the sink block properly
- Monitor client connections and resource usage
3. Error Handling
- Implement proper error handling for network and pipeline issues
- Monitor the pipeline status for potential issues
### Security Considerations
1. Network Security
- The MJPEG stream is unencrypted by default
- Consider implementing additional security measures for sensitive content
2. Access Control
- No built-in authentication mechanism
- Consider implementing application-level access control if needed
3. Port Security
- Ensure proper firewall rules are in place
- Consider network isolation for internal streams
## Windows-only MJPEG output
[!badge variant="dark" size="xl" text="VideoCaptureCore"] [!badge variant="dark" size="xl" text="VideoEditCore"]
Set the `Network_Streaming_Enabled` property to true to enable network streaming.
```cs
VideoCapture1.Network_Streaming_Enabled = true;
```
Set the HTTP MJPEG output.
```cs
VideoCapture1.Network_Streaming_Format = NetworkStreamingFormat.HTTP_MJPEG;
```
Create the settings object and set the port.
```cs
VideoCapture1.Network_Streaming_Output = new MJPEGOutput(8080);
```
---
Visit our [GitHub](https://github.com/visioforge/.Net-SDK-s-samples) page to get more code samples.
---END OF PAGE---
# Local File: .\dotnet\general\network-streaming\iis-smooth-streaming.md
---
title: Guide to IIS Smooth Streaming Implementation
description: Complete tutorial for implementing Microsoft IIS Smooth Streaming in .NET applications with VisioForge SDKs. Learn step-by-step configuration, adaptive bitrate streaming setup, mobile compatibility, and troubleshooting for high-quality video delivery across all devices.
sidebar_label: IIS Smooth Streaming
---
# Comprehensive Guide to IIS Smooth Streaming Implementation
IIS Smooth Streaming is Microsoft's implementation of adaptive streaming technology that dynamically adjusts video quality based on network conditions and CPU capabilities. This guide provides detailed instructions on configuring and implementing IIS Smooth Streaming using VisioForge SDKs.
## Compatible VisioForge SDKs
[!badge size="xl" target="blank" variant="info" text="Video Capture SDK .Net"](https://www.visioforge.com/video-capture-sdk-net) [!badge size="xl" target="blank" variant="info" text="Video Edit SDK .Net"](https://www.visioforge.com/video-edit-sdk-net)
[!badge variant="dark" size="xl" text="VideoCaptureCore"] [!badge variant="dark" size="xl" text="VideoEditCore"]
## Overview of IIS Smooth Streaming
IIS Smooth Streaming provides several key advantages for developers and end-users:
- **Adaptive bitrate streaming**: Automatically adjusts video quality based on available bandwidth
- **Reduced buffering**: Minimizes playback interruptions during network fluctuations
- **Broad device compatibility**: Works across desktops, mobile devices, smart TVs, and more
- **Scalable delivery**: Handles large numbers of concurrent viewers efficiently
This technology is particularly valuable for applications requiring high-quality video delivery across varied network conditions, such as live events, educational platforms, and media-rich applications.
## Prerequisites
Before implementing IIS Smooth Streaming with VisioForge SDKs, ensure you have:
1. Windows Server with IIS installed
2. Administrative access to the server
3. Relevant VisioForge SDK (Video Capture SDK .Net or Video Edit SDK .Net)
4. Basic understanding of .NET development
## Step-by-Step IIS Configuration
### Installing Required Components
1. Install [Web Platform Installer](https://www.microsoft.com/web/downloads/platform.aspx) on your server.
2. Through the Web Platform Installer, search for and install IIS Media Services.

This component package includes all necessary modules for Smooth Streaming functionality, including the Live Smooth Streaming Publishing service.
### Configuring IIS Manager
1. Open IIS Manager on your server through the Start menu or by running `inetmgr` in the Run dialog.

2. In the left navigation pane, locate and expand your server name, then select the site where you want to enable Smooth Streaming.
### Creating a Publishing Point
1. Within the selected site, find and open the "Live Smooth Streaming Publishing Points" feature.
2. Click "Add" to create a new publishing point.

3. Configure the basic settings for your publishing point:
- **Name**: Provide a descriptive name for your publishing point (e.g., "MainStream")
- **Path**: Specify the file path where the Smooth Streaming content will be stored

4. Configure additional parameters by enabling the "Allow clients to connect to this publishing point" checkbox. This ensures that clients can connect and receive the streamed content.

### Enabling Mobile Device Support
To ensure your Smooth Streaming content is accessible on mobile devices:
1. In the publishing point configuration, navigate to the "Mobile Devices" tab.
2. Enable the checkbox for "Allow playback on mobile devices."

This setting generates the necessary formats and manifests for mobile playback, significantly expanding your content's reach.
### Setting Up the Player
To provide viewers with a way to watch your Smooth Streaming content:
1. Download the Smooth Streaming Player Silverlight control provided by Microsoft.
2. Extract the downloaded files and locate the `.xap` file.
3. Copy this `.xap` file to your website's directory.
4. Copy the included HTML file to the same directory and rename it to `index.html`.
5. Open `index.html` in a text editor and replace the "initparams" section with the following configuration:
```html
```
This configuration initializes the Silverlight player with optimal settings for Smooth Streaming playback. The `mediaurl` parameter should point to your publishing point's manifest.
### Starting the Publishing Point
1. Return to IIS Manager and select your configured publishing point.
2. Click the "Start" action in the right-hand panel.
The publishing point will now be active and ready to receive content from your application.
## Implementing Smooth Streaming in VisioForge SDK Applications
### Basic Configuration
To implement IIS Smooth Streaming in your VisioForge SDK application:
1. Open your application built with Video Capture SDK .Net or Video Edit SDK .Net.
2. Navigate to the network streaming settings section.
3. Enable network streaming functionality.
4. Select "Smooth Streaming" as the streaming method.
5. Enter the publishing point URL (e.g., `http://localhost/mainstream.isml`).
6. Configure additional streaming parameters as needed (bitrate, resolution, etc.).
7. Start the stream.

### Verifying the Connection
Once your application is configured:
1. Check the connection status in your application. You should see confirmation that the SDK has successfully connected to IIS.

2. Open a web browser and navigate to `http://localhost` (or your server address).
3. The Silverlight player should load and begin playing your stream.

### HTML5 Streaming for iOS Devices
For broader device compatibility, particularly iOS devices that don't support Silverlight, create an HTML5 player:
1. Create a new HTML file in your website's directory.
2. Include the following code in the file:
```html
Smooth Streaming HTML5 Player
HTML5 Smooth Streaming Player
```
This HTML5 player uses HLS (HTTP Live Streaming) format, which is automatically generated by IIS Media Services when you enable mobile device support.
## Required Redistributables
To ensure your application functions correctly with IIS Smooth Streaming, include the following redistributables:
- SDK redistributables for your specific VisioForge SDK
- MP4 redistributables:
- For x86 architectures: [VisioForge.DotNet.Core.Redist.MP4.x86](https://www.nuget.org/packages/VisioForge.DotNet.Core.Redist.MP4.x86/)
- For x64 architectures: [VisioForge.DotNet.Core.Redist.MP4.x64](https://www.nuget.org/packages/VisioForge.DotNet.Core.Redist.MP4.x64/)
You can add these packages through NuGet Package Manager in Visual Studio or via the command line:
```
Install-Package VisioForge.DotNet.Core.Redist.MP4.x64
```
## Advanced Configuration Options
For production environments, consider these additional configurations:
- **Multiple bitrate encoding**: Configure your VisioForge SDK to encode at multiple bitrates for optimal adaptive streaming
- **Custom manifest settings**: Modify the Smooth Streaming manifest for specialized playback requirements
- **Authentication**: Implement token-based authentication for secure streaming
- **Content encryption**: Enable DRM protection for sensitive content
- **Load balancing**: Configure multiple publishing points behind a load balancer for high-traffic scenarios
## Troubleshooting Common Issues
- **Connection failures**: Verify firewall settings allow traffic on the streaming port (typically 80 or 443)
- **Playback stuttering**: Check server resources and consider increasing buffer settings
- **Mobile compatibility issues**: Ensure mobile format generation is enabled and test across multiple devices
- **Quality issues**: Adjust encoding parameters and bitrate ladder configuration
## Conclusion
IIS Smooth Streaming, when implemented with VisioForge SDKs, provides a robust solution for adaptive video delivery across diverse network conditions and devices. By following this comprehensive guide, you can configure, implement, and optimize Smooth Streaming for your .NET applications.
For additional code samples and implementation examples, visit our [GitHub repository](https://github.com/visioforge/.Net-SDK-s-samples).
---
*This documentation is provided by VisioForge. For additional support or information about our SDKs, please visit [www.visioforge.com](https://www.visioforge.com).*
---END OF PAGE---
# Local File: .\dotnet\general\network-streaming\index.md
---
title: Network Streaming Guide for .NET Development
description: Learn how to implement RTMP, RTSP, HLS, and NDI streaming in .NET applications. Includes code examples for live broadcasting, hardware acceleration, and integration with major streaming platforms.
sidebar_label: Network Streaming
order: 16
---
# Comprehensive Network Streaming Guide
[!badge size="xl" target="blank" variant="info" text="Video Capture SDK .Net"](https://www.visioforge.com/video-capture-sdk-net) [!badge size="xl" target="blank" variant="info" text="Video Edit SDK .Net"](https://www.visioforge.com/video-edit-sdk-net) [!badge size="xl" target="blank" variant="info" text="Media Blocks SDK .Net"](https://www.visioforge.com/media-blocks-sdk-net)
## Introduction to Network Streaming
Network streaming enables real-time transmission of audio and video content across the internet or local networks. VisioForge's comprehensive SDKs provide powerful tools for implementing various streaming protocols in your .NET applications, allowing you to create professional-grade broadcasting solutions with minimal development effort.
This guide covers all streaming options available in VisioForge SDKs, including implementation details, best practices, and code examples to help you select the most appropriate streaming technology for your specific requirements.
## Streaming Protocol Overview
VisioForge SDKs support a wide range of streaming protocols, each with unique advantages for different use cases:
### Real-Time Protocols
- **[RTMP (Real-Time Messaging Protocol)](rtmp.md)**: Industry-standard protocol for low-latency live streaming, widely used for live broadcasting to CDNs and streaming platforms
- **[RTSP (Real-Time Streaming Protocol)](rtsp.md)**: Ideal for IP camera integration and surveillance applications, offering precise control over media sessions
- **[SRT (Secure Reliable Transport)](srt.md)**: Advanced protocol designed for high-quality, low-latency video delivery over unpredictable networks
- **[NDI (Network Device Interface)](ndi.md)**: Professional-grade protocol for high-quality, low-latency video transmission over local networks
### HTTP-Based Streaming
- **[HLS (HTTP Live Streaming)](hls-streaming.md)**: Apple-developed protocol that breaks streams into downloadable segments, offering excellent compatibility with browsers and mobile devices
- **[HTTP MJPEG Streaming](http-mjpeg.md)**: Simple implementation for streaming motion JPEG over HTTP connections
- **[IIS Smooth Streaming](iis-smooth-streaming.md)**: Microsoft's adaptive streaming technology for delivering media through IIS servers
### Platform-Specific Solutions
- **[Windows Media Streaming (WMV)](wmv.md)**: Microsoft's native streaming format, ideal for Windows-centric deployments
- **[Adobe Flash Media Server](adobe-flash.md)**: Legacy streaming solution for Flash-based applications
### Cloud & Social Media Integration
- **[AWS S3](aws-s3.md)**: Direct streaming to Amazon Web Services S3 storage
- **[YouTube Live](youtube.md)**: Simplified integration with YouTube's live streaming platform
- **[Facebook Live](facebook.md)**: Direct broadcasting to Facebook's streaming service
## Key Components of Network Streaming
### Video Encoders
VisioForge SDKs provide multiple encoding options to balance quality, performance and compatibility:
#### Software Encoders
- **OpenH264**: Cross-platform software-based H.264 encoder
- **AVENC H264**: FFmpeg-based software encoder
#### Hardware-Accelerated Encoders
- **NVENC H264/HEVC**: NVIDIA GPU-accelerated encoding
- **QSV H264/HEVC**: Intel Quick Sync Video acceleration
- **AMF H264/HEVC**: AMD GPU-accelerated encoding
- **Apple Media H264**: macOS-specific hardware acceleration
## Best Practices for Network Streaming
### Performance Optimization
1. **Hardware acceleration**: Leverage GPU-based encoding where available for reduced CPU usage
2. **Resolution and framerate**: Match output to content type (60fps for gaming, 30fps for general content)
3. **Bitrate allocation**: Allocate 80-90% of bandwidth to video and 10-20% to audio
### Network Reliability
1. **Connection testing**: Verify upload speed before streaming
2. **Error handling**: Implement reconnection logic for disrupted streams
3. **Monitoring**: Track streaming metrics in real-time to identify issues
### Quality Assurance
1. **Pre-streaming checks**: Validate encoder settings and output parameters
2. **Quality monitoring**: Regularly check stream quality during broadcast
3. **Platform compliance**: Follow platform-specific requirements (YouTube, Facebook, etc.)
## Troubleshooting Common Issues
1. **Encoding overload**: If experiencing frame drops, reduce resolution or bitrate
2. **Connection failures**: Verify network stability and server addresses
3. **Audio/video sync**: Ensure proper timestamp synchronization between streams
4. **Platform rejection**: Confirm compliance with platform-specific requirements
5. **Hardware acceleration failures**: Verify driver installation and compatibility
## Conclusion
Network streaming with VisioForge SDKs provides a comprehensive solution for implementing professional-grade media broadcasting in your .NET applications. By understanding the available protocols and following best practices, you can create high-quality streaming experiences for your users across multiple platforms.
For protocol-specific implementation details, refer to the dedicated guides linked throughout this document.
---END OF PAGE---
# Local File: .\dotnet\general\network-streaming\ndi.md
---
title: NDI Network Video Streaming Integration Guide
description: Learn how to implement high-performance NDI streaming in .NET applications. Step-by-step guide for developers to set up low-latency video/audio transmission over IP networks with code examples and best practices.
sidebar_label: NDI
---
# Network Device Interface (NDI) Streaming Integration
[!badge size="xl" target="blank" variant="info" text="Video Capture SDK .Net"](https://www.visioforge.com/video-capture-sdk-net) [!badge size="xl" target="blank" variant="info" text="Media Blocks SDK .Net"](https://www.visioforge.com/media-blocks-sdk-net)
## What is NDI and Why Use It?
The VisioForge SDK's integration of Network Device Interface (NDI) technology provides a transformative solution for professional video production and broadcasting workflows. NDI has emerged as a leading industry standard for live production, enabling high-quality, ultra-low-latency video streaming over conventional Ethernet networks.
NDI significantly simplifies the process of sharing and managing multiple video streams across diverse devices and platforms. When implemented within the VisioForge SDK, it facilitates seamless transmission of high-definition video and audio content from servers to clients with exceptional performance characteristics. This makes the technology particularly valuable for applications including:
- Live broadcasting and streaming
- Professional video conferencing
- Multi-camera production setups
- Remote production workflows
- Educational and corporate presentation environments
The inherent flexibility and efficiency of NDI streaming technology substantially reduces dependency on specialized hardware configurations, delivering a cost-effective alternative to traditional SDI-based systems for professional-grade live video production.
## Installation Requirements
### Prerequisites for NDI Implementation
To successfully implement NDI streaming functionality within your application, you must install one of the following official NDI software packages:
1. **[NDI SDK](https://ndi.video/download-ndi-sdk/)** - Recommended for developers who need comprehensive access to NDI functionality
2. **[NDI Tools](https://ndi.video/tools/)** - Suitable for basic implementation and testing scenarios
These packages provide the necessary runtime components that enable NDI communication across your network infrastructure.
## Cross-Platform NDI Output Implementation
[!badge variant="dark" size="xl" text="VideoCaptureCoreX"] [!badge variant="dark" size="xl" text="VideoEditCoreX"] [!badge variant="dark" size="xl" text="MediaBlocksPipeline"]
### Understanding the NDIOutput Class Architecture
The `NDIOutput` class serves as the core implementation framework for NDI functionality within the VisioForge SDK ecosystem. This class encapsulates configuration properties and processing logic required for high-performance video-over-IP transmission using the NDI protocol. The architecture enables broadcast-quality video and audio transmission across standard network infrastructure without specialized hardware requirements.
#### Class Definition and Interface Implementation
```csharp
public class NDIOutput : IVideoEditXBaseOutput, IVideoCaptureXBaseOutput, IOutputVideoProcessor, IOutputAudioProcessor
```
The class implements several interfaces that provide comprehensive functionality for different output scenarios:
- `IVideoEditXBaseOutput` - Provides integration with video editing workflows
- `IVideoCaptureXBaseOutput` - Enables direct capture-to-NDI streaming capabilities
- `IOutputVideoProcessor` - Allows for advanced video processing during output
- `IOutputAudioProcessor` - Facilitates audio processing and manipulation in the NDI pipeline
### Configuration Properties
#### Video Processing Pipeline
```csharp
public MediaBlock CustomVideoProcessor { get; set; }
```
This property allows developers to extend the NDI streaming pipeline with custom video processing functionality. By assigning a custom `MediaBlock` implementation, you can integrate specialized video filters, transformations, or analysis algorithms before content is transmitted via NDI.
#### Audio Processing Pipeline
```csharp
public MediaBlock CustomAudioProcessor { get; set; }
```
Similar to the video processor property, this allows for insertion of custom audio processing logic. Common applications include dynamic audio level adjustment, noise reduction, or specialized audio effects that enhance the streaming experience.
#### NDI Sink Configuration
```csharp
public NDISinkSettings Sink { get; set; }
```
This property contains the comprehensive configuration parameters for the NDI output sink, including essential settings such as stream identification, compression options, and network transmission parameters.
### Constructor Overloads
#### Basic Constructor with Stream Name
```csharp
public NDIOutput(string name)
```
Creates a new NDI output instance with the specified stream name, which will identify this NDI source on the network.
**Parameters:**
- `name`: String identifier for the NDI stream visible to receivers on the network
#### Advanced Constructor with Pre-configured Settings
```csharp
public NDIOutput(NDISinkSettings settings)
```
Creates a new NDI output instance with comprehensive pre-configured sink settings for advanced implementation scenarios.
**Parameters:**
- `settings`: A fully configured `NDISinkSettings` object containing all required NDI configuration parameters
### Core Methods
#### Stream Identification
```csharp
public string GetFilename()
```
Returns the configured name of the NDI stream. This method maintains compatibility with file-based output interfaces in the SDK architecture.
**Returns:** The current NDI stream identifier
```csharp
public void SetFilename(string filename)
```
Updates the NDI stream identifier. This method is primarily used for compatibility with other output types that use filename-based identification.
**Parameters:**
- `filename`: The updated name for the NDI stream
#### Encoder Management
```csharp
public Tuple[] GetVideoEncoders()
```
Returns an empty array as NDI handles video encoding internally through its proprietary technology.
**Returns:** Empty array of encoder tuples
```csharp
public Tuple[] GetAudioEncoders()
```
Returns an empty array as NDI handles audio encoding internally through its proprietary technology.
**Returns:** Empty array of encoder tuples
## Implementation Examples
### Media Blocks SDK Implementation
The following example demonstrates how to configure an NDI output using the Media Blocks SDK architecture:
```cs
// Create an NDI output block with a descriptive stream name
var ndiSink = new NDISinkBlock("VisioForge Production Stream");
// Connect video source to the NDI output
// CreateNewInput method establishes a video input channel for the NDI sink
pipeline.Connect(videoSource.Output, ndiSink.CreateNewInput(MediaBlockPadMediaType.Video));
// Connect audio source to the NDI output
// CreateNewInput method establishes an audio input channel for the NDI sink
pipeline.Connect(audioSource.Output, ndiSink.CreateNewInput(MediaBlockPadMediaType.Audio));
```
### Video Capture SDK Implementation
This example shows how to integrate NDI streaming within the Video Capture SDK framework:
```cs
// Initialize NDI output with a network-friendly stream name
var ndiOutput = new NDIOutput("VisioForge_Studio_Output");
// Add the configured NDI output to the video capture pipeline
core.Outputs_Add(ndiOutput); // core represents the VideoCaptureCoreX instance
```
## Windows-Specific NDI Implementation
[!badge variant="dark" size="xl" text="VideoCaptureCore"] [!badge variant="dark" size="xl" text="VideoEditCore"]
For Windows-specific implementations, the SDK provides additional configuration options through the VideoCaptureCore or VideoEditCore components.
### Step-by-Step Implementation Guide
#### 1. Enable Network Streaming
First, activate the network streaming functionality:
```cs
VideoCapture1.Network_Streaming_Enabled = true;
```
#### 2. Configure Audio Streaming
Enable audio transmission alongside video content:
```cs
VideoCapture1.Network_Streaming_Audio_Enabled = true;
```
#### 3. Select NDI Protocol
Specify NDI as the preferred streaming format:
```csharp
VideoCapture1.Network_Streaming_Format = NetworkStreamingFormat.NDI;
```
#### 4. Create and Configure NDI Output
Initialize the NDI output with a descriptive name:
```cs
var streamName = "VisioForge NDI Streamer";
var ndiOutput = new NDIOutput(streamName);
```
#### 5. Assign the Output
Connect the configured NDI output to the video capture pipeline:
```cs
VideoCapture1.Network_Streaming_Output = ndiOutput;
```
#### 6. Generate the NDI URL (Optional)
For debugging or sharing purposes, you can generate the standard NDI protocol URL:
```cs
string ndiUrl = $"ndi://{System.Net.Dns.GetHostName()}/{streamName}";
Debug.WriteLine(ndiUrl);
```
## Advanced Integration Considerations
When implementing NDI streaming in production environments, consider the following factors:
- **Network bandwidth requirements** - NDI streams can consume significant bandwidth depending on resolution and framerate
- **Quality vs. latency tradeoffs** - Configure appropriate compression settings based on your specific use case
- **Multicast vs. unicast distribution** - Determine the optimal network transmission method based on your infrastructure
- **Hardware acceleration options** - Leverage GPU acceleration where available for improved performance
- **Discovery mechanism** - Consider how NDI sources will be discovered across network segments
## Related Components
- **NDISinkSettings** - Provides detailed configuration options for the NDI output sink
- **NDISinkBlock** - Implements the core NDI output functionality referenced in NDISinkSettings
- **MediaBlockPadMediaType** - Enum used to specify the type of media (video or audio) for input connections
---
Visit our [GitHub repository](https://github.com/visioforge/.Net-SDK-s-samples) for additional code samples and implementation examples.
---END OF PAGE---
# Local File: .\dotnet\general\network-streaming\rtmp.md
---
title: RTMP Live Streaming for .NET Applications
description: Learn how to implement RTMP streaming in .NET apps with practical code examples. Covers hardware acceleration, cross-platform support, error handling, and integration with popular streaming platforms like YouTube and Facebook Live.
sidebar_label: RTMP
---
# RTMP Streaming with VisioForge SDKs
[!badge size="xl" target="blank" variant="info" text="Video Capture SDK .Net"](https://www.visioforge.com/video-capture-sdk-net) [!badge size="xl" target="blank" variant="info" text="Video Edit SDK .Net"](https://www.visioforge.com/video-edit-sdk-net) [!badge size="xl" target="blank" variant="info" text="Media Blocks SDK .Net"](https://www.visioforge.com/media-blocks-sdk-net)
## Introduction to RTMP Streaming
RTMP (Real-Time Messaging Protocol) is a robust communication protocol designed for high-performance transmission of audio, video, and data between a server and a client. VisioForge SDKs provide comprehensive support for RTMP streaming, enabling developers to create powerful streaming applications with minimal effort.
This guide covers implementation details for RTMP streaming across different VisioForge products, including cross-platform solutions and Windows-specific integrations.
## Cross-Platform RTMP Implementation
[!badge variant="dark" size="xl" text="VideoCaptureCoreX"] [!badge variant="dark" size="xl" text="VideoEditCoreX"] [!badge variant="dark" size="xl" text="MediaBlocksPipeline"]
The `RTMPOutput` class serves as the central configuration point for RTMP streaming in cross-platform scenarios. It implements multiple interfaces including `IVideoEditXBaseOutput` and `IVideoCaptureXBaseOutput`, making it versatile for both video editing and capture workflows.
### Setting Up RTMP Output
To begin implementing RTMP streaming, you need to create and configure an `RTMPOutput` instance:
```csharp
// Initialize with streaming URL
var rtmpOutput = new RTMPOutput("rtmp://your-streaming-server/stream-key");
// Alternatively, set the URL after initialization
var rtmpOutput = new RTMPOutput();
rtmpOutput.Sink.Location = "rtmp://your-streaming-server/stream-key";
```
### Integration with VisioForge SDKs
#### Video Capture SDK Integration
```csharp
// Add RTMP output to the Video Capture SDK engine
core.Outputs_Add(rtmpOutput, true); // core is an instance of VideoCaptureCoreX
```
#### Video Edit SDK Integration
```csharp
// Set RTMP as the output format for Video Edit SDK
core.Output_Format = rtmpOutput; // core is an instance of VideoEditCoreX
```
#### Media Blocks SDK Integration
```csharp
// Create an RTMP sink block
var rtmpSink = new RTMPSinkBlock(new RTMPSinkSettings()
{
Location = "rtmp://streaming-server/stream"
});
// Connect video and audio encoders to the RTMP sink
pipeline.Connect(h264Encoder.Output, rtmpSink.CreateNewInput(MediaBlockPadMediaType.Video));
pipeline.Connect(aacEncoder.Output, rtmpSink.CreateNewInput(MediaBlockPadMediaType.Audio));
```
## Video Encoder Configuration
### Supported Video Encoders
VisioForge provides extensive support for various video encoders, making it possible to optimize streaming based on available hardware:
- **OpenH264**: Default software encoder for most platforms
- **NVENC H264**: Hardware-accelerated encoding for NVIDIA GPUs
- **QSV H264**: Intel Quick Sync Video acceleration
- **AMF H264**: AMD GPU-based acceleration
- **HEVC/H265**: Various implementations including MF HEVC, NVENC HEVC, QSV HEVC, and AMF H265
### Implementing Hardware-Accelerated Encoding
For optimal performance, it's recommended to utilize hardware acceleration when available:
```csharp
// Check for NVIDIA encoder availability and use if present
if (NVENCH264EncoderSettings.IsAvailable())
{
rtmpOutput.Video = new NVENCH264EncoderSettings();
}
// Fall back to OpenH264 if hardware acceleration isn't available
else
{
rtmpOutput.Video = new OpenH264EncoderSettings();
}
```
## Audio Encoder Configuration
### Supported Audio Encoders
The SDK supports multiple AAC encoder implementations:
- **VO-AAC**: Default for non-Windows platforms
- **AVENC AAC**: Cross-platform implementation
- **MF AAC**: Default for Windows platforms
```csharp
// Configure MF AAC encoder on Windows platforms
rtmpOutput.Audio = new MFAACEncoderSettings();
// For macOS or other platforms
rtmpOutput.Audio = new VOAACEncoderSettings();
```
## Platform-Specific Considerations
### Windows Implementation
On Windows platforms, the default configuration uses:
- OpenH264 for video encoding
- MF AAC for audio encoding
Additionally, Windows supports Microsoft Media Foundation HEVC encoding for high-efficiency streaming.
### macOS Implementation
For macOS applications, the system uses:
- AppleMediaH264EncoderSettings for video encoding
- VO-AAC for audio encoding
### Automatic Platform Detection
The SDK handles platform differences automatically through conditional compilation:
```csharp
#if __MACOS__
Video = new AppleMediaH264EncoderSettings();
#else
Video = new OpenH264EncoderSettings();
#endif
```
## Best Practices for RTMP Streaming
### 1. Encoder Selection Strategy
Always verify encoder availability before attempting to use hardware acceleration:
```csharp
// Check for Intel Quick Sync availability
if (QSVH264EncoderSettings.IsAvailable())
{
rtmpOutput.Video = new QSVH264EncoderSettings();
}
// Check for NVIDIA acceleration
else if (NVENCH264EncoderSettings.IsAvailable())
{
rtmpOutput.Video = new NVENCH264EncoderSettings();
}
// Fall back to software encoding
else
{
rtmpOutput.Video = new OpenH264EncoderSettings();
}
```
### 2. Error Handling
Implement robust error handling to manage streaming failures gracefully:
```csharp
try
{
var rtmpOutput = new RTMPOutput(streamUrl);
// Configure and start streaming
}
catch (Exception ex)
{
logger.LogError($"RTMP streaming initialization failed: {ex.Message}");
// Implement appropriate error recovery
}
```
### 3. Resource Management
Ensure proper disposal of resources when streaming is complete:
```csharp
// In your cleanup routine
if (rtmpOutput != null)
{
rtmpOutput.Dispose();
rtmpOutput = null;
}
```
## Advanced RTMP Configuration
### Dynamic Encoder Selection
For applications that need to adapt to different environments, you can enumerate available encoders:
```csharp
var rtmpOutput = new RTMPOutput();
var availableVideoEncoders = rtmpOutput.GetVideoEncoders();
var availableAudioEncoders = rtmpOutput.GetAudioEncoders();
// Present options to users or select based on system capabilities
```
### Custom Sink Configuration
Fine-tune streaming parameters using the RTMPSinkSettings class:
```csharp
rtmpOutput.Sink = new RTMPSinkSettings
{
Location = "rtmp://streaming-server/stream"
};
```
## Windows-Specific RTMP Implementation
[!badge variant="dark" size="xl" text="VideoCaptureCore"] [!badge variant="dark" size="xl" text="VideoEditCore"]
For Windows-only applications, VisioForge provides an alternative implementation using FFmpeg:
```csharp
// Enable network streaming
VideoCapture1.Network_Streaming_Enabled = true;
// Set streaming format to RTMP using FFmpeg
VideoCapture1.Network_Streaming_Format = NetworkStreamingFormat.RTMP_FFMPEG_EXE;
// Create and configure FFmpeg output
var ffmpegOutput = new FFMPEGEXEOutput();
ffmpegOutput.FillDefaults(DefaultsProfile.MP4_H264_AAC, true);
ffmpegOutput.OutputMuxer = OutputMuxer.FLV;
// Assign output to the capture component
VideoCapture1.Network_Streaming_Output = ffmpegOutput;
// Enable audio streaming (required for many services)
VideoCapture1.Network_Streaming_Audio_Enabled = true;
```
## Streaming to Popular Platforms
### YouTube Live
```csharp
// Format: rtmp://a.rtmp.youtube.com/live2/ + [YouTube stream key]
VideoCapture1.Network_Streaming_URL = "rtmp://a.rtmp.youtube.com/live2/xxxx-xxxx-xxxx-xxxx";
```
### Facebook Live
```csharp
// Format: rtmps://live-api-s.facebook.com:443/rtmp/ + [Facebook stream key]
VideoCapture1.Network_Streaming_URL = "rtmps://live-api-s.facebook.com:443/rtmp/xxxx-xxxx-xxxx-xxxx";
```
### Custom RTMP Servers
```csharp
// Connect to any RTMP server
VideoCapture1.Network_Streaming_URL = "rtmp://your-streaming-server:1935/live/stream";
```
## Performance Optimization
To achieve optimal streaming performance:
1. **Use hardware acceleration** when available to reduce CPU load
2. **Monitor resource usage** during streaming to identify bottlenecks
3. **Adjust resolution and bitrate** based on available bandwidth
4. **Implement adaptive bitrate** for varying network conditions
5. **Consider GOP size** and keyframe intervals for streaming quality
## Troubleshooting Common Issues
- **Connection Failures**: Verify server URL format and network connectivity
- **Encoder Errors**: Confirm hardware encoder availability and drivers
- **Performance Issues**: Monitor CPU/GPU usage and adjust encoding parameters
- **Audio/Video Sync**: Check timestamp synchronization settings
## Conclusion
VisioForge's RTMP implementation provides developers with a powerful, flexible framework for creating robust streaming applications. By leveraging the appropriate SDK components and following the best practices outlined in this guide, you can create high-performance streaming solutions that work across platforms and integrate with popular streaming services.
## Related Resources
- [Streaming to Adobe Flash Media Server](adobe-flash.md)
- [YouTube Streaming Integration](youtube.md)
- [Facebook Live Implementation](facebook.md)
---END OF PAGE---
# Local File: .\dotnet\general\network-streaming\rtsp.md
---
title: RTSP Video Streaming Implementation in .NET
description: Learn how to implement RTSP streaming in .NET applications with hardware acceleration, cross-platform support, and best practices. Master video encoding, server configuration, and real-time streaming for security cameras and live broadcasting.
sidebar_label: RTSP Streaming
---
# Mastering RTSP Streaming with VisioForge SDKs
[!badge size="xl" target="blank" variant="info" text="Video Capture SDK .Net"](https://www.visioforge.com/video-capture-sdk-net) [!badge size="xl" target="blank" variant="info" text="Video Edit SDK .Net"](https://www.visioforge.com/video-edit-sdk-net) [!badge size="xl" target="blank" variant="info" text="Media Blocks SDK .Net"](https://www.visioforge.com/media-blocks-sdk-net)
## Introduction to RTSP
The Real-Time Streaming Protocol (RTSP) is a network control protocol designed for use in entertainment and communications systems to control streaming media servers. It acts like a "network remote control," allowing users to play, pause, and stop media streams. VisioForge SDKs harness the power of RTSP to provide robust video and audio streaming capabilities.
Our SDKs integrate RTSP with industry-standard codecs like **H.264 (AVC)** for video and **Advanced Audio Coding (AAC)** for audio. H.264 offers excellent video quality at relatively low bitrates, making it ideal for streaming over various network conditions. AAC provides efficient and high-fidelity audio compression. This powerful combination ensures reliable, high-definition audiovisual streaming suitable for demanding applications such as:
* **Security and Surveillance:** Delivering clear, real-time video feeds from IP cameras.
* **Live Broadcasting:** Streaming events, webinars, or performances to a wide audience.
* **Video Conferencing:** Enabling smooth, high-quality communication.
* **Remote Monitoring:** Observing industrial processes or environments remotely.
This guide delves into the specifics of implementing RTSP streaming using VisioForge SDKs, covering both modern cross-platform approaches and legacy Windows-specific methods.
## Cross-Platform RTSP Output (Recommended)
[!badge variant="dark" size="xl" text="VideoCaptureCoreX"] [!badge variant="dark" size="xl" text="VideoEditCoreX"] [!badge variant="dark" size="xl" text="MediaBlocksPipeline"]
The modern VisioForge SDKs (`CoreX` versions and Media Blocks) provide a flexible and powerful cross-platform RTSP server implementation built upon the robust GStreamer framework. This approach offers greater control, wider codec support, and compatibility across Windows, Linux, macOS, and other platforms.
### Core Component: `RTSPServerOutput`
The `RTSPServerOutput` class is the central configuration point for establishing an RTSP stream within the Video Capture or Video Edit SDKs (`CoreX` versions). It acts as a bridge between your capture/edit pipeline and the underlying RTSP server logic.
**Key Responsibilities:**
* **Interface Implementation:** Implements `IVideoEditXBaseOutput` and `IVideoCaptureXBaseOutput`, allowing seamless integration as an output format in both editing and capture scenarios.
* **Settings Management:** Holds the `RTSPServerSettings` object, which contains all the detailed configuration parameters for the server instance.
* **Codec Specification:** Defines the video and audio encoders that will be used to compress the media before streaming.
**Supported Encoders:**
VisioForge provides access to a wide array of encoders, allowing optimization based on hardware capabilities and target platforms:
* **Video Encoders:**
* **Hardware-Accelerated (Recommended for performance):**
* `NVENC` (NVIDIA): Leverages dedicated encoding hardware on NVIDIA GPUs.
* `QSV` (Intel Quick Sync Video): Utilizes integrated GPU capabilities on Intel processors.
* `AMF` (AMD Advanced Media Framework): Uses encoding hardware on AMD GPUs/APUs.
* **Software-Based (Platform-independent, higher CPU usage):**
* `OpenH264`: A widely compatible H.264 software encoder.
* `VP8` / `VP9`: Royalty-free video codecs developed by Google, offering good compression (often used with WebRTC, but available here).
* **Platform-Specific:**
* `MF HEVC` (Media Foundation HEVC): Windows-specific H.265/HEVC encoder for higher efficiency compression.
* **Audio Encoders:**
* **AAC Variants:**
* `VO-AAC`: A versatile, cross-platform AAC encoder.
* `AVENC AAC`: Utilizes FFmpeg's AAC encoder.
* `MF AAC`: Windows Media Foundation AAC encoder.
* **Other Formats:**
* `MP3`: Widely compatible but less efficient than AAC.
* `OPUS`: Excellent low-latency codec, ideal for interactive applications.
### Configuring the Stream: `RTSPServerSettings`
This class encapsulates all the parameters needed to define the behavior and properties of your RTSP server.
**Detailed Properties:**
* **Network Configuration:**
* `Port` (int): The TCP port the server listens on for incoming RTSP connections. The default is `8554`, a common alternative to the standard (often restricted) port 554. Ensure this port is open in firewalls.
* `Address` (string): The IP address the server binds to.
* `"127.0.0.1"` (Default): Listens only for connections from the local machine.
* `"0.0.0.0"`: Listens on all available network interfaces (use for public access).
* Specific IP (e.g., `"192.168.1.100"`): Binds only to that specific network interface.
* `Point` (string): The path component of the RTSP URL (e.g., `/live`, `/stream1`). Clients will connect to `rtsp://:`. Default is `"/live"`.
* **Stream Configuration:**
* `VideoEncoder` (IVideoEncoderSettings): An instance of a video encoder settings class (e.g., `OpenH264EncoderSettings`, `NVEncoderSettings`). This defines the codec, bitrate, quality, etc.
* `AudioEncoder` (IAudioEncoderSettings): An instance of an audio encoder settings class (e.g., `VOAACEncoderSettings`). Defines audio codec parameters.
* `Latency` (TimeSpan): Controls the buffering delay introduced by the server to smooth out network jitter. Default is 250 milliseconds. Higher values increase stability but also delay.
* **Authentication:**
* `Username` (string): If set, clients must provide this username for basic authentication.
* `Password` (string): If set, clients must provide this password along with the username.
* **Server Identity:**
* `Name` (string): A friendly name for the server, sometimes displayed by client applications.
* `Description` (string): A more detailed description of the stream content or server purpose.
* **Convenience Property:**
* `URL` (Uri): Automatically constructs the full RTSP connection URL based on the `Address`, `Port`, and `Point` properties.
### The Engine: `RTSPServerBlock` (Media Blocks SDK)
When using the Media Blocks SDK, the `RTSPServerBlock` represents the actual GStreamer-based element that performs the streaming.
**Functionality:**
* **Media Sink:** Acts as a terminal point (sink) in a media pipeline, receiving encoded video and audio data.
* **Input Pads:** Provides distinct `VideoInput` and `AudioInput` pads for connecting upstream video and audio sources/encoders.
* **GStreamer Integration:** Manages the underlying GStreamer `rtspserver` and related elements necessary for handling client connections and streaming RTP packets.
* **Availability Check:** The static `IsAvailable()` method allows checking if the necessary GStreamer plugins for RTSP streaming are present on the system.
* **Resource Management:** Implements `IDisposable` for proper cleanup of network sockets and GStreamer resources when the block is no longer needed.
### Practical Usage Examples
#### Example 1: Basic Server Setup (VideoCaptureCoreX / VideoEditCoreX)
```csharp
// 1. Choose and configure encoders
// Use hardware acceleration if available, otherwise fallback to software
var videoEncoder = H264EncoderBlock.GetDefaultSettings();
var audioEncoder = new VOAACEncoderSettings(); // Reliable cross-platform AAC
// 2. Configure server network settings
var settings = new RTSPServerSettings(videoEncoder, audioEncoder)
{
Port = 8554,
Address = "0.0.0.0", // Accessible from other machines on the network
Point = "/livefeed"
};
// 3. Create the output object
var rtspOutput = new RTSPServerOutput(settings);
// 4. Integrate with the SDK engine
// For VideoCaptureCoreX:
// videoCapture is an initialized instance of VideoCaptureCoreX
videoCapture.Outputs_Add(rtspOutput);
// For VideoEditCoreX:
// videoEdit is an initialized instance of VideoEditCoreX
// videoEdit.Output_Format = rtspOutput; // Set before starting editing/playback
```
#### Example 2: Media Blocks Pipeline
```csharp
// Assume 'pipeline' is an initialized MediaBlocksPipeline
// Assume 'videoSource' and 'audioSource' provide unencoded media streams
// 1. Create video and audio encoder settings
var videoEncoder = H264EncoderBlock.GetDefaultSettings();
var audioEncoder = new VOAACEncoderSettings();
// 2. Create RTSP server settings with a specific URL
var serverUri = new Uri("rtsp://192.168.1.50:8554/cam1");
var rtspSettings = new RTSPServerSettings(serverUri, videoEncoder, audioEncoder)
{
Description = "Camera Feed 1 - Warehouse"
};
// 3. Create the RTSP Server Block
if (!RTSPServerBlock.IsAvailable())
{
Console.WriteLine("RTSP Server components not available. Check GStreamer installation.");
return;
}
var rtspSink = new RTSPServerBlock(rtspSettings);
// Connect source directly to RTSP server block, because server block will use its own encoders
pipeline.Connect(videoSource.Output, rtspSink.VideoInput); // Connect source directly to video input of RTSP server block
pipeline.Connect(audioSource.Output, rtspSink.AudioInput); // Connect source directly to audio input of RTSP server block
Start the pipeline...
await pipeline.StartAsync();
```
#### Example 3: Advanced Configuration with Authentication
```csharp
// Using settings from Example 1...
var secureSettings = new RTSPServerSettings(videoEncoder, audioEncoder)
{
Port = 8555, // Use a different port
Address = "192.168.1.100", // Bind to a specific internal IP
Point = "/secure",
Username = "viewer",
Password = "VerySecretPassword!",
Latency = TimeSpan.FromMilliseconds(400), // Slightly higher latency
Name = "SecureStream",
Description = "Authorized access only"
};
var secureRtspOutput = new RTSPServerOutput(secureSettings);
// Add to VideoCaptureCoreX or set for VideoEditCoreX as before
// videoCapture.Outputs_Add(secureRtspOutput);
```
### Streaming Best Practices
1. **Encoder Selection Strategy:**
* **Prioritize Hardware:** Always prefer hardware encoders (NVENC, QSV, AMF) when available on the target system. They drastically reduce CPU load, allowing for higher resolutions, frame rates, or more simultaneous streams.
* **Software Fallback:** Use `OpenH264` as a reliable software fallback for broad compatibility when hardware acceleration isn't present or suitable.
* **Codec Choice:** H.264 remains the most widely compatible codec for RTSP clients. HEVC offers better compression but client support might be less universal.
2. **Latency Tuning:**
* **Interactivity vs. Stability:** Lower latency (e.g., 100-200ms) is crucial for applications like video conferencing but makes the stream more susceptible to network hiccups.
* **Broadcast/Surveillance:** Higher latency (e.g., 500ms-1000ms+) provides larger buffers, improving stream resilience over unstable networks (like Wi-Fi or the internet) at the cost of increased delay. Start with the default (250ms) and adjust based on observed stream quality and requirements.
3. **Network Configuration:**
* **Security First:** Implement `Username` and `Password` authentication for any stream not intended for public anonymous access.
* **Binding Address:** Use `"0.0.0.0"` cautiously. For enhanced security, bind explicitly to the network interface (`Address`) intended for client connections if possible.
* **Firewall Rules:** Meticulously configure system and network firewalls to allow incoming TCP connections on the chosen RTSP `Port`. Also, remember that RTP/RTCP (used for the actual media data) often use dynamic UDP ports; firewalls might need helper modules (like `nf_conntrack_rtsp` on Linux) or broad UDP port ranges opened (less secure).
4. **Resource Management:**
* **Dispose Pattern:** RTSP server instances hold network resources (sockets) and potentially complex GStreamer pipelines. *Always* ensure they are disposed of correctly using `using` statements or explicit `.Dispose()` calls in `finally` blocks to prevent resource leaks.
* **Graceful Shutdown:** When stopping the capture or edit process, ensure the output is properly removed or the pipeline is stopped cleanly to allow the RTSP server to shut down gracefully.
### Performance Considerations
Optimizing RTSP streaming involves balancing quality, latency, and resource usage:
1. **Encoder Impact:** This is often the biggest factor.
* **Hardware:** Significantly lower CPU usage, higher potential throughput. Requires compatible hardware and drivers.
* **Software:** High CPU load, especially at higher resolutions/framerates. Limits the number of concurrent streams on a single machine but works universally.
2. **Latency vs. Bandwidth:** Lower latency settings can sometimes lead to increased peak bandwidth usage as the system has less time to smooth out data transmission.
3. **Resource Monitoring:**
* **CPU:** Keep a close eye on CPU usage, particularly with software encoders. Overload leads to dropped frames and stuttering.
* **Memory:** Monitor RAM usage, especially if handling multiple streams or complex Media Blocks pipelines.
* **Network:** Ensure the server's network interface has sufficient bandwidth for the configured bitrate, resolution, and number of connected clients. Calculate required bandwidth (Video Bitrate + Audio Bitrate) * Number of Clients.
## Windows-Only RTSP Output (Legacy)
[!badge variant="dark" size="xl" text="VideoCaptureCore"] [!badge variant="dark" size="xl" text="VideoEditCore"]
The implementation includes several error handling mechanisms:
Older versions of the SDK (`VideoCaptureCore`, `VideoEditCore`) included a simpler, Windows-specific RTSP output mechanism. While functional, it offers less flexibility and codec support compared to the cross-platform `RTSPServerOutput`. **It is generally recommended to use the `CoreX` / Media Blocks approach for new projects.**
### How it Works
This method leverages built-in Windows components or specific bundled filters. Configuration is done directly via properties on the `VideoCaptureCore` or `VideoEditCore` object.
### Sample Configuration Code
```csharp
// Assuming VideoCapture1 is an instance of VisioForge.Core.VideoCapture.VideoCaptureCore
// 1. Enable network streaming globally for the component
VideoCapture1.Network_Streaming_Enabled = true;
// 2. Specifically enable audio streaming (optional, default might be true)
VideoCapture1.Network_Streaming_Audio_Enabled = true;
// 3. Select the desired RTSP format.
// RTSP_H264_AAC_SW indicates software encoding for both H.264 and AAC.
// Other options might exist depending on installed filters/components.
VideoCapture1.Network_Streaming_Format = VisioForge.Types.VFNetworkStreamingFormat.RTSP_H264_AAC_SW;
// 4. Configure Encoder Settings (using MP4Output as a container)
// Even though we aren't creating an MP4 file, the MP4Output class
// is used here to hold H.264 and AAC encoder settings.
var mp4OutputSettings = new VisioForge.Types.Output.MP4Output();
// Configure H.264 settings within mp4OutputSettings
// (Specific properties depend on the SDK version, e.g., bitrate, profile)
// mp4OutputSettings.Video_H264... = ...;
// Configure AAC settings within mp4OutputSettings
// (e.g., bitrate, sample rate)
// mp4OutputSettings.Audio_AAC... = ...;
// 5. Assign the settings container to the network streaming output
VideoCapture1.Network_Streaming_Output = mp4OutputSettings;
// 6. Define the RTSP URL clients will use
// The server will automatically listen on the specified port (5554 here).
VideoCapture1.Network_Streaming_URL = "rtsp://localhost:5554/vfstream";
// Use machine's actual IP instead of localhost for external access.
// After configuration, start the capture/playback as usual
// VideoCapture1.Start();
```
**Note:** This legacy method often relies on DirectShow filters or Media Foundation transforms available on the specific Windows system, making it less predictable and portable than the GStreamer-based cross-platform solution.
---
For more detailed examples and advanced use cases, explore the code samples provided in our [GitHub repository](https://github.com/visioforge/.Net-SDK-s-samples).
---END OF PAGE---
# Local File: .\dotnet\general\network-streaming\srt.md
---
title: Implementing SRT Protocol Streaming in .NET
description: Learn how to integrate SRT (Secure Reliable Transport) protocol for low-latency video streaming in .NET applications. Includes code examples, hardware acceleration options, and best practices for reliable video delivery.
sidebar_label: SRT
---
# SRT Streaming Implementation Guide for VisioForge .NET SDKs
[!badge size="xl" target="blank" variant="info" text="Video Capture SDK .Net"](https://www.visioforge.com/video-capture-sdk-net) [!badge size="xl" target="blank" variant="info" text="Video Edit SDK .Net"](https://www.visioforge.com/video-edit-sdk-net) [!badge size="xl" target="blank" variant="info" text="Media Blocks SDK .Net"](https://www.visioforge.com/media-blocks-sdk-net)
## What is SRT and Why Should You Use It?
SRT (Secure Reliable Transport) is a high-performance streaming protocol designed for delivering high-quality, low-latency video across unpredictable networks. Unlike traditional streaming protocols, SRT excels in challenging network conditions by incorporating unique error recovery mechanisms and encryption features.
The VisioForge .NET SDKs provide comprehensive support for SRT streaming through an intuitive configuration API, enabling developers to implement secure, reliable video delivery in their applications with minimal effort.
## Getting Started with SRT in VisioForge
### Supported SDK Platforms
[!badge variant="dark" size="xl" text="VideoCaptureCoreX"] [!badge variant="dark" size="xl" text="VideoEditCoreX"] [!badge variant="dark" size="xl" text="MediaBlocksPipeline"]
### Basic SRT Configuration
Implementing SRT streaming in your application starts with specifying your streaming destination URL. The SRT URL follows a standard format that includes protocol, host, and port information.
#### Video Capture SDK Implementation
```csharp
// Initialize SRT output with destination URL
var srtOutput = new SRTOutput("srt://streaming-server:1234");
// Add the configured SRT output to your capture engine
videoCapture.Outputs_Add(srtOutput, true); // videoCapture is an instance of VideoCaptureCoreX
```
#### Media Blocks SDK Implementation
```csharp
// Create an SRT sink block with appropriate settings
var srtSink = new SRTMPEGTSSinkBlock(new SRTSinkSettings() { Uri = "srt://:8888" });
// Configure encoders for SRT compatibility
h264Encoder.Settings.ParseStream = false; // Disable parsing for H264 encoder
// Connect your video encoder to the SRT sink
pipeline.Connect(h264Encoder.Output, srtSink.CreateNewInput(MediaBlockPadMediaType.Video));
// Connect your audio encoder to the SRT sink
pipeline.Connect(aacEncoder.Output, srtSink.CreateNewInput(MediaBlockPadMediaType.Audio));
```
## Video Encoding Options for SRT Streaming
The VisioForge SDKs offer flexible encoding options to balance quality, performance, and hardware utilization. You can choose from software-based encoders or hardware-accelerated options based on your specific requirements.
### Software-Based Video Encoders
- **OpenH264**: The default cross-platform encoder that provides excellent compatibility across different environments
### Hardware-Accelerated Video Encoders
- **NVIDIA NVENC (H.264/HEVC)**: Leverages NVIDIA GPU acceleration for high-performance encoding
- **Intel Quick Sync Video (H.264/HEVC)**: Utilizes Intel's dedicated media processing hardware
- **AMD AMF (H.264/H.265)**: Enables hardware acceleration on AMD graphics processors
- **Microsoft Media Foundation HEVC**: Windows-specific hardware-accelerated encoder
#### Example: Configuring NVIDIA Hardware Acceleration
```csharp
// Set SRT output to use NVIDIA hardware acceleration
srtOutput.Video = new NVENCH264EncoderSettings();
```
## Audio Encoding for SRT Streams
Audio quality is critical for many streaming applications. The VisioForge SDKs provide multiple audio encoding options:
- **VO-AAC**: Cross-platform AAC encoder with consistent performance
- **AVENC AAC**: FFmpeg-based AAC encoder with extensive configuration options
- **MF AAC**: Microsoft Media Foundation AAC encoder (Windows-only)
The SDK automatically selects the most appropriate default audio encoder based on the platform:
- Windows systems default to MF AAC
- Other platforms default to VO AAC
## Platform-Specific Optimizations
### Windows-Specific Features
When running on Windows systems, the SDK can leverage Microsoft Media Foundation frameworks:
- MF AAC encoder provides efficient audio encoding
- MF HEVC encoder delivers high-quality, efficient video compression
### macOS Optimizations
On macOS platforms, the SDK automatically selects:
- Apple Media H264 encoder for optimized video encoding
- VO AAC encoder for reliable audio encoding
## Advanced SRT Configuration Options
### Custom Media Processing Pipeline
For applications with specialized requirements, the SDK supports custom processing for both video and audio streams:
```csharp
// Add custom video processing before encoding
srtOutput.CustomVideoProcessor = new SomeMediaBlock();
// Add custom audio processing before encoding
srtOutput.CustomAudioProcessor = new SomeMediaBlock();
```
These processors enable you to implement filters, transformations, or analytics before encoding and transmission.
### SRT Sink Configuration
Fine-tune your SRT connection using the SRTSinkSettings class:
```csharp
// Update the SRT destination URI
srtOutput.Sink.Uri = "srt://new-server:5678";
```
## Best Practices for SRT Streaming
### Optimizing Encoder Selection
1. **Hardware Acceleration Priority**: Always choose hardware-accelerated encoders when available. The performance benefits are significant, particularly for high-resolution streaming.
2. **Smart Fallback Mechanisms**: Implement encoder availability checks to automatically fall back to software encoding if hardware acceleration is unavailable:
```csharp
if (NVENCH264EncoderSettings.IsAvailable())
{
srtOutput.Video = new NVENCH264EncoderSettings();
}
else
{
srtOutput.Video = new OpenH264EncoderSettings();
}
```
### Performance Optimization
1. **Bitrate Configuration**: Carefully adjust encoder bitrates based on your content type and target network conditions. Higher bitrates increase quality but require more bandwidth.
2. **Resource Monitoring**: Monitor CPU and GPU usage during streaming to identify potential bottlenecks. If CPU usage is consistently high, consider switching to hardware acceleration.
3. **Latency Management**: Configure appropriate buffer sizes based on your latency requirements. Smaller buffers reduce latency but may increase susceptibility to network fluctuations.
## Troubleshooting SRT Implementations
### Common Issues and Solutions
#### Encoder Initialization Failures
- **Problem**: Selected encoder fails to initialize or throws exceptions
- **Solution**: Verify the encoder is supported on your platform and that required drivers are installed and up-to-date
#### Streaming Connection Problems
- **Problem**: Unable to establish SRT connection
- **Solution**: Confirm the SRT URL format is correct and that specified ports are open in all firewalls and network equipment
#### Performance Bottlenecks
- **Problem**: High CPU usage or dropped frames during streaming
- **Solution**: Consider switching to hardware-accelerated encoders or reducing resolution/bitrate
## Integration Examples
### Complete SRT Streaming Setup
```csharp
// Create and configure SRT output
var srtOutput = new SRTOutput("srt://streaming-server:1234");
// Configure video encoding - try hardware acceleration with fallback
if (NVENCH264EncoderSettings.IsAvailable())
{
var nvencSettings = new NVENCH264EncoderSettings();
nvencSettings.Bitrate = 4000000; // 4 Mbps
srtOutput.Video = nvencSettings;
}
else
{
var softwareSettings = new OpenH264EncoderSettings();
softwareSettings.Bitrate = 2000000; // 2 Mbps for software encoding
srtOutput.Video = softwareSettings;
}
// Add to capture engine
videoCapture.Outputs_Add(srtOutput, true);
// Start streaming
videoCapture.Start();
```
## Conclusion
SRT streaming in VisioForge .NET SDKs provides a powerful solution for high-quality, low-latency video delivery across challenging network conditions. By leveraging the flexible encoder options and configuration capabilities, developers can implement robust streaming solutions for a wide range of applications.
Whether you're building a live streaming platform, video conferencing solution, or content delivery system, the SRT protocol's combination of security, reliability, and performance makes it an excellent choice for modern video applications.
For more information about specific encoders or advanced configuration options, refer to the comprehensive VisioForge SDK documentation.
---END OF PAGE---
# Local File: .\dotnet\general\network-streaming\udp.md
---
title: UDP Video and Audio Streaming in .NET
description: Learn how to implement high-performance UDP streaming for video and audio in .NET applications. Detailed guide covers encoding, configuration, multicast support, and best practices for real-time media transmission.
sidebar_label: UDP
---
# UDP Streaming with VisioForge SDKs
[!badge size="xl" target="blank" variant="info" text="Video Capture SDK .Net"](https://www.visioforge.com/video-capture-sdk-net) [!badge size="xl" target="blank" variant="info" text="Video Edit SDK .Net"](https://www.visioforge.com/video-edit-sdk-net) [!badge size="xl" target="blank" variant="info" text="Media Blocks SDK .Net"](https://www.visioforge.com/media-blocks-sdk-net)
## Introduction to UDP Streaming
The User Datagram Protocol (UDP) is a lightweight, connectionless transport protocol that provides a simple interface between network applications and the underlying IP network. Unlike TCP, UDP offers minimal overhead and doesn't guarantee packet delivery, making it ideal for real-time applications where speed is crucial and occasional packet loss is acceptable.
VisioForge SDKs offer robust support for UDP streaming, enabling developers to implement high-performance, low-latency streaming solutions for various applications, including live broadcasts, video surveillance, and real-time communication systems.
## Key Features and Capabilities
The VisioForge SDK suite provides comprehensive UDP streaming functionality with the following key features:
### Video and Audio Codec Support
- **Video Codecs**: Full support for H.264 (AVC) and H.265 (HEVC), offering excellent compression efficiency while maintaining high video quality.
- **Audio Codec**: Advanced Audio Coding (AAC) support, providing superior audio quality at lower bitrates compared to older audio codecs.
### MPEG Transport Stream (MPEG-TS)
The SDK utilizes MPEG-TS as the container format for UDP streaming. MPEG-TS offers several advantages:
- Designed specifically for transmission over potentially unreliable networks
- Built-in error correction capabilities
- Support for multiplexing multiple audio and video streams
- Low latency characteristics ideal for live streaming
### FFMPEG Integration
VisioForge SDKs leverage the power of FFMPEG for UDP streaming, ensuring:
- High performance encoding and streaming
- Wide compatibility with various networks and receiving clients
- Reliable packet handling and stream management
### Unicast and Multicast Support
- **Unicast**: Point-to-point transmission from a single sender to a single receiver
- **Multicast**: Efficient distribution of the same content to multiple recipients simultaneously without duplicating bandwidth at the source
## Technical Implementation Details
UDP streaming in VisioForge SDKs involves several key technical components:
1. **Video Encoding**: Source video is compressed using H.264 or HEVC encoders with configurable parameters for bitrate, resolution, and frame rate.
2. **Audio Encoding**: Audio streams are processed through AAC encoders with adjustable quality settings.
3. **Multiplexing**: Video and audio streams are combined into a single MPEG-TS container.
4. **Packetization**: The MPEG-TS stream is divided into UDP packets of appropriate size for network transmission.
5. **Transmission**: Packets are sent over the network to specified unicast or multicast addresses.
The implementation prioritizes low latency while maintaining sufficient quality for professional applications. Advanced buffering mechanisms help manage network jitter and ensure smooth playback at the receiving end.
## Windows-only UDP Output Implementation
[!badge variant="dark" size="xl" text="VideoCaptureCore"] [!badge variant="dark" size="xl" text="VideoEditCore"]
### Step 1: Enable Network Streaming
The first step is to enable network streaming functionality in your application. This is done by setting the `Network_Streaming_Enabled` property to true:
```cs
VideoCapture1.Network_Streaming_Enabled = true;
```
### Step 2: Configure Audio Streaming (Optional)
If your application requires audio streaming alongside video, enable it with:
```cs
VideoCapture1.Network_Streaming_Audio_Enabled = true;
```
### Step 3: Set the Streaming Format
Specify UDP as the streaming format by setting the `Network_Streaming_Format` property to `UDP_FFMPEG_EXE`:
```cs
VideoCapture1.Network_Streaming_Format = NetworkStreamingFormat.UDP_FFMPEG_EXE;
```
### Step 4: Configure the UDP Stream URL
Set the destination URL for your UDP stream. For a basic unicast stream to localhost:
```cs
VideoCapture1.Network_Streaming_URL = "udp://127.0.0.1:10000?pkt_size=1316";
```
The `pkt_size` parameter defines the UDP packet size. The value 1316 is optimized for most network environments, allowing for efficient transmission while minimizing fragmentation.
### Step 5: Multicast Configuration (Optional)
For multicast streaming to multiple receivers, use a multicast address (typically in the range 224.0.0.0 to 239.255.255.255):
```cs
VideoCapture1.Network_Streaming_URL = "udp://239.101.101.1:1234?ttl=1&pkt_size=1316";
```
The additional parameters include:
- **ttl**: Time-to-live value that determines how many network hops the packets can traverse
- **pkt_size**: Packet size as explained above
### Step 6: Configure Output Settings
Finally, configure the streaming output parameters using the `FFMPEGEXEOutput` class:
```cs
var ffmpegOutput = new FFMPEGEXEOutput();
ffmpegOutput.FillDefaults(DefaultsProfile.MP4_H264_AAC, true);
ffmpegOutput.OutputMuxer = OutputMuxer.MPEGTS;
VideoCapture1.Network_Streaming_Output = ffmpegOutput;
```
This code:
1. Creates a new FFMPEG output configuration
2. Applies default settings for H.264 video and AAC audio
3. Specifies MPEG-TS as the container format
4. Assigns this configuration to the streaming output
## Advanced Configuration Options
### Bitrate Management
For optimal streaming performance, consider adjusting the video and audio bitrates based on your network capacity:
```cs
ffmpegOutput.VideoSettings.Bitrate = 2500000; // 2.5 Mbps for video
ffmpegOutput.AudioSettings.Bitrate = 128000; // 128 kbps for audio
```
### Resolution and Frame Rate
Lower resolutions and frame rates reduce bandwidth requirements:
```cs
VideoCapture1.Video_Resize_Enabled = true;
VideoCapture1.Video_Resize_Width = 1280; // 720p resolution
VideoCapture1.Video_Resize_Height = 720;
VideoCapture1.Video_FrameRate = 30; // 30 fps
```
### Buffer Size Configuration
Adjusting buffer sizes can help manage latency vs. stability trade-offs:
```cs
VideoCapture1.Network_Streaming_BufferSize = 8192; // in KB
```
## Best Practices for UDP Streaming
### Network Considerations
1. **Bandwidth Assessment**: Ensure sufficient bandwidth for your target quality. As a guideline:
- SD quality (480p): 1-2 Mbps
- HD quality (720p): 2.5-4 Mbps
- Full HD (1080p): 4-8 Mbps
2. **Network Stability**: UDP doesn't guarantee packet delivery. In unstable networks, consider:
- Reducing resolution or bitrate
- Implementing application-level error recovery
- Using forward error correction when available
3. **Firewall Configuration**: Ensure that UDP ports are open on both sender and receiver firewalls.
### Performance Optimization
1. **Hardware Acceleration**: When available, enable hardware acceleration for encoding:
```cs
ffmpegOutput.VideoSettings.HWAcceleration = HWAcceleration.Auto;
```
2. **Keyframe Intervals**: For lower latency, reduce keyframe (I-frame) intervals:
```cs
ffmpegOutput.VideoSettings.KeyframeInterval = 60; // One keyframe every 2 seconds at 30 fps
```
3. **Preset Selection**: Choose encoding presets based on your CPU capacity and latency requirements:
```cs
ffmpegOutput.VideoSettings.EncoderPreset = H264EncoderPreset.Ultrafast; // Lowest latency, higher bitrate
// or
ffmpegOutput.VideoSettings.EncoderPreset = H264EncoderPreset.Medium; // Balance between quality and CPU load
```
## Troubleshooting Common Issues
1. **Stream Not Receiving**: Verify network connectivity, port availability, and firewall settings.
2. **High Latency**: Check network congestion, reduce bitrate, or adjust buffer sizes.
3. **Poor Quality**: Increase bitrate, adjust encoding settings, or check for network packet loss.
4. **Audio/Video Sync Issues**: Ensure proper timestamp synchronization in your application.
## Conclusion
UDP streaming with VisioForge SDKs provides a powerful solution for real-time video and audio transmission with minimal latency. By leveraging H.264/HEVC video codecs, AAC audio, and MPEG-TS packaging, developers can create robust streaming applications suitable for a wide range of use cases.
The flexibility of the SDK allows for fine-tuning of all streaming parameters, enabling optimization for specific network conditions and quality requirements. Whether implementing a simple point-to-point stream or a complex multicast distribution system, VisioForge's UDP streaming capabilities provide the necessary tools for success.
---
Visit our [GitHub](https://github.com/visioforge/.Net-SDK-s-samples) page to get more code samples and working demonstrations of UDP streaming implementations.
---END OF PAGE---
# Local File: .\dotnet\general\network-streaming\wmv.md
---
title: WMV Network Streaming with .NET Development
description: Learn how to implement Windows Media Video (WMV) streaming in .NET applications. Step-by-step guide for developers covering setup, configuration, client connections, and performance optimization for network video streaming.
sidebar_label: Windows Media Video
---
# Windows Media Video (WMV) Network Streaming Implementation Guide
[!badge size="xl" target="blank" variant="info" text="Video Capture SDK .Net"](https://www.visioforge.com/video-capture-sdk-net) [!badge variant="dark" size="xl" text="VideoCaptureCore"]
## Introduction to WMV Streaming Technology
Windows Media Video (WMV) represents a versatile and powerful streaming technology developed by Microsoft. As an integral component of the Windows Media framework, WMV has established itself as a reliable solution for efficiently delivering video content across networks. This format utilizes sophisticated compression algorithms that substantially reduce file sizes while maintaining acceptable visual quality, making it particularly well-suited for streaming applications where bandwidth optimization is critical.
The WMV format supports an extensive range of video resolutions and bitrates, allowing developers to tailor their streaming implementations to accommodate varying network conditions and end-user requirements. This adaptability makes WMV an excellent choice for applications that need to serve diverse client environments with different connectivity constraints.
## Technical Overview of WMV Format
### Key Features and Capabilities
WMV implements the Advanced Systems Format (ASF) container, which provides several technical advantages for streaming applications:
- **Efficient compression**: Employs codec technology that balances quality with file size
- **Scalable bitrate adjustment**: Adapts to available bandwidth conditions
- **Error resilience**: Built-in mechanisms for packet loss recovery
- **Content protection**: Supports Digital Rights Management (DRM) when required
- **Metadata support**: Allows embedding of descriptive information about the stream
### Technical Specifications
| Feature | Specification |
|---------|---------------|
| Codec | VC-1 (primarily) |
| Container | ASF (Advanced Systems Format) |
| Supported resolutions | Up to 4K UHD (depending on profile) |
| Bitrate range | 10 Kbps to 20+ Mbps |
| Audio support | WMA (Windows Media Audio) |
| Streaming protocols | HTTP, RTSP, MMS |
## Windows-Only WMV Streaming Implementation
[!badge variant="dark" size="xl" text="VideoCaptureCore"]
The VisioForge SDK provides a robust framework for implementing WMV streaming in Windows environments. This implementation allows applications to broadcast video over networks while simultaneously capturing to a file if desired.
### Implementation Prerequisites
Before implementing WMV streaming in your application, ensure the following requirements are met:
1. Your development environment includes the VisioForge Video Capture SDK
2. Required redistributables are installed (details provided in the Deployment section)
3. Your application targets Windows operating systems
4. Network ports are properly configured and accessible
### Step-by-Step Implementation Guide
#### 1. Initialize the Video Capture Component
Begin by setting up the core video capture component in your application:
```cs
// Initialize the VideoCapture component
var VideoCapture1 = new VisioForge.Core.VideoCapture();
// Configure basic capture settings (adjust as needed)
// ...
```
#### 2. Enable Network Streaming
To activate network streaming functionality, you need to enable it explicitly and set the format to WMV:
```cs
// Enable network streaming
VideoCapture1.Network_Streaming_Enabled = true;
// Set the streaming format to WMV
VideoCapture1.Network_Streaming_Format = NetworkStreamingFormat.WMV;
```
#### 3. Configure WMV Output Settings
Create and configure a WMV output object with appropriate settings:
```cs
// Create WMV output configuration
var wmvOutput = new WMVOutput();
// Optional: Configure WMV-specific settings
wmvOutput.Bitrate = 2000000; // 2 Mbps
wmvOutput.KeyFrameInterval = 3; // seconds between keyframes
wmvOutput.Quality = 85; // Quality setting (0-100)
// Apply WMV output configuration
VideoCapture1.Network_Streaming_Output = wmvOutput;
// Set network port for client connections
VideoCapture1.Network_Streaming_Network_Port = 12345;
// Optional: Set maximum number of concurrent clients (default is 10)
VideoCapture1.Network_Streaming_Max_Clients = 25;
```
#### 4. Start the Streaming Process
Once everything is configured, you can start the streaming process:
```cs
// Start the streaming process
try {
VideoCapture1.Start();
// The streaming URL is now available for clients
string streamingUrl = VideoCapture1.Network_Streaming_URL;
// Display or log the streaming URL for client connections
Console.WriteLine($"Streaming available at: {streamingUrl}");
}
catch (Exception ex) {
// Handle any exceptions during streaming initialization
Console.WriteLine($"Streaming error: {ex.Message}");
}
```
### Advanced Configuration Options
#### Custom WMV Profiles
For more precise control over your WMV stream, you can implement custom encoding profiles:
```cs
// Create custom WMV profile
var customProfile = new WMVProfile();
customProfile.VideoCodec = WMVVideoCodec.WMV9;
customProfile.AudioCodec = WMVAudioCodec.WMAudioV9;
customProfile.VideoBitrate = 1500000; // 1.5 Mbps
customProfile.AudioBitrate = 128000; // 128 Kbps
customProfile.BufferWindow = 5000; // Buffer window in milliseconds
// Apply custom profile
wmvOutput.Profile = customProfile;
VideoCapture1.Network_Streaming_Output = wmvOutput;
```
## Client-Side Connection Implementation
Clients can connect to the WMV stream using Windows Media Player or any application that supports the Windows Media streaming protocol. The connection URL follows this format:
```
http://[server_ip]:[port]/
```
For example:
```
http://192.168.1.100:12345/
```
### Sample Client Connection Code
For programmatic connections to the WMV stream in client applications:
```cs
// Client-side WMV stream connection using Windows Media Player control
using System.Windows.Forms;
public partial class StreamViewerForm : Form
{
public StreamViewerForm(string streamUrl)
{
InitializeComponent();
// Assuming you have a Windows Media Player control named 'wmPlayer' on your form
wmPlayer.URL = streamUrl;
wmPlayer.Ctlcontrols.play();
}
}
```
## Performance Optimization
When implementing WMV network streaming, consider these optimization strategies:
1. **Adjust bitrate based on network conditions**: Lower bitrates for constrained networks
2. **Balance keyframe intervals**: Frequent keyframes improve seek performance but increase bandwidth
3. **Monitor CPU usage**: WMV encoding can be CPU-intensive; adjust quality settings accordingly
4. **Implement network quality detection**: Adapt streaming parameters dynamically
5. **Consider buffer settings**: Larger buffers improve stability but increase latency
## Troubleshooting Common Issues
| Issue | Possible Solution |
|-------|-------------------|
| Connection failures | Verify network port is open in firewall settings |
| Poor video quality | Increase bitrate or adjust compression settings |
| High CPU usage | Reduce resolution or frame rate |
| Client buffering | Adjust buffer window settings or reduce bitrate |
| Authentication errors | Verify credentials on both server and client |
## Deployment Requirements
### Required Redistributables
To successfully deploy applications using WMV streaming functionality, include the following redistributable packages:
- Video capture redist [x86](https://www.nuget.org/packages/VisioForge.DotNet.Core.Redist.VideoCapture.x86/) [x64](https://www.nuget.org/packages/VisioForge.DotNet.Core.Redist.VideoCapture.x64/)
### Installation Commands
Using NuGet Package Manager:
```
Install-Package VisioForge.DotNet.Core.Redist.VideoCapture.x64
```
Or for 32-bit systems:
```
Install-Package VisioForge.DotNet.Core.Redist.VideoCapture.x86
```
## Conclusion
WMV network streaming provides a reliable way to broadcast video content across networks in Windows environments. The VisioForge SDK simplifies implementation with its comprehensive API while giving developers fine-grained control over streaming parameters. By following the guidelines in this document, you can create robust streaming applications that deliver high-quality video content to multiple clients simultaneously.
For more advanced implementations and additional code samples, visit our [GitHub repository](https://github.com/visioforge/.Net-SDK-s-samples).
---END OF PAGE---
# Local File: .\dotnet\general\network-streaming\youtube.md
---
title: YouTube Live Streaming Integration for .NET Apps
description: Learn how to implement YouTube RTMP streaming in .NET applications with step-by-step guidance on video encoders, audio configuration, and cross-platform optimization. Includes code examples and best practices for developers.
sidebar_label: YouTube Streaming
---
# YouTube Live Streaming with VisioForge SDKs
## Introduction to YouTube Streaming Integration
The YouTube RTMP output functionality in VisioForge SDKs enables developers to create robust .NET applications that stream high-quality video content directly to YouTube. This implementation leverages various video and audio encoders to optimize streaming performance across different hardware configurations and platforms. This comprehensive guide provides detailed instructions on setting up, configuring, and troubleshooting YouTube streaming in your applications.
## Supported SDK Platforms
[!badge variant="dark" size="xl" text="VideoCaptureCoreX"] [!badge variant="dark" size="xl" text="VideoEditCoreX"] [!badge variant="dark" size="xl" text="MediaBlocksPipeline"]
All major VisioForge SDK platforms provide cross-platform capabilities for YouTube streaming, ensuring consistent functionality across Windows, macOS, and other operating systems.
## Understanding the YouTubeOutput Class
The `YouTubeOutput` class serves as the primary interface for YouTube streaming configuration, offering extensive customization options including:
- **Video encoder selection and configuration**: Choose from multiple hardware-accelerated and software-based encoders
- **Audio encoder selection and configuration**: Configure AAC audio encoders with custom parameters
- **Custom video and audio processing**: Apply filters and transformations before streaming
- **YouTube-specific sink settings**: Fine-tune streaming parameters specific to YouTube's requirements
## Getting Started: Basic Setup Process
### Stream Key Configuration
The foundation of any YouTube streaming implementation begins with your YouTube stream key. This authentication token connects your application to your YouTube channel:
```csharp
// Initialize YouTube output with your stream key
var youtubeOutput = new YouTubeOutput("your-youtube-stream-key");
```
## Video Encoder Configuration Options
### Comprehensive Video Encoder Support
The SDK provides support for multiple video encoders, each optimized for different hardware environments and performance requirements:
| Encoder Type | Platform/Hardware | Performance Characteristics |
|--------------|-------------------|----------------------------|
| OpenH264 | Cross-platform (software) | CPU-intensive, widely compatible |
| NVENC H264 | NVIDIA GPUs | Hardware-accelerated, reduced CPU usage |
| QSV H264 | Intel CPUs with Quick Sync | Hardware-accelerated, efficient |
| AMF H264 | AMD GPUs | Hardware-accelerated for AMD hardware |
| HEVC/H265 | Various (where supported) | Higher compression efficiency |
### Dynamic Encoder Selection
The system intelligently selects default encoders based on the platform (OpenH264 on most platforms, Apple Media H264 on macOS). Developers can override these defaults to leverage specific hardware capabilities:
```csharp
// Example: Using NVIDIA NVENC encoder if available
if (NVENCH264EncoderSettings.IsAvailable())
{
youtubeOutput.Video = new NVENCH264EncoderSettings();
}
```
### Configuring Video Encoding Parameters
Each encoder supports customization of various parameters to optimize streaming quality and performance:
```csharp
var videoSettings = new OpenH264EncoderSettings
{
Bitrate = 4500000, // 4.5 Mbps
KeyframeInterval = 60, // Keyframe every 2 seconds at 30fps
// Add other encoder-specific settings as needed
};
youtubeOutput.Video = videoSettings;
```
## Audio Encoder Configuration
### Supported AAC Audio Encoders
The SDK supports multiple AAC audio encoders to ensure optimal audio quality across different platforms:
- **VO-AAC**: Default for non-Windows platforms, providing consistent audio encoding
- **AVENC AAC**: Alternative cross-platform option with different performance characteristics
- **MF AAC**: Windows-specific encoder leveraging Media Foundation
### Audio Encoder Configuration Example
```csharp
// Example: Configure audio encoder settings
var audioSettings = new VOAACEncoderSettings
{
Bitrate = 128000, // 128 kbps
SampleRate = 48000 // 48 kHz (YouTube recommended)
};
youtubeOutput.Audio = audioSettings;
```
## Platform-Specific Optimization Strategies
### Windows-Specific Features
- Leverages Media Foundation (MF) encoders for optimal Windows performance
- Provides extended HEVC/H265 encoding capabilities
- Defaults to MF AAC for audio encoding, optimized for the Windows platform
### macOS Implementation Considerations
- Automatically utilizes Apple Media H264 encoder for native performance
- Implements VO-AAC for audio encoding with macOS optimization
### Cross-Platform Compatibility Layer
- Falls back to OpenH264 for video on platforms without specific optimizations
- Utilizes VO-AAC for consistent audio encoding across diverse environments
## Best Practices for Optimal Streaming
### Hardware-Aware Encoder Selection
- Always verify encoder availability before implementing hardware-accelerated options
- Implement fallback mechanisms to OpenH264 when specialized hardware is unavailable
- Consider platform-specific encoder capabilities when designing cross-platform applications
### YouTube-Optimized Stream Settings
- Adhere to YouTube's recommended bitrates for your target resolution
- Implement the standard 2-second keyframe interval (60 frames at 30fps)
- Configure 48 kHz audio sample rate to meet YouTube's audio specifications
### Robust Error Management
- Develop comprehensive error handling for connection issues
- Implement continuous monitoring of encoder performance
- Create diagnostic tools to evaluate stream health during operation
## Complete Implementation Examples
### VideoCaptureCoreX/VideoEditCoreX Integration
This example demonstrates a complete YouTube streaming implementation with error handling for VideoCaptureCoreX/VideoEditCoreX:
```csharp
try
{
var youtubeOutput = new YouTubeOutput("your-stream-key");
// Configure video encoding
if (NVENCH264EncoderSettings.IsAvailable())
{
youtubeOutput.Video = new NVENCH264EncoderSettings
{
Bitrate = 4500000,
KeyframeInterval = 60
};
}
// Configure audio encoding
youtubeOutput.Audio = new MFAACEncoderSettings
{
Bitrate = 128000,
SampleRate = 48000
};
// Additional sink settings if needed
youtubeOutput.Sink.CustomProperty = "value";
// Add the output to the video capture instance
core.Outputs_Add(youtubeOutput, true); // core is an instance of VideoCaptureCoreX
// Or set the output for the video edit instance
videoEdit.Output_Format = youtubeOutput; // videoEdit is an instance of VideoEditCoreX
}
catch (Exception ex)
{
// Handle initialization errors
Console.WriteLine($"Failed to initialize YouTube output: {ex.Message}");
}
```
### Media Blocks SDK Implementation
For developers using the Media Blocks SDK, this example shows how to connect encoder components with the YouTube sink:
```csharp
// Create the YouTube sink block (using RTMP)
var youtubeSinkBlock = YouTubeSinkBlock(new YouTubeSinkSettings("streaming key"));
// Connect the video encoder to the sink block
pipeline.Connect(h264Encoder.Output, youtubeSinkBlock.CreateNewInput(MediaBlockPadMediaType.Video));
// Connect the audio encoder to the sink block
pipeline.Connect(aacEncoder.Output, youtubeSinkBlock.CreateNewInput(MediaBlockPadMediaType.Audio));
```
## Troubleshooting Common Issues
### Encoder Initialization Problems
- Verify hardware encoder availability through system diagnostics
- Ensure system meets all requirements for your chosen encoder
- Confirm proper installation of hardware-specific drivers for GPU acceleration
### Stream Connection Failures
- Validate stream key format and expiration status
- Test network connectivity to YouTube's streaming servers
- Verify YouTube service status through official channels
### Performance Optimization
- Monitor system resource utilization during streaming sessions
- Adjust encoding bitrates and settings based on available resources
- Consider switching to hardware acceleration when CPU usage is excessive
## Additional Resources and Documentation
- [Official YouTube Live Streaming Documentation](https://support.google.com/youtube/topic/9257891)
- [YouTube Technical Stream Requirements](https://support.google.com/youtube/answer/2853702)
By leveraging these detailed configuration options and best practices, developers can create robust YouTube streaming applications using VisioForge SDKs that deliver high-quality content while optimizing system resource utilization across multiple platforms.
---END OF PAGE---
# Local File: .\dotnet\general\output-formats\avi.md
---
title: AVI File Output Guide for .NET SDK Development
description: Learn how to implement AVI file output in .NET applications with step-by-step examples. Covers video and audio encoding options, hardware acceleration, cross-platform support, and best practices for developers working with multimedia container formats.
sidebar_label: AVI
---
# AVI File Output in VisioForge .NET SDKs
[!badge size="xl" target="blank" variant="info" text="Video Capture SDK .Net"](https://www.visioforge.com/video-capture-sdk-net) [!badge size="xl" target="blank" variant="info" text="Video Edit SDK .Net"](https://www.visioforge.com/video-edit-sdk-net) [!badge size="xl" target="blank" variant="info" text="Media Blocks SDK .Net"](https://www.visioforge.com/media-blocks-sdk-net)
AVI (Audio Video Interleave) is a Microsoft-developed multimedia container format that stores both audio and video data in a single file with synchronized playback. It supports both compressed and uncompressed data, offering flexibility while sometimes resulting in larger file sizes.
## Technical Overview of AVI Format
AVI files use a RIFF (Resource Interchange File Format) structure to organize data. This format divides content into chunks, with each chunk containing either audio or video frames. Key technical aspects include:
- Container format supporting multiple audio and video codecs
- Interleaved audio and video data for synchronized playback
- Maximum file size of 4GB in standard AVI (extended to 16EB in OpenDML AVI)
- Support for multiple audio tracks and subtitles
- Widely supported across platforms and media players
Despite newer container formats like MP4 and MKV offering more features, AVI remains valuable for certain workflows due to its simplicity and compatibility with legacy systems.
## Cross-Platform AVI Implementation
[!badge variant="dark" size="xl" text="VideoCaptureCoreX"] [!badge variant="dark" size="xl" text="VideoEditCoreX"] [!badge variant="dark" size="xl" text="MediaBlocksPipeline"]
The [AVIOutput](https://api.visioforge.org/dotnet/api/VisioForge.Core.Types.Output.AVIOutput.html) class provides a robust way to configure and generate AVI files with various encoding options.
### Setting Up AVI Output
Create an `AVIOutput` instance by specifying a target filename:
```csharp
var aviOutput = new AVIOutput("output_video.avi");
```
This constructor automatically initializes default encoders:
- Video: OpenH264 encoder
- Audio: MP3 encoder
### Video Encoder Options
Configure video encoding through the `Video` property with several available encoders:
#### Standard Encoder
```csharp
// Open-source H.264 encoder for general use
aviOutput.Video = new OpenH264EncoderSettings();
```
#### Hardware-Accelerated Encoders
```csharp
// NVIDIA GPU acceleration
aviOutput.Video = new NVENCH264EncoderSettings(); // H.264
aviOutput.Video = new NVENCHEVCEncoderSettings(); // HEVC
// Intel Quick Sync acceleration
aviOutput.Video = new QSVH264EncoderSettings(); // H.264
aviOutput.Video = new QSVHEVCEncoderSettings(); // HEVC
// AMD GPU acceleration
aviOutput.Video = new AMFH264EncoderSettings(); // H.264
aviOutput.Video = new AMFHEVCEncoderSettings(); // HEVC
```
#### Special Purpose Encoder
```csharp
// Motion JPEG for high-quality frame-by-frame encoding
aviOutput.Video = new MJPEGEncoderSettings();
```
### Audio Encoder Options
The `Audio` property lets you configure audio encoding settings:
```csharp
// Standard MP3 encoding
aviOutput.Audio = new MP3EncoderSettings();
// AAC encoding options
aviOutput.Audio = new VOAACEncoderSettings();
aviOutput.Audio = new AVENCAACEncoderSettings();
aviOutput.Audio = new MFAACEncoderSettings(); // Windows only
```
### Integration with SDK Components
#### Video Capture SDK
```csharp
var core = new VideoCaptureCoreX();
core.Outputs_Add(aviOutput, true);
```
#### Video Edit SDK
```csharp
var core = new VideoEditCoreX();
core.Output_Format = aviOutput;
```
#### Media Blocks SDK
```csharp
var aac = new VOAACEncoderSettings();
var h264 = new OpenH264EncoderSettings();
var aviSinkSettings = new AVISinkSettings("output.avi");
var aviOutput = new AVIOutputBlock(aviSinkSettings, h264, aac);
```
### File Management
You can get or change the output filename after initialization:
```csharp
// Get current filename
string currentFile = aviOutput.GetFilename();
// Set new filename
aviOutput.SetFilename("new_output.avi");
```
### Complete Example
Here's a full example showing how to configure AVI output with hardware acceleration:
```csharp
// Create AVI output with specified filename
var aviOutput = new AVIOutput("high_quality_output.avi");
// Configure hardware-accelerated NVIDIA H.264 encoding
aviOutput.Video = new NVENCH264EncoderSettings();
// Configure AAC audio encoding
aviOutput.Audio = new VOAACEncoderSettings();
```
## Windows-Specific AVI Implementation
[!badge variant="dark" size="xl" text="VideoCaptureCore"] [!badge variant="dark" size="xl" text="VideoEditCore"]
The Windows-only components provide additional options for AVI output configuration.
### Basic Setup
Create the AVIOutput object:
```csharp
var aviOutput = new AVIOutput();
```
### Configuration Methods
#### Method 1: Using Settings Dialog
```csharp
var aviSettingsDialog = new AVISettingsDialog(
VideoCapture1.Video_Codecs.ToArray(),
VideoCapture1.Audio_Codecs.ToArray());
aviSettingsDialog.ShowDialog(this);
aviSettingsDialog.SaveSettings(ref aviOutput);
```
#### Method 2: Programmatic Configuration
First, get available codecs:
```csharp
// Populate codec lists
foreach (string codec in VideoCapture1.Video_Codecs)
{
cbVideoCodecs.Items.Add(codec);
}
foreach (string codec in VideoCapture1.Audio_Codecs)
{
cbAudioCodecs.Items.Add(codec);
}
```
Then set video and audio settings:
```csharp
// Configure video
aviOutput.Video_Codec = cbVideoCodecs.Text;
// Configure audio
aviOutput.ACM.Name = cbAudioCodecs.Text;
aviOutput.ACM.Channels = 2;
aviOutput.ACM.BPS = 16;
aviOutput.ACM.SampleRate = 44100;
aviOutput.ACM.UseCompression = true;
```
### Implementation
Apply settings and start capture:
```csharp
// Set output format
VideoCapture1.Output_Format = aviOutput;
// Set capture mode
VideoCapture1.Mode = VideoCaptureMode.VideoCapture;
// Set output file path
VideoCapture1.Output_Filename = "output.avi";
// Start capture
await VideoCapture1.StartAsync();
```
## Best Practices for AVI Output
### Encoder Selection Guidelines
1. **General-Purpose Applications**
- OpenH264 provides good compatibility and quality
- Suitable for most standard development scenarios
2. **Performance-Critical Applications**
- Use hardware-accelerated encoders (NVENC, QSV, AMF) when available
- Offers significant performance advantages with minimal quality loss
3. **Quality-Focused Applications**
- HEVC encoders provide better compression at similar quality
- MJPEG for scenarios requiring frame-by-frame accuracy
### Audio Encoding Recommendations
- MP3: Good compatibility with reasonable quality
- AAC: Better quality-to-size ratio, preferred for newer applications
- Choose based on your target platform and quality requirements
### Platform Considerations
- Some encoders are platform-specific:
- MF HEVC and MF AAC encoders are Windows-only
- Hardware-accelerated encoders require appropriate GPU support
- Check encoder availability with `GetVideoEncoders()` and `GetAudioEncoders()` when developing cross-platform applications
### Error Handling Tips
- Always verify encoder availability before use
- Implement fallback encoders for platform-specific scenarios
- Check file write permissions before setting output paths
## Troubleshooting Common Issues
### Codec Not Found
If you encounter "Codec not found" errors:
```csharp
// Check if codec is available before using
if (!VideoCapture1.Video_Codecs.Contains("H264"))
{
// Fall back to another codec or show error
MessageBox.Show("H264 codec not available. Please install required codecs.");
return;
}
```
### File Write Permission Issues
Handle permission-related errors:
```csharp
try
{
// Test write permissions
using (var fs = File.Create(outputPath, 1, FileOptions.DeleteOnClose)) { }
// If successful, proceed with AVI output
aviOutput.SetFilename(outputPath);
}
catch (UnauthorizedAccessException)
{
// Handle permission error
MessageBox.Show("Cannot write to the specified location. Please select another folder.");
}
```
### Memory Issues with Large Files
For handling large file recording:
```csharp
// Split recording into multiple files when size limit is reached
void SetupLargeFileRecording()
{
var aviOutput = new AVIOutput("recording_part1.avi");
// Set file size limit (3.5GB to stay under 4GB AVI limit)
aviOutput.MaxFileSize = 3.5 * 1024 * 1024 * 1024;
// Enable auto-split functionality
aviOutput.AutoSplit = true;
aviOutput.SplitNamingPattern = "recording_part{0}.avi";
// Apply to Video Capture
var core = new VideoCaptureCoreX();
core.Outputs_Add(aviOutput, true);
}
```
## Required Dependencies
### Video Capture SDK .Net
- [x86 Redist](https://www.nuget.org/packages/VisioForge.DotNet.Core.Redist.VideoCapture.x86/)
- [x64 Redist](https://www.nuget.org/packages/VisioForge.DotNet.Core.Redist.VideoCapture.x64/)
### Video Edit SDK .Net
- [x86 Redist](https://www.nuget.org/packages/VisioForge.DotNet.Core.Redist.VideoEdit.x86/)
- [x64 Redist](https://www.nuget.org/packages/VisioForge.DotNet.Core.Redist.VideoEdit.x64/)
## Additional Resources
- [VisioForge API Documentation](https://api.visioforge.org/dotnet/)
- [Sample Projects Repository](https://github.com/visioforge/.Net-SDK-s-samples)
- [Support and Community Forums](https://support.visioforge.com/)
---END OF PAGE---
# Local File: .\dotnet\general\output-formats\custom.md
---
title: DirectShow Custom Video Format Integration in .NET
description: Learn how to implement custom video output formats using DirectShow filters in .NET applications. Step-by-step guide for developers to create specialized video processing pipelines with codec configuration and format handling.
sidebar_label: Custom Output Formats
---
# Creating Custom Video Output Formats with DirectShow Filters
[!badge size="xl" target="blank" variant="info" text="Video Capture SDK .Net"](https://www.visioforge.com/video-capture-sdk-net) [!badge size="xl" target="blank" variant="info" text="Video Edit SDK .Net"](https://www.visioforge.com/video-edit-sdk-net)
[!badge variant="dark" size="xl" text="VideoCaptureCore"] [!badge variant="dark" size="xl" text="VideoEditCore"]
## Overview
Working with video in .NET applications often requires custom output formats to meet specific project requirements. The VisioForge SDKs provide powerful capabilities to implement custom format outputs using DirectShow filters, giving developers precise control over audio and video processing pipelines.
This guide demonstrates practical techniques for implementing custom output formats that work seamlessly with both the Video Capture SDK .NET and Video Edit SDK .NET, allowing you to tailor your video applications to exact specifications.
## Why Use Custom Output Formats?
Custom output formats offer several advantages for .NET developers:
- Support for specialized video codecs not available in standard formats
- Fine-grained control over video and audio compression settings
- Integration with third-party DirectShow filters
- Ability to create proprietary or industry-specific output formats
- Optimization for specific use cases (streaming, archiving, editing)
## Getting Started with CustomOutput
The `CustomOutput` class is the cornerstone for configuring custom output settings in VisioForge SDKs. This class enables you to define and configure the filters used in your video processing pipeline.
Start by initializing a new instance:
```cs
var customOutput = new CustomOutput();
```
While our examples use the `VideoCaptureCore` class, developers using Video Edit SDK .NET can apply the same techniques with `VideoEditCore`.
## Implementation Strategies
There are two primary approaches to implementing custom format output with DirectShow filters:
### Strategy 1: Three-Component Pipeline
This modular approach divides the processing pipeline into three distinct components:
1. Audio codec
2. Video codec
3. Multiplexer (file format container)
This separation provides maximum flexibility and control over each stage of the process. You can use either standard DirectShow filters or specialized codecs for audio and video components.
#### Retrieving Available Codecs
Begin by populating your UI with available codecs and filters:
```cs
// Populate video codec options
foreach (string codec in VideoCapture1.Video_Codecs)
{
videoCodecDropdown.Items.Add(codec);
}
// Populate audio codec options
foreach (string codec in VideoCapture1.Audio_Codecs)
{
audioCodecDropdown.Items.Add(codec);
}
// Get all available DirectShow filters
foreach (string filter in VideoCapture1.DirectShow_Filters)
{
directShowAudioFilters.Items.Add(filter);
directShowVideoFilters.Items.Add(filter);
multiplexerFilters.Items.Add(filter);
fileWriterFilters.Items.Add(filter);
}
```
#### Configuring the Pipeline Components
Next, set up your video and audio processing components based on user selections:
```cs
// Set up video codec
if (useStandardVideoCodec.Checked)
{
customOutput.Video_Codec = videoCodecDropdown.Text;
customOutput.Video_Codec_UseFiltersCategory = false;
}
else
{
customOutput.Video_Codec = directShowVideoFilters.Text;
customOutput.Video_Codec_UseFiltersCategory = true;
}
// Set up audio codec
if (useStandardAudioCodec.Checked)
{
customOutput.Audio_Codec = audioCodecDropdown.Text;
customOutput.Audio_Codec_UseFiltersCategory = false;
}
else
{
customOutput.Audio_Codec = directShowAudioFilters.Text;
customOutput.Audio_Codec_UseFiltersCategory = true;
}
// Configure the multiplexer
customOutput.MuxFilter_Name = multiplexerFilters.Text;
customOutput.MuxFilter_IsEncoder = false;
```
#### Custom File Writer Configuration
For specialized outputs that require a dedicated file writer:
```cs
// Enable special file writer if needed
customOutput.SpecialFileWriter_Needed = useCustomFileWriter.Checked;
customOutput.SpecialFileWriter_FilterName = fileWriterFilters.Text;
```
This approach gives you granular control over each stage of the encoding process, making it ideal for complex output requirements.
### Strategy 2: All-in-One Filter
This streamlined approach uses a single DirectShow filter that combines the functionality of the multiplexer, video codec, and audio codec. The SDK intelligently handles detection of the filter's capabilities, determining whether it:
- Can directly write files without assistance
- Requires the standard DirectShow File Writer filter
- Needs a specialized file writer filter
Implementation is straightforward:
```cs
// Populate filter options from available DirectShow filters
foreach (string filter in VideoCapture1.DirectShow_Filters)
{
filterDropdown.Items.Add(filter);
}
// Configure the all-in-one filter
customOutput.MuxFilter_Name = selectedFilter.Text;
customOutput.MuxFilter_IsEncoder = true;
// Set up specialized file writer if required
customOutput.SpecialFileWriter_Needed = requiresCustomWriter.Checked;
customOutput.SpecialFileWriter_FilterName = fileWriterFilter.Text;
```
This approach is simpler to implement but offers less granular control over individual components of the encoding process.
## Simplifying Configuration with Dialog UI
For a more user-friendly implementation, VisioForge provides a built-in settings dialog that handles the configuration of custom formats:
```cs
// Create and configure the settings dialog
CustomFormatSettingsDialog settingsDialog = new CustomFormatSettingsDialog(
VideoCapture1.Video_Codecs.ToArray(),
VideoCapture1.Audio_Codecs.ToArray(),
VideoCapture1.DirectShow_Filters.ToArray());
// Apply settings to your CustomOutput instance
settingsDialog.SaveSettings(ref customOutput);
```
This dialog provides a complete UI for configuring all aspects of custom output formats, saving development time while still offering full flexibility.
## Implementing the Output Process
After configuring your custom format settings, you need to apply them to your capture or edit process:
```cs
// Apply the custom format configuration
VideoCapture1.Output_Format = customOutput;
// Set the capture mode
VideoCapture1.Mode = VideoCaptureMode.VideoCapture;
// Specify output file path
VideoCapture1.Output_Filename = "output_video.mp4";
// Start the capture or encoding process
await VideoCapture1.StartAsync();
```
## Performance Considerations
When implementing custom output formats, keep these performance tips in mind:
- DirectShow filters vary in efficiency and resource usage
- Test your filter combinations with typical input media
- Some third-party filters may introduce additional latency
- Consider memory usage when processing high-resolution video
- Filter compatibility may vary across different Windows versions
## Required Packages
To use custom DirectShow filters, ensure you have the appropriate redistributable packages installed:
### Video Capture SDK .Net
- [x86 Package](https://www.nuget.org/packages/VisioForge.DotNet.Core.Redist.VideoCapture.x86/)
- [x64 Package](https://www.nuget.org/packages/VisioForge.DotNet.Core.Redist.VideoCapture.x64/)
### Video Edit SDK .Net
- [x86 Package](https://www.nuget.org/packages/VisioForge.DotNet.Core.Redist.VideoEdit.x86/)
- [x64 Package](https://www.nuget.org/packages/VisioForge.DotNet.Core.Redist.VideoEdit.x64/)
## Troubleshooting
Common issues when working with custom DirectShow filters include:
- Filter compatibility conflicts
- Missing codecs or dependencies
- Registration issues with COM components
- Memory leaks in third-party filters
- Performance bottlenecks with complex filter graphs
If you encounter problems, verify that all required filters are properly registered on your system and that you have the latest versions of both the filters and the VisioForge SDK.
## Conclusion
Custom output formats using DirectShow filters provide powerful capabilities for .NET developers working with video applications. Whether you choose the flexibility of a three-component pipeline or the simplicity of an all-in-one filter approach, VisioForge's SDKs give you the tools you need to create exactly the output format your application requires.
---
For more code samples and implementation examples, visit our [GitHub repository](https://github.com/visioforge/.Net-SDK-s-samples).
---END OF PAGE---
# Local File: .\dotnet\general\output-formats\ffmpeg-exe.md
---
title: FFMPEG Integration for VisioForge Video SDKs
description: Implement powerful FFMPEG.exe output in VisioForge .Net SDKs for video capture, editing, and processing. Learn how to configure video codecs, hardware acceleration, custom encoding parameters, and optimize performance for professional video applications.
sidebar_label: FFMPEG (exe)
---
# FFMPEG.exe Integration with VisioForge .Net SDKs
[!badge size="xl" target="blank" variant="info" text="Video Capture SDK .Net"](https://www.visioforge.com/video-capture-sdk-net) [!badge size="xl" target="blank" variant="info" text="Video Edit SDK .Net"](https://www.visioforge.com/video-edit-sdk-net)
[!badge variant="dark" size="xl" text="VideoCaptureCore"] [!badge variant="dark" size="xl" text="VideoEditCore"]
## Introduction to FFMPEG Output in .NET
This guide provides detailed instructions for implementing FFMPEG.exe output in Windows applications using VisioForge's .NET SDKs. The integration works with both [Video Capture SDK .NET](https://www.visioforge.com/video-capture-sdk-net) and [Video Edit SDK .NET](https://www.visioforge.com/video-edit-sdk-net), utilizing the `VideoCaptureCore` and `VideoEditCore` engines.
FFMPEG functions as a powerful multimedia framework that enables developers to output to a wide variety of video and audio formats. Its flexibility stems from extensive codec support and granular control over encoding parameters for both video and audio streams.
## Why Use FFMPEG with VisioForge SDKs?
Integrating FFMPEG into your VisioForge-powered applications provides several technical advantages:
- **Format versatility**: Support for virtually all modern container formats
- **Codec flexibility**: Access to both open-source and proprietary codecs
- **Performance optimization**: Options for CPU and GPU acceleration
- **Customization depth**: Fine-grained control over encoding parameters
- **Cross-platform compatibility**: Consistent output on different systems
## Key Features and Capabilities
### Supported Output Formats
FFMPEG supports numerous container formats, including but not limited to:
- MP4 (MPEG-4 Part 14)
- WebM (VP8/VP9 with Vorbis/Opus)
- MKV (Matroska)
- AVI (Audio Video Interleave)
- MOV (QuickTime)
- WMV (Windows Media Video)
- FLV (Flash Video)
- TS (MPEG Transport Stream)
### Hardware Acceleration Options
Modern video encoding benefits from hardware acceleration technologies that significantly improve encoding speed and efficiency:
- **Intel QuickSync**: Leverages Intel integrated graphics for H.264 and HEVC encoding
- **NVIDIA NVENC**: Utilizes NVIDIA GPUs for accelerated encoding (requires compatible NVIDIA graphics card)
- **AMD AMF/VCE**: Employs AMD graphics processors for encoding acceleration
### Video Codec Support
The integration offers access to multiple video codecs with customizable parameters:
- **H.264/AVC**: Industry standard with excellent quality-to-size ratio
- **H.265/HEVC**: Higher efficiency codec for 4K+ content
- **VP9**: Google's open video codec used in WebM
- **AV1**: Next-generation open codec (where supported)
- **MPEG-2**: Legacy codec for DVD and broadcast compatibility
- **ProRes**: Professional codec for editing workflows
## Implementation Process
### 1. Setting Up Your Development Environment
Before implementing FFMPEG output, ensure your development environment is properly configured:
1. Create a new or open an existing .NET project
2. Install the appropriate VisioForge SDK NuGet packages
3. Add FFMPEG dependency packages (detailed in the Dependencies section)
4. Import the necessary namespaces in your code:
```csharp
using VisioForge.Core.Types;
using VisioForge.Core.Types.VideoCapture;
using VisioForge.Core.Types.VideoEdit;
```
### 2. Initializing FFMPEG Output
Start by creating an instance of `FFMPEGEXEOutput` to handle your output configuration:
```csharp
var ffmpegOutput = new FFMPEGEXEOutput();
```
This object will serve as the container for all your encoding settings and preferences.
### 3. Configuring Output Container Format
Set your desired output container format using the `OutputMuxer` property:
```csharp
ffmpegOutput.OutputMuxer = OutputMuxer.MP4;
```
Other common container options include:
- `OutputMuxer.MKV` - For Matroska container
- `OutputMuxer.WebM` - For WebM format
- `OutputMuxer.AVI` - For AVI format
- `OutputMuxer.MOV` - For QuickTime container
### 4. Video Encoder Configuration
FFMPEG provides multiple video encoder options. Select and configure the appropriate encoder based on your requirements and available hardware:
#### Standard CPU-Based H.264 Encoding
```csharp
var videoEncoder = new H264MFSettings
{
Bitrate = 5000000,
RateControlMode = RateControlMode.CBR
};
ffmpegOutput.Video = videoEncoder;
```
#### Hardware-Accelerated NVIDIA Encoding
```csharp
var nvidiaEncoder = new H264NVENCSettings
{
Bitrate = 8000000, // 8 Mbps
};
ffmpegOutput.Video = nvidiaEncoder;
```
#### Hardware-Accelerated Intel QuickSync Encoding
```csharp
var intelEncoder = new H264QSVSettings
{
Bitrate = 6000000
};
ffmpegOutput.Video = intelEncoder;
```
#### HEVC/H.265 Encoding for Higher Efficiency
```csharp
var hevcEncoder = new HEVCQSVSettings
{
Bitrate = 3000000,
};
ffmpegOutput.Video = hevcEncoder;
```
### 5. Audio Encoder Configuration
Configure your audio encoding settings based on quality requirements and target platform compatibility:
```csharp
var audioEncoder = new BasicAudioSettings
{
Bitrate = 192000, // 192 kbps
Channels = 2, // Stereo
SampleRate = 48000, // 48 kHz - professional standard
Encoder = AudioEncoder.AAC,
Mode = AudioMode.CBR
};
ffmpegOutput.Audio = audioEncoder;
```
### 6. Final Configuration and Execution
Apply all settings and start the encoding process:
```csharp
// Apply format settings
core.Output_Format = ffmpegOutput;
// Set operation mode
core.Mode = VideoCaptureMode.VideoCapture; // For Video Capture SDK
// core.Mode = VideoEditMode.Convert; // For Video Edit SDK
// Set output path
core.Output_Filename = "output.mp4";
// Begin processing
await core.StartAsync();
```
## Required Dependencies
Install the following NuGet packages based on your target architecture to ensure proper functionality:
### Video Capture SDK Dependencies
```cmd
Install-Package VisioForge.DotNet.Core.Redist.VideoCapture.x64
Install-Package VisioForge.DotNet.Core.Redist.FFMPEGEXE.x64
```
For x86 targets:
```cmd
Install-Package VisioForge.DotNet.Core.Redist.VideoCapture.x86
Install-Package VisioForge.DotNet.Core.Redist.FFMPEGEXE.x86
```
### Video Edit SDK Dependencies
```cmd
Install-Package VisioForge.DotNet.Core.Redist.VideoEdit.x64
Install-Package VisioForge.DotNet.Core.Redist.FFMPEGEXE.x64
```
For x86 targets:
```cmd
Install-Package VisioForge.DotNet.Core.Redist.VideoEdit.x86
Install-Package VisioForge.DotNet.Core.Redist.FFMPEGEXE.x86
```
## Troubleshooting and Optimization
### Common Issues and Solutions
- **Codec not found errors**: Ensure you've installed the correct FFMPEG package with proper codec support
- **Hardware acceleration failures**: Verify GPU compatibility and driver versions
- **Performance issues**: Adjust thread count and encoding preset based on available CPU resources
- **Output quality problems**: Fine-tune bitrate, profile, and encoding parameters
### Performance Optimization Tips
- Use hardware acceleration when available
- Choose appropriate presets based on your quality/speed requirements
- Set reasonable bitrates based on content type and resolution
- Consider two-pass encoding for non-realtime scenarios requiring highest quality
## Additional Resources
For more code samples and implementation examples, visit our [GitHub repository](https://github.com/visioforge/.Net-SDK-s-samples).
To learn more about FFMPEG parameters and capabilities, refer to the [official FFMPEG documentation](https://ffmpeg.org/documentation.html).
---END OF PAGE---
# Local File: .\dotnet\general\output-formats\gif.md
---
title: GIF Animation Encoding for .NET Development
description: Learn how to implement and optimize GIF animation encoding in .NET applications. Explore frame rate control, resolution settings, and performance tuning with detailed code examples for both cross-platform and Windows environments.
sidebar_label: GIF
---
# GIF Encoder
[!badge size="xl" target="blank" variant="info" text="Video Capture SDK .Net"](https://www.visioforge.com/video-capture-sdk-net) [!badge size="xl" target="blank" variant="info" text="Video Edit SDK .Net"](https://www.visioforge.com/video-edit-sdk-net) [!badge size="xl" target="blank" variant="info" text="Media Blocks SDK .Net"](https://www.visioforge.com/media-blocks-sdk-net)
The GIF encoder is a component of the VisioForge SDK that enables video encoding to the GIF format. This document provides detailed information about the GIF encoder settings and implementation guidelines.
## Cross-platform GIF output
[!badge variant="dark" size="xl" text="VideoCaptureCoreX"] [!badge variant="dark" size="xl" text="VideoEditCoreX"] [!badge variant="dark" size="xl" text="MediaBlocksPipeline"]
The GIF encoder settings are managed through the `GIFEncoderSettings` class, which provides configuration options for controlling the encoding process.
### Properties
1. **Repeat**
- Type: `uint`
- Description: Controls the number of times the GIF animation will repeat
- Values:
- `-1`: Loop forever
- `0..n`: Finite number of repetitions
2. **Speed**
- Type: `int`
- Description: Controls the encoding speed
- Range: 1 to 30 (higher values result in faster encoding)
- Default: 10
## Implementation Guide
### Basic Usage
Here's a basic example of how to configure and use the GIF encoder:
```csharp
using VisioForge.Core.Types.X.VideoEncoders;
// Create and configure GIF encoder settings
var settings = new GIFEncoderSettings
{
Repeat = 0, // Play once
Speed = 15 // Set encoding speed to 15
};
```
### Advanced Configuration
For more controlled GIF encoding, you can adjust the settings based on your specific needs:
```csharp
// Configure for an infinitely looping GIF with maximum encoding speed
var settings = new GIFEncoderSettings
{
Repeat = uint.MaxValue, // Loop forever
Speed = 30 // Maximum encoding speed
};
// Configure for optimal quality
var qualitySettings = new GIFEncoderSettings
{
Repeat = 1, // Play twice
Speed = 1 // Slowest encoding speed for best quality
};
```
## Best Practices
1. **Speed Selection**
- For best quality, use lower speed values (1-5)
- For balanced quality and performance, use medium speed values (6-15)
- For fastest encoding, use higher speed values (16-30)
2. **Memory Considerations**
- Higher speed values consume more memory during encoding
- For large videos, consider using lower speed values to manage memory usage
3. **Loop Configuration**
- Use `Repeat = -1` for infinite loops
- Set specific repeat counts for presentation-style GIFs
- Use `Repeat = 0` for single-play GIFs
## Performance Optimization
When encoding videos to GIF format, consider these optimization strategies:
```csharp
// Optimize for web delivery
var webOptimizedSettings = new GIFEncoderSettings
{
Repeat = uint.MaxValue, // Infinite loop for web playback
Speed = 20 // Fast encoding for web content
};
// Optimize for quality
var qualityOptimizedSettings = new GIFEncoderSettings
{
Repeat = 1, // Single repeat
Speed = 3 // Slower encoding for better quality
};
```
### Example Implementation
Here's a complete example showing how to set up M4A output:
Add the M4A output to the Video Capture SDK core instance:
```csharp
var core = new VideoCaptureCoreX();
core.Outputs_Add(gifOutput, true);
```
Set the output format for the Video Edit SDK core instance:
```csharp
var core = new VideoEditCoreX();
core.Output_Format = gifOutput;
```
Create a Media Blocks GIF output instance:
```csharp
var gifSettings = new GIFEncoderSettings();
var gifOutput = new GIFEncoderBlock(gifSettings, "output.gif");
```
## Windows-only GIF output
[!badge variant="dark" size="xl" text="VideoCaptureCore"] [!badge variant="dark" size="xl" text="VideoEditCore"]
The `AnimatedGIFOutput` class is a specialized configuration class within the `VisioForge.Core.Types.Output` namespace that handles settings for generating animated GIF files. This class is designed to work with both video capture and video editing operations, implementing both `IVideoEditBaseOutput` and `IVideoCaptureBaseOutput` interfaces.
The primary purpose of this class is to provide a configuration container for controlling how video content is converted into animated GIF format. It allows users to specify key parameters such as frame rate and output dimensions, which are crucial for creating optimized animated GIFs from video sources.
### Properties
#### ForcedVideoHeight
- Type: `int`
- Purpose: Specifies a forced height for the output GIF
- Usage: Set this property when you need to resize the output GIF to a specific height, regardless of the input video dimensions
- Example: `gifOutput.ForcedVideoHeight = 480;`
#### ForcedVideoWidth
- Type: `int`
- Purpose: Specifies a forced width for the output GIF
- Usage: Set this property when you need to resize the output GIF to a specific width, regardless of the input video dimensions
- Example: `gifOutput.ForcedVideoWidth = 640;`
#### FrameRate
- Type: `VideoFrameRate`
- Default Value: 2 frames per second
- Purpose: Controls how many frames per second the output GIF will contain
- Note: The default value of 2 fps is chosen to balance file size and animation smoothness for typical GIF usage
### Constructor
```csharp
public AnimatedGIFOutput()
```
The constructor initializes a new instance with default settings:
- Sets the frame rate to 2 fps using `new VideoFrameRate(2)`
- All other properties are initialized to their default values
### Serialization Methods
#### Save()
- Returns: `string`
- Purpose: Serializes the current configuration to JSON format
- Usage: Use this method when you need to save or transfer the configuration
- Example:
```csharp
var gifOutput = new AnimatedGIFOutput();
gifOutput.ForcedVideoWidth = 800;
string jsonConfig = gifOutput.Save();
```
#### Load(string json)
- Parameters: `json` - A JSON string containing serialized configuration
- Returns: `AnimatedGIFOutput`
- Purpose: Creates a new instance from a JSON configuration string
- Usage: Use this method to restore a previously saved configuration
- Example:
```csharp
string jsonConfig = "..."; // Your saved JSON configuration
var gifOutput = AnimatedGIFOutput.Load(jsonConfig);
```
### Best Practices and Usage Guidelines
1. Frame Rate Considerations
- The default 2 fps is suitable for most basic animations
- Increase the frame rate for smoother animations, but be aware of file size implications
- Consider using higher frame rates (e.g., 10-15 fps) for complex motion
2. Resolution Settings
- Only set ForcedVideoWidth/Height when you specifically need to resize
- Maintain aspect ratio by setting width and height proportionally
- Consider target platform limitations when choosing dimensions
3. Performance Optimization
- Lower frame rates result in smaller file sizes
- Consider the balance between quality and file size based on your use case
- Test different configurations to find the optimal settings for your needs
### Example Usage
Here's a complete example of configuring and using the AnimatedGIFOutput class:
```csharp
// Create a new instance with default settings
var gifOutput = new AnimatedGIFOutput();
// Configure the output settings
gifOutput.ForcedVideoWidth = 800;
gifOutput.ForcedVideoHeight = 600;
gifOutput.FrameRate = new VideoFrameRate(5); // 5 fps
// Apply the settings to the core
core.Output_Format = gifOutput; // core is an instance of VideoCaptureCore or VideoEditCore
core.Output_Filename = "output.gif";
```
### Common Scenarios and Solutions
#### Creating Web-Optimized GIFs
```csharp
var webGifOutput = new AnimatedGIFOutput
{
ForcedVideoWidth = 480,
ForcedVideoHeight = 270,
FrameRate = new VideoFrameRate(5)
};
```
#### High-Quality Animation Settings
```csharp
var highQualityGif = new AnimatedGIFOutput
{
FrameRate = new VideoFrameRate(15)
};
```
---END OF PAGE---
# Local File: .\dotnet\general\output-formats\index.md
---
title: Video & Audio Format Guide for .NET Development
description: Learn about video and audio formats for .NET applications - from MP4 and WebM to AVI and MKV. Includes practical implementation examples, codec comparisons, and a detailed compatibility matrix for developers.
sidebar_label: Output Formats
order: 17
---
# Output Formats for .NET Media SDKs
[!badge size="xl" target="blank" variant="info" text="Video Capture SDK .Net"](https://www.visioforge.com/video-capture-sdk-net) [!badge size="xl" target="blank" variant="info" text="Video Edit SDK .Net"](https://www.visioforge.com/video-edit-sdk-net) [!badge size="xl" target="blank" variant="info" text="Media Blocks SDK .Net"](https://www.visioforge.com/media-blocks-sdk-net)
## Introduction
The VisioForge .NET SDKs support a wide range of output formats for video, audio, and media projects. Selecting the right format is crucial for ensuring compatibility, optimizing file size, and maintaining quality appropriate for your target platform. This guide covers all available formats, their technical specifications, use cases, and implementation details to help developers make informed decisions.
## Choosing the Right Format
When selecting an output format, consider these key factors:
- **Target platform** - Some formats work better on specific devices or browsers
- **Quality requirements** - Different codecs provide varying levels of quality at different bitrates
- **File size constraints** - Some formats offer better compression than others
- **Processing overhead** - Encoding complexity varies between formats
- **Streaming requirements** - Certain formats are optimized for streaming scenarios
## Video Container Formats
### AVI (Audio Video Interleave)
[AVI](avi.md) is a classic container format developed by Microsoft that supports various video and audio codecs.
**Key features:**
- Wide compatibility with Windows applications
- Supports virtually any DirectShow-compatible video and audio codec
- Simple structure makes it reliable for video editing workflows
- Better suited for archiving than streaming
### MP4 (MPEG-4 Part 14)
[MP4](mp4.md) is one of the most versatile and widely used container formats in modern applications.
**Key features:**
- Excellent compatibility across devices and platforms
- Supports advanced codecs including H.264, H.265/HEVC, and AAC
- Optimized for streaming and progressive download
- Efficient storage with good quality-to-size ratio
**Supported video codecs:**
- H.264 (AVC) - Balance of quality and compatibility
- H.265 (HEVC) - Better compression but higher encoding overhead
- MPEG-4 Part 2 - Older codec with wider compatibility
**Supported audio codecs:**
- AAC - Industry standard for digital audio compression
- MP3 - Widely supported legacy format
### WebM
[WebM](webm.md) is an open-source container format designed specifically for web use.
**Key features:**
- Royalty-free format ideal for web applications
- Native support in most modern browsers
- Excellent for streaming video content
- Supports VP8, VP9, and AV1 video codecs
**Technical considerations:**
- VP9 offers ~50% bitrate reduction compared to H.264 at similar quality
- AV1 provides even better compression but with significantly higher encoding complexity
- Works well with HTML5 video elements without plugins
### MKV (Matroska)
[MKV](mkv.md) is a flexible container format that can hold virtually any type of audio or video.
**Key features:**
- Supports multiple audio, video, and subtitle tracks
- Can contain almost any codec
- Great for archiving and high-quality storage
- Supports chapters and attachments
**Best uses:**
- Media archives requiring multiple tracks
- High-quality video storage
- Projects requiring complex chapter structures
### Additional Container Formats
- [MOV](mov.md) - Apple's QuickTime container format
- [MPEG-TS](mpegts.md) - Transport Stream format optimized for broadcasting
- [MXF](mxf.md) - Material Exchange Format used in professional video production
- [Windows Media Video](wmv.md) - Microsoft's proprietary format
## Audio-Only Formats
### MP3 (MPEG-1 Audio Layer III)
[MP3](../audio-encoders/mp3.md) remains one of the most widely supported audio formats.
**Key features:**
- Near-universal compatibility
- Configurable bitrate for quality vs. size tradeoffs
- VBR (Variable Bit Rate) option for optimized file sizes
### AAC in M4A Container
[M4A](../audio-encoders/aac.md) provides better audio quality than MP3 at the same bitrate.
**Key features:**
- Better compression efficiency than MP3
- Good compatibility with modern devices
- Supports advanced audio features like multichannel audio
### Other Audio Formats
- [FLAC](../audio-encoders/flac.md) - Lossless audio format for high-quality archiving
- [OGG Vorbis](../audio-encoders/vorbis.md) - Open-source alternative to MP3 with better quality at lower bitrates
## Specialized Formats
### GIF (Graphics Interchange Format)
[GIF](gif.md) is useful for creating short, silent animations.
**Key features:**
- Wide web compatibility
- Limited to 256 colors per frame
- Support for transparency
- Ideal for short, looping animations
### Custom Output Format
[Custom output format](custom.md) allows integration with third-party DirectShow filters.
**Key features:**
- Maximum flexibility for specialized requirements
- Integration with commercial or custom codecs
- Support for proprietary formats
## Advanced Output Options
### FFMPEG Integration
[FFMPEG EXE](ffmpeg-exe.md) integration provides access to FFMPEG's extensive codec library.
**Key features:**
- Support for virtually any format FFMPEG can handle
- Advanced encoding options
- Custom command line arguments for fine-tuned control
## Performance Optimization Tips
When working with video output formats, consider these optimization strategies:
1. **Match format to use case** - Use streaming-optimized formats for web delivery
2. **Consider hardware acceleration** - Many modern codecs support GPU acceleration
3. **Use appropriate bitrates** - Higher isn't always better; find the sweet spot for your content
4. **Test on target devices** - Ensure compatibility before finalizing format choice
5. **Enable multi-threading** - Take advantage of multiple CPU cores for faster encoding
## Implementation Best Practices
- Configure proper keyframe intervals for streaming formats
- Set appropriate bitrate constraints for target platforms
- Use two-pass encoding for highest quality output when time permits
- Consider audio quality requirements alongside video format decisions
## Format Compatibility Matrix
| Format | Windows | macOS | iOS | Android | Web Browsers |
|--------|---------|-------|-----|---------|--------------|
| MP4 (H.264) | ✓ | ✓ | ✓ | ✓ | ✓ |
| WebM (VP9) | ✓ | ✓ | Partial | ✓ | ✓ |
| MKV | ✓ | With players | With players | With players | ✗ |
| AVI | ✓ | With players | Limited | Limited | ✗ |
| MP3 | ✓ | ✓ | ✓ | ✓ | ✓ |
---
Visit our [GitHub repository](https://github.com/visioforge/.Net-SDK-s-samples) for more code samples and implementation examples. Our documentation is continuously updated to reflect new features and optimizations available in the latest SDK releases.
---END OF PAGE---
# Local File: .\dotnet\general\output-formats\mkv.md
---
title: MKV Container Format for .NET Video Applications
description: Learn how to implement MKV output in .NET applications with hardware-accelerated encoding, multiple audio tracks, and custom video processing. Master video and audio encoding options for high-performance multimedia applications.
sidebar_label: MKV (Matroska)
---
# MKV Output in VisioForge .NET SDKs
[!badge size="xl" target="blank" variant="info" text="Video Capture SDK .Net"](https://www.visioforge.com/video-capture-sdk-net) [!badge size="xl" target="blank" variant="info" text="Video Edit SDK .Net"](https://www.visioforge.com/video-edit-sdk-net) [!badge size="xl" target="blank" variant="info" text="Media Blocks SDK .Net"](https://www.visioforge.com/media-blocks-sdk-net)
[!badge variant="dark" size="xl" text="VideoCaptureCoreX"] [!badge variant="dark" size="xl" text="VideoEditCoreX"] [!badge variant="dark" size="xl" text="MediaBlocksPipeline"]
## Introduction to MKV Format
MKV (Matroska Video) is a flexible, open-standard container format that can hold an unlimited number of video, audio, and subtitle tracks in one file. The VisioForge SDKs provide robust support for MKV output with various encoding options to meet diverse development requirements.
This format is particularly valuable for developers working on applications that require:
- Multiple audio tracks or languages
- High-quality video with multiple codec options
- Cross-platform compatibility
- Support for metadata and chapters
## Getting Started with MKV Output
The `MKVOutput` class serves as the primary interface for generating MKV files in VisioForge SDKs. You can initialize it with default settings or specify custom encoders to match your application's needs.
### Basic Implementation
```csharp
// Create MKV output with default encoders
var mkvOutput = new MKVOutput("output.mkv");
// Or specify custom encoders during initialization
var videoEncoder = new NVENCH264EncoderSettings();
var audioEncoder = new MFAACEncoderSettings();
var mkvOutput = new MKVOutput("output.mkv", videoEncoder, audioEncoder);
```
## Video Encoding Options
The MKV format supports multiple video codecs, giving developers flexibility in balancing quality, performance, and compatibility. VisioForge SDKs offer both software and hardware-accelerated encoders.
### H.264 Encoder Options
H.264 remains one of the most widely supported video codecs, providing excellent compression and quality:
- **OpenH264**: Software-based encoder, used as default when hardware acceleration isn't available
- **NVENC H.264**: NVIDIA GPU-accelerated encoding for superior performance
- **QSV H.264**: Intel Quick Sync Video technology for hardware acceleration
- **AMF H.264**: AMD GPU-accelerated encoding option
### HEVC (H.265) Encoder Options
For applications requiring higher compression efficiency or 4K content:
- **MF HEVC**: Windows Media Foundation implementation (Windows-only)
- **NVENC HEVC**: NVIDIA GPU acceleration for H.265
- **QSV HEVC**: Intel Quick Sync implementation for H.265
- **AMF HEVC**: AMD GPU acceleration for H.265 encoding
### Setting a Video Encoder
```csharp
mkvOutput.Video = new NVENCH264EncoderSettings();
```
## Audio Encoding Options
Audio quality is equally important for most applications. VisioForge SDKs provide several audio encoder options for MKV output:
### Supported Audio Codecs
- **AAC Encoders**:
- **VO AAC**: Default choice for non-Windows platforms
- **AVENC AAC**: FFMPEG AAC implementation
- **MF AAC**: Windows Media Foundation implementation (default on Windows)
- **Alternative Audio Formats**:
- **MP3**: Common format with wide compatibility
- **Vorbis**: Open source audio codec
- **OPUS**: Modern codec with excellent quality-to-size ratio
### Configuring Audio Encoding
```csharp
// Platform-specific audio encoder selection
#if NET_WINDOWS
var aacSettings = new MFAACEncoderSettings
{
Bitrate = 192,
SampleRate = 48000
};
mkvOutput.Audio = aacSettings;
#else
var aacSettings = new VOAACEncoderSettings
{
Bitrate = 192,
SampleRate = 44100
};
mkvOutput.Audio = aacSettings;
#endif
// Or use OPUS for better quality at lower bitrates
var opusSettings = new OPUSEncoderSettings
{
Bitrate = 128,
Channels = 2
};
mkvOutput.Audio = opusSettings;
```
## Advanced MKV Configuration
### Custom Video and Audio Processing
For applications that require special processing, you can integrate custom MediaBlock processors:
```csharp
// Add a video processor for effects or transformations
var textOverlayBlock = new TextOverlayBlock(new TextOverlaySettings("Hello world!"));
mkvOutput.CustomVideoProcessor = textOverlayBlock;
// Add audio processing
var volumeBlock = new VolumeBlock() { Level = 1.2 }; // Boost volume by 20%
mkvOutput.CustomAudioProcessor = volumeBlock;
```
### Sink Settings Management
Control output file properties through the sink settings:
```csharp
// Change output filename
mkvOutput.Sink.Filename = "processed_output.mkv";
// Get current filename
string currentFile = mkvOutput.GetFilename();
// Update filename with timestamp
string timestamp = DateTime.Now.ToString("yyyyMMdd_HHmmss");
mkvOutput.SetFilename($"recording_{timestamp}.mkv");
```
## Integration with VisioForge SDK Components
### With Video Capture SDK
```csharp
// Initialize capture core
var captureCore = new VideoCaptureCoreX();
// Configure video and audio source
// ...
// Add MKV output to recording pipeline
var mkvOutput = new MKVOutput("capture.mkv");
captureCore.Outputs_Add(mkvOutput, true);
// Start recording
await captureCore.StartAsync();
```
### With Video Edit SDK
```csharp
// Initialize editing core
var editCore = new VideoEditCoreX();
// Add input sources
// ...
// Configure MKV output with hardware acceleration
var h265Encoder = new NVENCHEVCEncoderSettings
{
Bitrate = 10000
};
var mkvOutput = new MKVOutput("edited.mkv", h265Encoder);
editCore.Output_Format = mkvOutput;
// Process the file
await editCore.StartAsync();
```
### With Media Blocks SDK
```csharp
// Create a pipeline
var pipeline = new MediaBlocksPipeline();
// Add source block
var sourceBlock = // some block
## Interface Implementation
// Configure MKV output
var aacEncoder = new VOAACEncoderSettings();
var h264Encoder = new OpenH264EncoderSettings();
var mkvSinkSettings = new MKVSinkSettings("processed.mkv");
var mkvOutput = new MKVOutputBlock(mkvSinkSettings, h264Encoder, aacEncoder);
// Connect blocks and run the pipeline
pipeline.Connect(sourceBlock.VideoOutput, h264Encoder.Input);
pipeline.Connect(h264Encoder.Output, mkvOutput.CreateNewInput(MediaBlockPadMediaType.Video));
pipeline.Connect(sourceBlock.AudioOutput, aacEncoder.Input);
pipeline.Connect(aacEncoder.Output, mkvOutput.CreateNewInput(MediaBlockPadMediaType.Audio));
pipeline.Connect(mkvOutput.Output, pipeline.Sink);
// Start the pipeline
await pipeline.StartAsync();
```
## Hardware Acceleration Benefits
Hardware-accelerated encoding offers significant advantages for developers building real-time or batch processing applications:
1. **Reduced CPU Load**: Offloads encoding to dedicated hardware
2. **Faster Processing**: Up to 5-10x performance improvement
3. **Power Efficiency**: Lower energy consumption, important for mobile apps
4. **Higher Quality**: Some hardware encoders provide better quality-per-bitrate
## Best Practices for Developers
When implementing MKV output in your applications, consider these recommendations:
1. **Always check hardware availability** before using GPU-accelerated encoders
2. **Select appropriate bitrates** based on content type and resolution
3. **Use platform-specific encoders** where possible for optimal performance
4. **Test on target platforms** to ensure compatibility
5. **Consider quality-size trade-offs** based on your application's needs
## Conclusion
The MKV format provides developers with a flexible, robust container for video content in .NET applications. With VisioForge SDKs, you can leverage hardware acceleration, advanced encoding options, and custom processing to create high-performance video applications.
By understanding the available encoders and configuration options, you can optimize your implementation for specific hardware platforms while maintaining cross-platform compatibility where needed.
---END OF PAGE---
# Local File: .\dotnet\general\output-formats\mov.md
---
title: MOV File Encoding with VisioForge .NET SDKs
description: Learn how to implement high-performance MOV file output in your .NET applications using VisioForge SDKs. This developer guide covers hardware-accelerated encoding options, cross-platform implementation, audio/video configuration, and integration workflows for professional video applications.
sidebar_label: MOV
---
# MOV File Output for .NET Video Applications
[!badge size="xl" target="blank" variant="info" text="Video Capture SDK .Net"](https://www.visioforge.com/video-capture-sdk-net) [!badge size="xl" target="blank" variant="info" text="Video Edit SDK .Net"](https://www.visioforge.com/video-edit-sdk-net) [!badge size="xl" target="blank" variant="info" text="Media Blocks SDK .Net"](https://www.visioforge.com/media-blocks-sdk-net)
[!badge variant="dark" size="xl" text="VideoCaptureCoreX"] [!badge variant="dark" size="xl" text="VideoEditCoreX"] [!badge variant="dark" size="xl" text="MediaBlocksPipeline"]
## Introduction to MOV Output in VisioForge
The MOV container format is widely used for video storage in professional environments and Apple ecosystems. VisioForge's .NET SDKs provide robust cross-platform support for generating MOV files with customizable encoding options. The `MOVOutput` class serves as the primary interface for configuring and generating these files across Windows, macOS, and Linux environments.
MOV files created with VisioForge SDKs can leverage hardware acceleration through NVIDIA, Intel, and AMD encoders, making them ideal for performance-critical applications. This guide walks through the essential steps for implementing MOV output in .NET video applications.
### When to Use MOV Format
MOV is particularly well-suited for:
- Video editing workflows
- Projects requiring Apple ecosystem compatibility
- Professional video production pipelines
- Applications needing metadata preservation
- High-quality archival purposes
## Getting Started with MOV Output
The `MOVOutput` class ([API reference](https://api.visioforge.org/dotnet/api/VisioForge.Core.Types.X.Output.MOVOutput.html)) provides the foundation for MOV file generation with VisioForge SDKs. It encapsulates the configuration of video and audio encoders, processing parameters, and sink settings.
### Basic Implementation
Creating a MOV output requires minimal code:
```csharp
// Create a MOV output targeting the specified filename
var movOutput = new MOVOutput("output.mov");
```
This simple implementation automatically:
- Selects NVENC H264 encoder if available (falls back to OpenH264)
- Chooses the appropriate AAC encoder for your platform (MF AAC on Windows, VO-AAC elsewhere)
- Configures MOV container settings for broad compatibility
### Default Configuration Behavior
The default configuration delivers balanced performance and compatibility across platforms. However, for specialized use cases, you'll likely need to customize encoder settings, which we'll cover in the following sections.
## Video Encoder Options for MOV Files
MOV output supports a variety of video encoders to accommodate different performance, quality, and compatibility requirements. The choice of encoder significantly impacts processing speed, resource consumption, and output quality.
### Supported Video Encoders
The MOV output supports these video encoders:
| Encoder | Technology | Platform | Best For |
|---------|------------|----------|----------|
| OpenH264 | Software | Cross-platform | Compatibility |
| NVENC H264 | NVIDIA GPU | Cross-platform | Performance |
| QSV H264 | Intel GPU | Cross-platform | Efficiency |
| AMF H264 | AMD GPU | Cross-platform | Performance |
| MF HEVC | Software | Windows only | Quality |
| NVENC HEVC | NVIDIA GPU | Cross-platform | Quality/Performance |
| QSV HEVC | Intel GPU | Cross-platform | Efficiency |
| AMF H265 | AMD GPU | Cross-platform | Quality/Performance |
### Configuring Video Encoders
Set a specific video encoder with code like this:
```csharp
// For NVIDIA hardware-accelerated encoding
movOutput.Video = new NVENCH264EncoderSettings() {
Bitrate = 5000000, // 5 Mbps
};
// For software-based encoding with OpenH264
movOutput.Video = new OpenH264EncoderSettings() {
RateControl = RateControlMode.VBR,
Bitrate = 2500000 // 2.5 Mbps
};
```
### Encoder Selection Strategy
When implementing MOV output, consider these factors for encoder selection:
1. **Hardware availability** - Check if GPU acceleration is available
2. **Quality requirements** - HEVC offers better quality at lower bitrates
3. **Processing speed** - Hardware encoders provide significant speed advantages
4. **Platform compatibility** - Some encoders are Windows-specific
A multi-tier approach often works best, checking for the fastest available encoder and falling back as needed:
```csharp
// Try NVIDIA, then Intel, then software encoding
if (NVENCH264EncoderSettings.IsAvailable())
{
movOutput.Video = new NVENCH264EncoderSettings();
}
else if (QSVH264EncoderSettings.IsAvailable())
{
movOutput.Video = new QSVH264EncoderSettings();
}
else
{
movOutput.Video = new OpenH264EncoderSettings();
}
```
## Audio Encoder Options
Audio quality is critical for most video applications. The SDK provides several audio encoders optimized for different use cases.
### Supported Audio Encoders
| Encoder | Type | Platform | Quality | Use Case |
|---------|------|----------|---------|----------|
| MP3 | Software | Cross-platform | Good | Web distribution |
| VO-AAC | Software | Cross-platform | Excellent | Professional use |
| AVENC AAC | Software | Cross-platform | Very good | General purpose |
| MF AAC | Hardware-accelerated | Windows only | Excellent | Windows apps |
### Audio Encoder Configuration
Implementing audio encoding requires minimal code:
```csharp
// MP3 configuration
movOutput.Audio = new MP3EncoderSettings() {
Bitrate = 320000, // 320 kbps high quality
Channels = 2 // Stereo
};
// Or AAC for better quality (Windows)
movOutput.Audio = new MFAACEncoderSettings() {
Bitrate = 192000 // 192 kbps
};
// Cross-platform AAC implementation
movOutput.Audio = new VOAACEncoderSettings() {
Bitrate = 192000,
SampleRate = 48000
};
```
### Platform-Specific Audio Considerations
To handle platform differences elegantly, use conditional compilation:
```csharp
// Select appropriate encoder based on platform
#if NET_WINDOWS
movOutput.Audio = new MFAACEncoderSettings();
#else
movOutput.Audio = new VOAACEncoderSettings();
#endif
```
## Advanced MOV Output Customization
Beyond basic configuration, VisioForge SDKs enable powerful customization of MOV output through media processing blocks and sink settings.
### Custom Processing Pipeline
For specialized video processing needs, the SDK provides media block integration:
```csharp
// Add custom video processing
movOutput.CustomVideoProcessor = new SomeMediaBlock();
// Add custom audio processing
movOutput.CustomAudioProcessor = new SomeMediaBlock();
```
### MOV Sink Configuration
Fine-tune the MOV container settings for specialized requirements:
```csharp
// Configure sink settings
movOutput.Sink.Filename = "new_output.mov";
```
### Dynamic Encoder Detection
Your application can intelligently select encoders based on system capabilities:
```csharp
// Get available video encoders
var videoEncoders = movOutput.GetVideoEncoders();
// Get available audio encoders
var audioEncoders = movOutput.GetAudioEncoders();
// Display available options to users or auto-select
foreach (var encoder in videoEncoders)
{
Console.WriteLine($"Available encoder: {encoder.Name}");
}
```
## Integration with VisioForge SDK Core Components
The MOV output integrates seamlessly with the core SDK components for video capture, editing, and processing.
### Video Capture Integration
Add MOV output to a capture workflow:
```csharp
// Create and configure capture core
var core = new VideoCaptureCoreX();
// Add capture devices
// ..
// Add configured MOV output
core.Outputs_Add(movOutput, true);
// Start capture
await core.StartAsync();
```
### Video Edit SDK Integration
Incorporate MOV output in video editing:
```csharp
// Create edit core and configure project
var core = new VideoEditCoreX();
// Add input file
// ...
// Set MOV as output format
core.Output_Format = movOutput;
// Process the video
await core.StartAsync();
```
### Media Blocks SDK Implementation
For direct media pipeline control:
```csharp
// Create encoder instances
var aac = new VOAACEncoderSettings();
var h264 = new OpenH264EncoderSettings();
// Configure MOV sink
var movSinkSettings = new MOVSinkSettings("output.mov");
// Create output block
// Note: MP4OutputBlock handles MOV output (MOV is a subset of MP4)
var movOutput = new MP4OutputBlock(movSinkSettings, h264, aac);
// Add to pipeline
pipeline.AddBlock(movOutput);
```
## Platform Compatibility Notes
While VisioForge's MOV implementation is cross-platform, some features are platform-specific:
### Windows-Specific Features
- MF HEVC video encoder provides optimized encoding on Windows
- MF AAC audio encoder offers hardware acceleration on compatible systems
### Cross-Platform Features
- OpenH264, NVENC, QSV, and AMF encoders work across operating systems
- VO-AAC and AVENC AAC provide consistent audio encoding everywhere
## Conclusion
The MOV output capability in VisioForge .NET SDKs provides a powerful and flexible solution for creating high-quality video files. By leveraging hardware acceleration where available and falling back to optimized software implementations when needed, the SDK ensures excellent performance across platforms.
For more information, refer to the [VisioForge API documentation](https://api.visioforge.org/dotnet/api/VisioForge.Core.Types.X.Output.MOVOutput.html) or explore other output formats in our documentation.
---END OF PAGE---
# Local File: .\dotnet\general\output-formats\mp4.md
---
title: MP4 Video Output Integration for .NET
description: Learn how to implement MP4 video output in .NET applications using hardware-accelerated encoders. Guide covers H.264/HEVC encoding, audio configuration, and best practices for optimal video processing performance.
sidebar_label: MP4
---
# MP4 file output
[!badge size="xl" target="blank" variant="info" text="Video Capture SDK .Net"](https://www.visioforge.com/video-capture-sdk-net) [!badge size="xl" target="blank" variant="info" text="Video Edit SDK .Net"](https://www.visioforge.com/video-edit-sdk-net) [!badge size="xl" target="blank" variant="info" text="Media Blocks SDK .Net"](https://www.visioforge.com/media-blocks-sdk-net)
MP4 (MPEG-4 Part 14), introduced in 2001, is a digital multimedia container format most commonly used to store video and audio. It also supports subtitles and images. MP4 is known for its high compression and compatibility across various devices and platforms, making it a popular choice for streaming and sharing.
Capturing videos from a webcam and saving them to a file is a common requirement in many applications. One way to achieve this is by using a software development kit (SDK) like VisioForge Video Capture SDK .Net, which provides an easy-to-use API for capturing and processing videos in C#.
To capture video in MP4 format using Video Capture SDK, you need to configure video output format using one of the classes for MP4 output. You can use several available software and hardware video encoders, including Intel QuickSync, Nvidia NVENC, and AMD/ATI APU.
## Cross-platform MP4 output
[!badge variant="dark" size="xl" text="VideoCaptureCoreX"] [!badge variant="dark" size="xl" text="VideoEditCoreX"] [!badge variant="dark" size="xl" text="MediaBlocksPipeline"]
The [MP4Output](https://api.visioforge.org/dotnet/api/VisioForge.Core.Types.X.Output.MP4Output.html?q=MP4Output) class provides a flexible and powerful way to configure MP4 video output settings for video capture and editing operations. This guide will walk you through how to use the MP4Output class effectively, covering its key features and common usage patterns.
MP4Output implements several important interfaces:
- IVideoEditXBaseOutput
- IVideoCaptureXBaseOutput
- Media Block creation
This makes it suitable for both video editing and capture scenarios while providing extensive control over video and audio processing.
### Basic Usage
The simplest way to create an MP4Output instance is using the constructor with a filename:
```csharp
var output = new MP4Output("output.mp4");
```
This creates an MP4Output with default video and audio encoder settings. On Windows, it will use OpenH264 for video encoding and Media Foundation AAC for audio encoding by default.
### Video Encoder Configuration
The MP4Output class supports multiple video encoders through its `Video` property. Here are the supported video encoders:
**[H.264 Encoders](../video-encoders/h264.md)**
- OpenH264EncoderSettings (Default, CPU)
- AMFH264EncoderSettings (AMD)
- NVENCH264EncoderSettings (NVIDIA)
- QSVH264EncoderSettings (Intel Quick Sync)
**[HEVC (H.265) Encoders](../video-encoders/hevc.md)**
- MFHEVCEncoderSettings (Windows only)
- AMFH265EncoderSettings (AMD)
- NVENCHEVCEncoderSettings (NVIDIA)
- QSVHEVCEncoderSettings (Intel Quick Sync)
You can check the availability of specific encoders using the `IsAvailable` method:
```csharp
if (NVENCH264EncoderSettings.IsAvailable())
{
output.Video = new NVENCH264EncoderSettings();
}
```
Example of configuring a specific video encoder:
```csharp
var output = new MP4Output("output.mp4");
output.Video = new NVENCH264EncoderSettings(); // Use NVIDIA encoder
```
### Audio Encoder Configuration
The `Audio` property allows you to specify the audio encoder. Supported audio encoders include:
- [VOAACEncoderSettings](../audio-encoders/aac.md)
- [AVENCAACEncoderSettings](../audio-encoders/aac.md)
- [MFAACEncoderSettings](../audio-encoders/aac.md) (Windows only)
- [MP3EncoderSettings](../audio-encoders/mp3.md)
Example of setting a custom audio encoder:
```csharp
var output = new MP4Output("output.mp4");
output.Audio = new MP3EncoderSettings();
```
The MP4Output class automatically selects appropriate default encoders based on the platform.
### Sample code
Add the MP4 output to the Video Capture SDK core instance:
```csharp
var core = new VideoCaptureCoreX();
core.Outputs_Add(output, true);
```
Set the output format for the Video Edit SDK core instance:
```csharp
var core = new VideoEditCoreX();
core.Output_Format = output;
```
Create a Media Blocks MP4 output instance:
```csharp
var aac = new VOAACEncoderSettings();
var h264 = new OpenH264EncoderSettings();
var mp4SinkSettings = new MP4SinkSettings("output.mp4");
var mp4Output = new MP4OutputBlock(mp4SinkSettings, h264, aac);
```
### Best Practices
**Hardware Acceleration**: When possible, use hardware-accelerated encoders (NVENC, AMF, QSV) for better performance:
```csharp
var output = new MP4Output("output.mp4");
if (NVENCH264EncoderSettings.IsAvailable())
{
output.Video = new NVENCH264EncoderSettings();
}
```
**Encoder Selection**: Use the provided methods to enumerate available encoders:
```csharp
var output = new MP4Output("output.mp4");
var availableVideoEncoders = output.GetVideoEncoders();
var availableAudioEncoders = output.GetAudioEncoders();
```
### Common Issues and Solutions
1. **File Access**: The MP4Output constructor attempts to verify write access by creating and immediately deleting a test file. Ensure the application has proper permissions to the output directory.
2. **Encoder Availability**: Hardware encoders might not be available on all systems. Always provide a fallback:
```csharp
var output = new MP4Output("output.mp4");
if (!NVENCH264EncoderSettings.IsAvailable())
{
output.Video = new OpenH264EncoderSettings(); // Fallback to software encoder
}
```
3. **Platform Compatibility**: Some encoders are platform-specific. Use conditional compilation or runtime checks when targeting multiple platforms:
```csharp
#if NET_WINDOWS
output.Audio = new MFAACEncoderSettings();
#else
output.Audio = new MP3EncoderSettings();
#endif
```
## Windows-only MP4 output
[!badge variant="dark" size="xl" text="VideoCaptureCore"] [!badge variant="dark" size="xl" text="VideoEditCore"]
`The same sample code can be used for Video Edit SDK .Net. Use the VideoEditCore class instead of VideoCaptureCore.`
### CPU encoder or Intel QuickSync GPU encoder
Create an `MP4Output` object for MP4 output.
```cs
var mp4Output = new MP4Output();
```
Set MP4 mode to `CPU_QSV`.
```cs
mp4Output.MP4Mode = MP4Mode.CPU_QSV;
```
Set video settings.
```cs
mp4Output.Video.Profile = H264Profile.ProfileMain; // H264 profile
mp4Output.Video.Level = H264Level.Level4; // H264 level
mp4Output.Video.Bitrate = 2000; // bitrate
// optional parameters
mp4Output.Video.MBEncoding = H264MBEncoding.CABAC; //CABAC / CAVLC
mp4Output.Video.BitrateAuto = false; // true to use auto bitrate
mp4Output.Video.RateControl = H264RateControl.VBR; // rate control - CBR or VBR
```
Set AAC audio settings.
```cs
mp4Output.Audio_AAC.Bitrate = 192;
mp4Output.Audio_AAC.Version = AACVersion.MPEG4; // MPEG-4 / MPEG-2
mp4Output.Audio_AAC.Output = AACOutput.RAW; // RAW or ADTS
mp4Output.Audio_AAC.Object = AACObject.Low; // type of AAC
```
### Nvidia NVENC encoder
Create the `MP4Output` object for MP4 output.
```cs
var mp4Output = new MP4Output();
```
Set MP4 mode to `NVENC`.
```cs
mp4Output.MP4Mode = MP4Mode.NVENC;
```
Set the video settings.
```cs
mp4Output.Video_NVENC.Profile = NVENCVideoEncoderProfile.H264_Main; // H264 profile
mp4Output.Video_NVENC.Level = NVENCEncoderLevel.H264_4; // H264 level
mp4Output.Video_NVENC.Bitrate = 2000; // bitrate
// optional parameters
mp4Output.Video_NVENC.RateControl = NVENCRateControlMode.VBR; // rate control - CBR or VBR
```
Set the audio settings.
```cs
mp4Output.Audio_AAC.Bitrate = 192;
mp4Output.Audio_AAC.Version = AACVersion.MPEG4; // MPEG-4 / MPEG-2
mp4Output.Audio_AAC.Output = AACOutput.RAW; // RAW or ADTS
mp4Output.Audio_AAC.Object = AACObject.Low; // type of AAC
```
### CPU/GPU encoders
Using MP4 HW output, you can use hardware-accelerated encoders by Intel (QuickSync), Nvidia (NVENC), and AMD/ATI.
Create `MP4HWOutput` object for MP4 HW output.
```cs
var mp4Output = new MP4HWOutput();
```
Get available encoders.
```cs
var availableEncoders = VideoCaptureCore.HWEncodersAvailable();
// or
var availableEncoders = VideoEditCore.HWEncodersAvailable();
```
Depending on available encoders, select video codec.
```cs
mp4Output.Video.Codec = MFVideoEncoder.MS_H264; // Microsoft H264
mp4Output.Video.Profile = MFH264Profile.Main; // H264 profile
mp4Output.Video.Level = MFH264Level.Level4; // H264 level
mp4Output.Video.AvgBitrate = 2000; // bitrate
// optional parameters
mp4Output.Video.CABAC = true; // CABAC / CAVLC
mp4Output.Video.RateControl = MFCommonRateControlMode.CBR; // rate control
// many other parameters are available
```
Set audio settings.
```cs
mp4Output.Audio.Bitrate = 192;
mp4Output.Audio.Version = AACVersion.MPEG4; // MPEG-4 / MPEG-2
mp4Output.Audio.Output = AACOutput.RAW; // RAW or ADTS
mp4Output.Audio.Object = AACObject.Low; // type of AAC
```
Now, we can apply MP4 output settings to the core class (VideoCaptureCore or VideoEditCore) and start video capture or editing.
### Apply video capture settings
Set MP4 format settings for output.
```cs
core.Output_Format = mp4Output;
```
Set a video capture mode (or video convert mode if you use Video Edit SDK).
```cs
core.Mode = VideoCaptureMode.VideoCapture;
```
Set a file name (ensure you have to write access rights).
```cs
core.Output_Filename = "output.mp4";
```
Start video capture (convert) to a file.
```cs
await VideoCapture1.StartAsync();
```
Finally, when we're done capturing the video, we need to stop the video capture and release the resources. We can do this by calling the `StopAsync` method of the `VideoCaptureCore` class.
### Required redists
- Video Capture SDK redist [x86](https://www.nuget.org/packages/VisioForge.DotNet.Core.Redist.VideoCapture.x86/) [x64](https://www.nuget.org/packages/VisioForge.DotNet.Core.Redist.VideoCapture.x64/)
- Video Edit SDK redist [x86](https://www.nuget.org/packages/VisioForge.DotNet.Core.Redist.VideoEdit.x86/) [x64](https://www.nuget.org/packages/VisioForge.DotNet.Core.Redist.VideoEdit.x64/)
- MP4 redist [x86](https://www.nuget.org/packages/VisioForge.DotNet.Core.Redist.MP4.x86/) [x64](https://www.nuget.org/packages/VisioForge.DotNet.Core.Redist.MP4.x64/)
---
Visit our [GitHub](https://github.com/visioforge/.Net-SDK-s-samples) page to get more code samples.
---END OF PAGE---
# Local File: .\dotnet\general\output-formats\mpegts.md
---
title: MPEG-TS File Output Guide for .NET
description: Learn how to implement MPEG Transport Stream (MPEG-TS) file output in .NET applications. Covers video and audio encoding options, hardware acceleration, cross-platform considerations, and best practices for developers working with media streaming.
sidebar_label: MPEG-TS
---
# MPEG-TS Output
[!badge size="xl" target="blank" variant="info" text="Video Capture SDK .Net"](https://www.visioforge.com/video-capture-sdk-net) [!badge size="xl" target="blank" variant="info" text="Video Edit SDK .Net"](https://www.visioforge.com/video-edit-sdk-net) [!badge size="xl" target="blank" variant="info" text="Media Blocks SDK .Net"](https://www.visioforge.com/media-blocks-sdk-net)
The MPEG-TS (Transport Stream) output module in VisioForge SDK functionality for creating MPEG transport stream files with various video and audio encoding options. This guide explains how to configure and use the `MPEGTSOutput` class effectively.
## Cross-platform MPEG-TS output
[!badge variant="dark" size="xl" text="VideoCaptureCoreX"] [!badge variant="dark" size="xl" text="VideoEditCoreX"] [!badge variant="dark" size="xl" text="MediaBlocksPipeline"]
To create a new MPEG-TS output, use the following constructor:
```csharp
// Initialize with AAC audio (recommended)
var output = new MPEGTSOutput("output.ts", useAAC: true);
```
You can also use MP3 audio instead of AAC:
```csharp
// Initialize with MP3 audio instead of AAC
var output = new MPEGTSOutput("output.ts", useAAC: false);
```
### Video Encoding Options
The [MPEGTSOutput](https://api.visioforge.org/dotnet/api/VisioForge.Core.Types.X.Output.MPEGTSOutput.html) supports multiple video encoders through the `Video` property. Available encoders include:
**[H.264 Encoders](../video-encoders/h264.md)**
- OpenH264 (Software-based)
- NVENC H.264 (NVIDIA GPU acceleration)
- QSV H.264 (Intel Quick Sync)
- AMF H.264 (AMD GPU acceleration)
**[H.265/HEVC Encoders](../video-encoders/hevc.md)**
- MF HEVC (Windows Media Foundation, Windows only)
- NVENC HEVC (NVIDIA GPU acceleration)
- QSV HEVC (Intel Quick Sync)
- AMF H.265 (AMD GPU acceleration)
Example of setting a specific video encoder:
```csharp
// Check if NVIDIA encoder is available
if (NVENCH264EncoderSettings.IsAvailable())
{
output.Video = new NVENCH264EncoderSettings();
}
else
{
// Fall back to OpenH264
output.Video = new OpenH264EncoderSettings();
}
```
### Audio Encoding Options
The following audio encoders are supported through the `Audio` property:
**[AAC Encoders](../audio-encoders/aac.md)**
- VO-AAC (Cross-platform)
- AVENC AAC
- MF AAC (Windows only)
**[MP3 Encoder](../audio-encoders/mp3.md)**:
- MP3EncoderSettings
Example of setting an audio encoder:
```csharp
// For Windows platforms
output.Audio = new MFAACEncoderSettings();
```
```csharp
// For cross-platform compatibility
output.Audio = new VOAACEncoderSettings();
```
```csharp
// Using MP3 instead of AAC
output.Audio = new MP3EncoderSettings();
```
### File Management
You can get or set the output filename after initialization:
```csharp
// Get current filename
string currentFile = output.GetFilename();
// Change output filename
output.SetFilename("new_output.ts");
```
### Advanced Features
#### Custom Processing
The MPEGTSOutput supports custom video and audio processing through MediaBlocks:
```csharp
// Add custom video processing
output.CustomVideoProcessor = new YourCustomVideoProcessor();
// Add custom audio processing
output.CustomAudioProcessor = new YourCustomAudioProcessor();
```
#### Sink Settings
The output uses MP4SinkSettings for configuration:
```csharp
// Access sink settings
output.Sink.Filename = "modified_output.ts";
```
### Platform Considerations
- Some encoders (MF AAC, MF HEVC) are only available on Windows platforms
- Cross-platform applications should use platform-agnostic encoders like VO-AAC for audio
### Best Practices
1. **Hardware Acceleration**: When available, prefer hardware-accelerated encoders (NVENC, QSV, AMF) over software encoders for better performance.
2. **Audio Codec Selection**: Use AAC for better compatibility and quality unless you have specific requirements for MP3.
3. **Error Handling**: Always check for encoder availability before using hardware-accelerated options:
```csharp
if (NVENCH264EncoderSettings.IsAvailable())
{
// Use NVIDIA encoder
}
else if (QSVH264EncoderSettings.IsAvailable())
{
// Fall back to Intel Quick Sync
}
else
{
// Fall back to software encoding
}
```
**Cross-Platform Compatibility**: For cross-platform applications, ensure you're using encoders available on all target platforms or implement appropriate fallbacks.
### Implementation Example
Here's a complete example showing how to create and configure an MPEG-TS output:
```csharp
var output = new MPEGTSOutput("output.ts", useAAC: true);
// Configure video encoder
if (NVENCH264EncoderSettings.IsAvailable())
{
output.Video = new NVENCH264EncoderSettings();
}
else if (QSVH264EncoderSettings.IsAvailable())
{
output.Video = new QSVH264EncoderSettings();
}
else
{
output.Video = new OpenH264EncoderSettings();
}
// Configure audio encoder based on platform
#if NET_WINDOWS
output.Audio = new MFAACEncoderSettings();
#else
output.Audio = new VOAACEncoderSettings();
#endif
// Optional: Add custom processing
output.CustomVideoProcessor = new YourCustomVideoProcessor();
output.CustomAudioProcessor = new YourCustomAudioProcessor();
```
## Windows-only MPEG-TS output
[!badge variant="dark" size="xl" text="VideoCaptureCore"] [!badge variant="dark" size="xl" text="VideoEditCore"]
The `MPEGTSOutput` class provides configuration settings for MPEG Transport Stream (MPEG-TS) output in the VisioForge video processing framework. This class inherits from `MFBaseOutput` and implements the `IVideoCaptureBaseOutput` interface, enabling it to be used specifically for video capture scenarios with MPEG-TS formatting.
### Class Hierarchy
```text
MFBaseOutput
└── MPEGTSOutput
```
### Inherited Video Settings
The [MPEGTSOutput](https://api.visioforge.org/dotnet/api/VisioForge.Core.Types.Output.MPEGTSOutput.html) class inherits video encoding capabilities from [MFBaseOutput](https://api.visioforge.org/dotnet/api/VisioForge.Core.Types.Output.MFBaseOutput.html), which includes:
**Video Encoding Configuration**: Through the `Video` property of type [MFVideoEncoderSettings](https://api.visioforge.org/dotnet/api/VisioForge.Core.Types.Output.MFVideoEncoderSettings.html), supporting:
- Multiple codec options (H.264/H.265) with hardware acceleration support
- Bitrate control (CBR/VBR)
- Quality settings
- Frame type and GOP structure configuration
- Interlacing options
- Resolution and aspect ratio controls
### Inherited Audio Settings
Audio configuration is handled through the inherited `Audio` property of type [M4AOutput](https://api.visioforge.org/dotnet/api/VisioForge.Core.Types.Output.M4AOutput.html), which includes:
AAC audio encoding with configurable:
- Version (default: MPEG-4)
- Object type (default: AAC-LC)
- Bitrate (default: 128 kbps)
- Output format (default: RAW)
### Usage
#### Basic Implementation
```csharp
// Create VideoCaptureCore instance
var core = new VideoCaptureCore();
// Set output filename
core.Output_Filename = "output.ts";
// Create MPEG-TS output
var mpegtsOutput = new MPEGTSOutput();
// Configure video settings
mpegtsOutput.Video.Codec = MFVideoEncoder.MS_H264;
mpegtsOutput.Video.AvgBitrate = 2000; // 2 Mbps
mpegtsOutput.Video.RateControl = MFCommonRateControlMode.CBR;
// Configure audio settings
mpegtsOutput.Audio.Bitrate = 128; // 128 kbps
mpegtsOutput.Audio.Version = AACVersion.MPEG4;
core.Output_Format = mpegtsOutput;
```
#### Serialization Support
The class provides built-in JSON serialization support for saving and loading configurations:
```csharp
// Save configuration
string jsonConfig = mpegtsOutput.Save();
// Load configuration
MPEGTSOutput loadedConfig = MPEGTSOutput.Load(jsonConfig);
```
### Default Configuration
The `MPEGTSOutput` class initializes with these default settings:
#### Video Defaults (inherited from MFBaseOutput)
- Average Bitrate: 2000 kbps
- Codec: Microsoft H.264
- Profile: Main
- Level: 4.2
- Rate Control: CBR
- Quality vs Speed: 85
- Maximum Reference Frames: 2
- GOP Size: 50 frames
- B-Picture Count: 0
- Low Latency Mode: Disabled
- CABAC: Disabled
- Interlace Mode: Progressive
#### Audio Defaults
- Bitrate: 128 kbps
- AAC Version: MPEG-4
- AAC Object Type: Low Complexity (LC)
- Output Format: RAW
### Best Practices
1. **Bitrate Configuration**:
- For streaming applications, ensure the combined video and audio bitrates are within your target bandwidth
- Consider using VBR for storage scenarios and CBR for streaming
2. **Hardware Acceleration**:
- When available, use hardware-accelerated encoders (QSV, NVENC, AMD) for better performance
- Fall back to MS_H264/MS_H265 when hardware acceleration is unavailable
3. **Quality Optimization**:
- For higher quality at the cost of performance, increase the `QualityVsSpeed` value
- Enable CABAC for better compression efficiency in non-low-latency scenarios
- Adjust `MaxKeyFrameSpacing` based on your specific use case (lower values for better seeking, higher values for better compression)
### Technical Notes
1. **MPEG-TS Characteristics**:
- Suitable for streaming and broadcasting applications
- Provides error resilience through packet-based structure
- Supports multiple programs and elementary streams
2. **Performance Considerations**:
- Low latency mode trades quality for reduced encoding delay
- B-frames improve compression but increase latency
- Hardware acceleration can significantly reduce CPU usage
### Required redists
- Video Capture SDK redist [x86](https://www.nuget.org/packages/VisioForge.DotNet.Core.Redist.VideoCapture.x86/) [x64](https://www.nuget.org/packages/VisioForge.DotNet.Core.Redist.VideoCapture.x64/)
- Video Edit SDK redist [x86](https://www.nuget.org/packages/VisioForge.DotNet.Core.Redist.VideoEdit.x86/) [x64](https://www.nuget.org/packages/VisioForge.DotNet.Core.Redist.VideoEdit.x64/)
- MP4 redist [x86](https://www.nuget.org/packages/VisioForge.DotNet.Core.Redist.MP4.x86/) [x64](https://www.nuget.org/packages/VisioForge.DotNet.Core.Redist.MP4.x64/)
---
Visit our [GitHub](https://github.com/visioforge/.Net-SDK-s-samples) page to get more code samples.
---END OF PAGE---
# Local File: .\dotnet\general\output-formats\mxf.md
---
title: Professional MXF Integration for .NET Applications
description: Master MXF output implementation in VisioForge SDKs with detailed code samples for professional video workflows. Learn hardware acceleration, codec optimization, cross-platform considerations, and best practices for broadcast-ready MXF files in your .NET applications.
sidebar_label: MXF
---
# MXF Output in VisioForge .NET SDKs
[!badge size="xl" target="blank" variant="info" text="Video Capture SDK .Net"](https://www.visioforge.com/video-capture-sdk-net) [!badge size="xl" target="blank" variant="info" text="Video Edit SDK .Net"](https://www.visioforge.com/video-edit-sdk-net) [!badge size="xl" target="blank" variant="info" text="Media Blocks SDK .Net"](https://www.visioforge.com/media-blocks-sdk-net)
[!badge variant="dark" size="xl" text="VideoCaptureCoreX"] [!badge variant="dark" size="xl" text="VideoEditCoreX"] [!badge variant="dark" size="xl" text="MediaBlocksPipeline"]
Material Exchange Format (MXF) is an industry-standard container format designed for professional video applications. It's widely adopted in broadcast environments, post-production workflows, and archival systems. VisioForge SDKs provide robust cross-platform MXF output capabilities that allow developers to integrate this professional format into their applications.
## Understanding MXF Format
MXF serves as a wrapper that can contain various types of video and audio data along with metadata. The format was designed to address interoperability issues in professional video workflows:
- **Industry Standard**: Adopted by major broadcasters worldwide
- **Professional Metadata**: Supports extensive technical and descriptive metadata
- **Versatile Container**: Compatible with numerous audio and video codecs
- **Cross-Platform**: Supported across Windows, macOS, and Linux
## Getting Started with MXF Output
Implementing MXF output in VisioForge SDKs requires just a few steps. The basic setup involves:
1. Creating an MXF output object
2. Specifying video and audio stream types
3. Configuring encoder settings
4. Adding the output to your pipeline
### Basic Implementation
Here's the foundational code to create an MXF output:
```csharp
var mxfOutput = new MXFOutput(
filename: "output.mxf",
videoStreamType: MXFVideoStreamType.H264,
audioStreamType: MXFAudioStreamType.MPEG
);
```
This minimal implementation creates a valid MXF file with default encoding settings. For professional applications, you'll typically want to customize the encoding parameters further.
## Video Encoding Options for MXF
The quality and compatibility of your MXF output largely depends on your choice of video encoder. VisioForge SDKs support multiple encoder options to balance performance, quality, and compatibility.
### Hardware-Accelerated Encoders
For optimal performance in real-time applications, hardware-accelerated encoders are recommended:
#### NVIDIA NVENC Encoders
```csharp
// Check availability first
if (NVENCH264EncoderSettings.IsAvailable())
{
var nvencSettings = new NVENCH264EncoderSettings
{
Bitrate = 8000000, // 8 Mbps
};
mxfOutput.Video = nvencSettings;
}
```
#### Intel Quick Sync Video (QSV) Encoders
```csharp
if (QSVH264EncoderSettings.IsAvailable())
{
var qsvSettings = new QSVH264EncoderSettings
{
Bitrate = 8000000,
};
mxfOutput.Video = qsvSettings;
}
```
#### AMD Advanced Media Framework (AMF) Encoders
```csharp
if (AMFH264EncoderSettings.IsAvailable())
{
var amfSettings = new AMFH264EncoderSettings
{
Bitrate = 8000000,
};
mxfOutput.Video = amfSettings;
}
```
### Software-Based Encoders
When hardware acceleration isn't available, software encoders provide reliable alternatives:
#### OpenH264 Encoder
```csharp
var openH264Settings = new OpenH264EncoderSettings
{
Bitrate = 8000000,
};
mxfOutput.Video = openH264Settings;
```
### High-Efficiency Video Coding (HEVC/H.265)
For applications requiring higher compression efficiency:
```csharp
// NVIDIA HEVC encoder
if (NVENCHEVCEncoderSettings.IsAvailable())
{
var nvencHevcSettings = new NVENCHEVCEncoderSettings
{
Bitrate = 5000000, // Lower bitrate possible with HEVC
};
mxfOutput.Video = nvencHevcSettings;
}
```
## Audio Encoding for MXF Files
While video often gets the most attention, proper audio encoding is crucial for professional MXF outputs. VisioForge SDKs offer multiple audio encoder options:
### AAC Encoders
AAC is the preferred codec for most professional applications:
```csharp
// Media Foundation AAC (Windows-only)
#if NET_WINDOWS
var mfAacSettings = new MFAACEncoderSettings
{
Bitrate = 192000, // 192 kbps
SampleRate = 48000 // Professional standard
};
mxfOutput.Audio = mfAacSettings;
#else
// Cross-platform AAC alternative
var voAacSettings = new VOAACEncoderSettings
{
Bitrate = 192000,
SampleRate = 48000
};
mxfOutput.Audio = voAacSettings;
#endif
```
### MP3 Encoder
For maximum compatibility:
```csharp
var mp3Settings = new MP3EncoderSettings
{
Bitrate = 320000, // 320 kbps
SampleRate = 48000,
ChannelMode = MP3ChannelMode.Stereo
};
mxfOutput.Audio = mp3Settings;
```
## Advanced MXF Configuration
### Custom Processing Pipelines
One of the powerful features of VisioForge SDKs is the ability to add custom processing to your MXF output chain:
```csharp
// Add custom video processing
mxfOutput.CustomVideoProcessor = yourVideoProcessingBlock;
// Add custom audio processing
mxfOutput.CustomAudioProcessor = yourAudioProcessingBlock;
```
### Sink Configuration
Fine-tune your MXF output with sink settings:
```csharp
// Access sink settings
mxfOutput.Sink.Filename = "new_output.mxf";
```
## Cross-Platform Considerations
Building applications that work across different platforms requires careful planning:
```csharp
// Platform-specific encoder selection
var mxfOutput = new MXFOutput(
filename: "output.mxf",
videoStreamType: MXFVideoStreamType.H264,
audioStreamType: MXFAudioStreamType.MPEG
);
#if NET_WINDOWS
// Windows-specific settings
if (QSVH264EncoderSettings.IsAvailable())
{
mxfOutput.Video = new QSVH264EncoderSettings();
mxfOutput.Audio = new MFAACEncoderSettings();
}
#elif NET_MACOS
// macOS-specific settings
mxfOutput.Video = new OpenH264EncoderSettings();
mxfOutput.Audio = new VOAACEncoderSettings();
#else
// Linux fallback
mxfOutput.Video = new OpenH264EncoderSettings();
mxfOutput.Audio = new MP3EncoderSettings();
#endif
```
## Error Handling and Validation
Robust MXF implementations require proper error handling:
```csharp
try
{
// Create MXF output
var mxfOutput = new MXFOutput(
filename: Path.Combine(outputDirectory, "output.mxf"),
videoStreamType: MXFVideoStreamType.H264,
audioStreamType: MXFAudioStreamType.MPEG
);
// Validate encoder availability
if (!OpenH264EncoderSettings.IsAvailable())
{
throw new ApplicationException("No compatible H.264 encoder found");
}
// Validate output directory
var directoryInfo = new DirectoryInfo(Path.GetDirectoryName(mxfOutput.Sink.Filename));
if (!directoryInfo.Exists)
{
Directory.CreateDirectory(directoryInfo.FullName);
}
pipeline.AddBlock(mxfOutput);
// Connect blocks
// ...
}
catch (Exception ex)
{
logger.LogError($"MXF output error: {ex.Message}");
// Implement fallback strategy
}
```
## Performance Optimization
For optimal MXF output performance:
1. **Prioritize Hardware Acceleration**: Always check for and use hardware encoders first
2. **Buffer Management**: Adjust buffer sizes based on system capabilities
3. **Parallel Processing**: Utilize multi-threading where appropriate
4. **Preset Selection**: Choose encoder presets based on quality vs. speed requirements
## Complete Implementation Example
Here's a full example demonstrating MXF implementation with fallback options:
```csharp
// Create MXF output with specific stream types
var mxfOutput = new MXFOutput(
filename: "output.mxf",
videoStreamType: MXFVideoStreamType.H264,
audioStreamType: MXFAudioStreamType.MPEG
);
// Configure video encoder with prioritized fallback chain
if (NVENCH264EncoderSettings.IsAvailable())
{
var nvencSettings = new NVENCH264EncoderSettings
{
Bitrate = 8000000,
};
mxfOutput.Video = nvencSettings;
}
else if (QSVH264EncoderSettings.IsAvailable())
{
var qsvSettings = new QSVH264EncoderSettings
{
Bitrate = 8000000,
};
mxfOutput.Video = qsvSettings;
}
else if (AMFH264EncoderSettings.IsAvailable())
{
var amfSettings = new AMFH264EncoderSettings
{
Bitrate = 8000000,
};
mxfOutput.Video = amfSettings;
}
else
{
// Software fallback
var openH264Settings = new OpenH264EncoderSettings
{
Bitrate = 8000000,
};
mxfOutput.Video = openH264Settings;
}
// Configure platform-optimized audio
#if NET_WINDOWS
mxfOutput.Audio = new MFAACEncoderSettings
{
Bitrate = 192000,
SampleRate = 48000
};
#else
mxfOutput.Audio = new VOAACEncoderSettings
{
Bitrate = 192000,
SampleRate = 48000
};
#endif
// Add to pipeline and start
pipeline.AddBlock(mxfOutput);
// Connect blocks
// ...
// Start the pipeline
await pipeline.StartAsync();
```
By following this guide, you can implement professional-grade MXF output in your applications using VisioForge .NET SDKs, ensuring compatibility with broadcast workflows and post-production systems.
---END OF PAGE---
# Local File: .\dotnet\general\output-formats\webm.md
---
title: WebM Video Output for .NET - Developer Guide
description: Master WebM video implementation in .NET with detailed code examples for VP8, VP9, and AV1 codecs. Learn optimization strategies for quality, performance, and file size to create efficient web-ready videos across Windows and cross-platform applications.
sidebar_label: WebM
---
# WebM Video Output in VisioForge .NET SDKs
[!badge size="xl" target="blank" variant="info" text="Video Capture SDK .Net"](https://www.visioforge.com/video-capture-sdk-net) [!badge size="xl" target="blank" variant="info" text="Video Edit SDK .Net"](https://www.visioforge.com/video-edit-sdk-net) [!badge size="xl" target="blank" variant="info" text="Media Blocks SDK .Net"](https://www.visioforge.com/media-blocks-sdk-net)
## What is WebM?
WebM is an open-source, royalty-free media file format optimized for web delivery. Developed to provide efficient video streaming with minimal processing requirements, WebM has become a standard for HTML5 video content. The format supports modern codecs including VP8 and VP9 for video compression, along with Vorbis and Opus for audio encoding.
The key advantages of WebM include:
- **Web-optimized performance** with fast loading times
- **Broad browser support** across major platforms
- **High-quality video** at smaller file sizes
- **Open-source licensing** without royalty costs
- **Efficient streaming** capabilities for media applications
## Windows Implementation
[!badge variant="dark" size="xl" text="VideoCaptureCore"] [!badge variant="dark" size="xl" text="VideoEditCore"]
On Windows platforms, VisioForge's implementation leverages the [WebMOutput](https://api.visioforge.org/dotnet/api/VisioForge.Core.Types.Output.WebMOutput.html) class from the `VisioForge.Core.Types.Output` namespace.
### Basic Configuration
To quickly implement WebM output in your Windows application:
```csharp
using VisioForge.Core.Types.Output;
// Initialize WebM output settings
var webmOutput = new WebMOutput();
// Configure essential parameters
webmOutput.Video_Mode = VP8QualityMode.Realtime;
webmOutput.Video_EndUsage = VP8EndUsageMode.VBR;
webmOutput.Video_Encoder = WebMVideoEncoder.VP8;
webmOutput.Video_Bitrate = 2000;
webmOutput.Audio_Quality = 80;
// Apply to your core instance
var core = new VideoCaptureCore(); // or VideoEditCore
core.Output_Format = webmOutput;
core.Output_Filename = "output.webm";
```
### Video Quality Settings
Fine-tuning your WebM video quality involves balancing several parameters:
```csharp
var webmOutput = new WebMOutput();
// Quality parameters
webmOutput.Video_MinQuantizer = 4; // Lower values = higher quality (range: 0-63)
webmOutput.Video_MaxQuantizer = 48; // Upper quality bound (range: 0-63)
webmOutput.Video_Bitrate = 2000; // Target bitrate in kbps
// Encode with multiple threads for better performance
webmOutput.Video_ThreadCount = 4; // Adjust based on available CPU cores
```
### Keyframe Control
Proper keyframe configuration is crucial for efficient streaming and seeking:
```csharp
// Keyframe settings
webmOutput.Video_Keyframe_MinInterval = 30; // Minimum frames between keyframes
webmOutput.Video_Keyframe_MaxInterval = 300; // Maximum frames between keyframes
webmOutput.Video_Keyframe_Mode = VP8KeyframeMode.Auto;
```
### Performance Optimization
Balance encoding speed and quality with these parameters:
```csharp
// Performance settings
webmOutput.Video_CPUUsed = 0; // Range: -16 to 16 (higher = faster encoding, lower quality)
webmOutput.Video_LagInFrames = 25; // Frame look-ahead buffer (higher = better quality)
webmOutput.Video_ErrorResilient = true; // Enable for streaming applications
```
### Buffer Management
For streaming applications, proper buffer configuration improves playback stability:
```csharp
// Buffer settings
webmOutput.Video_Decoder_Buffer_Size = 6000; // Buffer size in milliseconds
webmOutput.Video_Decoder_Buffer_InitialSize = 4000; // Initial buffer fill level
webmOutput.Video_Decoder_Buffer_OptimalSize = 5000; // Target buffer level
// Rate control fine-tuning
webmOutput.Video_UndershootPct = 50; // Allows bitrate to drop below target
webmOutput.Video_OvershootPct = 50; // Allows bitrate to exceed target temporarily
```
## Cross-Platform Implementation
[!badge variant="dark" size="xl" text="VideoCaptureCoreX"] [!badge variant="dark" size="xl" text="VideoEditCoreX"] [!badge variant="dark" size="xl" text="MediaBlocksPipeline"]
For cross-platform applications, VisioForge provides the [WebMOutput](https://api.visioforge.org/dotnet/api/VisioForge.Core.Types.X.Output.WebMOutput.html) class from the `VisioForge.Core.Types.X.Output` namespace, offering enhanced codec flexibility.
### Basic Setup
```csharp
using VisioForge.Core.Types.X.Output;
using VisioForge.Core.Types.X.VideoEncoders;
using VisioForge.Core.Types.X.AudioEncoders;
// Create WebM output
var webmOutput = new WebMOutput("output.webm");
// Configure video encoder (VP8)
webmOutput.Video = new VP8EncoderSettings();
// Configure audio encoder (Vorbis)
webmOutput.Audio = new VorbisEncoderSettings();
```
### Integration with Video Capture SDK
```csharp
// Add WebM output to Video Capture SDK
var core = new VideoCaptureCoreX();
core.Outputs_Add(webmOutput, true);
```
### Integration with Video Edit SDK
```csharp
// Set WebM as output format for Video Edit SDK
var core = new VideoEditCoreX();
core.Output_Format = webmOutput;
```
### Integration with Media Blocks SDK
```csharp
// Create encoders
var vorbis = new VorbisEncoderSettings();
var vp9 = new VP9EncoderSettings();
// Configure WebM output block
var webmSettings = new WebMSinkSettings("output.webm");
var webmOutput = new WebMOutputBlock(webmSettings, vp9, vorbis);
// Add to your pipeline
// pipeline.AddBlock(webmOutput);
```
## Codec Selection Guide
### Video Codecs
VisioForge SDKs support multiple video codecs for WebM:
1. **VP8**
- Faster encoding speed
- Lower computational requirements
- Wider compatibility with older browsers
- Good quality for standard video
2. **VP9**
- Better compression efficiency (30-50% smaller files vs. VP8)
- Higher quality at the same bitrate
- Slower encoding performance
- Ideal for high-resolution content
3. **AV1**
- Next-generation codec with superior compression
- Highest quality per bit
- Significantly higher encoding complexity
- Best for situations where encoding time isn't critical
For codec-specific settings, refer to our dedicated documentation pages:
- [VP8/VP9 Configuration](../video-encoders/vp8-vp9.md)
- [AV1 Configuration](../video-encoders/av1.md)
### Audio Codecs
Two primary audio codec options are available:
1. **Vorbis**
- Established codec with good overall quality
- Compatible with all WebM-supporting browsers
- Default choice for most applications
2. **Opus**
- Superior audio quality, especially at low bitrates
- Better for voice content and music
- Lower latency for streaming applications
- More efficient for bandwidth-constrained scenarios
For detailed audio settings, see:
- [Vorbis Configuration](../audio-encoders/vorbis.md)
- [Opus Configuration](../audio-encoders/opus.md)
## Optimization Strategies
### For Video Quality
To achieve the highest possible video quality:
- Use VP9 or AV1 for video encoding
- Set lower quantizer values (higher quality)
- Increase `LagInFrames` for better lookahead analysis
- Use 2-pass encoding for offline video processing
- Set higher bitrates for complex visual content
```csharp
// Quality-focused VP9 configuration
var vp9 = new VP9EncoderSettings
{
Bitrate = 3000, // Higher bitrate for better quality
Speed = 0, // Slowest/highest quality encoding
}
```
### For Real-time Applications
When low latency is critical:
- Choose VP8 for faster encoding
- Use single-pass encoding
- Set `CPUUsed` to higher values
- Use smaller frame lookahead buffers
- Configure shorter keyframe intervals
```csharp
// Low-latency VP8 configuration
var vp8 = new VP8EncoderSettings
{
EndUsage = VP8EndUsageMode.CBR, // Constant bitrate for predictable streaming
Speed = 8, // Faster encoding
Deadline = VP8Deadline.Realtime, // Prioritize speed over quality
ErrorResilient = true // Better recovery from packet loss
};
```
### For File Size Efficiency
To minimize storage requirements:
- Use VP9 or AV1 for maximum compression
- Enable two-pass encoding
- Set appropriate target bitrates
- Use Variable Bit Rate (VBR) encoding
- Avoid unnecessary keyframes
```csharp
// Storage-optimized configuration
var av1 = new AV1EncoderSettings
{
EndUsage = AOMEndUsage.VBR, // Variable bitrate for efficiency
TwoPass = true, // Enable multi-pass encoding
CpuUsed = 2, // Balance between speed and compression
KeyframeMaxDistance = 300 // Fewer keyframes = smaller files
};
```
## Dependencies
To implement WebM output, add the appropriate NuGet packages to your project:
- For x86 platforms: [VisioForge.DotNet.Core.Redist.WebM.x86](https://www.nuget.org/packages/VisioForge.DotNet.Core.Redist.WebM.x86)
- For x64 platforms: [VisioForge.DotNet.Core.Redist.WebM.x64](https://www.nuget.org/packages/VisioForge.DotNet.Core.Redist.WebM.x64)
## Learning Resources
For additional implementation examples and more advanced scenarios, visit our [GitHub repository](https://github.com/visioforge/.Net-SDK-s-samples) containing sample code for all VisioForge SDKs.
---END OF PAGE---
# Local File: .\dotnet\general\output-formats\wmv.md
---
title: WMV File Output and Encoding Guide
description: Learn how to implement Windows Media Video (WMV) encoding in .NET applications. Covers audio/video configuration, streaming options, profile management, and cross-platform solutions with code examples.
sidebar_label: Windows Media Video
---
# Windows Media Video encoders
[!badge size="xl" target="blank" variant="info" text="Video Capture SDK .Net"](https://www.visioforge.com/video-capture-sdk-net) [!badge size="xl" target="blank" variant="info" text="Video Edit SDK .Net"](https://www.visioforge.com/video-edit-sdk-net) [!badge size="xl" target="blank" variant="info" text="Media Blocks SDK .Net"](https://www.visioforge.com/media-blocks-sdk-net)
This documentation covers the Windows Media Video (WMV) encoding capabilities available in VisioForge, including both Windows-specific and cross-platform solutions.
## Windows-only output
[!badge variant="dark" size="xl" text="VideoCaptureCore"] [!badge variant="dark" size="xl" text="VideoEditCore"]
The [WMVOutput](https://api.visioforge.org/dotnet/api/VisioForge.Core.Types.Output.WMVOutput.html) class provides comprehensive Windows Media encoding capabilities for both audio and video on Windows platforms.
### Audio Encoding Features
The `WMVOutput` class offers several audio-specific configuration options:
- Custom audio codec selection
- Audio format customization
- Multiple stream modes
- Bitrate control
- Quality settings
- Language support
- Buffer size management
### Rate Control Modes
WMV encoding supports four rate control modes through the `WMVStreamMode` enum:
1. CBR (Constant Bitrate)
2. VBRQuality (Variable Bitrate based on quality)
3. VBRBitrate (Variable Bitrate with target bitrate)
4. VBRPeakBitrate (Variable Bitrate with peak bitrate constraint)
### Configuration Modes
The encoder can be configured in several ways using the `WMVMode` enum:
- ExternalProfile: Load settings from a profile file
- ExternalProfileFromText: Load settings from a text string
- InternalProfile: Use built-in profiles
- CustomSettings: Manual configuration
- V8SystemProfile: Use Windows Media 8 system profiles
### Sample Code
Create new WMV custom output configuration:
```csharp
var wmvOutput = new WMVOutput
{
// Basic configuration
Mode = WMVMode.CustomSettings,
// Audio settings
Custom_Audio_StreamPresent = true,
Custom_Audio_Mode = WMVStreamMode.VBRQuality,
Custom_Audio_Quality = 98,
Custom_Audio_PeakBitrate = 192000,
Custom_Audio_PeakBufferSize = 3,
// Optional language setting
Custom_Audio_LanguageID = "en-US"
};
```
Using an internal profile:
```csharp
var profileWmvOutput = new WMVOutput
{
Mode = WMVMode.InternalProfile,
Internal_Profile_Name = "Windows Media Video 9 for Local Network (768 kbps)"
};
```
Network streaming configuration:
```csharp
var streamingWmvOutput = new WMVOutput
{
Mode = WMVMode.CustomSettings,
Network_Streaming_WMV_Maximum_Clients = 20,
Custom_Audio_Mode = WMVStreamMode.CBR
};
```
### Custom Profile Configuration
Custom profiles give you the most flexibility by allowing you to configure every aspect of the encoding process. Here are several examples for different scenarios:
High-quality video streaming configuration:
```csharp
var highQualityConfig = new WMVOutput
{
Mode = WMVMode.CustomSettings,
// Video settings
Custom_Video_StreamPresent = true,
Custom_Video_Mode = WMVStreamMode.VBRQuality,
Custom_Video_Quality = 95,
Custom_Video_Width = 1920,
Custom_Video_Height = 1080,
Custom_Video_FrameRate = 30.0,
Custom_Video_KeyFrameInterval = 4,
Custom_Video_Smoothness = 80,
Custom_Video_Buffer_UseDefault = false,
Custom_Video_Buffer_Size = 4000,
// Audio settings
Custom_Audio_StreamPresent = true,
Custom_Audio_Mode = WMVStreamMode.VBRQuality,
Custom_Audio_Quality = 98,
Custom_Audio_Format = "48kHz 16bit Stereo",
Custom_Audio_PeakBitrate = 320000,
Custom_Audio_PeakBufferSize = 3,
// Profile metadata
Custom_Profile_Name = "High Quality Streaming",
Custom_Profile_Description = "1080p streaming profile with high quality audio",
Custom_Profile_Language = "en-US"
};
```
Low bandwidth configuration for mobile streaming:
```csharp
var mobileLowBandwidthConfig = new WMVOutput
{
Mode = WMVMode.CustomSettings,
// Video settings optimized for mobile
Custom_Video_StreamPresent = true,
Custom_Video_Mode = WMVStreamMode.CBR,
Custom_Video_Bitrate = 800000, // 800 kbps
Custom_Video_Width = 854,
Custom_Video_Height = 480,
Custom_Video_FrameRate = 24.0,
Custom_Video_KeyFrameInterval = 5,
Custom_Video_Smoothness = 60,
// Audio settings for low bandwidth
Custom_Audio_StreamPresent = true,
Custom_Audio_Mode = WMVStreamMode.CBR,
Custom_Audio_PeakBitrate = 64000, // 64 kbps
Custom_Audio_Format = "44kHz 16bit Mono",
Custom_Profile_Name = "Mobile Low Bandwidth",
Custom_Profile_Description = "480p optimized for mobile devices"
};
```
Audio-focused configuration for music content:
```csharp
var audioFocusedConfig = new WMVOutput
{
Mode = WMVMode.CustomSettings,
// High quality audio settings
Custom_Audio_StreamPresent = true,
Custom_Audio_Mode = WMVStreamMode.VBRQuality,
Custom_Audio_Quality = 99,
Custom_Audio_Format = "96kHz 24bit Stereo",
Custom_Audio_PeakBitrate = 512000,
Custom_Audio_PeakBufferSize = 4,
// Minimal video settings
Custom_Video_StreamPresent = true,
Custom_Video_Mode = WMVStreamMode.VBRBitrate,
Custom_Video_Bitrate = 500000,
Custom_Video_Width = 1280,
Custom_Video_Height = 720,
Custom_Video_FrameRate = 25.0,
Custom_Profile_Name = "Audio Focus",
Custom_Profile_Description = "High quality audio configuration for music content"
};
```
### Internal Profile Usage
Internal profiles provide pre-configured settings optimized for common scenarios. Here are examples of using different internal profiles:
Standard broadcast quality profile:
```csharp
var broadcastProfile = new WMVOutput
{
Mode = WMVMode.InternalProfile,
Internal_Profile_Name = "Windows Media Video 9 Advanced Profile",
Custom_Video_TVSystem = WMVTVSystem.NTSC // Optional TV system override
};
```
Web streaming profile:
```csharp
var webStreamingProfile = new WMVOutput
{
Mode = WMVMode.InternalProfile,
Internal_Profile_Name = "Windows Media Video 9 for Broadband (2 Mbps)",
Network_Streaming_WMV_Maximum_Clients = 100 // Optional streaming override
};
```
Low latency profile for live streaming:
```csharp
var liveStreamingProfile = new WMVOutput
{
Mode = WMVMode.InternalProfile,
Internal_Profile_Name = "Windows Media Video 9 Screen (Low Rate)",
Network_Streaming_WMV_Maximum_Clients = 50
};
```
### External Profile Configuration
External profiles allow you to load encoding settings from files or text. This is useful for sharing configurations across different projects or storing multiple configurations:
Loading profile from a file:
```csharp
var fileBasedProfile = new WMVOutput
{
Mode = WMVMode.ExternalProfile,
External_Profile_FileName = @"C:\Profiles\HighQualityStreaming.prx"
};
```
Loading profile from text configuration:
```csharp
var textBasedProfile = new WMVOutput
{
Mode = WMVMode.ExternalProfileFromText,
External_Profile_Text = @"
"
};
```
Saving and loading profiles programmatically:
```csharp
async Task SaveAndLoadProfile(WMVOutput profile, string filename)
{
// Save profile configuration to JSON
string jsonConfig = profile.Save();
await File.WriteAllTextAsync(filename, jsonConfig);
// Load profile configuration from JSON
string loadedJson = await File.ReadAllTextAsync(filename);
WMVOutput loadedProfile = WMVOutput.Load(loadedJson);
}
```
Example usage of profile saving/loading:
```csharp
var profile = new WMVOutput
{
Mode = WMVMode.CustomSettings,
// ... configure settings ...
};
await SaveAndLoadProfile(profile, "encoding_profile.json");
```
### Working with Legacy Windows Media 8 Profiles
For compatibility with older systems, you can use Windows Media 8 system profiles:
Using Windows Media 8 profile:
```csharp
var wmv8Profile = new WMVOutput
{
Mode = WMVMode.V8SystemProfile,
V8ProfileName = "Windows Media Video 8 for Dial-up Access (28.8 Kbps)",
};
```
Customizing streaming settings for Windows Media 8 profiles:
```csharp
var wmv8StreamingProfile = new WMVOutput
{
Mode = WMVMode.V8SystemProfile,
V8ProfileName = "Windows Media Video 8 for Local Area Network (384 Kbps)",
Network_Streaming_WMV_Maximum_Clients = 25,
Custom_Video_TVSystem = WMVTVSystem.PAL // Optional TV system override
};
```
### Apply settings to your core object
```csharp
var core = new VideoCaptureCore(); // or VideoEditCore
core.Output_Format = wmvOutput;
core.Output_Filename = "output.wmv";
```
## Cross-platform WMV output
[!badge variant="dark" size="xl" text="VideoCaptureCoreX"] [!badge variant="dark" size="xl" text="VideoEditCoreX"] [!badge variant="dark" size="xl" text="MediaBlocksPipeline"]
The `WMVEncoderSettings` class provides a cross-platform solution for WMV encoding using GStreamer technology.
### Features
- Platform-independent implementation
- Integration with GStreamer backend
- Simple configuration interface
- Availability checking
### Sample Code
Add the WebM output to the Video Capture SDK core instance:
```csharp
var wmvOutput = new WMVOutput("output.wmv");
var core = new VideoCaptureCoreX();
core.Outputs_Add(wmvOutput, true);
```
Set the output format for the Video Edit SDK core instance:
```csharp
var wmvOutput = new WMVOutput("output.wmv");
var core = new VideoEditCoreX();
core.Output_Format = wmvOutput;
```
Create a Media Blocks WebM output instance:
```csharp
var wma = new WMAEncoderSettings();
var wmv = new WMVEncoderSettings();
var sinkSettings = new ASFSinkSettings("output.wmv");
var webmOutput = new WMVOutputBlock(sinkSettings, wmv, wma);
```
### Choosing Between Encoders
Consider the following factors when choosing between Windows-specific `WMVOutput` and cross-platform `WMVEncoderSettings`:
#### Windows-Specific WMVOutput
- Pros:
- Full access to Windows Media format features
- Advanced rate control options
- Network streaming support
- Profile-based configuration
- Cons:
- Windows-only compatibility
- Requires Windows Media components
#### Cross-Platform WMV
- Pros:
- Platform independence
- Simpler implementation
- Cons:
- More limited feature set
- Basic configuration options only
## Best Practices
1. Always check encoder availability before use, especially with cross-platform implementations
2. Use appropriate rate control modes based on your quality and bandwidth requirements
3. Consider using internal profiles for common scenarios when using WMVOutput
4. Implement proper error handling for codec availability checks
5. Test encoding performance across different platforms when using cross-platform solutions
---
Visit our [GitHub](https://github.com/visioforge/.Net-SDK-s-samples) page to get more code samples.
---END OF PAGE---
# Local File: .\dotnet\general\video-effects\add.md
---
title: Implementing Video Effects in .NET Applications
description: Master the implementation of video effects in .NET with this detailed tutorial. Learn to add, update, and configure video effect parameters in multiple SDK environments including capture, playback, and editing applications with practical C# code examples.
sidebar_label: Implementing Video Effects
---
# Implementing Video Effects in .NET SDK Applications
Video effects can significantly enhance the visual quality and user experience of your media applications. This guide demonstrates how to properly implement and manage video effects across various .NET SDK environments.
[!badge size="xl" target="blank" variant="info" text="Video Capture SDK .Net"](https://www.visioforge.com/video-capture-sdk-net) [!badge size="xl" target="blank" variant="info" text="Video Edit SDK .Net"](https://www.visioforge.com/video-edit-sdk-net) [!badge size="xl" target="blank" variant="info" text="Media Player SDK .Net"](https://www.visioforge.com/media-player-sdk-net) [!badge size="xl" target="blank" variant="info" text="Media Blocks SDK .Net"](https://www.visioforge.com/media-blocks-sdk-net)
## Implementation Overview
When working with video processing in .NET applications, you'll often need to apply various effects to enhance or modify the video content. The following sections explain the process step-by-step.
## C# Code Implementation
### Example: Lightness Effect in Media Player SDK
This detailed example demonstrates how to implement a lightness effect, which is a common video enhancement technique. The same implementation approach applies to Video Edit SDK .Net and Video Capture SDK .Net environments.
### Step 1: Define the Effect Interface
First, you need to declare the appropriate interface for your desired effect:
```cs
IVideoEffectLightness lightness;
```
### Step 2: Retrieve or Create the Effect Instance
Each effect requires a unique identifier. The following code checks if the effect already exists in the SDK control:
```cs
var effect = MediaPlayer1.Video_Effects_Get("Lightness");
```
### Step 3: Add the Effect if Not Present
If the effect doesn't exist yet, you'll need to instantiate and add it to your video processing pipeline:
```cs
if (effect == null)
{
lightness = new VideoEffectLightness(true, 100);
MediaPlayer1.Video_Effects_Add(lightness);
}
```
### Step 4: Update Existing Effect Parameters
If the effect is already present, you can modify its parameters to achieve the desired visual outcome:
```cs
else
{
lightness = effect as IVideoEffectLightness;
if (lightness != null)
{
lightness.Value = 100;
}
}
```
## Important Implementation Notes
For proper functionality, ensure you enable effects processing before starting video playback or capture:
* Set the `Video_Effects_Enable` property to `true` before calling any `Play()` or `Start()` methods
* Effects will not be applied if this property is not enabled
* Changing effect parameters during playback will update the visual output in real-time
## System Requirements
To successfully implement video effects in your .NET application, you'll need:
* SDK redistributable packages properly installed
* Sufficient system resources for real-time video processing
* Appropriate .NET framework version
## Additional Resources
For more advanced implementations and examples of video effect techniques:
---
Visit our [GitHub](https://github.com/visioforge/.Net-SDK-s-samples) repository for additional code samples and complete projects.
---END OF PAGE---
# Local File: .\dotnet\general\video-effects\image-overlay.md
---
title: Adding Image Overlays to Video Streams
description: Learn how to overlay images, animated GIFs, and transparent PNGs on video streams in .NET. Step-by-step guide with code examples for implementing image overlays using different formats and transparency effects.
sidebar_label: Image Overlay
---
# Image overlay
[!badge size="xl" target="blank" variant="info" text="Video Capture SDK .Net"](https://www.visioforge.com/video-capture-sdk-net) [!badge size="xl" target="blank" variant="info" text="Video Edit SDK .Net"](https://www.visioforge.com/video-edit-sdk-net) [!badge size="xl" target="blank" variant="info" text="Media Player SDK .Net"](https://www.visioforge.com/media-player-sdk-net) [!badge size="xl" target="blank" variant="info" text="Media Blocks SDK .Net"](https://www.visioforge.com/media-blocks-sdk-net)
[!badge variant="dark" size="xl" text="VideoCaptureCore"] [!badge variant="dark" size="xl" text="MediaPlayerCore"] [!badge variant="dark" size="xl" text="VideoEditCore"]
## Introduction
This example demonstrates how to overlay an image on a video stream.
JPG, PNG, BMP, and GIF images are supported.
## Sample code
Most simple image overlay with image added from a file with custom position:
```csharp
var effect = new VideoEffectImageLogo(true, "imageoverlay");
effect.Filename = @"logo.png";
effect.Left = 100;
effect.Top = 100;
VideoCapture1.Video_Effects_Add(effect);
```
### Transparent image overlay
SDK fully supports transparency in PNG images. If you want to set a custom transparency level, you can use the `TransparencyLevel` property with a range (0..255).
```csharp
var effect = new VideoEffectImageLogo(true, "imageoverlay");
effect.Filename = @"logo.jpg";
effect.TransparencyLevel = 50;
VideoCapture1.Video_Effects_Add(effect);
```
### Animated GIF overlay
You can overlay an animated GIF image on a video stream. The SDK will play the GIF animation in the overlay.
```csharp
var effect = new VideoEffectImageLogo(true, "imageoverlay");
effect.Filename = @"animated.gif";
effect.Animated = true;
effect.AnimationEnabled = true;
VideoCapture1.Video_Effects_Add(effect);
```
### Image overlay from `System.Drawing.Bitmap`
You can overlay an image from a `System.Drawing.Bitmap` object.
```csharp
var effect = new VideoEffectImageLogo(true, "imageoverlay");
effect.MemoryBitmap = new Bitmap("logo.jpg");
VideoCapture1.Video_Effects_Add(effect);
```
### Image overlay from RGB/RGBA byte array
You can overlay an image from RGB/RGBA data.
```csharp
// add image logo
var effect = new VideoEffectImageLogo(true, "imageoverlay");
// load image from JPG file
var bitmap = new Bitmap("logo.jpg");
// lock bitmap data and save to byte data (IntPtr)
var bitmapData = bitmap.LockBits(new Rectangle(0, 0, bitmap.Width, bitmap.Height), ImageLockMode.ReadOnly, PixelFormat.Format24bppRgb);
var pixels = Marshal.AllocCoTaskMem(bitmapData.Stride * bitmapData.Height);
NativeAPI.CopyMemory(pixels, bitmapData.Scan0, bitmapData.Stride * bitmapData.Height);
bitmap.UnlockBits(bitmapData);
// set data to effect
effect.Bitmap = pixels;
// set bitmap properties
effect.BitmapWidth = bitmap.Width;
effect.BitmapHeight = bitmap.Height;
effect.BitmapDepth = 3; // RGB24
// free bitmap
bitmap.Dispose();
// add effect
VideoCapture1.Video_Effects_Add(effect);
```
---
Visit our [GitHub](https://github.com/visioforge/.Net-SDK-s-samples) page to get more code samples.
---END OF PAGE---
# Local File: .\dotnet\general\video-effects\index.md
---
title: Advanced Video Effects & Processing for .Net SDKs
description: Enhance your applications with powerful video effects, overlays, and processing capabilities for .Net developers. Learn how to implement professional-grade visual effects, text/image overlays, and custom video processing in your .Net applications.
sidebar_label: Video Effects And Processing
order: 15
---
# Video Effects and Processing for .Net Applications
[!badge size="xl" target="blank" variant="info" text="Video Capture SDK .Net"](https://www.visioforge.com/video-capture-sdk-net)[!badge size="xl" target="blank" variant="info" text="Video Capture SDK .Net"](https://www.visioforge.com/video-capture-sdk-net) [!badge size="xl" target="blank" variant="info" text="Video Edit SDK .Net"](https://www.visioforge.com/video-edit-sdk-net) [!badge size="xl" target="blank" variant="info" text="Media Player SDK .Net"](https://www.visioforge.com/media-player-sdk-net) [!badge size="xl" target="blank" variant="info" text="Media Blocks SDK .Net"](https://www.visioforge.com/media-blocks-sdk-net)
## Introduction
Our .Net SDKs provide developers with an extensive array of video effects and processing capabilities. These powerful tools enable you to transform raw video content into polished, professional-quality media. Whether you need to add dynamic overlays, apply visual effects, or perform advanced video manipulation, these SDKs deliver the functionality required for sophisticated media applications.
## Available Video Effect Categories
### Real-time Effects
* Color correction and grading
* Blur and sharpening filters
* Noise reduction algorithms
* Chroma key (green screen) processing
### Video Enhancement
* Resolution upscaling
* Frame rate conversion
* Dynamic contrast adjustment
* HDR tone mapping
## Overlay Capabilities
* [Text overlay](text-overlay.md) - Add customizable text with control over font, size, color, and animation
* [Image overlay](image-overlay.md) - Incorporate logos, watermarks, and graphic elements with transparency support
## Video Processing Features
### Transformation Operations
* Rotation, scaling, and cropping
* Picture-in-picture effects
* Custom aspect ratio conversion
* Video composition and layering
### Advanced Processing
* Timeline-based editing capabilities
* Transition effects between scenes
* Audio-video synchronization tools
* Performance-optimized processing pipeline
* [Video sample grabber](video-sample-grabber.md) - Extract frames and process video data in real-time
## Integration Methods
Our SDKs are designed for seamless integration with your .Net applications. The architecture allows for both simple implementations and advanced customizations to meet your specific project requirements.
## More Information
Numerous additional video effects and processing features are available in the SDKs. Please refer to the documentation for the specific SDK you are using for detailed implementation examples and API references.
---
Visit our [GitHub](https://github.com/visioforge/.Net-SDK-s-samples) page to access more code samples and implementation examples.
---END OF PAGE---
# Local File: .\dotnet\general\video-effects\text-overlay.md
---
title: Advanced Text Overlays for .NET Video Processing
description: Learn how to implement custom text overlays in video streams with complete control over font, size, color, position, rotation, and animation effects. Perfect for adding timestamps, captions, and dynamic text to your .NET video applications.
sidebar_label: Text Overlay
---
# Implementing Text Overlays in Video Streams
[!badge size="xl" target="blank" variant="info" text="Video Capture SDK .Net"](https://www.visioforge.com/video-capture-sdk-net) [!badge size="xl" target="blank" variant="info" text="Video Edit SDK .Net"](https://www.visioforge.com/video-edit-sdk-net) [!badge size="xl" target="blank" variant="info" text="Media Player SDK .Net"](https://www.visioforge.com/media-player-sdk-net) [!badge size="xl" target="blank" variant="info" text="Media Blocks SDK .Net"](https://www.visioforge.com/media-blocks-sdk-net)
[!badge variant="dark" size="xl" text="VideoCaptureCore"] [!badge variant="dark" size="xl" text="MediaPlayerCore"] [!badge variant="dark" size="xl" text="VideoEditCore"]
## Introduction
Text overlays provide a powerful way to enhance video streams with dynamic information, branding, captions, or timestamps. This guide explores how to implement fully customizable text overlays with precise control over appearance, positioning, and animations.
## Classic Engine Implementation
Our classic engines (VideoCaptureCore, MediaPlayerCore, VideoEditCore) offer a straightforward API for adding text to video streams.
### Basic Text Overlay Implementation
The following example demonstrates a simple text overlay with custom positioning:
```csharp
var effect = new VideoEffectTextLogo(true, "textoverlay");
// set position
effect.Left = 20;
effect.Top = 20;
// set Font (System.Drawing.Font)
effect.Font = new Font("Arial", 40);
// set text
effect.Text = "Hello, world!";
// set text color
effect.FontColor = Color.Yellow;
MediaPlayer1.Video_Effects_Add(effect);
```
### Dynamic Information Display Options
#### Timestamp and Date Display
You can automatically display current date, time, or video timestamp information using specialized modes:
```csharp
// set mode and mask
effect.Mode = TextLogoMode.DateTime;
effect.DateTimeMask = "yyyy-MM-dd. hh:mm:ss";
```
The SDK supports custom formatting masks for timestamps and dates, allowing precise control over the displayed information format. Frame number display requires no additional configuration.
### Animation and Transition Effects
#### Implementing Fade Effects
Create smooth text appearances and disappearances with customizable fade effects:
```csharp
// add the fade-in
effect.FadeIn = true;
effect.FadeInDuration = TimeSpan.FromMilliseconds(5000);
// add the fade-out
effect.FadeOut = true;
effect.FadeOutDuration = TimeSpan.FromMilliseconds(5000);
```
### Text Rotation Options
Rotate your text overlay to match your design requirements:
```csharp
// set rotation mode
effect.RotationMode = TextRotationMode.Rm90;
```
### Text Flip Transformations
Apply mirror effects to your text for creative presentations:
```csharp
// set flip mode
effect.FlipMode = TextFlipMode.XAndY;
```
## X-Engine Implementation
Our newer X-engines (VideoCaptureCoreX, MediaPlayerCoreX, VideoEditCoreX) provide an enhanced API with additional features.
### Basic X-Engine Text Overlay
```csharp
// text overlay
var textOverlay = new TextOverlayVideoEffect() { Text = "Hello World!" };
// set position
textOverlay.XPad = 20;
textOverlay.YPad = 20;
textOverlay.HorizontalAlignment = TextOverlayHAlign.Left;
textOverlay.VerticalAlignment = TextOverlayVAlign.Top;
// set Font (System.Drawing.Font)
textOverlay.Font = new FontSettings("Arial", "Bold", 24);
// set text
textOverlay.Text = "Hello, world!";
// set text color
textOverlay.Color = SKColors.Yellow;
// add the effect
await videoCapture1.Video_Effects_AddOrUpdateAsync(textOverlay);
```
### Advanced Dynamic Content Display
#### Video Timestamp Integration
Display the current position within the video:
```csharp
// text overlay
var textOverlay = new TextOverlayVideoEffect();
// set text
textOverlay.Text = "Timestamp: ";
// set Timestamp mode
textOverlay.Mode = TextOverlayMode.Timestamp;
// add the effect
await videoCapture1.Video_Effects_AddOrUpdateAsync(textOverlay);
```
#### System Time Integration
Show the current system time alongside your video content:
```csharp
// text overlay
var textOverlay = new TextOverlayVideoEffect();
// set text
textOverlay.Text = "Time: ";
// set System Time mode
textOverlay.Mode = TextOverlayMode.SystemTime;
// add the effect
await videoCapture1.Video_Effects_AddOrUpdateAsync(textOverlay);
```
## Best Practices for Text Overlays
- Consider readability against different backgrounds
- Use appropriate font sizes for the target display resolution
- Implement fade effects for less intrusive overlays
- Test performance impact with complex text effects
---
For more code examples and implementation details, visit our [GitHub repository](https://github.com/visioforge/.Net-SDK-s-samples).
---END OF PAGE---
# Local File: .\dotnet\general\video-effects\video-sample-grabber.md
---
title: Video sample grabber usage
description: C# code sample - how to use video sample grabber in Video Capture SDK .Net, Media Player SDK .Net, Video Edit SDK .Net.
sidebar_label: Video Sample Grabber Usage
---
# Video sample grabber usage
[!badge size="xl" target="blank" variant="info" text="Video Capture SDK .Net"](https://www.visioforge.com/video-capture-sdk-net) [!badge size="xl" target="blank" variant="info" text="Video Edit SDK .Net"](https://www.visioforge.com/video-edit-sdk-net) [!badge size="xl" target="blank" variant="info" text="Media Player SDK .Net"](https://www.visioforge.com/media-player-sdk-net) [!badge size="xl" target="blank" variant="info" text="Media Blocks SDK .Net"](https://www.visioforge.com/media-blocks-sdk-net)
## Getting RAW video frames as unmanaged memory pointer inside the structure
+++ X-engines
```csharp
// Subscribe to the video frame buffer event
VideoCapture1.OnVideoFrameBuffer += OnVideoFrameBuffer;
private void OnVideoFrameBuffer(object sender, VideoFrameXBufferEventArgs e)
{
// Process the VideoFrameX object
ProcessFrame(e.Frame);
// If you've modified the frame and want to update the video stream
e.UpdateData = true;
}
// Example of processing a VideoFrameX frame - adjusting brightness
private void ProcessFrame(VideoFrameX frame)
{
// Only process RGB/BGR/RGBA/BGRA formats
if (frame.Format != VideoFormatX.RGB &&
frame.Format != VideoFormatX.BGR &&
frame.Format != VideoFormatX.RGBA &&
frame.Format != VideoFormatX.BGRA)
{
return;
}
// Get the data as a byte array for manipulation
byte[] data = frame.ToArray();
// Determine the pixel size based on format
int pixelSize = (frame.Format == VideoFormatX.RGB || frame.Format == VideoFormatX.BGR) ? 3 : 4;
// Brightness factor (1.2 = 20% brighter, 0.8 = 20% darker)
float brightnessFactor = 1.2f;
// Process each pixel
for (int i = 0; i < data.Length; i += pixelSize)
{
// Adjust R, G, B channels
for (int j = 0; j < 3; j++)
{
int newValue = (int)(data[i + j] * brightnessFactor);
data[i + j] = (byte)Math.Min(255, newValue);
}
}
// Copy the modified data back to the frame
Marshal.Copy(data, 0, frame.Data, data.Length);
}
```
+++ Classic engines
```csharp
// Subscribe to the video frame buffer event
VideoCapture1.OnVideoFrameBuffer += OnVideoFrameBuffer;
private void OnVideoFrameBuffer(object sender, VideoFrameBufferEventArgs e)
{
// Process the VideoFrame structure
ProcessFrame(e.Frame);
// If you've modified the frame and want to update the video stream
e.UpdateData = true;
}
// Example of processing a VideoFrame - adjusting brightness
private void ProcessFrame(VideoFrame frame)
{
// Only process RGB format for this example
if (frame.Info.Colorspace != RAWVideoColorSpace.RGB24)
{
return;
}
// Get the data as a byte array for manipulation
byte[] data = frame.ToArray();
// Brightness factor (1.2 = 20% brighter, 0.8 = 20% darker)
float brightnessFactor = 1.2f;
// Process each pixel (RGB24 format = 3 bytes per pixel)
for (int i = 0; i < data.Length; i += 3)
{
// Adjust R, G, B channels
for (int j = 0; j < 3; j++)
{
int newValue = (int)(data[i + j] * brightnessFactor);
data[i + j] = (byte)Math.Min(255, newValue);
}
}
// Copy the modified data back to the frame
Marshal.Copy(data, 0, frame.Data, data.Length);
}
```
+++ Media Blocks SDK
```csharp
// Create and set up video sample grabber block
var videoSampleGrabberBlock = new VideoSampleGrabberBlock(VideoFormatX.RGB);
videoSampleGrabberBlock.OnVideoFrameBuffer += OnVideoFrameBuffer;
private void OnVideoFrameBuffer(object sender, VideoFrameXBufferEventArgs e)
{
// Process the VideoFrameX object
ProcessFrame(e.Frame);
// If you've modified the frame and want to update the video stream
e.UpdateData = true;
}
// Example of processing a VideoFrameX frame - adjusting brightness
private void ProcessFrame(VideoFrameX frame)
{
if (frame.Format != VideoFormatX.RGB)
{
return;
}
// Get the data as a byte array for manipulation
byte[] data = frame.ToArray();
// Brightness factor (1.2 = 20% brighter, 0.8 = 20% darker)
float brightnessFactor = 1.2f;
// Process each pixel (RGB format = 3 bytes per pixel)
for (int i = 0; i < data.Length; i += 3)
{
// Adjust R, G, B channels
for (int j = 0; j < 3; j++)
{
int newValue = (int)(data[i + j] * brightnessFactor);
data[i + j] = (byte)Math.Min(255, newValue);
}
}
// Copy the modified data back to the frame
Marshal.Copy(data, 0, frame.Data, data.Length);
}
```
+++
## Working with bitmap frames
If you need to work with managed Bitmap objects instead of raw memory pointers, you can use the `OnVideoFrameBitmap` event of the `core` classes or the SampleGrabberBlock:
```csharp
// Subscribe to the bitmap frame event
VideoCapture1.OnVideoFrameBitmap += OnVideoFrameBitmap;
private void OnVideoFrameBitmap(object sender, VideoFrameBitmapEventArgs e)
{
// Process the Bitmap object
ProcessBitmap(e.Frame);
// If you've modified the bitmap and want to update the video stream
e.UpdateData = true;
}
// Example of processing a Bitmap - adjusting brightness
private void ProcessBitmap(Bitmap bitmap)
{
// Use Bitmap methods or Graphics to manipulate the image
// This example uses ColorMatrix for brightness adjustment
// Create a graphics object from the bitmap
using (Graphics g = Graphics.FromImage(bitmap))
{
// Create a color matrix for brightness adjustment
float brightnessFactor = 1.2f; // 1.0 = no change, >1.0 = brighter, <1.0 = darker
ColorMatrix colorMatrix = new ColorMatrix(new float[][]
{
new float[] {brightnessFactor, 0, 0, 0, 0},
new float[] {0, brightnessFactor, 0, 0, 0},
new float[] {0, 0, brightnessFactor, 0, 0},
new float[] {0, 0, 0, 1, 0},
new float[] {0, 0, 0, 0, 1}
});
// Create an ImageAttributes object and set the color matrix
using (ImageAttributes attributes = new ImageAttributes())
{
attributes.SetColorMatrix(colorMatrix);
// Draw the image with the brightness adjustment
g.DrawImage(bitmap,
new Rectangle(0, 0, bitmap.Width, bitmap.Height),
0, 0, bitmap.Width, bitmap.Height,
GraphicsUnit.Pixel, attributes);
}
}
}
```
## Working with SkiaSharp for cross-platform applications
For cross-platform applications, the VideoSampleGrabberBlock provides the ability to work with SkiaSharp, a high-performance 2D graphics API for .NET. This is especially useful for applications targeting multiple platforms including mobile and web.
### Using the OnVideoFrameSKBitmap event
```csharp
// First, add the SkiaSharp NuGet package to your project
// Install-Package SkiaSharp
// Import necessary namespaces
using SkiaSharp;
using VisioForge.Core.MediaBlocks.VideoProcessing;
using VisioForge.Core.Types.X.Events;
// Create a VideoSampleGrabberBlock with RGBA or BGRA format
// Note: OnVideoFrameSKBitmap event works only with RGBA or BGRA formats
var videoSampleGrabberBlock = new VideoSampleGrabberBlock(VideoFormatX.BGRA);
// Enable the SaveLastFrame property if you want to take snapshots later
videoSampleGrabberBlock.SaveLastFrame = true;
// Subscribe to the SkiaSharp bitmap event
videoSampleGrabberBlock.OnVideoFrameSKBitmap += OnVideoFrameSKBitmap;
// Event handler for SkiaSharp bitmap frames
private void OnVideoFrameSKBitmap(object sender, VideoFrameSKBitmapEventArgs e)
{
// Process the SKBitmap
ProcessSKBitmap(e.Frame);
// Note: Unlike VideoFrameBitmapEventArgs, VideoFrameSKBitmapEventArgs does not have
// an UpdateData property as it's designed for frame viewing/analysis only
}
// Example of processing an SKBitmap - adjusting brightness
private void ProcessSKBitmap(SKBitmap bitmap)
{
// Create a new bitmap to hold the processed image
using (var surface = SKSurface.Create(new SKImageInfo(bitmap.Width, bitmap.Height)))
{
var canvas = surface.Canvas;
// Set up a paint with a color filter for brightness adjustment
using (var paint = new SKPaint())
{
// Create a brightness filter (1.2 = 20% brighter)
float brightnessFactor = 1.2f;
var colorMatrix = new float[]
{
brightnessFactor, 0, 0, 0, 0,
0, brightnessFactor, 0, 0, 0,
0, 0, brightnessFactor, 0, 0,
0, 0, 0, 1, 0
};
paint.ColorFilter = SKColorFilter.CreateColorMatrix(colorMatrix);
// Draw the original bitmap with the brightness filter applied
canvas.DrawBitmap(bitmap, 0, 0, paint);
// If you need to get the result as a new SKBitmap:
var processedImage = surface.Snapshot();
using (var processedBitmap = SKBitmap.FromImage(processedImage))
{
// Use processedBitmap for further operations or display
// For example, display it in a SkiaSharp view
// mySkiaView.SKBitmap = processedBitmap.Copy();
}
}
}
}
```
### Taking snapshots with SkiaSharp
```csharp
// Create a method to capture and save a snapshot
private void CaptureSnapshot(string filePath)
{
// Make sure SaveLastFrame was enabled on the VideoSampleGrabberBlock
if (videoSampleGrabberBlock.SaveLastFrame)
{
// Get the last frame as an SKBitmap
using (var bitmap = videoSampleGrabberBlock.GetLastFrameAsSKBitmap())
{
if (bitmap != null)
{
// Save the bitmap to a file
using (var image = SKImage.FromBitmap(bitmap))
using (var data = image.Encode(SKEncodedImageFormat.Png, 100))
using (var stream = File.OpenWrite(filePath))
{
data.SaveTo(stream);
}
}
}
}
}
```
### Advantages of using SkiaSharp
1. **Cross-platform compatibility**: Works on Windows, macOS, Linux, iOS, Android, and WebAssembly
2. **Performance**: Provides high-performance graphics processing
3. **Modern API**: Offers a comprehensive set of drawing, filtering, and transformation functions
4. **Memory efficiency**: More efficient memory management compared to System.Drawing
5. **No platform dependencies**: No dependency on platform-specific imaging libraries
## Frame processing information
You can get video frames from live sources or files using the `OnVideoFrameBuffer` and `OnVideoFrameBitmap` events.
The `OnVideoFrameBuffer` event is faster and provides the unmanaged memory pointer for the decoded frame. The `OnVideoFrameBitmap` event is slower, but you get the decoded frame as the `Bitmap` class object.
### Understanding the frame objects
- **VideoFrameX** (X-engines): Contains frame data, dimensions, format, timestamp, and methods for manipulating raw video data
- **VideoFrame** (Classic engines): Similar structure but with a different memory layout
- **Common properties**:
- Width/Height: Frame dimensions
- Format/Colorspace: Pixel format (RGB, BGR, RGBA, etc.)
- Stride: Number of bytes per scan line
- Timestamp: Frame's position in the video timeline
- Data: Pointer to unmanaged memory with pixel data
### Important considerations
1. The frame's pixel format affects how you process the data:
- RGB/BGR: 3 bytes per pixel
- RGBA/BGRA/ARGB: 4 bytes per pixel (with alpha channel)
- YUV formats: Different component arrangements
2. Set `e.UpdateData = true` if you've modified the frame data and want the changes to be visible in the video stream.
3. For processing that requires multiple frames or complex operations, consider using a buffer or queue to store frames.
4. When using `OnVideoFrameSKBitmap`, select either RGBA or BGRA as the frame format when creating the VideoSampleGrabberBlock.
---
Visit our [GitHub](https://github.com/visioforge/.Net-SDK-s-samples) page to get more code samples.
---END OF PAGE---
# Local File: .\dotnet\general\video-encoders\av1.md
---
title: AV1 encoders usage in VisioForge .Net SDKs
description: AV1 encoders usage in Video Capture SDK .Net, Video Edit SDK .Net, and Media Blocks SDK .Net
sidebar_label: AV1
---
# AV1 Encoders
[!badge size="xl" target="blank" variant="info" text="Video Capture SDK .Net"](https://www.visioforge.com/video-capture-sdk-net) [!badge size="xl" target="blank" variant="info" text="Video Edit SDK .Net"](https://www.visioforge.com/video-edit-sdk-net) [!badge size="xl" target="blank" variant="info" text="Media Blocks SDK .Net"](https://www.visioforge.com/media-blocks-sdk-net)
[!badge variant="dark" size="xl" text="VideoCaptureCoreX"] [!badge variant="dark" size="xl" text="VideoEditCoreX"] [!badge variant="dark" size="xl" text="MediaBlocksPipeline"]
VisioForge supports multiple AV1 encoder implementations, each with its own unique features and capabilities. This document covers the available encoders and their configuration options.
Currently, AV1 encoder are supported in the cross-platform engines: `VideoCaptureCoreX`, `VideoEditCoreX`, and `Media Blocks SDK`.
## Available Encoders
1. [AMD AMF AV1 Encoder (AMF)](https://api.visioforge.org/dotnet/api/VisioForge.Core.Types.X.VideoEncoders.AMFAV1EncoderSettings.html)
2. [NVIDIA NVENC AV1 Encoder (NVENC)](https://api.visioforge.org/dotnet/api/VisioForge.Core.Types.X.VideoEncoders.NVENCAV1EncoderSettings.html)
3. [Intel QuickSync AV1 Encoder (QSV)](https://api.visioforge.org/dotnet/api/VisioForge.Core.Types.X.VideoEncoders.QSVAV1EncoderSettings.html)
4. [AOM AV1 Encoder](https://api.visioforge.org/dotnet/api/VisioForge.Core.Types.X.VideoEncoders.AOMAV1EncoderSettings.html)
5. [RAV1E Encoder](https://api.visioforge.org/dotnet/api/VisioForge.Core.Types.X.VideoEncoders.RAV1EEncoderSettings.html)
You can use AV1 encoder with [WebM output](../output-formats/webm.md) or for network streaming.
## AMD AMF AV1 Encoder
The AMD AMF AV1 encoder provides hardware-accelerated encoding using AMD graphics cards.
### Features
- Multiple quality presets
- Variable bitrate control modes
- GOP size control
- QP (Quantization Parameter) control
- Smart Access Video support
### Rate Control Modes
- `Default`: Depends on Usage
- `CQP`: Constant QP
- `LCVBR`: Latency Constrained VBR
- `VBR`: Peak Constrained VBR
- `CBR`: Constant Bitrate
### Sample Usage
```csharp
var encoderSettings = new AMFAV1EncoderSettings
{
Bitrate = 3000, // 3 Mbps
GOPSize = 30, // GOP size of 30 frames
Preset = AMFAV1EncoderPreset.Quality, // Quality preset
RateControl = AMFAV1RateControlMode.VBR, // Variable Bitrate mode
Usage = AMFAV1EncoderUsage.Transcoding, // Transcoding usage
MaxBitrate = 5000, // 5 Mbps max bitrate
QpI = 26, // I-frame QP
QpP = 26, // P-frame QP
RefFrames = 1, // Number of reference frames
SmartAccessVideo = false // Smart Access Video disabled
};
```
## NVIDIA NVENC AV1 Encoder
NVIDIA's NVENC AV1 encoder provides hardware-accelerated encoding using NVIDIA GPUs.
### Features
- Multiple encoding presets
- Adaptive B-frame support
- Temporal AQ (Adaptive Quantization)
- VBV (Video Buffering Verifier) buffer control
- Spatial AQ support
### Rate Control Modes
- `Default`: Default mode
- `ConstQP`: Constant Quantization Parameter
- `CBR`: Constant Bitrate
- `VBR`: Variable Bitrate
- `CBR_LD_HQ`: Low-delay CBR, high quality
- `CBR_HQ`: CBR, high quality (slower)
- `VBR_HQ`: VBR, high quality (slower)
### Sample Usage
```csharp
var encoderSettings = new NVENCAV1EncoderSettings
{
Bitrate = 3000, // 3 Mbps
Preset = NVENCPreset.HighQuality, // High quality preset
RateControl = NVENCRateControl.VBR, // Variable Bitrate mode
GOPSize = 75, // GOP size of 75 frames
MaxBitrate = 5000, // 5 Mbps max bitrate
BFrames = 2, // 2 B-frames between I and P
RCLookahead = 8, // 8 frames lookahead
TemporalAQ = true, // Enable temporal AQ
Tune = NVENCTune.HighQuality, // High quality tuning
VBVBufferSize = 6000 // 6000k VBV buffer
};
```
## Intel QuickSync AV1 Encoder
Intel's QuickSync AV1 encoder provides hardware-accelerated encoding using Intel GPUs.
### Features
- Low latency mode support
- Configurable target usage
- Reference frame control
- Flexible GOP size settings
### Rate Control Modes
- `CBR`: Constant Bitrate
- `VBR`: Variable Bitrate
- `CQP`: Constant Quantizer
### Sample Usage
```csharp
var encoderSettings = new QSVAV1EncoderSettings
{
Bitrate = 2000, // 2 Mbps
LowLatency = false, // Standard latency mode
TargetUsage = 4, // Balanced quality/speed
GOPSize = 30, // GOP size of 30 frames
MaxBitrate = 4000, // 4 Mbps max bitrate
QPI = 26, // I-frame QP
QPP = 28, // P-frame QP
RateControl = QSVAV1EncRateControl.VBR, // Variable Bitrate mode
RefFrames = 1 // Number of reference frames
};
```
## AOM AV1 Encoder
The Alliance for Open Media (AOM) AV1 encoder is a software-based reference implementation.
### Features
- Buffer control settings
- CPU usage optimization
- Frame dropping support
- Multi-threading capabilities
- Super-resolution support
### Rate Control Modes
- `VBR`: Variable Bit Rate Mode
- `CBR`: Constant Bit Rate Mode
- `CQ`: Constrained Quality Mode
- `Q`: Constant Quality Mode
### Sample Usage
```csharp
var encoderSettings = new AOMAV1EncoderSettings
{
BufferInitialSize = TimeSpan.FromMilliseconds(4000),
BufferOptimalSize = TimeSpan.FromMilliseconds(5000),
BufferSize = TimeSpan.FromMilliseconds(6000),
CPUUsed = 4, // CPU usage level
DropFrame = 0, // Disable frame dropping
RateControl = AOMAV1EncoderEndUsageMode.VBR, // Variable Bitrate mode
TargetBitrate = 256, // 256 Kbps
Threads = 0, // Auto thread count
UseRowMT = true, // Enable row-based threading
SuperResMode = AOMAV1SuperResolutionMode.None // No super-resolution
};
```
## RAV1E Encoder
RAV1E is a fast and safe AV1 encoder written in Rust.
### Features
- Speed preset control
- Quantizer settings
- Key frame interval control
- Low latency mode
- Psychovisual tuning
### Sample Usage
```csharp
var encoderSettings = new RAV1EEncoderSettings
{
Bitrate = 3000, // 3 Mbps
LowLatency = false, // Standard latency mode
MaxKeyFrameInterval = 240, // Maximum keyframe interval
MinKeyFrameInterval = 12, // Minimum keyframe interval
MinQuantizer = 0, // Minimum quantizer value
Quantizer = 100, // Base quantizer value
SpeedPreset = 6, // Speed preset (0-10)
Tune = RAV1EEncoderTune.Psychovisual // Psychovisual tuning
};
```
## General Usage Notes
1. All encoders implement the `IAV1EncoderSettings` interface, providing a consistent way to create encoder blocks.
2. Each encoder has its own specific set of optimizations and trade-offs.
3. Hardware encoders (AMF, NVENC, QSV) generally provide better performance but may have specific hardware requirements.
4. Software encoders (AOM, RAV1E) offer more flexibility but may require more CPU resources.
## Recommendations
- For AMD GPUs: Use AMF encoder
- For NVIDIA GPUs: Use NVENC encoder
- For Intel GPUs: Use QSV encoder
- For maximum quality: Use AOM encoder
- For CPU-efficient encoding: Use RAV1E encoder
## Best Practices
1. Always check encoder availability before using it
2. Set appropriate bitrates based on your target resolution and framerate
3. Use appropriate GOP sizes based on your content type
4. Consider the trade-off between quality and encoding speed
5. Test different rate control modes to find the best fit for your use case
---END OF PAGE---
# Local File: .\dotnet\general\video-encoders\h264.md
---
title: H264 encoders usage in VisioForge .Net SDKs
description: H264 encoders usage in Video Capture SDK .Net, Video Edit SDK .Net, and Media Blocks SDK .Net
sidebar_label: H264
---
# H264 Encoders
[!badge size="xl" target="blank" variant="info" text="Video Capture SDK .Net"](https://www.visioforge.com/video-capture-sdk-net) [!badge size="xl" target="blank" variant="info" text="Video Edit SDK .Net"](https://www.visioforge.com/video-edit-sdk-net) [!badge size="xl" target="blank" variant="info" text="Media Blocks SDK .Net"](https://www.visioforge.com/media-blocks-sdk-net)
[!badge variant="dark" size="xl" text="VideoCaptureCoreX"] [!badge variant="dark" size="xl" text="VideoEditCoreX"] [!badge variant="dark" size="xl" text="MediaBlocksPipeline"]
This document provides detailed information about available H264 encoders, their features, rate control options, and usage examples.
For Windows-only engines check the [MP4 output](../output-formats/mp4.md) page.
## Overview
The following H264 encoders are available:
1. AMD AMF H264 Encoder (GPU-accelerated)
2. NVIDIA NVENC H264 Encoder (GPU-accelerated)
3. Intel QSV H264 Encoder (GPU-accelerated)
4. OpenH264 Encoder (Software)
5. Apple Media H264 Encoder (Hardware-accelerated for Apple devices)
6. VAAPI H264 Encoder (Linux hardware acceleration)
7. Various OMX-based encoders (Platform-specific)
## AMD AMF H264 Encoder
AMD's Advanced Media Framework (AMF) provides hardware-accelerated encoding on AMD GPUs.
### Key Features
- Hardware-accelerated encoding
- Multiple preset options (Balanced, Speed, Quality)
- Configurable GOP size
- CABAC entropy coding support
- Various rate control methods
### Rate Control Options
```csharp
public enum AMFH264EncoderRateControl
{
Default = -1, // Default, depends on usage
CQP = 0, // Constant QP
CBR = 1, // Constant bitrate
VBR = 2, // Peak constrained VBR
LCVBR = 3 // Latency Constrained VBR
}
```
### Sample Usage
```csharp
var settings = new AMFH264EncoderSettings
{
Bitrate = 5000, // 5 Mbps
CABAC = true,
RateControl = AMFH264EncoderRateControl.CBR,
Preset = AMFH264EncoderPreset.Quality,
Profile = AMFH264EncoderProfile.Main,
Level = AMFH264EncoderLevel.Level4_2,
GOPSize = 30
};
var encoder = new H264EncoderBlock(settings);
```
## NVIDIA NVENC H264 Encoder
NVIDIA's hardware-based video encoder provides efficient H264 encoding on NVIDIA GPUs.
### Key Features
- Hardware-accelerated encoding
- B-frame support
- Adaptive quantization
- Multiple reference frames
- Weighted prediction
- Look-ahead support
### Rate Control Options
Inherited from NVENCBaseEncoderSettings with additional H264-specific options:
- Constant Bitrate (CBR)
- Variable Bitrate (VBR)
- Constant QP (CQP)
- Quality-based VBR
### Sample Usage
```csharp
var settings = new NVENCH264EncoderSettings
{
Bitrate = 5000,
MaxBitrate = 8000,
RCLookahead = 20,
BFrames = 2,
Profile = NVENCH264Profile.High,
Level = NVENCH264Level.Level4_2,
TemporalAQ = true
};
var encoder = new H264EncoderBlock(settings);
```
## Intel Quick Sync Video (QSV) H264 Encoder
Intel's hardware-based video encoder available on Intel processors with integrated graphics.
### Key Features
- Hardware-accelerated encoding
- Low latency mode
- Multiple rate control methods
- B-frame support
- Intelligent rate control options
### Rate Control Options
```csharp
public enum QSVH264EncRateControl
{
CBR = 1, // Constant Bitrate
VBR = 2, // Variable Bitrate
CQP = 3, // Constant Quantizer
AVBR = 4, // Average Variable Bitrate
LA_VBR = 8, // Look Ahead VBR
ICQ = 9, // Intelligent CQP
VCM = 10, // Video Conferencing Mode
LA_ICQ = 11, // Look Ahead ICQ
LA_HRD = 13, // HRD compliant LA
QVBR = 14 // Quality-defined VBR
}
```
### Sample Usage
```csharp
var settings = new QSVH264EncoderSettings
{
Bitrate = 5000,
MaxBitrate = 8000,
RateControl = QSVH264EncRateControl.VBR,
Profile = QSVH264EncProfile.High,
Level = QSVH264EncLevel.Level4_2,
LowLatency = true,
BFrames = 2
};
var encoder = new H264EncoderBlock(settings);
```
## OpenH264 Encoder
Cisco's open-source H264 software encoder.
### Key Features
- Software-based encoding
- Multiple complexity levels
- Scene change detection
- Adaptive quantization
- Denoising support
### Rate Control Options
```csharp
public enum OpenH264RCMode
{
Quality = 0, // Quality mode
Bitrate = 1, // Bitrate mode
Buffer = 2, // Buffer based
Off = -1 // Rate control off
}
```
### Sample Usage
```csharp
var settings = new OpenH264EncoderSettings
{
Bitrate = 5000,
RateControl = OpenH264RCMode.Bitrate,
Profile = OpenH264Profile.Main,
Level = OpenH264Level.Level4_2,
Complexity = OpenH264Complexity.Medium,
EnableDenoise = true,
SceneChangeDetection = true
};
var encoder = new H264EncoderBlock(settings);
```
## Apple Media H264 Encoder
Hardware-accelerated encoder for Apple platforms.
### Key Features
- Hardware acceleration on Apple devices
- Real-time encoding support
- Frame reordering options
- Quality-based encoding
### Sample Usage
```csharp
var settings = new AppleMediaH264EncoderSettings
{
Bitrate = 5000,
AllowFrameReordering = true,
Quality = 0.8,
Realtime = true
};
var encoder = new H264EncoderBlock(settings);
```
## VAAPI H264 Encoder
Video Acceleration API encoder for Linux systems.
### Key Features
- Hardware acceleration on Linux
- Multiple profile support
- Trellis quantization
- B-frame support
- Various rate control methods
### Rate Control Options
```csharp
public enum VAAPIH264RateControl
{
CQP = 1, // Constant QP
CBR = 2, // Constant bitrate
VBR = 4, // Variable bitrate
VBRConstrained = 5, // Constrained VBR
ICQ = 7, // Intelligent CQP
QVBR = 8 // Quality-defined VBR
}
```
### Sample Usage
```csharp
var settings = new VAAPIH264EncoderSettings
{
Bitrate = 5000,
RateControl = VAAPIH264RateControl.CBR,
Profile = VAAPIH264EncoderProfile.Main,
MaxBFrames = 2,
Trellis = true,
CABAC = true
};
var encoder = new H264EncoderBlock(settings);
```
## OpenMAX (OMX) H264 Encoders Guide
OpenMAX (OMX) is a royalty-free cross-platform API that provides comprehensive streaming media codec and application portability by enabling accelerated multimedia components to be developed, integrated and programmatically accessed across multiple operating systems and silicon platforms.
### OMX Google H264 Encoder
This is a baseline implementation primarily targeted at Android platforms.
```csharp
var settings = new OMXGoogleH264EncoderSettings();
// Configure via Properties dictionary
settings.Properties["some_key"] = "value";
settings.ParseStream = true; // Enable stream parsing (disable for SRT)
```
Key characteristics:
- Generic implementation
- Suitable for most Android devices
- Configurable through properties dictionary
- Minimal direct parameter exposure for maximum compatibility
### OMX Qualcomm H264 Encoder
Optimized for Qualcomm Snapdragon platforms, this encoder leverages hardware acceleration capabilities.
```csharp
var settings = new OMXQualcommH264EncoderSettings
{
Bitrate = 6_000, // 6 Mbps
IFrameInterval = 2, // Keyframe every 2 seconds
ParseStream = true // Enable stream parsing
};
```
Key features:
- Direct bitrate control
- I-frame interval management
- Hardware acceleration on Qualcomm platforms
- Additional properties available through dictionary
### OMX Exynos H264 Encoder
Specifically designed for Samsung Exynos platforms:
```csharp
var settings = new OMXExynosH264EncoderSettings();
// Configure platform-specific options
settings.Properties["quality_level"] = "high";
settings.Properties["hardware_acceleration"] = "true";
```
Characteristics:
- Samsung hardware optimization
- Flexible configuration through properties
- Hardware acceleration support
- Platform-specific optimizations
### OMX SPRD H264 Encoder
Designed for Spreadtrum (UNISOC) platforms:
```csharp
var settings = new OMXSPRDH264EncoderSettings
{
Bitrate = 6_000, // Target bitrate
IFrameInterval = 2, // GOP size in seconds
ParseStream = true // Stream parsing flag
};
```
Features:
- Hardware acceleration for SPRD chips
- Direct bitrate control
- Keyframe interval management
- Additional platform-specific properties
## Common Properties and Usage
All OMX encoders share some common characteristics:
```csharp
// Common interface implementation
public interface IH264EncoderSettings
{
bool ParseStream { get; set; }
KeyFrameDetectedDelegate KeyFrameDetected { get; set; }
H264EncoderType GetEncoderType();
MediaBlock CreateBlock();
}
```
Properties dictionary usage:
```csharp
// Generic way to set platform-specific options
settings.Properties["hardware_acceleration"] = "true";
settings.Properties["quality_preset"] = "balanced";
settings.Properties["thread_count"] = "4";
```
## Best Practices
1. **Encoder Selection**
- Use hardware encoders (AMD, NVIDIA, Intel) when available for better performance
- Fall back to OpenH264 when hardware encoding is not available
- Use platform-specific encoders (Apple Media, VAAPI) when targeting specific platforms
2. **Rate Control Selection**
- Use CBR for streaming applications where consistent bitrate is important
- Use VBR for offline encoding where quality is more important than bitrate consistency
- Use CQP for highest quality when bitrate is not a concern
- Consider using look-ahead options for better quality when latency is not critical
3. **Performance Optimization**
- Adjust GOP size based on content type (smaller for high motion, larger for static content)
- Enable CABAC for better compression efficiency when latency is not critical
- Use appropriate profile and level for target devices
- Consider B-frames for better compression but be aware of latency impact
4. **Platform Detection**:
```csharp
if (OMXSPRDH264EncoderSettings.IsAvailable())
{
// Use SPRD encoder
}
else if (OMXQualcommH264EncoderSettings.IsAvailable())
{
// Fall back to Qualcomm
}
else
{
// Fall back to Google implementation
}
```
## Platform-Specific Considerations
1. **Qualcomm Platforms**:
- Best performance with native bitrate settings
- Optimal for streaming when I-frame interval is 2-3 seconds
- Hardware acceleration should be enabled when possible
2. **Exynos Platforms**:
- Properties dictionary offers more fine-grained control
- Consider using platform-specific quality presets
- Monitor hardware acceleration status
3. **SPRD Platforms**:
- Keep bitrate within platform capabilities
- Use I-frame interval appropriate for content type
- Consider memory constraints when setting properties
4. **General OMX**:
- Always test on target hardware
- Monitor encoder performance metrics
- Have fallback options ready
- Consider power consumption impact
---END OF PAGE---
# Local File: .\dotnet\general\video-encoders\hevc.md
---
title: HEVC Encoding with VisioForge .Net SDKs
description: Learn how to implement hardware HEVC encoding with AMD, NVIDIA, and Intel GPUs in your .NET applications
sidebar_label: HEVC
---
# HEVC Hardware Encoding in .NET Applications
[!badge size="xl" target="blank" variant="info" text="Video Capture SDK .Net"](https://www.visioforge.com/video-capture-sdk-net) [!badge size="xl" target="blank" variant="info" text="Video Edit SDK .Net"](https://www.visioforge.com/video-edit-sdk-net) [!badge size="xl" target="blank" variant="info" text="Media Blocks SDK .Net"](https://www.visioforge.com/media-blocks-sdk-net)
[!badge variant="dark" size="xl" text="VideoCaptureCoreX"] [!badge variant="dark" size="xl" text="VideoEditCoreX"] [!badge variant="dark" size="xl" text="MediaBlocksPipeline"]
This guide explores hardware-accelerated HEVC (H.265) encoding options available in VisioForge .NET SDKs. We'll cover implementation details for AMD, NVIDIA, and Intel GPU encoders, helping you choose the right solution for your video processing needs.
For Windows-specific output formats, refer to our [MP4 output documentation](../output-formats/mp4.md).
## Hardware HEVC Encoders Overview
Modern GPUs offer powerful hardware encoding capabilities that significantly outperform software-based solutions. VisioForge SDKs support three major hardware HEVC encoders:
- **AMD AMF** - For AMD Radeon GPUs
- **NVIDIA NVENC** - For NVIDIA GeForce and professional GPUs
- **Intel QuickSync** - For Intel CPUs with integrated graphics
Each encoder provides unique features and optimization options. Let's explore their capabilities and implementation details.
## AMD AMF HEVC Encoder
AMD's Advanced Media Framework (AMF) delivers hardware-accelerated HEVC encoding on compatible Radeon GPUs. It balances encoding speed, quality, and efficiency for various scenarios.
### Key Features and Settings
- **Rate Control Methods**:
- `CQP` (Constant QP) for fixed quality settings
- `LCVBR` (Latency Constrained VBR) for streaming
- `VBR` (Variable Bitrate) for offline encoding
- `CBR` (Constant Bitrate) for reliable bandwidth usage
- **Usage Profiles**:
- Transcoding (highest quality)
- Ultra Low Latency (for real-time applications)
- Low Latency (for interactive streaming)
- Web Camera (optimized for webcam sources)
- **Quality Presets**: Balance between encoding speed and output quality
### Implementation Example
```csharp
var encoder = new AMFHEVCEncoderSettings
{
Bitrate = 3000, // 3 Mbps target bitrate
MaxBitrate = 5000, // 5 Mbps peak bitrate
RateControl = AMFHEVCEncoderRateControl.CBR,
// Quality optimization
Preset = AMFHEVCEncoderPreset.Quality,
Usage = AMFHEVCEncoderUsage.Transcoding,
// GOP and frame settings
GOPSize = 30, // Keyframe interval
QP_I = 22, // I-frame quantization parameter
QP_P = 22, // P-frame quantization parameter
RefFrames = 1 // Reference frames count
};
```
## NVIDIA NVENC HEVC Encoder
NVIDIA's NVENC technology provides dedicated encoding hardware on GeForce and professional GPUs, offering excellent performance and quality across various bitrates.
### Key Capabilities
- **Multiple Profile Support**:
- Main (8-bit)
- Main10 (10-bit HDR)
- Main444 (high color precision)
- Extended bit depth options (12-bit)
- **Advanced Encoding Features**:
- B-frame support with adaptive placement
- Temporal Adaptive Quantization
- Weighted Prediction
- Look-ahead rate control
- **Performance Presets**: From quality-focused to ultra-fast encoding
### Implementation Example
```csharp
var encoder = new NVENCHEVCEncoderSettings
{
// Bitrate configuration
Bitrate = 3000, // 3 Mbps target
MaxBitrate = 5000, // 5 Mbps maximum
// Profile settings
Profile = NVENCHEVCProfile.Main,
Level = NVENCHEVCLevel.Level5_1,
// Quality enhancement options
BFrames = 2, // Number of B-frames
BAdaptive = true, // Adaptive B-frame placement
TemporalAQ = true, // Temporal adaptive quantization
WeightedPrediction = true, // Improves quality for fades
RCLookahead = 20, // Frames to analyze for rate control
// Buffer settings
VBVBufferSize = 0 // Use default buffer size
};
```
## Intel QuickSync HEVC Encoder
Intel QuickSync leverages the integrated GPU present in modern Intel processors for efficient hardware encoding, making it accessible without a dedicated graphics card.
### Key Features
- **Versatile Rate Control Options**:
- `CBR` (Constant Bitrate)
- `VBR` (Variable Bitrate)
- `CQP` (Constant Quantizer)
- `ICQ` (Intelligent Constant Quality)
- `VCM` (Video Conferencing Mode)
- `QVBR` (Quality-defined VBR)
- **Optimization Settings**:
- Target Usage parameter (quality vs speed balance)
- Low-latency mode for streaming
- HDR conformance controls
- Closed caption insertion options
- **Profile Support**:
- Main (8-bit)
- Main10 (10-bit HDR)
### Implementation Example
```csharp
var encoder = new QSVHEVCEncoderSettings
{
// Bitrate settings
Bitrate = 3000, // 3 Mbps target
MaxBitrate = 5000, // 5 Mbps peak
RateControl = QSVHEVCEncRateControl.VBR,
// Quality tuning
TargetUsage = 4, // 1=Best quality, 7=Fastest encoding
// Stream structure
GOPSize = 30, // Keyframe interval
RefFrames = 2, // Reference frames
// Feature configuration
Profile = QSVHEVCEncProfile.Main,
LowLatency = false, // Enable for streaming
// Advanced options
CCInsertMode = QSVHEVCEncSEIInsertMode.Insert,
DisableHRDConformance = false
};
```
## Quality Presets for Simplified Configuration
All encoders support standardized quality presets through the `VideoQuality` enum, providing a simplified configuration approach:
- **Low**: 1 Mbps target, 2 Mbps max (for basic streaming)
- **Normal**: 3 Mbps target, 5 Mbps max (for standard content)
- **High**: 6 Mbps target, 10 Mbps max (for detailed content)
- **Very High**: 15 Mbps target, 25 Mbps max (for premium quality)
### Using Quality Presets
```csharp
// For AMD AMF
var amfEncoder = new AMFHEVCEncoderSettings(VideoQuality.High);
// For NVIDIA NVENC
var nvencEncoder = new NVENCHEVCEncoderSettings(VideoQuality.High);
// For Intel QuickSync
var qsvEncoder = new QSVHEVCEncoderSettings(VideoQuality.High);
```
## Hardware Detection and Fallback Strategy
A robust implementation should check for encoder availability and implement appropriate fallbacks:
```csharp
// Create the most appropriate encoder for the current system
IHEVCEncoderSettings GetOptimalHEVCEncoder()
{
if (AMFHEVCEncoderSettings.IsAvailable())
{
return new AMFHEVCEncoderSettings(VideoQuality.High);
}
else if (NVENCHEVCEncoderSettings.IsAvailable())
{
return new NVENCHEVCEncoderSettings(VideoQuality.High);
}
else if (QSVHEVCEncoderSettings.IsAvailable())
{
return new QSVHEVCEncoderSettings(VideoQuality.High);
}
else
{
// Fall back to software encoder if no hardware is available
return new SoftwareHEVCEncoderSettings(VideoQuality.High);
}
}
```
## Best Practices for HEVC Encoding
### 1. Encoder Selection
- **AMD GPUs**: Best for applications where you know users have AMD hardware
- **NVIDIA GPUs**: Provides consistent quality across generations, ideal for professional applications
- **Intel QuickSync**: Great universal option when a dedicated GPU isn't guaranteed
### 2. Rate Control Selection
- **Streaming**: Use CBR for consistent bandwidth utilization
- **VoD Content**: VBR provides better quality at the same file size
- **Archival**: CQP ensures consistent quality regardless of content complexity
### 3. Performance Optimization
- Lower the reference frames count for faster encoding
- Adjust GOP size based on content type (smaller for high motion, larger for static scenes)
- Consider disabling B-frames for ultra-low latency applications
### 4. Quality Enhancement
- Enable adaptive quantization features for content with varying complexity
- Use weighted prediction for content with fades or gradual transitions
- Implement look-ahead when encoding quality is more important than latency
## Common Troubleshooting
1. **Encoder unavailability**: Ensure GPU drivers are up-to-date
2. **Lower than expected quality**: Check if quality presets match your content type
3. **Performance issues**: Monitor GPU utilization and adjust settings accordingly
4. **Compatibility problems**: Verify target devices support the selected HEVC profile
## Conclusion
Hardware-accelerated HEVC encoding offers significant performance advantages for .NET applications dealing with video processing. By leveraging AMD AMF, NVIDIA NVENC, or Intel QuickSync through VisioForge SDKs, you can achieve optimal balance between quality, speed, and efficiency.
Choose the right encoder and settings based on your specific requirements, target audience, and content type to deliver the best possible experience in your applications.
Start by detecting available hardware encoders, implementing appropriate quality settings, and testing across various content types to ensure optimal results.
---END OF PAGE---
# Local File: .\dotnet\general\video-encoders\index.md
---
title: Complete Guide to Video Encoders in VisioForge .NET SDKs
description: Detailed overview of video encoders for .NET developers using Video Capture, Video Edit, and Media Blocks SDKs - features, performance, and implementation
sidebar_label: Video Encoders
order: 19
---
# Video Encoders in VisioForge .NET SDKs
[!badge size="xl" target="blank" variant="info" text="Video Capture SDK .Net"](https://www.visioforge.com/video-capture-sdk-net) [!badge size="xl" target="blank" variant="info" text="Video Edit SDK .Net"](https://www.visioforge.com/video-edit-sdk-net) [!badge size="xl" target="blank" variant="info" text="Media Blocks SDK .Net"](https://www.visioforge.com/media-blocks-sdk-net)
## Introduction to Video Encoders
Video encoders are essential components in multimedia processing applications, responsible for compressing video data while maintaining optimal quality. VisioForge .NET SDKs incorporate multiple advanced encoders to meet diverse development requirements across different platforms and use cases.
This guide provides detailed information about each encoder's capabilities, performance characteristics, and implementation details to help .NET developers make informed decisions for their multimedia applications.
## Hardware vs. Software Encoding
When developing video processing applications, choosing between hardware and software encoders significantly impacts application performance and user experience.
### Hardware-Accelerated Encoders
Hardware encoders utilize dedicated processing units (GPUs or specialized hardware):
- **Advantages**: Lower CPU usage, higher encoding speeds, improved battery efficiency
- **Use cases**: Real-time streaming, live video processing, mobile applications
- **Examples in our SDK**: NVIDIA NVENC, AMD AMF, Intel QuickSync
### Software Encoders
Software encoders run on the CPU without specialized hardware:
- **Advantages**: Greater compatibility, more quality control options, platform independence
- **Use cases**: High-quality offline encoding, environments without compatible hardware
- **Examples in our SDK**: OpenH264, Software MJPEG encoder
## Available Video Encoders
Our SDKs provide extensive encoder options to accommodate various project requirements:
### H.264 (AVC) Encoders
H.264 remains one of the most widely used video codecs, offering excellent compression efficiency and broad compatibility.
#### Key Features:
- Multiple profile support (Baseline, Main, High)
- Adjustable bitrate controls (CBR, VBR, CQP)
- B-frame and reference frame configuration
- Hardware acceleration options from major vendors
[Learn more about H.264 encoders →](h264.md)
### HEVC (H.265) Encoders
HEVC delivers superior compression efficiency compared to H.264, enabling higher quality video at the same bitrate or comparable quality at lower bitrates.
#### Key Features:
- Approximately 50% better compression than H.264
- 8-bit and 10-bit color depth support
- Multiple hardware acceleration options
- Advanced rate control mechanisms
[Learn more about HEVC encoders →](hevc.md)
### AV1 Encoder
AV1 represents the next generation of video codecs, offering superior compression efficiency particularly suited for web streaming.
#### Key Features:
- Royalty-free open standard
- Better compression than HEVC
- Increasing browser and device support
- Optimized for web content delivery
[Learn more about AV1 encoder →](av1.md)
### MJPEG Encoders
Motion JPEG provides frame-by-frame JPEG compression, useful for specific applications where individual frame access is important.
#### Key Features:
- Simple implementation
- Low encoding latency
- Independent frame access
- Hardware and software implementations
[Learn more about MJPEG encoders →](mjpeg.md)
### VP8 and VP9 Encoders
These open codecs developed by Google offer royalty-free alternatives with good compression efficiency.
#### Key Features:
- Open-source implementation
- Competitive quality-to-bitrate ratio
- Wide web browser support
- Suitable for WebM container format
[Learn more about VP8/VP9 encoders →](vp8-vp9.md)
### Windows Media Video Encoder
The WMV encoder provides compatibility with Windows ecosystem and legacy applications.
#### Key Features:
- Native Windows integration
- Multiple profile options
- Compatible with Windows Media framework
- Efficient for Windows-centric deployments
[Learn more about WMV encoder →](../output-formats/wmv.md)
## Encoder Selection Guidelines
Selecting the optimal encoder depends on various factors:
### Platform Compatibility
- **Windows**: All encoders supported
- **macOS**: Apple Media encoders, OpenH264, AV1
- **Linux**: VAAPI, OpenH264, software implementations
### Hardware Requirements
When using hardware-accelerated encoders, verify system compatibility:
```csharp
// Check availability of hardware encoders
if (NVENCEncoderSettings.IsAvailable())
{
// Use NVIDIA encoder
}
else if (AMFEncoderSettings.IsAvailable())
{
// Use AMD encoder
}
else if (QSVEncoderSettings.IsAvailable())
{
// Use Intel encoder
}
else
{
// Fallback to software encoder
}
```
### Quality vs. Performance Tradeoffs
Different encoders offer varying balances between quality and encoding speed:
| Encoder Type | Quality | Performance | CPU Usage |
|--------------|---------|-------------|-----------|
| NVENC H.264 | Good | Excellent | Very Low |
| NVENC HEVC | Very Good | Very Good | Very Low |
| AMF H.264 | Good | Very Good | Very Low |
| QSV H.264 | Good | Excellent | Very Low |
| OpenH264 | Good-Excellent | Moderate | High |
| AV1 | Excellent | Poor-Moderate | Very High |
### Encoding Scenarios
- **Live streaming**: Prefer hardware encoders with CBR rate control
- **Video recording**: Hardware encoders with VBR for better quality/size balance
- **Offline processing**: Quality-focused encoders with VBR or CQP
- **Low-latency applications**: Hardware encoders with low-latency presets
## Performance Optimization
Maximize encoder efficiency with these best practices:
1. **Match output resolution to content requirements** - Avoid unnecessary upscaling
2. **Select appropriate bitrates** - Higher isn't always better; target your delivery medium
3. **Choose encoder presets wisely** - Faster presets use less CPU but may reduce quality
4. **Enable scene detection** for improved quality at scene changes
5. **Use hardware acceleration** when available for real-time applications
## Conclusion
VisioForge .NET SDKs provide a comprehensive set of video encoders to meet diverse requirements across different platforms and use cases. By understanding the strengths and configurations of each encoder, developers can create high-performance video applications with optimal quality and efficiency.
For specific encoder configuration details, refer to the dedicated documentation pages for each encoder type linked throughout this guide.
---END OF PAGE---
# Local File: .\dotnet\general\video-encoders\mjpeg.md
---
title: Motion JPEG (MJPEG) Encoders in VisioForge .NET SDKs
description: Complete guide to implementing MJPEG video encoders in .NET applications using VisioForge SDKs, with CPU and GPU acceleration options
sidebar_label: Motion JPEG
---
# Motion JPEG (MJPEG) Video Encoders for .NET Applications
[!badge size="xl" target="blank" variant="info" text="Video Capture SDK .Net"](https://www.visioforge.com/video-capture-sdk-net) [!badge size="xl" target="blank" variant="info" text="Video Edit SDK .Net"](https://www.visioforge.com/video-edit-sdk-net) [!badge size="xl" target="blank" variant="info" text="Media Blocks SDK .Net"](https://www.visioforge.com/media-blocks-sdk-net)
[!badge variant="dark" size="xl" text="VideoCaptureCoreX"] [!badge variant="dark" size="xl" text="VideoEditCoreX"] [!badge variant="dark" size="xl" text="MediaBlocksPipeline"]
## Introduction to MJPEG Encoding in VisioForge
The VisioForge .NET SDK suite provides robust Motion JPEG (MJPEG) encoder implementations designed for efficient video processing in your applications. MJPEG remains a popular choice for many video applications due to its simplicity, compatibility, and specific use cases where frame-by-frame compression is advantageous.
This documentation provides a detailed exploration of the two MJPEG encoder options available in the VisioForge library:
1. CPU-based MJPEG encoder - The default implementation utilizing processor resources
2. GPU-accelerated Intel QuickSync MJPEG encoder - Hardware-accelerated option for compatible systems
Both implementations offer developers flexible configuration options while maintaining the core MJPEG functionality through the unified `IMJPEGEncoderSettings` interface.
## What is MJPEG and Why Use It?
Motion JPEG (MJPEG) is a video compression format where each video frame is compressed separately as a JPEG image. Unlike more modern codecs such as H.264 or H.265 that use temporal compression across frames, MJPEG treats each frame independently.
### Key Advantages of MJPEG
- **Frame-by-frame processing**: Each frame maintains independent quality without temporal artifacts
- **Lower latency**: Minimal processing delay makes it suitable for real-time applications
- **Editing friendly**: Individual frame access simplifies non-linear editing workflows
- **Resilience to motion**: Maintains quality during scenes with significant movement
- **Universal compatibility**: Works across platforms without specialized hardware decoders
- **Simplified development**: Straightforward implementation in various programming environments
### Common Use Cases
MJPEG encoding is particularly valuable in scenarios such as:
- **Security and surveillance systems**: Where frame quality and reliability are critical
- **Video capture applications**: Real-time video recording with minimal latency
- **Medical imaging**: When individual frame fidelity is essential
- **Industrial vision systems**: For consistent frame-by-frame analysis
- **Multimedia editing software**: Where rapid seeking and frame extraction is required
- **Streaming in bandwidth-limited environments**: Where consistent quality is preferred over file size
## MJPEG Implementation in VisioForge
Both MJPEG encoder implementations in VisioForge SDKs derive from the `IMJPEGEncoderSettings` interface, ensuring a consistent approach regardless of which encoder you choose. This design allows for easy switching between implementations based on performance requirements and hardware availability.
### Core Interface and Common Properties
The shared interface exposes essential properties and methods:
- **Quality**: Integer value from 10-100 controlling compression level
- **CreateBlock()**: Factory method to generate the encoder processing block
- **IsAvailable()**: Static method to verify encoder support on the current system
## CPU-based MJPEG Encoder
The CPU-based encoder serves as the default implementation, providing reliable encoding across virtually all system configurations. It performs all encoding operations using the CPU, making it a universally compatible choice for MJPEG encoding.
### Features and Specifications
- **Processing method**: Pure CPU-based encoding
- **Quality range**: 10-100 (higher values = better quality, larger files)
- **Default quality**: 85 (balances quality and file size)
- **Performance characteristics**: Scales with CPU cores and processing power
- **Memory usage**: Moderate, dependent on frame resolution and processing settings
- **Compatibility**: Works on any system supporting the .NET runtime
- **Specialized hardware**: None required
### Detailed Implementation Example
```csharp
// Import the necessary VisioForge namespaces
using VisioForge.Core.Types.Output;
// Create a new instance of the CPU-based encoder settings
var mjpegSettings = new MJPEGEncoderSettings();
// Configure quality (10-100)
mjpegSettings.Quality = 85; // Default balanced quality
// Optional: Verify encoder availability
if (MJPEGEncoderSettings.IsAvailable())
{
// Create the encoder processing block
var encoderBlock = mjpegSettings.CreateBlock();
// Add the encoder block to your processing pipeline
pipeline.AddBlock(encoderBlock);
// Additional pipeline configuration
// ...
// Start the encoding process
await pipeline.StartAsync();
}
else
{
// Handle encoder unavailability
Console.WriteLine("CPU-based MJPEG encoder is not available on this system.");
}
```
### Quality-to-Size Relationship
The quality setting directly affects both the visual quality and resulting file size:
| Quality Setting | Visual Quality | File Size | Recommended Use Case |
|----------------|---------------|-----------|----------------------|
| 10-30 | Very Low | Smallest | Archival, minimal bandwidth |
| 31-60 | Low | Small | Web previews, thumbnails |
| 61-80 | Medium | Moderate | Standard recording |
| 81-95 | High | Large | Professional applications |
| 96-100 | Maximum | Largest | Critical visual analysis |
## Intel QuickSync MJPEG Encoder
For systems with compatible Intel hardware, the QuickSync MJPEG encoder offers GPU-accelerated encoding performance. This implementation leverages Intel's QuickSync Video technology to offload encoding operations from the CPU to dedicated media processing hardware.
### Hardware Requirements
- Intel CPU with integrated graphics supporting QuickSync Video
- Supported processor families:
- Intel Core i3/i5/i7/i9 (6th generation or newer recommended)
- Intel Xeon with compatible graphics
- Select Intel Pentium and Celeron processors with HD Graphics
### Features and Advantages
- **Hardware acceleration**: Dedicated media processing engines
- **Quality range**: 10-100 (same as CPU-based encoder)
- **Default quality**: 85
- **Preset profiles**: Four predefined quality configurations
- **Reduced CPU load**: Frees processor resources for other tasks
- **Power efficiency**: Lower energy consumption during encoding
- **Performance gain**: Up to 3x faster than CPU-based encoding (hardware dependent)
### Implementation Examples
#### Basic Implementation
```csharp
// Import required namespaces
using VisioForge.Core.Types.Output;
// Create QuickSync MJPEG encoder with default settings
var qsvEncoder = new QSVMJPEGEncoderSettings();
// Verify hardware support
if (QSVMJPEGEncoderSettings.IsAvailable())
{
// Set custom quality value
qsvEncoder.Quality = 90; // Higher quality setting
// Create and add encoder block
var encoderBlock = qsvEncoder.CreateBlock();
pipeline.AddBlock(encoderBlock);
// Continue pipeline setup
}
else
{
// Fall back to CPU-based encoder
Console.WriteLine("QuickSync hardware not detected. Falling back to CPU encoder.");
var cpuEncoder = new MJPEGEncoderSettings();
pipeline.AddBlock(cpuEncoder.CreateBlock());
}
```
#### Using Preset Quality Profiles
```csharp
// Create encoder with preset quality profile
var highQualityEncoder = new QSVMJPEGEncoderSettings(VideoQuality.High);
// Or select other preset profiles
var lowQualityEncoder = new QSVMJPEGEncoderSettings(VideoQuality.Low);
var normalQualityEncoder = new QSVMJPEGEncoderSettings(VideoQuality.Normal);
var veryHighQualityEncoder = new QSVMJPEGEncoderSettings(VideoQuality.VeryHigh);
// Check availability and create encoder block
if (QSVMJPEGEncoderSettings.IsAvailable())
{
var encoderBlock = highQualityEncoder.CreateBlock();
// Use encoder in pipeline
}
```
### Quality Preset Mapping
The QuickSync implementation provides convenient preset quality profiles that map to specific quality values:
| Preset Profile | Quality Value | Suitable Applications |
|---------------|--------------|----------------------|
| Low | 60 | Surveillance, monitoring, archiving |
| Normal | 75 | Standard recording, web content |
| High | 85 | Default for most applications |
| VeryHigh | 95 | Professional video production |
## Performance Optimization Guidelines
Achieving optimal MJPEG encoding performance requires careful consideration of several factors:
### System Configuration Recommendations
1. **Memory allocation**: Ensure sufficient RAM for frame buffering (minimum 8GB recommended)
2. **Storage throughput**: Use SSD storage for best write performance during encoding
3. **CPU considerations**: Multi-core processors benefit the CPU-based encoder
4. **GPU drivers**: Keep Intel graphics drivers updated for QuickSync performance
5. **Background processes**: Minimize competing system processes during encoding
### Code-Level Optimization Techniques
1. **Frame size selection**: Consider downscaling before encoding for better performance
2. **Quality selection**: Balance visual requirements against performance needs
3. **Pipeline design**: Minimize unnecessary processing stages before encoding
4. **Error handling**: Implement graceful fallback between encoder types
5. **Threading model**: Respect the threading model of the VisioForge pipeline
## Best Practices for MJPEG Implementation
To ensure reliable and efficient MJPEG encoding in your applications:
1. **Always check availability**: Use the `IsAvailable()` method before creating encoder instances
2. **Implement encoder fallback**: Have CPU-based encoding as a backup when QuickSync is unavailable
3. **Quality testing**: Test different quality settings with your specific video content
4. **Performance monitoring**: Monitor CPU/GPU usage during encoding to identify bottlenecks
5. **Exception handling**: Handle potential encoder initialization failures gracefully
6. **Version compatibility**: Ensure SDK version compatibility with your development environment
7. **License validation**: Verify proper licensing for your production environment
## Troubleshooting Common Issues
### QuickSync Availability Problems
- Ensure Intel drivers are up-to-date
- Verify BIOS settings haven't disabled integrated graphics
- Check for competing GPU-accelerated applications
### Performance Issues
- Monitor system resource usage during encoding
- Reduce input frame resolution or frame rate if necessary
- Consider quality setting adjustments
### Quality Problems
- Increase quality settings for better visual results
- Examine source material for pre-existing quality issues
- Consider frame pre-processing for problematic source material
## Conclusion
The VisioForge .NET SDK provides flexible MJPEG encoding options suitable for a wide range of development scenarios. By understanding the characteristics and configuration options of both the CPU-based and QuickSync implementations, developers can make informed decisions about which encoder best fits their application requirements.
Whether prioritizing universal compatibility with the CPU-based encoder or leveraging hardware acceleration with the QuickSync implementation, the consistent interface and comprehensive feature set enable efficient video processing while maintaining the frame-independent nature of MJPEG encoding that makes it valuable for specific video processing applications.
---END OF PAGE---
# Local File: .\dotnet\general\video-encoders\vp8-vp9.md
---
title: Implementing VP8 and VP9 Encoders in VisioForge .Net SDK
description: Learn how to configure VP8 and VP9 video encoders in VisioForge SDK for optimal streaming, recording and processing performance
sidebar_label: VP8/VP9
---
# VP8 and VP9 Video Encoders Guide
[!badge size="xl" target="blank" variant="info" text="Video Capture SDK .Net"](https://www.visioforge.com/video-capture-sdk-net) [!badge size="xl" target="blank" variant="info" text="Video Edit SDK .Net"](https://www.visioforge.com/video-edit-sdk-net) [!badge size="xl" target="blank" variant="info" text="Media Blocks SDK .Net"](https://www.visioforge.com/media-blocks-sdk-net)
This guide shows you how to implement VP8 and VP9 video encoding in VisioForge .NET SDKs. You'll learn about the available encoder options and how to optimize them for your specific application needs.
## Encoder Options Overview
VisioForge SDK provides multiple encoder implementations based on your platform requirements:
### Windows Platform Encoders
[!badge variant="dark" size="xl" text="VideoCaptureCore"] [!badge variant="dark" size="xl" text="VideoEditCore"]
- Software-based VP8 and VP9 encoders configured through the [WebMOutput](https://api.visioforge.org/dotnet/api/VisioForge.Core.Types.Output.WebMOutput.html) class
### Cross-Platform X-Engine Options
[!badge variant="dark" size="xl" text="VideoCaptureCoreX"] [!badge variant="dark" size="xl" text="VideoEditCoreX"] [!badge variant="dark" size="xl" text="MediaBlocksPipeline"]
- VP8 software encoder via [VP8EncoderSettings](https://api.visioforge.org/dotnet/api/VisioForge.Core.Types.X.VideoEncoders.VP8EncoderSettings.html)
- VP9 software encoder via [VP9EncoderSettings](https://api.visioforge.org/dotnet/api/VisioForge.Core.Types.X.VideoEncoders.VP9EncoderSettings.html)
- Hardware-accelerated Intel GPU VP9 encoder via [QSVVP9EncoderSettings](https://api.visioforge.org/dotnet/api/VisioForge.Core.Types.X.VideoEncoders.QSVVP9EncoderSettings.html) for integrated GPUs
## Bitrate Control Strategies
All VP8 and VP9 encoders support different bitrate control modes to match your application requirements:
### Constant Bitrate (CBR)
CBR maintains consistent bitrate throughout the encoding process, making it ideal for:
- Live streaming applications
- Scenarios with bandwidth limitations
- Real-time video communication
**Implementation Examples:**
With `WebMOutput` (Windows):
```csharp
var webmOutput = new WebMOutput();
webmOutput.Video_EndUsage = VP8EndUsageMode.CBR;
webmOutput.Video_Encoder = WebMVideoEncoder.VP8;
webmOutput.Video_Bitrate = 2000; // 2 Mbps
```
With `VP8EncoderSettings`:
```csharp
var vp8 = new VP8EncoderSettings();
vp8.RateControl = VPXRateControl.CBR;
vp8.TargetBitrate = 2000; // 2 Mbps
```
With `VP9EncoderSettings`:
```csharp
var vp9 = new VP9EncoderSettings();
vp9.RateControl = VPXRateControl.CBR;
vp9.TargetBitrate = 2000; // 2 Mbps
```
With Intel GPU encoder:
```csharp
var vp9qsv = new QSVVP9EncoderSettings();
vp9qsv.RateControl = QSVVP9EncRateControl.CBR;
vp9qsv.Bitrate = 2000; // 2 Mbps
```
### Variable Bitrate (VBR)
VBR dynamically adjusts bitrate based on content complexity, best for:
- Non-live video encoding
- Scenarios prioritizing visual quality over file size
- Content with varying visual complexity
**Implementation Examples:**
With `WebMOutput` (Windows):
```csharp
var webmOutput = new WebMOutput();
webmOutput.Video_EndUsage = VP8EndUsageMode.VBR;
webmOutput.Video_Encoder = WebMVideoEncoder.VP8;
webmOutput.Video_Bitrate = 3000; // 3 Mbps target
```
With `VP8EncoderSettings`:
```csharp
var vp8 = new VP8EncoderSettings();
vp8.RateControl = VPXRateControl.VBR;
vp8.TargetBitrate = 3000;
```
With `VP9EncoderSettings`:
```csharp
var vp9 = new VP9EncoderSettings();
vp9.RateControl = VPXRateControl.VBR;
vp9.TargetBitrate = 3000;
```
With Intel GPU encoder:
```csharp
var vp9qsv = new QSVVP9EncoderSettings();
vp9qsv.RateControl = QSVVP9EncRateControl.VBR;
vp9qsv.Bitrate = 3000;
```
## Quality-Focused Encoding Modes
These modes prioritize consistent visual quality over specific bitrate targets:
### Constant Quality (CQ) Mode
Available for software VP8 and VP9 encoders:
```csharp
var vp8 = new VP8EncoderSettings();
vp8.RateControl = VPXRateControl.CQ;
vp8.CQLevel = 20; // Quality level (0-63, lower values = better quality)
```
```csharp
var vp9 = new VP9EncoderSettings();
vp9.RateControl = VPXRateControl.CQ;
vp9.CQLevel = 20;
```
### Intel QSV Quality Modes
Intel's hardware encoder supports two quality-focused modes:
**Intelligent Constant Quality (ICQ):**
```csharp
var vp9qsv = new QSVVP9EncoderSettings();
vp9qsv.RateControl = QSVVP9EncRateControl.ICQ;
vp9qsv.ICQQuality = 25; // 20-27 recommended for balanced quality
```
**Constant Quantization Parameter (CQP):**
```csharp
var vp9qsv = new QSVVP9EncoderSettings();
vp9qsv.RateControl = QSVVP9EncRateControl.CQP;
vp9qsv.QPI = 26; // I-frame QP
vp9qsv.QPP = 28; // P-frame QP
```
## VP9 Performance Optimization
VP9 encoders offer additional features for enhanced performance:
### Adaptive Quantization
Improves visual quality by allocating more bits to complex areas:
```csharp
var vp9 = new VP9EncoderSettings();
vp9.AQMode = VPXAdaptiveQuantizationMode.Variance; // Enable variance-based AQ
```
### Parallel Processing
Speeds up encoding through multi-threading and tile-based processing:
```csharp
var vp9 = new VP9EncoderSettings();
vp9.FrameParallelDecoding = true; // Enable parallel frame processing
vp9.RowMultithread = true; // Enable row-based multithreading
vp9.TileColumns = 6; // Set number of tile columns (log2)
vp9.TileRows = 0; // Set number of tile rows (log2)
```
## Error Resilience Settings
Both VP8 and VP9 support error resilience for robust streaming over unreliable networks:
Using `WebMOutput` (Windows):
```csharp
var webmOutput = new WebMOutput();
webmOutput.Video_ErrorResilient = true; // Enable error resilience
```
Using software encoders:
```csharp
var vpx = new VP8EncoderSettings(); // or VP9EncoderSettings
vpx.ErrorResilient = VPXErrorResilientFlags.Default | VPXErrorResilientFlags.Partitions;
```
## Performance Tuning Options
Optimize encoding performance with these settings:
```csharp
var vpx = new VP8EncoderSettings(); // or VP9EncoderSettings
vpx.CPUUsed = 0; // Range: -16 to 16, higher values favor speed over quality
vpx.NumOfThreads = 4; // Specify number of encoding threads
vpx.TokenPartitions = VPXTokenPartitions.Eight; // Enable parallel token processing
```
## Best Practices for VP8/VP9 Encoding
### Rate Control Selection
Choose the appropriate rate control mode based on your application:
- **CBR** for live streaming and real-time communication
- **VBR** for offline encoding where quality is the priority
- **Quality-based modes** (CQ, ICQ, CQP) for highest possible quality regardless of bitrate
### Performance Optimization
- Adjust `CPUUsed` to balance quality and encoding speed
- Enable multithreading for faster encoding on multi-core systems
- Use tile-based parallelism in VP9 for better hardware utilization
### Error Recovery
- Enable error resilience when streaming over unreliable networks
- Configure token partitioning for improved error recovery
- Consider frame reordering limitations for low-latency applications
### Quality Optimization
- Use adaptive quantization in VP9 for better quality distribution
- Consider two-pass encoding for offline encoding scenarios
- Adjust quantizer settings based on content type and target quality
By following this guide, you'll be able to effectively implement and configure VP8 and VP9 encoders in your VisioForge .NET applications for optimal performance and quality.
---END OF PAGE---
# Local File: .\dotnet\install\avalonia.md
---
title: Integrate Media SDKs with Avalonia Applications
description: Learn how to implement powerful video and media capabilities in cross-platform Avalonia projects. This guide covers setup, configuration, and optimization across Windows, macOS, Linux, Android, and iOS platforms, with platform-specific requirements and best practices for seamless integration.
sidebar_label: Avalonia
order: 14
---
# Building Media-Rich Avalonia Applications with VisioForge
## Framework Overview
Avalonia UI stands out as a versatile, truly cross-platform .NET UI framework with support spanning desktop environments (Windows, macOS, Linux) and mobile platforms (iOS and Android). VisioForge enhances this ecosystem through the specialized `VisioForge.DotNet.Core.UI.Avalonia` package, which delivers high-performance multimedia controls tailored for Avalonia's architecture.
Our suite of SDKs empowers Avalonia developers with extensive multimedia capabilities:
[!badge size="xl" target="blank" variant="info" text="Video Capture SDK .Net"](https://www.visioforge.com/video-capture-sdk-net) [!badge size="xl" target="blank" variant="info" text="Video Edit SDK .Net"](https://www.visioforge.com/video-edit-sdk-net) [!badge size="xl" target="blank" variant="info" text="Media Blocks SDK .Net"](https://www.visioforge.com/media-blocks-sdk-net) [!badge size="xl" target="blank" variant="info" text="Media Player SDK .Net"](https://www.visioforge.com/media-player-sdk-net)
## Setup and Configuration
### Essential Package Installation
Creating an Avalonia application with VisioForge multimedia capabilities requires installing several key NuGet components:
1. Avalonia-specific UI layer: `VisioForge.DotNet.Core.UI.Avalonia`
2. Core functionality package: `VisioForge.DotNet.Core` (or specialized SDK variant)
3. Platform-specific native bindings (covered in detail in later sections)
Add these to your project manifest (`.csproj`):
```xml
```
### Avalonia Initialization Architecture
A key advantage of VisioForge's Avalonia integration is its seamless initialization model. Unlike some frameworks requiring explicit global setup, the Avalonia controls become available immediately once the core package is referenced.
Your standard Avalonia bootstrap code in `Program.cs` remains unchanged:
```csharp
using Avalonia;
using System;
namespace YourAppNamespace;
class Program
{
[STAThread]
public static void Main(string[] args) => BuildAvaloniaApp()
.StartWithClassicDesktopLifetime(args);
public static AppBuilder BuildAvaloniaApp()
=> AppBuilder.Configure()
.UsePlatformDetect()
.LogToTrace();
}
```
### Implementing the VideoView Component
The `VideoView` control serves as the central rendering element. Integrate it into your `.axaml` files using:
1. First, declare the VisioForge namespace:
```xml
xmlns:vf="clr-namespace:VisioForge.Core.UI.Avalonia;assembly=VisioForge.Core.UI.Avalonia"
```
2. Then, implement the control in your layout structure:
```xml
```
This control adapts automatically to the platform-specific rendering pipeline while maintaining a consistent API surface.
## Desktop Platform Integration
### Windows Implementation Guide
Windows deployment requires specific native components packaged as NuGet references.
#### Core Windows Components
Add the following Windows-specific packages to your desktop project:
```xml
```
#### Advanced Media Format Support
For extended codec compatibility, include the size-optimized UPX variant of the libAV libraries:
```xml
```
The UPX variant delivers significant size optimization while maintaining full codec compatibility.
### macOS Integration
For macOS deployment:
#### Native Binding Package
Include the macOS-specific native components:
```xml
```
#### Framework Configuration
Configure your project with the appropriate macOS framework target:
```xml
net8.0-macos14.0
Exe
```
### Linux Deployment
Linux support includes:
#### Framework Configuration
Set up the appropriate target framework for Linux environments:
```xml
net8.0
Exe
```
#### System Dependencies
For Linux deployment, ensure required system libraries are available on the target system. Unlike Windows and macOS which use NuGet packages, Linux may require system-level dependencies. Consult the VisioForge Linux documentation for specific platform requirements.
## Mobile Development
### Android Configuration
Android implementation requires additional steps unique to Avalonia's Android integration model:
#### Java Interoperability Layer
The VisioForge Android implementation requires a binding bridge between .NET and Android native APIs:
1. Obtain the Java binding project from the [VisioForge samples repository](https://github.com/visioforge/.Net-SDK-s-samples) in the `AndroidDependency` directory
2. Add the appropriate binding project to your solution:
- Use `VisioForge.Core.Android.X8.csproj` for .NET 8 applications
3. Reference this project in your Android head project:
```xml
```
#### Android-Specific Package
Add the Android redistributable package:
```xml
```
#### Runtime Permissions
Configure the `AndroidManifest.xml` with appropriate permissions:
- `android.permission.CAMERA`
- `android.permission.RECORD_AUDIO`
- `android.permission.READ_EXTERNAL_STORAGE`
- `android.permission.WRITE_EXTERNAL_STORAGE`
- `android.permission.INTERNET`
### iOS Development
iOS integration with Avalonia requires:
#### Native Components
Add the iOS-specific redistributable to your iOS head project:
```xml
```
#### Important Implementation Notes
- Physical device testing is essential, as simulator support is limited
- Update your `Info.plist` with privacy descriptions:
- `NSCameraUsageDescription` for camera access
- `NSMicrophoneUsageDescription` for audio recording
## Performance Engineering
Maximize application performance with these Avalonia-specific optimizations:
1. Enable hardware acceleration when supported by the underlying platform
2. Implement adaptive resolution scaling based on device capabilities
3. Optimize memory usage patterns, especially for mobile targets
4. Utilize Avalonia's compositing model effectively by minimizing visual tree complexity around the `VideoView`
## Troubleshooting Guide
### Media Format Problems
- **Playback failures**:
- Ensure all platform packages are correctly referenced
- Verify codec availability for the target media format
- Check for platform-specific format restrictions
### Performance Concerns
- **Slow playback or rendering**:
- Enable hardware acceleration where available
- Reduce processing resolution when appropriate
- Utilize Avalonia's threading model correctly
### Deployment Challenges
- **Platform-specific runtime errors**:
- Validate target framework specifications
- Verify native dependency availability
- Ensure proper provisioning for mobile targets
## Multi-Platform Project Architecture
VisioForge's Avalonia integration excels with a specialized multi-headed project structure. The `SimplePlayerMVVM` sample demonstrates this architecture:
- **Core shared project** (`SimplePlayerMVVM.csproj`): Contains cross-platform views, view models, and shared logic with conditional multi-targeting:
```xml
enable
latest
true
net8.0-android;net8.0-ios;net8.0-windows
net8.0-android;net8.0-ios;net8.0-macos14.0
net8.0-android;net8.0
```
- **Platform-specific head projects**:
- `SimplePlayerMVVM.Android.csproj`: Contains Android-specific configuration and binding references
- `SimplePlayerMVVM.iOS.csproj`: Handles iOS initialization and dependencies
- `SimplePlayerMVVM.Desktop.csproj`: Manages desktop platform detection and appropriate redistributable loading
For simpler desktop-only applications, `SimpleVideoCaptureA.csproj` provides a streamlined model with platform detection occurring within a single project file.
## Conclusion
VisioForge's Avalonia integration offers a sophisticated approach to cross-platform multimedia development that leverages Avalonia's unique architectural advantages. Through carefully structured platform-specific components and a unified API, developers can build rich media applications that span desktop and mobile platforms without compromising on performance or capabilities.
For complete code examples and sample applications, visit our [GitHub repository](https://github.com/visioforge/.Net-SDK-s-samples), which contains specialized Avalonia demonstrations in the Video Capture SDK X and Media Player SDK X sections.
---END OF PAGE---
# Local File: .\dotnet\install\index.md
---
title: .NET SDKs Installation Guide for Developers
description: Complete guide for installing multimedia .NET SDKs in Visual Studio, Rider, and other IDEs. Learn step-by-step installation methods, platform-specific configuration, framework support, and troubleshooting for Windows, macOS, iOS, Android, and Linux environments.
sidebar_label: Installation
order: 21
---
# VisioForge .NET SDKs Installation Guide
[!badge size="xl" target="blank" variant="info" text="Video Capture SDK .Net"](https://www.visioforge.com/video-capture-sdk-net) [!badge size="xl" target="blank" variant="info" text="Video Edit SDK .Net"](https://www.visioforge.com/video-edit-sdk-net) [!badge size="xl" target="blank" variant="info" text="Media Blocks SDK .Net"](https://www.visioforge.com/media-blocks-sdk-net) [!badge size="xl" target="blank" variant="info" text="Media Player SDK .Net"](https://www.visioforge.com/media-player-sdk-net)
VisioForge offers powerful multimedia SDKs for .NET developers that enable advanced video capture, editing, playback, and media processing capabilities in your applications. This guide covers everything you need to know to properly install and configure our SDKs in your development environment.
## Available .NET SDKs
VisioForge provides several specialized SDKs to address different multimedia needs:
- [Video Capture SDK .Net](https://www.visioforge.com/video-capture-sdk-net) - For capturing video from cameras, screen recording, and streaming
- [Video Edit SDK .Net](https://www.visioforge.com/video-edit-sdk-net) - For video editing, processing, and format conversion
- [Media Blocks SDK .Net](https://www.visioforge.com/media-blocks-sdk-net) - For building custom media processing pipelines
- [Media Player SDK .Net](https://www.visioforge.com/media-player-sdk-net) - For creating custom media players with advanced features
## Installation Methods
You can install our SDKs using two primary methods:
### Using Setup Files
The setup file installation method is recommended for Windows development environments. This approach:
1. Automatically installs all required dependencies
2. Configures Visual Studio integration
3. Includes sample projects to help you get started quickly
4. Provides documentation and additional resources
Setup files can be downloaded from the respective SDK product pages on our website.
### Using NuGet Packages
For cross-platform development or CI/CD pipelines, our NuGet packages offer flexibility and easy integration:
```cmd
Install-Package VisioForge.DotNet.Core
```
Additional UI-specific packages may be required depending on your target platform:
```cmd
Install-Package VisioForge.DotNet.Core.UI.MAUI
Install-Package VisioForge.DotNet.Core.UI.WinUI
Install-Package VisioForge.DotNet.Core.UI.Avalonia
```
## IDE Integration and Setup
Our SDKs seamlessly integrate with popular .NET development environments:
### Visual Studio Integration
[Visual Studio](visual-studio.md) offers the most complete experience with our SDKs:
- Full IntelliSense support for SDK components
- Built-in debugging for media processing components
- Designer support for visual controls
- NuGet package management
For detailed Visual Studio setup instructions, see our [Visual Studio integration guide](visual-studio.md).
### JetBrains Rider Integration
[Rider](rider.md) provides excellent cross-platform development support:
- Full code completion for SDK APIs
- Smart navigation features for exploring SDK classes
- Integrated NuGet package management
- Cross-platform debugging capabilities
For Rider-specific instructions, visit our [Rider integration documentation](rider.md).
### Visual Studio for Mac
[Visual Studio for Mac](visual-studio-mac.md) users can develop applications for macOS, iOS, and Android:
- Built-in NuGet package manager for installing SDK components
- Project templates for quick setup
- Integrated debugging tools
Learn more in our [Visual Studio for Mac setup guide](visual-studio-mac.md).
## Platform-Specific Configuration
### Target Framework Configuration
Each operating system requires specific target framework settings for optimal compatibility:
#### Windows Applications
Windows applications must use the `-windows` target framework suffix:
```xml
net8.0-windows
```
This enables access to Windows-specific APIs and UI frameworks like WPF and Windows Forms.
#### Android Development
Android projects require the `-android` framework suffix:
```xml
net8.0-android
```
Ensure that Android workloads are installed in your development environment:
```
dotnet workload install android
```
#### iOS Development
iOS applications must use the `-ios` target framework:
```xml
net8.0-ios
```
iOS development requires a Mac with Xcode installed, even when using Visual Studio on Windows.
#### macOS Applications
macOS native applications use either the `-macos` or `-maccatalyst` framework:
```xml
net8.0-macos
```
For .NET MAUI applications targeting macOS, use:
```xml
net8.0-maccatalyst
```
#### Linux Development
Linux applications use the standard target framework without a platform suffix:
```xml
net8.0
```
Ensure required .NET workloads are installed:
```
dotnet workload install linux
```
## Special Framework Support
### .NET MAUI Applications
[MAUI projects](maui.md) require special configuration:
- Add the `VisioForge.DotNet.Core.UI.MAUI` NuGet package
- Configure platform-specific permissions in your project
- Use MAUI-specific video view controls
See our [detailed MAUI guide](maui.md) for complete instructions.
### Avalonia UI Framework
[Avalonia projects](avalonia.md) provide a cross-platform UI alternative:
- Install the `VisioForge.DotNet.Core.UI.Avalonia` package
- Use Avalonia-specific video rendering controls
- Configure platform-specific dependencies
Our [Avalonia integration guide](avalonia.md) provides complete setup instructions.
## SDK Initialization for Cross-Platform Engines
Our SDKs include both Windows-specific DirectShow engines (like `VideoCaptureCore`) and cross-platform X-engines (like `VideoCaptureCoreX`). The X-engines require explicit initialization and cleanup.
### Initializing the SDK
Before using any X-engine components, initialize the SDK:
```csharp
// Initialize at application startup
VisioForge.Core.VisioForgeX.InitSDK();
// Or use the async version
await VisioForge.Core.VisioForgeX.InitSDKAsync();
```
### Cleaning Up Resources
When your application exits, properly release resources:
```csharp
// Clean up at application exit
VisioForge.Core.VisioForgeX.DestroySDK();
// Or use the async version
await VisioForge.Core.VisioForgeX.DestroySDKAsync();
```
Failing to initialize or clean up properly may result in memory leaks or unstable behavior.
## Video Rendering Controls
Each UI framework requires specific video view controls to display media content:
### Windows Forms
```csharp
// Add reference to VisioForge.DotNet.Core
using VisioForge.Core.UI.WinForms;
// In your form
videoView = new VideoView();
this.Controls.Add(videoView);
```
### WPF Applications
```csharp
// Add reference to VisioForge.DotNet.Core
using VisioForge.Core.UI.WPF;
// In your XAML
```
### MAUI Applications
```csharp
// Add reference to VisioForge.DotNet.Core.UI.MAUI
using VisioForge.Core.UI.MAUI;
// In your XAML
```
### Avalonia UI
```csharp
// Add reference to VisioForge.DotNet.Core.UI.Avalonia
using VisioForge.Core.UI.Avalonia;
// In your XAML
```
## Native Dependencies Management
Our SDKs leverage native libraries for optimal performance. These dependencies must be properly managed for deployment:
- Windows: Included automatically with setup installation or NuGet packages
- macOS/iOS: Bundled with NuGet packages but require proper app signing
- Android: Included in NuGet packages with proper architecture support
- Linux: May require additional system packages depending on distribution
For detailed deployment instructions, see our [deployment guide](../deployment-x/index.md).
## Troubleshooting Common Installation Issues
If you encounter issues during installation:
1. Verify target framework compatibility with your project type
2. Ensure all required workloads are installed (`dotnet workload list`)
3. Check for dependency conflicts in your project
4. Confirm proper SDK initialization for X-engines
5. Review platform-specific requirements in our documentation
## Sample Code and Resources
We maintain an extensive collection of sample applications on our [GitHub repository](https://github.com/visioforge/.Net-SDK-s-samples) to help you get started quickly with our SDKs.
These examples cover common scenarios like:
- Video capture from cameras and screens
- Media playback with custom controls
- Video editing and processing
- Cross-platform development
Visit our repository for the latest code examples and best practices for using our SDKs.
---
For additional support or questions, please contact our technical support team or visit our documentation portal.
---END OF PAGE---
# Local File: .\dotnet\install\maui.md
---
title: Integrate Media SDKs with .NET MAUI Applications
description: Learn how to implement powerful video and media capabilities in cross-platform .NET MAUI projects. This guide covers setup, configuration, and optimization across Windows, Android, iOS, and macOS platforms, with platform-specific requirements and best practices for seamless integration.
sidebar_label: MAUI
order: 15
---
# Integrating VisioForge SDKs with .NET MAUI Applications
## Overview
.NET Multi-platform App UI (MAUI) enables developers to build cross-platform applications for mobile and desktop from a single codebase. VisioForge provides comprehensive support for MAUI applications through the `VisioForge.Core.UI.MAUI` package, which contains specialized UI controls designed specifically for the .NET MAUI platform.
Our SDKs enable powerful multimedia capabilities across all MAUI-supported platforms:
[!badge size="xl" target="blank" variant="info" text="Video Capture SDK .Net"](https://www.visioforge.com/video-capture-sdk-net) [!badge size="xl" target="blank" variant="info" text="Video Edit SDK .Net"](https://www.visioforge.com/video-edit-sdk-net) [!badge size="xl" target="blank" variant="info" text="Media Blocks SDK .Net"](https://www.visioforge.com/media-blocks-sdk-net) [!badge size="xl" target="blank" variant="info" text="Media Player SDK .Net"](https://www.visioforge.com/media-player-sdk-net)
## Getting Started
### Installation
To begin using VisioForge with your MAUI project, install the required NuGet packages:
1. The core UI package: `VisioForge.Core.UI.MAUI`
2. Platform-specific redistributable (detailed in platform sections below)
### SDK Initialization
Proper initialization is essential for the VisioForge SDKs to function correctly within your MAUI application. This process must be completed in your `MauiProgram.cs` file.
```csharp
using SkiaSharp.Views.Maui.Controls.Hosting;
using VisioForge.Core.UI.MAUI;
public static class MauiProgram
{
public static MauiApp CreateMauiApp()
{
var builder = MauiApp.CreateBuilder();
builder
.UseMauiApp()
// Initialize the SkiaSharp package by adding the below line of code
.UseSkiaSharp()
// Initialize the VisioForge MAUI package by adding the below line of code
.ConfigureMauiHandlers(handlers => handlers.AddVisioForgeHandlers())
// After initializing the VisioForge MAUI package, optionally add additional fonts
.ConfigureFonts(fonts =>
{
fonts.AddFont("OpenSans-Regular.ttf", "OpenSansRegular");
fonts.AddFont("OpenSans-Semibold.ttf", "OpenSansSemibold");
});
// Continue initializing your .NET MAUI App here
return builder.Build();
}
}
```
## Using VisioForge Controls in XAML
The `VideoView` control is the primary interface for displaying video content in your MAUI application. To use VisioForge controls in your XAML files:
1. Add the VisioForge namespace to your XAML file:
```xaml
xmlns:vf="clr-namespace:VisioForge.Core.UI.MAUI;assembly=VisioForge.Core.UI.MAUI"
```
2. Add the VideoView control to your layout:
```xaml
```
The VideoView control adapts to the native rendering capabilities of each platform while providing a consistent API for your application code.
## Platform-Specific Configuration
### Android Implementation
Android requires additional configuration steps to ensure proper operation:
#### 1. Add Java Bindings Library
The VisioForge SDK relies on native Android functionality that requires a custom Java bindings library:
1. Clone the binding library from our [GitHub repository](https://github.com/visioforge/.Net-SDK-s-samples/tree/master/AndroidDependency)
2. Add the appropriate project to your solution:
- Use `VisioForge.Core.Android.X8.csproj` for .NET 8
- Use `VisioForge.Core.Android.X9.csproj` for .NET 9
3. Add the reference to your project file:
```xml
```
#### 2. Add Android Redistributable Package
Include the Android-specific redistributable package:
```xml
```
#### 3. Android Permissions
Ensure your AndroidManifest.xml includes the necessary permissions for camera, microphone, and storage access depending on your application's functionality. Common required permissions include:
- `android.permission.CAMERA`
- `android.permission.RECORD_AUDIO`
- `android.permission.READ_EXTERNAL_STORAGE`
- `android.permission.WRITE_EXTERNAL_STORAGE`
### iOS Configuration
iOS integration requires fewer steps but has some important considerations:
#### 1. Add iOS Redistributable
Add the iOS-specific package to your project:
```xml
```
#### 2. Important Notes for iOS Development
- **Use physical devices**: The SDK requires testing on physical iOS devices rather than simulators for full functionality.
- **Privacy descriptions**: Add the necessary usage description strings in your Info.plist file for camera and microphone access:
- `NSCameraUsageDescription`
- `NSMicrophoneUsageDescription`
### macOS Configuration
For macOS Catalyst applications:
#### 1. Configure Runtime Identifiers
To ensure your application works correctly on both Intel and Apple Silicon Macs, specify the appropriate runtime identifiers:
```xml
maccatalyst-x64
maccatalyst-arm64
```
#### 2. Enable Trimming
For optimal performance on macOS, enable the PublishTrimmed option:
```xml
true
```
For more detailed information about macOS deployment, refer to our [macOS](../deployment-x/macOS.md) documentation page.
### Windows Configuration
For Windows applications, you need to include several redistributable packages:
#### 1. Add Base Windows Redistributables
Include the core Windows packages:
```xml
```
#### 2. Add Extended Codec Support (Optional but Recommended)
For enhanced media format support, include the libAV (FFMPEG) package:
```xml
```
### Performance Optimization
For optimal performance across platforms:
1. Use hardware acceleration when available
2. Adjust video resolution based on the target device capabilities
3. Consider memory constraints on mobile devices when processing large media files
## Troubleshooting Common Issues
- **Blank video display**: Ensure proper permissions are granted on mobile platforms
- **Missing codecs**: Verify all platform-specific redistributable packages are correctly installed
- **Performance issues**: Check that hardware acceleration is enabled when available
- **Deployment errors**: Confirm runtime identifiers are correctly specified for the target platform
## Conclusion
The VisioForge SDK provides a comprehensive solution for adding powerful multimedia capabilities to your .NET MAUI applications. By following the platform-specific setup instructions and best practices outlined in this guide, you can create rich cross-platform applications with advanced video and audio features.
For additional examples and sample code, visit our [GitHub repository](https://github.com/visioforge/.Net-SDK-s-samples).
---END OF PAGE---
# Local File: .\dotnet\install\rider.md
---
title: Integrate .Net SDKs into JetBrains Rider | Tutorial
description: Learn how to integrate .Net SDKs with JetBrains Rider in this step-by-step tutorial. From project setup to adding NuGet packages, UI components, and platform dependencies - master cross-platform development with WPF, MAUI, WinUI, and Avalonia integration for Windows, macOS, iOS and Android apps.
sidebar_label: JetBrains Rider
order: 12
---
# .Net SDKs Integration with JetBrains Rider
## Introduction
[!badge size="xl" target="blank" variant="info" text="Video Capture SDK .Net"](https://www.visioforge.com/video-capture-sdk-net) [!badge size="xl" target="blank" variant="info" text="Video Edit SDK .Net"](https://www.visioforge.com/video-edit-sdk-net) [!badge size="xl" target="blank" variant="info" text="Media Blocks SDK .Net"](https://www.visioforge.com/media-blocks-sdk-net) [!badge size="xl" target="blank" variant="info" text="Media Player SDK .Net"](https://www.visioforge.com/media-player-sdk-net)
This comprehensive guide walks you through the process of installing and configuring VisioForge .Net SDKs within JetBrains Rider, a powerful cross-platform IDE for .NET development. While we'll use a Windows application with WPF as our primary example, these installation steps can be readily adapted for macOS, iOS, or Android applications as well. JetBrains Rider provides a consistent development experience across Windows, macOS, and Linux platforms, making it an excellent choice for cross-platform .NET development.
## Creating Your Project
### Setting Up a Modern Project Structure
Begin by launching JetBrains Rider and creating a new project. For this tutorial, we'll use WPF (Windows Presentation Foundation) as our framework. It's crucial to utilize the modern project format, which provides enhanced compatibility with VisioForge SDKs and offers a more streamlined development experience.
1. Open JetBrains Rider
2. Select "Create New Solution" from the welcome screen
3. Choose "WPF Application" from the available templates
4. Configure your project settings, ensuring you select the modern project format
5. Click "Create" to generate your project structure

## Adding Required NuGet Packages
### Installing the Main SDK Package
Each VisioForge SDK has a corresponding main package that provides core functionality. You'll need to select the appropriate package based on which SDK you're working with.
1. Right-click on your project in the Solution Explorer
2. Select the "Manage NuGet Packages" menu item
3. In the NuGet Package Manager, search for the VisioForge package that corresponds to your desired SDK
4. Select the latest stable version and click "Install"

### Available Main SDK Packages
Choose from the following main packages based on your development needs:
- [VisioForge.DotNet.VideoCapture](https://www.nuget.org/packages/VisioForge.DotNet.VideoCapture) - For applications requiring video capture functionality
- [VisioForge.DotNet.VideoEdit](https://www.nuget.org/packages/VisioForge.DotNet.VideoEdit) - For video editing and processing applications
- [VisioForge.DotNet.MediaPlayer](https://www.nuget.org/packages/VisioForge.DotNet.MediaPlayer) - For media playback applications
- [VisioForge.DotNet.MediaBlocks](https://www.nuget.org/packages/VisioForge.DotNet.MediaBlocks) - For applications requiring modular media processing capabilities
### Adding the UI Package, if needed
Main SDK package contains the core UI components for WinForms, WPF, Android, and Apple.
For other platforms, you'll need to install the appropriate UI package that corresponds to your chosen UI framework.
### Available UI Packages
Depending on your target platform and UI framework, choose from these UI packages:
- Core package contains the core UI components For WinForms, WPF, and Apple
- [VisioForge.DotNet.Core.UI.WinUI](https://www.nuget.org/packages/VisioForge.DotNet.Core.UI.WinUI) - For Windows applications using the modern WinUI framework
- [VisioForge.DotNet.Core.UI.MAUI](https://www.nuget.org/packages/VisioForge.DotNet.Core.UI.MAUI) - For cross-platform applications using .NET MAUI
- [VisioForge.DotNet.Core.UI.Avalonia](https://www.nuget.org/packages/VisioForge.DotNet.Core.UI.Avalonia) - For cross-platform applications using Avalonia UI
## Integrating VideoView Control (Optional)
### Adding Video Preview Capabilities
If your application requires video preview functionality, you'll need to add the VideoView control to your user interface. This can be accomplished either through XAML markup or programmatically in your code-behind file. Below, we'll demonstrate how to add it via XAML.
#### Step 1: Add the WPF Namespace
First, add the necessary namespace reference to your XAML file:
```xml
xmlns:wpf="clr-namespace:VisioForge.Core.UI.WPF;assembly=VisioForge.Core"
```
#### Step 2: Add the VideoView Control
Then, add the VideoView control to your layout:
```xml
```
This control provides a canvas where video content can be displayed in real-time, essential for applications that involve video capture, editing, or playback.
## Adding Required Redistribution Packages
### Platform-Specific Dependencies
Depending on your target platform, chosen product, and the specific engine you're utilizing, additional redistribution packages may be needed to ensure proper functionality across all deployment environments.
For comprehensive information about which redistribution packages are required for your specific scenario, please consult the Deployment documentation page for your selected VisioForge product. These resources provide detailed guidance on:
- Required system dependencies
- Platform-specific considerations
- Deployment optimization strategies
- Runtime requirements
Following these deployment guidelines will ensure your application functions correctly on end-user systems without missing dependencies or runtime errors.
## Additional Resources
For more examples and detailed implementation guides, visit our [GitHub repository](https://github.com/visioforge/.Net-SDK-s-samples), which contains numerous code samples demonstrating various features and integration scenarios.
Our documentation portal also offers comprehensive API references, detailed tutorials, and best practice guides to help you make the most of VisioForge SDKs in your JetBrains Rider projects.
## Conclusion
By following this installation guide, you've successfully integrated VisioForge .Net SDKs with JetBrains Rider, setting the foundation for developing powerful media applications. The combination of VisioForge's robust media processing capabilities and JetBrains Rider's intelligent development environment provides an ideal platform for creating sophisticated media applications across multiple platforms.
---END OF PAGE---
# Local File: .\dotnet\install\visual-studio-mac.md
---
title: Integrate .NET SDKs with Visual Studio for Mac
description: Learn how to install, configure, and implement .NET SDKs in Visual Studio for Mac for macOS and iOS development. This step-by-step guide covers environment setup, package installation, UI component configuration, and troubleshooting to help you build powerful multimedia applications for Apple platforms.
sidebar_label: Visual Studio for Mac
order: 13
---
# Complete Guide to Integrating VisioForge .NET SDKs with Visual Studio for Mac
[!badge size="xl" target="blank" variant="info" text="Video Capture SDK .Net"](https://www.visioforge.com/video-capture-sdk-net) [!badge size="xl" target="blank" variant="info" text="Video Edit SDK .Net"](https://www.visioforge.com/video-edit-sdk-net) [!badge size="xl" target="blank" variant="info" text="Media Blocks SDK .Net"](https://www.visioforge.com/media-blocks-sdk-net) [!badge size="xl" target="blank" variant="info" text="Media Player SDK .Net"](https://www.visioforge.com/media-player-sdk-net)
## Introduction to VisioForge SDKs on macOS
VisioForge provides powerful multimedia SDKs for .NET developers working on macOS and iOS platforms. This detailed guide will walk you through the entire process of integrating these SDKs into your Visual Studio for Mac projects. While this tutorial primarily focuses on macOS application development, the same principles apply to iOS applications with minimal adaptations.
By following this guide, you'll learn how to properly set up your development environment, install the necessary packages, configure UI components, and prepare your application for deployment. This knowledge will serve as a solid foundation for building sophisticated multimedia applications using VisioForge technology.
## Prerequisites for Development
Before starting the integration process, ensure you have:
- Visual Studio for Mac (latest version recommended)
- .NET SDK installed (minimum version 6.0)
- Basic knowledge of C# and .NET development
- Administrative access to your macOS system
- Active internet connection for NuGet package downloads
- Optional: XCode for storyboard editing
Having these prerequisites in place will ensure a smooth installation process and prevent common setup issues.
## Setting Up a New macOS Project
Let's begin by creating a new macOS project in Visual Studio for Mac. This will serve as the foundation for our VisioForge SDK integration.
### Creating the Project Structure
1. Launch Visual Studio for Mac.
2. Select **File > New Solution** from the menu bar.
3. In the template selection dialog, navigate to **.NET > App**.
4. Choose **macOS Application** as your project template.
5. Configure your project settings, including:
- Project name (choose something descriptive)
- Organization identifier (typically in reverse domain format)
- Target framework (.NET 6.0 or later recommended)
- Solution name (can match your project name)
6. Click **Create** to generate your project template.
This creates a basic macOS application with the standard project structure required for VisioForge SDK integration.

## Installing VisioForge SDK Packages
After creating your project, the next step is to install the necessary VisioForge SDK packages via NuGet. These packages contain the core functionality and UI components required for multimedia operations.
### Adding the Main SDK Package
Each VisioForge product line has a dedicated main package that contains the core functionality. You'll need to choose the appropriate package based on your development requirements.
1. Right-click on your project in the Solution Explorer.
2. Select **Manage NuGet Packages** from the context menu.
3. Click on the **Browse** tab in the NuGet Package Manager.
4. In the search box, type "VisioForge" to find all available packages.
5. Select one of the following packages based on your requirements:
Available NuGet packages:
- [VisioForge.DotNet.VideoCapture](https://www.nuget.org/packages/VisioForge.DotNet.VideoCapture) - For video capture, webcam, and screen recording functionality
- [VisioForge.DotNet.VideoEdit](https://www.nuget.org/packages/VisioForge.DotNet.VideoEdit) - For video editing, processing, and conversion
- [VisioForge.DotNet.MediaPlayer](https://www.nuget.org/packages/VisioForge.DotNet.MediaPlayer) - For media playback and streaming
- [VisioForge.DotNet.MediaBlocks](https://www.nuget.org/packages/VisioForge.DotNet.MediaBlocks) - For advanced media processing workflows
6. Click **Add Package** to install your selected package.
7. Accept any license agreements that appear.
The installation process will automatically resolve dependencies and add references to your project.

### Adding the Apple UI Package
For macOS and iOS applications, you'll need the Apple-specific UI components that allow VisioForge SDKs to integrate with native UI elements.
1. In the NuGet Package Manager, search for "VisioForge.DotNet.UI.Apple".
2. Select the package from the results list.
3. Click **Add Package** to install.
This package includes specialized controls designed specifically for Apple platforms, ensuring proper visual integration and performance optimization.

## Integrating Video Preview Capabilities
Most multimedia applications require video preview functionality. VisioForge SDKs provide specialized controls for this purpose that integrate seamlessly with macOS applications.
### Adding the VideoView Control
The VideoView control is the primary component for displaying video content in your application. Here's how to add it to your interface:
1. Open your application's main storyboard file by double-clicking it in the Solution Explorer.
2. Visual Studio for Mac will open XCode Interface Builder for storyboard editing.
3. From the Object Library, find the **Custom View** control.
4. Drag the Custom View control onto your window where you want the video to appear.
5. Set appropriate constraints to ensure proper sizing and positioning.
6. Using the Identity Inspector, set a descriptive name for your Custom View (e.g., "videoViewHost").
7. Save your changes and return to Visual Studio for Mac.
This Custom View will serve as a container for the VisioForge VideoView control, which will be added programmatically.


### Initializing the VideoView in Code
After adding the container Custom View, you need to initialize the VideoView control programmatically:
1. Open your ViewController.cs file.
2. Add the necessary using directives at the top of the file:
```csharp
using VisioForge.Core.UI.Apple;
using CoreGraphics;
```
3. Add a private field to your ViewController class to hold the VideoView reference:
```csharp
private VideoViewGL _videoView;
```
4. Modify the ViewDidLoad method to initialize and add the VideoView:
```csharp
public override void ViewDidLoad()
{
base.ViewDidLoad();
// Create and add VideoView
_videoView = new VideoViewGL(new CGRect(0, 0, videoViewHost.Bounds.Width, videoViewHost.Bounds.Height));
this.videoViewHost.AddSubview(_videoView);
// Configure VideoView properties
_videoView.AutoresizingMask = Foundation.NSViewResizingMask.WidthSizable | Foundation.NSViewResizingMask.HeightSizable;
_videoView.BackgroundColor = NSColor.Black;
// Additional initialization code
InitializeMediaComponents();
}
private void InitializeMediaComponents()
{
// Initialize your VisioForge SDK components here
// For example, for MediaPlayer:
// var player = new MediaPlayer();
// player.VideoView = _videoView;
// Additional configuration...
}
```
This code creates a new VideoViewGL instance (optimized for hardware acceleration), sizes it to match your container view, and adds it as a subview. The AutoresizingMask property ensures that the video view resizes properly when the window size changes.
## Adding Required Redistribution Packages
VisioForge SDKs rely on various native libraries and components that must be included in your application bundle. These dependencies vary based on the specific SDK you're using and your target platform.
Check the [deployment documentation](../deployment-x/index.md) for detailed information on which redistribution packages are required for your specific scenario.
## Troubleshooting Common Issues
If you encounter issues during installation or integration, consider these common solutions:
1. **Missing dependencies**: Ensure all required redistribution packages are installed
2. **Build errors**: Verify that your project targets a compatible .NET version
3. **Runtime crashes**: Check for platform-specific initialization issues
4. **Black video display**: Verify that the VideoView is properly initialized and added to the view hierarchy
5. **Performance issues**: Consider enabling hardware acceleration where available
For more specific troubleshooting guidance, refer to the VisioForge documentation or contact their support team.
## Next Steps and Resources
Now that you've successfully integrated VisioForge SDKs into your Visual Studio for Mac project, you can explore more advanced features and capabilities:
- Create custom video processing workflows
- Implement recording and capture functionality
- Develop sophisticated media editing features
- Build streaming media applications
### Additional Resources
- Visit our [GitHub repository](https://github.com/visioforge/.Net-SDK-s-samples) for code samples and example projects
- Join the [developer forum](https://support.visioforge.com/) to connect with other developers
- Subscribe to our newsletter for updates on new features and best practices
By following this guide, you've established a solid foundation for developing powerful multimedia applications on macOS and iOS using VisioForge SDKs and Visual Studio for Mac.
---END OF PAGE---
# Local File: .\dotnet\install\visual-studio.md
---
title: Integrating .NET SDKs with Visual Studio
description: Learn how to properly install and configure multimedia .NET SDKs in Microsoft Visual Studio with this detailed step-by-step guide. Covers NuGet package installation, manual setup methods, UI framework integration, and best practices for professional video capture and editing applications.
sidebar_label: Visual Studio
order: 14
---
# Comprehensive Guide to Integrating .NET SDKs with Visual Studio
[!badge size="xl" target="blank" variant="info" text="Video Capture SDK .Net"](https://www.visioforge.com/video-capture-sdk-net) [!badge size="xl" target="blank" variant="info" text="Video Edit SDK .Net"](https://www.visioforge.com/video-edit-sdk-net) [!badge size="xl" target="blank" variant="info" text="Media Blocks SDK .Net"](https://www.visioforge.com/media-blocks-sdk-net) [!badge size="xl" target="blank" variant="info" text="Media Player SDK .Net"](https://www.visioforge.com/media-player-sdk-net)
## Introduction to VisioForge .NET SDKs
VisioForge offers a powerful suite of multimedia SDKs for .NET developers, enabling you to build feature-rich applications with advanced video capture, editing, playback, and media processing capabilities. This comprehensive guide will walk you through the process of integrating these SDKs into your Visual Studio projects, ensuring a smooth development experience.
For professional developers working on multimedia applications, properly integrating these SDKs is crucial for optimal performance and functionality. Our recommended approach is to use NuGet packages, which simplifies dependency management and ensures you're always using the latest features and bug fixes.
## Installation Methods Overview
There are two primary methods to install VisioForge .NET SDKs:
1. **NuGet Package Installation** (Recommended): The modern, streamlined approach that handles dependencies automatically and simplifies updates.
2. **Manual Installation**: A traditional approach for specialized scenarios, though generally not recommended for most projects.
We'll cover both methods in detail, but strongly encourage the NuGet approach for most development scenarios.
## NuGet Package Installation (Recommended Method)
NuGet is the package manager for .NET, providing a centralized way to incorporate libraries into your projects without the hassle of manual file management. Here's a detailed walkthrough of integrating VisioForge SDKs using NuGet.
### Step 1: Create or Open Your .NET Project
First, you'll need a WinForms, WPF, or other .NET project. We recommend using the modern SDK-style project format for optimal compatibility.
#### Creating a New Project
1. Launch Visual Studio (2019 or 2022 recommended)
2. Select "Create a new project"
3. Filter templates by "C#" and either "WPF" or "Windows Forms"
4. Choose "WPF Application" or "Windows Forms Application" with the .NET Core/5/6+ framework
5. Ensure you select the modern SDK-style project format (this is the default in newer Visual Studio versions)

#### Configuring the Project
After creating a new project, you'll need to configure basic settings:
1. Enter your project name (use a descriptive name relevant to your application)
2. Choose an appropriate location and solution name
3. Select your target framework (.NET 6 or newer recommended for best performance and features)
4. Click "Create" to generate the project structure

### Step 2: Access NuGet Package Manager
Once your project is open in Visual Studio:
1. Right-click on your project in Solution Explorer
2. Select "Manage NuGet Packages..." from the context menu
3. The NuGet Package Manager will open in the center pane
This interface provides search functionality and package browsing to easily find and install the VisioForge components you need.

### Step 3: Install the UI Package for Your Framework
VisioForge SDKs offer specialized UI components for different .NET frameworks. You'll need to select the appropriate UI package based on your project type.
1. In the NuGet Package Manager, switch to the "Browse" tab
2. Search for "VisioForge.DotNet.Core.UI"
3. Select the appropriate UI package for your project type from the search results

#### Available UI Packages
VisioForge supports a wide range of UI frameworks. Choose the one that matches your project:
- **[VisioForge.DotNet.Core.UI.WinUI](https://www.nuget.org/packages/VisioForge.DotNet.Core.UI.WinUI)**: For modern Windows UI applications
- **[VisioForge.DotNet.Core.UI.MAUI](https://www.nuget.org/packages/VisioForge.DotNet.Core.UI.MAUI)**: For cross-platform applications using .NET MAUI
- **[VisioForge.DotNet.Core.UI.Avalonia](https://www.nuget.org/packages/VisioForge.DotNet.Core.UI.Avalonia)**: For cross-platform desktop applications using Avalonia UI
These UI packages provide the necessary controls and components specifically designed for video rendering and interaction within your chosen framework.
### Step 4: Install the Core SDK Package
After installing the UI package, you'll need to add the main SDK package for your specific multimedia needs:
1. Return to the NuGet Package Manager "Browse" tab
2. Search for the specific VisioForge SDK you need (e.g., "VisioForge.DotNet.VideoCapture")
3. Click "Install" on the appropriate package

#### Available Core SDK Packages
Choose the SDK that aligns with your application's requirements:
- **[VisioForge.DotNet.VideoCapture](https://www.nuget.org/packages/VisioForge.DotNet.VideoCapture)**: For applications that need to capture video from cameras, screen recording, or other sources
- **[VisioForge.DotNet.VideoEdit](https://www.nuget.org/packages/VisioForge.DotNet.VideoEdit)**: For video editing, processing, and conversion applications
- **[VisioForge.DotNet.MediaPlayer](https://www.nuget.org/packages/VisioForge.DotNet.MediaPlayer)**: For creating media players with advanced playback controls
- **[VisioForge.DotNet.MediaBlocks](https://www.nuget.org/packages/VisioForge.DotNet.MediaBlocks)**: For building complex media processing pipelines
Each package includes comprehensive documentation, and you can install multiple packages if your application requires different multimedia capabilities.
### Step 5: Implementing the VideoView Control (Optional)
The VideoView control is crucial for applications that need to display video content. You can add it to your UI using XAML (for WPF) or through the designer (for WinForms).
#### For WPF Applications
Add the required namespace to your XAML file:
```xml
xmlns:wpf="clr-namespace:VisioForge.Core.UI.WPF;assembly=VisioForge.Core"
```
Then add the VideoView control to your layout:
```xml
```

The VideoView control will appear in your designer:

#### For WinForms Applications
1. Open the form in designer mode
2. Locate the VisioForge controls in the toolbox (if they don't appear, right-click the toolbox and select "Choose Items...")
3. Drag and drop the VideoView control onto your form
4. Adjust the size and position properties as needed
### Step 6: Install Required Redistribution Packages
Depending on your specific implementation, you may need additional redistribution packages:
1. Return to the NuGet Package Manager
2. Search for "VisioForge.DotNet.Redist" to see available redistribution packages
3. Install the ones relevant to your platform and SDK choice

The required redistribution packages vary based on:
- Target operating system (Windows, macOS, Linux)
- Hardware acceleration requirements
- Specific codecs and formats your application will use
- Backend engine configuration
Consult the specific Deployment documentation page for your selected product to determine which redistribution packages are necessary for your application.
## Manual Installation (Alternative Method)
While we generally don't recommend manual installation due to its complexity and potential for configuration issues, there are specific scenarios where it might be necessary. Follow these steps if NuGet isn't an option for your project:
1. Download the [complete SDK installer](https://files.visioforge.com/trials/visioforge_sdks_installer_dotnet_setup.exe) from our website
2. Run the installer with administrator privileges and follow the on-screen instructions
3. Create your WinForms or WPF project in Visual Studio
4. Add references to the installed SDK libraries:
- Right-click "References" in Solution Explorer
- Select "Add Reference"
- Navigate to the installed SDK location
- Select the required DLL files
5. Configure the Visual Studio Toolbox:
- Right-click the Toolbox and select "Add Tab"
- Name the new tab "VisioForge"
- Right-click the tab and select "Choose Items..."
- Browse to the SDK installation directory
- Select `VisioForge.Core.dll`
6. Drag and drop the VideoView control onto your form or window
This manual approach requires additional configuration for deployment and updates must be managed manually.
## Advanced Configuration and Best Practices
For production applications, consider these additional implementation details:
- **License Management**: Implement proper license validation at application startup
- **Error Handling**: Add comprehensive error handling around SDK initialization and operation
- **Performance Optimization**: Configure hardware acceleration and threading based on your target devices
- **Resource Management**: Implement proper disposal of SDK resources to prevent memory leaks
## Troubleshooting Common Issues
If you encounter problems during installation or implementation:
- Verify your project targets a supported .NET version
- Ensure all required redistributable packages are installed
- Check for NuGet package version compatibility
- Review the SDK documentation for platform-specific requirements
## Conclusion and Next Steps
With the VisioForge .NET SDKs properly installed in your Visual Studio project, you're now ready to leverage their powerful multimedia capabilities. The NuGet installation method ensures you have the correct dependencies and simplifies future updates.
To deepen your understanding and maximize the potential of these SDKs:
- Explore our [comprehensive code samples on GitHub](https://github.com/visioforge/.Net-SDK-s-samples)
- Review the product-specific documentation for advanced features
- Join our developer community forums for support and best practices
By following this guide, you've established a solid foundation for developing sophisticated multimedia applications with VisioForge and Visual Studio.
---END OF PAGE---
# Local File: .\dotnet\mediablocks\index.md
---
title: Media Blocks SDK for .NET Integration Guide
description: Learn how to leverage Media Blocks SDK for .NET to build powerful multimedia applications. Discover how to play, edit, and capture video content with our modular SDK designed for developers. Explore our extensive guide to video encoding, processing, and rendering features.
sidebar_label: Media Blocks SDK .Net
order: 14
---
# Media Blocks SDK for .NET Development Platform
[!badge size="xl" target="blank" variant="info" text="Media Blocks SDK .Net"](https://www.visioforge.com/media-blocks-sdk-net)
## What is Media Blocks SDK?
Media Blocks SDK for .NET empowers developers to engineer sophisticated multimedia applications with precision and flexibility. This powerful toolkit provides everything needed to implement professional-grade video playback, non-linear editing systems, and multi-source camera capture solutions.
The modular architecture allows developers to select and combine only the specific components required for each project, optimizing both performance and resource usage in your applications.
## Why Choose Media Blocks for Your Project?
Our component-based approach gives you granular control over your media pipeline. Each specialized block handles a distinct function within the multimedia processing chain:
- High-performance H264/H265 video encoding
- Professional-grade logo and watermark insertion
- Multi-stream mixing and composition
- Hardware-accelerated video rendering
- Cross-platform compatibility
This modular design enables you to construct precisely the multimedia processing workflow your application requires, without unnecessary overhead.
[Get Started with Media Blocks SDK](GettingStarted/index.md)
## Core SDK Components and Capabilities
### Audio Processing Components
- [Audio Encoders](AudioEncoders/index.md) - Convert raw audio streams to AAC, MP3, and other compressed formats with customizable quality settings
- [Audio Processing](AudioProcessing/index.md) - Apply dynamic filters, enhance sound quality, and manipulate audio characteristics in real-time
- [Audio Rendering](AudioRendering/index.md) - Output processed audio to physical devices with precise timing and synchronization
### Video Processing Components
- [Video Encoders](VideoEncoders/index.md) - Generate optimized video streams with support for multiple codecs and container formats
- [Video Processing](VideoProcessing/index.md) - Transform, filter and enhance video content with effects, color correction, and image adjustments
- [Video Rendering](VideoRendering/index.md) - Display video content across different output technologies with hardware acceleration
- [Live Video Compositor](LiveVideoCompositor/index.md) - Combine multiple video sources in real-time with transitions and effects
### Input/Output System Components
- [Bridges](Bridge/index.md) - Connect and synchronize different component types within your processing pipeline
- [Decklink](Decklink/index.md) - Integrate with professional Blackmagic Design video capture and playback hardware
- [Sinks](Sinks/index.md) - Direct processed media to files, streams, network destinations, and other output targets
- [Sources](Sources/index.md) - Ingest media from cameras, files, network streams, and other input devices
- [Special](Special/index.md) - Implement specialized functionality with our extended component collection
## Essential Developer Resources
- [Deployment Guide](../deployment-x/index.md)
- [Changelog](../changelog.md)
- [End User License Agreement](../../eula.md)
- [API Documentation](https://api.visioforge.com/dotnet/api/index.html)
## Technical Support and Community
Our dedicated development team provides responsive support to ensure your success with Media Blocks SDK. Join our active developer community to exchange implementation strategies, optimization techniques, and custom solutions.
---END OF PAGE---
# Local File: .\dotnet\mediablocks\AudioEncoders\index.md
---
title: Audio Encoders for .NET Media Processing
description: Comprehensive guide to audio compression formats including AAC, MP3, FLAC, and more with VisioForge Media Blocks SDK for .NET. Learn implementation with code examples.
sidebar_label: Audio Encoders
order: 19
---
# Audio encoders blocks
[!badge size="xl" target="blank" variant="info" text="Media Blocks SDK .Net"](https://www.visioforge.com/media-blocks-sdk-net)
Audio encoding is the process of converting raw audio data into a compressed format. This process is essential for reducing the size of audio files, making them easier to store and stream over the internet. VisioForge Media Blocks SDK provides a wide range of audio encoders that support various formats and codecs.
## Availability checks
Before using any encoder, you should check if it's available on the current platform. Each encoder block provides a static `IsAvailable()` method for this purpose:
```csharp
// For most encoders
if (EncoderBlock.IsAvailable())
{
// Use the encoder
}
// For AAC encoder which requires passing settings
if (AACEncoderBlock.IsAvailable(settings))
{
// Use the AAC encoder
}
```
This check is important because not all encoders are available on all platforms. Always perform this check before attempting to use an encoder to avoid runtime errors.
## AAC encoder
`AAC (Advanced Audio Coding)`: A lossy compression format known for its efficiency and superior sound quality compared to MP3, widely used in digital music and broadcasting.
AAC encoder is used for encoding files in MP4, MKV, M4A and some other formats, as well as for network streaming using RTSP and HLS.
Use the `AACEncoderSettings` class to set the parameters.
### Block info
Name: AACEncoderBlock.
Pin direction | Media type | Pins count
--- | :---: | :---:
Input | PCM/IEEE | 1
Output | AAC | 1
### Constructor options
```csharp
// Constructor with custom settings
public AACEncoderBlock(IAACEncoderSettings settings)
// Constructor without parameters (uses default settings)
public AACEncoderBlock() // Uses GetDefaultSettings() internally
```
### Settings
The `AACEncoderBlock` works with any implementation of the `IAACEncoderSettings` interface. Different implementations are available depending on the platform:
- `AVENCAACEncoderSettings` - Available on Windows and macOS/Linux (preferred when available)
- `MFAACEncoderSettings` - Windows Media Foundation implementation (Windows only)
- `VOAACEncoderSettings` - Used on Android and iOS
You can use the static `GetDefaultSettings()` method to get the optimal encoder settings for the current platform:
```csharp
var settings = AACEncoderBlock.GetDefaultSettings();
```
### The sample pipeline
```mermaid
graph LR;
UniversalSourceBlock-->AACEncoderBlock;
AACEncoderBlock-->MP4SinkBlock;
```
### Sample code
```cs
var pipeline = new MediaBlocksPipeline();
var filename = "test.mp3";
var fileSource = new UniversalSourceBlock(await UniversalSourceSettings.CreateAsync(new Uri(filename)));
var aacEncoderBlock = new AACEncoderBlock(new MFAACEncoderSettings() { Bitrate = 192 });
pipeline.Connect(fileSource.AudioOutput, aacEncoderBlock.Input);
var m4aSinkBlock = new MP4SinkBlock(new MP4SinkSettings(@"output.m4a"));
pipeline.Connect(aacEncoderBlock.Output, m4aSinkBlock.CreateNewInput(MediaBlockPadMediaType.Audio));
await pipeline.StartAsync();
```
## ADPCM encoder
`ADPCM (Adaptive Differential Pulse Code Modulation)`: A type of audio compression that reduces the bit rate required for audio storage and transmission while maintaining audio quality through adaptive prediction.
ADPCM encoder is used for embedding audio streams in DV, WAV and AVI formats.
Use the `ADPCMEncoderSettings` class to set the parameters.
### Block info
Name: ADPCMEncoderBlock.
Pin direction | Media type | Pins count
--- | :---: | :---:
Input | PCM/IEEE | 1
Output | ADPCM | 1
### Constructor options
```csharp
// Constructor with block align parameter
public ADPCMEncoderBlock(int blockAlign = 1024)
```
The `blockAlign` parameter defines the block alignment in bytes. The default value is 1024.
### The sample pipeline
```mermaid
graph LR;
UniversalSourceBlock-->ADPCMEncoderBlock;
ADPCMEncoderBlock-->WAVSinkBlock;
```
### Sample code
```csharp
var pipeline = new MediaBlocksPipeline();
var filename = "test.mp3";
var fileSource = new UniversalSourceBlock(await UniversalSourceSettings.CreateAsync(new Uri(filename)));
var adpcmEncoderBlock = new ADPCMEncoderBlock(new ADPCMEncoderSettings());
pipeline.Connect(fileSource.AudioOutput, adpcmEncoderBlock.Input);
var wavSinkBlock = new WAVSinkBlock(@"output.wav");
pipeline.Connect(adpcmEncoderBlock.Output, wavSinkBlock.Input);
await pipeline.StartAsync();
```
## ALAW encoder
`ALAW (A-law algorithm)`: A standard companding algorithm used in digital communications systems to optimize the dynamic range of an analog signal for digitizing.
ALAW encoder is used for embedding audio streams in WAV format or transmitting over IP.
Use the `ALAWEncoderSettings` class to set the parameters.
### Block info
Name: ALAWEncoderBlock.
Pin direction | Media type | Pins count
--- | :---: | :---:
Input | PCM/IEEE | 1
Output | ALAW | 1
### Constructor options
```csharp
// Default constructor
public ALAWEncoderBlock()
```
### The sample pipeline
```mermaid
graph LR;
UniversalSourceBlock-->ALAWEncoderBlock;
ALAWEncoderBlock-->WAVSinkBlock;
```
### Sample code
```csharp
var pipeline = new MediaBlocksPipeline();
var filename = "test.mp3";
var fileSource = new UniversalSourceBlock(await UniversalSourceSettings.CreateAsync(new Uri(filename)));
var alawEncoderBlock = new ALAWEncoderBlock(new ALAWEncoderSettings());
pipeline.Connect(fileSource.AudioOutput, alawEncoderBlock.Input);
var wavSinkBlock = new WAVSinkBlock(@"output.wav");
pipeline.Connect(alawEncoderBlock.Output, wavSinkBlock.Input);
await pipeline.StartAsync();
```
## FLAC encoder
`FLAC (Free Lossless Audio Codec)`: A lossless audio compression format that preserves audio quality while significantly reducing file size compared to uncompressed formats like WAV.
FLAC encoder is used for encoding audio in FLAC format.
Use the `FLACEncoderSettings` class to set the parameters.
### Block info
Name: FLACEncoderBlock.
Pin direction | Media type | Pins count
--- | :---: | :---:
Input | PCM/IEEE | 1
Output | FLAC | 1
### Constructor options
```csharp
// Constructor with settings
public FLACEncoderBlock(FLACEncoderSettings settings)
```
### The sample pipeline
```mermaid
graph LR;
UniversalSourceBlock-->FLACEncoderBlock;
FLACEncoderBlock-->FileSinkBlock;
```
### Sample code
```csharp
var pipeline = new MediaBlocksPipeline();
var filename = "test.mp3";
var fileSource = new UniversalSourceBlock(await UniversalSourceSettings.CreateAsync(new Uri(filename)));
var flacEncoderBlock = new FLACEncoderBlock(new FLACEncoderSettings());
pipeline.Connect(fileSource.AudioOutput, flacEncoderBlock.Input);
var fileSinkBlock = new FileSinkBlock(@"output.flac");
pipeline.Connect(flacEncoderBlock.Output, fileSinkBlock.Input);
await pipeline.StartAsync();
```
## MP2 encoder
`MP2 (MPEG-1 Audio Layer II)`: An older audio compression format that preceded MP3, still used in some broadcasting applications due to its efficiency at specific bitrates.
MP2 encoder is used for transmitting over IP or embedding to AVI/MPEG-2 formats.
Use the `MP2EncoderSettings` class to set the parameters.
### Block info
Name: MP2EncoderBlock.
Pin direction | Media type | Pins count
--- | :---: | :---:
Input | PCM/IEEE | 1
Output | audio/mpeg | 1
### Constructor options
```csharp
// Constructor with settings
public MP2EncoderBlock(MP2EncoderSettings settings)
```
The `MP2EncoderSettings` class allows you to configure parameters such as:
- Bitrate (default: 192 kbps)
### The sample pipeline
```mermaid
graph LR;
UniversalSourceBlock-->MP2EncoderBlock;
MP2EncoderBlock-->FileSinkBlock;
```
### Sample code
```csharp
var pipeline = new MediaBlocksPipeline();
var filename = "test.mp3";
var fileSource = new UniversalSourceBlock(await UniversalSourceSettings.CreateAsync(new Uri(filename)));
var mp2EncoderBlock = new MP2EncoderBlock(new MP2EncoderSettings() { Bitrate = 192 });
pipeline.Connect(fileSource.AudioOutput, mp2EncoderBlock.Input);
var fileSinkBlock = new FileSinkBlock(@"output.mp2");
pipeline.Connect(mp2EncoderBlock.Output, fileSinkBlock.Input);
await pipeline.StartAsync();
```
## MP3 encoder
`MP3 (MPEG Audio Layer III)`: A popular lossy audio format that revolutionized digital music distribution by compressing files while retaining a reasonable sound quality.
An MP3 encoder can convert audio streams into MP3 files or embed MP3 audio streams in formats like AVI, MKV, and others.
Use the `MP3EncoderSettings` class to set the parameters.
### Block info
Name: MP3EncoderBlock.
Pin direction | Media type | Pins count
--- | :---: | :---:
Input | PCM/IEEE | 1
Output | audio/mpeg | 1
### Constructor options
```csharp
// Constructor with settings and optional parser flag
public MP3EncoderBlock(MP3EncoderSettings settings, bool addParser = false)
```
The `addParser` parameter is used to add a parser to the output stream, which is required for certain streaming applications like RTMP (YouTube/Facebook) streaming.
### The sample pipeline
```mermaid
graph LR;
UniversalSourceBlock-->MP3EncoderBlock;
MP3EncoderBlock-->FileSinkBlock;
```
### Sample code
```csharp
var pipeline = new MediaBlocksPipeline();
var filename = "test.mp3";
var fileSource = new UniversalSourceBlock(await UniversalSourceSettings.CreateAsync(new Uri(filename)));
var mp3EncoderBlock = new MP3EncoderBlock(new MP3EncoderSettings() { Bitrate = 192 });
pipeline.Connect(fileSource.AudioOutput, mp3EncoderBlock.Input);
var fileSinkBlock = new FileSinkBlock(@"output.mp3");
pipeline.Connect(mp3EncoderBlock.Output, fileSinkBlock.Input);
await pipeline.StartAsync();
```
### Streaming to RTMP example
```csharp
var pipeline = new MediaBlocksPipeline();
var filename = "test.mp3";
var fileSource = new UniversalSourceBlock(await UniversalSourceSettings.CreateAsync(new Uri(filename)));
// Add parser is set to true for RTMP streaming
var mp3EncoderBlock = new MP3EncoderBlock(new MP3EncoderSettings() { Bitrate = 192 }, addParser: true);
pipeline.Connect(fileSource.AudioOutput, mp3EncoderBlock.Input);
// Connect to RTMP sink
var rtmpSink = new RTMPSinkBlock(new RTMPSinkSettings("rtmp://streaming-server/live/stream"));
pipeline.Connect(mp3EncoderBlock.Output, rtmpSink.CreateNewInput(MediaBlockPadMediaType.Audio));
await pipeline.StartAsync();
```
## OPUS encoder
`OPUS`: A highly efficient lossy audio compression format designed for the internet with low latency and high audio quality, making it ideal for real-time applications like WebRTC.
OPUS encoder is used for embedding audio streams in WebM or OGG formats.
Use the `OPUSEncoderSettings` class to set the parameters.
### Block info
Name: OPUSEncoderBlock.
Pin direction | Media type | Pins count
--- | :---: | :---:
Input | PCM/IEEE | 1
Output | OPUS | 1
### Constructor options
```csharp
// Constructor with settings
public OPUSEncoderBlock(OPUSEncoderSettings settings)
```
The `OPUSEncoderSettings` class allows you to configure parameters such as:
- Bitrate (default: 128 kbps)
- Audio bandwidth
- Frame size and other encoding parameters
### The sample pipeline
```mermaid
graph LR;
UniversalSourceBlock-->OPUSEncoderBlock;
OPUSEncoderBlock-->WebMSinkBlock;
```
### Sample code
```csharp
var pipeline = new MediaBlocksPipeline();
var filename = "test.mp3";
var fileSource = new UniversalSourceBlock(await UniversalSourceSettings.CreateAsync(new Uri(filename)));
var opusEncoderBlock = new OPUSEncoderBlock(new OPUSEncoderSettings() { Bitrate = 192 });
pipeline.Connect(fileSource.AudioOutput, opusEncoderBlock.Input);
var webmSinkBlock = new WebMSinkBlock(new WebMSinkSettings(@"output.webm"));
pipeline.Connect(opusEncoderBlock.Output, webmSinkBlock.CreateNewInput(MediaBlockPadMediaType.Audio));
await pipeline.StartAsync();
```
## Speex encoder
`Speex`: A patent-free audio compression format designed specifically for speech, offering high compression rates while maintaining clarity for voice recordings.
Speex encoder is used for embedding audio streams in OGG format.
Use the `SpeexEncoderSettings` class to set the parameters.
### Block info
Name: SpeexEncoderBlock.
Pin direction | Media type | Pins count
--- | :---: | :---:
Input | PCM/IEEE | 1
Output | Speex | 1
### Constructor options
```csharp
// Constructor with settings
public SpeexEncoderBlock(SpeexEncoderSettings settings)
```
The `SpeexEncoderSettings` class allows you to configure parameters such as:
- Mode (SpeexMode): NarrowBand, WideBand, UltraWideBand
- Quality
- Complexity
- VAD (Voice Activity Detection)
- DTX (Discontinuous Transmission)
### The sample pipeline
```mermaid
graph LR;
UniversalSourceBlock-->SpeexEncoderBlock;
SpeexEncoderBlock-->OGGSinkBlock;
```
### Sample code
```csharp
var pipeline = new MediaBlocksPipeline();
var filename = "test.mp3";
var fileSource = new UniversalSourceBlock(await UniversalSourceSettings.CreateAsync(new Uri(filename)));
var speexEncoderBlock = new SpeexEncoderBlock(new SpeexEncoderSettings() { Mode = SpeexMode.NarrowBand });
pipeline.Connect(fileSource.AudioOutput, speexEncoderBlock.Input);
var oggSinkBlock = new OGGSinkBlock(@"output.ogg");
pipeline.Connect(speexEncoderBlock.Output, oggSinkBlock.Input);
await pipeline.StartAsync();
```
## Vorbis encoder
`Vorbis`: An open-source, lossy audio compression format designed as a free alternative to MP3, often used within the OGG container format.
Vorbis encoder is used for embedding audio streams in OGG or WebM formats.
Use the `VorbisEncoderSettings` class to set the parameters.
### Block info
Name: VorbisEncoderBlock.
Pin direction | Media type | Pins count
--- | :---: | :---:
Input | PCM/IEEE | 1
Output | Vorbis | 1
### Constructor options
```csharp
// Constructor with settings
public VorbisEncoderBlock(VorbisEncoderSettings settings)
```
The `VorbisEncoderSettings` class allows you to configure parameters such as:
- BaseQuality: A float value between 0.0 and 1.0 that determines the quality of the encoded audio
- Bitrate: Alternative bitrate-based configuration
### The sample pipeline
```mermaid
graph LR;
UniversalSourceBlock-->VorbisEncoderBlock;
VorbisEncoderBlock-->OGGSinkBlock;
```
### Sample code
```csharp
var pipeline = new MediaBlocksPipeline();
var filename = "test.mp3";
var fileSource = new UniversalSourceBlock(await UniversalSourceSettings.CreateAsync(new Uri(filename)));
var vorbisEncoderBlock = new VorbisEncoderBlock(new VorbisEncoderSettings() { BaseQuality = 0.5f });
pipeline.Connect(fileSource.AudioOutput, vorbisEncoderBlock.Input);
var oggSinkBlock = new OGGSinkBlock(@"output.ogg");
pipeline.Connect(vorbisEncoderBlock.Output, oggSinkBlock.Input);
await pipeline.StartAsync();
```
## WAV encoder
`WAV (Waveform Audio File Format)`: An uncompressed audio format that preserves audio quality but results in larger file sizes compared to compressed formats.
WAV encoder is used for encoding audio into WAV format.
Use the `WAVEncoderSettings` class to set the parameters.
### Block info
Name: WAVEncoderBlock.
Pin direction | Media type | Pins count
--- | :---: | :---:
Input | PCM/IEEE | 1
Output | WAV | 1
### Constructor options
```csharp
// Constructor with settings
public WAVEncoderBlock(WAVEncoderSettings settings)
```
The `WAVEncoderSettings` class allows you to configure various parameters for the WAV format.
### The sample pipeline
```mermaid
graph LR;
UniversalSourceBlock-->WAVEncoderBlock;
WAVEncoderBlock-->FileSinkBlock;
```
### Sample code
```csharp
var pipeline = new MediaBlocksPipeline();
var filename = "test.mp3";
var fileSource = new UniversalSourceBlock(await UniversalSourceSettings.CreateAsync(new Uri(filename)));
var wavEncoderBlock = new WAVEncoderBlock(new WAVEncoderSettings());
pipeline.Connect(fileSource.AudioOutput, wavEncoderBlock.Input);
var fileSinkBlock = new FileSinkBlock(@"output.wav");
pipeline.Connect(wavEncoderBlock.Output, fileSinkBlock.Input);
await pipeline.StartAsync();
```
## WavPack encoder
`WavPack`: A free and open-source lossless audio compression format that offers high compression rates while maintaining excellent audio quality, supporting hybrid lossy/lossless modes.
WavPack encoder is used for encoding audio in WavPack format, which is ideal for archiving audio with perfect fidelity.
Use the `WavPackEncoderSettings` class to set the parameters.
### Block info
Name: WavPackEncoderBlock.
Pin direction | Media type | Pins count
--- | :---: | :---:
Input | PCM/IEEE | 1
Output | WavPack | 1
### Constructor options
```csharp
// Constructor with settings
public WavPackEncoderBlock(WavPackEncoderSettings settings)
```
### The sample pipeline
```mermaid
graph LR;
UniversalSourceBlock-->WavPackEncoderBlock;
WavPackEncoderBlock-->FileSinkBlock;
```
### Sample code
```csharp
var pipeline = new MediaBlocksPipeline();
var filename = "test.mp3";
var fileSource = new UniversalSourceBlock(await UniversalSourceSettings.CreateAsync(new Uri(filename)));
var wavpackEncoderBlock = new WavPackEncoderBlock(new WavPackEncoderSettings());
pipeline.Connect(fileSource.AudioOutput, wavpackEncoderBlock.Input);
var fileSinkBlock = new FileSinkBlock(@"output.wv");
pipeline.Connect(wavpackEncoderBlock.Output, fileSinkBlock.Input);
await pipeline.StartAsync();
```
## WMA encoder
`WMA (Windows Media Audio)`: A proprietary audio compression format developed by Microsoft, offering various compression levels and features for different audio applications.
WMA encoder is used for encoding audio in WMA format.
Use the `WMAEncoderSettings` class to set the parameters.
### Block info
Name: WMAEncoderBlock.
Pin direction | Media type | Pins count
--- | :---: | :---:
Input | PCM/IEEE | 1
Output | WMA | 1
### Constructor options
```csharp
// Constructor with settings
public WMAEncoderBlock(WMAEncoderSettings settings)
```
The `WMAEncoderSettings` class allows you to configure parameters such as:
- Bitrate (default: 128 kbps)
- Quality settings
- VBR (Variable Bit Rate) options
### Default settings
You can use the static method to get default settings:
```csharp
var settings = WMAEncoderBlock.GetDefaultSettings();
```
### The sample pipeline
```mermaid
graph LR;
UniversalSourceBlock-->WMAEncoderBlock;
WMAEncoderBlock-->ASFSinkBlock;
```
### Sample code
```csharp
var pipeline = new MediaBlocksPipeline();
var filename = "test.mp3";
var fileSource = new UniversalSourceBlock(await UniversalSourceSettings.CreateAsync(new Uri(filename)));
var wmaEncoderBlock = new WMAEncoderBlock(new WMAEncoderSettings() { Bitrate = 192 });
pipeline.Connect(fileSource.AudioOutput, wmaEncoderBlock.Input);
var asfSinkBlock = new ASFSinkBlock(@"output.wma");
pipeline.Connect(wmaEncoderBlock.Output, asfSinkBlock.CreateNewInput(MediaBlockPadMediaType.Audio));
await pipeline.StartAsync();
```
## Resource management
All encoder blocks implement `IDisposable` and have internal cleanup mechanisms. It's recommended to properly dispose of them when they're no longer needed:
```csharp
// Using block
using (var encoder = new MP3EncoderBlock(settings))
{
// Use encoder
}
// Or manual disposal
var encoder = new MP3EncoderBlock(settings);
try {
// Use encoder
}
finally {
encoder.Dispose();
}
```
## Platforms
Windows, macOS, Linux, iOS, Android.
Note that not all encoders are available on all platforms. Always use the `IsAvailable()` method to check for availability before using an encoder.
---END OF PAGE---
# Local File: .\dotnet\mediablocks\AudioProcessing\index.md
---
title: .Net Audio Processing & Effect Blocks
description: Explore a comprehensive set of .NET audio processing and effect blocks for building powerful audio pipelines. Includes converters, resamplers, mixers, EQs, and more.
sidebar_label: Audio Processing and Effects
---
# Audio processing and effect blocks
[!badge size="xl" target="blank" variant="info" text="Media Blocks SDK .Net"](https://www.visioforge.com/media-blocks-sdk-net)
VisioForge Media Blocks SDK .Net includes a set of audio processing and effect blocks that allow you to create audio processing pipelines for your applications.
The blocks can be connected to each other to create a processing pipeline.
Most of the blocks are available for all platforms, including Windows, Linux, MacOS, Android, and iOS.
## Basic Audio Processing
### Audio Converter
The audio converter block converts audio from one format to another.
#### Block info
Name: AudioConverterBlock.
Pin direction | Media type | Pins count
--- | :---: | :---:
Input | Uncompressed audio | 1
Output | Uncompressed audio | 1
#### The sample pipeline
```mermaid
graph LR;
UniversalSourceBlock-->AudioConverterBlock;
AudioConverterBlock-->AudioRendererBlock;
```
#### Sample code
```csharp
var pipeline = new MediaBlocksPipeline();
var filename = "test.mp3";
var fileSource = new UniversalSourceBlock(await UniversalSourceSettings.CreateAsync(new Uri(filename)));
var audioConverter = new AudioConverterBlock();
pipeline.Connect(fileSource.AudioOutput, audioConverter.Input);
var audioRenderer = new AudioRendererBlock();
pipeline.Connect(audioConverter.Output, audioRenderer.Input);
await pipeline.StartAsync();
```
#### Platforms
Windows, macOS, Linux, iOS, Android.
### Audio Resampler
The audio resampler block changes the sample rate of an audio stream.
#### Block info
Name: AudioResamplerBlock.
Pin direction | Media type | Pins count
--- | :---: | :---:
Input | Uncompressed audio | 1
Output | Uncompressed audio | 1
#### The sample pipeline
```mermaid
graph LR;
UniversalSourceBlock-->AudioResamplerBlock;
AudioResamplerBlock-->AudioRendererBlock;
```
#### Sample code
```csharp
var pipeline = new MediaBlocksPipeline();
var filename = "test.mp3";
var fileSource = new UniversalSourceBlock(await UniversalSourceSettings.CreateAsync(new Uri(filename)));
// Resample to 48000 Hz, stereo
var settings = new AudioResamplerSettings(AudioFormatX.S16LE, 48000, 2);
var audioResampler = new AudioResamplerBlock(settings);
pipeline.Connect(fileSource.AudioOutput, audioResampler.Input);
var audioRenderer = new AudioRendererBlock();
pipeline.Connect(audioResampler.Output, audioRenderer.Input);
await pipeline.StartAsync();
```
#### Platforms
Windows, macOS, Linux, iOS, Android.
### Audio Timestamp Corrector
The audio timestamp corrector block can add or remove frames to correct input stream from unstable sources.
#### Block info
Name: AudioTimestampCorrectorBlock.
Pin direction | Media type | Pins count
--- | :---: | :---:
Input | Uncompressed audio | 1
Output | Uncompressed audio | 1
#### The sample pipeline
```mermaid
graph LR;
UniversalSourceBlock-->AudioTimestampCorrectorBlock;
AudioTimestampCorrectorBlock-->AudioRendererBlock;
```
#### Sample code
```csharp
var pipeline = new MediaBlocksPipeline();
var filename = "test.mp3";
var fileSource = new UniversalSourceBlock(await UniversalSourceSettings.CreateAsync(new Uri(filename)));
var settings = new AudioTimestampCorrectorSettings();
var corrector = new AudioTimestampCorrectorBlock(settings);
pipeline.Connect(fileSource.AudioOutput, corrector.Input);
var audioRenderer = new AudioRendererBlock();
pipeline.Connect(corrector.Output, audioRenderer.Input);
await pipeline.StartAsync();
```
#### Platforms
Windows, macOS, Linux, iOS, Android.
### Volume
The volume block allows you to control the volume of the audio stream.
#### Block info
Name: VolumeBlock.
Pin direction | Media type | Pins count
--- | :---: | :---:
Input | Uncompressed audio | 1
Output | Uncompressed audio | 1
#### The sample pipeline
```mermaid
graph LR;
UniversalSourceBlock-->VolumeBlock;
VolumeBlock-->AudioRendererBlock;
```
#### Sample code
```csharp
var pipeline = new MediaBlocksPipeline();
var filename = "test.mp3";
var fileSource = new UniversalSourceBlock(await UniversalSourceSettings.CreateAsync(new Uri(filename)));
// Volume: 0.0 (silence) to 1.0 (normal) or higher (amplification)
var volume = new VolumeBlock(0.8);
pipeline.Connect(fileSource.AudioOutput, volume.Input);
var audioRenderer = new AudioRendererBlock();
pipeline.Connect(volume.Output, audioRenderer.Input);
await pipeline.StartAsync();
```
#### Platforms
Windows, macOS, Linux, iOS, Android.
### Audio mixer
The audio mixer block mixes multiple audio streams into one. Block mixes the streams regardless of their format, converting if necessary.
All input streams will be synchronized. The mixer block handles the conversion of different input audio formats to a common format for mixing. By default, it will try to match the format of the first connected input, but this can be explicitly configured.
Use the `AudioMixerSettings` class to set the custom output format. This is useful if you need a specific sample rate, channel layout, or audio format (like S16LE, Float32LE, etc.) for the mixed output.
#### Block info
Name: AudioMixerBlock.
Pin direction | Media type | Pins count
--- | :---: | :---:
Input | Uncompressed audio | 1 (dynamically created)
Output | Uncompressed audio | 1
#### The sample pipeline
```mermaid
graph LR;
VirtualAudioSourceBlock#1-->AudioMixerBlock;
VirtualAudioSourceBlock#2-->AudioMixerBlock;
AudioMixerBlock-->AudioRendererBlock;
```
#### Sample code
```csharp
var pipeline = new MediaBlocksPipeline();
var audioSource1Block = new VirtualAudioSourceBlock(new VirtualAudioSourceSettings());
var audioSource2Block = new VirtualAudioSourceBlock(new VirtualAudioSourceSettings());
// Configure the mixer with specific output settings if needed
// For example, to output 48kHz, 2-channel, S16LE audio:
// var mixerSettings = new AudioMixerSettings() { Format = new AudioInfoX(AudioFormatX.S16LE, 48000, 2) };
// var audioMixerBlock = new AudioMixerBlock(mixerSettings);
var audioMixerBlock = new AudioMixerBlock(new AudioMixerSettings());
// Each call to CreateNewInput() adds a new input to the mixer
var inputPad1 = audioMixerBlock.CreateNewInput();
pipeline.Connect(audioSource1Block.Output, inputPad1);
var inputPad2 = audioMixerBlock.CreateNewInput();
pipeline.Connect(audioSource2Block.Output, inputPad2);
// Output the mixed audio to the default audio renderer
var audioRenderer = new AudioRendererBlock();
pipeline.Connect(audioMixerBlock.Output, audioRenderer.Input);
await pipeline.StartAsync();
```
#### Controlling Individual Input Streams
You can control the volume and mute state of individual input streams connected to the `AudioMixerBlock`.
The `streamIndex` for these methods corresponds to the order in which the inputs were added via `CreateNewInput()` or `CreateNewInputLive()` (starting from 0).
* **Set Volume**: Use the `SetVolume(int streamIndex, double value)` method. The `value` ranges from 0.0 (silence) to 1.0 (normal volume), and can be higher for amplification (e.g., up to 10.0, though specifics might depend on the underlying implementation limits).
* **Set Mute**: Use the `SetMute(int streamIndex, bool value)` method. Set `value` to `true` to mute the stream and `false` to unmute it.
```csharp
// Assuming audioMixerBlock is already created and inputs are connected
// Set volume of the first input stream (index 0) to 50%
audioMixerBlock.SetVolume(0, 0.5);
// Mute the second input stream (index 1)
audioMixerBlock.SetMute(1, true);
```
#### Dynamic Input Management (Live Pipeline)
The `AudioMixerBlock` supports adding and removing inputs dynamically while the pipeline is running:
* **Adding Inputs**: Use the `CreateNewInputLive()` method to get a new input pad that can be connected to a source. The underlying GStreamer elements will be set up to handle the new input.
* **Removing Inputs**: Use the `RemoveInputLive(MediaBlockPad blockPad)` method. This will disconnect the specified input pad and clean up associated resources.
This is particularly useful for applications where the number of audio sources can change during operation, such as a live mixing console or a conferencing application.
#### Platforms
Windows, macOS, Linux, iOS, Android.
### Audio sample grabber
The audio sample grabber block allows you to access the raw audio samples from the audio stream.
#### Block info
Name: AudioSampleGrabberBlock.
Pin direction | Media type | Pins count
--- | :---: | :---:
Input | Uncompressed audio | 1
Output | Uncompressed audio | 1
#### The sample pipeline
```mermaid
graph LR;
UniversalSourceBlock-->AudioSampleGrabberBlock;
AudioSampleGrabberBlock-->AudioRendererBlock;
```
#### Sample code
```csharp
var pipeline = new MediaBlocksPipeline();
var filename = "test.mp3";
var fileSource = new UniversalSourceBlock(await UniversalSourceSettings.CreateAsync(new Uri(filename)));
var audioSampleGrabber = new AudioSampleGrabberBlock();
audioSampleGrabber.SampleGrabbed += (sender, args) =>
{
// Process audio samples
// args.AudioData - audio samples
// args.AudioFormat - audio format
};
pipeline.Connect(fileSource.AudioOutput, audioSampleGrabber.Input);
var audioRenderer = new AudioRendererBlock();
pipeline.Connect(audioSampleGrabber.Output, audioRenderer.Input);
await pipeline.StartAsync();
```
#### Platforms
Windows, macOS, Linux, iOS, Android.
## Audio Effects
### Amplify
Block amplifies an audio stream by an amplification factor. Several clipping modes are available.
Use method and level values to configure.
#### Block info
Name: AmplifyBlock.
Pin direction | Media type | Pins count
--- | :---: | :---:
Input | Uncompressed audio | 1
Output | Uncompressed audio | 1
#### The sample pipeline
```mermaid
graph LR;
UniversalSourceBlock-->AmplifyBlock;
AmplifyBlock-->AudioRendererBlock;
```
#### Sample code
```csharp
var pipeline = new MediaBlocksPipeline();
var filename = "test.mp3";
var fileSource = new UniversalSourceBlock(await UniversalSourceSettings.CreateAsync(new Uri(filename)));
var amplify = new AmplifyBlock(AmplifyClippingMethod.Normal, 2.0);
pipeline.Connect(fileSource.AudioOutput, amplify.Input);
var audioRenderer = new AudioRendererBlock();
pipeline.Connect(amplify.Output, audioRenderer.Input);
await pipeline.StartAsync();
```
#### Platforms
Windows, macOS, Linux, iOS, Android.
### Echo
The echo block adds echo effect to the audio stream.
#### Block info
Name: EchoBlock.
Pin direction | Media type | Pins count
--- | :---: | :---:
Input | Uncompressed audio | 1
Output | Uncompressed audio | 1
#### The sample pipeline
```mermaid
graph LR;
UniversalSourceBlock-->EchoBlock;
EchoBlock-->AudioRendererBlock;
```
#### Sample code
```csharp
var pipeline = new MediaBlocksPipeline();
var filename = "test.mp3";
var fileSource = new UniversalSourceBlock(await UniversalSourceSettings.CreateAsync(new Uri(filename)));
// Delay in ms, strength 0.0 - 1.0
var echo = new EchoBlock(500, 0.5);
pipeline.Connect(fileSource.AudioOutput, echo.Input);
var audioRenderer = new AudioRendererBlock();
pipeline.Connect(echo.Output, audioRenderer.Input);
await pipeline.StartAsync();
```
#### Platforms
Windows, macOS, Linux, iOS, Android.
### Karaoke
The karaoke block applies a karaoke effect to the audio stream, removing center-panned vocals.
#### Block info
Name: KaraokeBlock.
Pin direction | Media type | Pins count
--- | :---: | :---:
Input | Uncompressed audio | 1
Output | Uncompressed audio | 1
#### The sample pipeline
```mermaid
graph LR;
UniversalSourceBlock-->KaraokeBlock;
KaraokeBlock-->AudioRendererBlock;
```
#### Sample code
```csharp
var pipeline = new MediaBlocksPipeline();
var filename = "test.mp3";
var fileSource = new UniversalSourceBlock(await UniversalSourceSettings.CreateAsync(new Uri(filename)));
var settings = new KaraokeAudioEffect();
var karaoke = new KaraokeBlock(settings);
pipeline.Connect(fileSource.AudioOutput, karaoke.Input);
var audioRenderer = new AudioRendererBlock();
pipeline.Connect(karaoke.Output, audioRenderer.Input);
await pipeline.StartAsync();
```
#### Platforms
Windows, macOS, Linux, iOS, Android.
### Reverberation
The reverberation block adds reverb effects to the audio stream.
#### Block info
Name: ReverberationBlock.
Pin direction | Media type | Pins count
--- | :---: | :---:
Input | Uncompressed audio | 1
Output | Uncompressed audio | 1
#### The sample pipeline
```mermaid
graph LR;
UniversalSourceBlock-->ReverberationBlock;
ReverberationBlock-->AudioRendererBlock;
```
#### Sample code
```csharp
var pipeline = new MediaBlocksPipeline();
var filename = "test.mp3";
var fileSource = new UniversalSourceBlock(await UniversalSourceSettings.CreateAsync(new Uri(filename)));
var settings = new ReverberationAudioEffect();
var reverb = new ReverberationBlock(settings);
pipeline.Connect(fileSource.AudioOutput, reverb.Input);
var audioRenderer = new AudioRendererBlock();
pipeline.Connect(reverb.Output, audioRenderer.Input);
await pipeline.StartAsync();
```
#### Platforms
Windows, macOS, Linux, iOS, Android.
### Wide Stereo
The wide stereo block enhances the stereo image of the audio.
#### Block info
Name: WideStereoBlock.
Pin direction | Media type | Pins count
--- | :---: | :---:
Input | Uncompressed audio | 1
Output | Uncompressed audio | 1
#### The sample pipeline
```mermaid
graph LR;
UniversalSourceBlock-->WideStereoBlock;
WideStereoBlock-->AudioRendererBlock;
```
#### Sample code
```csharp
var pipeline = new MediaBlocksPipeline();
var filename = "test.mp3";
var fileSource = new UniversalSourceBlock(await UniversalSourceSettings.CreateAsync(new Uri(filename)));
var settings = new WideStereoAudioEffect();
var wideStereo = new WideStereoBlock(settings);
pipeline.Connect(fileSource.AudioOutput, wideStereo.Input);
var audioRenderer = new AudioRendererBlock();
pipeline.Connect(wideStereo.Output, audioRenderer.Input);
await pipeline.StartAsync();
```
#### Platforms
Windows, macOS, Linux, iOS, Android.
## Equalization and Filtering
### Balance
Block allows you to control the balance between left and right channels.
#### Block info
Name: AudioBalanceBlock.
Pin direction | Media type | Pins count
--- | :---: | :---:
Input | Uncompressed audio | 1
Output | Uncompressed audio | 1
#### The sample pipeline
```mermaid
graph LR;
UniversalSourceBlock-->AudioBalanceBlock;
AudioBalanceBlock-->AudioRendererBlock;
```
#### Sample code
```csharp
var pipeline = new MediaBlocksPipeline();
var filename = "test.mp3";
var fileSource = new UniversalSourceBlock(await UniversalSourceSettings.CreateAsync(new Uri(filename)));
// Balance: -1.0 (full left) to 1.0 (full right), 0.0 - center
var balance = new AudioBalanceBlock(0.5);
pipeline.Connect(fileSource.AudioOutput, balance.Input);
var audioRenderer = new AudioRendererBlock();
pipeline.Connect(balance.Output, audioRenderer.Input);
await pipeline.StartAsync();
```
#### Platforms
Windows, macOS, Linux, iOS, Android.
### Equalizer (10 bands)
The 10-band equalizer block provides a 10-band equalizer for audio processing.
#### Block info
Name: Equalizer10Block.
Pin direction | Media type | Pins count
--- | :---: | :---:
Input | Uncompressed audio | 1
Output | Uncompressed audio | 1
#### The sample pipeline
```mermaid
graph LR;
UniversalSourceBlock-->Equalizer10Block;
Equalizer10Block-->AudioRendererBlock;
```
#### Sample code
```csharp
var pipeline = new MediaBlocksPipeline();
var filename = "test.mp3";
var fileSource = new UniversalSourceBlock(await UniversalSourceSettings.CreateAsync(new Uri(filename)));
// Create 10-band equalizer with all bands set to 0 dB
var equalizer = new Equalizer10Block(0, 0, 0, 0, 0, 0, 0, 0, 0, 0);
// Or set bands individually
equalizer.SetBand(0, 3); // Band 0 (31 Hz) to +3 dB
equalizer.SetBand(1, 2); // Band 1 (62 Hz) to +2 dB
equalizer.SetBand(9, -3); // Band 9 (16 kHz) to -3 dB
pipeline.Connect(fileSource.AudioOutput, equalizer.Input);
var audioRenderer = new AudioRendererBlock();
pipeline.Connect(equalizer.Output, audioRenderer.Input);
await pipeline.StartAsync();
```
#### Platforms
Windows, macOS, Linux, iOS, Android.
### Equalizer (Parametric)
The parametric equalizer block provides a parametric equalizer for audio processing.
#### Block info
Name: EqualizerParametricBlock.
Pin direction | Media type | Pins count
--- | :---: | :---:
Input | Uncompressed audio | 1
Output | Uncompressed audio | 1
#### The sample pipeline
```mermaid
graph LR;
UniversalSourceBlock-->EqualizerParametricBlock;
EqualizerParametricBlock-->AudioRendererBlock;
```
#### Sample code
```csharp
var pipeline = new MediaBlocksPipeline();
var filename = "test.mp3";
var fileSource = new UniversalSourceBlock(await UniversalSourceSettings.CreateAsync(new Uri(filename)));
// Create parametric equalizer
var equalizer = new EqualizerParametricBlock();
// Set up to 4 bands
equalizer.SetBand(0, 100, 1.0, 3); // Band 0: 100 Hz frequency, 1.0 Q, +3 dB gain
equalizer.SetBand(1, 1000, 1.5, -2); // Band 1: 1000 Hz frequency, 1.5 Q, -2 dB gain
pipeline.Connect(fileSource.AudioOutput, equalizer.Input);
var audioRenderer = new AudioRendererBlock();
pipeline.Connect(equalizer.Output, audioRenderer.Input);
await pipeline.StartAsync();
```
#### Platforms
Windows, macOS, Linux, iOS, Android.
### Chebyshev Band Pass/Reject
The Chebyshev band pass/reject block applies a band pass or band reject filter to the audio stream using Chebyshev filters.
#### Block info
Name: ChebyshevBandPassRejectBlock.
Pin direction | Media type | Pins count
--- | :---: | :---:
Input | Uncompressed audio | 1
Output | Uncompressed audio | 1
#### The sample pipeline
```mermaid
graph LR;
UniversalSourceBlock-->ChebyshevBandPassRejectBlock;
ChebyshevBandPassRejectBlock-->AudioRendererBlock;
```
#### Sample code
```csharp
var pipeline = new MediaBlocksPipeline();
var filename = "test.mp3";
var fileSource = new UniversalSourceBlock(await UniversalSourceSettings.CreateAsync(new Uri(filename)));
var settings = new ChebyshevBandPassRejectAudioEffect();
var filter = new ChebyshevBandPassRejectBlock(settings);
pipeline.Connect(fileSource.AudioOutput, filter.Input);
var audioRenderer = new AudioRendererBlock();
pipeline.Connect(filter.Output, audioRenderer.Input);
await pipeline.StartAsync();
```
#### Platforms
Windows, macOS, Linux, iOS, Android.
### Chebyshev Limit
The Chebyshev limit block applies low-pass or high-pass filtering to the audio using Chebyshev filters.
#### Block info
Name: ChebyshevLimitBlock.
Pin direction | Media type | Pins count
--- | :---: | :---:
Input | Uncompressed audio | 1
Output | Uncompressed audio | 1
#### The sample pipeline
```mermaid
graph LR;
UniversalSourceBlock-->ChebyshevLimitBlock;
ChebyshevLimitBlock-->AudioRendererBlock;
```
#### Sample code
```csharp
var pipeline = new MediaBlocksPipeline();
var filename = "test.mp3";
var fileSource = new UniversalSourceBlock(await UniversalSourceSettings.CreateAsync(new Uri(filename)));
var settings = new ChebyshevLimitAudioEffect();
var filter = new ChebyshevLimitBlock(settings);
pipeline.Connect(fileSource.AudioOutput, filter.Input);
var audioRenderer = new AudioRendererBlock();
pipeline.Connect(filter.Output, audioRenderer.Input);
await pipeline.StartAsync();
```
#### Platforms
Windows, macOS, Linux, iOS, Android.
## Dynamic Processing
### Compressor/Expander
The compressor/expander block provides dynamic range compression or expansion.
#### Block info
Name: CompressorExpanderBlock.
Pin direction | Media type | Pins count
--- | :---: | :---:
Input | Uncompressed audio | 1
Output | Uncompressed audio | 1
#### The sample pipeline
```mermaid
graph LR;
UniversalSourceBlock-->CompressorExpanderBlock;
CompressorExpanderBlock-->AudioRendererBlock;
```
#### Sample code
```csharp
var pipeline = new MediaBlocksPipeline();
var filename = "test.mp3";
var fileSource = new UniversalSourceBlock(await UniversalSourceSettings.CreateAsync(new Uri(filename)));
var compressor = new CompressorExpanderBlock(0.5, 0.9, 0.1, 0.5);
pipeline.Connect(fileSource.AudioOutput, compressor.Input);
var audioRenderer = new AudioRendererBlock();
pipeline.Connect(compressor.Output, audioRenderer.Input);
await pipeline.StartAsync();
```
#### Platforms
Windows, macOS, Linux, iOS, Android.
### Scale/Tempo
The scale/tempo block allows you to change the tempo and pitch of the audio stream.
#### Block info
Name: ScaleTempoBlock.
Pin direction | Media type | Pins count
--- | :---: | :---:
Input | Uncompressed audio | 1
Output | Uncompressed audio | 1
#### The sample pipeline
```mermaid
graph LR;
UniversalSourceBlock-->ScaleTempoBlock;
ScaleTempoBlock-->AudioRendererBlock;
```
#### Sample code
```csharp
var pipeline = new MediaBlocksPipeline();
var filename = "test.mp3";
var fileSource = new UniversalSourceBlock(await UniversalSourceSettings.CreateAsync(new Uri(filename)));
// Scale tempo by factor (1.0 is normal, 0.5 is half-speed, 2.0 is double-speed)
var scaleTempo = new ScaleTempoBlock(1.5);
pipeline.Connect(fileSource.AudioOutput, scaleTempo.Input);
var audioRenderer = new AudioRendererBlock();
pipeline.Connect(scaleTempo.Output, audioRenderer.Input);
await pipeline.StartAsync();
```
#### Platforms
Windows, macOS, Linux, iOS, Android.
## Analysis and Metering
### VU Meter
The VU meter block allows you to measure the volume level of the audio stream.
#### Block info
Name: VUMeterBlock.
Pin direction | Media type | Pins count
--- | :---: | :---:
Input | Uncompressed audio | 1
Output | Uncompressed audio | 1
#### The sample pipeline
```mermaid
graph LR;
UniversalSourceBlock-->VUMeterBlock;
VUMeterBlock-->AudioRendererBlock;
```
#### Sample code
```csharp
var pipeline = new MediaBlocksPipeline();
var filename = "test.mp3";
var fileSource = new UniversalSourceBlock(await UniversalSourceSettings.CreateAsync(new Uri(filename)));
var vuMeter = new VUMeterBlock();
vuMeter.VolumeUpdated += (sender, args) =>
{
// Left channel volume in dB
var leftVolume = args.LeftVolume;
// Right channel volume in dB
var rightVolume = args.RightVolume;
Console.WriteLine($"Left: {leftVolume:F2} dB, Right: {rightVolume:F2} dB");
};
pipeline.Connect(fileSource.AudioOutput, vuMeter.Input);
var audioRenderer = new AudioRendererBlock();
pipeline.Connect(vuMeter.Output, audioRenderer.Input);
await pipeline.StartAsync();
```
#### Platforms
Windows, macOS, Linux, iOS, Android.
---END OF PAGE---
# Local File: .\dotnet\mediablocks\AudioRendering\index.md
---
title: Audio Rendering Block for .NET Media Processing
description: Explore the powerful Audio Rendering Block for cross-platform audio output in .NET applications. Learn implementation techniques, performance optimization, and device management for Windows, macOS, Linux, iOS, and Android development.
sidebar_label: Audio Rendering
---
# Audio Rendering Block: Cross-Platform Audio Output Processing
[!badge size="xl" target="blank" variant="info" text="Media Blocks SDK .Net"](https://www.visioforge.com/media-blocks-sdk-net)
## Introduction to Audio Rendering
The Audio Renderer Block serves as a critical component in media processing pipelines, enabling applications to output audio streams to sound devices across multiple platforms. This versatile block handles the complex task of converting digital audio data into audible sound through the appropriate hardware interfaces, making it an essential tool for developers building audio-enabled applications.
Audio rendering requires careful management of hardware resources, buffer settings, and timing synchronization to ensure smooth, uninterrupted playback. This block abstracts these complexities and provides a unified interface for audio output across diverse computing environments.
## Core Functionality
The Audio Renderer Block accepts uncompressed audio streams and outputs them to either the default audio device or a user-selected alternative. It provides essential audio playback controls including:
- Volume adjustment with precise decibel control
- Mute functionality for silent operation
- Device selection from available system audio outputs
- Buffering settings to optimize for latency or stability
These capabilities allow developers to create applications with professional-grade audio output without needing to implement platform-specific code for each target operating system.
## Underlying Technology
### Platform-Specific Implementation
The `AudioRendererBlock` supports various platform-specific audio rendering technologies. It can be configured to use a specific audio device and API (see Device Management section). When instantiated using its default constructor (e.g., `new AudioRendererBlock()`), it attempts to select a suitable default audio API based on the operating system:
- **Windows**: The default constructor typically uses DirectSound. The block supports multiple audio APIs including:
- DirectSound: Provides low-latency output with broad compatibility
- WASAPI (Windows Audio Session API): Offers exclusive mode for highest quality
- ASIO (Audio Stream Input/Output): Professional-grade audio with minimal latency for specialized hardware
- **macOS**: Utilizes the CoreAudio framework. The default constructor will typically select a CoreAudio-based device for:
- High-resolution audio output
- Native integration with macOS audio subsystem
- Support for audio units and professional equipment
(Note: Similarly for macOS, an `OSXAudioSinkBlock` is available for direct interaction with the platform-specific GStreamer sink if needed for specialized scenarios.)
- **Linux**: Implements ALSA (Advanced Linux Sound Architecture). The default constructor will typically select an ALSA-based device for:
- Direct hardware access
- Comprehensive device support
- Integration with the Linux audio stack
- **iOS**: Employs CoreAudio, optimized for mobile. The default constructor will typically select a CoreAudio-based device, enabling features like:
- Power-efficient rendering
- Background audio capabilities
- Integration with iOS audio session management
(Note: For developers requiring more direct control over the iOS-specific GStreamer sink or having advanced use cases, the SDK also provides `IOSAudioSinkBlock` as a distinct media block.)
- **Android**: Defaults to using OpenSL ES to provide:
- Low-latency audio output
- Hardware acceleration when available
## OSXAudioSinkBlock: Direct macOS Audio Output
The `OSXAudioSinkBlock` is a platform-specific media block designed for advanced scenarios where direct interaction with the macOS GStreamer audio sink is required. This block is useful for developers who need low-level control over audio output on macOS devices, such as custom device selection or integration with other native components.
### Key Features
- Direct access to the macOS audio sink
- Device selection via `DeviceID`
- Suitable for specialized or professional audio applications on macOS
### Settings: `OSXAudioSinkSettings`
The `OSXAudioSinkBlock` requires an `OSXAudioSinkSettings` object to specify the audio output device. The `OSXAudioSinkSettings` class allows you to define:
- `DeviceID`: The ID of the macOS audio output device (starting from 0)
Example:
```csharp
using VisioForge.Core.Types.X.Sinks;
// Select the first available audio device (DeviceID = 0)
var osxSettings = new OSXAudioSinkSettings { DeviceID = 0 };
// Create the macOS audio sink block
var osxAudioSink = new OSXAudioSinkBlock(osxSettings);
```
### Availability Check
You can check if the `OSXAudioSinkBlock` is available on the current platform:
```csharp
bool isAvailable = OSXAudioSinkBlock.IsAvailable();
```
### Integration Example
Below is a minimal example of integrating `OSXAudioSinkBlock` into a media pipeline:
```csharp
var pipeline = new MediaBlocksPipeline();
// Set up your audio source block as needed
var audioSourceBlock = new VirtualAudioSourceBlock(new VirtualAudioSourceSettings());
// Define settings for the sink
var osxSettings = new OSXAudioSinkSettings { DeviceID = 0 };
var osxAudioSink = new OSXAudioSinkBlock(osxSettings);
// Connect the source to the macOS audio sink
pipeline.Connect(audioSourceBlock.Output, osxAudioSink.Input);
await pipeline.StartAsync();
```
## IOSAudioSinkBlock: Direct iOS Audio Output
The `IOSAudioSinkBlock` is a platform-specific media block designed for advanced scenarios where direct interaction with the iOS GStreamer audio sink is required. This block is useful for developers who need low-level control over audio output on iOS devices, such as custom audio routing, format handling, or integration with other native components.
### Key Features
- Direct access to the iOS GStreamer audio sink
- Fine-grained control over audio format, sample rate, and channel count
- Suitable for specialized or professional audio applications on iOS
### Settings: `AudioInfoX`
The `IOSAudioSinkBlock` requires an `AudioInfoX` object to specify the audio format. The `AudioInfoX` class allows you to define:
- `Format`: The audio sample format (e.g., `AudioFormatX.S16LE`, `AudioFormatX.F32LE`, etc.)
- `SampleRate`: The sample rate in Hz (e.g., 44100, 48000)
- `Channels`: The number of audio channels (e.g., 1 for mono, 2 for stereo)
Example:
```csharp
using VisioForge.Core.Types.X;
// Define audio format: 16-bit signed little-endian, 44100 Hz, stereo
var audioInfo = new AudioInfoX(AudioFormatX.S16LE, 44100, 2);
// Create the iOS audio sink block
var iosAudioSink = new IOSAudioSinkBlock(audioInfo);
```
### Availability Check
You can check if the `IOSAudioSinkBlock` is available on the current platform:
```csharp
bool isAvailable = IOSAudioSinkBlock.IsAvailable();
```
### Integration Example
Below is a minimal example of integrating `IOSAudioSinkBlock` into a media pipeline:
```csharp
var pipeline = new MediaBlocksPipeline();
// Set up your audio source block as needed
var audioSourceBlock = new VirtualAudioSourceBlock(new VirtualAudioSourceSettings());
// Define audio format for the sink
var audioInfo = new AudioInfoX(AudioFormatX.S16LE, 44100, 2);
var iosAudioSink = new IOSAudioSinkBlock(audioInfo);
// Connect the source to the iOS audio sink
pipeline.Connect(audioSourceBlock.Output, iosAudioSink.Input);
await pipeline.StartAsync();
```
## Technical Specifications
### Block Information
Name: AudioRendererBlock
| Pin direction | Media type | Pins count |
| --- | :---: | :---: |
| Input audio | uncompressed audio | 1 |
### Audio Format Support
The Audio Renderer Block accepts a wide range of uncompressed audio formats:
- Sample rates: 8kHz to 192kHz
- Bit depths: 8-bit, 16-bit, 24-bit, and 32-bit (floating point)
- Channel configurations: Mono, stereo, and multichannel (up to 7.1 surround)
This flexibility allows developers to work with everything from basic voice applications to high-fidelity music and immersive audio experiences.
## Device Management
### Enumerating Available Devices
The Audio Renderer Block provides straightforward methods to discover and select from available audio output devices on the system using the `GetDevicesAsync` static method:
```csharp
// Get a list of all audio output devices on the current system
var availableDevices = await AudioRendererBlock.GetDevicesAsync();
// Optionally specify the API to use
var directSoundDevices = await AudioRendererBlock.GetDevicesAsync(AudioOutputDeviceAPI.DirectSound);
// Display device information
foreach (var device in availableDevices)
{
Console.WriteLine($"Device: {device.Name}");
}
// Create a renderer with a specific device
var audioRenderer = new AudioRendererBlock(availableDevices[0]);
```
### Default Device Handling
When no specific device is selected, the block automatically routes audio to the system's default output device. The no-parameter constructor attempts to select an appropriate default device based on the platform:
```csharp
// Create with default device
var audioRenderer = new AudioRendererBlock();
```
The block also monitors device status, handling scenarios such as:
- Device disconnection during playback
- Default device changes by the user
- Audio endpoint format changes
## Performance Considerations
### Latency Management
Audio rendering latency is critical for many applications. The block provides configuration options through the `Settings` property and synchronization control via the `IsSync` property:
```csharp
// Control synchronization behavior
audioRenderer.IsSync = true; // Enable synchronization (default)
// Check if a specific API is available on this platform
bool isDirectSoundAvailable = AudioRendererBlock.IsAvailable(AudioOutputDeviceAPI.DirectSound);
```
### Volume and Mute Control
The AudioRendererBlock provides precise volume control and mute functionality:
```csharp
// Set volume (0.0 to 1.0 range)
audioRenderer.Volume = 0.8; // 80% volume
// Get current volume
double currentVolume = audioRenderer.Volume;
// Mute/unmute
audioRenderer.Mute = true; // Mute audio
audioRenderer.Mute = false; // Unmute audio
// Check mute state
bool isMuted = audioRenderer.Mute;
```
### Resource Utilization
The Audio Renderer Block is designed for efficiency, with optimizations for:
- CPU usage during playback
- Memory footprint for buffer management
- Power consumption on mobile devices
## Integration Examples
### Basic Pipeline Setup
The following example demonstrates how to set up a simple audio rendering pipeline using a virtual audio source:
```csharp
var pipeline = new MediaBlocksPipeline();
var audioSourceBlock = new VirtualAudioSourceBlock(new VirtualAudioSourceSettings());
// Create audio renderer with default settings
var audioRenderer = new AudioRendererBlock();
pipeline.Connect(audioSourceBlock.Output, audioRenderer.Input);
await pipeline.StartAsync();
```
### Real-World Audio Pipeline
For a more practical application, here's how to capture system audio and render it:
```mermaid
graph LR;
SystemAudioSourceBlock-->AudioRendererBlock;
```
```csharp
var pipeline = new MediaBlocksPipeline();
// Capture system audio
var systemAudioSource = new SystemAudioSourceBlock();
// Configure the audio renderer
var audioRenderer = new AudioRendererBlock();
audioRenderer.Volume = 0.8f; // 80% volume
// Connect blocks
pipeline.Connect(systemAudioSource.Output, audioRenderer.Input);
// Start processing
await pipeline.StartAsync();
// Allow audio to play for 10 seconds
await Task.Delay(TimeSpan.FromSeconds(10));
// Stop the pipeline
await pipeline.StopAsync();
```
## Compatibility and Platform Support
The Audio Renderer Block is designed for cross-platform operation, supporting:
- Windows 10 and later
- macOS 10.13 and later
- Linux (Ubuntu, Debian, Fedora)
- iOS 12.0 and later
- Android 8.0 and later
This wide platform support enables developers to create consistent audio experiences across different operating systems and devices.
## Conclusion
The Audio Renderer Block provides developers with a powerful, flexible solution for audio output across multiple platforms. By abstracting the complexities of platform-specific audio APIs, it allows developers to focus on creating exceptional audio experiences without worrying about the underlying implementation details.
Whether building a simple media player, a professional audio editing application, or a real-time communications platform, the Audio Renderer Block provides the tools needed for high-quality, reliable audio output.
---END OF PAGE---
# Local File: .\dotnet\mediablocks\AudioVisualizers\index.md
---
title: .Net Audio Visualizer Blocks
description: Explore a comprehensive set of .NET audio visualizer blocks for building powerful audio-reactive applications. Includes Spacescope, Spectrascope, Synaescope, and Wavescope.
sidebar_label: Audio Visualizers
---
# Audio visualizer blocks
[!badge size="xl" target="blank" variant="info" text="Media Blocks SDK .Net"](https://www.visioforge.com/media-blocks-sdk-net)
VisioForge Media Blocks SDK .Net includes a set of audio visualizer blocks that allow you to create audio-reactive visualizations for your applications. These blocks take audio input and produce video output representing the audio characteristics.
The blocks can be connected to other audio and video processing blocks to create complex media pipelines.
Most of the blocks are available for all platforms, including Windows, Linux, MacOS, Android, and iOS.
## Spacescope
The Spacescope block is a simple audio visualization element that maps the left and right audio channels to X and Y coordinates, respectively, creating a Lissajous-like pattern. This visualizes the phase relationship between the channels. The appearance, such as using dots or lines and colors, can be customized via `SpacescopeSettings`.
#### Block info
Name: SpacescopeBlock.
Pin direction | Media type | Pins count
--- | :---: | :---:
Input | Uncompressed audio | 1
Output | Video | 1
#### The sample pipeline
```mermaid
graph LR;
UniversalSourceBlock-->SpacescopeBlock;
SpacescopeBlock-->VideoRendererBlock;
```
#### Sample code
```csharp
var pipeline = new MediaBlocksPipeline();
var filename = "test.mp3"; // Or any audio source
var fileSource = new UniversalSourceBlock(await UniversalSourceSettings.CreateAsync(new Uri(filename)));
// Settings can be customized, e.g., for shader, line thickness, etc.
// The style (dots, lines, color-dots, color-lines) can be set in SpacescopeSettings.
var spacescopeSettings = new SpacescopeSettings();
var spacescope = new SpacescopeBlock(spacescopeSettings);
pipeline.Connect(fileSource.AudioOutput, spacescope.Input);
// Assuming you have a VideoRendererBlock or a way to display video output
var videoRenderer = new VideoRendererBlock(IntPtr.Zero); // Example for Windows
pipeline.Connect(spacescope.Output, videoRenderer.Input);
await pipeline.StartAsync();
```
#### Platforms
Windows, macOS, Linux, iOS, Android.
## Spectrascope
The Spectrascope block is a simple spectrum visualization element. It renders the frequency spectrum of the audio input as a series of bars.
#### Block info
Name: SpectrascopeBlock.
Pin direction | Media type | Pins count
--- | :---: | :---:
Input | Uncompressed audio | 1
Output | Video | 1
#### The sample pipeline
```mermaid
graph LR;
UniversalSourceBlock-->SpectrascopeBlock;
SpectrascopeBlock-->VideoRendererBlock;
```
#### Sample code
```csharp
var pipeline = new MediaBlocksPipeline();
var filename = "test.mp3"; // Or any audio source
var fileSource = new UniversalSourceBlock(await UniversalSourceSettings.CreateAsync(new Uri(filename)));
var spectrascope = new SpectrascopeBlock();
pipeline.Connect(fileSource.AudioOutput, spectrascope.Input);
// Assuming you have a VideoRendererBlock or a way to display video output
var videoRenderer = new VideoRendererBlock(IntPtr.Zero); // Example for Windows
pipeline.Connect(spectrascope.Output, videoRenderer.Input);
await pipeline.StartAsync();
```
#### Platforms
Windows, macOS, Linux, iOS, Android.
## Synaescope
The Synaescope block is an audio visualization element that analyzes frequencies and out-of-phase properties of the audio. It draws this analysis as dynamic clouds of stars, creating colorful and abstract patterns.
#### Block info
Name: SynaescopeBlock.
Pin direction | Media type | Pins count
--- | :---: | :---:
Input | Uncompressed audio | 1
Output | Video | 1
#### The sample pipeline
```mermaid
graph LR;
UniversalSourceBlock-->SynaescopeBlock;
SynaescopeBlock-->VideoRendererBlock;
```
#### Sample code
```csharp
var pipeline = new MediaBlocksPipeline();
var filename = "test.mp3"; // Or any audio source
var fileSource = new UniversalSourceBlock(await UniversalSourceSettings.CreateAsync(new Uri(filename)));
// Settings can be customized for Synaescope.
// For example, to set a specific shader effect (if available in SynaescopeSettings):
// var synaescopeSettings = new SynaescopeSettings() { Shader = SynaescopeShader.LibVisualCurrent };
// var synaescope = new SynaescopeBlock(synaescopeSettings);
var synaescope = new SynaescopeBlock(); // Default settings
pipeline.Connect(fileSource.AudioOutput, synaescope.Input);
// Assuming you have a VideoRendererBlock or a way to display video output
var videoRenderer = new VideoRendererBlock(IntPtr.Zero); // Example for Windows
pipeline.Connect(synaescope.Output, videoRenderer.Input);
await pipeline.StartAsync();
```
#### Platforms
Windows, macOS, Linux, iOS, Android.
## Wavescope
The Wavescope block is a simple audio visualization element that renders the audio waveforms, similar to an oscilloscope display. The drawing style (dots, lines, colors) can be configured using `WavescopeSettings`.
#### Block info
Name: WavescopeBlock.
Pin direction | Media type | Pins count
--- | :---: | :---:
Input | Uncompressed audio | 1
Output | Video | 1
#### The sample pipeline
```mermaid
graph LR;
UniversalSourceBlock-->WavescopeBlock;
WavescopeBlock-->VideoRendererBlock;
```
#### Sample code
```csharp
var pipeline = new MediaBlocksPipeline();
var filename = "test.mp3"; // Or any audio source
var fileSource = new UniversalSourceBlock(await UniversalSourceSettings.CreateAsync(new Uri(filename)));
// Settings can be customized, e.g., for style, mono/stereo mode, etc.
// The style (dots, lines, color-dots, color-lines) can be set in WavescopeSettings.
var wavescopeSettings = new WavescopeSettings();
var wavescope = new WavescopeBlock(wavescopeSettings);
pipeline.Connect(fileSource.AudioOutput, wavescope.Input);
// Assuming you have a VideoRendererBlock or a way to display video output
var videoRenderer = new VideoRendererBlock(IntPtr.Zero); // Example for Windows
pipeline.Connect(wavescope.Output, videoRenderer.Input);
await pipeline.StartAsync();
```
#### Platforms
Windows, macOS, Linux, iOS, Android.
---END OF PAGE---
# Local File: .\dotnet\mediablocks\AWS\index.md
---
title: .Net Media AWS S3 Blocks Guide
description: Explore a complete guide to .Net Media SDK AWS S3 source and sink blocks. Learn how to read from and write to AWS S3 for your media processing pipelines.
sidebar_label: Amazon Web Services
---
# AWS S3 Blocks - VisioForge Media Blocks SDK .Net
[!badge size="xl" target="blank" variant="info" text="Media Blocks SDK .Net"](https://www.visioforge.com/media-blocks-sdk-net)
AWS S3 blocks enable interaction with Amazon Simple Storage Service (S3) to read media files as sources or write media files as sinks within your pipelines.
## AWSS3SinkBlock
The `AWSS3SinkBlock` allows you to write media data from your pipeline to a file in an AWS S3 bucket. This is useful for storing recorded media, transcoded files, or other outputs directly to cloud storage.
#### Block info
Name: `AWSS3SinkBlock`.
| Pin direction | Media type | Pins count |
| --- | :---: | :---: |
| Input | Auto (depends on connected block) | 1 |
#### Settings
The `AWSS3SinkBlock` is configured using `AWSS3SinkSettings`. Key properties:
- `Uri` (string): The S3 URI where the media file will be written (e.g., "s3://your-bucket-name/path/to/output/file.mp4").
- `AccessKeyId` (string): Your AWS Access Key ID.
- `SecretAccessKey` (string): Your AWS Secret Access Key.
- `Region` (string): The AWS region where the bucket is located (e.g., "us-east-1").
- `SessionToken` (string, optional): AWS session token, if using temporary credentials.
- `EndpointUrl` (string, optional): Custom S3-compatible endpoint URL.
- `ContentType` (string, optional): The MIME type of the content being uploaded (e.g., "video/mp4").
- `StorageClass` (string, optional): S3 storage class (e.g., "STANDARD", "INTELLIGENT_TIERING").
- `ServerSideEncryption` (string, optional): Server-side encryption method (e.g., "AES256", "aws:kms").
- `ACL` (string, optional): Access Control List for the uploaded object (e.g., "private", "public-read").
#### The sample pipeline
```mermaid
graph LR;
SystemVideoSourceBlock-->VideoEncoderBlock;
VideoEncoderBlock-->MuxerBlock;
SystemAudioSourceBlock-->AudioEncoderBlock;
AudioEncoderBlock-->MuxerBlock;
MuxerBlock-->AWSS3SinkBlock;
```
#### Sample code
```csharp
var pipeline = new MediaBlocksPipeline();
// Create video source (e.g., webcam)
var videoDevice = (await DeviceEnumerator.Shared.VideoSourcesAsync())[0];
var videoSourceSettings = new VideoCaptureDeviceSourceSettings(videoDevice);
var videoSource = new SystemVideoSourceBlock(videoSourceSettings);
// Create audio source (e.g., microphone)
var audioDevice = (await DeviceEnumerator.Shared.AudioSourcesAsync())[0];
var audioSourceSettings = audioDevice.CreateSourceSettings(audioDevice.Formats[0].ToFormat());
var audioSource = new SystemAudioSourceBlock(audioSourceSettings);
// Create video encoder
var h264Settings = new OpenH264EncoderSettings(); // Example encoder settings
var videoEncoder = new H264EncoderBlock(h264Settings);
// Create audio encoder
var opusSettings = new OpusEncoderSettings(); // Example encoder settings
var audioEncoder = new OpusEncoderBlock(opusSettings);
// Create a muxer (e.g., MP4MuxBlock)
var mp4MuxSettings = new MP4MuxSettings();
var mp4Muxer = new MP4MuxBlock(mp4MuxSettings);
// Configure AWSS3SinkSettings
var s3SinkSettings = new AWSS3SinkSettings
{
Uri = "s3://your-bucket-name/output/recorded-video.mp4",
AccessKeyId = "YOUR_AWS_ACCESS_KEY_ID",
SecretAccessKey = "YOUR_AWS_SECRET_ACCESS_KEY",
Region = "your-aws-region", // e.g., "us-east-1"
ContentType = "video/mp4"
};
var s3Sink = new AWSS3SinkBlock(s3SinkSettings);
// Connect video path
pipeline.Connect(videoSource.Output, videoEncoder.Input);
pipeline.Connect(videoEncoder.Output, mp4Muxer.CreateNewInput(MediaBlockPadMediaType.Video));
// Connect audio path
pipeline.Connect(audioSource.Output, audioEncoder.Input);
pipeline.Connect(audioEncoder.Output, mp4Muxer.CreateNewInput(MediaBlockPadMediaType.Audio));
// Connect muxer to S3 sink
pipeline.Connect(mp4Muxer.Output, s3Sink.Input);
// Check if AWSS3Sink is available
if (!AWSS3SinkBlock.IsAvailable())
{
Console.WriteLine("AWS S3 Sink Block is not available. Check SDK redistributables.");
return;
}
// Start pipeline
await pipeline.StartAsync();
// ... wait for recording to finish ...
// Stop pipeline
await pipeline.StopAsync();
```
#### Remarks
You can check if the `AWSS3SinkBlock` is available at runtime using the static method `AWSS3SinkBlock.IsAvailable()`. This ensures that the necessary underlying GStreamer plugins and AWS SDK components are present.
#### Platforms
Windows, macOS, Linux. (Availability depends on GStreamer AWS plugin and AWS SDK support on these platforms).
---END OF PAGE---
# Local File: .\dotnet\mediablocks\Bridge\index.md
---
title: Link Media Pipelines - Bridge Blocks Guide
description: Learn to use Bridge blocks for linking and dynamically switching media pipelines for audio, video, and subtitles in .Net applications.
sidebar_label: Video and Audio Bridges
---
# Bridge blocks
[!badge size="xl" target="blank" variant="info" text="Media Blocks SDK .Net"](https://www.visioforge.com/media-blocks-sdk-net)
Bridges can be used to link two pipelines and dynamically switch between them. For example, you can switch between different files or cameras in the first Pipeline without interrupting streaming in the second Pipeline.
To link source and sink, give them the same name. Each bridge pair has a unique channel name.
## Bridge audio sink and source
Bridges can be used to connect different media pipelines and use them independently. `BridgeAudioSourceBlock` is used to connect to `BridgeAudioSinkBlock` and supports uncompressed audio.
### Block info
#### BridgeAudioSourceBlock information
| Pin direction | Media type | Pins count |
| --- | :---: | :---: |
| Output audio | uncompressed audio | 1 |
#### BridgeAudioSinkBlock information
| Pin direction | Media type | Pins count |
| --- | :---: | :---: |
| Input audio | uncompressed audio | 1 |
### Sample pipelines
#### First pipeline with an audio source and a bridge audio sink
```mermaid
graph LR;
VirtualAudioSourceBlock-->BridgeAudioSinkBlock;
```
#### Second pipeline with a bridge audio source and an audio renderer
```mermaid
graph LR;
BridgeAudioSourceBlock-->AudioRendererBlock;
```
### Sample code
The source pipeline with virtual audio source and bridge audio sink.
```csharp
// create source pipeline
var sourcePipeline = new MediaBlocksPipeline();
// create virtual audio source and bridge audio sink
var audioSourceBlock = new VirtualAudioSourceBlock(new VirtualAudioSourceSettings());
var bridgeAudioSink = new BridgeAudioSinkBlock(new BridgeAudioSinkSettings());
// connect source and sink
sourcePipeline.Connect(audioSourceBlock.Output, bridgeAudioSink.Input);
// start pipeline
await sourcePipeline.StartAsync();
```
The sink pipeline with bridge audio source and audio renderer.
```csharp
// create sink pipeline
var sinkPipeline = new MediaBlocksPipeline();
// create bridge audio source and audio renderer
var bridgeAudioSource = new BridgeAudioSourceBlock(new BridgeAudioSourceSettings());
var audioRenderer = new AudioRendererBlock();
// connect source and sink
sinkPipeline.Connect(bridgeAudioSource.Output, audioRenderer.Input);
// start pipeline
await sinkPipeline.StartAsync();
```
## Bridge video sink and source
Bridges can be used to connect different media pipelines and use them independently. `BridgeVideoSinkBlock` is used to connect to the `BridgeVideoSourceBlock` and supports uncompressed video.
### Blocks info
#### BridgeVideoSinkBlock information
| Pin direction | Media type | Pins count |
| --- | :---: | :---: |
| Input video | uncompressed video | 1 |
#### BridgeVideoSourceBlock information
| Pin direction | Media type | Pins count |
| --- | :---: | :---: |
| Output video | uncompressed video | 1 |
### Sample pipelines
#### First pipeline with a video source and a bridge video sink
```mermaid
graph LR;
VirtualVideoSourceBlock-->BridgeVideoSinkBlock;
```
#### Second pipeline with a bridge video source and a video renderer
```mermaid
graph LR;
BridgeVideoSourceBlock-->VideoRendererBlock;
```
### Sample code
Source pipeline with a virtual video source and bridge video sink.
```csharp
// create source pipeline
var sourcePipeline = new MediaBlocksPipeline();
// create virtual video source and bridge video sink
var videoSourceBlock = new VirtualVideoSourceBlock(new VirtualVideoSourceSettings());
var bridgeVideoSink = new BridgeVideoSinkBlock(new BridgeVideoSinkSettings());
// connect source and sink
sourcePipeline.Connect(videoSourceBlock.Output, bridgeVideoSink.Input);
// start pipeline
await sourcePipeline.StartAsync();
```
Sink pipeline with a bridge video source and video renderer.
```csharp
// create sink pipeline
var sinkPipeline = new MediaBlocksPipeline();
// create bridge video source and video renderer
var bridgeVideoSource = new BridgeVideoSourceBlock(new BridgeVideoSourceSettings());
var videoRenderer = new VideoRendererBlock(sinkPipeline, VideoView1);
// connect source and sink
sinkPipeline.Connect(bridgeVideoSource.Output, videoRenderer.Input);
// start pipeline
await sinkPipeline.StartAsync();
```
## Bridge subtitle sink and source
Bridges can be used to connect different media pipelines and use them independently. `BridgeSubtitleSourceBlock` is used to connect to the `BridgeSubtitleSinkBlock`and supports text media type.
### Block info
#### BridgeSubtitleSourceBlock information
| Pin direction | Media type | Pins count |
| --- | :---: | :---: |
| Output video | text | 1 |
#### BridgeSubtitleSinkBlock information
| Pin direction | Media type | Pins count |
| --- | :---: | :---: |
| Output video | text | 1 |
## Proxy source
Proxy source/proxy sink pair of blocks can be used to connect different media pipelines and use them independently.
### Block info
Name: ProxySourceBlock.
| Pin direction | Media type | Pins count |
| --- | :---: | :---: |
| Output | Any uncompressed | 1 |
### Sample pipelines
#### First pipeline with a video source and a proxy video sink
```mermaid
graph LR;
VirtualVideoSourceBlock-->ProxySinkBlock;
```
#### Second pipeline with a proxy video source and a video renderer
```mermaid
graph LR;
ProxySourceBlock-->VideoRendererBlock;
```
### Sample code
```csharp
// source pipeline with virtual video source and proxy sink
var sourcePipeline = new MediaBlocksPipeline();
var videoSourceBlock = new VirtualVideoSourceBlock(new VirtualVideoSourceSettings());
var proxyVideoSink = new ProxySinkBlock();
sourcePipeline.Connect(videoSourceBlock.Output, proxyVideoSink.Input);
// sink pipeline with proxy video source and video renderer
var sinkPipeline = new MediaBlocksPipeline();
var proxyVideoSource = new ProxySourceBlock(proxyVideoSink);
var videoRenderer = new VideoRendererBlock(sinkPipeline, VideoView1);
sinkPipeline.Connect(proxyVideoSource.Output, videoRenderer.Input);
// start pipelines
await sourcePipeline.StartAsync();
await sinkPipeline.StartAsync();
```
## Platforms
All bridge blocks are supported on Windows, macOS, Linux, iOS, and Android.
---END OF PAGE---
# Local File: .\dotnet\mediablocks\Decklink\index.md
---
title: Blackmagic Decklink Integration for .NET Developers
description: Integrate professional Blackmagic Decklink devices for high-quality audio/video capture and rendering in your .NET applications. Learn to implement SDI, HDMI inputs/outputs, configure multiple devices, and build advanced media workflows with our comprehensive code examples and API.
sidebar_label: Blackmagic Decklink
---
# Blackmagic Decklink Integration with Media Blocks SDK
[!badge size="xl" target="blank" variant="info" text="Media Blocks SDK .Net"](https://www.visioforge.com/media-blocks-sdk-net)
## Introduction to Decklink Integration
The VisioForge Media Blocks SDK for .NET provides robust support for Blackmagic Decklink devices, enabling developers to implement professional-grade audio and video functionality in their applications. This integration allows for seamless capture and rendering operations using Decklink's high-quality hardware.
Our SDK includes specialized blocks designed specifically for Decklink devices, giving you full access to their capabilities including SDI, HDMI, and other inputs/outputs. These blocks are optimized for performance and offer a straightforward API for implementing complex media workflows.
### Key Capabilities
- **Audio Capture and Rendering**: Capture and output audio through Decklink devices
- **Video Capture and Rendering**: Capture and output video in various formats and resolutions
- **Multiple Device Support**: Work with multiple Decklink devices simultaneously
- **Professional I/O Options**: Utilize SDI, HDMI, and other professional interfaces
- **High-Quality Processing**: Maintain professional video/audio quality throughout the pipeline
- **Combined Audio/Video Blocks**: Simplified handling of synchronized audio and video streams with dedicated source and sink blocks.
## System Requirements
Before using the Decklink blocks, ensure your system meets these requirements:
- **Hardware**: Compatible Blackmagic Decklink device
- **Software**: Blackmagic Decklink SDK or drivers installed
## Decklink Block Types
The SDK provides several block types for working with Decklink devices:
1. **Audio Sink Block**: For audio output to Decklink devices.
2. **Audio Source Block**: For audio capture from Decklink devices.
3. **Video Sink Block**: For video output to Decklink devices.
4. **Video Source Block**: For video capture from Decklink devices.
5. **Video + Audio Sink Block**: For synchronized video and audio output to Decklink devices using a single block.
6. **Video + Audio Source Block**: For synchronized video and audio capture from Decklink devices using a single block.
Each block type is designed to handle specific media operations while maintaining synchronization and quality.
## Working with Decklink Audio Sink Block
The Decklink Audio Sink block enables audio output to Blackmagic Decklink devices. This block handles the complexities of audio timing and device interfacing.
### Device Enumeration
Before creating an audio sink block, you'll need to enumerate available devices:
```csharp
var devices = await DecklinkAudioSinkBlock.GetDevicesAsync();
foreach (var item in devices)
{
Console.WriteLine($"Found device: {item.Name}, Device Number: {item.DeviceNumber}");
}
```
This code retrieves all available Decklink devices that support audio output functionality.
### Block Creation and Configuration
Once you've identified the target device, you can create and configure the audio sink block:
```csharp
// Get the first available device
var deviceInfo = (await DecklinkAudioSinkBlock.GetDevicesAsync()).FirstOrDefault();
// Create settings for the selected device
DecklinkAudioSinkSettings audioSinkSettings = null;
if (deviceInfo != null)
{
audioSinkSettings = new DecklinkAudioSinkSettings(deviceInfo);
// Example: audioSinkSettings.DeviceNumber = deviceInfo.DeviceNumber; (already set by constructor)
// Further configuration:
// audioSinkSettings.BufferTime = TimeSpan.FromMilliseconds(100);
// audioSinkSettings.IsSync = true;
}
// Create the block with configured settings
var decklinkAudioSink = new DecklinkAudioSinkBlock(audioSinkSettings);
```
### Key Audio Sink Settings
The `DecklinkAudioSinkSettings` class includes properties like:
- `DeviceNumber`: The output device instance to use.
- `BufferTime`: Minimum latency reported by the sink (default: 50ms).
- `AlignmentThreshold`: Timestamp alignment threshold (default: 40ms).
- `DiscontWait`: Time to wait before creating a discontinuity (default: 1s).
- `IsSync`: Enables synchronization (default: true).
### Connecting to the Pipeline
The audio sink block includes an `Input` pad that accepts audio data from other blocks in your pipeline:
```csharp
// Example: Connect an audio source/encoder to the Decklink audio sink
audioEncoder.Output.Connect(decklinkAudioSink.Input);
```
## Working with Decklink Audio Source Block
The Decklink Audio Source block enables capturing audio from Blackmagic Decklink devices. It supports various audio formats and configurations.
### Device Enumeration
Enumerate available audio source devices:
```csharp
var devices = await DecklinkAudioSourceBlock.GetDevicesAsync();
foreach (var item in devices)
{
Console.WriteLine($"Available audio source: {item.Name}, Device Number: {item.DeviceNumber}");
}
```
### Block Creation and Configuration
Create and configure the audio source block:
```csharp
// Get the first available device
var deviceInfo = (await DecklinkAudioSourceBlock.GetDevicesAsync()).FirstOrDefault();
// Create settings for the selected device
DecklinkAudioSourceSettings audioSourceSettings = null;
if (deviceInfo != null)
{
// create settings object
audioSourceSettings = new DecklinkAudioSourceSettings(deviceInfo);
// Further configuration:
// audioSourceSettings.Channels = DecklinkAudioChannels.Ch2;
// audioSourceSettings.Connection = DecklinkAudioConnection.Embedded;
// audioSourceSettings.Format = DecklinkAudioFormat.S16LE; // SampleRate is fixed at 48000
}
// Create the block with the configured settings
var audioSource = new DecklinkAudioSourceBlock(audioSourceSettings);
```
### Key Audio Source Settings
The `DecklinkAudioSourceSettings` class includes properties like:
- `DeviceNumber`: The input device instance to use.
- `Channels`: Audio channels to capture (e.g., `DecklinkAudioChannels.Ch2`, `Ch8`, `Ch16`). Default `Ch2`.
- `Format`: Audio sample format (e.g., `DecklinkAudioFormat.S16LE`). Default `S16LE`. Sample rate is fixed at 48000 Hz.
- `Connection`: Audio connection type (e.g., `DecklinkAudioConnection.Embedded`, `AES`, `Analog`). Default `Auto`.
- `BufferSize`: Internal buffer size in frames (default: 5).
- `DisableAudioConversion`: Set to `true` to disable internal audio conversion. Default `false`.
### Connecting to the Pipeline
The audio source block provides an `Output` pad that can connect to other blocks:
```csharp
// Example: Connect the audio source to an audio encoder or processor
audioSource.Output.Connect(audioProcessor.Input);
```
## Working with Decklink Video Sink Block
The Decklink Video Sink block enables video output to Blackmagic Decklink devices, supporting various video formats and resolutions.
### Device Enumeration
Find available video sink devices:
```csharp
var devices = await DecklinkVideoSinkBlock.GetDevicesAsync();
foreach (var item in devices)
{
Console.WriteLine($"Available video output device: {item.Name}, Device Number: {item.DeviceNumber}");
}
```
### Block Creation and Configuration
Create and configure the video sink block:
```csharp
// Get the first available device
var deviceInfo = (await DecklinkVideoSinkBlock.GetDevicesAsync()).FirstOrDefault();
// Create settings for the selected device
DecklinkVideoSinkSettings videoSinkSettings = null;
if (deviceInfo != null)
{
videoSinkSettings = new DecklinkVideoSinkSettings(deviceInfo);
// Configure video output format and mode
videoSinkSettings.Mode = DecklinkMode.HD1080i60;
videoSinkSettings.VideoFormat = DecklinkVideoFormat.YUV_10bit; // Use VideoFormat
// Optional: Additional configuration
// videoSinkSettings.KeyerMode = DecklinkKeyerMode.Internal;
// videoSinkSettings.KeyerLevel = 128;
// videoSinkSettings.Profile = DecklinkProfileID.Default;
// videoSinkSettings.TimecodeFormat = DecklinkTimecodeFormat.RP188Any;
}
// Create the block with the configured settings
var decklinkVideoSink = new DecklinkVideoSinkBlock(videoSinkSettings);
```
### Key Video Sink Settings
The `DecklinkVideoSinkSettings` class includes properties like:
- `DeviceNumber`: The output device instance to use.
- `Mode`: Specifies the video resolution and frame rate (e.g., `DecklinkMode.HD1080i60`, `HD720p60`). Default `Unknown`.
- `VideoFormat`: Defines the pixel format using `DecklinkVideoFormat` enum (e.g., `DecklinkVideoFormat.YUV_8bit`, `YUV_10bit`). Default `YUV_8bit`.
- `KeyerMode`: Controls keying/compositing options using `DecklinkKeyerMode` (if supported by the device). Default `Off`.
- `KeyerLevel`: Sets the keyer level (0-255). Default `255`.
- `Profile`: Specifies the Decklink profile to use with `DecklinkProfileID`.
- `TimecodeFormat`: Specifies the timecode format for playback using `DecklinkTimecodeFormat`. Default `RP188Any`.
- `IsSync`: Enables synchronization (default: true).
## Working with Decklink Video Source Block
The Decklink Video Source block allows capturing video from Blackmagic Decklink devices, supporting various input formats and resolutions.
### Device Enumeration
Enumerate video capture devices:
```csharp
var devices = await DecklinkVideoSourceBlock.GetDevicesAsync();
foreach (var item in devices)
{
Console.WriteLine($"Available video capture device: {item.Name}, Device Number: {item.DeviceNumber}");
}
```
### Block Creation and Configuration
Create and configure the video source block:
```csharp
// Get the first available device
var deviceInfo = (await DecklinkVideoSourceBlock.GetDevicesAsync()).FirstOrDefault();
// Create settings for the selected device
DecklinkVideoSourceSettings videoSourceSettings = null;
if (deviceInfo != null)
{
videoSourceSettings = new DecklinkVideoSourceSettings(deviceInfo);
// Configure video input format and mode
videoSourceSettings.Mode = DecklinkMode.HD1080i60;
videoSourceSettings.Connection = DecklinkConnection.SDI;
// videoSourceSettings.VideoFormat = DecklinkVideoFormat.Auto; // Often used with Mode=Auto
}
// Create the block with configured settings
var videoSourceBlock = new DecklinkVideoSourceBlock(videoSourceSettings);
```
### Key Video Source Settings
The `DecklinkVideoSourceSettings` class includes properties like:
- `DeviceNumber`: The input device instance to use.
- `Mode`: Specifies the expected input resolution and frame rate (e.g., `DecklinkMode.HD1080i60`). Default `Unknown`.
- `Connection`: Defines which physical input to use, using `DecklinkConnection` enum (e.g., `DecklinkConnection.HDMI`, `DecklinkConnection.SDI`). Default `Auto`.
- `VideoFormat`: Specifies the video format type for input, using `DecklinkVideoFormat` enum. Default `Auto` (especially when `Mode` is `Auto`).
- `Profile`: Specifies the Decklink profile using `DecklinkProfileID`. Default `Default`.
- `DropNoSignalFrames`: If `true`, drops frames marked as having no input signal. Default `false`.
- `OutputAFDBar`: If `true`, extracts and outputs AFD/Bar data as Meta. Default `false`.
- `OutputCC`: If `true`, extracts and outputs Closed Captions as Meta. Default `false`.
- `TimecodeFormat`: Specifies the timecode format using `DecklinkTimecodeFormat`. Default `RP188Any`.
- `DisableVideoConversion`: Set to `true` to disable internal video conversion. Default `false`.
## Working with Decklink Video + Audio Source Block
The `DecklinkVideoAudioSourceBlock` simplifies capturing synchronized video and audio streams from a single Decklink device.
### Device Enumeration and Configuration
Device selection is managed through `DecklinkVideoSourceSettings` and `DecklinkAudioSourceSettings`. You would typically enumerate video devices using `DecklinkVideoSourceBlock.GetDevicesAsync()` and audio devices using `DecklinkAudioSourceBlock.GetDevicesAsync()`, then configure the respective settings objects for the chosen device. The `DecklinkVideoAudioSourceBlock` itself also provides `GetDevicesAsync()` which enumerates video sources.
```csharp
// Enumerate video devices (for video part of the combined source)
var videoDeviceInfo = (await DecklinkVideoAudioSourceBlock.GetDevicesAsync()).FirstOrDefault(); // or DecklinkVideoSourceBlock.GetDevicesAsync()
var audioDeviceInfo = (await DecklinkAudioSourceBlock.GetDevicesAsync()).FirstOrDefault(d => d.DeviceNumber == videoDeviceInfo.DeviceNumber); // Example: match by device number
DecklinkVideoSourceSettings videoSettings = null;
if (videoDeviceInfo != null)
{
videoSettings = new DecklinkVideoSourceSettings(videoDeviceInfo);
videoSettings.Mode = DecklinkMode.HD1080i60;
videoSettings.Connection = DecklinkConnection.SDI;
}
DecklinkAudioSourceSettings audioSettings = null;
if (audioDeviceInfo != null)
{
audioSettings = new DecklinkAudioSourceSettings(audioDeviceInfo);
audioSettings.Channels = DecklinkAudioChannels.Ch2;
}
// Create the block with configured settings
if (videoSettings != null && audioSettings != null)
{
var decklinkVideoAudioSource = new DecklinkVideoAudioSourceBlock(videoSettings, audioSettings);
// Connect outputs
// decklinkVideoAudioSource.VideoOutput.Connect(videoProcessor.Input);
// decklinkVideoAudioSource.AudioOutput.Connect(audioProcessor.Input);
}
```
### Block Creation and Configuration
You instantiate `DecklinkVideoAudioSourceBlock` by providing pre-configured `DecklinkVideoSourceSettings` and `DecklinkAudioSourceSettings` objects.
```csharp
// Assuming videoSourceSettings and audioSourceSettings are configured as above
var videoAudioSource = new DecklinkVideoAudioSourceBlock(videoSourceSettings, audioSourceSettings);
```
### Connecting to the Pipeline
The block provides separate `VideoOutput` and `AudioOutput` pads:
```csharp
// Example: Connect to video and audio processors/encoders
videoAudioSource.VideoOutput.Connect(videoEncoder.Input);
videoAudioSource.AudioOutput.Connect(audioEncoder.Input);
```
## Working with Decklink Video + Audio Sink Block
The `DecklinkVideoAudioSinkBlock` simplifies sending synchronized video and audio streams to a single Decklink device.
### Device Enumeration and Configuration
Similar to the combined source, device selection is managed via `DecklinkVideoSinkSettings` and `DecklinkAudioSinkSettings`. Enumerate devices using `DecklinkVideoSinkBlock.GetDevicesAsync()` and `DecklinkAudioSinkBlock.GetDevicesAsync()`.
```csharp
var videoSinkDeviceInfo = (await DecklinkVideoSinkBlock.GetDevicesAsync()).FirstOrDefault();
var audioSinkDeviceInfo = (await DecklinkAudioSinkBlock.GetDevicesAsync()).FirstOrDefault(d => d.DeviceNumber == videoSinkDeviceInfo.DeviceNumber); // Example match
DecklinkVideoSinkSettings videoSinkSettings = null;
if (videoSinkDeviceInfo != null)
{
videoSinkSettings = new DecklinkVideoSinkSettings(videoSinkDeviceInfo);
videoSinkSettings.Mode = DecklinkMode.HD1080i60;
videoSinkSettings.VideoFormat = DecklinkVideoFormat.YUV_8bit;
}
DecklinkAudioSinkSettings audioSinkSettings = null;
if (audioSinkDeviceInfo != null)
{
audioSinkSettings = new DecklinkAudioSinkSettings(audioSinkDeviceInfo);
}
// Create the block
if (videoSinkSettings != null && audioSinkSettings != null)
{
var decklinkVideoAudioSink = new DecklinkVideoAudioSinkBlock(videoSinkSettings, audioSinkSettings);
// Connect inputs
// videoEncoder.Output.Connect(decklinkVideoAudioSink.VideoInput);
// audioEncoder.Output.Connect(decklinkVideoAudioSink.AudioInput);
}
```
### Block Creation and Configuration
Instantiate `DecklinkVideoAudioSinkBlock` with configured `DecklinkVideoSinkSettings` and `DecklinkAudioSinkSettings`.
```csharp
// Assuming videoSinkSettings and audioSinkSettings are configured
var videoAudioSink = new DecklinkVideoAudioSinkBlock(videoSinkSettings, audioSinkSettings);
```
### Connecting to the Pipeline
The block provides separate `VideoInput` and `AudioInput` pads:
```csharp
// Example: Connect from video and audio encoders
videoEncoder.Output.Connect(videoAudioSink.VideoInput);
audioEncoder.Output.Connect(videoAudioSink.AudioInput);
```
## Advanced Usage Examples
### Synchronized Audio/Video Capture
**Using separate source blocks:**
```csharp
// Assume videoSourceSettings and audioSourceSettings are configured for the same device/timing
var videoSource = new DecklinkVideoSourceBlock(videoSourceSettings);
var audioSource = new DecklinkAudioSourceBlock(audioSourceSettings);
// Create an MP4 encoder
var mp4Settings = new MP4SinkSettings("output.mp4");
var sink = new MP4SinkBlock(mp4Settings);
// Create video encoder
var videoEncoder = new H264EncoderBlock();
// Create audio encoder
var audioEncoder = new AACEncoderBlock();
// Connect video and audio sources
pipeline.Connect(videoSource.Output, videoEncoder.Input);
pipeline.Connect(audioSource.Output, audioEncoder.Input);
// Connect video encoder to sink
pipeline.Connect(videoEncoder.Output, sink.CreateNewInput(MediaBlockPadMediaType.Video));
// Connect audio encoder to sink
pipeline.Connect(audioEncoder.Output, sink.CreateNewInput(MediaBlockPadMediaType.Audio));
// Start the pipeline
await pipeline.StartAsync();
```
**Using `DecklinkVideoAudioSourceBlock` for simplified synchronized capture:**
If you use `DecklinkVideoAudioSourceBlock` (as configured in its dedicated section), the source setup becomes:
```csharp
// Assuming videoSourceSettings and audioSourceSettings are configured for the same device
var videoAudioSource = new DecklinkVideoAudioSourceBlock(videoSourceSettings, audioSourceSettings);
// ... (encoders and sink setup as above) ...
// Connect video and audio from the combined source
pipeline.Connect(videoAudioSource.VideoOutput, videoEncoder.Input);
pipeline.Connect(videoAudioSource.AudioOutput, audioEncoder.Input);
// ... (connect encoders to sink and start pipeline as above) ...
```
This ensures that audio and video are sourced from the Decklink device in a synchronized manner by the SDK.
## Troubleshooting Tips
- **No Devices Found**: Ensure Blackmagic drivers/SDK are installed and up-to-date. Check if the device is recognized by Blackmagic Desktop Video Setup.
- **Format Mismatch**: Verify the device supports your selected video/audio mode, format, and connection type. For sources with `Mode = DecklinkMode.Unknown` (auto-detect), ensure a stable signal is present.
- **Performance Issues**: Check system resources (CPU, RAM, disk I/O). Consider lowering resolution/framerate if issues persist.
- **Signal Detection**: For input devices, check cable connections and ensure the source device is outputting a valid signal.
- **"Unable to build ...Block" errors**: Double-check that all settings are valid for the selected device and mode. Ensure the correct `DeviceNumber` is used if multiple Decklink cards are present.
## Sample Applications
For complete working examples, refer to these sample applications:
- [Decklink Demo](https://github.com/visioforge/.Net-SDK-s-samples/tree/master/Media%20Blocks%20SDK/WPF/CSharp/Decklink%20Demo)
## Conclusion
The Blackmagic Decklink blocks in the VisioForge Media Blocks SDK provide a powerful and flexible way to integrate professional video and audio hardware into your .NET applications. By leveraging the specific source and sink blocks, including the combined audio/video blocks, you can efficiently implement complex capture and playback workflows. Always refer to the specific settings classes for detailed configuration options.
For additional support or questions, please refer to our [documentation](https://www.visioforge.com/documentation) or contact our support team.
---END OF PAGE---
# Local File: .\dotnet\mediablocks\Demuxers\index.md
---
title: .Net Media Demuxer Blocks Guide
description: Explore a complete guide to .Net Media SDK demuxer blocks. Learn about MPEG-TS, QT (MP4/MOV), and Universal demuxers for your media processing pipelines.
sidebar_label: Demuxers
---
# Demuxer Blocks - VisioForge Media Blocks SDK .Net
[!badge size="xl" target="blank" variant="info" text="Media Blocks SDK .Net"](https://www.visioforge.com/media-blocks-sdk-net)
Demuxer blocks are essential components in media processing pipelines. They take a multimedia stream, typically from a file or network source, and separate it into its constituent elementary streams, such as video, audio, and subtitles. This allows for individual processing or rendering of each stream. VisioForge Media Blocks SDK .Net provides several demuxer blocks to handle various container formats.
## MPEG-TS Demux Block
The `MPEGTSDemuxBlock` is used to demultiplex MPEG Transport Streams (MPEG-TS). MPEG-TS is a standard format for transmission and storage of audio, video, and Program and System Information Protocol (PSIP) data. It is commonly used in digital television broadcasting and streaming.
### Block info
Name: `MPEGTSDemuxBlock`.
| Pin direction | Media type | Pins count |
| --- | :---: | :---: |
| Input | MPEG-TS Data | 1 |
| Output video | Depends on stream content | 0 or 1+ |
| Output audio | Depends on stream content | 0 or 1+ |
| Output subtitle | Depends on stream content | 0 or 1+ |
| Output metadata | Depends on stream content | 0 or 1+ |
### Settings
The `MPEGTSDemuxBlock` is configured using `MPEGTSDemuxSettings`.
Key properties of `MPEGTSDemuxSettings`:
- `Latency` (`TimeSpan`): Gets or sets the latency. Default is 700 milliseconds.
- `ProgramNumber` (int): Gets or sets the program number. Use -1 for default/automatic selection.
### The sample pipeline
This example shows how to connect a source (like `HTTPSourceBlock` for a network stream or `UniversalSourceBlock` for a local file that outputs raw MPEG-TS data) to `MPEGTSDemuxBlock`, and then connect its outputs to respective renderer blocks.
```mermaid
graph LR;
DataSourceBlock -- MPEG-TS Data --> MPEGTSDemuxBlock;
MPEGTSDemuxBlock -- Video Stream --> VideoRendererBlock;
MPEGTSDemuxBlock -- Audio Stream --> AudioRendererBlock;
MPEGTSDemuxBlock -- Subtitle Stream --> SubtitleOverlayOrRendererBlock;
```
### Sample code
```csharp
var pipeline = new MediaBlocksPipeline();
// Assume 'dataSourceBlock' is a source block providing MPEG-TS data
// For example, a UniversalSourceBlock reading a .ts file or an HTTP source.
// var dataSourceBlock = new UniversalSourceBlock(await UniversalSourceSettings.CreateAsync("input.ts"));
// For this example, let's assume dataSourceBlock.Output provides the MPEG-TS stream.
var mpegTSDemuxSettings = new MPEGTSDemuxSettings();
// mpegTSDemuxSettings.ProgramNumber = 1; // Optionally select a specific program
// Create MPEG-TS Demuxer Block
// Constructor parameters control which streams to attempt to render
var mpegTSDemuxBlock = new MPEGTSDemuxBlock(
renderVideo: true,
renderAudio: true,
renderSubtitle: true,
renderMetadata: false);
// Connect the data source to the demuxer's input
// pipeline.Connect(dataSourceBlock.Output, mpegTSDemuxBlock.Input); // Assuming dataSourceBlock is defined
// Create renderers
var videoRenderer = new VideoRendererBlock(pipeline, VideoView1); // Assuming VideoView1 is your display control
var audioRenderer = new AudioRendererBlock();
// var subtitleRenderer = ... ; // A block to handle subtitle rendering or overlay
// Connect demuxer outputs
if (mpegTSDemuxBlock.VideoOutput != null)
{
pipeline.Connect(mpegTSDemuxBlock.VideoOutput, videoRenderer.Input);
}
if (mpegTSDemuxBlock.AudioOutput != null)
{
pipeline.Connect(mpegTSDemuxBlock.AudioOutput, audioRenderer.Input);
}
if (mpegTSDemuxBlock.SubtitleOutput != null)
{
// pipeline.Connect(mpegTSDemuxBlock.SubtitleOutput, subtitleRenderer.Input); // Connect to a subtitle handler
}
// Start pipeline
// await pipeline.StartAsync(); // Start once dataSourceBlock is connected
```
### Remarks
- Ensure that the input to `MPEGTSDemuxBlock` is raw MPEG-TS data. If you are using a `UniversalSourceBlock` with a `.ts` file, it might already demultiplex the stream. In such cases, `MPEGTSDemuxBlock` might be used if `UniversalSourceBlock` is configured to output the raw container stream or if the stream comes from a source like `SRTRAWSourceBlock`.
- The availability of video, audio, or subtitle outputs depends on the content of the MPEG-TS stream.
### Platforms
Windows, macOS, Linux, iOS, Android.
## QT Demux Block (MP4/MOV)
The `QTDemuxBlock` is designed to demultiplex QuickTime (QT) container formats, which include MP4 and MOV files. These formats are widely used for storing video, audio, and other multimedia content.
### Block info
Name: `QTDemuxBlock`.
| Pin direction | Media type | Pins count |
| --- | :---: | :---: |
| Input | MP4/MOV Data | 1 |
| Output video | Depends on stream content | 0 or 1+ |
| Output audio | Depends on stream content | 0 or 1+ |
| Output subtitle | Depends on stream content | 0 or 1+ |
| Output metadata | Depends on stream content | 0 or 1+ |
### Settings
The `QTDemuxBlock` does not have specific settings class beyond the implicit configuration through its constructor parameters (`renderVideo`, `renderAudio`, etc.). The underlying GStreamer element `qtdemux` handles the demultiplexing automatically.
### The sample pipeline
This example shows how to connect a source block that outputs raw MP4/MOV data to `QTDemuxBlock`, and then connect its outputs to respective renderer blocks.
```mermaid
graph LR;
DataSourceBlock -- MP4/MOV Data --> QTDemuxBlock;
QTDemuxBlock -- Video Stream --> VideoRendererBlock;
QTDemuxBlock -- Audio Stream --> AudioRendererBlock;
```
### Sample code
```csharp
var pipeline = new MediaBlocksPipeline();
// Assume 'dataSourceBlock' is a source block providing MP4/MOV data.
// This could be a StreamSourceBlock feeding raw MP4 data, or a custom source.
// For typical file playback, UniversalSourceBlock directly provides decoded streams.
// QTDemuxBlock is used when you have the container data and need to demux it within the pipeline.
// Example: var fileStream = File.OpenRead("myvideo.mp4");
// var streamSource = new StreamSourceBlock(fileStream); // StreamSourceBlock provides raw data
// Create QT Demuxer Block
// Constructor parameters control which streams to attempt to render
var qtDemuxBlock = new QTDemuxBlock(
renderVideo: true,
renderAudio: true,
renderSubtitle: false,
renderMetadata: false);
// Connect the data source to the demuxer's input
// pipeline.Connect(streamSource.Output, qtDemuxBlock.Input); // Assuming streamSource is defined
// Create renderers
var videoRenderer = new VideoRendererBlock(pipeline, VideoView1); // Assuming VideoView1
var audioRenderer = new AudioRendererBlock();
// Connect demuxer outputs
if (qtDemuxBlock.VideoOutput != null)
{
pipeline.Connect(qtDemuxBlock.VideoOutput, videoRenderer.Input);
}
if (qtDemuxBlock.AudioOutput != null)
{
pipeline.Connect(qtDemuxBlock.AudioOutput, audioRenderer.Input);
}
// Start pipeline
// await pipeline.StartAsync(); // Start once dataSourceBlock is connected and pipeline is built
```
### Remarks
- `QTDemuxBlock` is typically used when you have a stream of MP4/MOV container data that needs to be demultiplexed within the pipeline (e.g., from a `StreamSourceBlock` or a custom data source).
- For playing local MP4/MOV files, `UniversalSourceBlock` is often more convenient as it handles both demuxing and decoding.
- The availability of outputs depends on the actual streams present in the MP4/MOV file.
### Platforms
Windows, macOS, Linux, iOS, Android.
## Universal Demux Block
The `UniversalDemuxBlock` provides a flexible way to demultiplex various media container formats based on provided settings or inferred from the input stream. It can handle formats like AVI, MKV, MP4, MPEG-TS, FLV, OGG, and WebM.
This block requires `MediaFileInfo` to be provided for proper initialization of its output pads, as the number and type of streams can vary greatly between files.
### Block info
Name: `UniversalDemuxBlock`.
| Pin direction | Media type | Pins count |
| --- | :---: | :---: |
| Input | Various Container Data | 1 |
| Output video | Depends on stream content and `renderVideo` flag | 0 to N |
| Output audio | Depends on stream content and `renderAudio` flag | 0 to N |
| Output subtitle | Depends on stream content and `renderSubtitle` flag | 0 to N |
| Output metadata | Depends on stream content and `renderMetadata` flag | 0 or 1 |
(N is the number of respective streams in the media file)
### Settings
The `UniversalDemuxBlock` is configured using an implementation of `IUniversalDemuxSettings`. The specific settings class depends on the container format you intend to demultiplex.
- `UniversalDemuxerType` (enum): Specifies the type of demuxer to use. Can be `Auto`, `MKV`, `MP4`, `AVI`, `MPEGTS`, `MPEGPS`, `FLV`, `OGG`, `WebM`.
- Based on the `UniversalDemuxerType`, you would create a corresponding settings object:
- `AVIDemuxSettings`
- `FLVDemuxSettings`
- `MKVDemuxSettings`
- `MP4DemuxSettings`
- `MPEGPSDemuxSettings`
- `MPEGTSDemuxSettings` (includes `Latency` and `ProgramNumber` properties)
- `OGGDemuxSettings`
- `WebMDemuxSettings`
- `UniversalDemuxSettings` (for `Auto` type)
The `UniversalDemuxerTypeHelper.CreateSettings(UniversalDemuxerType type)` method can be used to create the appropriate settings object.
### Constructor
`UniversalDemuxBlock(IUniversalDemuxSettings settings, MediaFileInfo info, bool renderVideo = true, bool renderAudio = true, bool renderSubtitle = false, bool renderMetadata = false)`
`UniversalDemuxBlock(MediaFileInfo info, bool renderVideo = true, bool renderAudio = true, bool renderSubtitle = false, bool renderMetadata = false)` (uses `UniversalDemuxSettings` for auto type detection)
**Crucially, `MediaFileInfo` must be provided to the constructor.** This object, typically obtained by analyzing the media file beforehand (e.g., using `MediaInfoReader`), informs the block about the number and types of streams, allowing it to create the correct number of output pads.
### The sample pipeline
This example demonstrates using `UniversalDemuxBlock` to demultiplex a file. Note that a data source block providing the raw file data to the `UniversalDemuxBlock` is implied.
```mermaid
graph LR;
DataSourceBlock -- Container Data --> UniversalDemuxBlock;
UniversalDemuxBlock -- Video Stream 1 --> VideoRendererBlock1;
UniversalDemuxBlock -- Audio Stream 1 --> AudioRendererBlock1;
UniversalDemuxBlock -- Subtitle Stream 1 --> SubtitleHandler1;
```
### Sample code
```csharp
var pipeline = new MediaBlocksPipeline();
// 1. Obtain MediaFileInfo for your media file
var mediaInfoReader = new MediaInfoReader(Context); // Assuming Context is your logging context
MediaFileInfo mediaInfo = await mediaInfoReader.GetInfoAsync("path/to/your/video.mkv");
if (mediaInfo == null)
{
Console.WriteLine("Failed to get media info.");
return;
}
// 2. Choose or create Demuxer Settings
// Example: Auto-detect demuxer type
IUniversalDemuxSettings demuxSettings = new UniversalDemuxSettings();
// Or, specify a type, e.g., for an MKV file:
// IUniversalDemuxSettings demuxSettings = new MKVDemuxSettings();
// Or, for MPEG-TS with specific program:
// var mpegTsSettings = new MPEGTSDemuxSettings { ProgramNumber = 1 };
// IUniversalDemuxSettings demuxSettings = mpegTsSettings;
// 3. Create UniversalDemuxBlock
var universalDemuxBlock = new UniversalDemuxBlock(
demuxSettings,
mediaInfo,
renderVideo: true, // Process video streams
renderAudio: true, // Process audio streams
renderSubtitle: true // Process subtitle streams
);
// 4. Connect a data source that provides the raw file stream to UniversalDemuxBlock's input.
// This step is crucial and depends on how you get the file data.
// For instance, using a FileSource configured to output raw data, or a StreamSourceBlock.
// Example with a hypothetical RawFileSourceBlock (not a standard block, for illustration):
// var rawFileSource = new RawFileSourceBlock("path/to/your/video.mkv");
// pipeline.Connect(rawFileSource.Output, universalDemuxBlock.Input);
// 5. Connect outputs
// Video outputs (MediaBlockPad[])
var videoOutputs = universalDemuxBlock.VideoOutputs;
if (videoOutputs.Length > 0)
{
// Example: connect the first video stream
var videoRenderer = new VideoRendererBlock(pipeline, VideoView1); // Assuming VideoView1
pipeline.Connect(videoOutputs[0], videoRenderer.Input);
}
// Audio outputs (MediaBlockPad[])
var audioOutputs = universalDemuxBlock.AudioOutputs;
if (audioOutputs.Length > 0)
{
// Example: connect the first audio stream
var audioRenderer = new AudioRendererBlock();
pipeline.Connect(audioOutputs[0], audioRenderer.Input);
}
// Subtitle outputs (MediaBlockPad[])
var subtitleOutputs = universalDemuxBlock.SubtitleOutputs;
if (subtitleOutputs.Length > 0)
{
// Example: connect the first subtitle stream to a conceptual handler
// var subtitleHandler = new MySubtitleHandlerBlock();
// pipeline.Connect(subtitleOutputs[0], subtitleHandler.Input);
}
// Metadata output (if renderMetadata was true and metadata stream exists)
var metadataOutputs = universalDemuxBlock.MetadataOutputs;
if (metadataOutputs.Length > 0 && metadataOutputs[0] != null)
{
// Handle metadata stream
}
// Start pipeline after all connections are made
// await pipeline.StartAsync();
```
### Remarks
- **`MediaFileInfo` is mandatory** for `UniversalDemuxBlock` to correctly initialize its output pads based on the streams present in the file.
- The `renderVideo`, `renderAudio`, and `renderSubtitle` flags in the constructor determine if outputs for these stream types will be created and processed. If set to `false`, respective streams will be ignored (or sent to internal null renderers if present in the file but not rendered).
- The `UniversalDemuxBlock` is powerful for scenarios where you need to explicitly manage the demuxing process for various formats or select specific streams from files with multiple tracks.
- For simple playback of common file formats, `UniversalSourceBlock` often provides a more straightforward solution as it integrates demuxing and decoding. `UniversalDemuxBlock` offers more granular control.
### Platforms
Windows, macOS, Linux, iOS, Android. (Platform support for specific formats may depend on underlying GStreamer plugins.)
---END OF PAGE---
# Local File: .\dotnet\mediablocks\GettingStarted\camera.md
---
title: Creating Camera Applications with Media Blocks SDK
description: Learn how to build powerful camera viewing applications with Media Blocks SDK .Net. This step-by-step tutorial covers device enumeration, format selection, camera configuration, pipeline creation, and video rendering for desktop and mobile platforms.
sidebar_label: Camera Applications
---
# Building Camera Applications with Media Blocks SDK
[!badge size="xl" target="blank" variant="info" text="Media Blocks SDK .Net"](https://www.visioforge.com/media-blocks-sdk-net)
## Introduction
This comprehensive guide demonstrates how to create a fully functional camera viewing application using the Media Blocks SDK .Net. The SDK provides a robust framework for capturing, processing, and displaying video streams across multiple platforms including Windows, macOS, iOS, and Android.
## Architecture Overview
To create a camera viewer application, you'll need to understand two fundamental components:
1. **System Video Source** - Captures the video stream from connected camera devices
2. **Video Renderer** - Displays the captured video on screen with configurable settings
These components work together within a pipeline architecture that manages media processing.
## Essential Media Blocks
To build a camera application, you need to add the following blocks to your pipeline:
- **[System Video Source Block](../Sources/index.md)** - Connects to and reads from camera devices
- **[Video Renderer Block](../VideoRendering/index.md)** - Displays the video with configurable rendering options
## Setting Up the Pipeline
### Creating the Base Pipeline
First, create a pipeline object that will manage the media flow:
```csharp
using VisioForge.Core.MediaBlocks;
// Initialize the pipeline
var pipeline = new MediaBlocksPipeline();
// Add error handling
pipeline.OnError += (sender, args) =>
{
Console.WriteLine($"Pipeline error: {args.Message}");
};
```
### Camera Device Enumeration
Before adding a camera source, you need to enumerate the available devices and select one:
```csharp
// Get all available video devices asynchronously
var videoDevices = await DeviceEnumerator.Shared.VideoSourcesAsync();
// Display available devices (useful for user selection)
foreach (var device in videoDevices)
{
Console.WriteLine($"Device: {device.Name} [{device.API}]");
}
// Select the first available device
var selectedDevice = videoDevices[0];
```
### Camera Format Selection
Each camera supports different resolutions and frame rates. You can enumerate and select the optimal format:
```csharp
// Display available formats for the selected device
foreach (var format in selectedDevice.VideoFormats)
{
Console.WriteLine($"Format: {format.Width}x{format.Height} {format.Format}");
// Display available frame rates for this format
foreach (var frameRate in format.FrameRateList)
{
Console.WriteLine($" Frame Rate: {frameRate}");
}
}
// Select the optimal format (in this example, we look for HD resolution)
var hdFormat = selectedDevice.GetHDVideoFormatAndFrameRate(out var frameRate);
var formatToUse = hdFormat ?? selectedDevice.VideoFormats[0];
```
## Configuring Camera Settings
### Creating Source Settings
Configure the camera source settings with your selected device and format:
```csharp
// Create camera settings with the selected device and format
var videoSourceSettings = new VideoCaptureDeviceSourceSettings(selectedDevice)
{
Format = formatToUse.ToFormat()
};
// Set the desired frame rate (selecting the highest available)
if (formatToUse.FrameRateList.Count > 0)
{
videoSourceSettings.Format.FrameRate = formatToUse.FrameRateList.Max();
}
// Optional: Enable force frame rate to maintain consistent timing
videoSourceSettings.Format.ForceFrameRate = true;
// Platform-specific settings
#if __ANDROID__
// Android-specific settings
videoSourceSettings.VideoStabilization = true;
#elif __IOS__ && !__MACCATALYST__
// iOS-specific settings
videoSourceSettings.Position = IOSVideoSourcePosition.Back;
videoSourceSettings.Orientation = IOSVideoSourceOrientation.Portrait;
#endif
```
### Creating the Video Source Block
Now create the system video source block with your configured settings:
```csharp
// Create the video source block
var videoSource = new SystemVideoSourceBlock(videoSourceSettings);
```
## Setting Up Video Display
### Creating the Video Renderer
Add a video renderer to display the captured video:
```csharp
// Create the video renderer and connect it to your UI component
var videoRenderer = new VideoRendererBlock(pipeline, VideoView1);
// Optional: Configure renderer settings
videoRenderer.Settings.IsSync = true;
```
### Advanced Renderer Configuration
For more control over video rendering, you can customize renderer settings:
```csharp
// Enable snapshot capabilities
videoRenderer.Settings.EnableSnapshot = true;
// Configure subtitle overlay if needed
videoRenderer.SubtitleEnabled = false;
```
## Connecting the Pipeline
Connect the video source to the renderer to establish the media flow:
```csharp
// Connect the output of the video source to the input of the renderer
pipeline.Connect(videoSource.Output, videoRenderer.Input);
```
## Managing the Pipeline Lifecycle
### Starting the Pipeline
Start the pipeline to begin capturing and displaying video:
```csharp
// Start the pipeline asynchronously
await pipeline.StartAsync();
```
### Taking Snapshots
Capture still images from the video stream:
```csharp
// Take a snapshot and save it as a JPEG file
await videoRenderer.Snapshot_SaveAsync("camera_snapshot.jpg", SkiaSharp.SKEncodedImageFormat.Jpeg, 90);
// Or get the snapshot as a bitmap for further processing
var bitmap = await videoRenderer.Snapshot_GetAsync();
```
### Stopping the Pipeline
When finished, properly stop the pipeline:
```csharp
// Stop the pipeline asynchronously
await pipeline.StopAsync();
```
## Platform-Specific Considerations
The Media Blocks SDK supports cross-platform development with specific optimizations:
- **Windows**: Supports both Media Foundation and Kernel Streaming APIs
- **macOS/iOS**: Utilizes AVFoundation for optimal performance
- **Android**: Provides access to camera features like stabilization and orientation
## Error Handling and Troubleshooting
Implement proper error handling to ensure a stable application:
```csharp
try
{
// Pipeline operations
await pipeline.StartAsync();
}
catch (Exception ex)
{
Console.WriteLine($"Error starting pipeline: {ex.Message}");
// Handle the exception appropriately
}
```
## Complete Implementation Example
This example demonstrates a complete camera viewer implementation:
```csharp
using System;
using System.Linq;
using System.Threading.Tasks;
using VisioForge.Core.MediaBlocks;
using VisioForge.Core.MediaBlocks.Sources;
using VisioForge.Core.MediaBlocks.VideoRendering;
using VisioForge.Core.Types.X.Sources;
public class CameraViewerExample
{
private MediaBlocksPipeline _pipeline;
private SystemVideoSourceBlock _videoSource;
private VideoRendererBlock _videoRenderer;
public async Task InitializeAsync(IVideoView videoView)
{
// Create pipeline
_pipeline = new MediaBlocksPipeline();
_pipeline.OnError += (s, e) => Console.WriteLine(e.Message);
// Enumerate devices
var devices = await DeviceEnumerator.Shared.VideoSourcesAsync();
if (devices.Length == 0)
{
throw new Exception("No camera devices found");
}
// Select device and format
var device = devices[0];
var format = device.GetHDOrAnyVideoFormatAndFrameRate(out var frameRate);
// Create settings
var settings = new VideoCaptureDeviceSourceSettings(device);
if (format != null)
{
settings.Format = format.ToFormat();
if (frameRate != null && !frameRate.IsEmpty)
{
settings.Format.FrameRate = frameRate;
}
}
// Create blocks
_videoSource = new SystemVideoSourceBlock(settings);
_videoRenderer = new VideoRendererBlock(_pipeline, videoView);
// Build pipeline
_pipeline.AddBlock(_videoSource);
_pipeline.AddBlock(_videoRenderer);
_pipeline.Connect(_videoSource.Output, _videoRenderer.Input);
// Start pipeline
await _pipeline.StartAsync();
}
public async Task StopAsync()
{
if (_pipeline != null)
{
await _pipeline.StopAsync();
_pipeline.Dispose();
}
}
public async Task TakeSnapshotAsync(string filename)
{
return await _videoRenderer.Snapshot_SaveAsync(filename,
SkiaSharp.SKEncodedImageFormat.Jpeg, 90);
}
}
```
## Conclusion
With Media Blocks SDK .Net, building powerful camera applications becomes straightforward. The component-based architecture provides flexibility and performance across platforms while abstracting the complexities of camera device integration.
For complete source code examples, please visit our [GitHub repository](https://github.com/visioforge/.Net-SDK-s-samples/tree/master/Media%20Blocks%20SDK/WPF/CSharp/Simple%20Capture%20Demo).
---END OF PAGE---
# Local File: .\dotnet\mediablocks\GettingStarted\device-enum.md
---
title: Complete Guide to Media Device Enumeration in .NET
description: Learn how to efficiently enumerate video cameras, audio inputs/outputs, Blackmagic Decklink devices, NDI sources, and GenICam/GigE Vision cameras in your .NET applications using the Media Blocks SDK. This tutorial provides practical code examples for device discovery and integration.
sidebar_label: Device Enumeration
order: 0
---
# Complete Guide to Media Device Enumeration in .NET
[!badge size="xl" target="blank" variant="info" text="Media Blocks SDK .Net"](https://www.visioforge.com/media-blocks-sdk-net)
The Media Blocks SDK provides a powerful and efficient way to discover and work with various media devices in your .NET applications. This guide will walk you through the process of enumerating different types of media devices using the SDK's `DeviceEnumerator` class.
## Introduction to Device Enumeration
Device enumeration is a critical first step when developing applications that interact with media hardware. The `DeviceEnumerator` class provides a centralized way to detect and list all available media devices connected to your system.
The SDK uses a singleton pattern for device enumeration, making it easy to access the functionality from anywhere in your code:
```csharp
// Access the shared DeviceEnumerator instance
var enumerator = DeviceEnumerator.Shared;
```
## Discovering Video Input Devices
### Standard Video Sources
To list all available video input devices (webcams, capture cards, virtual cameras):
```csharp
var videoSources = await DeviceEnumerator.Shared.VideoSourcesAsync();
foreach (var device in videoSources)
{
Debug.WriteLine($"Video device found: {device.Name}");
// You can access additional properties here if needed
}
```
The `VideoCaptureDeviceInfo` objects returned provide detailed information about each device, including device name, internal identifiers, and API type.
## Working with Audio Devices
### Enumerating Audio Input Sources
To discover microphones and other audio input devices:
```csharp
var audioSources = await DeviceEnumerator.Shared.AudioSourcesAsync();
foreach (var device in audioSources)
{
Debug.WriteLine($"Audio input device found: {device.Name}");
// Additional device information can be accessed here
}
```
You can also filter audio devices by their API type:
```csharp
// Get only audio sources for a specific API
var audioSources = await DeviceEnumerator.Shared.AudioSourcesAsync(AudioCaptureDeviceAPI.DirectSound);
```
### Finding Audio Output Devices
For speakers, headphones, and other audio output destinations:
```csharp
var audioOutputs = await DeviceEnumerator.Shared.AudioOutputsAsync();
foreach (var device in audioOutputs)
{
Debug.WriteLine($"Audio output device found: {device.Name}");
// Process device information as needed
}
```
Similar to audio sources, you can filter outputs by API:
```csharp
// Get only audio outputs for a specific API
var audioOutputs = await DeviceEnumerator.Shared.AudioOutputsAsync(AudioOutputDeviceAPI.DirectSound);
```
## Professional Blackmagic Decklink Integration
### Decklink Video Input Sources
For professional video workflows using Blackmagic hardware:
```csharp
var decklinkVideoSources = await DeviceEnumerator.Shared.DecklinkVideoSourcesAsync();
foreach (var device in decklinkVideoSources)
{
Debug.WriteLine($"Decklink video input: {device.Name}");
// You can work with specific Decklink properties here
}
```
### Decklink Audio Input Sources
To access audio channels from Decklink devices:
```csharp
var decklinkAudioSources = await DeviceEnumerator.Shared.DecklinkAudioSourcesAsync();
foreach (var device in decklinkAudioSources)
{
Debug.WriteLine($"Decklink audio input: {device.Name}");
// Process Decklink audio device information
}
```
### Decklink Video Output Destinations
For sending video to Decklink output devices:
```csharp
var decklinkVideoOutputs = await DeviceEnumerator.Shared.DecklinkVideoSinksAsync();
foreach (var device in decklinkVideoOutputs)
{
Debug.WriteLine($"Decklink video output: {device.Name}");
// Access output device properties as needed
}
```
### Decklink Audio Output Destinations
For routing audio to Decklink hardware outputs:
```csharp
var decklinkAudioOutputs = await DeviceEnumerator.Shared.DecklinkAudioSinksAsync();
foreach (var device in decklinkAudioOutputs)
{
Debug.WriteLine($"Decklink audio output: {device.Name}");
// Work with audio output configuration here
}
```
## Network Device Integration
### NDI Sources Discovery
To find NDI sources available on your network:
```csharp
var ndiSources = await DeviceEnumerator.Shared.NDISourcesAsync();
foreach (var device in ndiSources)
{
Debug.WriteLine($"NDI source discovered: {device.Name}");
// Process NDI-specific properties and information
}
```
### ONVIF Network Camera Discovery
To find IP cameras supporting the ONVIF protocol:
```csharp
// Set a timeout for discovery (2 seconds in this example)
var timeout = TimeSpan.FromSeconds(2);
var onvifDevices = await DeviceEnumerator.Shared.ONVIF_ListSourcesAsync(timeout, null);
foreach (var deviceUri in onvifDevices)
{
Debug.WriteLine($"ONVIF camera found at: {deviceUri}");
// Connect to the camera using the discovered URI
}
```
## Industrial Camera Support
### Basler Industrial Cameras
For applications requiring Basler industrial cameras:
```csharp
var baslerCameras = await DeviceEnumerator.Shared.BaslerSourcesAsync();
foreach (var device in baslerCameras)
{
Debug.WriteLine($"Basler camera detected: {device.Name}");
// Access Basler-specific camera features
}
```
### Allied Vision Industrial Cameras
To work with Allied Vision cameras in your application:
```csharp
var alliedCameras = await DeviceEnumerator.Shared.AlliedVisionSourcesAsync();
foreach (var device in alliedCameras)
{
Debug.WriteLine($"Allied Vision camera found: {device.Name}");
// Configure Allied Vision specific parameters
}
```
### Spinnaker SDK Compatible Cameras
For cameras supporting the Spinnaker SDK (Windows only):
```csharp
#if NET_WINDOWS
var spinnakerCameras = await DeviceEnumerator.Shared.SpinnakerSourcesAsync();
foreach (var device in spinnakerCameras)
{
Debug.WriteLine($"Spinnaker SDK camera: {device.Name}");
Debug.WriteLine($"Model: {device.Model}, Vendor: {device.Vendor}");
Debug.WriteLine($"Resolution: {device.WidthMax}x{device.HeightMax}");
// Work with camera-specific properties
}
#endif
```
### Generic GenICam Standard Cameras
For other industrial cameras supporting the GenICam standard:
```csharp
var genicamCameras = await DeviceEnumerator.Shared.GenICamSourcesAsync();
foreach (var device in genicamCameras)
{
Debug.WriteLine($"GenICam compatible device: {device.Name}");
Debug.WriteLine($"Model: {device.Model}, Vendor: {device.Vendor}");
Debug.WriteLine($"Protocol: {device.Protocol}, Serial: {device.SerialNumber}");
// Work with standard GenICam features
}
```
## Device Monitoring
The SDK also supports monitoring device connections and disconnections:
```csharp
// Start monitoring for video device changes
await DeviceEnumerator.Shared.StartVideoSourceMonitorAsync();
// Start monitoring for audio device changes
await DeviceEnumerator.Shared.StartAudioSourceMonitorAsync();
await DeviceEnumerator.Shared.StartAudioSinkMonitorAsync();
// Subscribe to device change events
DeviceEnumerator.Shared.OnVideoSourceAdded += (sender, device) =>
{
Debug.WriteLine($"New video device connected: {device.Name}");
};
DeviceEnumerator.Shared.OnVideoSourceRemoved += (sender, device) =>
{
Debug.WriteLine($"Video device disconnected: {device.Name}");
};
```
## Platform-Specific Considerations
### Windows
On Windows, the SDK can detect USB device connection and removal events at the system level:
```csharp
#if NET_WINDOWS
// Subscribe to system-wide device events
DeviceEnumerator.Shared.OnDeviceAdded += (sender, args) =>
{
// Refresh device lists when new hardware is connected
RefreshDeviceLists();
};
DeviceEnumerator.Shared.OnDeviceRemoved += (sender, args) =>
{
// Update UI when hardware is disconnected
RefreshDeviceLists();
};
#endif
```
By default, Media Foundation device enumeration is disabled to avoid duplication with DirectShow devices. You can enable it if needed:
```csharp
#if NET_WINDOWS
// Enable Media Foundation device enumeration if required
DeviceEnumerator.Shared.IsEnumerateMediaFoundationDevices = true;
#endif
```
### iOS and Android
On mobile platforms, the SDK handles the required permission requests when enumerating devices:
```csharp
#if __IOS__ || __ANDROID__
// This will automatically request camera permissions if needed
var videoSources = await DeviceEnumerator.Shared.VideoSourcesAsync();
// This will automatically request microphone permissions if needed
var audioSources = await DeviceEnumerator.Shared.AudioSourcesAsync();
#endif
```
## Best Practices for Device Enumeration
When working with device enumeration in production applications:
1. Always handle cases where no devices are found
2. Consider caching device lists when appropriate to improve performance
3. Implement proper exception handling for device access failures
4. Provide clear user feedback when required devices are missing
5. Use the async methods to avoid blocking the UI thread during enumeration
6. Clean up resources by calling `Dispose()` when you're done with the DeviceEnumerator
```csharp
// Proper cleanup when done
DeviceEnumerator.Shared.Dispose();
```
---END OF PAGE---
# Local File: .\dotnet\mediablocks\GettingStarted\index.md
---
title: Media Blocks SDK .Net - Developer Quick Start Guide
description: Learn to integrate Media Blocks SDK .Net into your applications with our detailed tutorial. From installation to implementation, discover how to create powerful multimedia pipelines, process video streams, and build robust media applications.
sidebar_label: Getting Started
order: 20
---
# Media Blocks SDK .Net - Developer Quick Start Guide
[!badge size="xl" target="blank" variant="info" text="Media Blocks SDK .Net"](https://www.visioforge.com/media-blocks-sdk-net)
## Introduction
This guide provides a comprehensive walkthrough for integrating the Media Blocks SDK .Net into your applications. The SDK is built around a modular pipeline architecture, enabling you to create, connect, and manage multimedia processing blocks for video, audio, and more. Whether you're building video processing tools, streaming solutions, or multimedia applications, this guide will help you get started quickly and correctly.
## SDK Installation Process
The SDK is distributed as a NuGet package for easy integration into your .Net projects. Install it using:
```bash
dotnet add package VisioForge.DotNet.MediaBlocks
```
For platform-specific requirements and additional installation details, refer to the [detailed installation guide](../../install/index.md).
## Core Concepts and Architecture
### MediaBlocksPipeline
- The central class for managing the flow of media data between processing blocks.
- Handles block addition, connection, state management, and event handling.
- Implements `IMediaBlocksPipeline` and exposes events such as `OnError`, `OnStart`, `OnPause`, `OnResume`, `OnStop`, and `OnLoop`.
### MediaBlock and Interfaces
- Each processing unit is a `MediaBlock` (or a derived class), implementing the `IMediaBlock` interface.
- Key interfaces:
- `IMediaBlock`: Base interface for all blocks. Defines properties for `Name`, `Type`, `Input`, `Inputs`, `Output`, `Outputs`, and methods for pipeline context and YAML export.
- `IMediaBlockDynamicInputs`: For blocks that support dynamic input creation (e.g., mixers).
- `IMediaBlockInternals`/`IMediaBlockInternals2`: For internal pipeline management, building, and post-connection logic.
- `IMediaBlockRenderer`: For blocks that render media (e.g., video/audio renderers), with a property to control stream synchronization.
- `IMediaBlockSink`/`IMediaBlockSource`: For blocks that act as sinks (outputs) or sources (inputs).
- `IMediaBlockSettings`: For settings objects that can create blocks.
### Pads and Media Types
- Blocks are connected via `MediaBlockPad` objects, which have a direction (`In`/`Out`) and a media type (`Video`, `Audio`, `Subtitle`, `Metadata`, `Auto`).
- Pads can be connected/disconnected, and their state can be queried.
### Block Types
- The SDK provides a wide range of built-in block types (see `MediaBlockType` enum in the source code) for sources, sinks, renderers, effects, and more.
## Creating and Managing a Pipeline
### 1. Initialize the SDK (if required)
```csharp
using VisioForge.Core;
// Initialize the SDK at application startup
VisioForgeX.InitSDK();
```
### 2. Create a Pipeline and Blocks
```csharp
using VisioForge.Core.MediaBlocks;
// Create a new pipeline instance
var pipeline = new MediaBlocksPipeline();
// Example: Create a virtual video source and a video renderer
var virtualSource = new VirtualVideoSourceBlock(new VirtualVideoSourceSettings());
var videoRenderer = new VideoRendererBlock(pipeline, VideoView1); // VideoView1 is your UI control
// Add blocks to the pipeline
pipeline.AddBlock(virtualSource);
pipeline.AddBlock(videoRenderer);
```
### 3. Connect Blocks
```csharp
// Connect the output of the source to the input of the renderer
pipeline.Connect(virtualSource.Output, videoRenderer.Input);
```
- You can also use `pipeline.Connect(sourceBlock, targetBlock)` to connect default pads, or connect multiple pads for complex graphs.
- For blocks supporting dynamic inputs, use the `IMediaBlockDynamicInputs` interface.
### 4. Start and Stop the Pipeline
```csharp
// Start the pipeline asynchronously
await pipeline.StartAsync();
// ... later, stop processing
await pipeline.StopAsync();
```
### 5. Resource Cleanup
```csharp
// Dispose of the pipeline when done
pipeline.Dispose();
```
### 6. SDK Cleanup (if required)
```csharp
// Release all SDK resources at application shutdown
VisioForgeX.DestroySDK();
```
## Error Handling and Events
- Subscribe to pipeline events for robust error and state management:
```csharp
pipeline.OnError += (sender, args) =>
{
Console.WriteLine($"Pipeline error: {args.Message}");
// Implement your error handling logic here
};
pipeline.OnStart += (sender, args) =>
{
Console.WriteLine("Pipeline started");
};
pipeline.OnStop += (sender, args) =>
{
Console.WriteLine("Pipeline stopped");
};
```
## Advanced Features
- **Dynamic Block Addition/Removal:** You can add or remove blocks at runtime as needed.
- **Pad Management:** Use `MediaBlockPad` methods to query and manage pad connections.
- **Hardware/Software Decoder Selection:** Use helper methods in `MediaBlocksPipeline` for hardware acceleration.
- **Segment Playback:** Set `StartPosition` and `StopPosition` properties for partial playback.
- **Debugging:** Export pipeline graphs for debugging using provided methods.
## Example: Minimal Pipeline Setup
```csharp
using VisioForge.Core.MediaBlocks;
var pipeline = new MediaBlocksPipeline();
var source = new VirtualVideoSourceBlock(new VirtualVideoSourceSettings());
var renderer = new VideoRendererBlock(pipeline, videoViewControl);
pipeline.AddBlock(source);
pipeline.AddBlock(renderer);
pipeline.Connect(source.Output, renderer.Input);
await pipeline.StartAsync();
// ...
await pipeline.StopAsync();
pipeline.Dispose();
```
## Reference: Key Interfaces
- `IMediaBlock`: Base interface for all blocks.
- `IMediaBlockDynamicInputs`: For blocks with dynamic input support.
- `IMediaBlockInternals`, `IMediaBlockInternals2`: For internal pipeline logic.
- `IMediaBlockRenderer`: For renderer blocks.
- `IMediaBlockSink`, `IMediaBlockSource`: For sink/source blocks.
- `IMediaBlockSettings`: For block settings objects.
- `IMediaBlocksPipeline`: Main pipeline interface.
- `MediaBlockPad`, `MediaBlockPadDirection`, `MediaBlockPadMediaType`: For pad management.
## Further Reading and Samples
- [Complete Pipeline Implementation](pipeline.md)
- [Media Player Development Guide](player.md)
- [Camera Viewer Application Tutorial](camera.md)
- [GitHub repository with code samples](https://github.com/visioforge/.Net-SDK-s-samples/tree/master/Media%20Blocks%20SDK)
For a full list of block types and advanced usage, consult the SDK API reference and source code.
---END OF PAGE---
# Local File: .\dotnet\mediablocks\GettingStarted\pipeline.md
---
title: Media Blocks Pipeline Core for Media Processing
description: Discover how to efficiently utilize the Media Blocks Pipeline to create powerful media applications for video playback, recording, and streaming. Learn essential pipeline operations including creation, block connections, error handling, and proper resource management.
sidebar_label: Pipeline Core Usage
order: 0
---
# Media Blocks Pipeline: Core Functionality
[!badge size="xl" target="blank" variant="info" text="Media Blocks SDK .Net"](https://www.visioforge.com/media-blocks-sdk-net)
## Overview of Pipeline and Block Structure
The Media Blocks SDK is built around the `MediaBlocksPipeline` class, which manages a collection of modular processing blocks. Each block implements the `IMediaBlock` interface or one of its specialized variants. Blocks are connected via input and output pads, allowing for flexible media processing chains.
### Main Block Interfaces
- **IMediaBlock**: Base interface for all blocks. Exposes properties for name, type, input/output pads, and methods for YAML conversion and pipeline context retrieval.
- **IMediaBlockDynamicInputs**: For blocks (like muxers) that can create new inputs dynamically. Methods: `CreateNewInput(mediaType)` and `GetInput(mediaType)`.
- **IMediaBlockInternals**: Internal methods for pipeline integration (e.g., `SetContext`, `Build`, `CleanUp`, `GetElement`, `GetCore`).
- **IMediaBlockInternals2**: For post-connection logic (`PostConnect()`).
- **IMediaBlockRenderer**: For renderer blocks, exposes `IsSync` property.
- **IMediaBlockSettings**: For settings/configuration objects that can create a block (`CreateBlock()`).
- **IMediaBlockSink**: For sink blocks, exposes filename/URL getter/setter.
- **IMediaBlockSource**: For source blocks (currently only commented-out pad accessors).
### Pads and Media Types
- **MediaBlockPad**: Represents a connection point (input/output) on a block. Has direction (`In`/`Out`), media type (`Video`, `Audio`, `Subtitle`, `Metadata`, `Auto`), and connection logic.
- **Pad connection**: Use `pipeline.Connect(outputPad, inputPad)` or `pipeline.Connect(block1.Output, block2.Input)`. For dynamic inputs, use `CreateNewInput()` on the sink block.
## Setting Up Your Pipeline Environment
### Creating a New Pipeline Instance
The first step in working with Media Blocks is instantiating a pipeline object:
```csharp
using VisioForge.Core.MediaBlocks;
// Create a standard pipeline instance
var pipeline = new MediaBlocksPipeline();
// Optionally, you can assign a name to your pipeline for easier identification
pipeline.Name = "MainVideoPlayer";
```
### Implementing Robust Error Handling
Media applications must handle various error scenarios that may occur during operation. Implementing proper error handling ensures your application remains stable:
```csharp
// Subscribe to error events to capture and handle exceptions
pipeline.OnError += (sender, args) =>
{
// Log the error message
Debug.WriteLine($"Pipeline error occurred: {args.Message}");
// Implement appropriate error recovery based on the message
if (args.Message.Contains("Access denied"))
{
// Handle permission issues
}
else if (args.Message.Contains("File not found"))
{
// Handle missing file errors
}
};
```
## Managing Media Timing and Navigation
### Retrieving Duration and Position Information
Accurate timing control is essential for media applications:
```csharp
// Get the total duration of the media (returns TimeSpan.Zero for live streams)
var duration = await pipeline.DurationAsync();
Console.WriteLine($"Media duration: {duration.TotalSeconds} seconds");
// Get the current playback position
var position = await pipeline.Position_GetAsync();
Console.WriteLine($"Current position: {position.TotalSeconds} seconds");
```
### Implementing Seeking Functionality
Enable your users to navigate through media content with seeking operations:
```csharp
// Basic seeking to a specific time position
await pipeline.Position_SetAsync(TimeSpan.FromSeconds(10));
// Seeking with keyframe alignment for more efficient navigation
await pipeline.Position_SetAsync(TimeSpan.FromMinutes(2), seekToKeyframe: true);
// Advanced seeking with start and stop positions for partial playback
await pipeline.Position_SetRangeAsync(
TimeSpan.FromSeconds(30), // Start position
TimeSpan.FromSeconds(60) // Stop position
);
```
## Controlling Pipeline Execution Flow
### Starting Media Playback
Control the playback of media with these essential methods:
```csharp
// Start playback immediately
await pipeline.StartAsync();
// Preload media without starting playback (useful for reducing startup delay)
await pipeline.StartAsync(onlyPreload: true);
await pipeline.ResumeAsync(); // Start the preloaded pipeline when ready
```
### Managing Playback States
Monitor and control the pipeline's current execution state:
```csharp
// Check the current state of the pipeline
var state = pipeline.State;
if (state == PlaybackState.Play)
{
Console.WriteLine("Pipeline is currently playing");
}
// Subscribe to important state change events
pipeline.OnStart += (sender, args) =>
{
Console.WriteLine("Pipeline playback has started");
UpdateUIForPlaybackState();
};
pipeline.OnStop += (sender, args) =>
{
Console.WriteLine("Pipeline playback has stopped");
Console.WriteLine($"Stopped at position: {args.Position.TotalSeconds} seconds");
ResetPlaybackControls();
};
pipeline.OnPause += (sender, args) =>
{
Console.WriteLine("Pipeline playback is paused");
UpdatePauseButtonState();
};
pipeline.OnResume += (sender, args) =>
{
Console.WriteLine("Pipeline playback has resumed");
UpdatePlayButtonState();
};
```
### Pausing and Resuming Operations
Implement pause and resume functionality for better user experience:
```csharp
// Pause the current playback
await pipeline.PauseAsync();
// Resume playback from paused state
await pipeline.ResumeAsync();
```
### Stopping Pipeline Execution
Properly terminate pipeline operations:
```csharp
// Standard stop operation
await pipeline.StopAsync();
// Force stop in time-sensitive scenarios (may affect output file integrity)
await pipeline.StopAsync(force: true);
```
## Building Media Processing Chains
### Connecting Media Processing Blocks
The true power of the Media Blocks SDK comes from connecting specialized blocks to create processing chains:
```csharp
// Basic connection between two blocks
pipeline.Connect(block1.Output, block2.Input);
// Connect blocks with specific media types
pipeline.Connect(videoSource.GetOutputPadByType(MediaBlockPadMediaType.Video),
videoEncoder.GetInputPadByType(MediaBlockPadMediaType.Video));
```
Different blocks may have multiple specialized inputs and outputs:
- Standard I/O: `Input` and `Output` properties
- Media-specific I/O: `VideoOutput`, `AudioOutput`, `VideoInput`, `AudioInput`
- Arrays of I/O: `Inputs[]` and `Outputs[]` for complex blocks
### Working with Dynamic Input Blocks
Some advanced sink blocks dynamically create inputs on demand:
```csharp
// Create a specialized MP4 muxer for recording
var mp4Muxer = new MP4SinkBlock();
mp4Muxer.FilePath = "output_recording.mp4";
// Request a new video input from the muxer
var videoInput = mp4Muxer.CreateNewInput(MediaBlockPadMediaType.Video);
// Connect a video source to the newly created input
pipeline.Connect(videoSource.Output, videoInput);
// Similarly for audio
var audioInput = mp4Muxer.CreateNewInput(MediaBlockPadMediaType.Audio);
pipeline.Connect(audioSource.Output, audioInput);
```
This flexibility enables complex media processing scenarios with multiple input streams.
## Proper Resource Management
### Disposing Pipeline Resources
Media applications can consume significant system resources. Always properly dispose of pipeline objects:
```csharp
// Synchronous disposal pattern
try
{
// Use pipeline
}
finally
{
pipeline.Dispose();
}
```
For modern applications, use the asynchronous pattern to prevent UI freezing:
```csharp
// Asynchronous disposal (preferred for UI applications)
try
{
// Use pipeline
}
finally
{
await pipeline.DisposeAsync();
}
```
### Using 'using' Statements for Automatic Cleanup
Leverage C# language features for automatic resource management:
```csharp
// Automatic disposal with 'using' statement
using (var pipeline = new MediaBlocksPipeline())
{
// Configure and use pipeline
await pipeline.StartAsync();
// Pipeline will be automatically disposed when exiting this block
}
// C# 8.0+ using declaration
using var pipeline = new MediaBlocksPipeline();
// Pipeline will be disposed when the containing method exits
```
## Advanced Pipeline Features
### Playback Rate Control
Adjust playback speed for slow-motion or fast-forward effects:
```csharp
// Get current playback rate
double currentRate = await pipeline.Rate_GetAsync();
// Set playback rate (1.0 is normal speed)
await pipeline.Rate_SetAsync(0.5); // Slow motion (half speed)
await pipeline.Rate_SetAsync(2.0); // Double speed
```
### Loop Playback Configuration
Implement continuous playback functionality:
```csharp
// Enable looping for continuous playback
pipeline.Loop = true;
// Listen for loop events
pipeline.OnLoop += (sender, args) =>
{
Console.WriteLine("Media has looped back to start");
UpdateLoopCounter();
};
```
### Debug Mode for Development
Enable debugging features during development:
```csharp
// Enable debug mode for more detailed logging
pipeline.Debug_Mode = true;
pipeline.Debug_Dir = Path.Combine(Environment.GetFolderPath(
Environment.SpecialFolder.MyDocuments), "PipelineDebugLogs");
```
## Block Types Reference
The SDK provides a wide range of block types for sources, processing, and sinks. See the `MediaBlockType` enum in the source code for a full list of available block types.
## Notes
- The pipeline supports both synchronous and asynchronous methods for starting, stopping, and disposing. Prefer asynchronous methods in UI or long-running applications.
- Events are available for error handling, state changes, and stream information.
- Use the correct interface for each block type to access specialized features (e.g., dynamic inputs, rendering, settings).
---END OF PAGE---
# Local File: .\dotnet\mediablocks\GettingStarted\player.md
---
title: Media Blocks SDK .Net Player Implementation Guide
description: Learn how to build a robust video player application with Media Blocks SDK .Net. This step-by-step tutorial covers essential components including source blocks, video rendering, audio output configuration, pipeline creation, and advanced playback controls for .NET developers.
sidebar_label: Player Sample
---
# Building a Feature-Rich Video Player with Media Blocks SDK
[!badge size="xl" target="blank" variant="info" text="Media Blocks SDK .Net"](https://www.visioforge.com/media-blocks-sdk-net)
This detailed tutorial walks you through the process of creating a professional-grade video player application using Media Blocks SDK .Net. By following these instructions, you'll understand how to implement key functionalities including media loading, playback control, and audio-video rendering.
## Essential Components for Your Player Application
To construct a fully functional video player, your application pipeline requires these critical building blocks:
- [Universal source](../Sources/index.md) - This versatile component handles media input from various sources, allowing your player to read and process video files from local storage or network streams.
- [Video renderer](../VideoRendering/index.md) - The visual component responsible for displaying video frames on screen with proper timing and formatting.
- [Audio renderer](../AudioRendering/index.md) - Manages sound output, ensuring synchronized audio playback alongside your video content.
## Setting Up the Media Pipeline
### Creating the Foundation
The first step in developing your player involves establishing the media pipeline—the core framework that manages data flow between components.
```csharp
using VisioForge.Core.MediaBlocks;
var pipeline = new MediaBlocksPipeline();
```
### Implementing Error Handling
Robust error management is essential for a reliable player application. Subscribe to the pipeline's error events to capture and respond to exceptions.
```csharp
pipeline.OnError += (sender, args) =>
{
Console.WriteLine(args.Message);
// Additional error handling logic can be implemented here
};
```
### Setting Up Event Listeners
For complete control over your player's lifecycle, implement event handlers for critical state changes:
```csharp
pipeline.OnStart += (sender, args) =>
{
// Execute code when pipeline starts
Console.WriteLine("Playback started");
};
pipeline.OnStop += (sender, args) =>
{
// Execute code when pipeline stops
Console.WriteLine("Playback stopped");
};
```
## Configuring Media Blocks
### Initializing the Source Block
The Universal Source Block serves as the entry point for media content. Configure it with the path to your media file:
```csharp
var sourceSettings = await UniversalSourceSettings.CreateAsync(new Uri(filePath));
var fileSource = new UniversalSourceBlock(sourceSettings);
```
During initialization, the SDK automatically analyzes the file to extract crucial metadata about video and audio streams, enabling proper configuration of downstream components.
### Setting Up Video Display
To render video content on screen, create and configure a Video Renderer Block:
```csharp
var videoRenderer = new VideoRendererBlock(_pipeline, VideoView1);
```
The renderer requires two parameters: a reference to your pipeline and the UI control where video frames will be displayed.
### Configuring Audio Output
For audio playback, you'll need to select and initialize an appropriate audio output device:
```csharp
var audioRenderers = await DeviceEnumerator.Shared.AudioOutputsAsync();
var audioRenderer = new AudioRendererBlock(audioRenderers[0]);
```
This code retrieves available audio output devices and configures the first available option for playback.
## Establishing Component Connections
Once all blocks are configured, you must establish connections between them to create a cohesive media flow:
```csharp
pipeline.Connect(fileSource.VideoOutput, videoRenderer.Input);
pipeline.Connect(fileSource.AudioOutput, audioRenderer.Input);
```
These connections define the path data takes through your application:
- Video data flows from the source to the video renderer
- Audio data flows from the source to the audio renderer
For files containing only video or audio, you can selectively connect only the relevant outputs.
### Validating Media Content
Before playback, you can inspect available streams using the Universal Source Settings:
```csharp
var mediaInfo = await sourceSettings.ReadInfoAsync();
bool hasVideo = mediaInfo.VideoStreams.Count > 0;
bool hasAudio = mediaInfo.AudioStreams.Count > 0;
```
## Controlling Media Playback
### Starting Playback
To begin media playback, call the pipeline's asynchronous start method:
```csharp
await pipeline.StartAsync();
```
Once executed, your application will begin rendering video frames and playing audio through the configured outputs.
### Managing Playback State
To halt playback, invoke the pipeline's stop method:
```csharp
await pipeline.StopAsync();
```
This gracefully terminates all media processing and releases associated resources.
## Advanced Implementation
For a complete implementation example with additional features like seeking, volume control, and full-screen support, refer to our comprehensive source code on [GitHub](https://github.com/visioforge/.Net-SDK-s-samples/tree/master/Media%20Blocks%20SDK/WPF/CSharp/Simple%20Player%20Demo%20WPF).
The repository contains working demonstrations for various platforms including WPF, Windows Forms, and cross-platform .NET applications.
---END OF PAGE---
# Local File: .\dotnet\mediablocks\Guides\rtsp-save-original-stream.md
---
title: Save Original RTSP Stream (No Video Re-encoding)
description: Learn how to save an RTSP stream to file (MP4) from your IP camera without re-encoding video. This guide covers how to record RTSP video streams, a common task when users want to save camera footage. Alternatives like ffmpeg save rtsp stream or VLC save rtsp stream to file exist, but this method uses .NET with VisioForge Media Blocks for programmatic control.
sidebar_label: Save RTSP Video without Re-encoding
order: 20
---
# How to Save RTSP Stream to File: Record IP Camera Video without Re-encoding
[!badge size="xl" target="blank" variant="info" text="Media Blocks SDK .Net"](https://www.visioforge.com/media-blocks-sdk-net)
## Table of Contents
- [How to Save RTSP Stream to File: Record IP Camera Video without Re-encoding](#how-to-save-rtsp-stream-to-file-record-ip-camera-video-without-re-encoding)
- [Table of Contents](#table-of-contents)
- [Overview](#overview)
- [Core Features](#core-features)
- [Core Concept](#core-concept)
- [Prerequisites](#prerequisites)
- [Code Sample: RTSPRecorder Class](#code-sample-rtsprecorder-class)
- [Explanation of the Code](#explanation-of-the-code)
- [How to Use the `RTSPRecorder`](#how-to-use-the-rtsprecorder)
- [Key Considerations](#key-considerations)
- [Full GitHub Sample](#full-github-sample)
- [Best Practices](#best-practices)
- [Troubleshooting](#troubleshooting)
## Overview
This guide demonstrates how to save an RTSP stream to an MP4 file by capturing the original video stream from an RTSP IP camera without re-encoding the video. This approach is highly beneficial for preserving the original video quality from cameras and minimizing CPU usage when you need to record footage. The audio stream can be passed through or, optionally, re-encoded for better compatibility, allowing you to save the complete streaming data. Tools like FFmpeg and VLC offer command-line or UI-based methods to record an RTSP stream; however, this guide focuses on a programmatic approach using the VisioForge Media Blocks SDK for .NET developers who need to create applications that connect to and record video from RTSP cameras.
## Core Features
- **Direct Stream Recording**: Save RTSP camera feeds without quality loss
- **CPU-Efficient Processing**: No video re-encoding required
- **Flexible Audio Handling**: Pass-through or re-encode audio as needed
- **Professional Integration**: Programmatic control for enterprise applications
- **High Performance**: Optimized for continuous recording
We will be using the VisioForge Media Blocks SDK, a powerful .NET library for building custom media processing applications, to effectively save RTSP to file.
## Core Concept
The main idea is to take the raw video stream from the RTSP source and directly send it to a file sink (e.g., MP4 muxer) without any decoding or encoding steps for the video. This is a common requirement for recording RTSP streams with maximum fidelity.
- **Video Stream**: Passed through directly from the RTSP source to the MP4 sink. This ensures the original video data is saved, crucial for applications that need to record high-quality footage from cameras.
- **Audio Stream**: Can either be passed through directly (if the original audio codec is compatible with the MP4 container) or re-encoded (e.g., to AAC) to ensure compatibility and potentially reduce file size when you save the RTSP stream.
## Prerequisites
You'll need the VisioForge Media Blocks SDK. You can add it to your .NET project via NuGet:
```xml
```
Depending on your target platform (Windows, macOS, Linux, including ARM-based systems like Jetson Nano for embedded camera applications), you will also need the corresponding native runtime packages. For example, on Windows to record video:
```xml
```
For detailed information about deployment requirements, and platform-specific dependencies, please refer to our [Deployment Guide](../../deployment-x/index.md). It's important to check these details to ensure your video stream capture application works correctly.
Refer to the `RTSP Capture Original.csproj` file in the sample project for a complete list of dependencies for different platforms.
## Code Sample: RTSPRecorder Class
The following C# code defines an `RTSPRecorder` class that encapsulates the logic for capturing and saving the RTSP stream.
```csharp
using System;
using System.Threading.Tasks;
using VisioForge.Core.MediaBlocks;
using VisioForge.Core.MediaBlocks.AudioEncoders;
using VisioForge.Core.MediaBlocks.Sinks;
using VisioForge.Core.MediaBlocks.Sources;
using VisioForge.Core.MediaBlocks.Special;
using VisioForge.Core.Types.Events;
using VisioForge.Core.Types.X.AudioEncoders;
using VisioForge.Core.Types.X.Sinks;
using VisioForge.Core.Types.X.Sources;
namespace RTSPCaptureOriginalStream
{
///
/// RTSPRecorder class encapsulates the RTSP recording functionality to save RTSP stream to file.
/// It uses the MediaBlocks SDK to create a pipeline that connects an
/// RTSP source (like an IP camera) to an MP4 sink (file).
///
public class RTSPRecorder : IAsyncDisposable
{
///
/// The MediaBlocks pipeline that manages the flow of media data.
///
public MediaBlocksPipeline Pipeline { get; private set; }
// Private fields for the MediaBlock components
private MediaBlock _muxer; // MP4 container muxer (sink)
private RTSPRAWSourceBlock _rtspRawSource; // RTSP stream source (provides raw streams)
private DecodeBinBlock _decodeBin; // Optional: Audio decoder (if re-encoding audio)
private AACEncoderBlock _audioEncoder; // Optional: AAC audio encoder (if re-encoding audio)
private bool disposedValue; // Flag to prevent multiple disposals
///
/// Event fired when an error occurs in the pipeline.
///
public event EventHandler OnError;
///
/// Event fired when a status message is available.
///
public event EventHandler OnStatusMessage;
///
/// Output filename for the MP4 recording.
///
public string Filename { get; set; } = "output.mp4";
///
/// Whether to re-encode audio to AAC format (recommended for compatibility).
/// If false, audio is passed through.
///
public bool ReencodeAudio { get; set; } = true;
///
/// Starts the recording session by creating and configuring the MediaBlocks pipeline.
///
/// RTSP source configuration settings.
/// True if the pipeline started successfully, false otherwise.
public async Task StartAsync(RTSPRAWSourceSettings rtspSettings)
{
// Create a new MediaBlocks pipeline
Pipeline = new MediaBlocksPipeline();
Pipeline.OnError += (sender, e) => OnError?.Invoke(this, e); // Bubble up errors
OnStatusMessage?.Invoke(this, "Creating pipeline to record RTSP stream...");
// 1. Create the RTSP source block.
// RTSPRAWSourceBlock provides raw, un-decoded elementary streams (video and audio) from your IP camera or other RTSP cameras.
_rtspRawSource = new RTSPRAWSourceBlock(rtspSettings);
// 2. Create the MP4 sink (muxer) block.
// This block will write the media streams into an MP4 file.
_muxer = new MP4SinkBlock(new MP4SinkSettings(Filename));
// 3. Connect Video Stream (Passthrough)
// Create a dynamic input pad on the muxer for the video stream.
// We connect the raw video output from the RTSP source directly to the MP4 sink.
// This ensures the video is not re-encoded when you record the camera feed.
var inputVideoPad = (_muxer as IMediaBlockDynamicInputs).CreateNewInput(MediaBlockPadMediaType.Video);
Pipeline.Connect(_rtspRawSource.VideoOutput, inputVideoPad);
OnStatusMessage?.Invoke(this, "Video stream connected (passthrough for original quality video).");
// 4. Connect Audio Stream (Optional Re-encoding)
// This section handles how the audio from the RTSP stream is processed and saved to the file.
if (rtspSettings.AudioEnabled)
{
// Create a dynamic input pad on the muxer for the audio stream.
var inputAudioPad = (_muxer as IMediaBlockDynamicInputs).CreateNewInput(MediaBlockPadMediaType.Audio);
if (ReencodeAudio)
{
// If audio re-encoding is enabled (e.g., to AAC for compatibility):
OnStatusMessage?.Invoke(this, "Setting up audio re-encoding to AAC for the recording...");
// Create a decoder block that only handles audio.
// We need to decode the original audio before re-encoding it to save the MP4 stream with compatible audio.
_decodeBin = new DecodeBinBlock(videoDisabled: false, audioDisabled: true, subtitlesDisabled: false)
{
// We can disable the internal audio converter if we're sure about the format
// or if the encoder handles conversion. For AAC, it's generally fine.
DisableAudioConverter = true
};
// Create an AAC encoder with default settings.
_audioEncoder = new AACEncoderBlock(new AVENCAACEncoderSettings());
// Connect the audio processing pipeline:
// RTSP audio output -> Decoder -> AAC Encoder -> MP4 Sink audio input
Pipeline.Connect(_rtspRawSource.AudioOutput, _decodeBin.Input);
Pipeline.Connect(_decodeBin.AudioOutput, _audioEncoder.Input);
Pipeline.Connect(_audioEncoder.Output, inputAudioPad);
OnStatusMessage?.Invoke(this, "Audio stream connected (re-encoding to AAC for MP4 file).");
}
else
{
// If audio re-encoding is disabled, connect RTSP audio directly to the muxer.
// Note: This may cause issues if the original audio format is not
// compatible with the MP4 container (e.g., G.711 PCMU/PCMA) when trying to save the RTSP stream.
// Common compatible formats include AAC. Check your camera's audio format.
Pipeline.Connect(_rtspRawSource.AudioOutput, inputAudioPad);
OnStatusMessage?.Invoke(this, "Audio stream connected (passthrough). Warning: Compatibility depends on original camera audio format for the file.");
}
}
// 5. Start the pipeline to record video
OnStatusMessage?.Invoke(this, "Starting recording pipeline to save RTSP stream to file...");
bool success = await Pipeline.StartAsync();
if (success)
{
OnStatusMessage?.Invoke(this, "Recording pipeline started successfully.");
}
else
{
OnStatusMessage?.Invoke(this, "Failed to start recording pipeline.");
}
return success;
}
///
/// Stops the recording by stopping the MediaBlocks pipeline.
///
/// True if the pipeline stopped successfully, false otherwise.
public async Task StopAsync()
{
if (Pipeline == null)
return false;
OnStatusMessage?.Invoke(this, "Stopping recording pipeline...");
bool success = await Pipeline.StopAsync();
if (success)
{
OnStatusMessage?.Invoke(this, "Recording pipeline stopped successfully.");
}
else
{
OnStatusMessage?.Invoke(this, "Failed to stop recording pipeline.");
}
// Detach the error handler to prevent issues if StopAsync is called multiple times
// or before DisposeAsync
if (Pipeline != null)
{
Pipeline.OnError -= OnError;
}
return success;
}
///
/// Asynchronously disposes of the RTSPRecorder and all its resources.
/// Implements the IAsyncDisposable pattern for proper resource cleanup.
///
public async ValueTask DisposeAsync()
{
if (!disposedValue)
{
if (Pipeline != null)
{
Pipeline.OnError -= (sender, e) => OnError?.Invoke(this, e); // Ensure detachment
await Pipeline.DisposeAsync();
Pipeline = null;
}
// Dispose of all MediaBlock components
// Using 'as IDisposable' for safe casting and disposal.
(_muxer as IDisposable)?.Dispose();
_muxer = null;
_rtspRawSource?.Dispose();
_rtspRawSource = null;
_decodeBin?.Dispose();
_decodeBin = null;
_audioEncoder?.Dispose();
_audioEncoder = null;
disposedValue = true;
}
}
}
}
```
## Explanation of the Code
1. **`RTSPRecorder` Class**: This class is central to helping a user save RTSP stream to file.
- Implements `IAsyncDisposable` for proper resource management.
- `Pipeline`: The `MediaBlocksPipeline` object that orchestrates the media flow.
- `_rtspRawSource`: An `RTSPRAWSourceBlock` is used. The "RAW" is key here, as it provides the elementary streams (video and audio) from camera without attempting to decode them initially.
- `_muxer`: An `MP4SinkBlock` is used to write the incoming video and audio streams into an MP4 file.
- `_decodeBin` and `_audioEncoder`: These are optional blocks used only if `ReencodeAudio` is true. `_decodeBin` decodes the original audio from the IP camera, and `_audioEncoder` (e.g., `AACEncoderBlock`) re-encodes it to a more compatible format like AAC.
- `Filename`: Specifies the output MP4 file path where the video will be saved.
- `ReencodeAudio`: A boolean property to control audio processing. If `true`, audio is re-encoded to AAC. If `false`, audio is passed through directly. Check your camera audio format for compatibility if set to false.
2. **`StartAsync(RTSPRAWSourceSettings rtspSettings)` Method**: This method initiates the process to **record RTSP stream**.
- Initializes `MediaBlocksPipeline`.
- **RTSP Source**: Creates `_rtspRawSource` with `RTSPRAWSourceSettings`. These settings include the URL (the path to your camera's stream), credentials for user access, and audio capture settings.
- **MP4 Sink**: Creates `_muxer` (MP4 sink) with the target filename.
- **Video Path (Passthrough)**:
- A new dynamic input pad for video is created on the `_muxer`.
- `Pipeline.Connect(_rtspRawSource.VideoOutput, inputVideoPad);` This line directly connects the raw video output from the RTSP source to the MP4 muxer's*video input. No re-encoding occurs for the video stream.
- **Audio Path (Conditional)**: Determines how audio from the **camera** is handled when you **save to file**.
- If `rtspSettings.AudioEnabled` is true:
- A new dynamic input pad for audio is created on the `_muxer`.
- If `ReencodeAudio` is `true` (recommended for wider file compatibility):
- `_decodeBin` is created to decode the incoming audio from the camera. It's configured to only process audio (`audioDisabled: false`).
- `_audioEncoder` (e.g., `AACEncoderBlock`) is created.
- The pipeline is connected: `_rtspRawSource.AudioOutput` -> `_decodeBin.Input` -> `_decodeBin.AudioOutput` -> `_audioEncoder.Input` -> `_audioEncoder.Output` -> `inputAudioPad` (muxer's audio input).
- If `ReencodeAudio` is `false`:
- `Pipeline.Connect(_rtspRawSource.AudioOutput, inputAudioPad);` The raw audio output from the camera source is connected directly to the MP4 muxer. *Caution*: This relies on the original audio codec from the camera being compatible with the MP4 container (e.g., AAC). Formats like G.711 (PCMU/PCMA) are common in RTSP cameras but are not standard in MP4 and might lead to playback issues or require specialized players if you save this way. Check your camera's documentation.
- Starts the pipeline using `Pipeline.StartAsync()` to begin the streaming video record process.
3. **`StopAsync()` Method**: Stops the `Pipeline`.
4. **`DisposeAsync()` Method**:
- Cleans up all resources, including the pipeline and individual media blocks.
## How to Use the `RTSPRecorder`
Here's a basic example of how you might use the `RTSPRecorder` class:
```csharp
using System;
using System.IO;
using System.Threading;
using System.Threading.Tasks;
using VisioForge.Core; // For VisioForgeX.DestroySDK()
using VisioForge.Core.Types.X.Sources; // For RTSPRAWSourceSettings
using RTSPCaptureOriginalStream; // Namespace of your RTSPRecorder class
class Demo
{
static async Task Main(string[] args)
{
Console.WriteLine("RTSP Camera to MP4 Capture (Original Video Stream)");
Console.WriteLine("-------------------------------------------------");
string rtspUrl = "rtsp://your_camera_ip:554/stream_path"; // Replace with your RTSP URL
string username = "admin"; // Replace with your username, or empty if none
string password = "password"; // Replace with your password, or empty if none
string outputFilePath = Path.Combine(Environment.GetFolderPath(Environment.SpecialFolder.MyVideos), "rtsp_original_capture.mp4");
Directory.CreateDirectory(Path.GetDirectoryName(outputFilePath));
Console.WriteLine($"Capturing from: {rtspUrl}");
Console.WriteLine($"Saving to: {outputFilePath}");
Console.WriteLine("Press any key to stop recording...");
var cts = new CancellationTokenSource();
RTSPRecorder recorder = null;
try
{
recorder = new RTSPRecorder
{
Filename = outputFilePath,
ReencodeAudio = true // Set to false to pass through audio (check compatibility)
};
recorder.OnError += (s, e) => Console.WriteLine($"ERROR: {e.Message}");
recorder.OnStatusMessage += (s, msg) => Console.WriteLine($"STATUS: {msg}");
// Configure RTSP source settings
var rtspSettings = new RTSPRAWSourceSettings(new Uri(rtspUrl), audioEnabled: true)
{
Login = username,
Password = password,
// Adjust other settings as needed, e.g., transport protocol
// RTSPTransport = VisioForge.Core.Types.RTSPTransport.TCP,
};
if (await recorder.StartAsync(rtspSettings))
{
Console.ReadKey(true); // Wait for a key press to stop
}
else
{
Console.WriteLine("Failed to start recording. Check status messages and RTSP URL/credentials.");
}
}
catch (Exception ex)
{
Console.WriteLine($"An unexpected error occurred: {ex.Message}");
}
finally
{
if (recorder != null)
{
Console.WriteLine("Stopping recording...");
await recorder.StopAsync();
await recorder.DisposeAsync();
Console.WriteLine("Recording stopped and resources disposed.");
}
// Important: Clean up VisioForge SDK resources on application exit
VisioForgeX.DestroySDK();
}
Console.WriteLine("Press any key to exit.");
Console.ReadKey(true);
}
}
```
## Key Considerations
- **Audio Compatibility (Passthrough)**: If you choose `ReencodeAudio = false`, ensure the camera's audio codec (e.g., AAC, MP3) is compatible with the MP4 container. Common RTSP audio codecs like G.711 (PCMU/PCMA) are generally not directly supported in MP4 files and will likely result in silent audio or playback errors. Re-encoding to AAC is generally safer for wider compatibility.
- **Network Conditions**: RTSP streaming is sensitive to network stability, so ensure a reliable network connection to the camera.
- **Error Handling**: Robust applications should implement thorough error handling by subscribing to the `OnError` event of the `RTSPRecorder` (or directly from the `MediaBlocksPipeline`).
- **Resource Management**: Always `DisposeAsync` the `RTSPRecorder` instance (and thus the `MediaBlocksPipeline`) when done to free up resources. `VisioForgeX.DestroySDK()` should be called once when your application exits.
## Full GitHub Sample
For a complete, runnable console application demonstrating these concepts, including user input for RTSP details and dynamic duration display, please refer to the official VisioForge samples repository:
- **[RTSP Capture Original Stream Sample on GitHub](https://github.com/visioforge/.Net-SDK-s-samples/tree/master/Media%20Blocks%20SDK/Console/RTSP%20Capture%20Original)**
This sample provides a more comprehensive example and showcases additional features.
## Best Practices
- Always implement proper error handling
- Monitor network stability for reliable streaming
- Use appropriate audio encoding settings
- Manage system resources effectively
- Implement proper cleanup procedures
## Troubleshooting
Common issues and their solutions when saving RTSP streams:
- Network connectivity problems
- Audio codec compatibility
- Resource management
- Stream initialization errors
- Recording storage considerations
---
This guide provides a foundational understanding of how to save an RTSP stream's original video while flexibly handling the audio stream using the VisioForge Media Blocks SDK. By leveraging the `RTSPRAWSourceBlock` and direct pipeline connections, you can achieve efficient, high-quality recordings.
---END OF PAGE---
# Local File: .\dotnet\mediablocks\LiveVideoCompositor\index.md
---
title: .Net Live Video Compositor
description: Master real-time video compositing in .Net. Add/remove multiple live video/audio sources and outputs on the fly. Build dynamic streaming & recording apps.
sidebar_label: Live Video Compositor
---
# Live Video Compositor
[!badge size="xl" target="blank" variant="info" text="Media Blocks SDK .Net"](https://www.visioforge.com/media-blocks-sdk-net)
Live Video Compositor is a part of the [VisioForge Media Blocks SDK .Net](https://www.visioforge.com/media-blocks-sdk-net) that allows you to add and remove sources and outputs in real time to a pipeline.
This allows you to create applications that simultaneously handle multiple video and audio sources.
For example, the LVC allows you to start streaming to YouTube at just the right moment while simultaneously recording video to disk.
Using the LVC, you can create an application similar to OBS Studio.
Each source and output has its unique identifier that can be used to add and remove sources and outputs in real time.
Each source and output has its own independent pipeline that can be started and stopped.
## Features
- Supports multiple video and audio sources
- Supports multiple video and audio outputs
- Setting the position and size of video sources
- Setting the transparency of video sources
- Setting the volume of audio sources
## LiveVideoCompositor class
The `LiveVideoCompositor` is the main class that allows the addition and removal of live sources and outputs to the pipeline. When creating it, it is necessary to specify the resolution and frame rate to use. All sources with a different frame rate will be automatically converted to the frame rate specified when creating the LVC.
`LiveVideoCompositorSettings` allows you to set the video and audio parameters. Key properties include:
- `MixerType`: Specifies the video mixer type (e.g., `LVCMixerType.OpenGL`, `LVCMixerType.D3D11` (Windows only), or `LVCMixerType.CPU`).
- `AudioEnabled`: A boolean indicating whether the audio stream is enabled.
- `VideoWidth`, `VideoHeight`, `VideoFrameRate`: Define the output video resolution and frame rate.
- `AudioFormat`, `AudioSampleRate`, `AudioChannels`: Define the output audio parameters.
- `VideoView`: An optional `IVideoView` for rendering video output directly.
- `AudioOutput`: An optional `AudioRendererBlock` for rendering audio output directly.
It is also necessary to set the maximum number of sources and outputs when designing your application, though this is not a direct parameter of `LiveVideoCompositorSettings`.
### Sample code
1. Create a new instance of the `LiveVideoCompositor` class.
```csharp
var settings = new LiveVideoCompositorSettings(1920, 1080, VideoFrameRate.FPS_25);
// Optionally, configure other settings like MixerType, AudioEnabled, etc.
// settings.MixerType = LVCMixerType.OpenGL;
// settings.AudioEnabled = true;
var compositor = new LiveVideoCompositor(settings);
```
2. Add video and audio sources and outputs (see below)
3. Start the pipeline.
```csharp
await compositor.StartAsync();
```
## LVC Video Input
The `LVCVideoInput` class is used to add video sources to the LVC pipeline. The class allows you to set the video parameters and the rectangle of the video source.
You can use any block that has a video output pad. For example, you can use `VirtualVideoSourceBlock` to create a virtual video source or `SystemVideoSourceBlock` to capture video from the webcam.
Key properties for `LVCVideoInput` include:
- `Rectangle`: Defines the position and size of the video source within the compositor's output.
- `ZOrder`: Determines the stacking order of overlapping video sources.
- `ResizePolicy`: Specifies how the video source should be resized if its aspect ratio differs from the target rectangle (`LVCResizePolicy.Stretch`, `LVCResizePolicy.Letterbox`, `LVCResizePolicy.LetterboxToFill`).
- `VideoView`: An optional `IVideoView` to preview this specific input source.
### Usage
When creating an `LVCVideoInput` object, you must specify the `MediaBlock` to be used as the video data source, along with `VideoFrameInfoX` describing the video, a `Rect` for its placement, and whether it should `autostart`.
### Sample code
#### Virtual video source
The sample code below shows how to create an `LVCVideoInput` object with a `VirtualVideoSourceBlock` as the video source.
```csharp
var rect = new Rect(0, 0, 640, 480);
var name = "Video source [Virtual]";
var settings = new VirtualVideoSourceSettings();
var info = new VideoFrameInfoX(settings.Width, settings.Height, settings.FrameRate);
var src = new LVCVideoInput(name, _compositor, new VirtualVideoSourceBlock(settings), info, rect, true);
// Optionally, set ZOrder or ResizePolicy
// src.ZOrder = 1;
// src.ResizePolicy = LVCResizePolicy.Letterbox;
if (await _compositor.Input_AddAsync(src))
{
// added successfully
}
else
{
src.Dispose();
}
```
#### Screen source
For Desktop platforms, we can capture the screen. The sample code below shows how to create an `LVCVideoInput` object with a `ScreenSourceBlock` as the video source.
```csharp
var settings = new ScreenCaptureDX9SourceSettings();
settings.CaptureCursor = true;
settings.Monitor = 0;
settings.FrameRate = new VideoFrameRate(30);
settings.Rectangle = new Rectangle(0, 0, 1920, 1080);
var rect = new Rect(0, 0, 640, 480);
var name = $"Screen source";
var info = new VideoFrameInfoX(settings.Rectangle.Width, settings.Rectangle.Height, settings.FrameRate);
var src = new LVCVideoInput(name, _compositor, new ScreenSourceBlock(settings), info, rect, true);
// Optionally, set ZOrder or ResizePolicy
// src.ZOrder = 0;
// src.ResizePolicy = LVCResizePolicy.Stretch;
if (await _compositor.Input_AddAsync(src))
{
// added successfully
}
else
{
src.Dispose();
}
```
#### System video source (webcam)
The sample code below shows how to create an `LVCVideoInput` object with a `SystemVideoSourceBlock` as the video source.
We use the `DeviceEnumerator` class to get the video source devices. The first video device will be used as the video source. The first video format of the device will be used as the video format.
```csharp
VideoCaptureDeviceSourceSettings settings = null;
var device = (await DeviceEnumerator.Shared.VideoSourcesAsync())[0];
if (device != null)
{
var formatItem = device.VideoFormats[0];
if (formatItem != null)
{
settings = new VideoCaptureDeviceSourceSettings(device)
{
Format = formatItem.ToFormat()
};
settings.Format.FrameRate = dlg.FrameRate;
}
}
if (settings == null)
{
MessageBox.Show(this, "Unable to configure video capture device.");
return;
}
var name = $"Camera source [{device.Name}]";
var rect = new Rect(0, 0, 1280, 720);
var videoInfo = new VideoFrameInfoX(settings.Format.Width, settings.Format.Height, settings.Format.FrameRate);
var src = new LVCVideoInput(name, _compositor, new SystemVideoSourceBlock(settings), videoInfo, rect, true);
// Optionally, set ZOrder or ResizePolicy
// src.ZOrder = 2;
// src.ResizePolicy = LVCResizePolicy.LetterboxToFill;
if (await _compositor.Input_AddAsync(src))
{
// added successfully
}
else
{
src.Dispose();
}
```
## LVC Audio Input
The `LVCAudioInput` class is used to add audio sources to the LVC pipeline. The class allows you to set the audio parameters and the volume of the audio source.
You can use any block that has an audio output pad. For example, you can use the `VirtualAudioSourceBlock` to create a virtual audio source or `SystemAudioSourceBlock` to capture audio from the microphone.
### Usage
When creating an `LVCAudioInput` object, you must specify the `MediaBlock` to be used as the audio data source, along with `AudioInfoX` (which requires format, channels, and sample rate) and whether it should `autostart`.
### Sample code
#### Virtual audio source
The sample code below shows how to create an `LVCAudioInput` object with a `VirtualAudioSourceBlock` as the audio source.
```csharp
var name = "Audio source [Virtual]";
var settings = new VirtualAudioSourceSettings();
var info = new AudioInfoX(settings.Format, settings.SampleRate, settings.Channels);
var src = new LVCAudioInput(name, _compositor, new VirtualAudioSourceBlock(settings), info, true);
if (await _compositor.Input_AddAsync(src))
{
// added successfully
}
else
{
src.Dispose();
}
```
#### System audio source (DirectSound in Windows)
The sample code below shows how to create an `LVCAudioInput` object with a `SystemAudioSourceBlock` as the audio source.
We use the `DeviceEnumerator` class to get the audio devices. The first audio device is used as the audio source. The first audio format of the device is used as the audio format.
```csharp
DSAudioCaptureDeviceSourceSettings settings = null;
AudioCaptureDeviceFormat deviceFormat = null;
var device = (await DeviceEnumerator.Shared.AudioSourcesAsync(AudioCaptureDeviceAPI.DirectSound))[0]];
if (device != null)
{
var formatItem = device.Formats[0];
if (formatItem != null)
{
deviceFormat = formatItem.ToFormat();
settings = new DSAudioCaptureDeviceSourceSettings(device, deviceFormat);
}
}
if (settings == null)
{
MessageBox.Show(this, "Unable to configure audio capture device.");
return;
}
var name = $"Audio source [{device.Name}]";
var info = new AudioInfoX(deviceFormat.Format, deviceFormat.SampleRate, deviceFormat.Channels);
var src = new LVCAudioInput(name, _compositor, new SystemAudioSourceBlock(settings), info, true);
if (await _compositor.Input_AddAsync(src))
{
// added successfully
}
else
{
src.Dispose();
}
```
## LVC Video Output
The `LVCVideoOutput` class is used to add video outputs to the LVC pipeline. You can start and stop the output pipeline independently from the main pipeline.
### Usage
When creating an `LVCVideoOutput` object, you must specify the `MediaBlock` to be used as the video data output, its `name`, a reference to the `LiveVideoCompositor`, and whether it should `autostart` with the main pipeline. An optional processing `MediaBlock` can also be provided. Usually, this element is used to save the video as a file or stream it (without audio).
For video+audio outputs, use the `LVCVideoAudioOutput` class.
You can use the SuperMediaBlock to make a custom block pipeline for video output. For example, you can add a video encoder, a muxer, and a file writer to save the video to a file.
## LVC Audio Output
The `LVCAudioOutput` class is used to add audio outputs to the LVC pipeline. You can start and stop the output pipeline independently from the main pipeline.
### Usage
When creating an `LVCAudioOutput` object, you must specify the `MediaBlock` to be used as the audio data output, its `name`, a reference to the `LiveVideoCompositor`, and whether it should `autostart`.
### Sample code
#### Add an audio renderer
Add an audio renderer to the LVC pipeline. You need to create an `AudioRendererBlock` object and then create an `LVCAudioOutput` object. Finally, add the output to the compositor.
The first device is used as an audio output.
```csharp
var audioRenderer = new AudioRendererBlock((await DeviceEnumerator.Shared.AudioOutputsAsync())[0]);
var audioRendererOutput = new LVCAudioOutput("Audio renderer", _compositor, audioRenderer, true);
await _compositor.Output_AddAsync(audioRendererOutput, true);
```
#### Add an MP3 output
Add an MP3 output to the LVC pipeline. You need to create an `MP3OutputBlock` object and then create an `LVCAudioOutput` object. Finally, add the output to the compositor.
```csharp
var mp3Output = new MP3OutputBlock(outputFile, new MP3EncoderSettings());
var output = new LVCAudioOutput(outputFile, _compositor, mp3Output, false);
if (await _compositor.Output_AddAsync(output))
{
// added successfully
}
else
{
output.Dispose();
}
```
## LVC Video/Audio Output
The `LVCVideoAudioOutput` class is used to add video+audio outputs to the LVC pipeline. You can start and stop the output pipeline independently from the main pipeline.
### Usage
When creating an `LVCVideoAudioOutput` object, you must specify the `MediaBlock` to be used as the video+audio data output, its `name`, a reference to the `LiveVideoCompositor`, and whether it should `autostart`. Optional processing `MediaBlock`s for video and audio can also be provided.
### Sample code
#### Add an MP4 output
```csharp
var mp4Output = new MP4OutputBlock(new MP4SinkSettings("output.mp4"), new OpenH264EncoderSettings(), new MFAACEncoderSettings());
var output = new LVCVideoAudioOutput(outputFile, _compositor, mp4Output, false);
if (await _compositor.Output_AddAsync(output))
{
// added successfully
}
else
{
output.Dispose();
}
```
#### Add a WebM output
```csharp
var webmOutput = new WebMOutputBlock(new WebMSinkSettings("output.webm"), new VP8EncoderSettings(), new VorbisEncoderSettings());
var output = new LVCVideoAudioOutput(outputFile, _compositor, webmOutput, false);
if (await _compositor.Output_AddAsync(output))
{
// added successfully
}
else
{
output.Dispose();
}
```
## LVC Video View Output
The `LVCVideoViewOutput` class is used to add video view to the LVC pipeline. You can use it to display the video on the screen.
### Usage
When creating an `LVCVideoViewOutput` object, you must specify the `IVideoView` control to be used, its `name`, a reference to the `LiveVideoCompositor`, and whether it should `autostart`. An optional processing `MediaBlock` can also be provided.
### Sample code
```csharp
var name = "[VideoView] Preview";
var videoRendererOutput = new LVCVideoViewOutput(name, _compositor, VideoView1, true);
await _compositor.Output_AddAsync(videoRendererOutput);
```
VideoView1 is a `VideoView` object that is used to display the video. Each platform / UI framework has its own `VideoView` implementation.
You can add several `LVCVideoViewOutput` objects to the LVC pipeline to display the video on different displays.
---
[Sample application on GitHub](https://github.com/visioforge/.Net-SDK-s-samples/tree/master/Media%20Blocks%20SDK/WPF/CSharp/Live%20Video%20Compositor%20Demo)
---END OF PAGE---
# Local File: .\dotnet\mediablocks\Nvidia\index.md
---
title: .Net Media Nvidia Blocks Guide
description: Explore a complete guide to .Net Media SDK Nvidia blocks. Learn about Nvidia-specific blocks for your media processing pipelines.
sidebar_label: Nvidia
---
# Nvidia Blocks - VisioForge Media Blocks SDK .Net
[!badge size="xl" target="blank" variant="info" text="Media Blocks SDK .Net"](https://www.visioforge.com/media-blocks-sdk-net)
Nvidia blocks leverage Nvidia GPU capabilities for accelerated media processing tasks such as data transfer, video conversion, and resizing.
## NVDataDownloadBlock
Nvidia data download block. Downloads data from Nvidia GPU to system memory.
#### Block info
Name: NVDataDownloadBlock.
| Pin direction | Media type | Pins count |
| --- | :---: | :---: |
| Input video | Video (GPU memory) | 1 |
| Output video | Video (system memory) | 1 |
#### The sample pipeline
```mermaid
graph LR;
NVCUDAConverterBlock-->NVDataDownloadBlock-->VideoRendererBlock;
```
#### Sample code
```csharp
// create pipeline
var pipeline = new MediaBlocksPipeline();
// create a source that outputs to GPU memory (e.g., a decoder or another Nvidia block)
// For example, NVDataUploadBlock or an NV-accelerated decoder
var upstreamNvidiaBlock = new NVDataUploadBlock(); // Conceptual: assume this block is properly configured
// create Nvidia data download block
var nvDataDownload = new NVDataDownloadBlock();
// create video renderer block
var videoRenderer = new VideoRendererBlock(pipeline, VideoView1); // Assuming VideoView1 is your display control
// connect blocks
// pipeline.Connect(upstreamNvidiaBlock.Output, nvDataDownload.Input); // Connect GPU source to download block
// pipeline.Connect(nvDataDownload.Output, videoRenderer.Input); // Connect download block (system memory) to renderer
// start pipeline
// await pipeline.StartAsync();
```
#### Remarks
This block is used to transfer video data from the Nvidia GPU's memory to the main system memory. This is typically needed when a GPU-processed video stream needs to be accessed by a component that operates on system memory, like a CPU-based encoder or a standard video renderer.
Ensure that the correct Nvidia drivers and CUDA toolkit are installed for this block to function.
Use `NVDataDownloadBlock.IsAvailable()` to check if the block can be used.
#### Platforms
Windows, Linux (Requires Nvidia GPU and appropriate drivers/SDK).
## NVDataUploadBlock
Nvidia data upload block. Uploads data to Nvidia GPU from system memory.
#### Block info
Name: NVDataUploadBlock.
| Pin direction | Media type | Pins count |
| --- | :---: | :---: |
| Input video | Video (system memory) | 1 |
| Output video | Video (GPU memory) | 1 |
#### The sample pipeline
```mermaid
graph LR;
SystemVideoSourceBlock-->NVDataUploadBlock-->NVH264EncoderBlock;
```
#### Sample code
```csharp
// create pipeline
var pipeline = new MediaBlocksPipeline();
// create a video source (e.g., SystemVideoSourceBlock or UniversalSourceBlock)
var videoSource = new UniversalSourceBlock(); // Conceptual: assume this block is properly configured
// videoSource.Filename = "input.mp4";
// create Nvidia data upload block
var nvDataUpload = new NVDataUploadBlock();
// create an Nvidia accelerated encoder (e.g., NVH264EncoderBlock)
// var nvEncoder = new NVH264EncoderBlock(new NVH264EncoderSettings()); // Conceptual
// connect blocks
// pipeline.Connect(videoSource.VideoOutput, nvDataUpload.Input); // Connect system memory source to upload block
// pipeline.Connect(nvDataUpload.Output, nvEncoder.Input); // Connect upload block (GPU memory) to NV encoder
// start pipeline
// await pipeline.StartAsync();
```
#### Remarks
This block is used to transfer video data from main system memory to the Nvidia GPU's memory. This is typically a prerequisite for using Nvidia-accelerated processing blocks like encoders, decoders, or filters that operate on GPU memory.
Ensure that the correct Nvidia drivers and CUDA toolkit are installed for this block to function.
Use `NVDataUploadBlock.IsAvailable()` to check if the block can be used.
#### Platforms
Windows, Linux (Requires Nvidia GPU and appropriate drivers/SDK).
## NVVideoConverterBlock
Nvidia video converter block. Performs color space conversions and other video format conversions using the Nvidia GPU.
#### Block info
Name: NVVideoConverterBlock.
| Pin direction | Media type | Pins count |
| --- | :---: | :---: |
| Input video | Video (GPU memory) | 1 |
| Output video | Video (GPU memory, possibly different format) | 1 |
#### The sample pipeline
```mermaid
graph LR;
NVDataUploadBlock-->NVVideoConverterBlock-->NVDataDownloadBlock;
```
#### Sample code
```csharp
// create pipeline
var pipeline = new MediaBlocksPipeline();
// Assume video data is already in GPU memory via NVDataUploadBlock or an NV-decoder
// var nvUploadedSource = new NVDataUploadBlock(); // Conceptual
// pipeline.Connect(systemMemorySource.Output, nvUploadedSource.Input);
// create Nvidia video converter block
var nvVideoConverter = new NVVideoConverterBlock();
// Specific conversion settings might be applied here if the block has properties for them.
// Assume we want to download the converted video back to system memory
// var nvDataDownload = new NVDataDownloadBlock(); // Conceptual
// connect blocks
// pipeline.Connect(nvUploadedSource.Output, nvVideoConverter.Input);
// pipeline.Connect(nvVideoConverter.Output, nvDataDownload.Input);
// pipeline.Connect(nvDataDownload.Output, videoRenderer.Input); // Or to another system memory component
// start pipeline
// await pipeline.StartAsync();
```
#### Remarks
The `NVVideoConverterBlock` is used for efficient video format conversions (e.g., color space, pixel format) leveraging the Nvidia GPU. This is often faster than CPU-based conversions, especially for high-resolution video. It typically operates on video data already present in GPU memory.
Ensure that the correct Nvidia drivers and CUDA toolkit are installed.
Use `NVVideoConverterBlock.IsAvailable()` to check if the block can be used.
#### Platforms
Windows, Linux (Requires Nvidia GPU and appropriate drivers/SDK).
## NVVideoResizeBlock
Nvidia video resize block. Resizes video frames using the Nvidia GPU.
#### Block info
Name: NVVideoResizeBlock.
| Pin direction | Media type | Pins count |
| --- | :---: | :---: |
| Input video | Video (GPU memory) | 1 |
| Output video | Video (GPU memory, resized) | 1 |
#### Settings
The `NVVideoResizeBlock` is configured using a `VisioForge.Core.Types.Size` object passed to its constructor.
- `Resolution` (`VisioForge.Core.Types.Size`): Specifies the target output resolution (Width, Height) for the video.
#### The sample pipeline
```mermaid
graph LR;
NVDataUploadBlock-->NVVideoResizeBlock-->NVH264EncoderBlock;
```
#### Sample code
```csharp
// create pipeline
var pipeline = new MediaBlocksPipeline();
// Target resolution for resizing
var targetResolution = new VisioForge.Core.Types.Size(1280, 720);
// Assume video data is already in GPU memory via NVDataUploadBlock or an NV-decoder
// var nvUploadedSource = new NVDataUploadBlock(); // Conceptual
// pipeline.Connect(systemMemorySource.Output, nvUploadedSource.Input);
// create Nvidia video resize block
var nvVideoResize = new NVVideoResizeBlock(targetResolution);
// Assume the resized video will be encoded by an NV-encoder
// var nvEncoder = new NVH264EncoderBlock(new NVH264EncoderSettings()); // Conceptual
// connect blocks
// pipeline.Connect(nvUploadedSource.Output, nvVideoResize.Input);
// pipeline.Connect(nvVideoResize.Output, nvEncoder.Input);
// start pipeline
// await pipeline.StartAsync();
```
#### Remarks
The `NVVideoResizeBlock` performs video scaling operations efficiently using the Nvidia GPU. This is useful for adapting video streams to different display resolutions or encoding requirements. It typically operates on video data already present in GPU memory.
Ensure that the correct Nvidia drivers and CUDA toolkit are installed.
Use `NVVideoResizeBlock.IsAvailable()` to check if the block can be used.
#### Platforms
Windows, Linux (Requires Nvidia GPU and appropriate drivers/SDK).
---END OF PAGE---
# Local File: .\dotnet\mediablocks\OpenCV\index.md
---
title: .Net Media OpenCV Blocks Guide
description: Explore a complete guide to .Net Media SDK OpenCV blocks. Learn about various OpenCV video processing capabilities.
sidebar_label: OpenCV
---
# OpenCV Blocks - VisioForge Media Blocks SDK .Net
[!badge size="xl" target="blank" variant="info" text="Media Blocks SDK .Net"](https://www.visioforge.com/media-blocks-sdk-net)
OpenCV (Open Source Computer Vision Library) blocks provide powerful video processing capabilities within the VisioForge Media Blocks SDK .Net. These blocks enable a wide range of computer vision tasks, from basic image manipulation to complex object detection and tracking.
To use OpenCV blocks, ensure that the VisioForge.CrossPlatform.OpenCV.Windows.x64 (or corresponding package for your platform) NuGet package is included in your project.
Most OpenCV blocks typically require a `videoconvert` element before them to ensure the input video stream is in a compatible format. The SDK handles this internally when you initialize the block.
## CV Dewarp Block
The CV Dewarp block applies dewarping effects to a video stream, which can correct distortions from wide-angle lenses, for example.
### Block info
Name: `CVDewarpBlock` (GStreamer element: `dewarp`).
| Pin direction | Media type | Pins count |
|---------------|:--------------------:|:----------:|
| Input video | Uncompressed video | 1 |
| Output video | Uncompressed video | 1 |
### Settings
The `CVDewarpBlock` is configured using `CVDewarpSettings`. Key properties:
- `DisplayMode` (`CVDewarpDisplayMode` enum): Specifies the display mode for dewarping (e.g., `SinglePanorama`, `DoublePanorama`). Default is `CVDewarpDisplayMode.SinglePanorama`.
- `InnerRadius` (double): Inner radius for dewarping.
- `InterpolationMethod` (`CVDewarpInterpolationMode` enum): Interpolation method used (e.g., `Bilinear`, `Bicubic`). Default is `CVDewarpInterpolationMode.Bilinear`.
- `OuterRadius` (double): Outer radius for dewarping.
- `XCenter` (double): X-coordinate of the center for dewarping.
- `XRemapCorrection` (double): X-coordinate remap correction factor.
- `YCenter` (double): Y-coordinate of the center for dewarping.
- `YRemapCorrection` (double): Y-coordinate remap correction factor.
### Sample pipeline
```mermaid
graph LR;
SystemVideoSourceBlock-->CVDewarpBlock;
CVDewarpBlock-->VideoRendererBlock;
```
### Sample code
```csharp
var pipeline = new MediaBlocksPipeline();
// Assuming SystemVideoSourceBlock is already created and configured as 'videoSource'
// Create Dewarp settings
var dewarpSettings = new CVDewarpSettings
{
DisplayMode = CVDewarpDisplayMode.SinglePanorama, // Example mode, default is SinglePanorama
InnerRadius = 0.2, // Example value
OuterRadius = 0.8, // Example value
XCenter = 0.5, // Example value, default is 0.5
YCenter = 0.5, // Example value, default is 0.5
// InterpolationMethod = CVDewarpInterpolationMode.Bilinear, // This is the default
};
var dewarpBlock = new CVDewarpBlock(dewarpSettings);
var videoRenderer = new VideoRendererBlock(pipeline, VideoView1); // Assuming VideoView1
// Connect blocks
pipeline.Connect(videoSource.Output, dewarpBlock.Input0);
pipeline.Connect(dewarpBlock.Output, videoRenderer.Input);
// Start pipeline
await pipeline.StartAsync();
```
### Platforms
Windows, macOS, Linux.
### Remarks
Ensure the VisioForge OpenCV NuGet package is referenced in your project.
## CV Dilate Block
The CV Dilate block performs a dilation operation on the video stream. Dilation is a morphological operation that typically expands bright regions and shrinks dark regions.
### Block info
Name: `CVDilateBlock` (GStreamer element: `cvdilate`).
| Pin direction | Media type | Pins count |
|---------------|:--------------------:|:----------:|
| Input video | Uncompressed video | 1 |
| Output video | Uncompressed video | 1 |
### Settings
This block does not have specific settings beyond the default behavior. The dilation is performed with a default structuring element.
### Sample pipeline
```mermaid
graph LR;
SystemVideoSourceBlock-->CVDilateBlock;
CVDilateBlock-->VideoRendererBlock;
```
### Sample code
```csharp
var pipeline = new MediaBlocksPipeline();
// Assuming SystemVideoSourceBlock is already created and configured as 'videoSource'
var dilateBlock = new CVDilateBlock();
var videoRenderer = new VideoRendererBlock(pipeline, VideoView1); // Assuming VideoView1
// Connect blocks
pipeline.Connect(videoSource.Output, dilateBlock.Input0);
pipeline.Connect(dilateBlock.Output, videoRenderer.Input);
// Start pipeline
await pipeline.StartAsync();
```
### Platforms
Windows, macOS, Linux.
### Remarks
Ensure the VisioForge OpenCV NuGet package is referenced in your project.
## CV Edge Detect Block
The CV Edge Detect block uses the Canny edge detector algorithm to find edges in the video stream.
### Block info
Name: `CVEdgeDetectBlock` (GStreamer element: `edgedetect`).
| Pin direction | Media type | Pins count |
|---------------|:--------------------:|:----------:|
| Input video | Uncompressed video | 1 |
| Output video | Uncompressed video | 1 |
### Settings
The `CVEdgeDetectBlock` is configured using `CVEdgeDetectSettings`. Key properties:
- `ApertureSize` (int): Aperture size for the Sobel operator (e.g., 3, 5, or 7). Default is 3.
- `Threshold1` (int): First threshold for the hysteresis procedure. Default is 50.
- `Threshold2` (int): Second threshold for the hysteresis procedure. Default is 150.
- `Mask` (bool): If true, the output is a mask; otherwise, it's the original image with edges highlighted. Default is `false`.
### Sample pipeline
```mermaid
graph LR;
SystemVideoSourceBlock-->CVEdgeDetectBlock;
CVEdgeDetectBlock-->VideoRendererBlock;
```
### Sample code
```csharp
var pipeline = new MediaBlocksPipeline();
// Assuming SystemVideoSourceBlock is already created and configured as 'videoSource'
var edgeDetectSettings = new CVEdgeDetectSettings
{
ApertureSize = 3, // Example value, default is 3
Threshold1 = 2000, // Example value, actual C# type is int, default is 50
Threshold2 = 4000, // Example value, actual C# type is int, default is 150
Mask = true // Example value, default is false
};
var edgeDetectBlock = new CVEdgeDetectBlock(edgeDetectSettings);
var videoRenderer = new VideoRendererBlock(pipeline, VideoView1); // Assuming VideoView1
// Connect blocks
pipeline.Connect(videoSource.Output, edgeDetectBlock.Input0);
pipeline.Connect(edgeDetectBlock.Output, videoRenderer.Input);
// Start pipeline
await pipeline.StartAsync();
```
### Platforms
Windows, macOS, Linux.
### Remarks
Ensure the VisioForge OpenCV NuGet package is referenced in your project.
## CV Equalize Histogram Block
The CV Equalize Histogram block equalizes the histogram of a video frame using the `cvEqualizeHist` function. This typically improves the contrast of the image.
### Block info
Name: `CVEqualizeHistogramBlock` (GStreamer element: `cvequalizehist`).
| Pin direction | Media type | Pins count |
|---------------|:--------------------:|:----------:|
| Input video | Uncompressed video | 1 |
| Output video | Uncompressed video | 1 |
### Settings
This block does not have specific settings beyond the default behavior.
### Sample pipeline
```mermaid
graph LR;
SystemVideoSourceBlock-->CVEqualizeHistogramBlock;
CVEqualizeHistogramBlock-->VideoRendererBlock;
```
### Sample code
```csharp
var pipeline = new MediaBlocksPipeline();
// Assuming SystemVideoSourceBlock is already created and configured as 'videoSource'
var equalizeHistBlock = new CVEqualizeHistogramBlock();
var videoRenderer = new VideoRendererBlock(pipeline, VideoView1); // Assuming VideoView1
// Connect blocks
pipeline.Connect(videoSource.Output, equalizeHistBlock.Input0);
pipeline.Connect(equalizeHistBlock.Output, videoRenderer.Input);
// Start pipeline
await pipeline.StartAsync();
```
### Platforms
Windows, macOS, Linux.
### Remarks
Ensure the VisioForge OpenCV NuGet package is referenced in your project.
## CV Erode Block
The CV Erode block performs an erosion operation on the video stream. Erosion is a morphological operation that typically shrinks bright regions and expands dark regions.
### Block info
Name: `CVErodeBlock` (GStreamer element: `cverode`).
| Pin direction | Media type | Pins count |
|---------------|:--------------------:|:----------:|
| Input video | Uncompressed video | 1 |
| Output video | Uncompressed video | 1 |
### Settings
This block does not have specific settings beyond the default behavior. The erosion is performed with a default structuring element.
### Sample pipeline
```mermaid
graph LR;
SystemVideoSourceBlock-->CVErodeBlock;
CVErodeBlock-->VideoRendererBlock;
```
### Sample code
```csharp
var pipeline = new MediaBlocksPipeline();
// Assuming SystemVideoSourceBlock is already created and configured as 'videoSource'
var erodeBlock = new CVErodeBlock();
var videoRenderer = new VideoRendererBlock(pipeline, VideoView1); // Assuming VideoView1
// Connect blocks
pipeline.Connect(videoSource.Output, erodeBlock.Input0);
pipeline.Connect(erodeBlock.Output, videoRenderer.Input);
// Start pipeline
await pipeline.StartAsync();
```
### Platforms
Windows, macOS, Linux.
### Remarks
Ensure the VisioForge OpenCV NuGet package is referenced in your project.
## CV Face Blur Block
The CV Face Blur block detects faces in the video stream and applies a blur effect to them.
### Block info
Name: `CVFaceBlurBlock` (GStreamer element: `faceblur`).
| Pin direction | Media type | Pins count |
|---------------|:--------------------:|:----------:|
| Input video | Uncompressed video | 1 |
| Output video | Uncompressed video | 1 |
### Settings
The `CVFaceBlurBlock` is configured using `CVFaceBlurSettings`. Key properties:
- `MainCascadeFile` (string): Path to the XML file for the primary Haar cascade classifier used for face detection (e.g., `haarcascade_frontalface_default.xml`). Default is `"haarcascade_frontalface_default.xml"`.
- `MinNeighbors` (int): Minimum number of neighbors each candidate rectangle should have to retain it. Default is 3.
- `MinSize` (`Size`): Minimum possible object size. Objects smaller than this are ignored. Default `new Size(30, 30)`.
- `ScaleFactor` (double): How much the image size is reduced at each image scale. Default is 1.25.
Note: `ProcessPaths(Context)` should be called on the settings object to ensure correct path resolution for cascade files.
### Sample pipeline
```mermaid
graph LR;
SystemVideoSourceBlock-->CVFaceBlurBlock;
CVFaceBlurBlock-->VideoRendererBlock;
```
### Sample code
```csharp
var pipeline = new MediaBlocksPipeline();
// Assuming SystemVideoSourceBlock is already created and configured as 'videoSource'
var faceBlurSettings = new CVFaceBlurSettings
{
MainCascadeFile = "haarcascade_frontalface_default.xml", // Adjust path as needed, this is the default
MinNeighbors = 5, // Example value, default is 3
ScaleFactor = 1.2, // Example value, default is 1.25
// MinSize = new VisioForge.Core.Types.Size(30, 30) // This is the default
};
// It's important to call ProcessPaths if you are not providing an absolute path
// and relying on SDK's internal mechanisms to locate the file, especially when deployed.
// faceBlurSettings.ProcessPaths(pipeline.Context); // or pass appropriate context
var faceBlurBlock = new CVFaceBlurBlock(faceBlurSettings);
var videoRenderer = new VideoRendererBlock(pipeline, VideoView1); // Assuming VideoView1
// Connect blocks
pipeline.Connect(videoSource.Output, faceBlurBlock.Input0);
pipeline.Connect(faceBlurBlock.Output, videoRenderer.Input);
// Start pipeline
await pipeline.StartAsync();
```
### Platforms
Windows, macOS, Linux.
### Remarks
This block requires Haar cascade XML files for face detection. These files are typically bundled with OpenCV distributions. Ensure the path to `MainCascadeFile` is correctly specified. The `ProcessPaths` method on the settings object can help resolve paths if files are placed in standard locations known to the SDK.
## CV Face Detect Block
The CV Face Detect block detects faces, and optionally eyes, noses, and mouths, in the video stream using Haar cascade classifiers.
### Block info
Name: `CVFaceDetectBlock` (GStreamer element: `facedetect`).
| Pin direction | Media type | Pins count |
|---------------|:--------------------:|:----------:|
| Input video | Uncompressed video | 1 |
| Output video | Uncompressed video | 1 |
### Settings
The `CVFaceDetectBlock` is configured using `CVFaceDetectSettings`. Key properties:
- `Display` (bool): If `true`, draws rectangles around detected features on the output video. Default is `true`.
- `MainCascadeFile` (string): Path to the XML for the primary Haar cascade. Default is `"haarcascade_frontalface_default.xml"`.
- `EyesCascadeFile` (string): Path to the XML for eyes detection. Default is `"haarcascade_mcs_eyepair_small.xml"`. Optional.
- `NoseCascadeFile` (string): Path to the XML for nose detection. Default is `"haarcascade_mcs_nose.xml"`. Optional.
- `MouthCascadeFile` (string): Path to the XML for mouth detection. Default is `"haarcascade_mcs_mouth.xml"`. Optional.
- `MinNeighbors` (int): Minimum neighbors for candidate retention. Default 3.
- `MinSize` (`Size`): Minimum object size. Default `new Size(30, 30)`.
- `MinDeviation` (int): Minimum standard deviation. Default 0.
- `ScaleFactor` (double): Image size reduction factor at each scale. Default 1.25.
- `UpdatesMode` (`CVFaceDetectUpdates` enum): Controls how updates/events are posted (`EveryFrame`, `OnChange`, `OnFace`, `None`). Default `CVFaceDetectUpdates.EveryFrame`.
Note: `ProcessPaths(Context)` should be called on the settings object for cascade files.
### Events
- `FaceDetected`: Occurs when faces (and other enabled features) are detected. Provides `CVFaceDetectedEventArgs` with an array of `CVFace` objects and a timestamp.
- `CVFace` contains `Rect` for `Position`, `Nose`, `Mouth`, and a list of `Rect` for `Eyes`.
### Sample pipeline
```mermaid
graph LR;
SystemVideoSourceBlock-->CVFaceDetectBlock;
CVFaceDetectBlock-->VideoRendererBlock;
```
### Sample code
```csharp
var pipeline = new MediaBlocksPipeline();
// Assuming SystemVideoSourceBlock is already created and configured as 'videoSource'
var faceDetectSettings = new CVFaceDetectSettings
{
MainCascadeFile = "haarcascade_frontalface_default.xml", // Adjust path, default
EyesCascadeFile = "haarcascade_mcs_eyepair_small.xml", // Adjust path, default, optional
// NoseCascadeFile = "haarcascade_mcs_nose.xml", // Optional, default
// MouthCascadeFile = "haarcascade_mcs_mouth.xml", // Optional, default
Display = true, // Default
UpdatesMode = CVFaceDetectUpdates.EveryFrame, // Default, possible values: EveryFrame, OnChange, OnFace, None
MinNeighbors = 5, // Example value, default is 3
ScaleFactor = 1.2, // Example value, default is 1.25
// MinSize = new VisioForge.Core.Types.Size(30,30) // Default
};
// faceDetectSettings.ProcessPaths(pipeline.Context); // or appropriate context
var faceDetectBlock = new CVFaceDetectBlock(faceDetectSettings);
faceDetectBlock.FaceDetected += (s, e) =>
{
Console.WriteLine($"Timestamp: {e.Timestamp}, Faces found: {e.Faces.Length}");
foreach (var face in e.Faces)
{
Console.WriteLine($" Face at [{face.Position.Left},{face.Position.Top},{face.Position.Width},{face.Position.Height}]");
if (face.Eyes.Any())
{
Console.WriteLine($" Eyes at [{face.Eyes[0].Left},{face.Eyes[0].Top},{face.Eyes[0].Width},{face.Eyes[0].Height}]");
}
}
};
var videoRenderer = new VideoRendererBlock(pipeline, VideoView1); // Assuming VideoView1
// Connect blocks
pipeline.Connect(videoSource.Output, faceDetectBlock.Input0);
pipeline.Connect(faceDetectBlock.Output, videoRenderer.Input);
// Start pipeline
await pipeline.StartAsync();
```
### Platforms
Windows, macOS, Linux.
### Remarks
Requires Haar cascade XML files. The `ProcessBusMessage` method in the C# class handles parsing messages from the GStreamer element to fire the `FaceDetected` event.
## CV Hand Detect Block
The CV Hand Detect block detects hand gestures (fist or palm) in the video stream using Haar cascade classifiers. It internally resizes the input video to 320x240 for processing.
### Block info
Name: `CVHandDetectBlock` (GStreamer element: `handdetect`).
| Pin direction | Media type | Pins count |
|---------------|:--------------------:|:----------:|
| Input video | Uncompressed video | 1 |
| Output video | Uncompressed video | 1 |
### Settings
The `CVHandDetectBlock` is configured using `CVHandDetectSettings`. Key properties:
- `Display` (bool): If `true`, draws rectangles around detected hands on the output video. Default is `true`.
- `FistCascadeFile` (string): Path to the XML for fist detection. Default is `"fist.xml"`.
- `PalmCascadeFile` (string): Path to the XML for palm detection. Default is `"palm.xml"`.
- `ROI` (`Rect`): Region Of Interest for detection. Coordinates are relative to the 320x240 processed image. Default (0,0,0,0) - full frame (corresponds to `new Rect()`).
Note: `ProcessPaths(Context)` should be called on the settings object for cascade files.
### Events
- `HandDetected`: Occurs when hands are detected. Provides `CVHandDetectedEventArgs` with an array of `CVHand` objects.
- `CVHand` contains `Rect` for `Position` and `CVHandGesture` for `Gesture` (Fist or Palm).
### Sample pipeline
```mermaid
graph LR;
SystemVideoSourceBlock-->CVHandDetectBlock;
CVHandDetectBlock-->VideoRendererBlock;
```
Note: The `CVHandDetectBlock` internally includes a `videoscale` element to resize input to 320x240 before the `handdetect` GStreamer element.
### Sample code
```csharp
var pipeline = new MediaBlocksPipeline();
// Assuming SystemVideoSourceBlock is already created and configured as 'videoSource'
var handDetectSettings = new CVHandDetectSettings
{
FistCascadeFile = "fist.xml", // Adjust path, default
PalmCascadeFile = "palm.xml", // Adjust path, default
Display = true, // Default
ROI = new VisioForge.Core.Types.Rect(0, 0, 320, 240) // Example: full frame of scaled image, default is new Rect()
};
// handDetectSettings.ProcessPaths(pipeline.Context); // or appropriate context
var handDetectBlock = new CVHandDetectBlock(handDetectSettings);
handDetectBlock.HandDetected += (s, e) =>
{
Console.WriteLine($"Hands found: {e.Hands.Length}");
foreach (var hand in e.Hands)
{
Console.WriteLine($" Hand at [{hand.Position.Left},{hand.Position.Top},{hand.Position.Width},{hand.Position.Height}], Gesture: {hand.Gesture}");
}
};
var videoRenderer = new VideoRendererBlock(pipeline, VideoView1); // Assuming VideoView1
// Connect blocks
pipeline.Connect(videoSource.Output, handDetectBlock.Input0);
pipeline.Connect(handDetectBlock.Output, videoRenderer.Input);
// Start pipeline
await pipeline.StartAsync();
```
### Platforms
Windows, macOS, Linux.
### Remarks
Requires Haar cascade XML files for fist and palm detection. The input video is internally scaled to 320x240 for processing by the `handdetect` element. The `ProcessBusMessage` method handles GStreamer messages to fire `HandDetected`.
## CV Laplace Block
The CV Laplace block applies a Laplace operator to the video stream, which highlights regions of rapid intensity change, often used for edge detection.
### Block info
Name: `CVLaplaceBlock` (GStreamer element: `cvlaplace`).
| Pin direction | Media type | Pins count |
|---------------|:--------------------:|:----------:|
| Input video | Uncompressed video | 1 |
| Output video | Uncompressed video | 1 |
### Settings
The `CVLaplaceBlock` is configured using `CVLaplaceSettings`. Key properties:
- `ApertureSize` (int): Aperture size for the Sobel operator used internally (e.g., 1, 3, 5, or 7). Default 3.
- `Scale` (double): Optional scale factor for the computed Laplacian values. Default 1.
- `Shift` (double): Optional delta value that is added to the results prior to storing them. Default 0.
- `Mask` (bool): If true, the output is a mask; otherwise, it's the original image with the effect applied. Default is true.
### Sample pipeline
```mermaid
graph LR;
SystemVideoSourceBlock-->CVLaplaceBlock;
CVLaplaceBlock-->VideoRendererBlock;
```
### Sample code
```csharp
var pipeline = new MediaBlocksPipeline();
// Assuming SystemVideoSourceBlock is already created and configured as 'videoSource'
var laplaceSettings = new CVLaplaceSettings
{
ApertureSize = 3, // Example value
Scale = 1.0, // Example value
Shift = 0.0, // Example value
Mask = true
};
var laplaceBlock = new CVLaplaceBlock(laplaceSettings);
var videoRenderer = new VideoRendererBlock(pipeline, VideoView1); // Assuming VideoView1
// Connect blocks
pipeline.Connect(videoSource.Output, laplaceBlock.Input0);
pipeline.Connect(laplaceBlock.Output, videoRenderer.Input);
// Start pipeline
await pipeline.StartAsync();
```
### Platforms
Windows, macOS, Linux.
### Remarks
Ensure the VisioForge OpenCV NuGet package is referenced in your project.
## CV Motion Cells Block
The CV Motion Cells block detects motion in a video stream by dividing the frame into a grid of cells and analyzing changes within these cells.
### Block info
Name: `CVMotionCellsBlock` (GStreamer element: `motioncells`).
| Pin direction | Media type | Pins count |
|---------------|:--------------------:|:----------:|
| Input video | Uncompressed video | 1 |
| Output video | Uncompressed video | 1 |
### Settings
The `CVMotionCellsBlock` is configured using `CVMotionCellsSettings`. Key properties:
- `CalculateMotion` (bool): Enable or disable motion calculation. Default `true`.
- `CellsColor` (`SKColor`): Color to draw motion cells if `Display` is true. Default `SKColors.Red`.
- `DataFile` (string): Path to a data file for loading/saving cell configuration. Extension is handled separately by `DataFileExtension`.
- `DataFileExtension` (string): Extension for the data file (e.g., "dat").
- `Display` (bool): If `true`, draws the grid and motion indication on the output video. Default `true`.
- `Gap` (`TimeSpan`): Interval after which motion is considered finished and a "motion finished" bus message is posted. Default `TimeSpan.FromSeconds(5)`. (Note: This is different from a pixel gap between cells).
- `GridSize` (`Size`): Number of cells in the grid (Width x Height). Default `new Size(10, 10)`.
- `MinimumMotionFrames` (int): Minimum number of frames motion must be detected in a cell to trigger. Default 1.
- `MotionCellsIdx` (string): Comma-separated string of cell indices (e.g., "0:0,1:1") to monitor for motion.
- `MotionCellBorderThickness` (int): Thickness of the border for cells with detected motion. Default 1.
- `MotionMaskCellsPos` (string): String defining cell positions for a motion mask.
- `MotionMaskCoords` (string): String defining coordinates for a motion mask.
- `PostAllMotion` (bool): Post all motion events. Default `false`.
- `PostNoMotion` (`TimeSpan`): Time after which a "no motion" event is posted if no motion is detected. Default `TimeSpan.Zero` (disabled).
- `Sensitivity` (double): Motion sensitivity. Expected range might be 0.0 to 1.0. Default `0.5`.
- `Threshold` (double): Threshold for motion detection, representing the fraction of cells that need to have moved. Default `0.01`.
- `UseAlpha` (bool): Use alpha channel for drawing. Default `true`.
### Events
- `MotionDetected`: Occurs when motion is detected or changes state. Provides `CVMotionCellsEventArgs`:
- `Cells`: String indicating which cells have motion (e.g., "0:0,1:2").
- `StartedTime`: Timestamp when motion began in the current event scope.
- `FinishedTime`: Timestamp when motion finished (if applicable to the event).
- `CurrentTime`: Timestamp of the current frame related to the event.
- `IsMotion`: Boolean indicating if the event signifies motion (`true`) or no motion (`false`).
### Sample pipeline
```mermaid
graph LR;
SystemVideoSourceBlock-->CVMotionCellsBlock;
CVMotionCellsBlock-->VideoRendererBlock;
```
### Sample code
```csharp
var pipeline = new MediaBlocksPipeline();
// Assuming SystemVideoSourceBlock is already created and configured as 'videoSource'
var motionCellsSettings = new CVMotionCellsSettings
{
GridSize = new VisioForge.Core.Types.Size(8, 6), // Example: 8x6 grid, default is new Size(10,10)
Sensitivity = 0.75, // Example value, C# default is 0.5. Represents sensitivity.
Threshold = 0.05, // Example value, C# default is 0.01. Represents fraction of moved cells.
Display = true, // Default is true
CellsColor = SKColors.Aqua, // Example color, default is SKColors.Red
PostNoMotion = TimeSpan.FromSeconds(5) // Post no_motion after 5s of inactivity, default is TimeSpan.Zero
};
var motionCellsBlock = new CVMotionCellsBlock(motionCellsSettings);
motionCellsBlock.MotionDetected += (s, e) =>
{
if (e.IsMotion)
{
Console.WriteLine($"Motion DETECTED at {e.CurrentTime}. Cells: {e.Cells}. Started: {e.StartedTime}");
}
else
{
Console.WriteLine($"Motion FINISHED or NO MOTION at {e.CurrentTime}. Finished: {e.FinishedTime}");
}
};
var videoRenderer = new VideoRendererBlock(pipeline, VideoView1); // Assuming VideoView1
// Connect blocks
pipeline.Connect(videoSource.Output, motionCellsBlock.Input0);
pipeline.Connect(motionCellsBlock.Output, videoRenderer.Input);
// Start pipeline
await pipeline.StartAsync();
```
### Platforms
Windows, macOS, Linux.
### Remarks
The `ProcessBusMessage` method handles GStreamer messages to fire `MotionDetected`. Event structure provides timestamps for motion start, finish, and current event time.
## CV Smooth Block
The CV Smooth block applies various smoothing (blurring) filters to the video stream.
### Block info
Name: `CVSmoothBlock` (GStreamer element: `cvsmooth`).
| Pin direction | Media type | Pins count |
|---------------|:--------------------:|:----------:|
| Input video | Uncompressed video | 1 |
| Output video | Uncompressed video | 1 |
### Settings
The `CVSmoothBlock` is configured using `CVSmoothSettings`. Key properties:
- `Type` (`CVSmoothType` enum): Type of smoothing filter to apply (`Blur`, `Gaussian`, `Median`, `Bilateral`). Default `CVSmoothType.Gaussian`.
- `KernelWidth` (int): Width of the kernel for `Blur`, `Gaussian`, `Median` filters. Default 3.
- `KernelHeight` (int): Height of the kernel for `Blur`, `Gaussian`, `Median` filters. Default 3.
- `Width` (int): Width of the area to blur. Default `int.MaxValue` (full frame).
- `Height` (int): Height of the area to blur. Default `int.MaxValue` (full frame).
- `PositionX` (int): X position for the blur area. Default 0.
- `PositionY` (int): Y position for the blur area. Default 0.
- `Color` (double): Sigma for color space (for Bilateral filter) or standard deviation (for Gaussian if `SpatialSigma` is 0). Default 0.
- `SpatialSigma` (double): Sigma for coordinate space (for Bilateral and Gaussian filters). For Gaussian, if 0, it's calculated from `KernelWidth`/`KernelHeight`. Default 0.
### Sample pipeline
```mermaid
graph LR;
SystemVideoSourceBlock-->CVSmoothBlock;
CVSmoothBlock-->VideoRendererBlock;
```
### Sample code
```csharp
var pipeline = new MediaBlocksPipeline();
// Assuming SystemVideoSourceBlock is already created and configured as 'videoSource'
var smoothSettings = new CVSmoothSettings
{
Type = CVSmoothType.Gaussian, // Example: Gaussian blur, also the default
KernelWidth = 5, // Kernel width, default is 3
KernelHeight = 5, // Kernel height, default is 3
SpatialSigma = 1.5 // Sigma for Gaussian. If 0 (default), it's calculated from kernel size.
};
var smoothBlock = new CVSmoothBlock(smoothSettings);
var videoRenderer = new VideoRendererBlock(pipeline, VideoView1); // Assuming VideoView1
// Connect blocks
pipeline.Connect(videoSource.Output, smoothBlock.Input0);
pipeline.Connect(smoothBlock.Output, videoRenderer.Input);
// Start pipeline
await pipeline.StartAsync();
```
### Platforms
Windows, macOS, Linux.
### Remarks
Ensure the VisioForge OpenCV NuGet package is referenced in your project. The specific parameters used by the GStreamer element (`color`, `spatial`, `kernel-width`, `kernel-height`) depend on the chosen `Type`. For kernel dimensions, use `KernelWidth` and `KernelHeight`. `Width` and `Height` define the area to apply the blur if not the full frame.
## CV Sobel Block
The CV Sobel block applies a Sobel operator to the video stream, which is used to calculate the derivative of an image intensity function, typically for edge detection.
### Block info
Name: `CVSobelBlock` (GStreamer element: `cvsobel`).
| Pin direction | Media type | Pins count |
|---------------|:--------------------:|:----------:|
| Input video | Uncompressed video | 1 |
| Output video | Uncompressed video | 1 |
### Settings
The `CVSobelBlock` is configured using `CVSobelSettings`. Key properties:
- `XOrder` (int): Order of the derivative x. Default 1.
- `YOrder` (int): Order of the derivative y. Default 1.
- `ApertureSize` (int): Size of the extended Sobel kernel (1, 3, 5, or 7). Default 3.
- `Mask` (bool): If true, the output is a mask; otherwise, it's the original image with the effect applied. Default is true.
### Sample pipeline
```mermaid
graph LR;
SystemVideoSourceBlock-->CVSobelBlock;
CVSobelBlock-->VideoRendererBlock;
```
### Sample code
```csharp
var pipeline = new MediaBlocksPipeline();
// Assuming SystemVideoSourceBlock is already created and configured as 'videoSource'
var sobelSettings = new CVSobelSettings
{
XOrder = 1, // Default is 1. Used for order of the derivative X.
YOrder = 0, // Example: Use 0 for Y-order to primarily detect vertical edges. C# class default is 1.
ApertureSize = 3, // Default is 3. Size of the extended Sobel kernel.
Mask = true // Default is true. Output as a mask.
};
var sobelBlock = new CVSobelBlock(sobelSettings);
var videoRenderer = new VideoRendererBlock(pipeline, VideoView1); // Assuming VideoView1
// Connect blocks
pipeline.Connect(videoSource.Output, sobelBlock.Input0);
pipeline.Connect(sobelBlock.Output, videoRenderer.Input);
// Start pipeline
await pipeline.StartAsync();
```
### Platforms
Windows, macOS, Linux.
### Remarks
Ensure the VisioForge OpenCV NuGet package is referenced in your project.
## CV Template Match Block
The CV Template Match block searches for occurrences of a template image within the video stream.
### Block info
Name: `CVTemplateMatchBlock` (GStreamer element: `templatematch`).
| Pin direction | Media type | Pins count |
|---------------|:--------------------:|:----------:|
| Input video | Uncompressed video | 1 |
| Output video | Uncompressed video | 1 |
### Settings
The `CVTemplateMatchBlock` is configured using `CVTemplateMatchSettings`. Key properties:
- `TemplateImage` (string): Path to the template image file (e.g., PNG, JPG) to search for.
- `Method` (`CVTemplateMatchMethod` enum): The comparison method to use (e.g., `Sqdiff`, `CcorrNormed`, `CcoeffNormed`). Default `CVTemplateMatchMethod.Correlation`.
- `Display` (bool): If `true`, draws a rectangle around the best match on the output video. Default `true`.
### Events
- `TemplateMatch`: Occurs when a template match is found. Provides `CVTemplateMatchEventArgs`:
- `Rect`: A `Types.Rect` object representing the location (x, y, width, height) of the best match.
- `Result`: A double value representing the quality or result of the match, depending on the method used.
### Sample pipeline
```mermaid
graph LR;
SystemVideoSourceBlock-->CVTemplateMatchBlock;
CVTemplateMatchBlock-->VideoRendererBlock;
```
### Sample code
```csharp
var pipeline = new MediaBlocksPipeline();
// Assuming SystemVideoSourceBlock is already created and configured as 'videoSource'
// Ensure "template.png" exists and is accessible.
var templateMatchSettings = new CVTemplateMatchSettings("path/to/your/template.png") // Adjust path as needed
{
// Method: Specifies the comparison method.
// Example: CVTemplateMatchMethod.CcoeffNormed is often a good choice.
// C# class default is CVTemplateMatchMethod.Correlation.
Method = CVTemplateMatchMethod.CcoeffNormed,
// Display: If true, draws a rectangle around the best match.
// C# class default is true.
Display = true
};
var templateMatchBlock = new CVTemplateMatchBlock(templateMatchSettings);
templateMatchBlock.TemplateMatch += (s, e) =>
{
Console.WriteLine($"Template matched at [{e.Rect.Left},{e.Rect.Top},{e.Rect.Width},{e.Rect.Height}] with result: {e.Result}");
};
var videoRenderer = new VideoRendererBlock(pipeline, VideoView1); // Assuming VideoView1
// Connect blocks
pipeline.Connect(videoSource.Output, templateMatchBlock.Input0);
pipeline.Connect(templateMatchBlock.Output, videoRenderer.Input);
// Start pipeline
await pipeline.StartAsync();
```
### Platforms
Windows, macOS, Linux.
### Remarks
Ensure the VisioForge OpenCV NuGet package and a valid template image file are available. The `ProcessBusMessage` method handles GStreamer messages to fire the `TemplateMatch` event.
## CV Text Overlay Block
The CV Text Overlay block renders text onto the video stream using OpenCV drawing functions.
### Block info
Name: `CVTextOverlayBlock` (GStreamer element: `opencvtextoverlay`).
| Pin direction | Media type | Pins count |
|---------------|:--------------------:|:----------:|
| Input video | Uncompressed video | 1 |
| Output video | Uncompressed video | 1 |
### Settings
The `CVTextOverlayBlock` is configured using `CVTextOverlaySettings`. Key properties:
- `Text` (string): The text string to overlay. Default: `"Default text"`.
- `X` (int): X-coordinate of the bottom-left corner of the text string. Default: `50`.
- `Y` (int): Y-coordinate of the bottom-left corner of the text string (from the top, OpenCV origin is top-left, GStreamer textoverlay might be bottom-left). Default: `50`.
- `FontWidth` (double): Font scale factor that is multiplied by the font-specific base size. Default: `1.0`.
- `FontHeight` (double): Font scale factor (similar to FontWidth, though GStreamer element usually has one `font-scale` or relies on point size). Default: `1.0`.
- `FontThickness` (int): Thickness of the lines used to draw a text. Default: `1`.
- `Color` (`SKColor`): Color of the text. Default: `SKColors.Black`.
### Sample pipeline
```mermaid
graph LR;
SystemVideoSourceBlock-->CVTextOverlayBlock;
CVTextOverlayBlock-->VideoRendererBlock;
```
### Sample code
```csharp
var pipeline = new MediaBlocksPipeline();
// Assuming SystemVideoSourceBlock is already created and configured as 'videoSource'
var textOverlaySettings = new CVTextOverlaySettings
{
Text = "VisioForge MediaBlocks.Net ROCKS!", // Default: "Default text"
X = 20, // X position of the text start. Default: 50
Y = 40, // Y position of the text baseline (from top). Default: 50
FontWidth = 1.2, // Font scale. Default: 1.0
FontHeight = 1.2, // Font scale (usually FontWidth is sufficient for opencvtextoverlay). Default: 1.0
FontThickness = 2, // Default: 1
Color = SKColors.Blue // Default: SKColors.Black
};
var textOverlayBlock = new CVTextOverlayBlock(textOverlaySettings);
var videoRenderer = new VideoRendererBlock(pipeline, VideoView1); // Assuming VideoView1
// Connect blocks
pipeline.Connect(videoSource.Output, textOverlayBlock.Input0);
pipeline.Connect(textOverlayBlock.Output, videoRenderer.Input);
// Start pipeline
await pipeline.StartAsync();
```
### Platforms
Windows, macOS, Linux.
### Remarks
Ensure the VisioForge OpenCV NuGet package is referenced. The GStreamer properties `colorR`, `colorG`, `colorB` are set based on the `Color` property.
## CV Tracker Block
The CV Tracker block implements various object tracking algorithms to follow an object defined by an initial bounding box in a video stream.
### Block info
Name: `CVTrackerBlock` (GStreamer element: `cvtracker`).
| Pin direction | Media type | Pins count |
|---------------|:--------------------:|:----------:|
| Input video | Uncompressed video | 1 |
| Output video | Uncompressed video | 1 |
### Settings
The `CVTrackerBlock` is configured using `CVTrackerSettings`. Key properties:
- `Algorithm` (`CVTrackerAlgorithm` enum): Specifies the tracking algorithm (`Boosting`, `CSRT`, `KCF`, `MedianFlow`, `MIL`, `MOSSE`, `TLD`). Default: `CVTrackerAlgorithm.MedianFlow`.
- `InitialRect` (`Rect`): The initial bounding box (Left, Top, Width, Height) of the object to track. Default: `new Rect(50, 50, 100, 100)`.
- `DrawRect` (bool): If `true`, draws a rectangle around the tracked object on the output video. Default: `true`.
### Sample pipeline
```mermaid
graph LR;
SystemVideoSourceBlock-->CVTrackerBlock;
CVTrackerBlock-->VideoRendererBlock;
```
### Sample code
```csharp
var pipeline = new MediaBlocksPipeline();
// Assuming SystemVideoSourceBlock is already created and configured as 'videoSource'
var trackerSettings = new CVTrackerSettings
{
Algorithm = CVTrackerAlgorithm.CSRT, // CSRT is often a good general-purpose tracker. Default: CVTrackerAlgorithm.MedianFlow
InitialRect = new VisioForge.Core.Types.Rect(150, 120, 80, 80), // Define your initial object ROI. Default: new Rect(50, 50, 100, 100)
DrawRect = true // Default: true
};
var trackerBlock = new CVTrackerBlock(trackerSettings);
// Note: The tracker initializes with InitialRect.
// To re-initialize tracking on a new object/location at runtime:
// 1. Pause or Stop the pipeline.
// 2. Update trackerBlock.Settings.InitialRect (or create new CVTrackerSettings).
// It's generally safer to update settings on a stopped/paused pipeline,
// or if the block/element supports dynamic property changes, that might be an option.
// Directly modifying `trackerBlock.Settings.InitialRect` might not re-initialize the underlying GStreamer element.
// You may need to remove and re-add the block, or check SDK documentation for live update capabilities.
// 3. Resume/Start the pipeline.
var videoRenderer = new VideoRendererBlock(pipeline, VideoView1); // Assuming VideoView1
// Connect blocks
pipeline.Connect(videoSource.Output, trackerBlock.Input0);
pipeline.Connect(trackerBlock.Output, videoRenderer.Input);
// Start pipeline
await pipeline.StartAsync();
```
### Platforms
Windows, macOS, Linux.
### Remarks
Ensure the VisioForge OpenCV NuGet package is referenced. The choice of tracking algorithm can significantly impact performance and accuracy. Some algorithms (like CSRT, KCF) are generally more robust than older ones (like Boosting, MedianFlow). Some trackers might require OpenCV contrib modules to be available in your OpenCV build/distribution.
---END OF PAGE---
# Local File: .\dotnet\mediablocks\OpenGL\index.md
---
title: .Net Media OpenGL Video Effects Guide
description: Explore a comprehensive guide to OpenGL video effects available in VisioForge Media Blocks SDK .Net. Learn about various effects, their settings, and related OpenGL functionalities.
sidebar_label: OpenGL Effects
---
# OpenGL Video Effects - VisioForge Media Blocks SDK .Net
[!badge size="xl" target="blank" variant="info" text="Media Blocks SDK .Net"](https://www.visioforge.com/media-blocks-sdk-net)
OpenGL video effects in VisioForge Media Blocks SDK .Net allow for powerful, hardware-accelerated manipulation of video streams. These effects can be applied to video content processed within an OpenGL context, typically via blocks like `GLVideoEffectsBlock` or custom OpenGL rendering pipelines. This guide covers the available effects, their configuration settings, and other related OpenGL types.
## Base Effect: `GLBaseVideoEffect`
All OpenGL video effects inherit from the `GLBaseVideoEffect` class, which provides common properties and events.
| Property | Type | Description |
|----------|-----------------------|--------------------------------------------------|
| `Name` | `string` | The internal name of the effect (read-only). |
| `ID` | `GLVideoEffectID` | The unique identifier for the effect (read-only). |
| `Index` | `int` | The index of the effect in a chain. |
**Events:**
- `OnUpdate`: Occurs when effect properties need to be updated in the pipeline. Call `OnUpdateCall()` to trigger it.
## Available Video Effects
This section details the various OpenGL video effects you can use. These effects are typically added to a `GLVideoEffectsBlock` or a similar OpenGL processing element.
### Alpha Effect (`GLAlphaVideoEffect`)
Replaces a selected color with an alpha channel or sets/adjusts the existing alpha channel.
**Properties:**
| Property | Type | Default Value | Description |
|--------------------|--------------------------|------------------|--------------------------------------------------------|
| `Alpha` | `double` | `1.0` | The value for the alpha channel. |
| `Angle` | `float` | `20` | The size of the colorcube to change (sensitivity radius for color matching). |
| `BlackSensitivity` | `uint` | `100` | The sensitivity to dark colors. |
| `Mode` | `GLAlphaVideoEffectMode` | `Set` | The method used for alpha modification. |
| `NoiseLevel` | `float` | `2` | The size of noise radius (pixels to ignore around the matched color). |
| `CustomColor` | `SKColor` | `SKColors.Green` | Custom color value for `Custom` chroma key mode. |
| `WhiteSensitivity` | `uint` | `100` | The sensitivity to bright colors. |
**Associated Enum: `GLAlphaVideoEffectMode`**
Defines the mode of operation for the Alpha video effect.
| Value | Description |
|----------|----------------------------------------|
| `Set` | Set/adjust alpha channel directly using the `Alpha` property. |
| `Green` | Chroma Key on pure green. |
| `Blue` | Chroma Key on pure blue. |
| `Custom` | Chroma Key on the color specified by `CustomColor`. |
### Blur Effect (`GLBlurVideoEffect`)
Applies a blur effect using a 9x9 separable convolution. This effect does not have additional configurable properties beyond those inherited from `GLBaseVideoEffect`.
### Bulge Effect (`GLBulgeVideoEffect`)
Creates a bulge distortion on the video. This effect does not have additional configurable properties beyond those inherited from `GLBaseVideoEffect`.
### Color Balance Effect (`GLColorBalanceVideoEffect`)
Adjusts the color balance of the video, including brightness, contrast, hue, and saturation.
**Properties:**
| Property | Type | Default Value | Description |
|--------------|----------|---------------|--------------------------------------------------|
| `Brightness` | `double` | `0` | Adjusts brightness (-1.0 to 1.0, 0 means no change). |
| `Contrast` | `double` | `1` | Adjusts contrast (0.0 to infinity, 1 means no change). |
| `Hue` | `double` | `0` | Adjusts hue (-1.0 to 1.0, 0 means no change). |
| `Saturation` | `double` | `1` | Adjusts saturation (0.0 to infinity, 1 means no change). |
### Deinterlace Effect (`GLDeinterlaceVideoEffect`)
Applies a deinterlacing filter to the video.
**Properties:**
| Property | Type | Default Value | Description |
|----------|-----------------------|-----------------|-------------------------------------|
| `Method` | `GLDeinterlaceMethod` | `VerticalBlur` | The deinterlacing method to use. |
**Associated Enum: `GLDeinterlaceMethod`**
Defines the method for the Deinterlace video effect.
| Value | Description |
|----------------|-----------------------------------------|
| `VerticalBlur` | Vertical blur method. |
| `MAAD` | Motion Adaptive: Advanced Detection. |
### Fish Eye Effect (`GLFishEyeVideoEffect`)
Applies a fish-eye lens distortion effect. This effect does not have additional configurable properties beyond those inherited from `GLBaseVideoEffect`.
### Flip Effect (`GLFlipVideoEffect`)
Flips or rotates the video.
**Properties:**
| Property | Type | Default Value | Description |
|----------|---------------------|---------------|-------------------------------------|
| `Method` | `GLFlipVideoMethod` | `None` | The flip or rotation method to use. |
**Associated Enum: `GLFlipVideoMethod`**
Defines the video flip or rotation method.
| Value | Description |
|----------------------|----------------------------------------------|
| `None` | No rotation. |
| `Clockwise` | Rotate clockwise 90 degrees. |
| `Rotate180` | Rotate 180 degrees. |
| `CounterClockwise` | Rotate counter-clockwise 90 degrees. |
| `HorizontalFlip` | Flip horizontally. |
| `VerticalFlip` | Flip vertically. |
| `UpperLeftDiagonal` | Flip across upper left/lower right diagonal. |
| `UpperRightDiagonal` | Flip across upper right/lower left diagonal. |
### Glow Lighting Effect (`GLGlowLightingVideoEffect`)
Adds a glow lighting effect to the video. This effect does not have additional configurable properties beyond those inherited from `GLBaseVideoEffect`.
### Grayscale Effect (`GLGrayscaleVideoEffect`)
Converts the video to grayscale. This effect does not have additional configurable properties beyond those inherited from `GLBaseVideoEffect`.
### Heat Effect (`GLHeatVideoEffect`)
Applies a heat signature-like effect to the video. This effect does not have additional configurable properties beyond those inherited from `GLBaseVideoEffect`.
### Laplacian Effect (`GLLaplacianVideoEffect`)
Applies a Laplacian edge detection filter.
**Properties:**
| Property | Type | Default Value | Description |
|----------|---------|---------------|-------------------------------------------------------------------|
| `Invert` | `bool` | `false` | If `true`, inverts colors to get dark edges on a bright background. |
### Light Tunnel Effect (`GLLightTunnelVideoEffect`)
Creates a light tunnel visual effect. This effect does not have additional configurable properties beyond those inherited from `GLBaseVideoEffect`.
### Luma Cross Processing Effect (`GLLumaCrossProcessingVideoEffect`)
Applies a luma cross-processing (often "xpro") effect. This effect does not have additional configurable properties beyond those inherited from `GLBaseVideoEffect`.
### Mirror Effect (`GLMirrorVideoEffect`)
Applies a mirror effect to the video. This effect does not have additional configurable properties beyond those inherited from `GLBaseVideoEffect`.
### Resize Effect (`GLResizeVideoEffect`)
Resizes the video to the specified dimensions.
**Properties:**
| Property | Type | Description |
|----------|-------|----------------------------------------|
| `Width` | `int` | The target width for the video resize. |
| `Height` | `int` | The target height for the video resize.|
### Sepia Effect (`GLSepiaVideoEffect`)
Applies a sepia tone effect to the video. This effect does not have additional configurable properties beyond those inherited from `GLBaseVideoEffect`.
### Sin City Effect (`GLSinCityVideoEffect`)
Applies a "Sin City" movie style effect (grayscale with red highlights). This effect does not have additional configurable properties beyond those inherited from `GLBaseVideoEffect`.
### Sobel Effect (`GLSobelVideoEffect`)
Applies a Sobel edge detection filter.
**Properties:**
| Property | Type | Default Value | Description |
|----------|---------|---------------|-------------------------------------------------------------------|
| `Invert` | `bool` | `false` | If `true`, inverts colors to get dark edges on a bright background. |
### Square Effect (`GLSquareVideoEffect`)
Applies a "square" distortion or pixelation effect. This effect does not have additional configurable properties beyond those inherited from `GLBaseVideoEffect`.
### Squeeze Effect (`GLSqueezeVideoEffect`)
Applies a squeeze distortion effect. This effect does not have additional configurable properties beyond those inherited from `GLBaseVideoEffect`.
### Stretch Effect (`GLStretchVideoEffect`)
Applies a stretch distortion effect. This effect does not have additional configurable properties beyond those inherited from `GLBaseVideoEffect`.
### Transformation Effect (`GLTransformationVideoEffect`)
Applies 3D transformations to the video, including rotation, scaling, and translation.
**Properties:**
| Property | Type | Default Value | Description |
|----------------|---------|---------------|-----------------------------------------------------------------------|
| `FOV` | `float` | `90.0f` | Field of view angle in degrees for perspective projection. |
| `Ortho` | `bool` | `false` | If `true`, uses orthographic projection; otherwise, perspective. |
| `PivotX` | `float` | `0.0f` | X-coordinate of the rotation pivot point (0 is center). |
| `PivotY` | `float` | `0.0f` | Y-coordinate of the rotation pivot point (0 is center). |
| `PivotZ` | `float` | `0.0f` | Z-coordinate of the rotation pivot point (0 is center). |
| `RotationX` | `float` | `0.0f` | Rotation around the X-axis in degrees. |
| `RotationY` | `float` | `0.0f` | Rotation around the Y-axis in degrees. |
| `RotationZ` | `float` | `0.0f` | Rotation around the Z-axis in degrees. |
| `ScaleX` | `float` | `1.0f` | Scale multiplier for the X-axis. |
| `ScaleY` | `float` | `1.0f` | Scale multiplier for the Y-axis. |
| `TranslationX` | `float` | `0.0f` | Translation along the X-axis (universal coordinates [0-1]). |
| `TranslationY` | `float` | `0.0f` | Translation along the Y-axis (universal coordinates [0-1]). |
| `TranslationZ` | `float` | `0.0f` | Translation along the Z-axis (universal coordinates [0-1], depth). |
### Twirl Effect (`GLTwirlVideoEffect`)
Applies a twirl distortion effect. This effect does not have additional configurable properties beyond those inherited from `GLBaseVideoEffect`.
### X-Ray Effect (`GLXRayVideoEffect`)
Applies an X-ray like visual effect. This effect does not have additional configurable properties beyond those inherited from `GLBaseVideoEffect`.
## OpenGL Effect Identification: `GLVideoEffectID` Enum
This enumeration lists all available OpenGL video effect types, used by `GLBaseVideoEffect.ID`.
| Value | Description |
|------------------|-------------------------------------------|
| `ColorBalance` | The color balance effect. |
| `Grayscale` | The grayscale effect. |
| `Resize` | The resize effect. |
| `Deinterlace` | The deinterlace effect. |
| `Flip` | The flip effect. |
| `Blur` | Blur with 9x9 separable convolution effect. |
| `FishEye` | The fish eye effect. |
| `GlowLighting` | The glow lighting effect. |
| `Heat` | The heat signature effect. |
| `LumaX` | The luma cross processing effect. |
| `Mirror` | The mirror effect. |
| `Sepia` | The sepia effect. |
| `Square` | The square effect. |
| `XRay` | The X-ray effect. |
| `Stretch` | The stretch effect. |
| `LightTunnel` | The light tunnel effect. |
| `Twirl` | The twirl effect. |
| `Squeeze` | The squeeze effect. |
| `SinCity` | The sin city movie gray-red effect. |
| `Bulge` | The bulge effect. |
| `Sobel` | The sobel effect. |
| `Laplacian` | The laplacian effect. |
| `Alpha` | The alpha channels effect. |
| `Transformation` | The transformation effect. |
## OpenGL Rendering and View Configuration
These types assist in configuring how video is rendered or viewed in an OpenGL context, especially for specialized scenarios like VR or custom display setups.
### Equirectangular View Settings (`GLEquirectangularViewSettings`)
Manages settings for rendering equirectangular (360-degree) video, commonly used in VR applications. Implements `IVRVideoControl`.
**Properties:**
| Property | Type | Default | Description |
|-----------------|--------------|-------------------|------------------------------------------------|
| `VideoWidth` | `int` | (readonly) | Width of the source video. |
| `VideoHeight` | `int` | (readonly) | Height of the source video. |
| `FieldOfView` | `float` | `80.0f` | Field of view in degrees. |
| `Yaw` | `float` | `0.0f` | Yaw (rotation around Y-axis) in degrees. |
| `Pitch` | `float` | `0.0f` | Pitch (rotation around X-axis) in degrees. |
| `Roll` | `float` | `0.0f` | Roll (rotation around Z-axis) in degrees. |
| `Mode` | `VRMode` | `Equirectangular` | The VR mode (supports `Equirectangular`). |
**Methods:**
- `IsModeSupported(VRMode mode)`: Checks if the specified `VRMode` is supported.
**Events:**
- `SettingsChanged`: Occurs when any view setting is changed.
### Video Renderer Settings (`GLVideoRendererSettings`)
Configures general properties for an OpenGL-based video renderer.
**Properties:**
| Property | Type | Default | Description |
|--------------------|-------------------------------|-------------|----------------------------------------------------------------------|
| `ForceAspectRatio` | `bool` | `true` | Whether scaling will respect the original aspect ratio. |
| `IgnoreAlpha` | `bool` | `true` | Whether alpha channel will be ignored (treated as black). |
| `PixelAspectRatio` | `System.Tuple` | `(0, 1)` | Pixel aspect ratio of the display device (numerator, denominator). |
| `Rotation` | `GLVideoRendererRotateMethod` | `None` | Specifies the rotation applied to the video. |
**Associated Enum: `GLVideoRendererRotateMethod`**
Defines rotation methods for the OpenGL video renderer.
| Value | Description |
|------------------|-----------------------------------------|
| `None` | No rotation. |
| `_90C` | Rotate 90 degrees clockwise. |
| `_180` | Rotate 180 degrees. |
| `_90CC` | Rotate 90 degrees counter-clockwise. |
| `FlipHorizontal` | Flip horizontally. |
| `FlipVertical` | Flip vertically. |
## Custom OpenGL Shaders
Allows for the application of custom GLSL shaders to the video stream.
### Shader Definition (`GLShader`)
Represents a pair of vertex and fragment shaders.
**Properties:**
| Property | Type | Description |
|------------------|----------|-----------------------------------------------|
| `VertexShader` | `string` | The GLSL source code for the vertex shader. |
| `FragmentShader` | `string` | The GLSL source code for the fragment shader. |
**Constructors:**
- `GLShader()`
- `GLShader(string vertexShader, string fragmentShader)`
### Shader Settings (`GLShaderSettings`)
Configures custom GLSL shaders for use in the pipeline.
**Properties:**
| Property | Type | Description |
|------------|--------------------------------------|--------------------------------------------------|
| `Vertex` | `string` | The GLSL source code for the vertex shader. |
| `Fragment` | `string` | The GLSL source code for the fragment shader. |
| `Uniforms` | `System.Collections.Generic.Dictionary` | A dictionary of uniform variables (parameters) to be passed to the shaders. |
**Constructors:**
- `GLShaderSettings()`
- `GLShaderSettings(string vertex, string fragment)`
- `GLShaderSettings(GLShader shader)`
## Image Overlays in OpenGL
Provides settings for overlaying static images onto a video stream within an OpenGL context.
### Overlay Settings (`GLOverlaySettings`)
Defines the properties of an image overlay.
**Properties:**
| Property | Type | Default | Description |
|------------|----------|---------|---------------------------------------------------|
| `Filename` | `string` | (N/A) | Path to the image file (read-only after init). |
| `Data` | `byte[]` | (N/A) | Image data as a byte array (read-only after init).|
| `X` | `int` | | X-coordinate of the overlay's top-left corner. |
| `Y` | `int` | | Y-coordinate of the overlay's top-left corner. |
| `Width` | `int` | | Width of the overlay. |
| `Height` | `int` | | Height of the overlay. |
| `Alpha` | `double` | `1.0` | Opacity of the overlay (0.0 transparent to 1.0 opaque). |
**Constructor:**
- `GLOverlaySettings(string filename)`
## OpenGL Video Mixing
These types are used to configure an OpenGL-based video mixer, allowing multiple video streams to be combined and composited.
### Mixer Settings (`GLVideoMixerSettings`)
Extends `VideoMixerBaseSettings` for OpenGL-specific video mixing. It manages a list of `GLVideoMixerStream` objects and inherits properties like `Width`, `Height`, and `FrameRate`.
**Methods:**
- `AddStream(GLVideoMixerStream stream)`: Adds a stream to the mixer.
- `RemoveStream(GLVideoMixerStream stream)`: Removes a stream from the mixer.
- `SetStream(int index, GLVideoMixerStream stream)`: Replaces a stream at a specific index.
**Constructors:**
- `GLVideoMixerSettings(int width, int height, VideoFrameRate frameRate)`
- `GLVideoMixerSettings(int width, int height, VideoFrameRate frameRate, List streams)`
### Mixer Stream (`GLVideoMixerStream`)
Extends `VideoMixerStream` and defines properties for an individual stream within the OpenGL video mixer. Inherits `Rectangle`, `ZOrder`, and `Alpha` from `VideoMixerStream`.
**Properties:**
| Property | Type | Default | Description |
|---------------------------------|-------------------------------|------------------------------|--------------------------------------------------|
| `Crop` | `Rect` | (N/A) | Crop rectangle for the input stream. |
| `BlendConstantColorAlpha` | `double` | `0` | Alpha component for constant blend color. |
| `BlendConstantColorBlue` | `double` | `0` | Blue component for constant blend color. |
| `BlendConstantColorGreen` | `double` | `0` | Green component for constant blend color. |
| `BlendConstantColorRed` | `double` | `0` | Red component for constant blend color. |
| `BlendEquationAlpha` | `GLVideoMixerBlendEquation` | `Add` | Blend equation for the alpha channel. |
| `BlendEquationRGB` | `GLVideoMixerBlendEquation` | `Add` | Blend equation for RGB channels. |
| `BlendFunctionDestinationAlpha` | `GLVideoMixerBlendFunction` | `OneMinusSourceAlpha` | Blend function for destination alpha. |
| `BlendFunctionDesctinationRGB` | `GLVideoMixerBlendFunction` | `OneMinusSourceAlpha` | Blend function for destination RGB. |
| `BlendFunctionSourceAlpha` | `GLVideoMixerBlendFunction` | `One` | Blend function for source alpha. |
| `BlendFunctionSourceRGB` | `GLVideoMixerBlendFunction` | `SourceAlpha` | Blend function for source RGB. |
**Constructor:**
- `GLVideoMixerStream(Rect rectangle, uint zorder, double alpha = 1.0)`
### Blend Equation (`GLVideoMixerBlendEquation` Enum)
Specifies how source and destination colors are combined during blending.
| Value | Description |
|-------------------|-------------------------------------------------|
| `Add` | Source + Destination |
| `Subtract` | Source - Destination |
| `ReverseSubtract` | Destination - Source |
### Blend Function (`GLVideoMixerBlendFunction` Enum)
Defines factors for source and destination colors in blending operations. (Rs, Gs, Bs, As are source color components; Rd, Gd, Bd, Ad are destination; Rc, Gc, Bc, Ac are constant color components).
| Value | Description |
|----------------------------|---------------------------------------------|
| `Zero` | Factor is (0, 0, 0, 0). |
| `One` | Factor is (1, 1, 1, 1). |
| `SourceColor` | Factor is (Rs, Gs, Bs, As). |
| `OneMinusSourceColor` | Factor is (1-Rs, 1-Gs, 1-Bs, 1-As). |
| `DestinationColor` | Factor is (Rd, Gd, Bd, Ad). |
| `OneMinusDestinationColor` | Factor is (1-Rd, 1-Gd, 1-Bd, 1-Ad). |
| `SourceAlpha` | Factor is (As, As, As, As). |
| `OneMinusSourceAlpha` | Factor is (1-As, 1-As, 1-As, 1-As). |
| `DestinationAlpha` | Factor is (Ad, Ad, Ad, Ad). |
| `OneMinusDestinationAlpha` | Factor is (1-Ad, 1-Ad, 1-Ad, 1-Ad). |
| `ConstantColor` | Factor is (Rc, Gc, Bc, Ac). |
| `OneMinusContantColor` | Factor is (1-Rc, 1-Gc, 1-Bc, 1-Ac). |
| `ConstantAlpha` | Factor is (Ac, Ac, Ac, Ac). |
| `OneMinusContantAlpha` | Factor is (1-Ac, 1-Ac, 1-Ac, 1-Ac). |
| `SourceAlphaSaturate` | Factor is (min(As, 1-Ad), min(As, 1-Ad), min(As, 1-Ad), 1). |
## Virtual Test Sources for OpenGL
These settings classes are used to configure virtual sources that generate test patterns directly within an OpenGL context.
### Virtual Video Source Settings (`GLVirtualVideoSourceSettings`)
Configures a source block (`GLVirtualVideoSourceBlock`) that produces test video data. Implements `IMediaPlayerBaseSourceSettings` and `IVideoCaptureBaseVideoSourceSettings`.
**Properties:**
| Property | Type | Default | Description |
|-------------|----------------------------|------------------------|--------------------------------------------------|
| `Width` | `int` | `1280` | Width of the output video. |
| `Height` | `int` | `720` | Height of the output video. |
| `FrameRate` | `VideoFrameRate` | `30/1` (30 fps) | Frame rate of the output video. |
| `IsLive` | `bool` | `true` | Indicates if the source is live. |
| `Mode` | `GLVirtualVideoSourceMode` | (N/A - must be set) | Specifies the type of test pattern to generate. |
**Associated Enum: `GLVirtualVideoSourceMode`**
Defines the test pattern generated by `GLVirtualVideoSourceBlock`.
| Value | Description |
|---------------|------------------------------|
| `SMPTE` | SMPTE 100% color bars. |
| `Snow` | Random (television snow). |
| `Black` | 100% Black. |
| `White` | 100% White. |
| `Red` | Solid Red color. |
| `Green` | Solid Green color. |
| `Blue` | Solid Blue color. |
| `Checkers1` | Checkerboard pattern (1px). |
| `Checkers2` | Checkerboard pattern (2px). |
| `Checkers4` | Checkerboard pattern (4px). |
| `Checkers8` | Checkerboard pattern (8px). |
| `Circular` | Circular pattern. |
| `Blink` | Blinking pattern. |
| `Mandelbrot` | Mandelbrot fractal. |
**Methods:**
- `Task ReadInfoAsync()`: Asynchronously reads media information (returns synthetic info based on settings).
- `MediaBlock CreateBlock()`: Creates a `GLVirtualVideoSourceBlock` instance configured with these settings.
---END OF PAGE---
# Local File: .\dotnet\mediablocks\Outputs\index.md
---
title: .Net Media Output Blocks Guide
description: Explore a complete guide to .Net Media SDK output blocks. Learn about file and network sinks for your media processing pipelines.
sidebar_label: Outputs
---
# Output Blocks - VisioForge Media Blocks SDK .Net
[!badge size="xl" target="blank" variant="info" text="Media Blocks SDK .Net"](https://www.visioforge.com/media-blocks-sdk-net)
Output blocks, also known as sinks, are responsible for writing media data to files, network streams, or other destinations. They are typically the last blocks in any media processing chain. VisioForge Media Blocks SDK .Net provides a comprehensive collection of output blocks for various formats and protocols.
This guide covers file output blocks like MP4, AVI, WebM, MKV, and network streaming blocks for protocols such as RTMP (used by YouTube and Facebook Live).
## AVI Output Block
The `AVIOutputBlock` is used to create AVI files. It combines video and audio encoders with a file sink to produce `.avi` files.
### Block info
Name: `AVIOutputBlock`.
| Pin direction | Media type | Expected Encoders |
| --- | :---: | :---: |
| Input Video | various | H264 (default), other `IVideoEncoder` compatible encoders |
| Input Audio | various | AAC (default), MP3, other `IAudioEncoder` compatible encoders |
### Settings
The `AVIOutputBlock` is configured using `AVISinkSettings` along with settings for the chosen video and audio encoders (e.g., `IH264EncoderSettings` and `IAACEncoderSettings` or `MP3EncoderSettings`).
Key `AVISinkSettings` properties:
- `Filename` (string): The path to the output AVI file.
Constructors:
- `AVIOutputBlock(string filename)`: Uses default H264 video and AAC audio encoders.
- `AVIOutputBlock(AVISinkSettings sinkSettings, IH264EncoderSettings h264settings, IAACEncoderSettings aacSettings)`: Uses specified H264 video and AAC audio encoders.
- `AVIOutputBlock(AVISinkSettings sinkSettings, IH264EncoderSettings h264settings, MP3EncoderSettings mp3Settings)`: Uses specified H264 video and MP3 audio encoders.
### The sample pipeline
```mermaid
graph LR;
VideoSource-->VideoEncoder;
AudioSource-->AudioEncoder;
VideoEncoder-->AVIOutputBlock;
AudioEncoder-->AVIOutputBlock;
```
Or, if using a source that provides encoded data, or if the `AVIOutputBlock` handles internal encoders based on settings:
```mermaid
graph LR;
UniversalSourceBlock--Video Output-->AVIOutputBlock;
UniversalSourceBlock--Audio Output-->AVIOutputBlock;
```
### Sample code
```csharp
// create pipeline
var pipeline = new MediaBlocksPipeline();
// create video source (example: virtual source)
var videoSource = new VirtualVideoSourceBlock(new VirtualVideoSourceSettings());
// create audio source (example: virtual source)
var audioSource = new VirtualAudioSourceBlock(new VirtualAudioSourceSettings());
// create AVI output block
// This constructor uses default H264 video and AAC audio encoders internally.
var aviOutput = new AVIOutputBlock("output.avi");
// Create inputs for the AVI output block
var videoInputPad = aviOutput.CreateNewInput(MediaBlockPadMediaType.Video);
var audioInputPad = aviOutput.CreateNewInput(MediaBlockPadMediaType.Audio);
// connect video path
pipeline.Connect(videoSource.Output, videoInputPad);
// connect audio path
pipeline.Connect(audioSource.Output, audioInputPad);
// start pipeline
await pipeline.StartAsync();
// ... later, to stop ...
// await pipeline.StopAsync();
```
### Remarks
The `AVIOutputBlock` internally manages encoder instances (like `H264Encoder` and `AACEncoder` or `MP3Encoder`) based on the provided settings. Ensure the necessary GStreamer plugins and SDK components for these encoders and the AVI muxer are available.
To check availability:
`AVIOutputBlock.IsAvailable(IH264EncoderSettings h264settings, IAACEncoderSettings aacSettings)`
### Platforms
Primarily Windows. Availability on other platforms depends on GStreamer plugin support for AVI muxing and the chosen encoders.
## Facebook Live Output Block
The `FacebookLiveOutputBlock` is designed to stream video and audio to Facebook Live using RTMP. It internally uses H.264 video and AAC audio encoders.
### Block info
Name: `FacebookLiveOutputBlock`.
| Pin direction | Media type | Expected Encoders |
| --- | :---: | :---: |
| Input Video | various | H.264 (internal) |
| Input Audio | various | AAC (internal) |
### Settings
The `FacebookLiveOutputBlock` is configured using `FacebookLiveSinkSettings`, `IH264EncoderSettings`, and `IAACEncoderSettings`.
Key `FacebookLiveSinkSettings` properties:
- `Url` (string): The RTMP URL provided by Facebook Live for streaming.
Constructor:
- `FacebookLiveOutputBlock(FacebookLiveSinkSettings sinkSettings, IH264EncoderSettings h264settings, IAACEncoderSettings aacSettings)`
### The sample pipeline
```mermaid
graph LR;
VideoSource-->FacebookLiveOutputBlock;
AudioSource-->FacebookLiveOutputBlock;
```
### Sample code
```csharp
// create pipeline
var pipeline = new MediaBlocksPipeline();
// create video source (e.g., SystemVideoSourceBlock)
var videoSource = new SystemVideoSourceBlock(videoSourceSettings); // Assuming videoSourceSettings are configured
// create audio source (e.g., SystemAudioSourceBlock)
var audioSource = new SystemAudioSourceBlock(audioSourceSettings); // Assuming audioSourceSettings are configured
// configure Facebook Live sink settings
var fbSinkSettings = new FacebookLiveSinkSettings("rtmp://your-facebook-live-url/your-stream-key");
// configure H.264 encoder settings (use defaults or customize)
var h264Settings = H264EncoderBlock.GetDefaultSettings();
h264Settings.Bitrate = 4000000; // Example: 4 Mbps
// configure AAC encoder settings (use defaults or customize)
var aacSettings = AACEncoderBlock.GetDefaultSettings();
aacSettings.Bitrate = 128000; // Example: 128 Kbps
// create Facebook Live output block
var facebookOutput = new FacebookLiveOutputBlock(fbSinkSettings, h264Settings, aacSettings);
// Create inputs for the Facebook Live output block
var videoInputPad = facebookOutput.CreateNewInput(MediaBlockPadMediaType.Video);
var audioInputPad = facebookOutput.CreateNewInput(MediaBlockPadMediaType.Audio);
// connect video path
pipeline.Connect(videoSource.Output, videoInputPad);
// connect audio path
pipeline.Connect(audioSource.Output, audioInputPad);
// start pipeline
await pipeline.StartAsync();
// ... later, to stop ...
// await pipeline.StopAsync();
```
### Remarks
This block encapsulates the necessary H.264 and AAC encoders and the RTMP sink (`FacebookLiveSink`).
Ensure that the `FacebookLiveSink`, `H264Encoder`, and `AACEncoder` are available. `FacebookLiveOutputBlock.IsAvailable()` can be used to check this (though the provided source shows `FacebookLiveSink.IsAvailable()`).
### Platforms
Windows, macOS, Linux, iOS, Android (Platform availability depends on GStreamer RTMP support and encoder availability).
## FLAC Output Block
The `FLACOutputBlock` is used for creating FLAC (Free Lossless Audio Codec) audio files. It takes uncompressed audio data, encodes it using a FLAC encoder, and saves it to a `.flac` file.
### Block info
Name: `FLACOutputBlock`.
| Pin direction | Media type | Expected Encoders |
| --- | :---: | :---: |
| Input Audio | uncompressed audio | FLAC (internal) |
### Settings
The `FLACOutputBlock` is configured with a filename and `FLACEncoderSettings`.
Key `FLACEncoderSettings` properties (refer to `FLACEncoderSettings` documentation for full details):
- Quality level, compression level, etc.
Constructor:
- `FLACOutputBlock(string filename, FLACEncoderSettings settings)`
### The sample pipeline
```mermaid
graph LR;
AudioSource-->FLACOutputBlock;
```
### Sample code
```csharp
// create pipeline
var pipeline = new MediaBlocksPipeline();
// create audio source (example: virtual audio source)
var audioSource = new VirtualAudioSourceBlock(new VirtualAudioSourceSettings());
// configure FLAC encoder settings
var flacSettings = new FLACEncoderSettings();
// flacSettings.Quality = 8; // Example: Set quality level (0-8, default is 5)
// create FLAC output block
var flacOutput = new FLACOutputBlock("output.flac", flacSettings);
// connect audio path
pipeline.Connect(audioSource.Output, flacOutput.Input);
// start pipeline
await pipeline.StartAsync();
// ... later, to stop ...
// await pipeline.StopAsync();
```
### Remarks
This block combines a `FLACEncoder` and a `FileSink` internally.
To check if the block and its dependencies are available:
`FLACOutputBlock.IsAvailable()` (This checks for `FLACEncoder` and `FileSink` availability).
### Platforms
Windows, macOS, Linux, iOS, Android (Platform availability depends on GStreamer FLAC encoder and file sink support).
## M4A Output Block
The `M4AOutputBlock` creates M4A (MPEG-4 Audio) files, commonly used for AAC encoded audio. It uses an AAC audio encoder and an MP4 sink to produce `.m4a` files.
### Block info
Name: `M4AOutputBlock`.
| Pin direction | Media type | Expected Encoders |
| --- | :---: | :---: |
| Input Audio | various | AAC (internal) |
### Settings
The `M4AOutputBlock` is configured using `MP4SinkSettings` and `IAACEncoderSettings`.
Key `MP4SinkSettings` properties:
- `Filename` (string): The path to the output M4A file.
Key `IAACEncoderSettings` properties (refer to `AACEncoderSettings` for details):
- Bitrate, profile, etc.
Constructors:
- `M4AOutputBlock(string filename)`: Uses default AAC encoder settings.
- `M4AOutputBlock(MP4SinkSettings sinkSettings, IAACEncoderSettings aacSettings)`: Uses specified AAC encoder settings.
### The sample pipeline
```mermaid
graph LR;
AudioSource-->M4AOutputBlock;
```
### Sample code
```csharp
// create pipeline
var pipeline = new MediaBlocksPipeline();
// create audio source (example: virtual audio source)
var audioSource = new VirtualAudioSourceBlock(new VirtualAudioSourceSettings());
// configure M4A output block with default AAC settings
var m4aOutput = new M4AOutputBlock("output.m4a");
// Or, with custom AAC settings:
// var sinkSettings = new MP4SinkSettings("output.m4a");
// var aacSettings = AACEncoderBlock.GetDefaultSettings();
// aacSettings.Bitrate = 192000; // Example: 192 Kbps
// var m4aOutput = new M4AOutputBlock(sinkSettings, aacSettings);
// Create input for the M4A output block
var audioInputPad = m4aOutput.CreateNewInput(MediaBlockPadMediaType.Audio);
// connect audio path
pipeline.Connect(audioSource.Output, audioInputPad);
// start pipeline
await pipeline.StartAsync();
// ... later, to stop ...
// await pipeline.StopAsync();
```
### Remarks
The `M4AOutputBlock` internally manages an `AACEncoder` and an `MP4Sink`.
To check availability:
`M4AOutputBlock.IsAvailable(IAACEncoderSettings aacSettings)`
### Platforms
Windows, macOS, Linux, iOS, Android (Platform availability depends on GStreamer MP4 muxer and AAC encoder support).
## MKV Output Block
The `MKVOutputBlock` is used to create Matroska (MKV) files. MKV is a flexible container format that can hold various video, audio, and subtitle streams. This block combines specified video and audio encoders with an MKV sink.
### Block info
Name: `MKVOutputBlock`.
| Pin direction | Media type | Expected Encoders |
| --- | :---: | :---: |
| Input Video | various | `IVideoEncoder` (e.g., H.264, HEVC, VPX, AV1) |
| Input Audio | various | `IAudioEncoder` (e.g., AAC, MP3, Vorbis, Opus, Speex) |
### Settings
The `MKVOutputBlock` is configured using `MKVSinkSettings`, along with settings for the chosen video (`IVideoEncoder`) and audio (`IAudioEncoder`) encoders.
Key `MKVSinkSettings` properties:
- `Filename` (string): The path to the output MKV file.
Constructors:
- `MKVOutputBlock(MKVSinkSettings sinkSettings, IVideoEncoder videoSettings, IAudioEncoder audioSettings)`
### The sample pipeline
```mermaid
graph LR;
VideoSource-->VideoEncoder;
AudioSource-->AudioEncoder;
VideoEncoder-->MKVOutputBlock;
AudioEncoder-->MKVOutputBlock;
```
More directly, if `MKVOutputBlock` handles encoder instantiation internally:
```mermaid
graph LR;
VideoSource-->MKVOutputBlock;
AudioSource-->MKVOutputBlock;
```
### Sample code
```csharp
// create pipeline
var pipeline = new MediaBlocksPipeline();
// create video source (example: virtual source)
var videoSource = new VirtualVideoSourceBlock(new VirtualVideoSourceSettings());
// create audio source (example: virtual source)
var audioSource = new VirtualAudioSourceBlock(new VirtualAudioSourceSettings());
// configure MKV sink settings
var mkvSinkSettings = new MKVSinkSettings("output.mkv");
// configure video encoder (example: H.264)
var h264Settings = H264EncoderBlock.GetDefaultSettings();
// h264Settings.Bitrate = 5000000; // Example
// configure audio encoder (example: AAC)
var aacSettings = AACEncoderBlock.GetDefaultSettings();
// aacSettings.Bitrate = 128000; // Example
// create MKV output block
var mkvOutput = new MKVOutputBlock(mkvSinkSettings, h264Settings, aacSettings);
// Create inputs for the MKV output block
var videoInputPad = mkvOutput.CreateNewInput(MediaBlockPadMediaType.Video);
var audioInputPad = mkvOutput.CreateNewInput(MediaBlockPadMediaType.Audio);
// connect video path
pipeline.Connect(videoSource.Output, videoInputPad);
// connect audio path
pipeline.Connect(audioSource.Output, audioInputPad);
// start pipeline
await pipeline.StartAsync();
// ... later, to stop ...
// await pipeline.StopAsync();
```
### Remarks
The `MKVOutputBlock` internally manages the specified video and audio encoder instances (e.g., `H264Encoder`, `HEVCEncoder`, `AACEncoder`, `VorbisEncoder`, etc.) and an `MKVSink`.
Supported video encoders include H.264, HEVC, VPX (VP8/VP9), AV1.
Supported audio encoders include AAC, MP3, Vorbis, Opus, Speex.
To check availability (example with H.264 and AAC):
`MKVOutputBlock.IsAvailable(IH264EncoderSettings h264settings, IAACEncoderSettings aacSettings)`
### Platforms
Windows, macOS, Linux, iOS, Android (Platform availability depends on GStreamer MKV muxer and chosen encoder support).
## MP3 Output Block
The `MP3OutputBlock` is used for creating MP3 audio files. It encodes uncompressed audio data using an MP3 encoder and saves it to an `.mp3` file.
### Block info
Name: `MP3OutputBlock`.
| Pin direction | Media type | Expected Encoders |
| --- | :---: | :---: |
| Input Audio | uncompressed audio | MP3 (internal) |
### Settings
The `MP3OutputBlock` is configured with a filename and `MP3EncoderSettings`.
Key `MP3EncoderSettings` properties (refer to `MP3EncoderSettings` documentation for full details):
- Bitrate, quality, channel mode, etc.
Constructor:
- `MP3OutputBlock(string filename, MP3EncoderSettings mp3Settings)`
### The sample pipeline
```mermaid
graph LR;
AudioSource-->MP3OutputBlock;
```
### Sample code
```csharp
// create pipeline
var pipeline = new MediaBlocksPipeline();
// create audio source (example: virtual audio source)
var audioSource = new VirtualAudioSourceBlock(new VirtualAudioSourceSettings());
// configure MP3 encoder settings
var mp3Settings = new MP3EncoderSettings();
// mp3Settings.Bitrate = 192; // Example: Set bitrate to 192 kbps
// mp3Settings.Quality = MP3Quality.Best; // Example: Set quality
// create MP3 output block
var mp3Output = new MP3OutputBlock("output.mp3", mp3Settings);
// connect audio path
pipeline.Connect(audioSource.Output, mp3Output.Input);
// start pipeline
await pipeline.StartAsync();
// ... later, to stop ...
// await pipeline.StopAsync();
```
### Remarks
This block combines an `MP3Encoder` and a `FileSink` internally.
To check if the block and its dependencies are available:
`MP3OutputBlock.IsAvailable()` (This checks for `MP3Encoder` and `FileSink` availability).
### Platforms
Windows, macOS, Linux, iOS, Android (Platform availability depends on GStreamer MP3 encoder (e.g., LAME) and file sink support).
## MP4 Output Block
The `MP4OutputBlock` is used for creating MP4 files. It can combine various video and audio encoders with an MP4 sink to produce `.mp4` files.
### Block info
Name: `MP4OutputBlock`.
| Pin direction | Media type | Expected Encoders |
| --- | :---: | :---: |
| Input Video | various | `IVideoEncoder` (e.g., H.264, HEVC) |
| Input Audio | various | `IAudioEncoder` (e.g., AAC, MP3) |
### Settings
The `MP4OutputBlock` is configured using `MP4SinkSettings`, along with settings for the chosen video (`IVideoEncoder`, typically `IH264EncoderSettings` or `IHEVCEncoderSettings`) and audio (`IAudioEncoder`, typically `IAACEncoderSettings` or `MP3EncoderSettings`) encoders.
Key `MP4SinkSettings` properties:
- `Filename` (string): The path to the output MP4 file.
- Can also be `MP4SplitSinkSettings` for recording in segments.
Constructors:
- `MP4OutputBlock(string filename)`: Uses default H.264 video and AAC audio encoders.
- `MP4OutputBlock(MP4SinkSettings sinkSettings, IH264EncoderSettings h264settings, IAACEncoderSettings aacSettings)`
- `MP4OutputBlock(MP4SinkSettings sinkSettings, IH264EncoderSettings h264settings, MP3EncoderSettings mp3Settings)`
- `MP4OutputBlock(MP4SinkSettings sinkSettings, IHEVCEncoderSettings hevcSettings, IAACEncoderSettings aacSettings)`
- `MP4OutputBlock(MP4SinkSettings sinkSettings, IHEVCEncoderSettings hevcSettings, MP3EncoderSettings mp3Settings)`
### The sample pipeline
```mermaid
graph LR;
VideoSource-->VideoEncoder;
AudioSource-->AudioEncoder;
VideoEncoder-->MP4OutputBlock;
AudioEncoder-->MP4OutputBlock;
```
If `MP4OutputBlock` uses its default internal encoders:
```mermaid
graph LR;
VideoSource-->MP4OutputBlock;
AudioSource-->MP4OutputBlock;
```
### Sample code
```csharp
// create pipeline
var pipeline = new MediaBlocksPipeline();
// create video source (example: virtual source)
var videoSource = new VirtualVideoSourceBlock(new VirtualVideoSourceSettings());
// create audio source (example: virtual source)
var audioSource = new VirtualAudioSourceBlock(new VirtualAudioSourceSettings());
// create MP4 output block with default H.264 video and AAC audio encoders
var mp4Output = new MP4OutputBlock("output.mp4");
// Or, with custom H.264 and AAC settings:
// var sinkSettings = new MP4SinkSettings("output.mp4");
// var h264Settings = H264EncoderBlock.GetDefaultSettings();
// h264Settings.Bitrate = 8000000; // Example: 8 Mbps
// var aacSettings = AACEncoderBlock.GetDefaultSettings();
// aacSettings.Bitrate = 192000; // Example: 192 Kbps
// var mp4Output = new MP4OutputBlock(sinkSettings, h264Settings, aacSettings);
// Create inputs for the MP4 output block
var videoInputPad = mp4Output.CreateNewInput(MediaBlockPadMediaType.Video);
var audioInputPad = mp4Output.CreateNewInput(MediaBlockPadMediaType.Audio);
// connect video path
pipeline.Connect(videoSource.Output, videoInputPad);
// connect audio path
pipeline.Connect(audioSource.Output, audioInputPad);
// start pipeline
await pipeline.StartAsync();
// ... later, to stop ...
// await pipeline.StopAsync();
```
### Remarks
The `MP4OutputBlock` internally manages video (e.g., `H264Encoder`, `HEVCEncoder`) and audio (e.g., `AACEncoder`, `MP3Encoder`) encoder instances along with an `MP4Sink`.
To check availability (example with H.264 and AAC):
`MP4OutputBlock.IsAvailable(IH264EncoderSettings h264settings, IAACEncoderSettings aacSettings)`
### Platforms
Windows, macOS, Linux, iOS, Android (Platform availability depends on GStreamer MP4 muxer and chosen encoder support).
## OGG Opus Output Block
The `OGGOpusOutputBlock` is used for creating Ogg Opus audio files. It encodes uncompressed audio data using an Opus encoder and multiplexes it into an Ogg container, saving to an `.opus` or `.ogg` file.
### Block info
Name: `OGGOpusOutputBlock`.
| Pin direction | Media type | Expected Encoders |
| --- | :---: | :---: |
| Input Audio | uncompressed audio | Opus (internal) |
### Settings
The `OGGOpusOutputBlock` is configured with a filename and `OPUSEncoderSettings`.
Key `OPUSEncoderSettings` properties (refer to `OPUSEncoderSettings` documentation for full details):
- Bitrate, complexity, frame duration, audio type (voice/music), etc.
Constructor:
- `OGGOpusOutputBlock(string filename, OPUSEncoderSettings settings)`
### The sample pipeline
```mermaid
graph LR;
AudioSource-->OGGOpusOutputBlock;
```
### Sample code
```csharp
// create pipeline
var pipeline = new MediaBlocksPipeline();
// create audio source (example: virtual audio source)
var audioSource = new VirtualAudioSourceBlock(new VirtualAudioSourceSettings());
// configure Opus encoder settings
var opusSettings = new OPUSEncoderSettings();
// opusSettings.Bitrate = 64000; // Example: Set bitrate to 64 kbps
// opusSettings.AudioType = OpusEncoderAudioType.Music; // Example
// create OGG Opus output block
var oggOpusOutput = new OGGOpusOutputBlock("output.opus", opusSettings);
// connect audio path
pipeline.Connect(audioSource.Output, oggOpusOutput.Input);
// start pipeline
await pipeline.StartAsync();
// ... later, to stop ...
// await pipeline.StopAsync();
```
### Remarks
This block combines an `OPUSEncoder` and an `OGGSink` internally.
To check if the block and its dependencies are available:
`OGGOpusOutputBlock.IsAvailable()` (This checks for `OGGSink`, `OPUSEncoder`, and `FileSink` - though `FileSink` might be implicitly part of `OGGSink` logic for file output).
### Platforms
Windows, macOS, Linux, iOS, Android (Platform availability depends on GStreamer Ogg muxer and Opus encoder support).
## OGG Speex Output Block
The `OGGSpeexOutputBlock` is used for creating Ogg Speex audio files, typically for voice. It encodes uncompressed audio data using a Speex encoder, multiplexes it into an Ogg container, and saves to an `.spx` or `.ogg` file.
### Block info
Name: `OGGSpeexOutputBlock`.
| Pin direction | Media type | Expected Encoders |
| --- | :---: | :---: |
| Input Audio | uncompressed audio | Speex (internal) |
### Settings
The `OGGSpeexOutputBlock` is configured with a filename and `SpeexEncoderSettings`.
Key `SpeexEncoderSettings` properties (refer to `SpeexEncoderSettings` documentation for full details):
- Quality, complexity, encoding mode (VBR/ABR/CBR), etc.
Constructor:
- `OGGSpeexOutputBlock(string filename, SpeexEncoderSettings settings)`
### The sample pipeline
```mermaid
graph LR;
AudioSource-->OGGSpeexOutputBlock;
```
### Sample code
```csharp
// create pipeline
var pipeline = new MediaBlocksPipeline();
// create audio source (example: virtual audio source)
var audioSource = new VirtualAudioSourceBlock(new VirtualAudioSourceSettings());
// configure Speex encoder settings
var speexSettings = new SpeexEncoderSettings();
// speexSettings.Quality = 8; // Example: Set quality (0-10)
// speexSettings.Mode = SpeexEncoderMode.VBR; // Example: Use Variable Bitrate
// create OGG Speex output block
var oggSpeexOutput = new OGGSpeexOutputBlock("output.spx", speexSettings);
// connect audio path
pipeline.Connect(audioSource.Output, oggSpeexOutput.Input);
// start pipeline
await pipeline.StartAsync();
// ... later, to stop ...
// await pipeline.StopAsync();
```
### Remarks
This block combines a `SpeexEncoder` and an `OGGSink` internally.
To check if the block and its dependencies are available:
`OGGSpeexOutputBlock.IsAvailable()` (This checks for `OGGSink`, `SpeexEncoder`, and `FileSink` - `FileSink` might be implicit to `OGGSink` for file output).
### Platforms
Windows, macOS, Linux, iOS, Android (Platform availability depends on GStreamer Ogg muxer and Speex encoder support).
## OGG Vorbis Output Block
The `OGGVorbisOutputBlock` is used for creating Ogg Vorbis audio files. It encodes uncompressed audio data using a Vorbis encoder, multiplexes it into an Ogg container, and saves to an `.ogg` file.
### Block info
Name: `OGGVorbisOutputBlock`.
| Pin direction | Media type | Expected Encoders |
| --- | :---: | :---: |
| Input Audio | uncompressed audio | Vorbis (internal) |
### Settings
The `OGGVorbisOutputBlock` is configured with a filename and `VorbisEncoderSettings`.
Key `VorbisEncoderSettings` properties (refer to `VorbisEncoderSettings` documentation for full details):
- Quality, bitrate, managed/unmanaged bitrate settings, etc.
Constructor:
- `OGGVorbisOutputBlock(string filename, VorbisEncoderSettings settings)`
### The sample pipeline
```mermaid
graph LR;
AudioSource-->OGGVorbisOutputBlock;
```
### Sample code
```csharp
// create pipeline
var pipeline = new MediaBlocksPipeline();
// create audio source (example: virtual audio source)
var audioSource = new VirtualAudioSourceBlock(new VirtualAudioSourceSettings());
// configure Vorbis encoder settings
var vorbisSettings = new VorbisEncoderSettings();
// vorbisSettings.Quality = 0.8f; // Example: Set quality (0.0 to 1.0)
// vorbisSettings.Bitrate = 128000; // Example if not using quality based encoding
// create OGG Vorbis output block
var oggVorbisOutput = new OGGVorbisOutputBlock("output.ogg", vorbisSettings);
// connect audio path
pipeline.Connect(audioSource.Output, oggVorbisOutput.Input);
// start pipeline
await pipeline.StartAsync();
// ... later, to stop ...
// await pipeline.StopAsync();
```
### Remarks
This block combines a `VorbisEncoder` and an `OGGSink` internally.
To check if the block and its dependencies are available:
`OGGVorbisOutputBlock.IsAvailable()` (This checks for `OGGSink`, `VorbisEncoder`, and `FileSink` - `FileSink` might be implicit to `OGGSink` for file output).
### Platforms
Windows, macOS, Linux, iOS, Android (Platform availability depends on GStreamer Ogg muxer and Vorbis encoder support).
## WebM Output Block
The `WebMOutputBlock` is used for creating WebM files, typically containing VP8 or VP9 video and Vorbis audio. It combines a VPX video encoder and a Vorbis audio encoder with a WebM sink.
### Block info
Name: `WebMOutputBlock`.
| Pin direction | Media type | Expected Encoders |
| --- | :---: | :---: |
| Input Video | various | VPX (VP8/VP9 - internal) |
| Input Audio | various | Vorbis (internal) |
### Settings
The `WebMOutputBlock` is configured using `WebMSinkSettings`, `IVPXEncoderSettings` (for VP8 or VP9), and `VorbisEncoderSettings`.
Key `WebMSinkSettings` properties:
- `Filename` (string): The path to the output WebM file.
Key `IVPXEncoderSettings` properties (refer to `VPXEncoderSettings` for details):
- Bitrate, quality, speed, threads, etc.
Key `VorbisEncoderSettings` properties:
- Quality, bitrate, etc.
Constructor:
- `WebMOutputBlock(WebMSinkSettings sinkSettings, IVPXEncoderSettings videoEncoderSettings, VorbisEncoderSettings vorbisSettings)`
### The sample pipeline
```mermaid
graph LR;
VideoSource-->WebMOutputBlock;
AudioSource-->WebMOutputBlock;
```
### Sample code
```csharp
// create pipeline
var pipeline = new MediaBlocksPipeline();
// create video source (example: virtual source)
var videoSource = new VirtualVideoSourceBlock(new VirtualVideoSourceSettings());
// create audio source (example: virtual source)
var audioSource = new VirtualAudioSourceBlock(new VirtualAudioSourceSettings());
// configure WebM sink settings
var webmSinkSettings = new WebMSinkSettings("output.webm");
// configure VPX encoder settings (example: VP9)
var vp9Settings = new VPXEncoderSettings(VPXEncoderMode.VP9);
// vp9Settings.Bitrate = 2000000; // Example: 2 Mbps
// vp9Settings.Speed = VP9Speed.Fast; // Example
// configure Vorbis encoder settings
var vorbisSettings = new VorbisEncoderSettings();
// vorbisSettings.Quality = 0.7f; // Example: Set quality
// create WebM output block
var webmOutput = new WebMOutputBlock(webmSinkSettings, vp9Settings, vorbisSettings);
// Create inputs for the WebM output block
var videoInputPad = webmOutput.CreateNewInput(MediaBlockPadMediaType.Video);
var audioInputPad = webmOutput.CreateNewInput(MediaBlockPadMediaType.Audio);
// connect video path
pipeline.Connect(videoSource.Output, videoInputPad);
// connect audio path
pipeline.Connect(audioSource.Output, audioInputPad);
// start pipeline
await pipeline.StartAsync();
// ... later, to stop ...
// await pipeline.StopAsync();
```
### Remarks
The `WebMOutputBlock` internally manages a `VPXEncoder` (for VP8/VP9), a `VorbisEncoder`, and a `WebMSink`.
To check availability:
`WebMOutputBlock.IsAvailable(IVPXEncoderSettings videoEncoderSettings)`
### Platforms
Windows, macOS, Linux, iOS, Android (Platform availability depends on GStreamer WebM muxer, VPX encoder, and Vorbis encoder support).
## Separate Output Block
The `SeparateOutputBlock` provides a flexible way to configure custom output pipelines, allowing you to specify distinct video and audio encoders, processors, and a final writer/sink. It uses bridge sources (`BridgeVideoSourceBlock`, `BridgeAudioSourceBlock`) to tap into the main pipeline, enabling recording independently from preview or other processing chains.
### Block info
Name: `SeparateOutputBlock`.
This block itself doesn't have direct input pads in the traditional sense; it orchestrates a sub-pipeline.
### Settings
The `SeparateOutputBlock` is configured using the `SeparateOutput` settings object.
Key `SeparateOutput` properties:
- `Sink` (`MediaBlock`): The final sink/muxer for the output (e.g., `MP4OutputBlock`, `FileSink`). Must implement `IMediaBlockDynamicInputs` if separate encoders are used, or `IMediaBlockSinkAllInOne` if it handles encoding internally.
- `VideoEncoder` (`MediaBlock`): An optional video encoder block.
- `AudioEncoder` (`MediaBlock`): An optional audio encoder block.
- `VideoProcessor` (`MediaBlock`): An optional video processing block to insert before the video encoder.
- `AudioProcessor` (`MediaBlock`): An optional audio processing block to insert before the audio encoder.
- `Writer` (`MediaBlock`): An optional writer block that takes the output of the `Sink` (e.g., for custom file writing or network streaming logic if the `Sink` is just a muxer).
- `GetFilename()`: Method to retrieve the configured output filename if applicable.
Constructor:
- `SeparateOutputBlock(MediaBlocksPipeline pipeline, SeparateOutput settings, BridgeVideoSourceSettings bridgeVideoSourceSettings, BridgeAudioSourceSettings bridgeAudioSourceSettings)`
### The conceptual pipeline
This block creates an independent processing branch. For video:
```mermaid
graph LR;
MainVideoPath --> BridgeVideoSink;
BridgeVideoSourceBlock --> OptionalVideoProcessor --> VideoEncoder --> SinkOrWriter;
```
For audio:
```mermaid
graph LR;
MainAudioPath --> BridgeAudioSink;
BridgeAudioSourceBlock --> OptionalAudioProcessor --> AudioEncoder --> SinkOrWriter;
```
### Sample code
```csharp
// Assuming 'pipeline' is your main MediaBlocksPipeline
// Assuming 'mainVideoSourceOutputPad' and 'mainAudioSourceOutputPad' are outputs from your main sources
// 1. Configure Bridge Sinks in your main pipeline
var bridgeVideoSinkSettings = new BridgeVideoSinkSettings("sep_video_bridge");
var bridgeVideoSink = new BridgeVideoSinkBlock(bridgeVideoSinkSettings);
pipeline.Connect(mainVideoSourceOutputPad, bridgeVideoSink.Input);
var bridgeAudioSinkSettings = new BridgeAudioSinkSettings("sep_audio_bridge");
var bridgeAudioSink = new BridgeAudioSinkBlock(bridgeAudioSinkSettings);
pipeline.Connect(mainAudioSourceOutputPad, bridgeAudioSink.Input);
// 2. Configure Bridge Sources for the SeparateOutputBlock's sub-pipeline
var bridgeVideoSourceSettings = new BridgeVideoSourceSettings("sep_video_bridge");
var bridgeAudioSourceSettings = new BridgeAudioSourceSettings("sep_audio_bridge");
// 3. Configure encoders and sink for the SeparateOutput
var h264Settings = H264EncoderBlock.GetDefaultSettings();
var videoEncoder = new H264EncoderBlock(h264Settings);
var aacSettings = AACEncoderBlock.GetDefaultSettings();
var audioEncoder = new AACEncoderBlock(aacSettings);
var mp4SinkSettings = new MP4SinkSettings("separate_output.mp4");
var mp4Sink = new MP4OutputBlock(mp4SinkSettings, h264Settings, aacSettings); // Using MP4OutputBlock which handles muxing.
// Alternatively, use a raw MP4Sink and connect encoders to it.
// 4. Configure SeparateOutput settings
var separateOutputSettings = new SeparateOutput(
sink: mp4Sink, // mp4Sink will act as the final writer here
videoEncoder: videoEncoder, // This is somewhat redundant if mp4Sink is MP4OutputBlock with encoders
audioEncoder: audioEncoder // Same as above. Better to use a raw sink if providing encoders separately
);
// A more typical setup if mp4Sink is just a muxer (e.g., new MP4Sink(mp4SinkRawSettings)):
// var separateOutputSettings = new SeparateOutput(
// sink: rawMp4Muxer,
// videoEncoder: videoEncoder,
// audioEncoder: audioEncoder
// );
// 5. Create the SeparateOutputBlock (this will internally connect its components)
var separateOutput = new SeparateOutputBlock(pipeline, separateOutputSettings, bridgeVideoSourceSettings, bridgeAudioSourceSettings);
// 6. Build the sources, encoders, and sink used by SeparateOutputBlock
// Note: Building these might be handled by the pipeline if they are added to it,
// or might need to be done explicitly if they are part of a sub-graph not directly in the main pipeline's block list.
// The SeparateOutputBlock's Build() method will handle building its internal sources (_videoSource, _audioSource)
// and the provided encoders/sink if they haven't been built.
// pipeline.Add(bridgeVideoSink);
// pipeline.Add(bridgeAudioSink);
// pipeline.Add(separateOutput); // Add the orchestrator block
// Start main pipeline
// await pipeline.StartAsync(); // This will also start the separate output processing via bridges
// To change filename later:
// separateOutput.SetFilenameOrURL("new_separate_output.mp4");
```
### Remarks
The `SeparateOutputBlock` itself is more of an orchestrator for a sub-pipeline that's fed by bridge sinks/sources from the main pipeline. It allows for complex recording or streaming configurations that can be started/stopped or modified independently to some extent.
The `VideoEncoder`, `AudioEncoder`, `Sink`, and `Writer` components must be built correctly. The `SeparateOutputBlock.Build()` method attempts to build these components.
### Platforms
Depends on the components used within the `SeparateOutput` configuration (encoders, sinks, processors). Generally cross-platform if GStreamer elements are available.
## WMV Output Block
The `WMVOutputBlock` is used for creating Windows Media Video (WMV) files. It uses WMV video (`WMVEncoder`) and WMA audio (`WMAEncoder`) encoders with an ASF (Advanced Systems Format) sink to produce `.wmv` files.
### Block info
Name: `WMVOutputBlock`.
| Pin direction | Media type | Expected Encoders |
| --- | :---: | :---: |
| Input Video | various | WMV (internal) |
| Input Audio | various | WMA (internal) |
### Settings
The `WMVOutputBlock` is configured using `ASFSinkSettings`, `WMVEncoderSettings`, and `WMAEncoderSettings`.
Key `ASFSinkSettings` properties:
- `Filename` (string): The path to the output WMV file.
Key `WMVEncoderSettings` properties (refer to `WMVEncoderSettings` documentation):
- Bitrate, GOP size, quality, etc.
Key `WMAEncoderSettings` properties (refer to `WMAEncoderSettings` documentation):
- Bitrate, WMA version, etc.
Constructors:
- `WMVOutputBlock(string filename)`: Uses default WMV video and WMA audio encoder settings.
- `WMVOutputBlock(ASFSinkSettings sinkSettings, WMVEncoderSettings videoSettings, WMAEncoderSettings audioSettings)`: Uses specified encoder settings.
### The sample pipeline
```mermaid
graph LR;
VideoSource-->WMVOutputBlock;
AudioSource-->WMVOutputBlock;
```
### Sample code
```csharp
// create pipeline
var pipeline = new MediaBlocksPipeline();
// create video source (example: virtual source)
var videoSource = new VirtualVideoSourceBlock(new VirtualVideoSourceSettings());
// create audio source (example: virtual source)
var audioSource = new VirtualAudioSourceBlock(new VirtualAudioSourceSettings());
// create WMV output block with default settings
var wmvOutput = new WMVOutputBlock("output.wmv");
// Or, with custom settings:
// var asfSinkSettings = new ASFSinkSettings("output.wmv");
// var wmvEncSettings = WMVEncoderBlock.GetDefaultSettings();
// wmvEncSettings.Bitrate = 3000000; // Example: 3 Mbps
// var wmaEncSettings = WMAEncoderBlock.GetDefaultSettings();
// wmaEncSettings.Bitrate = 160000; // Example: 160 Kbps
// var wmvOutput = new WMVOutputBlock(asfSinkSettings, wmvEncSettings, wmaEncSettings);
// Create inputs for the WMV output block
var videoInputPad = wmvOutput.CreateNewInput(MediaBlockPadMediaType.Video);
var audioInputPad = wmvOutput.CreateNewInput(MediaBlockPadMediaType.Audio);
// connect video path
pipeline.Connect(videoSource.Output, videoInputPad);
// connect audio path
pipeline.Connect(audioSource.Output, audioInputPad);
// start pipeline
await pipeline.StartAsync();
// ... later, to stop ...
// await pipeline.StopAsync();
```
### Remarks
The `WMVOutputBlock` internally manages `WMVEncoder`, `WMAEncoder`, and `ASFSink`.
To check availability:
`WMVOutputBlock.IsAvailable()`
### Platforms
Primarily Windows. Availability on other platforms depends on GStreamer plugin support for ASF muxing, WMV, and WMA encoders (which may be limited outside of Windows).
## YouTube Output Block
The `YouTubeOutputBlock` is designed for streaming video and audio to YouTube Live using RTMP. It internally utilizes H.264 video and AAC audio encoders.
### Block info
Name: `YouTubeOutputBlock`.
| Pin direction | Media type | Expected Encoders |
| --- | :---: | :---: |
| Input Video | various | H.264 (internal) |
| Input Audio | various | AAC (internal) |
### Settings
The `YouTubeOutputBlock` is configured using `YouTubeSinkSettings`, `IH264EncoderSettings`, and `IAACEncoderSettings`.
Key `YouTubeSinkSettings` properties:
- `Url` (string): The RTMP URL provided by YouTube Live for streaming (e.g., "rtmp://a.rtmp.youtube.com/live2/YOUR-STREAM-KEY").
Constructor:
- `YouTubeOutputBlock(YouTubeSinkSettings sinkSettings, IH264EncoderSettings h264settings, IAACEncoderSettings aacSettings)`
### The sample pipeline
```mermaid
graph LR;
VideoSource-->YouTubeOutputBlock;
AudioSource-->YouTubeOutputBlock;
```
### Sample code
```csharp
// create pipeline
var pipeline = new MediaBlocksPipeline();
// create video source (e.g., SystemVideoSourceBlock)
var videoSource = new SystemVideoSourceBlock(videoSourceSettings); // Assuming videoSourceSettings are configured
// create audio source (e.g., SystemAudioSourceBlock)
var audioSource = new SystemAudioSourceBlock(audioSourceSettings); // Assuming audioSourceSettings are configured
// configure YouTube sink settings
var ytSinkSettings = new YouTubeSinkSettings("rtmp://a.rtmp.youtube.com/live2/YOUR-STREAM-KEY");
// configure H.264 encoder settings (use defaults or customize per YouTube recommendations)
var h264Settings = H264EncoderBlock.GetDefaultSettings();
// h264Settings.Bitrate = 6000000; // Example: 6 Mbps for 1080p
// h264Settings.UsagePreset = H264UsagePreset.None; // Adjust based on performance/quality needs
// configure AAC encoder settings (use defaults or customize per YouTube recommendations)
var aacSettings = AACEncoderBlock.GetDefaultSettings();
// aacSettings.Bitrate = 128000; // Example: 128 Kbps stereo
// create YouTube output block
var youTubeOutput = new YouTubeOutputBlock(ytSinkSettings, h264Settings, aacSettings);
// Create inputs for the YouTube output block
var videoInputPad = youTubeOutput.CreateNewInput(MediaBlockPadMediaType.Video);
var audioInputPad = youTubeOutput.CreateNewInput(MediaBlockPadMediaType.Audio);
// connect video path
pipeline.Connect(videoSource.Output, videoInputPad);
// connect audio path
pipeline.Connect(audioSource.Output, audioInputPad);
// start pipeline
await pipeline.StartAsync();
// ... later, to stop ...
// await pipeline.StopAsync();
```
### Remarks
This block encapsulates the H.264 and AAC encoders and the RTMP sink (`YouTubeSink`).
Ensure that the `YouTubeSink`, `H264Encoder`, and `AACEncoder` are available. `YouTubeOutputBlock.IsAvailable(IH264EncoderSettings h264settings, IAACEncoderSettings aacSettings)` can be used to check this.
It's crucial to configure encoder settings (bitrate, resolution, frame rate) according to YouTube's recommended settings for live streaming to ensure optimal quality and compatibility.
### Platforms
Windows, macOS, Linux, iOS, Android (Platform availability depends on GStreamer RTMP support and H.264/AAC encoder availability).
---END OF PAGE---
# Local File: .\dotnet\mediablocks\Parsers\index.md
---
title: .Net Media Parser Blocks Guide
description: Explore a complete guide to .Net Media SDK parser blocks. Learn about various video and audio parsers for your media processing pipelines.
sidebar_label: Parsers
---
# Parser Blocks - VisioForge Media Blocks SDK .Net
[!badge size="xl" target="blank" variant="info" text="Media Blocks SDK .Net"](https://www.visioforge.com/media-blocks-sdk-net)
Parser blocks are essential components in media processing pipelines. They are used to parse elementary streams, which might be raw or partially processed, to extract metadata, and to prepare the streams for further processing like decoding or multiplexing. VisioForge Media Blocks SDK .Net offers a variety of parser blocks for common video and audio codecs.
## Video Parser Blocks
### AV1 Parser Block
The `AV1ParseBlock` is used to parse AV1 video elementary streams. It helps in identifying frame boundaries and extracting codec-specific information.
#### Block info
Name: `AV1ParseBlock`.
| Pin direction | Media type | Pins count |
| --- | :---: | :---: |
| Input video | AV1 video | 1 |
| Output video | AV1 video | 1 |
#### The sample pipeline
```mermaid
graph LR;
DataSourceBlock["Data Source (e.g., File or Network)"] --> AV1ParseBlock;
AV1ParseBlock --> AV1DecoderBlock["AV1 Decoder Block"];
AV1DecoderBlock --> VideoRendererBlock["Video Renderer Block"];
```
#### Platforms
Windows, macOS, Linux, iOS, Android.
---
### H.263 Parser Block
The `H263ParseBlock` is designed to parse H.263 video elementary streams. This is useful for older video conferencing and mobile video applications.
#### Block info
Name: `H263ParseBlock`.
| Pin direction | Media type | Pins count |
| --- | :---: | :---: |
| Input video | H.263 video | 1 |
| Output video | H.263 video | 1 |
#### The sample pipeline
```mermaid
graph LR;
DataSourceBlock["Data Source"] --> H263ParseBlock;
H263ParseBlock --> H263DecoderBlock["H.263 Decoder Block"];
H263DecoderBlock --> VideoRendererBlock["Video Renderer Block"];
```
#### Platforms
Windows, macOS, Linux, iOS, Android.
---
### H.264 Parser Block
The `H264ParseBlock` parses H.264 (AVC) video elementary streams. This is one of the most widely used video codecs. The parser helps in identifying NAL units and other stream properties.
#### Block info
Name: `H264ParseBlock`.
| Pin direction | Media type | Pins count |
| --- | :---: | :---: |
| Input video | H.264 video | 1 |
| Output video | H.264 video | 1 |
#### The sample pipeline
```mermaid
graph LR;
PushDataSource["Push Data Source (H.264 NALUs)"] --> H264ParseBlock;
H264ParseBlock --> H264DecoderBlock["H.264 Decoder Block"];
H264DecoderBlock --> VideoRendererBlock["Video Renderer Block"];
```
#### Platforms
Windows, macOS, Linux, iOS, Android.
---
### H.265 Parser Block
The `H265ParseBlock` parses H.265 (HEVC) video elementary streams. H.265 offers better compression than H.264. The parser helps in identifying NAL units and other stream properties.
#### Block info
Name: `H265ParseBlock`.
| Pin direction | Media type | Pins count |
| --- | :---: | :---: |
| Input video | H.265 video | 1 |
| Output video | H.265 video | 1 |
#### The sample pipeline
```mermaid
graph LR;
PushDataSource["Push Data Source (H.265 NALUs)"] --> H265ParseBlock;
H265ParseBlock --> H265DecoderBlock["H.265 Decoder Block"];
H265DecoderBlock --> VideoRendererBlock["Video Renderer Block"];
```
#### Platforms
Windows, macOS, Linux, iOS, Android.
---
### JPEG 2000 Parser Block
The `JPEG2000ParseBlock` is used to parse JPEG 2000 video streams. JPEG 2000 is a wavelet-based compression standard that can be used for still images and video.
#### Block info
Name: `JPEG2000ParseBlock`.
| Pin direction | Media type | Pins count |
| --- | :---: | :---: |
| Input video | JPEG 2000 video | 1 |
| Output video | JPEG 2000 video | 1 |
#### The sample pipeline
```mermaid
graph LR;
DataSourceBlock["Data Source"] --> JPEG2000ParseBlock;
JPEG2000ParseBlock --> JPEG2000DecoderBlock["JPEG 2000 Decoder Block"];
JPEG2000DecoderBlock --> VideoRendererBlock["Video Renderer Block"];
```
#### Platforms
Windows, macOS, Linux, iOS, Android.
---
### MPEG-1/2 Video Parser Block
The `MPEG12VideoParseBlock` parses MPEG-1 and MPEG-2 video elementary streams. These are older but still relevant video codecs, especially MPEG-2 for DVDs and broadcast.
#### Block info
Name: `MPEG12VideoParseBlock`.
| Pin direction | Media type | Pins count |
| --- | :---: | :---: |
| Input video | MPEG-1/2 video | 1 |
| Output video | MPEG-1/2 video | 1 |
#### The sample pipeline
```mermaid
graph LR;
DataSourceBlock["Data Source"] --> MPEG12VideoParseBlock;
MPEG12VideoParseBlock --> MPEGVideoDecoderBlock["MPEG-1/2 Decoder Block"];
MPEGVideoDecoderBlock --> VideoRendererBlock["Video Renderer Block"];
```
#### Platforms
Windows, macOS, Linux, iOS, Android.
---
### MPEG-4 Video Parser Block
The `MPEG4ParseBlock` parses MPEG-4 Part 2 video elementary streams (often referred to as DivX/Xvid in its early forms).
#### Block info
Name: `MPEG4ParseBlock`.
| Pin direction | Media type | Pins count |
| --- | :---: | :---: |
| Input video | MPEG-4 video | 1 |
| Output video | MPEG-4 video | 1 |
#### The sample pipeline
```mermaid
graph LR;
DataSourceBlock["Data Source"] --> MPEG4ParseBlock;
MPEG4ParseBlock --> MPEG4DecoderBlock["MPEG-4 Decoder Block"];
MPEG4DecoderBlock --> VideoRendererBlock["Video Renderer Block"];
```
#### Platforms
Windows, macOS, Linux, iOS, Android.
---
### PNG Parser Block
The `PNGParseBlock` is used to parse PNG image data. While PNG is primarily an image format, this parser can be useful in scenarios where PNG images are part of a stream or need to be processed within the Media Blocks pipeline.
#### Block info
Name: `PNGParseBlock`.
| Pin direction | Media type | Pins count |
| --- | :---: | :---: |
| Input video | PNG image data | 1 |
| Output video | PNG image data | 1 |
#### The sample pipeline
```mermaid
graph LR;
DataSourceBlock["Data Source (PNG data)"] --> PNGParseBlock;
PNGParseBlock --> PNGDecoderBlock["PNG Decoder Block"];
PNGDecoderBlock --> VideoRendererBlock["Video Renderer Block (or Image Overlay)"];
```
#### Platforms
Windows, macOS, Linux, iOS, Android.
---
### VC-1 Parser Block
The `VC1ParseBlock` parses VC-1 video elementary streams. VC-1 was developed by Microsoft and was used in Blu-ray Discs and Windows Media Video.
#### Block info
Name: `VC1ParseBlock`.
| Pin direction | Media type | Pins count |
| --- | :---: | :---: |
| Input video | VC-1 video | 1 |
| Output video | VC-1 video | 1 |
#### The sample pipeline
```mermaid
graph LR;
DataSourceBlock["Data Source"] --> VC1ParseBlock;
VC1ParseBlock --> VC1DecoderBlock["VC-1 Decoder Block"];
VC1DecoderBlock --> VideoRendererBlock["Video Renderer Block"];
```
#### Platforms
Windows, macOS, Linux, iOS, Android.
---
### VP9 Parser Block
The `VP9ParseBlock` parses VP9 video elementary streams. VP9 is an open and royalty-free video coding format developed by Google, often used for web video.
#### Block info
Name: `VP9ParseBlock`.
| Pin direction | Media type | Pins count |
| --- | :---: | :---: |
| Input video | VP9 video | 1 |
| Output video | VP9 video | 1 |
#### The sample pipeline
```mermaid
graph LR;
DataSourceBlock["Data Source"] --> VP9ParseBlock;
VP9ParseBlock --> VP9DecoderBlock["VP9 Decoder Block"];
VP9DecoderBlock --> VideoRendererBlock["Video Renderer Block"];
```
#### Platforms
Windows, macOS, Linux, iOS, Android.
---
## Audio Parser Blocks
### MPEG Audio Parser Block
The `MPEGAudioParseBlock` parses MPEG audio elementary streams, which includes MP1, MP2, and MP3 audio.
#### Block info
Name: `MPEGAudioParseBlock`.
| Pin direction | Media type | Pins count |
| --- | :---: | :---: |
| Input audio | MPEG audio | 1 |
| Output audio | MPEG audio | 1 |
#### The sample pipeline
```mermaid
graph LR;
DataSourceBlock["Data Source (MP3 data)"] --> MPEGAudioParseBlock;
MPEGAudioParseBlock --> MP3DecoderBlock["MP3 Decoder Block"];
MP3DecoderBlock --> AudioRendererBlock["Audio Renderer Block"];
```
#### Platforms
Windows, macOS, Linux, iOS, Android.
---END OF PAGE---
# Local File: .\dotnet\mediablocks\Sinks\index.md
---
title: .Net Media Sinks - File & Network Streaming
description: Discover .Net media sink blocks for saving or streaming audio/video. Learn about file sinks like MP4, MKV, AVI, and network sinks such as RTMP, HLS, SRT for versatile media output.
sidebar_label: Sinks
---
# Sinks
[!badge size="xl" target="blank" variant="info" text="Media Blocks SDK .Net"](https://www.visioforge.com/media-blocks-sdk-net)
Sinks are blocks that save or stream data. They are the last blocks in the pipeline.
Optionally, some sinks can have output pins to pass data to the next block in the pipeline.
SDK provides a lot of different sinks for different purposes.
**File sinks**
The following file sinks are available:
- [ASF](#asf)
- [AVI](#avi)
- [File](#raw-file)
- [MKV](#mkv)
- [MOV](#mov)
- [MP4](#mp4)
- [MPEG-PS](#mpeg-ps)
- [MPEG-TS](#mpeg-ts)
- [MXF](#mxf)
- [OGG](#ogg)
- [WAV](#wav)
- [WebM](#webm)
**Network streaming**
The following network streaming sinks are available:
- [Facebook Live](#facebook-live)
- [HLS](#hls)
- [MJPEG over HTTP](#mjpeg-over-http)
- [NDI](#ndi)
- [SRT](#srt)
- [SRT MPEG-TS](#srt-mpeg-ts)
- [RTMP](#rtmp)
- [Shoutcast](#shoutcast)
- [YouTube Live](#youtube-live)
## File Sinks
### ASF
`ASF (Advanced Systems Format)`: A Microsoft digital container format used to store multimedia data, designed to be platform-independent and to support scalable media types like audio and video.
Use the `ASFSinkSettings` class to set the parameters.
#### Block info
Name: AVISinkBlock.
| Pin direction | Media type | Pins count |
| --- | :---: | :---: |
| Input audio | audio/x-raw | one or more |
| | audio/mpeg | |
| | audio/x-ac3 | |
| | audio/x-alaw | |
| | audio/x-mulaw | |
| | audio/x-wma | |
| Input video | video/x-raw | one or more |
| | image/jpeg | |
| | video/x-divx | |
| | video/x-msmpeg | |
| | video/mpeg | |
| | video/x-h263 | |
| | video/x-h264 | |
| | video/x-dv | |
| | video/x-huffyuv | |
| | video/x-wmv | |
| | video/x-jpc | |
| | video/x-vp8 | |
| | image/png | |
#### The sample pipeline
```mermaid
graph LR;
UniversalSourceBlock-->WMVEncoderBlock;
UniversalSourceBlock-->WMAEncoderBlock;
WMVEncoderBlock-->ASFSinkBlock;
WMAEncoderBlock-->ASFSinkBlock;
```
#### Sample code
```csharp
var pipeline = new MediaBlocksPipeline();
var filename = "test.mp4";
var fileSource = new UniversalSourceBlock(await UniversalSourceSettings.CreateAsync(new Uri(filename)));
var audioEncoderBlock = new WMAEncoderBlock(new WMAEncoderSettings());
pipeline.Connect(fileSource.AudioOutput, audioEncoderBlock.Input);
var videoEncoderBlock = new WMVEncoderBlock(new WMVEncoderSettings());
pipeline.Connect(fileSource.VideoOutput, videoEncoderBlock.Input);
var sinkBlock = new ASFSinkBlock(new ASFSinkSettings(@"output.wmv"));
pipeline.Connect(audioEncoderBlock.Output, sinkBlock.CreateNewInput(MediaBlockPadMediaType.Audio));
pipeline.Connect(videoEncoderBlock.Output, sinkBlock.CreateNewInput(MediaBlockPadMediaType.Video));
await pipeline.StartAsync();
```
#### Platforms
Windows, macOS, Linux, iOS, Android.
### AVI
AVI (Audio Video Interleave) is a multimedia container format introduced by Microsoft. It enables simultaneous audio-with-video playback by alternating segments of audio and video data.
Use the `AVISinkSettings` class to set the parameters.
#### Block info
Name: AVISinkBlock.
| Pin direction | Media type | Pins count |
| --- | :---: | :---: |
| Input audio | audio/x-raw | one or more |
| | audio/mpeg | |
| | audio/x-ac3 | |
| | audio/x-alaw | |
| | audio/x-mulaw | |
| Input video | video/x-raw | one or more |
| | image/jpeg | |
| | video/x-divx | |
| | video/x-msmpeg | |
| | video/mpeg | |
| | video/x-h263 | |
| | video/x-h264 | |
| | video/x-dv | |
| | video/x-huffyuv | |
| | image/png | |
#### The sample pipeline
```mermaid
graph LR;
UniversalSourceBlock-->MP3EncoderBlock;
UniversalSourceBlock-->DIVXEncoderBlock;
MP3EncoderBlock-->AVISinkBlock;
DIVXEncoderBlock-->AVISinkBlock;
```
#### Sample code
```csharp
var pipeline = new MediaBlocksPipeline();
var filename = "test.mp4";
var fileSource = new UniversalSourceBlock(await UniversalSourceSettings.CreateAsync(new Uri(filename)));
var audioEncoderBlock = new MP3EncoderBlock(new MP3EncoderSettings() { Bitrate = 192 });
pipeline.Connect(fileSource.AudioOutput, audioEncoderBlock.Input);
var videoEncoderBlock = new DIVXEncoderBlock(new DIVXEncoderSettings());
pipeline.Connect(fileSource.VideoOutput, videoEncoderBlock.Input);
var sinkBlock = new AVISinkBlock(new AVISinkSettings(@"output.avi"));
pipeline.Connect(audioEncoderBlock.Output, sinkBlock.CreateNewInput(MediaBlockPadMediaType.Audio));
pipeline.Connect(videoEncoderBlock.Output, sinkBlock.CreateNewInput(MediaBlockPadMediaType.Video));
await pipeline.StartAsync();
```
#### Platforms
Windows, macOS, Linux, iOS, Android.
### RAW File
Universal output to a file. This sink is used inside all other higher-level sinks, e.g. MP4Sink. It can be used to write RAW video or audio to a file.
#### Block info
Name: FileSinkBlock.
| Pin direction | Media type | Pins count |
| --- | :---: | :---: |
| Input | Any stream format | 1 |
#### The sample pipeline
```mermaid
graph LR;
UniversalSourceBlock-->MP3EncoderBlock;
MP3EncoderBlock-->AVISinkBlock;
```
#### Sample code
```csharp
var pipeline = new MediaBlocksPipeline();
var filename = "test.mp3";
var fileSource = new UniversalSourceBlock(await UniversalSourceSettings.CreateAsync(new Uri(filename)));
var mp3EncoderBlock = new MP3EncoderBlock(new MP3EncoderSettings() { Bitrate = 192 });
pipeline.Connect(fileSource.AudioOutput, mp3EncoderBlock.Input);
var fileSinkBlock = new FileSinkBlock(@"output.mp3");
pipeline.Connect(mp3EncoderBlock.Output, fileSinkBlock.Input);
await pipeline.StartAsync();
```
#### Platforms
Windows, macOS, Linux, iOS, Android.
### MKV
MKV (Matroska) is an open standard free container format, similar to MP4 and AVI but with more flexibility and advanced features.
Use the `MKVSinkSettings` class to set the parameters.
#### Block info
Name: MKVSinkBlock.
| Pin direction | Media type | Pins count |
| --- | :---: | :---: |
| Input audio | audio/x-raw | one or more |
| | audio/mpeg | |
| | audio/x-ac3 | |
| | audio/x-alaw | |
| | audio/x-mulaw | |
| | audio/x-wma | |
| | audio/x-vorbis | |
| | audio/x-opus | |
| | audio/x-flac | |
| Input video | video/x-raw | one or more |
| | image/jpeg | |
| | video/x-divx | |
| | video/x-msmpeg | |
| | video/mpeg | |
| | video/x-h263 | |
| | video/x-h264 | |
| | video/x-h265 | |
| | video/x-dv | |
| | video/x-huffyuv | |
| | video/x-wmv | |
| | video/x-jpc | |
| | video/x-vp8 | |
| | video/x-vp9 | |
| | video/x-theora | |
| | image/png | |
#### The sample pipeline
```mermaid
graph LR;
UniversalSourceBlock-->VorbisEncoderBlock;
UniversalSourceBlock-->VP9EncoderBlock;
VorbisEncoderBlock-->MKVSinkBlock;
VP9EncoderBlock-->MKVSinkBlock;
```
#### Sample code
```csharp
var pipeline = new MediaBlocksPipeline();
var filename = "test.mp4";
var fileSource = new UniversalSourceBlock(await UniversalSourceSettings.CreateAsync(new Uri(filename)));
var audioEncoderBlock = new VorbisEncoderBlock(new VorbisEncoderSettings() { Bitrate = 192 });
pipeline.Connect(fileSource.AudioOutput, audioEncoderBlock.Input);
var videoEncoderBlock = new VP9EncoderBlock(new VP9EncoderSettings() { Bitrate = 2000 });
pipeline.Connect(fileSource.VideoOutput, videoEncoderBlock.Input);
var sinkBlock = new MKVSinkBlock(new MKVSinkSettings(@"output.mkv"));
pipeline.Connect(audioEncoderBlock.Output, sinkBlock.CreateNewInput(MediaBlockPadMediaType.Audio));
pipeline.Connect(videoEncoderBlock.Output, sinkBlock.CreateNewInput(MediaBlockPadMediaType.Video));
await pipeline.StartAsync();
```
#### Platforms
Windows, macOS, Linux, iOS, Android.
### MOV
MOV (QuickTime File Format) is a multimedia container format developed by Apple for storing video, audio, and other time-based media. It supports various codecs and is widely used for multimedia content on Apple platforms, and also in professional video editing.
Use the `MOVSinkSettings` class to set the parameters.
#### Block info
Name: MOVSinkBlock.
| Pin direction | Media type | Pins count |
| --- | :---: | :---: |
| Input audio | audio/x-raw | one or more |
| | audio/mpeg | |
| | audio/x-ac3 | |
| | audio/x-alaw | |
| | audio/x-mulaw | |
| | audio/AAC | |
| Input video | video/x-raw | one or more |
| | image/jpeg | |
| | video/x-divx | |
| | video/x-msmpeg | |
| | video/mpeg | |
| | video/x-h263 | |
| | video/x-h264 | |
| | video/x-h265 | |
| | video/x-dv | |
| | video/x-huffyuv | |
| | image/png | |
#### The sample pipeline
```mermaid
graph LR;
UniversalSourceBlock-->AACEncoderBlock;
UniversalSourceBlock-->H264EncoderBlock;
AACEncoderBlock-->MOVSinkBlock;
H264EncoderBlock-->MOVSinkBlock;
```
#### Sample code
```csharp
var pipeline = new MediaBlocksPipeline();
var filename = "test.mp4";
var fileSource = new UniversalSourceBlock(await UniversalSourceSettings.CreateAsync(new Uri(filename)));
var audioEncoderBlock = new AACEncoderBlock(new AACEncoderSettings() { Bitrate = 192 });
pipeline.Connect(fileSource.AudioOutput, audioEncoderBlock.Input);
var videoEncoderBlock = new H264EncoderBlock(new OpenH264EncoderSettings());
pipeline.Connect(fileSource.VideoOutput, videoEncoderBlock.Input);
var sinkBlock = new MOVSinkBlock(new MOVSinkSettings(@"output.mov"));
pipeline.Connect(audioEncoderBlock.Output, sinkBlock.CreateNewInput(MediaBlockPadMediaType.Audio));
pipeline.Connect(videoEncoderBlock.Output, sinkBlock.CreateNewInput(MediaBlockPadMediaType.Video));
await pipeline.StartAsync();
```
#### Platforms
Windows, macOS, Linux, iOS, Android.
### MP4
MP4 (MPEG-4 Part 14) is a digital multimedia container format used to store video, audio, and other data such as subtitles and images. It's widely used for sharing video content online and is compatible with a wide range of devices and platforms.
Use the `MP4SinkSettings` class to set the parameters.
#### Block info
Name: MP4SinkBlock.
| Pin direction | Media type | Pins count |
| --- | :---: | :---: |
| Input audio | audio/x-raw | one or more |
| | audio/mpeg | |
| | audio/x-ac3 | |
| | audio/x-alaw | |
| | audio/x-mulaw | |
| | audio/AAC | |
| Input video | video/x-raw | one or more |
| | image/jpeg | |
| | video/x-divx | |
| | video/x-msmpeg | |
| | video/mpeg | |
| | video/x-h263 | |
| | video/x-h264 | |
| | video/x-h265 | |
| | video/x-dv | |
| | video/x-huffyuv | |
| | image/png | |
#### The sample pipeline
```mermaid
graph LR;
UniversalSourceBlock-->AACEncoderBlock;
UniversalSourceBlock-->H264EncoderBlock;
AACEncoderBlock-->MP4SinkBlock;
H264EncoderBlock-->MP4SinkBlock;
```
#### Sample code
```csharp
var pipeline = new MediaBlocksPipeline();
var filename = "test.mp4";
var fileSource = new UniversalSourceBlock(await UniversalSourceSettings.CreateAsync(new Uri(filename)));
var audioEncoderBlock = new AACEncoderBlock(new AACEncoderSettings() { Bitrate = 192 });
pipeline.Connect(fileSource.AudioOutput, audioEncoderBlock.Input);
var videoEncoderBlock = new H264EncoderBlock(new OpenH264EncoderSettings());
pipeline.Connect(fileSource.VideoOutput, videoEncoderBlock.Input);
var sinkBlock = new MP4SinkBlock(new MP4SinkSettings(@"output.mp4"));
pipeline.Connect(audioEncoderBlock.Output, sinkBlock.CreateNewInput(MediaBlockPadMediaType.Audio));
pipeline.Connect(videoEncoderBlock.Output, sinkBlock.CreateNewInput(MediaBlockPadMediaType.Video));
await pipeline.StartAsync();
```
#### Platforms
Windows, macOS, Linux, iOS, Android.
### MPEG-PS
MPEG-PS (MPEG Program Stream) is a container format for multiplexing digital audio, video, and other data. It is designed for reasonably reliable media, such as DVDs, CD-ROMs, and other disc media.
Use the `MPEGPSSinkSettings` class to set the parameters.
#### Block info
Name: MPEGPSSinkBlock.
| Pin direction | Media type | Pins count |
| --- | :---: | :---: |
| Input audio | audio/x-raw | one or more |
| | audio/mpeg | |
| | audio/x-ac3 | |
| | audio/x-alaw | |
| | audio/x-mulaw | |
| Input video | video/x-raw | one or more |
| | image/jpeg | |
| | video/x-msmpeg | |
| | video/mpeg | |
| | video/x-h263 | |
| | video/x-h264 | |
#### The sample pipeline
```mermaid
graph LR;
UniversalSourceBlock-->MP2EncoderBlock;
UniversalSourceBlock-->MPEG2EncoderBlock;
MP2EncoderBlock-->MPEGPSSinkBlock;
MPEG2EncoderBlock-->MPEGPSSinkBlock;
```
#### Sample code
```csharp
var pipeline = new MediaBlocksPipeline();
var filename = "test.mp4";
var fileSource = new UniversalSourceBlock(await UniversalSourceSettings.CreateAsync(new Uri(filename)));
var audioEncoderBlock = new MP2EncoderBlock(new MP2EncoderSettings() { Bitrate = 192 });
pipeline.Connect(fileSource.AudioOutput, audioEncoderBlock.Input);
var videoEncoderBlock = new MPEG2EncoderBlock(new MPEG2EncoderSettings());
pipeline.Connect(fileSource.VideoOutput, videoEncoderBlock.Input);
var sinkBlock = new MPEGPSSinkBlock(new MPEGPSSinkSettings(@"output.mpg"));
pipeline.Connect(audioEncoderBlock.Output, sinkBlock.CreateNewInput(MediaBlockPadMediaType.Audio));
pipeline.Connect(videoEncoderBlock.Output, sinkBlock.CreateNewInput(MediaBlockPadMediaType.Video));
await pipeline.StartAsync();
```
#### Platforms
Windows, macOS, Linux, iOS, Android.
### MPEG-TS
MPEG-TS (MPEG Transport Stream) is a standard digital container format for transmission and storage of audio, video, and Program and System Information Protocol (PSIP) data. It is used in broadcast systems such as DVB, ATSC and IPTV.
Use the `MPEGTSSinkSettings` class to set the parameters.
#### Block info
Name: MPEGTSSinkBlock.
| Pin direction | Media type | Pins count |
| --- | :---: | :---: |
| Input audio | audio/x-raw | one or more |
| | audio/mpeg | |
| | audio/x-ac3 | |
| | audio/x-alaw | |
| | audio/x-mulaw | |
| | audio/AAC | |
| Input video | video/x-raw | one or more |
| | image/jpeg | |
| | video/x-msmpeg | |
| | video/mpeg | |
| | video/x-h263 | |
| | video/x-h264 | |
| | video/x-h265 | |
#### The sample pipeline
```mermaid
graph LR;
UniversalSourceBlock-->AACEncoderBlock;
UniversalSourceBlock-->H264EncoderBlock;
AACEncoderBlock-->MPEGTSSinkBlock;
H264EncoderBlock-->MPEGTSSinkBlock;
```
#### Sample code
```csharp
var pipeline = new MediaBlocksPipeline();
var filename = "test.mp4";
var fileSource = new UniversalSourceBlock(await UniversalSourceSettings.CreateAsync(new Uri(filename)));
var audioEncoderBlock = new AACEncoderBlock(new AACEncoderSettings() { Bitrate = 192 });
pipeline.Connect(fileSource.AudioOutput, audioEncoderBlock.Input);
var videoEncoderBlock = new H264EncoderBlock(new OpenH264EncoderSettings());
pipeline.Connect(fileSource.VideoOutput, videoEncoderBlock.Input);
var sinkBlock = new MPEGTSSinkBlock(new MPEGTSSinkSettings(@"output.ts"));
pipeline.Connect(audioEncoderBlock.Output, sinkBlock.CreateNewInput(MediaBlockPadMediaType.Audio));
pipeline.Connect(videoEncoderBlock.Output, sinkBlock.CreateNewInput(MediaBlockPadMediaType.Video));
await pipeline.StartAsync();
```
#### Platforms
Windows, macOS, Linux, iOS, Android.
### MXF
MXF (Material Exchange Format) is a container format for professional digital video and audio media, developed to address issues such as file exchange, interoperability, and to improve project workflow between production houses and content/equipment providers.
Use the `MXFSinkSettings` class to set the parameters.
#### Block info
Name: MXFSinkBlock.
| Pin direction | Media type | Pins count |
| --- | :---: | :---: |
| Input audio | audio/x-raw | one or more |
| | audio/mpeg | |
| | audio/x-ac3 | |
| | audio/x-alaw | |
| | audio/x-mulaw | |
| | audio/AAC | |
| Input video | video/x-raw | one or more |
| | image/jpeg | |
| | video/x-divx | |
| | video/x-msmpeg | |
| | video/mpeg | |
| | video/x-h263 | |
| | video/x-h264 | |
| | video/x-h265 | |
| | video/x-dv | |
| | image/png | |
#### The sample pipeline
```mermaid
graph LR;
UniversalSourceBlock-->PCMEncoderBlock;
UniversalSourceBlock-->DIVXEncoderBlock;
PCMEncoderBlock-->MXFSinkBlock;
DIVXEncoderBlock-->MXFSinkBlock;
```
#### Sample code
```csharp
var pipeline = new MediaBlocksPipeline();
var filename = "test.mp4";
var fileSource = new UniversalSourceBlock(await UniversalSourceSettings.CreateAsync(new Uri(filename)));
var audioBlock = new PCMEncoderBlock(new PCMEncoderSettings());
pipeline.Connect(fileSource.AudioOutput, audioBlock.Input);
var videoEncoderBlock = new DIVXEncoderBlock(new DIVXEncoderSettings());
pipeline.Connect(fileSource.VideoOutput, videoEncoderBlock.Input);
var sinkBlock = new MXFSinkBlock(new MXFSinkSettings(@"output.mxf"));
pipeline.Connect(audioBlock.Output, sinkBlock.CreateNewInput(MediaBlockPadMediaType.Audio));
pipeline.Connect(videoEncoderBlock.Output, sinkBlock.CreateNewInput(MediaBlockPadMediaType.Video));
await pipeline.StartAsync();
```
#### Platforms
Windows, macOS, Linux, iOS, Android.
### OGG
OGG is a free, open container format designed for efficient streaming and manipulation of high quality digital multimedia. It is developed by the Xiph.Org Foundation and supports audio codecs like Vorbis, Opus, and FLAC, and video codecs like Theora.
Use the `OGGSinkSettings` class to set the parameters.
#### Block info
Name: OGGSinkBlock.
| Pin direction | Media type | Pins count |
| --- | :---: | :---: |
| Input audio | audio/x-raw | one or more |
| | audio/x-vorbis | |
| | audio/x-flac | |
| | audio/x-speex | |
| | audio/x-celt | |
| | audio/x-opus | |
| Input video | video/x-raw | one or more |
| | video/x-theora | |
| | video/x-dirac | |
#### The sample pipeline
```mermaid
graph LR;
UniversalSourceBlock-->VorbisEncoderBlock;
UniversalSourceBlock-->TheoraEncoderBlock;
VorbisEncoderBlock-->OGGSinkBlock;
TheoraEncoderBlock-->OGGSinkBlock;
```
#### Sample code
```csharp
var pipeline = new MediaBlocksPipeline();
var filename = "test.mp4";
var fileSource = new UniversalSourceBlock(await UniversalSourceSettings.CreateAsync(new Uri(filename)));
var audioEncoderBlock = new VorbisEncoderBlock(new VorbisEncoderSettings() { Bitrate = 192 });
pipeline.Connect(fileSource.AudioOutput, audioEncoderBlock.Input);
var videoEncoderBlock = new TheoraEncoderBlock(new TheoraEncoderSettings());
pipeline.Connect(fileSource.VideoOutput, videoEncoderBlock.Input);
var sinkBlock = new OGGSinkBlock(new OGGSinkSettings(@"output.ogg"));
pipeline.Connect(audioEncoderBlock.Output, sinkBlock.CreateNewInput(MediaBlockPadMediaType.Audio));
pipeline.Connect(videoEncoderBlock.Output, sinkBlock.CreateNewInput(MediaBlockPadMediaType.Video));
await pipeline.StartAsync();
```
#### Platforms
Windows, macOS, Linux, iOS, Android.
### WAV
WAV (Waveform Audio File Format) is an audio file format standard developed by IBM and Microsoft for storing audio bitstreams on PCs. It is the main format used on Windows systems for raw and typically uncompressed audio.
Use the `WAVSinkSettings` class to set the parameters.
#### Block info
Name: WAVSinkBlock.
| Pin direction | Media type | Pins count |
| --- | :---: | :---: |
| Input audio | audio/x-raw | one |
| | audio/x-alaw | |
| | audio/x-mulaw | |
#### The sample pipeline
```mermaid
graph LR;
UniversalSourceBlock-->PCMEncoderBlock;
PCMEncoderBlock-->WAVSinkBlock;
```
### Sample code
```csharp
var pipeline = new MediaBlocksPipeline();
var filename = "test.mp3";
var fileSource = new UniversalSourceBlock(await UniversalSourceSettings.CreateAsync(new Uri(filename)));
var audioBlock = new PCMEncoderBlock(new PCMEncoderSettings());
pipeline.Connect(fileSource.AudioOutput, audioBlock.Input);
var sinkBlock = new WAVSinkBlock(new WAVSinkSettings(@"output.wav"));
pipeline.Connect(audioBlock.Output, sinkBlock.Input);
await pipeline.StartAsync();
```
#### Platforms
Windows, macOS, Linux, iOS, Android.
### WebM
WebM is an open, royalty-free, media file format designed for the web. WebM defines the file container structure, video and audio formats. WebM files consist of video streams compressed with the VP8 or VP9 video codecs and audio streams compressed with the Vorbis or Opus audio codecs.
Use the `WebMSinkSettings` class to set the parameters.
#### Block info
Name: WebMSinkBlock.
| Pin direction | Media type | Pins count |
| --- | :---: | :---: |
| Input audio | audio/x-raw | one or more |
| | audio/x-vorbis | |
| | audio/x-opus | |
| Input video | video/x-raw | one or more |
| | video/x-vp8 | |
| | video/x-vp9 | |
#### The sample pipeline
```mermaid
graph LR;
UniversalSourceBlock-->VorbisEncoderBlock;
UniversalSourceBlock-->VP9EncoderBlock;
VorbisEncoderBlock-->WebMSinkBlock;
VP9EncoderBlock-->WebMSinkBlock;
```
#### Sample code
```csharp
var pipeline = new MediaBlocksPipeline();
var filename = "test.mp4";
var fileSource = new UniversalSourceBlock(await UniversalSourceSettings.CreateAsync(new Uri(filename)));
var audioEncoderBlock = new VorbisEncoderBlock(new VorbisEncoderSettings() { Bitrate = 192 });
pipeline.Connect(fileSource.AudioOutput, audioEncoderBlock.Input);
var videoEncoderBlock = new VP9EncoderBlock(new VP9EncoderSettings());
pipeline.Connect(fileSource.VideoOutput, videoEncoderBlock.Input);
var sinkBlock = new WebMSinkBlock(new WebMSinkSettings(@"output.webm"));
pipeline.Connect(audioEncoderBlock.Output, sinkBlock.CreateNewInput(MediaBlockPadMediaType.Audio));
pipeline.Connect(videoEncoderBlock.Output, sinkBlock.CreateNewInput(MediaBlockPadMediaType.Video));
await pipeline.StartAsync();
```
#### Platforms
Windows, macOS, Linux, iOS, Android.
## Network Streaming Sinks
### RTMP
`RTMP (Real-Time Messaging Protocol)`: Developed by Adobe, RTMP is a protocol used for streaming audio, video, and data over the Internet, optimized for high-performance transmission. It enables efficient, low-latency communication, commonly used in live broadcasting like sports events and concerts.
Use the `RTMPSinkSettings` class to set the parameters.
#### Block info
Name: RTMPSinkBlock.
| Pin direction | Media type | Pins count |
| --- |:------------:|:-----------:|
| Input audio | audio/mpeg [1,2,4] | one |
| | audio/x-adpcm |
| | PCM [U8, S16LE] | |
| | audio/x-speex | |
| | audio/x-mulaw | |
| | audio/x-alaw | |
| | audio/x-nellymoser | |
| Input video | video/x-h264 | one |
#### The sample pipeline
```mermaid
graph LR;
VirtualVideoSourceBlock-->H264EncoderBlock;
VirtualAudioSourceBlock-->AACEncoderBlock;
H264EncoderBlock-->RTMPSinkBlock;
AACEncoderBlock-->RTMPSinkBlock;
```
#### Sample code
```csharp
// Pipeline
var pipeline = new MediaBlocksPipeline();
// video and audio sources
var virtualVideoSource = new VirtualVideoSourceSettings
{
Width = 1280,
Height = 720,
FrameRate = VideoFrameRate.FPS_25,
};
var videoSource = new VirtualVideoSourceBlock(virtualVideoSource);
var virtualAudioSource = new VirtualAudioSourceSettings
{
Channels = 2,
SampleRate = 44100,
};
var audioSource = new VirtualAudioSourceBlock(virtualAudioSource);
// H264/AAC encoders
var h264Encoder = new H264EncoderBlock(new OpenH264EncoderSettings());
var aacEncoder = new AACEncoderBlock();
pipeline.Connect(videoSource.Output, h264Encoder.Input);
pipeline.Connect(audioSource.Output, aacEncoder.Input);
// RTMP sink
var sink = new RTMPSinkBlock(new RTMPSinkSettings());
pipeline.Connect(h264Encoder.Output, sink.CreateNewInput(MediaBlockPadMediaType.Video));
pipeline.Connect(aacEncoder.Output, sink.CreateNewInput(MediaBlockPadMediaType.Audio));
// Start
await pipeline.StartAsync();
```
#### Platforms
Windows, macOS, Linux, iOS, Android.
### Facebook Live
Facebook Live is a feature that allows live streaming of video on Facebook. The livestream can be published to personal profiles, pages, or groups.
Use the `FacebookLiveSinkSettings` class to set the parameters.
#### Block info
Name: FacebookLiveSinkBlock.
| Pin direction | Media type | Pins count |
| --- |:------------:|:-----------:|
| Input audio | audio/mpeg [1,2,4] | one |
| | audio/x-adpcm |
| | PCM [U8, S16LE] | |
| | audio/x-speex | |
| | audio/x-mulaw | |
| | audio/x-alaw | |
| | audio/x-nellymoser | |
| Input video | video/x-h264 | one |
#### The sample pipeline
```mermaid
graph LR;
VirtualVideoSourceBlock-->H264EncoderBlock;
VirtualAudioSourceBlock-->AACEncoderBlock;
H264EncoderBlock-->FacebookLiveSinkBlock;
AACEncoderBlock-->FacebookLiveSinkBlock;
```
#### Sample code
```csharp
// Pipeline
var pipeline = new MediaBlocksPipeline();
// video and audio sources
var virtualVideoSource = new VirtualVideoSourceSettings
{
Width = 1280,
Height = 720,
FrameRate = VideoFrameRate.FPS_25,
};
var videoSource = new VirtualVideoSourceBlock(virtualVideoSource);
var virtualAudioSource = new VirtualAudioSourceSettings
{
Channels = 2,
SampleRate = 44100,
};
var audioSource = new VirtualAudioSourceBlock(virtualAudioSource);
// H264/AAC encoders
var h264Encoder = new H264EncoderBlock(new OpenH264EncoderSettings());
var aacEncoder = new AACEncoderBlock();
pipeline.Connect(videoSource.Output, h264Encoder.Input);
pipeline.Connect(audioSource.Output, aacEncoder.Input);
// Facebook Live sink
var sink = new FacebookLiveSinkBlock(new FacebookLiveSinkSettings(
"https://facebook.com/rtmp/...",
"your_stream_key"));
pipeline.Connect(h264Encoder.Output, sink.CreateNewInput(MediaBlockPadMediaType.Video));
pipeline.Connect(aacEncoder.Output, sink.CreateNewInput(MediaBlockPadMediaType.Audio));
// Start
await pipeline.StartAsync();
```
#### Platforms
Windows, macOS, Linux, iOS, Android.
### HLS
HLS (HTTP Live Streaming) is an HTTP-based adaptive streaming communications protocol developed by Apple. It enables adaptive bitrate streaming by breaking the stream into a sequence of small HTTP-based file segments, typically using MPEG-TS fragments as the container.
Use the `HLSSinkSettings` class to set the parameters.
#### Block info
Name: HLSSinkBlock.
| Pin direction | Media type | Pins count |
| --- | :---: | :---: |
| Input audio | audio/mpeg | one or more |
| | audio/x-ac3 | |
| | audio/x-alaw | |
| | audio/x-mulaw | |
| | audio/AAC | |
| Input video | video/x-raw | one or more |
| | image/jpeg | |
| | video/x-msmpeg | |
| | video/mpeg | |
| | video/x-h263 | |
| | video/x-h264 | |
| | video/x-h265 | |
#### The sample pipeline
```mermaid
graph LR;
UniversalSourceBlock-->AACEncoderBlock;
UniversalSourceBlock-->H264EncoderBlock1;
UniversalSourceBlock-->H264EncoderBlock2;
UniversalSourceBlock-->H264EncoderBlock3;
AACEncoderBlock-->HLSSinkBlock;
H264EncoderBlock1-->HLSSinkBlock;
H264EncoderBlock2-->HLSSinkBlock;
H264EncoderBlock3-->HLSSinkBlock;
```
#### Sample code
```csharp
var pipeline = new MediaBlocksPipeline();
var filename = "test.mp4";
var fileSource = new UniversalSourceBlock(await UniversalSourceSettings.CreateAsync(new Uri(filename)));
var audioEncoderBlock = new AACEncoderBlock(new AACEncoderSettings() { Bitrate = 192 });
pipeline.Connect(fileSource.AudioOutput, audioEncoderBlock.Input);
// 3 video encoders with different bitrates for adaptive streaming
var videoEncoderBlock1 = new H264EncoderBlock(new OpenH264EncoderSettings { Bitrate = 3000, Width = 1920, Height = 1080 });
var videoEncoderBlock2 = new H264EncoderBlock(new OpenH264EncoderSettings { Bitrate = 1500, Width = 1280, Height = 720 });
var videoEncoderBlock3 = new H264EncoderBlock(new OpenH264EncoderSettings { Bitrate = 800, Width = 854, Height = 480 });
pipeline.Connect(fileSource.VideoOutput, videoEncoderBlock1.Input);
pipeline.Connect(fileSource.VideoOutput, videoEncoderBlock2.Input);
pipeline.Connect(fileSource.VideoOutput, videoEncoderBlock3.Input);
// Configure HLS sink
var hlsSettings = new HLSSinkSettings("./output/")
{
PlaylistName = "playlist.m3u8",
SegmentDuration = 6,
PlaylistType = HLSPlaylistType.Event,
HTTPServerEnabled = true,
HTTPServerPort = 8080
};
var sinkBlock = new HLSSinkBlock(hlsSettings);
// Connect audio
pipeline.Connect(audioEncoderBlock.Output, sinkBlock.CreateNewInput(MediaBlockPadMediaType.Audio));
// Connect video variants
pipeline.Connect(videoEncoderBlock1.Output, sinkBlock.CreateNewInput(MediaBlockPadMediaType.Video, "1080p"));
pipeline.Connect(videoEncoderBlock2.Output, sinkBlock.CreateNewInput(MediaBlockPadMediaType.Video, "720p"));
pipeline.Connect(videoEncoderBlock3.Output, sinkBlock.CreateNewInput(MediaBlockPadMediaType.Video, "480p"));
await pipeline.StartAsync();
```
#### Platforms
Windows, macOS, Linux, iOS, Android.
### MJPEG over HTTP
HTTP MJPEG (Motion JPEG) Live is a video streaming format where each video frame is compressed separately as a JPEG image and transmitted over HTTP. It is widely used in IP cameras and webcams due to its simplicity, although it is less efficient than modern codecs.
Use the `HTTPMJPEGLiveSinkSettings` class to set the parameters.
#### Block info
Name: HTTPMJPEGLiveSinkBlock.
| Pin direction | Media type | Pins count |
| --- | :---: | :---: |
| Input video | video/x-raw | one |
| | image/jpeg | |
#### The sample pipeline
```mermaid
graph LR;
VirtualVideoSourceBlock-->MJPEGEncoderBlock;
MJPEGEncoderBlock-->HTTPMJPEGLiveSinkBlock;
```
#### Sample code
```csharp
var pipeline = new MediaBlocksPipeline();
// Create virtual video source
var virtualVideoSource = new VirtualVideoSourceSettings
{
Width = 1280,
Height = 720,
FrameRate = VideoFrameRate.FPS_30,
};
var videoSource = new VirtualVideoSourceBlock(virtualVideoSource);
// MJPEG encoder
var mjpegEncoder = new MJPEGEncoderBlock(new MJPEGEncoderSettings { Quality = 80 });
pipeline.Connect(videoSource.Output, mjpegEncoder.Input);
// HTTP MJPEG server
var sink = new HTTPMJPEGLiveSinkBlock(new HTTPMJPEGLiveSinkSettings
{
Port = 8080,
Path = "/stream"
});
pipeline.Connect(mjpegEncoder.Output, sink.Input);
// Start
await pipeline.StartAsync();
Console.WriteLine("MJPEG stream available at http://localhost:8080/stream");
Console.WriteLine("Press any key to stop...");
Console.ReadKey();
```
### Platforms
Windows, macOS, Linux, iOS, Android.
### NDI
NDI (Network Device Interface) is a royalty-free video transport standard developed by NewTek that enables video-compatible products to communicate, deliver, and receive broadcast-quality video in a high-quality, low-latency manner over standard Ethernet networks.
Use the `NDISinkSettings` class to set the parameters.
#### Block info
Name: NDISinkBlock.
| Pin direction | Media type | Pins count |
| --- | :---: | :---: |
| Input audio | audio/x-raw | one |
| Input video | video/x-raw | one |
#### The sample pipeline
```mermaid
graph LR;
UniversalSourceBlock-->NDISinkBlock;
```
#### Sample code
```csharp
var pipeline = new MediaBlocksPipeline();
var filename = "test.mp4";
var fileSource = new UniversalSourceBlock(await UniversalSourceSettings.CreateAsync(new Uri(filename)));
var sinkBlock = new NDISinkBlock(new NDISinkSettings("My NDI Stream"));
pipeline.Connect(fileSource.AudioOutput, sinkBlock.AudioInput);
pipeline.Connect(fileSource.VideoOutput, sinkBlock.VideoInput);
await pipeline.StartAsync();
```
#### Platforms
Windows, macOS, Linux.
### SRT
SRT (Secure Reliable Transport) is an open source video transport protocol that enables the delivery of high-quality, secure, low-latency video across unpredictable networks like the public internet. It was developed by Haivision.
Use the `SRTSinkSettings` class to set the parameters.
#### Block info
Name: SRTSinkBlock.
| Pin direction | Media type | Pins count |
| --- | :---: | :---: |
| Input | Any stream format | 1 |
#### The sample pipeline
```mermaid
graph LR;
UniversalSourceBlock-->MP4MuxerBlock;
MP4MuxerBlock-->SRTSinkBlock;
```
#### Sample code
```csharp
var pipeline = new MediaBlocksPipeline();
var filename = "test.mp4";
var fileSource = new UniversalSourceBlock(await UniversalSourceSettings.CreateAsync(new Uri(filename)));
// Create a multiplexer block to combine audio and video
var muxer = new MP4MuxerBlock();
pipeline.Connect(fileSource.AudioOutput, muxer.CreateNewInput(MediaBlockPadMediaType.Audio));
pipeline.Connect(fileSource.VideoOutput, muxer.CreateNewInput(MediaBlockPadMediaType.Video));
// Create SRT sink in caller mode (connecting to a listener)
var srtSettings = new SRTSinkSettings
{
Host = "srt-server.example.com",
Port = 1234,
Mode = SRTMode.Caller,
Latency = 200, // milliseconds
Passphrase = "optional-encryption-passphrase"
};
var srtSink = new SRTSinkBlock(srtSettings);
pipeline.Connect(muxer.Output, srtSink.Input);
await pipeline.StartAsync();
```
#### Platforms
Windows, macOS, Linux, iOS, Android.
### SRT MPEG-TS
SRT MPEG-TS is a combination of the SRT transport protocol with MPEG-TS container format. This allows secure, reliable transport of MPEG-TS streams over public networks, which is useful for broadcast and professional video workflows.
Use the `SRTMPEGTSSinkSettings` class to set the parameters.
#### Block info
Name: SRTMPEGTSSinkBlock.
| Pin direction | Media type | Pins count |
| --- | :---: | :---: |
| Input audio | audio/x-raw | one or more |
| | audio/mpeg | |
| | audio/x-ac3 | |
| | audio/x-alaw | |
| | audio/x-mulaw | |
| | audio/AAC | |
| Input video | video/x-raw | one or more |
| | image/jpeg | |
| | video/x-msmpeg | |
| | video/mpeg | |
| | video/x-h263 | |
| | video/x-h264 | |
| | video/x-h265 | |
#### The sample pipeline
```mermaid
graph LR;
UniversalSourceBlock-->AACEncoderBlock;
UniversalSourceBlock-->H264EncoderBlock;
AACEncoderBlock-->SRTMPEGTSSinkBlock;
H264EncoderBlock-->SRTMPEGTSSinkBlock;
```
#### Sample code
```csharp
var pipeline = new MediaBlocksPipeline();
var filename = "test.mp4";
var fileSource = new UniversalSourceBlock(await UniversalSourceSettings.CreateAsync(new Uri(filename)));
var audioEncoderBlock = new AACEncoderBlock(new AACEncoderSettings() { Bitrate = 192 });
pipeline.Connect(fileSource.AudioOutput, audioEncoderBlock.Input);
var videoEncoderBlock = new H264EncoderBlock(new OpenH264EncoderSettings());
pipeline.Connect(fileSource.VideoOutput, videoEncoderBlock.Input);
// Configure SRT MPEG-TS sink
var srtMpegtsSinkSettings = new SRTMPEGTSSinkSettings
{
Host = "srt-server.example.com",
Port = 1234,
Mode = SRTMode.Caller,
Latency = 200,
Passphrase = "optional-encryption-passphrase"
};
var sinkBlock = new SRTMPEGTSSinkBlock(srtMpegtsSinkSettings);
pipeline.Connect(audioEncoderBlock.Output, sinkBlock.CreateNewInput(MediaBlockPadMediaType.Audio));
pipeline.Connect(videoEncoderBlock.Output, sinkBlock.CreateNewInput(MediaBlockPadMediaType.Video));
await pipeline.StartAsync();
```
#### Platforms
Windows, macOS, Linux, iOS, Android.
### YouTube Live
YouTube Live is a live streaming service provided by YouTube. It allows creators to broadcast live videos to their audience through the YouTube platform.
Use the `YouTubeSinkSettings` class to set the parameters.
#### Block info
Name: YouTubeSinkBlock.
| Pin direction | Media type | Pins count |
| --- |:------------:|:-----------:|
| Input audio | audio/mpeg [1,2,4] | one |
| | audio/x-adpcm |
| | PCM [U8, S16LE] | |
| | audio/x-speex | |
| | audio/x-mulaw | |
| | audio/x-alaw | |
| | audio/x-nellymoser | |
| Input video | video/x-h264 | one |
#### The sample pipeline
```mermaid
graph LR;
VirtualVideoSourceBlock-->H264EncoderBlock;
VirtualAudioSourceBlock-->AACEncoderBlock;
H264EncoderBlock-->YouTubeSinkBlock;
AACEncoderBlock-->YouTubeSinkBlock;
```
#### Sample code
```csharp
// Pipeline
var pipeline = new MediaBlocksPipeline();
// video and audio sources
var virtualVideoSource = new VirtualVideoSourceSettings
{
Width = 1920,
Height = 1080,
FrameRate = VideoFrameRate.FPS_30,
};
var videoSource = new VirtualVideoSourceBlock(virtualVideoSource);
var virtualAudioSource = new VirtualAudioSourceSettings
{
Channels = 2,
SampleRate = 48000,
};
var audioSource = new VirtualAudioSourceBlock(virtualAudioSource);
// H264/AAC encoders
var h264Settings = new OpenH264EncoderSettings
{
Bitrate = 4000, // 4 Mbps for 1080p
KeyframeInterval = 2 // Keyframe every 2 seconds
};
var h264Encoder = new H264EncoderBlock(h264Settings);
var aacSettings = new AACEncoderSettings
{
Bitrate = 192 // 192 kbps for audio
};
var aacEncoder = new AACEncoderBlock(aacSettings);
pipeline.Connect(videoSource.Output, h264Encoder.Input);
pipeline.Connect(audioSource.Output, aacEncoder.Input);
// YouTube Live sink
var sink = new YouTubeSinkBlock(new YouTubeSinkSettings(
"rtmp://a.rtmp.youtube.com/live2/",
"your_youtube_stream_key"));
pipeline.Connect(h264Encoder.Output, sink.CreateNewInput(MediaBlockPadMediaType.Video));
pipeline.Connect(aacEncoder.Output, sink.CreateNewInput(MediaBlockPadMediaType.Audio));
// Start
await pipeline.StartAsync();
```
#### Platforms
Windows, macOS, Linux, iOS, Android.
### Shoutcast
`Shoutcast` is a service for streaming media over the internet to media players, using its own cross-platform proprietary software. It allows digital audio content, primarily in MP3 or High-Efficiency Advanced Audio Coding (HE-AAC) format, to be broadcast. The most common use of Shoutcast is for creating or listening to Internet audio broadcasts.
Use the `ShoutcastSinkSettings` class to set the parameters.
#### Block info
Name: ShoutcastSinkBlock.
| Pin direction | Media type | Pins count |
| ------------- | :----------------: | :--------: |
| Input audio | audio/mpeg | one |
| | audio/aac | |
| | audio/x-aac | |
#### The sample pipeline
```mermaid
graph LR;
subgraph MainPipeline
direction LR
A[Audio Source e.g. UniversalSourceBlock or VirtualAudioSourceBlock] --> B{Optional Audio Encoder e.g. MP3EncoderBlock};
B --> C[ShoutcastSinkBlock];
end
subgraph AlternativeIfSourceEncoded
A2[Encoded Audio Source] --> C2[ShoutcastSinkBlock];
end
```
#### Sample code
```csharp
// Pipeline
var pipeline = new MediaBlocksPipeline();
// Audio source (e.g., from a file with MP3/AAC or raw audio)
var universalSource = new UniversalSourceBlock(await UniversalSourceSettings.CreateAsync(new Uri("input.mp3")));
// Or use VirtualAudioSourceBlock for live raw audio input:
// var audioSource = new VirtualAudioSourceBlock(new VirtualAudioSourceSettings { Channels = 2, SampleRate = 44100 });
// Optional: Audio Encoder (if source is raw audio or needs re-encoding for Shoutcast)
// Example: MP3EncoderBlock if Shoutcast server expects MP3
var mp3Encoder = new MP3EncoderBlock(new MP3EncoderSettings() { Bitrate = 128000 }); // Bitrate in bps
pipeline.Connect(universalSource.AudioOutput, mp3Encoder.Input);
// If using VirtualAudioSourceBlock: pipeline.Connect(audioSource.Output, mp3Encoder.Input);
// Shoutcast sink
// Configure the Shoutcast/Icecast server connection details
var shoutcastSettings = new ShoutcastSinkSettings
{
IP = "your-shoutcast-server-ip", // Server hostname or IP address
Port = 8000, // Server port
Mount = "/mountpoint", // Mount point (e.g., "/stream", "/live.mp3")
Password = "your-password", // Source password for the server
Protocol = ShoutProtocol.ICY, // ShoutProtocol.ICY for Shoutcast v1/v2 (e.g., icy://)
// ShoutProtocol.HTTP for Icecast 2.x (e.g., http://)
// ShoutProtocol.XAudiocast for older Shoutcast/XAudioCast
// Metadata for the stream
StreamName = "My Radio Stream",
Genre = "Various",
Description = "My awesome internet radio station",
URL = "http://my-radio-website.com", // Homepage URL for your stream (shows up in directory metadata)
Public = true, // Set to true to list on public directories (if server supports)
Username = "source" // Username for authentication (often "source"; check server config)
// Other stream parameters like audio bitrate, samplerate, channels are typically determined
// by the properties of the encoded input audio stream fed to the ShoutcastSinkBlock.
};
var shoutcastSink = new ShoutcastSinkBlock(shoutcastSettings);
// Connect encoder's output (or source's audio output if already encoded and compatible) to Shoutcast sink
pipeline.Connect(mp3Encoder.Output, shoutcastSink.Input);
// If source is already encoded and compatible (e.g. MP3 file to MP3 Shoutcast):
// pipeline.Connect(universalSource.AudioOutput, shoutcastSink.Input);
// Start the pipeline
await pipeline.StartAsync();
// For display purposes, you can construct a string representing the connection:
string protocolScheme = shoutcastSettings.Protocol switch
{
ShoutProtocol.ICY => "icy",
ShoutProtocol.HTTP => "http",
ShoutProtocol.XAudiocast => "xaudiocast", // Note: actual scheme might be http for XAudiocast
_ => "unknown"
};
Console.WriteLine($"Streaming to Shoutcast server: {protocolScheme}://{shoutcastSettings.IP}:{shoutcastSettings.Port}{shoutcastSettings.Mount}");
Console.WriteLine($"Stream metadata URL (for directories): {shoutcastSettings.URL}");
Console.WriteLine("Press any key to stop the stream...");
Console.ReadKey();
// Stop the pipeline (important for graceful disconnection and resource cleanup)
await pipeline.StopAsync();
```
#### Platforms
Windows, macOS, Linux, iOS, Android.
---END OF PAGE---
# Local File: .\dotnet\mediablocks\Sources\index.md
---
title: .Net Media Source Blocks Guide
description: Explore a complete guide to .Net Media SDK source blocks. Learn about hardware, file, network, and virtual sources for your media processing pipelines.
sidebar_label: Sources
---
# Source Blocks - VisioForge Media Blocks SDK .Net
[!badge size="xl" target="blank" variant="info" text="Media Blocks SDK .Net"](https://www.visioforge.com/media-blocks-sdk-net)
Source blocks provide data to the pipeline and are typically the first blocks in any media processing chain. VisioForge Media Blocks SDK .Net provides a comprehensive collection of source blocks for various inputs including hardware devices, files, networks, and virtual sources.
## Hardware Source Blocks
### System Video Source
SystemVideoSourceBlock is used to access webcams and other video capture devices.
#### Block info
Name: SystemVideoSourceBlock.
| Pin direction | Media type | Pins count |
| --- | :---: | :---: |
| Output video | uncompressed video | 1 |
#### Enumerate available devices
Use the `DeviceEnumerator.Shared.VideoSourcesAsync()` method to get a list of available devices and their specifications: available resolutions, frame rates, and video formats.
This method returns a list of `VideoCaptureDeviceInfo` objects. Each `VideoCaptureDeviceInfo` object provides detailed information about a capture device.
#### The sample pipeline
```mermaid
graph LR;
SystemVideoSourceBlock-->VideoRendererBlock;
```
#### Sample code
```csharp
// create pipeline
var pipeline = new MediaBlocksPipeline();
// create video source
VideoCaptureDeviceSourceSettings videoSourceSettings = null;
// select the first device
var device = (await DeviceEnumerator.Shared.VideoSourcesAsync())[0];
if (device != null)
{
// select the first format (maybe not the best, but it is just a sample)
var formatItem = device.VideoFormats[0];
if (formatItem != null)
{
videoSourceSettings = new VideoCaptureDeviceSourceSettings(device)
{
Format = formatItem.ToFormat()
};
// select the first frame rate
videoSourceSettings.Format.FrameRate = formatItem.FrameRateList[0];
}
}
// create video source block using the selected device and format
var videoSource = new SystemVideoSourceBlock(videoSourceSettings);
// create video renderer block
var videoRenderer = new VideoRendererBlock(pipeline, VideoView1);
// connect blocks
pipeline.Connect(videoSource.Output, videoRenderer.Input);
// start pipeline
await pipeline.StartAsync();
```
#### Sample applications
- [Simple Video Capture Demo (WPF)](https://github.com/visioforge/.Net-SDK-s-samples/tree/master/Media%20Blocks%20SDK/WPF/CSharp/Simple%20Capture%20Demo)
#### Remarks
You can specify an API to use during the device enumeration (refer to the `VideoCaptureDeviceAPI` enum description under `SystemVideoSourceBlock` for typical values). Android and iOS platforms have only one API, while Windows and Linux have multiple APIs.
#### Platforms
Windows, macOS, Linux, iOS, Android.
### System Audio Source
SystemAudioSourceBlock is used to access mics and other audio capture devices.
#### Block info
Name: SystemAudioSourceBlock.
| Pin direction | Media type | Pins count |
| --- | :---: | :---: |
| Output audio | uncompressed audio | 1 |
#### Enumerate available devices
Use the `DeviceEnumerator.Shared.AudioSourcesAsync()` method call to get a list of available devices and their specifications.
During device enumeration, you can get the list of available devices and their specifications. You can select the device and its format to create the source settings.
#### The sample pipeline
```mermaid
graph LR;
SystemAudioSourceBlock-->AudioRendererBlock;
```
#### Sample code
```csharp
// create pipeline
var pipeline = new MediaBlocksPipeline();
// create audio source block
IAudioCaptureDeviceSourceSettings audioSourceSettings = null;
// select first device
var device = (await DeviceEnumerator.Shared.AudioSourcesAsync())[0];
if (device != null)
{
// select first format
var formatItem = device.Formats[0];
if (formatItem != null)
{
audioSourceSettings = device.CreateSourceSettings(formatItem.ToFormat());
}
}
// create audio source block using selected device and format
var audioSource = new SystemAudioSourceBlock(audioSourceSettings);
// create audio renderer block
var audioRenderer = new AudioRendererBlock();
// connect blocks
pipeline.Connect(audioSource.Output, audioRenderer.Input);
// start pipeline
await pipeline.StartAsync();
```
#### Capture audio from speakers (loopback)
Currently, loopback audio capture is supported only on Windows. Use the `LoopbackAudioCaptureDeviceSourceSettings` class to create the source settings for loopback audio capture.
WASAPI2 is used as the default API for loopback audio capture. You can specify the API to use during device enumeration.
```csharp
// create pipeline
var pipeline = new MediaBlocksPipeline();
// create audio source block
var deviceItem = (await DeviceEnumerator.Shared.AudioOutputsAsync(AudioOutputDeviceAPI.WASAPI2))[0];
if (deviceItem == null)
{
return;
}
var audioSourceSettings = new LoopbackAudioCaptureDeviceSourceSettings(deviceItem);
var audioSource = new SystemAudioSourceBlock(audioSourceSettings);
// create audio renderer block
var audioRenderer = new AudioRendererBlock();
// connect blocks
pipeline.Connect(audioSource.Output, audioRenderer.Input);
// start pipeline
await pipeline.StartAsync();
```
#### Sample applications
- [Audio Capture Demo](https://github.com/visioforge/.Net-SDK-s-samples/tree/master/Media%20Blocks%20SDK/WPF/CSharp/Audio%20Capture%20Demo)
- [Simple Capture Demo](https://github.com/visioforge/.Net-SDK-s-samples/tree/master/Media%20Blocks%20SDK/WPF/CSharp/Simple%20Capture%20Demo)
#### Remarks
You can specify an API to use during the device enumeration. Android and iOS platforms have only one API, while Windows and Linux have multiple APIs.
#### Platforms
Windows, macOS, Linux, iOS, Android.
### Basler Source Block
The Basler source block supports Basler USB3 Vision and GigE cameras.
The Pylon SDK or Runtime should be installed to use the camera source.
#### Block info
Name: BaslerSourceBlock.
| Pin direction | Media type | Pins count |
|-----------------|:--------------------:|:-----------:|
| Output video | Uncompressed | 1 |
#### The sample pipeline
```mermaid
graph LR;
BaslerSourceBlock-->VideoRendererBlock;
```
#### Sample code
```csharp
var pipeline = new MediaBlocksPipeline();
// get Basler source info by enumerating sources
var sources = await DeviceEnumerator.Shared.BaslerSourcesAsync();
var sourceInfo = sources[0];
// create Basler source
var source = new BaslerSourceBlock(new BaslerSourceSettings(sourceInfo));
// create video renderer for VideoView
var videoRenderer = new VideoRendererBlock(pipeline, VideoView1);
// connect
pipeline.Connect(source.Output, videoRenderer.Input);
// start
await pipeline.StartAsync();
```
#### Sample applications
- [Basler Source Demo (WPF)](https://github.com/visioforge/.Net-SDK-s-samples/tree/master/Media%20Blocks%20SDK/WPF/CSharp/Basler%20Source%20Demo)
#### Platforms
Windows, Linux.
### Spinnaker/FLIR Source Block
The Spinnaker/FLIR source supports connection to FLIR cameras using Spinnaker SDK.
To use the `SpinnakerSourceBlock`, you first need to enumerate available Spinnaker cameras and then configure the source using `SpinnakerSourceSettings`.
#### Enumerate Devices & `SpinnakerCameraInfo`
Use `DeviceEnumerator.Shared.SpinnakerSourcesAsync()` to get a list of `SpinnakerCameraInfo` objects. Each `SpinnakerCameraInfo` provides details about a detected camera:
- `Name` (string): Unique identifier or name of the camera. Often a serial number or model-serial combination.
- `NetworkInterfaceName` (string): Name of the network interface if it's a GigE camera.
- `Vendor` (string): Camera vendor name.
- `Model` (string): Camera model name.
- `SerialNumber` (string): Camera's serial number.
- `FirmwareVersion` (string): Camera's firmware version.
- `SensorSize` (`Size`): Reports the sensor dimensions (Width, Height). You might need to call a method on `SpinnakerCameraInfo` like `ReadInfo()` (if available, or implied by enumeration) to populate this.
- `WidthMax` (int): Maximum sensor width.
- `HeightMax` (int): Maximum sensor height.
You select a `SpinnakerCameraInfo` object from the list to initialize `SpinnakerSourceSettings`.
#### Settings
The `SpinnakerSourceBlock` is configured using `SpinnakerSourceSettings`. Key properties:
- `Name` (string): The name of the camera (from `SpinnakerCameraInfo.Name`) to use.
- `Region` (`Rect`): Defines the Region of Interest (ROI) to capture from the camera sensor. Set X, Y, Width, Height.
- `FrameRate` (`VideoFrameRate`): The desired frame rate.
- `PixelFormat` (`SpinnakerPixelFormat` enum): The desired pixel format (e.g., `RGB`, `Mono8`, `BayerRG8`). Default `RGB`.
- `OffsetX` (int): X offset for the ROI on the sensor (default 0). Often implicitly part of `Region.X`.
- `OffsetY` (int): Y offset for the ROI on the sensor (default 0). Often implicitly part of `Region.Y`.
- `ExposureMinimum` (int): Minimum exposure time for auto-exposure algorithm (microseconds, e.g., 10-29999999). Default 0 (auto/camera default).
- `ExposureMaximum` (int): Maximum exposure time for auto-exposure algorithm (microseconds). Default 0 (auto/camera default).
- `ShutterType` (`SpinnakerSourceShutterType` enum): Type of shutter (e.g., `Rolling`, `Global`). Default `Rolling`.
Constructor:
`SpinnakerSourceSettings(string deviceName, Rect region, VideoFrameRate frameRate, SpinnakerPixelFormat pixelFormat = SpinnakerPixelFormat.RGB)`
#### Block info
Name: SpinnakerSourceBlock.
| Pin direction | Media type | Pins count |
| --- | :---: | :---: |
| Output video | various | one or more |
#### The sample pipeline
`SpinnakerSourceBlock:Output` → `VideoRendererBlock`
#### Sample code
```csharp
var pipeline = new MediaBlocksPipeline();
var sources = await DeviceEnumerator.Shared.SpinnakerSourcesAsync();
var sourceSettings = new SpinnakerSourceSettings(sources[0].Name, new VisioForge.Core.Types.Rect(0, 0, 1280, 720), new VideoFrameRate(10));
var source = new SpinnakerSourceBlock(sourceSettings);
var videoRenderer = new VideoRendererBlock(pipeline, VideoView1);
pipeline.Connect(source.Output, videoRenderer.Input);
await pipeline.StartAsync();
```
#### Requirements
- Spinnaker SDK installed.
#### Platforms
Windows
### Allied Vision Source Block
The Allied Vision Source Block enables integration with Allied Vision cameras using the Vimba SDK. It allows capturing video streams from these industrial cameras.
#### Block info
Name: AlliedVisionSourceBlock.
| Pin direction | Media type | Pins count |
|---------------|:--------------------:|:----------:|
| Output video | Uncompressed video | 1 |
#### The sample pipeline
```mermaid
graph LR;
AlliedVisionSourceBlock-->VideoRendererBlock;
```
#### Sample code
```csharp
var pipeline = new MediaBlocksPipeline();
// Enumerate Allied Vision cameras
var alliedVisionCameras = await DeviceEnumerator.Shared.AlliedVisionSourcesAsync();
if (alliedVisionCameras.Count == 0)
{
Console.WriteLine("No Allied Vision cameras found.");
return;
}
var cameraInfo = alliedVisionCameras[0]; // Select the first camera
// Create Allied Vision source settings
// Width, height, x, y are optional and depend on whether you want to set a specific ROI
// If null, it might use default/full sensor resolution. Camera.ReadInfo() should be called.
cameraInfo.ReadInfo(); // Ensure camera info like Width/Height is read
var alliedVisionSettings = new AlliedVisionSourceSettings(
cameraInfo,
width: cameraInfo.Width, // Or a specific ROI width
height: cameraInfo.Height // Or a specific ROI height
);
// Optionally configure other settings
alliedVisionSettings.ExposureAuto = VmbSrcExposureAutoModes.Continuous;
alliedVisionSettings.Gain = 10; // Example gain value
var alliedVisionSource = new AlliedVisionSourceBlock(alliedVisionSettings);
// Create video renderer
var videoRenderer = new VideoRendererBlock(pipeline, VideoView1); // Assuming VideoView1 is your display control
// Connect blocks
pipeline.Connect(alliedVisionSource.Output, videoRenderer.Input);
// Start pipeline
await pipeline.StartAsync();
```
#### Requirements
- Allied Vision Vimba SDK must be installed.
#### Sample applications
- Refer to samples demonstrating industrial camera integration if available.
#### Platforms
Windows, macOS, Linux.
### Blackmagic Decklink Source Block
For information about Decklink sources, see [Decklink](../Decklink/index.md).
## File Source Blocks
### Universal Source Block
A universal source that decodes video and audio files/network streams and provides uncompressed data to the connected blocks.
Block supports MP4, WebM, AVI, TS, MKV, MP3, AAC, M4A, and many other formats. If FFMPEG redist is available, all decoders available in FFMPEG will also be supported.
#### Settings
The `UniversalSourceBlock` is configured through `UniversalSourceSettings`. It's recommended to create settings using the static factory method `await UniversalSourceSettings.CreateAsync(...)`.
Key properties and parameters for `UniversalSourceSettings`:
- **URI/Filename**:
- `UniversalSourceSettings.CreateAsync(string filename, bool renderVideo = true, bool renderAudio = true, bool renderSubtitle = false)`: Creates settings from a local file path.
- `UniversalSourceSettings.CreateAsync(System.Uri uri, bool renderVideo = true, bool renderAudio = true, bool renderSubtitle = false)`: Creates settings from a `System.Uri` (can be a file URI or network URI like HTTP, RTSP - though dedicated blocks are often preferred for network streams). For iOS, an `Foundation.NSUrl` is used.
- The `renderVideo`, `renderAudio`, `renderSubtitle` booleans control which streams are processed. The `CreateAsync` method may update these based on actual stream availability in the media file/stream if `ignoreMediaInfoReader` is `false` (default).
- `StartPosition` (`TimeSpan?`): Sets the starting position for playback.
- `StopPosition` (`TimeSpan?`): Sets the stopping position for playback.
- `VideoCustomFrameRate` (`VideoFrameRate?`): If set, video frames will be dropped or duplicated to match this custom frame rate.
- `UseAdvancedEngine` (bool): If `true` (default, except Android where it's `false`), uses an advanced engine with stream selection support.
- `DisableHWDecoders` (bool): If `true` (default `false`, except Android where it's `true`), hardware-accelerated decoders will be disabled, forcing software decoding.
- `MPEGTSProgramNumber` (int): For MPEG-TS streams, specifies the program number to select (default -1, meaning automatic selection or first program).
- `ReadInfoAsync()`: Asynchronously reads media file information (`MediaFileInfo`). This is called internally by `CreateAsync` unless `ignoreMediaInfoReader` is true.
- `GetInfo()`: Gets the cached `MediaFileInfo`.
The `UniversalSourceBlock` itself is then instantiated with these settings: `new UniversalSourceBlock(settings)`.
The `Filename` property on `UniversalSourceBlock` instance (as seen in older examples) is a shortcut that internally creates basic `UniversalSourceSettings`. Using `UniversalSourceSettings.CreateAsync` provides more control.
#### Block info
Name: UniversalSourceBlock.
| Pin direction | Media type | Pins count |
| --- | :---: | :---: |
| Output audio | depends from decoder | one or more |
| Output video | depends from decoder | one or more |
| Output subtitle | depends from decoder | one or more |
#### The sample pipeline
```mermaid
graph LR;
UniversalSourceBlock-->VideoRendererBlock;
UniversalSourceBlock-->AudioRendererBlock;
```
#### Sample code
```csharp
var pipeline = new MediaBlocksPipeline();
var fileSource = new UniversalSourceBlock();
fileSource.Filename = "test.mp4";
var videoRenderer = new VideoRendererBlock(pipeline, VideoView1);
pipeline.Connect(fileSource.VideoOutput, videoRenderer.Input);
var audioRenderer = new AudioRendererBlock();
pipeline.Connect(fileSource.AudioOutput, audioRenderer.Input);
await pipeline.StartAsync();
```
#### Sample applications
- [Simple Player Demo (WPF)](https://github.com/visioforge/.Net-SDK-s-samples/tree/master/Media%20Blocks%20SDK/WPF/CSharp/Simple%20Player%20Demo%20WPF)
#### Platforms
Windows, macOS, Linux, iOS, Android.
### Subtitle Source Block
The Subtitle Source Block loads subtitles from a file and outputs them as a subtitle stream, which can then be overlaid on video or rendered separately.
#### Block info
Name: `SubtitleSourceBlock`.
| Pin direction | Media type | Pins count |
|-----------------|:--------------------:|:-----------:|
| Output subtitle | Subtitle data | 1 |
#### Settings
The `SubtitleSourceBlock` is configured using `SubtitleSourceSettings`. Key properties include:
- `Filename` (string): The path to the subtitle file (e.g., .srt, .ass).
#### The sample pipeline
```mermaid
graph LR;
UniversalSourceBlock --> SubtitleOverlayBlock;
SubtitleSourceBlock --> SubtitleOverlayBlock;
SubtitleOverlayBlock --> VideoRendererBlock;
UniversalSourceBlock --> AudioRendererBlock;
```
#### Sample code
```csharp
var pipeline = new MediaBlocksPipeline();
// Create subtitle source settings
var subtitleSettings = new SubtitleSourceSettings("path/to/your/subtitles.srt");
var subtitleSource = new SubtitleSourceBlock(subtitleSettings);
// Example: Overlaying subtitles on a video from UniversalSourceBlock
var fileSource = await UniversalSourceSettings.CreateAsync("path/to/your/video.mp4");
var universalSource = new UniversalSourceBlock(fileSource);
var videoRenderer = new VideoRendererBlock(pipeline, VideoView1);
var audioRenderer = new AudioRendererBlock();
// This is a conceptual overlay. Actual implementation might need a specific subtitle overlay block.
// For simplicity, let's assume a downstream block can consume a subtitle stream,
// or you connect it to a block that renders subtitles on the video.
// Example with a hypothetical SubtitleOverlayBlock:
// var subtitleOverlay = new SubtitleOverlayBlock(); // Assuming such a block exists
// pipeline.Connect(universalSource.VideoOutput, subtitleOverlay.VideoInput);
// pipeline.Connect(subtitleSource.Output, subtitleOverlay.SubtitleInput);
// pipeline.Connect(subtitleOverlay.Output, videoRenderer.Input);
// pipeline.Connect(universalSource.AudioOutput, audioRenderer.Input);
// For a simple player without explicit overlay shown here:
pipeline.Connect(universalSource.VideoOutput, videoRenderer.Input);
pipeline.Connect(universalSource.AudioOutput, audioRenderer.Input);
// How subtitles from subtitleSource.Output are used would depend on the rest of the pipeline design.
// This block primarily provides the subtitle stream.
Console.WriteLine("Subtitle source created. Connect its output to a compatible block like a subtitle overlay or renderer.");
await pipeline.StartAsync();
```
#### Platforms
Windows, macOS, Linux, iOS, Android (Depends on subtitle parsing capabilities).
### Stream Source Block
The Stream Source Block allows reading media data from a `System.IO.Stream`. This is useful for playing media from memory, embedded resources, or custom stream providers without needing a temporary file. The format of the data within the stream must be parsable by the underlying media framework (GStreamer).
#### Block info
Name: `StreamSourceBlock`.
(Pin information is dynamic, similar to `UniversalSourceBlock`, based on stream content. Typically, it would have an output that connects to a demuxer/decoder like `DecodeBinBlock`, or provide decoded audio/video pins if it includes demuxing/decoding capabilities.)
| Pin direction | Media type | Pins count |
|---------------|:--------------------:|:----------:|
| Output data | Varies (raw stream)| 1 |
_Alternatively, if it decodes:_
| Output video | Depends on stream | 0 or 1 |
| Output audio | Depends on stream | 0 or 1+ |
#### Settings
The `StreamSourceBlock` is typically instantiated directly with a `System.IO.Stream`. The `StreamSourceSettings` class serves as a wrapper to provide this stream.
- `Stream` (`System.IO.Stream`): The input stream containing the media data. The stream must be readable and, if seeking is required by the pipeline, seekable.
#### The sample pipeline
If `StreamSourceBlock` outputs raw data that needs decoding:
```mermaid
graph LR;
StreamSourceBlock -- Stream Data --> DecodeBinBlock;
DecodeBinBlock -- Video Output --> VideoRendererBlock;
DecodeBinBlock -- Audio Output --> AudioRendererBlock;
```
If `StreamSourceBlock` handles decoding internally (less common for a generic stream source):
```mermaid
graph LR;
StreamSourceBlock -- Video Output --> VideoRendererBlock;
StreamSourceBlock -- Audio Output --> AudioRendererBlock;
```
#### Sample code
```csharp
var pipeline = new MediaBlocksPipeline();
// Example: Load a video file into a MemoryStream
byte[] fileBytes = File.ReadAllBytes("path/to/your/video.mp4");
var memoryStream = new MemoryStream(fileBytes);
// StreamSourceSettings is a container for the stream.
var streamSettings = new StreamSourceSettings(memoryStream);
// The CreateBlock method of StreamSourceSettings would typically return new StreamSourceBlock(streamSettings.Stream)
var streamSource = streamSettings.CreateBlock() as StreamSourceBlock;
// Or, more directly: var streamSource = new StreamSourceBlock(memoryStream);
// Create video and audio renderers
var videoRenderer = new VideoRendererBlock(pipeline, VideoView1); // Assuming VideoView1
var audioRenderer = new AudioRendererBlock();
// Connect outputs. Commonly, a StreamSourceBlock provides raw data to a DecodeBinBlock.
var decodeBin = new DecodeBinBlock();
pipeline.Connect(streamSource.Output, decodeBin.Input); // Assuming a single 'Output' pin on StreamSourceBlock
pipeline.Connect(decodeBin.VideoOutput, videoRenderer.Input);
pipeline.Connect(decodeBin.AudioOutput, audioRenderer.Input);
await pipeline.StartAsync();
// Important: Ensure the stream remains open and valid for the duration of playback.
// Dispose of the stream when the pipeline is stopped or disposed.
// Consider this in relation to pipeline.DisposeAsync() or similar cleanup.
// memoryStream.Dispose(); // Typically after pipeline.StopAsync() and pipeline.DisposeAsync()
```
#### Remarks
The `StreamSourceBlock` itself will attempt to read from the provided stream. The success of playback depends on the format of the data in the stream and the availability of appropriate demuxers and decoders in the subsequent parts of the pipeline (often managed via `DecodeBinBlock`).
#### Platforms
Windows, macOS, Linux, iOS, Android.
### CDG Source Block
The CDG Source Block is designed to play CD+G (Compact Disc + Graphics) files, commonly used for karaoke. It decodes both the audio track and the low-resolution graphics stream.
#### Block info
Name: CDGSourceBlock.
| Pin direction | Media type | Pins count |
|---------------|:--------------------:|:----------:|
| Output audio | Uncompressed audio | 1 |
| Output video | Uncompressed video | 1 |
#### The sample pipeline
```mermaid
graph LR;
CDGSourceBlock -- Audio --> AudioRendererBlock;
CDGSourceBlock -- Video --> VideoRendererBlock;
```
#### Sample code
```csharp
var pipeline = new MediaBlocksPipeline();
// Create CDG source settings
var cdgSettings = new CDGSourceSettings(
"path/to/your/file.cdg", // Path to the CDG graphics file
"path/to/your/file.mp3" // Path to the corresponding audio file (MP3, WAV, etc.)
);
// If audioFilename is null or empty, audio will be ignored.
var cdgSource = new CDGSourceBlock(cdgSettings);
// Create video renderer
var videoRenderer = new VideoRendererBlock(pipeline, VideoView1); // Assuming VideoView1 is your display control
pipeline.Connect(cdgSource.VideoOutput, videoRenderer.Input);
// Create audio renderer (if audio is to be played)
if (!string.IsNullOrEmpty(cdgSettings.AudioFilename) && cdgSource.AudioOutput != null)
{
var audioRenderer = new AudioRendererBlock();
pipeline.Connect(cdgSource.AudioOutput, audioRenderer.Input);
}
// Start pipeline
await pipeline.StartAsync();
```
#### Remarks
Requires both a `.cdg` file for graphics and a separate audio file (e.g., MP3, WAV) for the music.
#### Platforms
Windows, macOS, Linux, iOS, Android.
## Network Source Blocks
### VNC Source Block
The VNC Source Block allows capturing video from a VNC (Virtual Network Computing) or RFB (Remote Framebuffer) server. This is useful for streaming the desktop of a remote machine.
#### Block info
Name: `VNCSourceBlock`.
| Pin direction | Media type | Pins count |
|---------------|:--------------------:|:----------:|
| Output video | Uncompressed video | 1 |
#### Settings
The `VNCSourceBlock` is configured using `VNCSourceSettings`. Key properties include:
- `Host` (string): The hostname or IP address of the VNC server.
- `Port` (int): The port number of the VNC server.
- `Password` (string): The password for VNC server authentication, if required.
- `Uri` (string): Alternatively, a full RFB URI (e.g., "rfb://host:port").
- `Width` (int): Desired output width. The block may connect to a VNC server that provides specific dimensions.
- `Height` (int): Desired output height.
- `Shared` (bool): Whether to share the desktop with other clients (default `true`).
- `ViewOnly` (bool): If `true`, no input (mouse/keyboard) is sent to the VNC server (default `false`).
- `Incremental` (bool): Whether to use incremental updates (default `true`).
- `UseCopyrect` (bool): Whether to use copyrect encoding (default `false`).
- `RFBVersion` (string): RFB protocol version (default "3.3").
- `OffsetX` (int): X offset for screen scraping.
- `OffsetY` (int): Y offset for screen scraping.
#### The sample pipeline
```mermaid
graph LR;
VNCSourceBlock-->VideoRendererBlock;
```
#### Sample code
```csharp
var pipeline = new MediaBlocksPipeline();
// Configure VNC source settings
var vncSettings = new VNCSourceSettings
{
Host = "your-vnc-server-ip", // or use Uri
Port = 5900, // Standard VNC port
Password = "your-password", // if any
// Width = 1920, // Optional: desired width
// Height = 1080, // Optional: desired height
};
var vncSource = new VNCSourceBlock(vncSettings);
// Create video renderer
var videoRenderer = new VideoRendererBlock(pipeline, VideoView1); // Assuming VideoView1 is your display control
// Connect blocks
pipeline.Connect(vncSource.Output, videoRenderer.Input);
// Start pipeline
await pipeline.StartAsync();
```
#### Platforms
Windows, macOS, Linux (Depends on underlying GStreamer VNC plugin availability).
### RTSP Source Block
The RTSP source supports connection to IP cameras and other devices supporting the RTSP protocol.
Supported video codecs: H264, HEVC, MJPEG.
Supported audio codecs: AAC, MP3, PCM, G726, G711, and some others if FFMPEG redist is installed.
#### Block info
Name: RTSPSourceBlock.
| Pin direction | Media type | Pins count |
| --- | :---: | :---: |
| Output audio | depends from decoder | one or more |
| Output video | depends from decoder | one or more |
| Output subtitle | depends from decoder | one or more |
#### Settings
The `RTSPSourceBlock` is configured using `RTSPSourceSettings`. Key properties include:
- `Uri`: The RTSP URL of the stream.
- `Login`: Username for RTSP authentication, if required.
- `Password`: Password for RTSP authentication, if required.
- `AudioEnabled`: A boolean indicating whether to attempt to process the audio stream.
- `Latency`: Specifies the buffering duration for the incoming stream (default is 1000ms).
- `AllowedProtocols`: Defines the transport protocols to be used for receiving the stream. It's a flags enum `RTSPSourceProtocol` with values:
- `UDP`: Stream data over UDP.
- `UDP_Multicast`: Stream data over UDP multicast.
- `TCP` (Recommended): Stream data over TCP.
- `HTTP`: Stream data tunneled over HTTP.
- `EnableTLS`: Encrypt TCP and HTTP with TLS (use `rtsps://` or `httpsps://` in URI).
- `DoRTCP`: Enables RTCP (RTP Control Protocol) for stream statistics and control (default is usually true).
- `RTPBlockSize`: Specifies the size of RTP blocks.
- `UDPBufferSize`: Buffer size for UDP transport.
- `CustomVideoDecoder`: Allows specifying a custom GStreamer video decoder element name if the default is not suitable.
- `UseGPUDecoder`: If set to `true`, the SDK will attempt to use a hardware-accelerated GPU decoder if available.
- `CompatibilityMode`: If `true`, the SDK will not try to read camera information before attempting to play, which can be useful for problematic streams.
- `EnableRAWVideoAudioEvents`: If `true`, enables events for raw (undecoded) video and audio sample data.
It's recommended to initialize `RTSPSourceSettings` using the static factory method `RTSPSourceSettings.CreateAsync(Uri uri, string login, string password, bool audioEnabled, bool readInfo = true)`. This method can also handle ONVIF discovery if the URI points to an ONVIF device service. Setting `readInfo` to `false` enables `CompatibilityMode`.
#### The sample pipeline
```mermaid
graph LR;
RTSPSourceBlock-->VideoRendererBlock;
RTSPSourceBlock-->AudioRendererBlock;
```
#### Sample code
```csharp
var pipeline = new MediaBlocksPipeline();
// It's recommended to use CreateAsync to initialize settings
var rtspSettings = await RTSPSourceSettings.CreateAsync(
new Uri("rtsp://login:pwd@192.168.1.64:554/Streaming/Channels/101?transportmode=unicast&profile=Profile_1"),
"login",
"pwd",
audioEnabled: true);
// Optionally, configure more settings
// rtspSettings.Latency = TimeSpan.FromMilliseconds(500);
// rtspSettings.AllowedProtocols = RTSPSourceProtocol.TCP; // Prefer TCP
var rtspSource = new RTSPSourceBlock(rtspSettings);
var videoRenderer = new VideoRendererBlock(pipeline, VideoView1);
pipeline.Connect(rtspSource.VideoOutput, videoRenderer.Input);
var audioRenderer = new AudioRendererBlock();
pipeline.Connect(rtspSource.AudioOutput, audioRenderer.Input);
await pipeline.StartAsync();
```
#### Sample applications
- [RTSP Preview Demo](https://github.com/visioforge/.Net-SDK-s-samples/tree/master/Media%20Blocks%20SDK/WPF/CSharp/RTSP%20Preview%20Demo)
- [RTSP MultiViewSync Demo](https://github.com/visioforge/.Net-SDK-s-samples/tree/master/Media%20Blocks%20SDK/WPF/CSharp/RTSP%20MultiViewSync%20Demo)
#### Platforms
Windows, macOS, Linux, iOS, Android.
### HTTP Source Block
The HTTP source block allows data to be retrieved using HTTP/HTTPS protocols.
It can be used to read data from MJPEG IP cameras, MP4 network files, or other sources.
#### Block info
Name: HTTPSourceBlock.
| Pin direction | Media type | Pins count |
|---------------|:------------:|:-----------:|
| Output | Data | 1 |
#### The sample pipeline
The sample pipeline reads data from an MJPEG camera and displays it using VideoView.
```mermaid
graph LR;
HTTPSourceBlock-->JPEGDecoderBlock;
JPEGDecoderBlock-->VideoRendererBlock;
```
#### Sample code
```csharp
var pipeline = new MediaBlocksPipeline();
var settings = new HTTPSourceSettings(new Uri("http://mjpegcamera:8080"))
{
UserID = "username",
UserPassword = "password"
};
var source = new HTTPSourceBlock(settings);
var videoRenderer = new VideoRendererBlock(pipeline, VideoView1);
var jpegDecoder = new JPEGDecoderBlock();
pipeline.Connect(source.Output, jpegDecoder.Input);
pipeline.Connect(jpegDecoder.Output, videoRenderer.Input);
await pipeline.StartAsync();
```
#### Platforms
Windows, macOS, Linux.
### HTTP MJPEG Source Block
The HTTP MJPEG Source Block is specifically designed to connect to and decode MJPEG (Motion JPEG) video streams over HTTP/HTTPS. This is common for many IP cameras.
#### Block info
Name: HTTPMJPEGSourceBlock.
| Pin direction | Media type | Pins count |
|---------------|:--------------------:|:----------:|
| Output video | Uncompressed video | 1 |
#### The sample pipeline
```mermaid
graph LR;
HTTPMJPEGSourceBlock-->VideoRendererBlock;
```
#### Sample code
```csharp
var pipeline = new MediaBlocksPipeline();
// Create settings for the HTTP MJPEG source
var mjpegSettings = await HTTPMJPEGSourceSettings.CreateAsync(
new Uri("http://your-mjpeg-camera-url/stream"), // Replace with your camera's MJPEG stream URL
"username", // Optional: username for camera authentication
"password" // Optional: password for camera authentication
);
if (mjpegSettings == null)
{
Console.WriteLine("Failed to initialize HTTP MJPEG settings.");
return;
}
mjpegSettings.CustomVideoFrameRate = new VideoFrameRate(25); // Optional: Set if camera doesn't report frame rate
mjpegSettings.Latency = TimeSpan.FromMilliseconds(200); // Optional: Adjust latency
var httpMjpegSource = new HTTPMJPEGSourceBlock(mjpegSettings);
// Create video renderer
var videoRenderer = new VideoRendererBlock(pipeline, VideoView1); // Assuming VideoView1 is your display control
// Connect blocks
pipeline.Connect(httpMjpegSource.Output, videoRenderer.Input);
// Start pipeline
await pipeline.StartAsync();
```
#### Sample applications
- Similar to HTTP MJPEG Source Demo mentioned under the generic HTTP Source Block.
#### Platforms
Windows, macOS, Linux.
### NDI Source Block
The NDI source block supports connection to NDI software sources and devices supporting the NDI protocol.
#### Block info
Name: NDISourceBlock.
| Pin direction | Media type | Pins count |
|-----------------|:--------------------:|:-----------:|
| Output audio | Uncompressed | 1 |
| Output video | Uncompressed | 1 |
#### The sample pipeline
```mermaid
graph LR;
NDISourceBlock-->VideoRendererBlock;
NDISourceBlock-->AudioRendererBlock;
```
#### Sample code
```csharp
var pipeline = new MediaBlocksPipeline();
// get NDI source info by enumerating sources
var ndiSources = await DeviceEnumerator.Shared.NDISourcesAsync();
var ndiSourceInfo = ndiSources[0];
// create NDI source settings
var ndiSettings = NDISourceSettings.CreateAsync(ndiSourceInfo);
var ndiSource = new NDISourceBlock(ndiSettings);
var videoRenderer = new VideoRendererBlock(pipeline, VideoView1);
pipeline.Connect(ndiSource.VideoOutput, videoRenderer.Input);
var audioRenderer = new AudioRendererBlock();
pipeline.Connect(ndiSource.AudioOutput, audioRenderer.Input);
await pipeline.StartAsync();
```
#### Sample applications
- [NDI Source Demo](https://github.com/visioforge/.Net-SDK-s-samples/tree/master/Media%20Blocks%20SDK/WPF/CSharp/NDI%20Source%20Demo)
#### Platforms
Windows, macOS, Linux.
### GenICam Source Block
The GenICam source supports connection to GigE, and the USB3 Vision camera supports the GenICam protocol.
#### Block info
Name: GenICamSourceBlock.
| Pin direction | Media type | Pins count |
| --- | :---: | :---: |
| Output video | various | one or more |
#### The sample pipeline
```mermaid
graph LR;
GenICamSourceBlock-->VideoRendererBlock;
```
#### Sample code
```csharp
var pipeline = new MediaBlocksPipeline();
var sourceSettings = new GenICamSourceSettings(cbCamera.Text, new VisioForge.Core.Types.Rect(0, 0, 512, 512), 15, GenICamPixelFormat.Mono8);
var source = new GenICamSourceBlock(sourceSettings);
var videoRenderer = new VideoRendererBlock(pipeline, VideoView1);
pipeline.Connect(source.Output, videoRenderer.Input);
await pipeline.StartAsync();
```
#### Sample applications
- [GenICam Source Demo](https://github.com/visioforge/.Net-SDK-s-samples/tree/master/Media%20Blocks%20SDK/WPF/CSharp/GenICam%20Source%20Demo)
#### Prerequisites
##### macOS
Install the `Aravis` package using Homebrew:
```bash
brew install aravis
```
##### Linux
Install the `Aravis` package using the package manager:
```bash
sudo apt-get install libaravis-0.8-dev
```
##### Windows
Install the `VisioForge.CrossPlatform.GenICam.Windows.x64` package to your project using NuGet.
#### Platforms
Windows, macOS, Linux
### SRT Source Block (with decoding)
The `Secure Reliable Transport (SRT)` is an open-source video streaming protocol designed for secure and low-latency delivery over unpredictable networks, like the public internet. Developed by Haivision, SRT optimizes streaming performance by dynamically adapting to varying bandwidths and minimizing the effects of packet loss. It incorporates AES encryption for secure content transmission. Primarily used in broadcasting and online streaming, SRT is crucial for delivering high-quality video feeds in real-time applications, enhancing viewer experiences even in challenging network conditions. It supports point-to-point and multicast streaming, making it versatile for diverse setups.
The SRT source block provides decoded video and audio streams from an SRT source.
#### Block info
Name: SRTSourceBlock.
| Pin direction | Media type | Pins count |
| --- | :---: | :---: |
| Output video | Uncompressed | 0+ |
| Output audio | Uncompressed | 0+ |
#### Settings
The `SRTSourceBlock` is configured using `SRTSourceSettings`. This class provides comprehensive options for SRT connections:
- `Uri` (string): The SRT URI (e.g., "srt://127.0.0.1:8888" or "srt://example.com:9000?mode=listener"). Default is "srt://127.0.0.1:8888".
- `Mode` (`SRTConnectionMode` enum): Specifies the SRT connection mode. Default is `Caller`. See `SRTConnectionMode` enum details below.
- `Passphrase` (string): The password for encrypted transmission.
- `PbKeyLen` (`SRTKeyLength` enum): The crypto key length for AES encryption. Default is `NoKey`. See `SRTKeyLength` enum details below.
- `Latency` (`TimeSpan`): The maximum accepted transmission latency (receiver side for caller/listener, or for both in rendezvous). Default is 125 milliseconds.
- `StreamId` (string): The stream ID for SRT access control.
- `LocalAddress` (string): The local address to bind to when in `Listener` or `Rendezvous` mode. Default `null` (any).
- `LocalPort` (uint): The local port to bind to when in `Listener` or `Rendezvous` mode. Default 7001.
- `Authentication` (bool): Whether to authenticate the connection. Default `true`.
- `AutoReconnect` (bool): Whether the source should attempt to reconnect if the connection fails. Default `true`.
- `KeepListening` (bool): If `false` (default), the element will signal end-of-stream when the remote client disconnects (in listener mode). If `true`, it keeps waiting for reconnection.
- `PollTimeout` (`TimeSpan`): Polling timeout used when an SRT poll is started. Default 1000 milliseconds.
- `WaitForConnection` (bool): If `true` (default), blocks the stream until a client connects (in listener mode).
The `SRTSourceSettings` can be initialized using `await SRTSourceSettings.CreateAsync(string uri, bool ignoreMediaInfoReader = false)`. Setting `ignoreMediaInfoReader` to `true` can be useful if media info reading fails for a live stream.
##### `SRTConnectionMode` Enum
Defines the operational mode for an SRT connection:
- `None` (0): No connection mode specified (should not typically be used directly).
- `Caller` (1): The source initiates the connection to a listener.
- `Listener` (2): The source waits for an incoming connection from a caller.
- `Rendezvous` (3): Both ends initiate connection to each other simultaneously, useful for traversing firewalls.
##### `SRTKeyLength` Enum
Defines the key length for SRT's AES encryption:
- `NoKey` (0) / `Length0` (0): No encryption is used.
- `Length16` (16): 16-byte (128-bit) AES encryption key.
- `Length24` (24): 24-byte (192-bit) AES encryption key.
- `Length32` (32): 32-byte (256-bit) AES encryption key.
#### The sample pipeline
```mermaid
graph LR;
SRTSourceBlock-->VideoRendererBlock;
SRTSourceBlock-->AudioRendererBlock;
```
#### Sample code
```csharp
var pipeline = new MediaBlocksPipeline();
var source = new SRTSourceBlock(new SRTSourceSettings() { Uri = edURL.Text });
var videoRenderer = new VideoRendererBlock(pipeline, VideoView1);
var audioRenderer = new AudioRendererBlock();
pipeline.Connect(source.VideoOutput, videoRenderer.Input);
pipeline.Connect(source.AudioOutput, audioRenderer.Input);
await pipeline.StartAsync();
```
#### Sample applications
- [SRT Source Demo](https://github.com/visioforge/.Net-SDK-s-samples/tree/master/Media%20Blocks%20SDK/WPF/CSharp/SRT%20Source%20Demo)
#### Platforms
Windows, macOS, Linux, iOS, Android.
### SRT RAW Source Block
`The Secure Reliable Transport (SRT)` is a streaming protocol that optimizes video data delivery over unpredictable networks, like the Internet. It is open-source and designed to handle high-performance video and audio streaming. SRT provides security through end-to-end encryption, reliability by recovering lost packets, and low latency, which is suitable for live broadcasts. It adapts to varying network conditions by dynamically managing bandwidth, ensuring high-quality streams even under suboptimal conditions. Widely used in broadcasting and streaming applications, SRT supports interoperability and is ideal for remote production and content distribution.
The SRT source supports connection to SRT sources and provides a data stream. You can connect this block to `DecodeBinBlock` to decode the stream.
#### Block info
Name: SRTRAWSourceBlock.
| Pin direction | Media type | Pins count |
| --- | :---: | :---: |
| Output data | Any | one |
#### Settings
The `SRTRAWSourceBlock` is configured using `SRTSourceSettings`. Refer to the detailed description of `SRTSourceSettings` and its related enums (`SRTConnectionMode`, `SRTKeyLength`) under the `SRT Source Block (with decoding)` section for all available properties and their explanations.
#### The sample pipeline
```mermaid
graph LR;
SRTRAWSourceBlock-->DecodeBinBlock;
DecodeBinBlock-->VideoRendererBlock;
DecodeBinBlock-->AudioRendererBlock;
```
#### Sample code
```csharp
var pipeline = new MediaBlocksPipeline();
var source = new SRTRAWSourceBlock(new SRTSourceSettings() { Uri = edURL.Text });
var decodeBin = new DecodeBinBlock();
var videoRenderer = new VideoRendererBlock(pipeline, VideoView1);
var audioRenderer = new AudioRendererBlock();
pipeline.Connect(source.Output, decodeBin.Input);
pipeline.Connect(decodeBin.VideoOutput, videoRenderer.Input);
pipeline.Connect(decodeBin.AudioOutput, audioRenderer.Input);
await pipeline.StartAsync();
```
#### Platforms
Windows, macOS, Linux, iOS, Android.
## Other Source Blocks
### Screen Source Block
Screen source supports recording video from the screen. You can select the display (if more than one), the part of the screen to be recorded, and optional mouse cursor recording.
#### Settings
The `ScreenSourceBlock` uses platform-specific settings classes. The choice of settings class determines the underlying screen capture technology. The `ScreenCaptureSourceType` enum indicates the available technologies:
##### Windows
- `ScreenCaptureDX9SourceSettings` - Use `DirectX 9` for screen recording. (`ScreenCaptureSourceType.DX9`)
- `ScreenCaptureD3D11SourceSettings` - Use `Direct3D 11` Desktop Duplication for screen recording. Allows specific window capture. (`ScreenCaptureSourceType.D3D11DesktopDuplication`)
- `ScreenCaptureGDISourceSettings` - Use `GDI` for screen recording. (`ScreenCaptureSourceType.GDI`)
##### macOS
`ScreenCaptureMacOSSourceSettings` - Use `AVFoundation` for screen recording. (`ScreenCaptureSourceType.AVFoundation`)
##### Linux
`ScreenCaptureXDisplaySourceSettings` - Use `X11` (XDisplay) for screen recording. (`ScreenCaptureSourceType.XDisplay`)
##### iOS
`IOSScreenSourceSettings` - Use `AVFoundation` for current window/app recording. (`ScreenCaptureSourceType.IOSScreen`)
#### Block info
Name: ScreenSourceBlock.
| Pin direction | Media type | Pins count |
| --- | :---: | :---: |
| Output video | uncompressed video | 1 |
#### The sample pipeline
```mermaid
graph LR;
ScreenSourceBlock-->H264EncoderBlock;
H264EncoderBlock-->MP4SinkBlock;
```
#### Sample code
```csharp
// create pipeline
var pipeline = new MediaBlocksPipeline();
// create source settings
var screenSourceSettings = new ScreenCaptureDX9SourceSettings() { FrameRate = 15 }
// create source block
var screenSourceBlock = new ScreenSourceBlock(screenSourceSettings);
// create video encoder block and connect it to the source block
var h264EncoderBlock = new H264EncoderBlock(new OpenH264EncoderSettings());
pipeline.Connect(screenSourceBlock.Output, h264EncoderBlock.Input);
// create MP4 sink block and connect it to the encoder block
var mp4SinkBlock = new MP4SinkBlock(new MP4SinkSettings(@"output.mp4"));
pipeline.Connect(h264EncoderBlock.Output, mp4SinkBlock.CreateNewInput(MediaBlockPadMediaType.Video));
// run pipeline
await pipeline.StartAsync();
```
#### [Windows] Window capture
You can capture a specific window by using the `ScreenCaptureD3D11SourceSettings` class.
```csharp
// create Direct3D11 source
var source = new ScreenCaptureD3D11SourceSettings();
// set frame rate
source.FrameRate = new VideoFrameRate(30);
// get handle of the window
var wih = new System.Windows.Interop.WindowInteropHelper(this);
source.WindowHandle = wih.Handle;
// create source block
var screenSourceBlock = new ScreenSourceBlock(new ScreenCaptureDX9SourceSettings() { FrameRate = 15 });
// other code is the same as above
```
#### Sample applications
- [Screen Capture Demo (WPF)](https://github.com/visioforge/.Net-SDK-s-samples/tree/master/Media%20Blocks%20SDK/WPF/CSharp/Screen%20Capture)
- [Screen Capture Demo (MAUI)](https://github.com/visioforge/.Net-SDK-s-samples/tree/master/Media%20Blocks%20SDK/MAUI/ScreenCaptureMB)
- [Screen Capture Demo (iOS)](https://github.com/visioforge/.Net-SDK-s-samples/tree/master/Media%20Blocks%20SDK/iOS/ScreenCapture)
#### Platforms
Windows, macOS, Linux, iOS.
### Virtual Video Source Block
VirtualVideoSourceBlock is used to produce test video data in a wide variety of video formats. The type of test data is controlled by the settings.
#### Settings
The `VirtualVideoSourceBlock` is configured using `VirtualVideoSourceSettings`. Key properties:
- `Pattern` (`VirtualVideoSourcePattern` enum): Specifies the type of test pattern to generate. See `VirtualVideoSourcePattern` enum below for available patterns. Default is `SMPTE`.
- `Width` (int): Width of the output video (default 1280).
- `Height` (int): Height of the output video (default 720).
- `FrameRate` (`VideoFrameRate`): Frame rate of the output video (default 30fps).
- `Format` (`VideoFormatX` enum): Pixel format of the video (default `RGB`).
- `ForegroundColor` (`SKColor`): For patterns that use a foreground color (e.g., `SolidColor`), this property defines it (default `SKColors.White`).
Constructors:
- `VirtualVideoSourceSettings()`: Default constructor.
- `VirtualVideoSourceSettings(int width, int height, VideoFrameRate frameRate)`: Initializes with specified dimensions and frame rate.
##### `VirtualVideoSourcePattern` Enum
Defines the test pattern generated by `VirtualVideoSourceBlock`:
- `SMPTE` (0): SMPTE 100% color bars.
- `Snow` (1): Random (television snow).
- `Black` (2): 100% Black.
- `White` (3): 100% White.
- `Red` (4), `Green` (5), `Blue` (6): Solid colors.
- `Checkers1` (7) to `Checkers8` (10): Checkerboard patterns with 1, 2, 4, or 8 pixel squares.
- `Circular` (11): Circular pattern.
- `Blink` (12): Blinking pattern.
- `SMPTE75` (13): SMPTE 75% color bars.
- `ZonePlate` (14): Zone plate.
- `Gamut` (15): Gamut checkers.
- `ChromaZonePlate` (16): Chroma zone plate.
- `SolidColor` (17): A solid color, defined by `ForegroundColor`.
- `Ball` (18): Moving ball.
- `SMPTE100` (19): Alias for SMPTE 100% color bars.
- `Bar` (20): Bar pattern.
- `Pinwheel` (21): Pinwheel pattern.
- `Spokes` (22): Spokes pattern.
- `Gradient` (23): Gradient pattern.
- `Colors` (24): Various colors pattern.
- `SMPTERP219` (25): SMPTE test pattern, RP 219 conformant.
#### Block info
Name: VirtualVideoSourceBlock.
| Pin direction | Media type | Pins count |
| --- | :---: | :---: |
| Output video | uncompressed video | 1 |
#### The sample pipeline
```mermaid
graph LR;
VirtualVideoSourceBlock-->VideoRendererBlock;
```
#### Sample code
```csharp
var pipeline = new MediaBlocksPipeline();
var audioSourceBlock = new VirtualAudioSourceBlock(new VirtualAudioSourceSettings());
var videoSourceBlock = new VirtualVideoSourceBlock(new VirtualVideoSourceSettings());
var videoRenderer = new VideoRendererBlock(pipeline, VideoView1);
pipeline.Connect(videoSourceBlock.Output, videoRenderer.Input);
var audioRenderer = new AudioRendererBlock();
pipeline.Connect(audioSourceBlock.Output, audioRenderer.Input);
await pipeline.StartAsync();
```
#### Platforms
Windows, macOS, Linux, iOS, Android.
### Virtual Audio Source Block
VirtualAudioSourceBlock is used to produce test audio data in a wide variety of audio formats. The type of test data is controlled by the settings.
#### Settings
The `VirtualAudioSourceBlock` is configured using `VirtualAudioSourceSettings`. Key properties:
- `Wave` (`VirtualAudioSourceSettingsWave` enum): Specifies the type of audio waveform to generate. See `VirtualAudioSourceSettingsWave` enum below. Default `Sine`.
- `Format` (`AudioFormatX` enum): Audio sample format (default `S16LE`).
- `SampleRate` (int): Sample rate in Hz (default 48000).
- `Channels` (int): Number of audio channels (default 2).
- `Volume` (double): Volume of the test signal (0.0 to 1.0, default 0.8).
- `Frequency` (double): Frequency of the test signal in Hz (e.g., for Sine wave, default 440).
- `IsLive` (bool): Indicates if the source is live (default `true`).
- `ApplyTickRamp` (bool): Apply ramp to tick samples (default `false`).
- `CanActivatePull` (bool): Can activate in pull mode (default `false`).
- `CanActivatePush` (bool): Can activate in push mode (default `true`).
- `MarkerTickPeriod` (uint): Make every Nth tick a marker tick (for `Ticks` wave, 0 = no marker, default 0).
- `MarkerTickVolume` (double): Volume of marker ticks (default 1.0).
- `SamplesPerBuffer` (int): Number of samples in each outgoing buffer (default 1024).
- `SinePeriodsPerTick` (uint): Number of sine wave periods in one tick (for `Ticks` wave, default 10).
- `TickInterval` (`TimeSpan`): Distance between start of current and start of next tick (default 1 second).
- `TimestampOffset` (`TimeSpan`): An offset added to timestamps (default `TimeSpan.Zero`).
Constructor:
- `VirtualAudioSourceSettings(VirtualAudioSourceSettingsWave wave = VirtualAudioSourceSettingsWave.Ticks, int sampleRate = 48000, int channels = 2, AudioFormatX format = AudioFormatX.S16LE)`
##### `VirtualAudioSourceSettingsWave` Enum
Defines the waveform for `VirtualAudioSourceBlock`:
- `Sine` (0): Sine wave.
- `Square` (1): Square wave.
- `Saw` (2): Sawtooth wave.
- `Triangle` (3): Triangle wave.
- `Silence` (4): Silence.
- `WhiteNoise` (5): White uniform noise.
- `PinkNoise` (6): Pink noise.
- `SineTable` (7): Sine table.
- `Ticks` (8): Periodic Ticks.
- `GaussianNoise` (9): White Gaussian noise.
- `RedNoise` (10): Red (Brownian) noise.
- `BlueNoise` (11): Blue noise.
- `VioletNoise` (12): Violet noise.
#### Block info
Name: VirtualAudioSourceBlock.
| Pin direction | Media type | Pins count |
| --- | :---: | :---: |
| Output audio | uncompressed audio | 1 |
#### The sample pipeline
```mermaid
graph LR;
VirtualAudioSourceBlock-->AudioRendererBlock;
```
#### Sample code
```csharp
var pipeline = new MediaBlocksPipeline();
var audioSourceBlock = new VirtualAudioSourceBlock(new VirtualAudioSourceSettings());
var videoSourceBlock = new VirtualVideoSourceBlock(new VirtualVideoSourceSettings());
var videoRenderer = new VideoRendererBlock(pipeline, VideoView1);
pipeline.Connect(videoSourceBlock.Output, videoRenderer.Input);
var audioRenderer = new AudioRendererBlock();
pipeline.Connect(audioSourceBlock.Output, audioRenderer.Input);
await pipeline.StartAsync();
```
#### Platforms
Windows, macOS, Linux, iOS, Android.
### Demuxer Source Block
The Demuxer Source Block is used to demultiplex local media files into their constituent elementary streams (video, audio, subtitles). It allows for selective rendering of these streams.
#### Block info
Name: DemuxerSourceBlock.
| Pin direction | Media type | Pins count |
|-----------------|:--------------------:|:-----------:|
| Output video | Depends on file | 0 or 1 |
| Output audio | Depends on file | 0 or 1+ |
| Output subtitle | Depends on file | 0 or 1+ |
#### The sample pipeline
```mermaid
graph LR;
DemuxerSourceBlock -- Video Stream --> VideoRendererBlock;
DemuxerSourceBlock -- Audio Stream --> AudioRendererBlock;
```
#### Sample code
```csharp
var pipeline = new MediaBlocksPipeline();
// Create settings, ensure to await CreateAsync
var demuxerSettings = await DemuxerSourceSettings.CreateAsync(
"path/to/your/video.mp4",
renderVideo: true,
renderAudio: true,
renderSubtitle: false);
if (demuxerSettings == null)
{
Console.WriteLine("Failed to initialize demuxer settings. Ensure the file exists and is readable.");
return;
}
var demuxerSource = new DemuxerSourceBlock(demuxerSettings);
// Setup video rendering if video is available and rendered
if (demuxerSettings.RenderVideo && demuxerSource.VideoOutput != null)
{
var videoRenderer = new VideoRendererBlock(pipeline, VideoView1); // Assuming VideoView1 is your display control
pipeline.Connect(demuxerSource.VideoOutput, videoRenderer.Input);
}
// Setup audio rendering if audio is available and rendered
if (demuxerSettings.RenderAudio && demuxerSource.AudioOutput != null)
{
var audioRenderer = new AudioRendererBlock();
pipeline.Connect(demuxerSource.AudioOutput, audioRenderer.Input);
}
// Start pipeline
await pipeline.StartAsync();
```
#### Sample applications
- No specific sample application link, but can be used in player-like scenarios.
#### Platforms
Windows, macOS, Linux, iOS, Android.
### Image Video Source Block
The Image Video Source Block generates a video stream from a static image file (e.g., JPG, PNG). It repeatedly outputs the image as video frames according to the specified frame rate.
#### Block info
Name: ImageVideoSourceBlock.
| Pin direction | Media type | Pins count |
|---------------|:--------------------:|:----------:|
| Output video | Uncompressed video | 1 |
#### The sample pipeline
```mermaid
graph LR;
ImageVideoSourceBlock-->VideoRendererBlock;
```
#### Sample code
```csharp
var pipeline = new MediaBlocksPipeline();
// Create image video source settings
var imageSourceSettings = new ImageVideoSourceSettings("path/to/your/image.jpg"); // Replace with your image path
imageSourceSettings.FrameRate = new VideoFrameRate(10); // Output 10 frames per second
imageSourceSettings.IsLive = true; // Treat as a live source (optional)
// imageSourceSettings.NumBuffers = 100; // Optional: output only 100 frames then stop
var imageSource = new ImageVideoSourceBlock(imageSourceSettings);
// Create video renderer
var videoRenderer = new VideoRendererBlock(pipeline, VideoView1); // Assuming VideoView1 is your display control
// Connect blocks
pipeline.Connect(imageSource.Output, videoRenderer.Input);
// Start pipeline
await pipeline.StartAsync();
```
#### Remarks
This block uses SkiaSharp for image decoding, so ensure necessary dependencies are met if not using a standard VisioForge package that includes it.
#### Platforms
Windows, macOS, Linux, iOS, Android.
## Push Source Blocks
Push Source blocks allow you to feed media data (video, audio, JPEG images, or generic data) directly into the Media Blocks pipeline from your application code. This is useful when your media originates from a custom source, such as a proprietary capture device, a network stream not supported by built-in blocks, or procedurally generated content.
The behavior of push sources is generally controlled by common settings available through the `IPushSourceSettings` interface, implemented by specific push source settings classes:
- `IsLive` (bool): Indicates if the source is live. Defaults vary by type (e.g., `true` for audio/video).
- `DoTimestamp` (bool): If `true`, the block will attempt to generate timestamps for the pushed data.
- `StreamType` (`PushSourceStreamType` enum: `Stream` or `SeekableStream`): Defines the stream characteristics.
- `PushFormat` (`PushSourceFormat` enum: `Bytes`, `Time`, `Default`, `Automatic`): Controls how data is pushed (e.g., based on byte count or time).
- `BlockPushData` (bool): If `true`, the push operation will block until the data is consumed by the pipeline.
The specific type of push source is determined by the `PushSourceType` enum: `Video`, `Audio`, `Data`, `JPEG`.
### Push Video Source Block
Allows pushing raw video frames into the pipeline.
#### Block info
Name: `PushSourceBlock` (configured for video).
| Pin direction | Media type | Pins count |
|---------------|:--------------------:|:----------:|
| Output video | Uncompressed video | 1 |
#### Settings
Configured using `PushVideoSourceSettings`:
- `Width` (int): Width of the video frames.
- `Height` (int): Height of the video frames.
- `FrameRate` (`VideoFrameRate`): Frame rate of the video.
- `Format` (`VideoFormatX` enum): Pixel format of the video frames (e.g., `RGB`, `NV12`, `I420`).
- Inherits common push settings like `IsLive` (defaults to `true`), `DoTimestamp`, `StreamType`, `PushFormat`, `BlockPushData`.
Constructor: `PushVideoSourceSettings(int width, int height, VideoFrameRate frameRate, VideoFormatX format = VideoFormatX.RGB)`
#### The sample pipeline
```mermaid
graph LR;
PushVideoSourceBlock-->VideoEncoderBlock-->MP4SinkBlock;
PushVideoSourceBlock-->VideoRendererBlock;
```
#### Sample code
```csharp
var pipeline = new MediaBlocksPipeline();
// Configure push video source
var videoPushSettings = new PushVideoSourceSettings(
width: 640,
height: 480,
frameRate: new VideoFrameRate(30),
format: VideoFormatX.RGB);
// videoPushSettings.IsLive = true; // Default
var videoPushSource = new PushSourceBlock(videoPushSettings);
// Example: Render the pushed video
var videoRenderer = new VideoRendererBlock(pipeline, VideoView1);
pipeline.Connect(videoPushSource.Output, videoRenderer.Input);
// Start pipeline
await pipeline.StartAsync();
// In a separate thread or task, push video frames:
// byte[] frameData = ... ; // Your raw RGB frame data (640 * 480 * 3 bytes)
// videoPushSource.PushFrame(frameData);
// Call PushFrame repeatedly for each new video frame.
```
#### Platforms
Windows, macOS, Linux, iOS, Android.
### Push Audio Source Block
Allows pushing raw audio samples into the pipeline.
#### Block info
Name: `PushSourceBlock` (configured for audio).
| Pin direction | Media type | Pins count |
|---------------|:--------------------:|:----------:|
| Output audio | Uncompressed audio | 1 |
#### Settings
Configured using `PushAudioSourceSettings`:
- `SampleRate` (int): Sample rate of the audio (e.g., 44100, 48000).
- `Channels` (int): Number of audio channels (e.g., 1 for mono, 2 for stereo).
- `Format` (`AudioFormatX` enum): Format of the audio samples (e.g., `S16LE` for 16-bit signed little-endian PCM).
- Inherits common push settings like `IsLive` (defaults to `true`), `DoTimestamp`, `StreamType`, `PushFormat`, `BlockPushData`.
Constructor: `PushAudioSourceSettings(bool isLive = true, int sampleRate = 48000, int channels = 2, AudioFormatX format = AudioFormatX.S16LE)`
#### The sample pipeline
```mermaid
graph LR;
PushAudioSourceBlock-->AudioEncoderBlock-->MP4SinkBlock;
PushAudioSourceBlock-->AudioRendererBlock;
```
#### Sample code
```csharp
var pipeline = new MediaBlocksPipeline();
// Configure push audio source
var audioPushSettings = new PushAudioSourceSettings(
isLive: true,
sampleRate: 44100,
channels: 2,
format: AudioFormatX.S16LE);
var audioPushSource = new PushSourceBlock(audioPushSettings);
// Example: Render the pushed audio
var audioRenderer = new AudioRendererBlock();
pipeline.Connect(audioPushSource.Output, audioRenderer.Input);
// Start pipeline
await pipeline.StartAsync();
// In a separate thread or task, push audio samples:
// byte[] audioData = ... ; // Your raw PCM S16LE audio data
// audioPushSource.PushFrame(audioData);
// Call PushFrame repeatedly for new audio data.
```
#### Platforms
Windows, macOS, Linux, iOS, Android.
### Push Data Source Block
Allows pushing generic byte data into the pipeline. The interpretation of this data depends on the `Caps` (capabilities) specified.
#### Block info
Name: `PushSourceBlock` (configured for data).
| Pin direction | Media type | Pins count |
|---------------|:----------:|:----------:|
| Output data | Custom | 1 |
#### Settings
Configured using `PushDataSourceSettings`:
- `Caps` (`Gst.Caps`): GStreamer capabilities string describing the data format (e.g., "video/x-h264, stream-format=byte-stream"). This is crucial for downstream blocks to understand the data.
- `PadMediaType` (`MediaBlockPadMediaType` enum): Specifies the type of the output pad (e.g., `Video`, `Audio`, `Data`, `Auto`).
- Inherits common push settings like `IsLive`, `DoTimestamp`, `StreamType`, `PushFormat`, `BlockPushData`.
#### The sample pipeline
```mermaid
graph LR;
PushDataSourceBlock-->ParserOrDecoder-->Renderer;
```
Example: Pushing H.264 Annex B byte stream
```mermaid
graph LR;
PushDataSourceBlock-->H264ParserBlock-->H264DecoderBlock-->VideoRendererBlock;
```
#### Sample code
```csharp
var pipeline = new MediaBlocksPipeline();
// Configure push data source for H.264 byte stream
var dataPushSettings = new PushDataSourceSettings();
dataPushSettings.Caps = new Gst.Caps("video/x-h264, stream-format=(string)byte-stream");
dataPushSettings.PadMediaType = MediaBlockPadMediaType.Video;
// dataPushSettings.IsLive = true; // Set if live
var dataPushSource = new PushSourceBlock(dataPushSettings);
// Example: Decode and render H.264 stream
var h264Parser = new H264ParserBlock();
var h264Decoder = new H264DecoderBlock(); // Or OpenH264DecoderBlock, etc.
var videoRenderer = new VideoRendererBlock(pipeline, VideoView1);
pipeline.Connect(dataPushSource.Output, h264Parser.Input);
pipeline.Connect(h264Parser.Output, h264Decoder.Input);
pipeline.Connect(h264Decoder.Output, videoRenderer.Input);
// Start pipeline
await pipeline.StartAsync();
// In a separate thread or task, push H.264 NALUs:
// byte[] naluData = ... ; // Your H.264 NALU data
// dataPushSource.PushFrame(naluData);
```
#### Platforms
Windows, macOS, Linux, iOS, Android.
### Push JPEG Source Block
Allows pushing individual JPEG images, which are then output as a video stream.
#### Block info
Name: `PushSourceBlock` (configured for JPEG).
| Pin direction | Media type | Pins count |
|---------------|:--------------------:|:----------:|
| Output video | Uncompressed video | 1 |
#### Settings
Configured using `PushJPEGSourceSettings`:
- `Width` (int): Width of the decoded JPEG images.
- `Height` (int): Height of the decoded JPEG images.
- `FrameRate` (`VideoFrameRate`): The frame rate at which the JPEG images will be presented as a video stream.
- Inherits common push settings like `IsLive` (defaults to `true`), `DoTimestamp`, `StreamType`, `PushFormat`, `BlockPushData`.
Constructor: `PushJPEGSourceSettings(int width, int height, VideoFrameRate frameRate)`
#### The sample pipeline
```mermaid
graph LR;
PushJPEGSourceBlock-->VideoRendererBlock;
PushJPEGSourceBlock-->VideoEncoderBlock-->MP4SinkBlock;
```
#### Sample code
```csharp
var pipeline = new MediaBlocksPipeline();
// Configure push JPEG source
var jpegPushSettings = new PushJPEGSourceSettings(
width: 1280,
height: 720,
frameRate: new VideoFrameRate(10)); // Present JPEGs as a 10 FPS video
var jpegPushSource = new PushSourceBlock(jpegPushSettings);
// Example: Render the video stream from JPEGs
var videoRenderer = new VideoRendererBlock(pipeline, VideoView1);
pipeline.Connect(jpegPushSource.Output, videoRenderer.Input);
// Start pipeline
await pipeline.StartAsync();
// In a separate thread or task, push JPEG image data:
// byte[] jpegImageData = File.ReadAllBytes("image.jpg");
// jpegPushSource.PushFrame(jpegImageData);
// Call PushFrame for each new JPEG image.
```
#### Platforms
Windows, macOS, Linux, iOS, Android.
## Apple Platform Source Blocks
### iOS Video Source Block
iOSVideoSourceBlock provides video capture from the device camera on iOS platforms. It is available only on iOS (not macOS Catalyst).
#### Block info
Name: IOSVideoSourceBlock.
| Pin direction | Media type | Pins count |
|---------------|:------------------:|:----------:|
| Output video | Uncompressed video | 1 |
#### Enumerate available devices
Use `DeviceEnumerator.Shared.VideoSourcesAsync()` to get a list of available video devices on iOS. Each device is represented by a `VideoCaptureDeviceInfo` object.
#### The sample pipeline
```mermaid
graph LR;
IOSVideoSourceBlock-->VideoRendererBlock;
```
#### Sample code
```csharp
// create pipeline
var pipeline = new MediaBlocksPipeline();
// select the first available video device
var device = (await DeviceEnumerator.Shared.VideoSourcesAsync())[0];
VideoCaptureDeviceSourceSettings videoSourceSettings = null;
if (device != null)
{
var formatItem = device.VideoFormats[0];
if (formatItem != null)
{
videoSourceSettings = new VideoCaptureDeviceSourceSettings(device)
{
Format = formatItem.ToFormat()
};
videoSourceSettings.Format.FrameRate = formatItem.FrameRateList[0];
}
}
// create iOS video source block
var videoSource = new IOSVideoSourceBlock(videoSourceSettings);
// create video renderer block
var videoRenderer = new VideoRendererBlock(pipeline, VideoView1);
// connect blocks
pipeline.Connect(videoSource.Output, videoRenderer.Input);
// start pipeline
await pipeline.StartAsync();
```
#### Platforms
iOS (not available on macOS Catalyst)
---
### macOS Audio Source Block
OSXAudioSourceBlock provides audio capture from input devices on macOS platforms.
#### Block info
Name: OSXAudioSourceBlock.
| Pin direction | Media type | Pins count |
|---------------|:------------------:|:----------:|
| Output audio | Uncompressed audio | 1 |
#### Enumerate available devices
Use `DeviceEnumerator.Shared.AudioSourcesAsync()` to get a list of available audio devices on macOS. Each device is represented by an `AudioCaptureDeviceInfo` object.
#### The sample pipeline
```mermaid
graph LR;
OSXAudioSourceBlock-->AudioRendererBlock;
```
#### Sample code
```csharp
// create pipeline
var pipeline = new MediaBlocksPipeline();
// select the first available audio device
var devices = await DeviceEnumerator.Shared.AudioSourcesAsync();
var device = devices.Length > 0 ? devices[0] : null;
OSXAudioSourceSettings audioSourceSettings = null;
if (device != null)
{
var formatItem = device.Formats[0];
if (formatItem != null)
{
audioSourceSettings = new OSXAudioSourceSettings(device.DeviceID, formatItem);
}
}
// create macOS audio source block
var audioSource = new OSXAudioSourceBlock(audioSourceSettings);
// create audio renderer block
var audioRenderer = new AudioRendererBlock();
// connect blocks
pipeline.Connect(audioSource.Output, audioRenderer.Input);
// start pipeline
await pipeline.StartAsync();
```
#### Platforms
macOS (not available on iOS)
---END OF PAGE---
# Local File: .\dotnet\mediablocks\Special\index.md
---
title: Special .Net Media Blocks & Customization
description: Discover special media blocks like Null Renderer, Tee, and Super MediaBlock in the VisioForge Media Blocks SDK for .Net. Learn to customize media pipelines with advanced settings for encryption, custom GStreamer elements, and input source switching.
sidebar_label: Special Blocks
---
# Special blocks
[!badge size="xl" target="blank" variant="info" text="Media Blocks SDK .Net"](https://www.visioforge.com/media-blocks-sdk-net)
## Introduction
Special blocks are blocks that do not fit into any other category.
## Null Renderer
The null renderer block sends the data to null. This block may be required if your block has outputs you do not want to use.
### Block info
Name: NullRendererBlock.
Pin direction | Media type | Pins count
--- | :---: | :---:
Input | Any | 1
### The sample pipeline
The sample pipeline is shown below. It reads a file and sends the video data to the video samples grabber, where you can grab each video frame after decoding. The Null renderer block is used to end the pipeline.
```mermaid
graph LR;
UniversalSourceBlock-->VideoSampleGrabberBlock;
VideoSampleGrabberBlock-->NullRendererBlock;
```
### Sample code
```csharp
private void Start()
{
// create the pipeline
var pipeline = new MediaBlocksPipeline();
// create universal source block
var filename = "test.mp4";
var fileSource = new UniversalSourceBlock(await UniversalSourceSettings.CreateAsync(new Uri(filename)));
// create video sample grabber block and add the event handler
var sampleGrabber = new VideoSampleGrabberBlock();
sampleGrabber.OnVideoFrameBuffer += sampleGrabber_OnVideoFrameBuffer;
// create null renderer block
var nullRenderer = new NullRendererBlock();
// connect blocks
pipeline.Connect(fileSource.VideoOutput, sampleGrabber.Input);
pipeline.Connect(sampleGrabber.Output, nullRenderer.Input);
// start the pipeline
await pipeline.StartAsync();
}
private void sampleGrabber_OnVideoFrameBuffer(object sender, VideoFrameXBufferEventArgs e)
{
// received new video frame
}
```
### Platforms
Windows, macOS, Linux, iOS, Android.
## Tee
The tee block splits the video or audio data stream into multiple streams that completely copy the original stream.
### Block info
Name: TeeBlock.
Pin direction | Media type | Pins count
--- | :---: | :---:
Input | Any | 1
Output | Same as input | 2 or more
### The sample pipeline
```mermaid
graph LR;
UniversalSourceBlock-->TeeBlock;
TeeBlock-->VideoRendererBlock;
TeeBlock-->H264EncoderBlock;
H264EncoderBlock-->MP4SinkBlock;
```
### Sample code
```csharp
var pipeline = new MediaBlocksPipeline();
var filename = "test.mp4";
var fileSource = new UniversalSourceBlock(await UniversalSourceSettings.CreateAsync(new Uri(filename)));
var videoTee = new TeeBlock(2);
var h264Encoder = new H264EncoderBlock(new OpenH264EncoderSettings());
var mp4Muxer = new MP4SinkBlock(new MP4SinkSettings(@"output.mp4"));
var videoRenderer = new VideoRendererBlock(pipeline, VideoView1);
pipeline.Connect(fileSource.VideoOutput, videoTee.Input);
pipeline.Connect(videoTee.Outputs[0], videoRenderer.Input);
pipeline.Connect(videoTee.Outputs[1], h264Encoder.Input);
pipeline.Connect(h264Encoder.Output, mp4Muxer.CreateNewInput(MediaBlockPadMediaType.Video));
await pipeline.StartAsync();
```
#### Sample applications
- [Simple Capture Demo](https://github.com/visioforge/.Net-SDK-s-samples/tree/master/Media%20Blocks%20SDK/WPF/CSharp/Simple%20Capture%20Demo)
### Platforms
Windows, macOS, Linux, iOS, Android.
## Super MediaBlock
The Super MediaBlock allows you to combine multiple blocks into a single block.
### Block info
Name: SuperMediaBlock.
Pin direction | Media type | Pins count
--- | :---: | :---:
Input | Any | 1
Output | Any | 1
### The sample pipeline
```mermaid
graph LR;
VirtualVideoSourceBlock-->SuperMediaBlock;
SuperMediaBlock-->NullRendererBlock;
```
Inside the SuperMediaBlock:
```mermaid
graph LR;
FishEyeBlock-->ColorEffectsBlock;
```
Final pipeline:
```mermaid
graph LR;
VirtualVideoSourceBlock-->FishEyeBlock;
subgraph SuperMediaBlock
FishEyeBlock-->ColorEffectsBlock;
end
ColorEffectsBlock-->NullRendererBlock;
```
### Sample code
```csharp
var pipeline = new MediaBlocksPipeline();
var videoViewBlock = new VideoRendererBlock(pipeline, VideoView1);
var videoSource = new VirtualVideoSourceBlock(new VirtualVideoSourceSettings());
var colorEffectsBlock = new ColorEffectsBlock(VisioForge.Core.Types.X.VideoEffects.ColorEffectsPreset.Sepia);
var fishEyeBlock = new FishEyeBlock();
var superBlock = new SuperMediaBlock();
superBlock.Blocks.Add(fishEyeBlock);
superBlock.Blocks.Add(colorEffectsBlock);
superBlock.Configure(pipeline);
pipeline.Connect(videoSource.Output, superBlock.Input);
pipeline.Connect(superBlock.Output, videoViewBlock.Input);
await pipeline.StartAsync();
```
### Platforms
Windows, macOS, Linux, iOS, Android.
## AESCipher
The `AESCipher` enum defines the types of AES ciphers that can be used. (Source: `VisioForge.Core/Types/X/Special/AESCipher.cs`)
### Enum Values
- `AES_128`: AES 128-bit cipher key using CBC method.
- `AES_256`: AES 256-bit cipher key using CBC method.
### Platforms
Windows, macOS, Linux, iOS, Android.
## EncryptorDecryptorSettings
The `EncryptorDecryptorSettings` class holds settings for encryption and decryption operations. (Source: `VisioForge.Core/Types/X/Special/EncryptorDecryptorSettings.cs`)
### Properties
- `Cipher` (`AESCipher`): Gets or sets the AES cipher type. Defaults to `AES_128`.
- `Key` (`string`): Gets or sets the encryption key.
- `IV` (`string`): Gets or sets the initialization vector (16 bytes as hex).
- `SerializeIV` (`bool`): Gets or sets a value indicating whether to serialize the IV.
### Constructor
- `EncryptorDecryptorSettings(string key, string iv)`: Initializes a new instance with the given key and initialization vector.
### Platforms
Windows, macOS, Linux, iOS, Android.
## CustomMediaBlockPad
The `CustomMediaBlockPad` class defines information for a pad within a `CustomMediaBlock`. (Source: `VisioForge.Core/Types/X/Special/CustomMediaBlockPad.cs`)
### Properties
- `Direction` (`MediaBlockPadDirection`): Gets or sets the pad direction (input/output).
- `MediaType` (`MediaBlockPadMediaType`): Gets or sets the media type of the pad (e.g., Audio, Video).
- `CustomCaps` (`Gst.Caps`): Gets or sets custom GStreamer capabilities for an output pad.
### Constructor
- `CustomMediaBlockPad(MediaBlockPadDirection direction, MediaBlockPadMediaType mediaType)`: Initializes a new instance with the specified direction and media type.
### Platforms
Windows, macOS, Linux, iOS, Android.
## CustomMediaBlockSettings
The `CustomMediaBlockSettings` class provides settings for configuring a custom media block, potentially wrapping GStreamer elements. (Source: `VisioForge.Core/Types/X/Special/CustomMediaBlockSettings.cs`)
### Properties
- `ElementName` (`string`): Gets the name of the GStreamer element or Media Blocks SDK element. To create a custom GStreamer Bin, include square brackets, e.g., `"[ videotestsrc ! videoconvert ]"`.
- `UsePadAddedEvent` (`bool`): Gets or sets a value indicating whether to use the `pad-added` event for dynamically created GStreamer pads.
- `ElementParams` (`Dictionary`): Gets the parameters for the element.
- `Pads` (`List`): Gets the list of `CustomMediaBlockPad` definitions for the block.
- `ListProperties` (`bool`): Gets or sets a value indicating whether to list element properties to the Debug window after creation. Defaults to `false`.
### Constructor
- `CustomMediaBlockSettings(string elementName)`: Initializes a new instance with the specified element name.
### Platforms
Windows, macOS, Linux, iOS, Android.
## InputSelectorSyncMode
The `InputSelectorSyncMode` enum defines how an input-selector (used by `SourceSwitchSettings`) synchronizes buffers when in `sync-streams` mode. (Source: `VisioForge.Core/Types/X/Special/SourceSwitchSettings.cs`)
### Enum Values
- `ActiveSegment` (0): Sync using the current active segment.
- `Clock` (1): Sync using the clock.
### Platforms
Windows, macOS, Linux, iOS, Android.
## SourceSwitchSettings
The `SourceSwitchSettings` class configures a block that can switch between multiple input sources. (Source: `VisioForge.Core/Types/X/Special/SourceSwitchSettings.cs`)
The summary "Represents the currently active sink pad" from the code comment might be slightly misleading or incomplete for the class name `SourceSwitchSettings`. The properties suggest it's for configuring a source switcher.
### Properties
- `PadsCount` (`int`): Gets or sets the number of input pads. Defaults to `2`.
- `DefaultActivePad` (`int`): Gets or sets the initially active sink pad.
- `CacheBuffers` (`bool`): Gets or sets whether the active pad caches buffers to avoid missing frames when reactivated. Defaults to `false`.
- `DropBackwards` (`bool`): Gets or sets whether to drop buffers that go backwards relative to the last output buffer pre-switch. Defaults to `false`.
- `SyncMode` (`InputSelectorSyncMode`): Gets or sets how the input-selector syncs buffers in `sync-streams` mode. Defaults to `InputSelectorSyncMode.ActiveSegment`.
- `SyncStreams` (`bool`): Gets or sets if all inactive streams will be synced to the running time of the active stream or to the current clock. Defaults to `true`.
- `CustomName` (`string`): Gets or sets a custom name for logging purposes. Defaults to `"SourceSwitch"`.
### Constructor
- `SourceSwitchSettings(int padsCount = 2)`: Initializes a new instance, optionally specifying the number of pads.
### Platforms
Windows, macOS, Linux, iOS, Android.
---END OF PAGE---
# Local File: .\dotnet\mediablocks\VideoDecoders\index.md
---
title: .Net Media Video Decoder Blocks Guide
description: Explore a complete guide to .Net Media SDK video decoder blocks. Learn about various video decoders for your media processing pipelines.
sidebar_label: Video Decoders
---
# Video Decoder Blocks - VisioForge Media Blocks SDK .Net
[!badge size="xl" target="blank" variant="info" text="Media Blocks SDK .Net"](https://www.visioforge.com/media-blocks-sdk-net)
Video Decoder blocks are essential components in a media pipeline, responsible for decompressing encoded video streams into raw video frames that can be further processed or rendered. VisioForge Media Blocks SDK .Net offers a variety of video decoder blocks supporting numerous codecs and hardware acceleration technologies.
## Available Video Decoder Blocks
### H264 Decoder Block
Decodes H.264 (AVC) video streams. This is one of the most widely used video compression standards. The block can utilize different underlying decoder implementations like FFMPEG, OpenH264, or hardware-accelerated decoders if available.
#### Block info
Name: `H264DecoderBlock`.
| Pin direction | Media type | Pins count |
| --- | :---: | :---: |
| Input video | H.264 encoded video | 1 |
| Output video | Uncompressed video | 1 |
#### Settings
The `H264DecoderBlock` is configured using settings that implement `IH264DecoderSettings`. Available settings classes include:
- `FFMPEGH264DecoderSettings`
- `OpenH264DecoderSettings`
- `NVH264DecoderSettings` (for NVIDIA GPU acceleration)
- `VAAPIH264DecoderSettings` (for VA-API acceleration on Linux)
A constructor without parameters will attempt to select an available decoder automatically.
#### The sample pipeline
```mermaid
graph LR;
BasicFileSourceBlock -- Raw Data --> UniversalDemuxBlock;
UniversalDemuxBlock -- H.264 Video Stream --> H264DecoderBlock;
H264DecoderBlock -- Decoded Video --> VideoRendererBlock;
```
#### Sample code
```csharp
var pipeline = new MediaBlocksPipeline();
// Create H264 Decoder block
var h264Decoder = new H264DecoderBlock();
// Example: Create a basic file source, demuxer, and renderer
var basicFileSource = new BasicFileSourceBlock("test_h264.mp4");
// You'll need MediaFileInfo, typically obtained using MediaInfoReader
// Assuming MediaInfoReader.GetMediaInfoAsync is available:
var mediaInfo = await MediaInfoReader.GetMediaInfoAsync("test_h264.mp4");
if (mediaInfo == null)
{
Console.WriteLine("Failed to get media info.");
return;
}
var universalDemux = new UniversalDemuxBlock(mediaInfo, renderVideo: true, renderAudio: false);
var videoRenderer = new VideoRendererBlock(pipeline, VideoView1); // Assuming VideoView1
// Connect blocks
pipeline.Connect(basicFileSource.Output, universalDemux.Input);
pipeline.Connect(universalDemux.GetVideoOutput(), h264Decoder.Input);
pipeline.Connect(h264Decoder.Output, videoRenderer.Input);
// Start pipeline
await pipeline.StartAsync();
```
#### Availability
You can check for specific decoder implementations using `H264Decoder.IsAvailable(H264DecoderType decoderType)`.
`H264DecoderType` includes `FFMPEG`, `OpenH264`, `GPU_Nvidia_H264`, `VAAPI_H264`, etc.
#### Platforms
Windows, macOS, Linux. (Hardware-specific decoders like NVH264Decoder require specific hardware and drivers).
### JPEG Decoder Block
Decodes JPEG (Motion JPEG) video streams or individual JPEG images into raw video frames.
#### Block info
Name: `JPEGDecoderBlock`.
| Pin direction | Media type | Pins count |
| --- | :---: | :---: |
| Input video | JPEG encoded video/images | 1 |
| Output video | Uncompressed video | 1 |
#### The sample pipeline
```mermaid
graph LR;
HTTPSourceBlock -- MJPEG Stream --> JPEGDecoderBlock;
JPEGDecoderBlock -- Decoded Video --> VideoRendererBlock;
```
#### Sample code
```csharp
var pipeline = new MediaBlocksPipeline();
// Create JPEG Decoder block
var jpegDecoder = new JPEGDecoderBlock();
// Example: Create an HTTP source for an MJPEG camera and a video renderer
var httpSettings = new HTTPSourceSettings(new Uri("http://your-mjpeg-camera/stream"));
var httpSource = new HTTPSourceBlock(httpSettings);
var videoRenderer = new VideoRendererBlock(pipeline, VideoView1); // Assuming VideoView1
// Connect blocks
pipeline.Connect(httpSource.Output, jpegDecoder.Input);
pipeline.Connect(jpegDecoder.Output, videoRenderer.Input);
// Start pipeline
await pipeline.StartAsync();
```
#### Availability
You can check if the underlying NVIDIA JPEG decoder (if applicable) is available using `NVJPEGDecoder.IsAvailable()`. The generic JPEG decoder functionality is generally available.
#### Platforms
Windows, macOS, Linux. (NVIDIA specific implementation requires NVIDIA hardware).
### NVIDIA H.264 Decoder Block (NVH264DecoderBlock)
Provides hardware-accelerated decoding of H.264 (AVC) video streams using NVIDIA's NVDEC technology. This offers high performance and efficiency on systems with compatible NVIDIA GPUs.
#### Block info
Name: `NVH264DecoderBlock`.
| Pin direction | Media type | Pins count |
| --- | :---: | :---: |
| Input video | H.264 encoded video | 1 |
| Output video | Uncompressed video | 1 |
#### The sample pipeline
```mermaid
graph LR;
BasicFileSourceBlock -- Raw Data --> UniversalDemuxBlock;
UniversalDemuxBlock -- H.264 Video Stream --> NVH264DecoderBlock;
NVH264DecoderBlock -- Decoded Video --> VideoRendererBlock;
```
#### Sample code
```csharp
var pipeline = new MediaBlocksPipeline();
// Create NVIDIA H.264 Decoder block
var nvH264Decoder = new NVH264DecoderBlock();
// Example: Create a basic file source, demuxer, and renderer
var basicFileSource = new BasicFileSourceBlock("test_h264.mp4");
var mediaInfo = await MediaInfoReader.GetMediaInfoAsync("test_h264.mp4");
if (mediaInfo == null)
{
Console.WriteLine("Failed to get media info.");
return;
}
var universalDemux = new UniversalDemuxBlock(mediaInfo, renderVideo: true, renderAudio: false);
var videoRenderer = new VideoRendererBlock(pipeline, VideoView1);
// Connect blocks
pipeline.Connect(basicFileSource.Output, universalDemux.Input);
pipeline.Connect(universalDemux.GetVideoOutput(), nvH264Decoder.Input);
pipeline.Connect(nvH264Decoder.Output, videoRenderer.Input);
// Start pipeline
await pipeline.StartAsync();
```
#### Availability
Check availability using `NVH264Decoder.IsAvailable()`. Requires an NVIDIA GPU that supports NVDEC and appropriate drivers.
#### Platforms
Windows, Linux (with NVIDIA drivers).
### NVIDIA H.265 Decoder Block (NVH265DecoderBlock)
Provides hardware-accelerated decoding of H.265 (HEVC) video streams using NVIDIA's NVDEC technology. H.265 offers better compression efficiency than H.264.
#### Block info
Name: `NVH265DecoderBlock`.
| Pin direction | Media type | Pins count |
| --- | :---: | :---: |
| Input video | H.265/HEVC encoded video | 1 |
| Output video | Uncompressed video | 1 |
#### The sample pipeline
```mermaid
graph LR;
BasicFileSourceBlock -- Raw Data --> UniversalDemuxBlock;
UniversalDemuxBlock -- H.265 Video Stream --> NVH265DecoderBlock;
NVH265DecoderBlock -- Decoded Video --> VideoRendererBlock;
```
#### Sample code
```csharp
var pipeline = new MediaBlocksPipeline();
// Create NVIDIA H.265 Decoder block
var nvH265Decoder = new NVH265DecoderBlock();
// Example: Create a basic file source, demuxer, and renderer
var basicFileSource = new BasicFileSourceBlock("test_h265.mp4");
var mediaInfo = await MediaInfoReader.GetMediaInfoAsync("test_h265.mp4");
if (mediaInfo == null)
{
Console.WriteLine("Failed to get media info.");
return;
}
var universalDemux = new UniversalDemuxBlock(mediaInfo, renderVideo: true, renderAudio: false);
var videoRenderer = new VideoRendererBlock(pipeline, VideoView1);
// Connect blocks
pipeline.Connect(basicFileSource.Output, universalDemux.Input);
pipeline.Connect(universalDemux.GetVideoOutput(), nvH265Decoder.Input);
pipeline.Connect(nvH265Decoder.Output, videoRenderer.Input);
// Start pipeline
await pipeline.StartAsync();
```
#### Availability
Check availability using `NVH265Decoder.IsAvailable()`. Requires an NVIDIA GPU that supports NVDEC for H.265 and appropriate drivers.
#### Platforms
Windows, Linux (with NVIDIA drivers).
### NVIDIA JPEG Decoder Block (NVJPEGDecoderBlock)
Provides hardware-accelerated decoding of JPEG images or Motion JPEG (MJPEG) streams using NVIDIA's NVJPEG library. This is particularly useful for high-resolution or high-framerate MJPEG streams.
(Note: The sample pipeline for JPEG with BasicFileSourceBlock might be less common than HTTPSource for MJPEG. The example below is adapted but consider typical use cases.)
#### Block info
Name: `NVJPEGDecoderBlock`.
| Pin direction | Media type | Pins count |
| --- | :---: | :---: |
| Input video | JPEG encoded video/images | 1 |
| Output video | Uncompressed video | 1 |
#### The sample pipeline
```mermaid
graph LR;
BasicFileSourceBlock -- Raw MJPEG Data --> UniversalDemuxBlock;
UniversalDemuxBlock -- JPEG Video Stream --> NVJPEGDecoderBlock;
NVJPEGDecoderBlock -- Decoded Video --> VideoRendererBlock;
```
For live MJPEG streams, `HTTPSourceBlock --> NVJPEGDecoderBlock` is more typical.
#### Sample code
```csharp
var pipeline = new MediaBlocksPipeline();
// Create NVIDIA JPEG Decoder block
var nvJpegDecoder = new NVJPEGDecoderBlock();
// Example: Create a basic file source for an MJPEG file, demuxer, and renderer
// Ensure "test.mjpg" contains a Motion JPEG stream.
var basicFileSource = new BasicFileSourceBlock("test.mjpg");
var mediaInfo = await MediaInfoReader.GetMediaInfoAsync("test.mjpg");
if (mediaInfo == null || mediaInfo.VideoStreams.Count == 0 || !mediaInfo.VideoStreams[0].Codec.Contains("jpeg"))
{
Console.WriteLine("Failed to get MJPEG media info or not an MJPEG file.");
return;
}
var universalDemux = new UniversalDemuxBlock(mediaInfo, renderVideo: true, renderAudio: false);
var videoRenderer = new VideoRendererBlock(pipeline, VideoView1);
// Connect blocks
pipeline.Connect(basicFileSource.Output, universalDemux.Input);
pipeline.Connect(universalDemux.GetVideoOutput(), nvJpegDecoder.Input);
pipeline.Connect(nvJpegDecoder.Output, videoRenderer.Input);
// Start pipeline
await pipeline.StartAsync();
```
#### Availability
Check availability using `NVJPEGDecoder.IsAvailable()`. Requires an NVIDIA GPU and appropriate drivers.
#### Platforms
Windows, Linux (with NVIDIA drivers).
### NVIDIA MPEG-1 Decoder Block (NVMPEG1DecoderBlock)
Provides hardware-accelerated decoding of MPEG-1 video streams using NVIDIA's NVDEC technology.
#### Block info
Name: `NVMPEG1DecoderBlock`.
| Pin direction | Media type | Pins count |
| --- | :---: | :---: |
| Input video | MPEG-1 encoded video | 1 |
| Output video | Uncompressed video | 1 |
#### The sample pipeline
```mermaid
graph LR;
BasicFileSourceBlock -- Raw Data --> UniversalDemuxBlock;
UniversalDemuxBlock -- MPEG-1 Video Stream --> NVMPEG1DecoderBlock;
NVMPEG1DecoderBlock -- Decoded Video --> VideoRendererBlock;
```
#### Sample code
```csharp
var pipeline = new MediaBlocksPipeline();
// Create NVIDIA MPEG-1 Decoder block
var nvMpeg1Decoder = new NVMPEG1DecoderBlock();
// Example: Create a basic file source, demuxer, and renderer
var basicFileSource = new BasicFileSourceBlock("test_mpeg1.mpg");
var mediaInfo = await MediaInfoReader.GetMediaInfoAsync("test_mpeg1.mpg");
if (mediaInfo == null)
{
Console.WriteLine("Failed to get media info.");
return;
}
var universalDemux = new UniversalDemuxBlock(mediaInfo, renderVideo: true, renderAudio: false);
var videoRenderer = new VideoRendererBlock(pipeline, VideoView1);
// Connect blocks
pipeline.Connect(basicFileSource.Output, universalDemux.Input);
pipeline.Connect(universalDemux.GetVideoOutput(), nvMpeg1Decoder.Input);
pipeline.Connect(nvMpeg1Decoder.Output, videoRenderer.Input);
// Start pipeline
await pipeline.StartAsync();
```
#### Availability
Check availability using `NVMPEG1Decoder.IsAvailable()`. Requires an NVIDIA GPU that supports NVDEC for MPEG-1 and appropriate drivers.
#### Platforms
Windows, Linux (with NVIDIA drivers).
### NVIDIA MPEG-2 Decoder Block (NVMPEG2DecoderBlock)
Provides hardware-accelerated decoding of MPEG-2 video streams using NVIDIA's NVDEC technology. Commonly used for DVD video and some digital television broadcasts.
#### Block info
Name: `NVMPEG2DecoderBlock`.
| Pin direction | Media type | Pins count |
| --- | :---: | :---: |
| Input video | MPEG-2 encoded video | 1 |
| Output video | Uncompressed video | 1 |
#### The sample pipeline
```mermaid
graph LR;
BasicFileSourceBlock -- Raw Data --> UniversalDemuxBlock;
UniversalDemuxBlock -- MPEG-2 Video Stream --> NVMPEG2DecoderBlock;
NVMPEG2DecoderBlock -- Decoded Video --> VideoRendererBlock;
```
#### Sample code
```csharp
var pipeline = new MediaBlocksPipeline();
// Create NVIDIA MPEG-2 Decoder block
var nvMpeg2Decoder = new NVMPEG2DecoderBlock();
// Example: Create a basic file source, demuxer, and renderer
var basicFileSource = new BasicFileSourceBlock("test_mpeg2.mpg");
var mediaInfo = await MediaInfoReader.GetMediaInfoAsync("test_mpeg2.mpg");
if (mediaInfo == null)
{
Console.WriteLine("Failed to get media info.");
return;
}
var universalDemux = new UniversalDemuxBlock(mediaInfo, renderVideo: true, renderAudio: false);
var videoRenderer = new VideoRendererBlock(pipeline, VideoView1);
// Connect blocks
pipeline.Connect(basicFileSource.Output, universalDemux.Input);
pipeline.Connect(universalDemux.GetVideoOutput(), nvMpeg2Decoder.Input);
pipeline.Connect(nvMpeg2Decoder.Output, videoRenderer.Input);
// Start pipeline
await pipeline.StartAsync();
```
#### Availability
Check availability using `NVMPEG2Decoder.IsAvailable()`. Requires an NVIDIA GPU that supports NVDEC for MPEG-2 and appropriate drivers.
#### Platforms
Windows, Linux (with NVIDIA drivers).
### NVIDIA MPEG-4 Decoder Block (NVMPEG4DecoderBlock)
Provides hardware-accelerated decoding of MPEG-4 Part 2 video streams (often found in AVI files, e.g., DivX/Xvid) using NVIDIA's NVDEC technology. Note that this is different from MPEG-4 Part 10 (H.264/AVC).
#### Block info
Name: `NVMPEG4DecoderBlock`.
| Pin direction | Media type | Pins count |
| --- | :---: | :---: |
| Input video | MPEG-4 Part 2 encoded video | 1 |
| Output video | Uncompressed video | 1 |
#### The sample pipeline
```mermaid
graph LR;
BasicFileSourceBlock -- Raw Data --> UniversalDemuxBlock;
UniversalDemuxBlock -- MPEG-4 Video Stream --> NVMPEG4DecoderBlock;
NVMPEG4DecoderBlock -- Decoded Video --> VideoRendererBlock;
```
#### Sample code
```csharp
var pipeline = new MediaBlocksPipeline();
// Create NVIDIA MPEG-4 Decoder block
var nvMpeg4Decoder = new NVMPEG4DecoderBlock();
// Example: Create a basic file source, demuxer, and renderer
var basicFileSource = new BasicFileSourceBlock("test_mpeg4.avi");
var mediaInfo = await MediaInfoReader.GetMediaInfoAsync("test_mpeg4.avi");
if (mediaInfo == null)
{
Console.WriteLine("Failed to get media info.");
return;
}
var universalDemux = new UniversalDemuxBlock(mediaInfo, renderVideo: true, renderAudio: false);
var videoRenderer = new VideoRendererBlock(pipeline, VideoView1);
// Connect blocks
pipeline.Connect(basicFileSource.Output, universalDemux.Input);
pipeline.Connect(universalDemux.GetVideoOutput(), nvMpeg4Decoder.Input);
pipeline.Connect(nvMpeg4Decoder.Output, videoRenderer.Input);
// Start pipeline
await pipeline.StartAsync();
```
#### Availability
Check availability using `NVMPEG4Decoder.IsAvailable()`. Requires an NVIDIA GPU that supports NVDEC for MPEG-4 Part 2 and appropriate drivers.
#### Platforms
Windows, Linux (with NVIDIA drivers).
### NVIDIA VP8 Decoder Block (NVVP8DecoderBlock)
Provides hardware-accelerated decoding of VP8 video streams using NVIDIA's NVDEC technology. VP8 is an open video format, often used with WebM.
#### Block info
Name: `NVVP8DecoderBlock`.
| Pin direction | Media type | Pins count |
| --- | :---: | :---: |
| Input video | VP8 encoded video | 1 |
| Output video | Uncompressed video | 1 |
#### The sample pipeline
```mermaid
graph LR;
BasicFileSourceBlock -- Raw Data --> UniversalDemuxBlock;
UniversalDemuxBlock -- VP8 Video Stream --> NVVP8DecoderBlock;
NVVP8DecoderBlock -- Decoded Video --> VideoRendererBlock;
```
#### Sample code
```csharp
var pipeline = new MediaBlocksPipeline();
// Create NVIDIA VP8 Decoder block
var nvVp8Decoder = new NVVP8DecoderBlock();
// Example: Create a basic file source, demuxer, and renderer
var basicFileSource = new BasicFileSourceBlock("test_vp8.webm");
var mediaInfo = await MediaInfoReader.GetMediaInfoAsync("test_vp8.webm");
if (mediaInfo == null)
{
Console.WriteLine("Failed to get media info.");
return;
}
var universalDemux = new UniversalDemuxBlock(mediaInfo, renderVideo: true, renderAudio: false);
var videoRenderer = new VideoRendererBlock(pipeline, VideoView1);
// Connect blocks
pipeline.Connect(basicFileSource.Output, universalDemux.Input);
pipeline.Connect(universalDemux.GetVideoOutput(), nvVp8Decoder.Input);
pipeline.Connect(nvVp8Decoder.Output, videoRenderer.Input);
// Start pipeline
await pipeline.StartAsync();
```
#### Availability
Check availability using `NVVP8Decoder.IsAvailable()`. Requires an NVIDIA GPU that supports NVDEC for VP8 and appropriate drivers.
#### Platforms
Windows, Linux (with NVIDIA drivers).
### NVIDIA VP9 Decoder Block (NVVP9DecoderBlock)
Provides hardware-accelerated decoding of VP9 video streams using NVIDIA's NVDEC technology. VP9 is an open and royalty-free video coding format developed by Google, often used for web streaming (e.g., YouTube).
#### Block info
Name: `NVVP9DecoderBlock`.
| Pin direction | Media type | Pins count |
| --- | :---: | :---: |
| Input video | VP9 encoded video | 1 |
| Output video | Uncompressed video | 1 |
#### The sample pipeline
```mermaid
graph LR;
BasicFileSourceBlock -- Raw Data --> UniversalDemuxBlock;
UniversalDemuxBlock -- VP9 Video Stream --> NVVP9DecoderBlock;
NVVP9DecoderBlock -- Decoded Video --> VideoRendererBlock;
```
#### Sample code
```csharp
var pipeline = new MediaBlocksPipeline();
// Create NVIDIA VP9 Decoder block
var nvVp9Decoder = new NVVP9DecoderBlock();
// Example: Create a basic file source, demuxer, and renderer
var basicFileSource = new BasicFileSourceBlock("test_vp9.webm");
var mediaInfo = await MediaInfoReader.GetMediaInfoAsync("test_vp9.webm");
if (mediaInfo == null)
{
Console.WriteLine("Failed to get media info.");
return;
}
var universalDemux = new UniversalDemuxBlock(mediaInfo, renderVideo: true, renderAudio: false);
var videoRenderer = new VideoRendererBlock(pipeline, VideoView1);
// Connect blocks
pipeline.Connect(basicFileSource.Output, universalDemux.Input);
pipeline.Connect(universalDemux.GetVideoOutput(), nvVp9Decoder.Input);
pipeline.Connect(nvVp9Decoder.Output, videoRenderer.Input);
// Start pipeline
await pipeline.StartAsync();
```
#### Availability
Check availability using `NVVP9Decoder.IsAvailable()`. Requires an NVIDIA GPU that supports NVDEC for VP9 and appropriate drivers.
#### Platforms
Windows, Linux (with NVIDIA drivers).
### VAAPI H.264 Decoder Block (VAAPIH264DecoderBlock)
Provides hardware-accelerated decoding of H.264 (AVC) video streams using VA-API (Video Acceleration API). Available on Linux systems with compatible hardware and drivers.
#### Block info
| Pin direction | Media type | Pins count |
|---------------|---------------------|------------|
| Input video | H.264 encoded video | 1 |
| Output video | Uncompressed video | 1 |
#### The sample pipeline
```mermaid
graph LR;
BasicFileSourceBlock -- Raw Data --> UniversalDemuxBlock;
UniversalDemuxBlock -- H.264 Video Stream --> VAAPIH264DecoderBlock;
VAAPIH264DecoderBlock -- Decoded Video --> VideoRendererBlock;
```
#### Sample code
```csharp
var pipeline = new MediaBlocksPipeline();
var vaapiH264Decoder = new VAAPIH264DecoderBlock();
var basicFileSource = new BasicFileSourceBlock("test_h264.mp4");
var mediaInfo = await MediaInfoReader.GetMediaInfoAsync("test_h264.mp4");
if (mediaInfo == null)
{
Console.WriteLine("Failed to get media info.");
return;
}
var universalDemux = new UniversalDemuxBlock(mediaInfo, renderVideo: true, renderAudio: false);
var videoRenderer = new VideoRendererBlock(pipeline, VideoView1);
pipeline.Connect(basicFileSource.Output, universalDemux.Input);
pipeline.Connect(universalDemux.GetVideoOutput(), vaapiH264Decoder.Input);
pipeline.Connect(vaapiH264Decoder.Output, videoRenderer.Input);
await pipeline.StartAsync();
```
#### Availability
Check with `VAAPIH264DecoderBlock.IsAvailable()`. Requires VA-API support and correct SDK redist.
#### Platforms
Linux (with VA-API drivers).
---
### VAAPI HEVC Decoder Block (VAAPIHEVCDecoderBlock)
Provides hardware-accelerated decoding of H.265/HEVC video streams using VA-API. Available on Linux systems with compatible hardware and drivers.
#### Block info
| Pin direction | Media type | Pins count |
|---------------|----------------------|------------|
| Input video | H.265/HEVC encoded | 1 |
| Output video | Uncompressed video | 1 |
#### The sample pipeline
```mermaid
graph LR;
BasicFileSourceBlock -- Raw Data --> UniversalDemuxBlock;
UniversalDemuxBlock -- H.265 Video Stream --> VAAPIHEVCDecoderBlock;
VAAPIHEVCDecoderBlock -- Decoded Video --> VideoRendererBlock;
```
#### Sample code
```csharp
var pipeline = new MediaBlocksPipeline();
var vaapiHevcDecoder = new VAAPIHEVCDecoderBlock();
var basicFileSource = new BasicFileSourceBlock("test_hevc.mp4");
var mediaInfo = await MediaInfoReader.GetMediaInfoAsync("test_hevc.mp4");
if (mediaInfo == null)
{
Console.WriteLine("Failed to get media info.");
return;
}
var universalDemux = new UniversalDemuxBlock(mediaInfo, renderVideo: true, renderAudio: false);
var videoRenderer = new VideoRendererBlock(pipeline, VideoView1);
pipeline.Connect(basicFileSource.Output, universalDemux.Input);
pipeline.Connect(universalDemux.GetVideoOutput(), vaapiHevcDecoder.Input);
pipeline.Connect(vaapiHevcDecoder.Output, videoRenderer.Input);
await pipeline.StartAsync();
```
#### Availability
Check with `VAAPIHEVCDecoderBlock.IsAvailable()`. Requires VA-API support and correct SDK redist.
#### Platforms
Linux (with VA-API drivers).
---
### VAAPI JPEG Decoder Block (VAAPIJPEGDecoderBlock)
Provides hardware-accelerated decoding of JPEG/MJPEG video streams using VA-API. Available on Linux systems with compatible hardware and drivers.
#### Block info
| Pin direction | Media type | Pins count |
|---------------|--------------------------|------------|
| Input video | JPEG encoded video/images | 1 |
| Output video | Uncompressed video | 1 |
#### The sample pipeline
```mermaid
graph LR;
HTTPSourceBlock -- MJPEG Stream --> VAAPIJPEGDecoderBlock;
VAAPIJPEGDecoderBlock -- Decoded Video --> VideoRendererBlock;
```
#### Sample code
```csharp
var pipeline = new MediaBlocksPipeline();
var vaapiJpegDecoder = new VAAPIJPEGDecoderBlock();
var httpSettings = new HTTPSourceSettings(new Uri("http://your-mjpeg-camera/stream"));
var httpSource = new HTTPSourceBlock(httpSettings);
var videoRenderer = new VideoRendererBlock(pipeline, VideoView1);
pipeline.Connect(httpSource.Output, vaapiJpegDecoder.Input);
pipeline.Connect(vaapiJpegDecoder.Output, videoRenderer.Input);
await pipeline.StartAsync();
```
#### Availability
Check with `VAAPIJPEGDecoderBlock.IsAvailable()`. Requires VA-API support and correct SDK redist.
#### Platforms
Linux (with VA-API drivers).
---
### VAAPI VC1 Decoder Block (VAAPIVC1DecoderBlock)
Provides hardware-accelerated decoding of VC-1 video streams using VA-API. Available on Linux systems with compatible hardware and drivers.
#### Block info
| Pin direction | Media type | Pins count |
|---------------|---------------------|------------|
| Input video | VC-1 encoded video | 1 |
| Output video | Uncompressed video | 1 |
#### The sample pipeline
```mermaid
graph LR;
BasicFileSourceBlock -- Raw Data --> UniversalDemuxBlock;
UniversalDemuxBlock -- VC-1 Video Stream --> VAAPIVC1DecoderBlock;
VAAPIVC1DecoderBlock -- Decoded Video --> VideoRendererBlock;
```
#### Sample code
```csharp
var pipeline = new MediaBlocksPipeline();
var vaapiVc1Decoder = new VAAPIVC1DecoderBlock();
var basicFileSource = new BasicFileSourceBlock("test_vc1.wmv");
var mediaInfo = await MediaInfoReader.GetMediaInfoAsync("test_vc1.wmv");
if (mediaInfo == null)
{
Console.WriteLine("Failed to get media info.");
return;
}
var universalDemux = new UniversalDemuxBlock(mediaInfo, renderVideo: true, renderAudio: false);
var videoRenderer = new VideoRendererBlock(pipeline, VideoView1);
pipeline.Connect(basicFileSource.Output, universalDemux.Input);
pipeline.Connect(universalDemux.GetVideoOutput(), vaapiVc1Decoder.Input);
pipeline.Connect(vaapiVc1Decoder.Output, videoRenderer.Input);
await pipeline.StartAsync();
```
#### Availability
Check with `VAAPIVC1DecoderBlock.IsAvailable()`. Requires VA-API support and correct SDK redist.
#### Platforms
Linux (with VA-API drivers).
---
## Direct3D 11/DXVA Video Decoder Blocks
Direct3D 11/DXVA (D3D11) decoder blocks provide hardware-accelerated video decoding on Windows systems with compatible GPUs and drivers. These blocks are useful for high-performance video playback and processing pipelines on Windows.
### D3D11 AV1 Decoder Block
Decodes AV1 video streams using Direct3D 11/DXVA hardware acceleration.
#### Block info
Name: `D3D11AV1DecoderBlock`.
| Pin direction | Media type | Pins count |
|---------------|---------------------|------------|
| Input video | AV1 encoded video | 1 |
| Output video | Uncompressed video | 1 |
#### The sample pipeline
```mermaid
graph LR;
BasicFileSourceBlock -- Raw Data --> UniversalDemuxBlock;
UniversalDemuxBlock -- AV1 Video Stream --> D3D11AV1DecoderBlock;
D3D11AV1DecoderBlock -- Decoded Video --> VideoRendererBlock;
```
#### Sample code
```csharp
var pipeline = new MediaBlocksPipeline();
// Create D3D11 AV1 Decoder block
var d3d11Av1Decoder = new D3D11AV1DecoderBlock();
var basicFileSource = new BasicFileSourceBlock("test_av1.mkv");
var mediaInfo = await MediaInfoReader.GetMediaInfoAsync("test_av1.mkv");
if (mediaInfo == null)
{
Console.WriteLine("Failed to get media info.");
return;
}
var universalDemux = new UniversalDemuxBlock(mediaInfo, renderVideo: true, renderAudio: false);
var videoRenderer = new VideoRendererBlock(pipeline, VideoView1);
pipeline.Connect(basicFileSource.Output, universalDemux.Input);
pipeline.Connect(universalDemux.GetVideoOutput(), d3d11Av1Decoder.Input);
pipeline.Connect(d3d11Av1Decoder.Output, videoRenderer.Input);
await pipeline.StartAsync();
```
#### Availability
Check availability using `D3D11AV1DecoderBlock.IsAvailable()`. Requires Windows with D3D11/DXVA support and correct SDK redist.
#### Platforms
Windows (D3D11/DXVA required).
---
### D3D11 H.264 Decoder Block
Decodes H.264 (AVC) video streams using Direct3D 11/DXVA hardware acceleration.
#### Block info
Name: `D3D11H264DecoderBlock`.
| Pin direction | Media type | Pins count |
|---------------|---------------------|------------|
| Input video | H.264 encoded video | 1 |
| Output video | Uncompressed video | 1 |
#### The sample pipeline
```mermaid
graph LR;
BasicFileSourceBlock -- Raw Data --> UniversalDemuxBlock;
UniversalDemuxBlock -- H.264 Video Stream --> D3D11H264DecoderBlock;
D3D11H264DecoderBlock -- Decoded Video --> VideoRendererBlock;
```
#### Sample code
```csharp
var pipeline = new MediaBlocksPipeline();
// Create D3D11 H.264 Decoder block
var d3d11H264Decoder = new D3D11H264DecoderBlock();
var basicFileSource = new BasicFileSourceBlock("test_h264.mp4");
var mediaInfo = await MediaInfoReader.GetMediaInfoAsync("test_h264.mp4");
if (mediaInfo == null)
{
Console.WriteLine("Failed to get media info.");
return;
}
var universalDemux = new UniversalDemuxBlock(mediaInfo, renderVideo: true, renderAudio: false);
var videoRenderer = new VideoRendererBlock(pipeline, VideoView1);
pipeline.Connect(basicFileSource.Output, universalDemux.Input);
pipeline.Connect(universalDemux.GetVideoOutput(), d3d11H264Decoder.Input);
pipeline.Connect(d3d11H264Decoder.Output, videoRenderer.Input);
await pipeline.StartAsync();
```
#### Availability
Check availability using `D3D11H264DecoderBlock.IsAvailable()`. Requires Windows with D3D11/DXVA support and correct SDK redist.
#### Platforms
Windows (D3D11/DXVA required).
---
### D3D11 H.265 Decoder Block
Decodes H.265 (HEVC) video streams using Direct3D 11/DXVA hardware acceleration.
#### Block info
Name: `D3D11H265DecoderBlock`.
| Pin direction | Media type | Pins count |
|---------------|----------------------|------------|
| Input video | H.265/HEVC encoded | 1 |
| Output video | Uncompressed video | 1 |
#### The sample pipeline
```mermaid
graph LR;
BasicFileSourceBlock -- Raw Data --> UniversalDemuxBlock;
UniversalDemuxBlock -- H.265 Video Stream --> D3D11H265DecoderBlock;
D3D11H265DecoderBlock -- Decoded Video --> VideoRendererBlock;
```
#### Sample code
```csharp
var pipeline = new MediaBlocksPipeline();
// Create D3D11 H.265 Decoder block
var d3d11H265Decoder = new D3D11H265DecoderBlock();
var basicFileSource = new BasicFileSourceBlock("test_h265.mp4");
var mediaInfo = await MediaInfoReader.GetMediaInfoAsync("test_h265.mp4");
if (mediaInfo == null)
{
Console.WriteLine("Failed to get media info.");
return;
}
var universalDemux = new UniversalDemuxBlock(mediaInfo, renderVideo: true, renderAudio: false);
var videoRenderer = new VideoRendererBlock(pipeline, VideoView1);
pipeline.Connect(basicFileSource.Output, universalDemux.Input);
pipeline.Connect(universalDemux.GetVideoOutput(), d3d11H265Decoder.Input);
pipeline.Connect(d3d11H265Decoder.Output, videoRenderer.Input);
await pipeline.StartAsync();
```
#### Availability
Check availability using `D3D11H265DecoderBlock.IsAvailable()`. Requires Windows with D3D11/DXVA support and correct SDK redist.
#### Platforms
Windows (D3D11/DXVA required).
---
### D3D11 MPEG-2 Decoder Block
Decodes MPEG-2 video streams using Direct3D 11/DXVA hardware acceleration.
#### Block info
Name: `D3D11MPEG2DecoderBlock`.
| Pin direction | Media type | Pins count |
|---------------|---------------------|------------|
| Input video | MPEG-2 encoded video| 1 |
| Output video | Uncompressed video | 1 |
#### The sample pipeline
```mermaid
graph LR;
BasicFileSourceBlock -- Raw Data --> UniversalDemuxBlock;
UniversalDemuxBlock -- MPEG-2 Video Stream --> D3D11MPEG2DecoderBlock;
D3D11MPEG2DecoderBlock -- Decoded Video --> VideoRendererBlock;
```
#### Sample code
```csharp
var pipeline = new MediaBlocksPipeline();
// Create D3D11 MPEG-2 Decoder block
var d3d11Mpeg2Decoder = new D3D11MPEG2DecoderBlock();
var basicFileSource = new BasicFileSourceBlock("test_mpeg2.mpg");
var mediaInfo = await MediaInfoReader.GetMediaInfoAsync("test_mpeg2.mpg");
if (mediaInfo == null)
{
Console.WriteLine("Failed to get media info.");
return;
}
var universalDemux = new UniversalDemuxBlock(mediaInfo, renderVideo: true, renderAudio: false);
var videoRenderer = new VideoRendererBlock(pipeline, VideoView1);
pipeline.Connect(basicFileSource.Output, universalDemux.Input);
pipeline.Connect(universalDemux.GetVideoOutput(), d3d11Mpeg2Decoder.Input);
pipeline.Connect(d3d11Mpeg2Decoder.Output, videoRenderer.Input);
await pipeline.StartAsync();
```
#### Availability
Check availability using `D3D11MPEG2DecoderBlock.IsAvailable()`. Requires Windows with D3D11/DXVA support and correct SDK redist.
#### Platforms
Windows (D3D11/DXVA required).
---
### D3D11 VP8 Decoder Block
Decodes VP8 video streams using Direct3D 11/DXVA hardware acceleration.
#### Block info
Name: `D3D11VP8DecoderBlock`.
| Pin direction | Media type | Pins count |
|---------------|---------------------|------------|
| Input video | VP8 encoded video | 1 |
| Output video | Uncompressed video | 1 |
#### The sample pipeline
```mermaid
graph LR;
BasicFileSourceBlock -- Raw Data --> UniversalDemuxBlock;
UniversalDemuxBlock -- VP8 Video Stream --> D3D11VP8DecoderBlock;
D3D11VP8DecoderBlock -- Decoded Video --> VideoRendererBlock;
```
#### Sample code
```csharp
var pipeline = new MediaBlocksPipeline();
// Create D3D11 VP8 Decoder block
var d3d11Vp8Decoder = new D3D11VP8DecoderBlock();
var basicFileSource = new BasicFileSourceBlock("test_vp8.webm");
var mediaInfo = await MediaInfoReader.GetMediaInfoAsync("test_vp8.webm");
if (mediaInfo == null)
{
Console.WriteLine("Failed to get media info.");
return;
}
var universalDemux = new UniversalDemuxBlock(mediaInfo, renderVideo: true, renderAudio: false);
var videoRenderer = new VideoRendererBlock(pipeline, VideoView1);
pipeline.Connect(basicFileSource.Output, universalDemux.Input);
pipeline.Connect(universalDemux.GetVideoOutput(), d3d11Vp8Decoder.Input);
pipeline.Connect(d3d11Vp8Decoder.Output, videoRenderer.Input);
await pipeline.StartAsync();
```
#### Availability
Check availability using `D3D11VP8DecoderBlock.IsAvailable()`. Requires Windows with D3D11/DXVA support and correct SDK redist.
#### Platforms
Windows (D3D11/DXVA required).
---
### D3D11 VP9 Decoder Block
Decodes VP9 video streams using Direct3D 11/DXVA hardware acceleration.
#### Block info
Name: `D3D11VP9DecoderBlock`.
| Pin direction | Media type | Pins count |
|---------------|---------------------|------------|
| Input video | VP9 encoded video | 1 |
| Output video | Uncompressed video | 1 |
#### The sample pipeline
```mermaid
graph LR;
BasicFileSourceBlock -- Raw Data --> UniversalDemuxBlock;
UniversalDemuxBlock -- VP9 Video Stream --> D3D11VP9DecoderBlock;
D3D11VP9DecoderBlock -- Decoded Video --> VideoRendererBlock;
```
#### Sample code
```csharp
var pipeline = new MediaBlocksPipeline();
// Create D3D11 VP9 Decoder block
var d3d11Vp9Decoder = new D3D11VP9DecoderBlock();
var basicFileSource = new BasicFileSourceBlock("test_vp9.webm");
var mediaInfo = await MediaInfoReader.GetMediaInfoAsync("test_vp9.webm");
if (mediaInfo == null)
{
Console.WriteLine("Failed to get media info.");
return;
}
var universalDemux = new UniversalDemuxBlock(mediaInfo, renderVideo: true, renderAudio: false);
var videoRenderer = new VideoRendererBlock(pipeline, VideoView1);
pipeline.Connect(basicFileSource.Output, universalDemux.Input);
pipeline.Connect(universalDemux.GetVideoOutput(), d3d11Vp9Decoder.Input);
pipeline.Connect(d3d11Vp9Decoder.Output, videoRenderer.Input);
await pipeline.StartAsync();
```
#### Availability
Check availability using `D3D11VP9DecoderBlock.IsAvailable()`. Requires Windows with D3D11/DXVA support and correct SDK redist.
#### Platforms
Windows (D3D11/DXVA required).
---END OF PAGE---
# Local File: .\dotnet\mediablocks\VideoEncoders\index.md
---
title: Mastering Video Encoders in .NET SDK
description: Unlock high-performance video encoding in .NET projects. This guide covers various video encoders, codecs like AV1, H264, HEVC, and GPU acceleration techniques.
sidebar_label: Video Encoders
order: 18
---
# Video encoding
[!badge size="xl" target="blank" variant="info" text="Media Blocks SDK .Net"](https://www.visioforge.com/media-blocks-sdk-net)
Video encoding is the process of converting raw video data into a compressed format. This process is essential for reducing the size of video files, making them easier to store and stream over the internet. VisioForge Media Blocks SDK provides a wide range of video encoders that support various formats and codecs.
For some video encoders, SDK can use GPU acceleration to speed up the encoding process. This feature is especially useful when working with high-resolution video files or when encoding multiple videos simultaneously.
NVidia, Intel, and AMD GPUs are supported for hardware acceleration.
## AV1 encoder
`AV1 (AOMedia Video 1)`: Developed by the Alliance for Open Media, AV1 is an open, royalty-free video coding format designed for video transmissions over the Internet. It is known for its high compression efficiency and better quality at lower bit rates compared to its predecessors, making it well-suited for high-resolution video streaming applications.
Use classes that implement the `IAV1EncoderSettings` interface to set the parameters.
#### CPU Encoders
##### AOMAV1EncoderSettings
AOM AV1 encoder settings. CPU encoder.
**Platforms:** Windows, Linux, macOS.
##### RAV1EEncoderSettings
RAV1E AV1 encoder settings. CPU encoder.
- **Key Properties**:
- `Bitrate` (integer): Target bitrate in kilobits per second.
- `LowLatency` (boolean): Enables or disables low latency mode. Default is `false`.
- `MaxKeyFrameInterval` (ulong): Maximum interval between keyframes. Default is `240`.
- `MinKeyFrameInterval` (ulong): Minimum interval between keyframes. Default is `12`.
- `MinQuantizer` (uint): Minimum quantizer value (range 0-255). Default is `0`.
- `Quantizer` (uint): Quantizer value (range 0-255). Default is `100`.
- `SpeedPreset` (int): Encoding speed preset (10 fastest, 0 slowest). Default is `6`.
- `Tune` (`RAV1EEncoderTune`): Tune setting for the encoder. Default is `RAV1EEncoderTune.Psychovisual`.
**Platforms:** Windows, Linux, macOS.
###### RAV1EEncoderTune Enum
Specifies the tuning option for the RAV1E encoder.
- `PSNR` (0): Tune for best PSNR (Peak Signal-to-Noise Ratio).
- `Psychovisual` (1): Tune for psychovisual quality.
#### GPU Encoders
##### AMFAV1EncoderSettings
AMD GPU AV1 video encoder.
**Platforms:** Windows, Linux, macOS.
##### NVENCAV1EncoderSettings
Nvidia GPU AV1 video encoder.
**Platforms:** Windows, Linux, macOS.
##### QSVAV1EncoderSettings
Intel GPU AV1 video encoder.
**Platforms:** Windows, Linux, macOS.
*Note: Intel QSV encoders may also utilize common enumerations like `QSVCodingOption` (`On`, `Off`, `Unknown`) for configuring specific hardware features.*
### Block info
Name: AV1EncoderBlock.
Pin direction | Media type | Pins count
--- | :---: | :---:
Input | Uncompressed video | 1
Output | AV1 | 1
### The sample pipeline
```mermaid
graph LR;
UniversalSourceBlock-->AV1EncoderBlock;
AV1EncoderBlock-->MP4SinkBlock;
```
### Sample code
```csharp
var pipeline = new MediaBlocksPipeline();
var filename = "test.mp4";
var fileSource = new UniversalSourceBlock(await UniversalSourceSettings.CreateAsync(new Uri(filename)));
var videoEncoderBlock = new AV1EncoderBlock(new QSVAV1EncoderSettings());
pipeline.Connect(fileSource.VideoOutput, videoEncoderBlock.Input);
var mp4SinkBlock = new MP4SinkBlock(new MP4SinkSettings(@"output.mp4"));
pipeline.Connect(videoEncoderBlock.Output, mp4SinkBlock.CreateNewInput(MediaBlockPadMediaType.Video));
await pipeline.StartAsync();
```
### Platforms
Windows, macOS, Linux, iOS, Android.
## DV encoder
`DV (Digital Video)`: A format for storing digital video introduced in the 1990s, primarily used in consumer digital camcorders. DV employs intra-frame compression to deliver high-quality video on digital tapes, making it suitable for home videos as well as semi-professional productions.
### Block info
Name: DVEncoderBlock.
Pin direction | Media type | Pins count
--- | :---: | :---:
Input | Uncompressed video | 1
Output | video/x-dv | 1
### The sample pipeline
```mermaid
graph LR;
UniversalSourceBlock-->DVEncoderBlock;
DVEncoderBlock-->AVISinkBlock;
```
### Sample code
```csharp
var pipeline = new MediaBlocksPipeline();
var filename = "test.mp4";
var fileSource = new UniversalSourceBlock(await UniversalSourceSettings.CreateAsync(new Uri(filename)));
var videoEncoderBlock = new DVEncoderBlock(new DVVideoEncoderSettings());
pipeline.Connect(fileSource.VideoOutput, videoEncoderBlock.Input);
var sinkBlock = new AVISinkBlock(new AVISinkSettings(@"output.avi"));
pipeline.Connect(videoEncoderBlock.Output, sinkBlock.CreateNewInput(MediaBlockPadMediaType.Video));
await pipeline.StartAsync();
```
### Platforms
Windows, macOS, Linux, iOS, Android.
## H264 encoder
The H264 encoder block is used for encoding files in MP4, MKV, and some other formats, as well as for network streaming using RTSP and HLS.
Use classes that implement the IH264EncoderSettings interface to set the parameters.
### Settings
#### NVENCH264EncoderSettings
Nvidia GPUs H264 video encoder.
**Platforms:** Windows, Linux, macOS.
#### AMFHEVCEncoderSettings
AMD/ATI GPUs H264 video encoder.
**Platforms:** Windows, Linux, macOS.
#### QSVH264EncoderSettings
Intel GPU H264 video encoder.
**Platforms:** Windows, Linux, macOS.
#### OpenH264EncoderSettings
Software CPU H264 encoder.
**Platforms:** Windows, macOS, Linux, iOS, Android.
#### CustomH264EncoderSettings
Allows using a custom GStreamer element for H264 encoding. You can specify the GStreamer element name and configure its properties.
**Platforms:** Windows, Linux, macOS.
### Block info
Name: H264EncoderBlock.
Pin direction | Media type | Pins count
--- | :---: | :---:
Input | Uncompressed video | 1
Output | H264 | 1
### The sample pipeline
```mermaid
graph LR;
UniversalSourceBlock-->H264EncoderBlock;
H264EncoderBlock-->MP4SinkBlock;
```
### Sample code
```csharp
var pipeline = new MediaBlocksPipeline();
var filename = "test.mp4";
var fileSource = new UniversalSourceBlock(await UniversalSourceSettings.CreateAsync(new Uri(filename)));
var h264EncoderBlock = new H264EncoderBlock(new NVENCH264EncoderSettings());
pipeline.Connect(fileSource.VideoOutput, h264EncoderBlock.Input);
var mp4SinkBlock = new MP4SinkBlock(new MP4SinkSettings(@"output.mp4"));
pipeline.Connect(h264EncoderBlock.Output, mp4SinkBlock.CreateNewInput(MediaBlockPadMediaType.Video));
await pipeline.StartAsync();
```
#### Sample applications
- [Simple Capture Demo](https://github.com/visioforge/.Net-SDK-s-samples/tree/master/Media%20Blocks%20SDK/WPF/CSharp/Simple%20Capture%20Demo)
- [Screen Capture Demo](https://github.com/visioforge/.Net-SDK-s-samples/tree/master/Media%20Blocks%20SDK/WPF/CSharp/Screen%20Capture)
### Platforms
Windows, macOS, Linux, iOS, Android.
## HEVC/H265 encoder
HEVC encoder is used for encoding files in MP4, MKV, and some other formats, as well as for network streaming using RTSP and HLS.
Use classes that implement the IHEVCEncoderSettings interface to set the parameters.
### Settings
#### MFHEVCEncoderSettings
Microsoft Media Foundation HEVC encoder. CPU encoder.
**Platforms:** Windows.
#### NVENCHEVCEncoderSettings
Nvidia GPUs HEVC video encoder.
**Platforms:** Windows, Linux, macOS.
#### AMFHEVCEncoderSettings
AMD/ATI GPUs HEVC video encoder.
**Platforms:** Windows, Linux, macOS.
#### QSVHEVCEncoderSettings
Intel GPU HEVC video encoder.
**Platforms:** Windows, Linux, macOS.
#### CustomHEVCEncoderSettings
Allows using a custom GStreamer element for HEVC encoding. You can specify the GStreamer element name and configure its properties.
**Platforms:** Windows, Linux, macOS.
### Block info
Name: HEVCEncoderBlock.
Pin direction | Media type | Pins count
--- | :---: | :---:
Input | Uncompressed video | 1
Output | HEVC | 1
### The sample pipeline
```mermaid
graph LR;
UniversalSourceBlock-->HEVCEncoderBlock;
HEVCEncoderBlock-->MP4SinkBlock;
```
### Sample code
```csharp
var pipeline = new MediaBlocksPipeline();
var filename = "test.mp4";
var fileSource = new UniversalSourceBlock(await UniversalSourceSettings.CreateAsync(new Uri(filename)));
var hevcEncoderBlock = new HEVCEncoderBlock(new NVENCHEVCEncoderSettings());
pipeline.Connect(fileSource.VideoOutput, hevcEncoderBlock.Input);
var mp4SinkBlock = new MP4SinkBlock(new MP4SinkSettings(@"output.mp4"));
pipeline.Connect(hevcEncoderBlock.Output, mp4SinkBlock.CreateNewInput(MediaBlockPadMediaType.Video));
await pipeline.StartAsync();
```
### Platforms
Windows, macOS, Linux, iOS, Android.
## MJPEG encoder
`MJPEG (Motion JPEG)`: A video compression format where each frame of video is separately compressed into a JPEG image. This technique is straightforward and results in no interframe compression, making it ideal for situations where frame-specific editing or access is required, such as in surveillance and medical imaging.
Use classes that implement the IH264EncoderSettings interface to set the parameters.
### Settings
#### MJPEGEncoderSettings
Default MJPEG encoder. CPU encoder.
- **Key Properties**:
- `Quality` (int): JPEG quality level (10-100). Default is `85`.
- **Encoder Type**: `MJPEGEncoderType.CPU`.
**Platforms:** Windows, Linux, macOS, iOS, Android.
#### QSVMJPEGEncoderSettings
Intel GPUs MJPEG encoder.
- **Key Properties**:
- `Quality` (uint): JPEG quality level (10-100). Default is `85`.
- **Encoder Type**: `MJPEGEncoderType.GPU_Intel_QSV_MJPEG`.
**Platforms:** Windows, Linux, macOS.
#### MJPEGEncoderType Enum
Specifies the type of MJPEG encoder.
- `CPU`: Default CPU-based encoder.
- `GPU_Intel_QSV_MJPEG`: Intel QuickSync GPU-based MJPEG encoder.
### Block info
Name: MJPEGEncoderBlock.
Pin direction | Media type | Pins count
--- | :---: | :---:
Input | Uncompressed video | 1
Output | MJPEG | 1
### The sample pipeline
```mermaid
graph LR;
UniversalSourceBlock-->MJPEGEncoderBlock;
MJPEGEncoderBlock-->AVISinkBlock;
```
### Sample code
```csharp
var pipeline = new MediaBlocksPipeline();
var filename = "test.mp4";
var fileSource = new UniversalSourceBlock(await UniversalSourceSettings.CreateAsync(new Uri(filename)));
var videoEncoderBlock = new MJPEGEncoderBlock(new MJPEGEncoderSettings());
pipeline.Connect(fileSource.VideoOutput, videoEncoderBlock.Input);
var aviSinkBlock = new AVISinkBlock(new AVISinkSettings(@"output.avi"));
pipeline.Connect(videoEncoderBlock.Output, aviSinkBlock.CreateNewInput(MediaBlockPadMediaType.Video));
await pipeline.StartAsync();
```
### Platforms
Windows, macOS, Linux, iOS, Android.
## Theora encoder
The [Theora](https://www.theora.org/) encoder is used to encode video files in WebM format.
### Settings
#### TheoraEncoderSettings
Provides settings for the Theora encoder.
- **Key Properties**:
- `Bitrate` (kbps)
- `CapOverflow`, `CapUnderflow` (bit reservoir capping)
- `DropFrames` (allow/disallow frame dropping)
- `KeyFrameAuto` (automatic keyframe detection)
- `KeyFrameForce` (interval to force keyframe every N frames)
- `KeyFrameFrequency` (keyframe frequency)
- `MultipassCacheFile` (string path for multipass cache)
- `MultipassMode` (using `TheoraMultipassMode` enum: `SinglePass`, `FirstPass`, `SecondPass`)
- `Quality` (integer value, typically 0-63 for libtheora, meaning can vary)
- `RateBuffer` (size of rate control buffer in units of frames, 0 = auto)
- `SpeedLevel` (amount of motion vector searching, 0-2 or higher depending on implementation)
- `VP3Compatible` (boolean to enable VP3 compatibility)
- **Availability**: Can be checked using `TheoraEncoderSettings.IsAvailable()`.
### Block info
Name: TheoraEncoderBlock.
Pin direction | Media type | Pins count
--- | :---: | :---:
Input | Uncompressed video | 1
Output | video/x-theora | 1
### The sample pipeline
```mermaid
graph LR;
UniversalSourceBlock-->TheoraEncoderBlock;
TheoraEncoderBlock-->WebMSinkBlock;
```
### Sample code
```csharp
var pipeline = new MediaBlocksPipeline();
var filename = "test.mp4";
var fileSource = new UniversalSourceBlock(await UniversalSourceSettings.CreateAsync(new Uri(filename)));
var theoraEncoderBlock = new TheoraEncoderBlock(new TheoraEncoderSettings());
pipeline.Connect(fileSource.VideoOutput, theoraEncoderBlock.Input);
var webmSinkBlock = new WebMSinkBlock(new WebMSinkSettings(@"output.webm"));
pipeline.Connect(theoraEncoderBlock.Output, webmSinkBlock.CreateNewInput(MediaBlockPadMediaType.Video));
await pipeline.StartAsync();
```
### Platforms
Windows, macOS, Linux, iOS, Android.
## VPX encoder
VPX encoder block is used to encode files in WebM, MKV, or OGG files. VPX encoder is a set of video codecs for encoding in VP8 and VP9 formats.
The VPX encoder block utilizes settings classes that implement the `IVPXEncoderSettings` interface. Key settings classes include:
### Settings
The common base class for VP8 and VP9 CPU encoder settings is `VPXEncoderSettings`. It provides a wide range of shared properties for tuning the encoding process, such as:
- `ARNRMaxFrames`, `ARNRStrength`, `ARNRType` (AltRef noise reduction)
- `BufferInitialSize`, `BufferOptimalSize`, `BufferSize` (client buffer settings)
- `CPUUsed`, `CQLevel` (constrained quality)
- `Deadline` (encoding deadline per frame)
- `DropframeThreshold`
- `RateControl` (using `VPXRateControl` enum)
- `ErrorResilient` (using `VPXErrorResilientFlags` enum)
- `HorizontalScalingMode`, `VerticalScalingMode` (using `VPXScalingMode` enum)
- `KeyFrameMaxDistance`, `KeyFrameMode` (using `VPXKeyFrameMode` enum)
- `MinQuantizer`, `MaxQuantizer`
- `MultipassCacheFile`, `MultipassMode` (using `VPXMultipassMode` enum)
- `NoiseSensitivity`
- `TargetBitrate` (in Kbits/s)
- `NumOfThreads`
- `TokenPartitions` (using `VPXTokenPartitions` enum)
- `Tuning` (using `VPXTuning` enum)
#### VP8EncoderSettings
CPU encoder for VP8. Inherits from `VPXEncoderSettings`.
- **Key Properties**: Leverages properties from `VPXEncoderSettings` tailored for VP8.
- **Encoder Type**: `VPXEncoderType.VP8`.
- **Availability**: Can be checked using `VP8EncoderSettings.IsAvailable()`.
#### VP9EncoderSettings
CPU encoder for VP9. Inherits from `VPXEncoderSettings`.
- **Key Properties**: In addition to `VPXEncoderSettings` properties, includes VP9-specific settings:
- `AQMode` (Adaptive Quantization mode, using `VPXAdaptiveQuantizationMode` enum)
- `FrameParallelDecoding` (allow parallel processing)
- `RowMultithread` (multi-threaded row encoding)
- `TileColumns`, `TileRows` (log2 values)
- **Encoder Type**: `VPXEncoderType.VP9`.
- **Availability**: Can be checked using `VP9EncoderSettings.IsAvailable()`.
#### QSVVP9EncoderSettings
Intel QSV (GPU accelerated) encoder for VP9.
- **Key Properties**:
- `LowLatency`
- `TargetUsage` (1: Best quality, 4: Balanced, 7: Best speed)
- `Bitrate` (Kbit/sec)
- `GOPSize`
- `ICQQuality` (Intelligent Constant Quality)
- `MaxBitrate` (Kbit/sec)
- `QPI`, `QPP` (constant quantizer for I and P frames)
- `Profile` (0-3)
- `RateControl` (using `QSVVP9EncRateControl` enum)
- `RefFrames`
- **Encoder Type**: `VPXEncoderType.QSV_VP9`.
- **Availability**: Can be checked using `QSVVP9EncoderSettings.IsAvailable()`.
#### CustomVPXEncoderSettings
Allows using a custom GStreamer element for VPX encoding.
- **Key Properties**:
- `ElementName` (string to specify the GStreamer element name)
- `Properties` (Dictionary to configure the element)
- `VideoFormat` (required video format like `VideoFormatX.NV12`)
- **Encoder Type**: `VPXEncoderType.CustomEncoder`.
### VPX Enumerations
Several enumerations are available to configure VPX encoders:
- `VPXAdaptiveQuantizationMode`: Defines adaptive quantization modes (e.g., `Off`, `Variance`, `Complexity`, `CyclicRefresh`, `Equator360`, `Perceptual`, `PSNR`, `Lookahead`).
- `VPXErrorResilientFlags`: Flags for error resilience features (e.g., `None`, `Default`, `Partitions`).
- `VPXKeyFrameMode`: Defines keyframe placement strategies (e.g., `Auto`, `Disabled`).
- `VPXMultipassMode`: Modes for multipass encoding (e.g., `OnePass`, `FirstPass`, `LastPass`).
- `VPXRateControl`: Rate control modes (e.g., `VBR`, `CBR`, `CQ`).
- `VPXScalingMode`: Scaling modes (e.g., `Normal`, `_4_5`, `_3_5`, `_1_2`).
- `VPXTokenPartitions`: Number of token partitions (e.g., `One`, `Two`, `Four`, `Eight`).
- `VPXTuning`: Tuning options for the encoder (e.g., `PSNR`, `SSIM`).
- `VPXEncoderType`: Specifies the VPX encoder variant (e.g., `VP8`, `VP9`, `QSV_VP9`, `CustomEncoder`, and platform-specific ones like `OMXExynosVP8Encoder`).
- `QSVVP9EncRateControl`: Rate control modes specific to `QSVVP9EncoderSettings` (e.g., `CBR`, `VBR`, `CQP`, `ICQ`).
### Block info
Name: VPXEncoderBlock.
Pin direction | Media type | Pins count
--- | :---: | :---:
Input | Uncompressed video | 1
Output | VP8/VP9 | 1
### The sample pipeline
```mermaid
graph LR;
UniversalSourceBlock-->VPXEncoderBlock;
VPXEncoderBlock-->WebMSinkBlock;
```
### Sample code
```csharp
var pipeline = new MediaBlocksPipeline();
var filename = "test.mp4";
var fileSource = new UniversalSourceBlock(await UniversalSourceSettings.CreateAsync(new Uri(filename)));
var vp8EncoderBlock = new VPXEncoderBlock(new VP8EncoderSettings());
pipeline.Connect(fileSource.VideoOutput, vp8EncoderBlock.Input);
var webmSinkBlock = new WebMSinkBlock(new WebMSinkSettings(@"output.webm"));
pipeline.Connect(vp8EncoderBlock.Output, webmSinkBlock.CreateNewInput(MediaBlockPadMediaType.Video));
await pipeline.StartAsync();
```
### Platforms
Windows, macOS, Linux, iOS, Android.
## MPEG2 encoder
`MPEG-2`: A widely used standard for video and audio compression, commonly found in DVDs, digital television broadcasts (like DVB and ATSC), and SVCDs. It offers good quality at relatively low bitrates for standard definition content.
### Block info
Name: MPEG2EncoderBlock.
Pin direction | Media type | Pins count
--- | :---: | :---:
Input | Uncompressed video | 1
Output | video/mpeg | 1
### The sample pipeline
```mermaid
graph LR;
UniversalSourceBlock-->MPEG2EncoderBlock;
MPEG2EncoderBlock-->MPEGTSSinkBlock;
```
### Sample code
```csharp
var pipeline = new MediaBlocksPipeline();
var filename = "test.mp4";
var fileSource = new UniversalSourceBlock(await UniversalSourceSettings.CreateAsync(new Uri(filename)));
var mpeg2EncoderBlock = new MPEG2EncoderBlock(new MPEG2VideoEncoderSettings());
pipeline.Connect(fileSource.VideoOutput, mpeg2EncoderBlock.Input);
// Example: Using an MPGSinkBlock for .mpg or .ts files
var mpgSinkBlock = new MPGSinkBlock(new MPGSinkSettings(@"output.mpg"));
pipeline.Connect(mpeg2EncoderBlock.Output, mpgSinkBlock.CreateNewInput(MediaBlockPadMediaType.Video));
await pipeline.StartAsync();
```
### Platforms
Windows, macOS, Linux.
## MPEG4 encoder
`MPEG-4 Part 2 Visual` (often referred to simply as MPEG-4 video) is a video compression standard that is part of the MPEG-4 suite. It is used in various applications, including streaming video, video conferencing, and optical discs like DivX and Xvid.
### Block info
Name: MPEG4EncoderBlock.
Pin direction | Media type | Pins count
--- | :---: | :---:
Input | Uncompressed video | 1
Output | video/mpeg, mpegversion=4 | 1
### The sample pipeline
```mermaid
graph LR;
UniversalSourceBlock-->MPEG4EncoderBlock;
MPEG4EncoderBlock-->MP4SinkBlock;
```
### Sample code
```csharp
var pipeline = new MediaBlocksPipeline();
var filename = "test.mp4"; // Input file
var fileSource = new UniversalSourceBlock(await UniversalSourceSettings.CreateAsync(new Uri(filename)));
var mpeg4EncoderBlock = new MPEG4EncoderBlock(new MPEG4VideoEncoderSettings());
pipeline.Connect(fileSource.VideoOutput, mpeg4EncoderBlock.Input);
// Example: Using an MP4SinkBlock for .mp4 files
var mp4SinkBlock = new MP4SinkBlock(new MP4SinkSettings(@"output_mpeg4.mp4"));
pipeline.Connect(mpeg4EncoderBlock.Output, mp4SinkBlock.CreateNewInput(MediaBlockPadMediaType.Video));
await pipeline.StartAsync();
```
### Platforms
Windows, macOS, Linux.
## Apple ProRes encoder
`Apple ProRes`: A high-quality, lossy video compression format developed by Apple Inc., widely used in professional video production and post-production workflows for its excellent balance of image quality and performance.
### Block info
Name: AppleProResEncoderBlock.
Pin direction | Media type | Pins count
--- | :---: | :---:
Input | Uncompressed video | 1
Output | ProRes | 1
### The sample pipeline
```mermaid
graph LR;
UniversalSourceBlock-->AppleProResEncoderBlock;
AppleProResEncoderBlock-->MOVSinkBlock;
```
### Sample code
```csharp
var pipeline = new MediaBlocksPipeline();
var filename = "test.mp4";
var fileSource = new UniversalSourceBlock(await UniversalSourceSettings.CreateAsync(new Uri(filename)));
var proResEncoderBlock = new AppleProResEncoderBlock(new AppleProResEncoderSettings());
pipeline.Connect(fileSource.VideoOutput, proResEncoderBlock.Input);
var movSinkBlock = new MOVSinkBlock(new MOVSinkSettings(@"output.mov"));
pipeline.Connect(proResEncoderBlock.Output, movSinkBlock.CreateNewInput(MediaBlockPadMediaType.Video));
await pipeline.StartAsync();
```
### Platforms
macOS, iOS.
### Availability
You can check if the Apple ProRes encoder is available in your environment using:
```csharp
bool available = AppleProResEncoderBlock.IsAvailable();
```
## WMV encoder
### Overview
WMV encoder block encodes video in WMV format.
### Block info
Name: WMVEncoderBlock.
Pin direction | Media type | Pins count
--- | :---: | :---:
Input | Uncompressed video | 1
Output | video/x-wmv | 1
### The sample pipeline
```mermaid
graph LR;
UniversalSourceBlock-->WMVEncoderBlock;
WMVEncoderBlock-->ASFSinkBlock;
```
### Sample code
```csharp
var pipeline = new MediaBlocksPipeline(false);
var filename = "test.mp4";
var fileSource = new UniversalSourceBlock(await UniversalSourceSettings.CreateAsync(new Uri(filename)));
var wmvEncoderBlock = new WMVEncoderBlock(new WMVEncoderSettings());
pipeline.Connect(fileSource.VideoOutput, wmvEncoderBlock.Input);
var asfSinkBlock = new ASFSinkBlock(new ASFSinkSettings(@"output.wmv"));
pipeline.Connect(wmvEncoderBlock.Output, asfSinkBlock.CreateNewInput(MediaBlockPadMediaType.Video));
await pipeline.StartAsync();
```
### Platforms
Windows, macOS, Linux.
## General Video Settings Considerations
While specific encoder settings classes provide detailed control, some general concepts or enumerations might be relevant across different encoders or for understanding video quality options.
---END OF PAGE---
# Local File: .\dotnet\mediablocks\VideoProcessing\index.md
---
title: Video Processing & Effects Blocks for .Net
description: Discover a wide array of video processing and visual effects blocks available in the Media Blocks SDK for .Net. Learn how to implement color adjustments, deinterlacing, image/text overlays, geometric transformations, and many other real-time video enhancements in your .Net applications.
sidebar_label: Video Processing and Effects
---
# Video processing blocks
[!badge size="xl" target="blank" variant="info" text="Media Blocks SDK .Net"](https://www.visioforge.com/media-blocks-sdk-net)
## Table of Contents
- [Color effects](#color-effects)
- [Deinterlace](#deinterlace)
- [Fish eye](#fish-eye)
- [Flip/Rotate](#fliprotate)
- [Gamma](#gamma)
- [Gaussian blur](#gaussian-blur)
- [Image overlay](#image-overlay)
- [Mirror](#mirror)
- [Perspective](#perspective)
- [Pinch](#pinch)
- [Resize](#resize)
- [Rotate](#rotate)
- [Video sample grabber](#video-sample-grabber)
- [Sphere](#sphere)
- [Square](#square)
- [Stretch](#stretch)
- [Text overlay](#text-overlay)
- [Tunnel](#tunnel)
- [Twirl](#twirl)
- [Video balance](#video-balance)
- [Video mixer](#video-mixer)
- [Water ripple](#water-ripple)
- [D3D11 Video Converter](#d3d11-video-converter)
- [Video Effects (Windows)](#video-effects-windows)
- [D3D11 Video Compositor](#d3d11-video-compositor)
- [VR360 Processor](#vr360-processor)
## Color effects
[!badge size="xl" target="blank" variant="info" text="Media Blocks SDK .Net"](https://www.visioforge.com/media-blocks-sdk-net)
The block performs basic video frame color processing: fake heat camera toning, sepia toning, invert and slightly shade to blue, cross processing toning, and yellow foreground/blue background color filter.
### Block info
Name: ColorEffectsBlock.
Pin direction | Media type | Pins count
--- | :---: | :---:
Input | Uncompressed video | 1
Output | Uncompressed video | 1
### The sample pipeline
```mermaid
graph LR;
UniversalSourceBlock-->ColorEffectsBlock;
ColorEffectsBlock-->VideoRendererBlock;
```
### Sample code
```csharp
var pipeline = new MediaBlocksPipeline();
var filename = "test.mp4";
var fileSource = new UniversalSourceBlock(await UniversalSourceSettings.CreateAsync(new Uri(filename)));
// Sepia
var colorEffects = new ColorEffectsBlock(ColorEffectsPreset.Sepia);
pipeline.Connect(fileSource.VideoOutput, colorEffects.Input);
var videoRenderer = new VideoRendererBlock(pipeline, VideoView1);
pipeline.Connect(colorEffects.Output, videoRenderer.Input);
await pipeline.StartAsync();
```
### Platforms
Windows, macOS, Linux, iOS, Android.
## Deinterlace
[!badge size="xl" target="blank" variant="info" text="Media Blocks SDK .Net"](https://www.visioforge.com/media-blocks-sdk-net)
The block deinterlaces interlaced video frames into progressive video frames. Several methods of processing are available.
Use the DeinterlaceSettings class to configure the block.
### Block info
Name: DeinterlaceBlock.
Pin direction | Media type | Pins count
--- | :---: | :---:
Input | Uncompressed video | 1
Output | Uncompressed video | 1
### The sample pipeline
```mermaid
graph LR;
UniversalSourceBlock-->DeinterlaceBlock;
DeinterlaceBlock-->VideoRendererBlock;
```
### Sample code
```csharp
var pipeline = new MediaBlocksPipeline();
var filename = "test.mp4";
var fileSource = new UniversalSourceBlock(await UniversalSourceSettings.CreateAsync(new Uri(filename)));
var deinterlace = new DeinterlaceBlock(new DeinterlaceSettings());
pipeline.Connect(fileSource.VideoOutput, deinterlace.Input);
var videoRenderer = new VideoRendererBlock(pipeline, VideoView1);
pipeline.Connect(deinterlace.Output, videoRenderer.Input);
await pipeline.StartAsync();
```
### Platforms
Windows, macOS, Linux, iOS, Android.
## Fish eye
[!badge size="xl" target="blank" variant="info" text="Media Blocks SDK .Net"](https://www.visioforge.com/media-blocks-sdk-net)
The fisheye block simulates a fisheye lens by zooming on the center of the image and compressing the edges.
### Block info
Name: FishEyeBlock.
Pin direction | Media type | Pins count
--- | :---: | :---:
Input | Uncompressed video | 1
Output | Uncompressed video | 1
### The sample pipeline
```mermaid
graph LR;
UniversalSourceBlock-->FishEyeBlock;
FishEyeBlock-->VideoRendererBlock;
```
### Sample code
```csharp
var pipeline = new MediaBlocksPipeline();
var filename = "test.mp4";
var fileSource = new UniversalSourceBlock(await UniversalSourceSettings.CreateAsync(new Uri(filename)));
var fishEye = new FishEyeBlock();
pipeline.Connect(fileSource.VideoOutput, fishEye.Input);
var videoRenderer = new VideoRendererBlock(pipeline, VideoView1);
pipeline.Connect(fishEye.Output, videoRenderer.Input);
await pipeline.StartAsync();
```
### Platforms
Windows, macOS, Linux, iOS, Android.
## Flip/Rotate
[!badge size="xl" target="blank" variant="info" text="Media Blocks SDK .Net"](https://www.visioforge.com/media-blocks-sdk-net)
The block flips and rotates the video stream.
Use the VideoFlipRotateMethod enumeration to configure.
### Block info
Name: FlipRotateBlock.
Pin direction | Media type | Pins count
--- | :---: | :---:
Input | Uncompressed video | 1
Output | Uncompressed video | 1
### The sample pipeline
```mermaid
graph LR;
UniversalSourceBlock-->FlipRotateBlock;
FlipRotateBlock-->VideoRendererBlock;
```
### Sample code
```csharp
var pipeline = new MediaBlocksPipeline();
var filename = "test.mp4";
var fileSource = new UniversalSourceBlock(await UniversalSourceSettings.CreateAsync(new Uri(filename)));
// 90 degree rotation
var flipRotate = new FlipRotateBlock(VideoFlipRotateMethod.Method90R);
pipeline.Connect(fileSource.VideoOutput, flipRotate.Input);
var videoRenderer = new VideoRendererBlock(pipeline, VideoView1);
pipeline.Connect(flipRotate.Output, videoRenderer.Input);
await pipeline.StartAsync();
```
### Platforms
Windows, macOS, Linux, iOS, Android.
## Gamma
[!badge size="xl" target="blank" variant="info" text="Media Blocks SDK .Net"](https://www.visioforge.com/media-blocks-sdk-net)
The block performs gamma correction on a video stream.
### Block info
Name: GammaBlock.
Pin direction | Media type | Pins count
--- | :---: | :---:
Input | Uncompressed video | 1
Output | Uncompressed video | 1
### The sample pipeline
```mermaid
graph LR;
UniversalSourceBlock-->GammaBlock;
GammaBlock-->VideoRendererBlock;
```
### Sample code
```csharp
var pipeline = new MediaBlocksPipeline();
var filename = "test.mp4";
var fileSource = new UniversalSourceBlock(await UniversalSourceSettings.CreateAsync(new Uri(filename)));
var gamma = new GammaBlock(2.0);
pipeline.Connect(fileSource.VideoOutput, gamma.Input);
var videoRenderer = new VideoRendererBlock(pipeline, VideoView1);
pipeline.Connect(gamma.Output, videoRenderer.Input);
await pipeline.StartAsync();
```
### Platforms
Windows, macOS, Linux, iOS, Android.
## Gaussian blur
[!badge size="xl" target="blank" variant="info" text="Media Blocks SDK .Net"](https://www.visioforge.com/media-blocks-sdk-net)
The block blurs the video stream using the Gaussian function.
### Block info
Name: GaussianBlurBlock.
Pin direction | Media type | Pins count
--- | :---: | :---:
Input | Uncompressed video | 1
Output | Uncompressed video | 1
### The sample pipeline
```mermaid
graph LR;
UniversalSourceBlock-->GaussianBlurBlock;
GaussianBlurBlock-->VideoRendererBlock;
```
### Sample code
```csharp
var pipeline = new MediaBlocksPipeline();
var filename = "test.mp4";
var fileSource = new UniversalSourceBlock(await UniversalSourceSettings.CreateAsync(new Uri(filename)));
var gaussianBlur = new GaussianBlurBlock();
pipeline.Connect(fileSource.VideoOutput, gaussianBlur.Input);
var videoRenderer = new VideoRendererBlock(pipeline, VideoView1);
pipeline.Connect(gaussianBlur.Output, videoRenderer.Input);
await pipeline.StartAsync();
```
### Platforms
Windows, macOS, Linux, iOS, Android.
## Image overlay
[!badge size="xl" target="blank" variant="info" text="Media Blocks SDK .Net"](https://www.visioforge.com/media-blocks-sdk-net)
The block overlays an image loaded from a file onto a video stream.
You can set an image position and optional alpha value. 32-bit images with alpha-channel are supported.
### Block info
Name: ImageOverlayBlock.
Pin direction | Media type | Pins count
--- | :---: | :---:
Input | Uncompressed video | 1
Output | Uncompressed video | 1
### The sample pipeline
```mermaid
graph LR;
UniversalSourceBlock-->ImageOverlayBlock;
ImageOverlayBlock-->VideoRendererBlock;
```
### Sample code
```csharp
var pipeline = new MediaBlocksPipeline();
var filename = "test.mp4";
var fileSource = new UniversalSourceBlock(await UniversalSourceSettings.CreateAsync(new Uri(filename)));
var imageOverlay = new ImageOverlayBlock(@"logo.png");
pipeline.Connect(fileSource.VideoOutput, imageOverlay.Input);
var videoRenderer = new VideoRendererBlock(pipeline, VideoView1);
pipeline.Connect(imageOverlay.Output, videoRenderer.Input);
await pipeline.StartAsync();
```
### Platforms
Windows, macOS, Linux, iOS, Android.
## Mirror
[!badge size="xl" target="blank" variant="info" text="Media Blocks SDK .Net"](https://www.visioforge.com/media-blocks-sdk-net)
The mirror block splits the image into two halves and reflects one over the other.
### Block info
Name: MirrorBlock.
Pin direction | Media type | Pins count
--- | :---: | :---:
Input | Uncompressed video | 1
Output | Uncompressed video | 1
### The sample pipeline
```mermaid
graph LR;
UniversalSourceBlock-->MirrorBlock;
MirrorBlock-->VideoRendererBlock;
```
### Sample code
```csharp
var pipeline = new MediaBlocksPipeline();
var filename = "test.mp4";
var fileSource = new UniversalSourceBlock(await UniversalSourceSettings.CreateAsync(new Uri(filename)));
var mirrorBlock = new MirrorBlock(MirrorMode.Top);
pipeline.Connect(fileSource.VideoOutput, mirrorBlock.Input);
var videoRenderer = new VideoRendererBlock(pipeline, VideoView1);
pipeline.Connect(mirrorBlock.Output, videoRenderer.Input);
await pipeline.StartAsync();
```
### Platforms
Windows, macOS, Linux, iOS, Android.
## Perspective
[!badge size="xl" target="blank" variant="info" text="Media Blocks SDK .Net"](https://www.visioforge.com/media-blocks-sdk-net)
The perspective block applies a 2D perspective transform.
### Block info
Name: PerspectiveBlock.
Pin direction | Media type | Pins count
--- | :---: | :---:
Input | Uncompressed video | 1
Output | Uncompressed video | 1
### The sample pipeline
```mermaid
graph LR;
UniversalSourceBlock-->PerspectiveBlock;
PerspectiveBlock-->VideoRendererBlock;
```
### Sample code
```csharp
var pipeline = new MediaBlocksPipeline();
var filename = "test.mp4";
var fileSource = new UniversalSourceBlock(await UniversalSourceSettings.CreateAsync(new Uri(filename)));
var persBlock = new PerspectiveBlock(new int[] { 1, 2, 3, 4, 5, 6, 7, 8, 9 });
pipeline.Connect(fileSource.VideoOutput, persBlock.Input);
var videoRenderer = new VideoRendererBlock(pipeline, VideoView1);
pipeline.Connect(persBlock.Output, videoRenderer.Input);
await pipeline.StartAsync();
```
### Platforms
Windows, macOS, Linux, iOS, Android.
## Pinch
[!badge size="xl" target="blank" variant="info" text="Media Blocks SDK .Net"](https://www.visioforge.com/media-blocks-sdk-net)
The block performs the pinch geometric transform of the image.
### Block info
Name: PinchBlock.
Pin direction | Media type | Pins count
--- | :---: | :---:
Input | Uncompressed video | 1
Output | Uncompressed video | 1
### The sample pipeline
```mermaid
graph LR;
UniversalSourceBlock-->PinchBlock;
PinchBlock-->VideoRendererBlock;
```
### Sample code
```csharp
var pipeline = new MediaBlocksPipeline();
var filename = "test.mp4";
var fileSource = new UniversalSourceBlock(await UniversalSourceSettings.CreateAsync(new Uri(filename)));
var pinchBlock = new PinchBlock();
pipeline.Connect(fileSource.VideoOutput, pinchBlock.Input);
var videoRenderer = new VideoRendererBlock(pipeline, VideoView1);
pipeline.Connect(pinchBlock.Output, videoRenderer.Input);
await pipeline.StartAsync();
```
### Platforms
Windows, macOS, Linux, iOS, Android.
## Rotate
[!badge size="xl" target="blank" variant="info" text="Media Blocks SDK .Net"](https://www.visioforge.com/media-blocks-sdk-net)
The block rotates the image by a specified angle.
### Block info
Name: RotateBlock.
Pin direction | Media type | Pins count
--- | :---: | :---:
Input | Uncompressed video | 1
Output | Uncompressed video | 1
### The sample pipeline
```mermaid
graph LR;
UniversalSourceBlock-->RotateBlock;
RotateBlock-->VideoRendererBlock;
```
### Sample code
```csharp
var pipeline = new MediaBlocksPipeline();
var filename = "test.mp4";
var fileSource = new UniversalSourceBlock(await UniversalSourceSettings.CreateAsync(new Uri(filename)));
var rotateBlock = new RotateBlock(0.7);
pipeline.Connect(fileSource.VideoOutput, rotateBlock.Input);
var videoRenderer = new VideoRendererBlock(pipeline, VideoView1);
pipeline.Connect(rotateBlock.Output, videoRenderer.Input);
await pipeline.StartAsync();
```
### Platforms
Windows, macOS, Linux, iOS, Android.
## Resize
[!badge size="xl" target="blank" variant="info" text="Media Blocks SDK .Net"](https://www.visioforge.com/media-blocks-sdk-net)
The block resizes the video stream. You can configure the resize method, the letterbox flag, and many other options.
Use the `ResizeVideoEffect` class to configure.
### Block info
Name: VideoResizeBlock.
Pin direction | Media type | Pins count
--- | :---: | :---:
Input | Uncompressed video | 1
Output | Uncompressed video | 1
### The sample pipeline
```mermaid
graph LR;
UniversalSourceBlock-->VideoResizeBlock;
VideoResizeBlock-->VideoRendererBlock;
```
### Sample code
```csharp
var pipeline = new MediaBlocksPipeline();
var filename = "test.mp4";
var fileSource = new UniversalSourceBlock(await UniversalSourceSettings.CreateAsync(new Uri(filename)));
var videoResize = new VideoResizeBlock(new ResizeVideoEffect(1280, 720) { Letterbox = false });
pipeline.Connect(fileSource.VideoOutput, videoResize.Input);
var videoRenderer = new VideoRendererBlock(pipeline, VideoView1);
pipeline.Connect(videoResize.Output, videoRenderer.Input);
await pipeline.StartAsync();
```
### Platforms
Windows, macOS, Linux, iOS, Android.
## Video sample grabber
[!badge size="xl" target="blank" variant="info" text="Media Blocks SDK .Net"](https://www.visioforge.com/media-blocks-sdk-net)
The video sample grabber calls an event for each video frame. You can save or process the received video frame.
### Block info
Name: VideoSampleGrabberBlock.
Pin direction | Media type | Pins count
--- | :---: | :---:
Input | Uncompressed video | 1
Output | Uncompressed video | 1
### The sample pipeline
```mermaid
graph LR;
UniversalSourceBlock-->VideoSampleGrabberBlock;
VideoSampleGrabberBlock-->VideoRendererBlock;
```
### Sample code
```csharp
var pipeline = new MediaBlocksPipeline();
var filename = "test.mp4";
var fileSource = new UniversalSourceBlock(await UniversalSourceSettings.CreateAsync(new Uri(filename)));
var videoSG = new VideoSampleGrabberBlock();
videoSG.OnVideoFrameBuffer += VideoSG_OnVideoFrameBuffer;
pipeline.Connect(fileSource.VideoOutput, videoSG.Input);
var videoRenderer = new VideoRendererBlock(pipeline, VideoView1);
pipeline.Connect(videoSG.Output, videoRenderer.Input);
await pipeline.StartAsync();
private void VideoSG_OnVideoFrameBuffer(object sender, VideoFrameBufferEventArgs e)
{
// save or process the video frame
}
```
### Platforms
Windows, macOS, Linux, iOS, Android.
## Sphere
[!badge size="xl" target="blank" variant="info" text="Media Blocks SDK .Net"](https://www.visioforge.com/media-blocks-sdk-net)
The sphere block applies a sphere geometric transform to the video.
### Block info
Name: SphereBlock.
Pin direction | Media type | Pins count
--- | :---: | :---:
Input | Uncompressed video | 1
Output | Uncompressed video | 1
### The sample pipeline
```mermaid
graph LR;
UniversalSourceBlock-->SphereBlock;
SphereBlock-->VideoRendererBlock;
```
### Sample code
```csharp
var pipeline = new MediaBlocksPipeline();
var filename = "test.mp4";
var fileSource = new UniversalSourceBlock(await UniversalSourceSettings.CreateAsync(new Uri(filename)));
var sphereBlock = new SphereBlock();
pipeline.Connect(fileSource.VideoOutput, sphereBlock.Input);
var videoRenderer = new VideoRendererBlock(pipeline, VideoView1);
pipeline.Connect(sphereBlock.Output, videoRenderer.Input);
await pipeline.StartAsync();
```
### Platforms
Windows, macOS, Linux, iOS, Android.
## Square
[!badge size="xl" target="blank" variant="info" text="Media Blocks SDK .Net"](https://www.visioforge.com/media-blocks-sdk-net)
The square block distorts the center part of the video into a square.
### Block info
Name: SquareBlock.
Pin direction | Media type | Pins count
--- | :---: | :---:
Input | Uncompressed video | 1
Output | Uncompressed video | 1
### The sample pipeline
```mermaid
graph LR;
UniversalSourceBlock-->SquareBlock;
SquareBlock-->VideoRendererBlock;
```
### Sample code
```csharp
var pipeline = new MediaBlocksPipeline();
var filename = "test.mp4";
var fileSource = new UniversalSourceBlock(await UniversalSourceSettings.CreateAsync(new Uri(filename)));
var squareBlock = new SquareBlock(new SquareVideoEffect());
pipeline.Connect(fileSource.VideoOutput, squareBlock.Input);
var videoRenderer = new VideoRendererBlock(pipeline, VideoView1);
pipeline.Connect(squareBlock.Output, videoRenderer.Input);
await pipeline.StartAsync();
```
### Platforms
Windows, macOS, Linux, iOS, Android.
## Stretch
[!badge size="xl" target="blank" variant="info" text="Media Blocks SDK .Net"](https://www.visioforge.com/media-blocks-sdk-net)
The stretch block stretches the video in the circle around the center point.
### Block info
Name: StretchBlock.
Pin direction | Media type | Pins count
--- | :---: | :---:
Input | Uncompressed video | 1
Output | Uncompressed video | 1
### The sample pipeline
```mermaid
graph LR;
UniversalSourceBlock-->StretchBlock;
StretchBlock-->VideoRendererBlock;
```
### Sample code
```csharp
var pipeline = new MediaBlocksPipeline();
var filename = "test.mp4";
var fileSource = new UniversalSourceBlock(await UniversalSourceSettings.CreateAsync(new Uri(filename)));
var stretchBlock = new StretchBlock();
pipeline.Connect(fileSource.VideoOutput, stretchBlock.Input);
var videoRenderer = new VideoRendererBlock(pipeline, VideoView1);
pipeline.Connect(stretchBlock.Output, videoRenderer.Input);
await pipeline.StartAsync();
```
### Platforms
Windows, macOS, Linux, iOS, Android.
## Text overlay
[!badge size="xl" target="blank" variant="info" text="Media Blocks SDK .Net"](https://www.visioforge.com/media-blocks-sdk-net)
The block adds the text overlay on top of the video stream.
### Block info
Name: TextOverlayBlock.
Pin direction | Media type | Pins count
--- | :---: | :---:
Input | Uncompressed video | 1
Output | Uncompressed video | 1
### The sample pipeline
```mermaid
graph LR;
UniversalSourceBlock-->TextOverlayBlock;
TextOverlayBlock-->VideoRendererBlock;
```
### Sample code
```csharp
var pipeline = new MediaBlocksPipeline();
var filename = "test.mp4";
var fileSource = new UniversalSourceBlock(await UniversalSourceSettings.CreateAsync(new Uri(filename)));
var textOverlay = new TextOverlayBlock(new TextOverlaySettings("Hello world!"));
pipeline.Connect(fileSource.VideoOutput, textOverlay.Input);
var videoRenderer = new VideoRendererBlock(pipeline, VideoView1);
pipeline.Connect(textOverlay.Output, videoRenderer.Input);
await pipeline.StartAsync();
```
### Platforms
Windows, macOS, Linux, iOS, Android.
## Tunnel
[!badge size="xl" target="blank" variant="info" text="Media Blocks SDK .Net"](https://www.visioforge.com/media-blocks-sdk-net)
The block applies a light tunnel effect to a video stream.
### Block info
Name: TunnelBlock.
Pin direction | Media type | Pins count
--- | :---: | :---:
Input | Uncompressed video | 1
Output | Uncompressed video | 1
### The sample pipeline
```mermaid
graph LR;
UniversalSourceBlock-->TunnelBlock;
TunnelBlock-->VideoRendererBlock;
```
### Sample code
```csharp
var pipeline = new MediaBlocksPipeline();
var filename = "test.mp4";
var fileSource = new UniversalSourceBlock(await UniversalSourceSettings.CreateAsync(new Uri(filename)));
var tunnelBlock = new TunnelBlock();
pipeline.Connect(fileSource.VideoOutput, tunnelBlock.Input);
var videoRenderer = new VideoRendererBlock(pipeline, VideoView1);
pipeline.Connect(tunnelBlock.Output, videoRenderer.Input);
await pipeline.StartAsync();
```
### Platforms
Windows, macOS, Linux, iOS, Android.
## Twirl
[!badge size="xl" target="blank" variant="info" text="Media Blocks SDK .Net"](https://www.visioforge.com/media-blocks-sdk-net)
The twirl block twists the video frame from the center out.
### Block info
Name: TwirlBlock.
Pin direction | Media type | Pins count
--- | :---: | :---:
Input | Uncompressed video | 1
Output | Uncompressed video | 1
### The sample pipeline
```mermaid
graph LR;
UniversalSourceBlock-->TwirlBlock;
TwirlBlock-->VideoRendererBlock;
```
### Sample code
```csharp
var pipeline = new MediaBlocksPipeline();
var filename = "test.mp4";
var fileSource = new UniversalSourceBlock(await UniversalSourceSettings.CreateAsync(new Uri(filename)));
var twirlBlock = new TwirlBlock();
pipeline.Connect(fileSource.VideoOutput, twirlBlock.Input);
var videoRenderer = new VideoRendererBlock(pipeline, VideoView1);
pipeline.Connect(twirlBlock.Output, videoRenderer.Input);
await pipeline.StartAsync();
```
### Platforms
Windows, macOS, Linux, iOS, Android.
## Video balance
[!badge size="xl" target="blank" variant="info" text="Media Blocks SDK .Net"](https://www.visioforge.com/media-blocks-sdk-net)
The block processes the video stream and allows you to change brightness, contrast, hue, and saturation.
Use the VideoBalanceVideoEffect class to configure the block settings.
### Block info
Name: VideoBalanceBlock.
Pin direction | Media type | Pins count
--- | :---: | :---:
Input | Uncompressed video | 1
Output | Uncompressed video | 1
### The sample pipeline
```mermaid
graph LR;
UniversalSourceBlock-->VideoBalanceBlock;
VideoBalanceBlock-->VideoRendererBlock;
```
### Sample code
```csharp
var pipeline = new MediaBlocksPipeline();
var filename = "test.mp4";
var fileSource = new UniversalSourceBlock(await UniversalSourceSettings.CreateAsync(new Uri(filename)));
var videoBalance = new VideoBalanceBlock(new VideoBalanceVideoEffect() { Brightness = 0.25 });
pipeline.Connect(fileSource.VideoOutput, videoBalance.Input);
var videoRenderer = new VideoRendererBlock(pipeline, VideoView1);
pipeline.Connect(videoBalance.Output, videoRenderer.Input);
await pipeline.StartAsync();
```
### Platforms
Windows, macOS, Linux, iOS, Android.
## Video mixer
[!badge size="xl" target="blank" variant="info" text="Media Blocks SDK .Net"](https://www.visioforge.com/media-blocks-sdk-net)
The video mixer block has several inputs and one output. The block draws the inputs in the selected order at the selected positions. You can also set the desired level of transparency for each stream.
### Block info
Name: VideoMixerBlock.
Pin direction | Media type | Pins count
--- | :---: | :---:
Input | Uncompressed video | 1 or more
Output | Uncompressed video | 1
### The sample pipeline
```mermaid
graph LR;
UniversalSourceBlock#1-->VideoMixerBlock;
UniversalSourceBlock#2-->VideoMixerBlock;
VideoMixerBlock-->VideoRendererBlock;
```
### Sample code
```csharp
var pipeline = new MediaBlocksPipeline();
// Define source files
var filename1 = "test.mp4"; // Replace with your first video file
var fileSource1 = new UniversalSourceBlock(await UniversalSourceSettings.CreateAsync(new Uri(filename1)));
var filename2 = "test2.mp4"; // Replace with your second video file
var fileSource2 = new UniversalSourceBlock(await UniversalSourceSettings.CreateAsync(new Uri(filename2)));
// Configure VideoMixerSettings with output resolution and frame rate
// For example, 1280x720 resolution at 30 frames per second
var outputWidth = 1280;
var outputHeight = 720;
var outputFrameRate = new VideoFrameRate(30);
var mixerSettings = new VideoMixerSettings(outputWidth, outputHeight, outputFrameRate);
// Add streams to the mixer
// Stream 1: Main video, occupies the full output frame, Z-order 0 (bottom layer)
mixerSettings.AddStream(new VideoMixerStream(new Rect(0, 0, outputWidth, outputHeight), 0));
// Stream 2: Overlay video, smaller rectangle, positioned at (50,50), Z-order 1 (on top)
// Rectangle: left=50, top=50, width=320, height=180
mixerSettings.AddStream(new VideoMixerStream(new Rect(50, 50, 320, 180), 1));
// Create the VideoMixerBlock
var videoMixer = new VideoMixerBlock(mixerSettings);
// Connect source outputs to VideoMixerBlock inputs
pipeline.Connect(fileSource1.VideoOutput, videoMixer.Inputs[0]);
pipeline.Connect(fileSource2.VideoOutput, videoMixer.Inputs[1]);
// Create a VideoRendererBlock to display the mixed video
// VideoView1 is a placeholder for your UI element (e.g., a WPF control)
var videoRenderer = new VideoRendererBlock(pipeline, VideoView1);
pipeline.Connect(videoMixer.Output, videoRenderer.Input);
// Start the pipeline
await pipeline.StartAsync();
```
### Platforms
Windows, macOS, Linux, iOS, Android.
### Video Mixer Types and Configuration
The Media Blocks SDK offers several types of video mixers, allowing you to choose the best fit for your application's performance needs and target platform capabilities. These include CPU-based, Direct3D 11, and OpenGL mixers.
All mixer settings classes inherit from `VideoMixerBaseSettings`, which defines common properties like output resolution (`Width`, `Height`), `FrameRate`, and the list of `Streams` to be mixed.
#### 1. CPU-based Video Mixer (VideoMixerSettings)
This is the default video mixer and relies on CPU processing for mixing video streams. It is platform-agnostic and a good general-purpose option.
To use the CPU-based mixer, you instantiate `VideoMixerSettings`:
```csharp
// Output resolution 1920x1080 at 30 FPS
var outputWidth = 1920;
var outputHeight = 1080;
var outputFrameRate = new VideoFrameRate(30);
var mixerSettings = new VideoMixerSettings(outputWidth, outputHeight, outputFrameRate);
// Add streams (see example in the main Video Mixer section)
// mixerSettings.AddStream(new VideoMixerStream(new Rect(0, 0, outputWidth, outputHeight), 0));
// ...
var videoMixer = new VideoMixerBlock(mixerSettings);
```
#### 2. Direct3D 11 Video Compositor (D3D11VideoCompositorSettings)
For Windows applications, the `D3D11VideoCompositorSettings` provides hardware-accelerated video mixing using Direct3D 11. This can offer significant performance improvements, especially with high-resolution video or a large number of streams.
```csharp
// Output resolution 1920x1080 at 30 FPS
var outputWidth = 1920;
var outputHeight = 1080;
var outputFrameRate = new VideoFrameRate(30);
// Optionally, specify the graphics adapter index (-1 for default)
var adapterIndex = -1;
var d3dMixerSettings = new D3D11VideoCompositorSettings(outputWidth, outputHeight, outputFrameRate)
{
AdapterIndex = adapterIndex
};
// Streams are added similarly to VideoMixerSettings
// d3dMixerSettings.AddStream(new VideoMixerStream(new Rect(0, 0, outputWidth, outputHeight), 0));
// For more advanced control, you can use D3D11VideoCompositorStream to specify blend states
// d3dMixerSettings.AddStream(new D3D11VideoCompositorStream(new Rect(50, 50, 320, 180), 1)
// {
// BlendSourceRGB = D3D11CompositorBlend.SourceAlpha,
// BlendDestRGB = D3D11CompositorBlend.InverseSourceAlpha
// });
// ...
var videoMixer = new VideoMixerBlock(d3dMixerSettings);
```
The `D3D11VideoCompositorStream` class, which inherits from `VideoMixerStream`, allows for fine-grained control over D3D11 blend states if needed.
#### 3. OpenGL Video Mixer (GLVideoMixerSettings)
The `GLVideoMixerSettings` enables hardware-accelerated video mixing using OpenGL. This is a cross-platform solution for leveraging GPU capabilities on Windows, macOS, and Linux.
```csharp
// Output resolution 1920x1080 at 30 FPS
var outputWidth = 1920;
var outputHeight = 1080;
var outputFrameRate = new VideoFrameRate(30);
var glMixerSettings = new GLVideoMixerSettings(outputWidth, outputHeight, outputFrameRate);
// Streams are added similarly to VideoMixerSettings
// glMixerSettings.AddStream(new VideoMixerStream(new Rect(0, 0, outputWidth, outputHeight), 0));
// For more advanced control, you can use GLVideoMixerStream to specify blend functions and equations
// glMixerSettings.AddStream(new GLVideoMixerStream(new Rect(50, 50, 320, 180), 1)
// {
// BlendFunctionSourceRGB = GLVideoMixerBlendFunction.SourceAlpha,
// BlendFunctionDesctinationRGB = GLVideoMixerBlendFunction.OneMinusSourceAlpha,
// BlendEquationRGB = GLVideoMixerBlendEquation.Add
// });
// ...
var videoMixer = new VideoMixerBlock(glMixerSettings);
```
The `GLVideoMixerStream` class, inheriting from `VideoMixerStream`, provides properties to control OpenGL-specific blending parameters.
Choosing the appropriate mixer depends on your application's requirements. For simple mixing or maximum compatibility, the CPU-based mixer is suitable. For performance-critical applications on Windows, D3D11 is recommended. For cross-platform GPU acceleration, OpenGL is the preferred choice.
## Water ripple
[!badge size="xl" target="blank" variant="info" text="Media Blocks SDK .Net"](https://www.visioforge.com/media-blocks-sdk-net)
The water ripple block creates a water ripple effect on the video stream.
Use the `WaterRippleVideoEffect` class to configure.
### Block info
Name: WaterRippleBlock.
Pin direction | Media type | Pins count
--- | :---: | :---:
Input | Uncompressed video | 1
Output | Uncompressed video | 1
### The sample pipeline
```mermaid
graph LR;
UniversalSourceBlock-->WaterRippleBlock;
WaterRippleBlock-->VideoRendererBlock;
```
### Sample code
```csharp
var pipeline = new MediaBlocksPipeline();
var filename = "test.mp4";
var fileSource = new UniversalSourceBlock(await UniversalSourceSettings.CreateAsync(new Uri(filename)));
var wrBlock = new WaterRippleBlock(new WaterRippleVideoEffect());
pipeline.Connect(fileSource.VideoOutput, wrBlock.Input);
var videoRenderer = new VideoRendererBlock(pipeline, VideoView1);
pipeline.Connect(wrBlock.Output, videoRenderer.Input);
await pipeline.StartAsync();
```
### Platforms
Windows, macOS, Linux, iOS, Android.
## D3D11 Video Converter
[!badge size="xl" target="blank" variant="info" text="Media Blocks SDK .Net"](https://www.visioforge.com/media-blocks-sdk-net)
The D3D11 Video Converter block performs hardware-accelerated video format conversion using Direct3D 11. This is useful for efficient color space or format changes on Windows platforms.
### Block info
Name: D3D11VideoConverterBlock.
Pin direction | Media type | Pins count
--- | :---: | :---:
Input | Uncompressed video | 1
Output | Uncompressed video | 1
### The sample pipeline
```mermaid
graph LR;
UniversalSourceBlock-->D3D11VideoConverterBlock;
D3D11VideoConverterBlock-->VideoRendererBlock;
```
### Sample code
```csharp
var pipeline = new MediaBlocksPipeline();
var filename = "test.mp4";
var fileSource = new UniversalSourceBlock(await UniversalSourceSettings.CreateAsync(new Uri(filename)));
var d3d11Converter = new D3D11VideoConverterBlock();
pipeline.Connect(fileSource.VideoOutput, d3d11Converter.Input);
var videoRenderer = new VideoRendererBlock(pipeline, VideoView1);
pipeline.Connect(d3d11Converter.Output, videoRenderer.Input);
await pipeline.StartAsync();
```
### Platforms
Windows (Direct3D 11 required).
## Video Effects (Windows)
[!badge size="xl" target="blank" variant="info" text="Media Blocks SDK .Net"](https://www.visioforge.com/media-blocks-sdk-net)
The Video Effects (Windows) block allows you to add, update, and manage multiple video effects in real time. This block is specific to Windows and leverages the Media Foundation pipeline for effects processing.
### Block info
Name: VideoEffectsWinBlock.
Pin direction | Media type | Pins count
--- | :---: | :---:
Input | Uncompressed video | 1
Output | Uncompressed video | 1
### The sample pipeline
```mermaid
graph LR;
UniversalSourceBlock-->VideoEffectsWinBlock;
VideoEffectsWinBlock-->VideoRendererBlock;
```
### Sample code
```csharp
var pipeline = new MediaBlocksPipeline();
var filename = "test.mp4";
var fileSource = new UniversalSourceBlock(await UniversalSourceSettings.CreateAsync(new Uri(filename)));
var videoEffects = new VideoEffectsWinBlock();
// Example: add a brightness effect
videoEffects.Video_Effects_Add(new VideoEffectBrightness(true, 0.2));
pipeline.Connect(fileSource.VideoOutput, videoEffects.Input);
var videoRenderer = new VideoRendererBlock(pipeline, VideoView1);
pipeline.Connect(videoEffects.Output, videoRenderer.Input);
await pipeline.StartAsync();
```
### Platforms
Windows.
## D3D11 Video Compositor
[!badge size="xl" target="blank" variant="info" text="Media Blocks SDK .Net"](https://www.visioforge.com/media-blocks-sdk-net)
The D3D11 Video Compositor block provides hardware-accelerated video mixing and compositing using Direct3D 11. It is designed for high-performance multi-stream video composition on Windows.
### Block info
Name: D3D11VideoCompositorBlock.
Pin direction | Media type | Pins count
--- | :---: | :---:
Input | Uncompressed video | 1 or more
Output | Uncompressed video | 1
### The sample pipeline
```mermaid
graph LR;
UniversalSourceBlock#1-->D3D11VideoCompositorBlock;
UniversalSourceBlock#2-->D3D11VideoCompositorBlock;
D3D11VideoCompositorBlock-->VideoRendererBlock;
```
### Sample code
```csharp
var pipeline = new MediaBlocksPipeline();
var filename1 = "test.mp4";
var fileSource1 = new UniversalSourceBlock(await UniversalSourceSettings.CreateAsync(new Uri(filename1)));
var filename2 = "test2.mp4";
var fileSource2 = new UniversalSourceBlock(await UniversalSourceSettings.CreateAsync(new Uri(filename2)));
var outputWidth = 1280;
var outputHeight = 720;
var outputFrameRate = new VideoFrameRate(30);
var settings = new D3D11VideoCompositorSettings(outputWidth, outputHeight, outputFrameRate);
settings.AddStream(new D3D11VideoCompositorStream(new Rect(0, 0, outputWidth, outputHeight), 0));
settings.AddStream(new D3D11VideoCompositorStream(new Rect(50, 50, 320, 180), 1));
var d3d11Compositor = new D3D11VideoCompositorBlock(settings);
pipeline.Connect(fileSource1.VideoOutput, d3d11Compositor.Inputs[0]);
pipeline.Connect(fileSource2.VideoOutput, d3d11Compositor.Inputs[1]);
var videoRenderer = new VideoRendererBlock(pipeline, VideoView1);
pipeline.Connect(d3d11Compositor.Output, videoRenderer.Input);
await pipeline.StartAsync();
```
### Platforms
Windows (Direct3D 11 required).
## VR360 Processor
[!badge size="xl" target="blank" variant="info" text="Media Blocks SDK .Net"](https://www.visioforge.com/media-blocks-sdk-net)
The VR360 Processor block applies 360-degree equirectangular video effects, suitable for VR content. It uses Direct3D 11 for GPU-accelerated processing and allows real-time adjustment of yaw, pitch, roll, and field of view.
### Block info
Name: VR360ProcessorBlock.
Pin direction | Media type | Pins count
--- | :---: | :---:
Input | Uncompressed video | 1
Output | Uncompressed video | 1
### The sample pipeline
```mermaid
graph LR;
UniversalSourceBlock-->VR360ProcessorBlock;
VR360ProcessorBlock-->VideoRendererBlock;
```
### Sample code
```csharp
var pipeline = new MediaBlocksPipeline();
var filename = "test.mp4";
var fileSource = new UniversalSourceBlock(await UniversalSourceSettings.CreateAsync(new Uri(filename)));
var vr360Settings = new D3D11VR360RendererSettings
{
Yaw = 0,
Pitch = 0,
Roll = 0,
FOV = 90
};
var vr360Processor = new VR360ProcessorBlock(vr360Settings);
pipeline.Connect(fileSource.VideoOutput, vr360Processor.Input);
var videoRenderer = new VideoRendererBlock(pipeline, VideoView1);
pipeline.Connect(vr360Processor.Output, videoRenderer.Input);
await pipeline.StartAsync();
```
### Platforms
Windows (Direct3D 11 required).
---END OF PAGE---
# Local File: .\dotnet\mediablocks\VideoRendering\index.md
---
title: Media Streaming Video Renderer Block SDK
description: Display video streams on multiple platforms (Windows, macOS, Linux, iOS, Android) with DirectX, OpenGL, and Metal support using our Video Renderer Block SDK.
sidebar_label: Video Renderer
---
# Video Renderer Block
[!badge size="xl" target="blank" variant="info" text="Media Blocks SDK .Net"](https://www.visioforge.com/media-blocks-sdk-net)
## Overview
The Video Renderer block is an essential component designed for developers who need to display video streams in their applications. This powerful tool enables you to render video content on specific areas of windows or screens across various platforms and UI frameworks.
The block utilizes a platform-specific visual control called `VideoView` which leverages DirectX technology on Windows systems and typically implements OpenGL rendering on other platforms. The SDK fully supports cross-platform development with compatibility for both Avalonia and MAUI UI frameworks.
One of the key advantages of this block is its flexibility - developers can implement multiple video views and renderers to display the same video stream in different locations simultaneously, whether in separate sections of a window or across multiple windows.
## Rendering Technologies
### DirectX Integration
On Windows platforms, the Video Renderer Block seamlessly integrates with DirectX for high-performance hardware-accelerated rendering. This integration provides several benefits:
- **Hardware acceleration**: Utilizes the GPU for efficient video processing and rendering
- **Low-latency playback**: Minimizes delay between frame processing and display
- **Direct3D surface sharing**: Enables efficient memory management and reduced copying of video data
- **Multiple display support**: Handles rendering across various display configurations
- **Support for High DPI**: Ensures crisp rendering on high-resolution displays
The renderer automatically selects the appropriate DirectX version based on your system capabilities, supporting DirectX 11 and DirectX 12 where available.
### OpenGL Implementation
For cross-platform compatibility, the Video Renderer uses OpenGL on Linux and older macOS systems:
- **Consistent rendering API**: Provides a unified approach across different operating systems
- **Shader-based processing**: Enables advanced video effects and color transformations
- **Texture mapping optimization**: Efficiently handles video frame presentation
- **Framebuffer objects support**: Allows for off-screen rendering and complex composition
- **Hardware-accelerated scaling**: Delivers high-quality resizing with minimal performance impact
OpenGL ES variants are utilized on mobile platforms to ensure optimal performance while maintaining compatibility with the core rendering pipeline.
### Metal Framework Support
On newer Apple platforms (macOS, iOS, iPadOS), the Video Renderer can leverage Metal - Apple's modern graphics and compute API:
- **Native Apple integration**: Optimized specifically for Apple hardware
- **Reduced CPU overhead**: Minimizes processing bottlenecks compared to OpenGL
- **Enhanced parallel execution**: Better utilizes multi-core processors
- **Improved memory bandwidth**: More efficient video frame handling
- **Integration with Apple's video toolchain**: Seamless interoperability with AV Foundation and Core Video
The renderer automatically selects Metal when available on Apple platforms, falling back to OpenGL when necessary on older versions.
## Technical Specifications
### Block Information
Name: VideoRendererBlock
| Pin direction | Media type | Pins count |
| --- | :---: | :---: |
| Input video | uncompressed video | one or more |
## Implementation Guide
### Setting Up Your Video View
The Video View component serves as the visual element where your video content will be displayed. It needs to be properly integrated into your application's UI layout.
### Creating a Basic Pipeline
Below is a visual representation of a simple pipeline implementation:
```mermaid
graph LR;
UniversalSourceBlock-->VideoRendererBlock;
```
This diagram illustrates how a source block connects directly to the video renderer to create a functional video playback system.
### Code Implementation Example
The following sample demonstrates how to implement a basic video rendering pipeline:
```csharp
// Create a pipeline
var pipeline = new MediaBlocksPipeline();
// create a source block
var filename = "test.mp4";
var fileSource = new UniversalSourceBlock(await UniversalSourceSettings.CreateAsync(new Uri(filename)));
// create a video renderer block
var videoRenderer = new VideoRendererBlock(pipeline, VideoView1);
// connect the blocks
pipeline.Connect(fileSource.VideoOutput, videoRenderer.Input);
// start the pipeline
await pipeline.StartAsync();
```
## Platform Compatibility
The Video Renderer block offers wide compatibility across multiple operating systems and devices:
- Windows
- macOS
- Linux
- iOS
- Android
This makes it an ideal solution for developers building cross-platform applications that require consistent video rendering capabilities.
---END OF PAGE---
# Local File: .\dotnet\mediaplayer\deployment.md
---
title: Media Player SDK .Net Deployment Guide
description: Step-by-step deployment instructions for Media Player SDK .Net applications. Learn how to deploy using NuGet packages, silent installers, and manual configuration. Includes runtime dependencies, DirectShow filters, and environment setup for Windows and cross-platform development.
sidebar_label: Deployment Guide
---
# Media Player SDK .Net Deployment Guide
[!badge size="xl" target="blank" variant="info" text="Media Player SDK .Net"](https://www.visioforge.com/media-player-sdk-net)
This comprehensive guide covers all deployment scenarios for the Media Player SDK .Net, ensuring your applications work correctly across different environments. Whether you're developing cross-platform applications or Windows-specific solutions, this guide provides the necessary steps for successful deployment.
## Engine Types Overview
The Media Player SDK .Net offers two primary engine types, each designed for specific deployment scenarios:
### MediaPlayerCoreX Engine (Cross-Platform)
MediaPlayerCoreX is our cross-platform solution that works across multiple operating systems. For detailed deployment instructions specific to this engine, refer to the main [Cross-Platform Deployment Guide](../deployment-x/index.md).
### MediaPlayerCore Engine (Windows-Only)
The MediaPlayerCore engine is optimized specifically for Windows environments. When deploying applications that use this engine on computers without the SDK pre-installed, you must include the necessary SDK components with your application.
> **Important**: For AnyCPU applications, you should deploy both x86 and x64 redistributables to ensure compatibility across different system architectures.
## Deployment Options
There are three primary methods for deploying the Media Player SDK .Net components:
1. Using NuGet packages (recommended for most scenarios)
2. Using automatic silent installers (requires administrative privileges)
3. Manual installation (for complete control over the deployment process)
## NuGet Package Deployment
NuGet packages provide the simplest deployment method, automatically handling the inclusion of necessary files in your application folder during the build process.
### Required NuGet Packages
#### Core Packages (Always Required)
* **SDK Base Package**:
* [x86 Version](http://www.nuget.org/packages/VisioForge.DotNet.Core.Redist.Base.x86/)
* [x64 Version](http://www.nuget.org/packages/VisioForge.DotNet.Core.Redist.Base.x64/)
* **Media Player SDK Package**:
* [x86 Version](http://www.nuget.org/packages/VisioForge.DotNet.Core.Redist.MediaPlayer.x86/)
* [x64 Version](http://www.nuget.org/packages/VisioForge.DotNet.Core.Redist.MediaPlayer.x64/)
#### Feature-Specific Packages (Add as Needed)
##### Media Format Support
* **FFMPEG Package** (for file playback using FFMPEG source mode):
* [x86 Version](http://www.nuget.org/packages/VisioForge.DotNet.Core.Redist.FFMPEG.x86/)
* [x64 Version](http://www.nuget.org/packages/VisioForge.DotNet.Core.Redist.FFMPEG.x64/)
* **MP4 Output Package**:
* [x86 Version](http://www.nuget.org/packages/VisioForge.DotNet.Core.Redist.MP4.x86/)
* [x64 Version](https://www.nuget.org/packages/VisioForge.DotNet.Core.Redist.MP4.x64/)
* **WebM Output Package**:
* [x86 Version](https://www.nuget.org/packages/VisioForge.DotNet.Core.Redist.WebM.x86/)
##### Source Support
* **VLC Source Package** (for file/IP camera sources):
* [x86 Version](http://www.nuget.org/packages/VisioForge.DotNet.Core.Redist.VLC.x86/)
* [x64 Version](http://www.nuget.org/packages/VisioForge.DotNet.Core.Redist.VLC.x64/)
##### Audio Format Support
* **XIPH Formats Package** (Ogg, Vorbis, FLAC output/source):
* [x86 Version](http://www.nuget.org/packages/VisioForge.DotNet.Core.Redist.XIPH.x86/)
* [x64 Version](http://www.nuget.org/packages/VisioForge.DotNet.Core.Redist.XIPH.x64/)
##### Filter Support
* **LAV Filters Package**:
* [x86 Version](http://www.nuget.org/packages/VisioForge.DotNet.Core.Redist.LAV.x86/)
* [x64 Version](http://www.nuget.org/packages/VisioForge.DotNet.Core.Redist.LAV.x64/)
## Automatic Silent Installers
For scenarios where you prefer installer-based deployment, the SDK offers automatic silent installers that require administrative privileges.
### Available Installers
#### Core Components
* **Base Package** (always required):
* [x86 Installer](http://files.visioforge.com/redists_net/redist_dotnet_base_x86.exe)
* [x64 Installer](http://files.visioforge.com/redists_net/redist_dotnet_base_x64.exe)
#### Media Format Support
* **FFMPEG Package** (for file/IP camera sources):
* [x86 Installer](http://files.visioforge.com/redists_net/redist_dotnet_ffmpeg_x86.exe)
* [x64 Installer](http://files.visioforge.com/redists_net/redist_dotnet_ffmpeg_x64.exe)
#### Source Support
* **VLC Source Package** (for file/IP camera sources):
* [x86 Installer](http://files.visioforge.com/redists_net/redist_dotnet_vlc_x86.exe)
* [x64 Installer](http://files.visioforge.com/redists_net/redist_dotnet_vlc_x64.exe)
#### Audio Format Support
* **XIPH Formats Package** (Ogg, Vorbis, FLAC output/source):
* [x86 Installer](http://files.visioforge.com/redists_net/redist_dotnet_xiph_x86.exe)
* [x64 Installer](http://files.visioforge.com/redists_net/redist_dotnet_xiph_x64.exe)
#### Filter Support
* **LAV Filters Package**:
* [x86 Installer](http://files.visioforge.com/redists_net/redist_dotnet_lav_x86.exe)
* [x64 Installer](http://files.visioforge.com/redists_net/redist_dotnet_lav_x64.exe)
> **Note**: To uninstall any installed package, run the executable with administrative privileges using the parameters: `/x //`
## Manual Installation
For advanced deployment scenarios requiring precise control over component installation, follow these steps:
### Step 1: Runtime Dependencies
* **With Administrative Privileges**: Install the VC++ 2022 (v143) runtime (x86/x64) and OpenMP runtime DLLs using redistributable executables or MSM modules.
* **Without Administrative Privileges**: Copy the VC++ 2022 (v143) runtime (x86/x64) and OpenMP runtime DLLs directly to your application folder.
### Step 2: Core Components
* Copy the VisioForge_MFP/VisioForge_MFPX (or x64 versions) DLLs from the Redist\Filters directory to your application folder.
### Step 3: .NET Assemblies
* Either copy the .NET assemblies to your application folder or install them to the Global Assembly Cache (GAC).
### Step 4: DirectShow Filters
* Copy and COM-register SDK DirectShow filters using [regsvr32.exe](https://support.microsoft.com/en-us/help/249873/how-to-use-the-regsvr32-tool-and-troubleshoot-regsvr32-error-messages) or another suitable method.
### Step 5: Environment Configuration
* Add the folder containing the filters to the system PATH environment variable if your application executable is located in a different directory.
## DirectShow Filter Configuration
The SDK uses various DirectShow filters for specific functionality. Below is a comprehensive list organized by feature category:
### Basic Feature Filters
* VisioForge_Video_Effects_Pro.ax
* VisioForge_MP3_Splitter.ax
* VisioForge_H264_Decoder.ax
* VisioForge_Audio_Mixer.ax
### Audio Effect Filters
* VisioForge_Audio_Effects_4.ax (legacy audio effects)
### Streaming Support Filters
#### RTSP Streaming
* VisioForge_RTSP_Sink.ax
* MP4 filters (legacy/modern, excluding muxer)
#### SSF Streaming
* VisioForge_SSF_Muxer.ax
* MP4 filters (legacy/modern, excluding muxer)
### Source Filters
#### VLC Source
* VisioForge_VLC_Source.ax
* Complete Redist\VLC folder with COM registration
* VLC_PLUGIN_PATH environment variable pointing to VLC\plugins folder
#### FFMPEG Source
* VisioForge_FFMPEG_Source.ax
* Complete Redist\FFMPEG folder, added to the Windows PATH variable
#### Memory Source
* VisioForge_AsyncEx.ax
#### WebM Decoding
* VisioForge_WebM_Ogg_Source.ax
* VisioForge_WebM_Source.ax
* VisioForge_WebM_Split.ax
* VisioForge_WebM_Vorbis_Decoder.ax
* VisioForge_WebM_VP8_Decoder.ax
* VisioForge_WebM_VP9_Decoder.ax
#### Network Streaming Sources
* VisioForge_RTSP_Source.ax
* VisioForge_RTSP_Source_Live555.ax
* FFMPEG, VLC or LAV filters
#### Audio Format Sources
* VisioForge_Xiph_FLAC_Source.ax (FLAC source)
* VisioForge_Xiph_Ogg_Demux2.ax (Ogg Vorbis source)
* VisioForge_Xiph_Vorbis_Decoder.ax (Ogg Vorbis source)
### Special Feature Filters
#### Video Encryption
* VisioForge_Encryptor_v8.ax
* VisioForge_Encryptor_v9.ax
#### GPU Acceleration
* VisioForge_DXP.dll / VisioForge_DXP64.dll (DirectX 11 GPU video effects)
#### LAV Source
* Complete contents of redist\LAV\x86(x64), with all .ax files registered
### Filter Registration Tip
To simplify the COM registration process for all DirectShow filters in a directory, place the "reg_special.exe" file from the SDK redist into the filters folder and run it with administrative privileges.
---
For more code samples and examples, visit our [GitHub repository](https://github.com/visioforge/.Net-SDK-s-samples).
---END OF PAGE---
# Local File: .\dotnet\mediaplayer\index.md
---
title: Media Player SDK .Net (MediaPlayerCore)
description: SDK usage tutorials for VisioForge Media Player SDK .Net
sidebar_label: Media Player SDK .Net
order: 13
---
# Media Player SDK .Net
[!badge size="xl" target="blank" variant="info" text="Media Player SDK .Net"](https://www.visioforge.com/media-player-sdk-net)
Media Player SDK .Net is a video player SDK with a wide range of features.
SDK can use several decoding engines to play video and audio files, such as FFMPEG, VLC, and DirectShow. Most of the video and audio formats are supported by the FFMPEG engine.
You can play files, network streams, 360-degree videos, and, optionally, DVD and Blu-Ray disks.
## Features
- Video and audio playback
- Video effects
- Audio effects
- Text overlays
- Image overlays
- SVG overlays
- Brightness, contrast, saturation, hue, and other video adjustments
- Sepia, pixelate, grayscale, and other video filters
You can check the full list of features on the [product page](https://www.visioforge.com/media-player-sdk-net).
## Sample applications
You can use WPF code in WinForms applications and vice versa. Most of code is the same for all UI frameworks, including Avalonia and MAUI. The main difference is the VideoView control available for each UI framework.
### MediaPlayerCoreX engine (cross-platform)
MAUI
Avalonia
- [Simple Media Player](https://github.com/visioforge/.Net-SDK-s-samples/tree/master/Media%20Player%20SDK%20X/Avalonia/Simple%20Media%20Player) shows basic playback functionality in Avalonia
iOS
Android
- [Simple Media Player](https://github.com/visioforge/.Net-SDK-s-samples/tree/master/Media%20Player%20SDK%20X/Android/MediaPlayer) shows basic playback functionality in Android
macOS
WPF
WinForms
### MediaPlayerCore engine (Windows only)
#### WPF
- [Simple Player](https://github.com/visioforge/.Net-SDK-s-samples/tree/master/Media%20Player%20SDK/WPF/CSharp/Simple%20Player%20Demo) shows basic playback functionality
- [Main Demo](https://github.com/visioforge/.Net-SDK-s-samples/tree/master/Media%20Player%20SDK/WPF/CSharp/Main%20Demo) shows all features of the SDK
- [Nvidia Maxine Player](https://github.com/visioforge/.Net-SDK-s-samples/tree/master/Media%20Player%20SDK/WPF/CSharp/Nvidia%20Maxine%20Player) uses the Nvidia Maxine engine
- [Skinned Player](https://github.com/visioforge/.Net-SDK-s-samples/tree/master/Media%20Player%20SDK/WPF/CSharp/Skinned%20Player) shows how to use custom skins
- [madVR Demo](https://github.com/visioforge/.Net-SDK-s-samples/tree/master/Media%20Player%20SDK/WPF/CSharp/madVR%20Demo) uses the madVR video renderer
#### WinForms
- [Audio Player](https://github.com/visioforge/.Net-SDK-s-samples/tree/master/Media%20Player%20SDK/WinForms/CSharp/Audio%20Player) shows how to play audio files
- [DVD Player](https://github.com/visioforge/.Net-SDK-s-samples/tree/master/Media%20Player%20SDK/WinForms/CSharp/DVD%20Player) shows how to play DVDs
- [Encrypted Memory Playback Demo](https://github.com/visioforge/.Net-SDK-s-samples/tree/master/Media%20Player%20SDK/WinForms/CSharp/Encrypted%20Memory%20Playback%20Demo) shows how to play encrypted file from the memory
- [Karaoke Demo](https://github.com/visioforge/.Net-SDK-s-samples/tree/master/Media%20Player%20SDK/WinForms/CSharp/Karaoke%20Demo) shows how to play audio karaoke files
- [Main Demo](https://github.com/visioforge/.Net-SDK-s-samples/tree/master/Media%20Player%20SDK/WinForms/CSharp/Main%20Demo) shows all features of the SDK
- [Memory Stream](https://github.com/visioforge/.Net-SDK-s-samples/tree/master/Media%20Player%20SDK/WinForms/CSharp/Memory%20Stream) shows how to play files from the memory
- [Multiple Video Streams](https://github.com/visioforge/.Net-SDK-s-samples/tree/master/Media%20Player%20SDK/WinForms/CSharp/Multiple%20Video%20Streams) shows how to play filles with multiple video streams
- [Seamless Playback](https://github.com/visioforge/.Net-SDK-s-samples/tree/master/Media%20Player%20SDK/WinForms/CSharp/Seamless%20Playback) shows how to play files without delays
- [Simple Video Player](https://github.com/visioforge/.Net-SDK-s-samples/tree/master/Media%20Player%20SDK/WinForms/CSharp/Simple%20Video%20Player) shows basic playback functionality
- [Two Windows](https://github.com/visioforge/.Net-SDK-s-samples/tree/master/Media%20Player%20SDK/WinForms/CSharp/Two%20Windows) shows how to play files in two windows
- [VR 360 Demo](https://github.com/visioforge/.Net-SDK-s-samples/tree/master/Media%20Player%20SDK/WinForms/CSharp/VR%20360%20Demo) shows how to play 360-degree videos
- [Video Mixing Demo](https://github.com/visioforge/.Net-SDK-s-samples/tree/master/Media%20Player%20SDK/WinForms/CSharp/Video%20Mixing%20Demo) shows how to mix video files
- [YouTube Player](https://github.com/visioforge/.Net-SDK-s-samples/tree/master/Media%20Player%20SDK/WinForms/CSharp/YouTube%20Player%20Demo) shows how to play YouTube videos (with open license)
- [madVR Demo](https://github.com/visioforge/.Net-SDK-s-samples/tree/master/Media%20Player%20SDK/WinForms/CSharp/madVR%20Demo) uses the madVR to render video
#### WinUI
- [Simple Media Player](https://github.com/visioforge/.Net-SDK-s-samples/tree/master/Media%20Player%20SDK/WinUI/CSharp/Simple%20Media%20Player%20WinUI) shows basic playback functionality
#### Code snippets
- [Memory Playback](https://github.com/visioforge/.Net-SDK-s-samples/tree/master/Media%20Player%20SDK/_CodeSnippets/memory-playback) shows how to play files from the memory
- [Read File Info](https://github.com/visioforge/.Net-SDK-s-samples/tree/master/Media%20Player%20SDK/_CodeSnippets/read-file-info) shows how to read file information
## Documentation
- [Code samples](code-samples/index.md)
- [Deployment](deployment.md)
- [API](https://api.visioforge.com/dotnet/api/index.html)
## Links
- [Changelog](../changelog.md)
- [End User License Agreement](../../eula.md)
---END OF PAGE---
# Local File: .\dotnet\mediaplayer\code-samples\get-frame-from-video-file.md
---
title: Extracting Video Frames in .NET - Complete Guide
description: Learn how to extract and capture specific frames from video files using .NET libraries. This tutorial covers multiple approaches with code examples for both Windows-specific and cross-platform solutions for developers working with video processing.
sidebar_label: Extract Video Frames from Files
order: 1
---
# Extracting Video Frames from Video Files in .NET
[!badge size="xl" target="blank" variant="info" text="Media Player SDK .Net"](https://www.visioforge.com/media-player-sdk-net)
Video frame extraction is a common requirement in many multimedia applications. Whether you're building a video editing tool, creating thumbnails, or performing video analysis, extracting specific frames from video files is an essential capability. This guide explains different approaches to capturing frames from video files in .NET applications.
## Why Extract Video Frames?
There are numerous use cases for video frame extraction:
- Creating thumbnail images for video galleries
- Extracting key frames for video analysis
- Generating preview images at specific timestamps
- Building video editing tools with frame-by-frame precision
- Creating timelapse sequences from video footage
- Capturing still images from video recordings
## Understanding Video Frame Extraction
Video files contain sequences of frames displayed at specific intervals to create the illusion of motion. When extracting a frame, you're essentially capturing a single image at a specific timestamp within the video. This process involves:
1. Opening the video file
2. Seeking to the specific timestamp
3. Decoding the frame data
4. Converting it to an image format
## Frame Extraction Methods in .NET
There are several approaches to extract frames from video files in .NET, depending on your requirements and environment.
### Using Windows-Specific SDK Components
For Windows-only applications, the classic SDK components offer straightforward methods for frame extraction:
```csharp
// Using VideoEditCore for frame extraction
using VisioForge.Core.VideoEdit;
public void ExtractFrameWithVideoEditCore()
{
var videoEdit = new VideoEditCore();
var bitmap = videoEdit.Helpful_GetFrameFromFile("C:\\Videos\\sample.mp4", TimeSpan.FromSeconds(5));
bitmap.Save("C:\\Output\\frame.png");
}
// Using MediaPlayerCore for frame extraction
using VisioForge.Core.MediaPlayer;
public void ExtractFrameWithMediaPlayerCore()
{
var mediaPlayer = new MediaPlayerCore();
var bitmap = mediaPlayer.Helpful_GetFrameFromFile("C:\\Videos\\sample.mp4", TimeSpan.FromSeconds(10));
bitmap.Save("C:\\Output\\frame.png");
}
```
The `Helpful_GetFrameFromFile` method simplifies the process by handling the file opening, seeking, and frame decoding operations in a single call.
### Cross-Platform Solutions with X-Engine
Modern .NET applications often need to run on multiple platforms. The X-engine provides cross-platform capabilities for video frame extraction:
#### Extracting Frames as System.Drawing.Bitmap
The most common approach is to extract frames as `System.Drawing.Bitmap` objects:
```csharp
using VisioForge.Core.MediaInfo;
public void ExtractFrameAsBitmap()
{
// Extract the frame at the beginning of the video (TimeSpan.Zero)
var bitmap = MediaInfoReaderX.GetFileSnapshotBitmap("C:\\Videos\\sample.mp4", TimeSpan.Zero);
// Extract a frame at 30 seconds into the video
var frame30sec = MediaInfoReaderX.GetFileSnapshotBitmap("C:\\Videos\\sample.mp4", TimeSpan.FromSeconds(30));
// Save the extracted frame
bitmap.Save("C:\\Output\\first-frame.png");
frame30sec.Save("C:\\Output\\frame-30sec.png");
}
```
#### Extracting Frames as SkiaSharp Bitmaps
For applications using SkiaSharp for graphics processing, you can extract frames directly as `SKBitmap` objects:
```csharp
using VisioForge.Core.MediaInfo;
using SkiaSharp;
public void ExtractFrameAsSkiaBitmap()
{
// Extract the frame at 15 seconds into the video
var skBitmap = MediaInfoReaderX.GetFileSnapshotSKBitmap("C:\\Videos\\sample.mp4", TimeSpan.FromSeconds(15));
// Work with the SKBitmap
using (var image = SKImage.FromBitmap(skBitmap))
using (var data = image.Encode(SKEncodedImageFormat.Png, 100))
using (var stream = File.OpenWrite("C:\\Output\\frame-skia.png"))
{
data.SaveTo(stream);
}
}
```
#### Working with Raw RGB Data
For more advanced scenarios or when you need direct pixel manipulation, you can extract frames as RGB byte arrays:
```csharp
using VisioForge.Core.MediaInfo;
public void ExtractFrameAsRGBArray()
{
// Extract the frame at 20 seconds as RGB byte array
var rgbData = MediaInfoReaderX.GetFileSnapshotRGB("C:\\Videos\\sample.mp4", TimeSpan.FromSeconds(20));
// Process the RGB data as needed
// The format is typically a byte array with R, G, B values for each pixel
// You would also need to know the frame width and height to properly interpret the data
}
```
## Best Practices for Video Frame Extraction
When implementing video frame extraction in your applications, consider these best practices:
### Performance Considerations
- Extracting frames can be CPU-intensive, especially for high-resolution videos
- Consider implementing caching mechanisms for frequently accessed frames
- For batch extraction, implement parallel processing where appropriate
```csharp
// Example of parallel frame extraction
public void ExtractMultipleFramesInParallel(string videoPath, TimeSpan[] timestamps)
{
Parallel.ForEach(timestamps, timestamp => {
var bitmap = MediaInfoReaderX.GetFileSnapshotBitmap(videoPath, timestamp);
bitmap.Save($"C:\\Output\\frame-{timestamp.TotalSeconds}.png");
});
}
```
### Error Handling
Always implement proper error handling when working with video files:
```csharp
public Bitmap SafeExtractFrame(string videoPath, TimeSpan position)
{
try
{
return MediaInfoReaderX.GetFileSnapshotBitmap(videoPath, position);
}
catch (FileNotFoundException)
{
Console.WriteLine("Video file not found");
}
catch (InvalidOperationException)
{
Console.WriteLine("Invalid position in video");
}
catch (Exception ex)
{
Console.WriteLine($"Error extracting frame: {ex.Message}");
}
return null;
}
```
### Memory Management
Proper memory management is crucial, especially when working with large video files:
```csharp
public void ExtractFrameWithProperDisposal()
{
Bitmap bitmap = null;
try
{
bitmap = MediaInfoReaderX.GetFileSnapshotBitmap("C:\\Videos\\sample.mp4", TimeSpan.FromSeconds(5));
// Process the bitmap...
}
finally
{
bitmap?.Dispose();
}
}
```
## Common Applications
Frame extraction is used in various multimedia applications:
- **Video Players**: Generating preview thumbnails
- **Media Libraries**: Creating video thumbnails for gallery views
- **Video Analysis**: Extracting frames for computer vision processing
- **Content Management**: Creating preview images for video assets
- **Video Editing**: Providing visual reference for timeline editing
## Conclusion
Extracting frames from video files is a powerful capability for .NET developers working with multimedia content. Whether you're building Windows-specific applications or cross-platform solutions, the methods described in this guide provide efficient ways to capture and work with video frames.
By understanding the different approaches and following best practices, you can implement robust frame extraction functionality in your .NET applications.
---
For more code samples and examples, visit our [GitHub repository](https://github.com/visioforge/.Net-SDK-s-samples).
---END OF PAGE---
# Local File: .\dotnet\mediaplayer\code-samples\index.md
---
title: .NET Media Player SDK Code Examples & Tutorials
description: Explore our extensive library of .NET Media Player SDK code examples for C# and VB.NET developers. Learn to implement video playback, frame extraction, playlists, and more in WinForms, WPF, Console, and Service applications with detailed tutorials and practical implementations.
sidebar_label: Code Examples
---
# .NET Media Player SDK Implementation Examples
[!badge size="xl" target="blank" variant="info" text="Media Player SDK .Net"](https://www.visioforge.com/media-player-sdk-net)
## Getting Started with Code Examples
This resource contains a rich collection of implementation examples for the Media Player SDK .Net, demonstrating the powerful capabilities and diverse functionalities available to developers working with video and audio playback in .NET applications.
### Multi-Language Support
Our examples are meticulously developed in both C# and VB.Net programming languages, showcasing the flexibility and developer-friendly nature of the MediaPlayerCore engine. Each example has been thoughtfully crafted to illustrate real-world scenarios and implementation strategies, enabling developers to quickly master the core concepts needed for effective SDK integration.
### Cross-Platform Application Integration
The provided code examples cover an extensive range of application frameworks, including:
- **WinForms applications** for traditional desktop interfaces
- **WPF applications** for modern UI experiences
- **Console applications** for command-line utilities
- **Windows Service applications** for background processing
Whether you're building feature-rich desktop software, efficient command-line tools, or robust background services, these examples provide valuable guidance throughout your development journey. The examples serve as both learning resources and practical references for troubleshooting and performance optimization in your media applications.
## Featured Implementation Examples
### Video Processing Examples
- [How to get a specific frame from a video file?](get-frame-from-video-file.md)
- [How to play a fragment of the source file?](play-fragment-file.md)
- [How to show the first frame?](show-first-frame.md)
### Advanced Playback Examples
- [Memory playback implementation](memory-playback.md)
- [Playlist API integration](playlist-api.md)
- [Previous frame and reverse video playback](reverse-video-playback.md)
---
## Additional Resources
For a more extensive collection of code examples and implementation scenarios, visit our [GitHub repository](https://github.com/visioforge/.Net-SDK-s-samples).
---END OF PAGE---
# Local File: .\dotnet\mediaplayer\code-samples\memory-playback.md
---
title: Memory Playback Implementation in .NET Media Player SDK
description: Learn how to implement memory-based media playback in C# applications using stream objects, byte arrays, and memory management techniques. This guide provides code examples and best practices for efficient memory handling during audio and video playback.
sidebar_label: Memory Playback
order: 2
---
# Memory-Based Media Playback in .NET Applications
[!badge size="xl" target="blank" variant="info" text="Media Player SDK .Net"](https://www.visioforge.com/media-player-sdk-net)
## Introduction to Memory-Based Media Playback
Memory-based playback offers a powerful alternative to traditional file-based media consumption in .NET applications. By loading and processing media directly from memory, developers can achieve more responsive playback, enhanced security through reduced file access, and greater flexibility in handling different data sources.
This guide explores the various approaches to implementing memory-based playback in your .NET applications, complete with code examples and best practices.
## Advantages of Memory-Based Media Playback
Before diving into implementation details, let's understand why memory-based playback is valuable:
- **Improved performance**: By eliminating file I/O operations during playback, your application can deliver smoother media experiences.
- **Enhanced security**: Media content doesn't need to be stored as accessible files on the filesystem.
- **Stream processing**: Work with data from various sources, including network streams, encrypted content, or dynamically generated media.
- **Virtual file systems**: Implement custom media access patterns without filesystem dependencies.
- **In-memory transformations**: Apply real-time modifications to media content before playback.
## Implementation Approaches
### Stream-Based Playback from Existing Files
The most straightforward approach to memory-based playback begins with existing media files that you load into memory streams. This technique is ideal when you want the performance benefits of memory playback while still maintaining your content in traditional file formats.
```cs
// Create a FileStream from an existing media file
var fileStream = new FileStream(mediaFilePath, FileMode.Open);
// Convert to a managed IStream for the media player
var managedStream = new ManagedIStream(fileStream);
// Configure stream settings for your content
bool videoPresent = true;
bool audioPresent = true;
// Set the memory stream as the media source
MediaPlayer1.Source_MemoryStream = new MemoryStreamSource(
managedStream,
videoPresent,
audioPresent,
fileStream.Length
);
// Set the player to memory playback mode
MediaPlayer1.Source_Mode = MediaPlayerSourceMode.Memory_DS;
// Start playback
await MediaPlayer1.PlayAsync();
```
When using this approach, remember to properly dispose of the FileStream when playback is complete to prevent resource leaks.
### Byte Array-Based Playback
For scenarios where your media content already exists as a byte array in memory (perhaps downloaded from a network source or decrypted from protected storage), you can play directly from this data structure:
```cs
// Assume 'mediaBytes' is a byte array containing your media content
byte[] mediaBytes = GetMediaContent();
// Create a MemoryStream from the byte array
using (var memoryStream = new MemoryStream(mediaBytes))
{
// Convert to a managed IStream
var managedStream = new ManagedIStream(memoryStream);
// Configure stream settings based on your content
bool videoPresent = true; // Set to false for audio-only content
bool audioPresent = true; // Set to false for video-only content
// Create and assign the memory stream source
MediaPlayer1.Source_MemoryStream = new MemoryStreamSource(
managedStream,
videoPresent,
audioPresent,
memoryStream.Length
);
// Set memory playback mode
MediaPlayer1.Source_Mode = MediaPlayerSourceMode.Memory_DS;
// Begin playback
await MediaPlayer1.PlayAsync();
// Additional playback handling code...
}
```
This technique is particularly useful when dealing with content that should never be written to disk for security reasons.
### Advanced: Custom Stream Implementations
For more complex scenarios, you can implement custom stream handlers that provide media data from any source you can imagine:
```cs
// Example of a custom stream provider
public class CustomMediaStreamProvider : Stream
{
private byte[] _buffer;
private long _position;
// Constructor might take a custom data source
public CustomMediaStreamProvider(IDataSource dataSource)
{
// Initialize your stream from the data source
}
// Implement required Stream methods
public override int Read(byte[] buffer, int offset, int count)
{
// Custom implementation to provide data
}
// Other required Stream overrides
// ...
}
// Usage example:
var customStream = new CustomMediaStreamProvider(myDataSource);
var managedStream = new ManagedIStream(customStream);
MediaPlayer1.Source_MemoryStream = new MemoryStreamSource(
managedStream,
hasVideo,
hasAudio,
streamLength
);
```
## Performance Considerations
When implementing memory-based playback, keep these performance factors in mind:
1. **Memory allocation**: For large media files, ensure your application has sufficient memory available.
2. **Buffering strategy**: Consider implementing a sliding buffer for very large files rather than loading the entire content into memory.
3. **Garbage collection impact**: Large memory allocations can trigger garbage collection, potentially causing playback stuttering.
4. **Thread synchronization**: If providing stream data from another thread or async source, ensure proper synchronization to prevent playback issues.
## Error Handling Best Practices
Robust error handling is critical when implementing memory-based playback:
```cs
try
{
var fileStream = new FileStream(mediaFilePath, FileMode.Open);
var managedStream = new ManagedIStream(fileStream);
MediaPlayer1.Source_MemoryStream = new MemoryStreamSource(
managedStream,
true,
true,
fileStream.Length
);
MediaPlayer1.Source_Mode = MediaPlayerSourceMode.Memory_DS;
await MediaPlayer1.PlayAsync();
}
catch (FileNotFoundException ex)
{
LogError("Media file not found", ex);
DisplayUserFriendlyError("The requested media file could not be found.");
}
catch (UnauthorizedAccessException ex)
{
LogError("Access denied to media file", ex);
DisplayUserFriendlyError("You don't have permission to access this media file.");
}
catch (Exception ex)
{
LogError("Unexpected playback error", ex);
DisplayUserFriendlyError("An error occurred during media playback.");
}
finally
{
// Ensure resources are properly cleaned up
CleanupResources();
}
```
## Required Dependencies
To successfully implement memory-based playback using the Media Player SDK, ensure you have these dependencies:
- Base redistributable components
- SDK redistributable components
For more information on installing or deploying these dependencies to your users' systems, refer to our [deployment guide](../deployment.md).
## Advanced Scenarios
### Encrypted Media Playback
For applications dealing with protected content, you can integrate decryption into your memory-based playback pipeline:
```cs
// Read encrypted content
byte[] encryptedContent = File.ReadAllBytes(encryptedMediaPath);
// Decrypt the content
byte[] decryptedContent = DecryptMedia(encryptedContent, encryptionKey);
// Play from decrypted memory without writing to disk
using (var memoryStream = new MemoryStream(decryptedContent))
{
var managedStream = new ManagedIStream(memoryStream);
// Continue with standard memory playback setup...
}
```
### Network Streaming to Memory
Pull content from network sources directly into memory for playback:
```cs
using (HttpClient client = new HttpClient())
{
// Download media content
byte[] mediaContent = await client.GetByteArrayAsync(mediaUrl);
// Play from memory
using (var memoryStream = new MemoryStream(mediaContent))
{
// Continue with standard memory playback setup...
}
}
```
## Conclusion
Memory-based media playback provides a flexible and powerful approach for .NET applications requiring enhanced performance, security, or custom media handling. By understanding the implementation options and following best practices for resource management, you can deliver smooth and responsive media experiences to your users.
For more sample code and advanced implementations, visit our [GitHub repository](https://github.com/visioforge/.Net-SDK-s-samples).
---END OF PAGE---
# Local File: .\dotnet\mediaplayer\code-samples\play-fragment-file.md
---
title: Play Video & Audio File Segments in C# .NET Apps
description: Complete guide to implementing precise media fragment playback in your C# applications using .NET Media Player SDK. Learn how to create time-based segments in videos and audio files with step-by-step code examples for both Windows and cross-platform applications.
sidebar_label: Playing Media File Fragments
order: 3
---
# Playing Media File Fragments: Implementation Guide for .NET Developers
[!badge size="xl" target="blank" variant="info" text="Media Player SDK .Net"](https://www.visioforge.com/media-player-sdk-net)
When developing media applications, one frequently requested feature is the ability to play specific segments of a video or audio file. This functionality is crucial for creating video editors, highlight reels, educational platforms, or any application requiring precise media segment playback.
## Understanding Fragment Playback in .NET Applications
Fragment playback allows you to define specific time segments of a media file for playback, effectively creating clips without modifying the source file. This technique is particularly useful when you need to:
- Create preview segments from longer media files
- Focus on specific sections of instructional videos
- Create looping segments for demonstrations or presentations
- Build clip-based media players for sports highlights or video compilations
- Implement training applications that focus on specific video segments
The Media Player SDK .NET provides two primary engines for implementing fragment playback, each with its own approach and platform compatibility considerations.
## Windows-Only Implementation: MediaPlayerCore Engine
The MediaPlayerCore engine provides a straightforward implementation for Windows applications. This solution works across WPF, WinForms, and console applications but is limited to Windows operating systems.
### Setting Up Fragment Playback
To implement fragment playback with the MediaPlayerCore engine, you'll need to follow three key steps:
1. Activate the selection mode on your MediaPlayer instance
2. Define the starting position of your fragment (in milliseconds)
3. Define the ending position of your fragment (in milliseconds)
### Implementation Example
The following C# code demonstrates how to configure fragment playback to play only the segment between 2000ms and 5000ms of your source file:
```csharp
// Step 1: Enable fragment selection mode
MediaPlayer1.Selection_Active = true;
// Step 2: Set the starting position to 2000 milliseconds (2 seconds)
MediaPlayer1.Selection_Start = TimeSpan.FromMilliseconds(2000);
// Step 3: Set the ending position to 5000 milliseconds (5 seconds)
MediaPlayer1.Selection_Stop = TimeSpan.FromMilliseconds(5000);
// When you call Play() or PlayAsync(), only the specified fragment will play
```
When your application calls the Play or PlayAsync method after setting these properties, the player will automatically jump to the selection start position and stop playback when it reaches the selection end position.
### Required Redistributables for Windows Implementation
For the MediaPlayerCore engine implementation to function correctly, you must include:
- Base redistributable package
- SDK redistributable package
These packages contain the necessary components for the Windows-based playback functionality. For detailed information on deploying these redistributables to end-user machines, refer to the [deployment documentation](../deployment.md).
## Cross-Platform Implementation: MediaPlayerCoreX Engine
For developers requiring fragment playback functionality across multiple platforms, the MediaPlayerCoreX engine provides a more versatile solution. This implementation works across Windows, macOS, iOS, Android, and Linux environments.
### Setting Up Cross-Platform Fragment Playback
The cross-platform implementation follows a similar conceptual approach but uses different property names. The key steps include:
1. Creating a MediaPlayerCoreX instance
2. Loading your media source
3. Defining the segment start and stop positions
4. Initiating playback
### Cross-Platform Implementation Example
The following example demonstrates how to implement fragment playback in a cross-platform .NET application:
```csharp
// Step 1: Create a new instance of MediaPlayerCoreX with your video view
MediaPlayerCoreX MediaPlayer1 = new MediaPlayerCoreX(VideoView1);
// Step 2: Set the source media file
var fileSource = await UniversalSourceSettings.CreateAsync(new Uri("video.mkv"));
await MediaPlayer1.OpenAsync(fileSource);
// Step 3: Define the segment start time (2 seconds from beginning)
MediaPlayer1.Segment_Start = TimeSpan.FromMilliseconds(2000);
// Step 4: Define the segment end time (5 seconds from beginning)
MediaPlayer1.Segment_Stop = TimeSpan.FromMilliseconds(5000);
// Step 5: Start playback of the defined segment
await MediaPlayer1.PlayAsync();
```
This implementation uses the Segment_Start and Segment_Stop properties instead of the Selection properties used in the Windows-only implementation. Also note the asynchronous approach used in the cross-platform example, which improves UI responsiveness.
## Advanced Fragment Playback Techniques
### Dynamic Fragment Adjustment
In more complex applications, you might need to adjust fragment boundaries dynamically. Both engines support changing the segment boundaries during runtime:
```csharp
// For Windows-only implementation
private void UpdateFragmentBoundaries(int startMs, int endMs)
{
MediaPlayer1.Selection_Start = TimeSpan.FromMilliseconds(startMs);
MediaPlayer1.Selection_Stop = TimeSpan.FromMilliseconds(endMs);
// If playback is in progress, restart it to apply the new boundaries
if (MediaPlayer1.State == PlaybackState.Playing)
{
MediaPlayer1.Position_Set(MediaPlayer1.Selection_Start);
}
}
// For cross-platform implementation
private async Task UpdateFragmentBoundariesAsync(int startMs, int endMs)
{
MediaPlayer1.Segment_Start = TimeSpan.FromMilliseconds(startMs);
MediaPlayer1.Segment_Stop = TimeSpan.FromMilliseconds(endMs);
// If playback is in progress, restart from the new start position
if (await MediaPlayer1.StateAsync() == PlaybackState.Playing)
{
await MediaPlayer1.Position_SetAsync(MediaPlayer1.Segment_Start);
}
}
```
### Multiple Fragment Playback
For applications that need to play multiple fragments sequentially, you can implement a fragment queue:
```csharp
public class MediaFragment
{
public TimeSpan StartTime { get; set; }
public TimeSpan EndTime { get; set; }
}
private Queue fragmentQueue = new Queue();
private bool isProcessingQueue = false;
// Add fragments to the queue
public void EnqueueFragment(TimeSpan start, TimeSpan end)
{
fragmentQueue.Enqueue(new MediaFragment { StartTime = start, EndTime = end });
if (!isProcessingQueue && MediaPlayer1 != null)
{
PlayNextFragment();
}
}
// Process the fragment queue
private async void PlayNextFragment()
{
if (fragmentQueue.Count == 0)
{
isProcessingQueue = false;
return;
}
isProcessingQueue = true;
var fragment = fragmentQueue.Dequeue();
// Set the fragment boundaries
MediaPlayer1.Segment_Start = fragment.StartTime;
MediaPlayer1.Segment_Stop = fragment.EndTime;
// Subscribe to completion event for this fragment
MediaPlayer1.OnStop += (s, e) => PlayNextFragment();
// Start playback
await MediaPlayer1.PlayAsync();
}
```
### Performance Considerations
For optimal performance when using fragment playback, consider the following tips:
1. For frequent seeking between fragments, use formats with good keyframe density
2. MP4 and MOV files generally perform better for fragment-heavy applications
3. Setting fragments at keyframe boundaries improves seeking performance
4. Consider preloading files before setting fragment boundaries
5. On mobile platforms, keep fragments reasonably sized to avoid memory pressure
## Conclusion
Implementing fragment playback in your .NET media applications provides substantial flexibility and enhanced user experience. Whether you're developing for Windows only or targeting multiple platforms, the Media Player SDK .NET offers robust solutions for precise media segment playback.
By leveraging the techniques demonstrated in this guide, you can create sophisticated media experiences that allow users to focus on exactly the content they need, without the overhead of editing or splitting source files.
For more code samples and implementations, visit our [GitHub repository](https://github.com/visioforge/.Net-SDK-s-samples) where you'll find comprehensive examples of media player implementations, including fragment playback and other advanced media features.
---END OF PAGE---
# Local File: .\dotnet\mediaplayer\code-samples\playlist-api.md
---
title: Media Player SDK .Net Playlist API Guide
description: Learn how to implement powerful playlist functionality in your .NET applications using our Media Player SDK. Complete code examples for WinForms, WPF, and console applications with step-by-step implementation guide.
sidebar_label: Playlist API
---
# Complete Guide to Playlist API Implementation in .NET
[!badge size="xl" target="blank" variant="info" text="Media Player SDK .Net"](https://www.visioforge.com/media-player-sdk-net) [!badge variant="dark" size="xl" text="MediaPlayerCore"]
## Introduction to Playlist Management
The Playlist API provides a powerful and flexible way to manage media content in your .NET applications. Whether you're developing a music player, video application, or any media-centric software, efficient playlist management is essential for delivering a seamless user experience.
This guide covers everything you need to know about implementing playlist functionality using the MediaPlayerCore component. You'll learn how to create playlists, navigate between tracks, handle playlist events, and optimize performance in various .NET environments.
## Key Features and Benefits
- **Simple Integration**: Easy-to-implement API that integrates seamlessly with existing .NET applications
- **Format Compatibility**: Support for a wide range of audio and video formats
- **Cross-Platform**: Works consistently across WinForms, WPF, and console applications
- **Performance Optimized**: Built for efficient memory usage and responsive playback
- **Event-Driven Architecture**: Rich event system for building reactive UI experiences
## Getting Started with Playlist API
Before diving into specific methods, ensure you have properly initialized the MediaPlayer component in your application. The following sections contain practical code examples that you can implement directly in your project.
### Creating Your First Playlist
Creating a playlist is the first step in managing multiple media files. The API provides straightforward methods to add files to your playlist collection:
```csharp
// Initialize the media player (assuming you've added the component to your form)
// this.mediaPlayer1 = new MediaPlayer();
// Add individual files to the playlist
this.mediaPlayer1.Playlist_Add(@"c:\media\intro.mp4");
this.mediaPlayer1.Playlist_Add(@"c:\media\main_content.mp4");
this.mediaPlayer1.Playlist_Add(@"c:\media\conclusion.mp4");
// Start playback from the first item
this.mediaPlayer1.Play();
```
This approach allows you to build playlists programmatically, which is ideal for applications where playlist content is determined at runtime.
## Core Playlist Operations
### Navigating Through Playlist Items
Once you've created a playlist, your users will need to navigate between items. The API provides intuitive methods for moving to the next or previous file:
```csharp
// Play the next file in the playlist
this.mediaPlayer1.Playlist_PlayNext();
// Play the previous file in the playlist
this.mediaPlayer1.Playlist_PlayPrevious();
```
These methods automatically handle the transition between media files, including stopping the current playback and starting the new item.
### Managing Playlist Content
During application runtime, you may need to modify the playlist by removing specific items or clearing it entirely:
```csharp
// Remove a specific file from the playlist
this.mediaPlayer1.Playlist_Remove(@"c:\media\intro.mp4");
// Clear all items from the playlist
this.mediaPlayer1.Playlist_Clear();
```
This dynamic content management allows your application to adapt to user preferences or changing requirements on the fly.
### Retrieving Playlist Information
Accessing information about the current state of the playlist is crucial for building an informative user interface:
```csharp
// Get the current file's index (0-based)
int currentIndex = this.mediaPlayer1.Playlist_GetPosition();
// Get the total number of files in the playlist
int totalFiles = this.mediaPlayer1.Playlist_GetCount();
// Get a specific filename by its index
string fileName = this.mediaPlayer1.Playlist_GetFilename(1); // Gets the second file
// Display current playback information
string statusMessage = $"Playing file {currentIndex + 1} of {totalFiles}: {fileName}";
```
These methods enable you to create dynamic interfaces that reflect the current state of media playback.
## Advanced Playlist Control
### Resetting and Repositioning
For more precise control over playlist navigation, you can reset the playlist or jump to a specific position:
```csharp
// Reset the playlist to start from the first file
this.mediaPlayer1.Playlist_Reset();
// Jump to a specific position in the playlist (0-based index)
this.mediaPlayer1.Playlist_SetPosition(2); // Jump to the third item
```
These methods are particularly useful for implementing features like "restart playlist" or allowing users to select specific items from a playlist view.
### Custom Event Handling for Playlist Navigation
To create a responsive application, you'll want to implement custom event handling for playlist navigation. Since the MediaPlayerCore doesn't have a dedicated playlist item changed event, you can create your own tracking mechanism using the existing events:
```csharp
private int _lastPlaylistIndex = -1;
// Track playlist position changes when playback starts
private void mediaPlayer1_OnStart(object sender, EventArgs e)
{
int currentIndex = this.mediaPlayer1.Playlist_GetPosition();
if (currentIndex != _lastPlaylistIndex)
{
_lastPlaylistIndex = currentIndex;
// Handle playlist item change
string currentFile = this.mediaPlayer1.Playlist_GetFilename(currentIndex);
UpdatePlaylistUI(currentIndex, currentFile);
}
}
// Also track when a new file playback starts
private void mediaPlayer1_OnNewFilePlaybackStarted(object sender, NewFilePlaybackEventArgs e)
{
int currentIndex = this.mediaPlayer1.Playlist_GetPosition();
_lastPlaylistIndex = currentIndex;
// Handle playlist item change
string currentFile = this.mediaPlayer1.Playlist_GetFilename(currentIndex);
UpdatePlaylistUI(currentIndex, currentFile);
}
// Handle playlist completion
private void mediaPlayer1_OnPlaylistFinished(object sender, EventArgs e)
{
// Handle playlist completion
this.lblPlaybackStatus.Text = "Playlist finished";
// Optionally reset or loop playlist
// this.mediaPlayer1.Playlist_Reset();
// this.mediaPlayer1.Play();
}
private void UpdatePlaylistUI(int index, string filename)
{
// Update UI elements with new information
this.lblCurrentTrack.Text = $"Now playing: {Path.GetFileName(filename)}";
this.lblTrackNumber.Text = $"Track {index + 1} of {this.mediaPlayer1.Playlist_GetCount()}";
// Update playlist selection in UI
// ...
}
```
This approach allows you to detect and respond to playlist navigation events in your application by subscribing to the actual events provided by MediaPlayerCore:
```csharp
// Subscribe to events
this.mediaPlayer1.OnStart += mediaPlayer1_OnStart;
this.mediaPlayer1.OnNewFilePlaybackStarted += mediaPlayer1_OnNewFilePlaybackStarted;
this.mediaPlayer1.OnPlaylistFinished += mediaPlayer1_OnPlaylistFinished;
```
### Async Playlist Operations
The MediaPlayerCore provides async versions of playlist navigation methods for improved responsiveness:
```csharp
// Play the next file asynchronously
await this.mediaPlayer1.Playlist_PlayNextAsync();
// Play the previous file asynchronously
await this.mediaPlayer1.Playlist_PlayPreviousAsync();
```
Using these async methods is recommended for UI applications to prevent blocking the main thread during playback transitions.
## Implementation Patterns and Best Practices
### Implementing Repeat and Shuffle Modes
Most media players include repeat and shuffle functionality. Here's how to implement these common features:
```csharp
private bool repeatEnabled = false;
private bool shuffleEnabled = false;
private Random random = new Random();
// Handle playlist navigation when media playback stops
private void MediaPlayer1_OnStop(object sender, StopEventArgs e)
{
// Check if this is the end of media (not a manual stop)
if (e.Reason == StopReason.EndOfMedia)
{
if (repeatEnabled)
{
// Just replay the current item
this.mediaPlayer1.Play();
}
else if (shuffleEnabled)
{
// Play a random item
int totalFiles = this.mediaPlayer1.Playlist_GetCount();
int randomIndex = random.Next(0, totalFiles);
this.mediaPlayer1.Playlist_SetPosition(randomIndex);
this.mediaPlayer1.Play();
}
else
{
// Standard behavior: play next if available
if (this.mediaPlayer1.Playlist_GetPosition() < this.mediaPlayer1.Playlist_GetCount() - 1)
{
this.mediaPlayer1.Playlist_PlayNext();
}
else
{
// We've reached the end of the playlist
// OnPlaylistFinished will be triggered
}
}
}
}
// Subscribe to the stop event
this.mediaPlayer1.OnStop += MediaPlayer1_OnStop;
```
### Memory Management for Large Playlists
When dealing with large playlists, consider implementing lazy loading techniques:
```csharp
// Store playlist information separately for large playlists
private List masterPlaylist = new List();
public void LoadLargePlaylist(string[] filePaths)
{
// Clear existing playlist
this.mediaPlayer1.Playlist_Clear();
masterPlaylist.Clear();
// Store all paths
masterPlaylist.AddRange(filePaths);
// Load only the first batch of items (e.g., 100)
int initialBatchSize = Math.Min(100, filePaths.Length);
for (int i = 0; i < initialBatchSize; i++)
{
this.mediaPlayer1.Playlist_Add(filePaths[i]);
}
// Start playback
this.mediaPlayer1.Play();
}
// Implement dynamic loading as user approaches the end of loaded items
private void CheckAndLoadMoreItems()
{
int currentPosition = this.mediaPlayer1.Playlist_GetPosition();
int loadedCount = this.mediaPlayer1.Playlist_GetCount();
// If we're near the end of loaded items but have more in master playlist
if (currentPosition > loadedCount - 10 && loadedCount < masterPlaylist.Count)
{
// Load next batch
int nextBatchSize = Math.Min(50, masterPlaylist.Count - loadedCount);
for (int i = 0; i < nextBatchSize; i++)
{
this.mediaPlayer1.Playlist_Add(masterPlaylist[loadedCount + i]);
}
}
}
```
## Cross-Platform Considerations
The Playlist API functions consistently across different .NET environments, but there are some platform-specific considerations:
### WPF Implementation Notes
When implementing in WPF applications, you'll typically use data binding with your playlist:
```csharp
// Create an observable collection to bind to UI
private ObservableCollection observablePlaylist = new ObservableCollection();
// Sync the observable collection with the player's playlist
private void SyncObservablePlaylist()
{
observablePlaylist.Clear();
for (int i = 0; i < this.mediaPlayer1.Playlist_GetCount(); i++)
{
string filename = this.mediaPlayer1.Playlist_GetFilename(i);
observablePlaylist.Add(new PlaylistItem
{
Index = i,
FileName = System.IO.Path.GetFileName(filename),
FullPath = filename
});
}
}
```
## Conclusion
The Playlist API provides a robust foundation for building feature-rich media applications in .NET. By using the methods and patterns outlined in this guide, you can create intuitive playlist management systems that enhance the user experience of your application.
For more advanced scenarios, explore the additional capabilities of the MediaPlayerCore component, including custom event handling, media metadata extraction, and format-specific optimizations.
---END OF PAGE---
# Local File: .\dotnet\mediaplayer\code-samples\reverse-video-playback.md
---
title: Reverse Video Playback for .NET Applications
description: Master reverse video playback in .NET applications with detailed C# code examples, frame-by-frame navigation techniques, performance optimization tips, and platform-specific implementations for both cross-platform and Windows-specific scenarios.
sidebar_label: Reverse Video Playback
order: 4
---
# Implementing Reverse Video Playback in .NET Applications
Playing video in reverse is a powerful feature for media applications, allowing users to review content, create unique visual effects, or enhance the user experience with non-linear playback options. This guide provides complete implementations for reverse playback in .NET applications, focusing on both cross-platform and Windows-specific solutions.
## Understanding Reverse Playback Mechanisms
Reverse video playback can be achieved through several techniques, each with distinct advantages depending on your application's requirements:
1. **Rate-based reverse playback** - Setting a negative playback rate to reverse the video stream
2. **Frame-by-frame backward navigation** - Manually stepping backward through cached video frames
3. **Buffer-based approaches** - Creating a frame buffer to enable smooth reverse navigation
Let's explore how to implement each approach using the Media Player SDK for .NET.
## Cross-Platform Reverse Playback with MediaPlayerCoreX
The MediaPlayerCoreX engine provides cross-platform support for reverse video playback with a straightforward implementation. This approach works across Windows, macOS, and other supported platforms.
### Basic Implementation
The simplest method for reverse playback involves setting a negative rate value:
```cs
// Create new instance of MediaPlayerCoreX
MediaPlayerCoreX MediaPlayer1 = new MediaPlayerCoreX(VideoView1);
// Set the source file
var fileSource = await UniversalSourceSettings.CreateAsync(new Uri("video.mp4"));
await MediaPlayer1.OpenAsync(fileSource);
// Start normal playback first
await MediaPlayer1.PlayAsync();
// Change to reverse playback with normal speed
MediaPlayer1.Rate_Set(-1.0);
```
### Controlling Reverse Playback Speed
You can control the reverse playback speed by adjusting the negative rate value:
```cs
// Double-speed reverse playback
MediaPlayer1.Rate_Set(-2.0);
// Half-speed reverse playback (slow motion in reverse)
MediaPlayer1.Rate_Set(-0.5);
// Quarter-speed reverse playback (very slow motion in reverse)
MediaPlayer1.Rate_Set(-0.25);
```
### Event Handling During Reverse Playback
When implementing reverse playback, you may need to handle events differently:
```cs
// Subscribe to position change events
MediaPlayer1.PositionChanged += (sender, e) =>
{
// Update UI with current position
TimeSpan currentPosition = MediaPlayer1.Position_Get();
UpdatePositionUI(currentPosition);
};
// Handle reaching the beginning of the video
MediaPlayer1.ReachedStart += (sender, e) =>
{
// Stop playback or switch to forward playback
MediaPlayer1.Rate_Set(1.0);
// Alternatively: await MediaPlayer1.PauseAsync();
};
```
## Windows-Specific Frame-by-Frame Reverse Navigation
The MediaPlayerCore engine (Windows-only) provides enhanced frame-by-frame control with its frame caching system, allowing precise backward navigation even with codecs that don't natively support it.
### Setting Up Frame Caching
Before starting playback, configure the reverse playback cache:
```cs
// Configure reverse playback before starting
MediaPlayer1.ReversePlayback_CacheSize = 100; // Cache 100 frames
MediaPlayer1.ReversePlayback_Enabled = true; // Enable the feature
// Start playback
await MediaPlayer1.PlayAsync();
```
### Navigating Frame by Frame
With the cache configured, you can navigate to previous frames:
```cs
// Navigate to the previous frame
MediaPlayer1.ReversePlayback_PreviousFrame();
// Navigate backward multiple frames
for(int i = 0; i < 5; i++)
{
MediaPlayer1.ReversePlayback_PreviousFrame();
// Optional: add delay between frames for controlled playback
await Task.Delay(40); // ~25fps equivalent timing
}
```
### Advanced Frame Cache Configuration
For applications with specific memory or performance requirements, you can fine-tune the cache:
```cs
// For high-resolution videos, you might need fewer frames to manage memory
MediaPlayer1.ReversePlayback_CacheSize = 50; // Reduce cache size
// For applications that need extensive backward navigation
MediaPlayer1.ReversePlayback_CacheSize = 250; // Increase cache size
// Listen for cache-related events
MediaPlayer1.ReversePlayback_CacheFull += (sender, e) =>
{
Console.WriteLine("Reverse playback cache is full");
};
```
## Implementing UI Controls for Reverse Playback
A complete reverse playback implementation typically includes dedicated UI controls:
```cs
// Button click handler for reverse playback
private async void ReversePlaybackButton_Click(object sender, EventArgs e)
{
if(MediaPlayer1.State == MediaPlayerState.Playing)
{
// Toggle between forward and reverse
if(MediaPlayer1.Rate_Get() > 0)
{
MediaPlayer1.Rate_Set(-1.0);
UpdateUIForReverseMode(true);
}
else
{
MediaPlayer1.Rate_Set(1.0);
UpdateUIForReverseMode(false);
}
}
else
{
// Start playback in reverse
await MediaPlayer1.PlayAsync();
MediaPlayer1.Rate_Set(-1.0);
UpdateUIForReverseMode(true);
}
}
// Button click handler for frame-by-frame backward navigation
private void PreviousFrameButton_Click(object sender, EventArgs e)
{
// Ensure we're paused first
if(MediaPlayer1.State == MediaPlayerState.Playing)
{
await MediaPlayer1.PauseAsync();
}
// Navigate to previous frame
MediaPlayer1.ReversePlayback_PreviousFrame();
UpdateFrameCountDisplay();
}
```
## Performance Considerations
Reverse playback can be resource-intensive, especially with high-resolution videos. Consider these optimization techniques:
1. **Limit cache size** for devices with memory constraints
2. **Use hardware acceleration** when available
3. **Monitor performance** during reverse playback with debugging tools
4. **Provide fallback options** for devices that struggle with full-speed reverse playback
```cs
// Example of performance monitoring during reverse playback
private void MonitorPerformance()
{
Timer performanceTimer = new Timer(1000);
performanceTimer.Elapsed += (s, e) =>
{
if(MediaPlayer1.Rate_Get() < 0)
{
// Log or display current memory usage, frame rate, etc.
LogPerformanceMetrics();
// Adjust settings if needed
if(IsMemoryUsageHigh())
{
MediaPlayer1.ReversePlayback_CacheSize =
Math.Max(10, MediaPlayer1.ReversePlayback_CacheSize / 2);
}
}
};
performanceTimer.Start();
}
```
## Required Dependencies
To ensure proper functionality of reverse playback features, include these dependencies:
- Base redistributable package
- SDK redistributable package
These packages contain the necessary codecs and media processing components to enable smooth reverse playback across different video formats.
## Additional Resources and Advanced Techniques
For complex media applications requiring advanced reverse playback features, consider exploring:
- Frame extraction and manual rendering for custom effects
- Keyframe analysis for optimized navigation
- Buffering strategies for smoother reverse playback
## Conclusion
Implementing reverse video playback adds significant value to media applications, providing users with enhanced control over content navigation. By following the implementation patterns in this guide, developers can create robust, performant reverse playback experiences in .NET applications.
---
Visit our [GitHub](https://github.com/visioforge/.Net-SDK-s-samples) page for more complete code samples and implementation examples.
---END OF PAGE---
# Local File: .\dotnet\mediaplayer\code-samples\show-first-frame.md
---
title: Display First Frame in Video Files with .NET
description: Learn how to display the first frame of a video file in your .NET applications using the Media Player SDK. Complete C# code examples for WinForms, WPF, and console applications with detailed implementation steps.
sidebar_label: How to Show the First Frame?
---
# Displaying the First Frame of Video Files in .NET Applications
[!badge size="xl" target="blank" variant="info" text="Media Player SDK .Net"](https://www.visioforge.com/media-player-sdk-net) [!badge variant="dark" size="xl" text="VideoCaptureCore"]
## Overview
When developing media applications, it's often necessary to preview video content without playing the entire file. This technique is particularly useful for creating thumbnail galleries, video selection screens, or providing users with a visual preview before committing to watching a video.
## Implementation Guide
The Media Player SDK .NET provides a simple yet powerful way to display the first frame of any video file. This is achieved through the `Play_PauseAtFirstFrame` property, which when set to `true`, instructs the player to pause immediately after loading the first frame.
### How It Works
When the `Play_PauseAtFirstFrame` property is enabled:
1. The player loads the video file
2. Renders the first frame to the video display surface
3. Automatically pauses playback
4. Maintains the first frame on screen until further user action
If this property is not enabled (set to `false`), the player will proceed with normal playback after loading.
## Code Implementation
### Basic Example
```cs
// create player and configure the file name
// ...
// set the property to true
MediaPlayer1.Play_PauseAtFirstFrame = true;
// play the file
await MediaPlayer1.PlayAsync();
```
Resume playback from the first frame:
```cs
// resume playback
await MediaPlayer1.ResumeAsync();
```
## Practical Applications
This feature is particularly useful for:
- Providing preview capabilities in video editing applications
- Generating video poster frames for streaming applications
- Implementing "hover to preview" functionality in media browsers
## Required Components
To implement this functionality in your application, you'll need:
- Base redist package
- SDK redist package
For more information on distributing these components with your application, see: [How can the required redists be installed or deployed to the user's PC?](../deployment.md)
## Additional Resources
Find more code samples and implementation examples in our [GitHub repository](https://github.com/visioforge/.Net-SDK-s-samples).
## Technical Considerations
When implementing this feature, keep in mind:
- First frame display is nearly instantaneous for most video formats
- Resource usage is minimal as the player doesn't buffer beyond the first frame
- Works with all supported video formats including MP4, MOV, AVI, and more
---END OF PAGE---
# Local File: .\dotnet\mediaplayer\guides\avalonia-player.md
# How to Create a Cross-Platform Media Player using Avalonia MVVM and VisioForge SDK
This guide will walk you through the process of building a cross-platform media player application using Avalonia UI with the Model-View-ViewModel (MVVM) pattern and the VisioForge Media Player SDK. The application will be capable of playing video files on Windows, macOS, Linux, Android, and iOS.
We will be referencing the `SimplePlayerMVVM` example project, which demonstrates the core concepts and implementation details.
`[SCREENSHOT: Final application running on multiple platforms]`
## 1. Prerequisites
Before you begin, ensure you have the following installed:
* .NET SDK (latest version, e.g., .NET 8 or newer)
* An IDE such as Visual Studio, JetBrains Rider, or VS Code with C# and Avalonia extensions.
* For Android development:
* Android SDK
* Java Development Kit (JDK)
* For iOS development (requires a macOS machine):
* Xcode
* Necessary provisioning profiles and certificates.
* VisioForge .NET SDK (MediaPlayer SDK X). You can obtain this from the VisioForge website. The necessary packages will be added via NuGet.
## 2. Project Setup
This section outlines how to set up the solution structure and include the necessary VisioForge SDK packages.
### 2.1. Solution Structure
The `SimplePlayerMVVM` solution consists of several projects:
* **SimplePlayerMVVM**: A .NET Standard library containing the core application logic, including ViewModels, Views (AXAML), and shared interfaces. This is the main project where most of our application logic resides.
* **SimplePlayerMVVM.Android**: The Android-specific head project.
* **SimplePlayerMVVM.Desktop**: The desktop-specific head project (Windows, macOS, Linux).
* **SimplePlayerMVVM.iOS**: The iOS-specific head project.
`[SCREENSHOT: Solution structure in the IDE]`
### 2.2. Core Project (`SimplePlayerMVVM.csproj`)
The main project, `SimplePlayerMVVM.csproj`, targets multiple platforms. Key package references include:
* `Avalonia`: The core Avalonia UI framework.
* `Avalonia.Themes.Fluent`: Provides a Fluent Design theme.
* `Avalonia.ReactiveUI`: For MVVM support using ReactiveUI.
* `VisioForge.DotNet.MediaBlocks`: Core VisioForge media processing components.
* `VisioForge.DotNet.Core.UI.Avalonia`: VisioForge UI components for Avalonia, including the `VideoView`.
```xml
enable
latest
true
net8.0-android;net8.0-ios;net8.0-windows
net8.0-android;net8.0-ios;net8.0-macos14.0
net8.0-android;net8.0
```
This setup allows the core logic to be shared across all target platforms.
### 2.3. Platform-Specific Projects
Each platform head project (`SimplePlayerMVVM.Android.csproj`, `SimplePlayerMVVM.Desktop.csproj`, `SimplePlayerMVVM.iOS.csproj`) includes platform-specific dependencies and configurations.
**Desktop (`SimplePlayerMVVM.Desktop.csproj`):**
* References `Avalonia.Desktop`.
* Includes platform-specific VisioForge native libraries (e.g., `VisioForge.CrossPlatform.Core.Windows.x64`, `VisioForge.CrossPlatform.Core.macOS`).
```xml
net8.0-windows
WinExe
net8.0-macos14.0
Exe
net8.0
Exe
```
**Android (`SimplePlayerMVVM.Android.csproj`):**
* References `Avalonia.Android`.
* Includes Android-specific VisioForge libraries and dependencies like `VisioForge.CrossPlatform.Core.Android`.
```xml
Exe
net8.0-android
21
enable
com.CompanyName.Simple_Player_MVVM
1
1.0
apk
false
```
**iOS (`SimplePlayerMVVM.iOS.csproj`):**
* References `Avalonia.iOS`.
* Includes iOS-specific VisioForge libraries like `VisioForge.CrossPlatform.Core.iOS`.
```xml
Exe
net8.0-ios
13.0
enable
Simple_Player_MVVM.iOS
com.visioforge.avaloniaplayer
```
These project files are crucial for managing dependencies and build configurations for each platform.
## 3. Core MVVM Structure
The application follows the MVVM pattern, separating UI (Views) from logic (ViewModels) and data (Models). ReactiveUI is used to facilitate this pattern.
### 3.1. `ViewModelBase.cs`
This abstract class serves as the base for all ViewModels in the application. It inherits from `ReactiveObject`, which is part of ReactiveUI and provides the necessary infrastructure for property change notifications.
```csharp
using ReactiveUI;
namespace Simple_Player_MVVM.ViewModels
{
public abstract class ViewModelBase : ReactiveObject
{
}
}
```
Any ViewModel that needs to notify the UI of property changes should inherit from `ViewModelBase`.
`[SCREENSHOT: ViewModelBase.cs code]`
### 3.2. `ViewLocator.cs`
The `ViewLocator` class is responsible for locating and instantiating Views based on the type of their corresponding ViewModel. It implements Avalonia's `IDataTemplate` interface.
```csharp
using Avalonia.Controls;
using Avalonia.Controls.Templates;
using Simple_Player_MVVM.ViewModels;
using System;
namespace Simple_Player_MVVM
{
public class ViewLocator : IDataTemplate
{
public Control? Build(object? data)
{
if (data is null)
return null;
var name = data.GetType().FullName!.Replace("ViewModel", "View", StringComparison.Ordinal);
var type = Type.GetType(name);
if (type != null)
{
return (Control)Activator.CreateInstance(type)!;
}
return new TextBlock { Text = "Not Found: " + name };
}
public bool Match(object? data)
{
return data is ViewModelBase;
}
}
}
```
When Avalonia needs to display a ViewModel, the `ViewLocator`'s `Match` method checks if the data object is a `ViewModelBase`. If it is, the `Build` method attempts to find a corresponding View by replacing "ViewModel" with "View" in the ViewModel's class name and instantiates it.
This convention-based approach simplifies the association between Views and ViewModels.
`[SCREENSHOT: ViewLocator.cs code]`
### 3.3. Application Initialization (`App.axaml` and `App.axaml.cs`)
The `App.axaml` file defines the application-level resources, including the `ViewLocator` as a data template and the theme (FluentTheme).
**`App.axaml`**:
```xml
```
**`App.axaml.cs`**:
The `App.axaml.cs` file handles the application's initialization and lifecycle.
Key responsibilities in `OnFrameworkInitializationCompleted`:
1. Creates an instance of `MainViewModel`.
2. Sets up the main window or view based on the application lifetime (`IClassicDesktopStyleApplicationLifetime` for desktop, `ISingleViewApplicationLifetime` for mobile/web-like views).
3. Assigns the `MainViewModel` instance as the `DataContext` for the main window/view.
4. Retrieves the `IVideoView` instance from the `MainView` (hosted within `MainWindow` or directly as `MainView`).
5. Passes the `IVideoView` and the `TopLevel` control (necessary for file dialogs and other top-level interactions) to the `MainViewModel`.
```csharp
using Avalonia;
using Avalonia.Controls;
using Avalonia.Controls.ApplicationLifetimes;
using Avalonia.Markup.Xaml;
using Simple_Player_MVVM.ViewModels;
using Simple_Player_MVVM.Views;
using VisioForge.Core.Types;
namespace Simple_Player_MVVM
{
public partial class App : Application
{
public override void Initialize()
{
AvaloniaXamlLoader.Load(this);
}
public override void OnFrameworkInitializationCompleted()
{
IVideoView videoView = null;
var model = new MainViewModel();
if (ApplicationLifetime is IClassicDesktopStyleApplicationLifetime desktop)
{
desktop.MainWindow = new MainWindow
{
DataContext = model
};
videoView = (desktop.MainWindow as MainWindow).GetVideoView();
model.VideoViewIntf = videoView;
model.TopLevel = desktop.MainWindow;
}
else if (ApplicationLifetime is ISingleViewApplicationLifetime singleViewPlatform)
{
singleViewPlatform.MainView = new MainView
{
DataContext = model
};
videoView = (singleViewPlatform.MainView as MainView).GetVideoView();
model.VideoViewIntf = videoView;
model.TopLevel = TopLevel.GetTopLevel(singleViewPlatform.MainView);
}
base.OnFrameworkInitializationCompleted();
}
}
}
```
This setup ensures that the `MainViewModel` has access to the necessary UI components for video playback and interaction, regardless of the platform.
`[SCREENSHOT: App.axaml.cs code focusing on OnFrameworkInitializationCompleted]`
## 4. MainViewModel Implementation (`MainViewModel.cs`)
The `MainViewModel` is central to the media player's functionality. It manages the player's state, handles user interactions, and communicates with the VisioForge `MediaPlayerCoreX` engine.
`[SCREENSHOT: MainViewModel.cs overall structure or class definition]`
Key components of `MainViewModel`:
### 4.1. Properties for UI Binding
The ViewModel exposes several properties that are bound to UI elements in `MainView.axaml`. These properties use `ReactiveUI`'s `RaiseAndSetIfChanged` to notify the UI of changes.
* **`VideoViewIntf` (IVideoView):** A reference to the `VideoView` control in the UI, passed from `App.axaml.cs`.
* **`TopLevel` (TopLevel):** A reference to the top-level control, used for displaying file dialogs.
* **`Position` (string?):** Current playback position (e.g., "00:01:23").
* **`Duration` (string?):** Total duration of the media file (e.g., "00:05:00").
* **`Filename` (string? or Foundation.NSUrl? for iOS):** The name or path of the currently loaded file.
* **`VolumeValue` (double?):** Current volume level (0-100).
* **`PlayPauseText` (string?):** Text for the Play/Pause button (e.g., "PLAY" or "PAUSE").
* **`SpeedText` (string?):** Text indicating the current playback speed (e.g., "SPEED: 1X").
* **`SeekingValue` (double?):** Current value of the seeking slider.
* **`SeekingMaximum` (double?):** Maximum value of the seeking slider (corresponds to media duration in milliseconds).
```csharp
// Example property
private string? _Position = "00:00:00";
public string? Position
{
get => _Position;
set => this.RaiseAndSetIfChanged(ref _Position, value);
}
// ... other properties ...
```
### 4.2. Commands for UI Interactions
ReactiveUI `ReactiveCommand` instances are used to handle actions triggered by UI elements (e.g., button clicks, slider value changes).
* **`OpenFileCommand`:** Opens a file dialog to select a media file.
* **`PlayPauseCommand`:** Plays or pauses the media.
* **`StopCommand`:** Stops playback.
* **`SpeedCommand`:** Cycles through playback speeds (1x, 2x, 0.5x).
* **`VolumeValueChangedCommand`:** Updates the player volume when the volume slider changes.
* **`SeekingValueChangedCommand`:** Seeks to a new position when the seeking slider changes.
* **`WindowClosingCommand`:** Handles cleanup when the application window is closing.
```csharp
// Constructor - Command initialization
public MainViewModel()
{
OpenFileCommand = ReactiveCommand.Create(OpenFileAsync);
PlayPauseCommand = ReactiveCommand.CreateFromTask(PlayPauseAsync);
StopCommand = ReactiveCommand.CreateFromTask(StopAsync);
// ... other command initializations ...
// Subscribe to property changes to trigger commands for sliders
this.WhenAnyValue(x => x.VolumeValue).Subscribe(_ => VolumeValueChangedCommand.Execute().Subscribe());
this.WhenAnyValue(x => x.SeekingValue).Subscribe(_ => SeekingValueChangedCommand.Execute().Subscribe());
_tmPosition = new System.Timers.Timer(1000); // Timer for position updates
_tmPosition.Elapsed += tmPosition_Elapsed;
VisioForgeX.InitSDK(); // Initialize VisioForge SDK
}
```
Note: `VisioForgeX.InitSDK()` initializes the VisioForge SDK. This should be called once at application startup.
### 4.3. VisioForge `MediaPlayerCoreX` Integration
A private field `_player` of type `MediaPlayerCoreX` holds the instance of the VisioForge media player engine.
```csharp
private MediaPlayerCoreX _player;
```
### 4.4. Engine Creation (`CreateEngineAsync`)
This asynchronous method initializes or re-initializes the `MediaPlayerCoreX` instance.
```csharp
private async Task CreateEngineAsync()
{
if (_player != null)
{
await _player.StopAsync();
await _player.DisposeAsync();
}
_player = new MediaPlayerCoreX(VideoViewIntf); // Pass the Avalonia VideoView
_player.OnError += _player_OnError; // Subscribe to error events
_player.Audio_Play = true; // Ensure audio is enabled
// Create source settings from the filename
var sourceSettings = await UniversalSourceSettings.CreateAsync(Filename);
await _player.OpenAsync(sourceSettings);
}
```
Key steps:
1. Disposes of any existing player instance.
2. Creates a new `MediaPlayerCoreX`, passing the `IVideoView` from the UI.
3. Subscribes to the `OnError` event for error handling.
4. Sets `Audio_Play = true` to enable audio playback by default.
5. Uses `UniversalSourceSettings.CreateAsync(Filename)` to create source settings appropriate for the selected file.
6. Opens the media source using `_player.OpenAsync(sourceSettings)`.
`[SCREENSHOT: CreateEngineAsync method code]`
### 4.5. File Opening (`OpenFileAsync`)
This method is responsible for allowing the user to select a media file.
```csharp
private async Task OpenFileAsync()
{
await StopAllAsync(); // Stop any current playback
PlayPauseText = "PLAY";
#if __IOS__ && !__MACCATALYST__
// iOS specific: Use IDocumentPickerService
var filePicker = Locator.Current.GetService();
var res = await filePicker.PickVideoAsync();
if (res != null)
{
Filename = (Foundation.NSUrl)res;
var access = IOSHelper.CheckFileAccess(Filename); // Helper to check file access
if (!access)
{
IOSHelper.ShowToast("File access error");
return;
}
}
#else
// Other platforms: Use Avalonia's StorageProvider
try
{
var files = await TopLevel.StorageProvider.OpenFilePickerAsync(new FilePickerOpenOptions
{
Title = "Open video file",
AllowMultiple = false
});
if (files.Count >= 1)
{
var file = files[0];
Filename = file.Path.AbsoluteUri;
#if __ANDROID__
// Android specific: Convert content URI to file path if necessary
if (!Filename.StartsWith('/'))
{
Filename = global::VisioForge.Core.UI.Android.FileDialogHelper.GetFilePathFromUri(AndroidHelper.GetContext(), file.Path);
}
#endif
}
}
catch (Exception ex)
{
// Handle cancellation or errors
Debug.WriteLine($"File open error: {ex.Message}");
}
#endif
}
```
Platform-specific considerations:
* **iOS:** Uses an `IDocumentPickerService` (resolved via `Locator.Current.GetService`) to present the native document picker. `IOSHelper.CheckFileAccess` is used to ensure the app has permission to access the selected file. The filename is stored as an `NSUrl`.
* **Android:** If the path obtained from the file picker is a content URI, `FileDialogHelper.GetFilePathFromUri` (from `VisioForge.Core.UI.Android`) is used to convert it to an actual file path. This requires an `IAndroidHelper` to get the Android context.
* **Desktop/Other:** Uses `TopLevel.StorageProvider.OpenFilePickerAsync` for the standard Avalonia file dialog.
`[SCREENSHOT: OpenFileAsync method with platform-specific blocks highlighted]`
### 4.6. Playback Controls
* **`PlayPauseAsync`:**
* If the player is not initialized or stopped (`PlaybackState.Free`), it calls `CreateEngineAsync` and then `_player.PlayAsync()`.
* If playing (`PlaybackState.Play`), it calls `_player.PauseAsync()`.
* If paused (`PlaybackState.Pause`), it calls `_player.ResumeAsync()`.
* Updates `PlayPauseText` accordingly and starts/stops the `_tmPosition` timer.
```csharp
private async Task PlayPauseAsync()
{
// ... (null/empty filename check) ...
if (_player == null || _player.State == PlaybackState.Free)
{
await CreateEngineAsync();
await _player.PlayAsync();
_tmPosition.Start();
PlayPauseText = "PAUSE";
}
else if (_player.State == PlaybackState.Play)
{
await _player.PauseAsync();
PlayPauseText = "PLAY";
}
else if (_player.State == PlaybackState.Pause)
{
await _player.ResumeAsync();
PlayPauseText = "PAUSE";
}
}
```
* **`StopAsync`:**
* Calls `StopAllAsync` to stop the player and reset UI elements.
* Resets `SpeedText` and `PlayPauseText`.
```csharp
private async Task StopAsync()
{
await StopAllAsync();
SpeedText = "SPEED: 1X";
PlayPauseText = "PLAY";
}
```
* **`StopAllAsync` (Helper):**
* Stops the `_tmPosition` timer.
* Calls `_player.StopAsync()`.
* Resets `SeekingMaximum` to null (so it gets re-calculated on next play).
```csharp
private async Task StopAllAsync()
{
if (_player == null) return;
_tmPosition.Stop();
if (_player != null) await _player.StopAsync();
await Task.Delay(300); // Small delay to ensure stop completes
SeekingMaximum = null;
}
```
### 4.7. Playback Speed (`SpeedAsync`)
Cycles through playback rates: 1.0, 2.0, and 0.5.
```csharp
private async Task SpeedAsync()
{
if (SpeedText == "SPEED: 1X")
{
SpeedText = "SPEED: 2X";
await _player.Rate_SetAsync(2.0);
}
else if (SpeedText == "SPEED: 2X")
{
SpeedText = "SPEED: 0.5X";
await _player.Rate_SetAsync(0.5);
}
else if (SpeedText == "SPEED: 0.5X") // Assumes this was the previous state
{
SpeedText = "SPEED: 1X";
await _player.Rate_SetAsync(1.0);
}
}
```
Uses `_player.Rate_SetAsync(double rate)` to change the playback speed.
### 4.8. Position and Duration Updates (`tmPosition_Elapsed`)
This method is called by the `_tmPosition` timer (typically every second) to update the UI with the current playback position and duration.
```csharp
private async void tmPosition_Elapsed(object sender, System.Timers.ElapsedEventArgs e)
{
if (_player == null) return;
var pos = await _player.Position_GetAsync();
var progress = (int)pos.TotalMilliseconds;
try
{
await Dispatcher.UIThread.InvokeAsync(async () =>
{
if (_player == null) return;
_isTimerUpdate = true; // Flag to prevent seeking loop
if (SeekingMaximum == null)
{
SeekingMaximum = (int)(await _player.DurationAsync()).TotalMilliseconds;
}
SeekingValue = Math.Min(progress, (int)(SeekingMaximum ?? progress));
Position = $"{pos.ToString(@"hh\:mm\:ss", CultureInfo.InvariantCulture)}";
Duration = $"{(await _player.DurationAsync()).ToString(@"hh\:mm\:ss", CultureInfo.InvariantCulture)}";
_isTimerUpdate = false;
});
}
catch (Exception exception)
{
System.Diagnostics.Debug.WriteLine(exception);
}
}
```
Key actions:
1. Retrieves current position (`_player.Position_GetAsync()`) and duration (`_player.DurationAsync()`).
2. Updates `SeekingMaximum` if it hasn't been set yet (usually after a file is opened).
3. Updates `SeekingValue` with the current progress.
4. Formats and updates `Position` and `Duration` strings.
5. Uses `Dispatcher.UIThread.InvokeAsync` to ensure UI updates happen on the UI thread.
6. Sets `_isTimerUpdate = true` before updating `SeekingValue` and `false` after, to prevent the `OnSeekingValueChanged` handler from re-seeking when the timer updates the slider position.
`[SCREENSHOT: tmPosition_Elapsed method]`
### 4.9. Seeking (`OnSeekingValueChanged`)
Called when the `SeekingValue` property changes (i.e., the user moves the seeking slider).
```csharp
private async Task OnSeekingValueChanged()
{
if (!_isTimerUpdate && _player != null && SeekingValue.HasValue)
{
await _player.Position_SetAsync(TimeSpan.FromMilliseconds(SeekingValue.Value));
}
}
```
If not currently being updated by the timer (`!_isTimerUpdate`), it calls `_player.Position_SetAsync()` to seek to the new position.
### 4.10. Volume Control (`OnVolumeValueChanged`)
Called when the `VolumeValue` property changes (i.e., the user moves the volume slider).
```csharp
private void OnVolumeValueChanged()
{
if (_player != null && VolumeValue.HasValue)
{
// Volume for MediaPlayerCoreX is 0.0 to 1.0
_player.Audio_OutputDevice_Volume = VolumeValue.Value / 100.0;
}
}
```
Sets `_player.Audio_OutputDevice_Volume`. Note that the ViewModel uses a 0-100 scale for `VolumeValue`, while the player expects 0.0-1.0.
### 4.11. Error Handling (`_player_OnError`)
A simple error handler that logs errors to the debug console.
```csharp
private void _player_OnError(object sender, VisioForge.Core.Types.Events.ErrorsEventArgs e)
{
Debug.WriteLine(e.Message);
}
```
More sophisticated error handling (e.g., showing a message to the user) could be implemented here.
### 4.12. Resource Cleanup (`OnWindowClosing`)
This method is invoked when the main window is closing. It ensures that VisioForge SDK resources are properly released.
```csharp
private void OnWindowClosing()
{
if (_player != null)
{
_player.OnError -= _player_OnError; // Unsubscribe from events
_player.Stop(); // Ensure player is stopped (sync version here for quick cleanup)
_player.Dispose();
_player = null;
}
VisioForgeX.DestroySDK(); // Destroy VisioForge SDK instance
}
```
It stops the player, disposes of it, and importantly, calls `VisioForgeX.DestroySDK()` to release all SDK resources. This is crucial to prevent memory leaks or issues when the application exits.
This ViewModel orchestrates all the core logic of the media player, from loading files to controlling playback and interacting with the VisioForge SDK.
## 5. User Interface (Views)
The user interface is defined using Avalonia XAML (`.axaml` files).
### 5.1. `MainView.axaml` - The Player Interface
This `UserControl` defines the layout and controls for the media player.
`[SCREENSHOT: MainView.axaml rendered UI design]`
**Key UI Elements:**
* **`avalonia:VideoView`:** This is the VisioForge control responsible for rendering video. It's placed in the main area of the grid and set to stretch.
```xml
```
* **Seeking Slider (`Slider Name="slSeeking"`):**
* `Maximum="{Binding SeekingMaximum}"`: Binds to the `SeekingMaximum` property in `MainViewModel`.
* `Value="{Binding SeekingValue}"`: Binds two-way to the `SeekingValue` property in `MainViewModel`. Changes to this slider by the user will update `SeekingValue`, triggering `OnSeekingValueChanged`. Updates to `SeekingValue` from the ViewModel (e.g., by the timer) will update the slider's position.
* **Time Display (`TextBlock`s for Position and Duration):**
* Bound to `Position` and `Duration` properties in `MainViewModel`.
* `TextBlock Text="{Binding Filename}"` displays the current file name.
* **Playback Control Buttons (`Button`s):**
* **Open File:** `Command="{Binding OpenFileCommand}"`
* **Play/Pause:** `Command="{Binding PlayPauseCommand}"`, `Content="{Binding PlayPauseText}"` (dynamically changes button text).
* **Stop:** `Command="{Binding StopCommand}"`
* **Volume and Speed Controls:**
* **Volume Slider:** `Value="{Binding VolumeValue}"` (binds to `VolumeValue` for volume control).
* **Speed Button:** `Command="{Binding SpeedCommand}"`, `Content="{Binding SpeedText}"`.
**Layout:**
The view uses a `Grid` to arrange the `VideoView` and a `StackPanel` for the controls at the bottom. The controls themselves are organized using nested `StackPanel`s and `Grid`s for alignment.
```xml
```
The `x:DataType="vm:MainViewModel"` directive enables compiled bindings, providing better performance and compile-time checking of binding paths. The `Design.DataContext` is used to provide data for the XAML previewer in IDEs.
`[SCREENSHOT: MainView.axaml XAML code, perhaps highlighting binding expressions]`
### 5.2. `MainView.axaml.cs` - Code-Behind
The code-behind for `MainView` is minimal. Its primary purpose is to provide a way for the application setup code (in `App.axaml.cs`) to access the `VideoView` control instance.
```csharp
using Avalonia.Controls;
using VisioForge.Core.Types;
namespace Simple_Player_MVVM.Views
{
public partial class MainView : UserControl
{
// Provides access to the VideoView control instance
public IVideoView GetVideoView()
{
return videoView1; // videoView1 is the x:Name of the VideoView in XAML
}
public MainView()
{
InitializeComponent(); // Standard Avalonia control initialization
}
}
}
```
This `GetVideoView()` method is called during application startup to pass the `VideoView` reference to the `MainViewModel`.
### 5.3. `MainWindow.axaml` - The Main Application Window (Desktop)
For desktop platforms, `MainWindow.axaml` serves as the top-level window that hosts the `MainView`.
```xml
```
It simply embeds the `MainView` control. The `DataContext` (which will be an instance of `MainViewModel`) is typically set in `App.axaml.cs` when the `MainWindow` is created.
### 5.4. `MainWindow.axaml.cs` - Main Window Code-Behind
The code-behind for `MainWindow` primarily handles two things:
1. Provides a way to get the `VideoView` from the contained `MainView`.
2. Hooks into the `Closing` event of the window to trigger the `WindowClosingCommand` in the `MainViewModel` for resource cleanup.
```csharp
using Avalonia.Controls;
using Simple_Player_MVVM.ViewModels;
using System;
using VisioForge.Core.Types;
namespace Simple_Player_MVVM.Views
{
public partial class MainWindow : Window
{
// Helper to get VideoView from the MainView content
public IVideoView GetVideoView()
{
return (Content as MainView).GetVideoView();
}
public MainWindow()
{
InitializeComponent();
// Handle the window closing event to trigger cleanup in ViewModel
Closing += async (sender, e) =>
{
if (DataContext is MainViewModel viewModel)
{
// Execute the command and handle potential errors or completion
viewModel.WindowClosingCommand.Execute()
.Subscribe(_ => { /* Optional: action on completion */ },
ex => Console.WriteLine($"Error during closing: {ex.Message}"));
}
};
}
}
}
```
When the window closes, it checks if the `DataContext` is a `MainViewModel` and then executes its `WindowClosingCommand`. This ensures that the `MainViewModel` can perform necessary cleanup, such as disposing of the `MediaPlayerCoreX` instance and calling `VisioForgeX.DestroySDK()`.
`[SCREENSHOT: MainWindow.axaml.cs code, highlighting the Closing event handler]`
## 6. Platform-Specific Implementation Details
While Avalonia and .NET provide a high degree of cross-platform compatibility, certain aspects like file system access and permissions require platform-specific handling.
### 6.1. Interfaces for Platform Services
To abstract platform-specific functionality, interfaces are defined in the core `SimplePlayerMVVM` project:
* **`IAndroidHelper.cs`:**
```csharp
namespace SimplePlayerMVVM
{
public interface IAndroidHelper
{
#if __ANDROID__
global::Android.Content.Context GetContext();
#endif
}
}
```
This interface is used to get the Android `Context`, which is needed for operations like converting content URIs to file paths.
* **`IDocumentPickerService.cs`:**
```csharp
using System.Threading.Tasks;
namespace SimplePlayerMVVM;
public interface IDocumentPickerService
{
Task PickVideoAsync();
}
```
This interface abstracts the file picking mechanism, specifically for iOS where a native document picker is preferred.
### 6.2. Android Implementation (`SimplePlayerMVVM.Android` project)
`[SCREENSHOT: Android project structure or MainActivity.cs]`
* **`MainActivity.cs`:**
* Inherits from `AvaloniaMainActivity` and implements `IAndroidHelper`.
* **`CustomizeAppBuilder`:** Standard Avalonia Android setup.
* **Permissions:** In `OnCreate`, it calls `RequestPermissionsAsync` to request necessary permissions like `Manifest.Permission.Internet`, `Manifest.Permission.ReadExternalStorage`, and `Manifest.Permission.ReadMediaVideo` (for newer Android versions).
```csharp
// In MainActivity.cs
protected override void OnCreate(Bundle savedInstanceState)
{
base.OnCreate(savedInstanceState);
MainViewModel.AndroidHelper = this; // Provide IAndroidHelper implementation to ViewModel
RequestPermissionsAsync();
}
private async void RequestPermissionsAsync()
{
RequestPermissions(
new String[]{
Manifest.Permission.Internet,
Manifest.Permission.ReadExternalStorage,
Manifest.Permission.ReadMediaVideo}, 1004);
}
public Context GetContext() // IAndroidHelper implementation
{
return this;
}
```
* The `MainViewModel.AndroidHelper = this;` line makes the `MainActivity` instance (which implements `IAndroidHelper`) available to the `MainViewModel` for getting the Android context.
* The Android Manifest (`AndroidManifest.xml`, not explicitly shown in the provided files but essential) must also declare these permissions.
* **File Path Handling:** As seen in `MainViewModel.OpenFileAsync`, the `FileDialogHelper.GetFilePathFromUri` method uses the context obtained via `IAndroidHelper` to resolve file paths from content URIs, which is common when using Android's file picker.
* **Project File (`SimplePlayerMVVM.Android.csproj`):** Configures the Android-specific build, target SDK versions, and includes necessary VisioForge Android libraries.
### 6.3. iOS Implementation (`SimplePlayerMVVM.iOS` project)
`[SCREENSHOT: iOS project structure or AppDelegate.cs]`
* **`AppDelegate.cs`:**
* Inherits from `AvaloniaAppDelegate`.
* **`CustomizeAppBuilder`:** Registers the `IOSDocumentPickerService` with the Splat dependency resolver (`Locator.CurrentMutable.RegisterConstant`). This makes the `IDocumentPickerService` available for injection or service location in the `MainViewModel`.
```csharp
// In AppDelegate.cs
protected override AppBuilder CustomizeAppBuilder(AppBuilder builder)
{
Locator.CurrentMutable.RegisterConstant(new IOSDocumentPickerService(), typeof(IDocumentPickerService));
return base.CustomizeAppBuilder(builder)
.WithInterFont()
.UseReactiveUI();
}
```
* **`IOSDocumentPickerService.cs`:**
* Implements `IDocumentPickerService`.
* Uses `UIDocumentPickerViewController` to present the native iOS file picker for video files (`UTType.Video`, `UTType.Movie`).
* Handles the `DidPickDocumentAtUrls` and `WasCancelled` events from the picker.
* Returns the selected file URL (`NSUrl`) via a `TaskCompletionSource`.
* Includes utility code (`GetTopViewController`) to find the topmost view controller to present the picker from.
```csharp
// Snippet from IOSDocumentPickerService.cs
public Task PickVideoAsync()
{
_tcs = new TaskCompletionSource();
string[] allowedUTIs = { UTType.Video, UTType.Movie };
var picker = new UIDocumentPickerViewController(allowedUTIs, UIDocumentPickerMode.Import);
// ... event subscriptions and presentation ...
return _tcs.Task;
}
private void OnDocumentPicked(object sender, UIDocumentPickedAtUrlsEventArgs e)
{
// ... handles picked URL, resolves _tcs ...
NSUrl fileUrl = e.Urls[0];
_tcs?.TrySetResult(fileUrl);
}
```
`[SCREENSHOT: IOSDocumentPickerService.cs showing picker setup or result handling]`
* **`Info.plist`:**
* This file is crucial for iOS apps. It must include keys like `NSPhotoLibraryUsageDescription` if accessing the photo library, or other relevant permissions depending on where files are stored/accessed. The provided `Info.plist` includes:
```xml
NSPhotoLibraryUsageDescription
Photo library used to play files
```
* It also defines bundle identifiers, version numbers, supported orientations, etc.
* **Project File (`SimplePlayerMVVM.iOS.csproj`):** Configures the iOS-specific build, target OS version, and includes VisioForge iOS libraries.
### 6.4. Desktop Implementation (`SimplePlayerMVVM.Desktop` project)
`[SCREENSHOT: Desktop project structure or Program.cs]`
* **`Program.cs`:**
* Contains the `Main` entry point for desktop applications.
* Uses `BuildAvaloniaApp().StartWithClassicDesktopLifetime(args);` to initialize and run the Avalonia application for desktop.
* `BuildAvaloniaApp()` configures Avalonia with platform detection, fonts, ReactiveUI, and logging.
```csharp
internal sealed class Program
{
[STAThread]
public static void Main(string[] args) => BuildAvaloniaApp()
.StartWithClassicDesktopLifetime(args);
public static AppBuilder BuildAvaloniaApp()
=> AppBuilder.Configure()
.UsePlatformDetect()
.WithInterFont()
.UseReactiveUI()
.LogToTrace();
}
```
* **File Access:** On desktop, file access is generally more straightforward. The `MainViewModel` uses `TopLevel.StorageProvider.OpenFilePickerAsync` which works across Windows, macOS, and Linux without specific helper services like those for Android or iOS URI/permission complexities.
* **Project File (`SimplePlayerMVVM.Desktop.csproj`):**
* Targets specific desktop frameworks (e.g., `net8.0-windows`, `net8.0-macos14.0`, `net8.0` for Linux).
* Includes `Avalonia.Desktop`.
* Includes platform-specific VisioForge native libraries for Windows (x64) and macOS through `PackageReference` conditions.
```xml
```
* **Windows Manifest (`app.manifest`):** Used on Windows for application settings, such as compatibility with specific Windows versions.
* **macOS Info (`Info.plist` in Desktop project):** Provides bundle information for macOS applications.
These platform-specific projects and configurations ensure that the shared core logic in `SimplePlayerMVVM` can interact correctly with the native features and requirements of each operating system.
## 7. Key VisioForge SDK Components Used
This application leverages several key components from the VisioForge Media Player SDK X:
* **`VisioForge.Core.MediaPlayerX.MediaPlayerCoreX`:**
* The central engine for media playback. It handles opening media sources, controlling playback (play, pause, stop, seek, rate), managing audio and video, and providing status information (position, duration).
* Initialized in `MainViewModel` and linked to the `VideoViewIntf`.
* **`VisioForge.Core.UI.Avalonia.VideoView`:**
* An Avalonia control that serves as the rendering surface for video. It is declared in `MainView.axaml` and its reference (`IVideoView`) is passed to `MediaPlayerCoreX`.
* **`VisioForge.Core.Types.X.Sources.UniversalSourceSettings`:**
* Used to configure the media source. `UniversalSourceSettings.CreateAsync(filename)` automatically determines the best way to open a given file or URL.
* **`VisioForge.Core.VisioForgeX` static class:**
* **`InitSDK()`:** Initializes the VisioForge SDK. This must be called once at application startup (done in `MainViewModel` constructor in this example, but can also be done in `App.axaml.cs`).
* **`DestroySDK()`:** Releases all SDK resources. This must be called when the application is closing to prevent resource leaks (done in `MainViewModel.OnWindowClosing`).
* **Platform-Specific Libraries:**
* As detailed in the project setup and platform-specific sections, various NuGet packages like `VisioForge.CrossPlatform.Core.Windows.x64`, `VisioForge.CrossPlatform.Core.macOS`, `VisioForge.CrossPlatform.Core.Android`, and `VisioForge.CrossPlatform.Core.iOS` provide the necessary native binaries and bindings for each platform.
* **`VisioForge.Core.UI.Android.FileDialogHelper` (for Android):**
* Contains helper methods like `GetFilePathFromUri` to work with Android's file system and content URIs.
Understanding these components is crucial for working with the VisioForge SDK and extending the player's functionality.
`[SCREENSHOT: Diagram showing interaction between MainViewModel, MediaPlayerCoreX, and VideoView]`
## 8. Building and Running the Application
1. **Clone/Download the Source Code:** Obtain the `SimplePlayerMVVM` example project.
2. **Restore NuGet Packages:** Open the solution in your IDE and ensure all NuGet packages are restored for all projects.
3. **Select Startup Project and Target:**
* **Desktop:** Set `SimplePlayerMVVM.Desktop` as the startup project. You can then run it directly on Windows, macOS, or Linux (ensure you have the .NET runtime for your OS).
* **Android:** Set `SimplePlayerMVVM.Android` as the startup project. Select an Android emulator or connected device. Build and deploy.
* Ensure Android SDK and emulators/devices are correctly configured in your IDE.
* You might need to accept permission prompts on the device/emulator upon first launch.
* **iOS:** Set `SimplePlayerMVVM.iOS` as the startup project. Select an iOS simulator or connected device (requires a macOS build machine and appropriate Apple Developer provisioning).
* Ensure Xcode and developer tools are correctly configured.
* You might need to trust the developer certificate on the device.
4. **Build and Run:** Build the selected startup project and run it.
`[SCREENSHOT: IDE showing startup project selection and run button]`
`[SCREENSHOT: Application running on Android emulator]`
`[SCREENSHOT: Application running on iOS simulator]`
`[SCREENSHOT: Application running on Windows/macOS/Linux desktop]`
## 9. Conclusion
This guide has demonstrated how to build a cross-platform media player using Avalonia UI with the MVVM pattern and the VisioForge Media Player SDK X. By leveraging a shared core project for ViewModels and Views, and handling platform-specifics in dedicated head projects, we can create a maintainable application that runs on a wide range of devices.
Key takeaways:
* The MVVM pattern helps separate concerns and improves testability.
* ReactiveUI simplifies implementing MVVM with Avalonia.
* VisioForge Media Player SDK X provides powerful media playback capabilities, with `MediaPlayerCoreX` as the core engine and `VideoView` for Avalonia UI integration.
* Platform-specific considerations, especially for file access and permissions, are handled through interfaces and platform-specific implementations.
* Proper initialization (`VisioForgeX.InitSDK()`) and cleanup (`VisioForgeX.DestroySDK()`) of the VisioForge SDK are essential.
You can extend this example by adding more features like playlist support, network streaming, video effects, or more advanced UI controls.
---END OF PAGE---
# Local File: .\dotnet\videocapture\deployment.md
---
title: Video Capture SDK .NET Deployment Guide
description: Learn how to deploy Video Capture SDK .NET applications using NuGet packages, silent installers, or manual installation. Includes step-by-step instructions for x86/x64 architectures and component-specific deployment options.
sidebar_label: Deployment
order: 0
---
# Comprehensive Deployment Guide for Video Capture SDK .Net
[!badge size="xl" target="blank" variant="info" text="Video Capture SDK .Net"](https://www.visioforge.com/video-capture-sdk-net)
When deploying the Video Capture SDK .Net to systems without the SDK pre-installed, proper component deployment is essential for functionality. For AnyCPU applications, both x86 and x64 redistributables must be deployed to ensure compatibility across different system architectures.
## Engine Options Overview
### VideoCaptureCoreX Engine (Cross-Platform Compatibility)
For cross-platform deployment scenarios, refer to our comprehensive [deployment guide](../deployment-x/index.md) which details platform-specific requirements and configuration options.
### VideoCaptureCore Engine (Windows Platform)
The VideoCaptureCore engine is optimized specifically for Windows environments and offers multiple deployment approaches based on your application requirements and target environment constraints.
## Deployment Methods
### NuGet Package Distribution (No Administrator Privileges Required)
The NuGet package approach provides a streamlined deployment method that doesn't require administrator privileges, making it ideal for restricted environments or when deploying to multiple systems without elevated access.
Add the required NuGet packages to your application project, and after building, the necessary redistributable files will be automatically included in your application folder. This method simplifies dependency management while ensuring all required components are available.
#### Essential NuGet Packages
**Core Components (Required):**
- SDK Base Package: [x86](https://www.nuget.org/packages/VisioForge.DotNet.Core.Redist.Base.x86) | [x64](https://www.nuget.org/packages/VisioForge.DotNet.Core.Redist.Base.x64)
- Video Capture SDK: [x86](https://www.nuget.org/packages/VisioForge.DotNet.Core.Redist.VideoCapture.x86) | [x64](https://www.nuget.org/packages/VisioForge.DotNet.Core.Redist.VideoCapture.x64)
**Feature-Specific Packages:**
- FFMPEG Integration (for file output/network streaming): [x86](https://www.nuget.org/packages/VisioForge.DotNet.Core.Redist.FFMPEG.x86) | [x64](https://www.nuget.org/packages/VisioForge.DotNet.Core.Redist.FFMPEG.x64)
- MP4 Output Support: [x86](https://www.nuget.org/packages/VisioForge.DotNet.Core.Redist.MP4.x86) | [x64](https://www.nuget.org/packages/VisioForge.DotNet.Core.Redist.MP4.x64)
- VLC Source Integration (for file/IP camera sources): [x86](https://www.nuget.org/packages/VisioForge.DotNet.Core.Redist.VLC.x86) | [x64](https://www.nuget.org/packages/VisioForge.DotNet.Core.Redist.VLC.x64)
- WebM Output Format: [x86](https://www.nuget.org/packages/VisioForge.DotNet.Core.Redist.WebM.x86)
- XIPH Format Support (Ogg, Vorbis, FLAC): [x86](https://www.nuget.org/packages/VisioForge.DotNet.Core.Redist.XIPH.x86) | [x64](https://www.nuget.org/packages/VisioForge.DotNet.Core.Redist.XIPH.x64)
- LAV Filters: [x86](https://www.nuget.org/packages/VisioForge.DotNet.Core.Redist.LAV.x86) | [x64](https://www.nuget.org/packages/VisioForge.DotNet.Core.Redist.LAV.x64)
- Virtual Camera Support: [x86](https://www.nuget.org/packages/VisioForge.DotNet.Core.Redist.VirtualCamera.x86) | [x64](https://www.nuget.org/packages/VisioForge.DotNet.Core.Redist.VirtualCamera.x64)
> **Note:** When using the Virtual Camera package, additional registration of camera files is required as outlined in the Manual Installation section if you want the virtual camera to be accessible from external applications.
### Silent Installer Deployment (Administrator Privileges Required)
For scenarios where administrator access is available, silent installers provide a streamlined deployment approach that handles component registration automatically.
**Core Components:**
- Base Package (required): [x86](http://files.visioforge.com/redists_net/redist_dotnet_base_x86.exe) | [x64](http://files.visioforge.com/redists_net/redist_dotnet_base_x64.exe)
- .NET Assemblies: Can be installed in the Global Assembly Cache (GAC) or used from a local folder
**Feature-Specific Installers:**
- FFMPEG Integration: [x86](http://files.visioforge.com/redists_net/redist_dotnet_ffmpeg_x86.exe) | [x64](http://files.visioforge.com/redists_net/redist_dotnet_ffmpeg_x64.exe)
- MP4 Output Support: [x86](http://files.visioforge.com/redists_net/redist_dotnet_mp4_x86.exe) | [x64](http://files.visioforge.com/redists_net/redist_dotnet_mp4_x64.exe)
- VLC Source Integration: [x86](http://files.visioforge.com/redists_net/redist_dotnet_vlc_x86.exe) | [x64](http://files.visioforge.com/redists_net/redist_dotnet_vlc_x64.exe)
- Additional Format Support: WebM ([x86](http://files.visioforge.com/redists_net/redist_dotnet_webm_x86.exe)) and XIPH formats ([x86](http://files.visioforge.com/redists_net/redist_dotnet_xiph_x86.exe) | [x64](http://files.visioforge.com/redists_net/redist_dotnet_xiph_x64.exe))
- LAV Filters: [x86](http://files.visioforge.com/redists_net/redist_dotnet_lav_x86.exe) | [x64](http://files.visioforge.com/redists_net/redist_dotnet_lav_x64.exe)
> **Uninstallation Note:** To remove the package, run the installer executable with administrator privileges using the `/x //` parameter.
### Manual Installation Process
For complete control over the deployment process or in environments with specific requirements, manual installation provides the most flexibility:
1. **Runtime Dependencies:** Install or copy the VC++ 2022 (v143) runtime (x86/x64) and OpenMP runtime DLLs. With admin rights, use exe redist or MSM modules; otherwise, copy directly to the application folder.
2. **Core Components:** Copy the `VisioForge_MFP`/`VisioForge_MFPX` DLLs (or x64 versions) from the `Redist\Filters` folder to your application directory.
3. **.NET Assemblies:** Either copy the assemblies to your application folder or install them to the GAC.
4. **DirectShow Filters:** Copy the SDK DirectShow filters to either your application folder or a designated redist folder (configured via the `CustomRedist_Path` property).
5. **Configuration:** Set the `CustomRedist_Enabled` property to `true` in the Window Load event.
6. **Architecture Handling:** For LAV filters (which use identical names for both x64 and x86 versions), use separate redist folders for each architecture.
7. **Path Configuration:** If your application executable resides in a different location, add the filter folder to the system `PATH` environment variable.
#### Core Components
**Basic Features:**
- Base Filters: VisioForge_BaseFilters.ax / VisioForge_BaseFilters_x64.ax
- Video Effects: VisioForge_Video_Effects_Pro.ax / VisioForge_Video_Effects_Pro_x64.ax
- Audio Processing: VisioForge_MP3_Splitter.ax / VisioForge_MP3_Splitter_x64.ax, VisioForge_Audio_Mixer.ax / VisioForge_Audio_Mixer_x64.ax
**Legacy Audio Effects:**
- VisioForge_Audio_Effects_4.ax / VisioForge_Audio_Effects_4_x64.ax
#### Format-Specific Components
**MP3 Output:**
- VisioForge_LAME.ax / VisioForge_LAME_x64.ax
**MP4/M4A Output:**
- Legacy Version: VisioForge_AAC_Encoder.ax, VisioForge_H264_Encoder_XP.ax, VisioForge_MP4_Muxer.ax with supporting libraries
- Version 10: VisioForge_AAC_Encoder_v10.ax, VisioForge_H264_Encoder.ax, VisioForge_MP4_Muxer_v10.ax with supporting libraries
- Version 11/HW Encoding: VisioForge_MFT.dll, VisioForge_MF_Mux.ax (with x64 variants)
**WebM Output:**
- Muxer: VisioForge_WebM_Mux.ax / VisioForge_WebM_Mux_x64.ax
- Encoders: VisioForge_WebM_Vorbis_Encoder.ax, VisioForge_WebM_VP8_Encoder.ax
- Audio Enhancement: VisioForge_Audio_Enhancer.ax / VisioForge_Audio_Enhancer_x64.ax
**Ogg/FLAC Support:**
- FLAC: VisioForge_Xiph_FLAC_Encoder.ax / VisioForge_Xiph_FLAC_Encoder_x64.ax
- Ogg Vorbis: VisioForge_Xiph_Ogg_Mux.ax, VisioForge_Xiph_Vorbis_Encoder.ax (with x64 variants)
#### Streaming and Source Components
**RTSP Streaming:**
- VisioForge_RTSP_Sink.ax / VisioForge_RTSP_Sink_x64.ax
- MP4 filters (excluding Muxer)
**VLC Source Integration:**
- VisioForge_VLC_Source.ax / VisioForge_VLC_Source_x64.ax
- Requires copying all files from Redist\VLC folder, COM registration, and proper environment variable configuration
**FFMPEG Integration:**
- VisioForge_FFMPEG_Source.ax / VisioForge_FFMPEG_Source_x64.ax
- Requires all files from Redist\FFMPEG folder and PATH variable updates
**RTSP/RTMP/HTTP Source Support:**
- VisioForge_RTSP_Source.ax, VisioForge_RTSP_Source_Live555.ax
- Requires FFMPEG, VLC, or LAV filters
#### Specialized Components
**Screen Capture:**
- VisioForge_Screen_Capture_DD.ax / VisioForge_Screen_Capture_DD_x64.ax
**Audio Capture:**
- VisioForge_WhatYouHear_Source.ax / VisioForge_WhatYouHear_Source_x64.ax
**Virtual Camera:**
- VisioForge_Virtual_Camera.ax / VisioForge_Virtual_Camera_x64.ax
- VisioForge_Virtual_Audio_Card.ax / VisioForge_Virtual_Audio_Card_x64.ax
**Video Processing:**
- Push Source: VisioForge_Push_Video_Source.ax / VisioForge_Push_Video_Source_x64.ax
- Network Streaming: VisioForge_Network_Streamer_Audio.ax, VisioForge_Network_Streamer_Video.ax
- Video Encryption: Multiple components including Decryptors, Encoders, and supporting libraries
- Picture-In-Picture: VisioForge_Video_Mixer.ax / VisioForge_Video_Mixer_x64.ax
#### Filter Registration
For COM registration of all DirectShow filters in a specific folder, you can deploy the `reg_special.exe` utility from the SDK to the filters directory and run it with administrator privileges to automate the registration process.
---END OF PAGE---
# Local File: .\dotnet\videocapture\index.md
---
title: Video Capture SDK for .NET Development
description: Learn how to implement advanced video capture, processing, and streaming capabilities in your .NET applications. Complete developer guide with tutorials, code examples, and integration tips for building powerful multimedia applications.
sidebar_label: Video Capture SDK .Net
order: 15
---
# Video Capture SDK for .NET Applications
## Introduction to Video Capture Development
The Video Capture SDK for .NET enables developers to integrate powerful video capture and processing capabilities into their software applications. This robust toolkit provides everything needed to build feature-rich multimedia applications with minimal effort.
You can explore all features on the [product page](https://www.visioforge.com/video-capture-sdk-net).
## Supported Input Device Categories
### Camera and Capture Hardware
* High-quality DV and HDV MPEG-2 camcorders
* USB webcams and capture devices (including 4K resolution support)
* Professional PCI capture cards
* Television tuners (with and without internal MPEG encoder)
### Network and IP Cameras
* JPEG/MJPEG HTTP IP cameras
* RTSP-enabled IP camera systems
* RTMP network streaming sources
* ONVIF-compatible IP cameras
* SRT network stream sources
### Professional Equipment
* Blackmagic Decklink professional capture devices
* Microsoft Kinect and Kinect 2 for Windows
* NDI-compatible camera systems
### Industrial Vision Systems
* GenICam standard cameras
* GigE Vision industrial cameras
* USB3 Vision high-speed cameras
### Audio Capture Support
* Standard audio capture devices and sound cards
* Professional ASIO audio devices
## Getting Started with Development
* [Installation Guide](../install/index.md)
* [Video Development Tutorials](video-tutorials/index.md)
## Developer Documentation
### Core Functionality
* [Configuring Video Sources](video-sources/index.md)
* [Configuring Audio Sources](audio-sources/index.md)
* [Video Processing and Effects](video-processing/index.md)
* [Audio Rendering](audio-rendering/index.md)
### Advanced Features
* [Video Capture Implementation](video-capture/index.md)
* [Audio Capture Implementation](audio-capture/index.md)
* [Motion Detection Algorithms](motion-detection/index.md)
* [Network Streaming Solutions](network-streaming/index.md)
### Integration and Extensions
* [Third-Party Software Integration](3rd-party-software/index.md)
* [Computer Vision Applications](computer-vision/index.md)
* [Additional Development Topics](guides/index.md)
## Developer Resources
* [Code Samples Repository](https://github.com/visioforge/.Net-SDK-s-samples/)
* [Deployment Guidelines](deployment.md)
* [API Reference Documentation](https://api.visioforge.com/dotnet/api/index.html)
* [Changelog and Updates](../changelog.md)
* [End User License Agreement](../../eula.md)
* [Licensing Information](../../licensing.md)
---END OF PAGE---
# Local File: .\dotnet\videocapture\3rd-party-software\ffmpeg-streaming.md
---
title: FFMPEG Streaming for Video Capture .NET SDK
description: Learn how to implement FFMPEG streaming with Video Capture SDK .NET for your WinForms, WPF, and console applications. This guide provides step-by-step instructions, code samples, and advanced configuration options to help you set up efficient video streaming.
sidebar_label: FFMPEG Streaming
---
# FFMPEG Streaming Integration with .NET
[!badge size="xl" target="blank" variant="info" text="Video Capture SDK .Net"](https://www.visioforge.com/video-capture-sdk-net)
## Introduction to FFMPEG Streaming
The Video Capture SDK offers powerful capabilities for streaming video from multiple sources directly into FFMPEG, which runs as an external process. This integration provides developers with exceptional flexibility, allowing you to use GPL/LGPL FFMPEG builds with any configuration of video/audio codecs and muxers according to your project requirements.
With this integration, you can:
- Capture video from various sources
- Stream the captured content to FFMPEG
- Configure FFMPEG to save streams to files
- Stream content to remote servers
- Process video in real-time
- Apply filters and transformations
This approach combines the robustness of the .NET SDK with the versatility of FFMPEG, creating a powerful solution for video capture and streaming applications.
## Getting Started with FFMPEG Streaming
Before diving into implementation details, it's important to understand the basic workflow:
1. Configure your video source (capture device, screen, file, etc.)
2. Enable the Virtual Camera output
3. Start the video streaming process
4. Configure and launch FFMPEG with appropriate parameters
5. Process or save the stream as needed
Let's explore each step in detail.
## Basic Implementation
### Step 1: Configure Your Video Source
The first step involves setting up your video source. This can be done either programmatically or through the UI if you're using the Main Demo application. Here's a simple code example to enable the Virtual Camera output:
```cs
VideoCapture1.Virtual_Camera_Output_Enabled = true;
```
This single line of code activates the Virtual Camera output feature, making the video stream available to FFMPEG.

### Step 2: Start Video Streaming
Once the Virtual Camera output is enabled, you need to initiate the video streaming process. This can be done by calling the appropriate method on your VideoCapture instance:
```cs
// Configure your video sources
// ...
// Enable the Virtual Camera output
VideoCapture1.Virtual_Camera_Output_Enabled = true;
// Start the streaming process
VideoCapture1.Start();
```
### Step 3: Configure and Launch FFMPEG
Now that your video is streaming and being sent to the Virtual Camera output, you need to configure FFMPEG to receive and process this stream. FFMPEG is launched as an external process with specific command-line arguments:
```bash
ffmpeg -f dshow -i video="VisioForge Virtual Camera" -c:v libopenh264 output.mp4
```
This command tells FFMPEG to:
- Use DirectShow (`-f dshow`) as the input format
- Capture video from the "VisioForge Virtual Camera" source (`-i video="VisioForge Virtual Camera"`)
- Encode the video using the libopenh264 codec (`-c:v libopenh264`)
- Save the output to a file named "output.mp4"
## Advanced FFMPEG Configuration Options
### Adding Audio to Your Stream
If you want to include audio in your stream, you can use the Virtual Audio Card provided with the SDK:
```bash
ffmpeg -f dshow -i video="VisioForge Virtual Camera" -f dshow -i audio="VisioForge Virtual Audio Card" -c:v libopenh264 -c:a aac -b:a 128k output.mp4
```
This command adds:
- Audio capture from the Virtual Audio Card
- AAC audio encoding with a bitrate of 128 kbps
### Streaming to RTMP Servers
For live streaming to platforms like YouTube, Twitch, or Facebook, you can use RTMP:
```bash
ffmpeg -f dshow -i video="VisioForge Virtual Camera" -f dshow -i audio="VisioForge Virtual Audio Card" -c:v libx264 -preset veryfast -tune zerolatency -c:a aac -b:a 128k -f flv rtmp://your-streaming-server/app/key
```
This configuration:
- Uses the x264 codec for video encoding
- Sets the encoding preset to "veryfast" for reduced CPU usage
- Enables zero-latency tuning for live streaming
- Outputs to the FLV format
- Sends the stream to your RTMP server URL
### HLS Streaming
HTTP Live Streaming (HLS) is another popular option, especially for web and mobile viewers:
```bash
ffmpeg -f dshow -i video="VisioForge Virtual Camera" -c:v libx264 -c:a aac -b:a 128k -f hls -hls_time 4 -hls_playlist_type event stream.m3u8
```
This command:
- Creates HLS segments of 4 seconds each
- Sets the playlist type to "event"
- Generates an m3u8 playlist file and TS segment files
## Performance Optimization
When working with FFMPEG streaming, several factors can affect performance:
### Hardware Acceleration
Enabling hardware acceleration can significantly reduce CPU usage and improve performance:
```bash
ffmpeg -f dshow -i video="VisioForge Virtual Camera" -c:v h264_nvenc -preset llhq -b:v 5M output.mp4
```
This example uses NVIDIA's NVENC encoder for H.264 encoding, which offloads encoding work to the GPU.
### Buffer Size Configuration
Adjusting buffer sizes can help with stability, especially for high-resolution streams:
```bash
ffmpeg -f dshow -video_size 1920x1080 -framerate 30 -i video="VisioForge Virtual Camera" -c:v libx264 -bufsize 5M -maxrate 5M output.mp4
```
### Multi-threading Options
Controlling how FFMPEG utilizes CPU threads can optimize performance:
```bash
ffmpeg -f dshow -i video="VisioForge Virtual Camera" -c:v libx264 -threads 4 output.mp4
```
## Common Use Cases
### Recording Surveillance Video
FFMPEG is excellent for surveillance applications, supporting features like timestamp overlays:
```bash
ffmpeg -f dshow -i video="VisioForge Virtual Camera" -vf "drawtext=text='%{localtime}':fontcolor=white:fontsize=24:box=1:boxcolor=black@0.5:x=10:y=10" -c:v libx264 surveillance.mp4
```
### Creating Time-lapse Videos
You can configure FFMPEG to create time-lapse videos from your streams:
```bash
ffmpeg -f dshow -i video="VisioForge Virtual Camera" -vf "setpts=0.1*PTS" -c:v libx264 timelapse.mp4
```
### Multiple Output Formats Simultaneously
FFMPEG can generate multiple outputs from a single input stream:
```bash
ffmpeg -f dshow -i video="VisioForge Virtual Camera" -c:v libx264 -f mp4 output.mp4 -c:v libvpx -f webm output.webm
```
## Deployment Requirements
To successfully deploy applications using this streaming approach, ensure you include:
- Base SDK redistributables
- SDK-specific redistributables
- Virtual Camera SDK redistributables
For detailed information about deployment requirements, refer to the [Deployment](../deployment.md) page in the documentation.
## Troubleshooting Common Issues
### Stream Not Appearing in FFMPEG
If FFMPEG doesn't recognize the Virtual Camera:
- Ensure the Virtual Camera driver is properly installed
- Verify that the Virtual Camera output is enabled in your code
- Check that the video streaming has successfully started
### Video Quality Issues
If the video quality is poor:
- Increase the bitrate in your FFMPEG command
- Adjust the encoding preset (slower presets generally produce better quality)
- Check your source video resolution and frame rate
### High CPU Usage
To address high CPU utilization:
- Enable hardware acceleration if available
- Use a faster encoding preset
- Reduce the output resolution or frame rate
## Conclusion
Integrating FFMPEG streaming with the Video Capture SDK provides a powerful and flexible solution for video processing and streaming needs. By following the guidelines and examples in this documentation, you can create sophisticated video applications that leverage the strengths of both technologies.
Whether you're building a streaming application, a surveillance system, or a video processing tool, this integration offers the performance and flexibility needed for professional-grade solutions.
---
For more code samples and examples, visit our [GitHub repository](https://github.com/visioforge/.Net-SDK-s-samples).
---END OF PAGE---
# Local File: .\dotnet\videocapture\3rd-party-software\index.md
---
title: Video Capture SDK Third-Party Integration Guide
description: Master video capture integration with DirectShow applications. Learn to connect OBS, FFMPEG, and VLC with our SDK. Step-by-step tutorials for WinForms, WPF, and console apps. Perfect for developers building video processing solutions.
sidebar_label: 3rd-Party Software Usage
order: 4
---
# Integrating Third-Party Software with Video Capture SDK
[!badge size="xl" target="blank" variant="info" text="Video Capture SDK .Net"](https://www.visioforge.com/video-capture-sdk-net)
## Overview
The Video Capture SDK .NET provides robust capabilities for integrating with various third-party software applications. This integration expands the functionality of your applications and allows for greater flexibility in video processing workflows.
## How Integration Works
The SDK uses Virtual Camera SDK as a bridge between our Video Capture SDK and third-party applications. This bridge creates a virtual camera device that can be detected and used by any DirectShow-compatible application in your development environment.
### Video Bridge
The virtual camera technology allows captured video streams to be seamlessly passed to external applications without quality loss or significant performance impact.
### Audio Bridge
In addition to video, an audio bridge is also provided, enabling complete audio-visual integration with external software.
## Compatible Applications
The virtual camera works with numerous DirectShow-compatible applications, including:
- OBS (Open Broadcaster Software)
- FFMPEG
- VLC Media Player
- Zoom, Teams, and other conferencing software
- Custom DirectShow applications
## Detailed Tutorials
Our step-by-step tutorials guide you through the integration process with popular applications:
- [FFMPEG Streaming Integration](ffmpeg-streaming.md) - Learn how to use FFMPEG with the SDK for powerful streaming capabilities
- [OBS Streaming Setup](obs-streaming.md) - Detailed guide for integrating with Open Broadcaster Software
## Development Resources
We provide extensive documentation and examples to help you implement these integrations in your software projects. The integration works across all supported platforms:
- WinForms applications
- WPF (Windows Presentation Foundation) applications
- Console applications
---
For additional implementation examples and code samples, visit our [GitHub repository](https://github.com/visioforge/.Net-SDK-s-samples).
---END OF PAGE---
# Local File: .\dotnet\videocapture\3rd-party-software\obs-streaming.md
---
title: Integrating OBS Streaming in Video Capture SDK .Net
description: Learn how to implement OBS streaming with video and audio sources using Video Capture SDK .Net. Detailed guide with code examples for WinForms, WPF, and console applications to create professional broadcast solutions.
sidebar_label: OBS (Open Broadcaster Software) Streaming
---
# Integrating OBS Streaming in Video Capture SDK .Net
[!badge size="xl" target="blank" variant="info" text="Video Capture SDK .Net"](https://www.visioforge.com/video-capture-sdk-net)
## Introduction to OBS Integration
Open Broadcaster Software (OBS) has become the industry standard for live streaming and video recording. The Video Capture SDK .Net provides robust capabilities to stream video and audio from multiple sources directly into OBS, creating a powerful pipeline for broadcast-quality content creation.
This integration allows developers to build applications that can:
- Capture from multiple camera devices simultaneously
- Process and enhance video streams in real-time
- Mix various content sources before sending to OBS
- Create professional broadcasting solutions with minimal setup
Whether you're developing applications for WinForms, WPF, or console environments, the SDK provides a consistent API for OBS integration.
## How OBS Integration Works
The SDK leverages DirectShow Virtual Camera technology to create a bridge between your application and OBS. This approach offers several advantages:
1. **Zero-latency streaming**: Direct memory transfer minimizes delay
2. **Format flexibility**: Support for various resolutions and frame rates
3. **Minimal configuration**: OBS recognizes the virtual device automatically
4. **Audio synchronization**: Combined audio-video streaming capabilities
The virtual camera appears to OBS as a standard webcam device, making it immediately usable within any OBS scene.
## Implementation Guide
### Required Components
Before implementing OBS streaming, ensure you have the following components installed:
- Video Capture SDK .Net (latest version recommended)
- DirectShow Virtual Camera components
- OBS Studio (version 27.0 or higher recommended)
- .NET Framework 4.6.2 or higher (for full compatibility)
### Basic Implementation
The following code demonstrates how to enable virtual camera output in your application:
```cs
// Initialize the video capture component
var videoCapture = new VideoCaptureCore();
// Configure basic capture settings
// ...
// Enable virtual camera output
videoCapture.Virtual_Camera_Output_Enabled = true;
// Start capture
videoCapture.Start();
```
This minimal implementation will send the camera feed to the virtual device that OBS can use as an input source.
## Configuring OBS for SDK Integration
### Adding the Virtual Camera Source
1. Launch OBS Studio
2. In your scene, click the "+" button under Sources
3. Select "Video Capture Device" from the list
4. Name your source (e.g., "SDK Virtual Camera")
5. In the Properties dialog, select "VisioForge Virtual Camera" from the Device dropdown
6. Configure resolution and FPS to match your SDK settings
7. Click "OK" to add the source

### Audio Configuration
For audio streaming, configure the "VisioForge Virtual Audio Card" in OBS:
1. Add an "Audio Input Capture" source
2. Select "VisioForge Virtual Audio Card" as the device
3. Adjust audio levels and filters as needed
This creates a complete audio-visual pipeline from your application to OBS.
## Performance Considerations
When streaming to OBS, consider these performance tips:
1. **Resolution matching**: Set the same resolution in both SDK and OBS
2. **Frame rate consistency**: Maintain consistent FPS throughout the pipeline
3. **CPU usage**: Monitor processor load, especially when using frame processing
4. **Memory management**: Dispose of unneeded resources promptly
5. **Buffer size**: Adjust buffer sizes based on available system memory
For optimal performance, we recommend using a dedicated GPU for video processing tasks.
## Required Redistributables
Ensure the following components are included in your application deployment:
- Base redistributable package
- SDK redistributable components
- Virtual Camera SDK redistributable files
Review the full [Deployment](../deployment.md) documentation for detailed instructions.
## Troubleshooting Common Issues
If you encounter issues with OBS integration:
1. **Virtual camera not appearing in OBS**: Verify that the virtual camera driver is properly installed
2. **Poor performance**: Check resolution and frame rate settings in both SDK and OBS
3. **Audio sync issues**: Ensure audio and video streams use the same timing mechanism
4. **Video quality problems**: Verify encoding settings and buffer configurations
5. **Application crashes**: Check for proper initialization and shutdown of SDK components
## Conclusion
Integrating OBS streaming capabilities into your .NET applications using the Video Capture SDK provides a powerful foundation for building professional broadcasting solutions. The DirectShow Virtual Camera approach ensures compatibility with OBS while maintaining high performance and quality.
By following the implementation guide and best practices outlined in this document, developers can create sophisticated streaming applications that leverage the combined strengths of the SDK and OBS.
---
Visit our [GitHub](https://github.com/visioforge/.Net-SDK-s-samples) page to get more code samples.
---END OF PAGE---
# Local File: .\dotnet\videocapture\audio-capture\index.md
---
title: Audio Capture for .NET - Complete Developer Guide
description: Master audio capture in .NET applications with our powerful SDK. Learn how to implement microphone, line-in, and streaming audio recording with multiple format support, advanced processing, and real-time monitoring capabilities.
sidebar_label: Audio Capture
order: 10
---
# Audio Capture for .NET Developers
[!badge size="xl" target="blank" variant="info" text="Video Capture SDK .Net"](https://www.visioforge.com/video-capture-sdk-net)
## Introduction to Audio Capture
Our SDK provides robust audio capture capabilities designed specifically for .NET developers. Whether you're building a professional recording application, adding voice chat to your software, or creating a podcasting tool, our audio capture components deliver exceptional performance and flexibility.
The audio capture functionality lets you record from any audio input device on the system, including microphones, line-in ports, and virtual audio devices. All processing is optimized for minimal CPU usage while maintaining pristine audio quality.
## Supported Audio Sources
The SDK supports capturing from multiple audio sources:
- **Physical microphones** - Desktop, USB, and Bluetooth microphones
- **Line-in ports** - For capturing from external mixers or instruments
- **Virtual audio devices** - Capture audio from other applications
- **System audio** - Record what's playing through your speakers
- **Network streams** - Capture audio from RTSP, HTTP, and other streaming sources
## Audio Format Support
Our SDK allows you to capture and encode audio in various industry-standard formats to meet any requirement:
### Lossy Formats
- [MP3](../../general/audio-encoders/mp3.md) - Industry standard compressed audio with adjustable bitrates from 8kbps to 320kbps
- [M4A (AAC)](../../general/audio-encoders/aac.md) - Advanced Audio Coding with excellent quality-to-size ratio
- [Windows Media Audio](../../general/audio-encoders/wma.md) - Microsoft's audio format with good compression and Windows integration
- [Ogg Vorbis](../../general/audio-encoders/vorbis.md) - Free and open-source format with excellent quality at lower bitrates
- [Speex](../../general/audio-encoders/speex.md) - Optimized for speech with good quality at very low bitrates
### Lossless Formats
- [WAV](../../general/audio-encoders/wav.md) - Uncompressed audio with perfect quality and wide compatibility
- [FLAC](../../general/audio-encoders/flac.md) - Free Lossless Audio Codec providing compression without quality loss
## Key Features
### Device Control
- Enumerate all available audio input devices
- Select specific input devices programmatically
- Set input volume levels and mute status
- Monitor audio levels in real-time
- Auto-select default system devices
### Advanced Processing
- Real-time audio visualization with spectrum and waveform analysis
- Noise reduction and echo cancellation
- Gain control and normalization
- Voice activity detection (VAD)
- Stereo/mono channel management
- Sample rate conversion
### Recording Controls
- Start, pause, resume, and stop recording
- Buffer management for low-latency operation
- Timed recordings with automatic stop
- File splitting for large recordings
- Auto file naming with timestamps
- Recording profiles for quick setup
## Best Practices
For optimal audio capture in your applications:
1. **Always check device availability** before starting capture
2. **Monitor audio levels** during recording to detect silence or clipping
3. **Use appropriate formats** based on your quality and file size requirements
4. **Implement error handling** for device disconnection events
5. **Provide visual feedback** to users during recording
6. **Test on various hardware** to ensure compatibility
7. **Apply noise reduction** only when needed as it can affect audio quality
## Audio Capture Integration
The audio capture component integrates seamlessly with other SDK elements:
- Combine with video capture for complete AV recording
- Mix with audio playback for call recording applications
- Use with streaming components for live broadcasting
- Integrate with timeline editor for basic audio editing
- Pair with file conversion for post-processing workflows
## Performance Considerations
The SDK is optimized for efficiency, but here are some tips for best performance:
- Lower sample rates (44.1kHz vs 48kHz) reduce CPU usage
- Mono recording uses less processing power than stereo
- MP3 encoding is more CPU-intensive than WAV recording
- Higher bitrates require more processing power
- Buffer sizes affect latency and stability
---
Visit our [GitHub](https://github.com/visioforge/.Net-SDK-s-samples) page to get more code samples and implementation examples.
---END OF PAGE---
# Local File: .\dotnet\videocapture\audio-rendering\index.md
---
title: .NET Audio Rendering in Video Capture SDK
description: Master audio rendering in .NET applications with detailed tutorials on device selection, volume control, and performance optimization. Learn best practices for implementing high-quality audio output in your video applications.
sidebar_label: Audio Rendering
order: 12
---
# Audio Rendering in .NET Video Applications
[!badge size="xl" target="blank" variant="info" text="Video Capture SDK .Net"](https://www.visioforge.com/video-capture-sdk-net) [!badge variant="dark" size="xl" text="VideoCaptureCoreX"] [!badge variant="dark" size="xl" text="VideoCaptureCore"]
## Introduction to Audio Rendering
Audio rendering is a critical component of any video capture application. It enables your application to output captured or processed audio to various audio devices supported by the operating system. The Video Capture SDK .NET provides robust capabilities for audio rendering, allowing developers to create rich multimedia applications with high-quality audio output.
This guide walks through the essential aspects of implementing audio rendering in your .NET applications using our SDK, covering everything from device enumeration to volume control and optimization techniques.
## Key Features of Audio Rendering
- **Device Selection**: Enumerate and select from all available audio output devices
- **Volume Control**: Precise control over output volume levels
- **Real-time Adjustment**: Modify audio output parameters during runtime
- **Multi-device Support**: Route audio to different output devices simultaneously
- **Format Compatibility**: Support for various audio formats and sample rates
## Implementation Guide
### Enumerating Audio Output Devices
The first step in implementing audio rendering is to identify and list all available audio output devices. This allows users to select their preferred output device for audio playback.
+++ VideoCaptureCoreX
```csharp
var audioSinks = await VideoCapture1.Audio_OutputsAsync();
foreach (var sink in audioSinks)
{
// add to some combobox
cbAudioOutputDevice.Items.Add(sink.DisplayName);
}
```
+++ VideoCaptureCore
```csharp
foreach (var device in VideoCapture1.Audio_OutputDevices())
{
// add to some combobox
cbAudioOutputDevice.Items.Add(device.Name);
}
```
+++
The above code demonstrates how to retrieve all available audio output devices and populate a selection control such as a ComboBox. This gives users the flexibility to choose their preferred audio output device.
### Setting the Audio Output Device
Once the user has selected an audio output device, you need to configure the SDK to use that device for audio playback.
+++ VideoCaptureCoreX
```csharp
var audioOutputDevice = (await VideoCapture1.Audio_OutputDevices()).Where(device => device.DisplayName == cbAudioOutputDevice.Text).First();
VideoCapture1.Audio_OutputDevice = new AudioRendererSettings(audioOutputDevice);
```
+++ VideoCaptureCore
```csharp
VideoCapture1.Audio_PlayAudio = true;
VideoCapture1.Audio_OutputDevice = "Device name";
```
+++
In VideoCaptureCoreX, we first retrieve the selected device object and then create an AudioRendererSettings instance to configure the output. In VideoCaptureCore, the process is simpler, requiring only the device name string and enabling audio playback.
### Controlling Audio Volume
Volume control is an essential feature for any audio application. The SDK provides straightforward methods to adjust the output volume during playback.
+++ VideoCaptureCoreX
```csharp
VideoCapture1.Audio_OutputDevice_Volume = 0.75; // 75%
```
+++ VideoCaptureCore
```csharp
VideoCapture1.Audio_OutputDevice_Volume_Set(75); // 75%
```
+++
Both implementations allow setting the volume as a percentage (0-100%). In VideoCaptureCoreX, the volume is set as a floating-point value between 0 and 1, while VideoCaptureCore uses an integer percentage.
## Troubleshooting Common Issues
### No Audio Output
If you're experiencing issues with audio output:
1. **Verify device availability**: Ensure the selected audio device is connected and functioning
2. **Check volume settings**: Confirm that the volume is set to an audible level
3. **Examine format compatibility**: Some devices might not support certain audio formats
### Audio Latency Problems
High audio latency can affect user experience:
1. **Reduce buffer size**: Smaller buffer sizes can reduce latency but may increase CPU usage
2. **Optimize processing pipeline**: Remove unnecessary audio processing steps
3. **Check hardware capabilities**: Some audio devices inherently have higher latency
### Audio Quality Issues
For optimal audio quality:
1. **Use appropriate sample rates**: Match the sample rate to your source material
2. **Consider bit depth**: Higher bit depths provide better quality but consume more resources
3. **Monitor CPU usage**: Audio dropouts can occur when the system is overloaded
## Conclusion
Audio rendering is a vital component of multimedia applications. The Video Capture SDK .NET provides powerful tools for implementing high-quality audio playback in your applications. By following the guidelines and examples in this document, you can create sophisticated audio rendering solutions that enhance your users' experience.
The SDK's flexible architecture accommodates both simple audio playback scenarios and complex multi-device setups, making it suitable for a wide range of applications from basic video players to professional multimedia production tools.
---
Visit our [GitHub](https://github.com/visioforge/.Net-SDK-s-samples) page to get more code samples.
---END OF PAGE---
# Local File: .\dotnet\videocapture\audio-sources\index.md
---
title: Implementing Audio Capture in .NET Applications
description: Learn how to integrate multiple audio sources in your .NET applications including capture devices, system audio loopback, IP cameras, and Decklink devices with complete code examples and implementation steps.
sidebar_label: Audio Sources
order: 15
---
# Working with Audio Sources in .NET
[!badge size="xl" target="blank" variant="info" text="Video Capture SDK .Net"](https://www.visioforge.com/video-capture-sdk-net) [!badge variant="dark" size="xl" text="VideoCaptureCoreX"] [!badge variant="dark" size="xl" text="VideoCaptureCore"]
## Available Audio Sources
When building media applications, you'll need to capture audio from various sources. This guide covers how to implement audio capture from multiple input types using our SDK:
* Audio capture devices (microphones, line-in)
* System audio (speakers/headphones via loopback)
* Network streams (IP cameras)
* Professional Decklink devices
Each source type requires different initialization methods and has unique capabilities. Let's explore how to work with each one.
## Implementing Audio Capture Devices
Audio capture devices include microphones, webcams with built-in mics, and other input hardware connected to your system. Working with these devices involves three key steps:
1. Enumerating available devices
2. Selecting appropriate audio formats
3. Configuring the selected device as your audio source
### Enumerating Available Audio Devices
First, you need to detect all audio input devices connected to the system:
+++ VideoCaptureCoreX
```csharp
var audioSources = await core.Audio_SourcesAsync();
foreach (var source in audioSources)
{
// add to some combobox
cbAudioInputDevice.Items.Add(source.DisplayName);
}
```
+++ VideoCaptureCore
```csharp
foreach (var device in core.Audio_CaptureDevices())
{
// add to some combobox
cbAudioInputDevice.Items.Add(device.Name);
}
```
+++
This code retrieves all audio input devices and can display them in a dropdown for user selection. The async approach in VideoCaptureCoreX provides better performance for systems with many connected devices.
### Discovering Supported Audio Formats
Once you've identified available devices, you'll need to determine which audio formats each device supports:
+++ VideoCaptureCoreX
```csharp
// find the device by name
var deviceItem = (await VideoCapture1.Audio_SourcesAsync()).FirstOrDefault(device => device.DisplayName == "Some device name");
if (deviceItem == null)
{
return;
}
// enumerate formats
foreach (var format in deviceItem.Formats)
{
cbAudioInputFormat.Items.Add(format.Name);
}
```
+++ VideoCaptureCore
```csharp
// find the device by name
var deviceItem = VideoCapture1.Audio_CaptureDevices().FirstOrDefault(device => device.Name == "Some device name");
// enumerate formats
foreach (var format in deviceItem.Formats)
{
cbAudioInputFormat.Items.Add(format);
}
```
+++
Different audio devices support various formats with different bit depths, sample rates, and channel configurations. Enumerating these options allows you to select the most appropriate format for your application's needs.
### Setting Up the Audio Capture Device
After selecting a device and format, configure it as your audio source:
+++ VideoCaptureCoreX
```csharp
// find the device by name
var deviceItem = (await VideoCapture1.Audio_CaptureDevices()).FirstOrDefault(device => device.DisplayName == "Device name");
if (deviceItem == null)
{
return;
}
// set the first format
AudioCaptureDeviceFormat format = formats[0].ToFormat();
// create audio source settings
IVideoCaptureBaseAudioSourceSettings audioSource = deviceItem.CreateSourceSettingsVC(format);
// set audio source
VideoCapture1.Audio_Source = audioSource;
```
+++ VideoCaptureCore
```csharp
// find the device by name
var deviceItem = VideoCapture1.Audio_CaptureDevices().FirstOrDefault(device => device.Name == "Some device name");
VideoCapture1.Audio_CaptureDevice = new AudioCaptureSource(deviceItem.Name);
VideoCapture1.Audio_CaptureDevice.Format = deviceItem.Formats[0].ToString(); // set the first format
```
+++
This code configures your application to capture audio from the selected device using the specified format. The VideoCaptureCoreX API provides more granular control over format selection and device configuration.
## Capturing System Audio via Loopback
Audio loopback allows you to record any sound playing through your system's speakers or headphones. This is particularly useful for:
* Screen recording with audio
* Capturing application sounds
* Recording audio from web conferences or streaming services
Here's how to implement it:
+++ VideoCaptureCoreX
First, enumerate available loopback devices:
```csharp
// Enumerate audio loopback devices
var audioSinks = await DeviceEnumerator.Shared.AudioOutputsAsync();
foreach (var sink in audioSinks)
{
// Filter by WASAPI2 API
if (sink.API == AudioOutputDeviceAPI.WASAPI2)
{
// Add to some combobox
cbAudioLoopbackDevice.Items.Add(sink.Name);
}
}
```
Next, create source settings for your selected output device:
```csharp
// audio input
var deviceItem = (await DeviceEnumerator.Shared.AudioOutputsAsync(AudioOutputDeviceAPI.WASAPI2)).FirstOrDefault(device => device.Name == "Output device name");
if (deviceItem == null)
{
return;
}
IVideoCaptureBaseAudioSourceSettings audioSource = new LoopbackAudioCaptureDeviceSourceSettings(deviceItem);
VideoCapture1.Audio_Source = audioSource;
```
The WASAPI2 API provides the most reliable loopback functionality on Windows systems, with lower latency and better performance compared to other options.
+++ VideoCaptureCore
In VideoCaptureCore, loopback functionality is simplified with a dedicated virtual device:
```cs
VideoCapture1.Audio_CaptureDevice = new AudioCaptureSource("VisioForge What You Hear Source");
VideoCapture1.Audio_CaptureDevice.Format_UseBest = true;
```
This approach automatically selects the best available format for the loopback source, making implementation straightforward.
+++
## Working with Network Audio Sources
For IP cameras and other network streams, audio capture is typically handled as part of the overall stream connection. The exact implementation depends on the network protocol being used (RTSP, HLS, etc.) and the specific device capabilities.
When connecting to network sources, you'll generally:
1. Establish a connection to the IP address and port
2. Authenticate if required
3. Configure audio parameters as supported by the device
Audio from network sources may come in various formats including AAC, MP3, or raw PCM data depending on the device. Our SDK handles the necessary format conversion and synchronization with video streams automatically.
## Implementing Decklink Audio Capture
Decklink devices provide professional-grade audio capture capabilities with features like:
* High sample rates (up to 192kHz)
* Multiple channel configurations
* Synchronized audio/video capture
* Embedded audio in SDI signals
When working with Decklink hardware, audio settings are typically configured as part of the overall device setup. The SDK provides specialized classes and methods for working with these professional devices.
## Best Practices for Audio Capture
To ensure high-quality audio capture in your applications:
1. **Sample rate selection**: Choose appropriate sample rates based on your target output. For most applications, 44.1kHz or 48kHz is sufficient.
2. **Buffer management**: Configure appropriate buffer sizes to balance between latency and stability. Smaller buffers reduce latency but may cause audio dropouts.
3. **Format handling**: Support multiple formats to accommodate various devices. Always have fallback options when specific formats aren't available.
4. **Level monitoring**: Implement audio level monitoring to detect silence or clipping, allowing your application to respond appropriately.
5. **Error handling**: Implement robust error handling for device disconnections or format negotiation failures.
## Conclusion
Implementing audio capture capabilities in your .NET application involves selecting the appropriate source, configuring formats, and managing the audio stream. Whether you're capturing from microphones, system audio, or network sources, our SDK provides the tools needed to build sophisticated audio applications.
By following the code examples and implementation patterns outlined in this guide, you'll be able to integrate powerful audio capture functionality into your projects efficiently.
---
Visit our [GitHub](https://github.com/visioforge/.Net-SDK-s-samples) page to get more code samples.
---END OF PAGE---
# Local File: .\dotnet\videocapture\computer-vision\face-detection.md
---
title: Face Detection in .NET Video Applications
description: Learn how to implement powerful face detection capabilities in your .NET applications with complete code examples, configuration options, and optimization techniques for webcams, IP cameras, and video streams.
sidebar_label: How to Configure Face Detection?
---
# Implementing Face Detection in .NET Video Applications
[!badge size="xl" target="blank" variant="info" text="Video Capture SDK .Net"](https://www.visioforge.com/video-capture-sdk-net)
## Introduction to Face Detection Technology
Face detection is a computer vision technology that identifies and locates human faces within digital images or video frames. Unlike facial recognition (which identifies specific individuals), face detection simply answers the question: "Is there a face in this image, and if so, where is it located?"
This technology serves as the foundation for numerous applications:
- Security and surveillance systems
- Photography applications (auto-focus, red-eye reduction)
- Social media (tagging suggestions, filters)
- Emotion analysis and user experience research
- Attendance tracking systems
- Video conferencing enhancements
For developers building .NET applications, implementing face detection can add significant value to video capture and processing applications. This guide provides a complete walkthrough of implementing face detection in your .NET projects.
## Getting Started with Face Detection in .NET
### Prerequisites
Before implementing face detection in your application, ensure you have:
- Visual Studio (2019 or newer recommended)
- .NET Framework 4.6.2+ or .NET Core 3.1+/.NET 5+
- Basic understanding of C# and event-driven programming
- NuGet package manager
- Required redistributables (detailed later in this document)
### Implementation Overview
The implementation process follows these key steps:
1. Configure your video source
2. Set up face tracking parameters
3. Create and register event handlers for face detection
4. Process detection results
5. Start the video stream
Let's break down each of these steps with detailed code examples.
## Step 1: Configure Your Video Source
The first step is to choose and configure your video input source. This could be:
- A webcam connected to the computer
- An IP camera on the network
- A video file for processing
- A video stream from another source
## Step 2: Configure Face Tracking Settings
With your video source configured, the next step is to set up the face detection parameters. These settings determine how the SDK identifies and tracks faces:
```cs
VideoCapture1.Face_Tracking = new FaceTrackingSettings
{
// Color mode determines how colors are processed for detection
ColorMode = CamshiftMode.RGB,
// Highlight detected faces in the preview
Highlight = true,
// Minimum size (in pixels) of face to detect
MinimumWindowSize = 25,
// Scanning approach - how the algorithm scales through the image
ScalingMode = ObjectDetectorScalingMode.GreaterToSmaller,
// Single or multiple face detection
SearchMode = ObjectDetectorSearchMode.Single,
// Optional: set custom highlight color
HighlightColor = Color.YellowGreen,
// Optional: detection confidence threshold (0-100)
DetectionThreshold = 85
};
```
### Understanding the Face Tracking Parameters
- **ColorMode**: Determines how the algorithm processes colors for detection
- RGB: Standard RGB color processing
- HSV: Hue-Saturation-Value color space, can be more robust in varying lighting
- **ScalingMode**: Controls how the algorithm searches through different scales
- GreaterToSmaller: Starts with larger potential faces and works down
- SmallerToGreater: Starts with smaller potential faces and works up
- **SearchMode**: Determines whether to look for single or multiple faces
- Single: Optimized for finding one face (faster)
- Multiple: Designed to find all faces in frame (more processing intensive)
- **MinimumWindowSize**: The smallest face size (in pixels) that will be detected
- Smaller values catch distant faces but increase false positives
- Larger values are more reliable but may miss smaller/distant faces
## Step 3: Set Up Face Detection Event Handling
To respond to detected faces, you need to create an event handler and register it with the SDK:
```cs
// Define delegate for the face detection event
public delegate void FaceDelegate(AFFaceDetectionEventArgs e);
// Create method to handle face detection events
public void FaceDelegateMethod(AFFaceDetectionEventArgs e)
{
// Clear previous text
edFaceTrackingFaces.Text = string.Empty;
// Process each detected face
foreach (var faceRectangle in e.FaceRectangles)
{
// Display face coordinates and dimensions
edFaceTrackingFaces.Text +=
$"Position: ({faceRectangle.Left}, {faceRectangle.Top}), " +
$"Size: ({faceRectangle.Width}, {faceRectangle.Height}){Environment.NewLine}";
// You can also calculate center point
int centerX = faceRectangle.Left + (faceRectangle.Width / 2);
int centerY = faceRectangle.Top + (faceRectangle.Height / 2);
edFaceTrackingFaces.Text += $"Center: ({centerX}, {centerY}){Environment.NewLine}";
// Optional: Add timestamp for tracking
edFaceTrackingFaces.Text += $"Time: {DateTime.Now.ToString("HH:mm:ss.fff")}{Environment.NewLine}{Environment.NewLine}";
}
// Update face count
lblFaceCount.Text = $"Faces detected: {e.FaceRectangles.Count}";
}
// Register the event handler
VideoCapture1.OnFaceDetected += new AFFaceDetectionEventHandler(FaceDelegateMethod);
```
This event handler provides real-time updates whenever faces are detected. The handler receives face coordinates that you can use for:
- Displaying visual indicators
- Tracking face movement over time
- Triggering actions based on face position
- Logging detection data
## Step 4: Processing Detection Results
With the event handler in place, you can process the detection results. Some common processing tasks include:
### Visualizing Detected Faces
Beyond the built-in highlighting, you might want to implement custom visualizations:
```cs
// Custom visualization - draw face rectangles on an overlay
private void DrawFacesOnOverlay(List faceRectangles, PictureBox overlay)
{
// Create bitmap for overlay
Bitmap overlayBitmap = new Bitmap(overlay.Width, overlay.Height);
using (Graphics g = Graphics.FromImage(overlayBitmap))
{
g.Clear(Color.Transparent);
// Draw each face
foreach (var face in faceRectangles)
{
// Draw rectangle
g.DrawRectangle(new Pen(Color.GreenYellow, 2), face);
// Optional: Draw crosshair at center
int centerX = face.Left + (face.Width / 2);
int centerY = face.Top + (face.Height / 2);
g.DrawLine(new Pen(Color.Red, 1), centerX - 10, centerY, centerX + 10, centerY);
g.DrawLine(new Pen(Color.Red, 1), centerX, centerY - 10, centerX, centerY + 10);
}
}
// Update overlay
overlay.Image = overlayBitmap;
}
```
### Implementing Face Tracking Logic
For more advanced applications, you might want to track faces over time:
```cs
private Dictionary trackedFaces = new Dictionary();
private int nextFaceId = 1;
private void TrackFaces(List currentFaces)
{
// Match current faces with previously tracked faces
List matchedIds = new List();
List unmatchedFaces = new List(currentFaces);
foreach (var trackedFace in trackedFaces.Values.ToList())
{
bool foundMatch = false;
for (int i = unmatchedFaces.Count - 1; i >= 0; i--)
{
if (IsLikelyMatch(trackedFace.LastLocation, unmatchedFaces[i]))
{
// Update existing tracked face
trackedFace.UpdateLocation(unmatchedFaces[i]);
matchedIds.Add(trackedFace.Id);
unmatchedFaces.RemoveAt(i);
foundMatch = true;
break;
}
}
// Remove faces that disappeared
if (!foundMatch)
{
trackedFaces.Remove(trackedFace.Id);
}
}
// Add new faces
foreach (var newFace in unmatchedFaces)
{
trackedFaces.Add(nextFaceId, new TrackedFace(nextFaceId, newFace));
nextFaceId++;
}
}
private bool IsLikelyMatch(Rectangle previous, Rectangle current)
{
// Calculate center points
Point prevCenter = new Point(
previous.Left + previous.Width / 2,
previous.Top + previous.Height / 2);
Point currCenter = new Point(
current.Left + current.Width / 2,
current.Top + current.Height / 2);
// Calculate distance between centers
double distance = Math.Sqrt(
Math.Pow(prevCenter.X - currCenter.X, 2) +
Math.Pow(prevCenter.Y - currCenter.Y, 2));
// If centers are close enough, consider it the same face
return distance < Math.Max(previous.Width, current.Width) * 0.5;
}
// Simple class to track face data
private class TrackedFace
{
public int Id { get; private set; }
public Rectangle LastLocation { get; private set; }
public DateTime FirstSeen { get; private set; }
public DateTime LastSeen { get; private set; }
public TrackedFace(int id, Rectangle location)
{
Id = id;
LastLocation = location;
FirstSeen = DateTime.Now;
LastSeen = DateTime.Now;
}
public void UpdateLocation(Rectangle newLocation)
{
LastLocation = newLocation;
LastSeen = DateTime.Now;
}
}
```
## Step 5: Start Video Stream and Face Detection
The final step is to start the video stream and face detection process:
```cs
// Start video capture asynchronously
await VideoCapture1.StartAsync();
```
If you need to stop the process:
```cs
// Stop video capture
await VideoCapture1.StopAsync();
```
## Required Dependencies
To ensure your application works correctly, you'll need to include the appropriate redistributable packages:
- Video capture redistributables:
- [x86 version](https://www.nuget.org/packages/VisioForge.DotNet.Core.Redist.VideoCapture.x86/)
- [x64 version](https://www.nuget.org/packages/VisioForge.DotNet.Core.Redist.VideoCapture.x64/)
Install these packages via NuGet:
```cmd
Install-Package VisioForge.DotNet.Core.Redist.VideoCapture.x64
```
Or for x86 projects:
```cmd
Install-Package VisioForge.DotNet.Core.Redist.VideoCapture.x86
```
## Conclusion
Implementing face detection in your .NET applications enhances their capabilities and opens up numerous possibilities for user interaction, security features, and automation. By following this guide, you now have the knowledge to integrate robust face detection into your video capture applications.
For additional resources and more code samples, visit our [GitHub repository](https://github.com/visioforge/.Net-SDK-s-samples).
---END OF PAGE---
# Local File: .\dotnet\videocapture\computer-vision\index.md
---
title: Advanced Computer Vision for .NET Video Processing
description: Implement powerful computer vision capabilities in your .NET applications with our SDK. Learn how to detect faces, recognize objects, count vehicles, and track pedestrians with detailed C# code examples and integration guidance.
sidebar_label: Computer Vision
order: 3
---
# Computer Vision Integration for .NET Applications
[!badge size="xl" target="blank" variant="info" text="Video Capture SDK .Net"](https://www.visioforge.com/video-capture-sdk-net)
## Overview
Our SDK provides powerful built-in computer vision capabilities that enable developers to enhance their applications with intelligent video analysis features. These functionalities allow your software to automatically detect and track various elements in video streams including human faces, general objects, vehicles, and pedestrians in real-time.
## Key Computer Vision Modules
The SDK offers multiple specialized detection modules to address various use cases:
* **PedestrianDetector** - Track and count people moving through video frames
* **ObjectDetector** - Identify and classify common objects within video content
* **FaceDetector** - Locate and analyze human faces, supporting security and UX applications
* **CarCounter** - Monitor and quantify vehicle traffic in transportation scenarios
Each module is optimized for performance and accuracy, allowing for reliable real-time processing even on standard hardware configurations.
## Implementation Resources
Developers can access complete working examples in our [GitHub repository](https://github.com/visioforge/.Net-SDK-s-samples/tree/master/Video%20Capture%20SDK/WinForms/CSharp/Computer%20Vision). These samples demonstrate practical implementation patterns and best practices for integrating computer vision capabilities into .NET applications.
## Advanced Features
* [Face detection](face-detection.md) - Learn about facial recognition, landmark detection, and emotion analysis
* Machine learning integration
* Custom detection model support
* Multi-threading optimization techniques
---
For additional code samples and implementation guidance, visit our [GitHub repository](https://github.com/visioforge/.Net-SDK-s-samples).
---END OF PAGE---
# Local File: .\dotnet\videocapture\guides\index.md
---
title: Video Capture SDK .Net - Advanced Guides & Tutorials
description: Master advanced Video Capture SDK .Net techniques with our in-depth guides. Learn synchronization, DirectShow capture, webcam photo features, explore code samples, and access support.
sidebar_label: Additional Guides
order: 1
---
# Advanced Video Capture SDK .Net Guides & Tutorials
[!badge size="xl" target="blank" variant="info" text="Video Capture SDK .Net"](https://www.visioforge.com/video-capture-sdk-net)
## Overview
Explore advanced implementation techniques, specialized usage guides, and tutorials for the Video Capture SDK .Net. These resources address specific development scenarios that require custom approaches, including synchronizing multiple capture objects, webcam integration, DirectShow capture techniques, and more.
## Available Guides
This curated collection of guides addresses specific advanced functionalities within the Video Capture SDK .Net. Each guide provides practical instructions and insights to help you implement complex features effectively.
### Synchronization Techniques
* [**Synchronizing Multiple Capture Objects**](start-in-sync.md) - In many professional video applications, such as multi-camera event coverage, advanced surveillance systems, or immersive 360-degree video recording, the ability to precisely synchronize multiple video capture instances is paramount. This guide delves into the methodologies for initializing and coordinating several `VideoCaptureCore` objects, ensuring that they start, stop, and record in unison. It addresses potential challenges like timestamp alignment and resource management, offering solutions to achieve seamless and synchronized multi-source capture. Implementing robust synchronization is key to producing professional-grade video content where timing and coherence across different angles or sources are critical.
### Camera Integration & Capture Techniques
Explore specialized guides on integrating various camera functionalities and mastering different capture technologies.
* [**Web Camera Photo Capture Implementation**](make-photo-using-webcam.md) - Beyond continuous video recording, the ability to capture high-quality still images using webcams is a frequent requirement in diverse applications. This step-by-step guide details how to implement robust photo capture functionality. It covers device selection, resolution configuration, image format choices (like JPEG, PNG, BMP), and saving the captured frames. Common use cases include integrating profile picture capture in user registration forms, developing simple document scanning utilities, or adding snapshot capabilities to security and monitoring applications. The guide simplifies the process, enabling developers to quickly add valuable still image capture features.
* [**Webcam Capture (DirectShow)**](webcam-capture-directshow.md) - For Windows developers seeking granular control and access to a wide array of media processing capabilities, Microsoft DirectShow remains a cornerstone technology. This comprehensive guide explains how to build C# webcam capture applications by leveraging the DirectShow backend within the Video Capture SDK .Net. It covers essential topics such as device enumeration, selecting specific video and audio sources, configuring formats and properties, and managing the capture pipeline. DirectShow is particularly powerful for scenarios requiring custom filter graphs, integration with third-party DirectShow filters, or when dealing with legacy hardware. Understanding its intricacies can unlock advanced video processing and control, and this guide provides a solid foundation for C# developers.
## Additional Resources
Beyond the specific guides listed above, we offer a wealth of supplementary materials to support your development journey with the Video Capture SDK .Net.
### Code Samples
Our extensive [GitHub repository](https://github.com/visioforge/.Net-SDK-s-samples) is a treasure trove of practical implementation examples. These samples are not just snippets but often complete mini-applications demonstrating various SDK capabilities across different .NET frameworks like WPF, WinForms, and console applications.
### Technical Support
If you encounter challenges during implementation, our technical documentation provides detailed solutions for common development questions.
---END OF PAGE---
# Local File: .\dotnet\videocapture\guides\make-photo-using-webcam.md
---
title: Capturing Photos Using Webcam in .NET Applications
description: Learn how to implement webcam photo capture in .NET applications with step-by-step tutorials, code samples, and best practices. Master still frame capture, frame processing, and image saving techniques for professional webcam integration.
sidebar_label: Webcam Photo Capture in .NET
---
# Capturing Photos Using Webcam in .NET Applications
## Introduction to Webcam Integration
Modern applications increasingly require webcam integration for various purposes, from user profile photos to document scanning. Implementing effective webcam photo capture functionality requires understanding the underlying mechanisms of how webcams work with the .NET framework.
Webcams can capture images through two primary methods: software-triggered captures (where the application initiates the process) and hardware-triggered captures, where a physical button on the webcam device triggers the image capture. The latter method is known as "still frame capture" and provides a more intuitive user experience in many applications.
## Understanding Still Frame Capture
Still frame capture is a specialized function available on many webcam models that allows users to capture high-quality images by pressing a dedicated button on the device. This approach offers several advantages:
- More intuitive user experience
- Reduced application complexity
- Lower chance of camera shake
- Often better image quality than video frame extraction
Not all webcams support still frame capture, so it's important to check your device specifications or test this functionality before relying on it in your application.
## Implementing Webcam Photo Capture in .NET
The Video Capture SDK for .NET provides a robust framework for implementing webcam photo capture in your applications. Below, we'll cover the essential steps to integrate this functionality.
### Setting Up Your Project
Before diving into the implementation details, ensure your development environment is properly configured:
1. Create a new .NET application project
2. Add the Video Capture SDK reference to your project
3. Import the necessary namespaces:
```csharp
using VisioForge.Core.VideoCapture;
using System.Drawing;
```
### Enabling Still Frame Capture
The first step in implementing still frame capture is to properly configure your application to detect and respond to the webcam's hardware button presses. Here's how:
```csharp
// Initialize the video capture component
var videoCapture = new VideoCaptureCore();
// Enable still frame capture before starting the video stream
videoCapture.Video_Still_Frames_Grabber_Enabled = true;
// Set the video capture device and other settings
// ...
// Start the video capture
videoCapture.Start();
```
Setting the `Video_Still_Frames_Grabber_Enabled` property to `true` is crucial. This configuration tells the SDK to monitor for hardware button presses and trigger the appropriate events when a still frame is captured.
### Handling Captured Frames
Once still frame capture is enabled, you need to handle the events that are triggered when a frame is captured. The SDK provides two main events for this purpose:
```csharp
// For handling frames as Bitmap objects
videoCapture.OnStillVideoFrameBitmap += VideoCapture_OnStillVideoFrameBitmap;
// For handling frames as raw buffer data
videoCapture.OnStillVideoFrameBuffer += VideoCapture_OnStillVideoFrameBuffer;
```
Here's an example of how to implement the event handler for bitmap frames:
```csharp
private void VideoCapture_OnStillVideoFrameBitmap(object sender, BitmapEventArgs e)
{
// Process the captured bitmap
Bitmap capturedImage = e.Bitmap;
// Perform any required image processing
// ...
// Display the image in a PictureBox control
pictureBox1.Image = capturedImage;
}
```
### Saving Captured Images
After capturing and potentially processing the image, you'll often want to save it to disk. The SDK provides a convenient method for this purpose:
```csharp
// Save the current frame to a file
videoCapture.Frame_Save("capturedImage.jpg", ImageFormat.Jpeg);
```
You can specify different image formats based on your application's requirements, such as PNG for lossless quality or JPEG for smaller file sizes.
### Getting the Current Frame
In some scenarios, you might want to programmatically capture an image without relying on the hardware button. You can do this using the `Frame_GetCurrent` method:
```csharp
// Get the current frame as a Bitmap
Bitmap currentFrame = videoCapture.Frame_GetCurrent();
// Process or save the frame
if (currentFrame != null)
{
// Use the image
pictureBox1.Image = currentFrame;
// Save if needed
currentFrame.Save("manualCapture.png", ImageFormat.Png);
}
```
## Performance Considerations
Webcam applications can be resource-intensive, especially when processing high-resolution images. Consider these optimization techniques:
1. Use background processing for image saving operations
2. Implement frame rate limiting if continuous monitoring is necessary
3. Scale down resolution for preview while maintaining high resolution for captures
4. Release resources properly when the application closes:
```csharp
protected override void OnFormClosing(FormClosingEventArgs e)
{
// Stop capture and release resources
videoCapture.Stop();
videoCapture.Dispose();
base.OnFormClosing(e);
}
```
## Troubleshooting Common Issues
- **Camera Not Detected**: Ensure the webcam is properly connected and drivers are installed
- **Still Frame Capture Not Working**: Verify that your webcam model supports hardware button capture
- **Poor Image Quality**: Check resolution settings and ensure proper lighting conditions
- **Application Crashes**: Implement proper error handling and resource management
## Conclusion
Implementing webcam photo capture in .NET applications provides valuable functionality for many scenarios. By following the guidelines in this article, you can create robust, user-friendly applications that effectively leverage webcam capabilities.
Remember to test your implementation across different webcam models and configurations to ensure consistent performance and reliability.
---
For more code samples and implementation examples, visit our [GitHub](https://github.com/visioforge/.Net-SDK-s-samples) repository.
---END OF PAGE---
# Local File: .\dotnet\videocapture\guides\start-in-sync.md
---
title: Synchronize Multiple Video Captures in .NET Applications
description: Learn how to perfectly synchronize multiple video capture streams in .NET with practical code examples, troubleshooting tips, and best practices for professional video recording applications.
sidebar_label: Synchronize Multiple Video Captures
---
# Synchronizing Multiple Video Capture Sources in .NET Applications
[!badge size="xl" target="blank" variant="info" text="Video Capture SDK .Net"](https://www.visioforge.com/video-capture-sdk-net)
## Introduction to Multi-Source Video Capture
When developing applications that require recording from multiple video sources simultaneously, synchronization becomes a critical challenge. Whether you're building surveillance systems, multi-camera recording solutions, or specialized video production tools, ensuring all video streams start and end recording at precisely the same moment can make the difference between professional-grade and amateur results.
This guide explains how to properly synchronize multiple video capture objects in .NET applications, eliminating timing discrepancies between different cameras or input sources.
## Understanding the Challenge of Video Synchronization
Without proper synchronization, multiple video recordings started sequentially will have timing offsets. Even millisecond differences can cause problems in applications where precise timing alignment is required, such as:
- Multi-angle sports analysis
- Security camera systems
- Motion capture setups
- Scientific measurements and observations
- Professional video production
These timing discrepancies occur because each time you initialize a capture device and start recording, there's processing overhead that varies between devices.
## The Solution: Delayed Start Mechanism
The Video Capture SDK provides an elegant solution through its delayed start mechanism. This approach allows you to:
1. Initialize all capture objects and prepare them for recording
2. Put them in a "ready" state where they're waiting for a final signal
3. Trigger all recordings to start with minimal delay between sources
This approach dramatically reduces the synchronization gap between recordings compared to sequential start operations.
## Implementation Using VideoCaptureCore
In this implementation, we'll use the `VideoCaptureCore` engine to demonstrate the synchronization technique.
### Step 1: Set Up Your Video Capture Objects
First, create and configure your video capture objects for each source:
```csharp
// Create video capture objects
var capture1 = new VideoCaptureCore();
var capture2 = new VideoCaptureCore();
// Configure output files
capture1.Output_Filename = "camera1_recording.mp4";
capture2.Output_Filename = "camera2_recording.mp4";
// Configure video sources
// ...
// Configure other settings as needed
```
### Step 2: Enable Delayed Start
The critical step is to enable the delayed start feature on all capture objects before calling their respective `Start` or `StartAsync` methods:
```csharp
// Enable delayed start for all capture objects
capture1.Start_DelayEnabled = true;
capture2.Start_DelayEnabled = true;
```
### Step 3: Initialize the Capture Objects
Next, call the `Start` or `StartAsync` method on each object. This initializes the sources, codecs, and output files but doesn't begin the actual recording process:
```csharp
// Initialize all capture objects (but don't start recording yet)
await capture1.StartAsync();
await capture2.StartAsync();
// Or for synchronous operation:
// capture1.Start();
// capture2.Start();
```
At this point, all your capture objects are initialized and waiting for the final trigger.
### Step 4: Trigger Synchronized Recording
Finally, call the `StartDelayed` or `StartDelayedAsync` method on each object to begin recording with minimal delay between them:
```csharp
// Begin synchronized recording
await capture1.StartDelayedAsync();
await capture2.StartDelayedAsync();
// Or for synchronous operation:
// capture1.StartDelayed();
// capture2.StartDelayed();
```
This triggers the actual recording to start on all prepared devices with the smallest possible delay between them.
## Complete Synchronization Example
Here's a complete example demonstrating synchronized recording from two video sources:
```csharp
using System;
using System.Threading.Tasks;
using VisioForge.Core.VideoCapture;
namespace MultiCameraRecordingApp
{
class Program
{
static async Task Main(string[] args)
{
// Create video capture objects
var camera1 = new VideoCaptureCore();
var camera2 = new VideoCaptureCore();
try
{
// Configure camera 1
// ...
camera1.Output_Filename = "camera1_recording.mp4";
// Configure camera 2
// ...
camera2.Output_Filename = "camera2_recording.mp4";
// Enable delayed start for synchronization
camera1.Start_DelayEnabled = true;
camera2.Start_DelayEnabled = true;
Console.WriteLine("Initializing cameras...");
// Initialize both cameras (but don't start recording yet)
await camera1.StartAsync();
await camera2.StartAsync();
Console.WriteLine("Cameras initialized and ready.");
Console.WriteLine("Starting synchronized recording...");
// Begin synchronized recording
await camera1.StartDelayedAsync();
await camera2.StartDelayedAsync();
Console.WriteLine("Recording in progress. Press Enter to stop.");
Console.ReadLine();
// Stop recording
await camera1.StopAsync();
await camera2.StopAsync();
Console.WriteLine("Recording completed successfully.");
}
catch (Exception ex)
{
Console.WriteLine($"Error: {ex.Message}");
}
finally
{
// Clean up resources
camera1.Dispose();
camera2.Dispose();
}
}
}
}
```
## Advanced Synchronization Techniques
### Hardware Synchronization
For applications requiring frame-perfect synchronization, consider these additional approaches:
- External hardware triggers: Some professional cameras support external trigger inputs
- Genlock: Professional broadcast equipment often uses genlock for frame-level synchronization
- Timecode synchronization: Embedding matching timecodes across video files
### Multiple File Format Considerations
When recording to different file formats simultaneously, be aware that certain formats have different initialization times. To minimize this effect:
- Use identical encoding settings when possible
- Prefer container formats with similar overhead
- When mixing container formats, initialize the more complex format first
## Troubleshooting Synchronization Issues
If you encounter synchronization problems, consider these common issues:
1. **Variable Initialization Times**: Different camera models may have different startup times. Call `StartDelayedAsync` in order from slowest to fastest device.
2. **Resource Contention**: Multiple high-resolution captures may compete for system resources. Consider reducing resolution or frame rate for better sync.
3. **USB Bandwidth Limitations**: When using multiple USB cameras, bandwidth constraints may cause delays. Use separate USB controllers when possible.
4. **CPU Overload**: High-resolution encoding across multiple streams can overwhelm the CPU. Monitor CPU usage and consider using hardware encoding.
## Performance Optimization
To maximize synchronization precision:
- Prioritize your recording thread using system thread priority settings
- Close unnecessary applications to free system resources
- Use SSDs for recording outputs to minimize I/O bottlenecks
- Consider dedicated graphics cards with hardware encoding support
## Conclusion
Properly synchronizing multiple video capture sources is essential for creating professional multi-camera applications. By using the delayed start mechanism provided by the Video Capture SDK, developers can achieve highly synchronized recordings with minimal effort.
This approach separates the initialization phase from the recording phase, allowing all devices to be prepared before any begin recording, resulting in significantly improved synchronization between sources.
---
Visit our [GitHub](https://github.com/visioforge/.Net-SDK-s-samples) page to get more code samples.
---END OF PAGE---
# Local File: .\dotnet\videocapture\guides\webcam-capture-directshow.md
---
title: C# Webcam Capture - DirectShow .NET SDK Guide
description: Learn to build C# webcam capture apps with the Video Capture SDK .NET using DirectShow. This guide covers device enumeration, configuration, recording, and effects.
sidebar_label: Webcam Capture (DirectShow)
---
# C# Webcam Capture Using DirectShow .NET SDK
## Introduction
This guide demonstrates how to create a webcam capture application in C# using the Video Capture SDK .Net with Microsoft DirectShow technology. DirectShow is a powerful Windows media framework that enables applications to control and process audio and video data from various sources, including webcams and USB cameras.
The full source code of the sample application is available in the [GitHub repository](https://github.com/visioforge/.Net-SDK-s-samples/tree/master/Video%20Capture%20SDK/WPF/CSharp/Simple%20Video%20Capture).
## Prerequisites
- Visual Studio 2019 or later
- Windows 10 or 11 operating system
- Webcam or other video capture device (USB camera)
- Basic understanding of C# programming
## Installation
Check the main [installation guide](../../install/index.md) for detailed steps on how to install the DirectShow .NET SDK in your application.
## Key Components
### Core Classes
- `VideoCaptureCore` - Main class for capturing video from a source device
- `VideoCaptureSource` - Represents a video source device (webcam, camera)
- `AudioCaptureSource` - Represents an audio capture device (microphone)
## Implementation Guide
### 1. Initialize the Capture Engine
The first step in any DirectShow application is to create the core capture object:
```csharp
// Create a new instance with a video view
var captureCore = await VideoCaptureCore.CreateAsync(videoView as IVideoView);
// Register error handler for robust application development
captureCore.OnError += (sender, args) => {
Console.WriteLine($"Error: {args.Message}");
};
```
### 2. Device Enumeration and Selection
#### Enumerate Available Devices
To access webcams and microphones, you need to enumerate available devices:
```csharp
// Get video sources
foreach (var item in captureCore.Video_CaptureDevices())
{
Console.WriteLine($"Video device: {item.Name}");
// List available formats for this device
foreach (var format in item.VideoFormats)
{
Console.WriteLine($" Format: {format}");
}
}
// Get audio sources
foreach (var item in captureCore.Audio_CaptureDevices())
{
Console.WriteLine($"Audio device: {item.Name}");
foreach (var format in item.Formats)
{
Console.WriteLine($" Format: {format}");
}
}
```
#### Configure Video and Audio Capture Sources
This sample code shows how to filter and select specific video and audio formats required by your application:
```csharp
// Find and configure video source with specific format
var videoDevices = captureCore.Video_CaptureDevices();
VideoCaptureSource selectedVideoDevice = null;
string targetVideoFormat = null;
// Find a device with 1280x720 MJPG support
foreach (var item in videoDevices)
{
Console.WriteLine($"Checking video device: {item.Name}");
foreach (var format in item.VideoFormats)
{
Console.WriteLine($" Format: {format}");
// Look for 1280x720 MJPG format
if (format.Contains("1280x720") && format.Contains("MJPG"))
{
selectedVideoDevice = item;
targetVideoFormat = format;
Console.WriteLine($" SELECTED: {format}");
break;
}
}
if (selectedVideoDevice != null)
break;
}
// Find and configure audio source with specific format
var audioDevices = captureCore.Audio_CaptureDevices();
AudioCaptureSource selectedAudioDevice = null;
string targetAudioFormat = null;
// Find a device with 44100 Hz, 16 bit, 2 channels support
foreach (var item in audioDevices)
{
Console.WriteLine($"Checking audio device: {item.Name}");
foreach (var format in item.Formats)
{
Console.WriteLine($" Format: {format}");
// Look for 44100 Hz, 16 bit, 2 channels format
if (format.Contains("44100 Hz") && format.Contains("16 Bit") && format.Contains("2 Channel"))
{
selectedAudioDevice = item;
targetAudioFormat = format;
Console.WriteLine($" SELECTED: {format}");
break;
}
}
if (selectedAudioDevice != null)
break;
}
// Set up video capture with the selected device and format
if (selectedVideoDevice != null)
{
captureCore.Video_CaptureDevice = new VideoCaptureSource(selectedVideoDevice.Name);
if (targetVideoFormat != null)
{
captureCore.Video_CaptureDevice.Format = targetVideoFormat;
captureCore.Video_CaptureDevice.Format_UseBest = false; // Using specific format
}
else
{
captureCore.Video_CaptureDevice.Format_UseBest = true; // Use best available format
}
// Configure video frame rate if needed
captureCore.Video_CaptureDevice.FrameRate = new VideoFrameRate(30.0);
}
else
{
Console.WriteLine("No video device with 1280x720 MJPG found.");
// Fallback to first available device with best format
if (videoDevices.Count() > 0)
{
captureCore.Video_CaptureDevice = new VideoCaptureSource(videoDevices[0].Name);
captureCore.Video_CaptureDevice.Format_UseBest = true;
}
}
// Select audio capture device. Specify the device name and format
if (selectedAudioDevice != null)
{
captureCore.Audio_CaptureDevice = new AudioCaptureSource(selectedAudioDevice.Name);
if (targetAudioFormat != null)
{
captureCore.Audio_CaptureDevice.Format = targetAudioFormat;
captureCore.Audio_CaptureDevice.Format_UseBest = false; // Using specific format
}
else
{
captureCore.Audio_CaptureDevice.Format_UseBest = true; // Set true to detect the best format automatically
}
}
else
{
Console.WriteLine("No audio device with 44100 Hz, 16 bit, 2 channels found.");
// Fallback to the first available device
if (audioDevices.Count() > 0)
{
captureCore.Audio_CaptureDevice = new AudioCaptureSource(audioDevices[0].Name);
captureCore.Audio_CaptureDevice.Format_UseBest = true;
}
}
// Open device settings dialogs if needed
// captureCore.Video_CaptureDevice_SettingsDialog_Show(IntPtr.Zero, captureCore.Video_CaptureDevice.Name);
// captureCore.Audio_CaptureDevice_SettingsDialog_Show(IntPtr.Zero, captureCore.Audio_CaptureDevice.Name);
```
### 3. Configuring Audio Settings
Control audio recording and playback with these settings:
```csharp
// Enable audio recording
captureCore.Audio_RecordAudio = true;
// Enable audio playback during capture
captureCore.Audio_PlayAudio = true;
// Configure audio output device
captureCore.Audio_OutputDevice = "Default DirectSound Device";
// Set audio volume (0-100)
captureCore.Audio_OutputDevice_Volume_Set(75);
// Set audio balance (-100 to 100)
captureCore.Audio_OutputDevice_Balance_Set(0);
```
### 4. Output Configuration
#### MP4 Video Output
To save the captured video to an MP4 file, use the following code:
```csharp
// Set capture mode
captureCore.Mode = VideoCaptureMode.VideoCapture;
captureCore.Output_Filename = "output.mp4";
// Configure MP4 output (CPU/QuickSync)
var mp4Output = new MP4Output
{
MP4Mode = MP4Mode.CPU_QSV,
AudioFormat = MP4AudioEncoder.AAC
};
// Configure AAC audio settings
mp4Output.Audio_AAC = new M4AOutput
{
Bitrate = 128,
Object = AACObject.Low,
Output = AACOutput.RAW,
Version = AACVersion.MPEG4
};
// Or use MP3 for audio (via LAME encoder)
var mp3Output = new MP3Output();
mp4Output.Audio_LAME = mp3Output;
mp4Output.AudioFormat = MP4AudioEncoder.MP3_LAME;
// Configure H.264 video settings
mp4Output.Video = new MP4OutputH264Settings
{
// Basic settings
Bitrate = 3500,
MaxBitrate = 6000,
MinBitrate = 1500,
BitrateAuto = false,
// Profile and level
Profile = H264Profile.ProfileMain,
Level = H264Level.Level41,
// Frame structure
IDR_Period = 15, // I-frame interval in frames
P_Period = 3, // Distance between I- or P-key frames (if 1, no B-frames)
// Encoding settings
RateControl = H264RateControl.VBR,
MBEncoding = H264MBEncoding.CAVLC, // or CABAC for better compression
TargetUsage = H264TargetUsage.Balanced,
Preset = H264Peset.Balanced,
// Other options
Deblocking = true,
GOP = true,
PictureType = H264PictureType.Auto
};
// Assign output format
captureCore.Output_Format = mp4Output;
```
#### Hardware-Accelerated Encoding
For hardware acceleration using NVIDIA GPU:
```csharp
// Use hardware acceleration with NVENC
var mp4HWOutput = new MP4HWOutput
{
// H264 settings
Video = new MFVideoEncoderSettings
{
Codec = MFVideoEncoder.NVENC_H264, // or MS_H264, QSV_H264, AMD_H264
AvgBitrate = 3500,
MaxBitrate = 6000,
Profile = MFH264Profile.Main,
Level = MFH264Level.Level41,
RateControl = MFCommonRateControlMode.CBR,
CABAC = true,
QualityVsSpeed = 85,
MaxKeyFrameSpacing = 125
},
// AAC settings
Audio = new M4AOutput
{
Bitrate = 128,
Object = AACObject.Low
}
};
captureCore.Output_Format = mp4HWOutput;
```
#### Custom Output Formats
For more advanced output configurations:
- Check the [Custom output formats](../../general/output-formats/custom.md) guide for more information.
### 5. Video Processing and Effects
DirectShow allows for video processing through filters. Here's how to add various effects:
```csharp
// Enable video effects
captureCore.Video_Effects_Enabled = true;
captureCore.Video_Effects_MergeImageLogos = true;
captureCore.Video_Effects_MergeTextLogos = true;
// Add grayscale effect
var grayscale = new VideoEffectGrayscale(true);
captureCore.Video_Effects_Add(grayscale);
// Add contrast effect (0-200)
var contrast = new VideoEffectContrast(true, 50);
captureCore.Video_Effects_Add(contrast);
// Add brightness effect (0-200)
var lightness = new VideoEffectLightness(true, 50);
captureCore.Video_Effects_Add(lightness);
// Add saturation effect (0-255)
var saturation = new VideoEffectSaturation(120);
captureCore.Video_Effects_Add(saturation);
// Add darkness effect (0-200)
var darkness = new VideoEffectDarkness(true, 20);
captureCore.Video_Effects_Add(darkness);
// Add invert colors effect
var invert = new VideoEffectInvert(true);
captureCore.Video_Effects_Add(invert);
// Add flip effects
var flipHorizontal = new VideoEffectFlipHorizontal(true);
captureCore.Video_Effects_Add(flipHorizontal);
var flipVertical = new VideoEffectFlipVertical(true);
captureCore.Video_Effects_Add(flipVertical);
```
#### Adding Overlays
```csharp
// Add image logo
var imageLogo = new VideoEffectImageLogo(true, "MyLogo");
imageLogo.Filename = "logo.png"; // Path to your logo image
// Configure logo properties here
captureCore.Video_Effects_Add(imageLogo);
// Add text logo
var textLogo = new VideoEffectTextLogo(true, "MyTextLogo");
textLogo.Text = "My Text Logo";
// Configure text properties here
captureCore.Video_Effects_Add(textLogo);
// Add scrolling text
var scrollingText = new VideoEffectScrollingTextLogo(true);
// Configure text properties here
captureCore.Video_Effects_Add(scrollingText);
```
#### Custom DirectShow Filters
DirectShow's power comes from its filter-based architecture. Here's how to add filter for video processing:
```csharp
// List all available DirectShow filters
var filters = captureCore.DirectShow_Filters();
// Use a specific filter
var filter = filters.FirstOrDefault(f => f.Name == "MyFilter");
captureCore.Video_Filters_Add(new CustomProcessingFilter(filter));
```
### 6. Capture Control
Control the media flow with these simple methods:
```csharp
// Set debugging options if needed
captureCore.Debug_Mode = true;
captureCore.Debug_Dir = Path.Combine(Environment.GetFolderPath(Environment.SpecialFolder.MyDocuments), "VisioForge");
// Start capture
await captureCore.StartAsync();
// Pause capture
await captureCore.PauseAsync();
// Resume capture
await captureCore.ResumeAsync();
// Stop capture
await captureCore.StopAsync();
// Dispose when done
captureCore.Dispose();
```
### 7. Taking Snapshots
Capture still images from your video stream:
```csharp
// Take a snapshot and save as JPEG with quality 85
await captureCore.Frame_SaveAsync("snapshot.jpg", ImageFormat.Jpeg, 85);
// Other supported formats
await captureCore.Frame_SaveAsync("snapshot.png", ImageFormat.Png, 0);
await captureCore.Frame_SaveAsync("snapshot.bmp", ImageFormat.Bmp, 0);
await captureCore.Frame_SaveAsync("snapshot.gif", ImageFormat.Gif, 0);
await captureCore.Frame_SaveAsync("snapshot.tiff", ImageFormat.Tiff, 0);
```
## Advanced Topics
For more advanced DirectShow .NET SDK functionality, explore:
- Stream publishing to network
- Multi-source recording
- Custom filter graphs
- Event handling and notifications
- Timeline editing
## Troubleshooting
Common issues when working with DirectShow in C#:
- Device busy or inaccessible: Ensure no other application is using the webcam
- Format compatibility: Not all formats work with all filters and output configurations
- Memory leaks: Always dispose of DirectShow objects properly
- Driver issues: Make sure webcam/camera drivers are up to date
## Conclusion
This tutorial demonstrates the core functionality needed to create a C# video capture application using the DirectShow .NET SDK. With this framework, you can build applications that capture, process, and save video and audio from various sources like webcams and USB cameras. The DirectShow architecture provides access to a wide range of media processing capabilities through its filter-based design, making it a powerful choice for Windows media applications.
---END OF PAGE---
# Local File: .\dotnet\videocapture\maui\camera-recording-maui.md
---
title: Video Capture & Processing in .NET MAUI Apps
description: Learn to implement powerful video capture functionality in your .NET MAUI apps with cross-platform support for iOS, Android, macCatalyst and Windows. This guide shows how to integrate camera preview, add real-time video effects, implement recording features, and save videos using native APIs for each platform.
sidebar_label: Capture and Process Video in .NET MAUI Apps
---
# How to Capture and Process Video in .NET MAUI Apps Using VisioForge SDK
## Introduction
The VisioForge Video Capture SDK for .NET is a comprehensive media capture and processing solution that integrates seamlessly with .NET MAUI applications. As a feature-rich SDK, it significantly extends .NET MAUI's native capabilities for video capture across supported platforms including iOS, Android, macCatalyst, and Windows.
In this tutorial, we will learn how to record video from hardware cameras on iOS/Android devices and webcams on Windows and macOS. We will also cover how to add various effects and filters to the video, as well as how to save the video to the device using native APIs for each platform.
For mobile devices (.NET iOS and .NET Android), we will request the necessary permissions to ensure proper functionality with the native device capabilities.
The full sample code is available on [GitHub](https://github.com/visioforge/.Net-SDK-s-samples/tree/master/Video%20Capture%20SDK%20X/MAUI/SimpleCapture) as part of the SDK documentation.
## Prerequisites
Required software and tools:
- Visual Studio or Visual Studio Code with .NET MAUI support or JetBrains Rider
- [VisioForge Video Capture SDK for .NET](https://www.visioforge.com/video-capture-sdk-net) (we'll use NuGet packages)
## Setting up a Basic .NET MAUI Project Structure
### Create a New Empty .NET MAUI Project (.NET 8 or Later)
You can use Visual Studio, Rider, or dotnet tool to create a new .NET MAUI project with cross-platform support.
### Update Project File
Add runtime targets for macCatalyst for arm64 and x86_64 compatibility, which ensures proper .NET MAUI support for Mac environments:
```xml
maccatalyst-x64
maccatalyst-arm64
```
### NuGet Main SDK Packages
Use the latest NuGet package versions of the SDK for .NET in your project.
Add the following NuGet packages to your project:
```xml
```
The `VideoCapture` package contains the main video capture functionality, while the `Core.UI.MAUI` package contains the `VideoView` control for video preview in .NET MAUI apps.
### NuGet Redist Packages
Add the following NuGet packages to your project based on target platform:
**Windows:**
```xml
```
**Android** requires a NuGet redist package and a project reference to the [Android dependency project](https://github.com/visioforge/.Net-SDK-s-samples/tree/master/AndroidDependency):
```xml
```
**iOS:**
```xml
```
**macCatalyst** requires a NuGet redist package and a target code to copy the redist files to the app file:
```xml
$(OutputPath)$(AssemblyName).app
$(AppBundleDir)/Contents/MonoBundle
```
### Update MauiProgram.cs
We need to add SkiaSharp support and VisioForge handlers initialization code to the MauiProgram.cs file:
```csharp
using SkiaSharp.Views.Maui.Controls.Hosting;
using VisioForge.Core.UI.MAUI;
public static MauiApp CreateMauiApp()
{
var builder = MauiApp.CreateBuilder();
builder
.UseMauiApp()
// Add SkiaSharp support
.UseSkiaSharp()
// Add VisioForge handlers for VideoView and other controls
.ConfigureMauiHandlers(handlers => handlers.AddVisioForgeHandlers())
.ConfigureFonts(fonts =>
{
fonts.AddFont("OpenSans-Regular.ttf", "OpenSansRegular");
fonts.AddFont("OpenSans-Semibold.ttf", "OpenSansSemibold");
});
#if DEBUG
builder.Logging.AddDebug();
#endif
return builder.Build();
}
```
### Update Android Manifest
Add additional permissions to the `AndroidManifest.xml` file for native .NET Android functionality:
```xml
```
CAMERA, RECORD_AUDIO, and WRITE_EXTERNAL_STORAGE permissions are required for video capture on .NET Android. INTERNET and ACCESS_NETWORK_STATE permissions are required for network access. READ_EXTERNAL_STORAGE and WRITE_EXTERNAL_STORAGE permissions are required to save videos to the device. MANAGE_EXTERNAL_STORAGE and MANAGE_MEDIA permissions are required for Android 11 and later.
### Add Permissions to iOS Info.plist File
Configure native iOS permissions in the Info.plist file for SDK iOS compatibility:
```xml
LSRequiresIPhoneOS
UIDeviceFamily
1
2
UIRequiredDeviceCapabilities
arm64
UISupportedInterfaceOrientations
UIInterfaceOrientationLandscapeRight
UISupportedInterfaceOrientations~ipad
UIInterfaceOrientationPortrait
UIInterfaceOrientationPortraitUpsideDown
UIInterfaceOrientationLandscapeLeft
UIInterfaceOrientationLandscapeRight
XSAppIconAssets
Assets.xcassets/appicon.appiconset
NSCameraUsageDescription
Camera usage required
NSMicrophoneUsageDescription
Mic usage required
NSPhotoLibraryUsageDescription
This app requires access to the photos library to save videos.
CFBundleIdentifier
```
NSCameraUsageDescription and NSMicrophoneUsageDescription are required for video capture on SDK iOS. NSPhotoLibraryUsageDescription is required to save videos to the device.
### Update macCatalyst Permissions
**Info.plist file for Mac Catalyst:**
```xml
UIDeviceFamily
1
2
UIRequiredDeviceCapabilities
arm64
UISupportedInterfaceOrientations
UIInterfaceOrientationPortrait
UIInterfaceOrientationLandscapeLeft
UIInterfaceOrientationLandscapeRight
UISupportedInterfaceOrientations~ipad
UIInterfaceOrientationPortrait
UIInterfaceOrientationPortraitUpsideDown
UIInterfaceOrientationLandscapeLeft
UIInterfaceOrientationLandscapeRight
XSAppIconAssets
Assets.xcassets/appicon.appiconset
NSCameraUsageDescription
Camera usage required
NSMicrophoneUsageDescription
Mic usage required
```
**Entitlements.plist file for Mac Catalyst:**
```xml
com.apple.security.device.audio-input
com.apple.security.device.camera
com.apple.security.device.usb
```
## Creating UI
To see the video preview, add the `VideoView` control to your MainPage.xaml file.
Add the namespace to the top of the file:
```xml
xmlns:my="clr-namespace:VisioForge.Core.UI.MAUI;assembly=VisioForge.Core.UI.MAUI"
```
Add the `VideoView` control to the content of the page:
```xml
```
In your code, you can add buttons to start and stop recording, select cameras, and more.
In this sample, we'll use buttons to select source video, audio sources, and audio output.
```xml
```
Now we can start writing our source code to implement the functionality for our .NET MAUI app with native platform support.
## Namespaces and Fields
Add namespaces to your MainPage.xaml.cs file:
```csharp
#if (__IOS__ && !__MACCATALYST__) || __ANDROID__
#define MOBILE
#endif
using System;
using System.ComponentModel;
using System.Diagnostics;
using VisioForge.Core;
using VisioForge.Core.Helpers;
using VisioForge.Core.MediaBlocks.VideoEncoders;
using VisioForge.Core.Types;
using VisioForge.Core.Types.X.AudioEncoders;
using VisioForge.Core.Types.X.AudioRenderers;
using VisioForge.Core.Types.X.Output;
using VisioForge.Core.Types.X.Sources;
using VisioForge.Core.Types.X.VideoCapture;
using VisioForge.Core.VideoCaptureX;
```
Add the following fields to your MainPage.xaml.cs file to handle native device capabilities:
```csharp
// Video capture core object.
private VideoCaptureCoreX _core;
// Video capture devices.
private VideoCaptureDeviceInfo[] _cameras;
// Selected camera index.
private int _cameraSelectedIndex = 0;
// Audio capture devices.
private AudioCaptureDeviceInfo[] _mics;
// Selected microphone index.
private int _micSelectedIndex = 0;
// Audio output devices.
private AudioOutputDeviceInfo[] _speakers;
// Selected speaker index.
private int _speakerSelectedIndex = 0;
// Default button color.
private Color _defaultButtonColor;
```
## MainPage Constructor
Update constructor and add event handlers:
```csharp
public MainPage()
{
InitializeComponent();
Loaded += MainPage_Loaded;
Unloaded += MainPage_Unloaded;
this.BindingContext = this;
}
```
## Permissions
Add code to request permissions for mobile platforms:
```csharp
#if __IOS__ && !__MACCATALYST__
private void RequestPhotoPermission()
{
Photos.PHPhotoLibrary.RequestAuthorization(status =>
{
if (status == Photos.PHAuthorizationStatus.Authorized)
{
Debug.WriteLine("Photo library access granted.");
}
});
}
#endif
private async Task RequestCameraPermissionAsync()
{
var result = await Permissions.RequestAsync();
// Check result from permission request. If it is allowed by the user, connect to scanner
if (result == PermissionStatus.Granted)
{
}
else
{
if (Permissions.ShouldShowRationale())
{
if (await DisplayAlert(null, "You need to allow access to the Camera", "OK", "Cancel"))
await RequestCameraPermissionAsync();
}
}
}
private async Task RequestMicPermissionAsync()
{
var result = await Permissions.RequestAsync();
// Check result from permission request. If it is allowed by the user, connect to scanner
if (result == PermissionStatus.Granted)
{
}
else
{
if (Permissions.ShouldShowRationale())
{
if (await DisplayAlert(null, "You need to allow access to the Microphone", "OK", "Cancel"))
await RequestMicPermissionAsync();
}
}
}
```
## MainPage Events
Add Loaded event to initialize the SDK for .NET MAUI apps:
```csharp
private async void MainPage_Loaded(object sender, EventArgs e)
{
// Ask for permissions
#if __ANDROID__ || __MACOS__ || __MACCATALYST__ || __IOS__
await RequestCameraPermissionAsync();
await RequestMicPermissionAsync();
#endif
#if __IOS__ && !__MACCATALYST__
RequestPhotoPermission();
#endif
// Get IVideoView interface
IVideoView vv = videoView.GetVideoView();
// Create core object with IVideoView interface
_core = new VideoCaptureCoreX(vv);
// Add event handlers
_core.OnError += Core_OnError;
// Enumerate cameras
_cameras = await DeviceEnumerator.Shared.VideoSourcesAsync();
if (_cameras.Length > 0)
{
btCamera.Text = _cameras[0].DisplayName;
}
// Enumerate microphones and other audio sources
_mics = await DeviceEnumerator.Shared.AudioSourcesAsync(null);
if (_mics.Length > 0)
{
btMic.Text = _mics[0].DisplayName;
}
// Enumerate audio outputs
_speakers = await DeviceEnumerator.Shared.AudioOutputsAsync(null);
if (_speakers.Length > 0)
{
btSpeakers.Text = _speakers[0].DisplayName;
}
// Add Destroying event handler
Window.Destroying += Window_Destroying;
#if __ANDROID__ || (__IOS__ && !__MACCATALYST__)
// Select second camera if available for mobile platforms
if (_cameras.Length > 1)
{
btCamera.Text = _cameras[1].DisplayName;
_cameraSelectedIndex = 1;
}
// Start preview
btStartCapture.IsEnabled = true;
await StartPreview();
#endif
}
```
Add Unloaded event:
```csharp
private void MainPage_Unloaded(object sender, EventArgs e)
{
// Dispose core object
_core?.Dispose();
_core = null;
// Destroy SDK
VisioForgeX.DestroySDK();
}
```
Add Destroying event handler:
```csharp
private async void Window_Destroying(object sender, EventArgs e)
{
if (_core != null)
{
_core.OnError -= Core_OnError;
await _core.StopAsync();
_core?.Dispose();
_core = null;
}
VisioForgeX.DestroySDK();
}
```
Add error event handler:
```csharp
private void Core_OnError(object sender, VisioForge.Core.Types.Events.ErrorsEventArgs e)
{
Debug.WriteLine(e.Message);
}
```
Camera, microphone, and speaker selection event handlers are available in the GitHub code as part of the SDK documentation. We'll skip them here for brevity.
## Preview and Capture Implementation
Start button code:
```csharp
private async Task StartPreview()
{
if (_core.State == PlaybackState.Play || _core.State == PlaybackState.Pause)
{
return;
}
}
```
Create audio output settings for desktop or disable for mobile platforms. `DeviceEnumerator` is used to get available audio output devices:
```csharp
// audio output
#if MOBILE
_core.Audio_Play = false;
#else
var audioOutputDevice = (await DeviceEnumerator.Shared.AudioOutputsAsync()).Where(device => device.DisplayName == btSpeakers.Text).First();
_core.Audio_OutputDevice = new AudioRendererSettings(audioOutputDevice);
_core.Audio_Play = true;
#endif
```
Create video source settings for the selected camera. `DeviceEnumerator` is used to get available video sources:
`VideoCaptureDeviceSourceSettings` allows you to specify device, format, and orientation. The `GetHDVideoFormatAndFrameRate` method is used to get the default HD available format and frame rate for the selected camera. Alternatively, you can enumerate all available formats and frame rates and let the user select them:
```csharp
// video source
VideoCaptureDeviceSourceSettings videoSourceSettings = null;
var deviceName = btCamera.Text;
if (!string.IsNullOrEmpty(deviceName))
{
var device = (await DeviceEnumerator.Shared.VideoSourcesAsync()).FirstOrDefault(x => x.DisplayName == deviceName);
if (device != null)
{
var formatItem = device.GetHDVideoFormatAndFrameRate(out var frameRate);
if (formatItem != null)
{
videoSourceSettings = new VideoCaptureDeviceSourceSettings(device)
{
Format = formatItem.ToFormat()
};
videoSourceSettings.Format.FrameRate = frameRate;
}
}
}
_core.Video_Source = videoSourceSettings;
#if __IOS__ && !__MACCATALYST__
videoSourceSettings.Orientation = IOSVideoSourceOrientation.LandscapeRight;
#endif
if (videoSourceSettings == null)
{
await DisplayAlert("Error", "Unable to configure camera settings", "OK");
}
```
Create audio source settings for the selected microphone. `DeviceEnumerator` is used to get available audio sources:
```csharp
// audio source
IVideoCaptureBaseAudioSourceSettings audioSourceSettings = null;
deviceName = btMic.Text;
if (!string.IsNullOrEmpty(deviceName))
{
var device = (await DeviceEnumerator.Shared.AudioSourcesAsync()).FirstOrDefault(x => x.DisplayName == deviceName);
if (device != null)
{
var formatItem = device.GetDefaultFormat();
audioSourceSettings = device.CreateSourceSettingsVC(formatItem);
}
}
_core.Audio_Source = audioSourceSettings;
```
Configure output file settings. In this example, we use MP4 video and MP3 audio. The `Outputs_Add` second parameter is set to false to not start recording immediately.
By default, H264 GPU encoder is used for all platforms (.NET iOS, .NET Android, Windows, Mac Catalyst). As an alternative or on platforms where GPU encoding is not available, you can use a software encoder.
For audio stream, you can use MP3 or AAC encoders.
The SDK supports a wide range of video and audio formats and encoders across all .NET MAUI supported platforms.
```csharp
// configure capture
_core.Audio_Record = true;
_core.Outputs_Clear();
_core.Outputs_Add(new MP4Output(GenerateFilename(), H264EncoderBlock.GetDefaultSettings(), new MP3EncoderSettings()), false);
```
Start the preview and update button label:
```csharp
// start
await _core.StartAsync();
btStartPreview.Text = "STOP";
}
```
Now we can implement Start preview, Start capture, and Stop buttons code:
```csharp
private async void btStartPreview_Clicked(object sender, EventArgs e)
{
if (_core == null)
{
return;
}
switch (_core.State)
{
case PlaybackState.Play:
{
await StopAllAsync();
btStartPreview.Text = "PREVIEW";
btStartCapture.IsEnabled = false;
}
break;
case PlaybackState.Free:
{
if (_core.State == PlaybackState.Play || _core.State == PlaybackState.Pause)
{
return;
}
await StartPreview();
btStartCapture.IsEnabled = true;
}
break;
default:
break;
}
}
```
The `StartCaptureAsync` method is used to start video capture. We use the `GenerateFilename` method to generate a unique filename for each video:
```csharp
private async void btStartCapture_Clicked(object sender, EventArgs e)
{
if (_core == null || _core.State != PlaybackState.Play)
{
return;
}
if (btStartCapture.BackgroundColor != Colors.Red)
{
System.Diagnostics.Debug.WriteLine("Start capture");
await _core.StartCaptureAsync(0, GenerateFilename());
btStartCapture.BackgroundColor = Colors.Red;
btStartCapture.Text = "STOP";
}
else
{
await StopCaptureAsync();
}
}
private string GenerateFilename()
{
DateTime now = DateTime.Now;
#if __ANDROID__
var filename = Path.Combine(Android.OS.Environment.GetExternalStoragePublicDirectory(Android.OS.Environment.DirectoryDcim).AbsolutePath, "Camera", $"visioforge_{now.Hour}_{now.Minute}_{now.Second}.mp4");
#elif __IOS__ && !__MACCATALYST__
var filename = Path.Combine(Environment.GetFolderPath(Environment.SpecialFolder.MyDocuments), "..",
"Library", $"{now.Hour}_{now.Minute}_{now.Second}.mp4");
#elif __MACCATALYST__
var filename = Path.Combine("/tmp", $"{now.Hour}_{now.Minute}_{now.Second}.mp4");
#else
var filename = Path.Combine(Environment.GetFolderPath(Environment.SpecialFolder.MyVideos), $"{now.Hour}_{now.Minute}_{now.Second}.mp4");
#endif
return filename;
}
```
The `StopCaptureAsync` method is used to stop video capture and save the recording to the appropriate platform-specific location:
```csharp
private async Task StopCaptureAsync()
{
System.Diagnostics.Debug.WriteLine("Stop capture");
await _core.StopCaptureAsync(0);
btStartCapture.BackgroundColor = _defaultButtonColor;
btStartCapture.Text = "CAPTURE";
// save video to photo library on native iOS and Android platforms
#if __ANDROID__ || (__IOS__ && !__MACCATALYST__)
string filename = null;
var output = _core.Outputs_Get(0);
filename = output.GetFilename();
await PhotoGalleryHelper.AddVideoToGalleryAsync(filename);
#endif
}
```
## Video Effects and Enhancement Features
The VisioForge SDK for .NET supports a wide range of video effects across all .NET MAUI platforms, including text and image overlays, chroma key, and more, providing consistent functionality in iOS MAUI, Mac Catalyst, and .NET Android apps.
In this guide we'll add optional image and text overlays to the video.
Add the following code before the **_core.StartAsync** method call to add text overlay:
```csharp
var textOverlay = new OverlayManagerText("Hello world", x: 50, y: 50);
_core.Video_Overlay_Add(textOverlay);
```
Copy PNG or JPEG image to the assets folder and add the following code to add image overlay:
```csharp
using var stream = await FileSystem.OpenAppPackageFileAsync("icon.png");
var bitmap = SkiaSharp.SKBitmap.Decode(stream);
var img = new OverlayManagerImage(bitmap, x: 250, y: 50);
_core.Video_Overlay_Add(img);
```
## Conclusion
This tutorial demonstrated how to integrate the VisioForge Video Capture SDK with .NET MAUI applications to create powerful cross-platform video capture solutions. The SDK provides consistent functionality across Windows, macOS (through Mac Catalyst), iOS, and Android platforms while leveraging native capabilities of each platform.
The SDK documentation provides more details on advanced features including:
- Additional video effects and filters
- Various video and audio codecs
- Network streaming
- Video analysis capabilities
- Custom processing pipelines
By using this SDK with .NET MAUI, developers can create sophisticated video applications with minimal platform-specific code while still maintaining the native look and feel on each platform.
---END OF PAGE---
# Local File: .\dotnet\videocapture\motion-detection\index.md
---
title: Motion Detection for Video Processing in .NET
description: Learn how to implement advanced and simple motion detection features in your .NET applications with multiple detector types, customizable settings, and real-time processing capabilities for video streams.
sidebar_label: Motion Detection
order: 6
---
# Motion Detection for Video Processing
[!badge size="xl" target="blank" variant="info" text="Video Capture SDK .Net"](https://www.visioforge.com/video-capture-sdk-net)
## Overview
The Video Capture SDK provides powerful motion detection capabilities for your .NET applications. Whether you need simple presence detection or advanced object tracking, the SDK offers two distinct motion detector implementations to match your specific requirements:
1. **Simple Motion Detector** - Efficient, lightweight processing with customizable detection matrices
2. **Advanced Motion Detector** - Enhanced capabilities including object detection, multiple processor types, and specialized detectors
These motion detection tools enable developers to implement sophisticated video analysis features such as security monitoring, automated alerts, object counting, and interactive motion-responsive applications.
## Simple Motion Detector
[!badge variant="dark" size="xl" text="VideoCaptureCore"]
### How It Works
The simple motion detector offers an efficient solution for basic movement detection scenarios. Its streamlined approach makes it ideal for applications where processing speed and resource efficiency are priorities.
When activated, the detector:
- Processes each frame to detect movement changes
- Generates a two-dimensional byte array (motion matrix)
- Calculates the overall motion level as a percentage
- Optionally highlights detected motion areas visually
### Key Features
- **Customizable Matrix Size**: Adjust detection resolution to balance performance and accuracy
- **Channel Selection**: Analyze all RGB channels or focus on specific ones for optimized detection
- **Motion Highlighting**: Visually emphasize detected motion with color overlays
- **Performance Optimization**: Configure frame interval settings to manage processing load
### Implementation Example
```cs
// create motion detector settings
var motionDetector = new MotionDetectionSettings();
// set the motion detector matrix dimensions
motionDetector.Matrix_Width = 10;
motionDetector.Matrix_Height = 10;
// configure color channel analysis
motionDetector.Compare_Red = false;
motionDetector.Compare_Green = false;
motionDetector.Compare_Blue = false;
motionDetector.Compare_Greyscale = true;
// motion highlighting configuration
motionDetector.Highlight_Color = MotionCHLColor.Green;
motionDetector.Highlight_Enabled = true;
// performance optimization settings
motionDetector.FrameInterval = 5;
motionDetector.DropFrames_Enabled = false;
// apply settings to the video capture component
VideoCapture1.Motion_Detection = motionDetector;
VideoCapture1.MotionDetection_Update();
```
### Retrieving Motion Data
To access the motion detection data in your application, implement the `OnMotion` event handler. This event provides:
- Current motion level (percentage)
- Motion matrix data
- Frame information
This data can be used to trigger alerts, record events, or initiate application-specific actions when motion exceeds defined thresholds.
## Advanced Motion Detector
[!badge variant="dark" size="xl" text="VideoCaptureCoreX"] [!badge variant="dark" size="xl" text="VideoCaptureCore"]
### Enhanced Capabilities
The advanced motion detector provides more sophisticated detection algorithms and analysis options. This detector is designed for applications requiring detailed motion information, object identification, and precise motion area definition.
Key advantages include:
- Object detection and counting
- Multiple processor types for different visual analysis needs
- Specialized detector algorithms for various environments
- Enhanced motion area processing
### Configuration Options
#### Motion Processor Types
The processor determines how motion is analyzed and visualized:
- **None**: Raw detection without visual highlighting
- **BlobCountingObjects**: Identifies and counts distinct moving objects
- **GridMotionAreaProcessing**: Divides frame into grid sections for analysis
- **MotionAreaHighlighting**: Highlights full areas where motion is detected
- **MotionBorderHighlighting**: Outlines the perimeter of motion areas
#### Motion Detector Types
The detector algorithm defines the fundamental approach to motion identification:
- **CustomFrameDifference**: Compares current frame against a predefined background
- **SimpleBackgroundModeling**: Uses adaptive background modeling techniques
- **TwoFramesDifference**: Analyzes differences between consecutive frames
### Implementation Steps
1. Create the advanced motion detector settings:
```cs
var motionDetector = new MotionDetectionExSettings();
```
2. Select the appropriate processor type for your application needs:
```cs
motionDetector.ProcessorType = MotionProcessorType.BlobCountingObjects;
```
3. Choose the detection algorithm that best suits your environment:
```cs
motionDetector.DetectorType = MotionDetectorType.CustomFrameDifference;
```
4. Apply the settings to your video capture component:
+++ VideoCaptureCoreX
```cs
VideoCapture1.Motion_Detection = motionDetector;
```
+++ VideoCaptureCore
```cs
VideoCapture1.Motion_DetectionEx = motionDetector;
```
+++
5. Implement the corresponding event handler to receive detection data:
- Use `OnMotionDetectionEx` or `OnMotionDetection` depending on your component
- Access motion level, matrix data, and detected objects information
- Process this data according to your application requirements
## Practical Applications
Motion detection capabilities enable developers to create powerful video-processing applications:
- **Security Systems**: Trigger recording or alerts when unauthorized movement is detected
- **Traffic Analysis**: Count and track vehicles or pedestrians
- **Interactive Installations**: Create motion-responsive digital experiences
- **Automated Video Indexing**: Mark and categorize sections containing activity
- **Industrial Automation**: Monitor production lines or restricted areas
- **Wildlife Observation**: Record animal activity without human intervention
## Performance Considerations
To optimize motion detection performance:
1. Adjust the matrix dimensions to balance accuracy and processing load
2. Use frame interval settings to analyze only essential frames
3. Select the appropriate color channels for your detection scenario
4. Consider enabling the frame dropping option for high-performance requirements
5. Choose the detector type based on your specific environment conditions
## Advanced Configuration
For environments with complex motion patterns, consider these additional settings:
- Sensitivity thresholds to filter out minor movements
- Detection zones to focus on specific areas of the frame
- Object size filtering to ignore movements below certain dimensions
- Persistence settings to require sustained motion before triggering
## Event Integration
The motion detection events can be integrated with other SDK features:
- Video recording to capture detected motion
- Snapshot creation when motion is detected
- Custom notification systems
- Data logging and analysis
---
Visit our [GitHub](https://github.com/visioforge/.Net-SDK-s-samples) page to get more code samples.
---END OF PAGE---
# Local File: .\dotnet\videocapture\network-streaming\index.md
---
title: Network Video Streaming Guide for .NET Development
description: Learn how to implement high-performance network streaming in .NET applications. Explore RTSP, RTMP, NDI, HLS, and SRT protocols with practical implementation tips and best practices for building robust streaming solutions.
sidebar_label: Network Streaming
order: 5
---
# Network Streaming in .NET Applications
[!badge size="xl" target="blank" variant="info" text="Video Capture SDK .Net"](https://www.visioforge.com/video-capture-sdk-net) [!badge size="xl" target="blank" variant="info" text="Video Edit SDK .Net"](https://www.visioforge.com/video-edit-sdk-net) [!badge size="xl" target="blank" variant="info" text="Media Blocks SDK .Net"](https://www.visioforge.com/media-blocks-sdk-net)
## Introduction to Network Streaming
Network streaming has become a fundamental component of modern digital communication infrastructure, enabling real-time transmission of audio and video data across diverse network environments. As bandwidth capabilities continue to expand and user expectations for content delivery evolve, developers need robust tools to implement streaming solutions that balance performance, quality, and reliability.
The VisioForge Video Capture SDK for .NET provides comprehensive support for multiple streaming protocols, offering developers a versatile toolkit for integrating sophisticated streaming capabilities into their applications. Whether you're building live broadcasting platforms, video conferencing tools, surveillance systems, or content delivery networks, this SDK provides the foundation for implementing professional-grade streaming solutions.
## Core Network Streaming Protocols
### RTSP (Real-Time Streaming Protocol)
RTSP is an application-level protocol designed for controlling the delivery of data with real-time properties. It serves as a "network remote control" for multimedia servers, establishing and controlling media sessions between endpoints.
#### Key RTSP Features:
- **Session Control**: Enables clients to establish and manage media sessions with servers
- **Transport Independence**: Works with various transport protocols including UDP, TCP, and multicast UDP
- **Command Support**: Implements commands like PLAY, PAUSE, and RECORD for granular session control
- **Scalability**: Supports unicast and multicast delivery for efficient bandwidth utilization
### RTMP (Real-Time Messaging Protocol)
Originally developed by Macromedia for streaming Flash content, RTMP has evolved into one of the most widely used protocols for live broadcasting. It maintains persistent connections between the client and server, facilitating low-latency transmission crucial for interactive applications.
#### Key RTMP Features:
- **Low Latency**: Typically delivers sub-second latency, making it suitable for interactive streaming
- **Reliable Delivery**: Uses TCP as its transport layer for reliable packet delivery
- **Content Protection**: Supports encryption for secure content delivery
- **Widespread Support**: Compatible with numerous CDNs and streaming platforms
### NDI (Network Device Interface)
NDI represents a significant advancement in professional video production workflows, enabling high-quality, low-latency video transmission over standard IP networks. Developed by NewTek, NDI has gained widespread adoption in broadcast and production environments.
#### Key NDI Features:
- **IP-Based Workflow**: Leverages existing network infrastructure without specialized hardware
- **Bidirectional Communication**: Supports metadata and control data alongside audio/video
- **Discovery Mechanism**: Automatic device and source discovery on local networks
- **High-Quality Encoding**: Maintains visual quality while optimizing for network conditions
### HLS (HTTP Live Streaming)
Developed by Apple, HLS has become one of the most widely supported streaming protocols. It segments content into small HTTP-based file downloads, allowing adaptive bitrate streaming that adjusts quality based on the viewer's available bandwidth.
#### Key HLS Features:
- **Adaptive Bitrate**: Dynamically adjusts stream quality based on network conditions
- **Wide Compatibility**: Supported across most modern browsers and devices
- **HTTP Delivery**: Uses standard web servers and CDNs for efficient content delivery
- **Content Protection**: Supports encryption and DRM integration
### SRT (Secure Reliable Transport)
SRT is an open-source protocol optimized for delivering high-quality, low-latency video over unpredictable networks. It combines the reliability of TCP with the speed of UDP while adding security features.
#### Key SRT Features:
- **Packet Loss Recovery**: Implements dynamic retransmission mechanisms
- **Encryption**: Built-in AES encryption for secure transmission
- **Network Health Monitoring**: Continually assesses connection quality
- **Latency Control**: Configurable latency settings to balance reliability and delay
## Additional Supported Protocols
### HTTP MJPEG (Motion JPEG)
MJPEG over HTTP transmits a sequence of JPEG images, providing a simple yet effective streaming solution. While not as bandwidth-efficient as modern codecs, its simplicity and compatibility make it suitable for certain applications.
### UDP (User Datagram Protocol)
UDP streaming prioritizes speed over reliability, making it ideal for real-time applications where occasional packet loss is preferable to increased latency. The SDK provides configurable buffer settings to help optimize UDP streaming for specific network conditions.
### WMV (Windows Media Video)
The SDK supports streaming in Microsoft's WMV format, which remains relevant for certain Windows-centric applications and legacy systems integration.
### Platform-Specific Streaming
The SDK also integrates with popular streaming platforms including:
- **YouTube Live**: Direct streaming to YouTube channels
- **Facebook Live**: Integrated Facebook Live broadcasting
- **AWS S3**: Cloud-based media distribution via Amazon Web Services
## Implementation Considerations
When implementing network streaming with the SDK, developers should consider:
1. **Bandwidth Requirements**: Estimate and test the required bandwidth for your target quality and framerate
2. **Network Resilience**: Implement appropriate error handling and reconnection logic
3. **Quality vs. Latency**: Balance visual quality against latency requirements
4. **Cross-Platform Compatibility**: Select protocols based on your target platforms
5. **Security Needs**: Implement encryption and authentication where required
## Conclusion
The VisioForge Video Capture SDK for .NET provides comprehensive support for contemporary streaming protocols, empowering developers to implement sophisticated streaming solutions without managing the complexity of protocol implementations directly. From low-latency live broadcasts to secure content delivery, the SDK's streaming capabilities address diverse use cases across industries.
By leveraging these capabilities, developers can focus on building compelling experiences while relying on the SDK to handle the technical challenges of reliable network streaming. Whether you're developing applications for entertainment, education, security, or professional video production, the SDK provides a solid foundation for your streaming needs.
## Available Protocols
* [Adobe Flash Server](../../general/network-streaming/adobe-flash.md)
* [AWS S3](../../general/network-streaming/aws-s3.md)
* [Facebook](../../general/network-streaming/facebook.md)
* [HLS](../../general/network-streaming/hls-streaming.md)
* [HTTP MJPEG](../../general/network-streaming/http-mjpeg.md)
* [NDI](../../general/network-streaming/ndi.md)
* [RTMP](../../general/network-streaming/rtmp.md)
* [RTSP](../../general/network-streaming/rtsp.md)
* [SRT](../../general/network-streaming/srt.md)
* [UDP](../../general/network-streaming/udp.md)
* [WMV](../../general/network-streaming/wmv.md)
* [YouTube](../../general/network-streaming/youtube.md)
---
Visit our [GitHub](https://github.com/visioforge/.Net-SDK-s-samples) page to get more code samples.
---END OF PAGE---
# Local File: .\dotnet\videocapture\video-capture\dv.md
---
title: Video Capture to DV Format in .NET Applications
description: Learn how to implement DV video capture functionality in your .NET applications. This guide covers both recompression and direct capture methods with code examples and best practices for developers.
sidebar_label: DV Format
order: 18
---
# Capturing Video to DV Format in .NET Applications
[!badge size="xl" target="blank" variant="info" text="Video Capture SDK .Net"](https://www.visioforge.com/video-capture-sdk-net) [!badge variant="dark" size="xl" text="VideoCaptureCore"]
DV (Digital Video) is a professional-grade digital video format widely used in the broadcasting and film industry. Originally developed for camcorders, DV provides exceptional quality while maintaining reasonable file sizes, making it suitable for both consumer and professional video production environments.
## Understanding DV Format
DV format offers several advantages for video capture applications:
- **High-quality video** with minimal compression artifacts
- **Consistent frame rate** suitable for broadcast standards
- **Efficient compression** with predictable file sizes
- **Industry-standard compatibility** across editing platforms
- **Frame-accurate editing** capabilities
DV streams are typically stored either directly on tape (in traditional DV camcorders) or as digital files using containers like AVI or MKV. The format uses a specific codec for video compression along with PCM audio, creating a reliable standard for video production workflows.
## Implementation Options
When implementing DV capture in your .NET applications, you have two primary approaches:
1. **Direct capture without recompression** - Requires a DV/HDV camcorder that outputs native DV
2. **Capture with recompression** - Works with any video source but requires processing power
Each method has specific hardware requirements and performance considerations that will be covered in detail below.
## Setting Up Your Development Environment
Before implementing DV capture functionality, ensure your development environment includes:
1. The VideoCaptureCore component from the Video Capture SDK
2. Proper video capture device drivers
3. Required runtime redistributables (detailed at the end of this document)
## Direct DV Capture Without Recompression
This method provides the highest quality output with minimal processing overhead, but requires specialized hardware.
### Hardware Requirements
To capture DV without recompression, you'll need:
- A DV or HDV camcorder with FireWire (IEEE 1394) output
- A compatible FireWire port on your capture system
- Sufficient disk speed to handle the DV data stream (approximately 3.6 MB/s)
### Implementation Steps
#### Step 1: Configure the Video Capture Device
First, ensure your DV camcorder is properly connected and recognized by the system. The device should appear in the available capture devices list.
```cs
// Select your DV camcorder from the available devices
VideoCapture1.Video_CaptureDevice = ...
```
#### Step 2: Set DV as Output Format
Configure the output format to use direct DV capture without recompression:
```cs
VideoCapture1.Output_Format = new DirectCaptureDVOutput();
```
#### Step 3: Configure Capture Mode and Output File
Specify the capture mode and destination file:
```cs
VideoCapture1.Mode = VideoCaptureMode.VideoCapture;
VideoCapture1.Output_Filename = "captured_footage.avi";
```
#### Step 4: Start the Capture Process
Initiate the capture process either synchronously or asynchronously:
```cs
// Asynchronous capture (recommended for UI applications)
await VideoCapture1.StartAsync();
// Or synchronous capture (for console applications)
// VideoCapture1.Start();
```
#### Step 5: Stop Capture When Finished
When the desired footage has been captured:
```cs
await VideoCapture1.StopAsync();
```
## DV Capture With Recompression
This method allows you to use any video source to create DV-compatible files, though it requires more processing power.
### Hardware Considerations
For recompression-based DV capture, you'll need:
- Any compatible video capture device (webcam, capture card, etc.)
- Sufficient CPU processing power for real-time DV encoding
- Adequate system memory for buffer processing
### Implementation Process
#### Step 1: Configure Your Video Source
Select and configure any supported video capture device:
```cs
// Select video source
VideoCapture1.Video_CaptureDevice = ...
// Configure audio source (if separate)
VideoCapture1.Audio_CaptureDevice = ...
```
#### Step 2: Configure DV Output Parameters
Create and configure a DVOutput object with appropriate settings:
```cs
var dvOutput = new DVOutput();
// Audio configuration
dvOutput.Audio_Channels = 2;
dvOutput.Audio_SampleRate = 44100;
// Video format - PAL (Europe/Asia) or NTSC (North America/Japan)
dvOutput.Video_Format = DVVideoFormat.PAL;
// Alternatively: DVVideoFormat.NTSC
// Use Type 2 DV file format (recommended for most applications)
dvOutput.Type2 = true;
// Apply the configuration
VideoCapture1.Output_Format = dvOutput;
```
#### Step 3: Set Capture Mode and Output File
```cs
VideoCapture1.Mode = VideoCaptureMode.VideoCapture;
VideoCapture1.Output_Filename = "recompressed_footage.avi";
```
#### Step 4: Initiate and Manage Capture
```cs
// Start capture
await VideoCapture1.StartAsync();
// Stop capture when done
await VideoCapture1.StopAsync();
```
### Custom Audio Settings
While DV typically uses 48 kHz audio, you can configure alternative settings:
```cs
dvOutput.Audio_SampleRate = 48000; // Professional standard
dvOutput.Audio_Channels = 2; // Stereo
dvOutput.Audio_BitsPerSample = 16; // 16-bit audio
```
## Error Handling and Troubleshooting
Implement proper error handling to manage common DV capture issues:
```cs
VideoCapture1.OnError += (sender, args) =>
{
// Log error details
LogError($"Capture error: {args.Message}");
// Safely stop capture if needed
try
{
VideoCapture1.Stop();
}
catch
{
// Handle secondary exceptions
}
// Notify user
NotifyUser("Capture stopped due to an error. Check logs for details.");
};
```
## Performance Optimization Tips
To ensure smooth DV capture performance:
1. **Disk speed**: Use SSDs or high-performance HDDs for capture storage
2. **Memory allocation**: Increase buffer size for more stable capture
3. **CPU priority**: Consider increasing the process priority for capture operations
4. **Background processes**: Minimize other activities during capture
5. **Dropped frames**: Monitor and log frame drops to identify bottlenecks
## Required Redistributables
To deploy your DV capture application, include the following redistributables:
- Video capture redistributables:
- [x86 version](https://www.nuget.org/packages/VisioForge.DotNet.Core.Redist.VideoCapture.x86/)
- [x64 version](https://www.nuget.org/packages/VisioForge.DotNet.Core.Redist.VideoCapture.x64/)
## Conclusion
Implementing DV capture in your .NET applications provides a professional-grade video acquisition solution with excellent quality and compatibility. Whether using direct capture from DV devices or recompression from standard sources, the SDK provides flexible options to meet your requirements.
For further information and sample implementations, visit our [GitHub repository](https://github.com/visioforge/.Net-SDK-s-samples) containing additional code examples and integration patterns.
---END OF PAGE---
# Local File: .\dotnet\videocapture\video-capture\index.md
---
title: Video Capture SDK .Net for Advanced Recording
description: Powerful .NET Video Capture SDK offering extensive format support, hardware integration, and flexible implementation options for developers building professional recording applications. Supports MP4, WebM, AVI, WMV, and specialized formats.
sidebar_label: Video Capture
order: 11
---
# Video Capture SDK for .NET Developers
[!badge size="xl" target="blank" variant="info" text="Video Capture SDK .Net"](https://www.visioforge.com/video-capture-sdk-net)
## Introduction
Our Video Capture SDK for .NET equips developers with a powerful, versatile solution for implementing professional-grade video recording capabilities in their applications. Designed specifically for .NET environments, this SDK provides seamless integration with your existing codebase while delivering exceptional performance and reliability.
## Key Capabilities
- **Multi-source capture** - Record from webcams, capture cards, and other video devices
- **Real-time processing** - Apply filters and effects during capture
- **Customizable quality settings** - Control bitrate, framerate, and resolution
- **Event-driven architecture** - Respond to capture events in your application
- **Multi-platform support** - Works across Windows desktop environments
## Extensive Format Support
Our SDK supports a comprehensive range of output formats to meet diverse project requirements, ensuring your applications can deliver video in exactly the format your users need:
### Standard Video Formats
- [MP4 (H.264/AAC)](../../general/output-formats/mp4.md) - Industry standard format offering excellent compatibility across devices and platforms, ideal for distribution and streaming applications
- [WebM](../../general/output-formats/webm.md) - Open-source format optimized for web applications with efficient compression and broad browser support
- [AVI](../../general/output-formats/avi.md) - Classic container format with widespread compatibility and minimal processing overhead, supporting virtually any DirectShow-compatible codec
- [WMV](../../general/output-formats/wmv.md) - Microsoft's video format providing good compression ratios and integration with Windows environments
### Professional & Broadcast Formats
- [MKV (Matroska)](../../general/output-formats/mkv.md) - Flexible container format supporting multiple audio, video, and subtitle tracks, ideal for archiving and high-quality storage
- [MOV (QuickTime)](../../general/output-formats/mov.md) - Apple's container format widely used in professional video editing and production workflows
- [MPEG-TS (Transport Stream)](../../general/output-formats/mpegts.md) - Format optimized for broadcasting and streaming applications with robust error correction
- [MXF (Material Exchange Format)](../../general/output-formats/mxf.md) - Professional video production format used in broadcast and post-production environments
### Specialized Output Options
- [GIF (Graphics Interchange Format)](../../general/output-formats/gif.md) - Perfect for creating short, looping animations with wide web compatibility
- [DV (Digital Video)](dv.md) - Professional-grade format commonly used with digital camcorders, preserving high-quality video for editing workflows
- [FFMPEG Integration](../../general/output-formats/ffmpeg-exe.md) - Advanced encoding options leveraging the powerful FFMPEG library for specialized encoding requirements
- [Custom Output Solutions](../../general/output-formats/custom.md) - Create your own format specifications and processing pipelines for unique application needs
### Hardware-Optimized Capture
- [MPEG-2 Camcorder Integration](mpeg2-camcorder.md) - Direct capture from digital camcorders with hardware-optimized encoding for maximum efficiency
- [MPEG-2 TV Tuner with Hardware Encoding](mpeg2-tvtuner.md) - Specially optimized for television capture devices, utilizing hardware acceleration when available
## Advanced Video Encoders
Our SDK incorporates multiple advanced video encoders to provide optimal compression efficiency and performance for different capture scenarios:
### Modern High-Efficiency Encoders
- [H.264 (AVC)](../../general/video-encoders/h264.md) - Industry-standard encoder offering excellent compatibility and multiple hardware acceleration options from NVIDIA, AMD, and Intel
- [HEVC (H.265)](../../general/video-encoders/hevc.md) - Next-generation encoder providing ~50% better compression than H.264 with support for 4K and HDR content
- [AV1](../../general/video-encoders/av1.md) - Royalty-free open standard delivering superior compression efficiency, ideal for web streaming applications
### Specialized & Legacy Encoders
- [MJPEG](../../general/video-encoders/mjpeg.md) - Motion JPEG encoder providing low-latency frame-by-frame compression with hardware and software implementations
- [VP8/VP9](../../general/video-encoders/vp8-vp9.md) - Google's open-source codecs offering competitive quality-to-bitrate ratios for WebM containers
### Hardware Acceleration Support
Our encoders support hardware acceleration from major vendors:
- **NVIDIA NVENC** - GPU-accelerated encoding with minimal CPU usage
- **AMD AMF** - Advanced Media Framework for efficient AMD GPU encoding
- **Intel QuickSync** - Intel's hardware-accelerated video processing
- **Software Fallbacks** - Comprehensive software implementations when hardware acceleration isn't available
For detailed encoder specifications, configuration options, and performance comparisons, visit our [Video Encoders Guide](../../general/video-encoders/index.md).
## Advanced Implementation Techniques
- [Concurrent Preview and Capture](separate-capture.md) - Implement simultaneous preview and recording functionality for improved user experience
- **Memory Optimization** - Best practices for managing memory during long recording sessions
- **Thread Management** - Guidelines for proper threading to ensure responsive applications
## Developer Resources
For additional implementation examples, detailed documentation, and sample code, visit our [GitHub repository](https://github.com/visioforge/.Net-SDK-s-samples).
---END OF PAGE---
# Local File: .\dotnet\videocapture\video-capture\mpeg2-camcorder.md
---
title: Capture Camcorder Video to MPEG-2 Format in .NET
description: Learn how to implement high-quality video capture from camcorders to MPEG-2 format in your .NET applications. This developer guide covers implementation steps, code examples, performance optimization techniques, and troubleshooting tips.
sidebar_label: MPEG-2 File from Camcorder
order: 15
---
# Capturing Camcorder Video to MPEG-2 Format
[!badge size="xl" target="blank" variant="info" text="Video Capture SDK .Net"](https://www.visioforge.com/video-capture-sdk-net) [!badge variant="dark" size="xl" text="VideoCaptureCore"]
## Introduction
MPEG-2 remains a reliable video encoding standard widely used in professional video workflows. This guide shows how to implement camcorder-to-MPEG-2 capture functionality in your .NET applications.
MPEG-2 (Moving Picture Experts Group 2) was established in 1995 as an industry standard for digital video and audio encoding. Despite newer formats, MPEG-2 continues to be valued for its optimal balance between compression efficiency and video quality, making it particularly suitable for applications requiring high fidelity video capture from camcorders.
## Why Use MPEG-2 for Camcorder Capture?
MPEG-2 offers several advantages for developers implementing camcorder capture functionality:
- **Widespread compatibility** with video editing software and playback devices
- **Efficient compression** that preserves visual quality at reasonable file sizes
- **Robust handling** of interlaced video content (common in camcorders)
- **Industry standard** that ensures long-term support and compatibility
- **Lower processing requirements** compared to more complex modern codecs
## Implementation Guide
### Required Dependencies
Before implementing camcorder-to-MPEG-2 capture, ensure your project includes:
- Video Capture SDK .NET (VideoCaptureCore component)
- Video capture redistributables:
- [x86 package](https://www.nuget.org/packages/VisioForge.DotNet.Core.Redist.VideoCapture.x86/)
- [x64 package](https://www.nuget.org/packages/VisioForge.DotNet.Core.Redist.VideoCapture.x64/)
Install these packages using NuGet Package Manager:
```cmd
Install-Package VisioForge.DotNet.Core.Redist.VideoCapture.x64
```
### Basic Implementation
The following code demonstrates how to set up and execute a basic camcorder-to-MPEG-2 capture:
```cs
// Initialize video capture component
using var videoCapture = new VideoCapture();
// Configure MPEG-2 output format
videoCapture.Output_Format = new DirectCaptureMPEGOutput();
// Specify capture mode
videoCapture.Mode = VideoCaptureMode.VideoCapture;
// Set output file path
videoCapture.Output_Filename = "captured_video.mpg";
// Begin capture process (asynchronously)
await videoCapture.StartAsync();
// ... Additional code to manage the capture process
// Stop capture when complete
await videoCapture.StopAsync();
```
### Selecting Input Devices
To ensure your application captures from the correct camcorder:
```cs
// List available video input devices
foreach (var device in videoCapture.Video_CaptureDevices)
{
Console.WriteLine($"Device: {device.Name}");
}
// Select a specific camcorder and format
videoCapture.Video_CaptureDevice = ...
```
## Advanced Features
### Audio Configuration
Configure audio settings for optimal results:
```cs
// List available audio devices
foreach (var device in videoCapture.Audio_CaptureDevices)
{
Console.WriteLine($"Audio device: {device.Name}");
}
// Select specific audio device and format
videoCapture.Audio_CaptureDevice = ...
```
### Event Handling
Monitor and respond to events:
```cs
// Subscribe to status change events
videoCapture.OnError += (sender, args) =>
{
Console.WriteLine($"Error: {args.Message}");
};
```
### Memory Management
Ensure proper resource cleanup:
```cs
// Implement proper disposal
public async Task StopAndDisposeCapture()
{
if (videoCapture != null)
{
if (videoCapture.State == VideoCaptureState.Running)
{
await videoCapture.StopAsync();
}
videoCapture.Dispose();
}
}
```
## Troubleshooting
If you encounter issues with your MPEG-2 camcorder capture:
1. **Verify device compatibility** - Ensure your camcorder is properly recognized
2. **Check driver installation** - Update to the latest device drivers
3. **Monitor system resources** - Capture can be resource-intensive
4. **Inspect connection quality** - USB or FireWire issues can affect stability
5. **Test with different resolutions** - Lower resolutions may perform better
## Conclusion
Implementing MPEG-2 capture from camcorders provides a reliable solution for applications requiring high-quality video capture with broad compatibility. By following the techniques outlined in this guide, developers can create robust video capture functionality that maintains the balance between quality and efficiency that MPEG-2 is known for.
For more advanced usage scenarios and detailed examples, visit our [GitHub repository](https://github.com/visioforge/.Net-SDK-s-samples) containing additional code samples and implementation guides.
---END OF PAGE---
# Local File: .\dotnet\videocapture\video-capture\mpeg2-tvtuner.md
---
title: MPEG-2 Capture with TV Tuner Hardware Encoder
description: Learn how to implement TV tuner video capture to MPEG-2 files in .NET applications. Step-by-step guide with code examples for WPF, WinForms, and console applications. Improve your media streaming applications with hardware acceleration.
sidebar_label: MPEG-2 File Using TV Tuner with Internal MPEG Encoder
order: 14
---
# MPEG-2 Video Capture Using TV Tuner Hardware Encoder in .NET
[!badge size="xl" target="blank" variant="info" text="Video Capture SDK .Net"](https://www.visioforge.com/video-capture-sdk-net) [!badge variant="dark" size="xl" text="VideoCaptureCore"]
## Introduction to MPEG-2 Video Capture
MPEG-2, introduced in 1995, revolutionized digital video as a standard for "the generic coding of moving pictures and associated audio information." This format remains widely implemented across multiple platforms including digital television broadcasting, DVD video, and various streaming applications. Despite being an older standard, MPEG-2 continues to be relevant in specific broadcast scenarios due to its balance of quality and efficiency.
The ability to capture video directly to MPEG-2 format using hardware encoders provides significant advantages for developers building media applications. Hardware encoding offloads intensive processing from the CPU, resulting in better system performance and more efficient battery usage on portable devices.
## Why Use Hardware-Accelerated MPEG-2 Encoding?
Hardware encoding offers several distinct advantages for video capture applications:
1. **Reduced CPU Usage**: By utilizing dedicated encoding hardware, your application can maintain responsive performance while capturing video
2. **Improved Battery Life**: Critical for portable applications where energy efficiency matters
3. **Real-Time Encoding**: Hardware encoders can process high-resolution video in real-time
4. **Consistent Quality**: Hardware encoders deliver reliable encoding performance
TV tuners with built-in MPEG-2 hardware encoders are particularly valuable for applications that need to capture broadcast content efficiently. These devices handle both the tuning and encoding processes, simplifying your application architecture.
## Implementation Guide
This guide walks through implementing MPEG-2 video capture using TV tuners with internal MPEG encoders in .NET applications. The code examples work across WPF, WinForms, and console applications.
### Prerequisites
Before implementing MPEG-2 video capture, ensure you have:
- Installed the Video Capture SDK .Net
- A compatible TV tuner device with internal MPEG-2 encoding capability
- Properly configured redist packages for your target platform
- Basic understanding of video capture concepts in .NET
### Device Configuration
[First, configure the video capture device](../video-sources/video-capture-devices/index.md) using the standard procedures. This includes selecting the correct input device and configuring basic video parameters.
The TV tuner must be properly installed and recognized by your operating system before it can be accessed by your application. Use the Windows Device Manager to verify the device is correctly installed and functioning.
### Step 1: Enumerate Available MPEG-2 Hardware Encoders
Your first task is to discover which MPEG-2 hardware encoders are available in the system. This allows users to select the appropriate encoder for their needs:
```cs
// Get all hardware video encoders available on the system
foreach (var specialFilter in VideoCapture1.Special_Filters(SpecialFilterType.HardwareVideoEncoder))
{
// Add each encoder to a dropdown or selection list
cbMPEGEncoder.Items.Add(specialFilter);
}
```
This code enumerates all hardware video encoders and populates a selection interface element, allowing users to choose their preferred encoding device.
### Step 2: Select the MPEG-2 Encoder
Once the user has selected a hardware encoder, set it as the active encoder for the capture session:
```cs
// Apply the selected MPEG-2 encoder to the video capture device
VideoCapture1.Video_CaptureDevice.InternalMPEGEncoder_Name = cbMPEGEncoder.Text;
```
This line configures the video capture component to use the hardware encoder selected by the user. The `InternalMPEGEncoder_Name` property accepts the name of the encoder device exactly as returned by the `Special_Filters` enumeration.
### Step 3: Configure DirectCapture MPEG Output
Next, configure the output format to use DirectCapture MPEG, which optimizes the capture pipeline for hardware-encoded MPEG-2:
```cs
// Set the output format for MPEG-2 capture
VideoCapture1.Output_Format = new DirectCaptureMPEGOutput();
```
The `DirectCaptureMPEGOutput` class handles the specific requirements for MPEG-2 formatted output, including proper container formatting and stream multiplexing.
### Step 4: Set Video Capture Mode and Start Capturing
Finally, configure the capture mode, specify the output filename, and start the capture process:
```cs
// Configure the capture mode for video recording
VideoCapture1.Mode = VideoCaptureMode.VideoCapture;
// Set the output filename for the captured MPEG-2 file
VideoCapture1.Output_Filename = "output.mpg";
// Start the asynchronous capture process
await VideoCapture1.StartAsync();
```
The `StartAsync` method begins the capture process asynchronously, allowing your application to remain responsive during capture.
### Audio Configuration
Proper audio configuration is essential for complete MPEG-2 capture. Most TV tuners with MPEG-2 encoders will handle audio automatically, but you can verify and adjust settings:
```cs
// Ensure audio is enabled for the capture
VideoCapture1.Audio_RecordAudio = true;
```
### Handling Capture Events
Implementing event handlers improves user experience by providing feedback during the capture process:
```cs
// Handle errors during capture
VideoCapture1.OnError += (sender, args) =>
{
// Log or display error information
Console.WriteLine($"Error: {args.Message}");
};
```
## Performance Considerations
When capturing video with hardware MPEG-2 encoders, consider these performance factors:
1. **Disk Speed**: Ensure your storage device can handle the sustained write speeds required for MPEG-2 capture
2. **Buffer Settings**: Adjust buffer sizes based on available memory and system performance
3. **Background Processing**: Minimize CPU-intensive tasks during capture to prevent frame drops
4. **Thermal Management**: Extended capture sessions may cause device heating; monitor system temperatures
## Troubleshooting Common Issues
### Encoder Not Found
If your application cannot find hardware encoders, verify:
- The device is properly connected and powered
- Appropriate drivers are installed
- The device supports MPEG-2 hardware encoding
### Poor Video Quality
If captured video quality is unsatisfactory:
- Check signal strength from the TV source
- Verify encoder quality settings
- Ensure proper lighting conditions if using a camera source
### Capture Failures
For capture failures or crashes:
- Verify the output directory is writable
- Check for sufficient disk space
- Ensure no other applications are using the capture device
## Required Redistributables
For proper operation, your application needs these redist packages:
- Video capture redist [x86](https://www.nuget.org/packages/VisioForge.DotNet.Core.Redist.VideoCapture.x86/) [x64](https://www.nuget.org/packages/VisioForge.DotNet.Core.Redist.VideoCapture.x64/)
Install the appropriate package based on your application's target architecture.
## Conclusion
Implementing MPEG-2 video capture using TV tuners with hardware encoders enables efficient broadcast recording in your .NET applications. The hardware acceleration provides performance benefits while maintaining good video quality. By following the steps outlined in this guide, you can create robust video capture solutions for various broadcast applications.
---
Visit our [GitHub](https://github.com/visioforge/.Net-SDK-s-samples) page to get more code samples.
---END OF PAGE---
# Local File: .\dotnet\videocapture\video-capture\separate-capture.md
---
title: Start/Stop Video Capture Without Stopping Preview
description: Learn how to implement separate video capture and preview management in your .NET applications. This guide provides step-by-step code examples for efficiently starting and stopping video capture without interrupting the preview functionality.
sidebar_label: Start/Stop Capture Without Stopping Preview
order: 1
---
# Managing Video Capture and Preview Independently in .NET
[!badge size="xl" target="blank" variant="info" text="Video Capture SDK .Net"](https://www.visioforge.com/video-capture-sdk-net)
## Introduction
When developing video applications, it's often necessary to start or stop recording while maintaining an uninterrupted preview. This capability is essential for creating professional video recording software, security applications, or any scenario where continuous visual feedback is required regardless of the recording state.
This guide demonstrates how to independently control video capture operations without affecting the preview display. This technique applies to various capture scenarios including camera recording, screen capture, and other input sources.
## Why Separate Preview and Capture?
There are several advantages to separating preview and capture functionality:
1. **Enhanced User Experience** - Users can continuously see what's being captured, even when not recording
2. **Resource Efficiency** - Prevents unnecessary stopping/restarting of video streams
3. **Reduced Latency** - Eliminates the delay associated with reestablishing preview after stopping a recording
4. **Greater Control** - Provides more precise management of recording sessions
## Implementation Options
There are two main approaches to implementing this functionality depending on which SDK version you're using:
+++ VideoCaptureCoreX
### Method 1: Using VideoCaptureCoreX
The VideoCaptureCoreX approach offers a streamlined way to manage outputs and control capture states.
#### Step 1: Configure the Output
First, add a new output with your desired settings. In this example, we'll use MP4 output. Note the `false` parameter which indicates we don't want to start capture immediately:
```cs
VideoCapture1.Outputs_Add(new MP4Output("output.mp4"), false); // false - don't start capture immediately.
```
#### Step 2: Start Preview Only
Next, start the video preview without initiating capture:
```cs
await VideoCapture1.StartAsync();
```
#### Step 3: Start Capture When Needed
When you want to begin recording, start the actual video capture to your output destination:
```cs
await VideoCapture1.StartCaptureAsync(0, "output.mp4"); // 0 - index of the output.
```
#### Step 4: Stop Capture While Maintaining Preview
To stop recording while keeping the preview active:
```cs
await VideoCapture1.StopCaptureAsync(0); // 0 - index of the output.
```
### Advanced Output Management
You can add multiple outputs with different settings:
```cs
// Add MP4 output
VideoCapture1.Outputs_Add(new MP4Output("primary_recording.mp4"), false);
// Add additional output for streaming
VideoCapture1.Outputs_Add(new RTMPOutput("rtmp://streaming.example.com/live/stream"), false);
// Start preview
await VideoCapture1.StartAsync();
// Start recording to both outputs
await VideoCapture1.StartCaptureAsync(0, "primary_recording.mp4");
await VideoCapture1.StartCaptureAsync(1, "rtmp://streaming.example.com/live/stream");
```
### Output Control With Indices
When managing multiple outputs, the index parameter becomes crucial:
```cs
// Stop the MP4 recording but continue streaming
await VideoCapture1.StopCaptureAsync(0);
// Later, stop the stream too
await VideoCapture1.StopCaptureAsync(1);
```
+++ VideoCaptureCore
### Method 2: Using VideoCaptureCore
The older VideoCaptureCore approach uses a different pattern with explicit separate capture enablement.
#### Step 1: Enable Separate Capture Mode
Begin by enabling the separate capture functionality:
```cs
VideoCapture1.SeparateCapture_Enabled = true;
```
#### Step 2: Configure Capture Mode
Set the appropriate capture mode for your application:
```cs
VideoCapture1.Mode = VideoCaptureMode.VideoCapture;
// Other options include:
// VideoCaptureMode.ScreenCapture
// VideoCaptureMode.AudioCapture
// etc.
```
#### Step 3: Configure Output Format
Set your desired output format configuration:
```cs
VideoCapture1.Output_Format = ...
```
#### Step 4: Start Preview
Begin the preview without starting the actual recording:
```cs
await VideoCapture1.StartAsync();
```
#### Step 5: Start Capture When Needed
When you want to begin recording, start the separate capture process:
```cs
await VideoCapture1.SeparateCapture_StartAsync();
```
#### Step 6: Stop Capture While Maintaining Preview
To stop recording while keeping the preview active:
```cs
await VideoCapture1.SeparateCapture_StopAsync();
```
### Dynamic Filename Changes
A key advantage of the separate capture approach is the ability to change the output filename during an active recording session:
```cs
await VideoCapture1.SeparateCapture_ChangeFilenameOnTheFlyAsync("newfile.mp4");
```
This is particularly useful for:
- Creating sequential file segments
- Implementing file size limits with automatic continuation
- Responding to user-initiated filename changes
+++
## Implementation Considerations
### Memory and Performance
When implementing separate capture and preview functionality, be mindful of these performance considerations:
- **Memory Usage**: Maintaining an active preview while not capturing consumes system resources
- **CPU Impact**: Encoding operations during capture increase CPU load
- **Buffer Management**: Ensure proper buffer handling to prevent memory leaks
### UI Considerations
Your application UI should clearly indicate the current state of both preview and capture:
- Use different visual indicators for preview-only vs. active recording
- Implement appropriate UI controls for each state
- Consider adding recording timers and indicators
## Integration Best Practices
For optimal performance and reliability:
1. **Initialize Early**: Set up your capture configuration at application startup
2. **Release Resources**: Always stop capture and preview when they're no longer needed
3. **Handle Device Changes**: Implement proper detection and handling of device connection/disconnection
4. **Thread Management**: Perform capture operations on background threads to prevent UI freezing
## Conclusion
Separating video capture and preview operations provides greater flexibility and a better user experience in video applications. By following the approaches outlined in this guide, you can implement this functionality in your .NET applications with either the VideoCaptureCoreX or VideoCaptureCore components.
These techniques can be applied to a wide range of scenarios including webcam recording, screen capture, surveillance systems, and professional video production tools.
---
Visit our [GitHub](https://github.com/visioforge/.Net-SDK-s-samples) page to get more code samples.
---END OF PAGE---
# Local File: .\dotnet\videocapture\video-processing\index.md
---
title: Advanced Video Processing with .NET SDK
description: Learn how to enhance your video capture projects with resizing, cropping, rotation, text overlays, image effects, color adjustments, and special filters using our powerful .NET video processing tools for developers.
sidebar_label: Video Processing And Effects
order: 13
---
# Video Processing and Effects for .NET Developers
[!badge size="xl" target="blank" variant="info" text="Video Capture SDK .Net"](https://www.visioforge.com/video-capture-sdk-net)
## Transform Your Video Content with Powerful Processing Tools
Our .NET SDK offers developers a complete toolkit for modifying and enhancing video streams during the capture process. With our robust API, you can implement professional-grade video manipulations with minimal code.
## Key Features and Capabilities
### Dynamic Resizing and Cropping
Precisely control your video dimensions to match any requirement. Our SDK enables you to:
- Adjust resolution on-the-fly to optimize for different platforms
- Crop unwanted areas from your video frame
- Maintain aspect ratios or create custom dimensions
- Scale content proportionally for different screen sizes
### Professional Overlay System
Enhance your videos with rich content overlays:
- **Text Overlays**: Add customizable captions, titles, timestamps, or any text element with precise control over fonts, colors, positioning, and animations
- **Image Overlays**: Incorporate logos, watermarks, or informational graphics with transparency support
- **Animated GIF Integration**: Embed animated elements that bring movement and visual interest to static scenes
### Advanced Color Manipulation
Fine-tune the visual characteristics of your video with our color adjustment tools:
- Modify brightness, contrast, and gamma for perfect exposure
- Adjust hue and saturation to create specific moods or correct color issues
- Apply color balance adjustments for professional-looking results
- Create custom color grading profiles for consistent visual styling
### Creative Effects Library
Transform ordinary footage with our collection of real-time effects:
- Apply sepia, grayscale, or noir filters for artistic expression
- Use fish-eye, barrel distortion, or other perspective effects
- Implement blur, sharpen, or other focus-based modifications
- Create picture-in-picture and custom compositing effects
## Detailed Documentation
Explore our comprehensive guides for implementing specific features:
- [Video Effects Implementation Guide](video-effects.md)
- [Resizing and Cropping Techniques](resize-crop.md)
- [Multi-Stream Video Mixing](video-mixing.md)
## Developer Resources
For practical implementation examples and code snippets, visit our [GitHub repository](https://github.com/visioforge/.Net-SDK-s-samples) containing extensive sample applications and projects.
---END OF PAGE---
# Local File: .\dotnet\videocapture\video-processing\resize-crop.md
---
title: Resize and Crop Operations in Video Capture SDK .Net
description: Learn how to implement professional video resizing and cropping in your .NET applications with optimized code examples for webcams, screen captures, IP cameras, and other video sources. Improve video quality with multiple resize algorithms.
sidebar_label: Video resize and crop
---
# Video Resize and Crop Operations for .NET Developers
[!badge size="xl" target="blank" variant="info" text="Video Capture SDK .Net"](https://www.visioforge.com/video-capture-sdk-net)
## Introduction to Video Processing
When working with video streams in .NET applications, controlling the dimensions and focus area of your video is essential for creating professional applications. This guide explains how to implement resize and crop operations on video streams from webcams, screen captures, IP cameras, and other sources.
## Video Resizing Implementation
Resizing allows you to standardize video dimensions across different video sources, which is particularly useful when working with multiple camera inputs or when targeting specific output formats.
### Step 1: Enable Resize Functionality
First, enable the resize or crop feature in your application:
```cs
VideoCapture1.Video_ResizeOrCrop_Enabled = true;
```
### Step 2: Configure Resize Parameters
Set your desired width and height, and determine whether to maintain aspect ratio with letterboxing:
```cs
VideoCapture1.Video_Resize = new VideoResizeSettings
{
Width = 640,
Height = 480,
LetterBox = true
};
```
### Step 3: Select Appropriate Resize Algorithm
Choose the algorithm that best fits your performance and quality requirements:
```cs
switch (cbResizeMode.SelectedIndex)
{
case 0: VideoCapture1.Video_Resize.Mode = VideoResizeMode.NearestNeighbor;
break;
case 1: VideoCapture1.Video_Resize.Mode = VideoResizeMode.Bilinear;
break;
case 2: VideoCapture1.Video_Resize.Mode = VideoResizeMode.Bicubic;
break;
case 3: VideoCapture1.Video_Resize.Mode = VideoResizeMode.Lancroz;
break;
}
```
## Video Cropping Implementation
Cropping allows you to focus on specific regions of interest in your video feed, removing unwanted areas from the frame.
### Step 1: Enable Crop Functionality
Similar to resizing, first enable the crop functionality:
```cs
VideoCapture1.Video_ResizeOrCrop_Enabled = true;
```
### Step 2: Define Crop Region
Specify the crop region by setting the margins to remove from each edge of the video frame:
```cs
VideoCapture1.Video_Crop = new VideoCropSettings(40, 0, 40, 0);
```
## Performance Considerations
When implementing resize and crop operations in production applications, consider the following:
- Resizing operations require CPU resources, especially at higher resolutions
- More complex algorithms (Bicubic, Lanczos) provide better quality but require more processing power
- For real-time applications, balance quality and performance based on your target hardware
## Required Dependencies
Ensure your project includes the necessary redistributable packages:
- Video capture redist [x86](https://www.nuget.org/packages/VisioForge.DotNet.Core.Redist.VideoCapture.x86/) [x64](https://www.nuget.org/packages/VisioForge.DotNet.Core.Redist.VideoCapture.x64/)
## Additional Resources
For more advanced implementations and code samples, visit our [GitHub repository](https://github.com/visioforge/.Net-SDK-s-samples) containing numerous examples for .NET developers.
---END OF PAGE---
# Local File: .\dotnet\videocapture\video-processing\video-effects.md
---
title: Applying Real-Time Video Effects in .NET
description: Learn how to enhance your video capture applications by implementing real-time video effects in .NET. Step-by-step guide for developers to add professional video filters and effects during capture from various sources.
sidebar_label: Video effects
---
# Video effects
[!badge size="xl" target="blank" variant="info" text="Video Capture SDK .Net"](https://www.visioforge.com/video-capture-sdk-net)
Video Capture SDK .Net allows you to apply various video effects to the video captured from different sources. The video effects are applied in realtime.
Read the [Video Effects in .Net SDKs](../../general/video-effects/index.md) article to learn more about video effects in Video Capture SDK .Net.
## Required redists
- Video capture redist [x86](https://www.nuget.org/packages/VisioForge.DotNet.Core.Redist.VideoCapture.x86/) [x64](https://www.nuget.org/packages/VisioForge.DotNet.Core.Redist.VideoCapture.x64/)
---
Visit our [GitHub](https://github.com/visioforge/.Net-SDK-s-samples) page to get more code samples.
---END OF PAGE---
# Local File: .\dotnet\videocapture\video-processing\video-mixing.md
---
title: Combining Multiple Video Streams in .NET
description: Learn to implement Picture-in-Picture functionality with multiple video sources in .NET applications. This guide provides complete C# code examples for mixing video streams from cameras, screens, and IP cameras with different resolutions, frame rates, and custom layouts.
sidebar_label: Video streams mixing
---
# Mixing Multiple Video Streams in .NET Applications
[!badge size="xl" target="blank" variant="info" text="Video Capture SDK .Net"](https://www.visioforge.com/video-capture-sdk-net)
## Introduction to Video Stream Mixing
The SDK provides powerful capabilities for mixing several video streams with different resolutions and frame rates. This functionality is essential for creating professional video applications that require Picture-in-Picture effects, multi-camera views, or combined display outputs.
## Key Features of Video Mixing
- Combine multiple video sources in a single output
- Support for different video resolutions and frame rates
- Multiple layout options (horizontal, vertical, grid, custom)
- Real-time position and parameter adjustments
- Transparency and flip controls
- Support for diverse input sources (cameras, screens, IP cameras)
## VideoCaptureCore engine
The implementation process involves three main steps:
1. Setting up the video mixing mode
2. Adding multiple video sources
3. Configuring and adjusting source parameters
Let's explore each step in detail with code examples.
### Setting Video Mixing Mode
The SDK supports various predefined layouts as well as custom configurations. Select the appropriate mode based on your application requirements.
#### Horizontal Stack Layout
This mode arranges all video sources horizontally in a row:
```cs
VideoCapture1.PIP_Mode = PIPMode.Horizontal;
```
#### Vertical Stack Layout
This mode arranges all video sources vertically in a column:
```cs
VideoCapture1.PIP_Mode = PIPMode.Vertical;
```
#### Grid Layout (2×2)
This mode organizes up to four video sources in a square grid:
```cs
VideoCapture1.PIP_Mode = PIPMode.Mode2x2;
```
#### Custom Layout with Specific Resolution
For advanced scenarios, you can define a custom layout with precise output dimensions:
```cs
VideoCapture1.PIP_Mode = PIPMode.Custom;
VideoCapture1.PIP_CustomOutputSize_Set(1920, 1080);
```
### Adding Video Sources
The first configured source serves as the main input, while additional sources can be added using the PIP API.
#### Adding a Video Capture Device
To incorporate a camera or other video capture device:
```cs
VideoCapture1.PIP_Sources_Add_VideoCaptureDevice(
deviceName,
format,
false,
frameRate,
input,
left,
top,
width,
height);
```
#### Adding an IP Camera Source
For network-based cameras:
```cs
var ipCameraSource= new IPCameraSourceSettings
{
URL = "camera url"
};
// Set additional IP camera parameters as needed
// Authentication, protocol, buffering, etc.
VideoCapture1.PIP_Sources_Add_IPCamera(
ipCameraSource,
left,
top,
width,
height);
```
#### Adding a Screen Capture Source
To include desktop or application windows:
```cs
ScreenCaptureSourceSettings screenSource = new ScreenCaptureSourceSettings();
screenSource.Mode = ScreenCaptureMode.Screen;
screenSource.FullScreen = true;
VideoCapture1.PIP_Sources_Add_ScreenSource(
screenSource,
left,
top,
width,
height);
```
### Dynamic Source Adjustments
A major advantage of the SDK is the ability to adjust source parameters in real-time during operation.
#### Repositioning Sources
You can modify the position and dimensions of any source:
```cs
await VideoCapture1.PIP_Sources_SetSourcePositionAsync(
index, // 0 is main source, 1+ are additional sources
left,
top,
width,
height);
```
#### Adjusting Visual Properties
Fine-tune the appearance with transparency and orientation controls:
```cs
int transparency = 127; // Range: 0-255
bool flipX = false;
bool flipY = false;
await VideoCapture1.PIP_Sources_SetSourceSettingsAsync(
index,
transparency,
transparency,
flipX,
flipY);
```
### Required Dependencies
To use video mixing functionality, ensure you include the appropriate redistributable packages:
- Video capture redistributables:
- [x86 Package](https://www.nuget.org/packages/VisioForge.DotNet.Core.Redist.VideoCapture.x86/)
- [x64 Package](https://www.nuget.org/packages/VisioForge.DotNet.Core.Redist.VideoCapture.x64/)
## VideoCaptureCoreX engine
The VideoCaptureCoreX engine is a newer version of the VideoCaptureCore engine that provides additional features and improvements.
### Video Mixing with VideoCaptureCoreX
The VideoCaptureCoreX engine offers a more flexible and powerful approach to video mixing through the `VideoMixerSourceSettings` class. This allows for precise control over multiple video sources and their layout.
#### Basic Setup
```cs
using System;
using System.Threading.Tasks;
using VisioForge.Core.Types.MediaInfo;
using VisioForge.Core.Types.X.Sources;
using VisioForge.Core.Types.X.VideoCapture;
// Create a video mixer with 1080p resolution at 30fps
var videoMixer = new VideoMixerSourceSettings(1920, 1080, VideoFrameRate.FPS_30);
// Initialize the VideoCaptureCoreX engine
var captureX = new VideoCaptureCoreX();
captureX.Video_Source = videoMixer;
```
#### Adding Multiple Sources
You can add various video sources to the mixer, positioning each one exactly where needed:
```cs
// Add a camera as the first source (full screen background)
var cameraSource = new VideoCaptureDeviceSourceSettings();
// Configure camera settings
// ...
var rect = new Rect(0, 0, 1920, 1080);
videoMixer.Add(cameraSource, rect);
// Add a screen capture source in the top-right corner
var screenSource = new ScreenCaptureDX9SourceSettings();
screenSource.CaptureCursor = true;
screenSource.FrameRate = VideoFrameRate.FPS_30;
var rect = new Rect(1280, 0, 640, 480);
videoMixer.Add(screenSource, rect);
```
#### Dynamic Source Management
The VideoCaptureCoreX engine allows for real-time modifications to the video mixer:
```cs
// Change the position of a source (index 1, which is the screen capture)
var mixer = _videoCapture.GetSourceMixerControl();
if (mixer != null)
{
var stream = mixer.Input_Get(1);
if (stream != null)
{
stream.Rectangle = new Rect(0, 0, 1280, 720);
mixer.Input_Update(1, stream);
}
}
```
#### Output Configuration
Configure the output destination for your mixed video:
```cs
// Set up MP4 recording
captureX.Outputs_Add(new MP4Output("output.mp4"));
// Start capturing
await captureX.StartAsync();
// Stop after some time
await Task.Delay(TimeSpan.FromMinutes(5));
await captureX.StopAsync();
```
### Comparison with VideoCaptureCore Engine
| Feature | VideoCaptureCore | VideoCaptureCoreX |
|---------|------------------|-------------------|
| API Style | Method-based approach | Object-oriented with settings classes |
| Flexibility | Predefined layouts | Fully customizable source positioning |
| Source Management | Fixed API for adding sources | Add any source implementing IVideoMixerSource |
| Performance | Good | Enhanced with optimized rendering pipeline |
| Real-time Changes | Limited | Comprehensive source manipulation |
### Required Dependencies
Check the main [Deployment](../deployment.md) page for the latest dependencies.
## Advanced Usage Scenarios
The video mixing capabilities enable numerous application scenarios:
- Multi-camera security monitoring
- Video conferencing with screen sharing
- Broadcasting with commentator overlay
- Educational presentations with multiple inputs
- Gaming streams with player camera
## Troubleshooting Tips
- Ensure hardware resources are sufficient for the number of streams
- Monitor CPU and memory usage during operation
- Consider lower resolutions for smoother performance with many sources
- Test different layout configurations for optimal visual results
---
Visit our [GitHub](https://github.com/visioforge/.Net-SDK-s-samples) page for additional code samples and implementation examples.
---END OF PAGE---
# Local File: .\dotnet\videocapture\video-sources\decklink.md
---
title: ".NET Blackmagic Decklink Integration Guide"
description: Implement professional video capture in .NET with Blackmagic Decklink devices. This developer guide provides code examples for device detection, format handling, configuration, and performance optimization techniques for broadcast-quality video applications.
sidebar_label: Decklink Integration
order: 18
---
# Integrating Blackmagic Decklink Devices with .NET Applications
[!badge size="xl" target="blank" variant="info" text="Video Capture SDK .Net"](https://www.visioforge.com/video-capture-sdk-net) [!badge variant="dark" size="xl" text="VideoCaptureCoreX"] [!badge variant="dark" size="xl" text="VideoCaptureCore"]
## What Are Decklink Devices?
Blackmagic Design's Decklink devices represent industry-standard capture and playback cards designed for professional video production environments. These high-performance hardware solutions deliver exceptional capabilities for developers integrating video capture functionality into .NET applications.
Decklink cards are renowned for their superior technical specifications:
- Support for high-resolution video formats including 4K, 8K, and HD
- Multiple input/output connection options (SDI, HDMI) for flexible integration
- Low-latency performance crucial for real-time broadcasting applications
- Cross-compatibility with major video production software platforms
- Developer-friendly APIs that integrate seamlessly with various programming languages
For .NET developers building professional video applications, Decklink integration provides a reliable foundation for handling broadcast-quality video signal processing.
## Programmatic Device Detection
The first step in implementing Decklink functionality is proper device enumeration. The following code samples demonstrate how to detect available Decklink hardware in your .NET application.
### Enumerating Available Devices
+++ VideoCaptureCore
```csharp
foreach (var device in (await VideoCapture1.Decklink_CaptureDevicesAsync()))
{
cbDecklinkCaptureDevice.Items.Add(device.Name);
}
```
+++ VideoCaptureCoreX
```cs
var videoCaptureDevices = await DeviceEnumerator.Shared.DecklinkVideoSourcesAsync();
if (videoCaptureDevices.Length > 0)
{
foreach (var item in videoCaptureDevices)
{
cbVideoInput.Items.Add(item.Name);
}
cbVideoInput.SelectedIndex = 0;
}
```
When working with VideoCaptureCoreX, you'll also need to enumerate audio sources separately:
```cs
var audioCaptureDevices = await DeviceEnumerator.Shared.DecklinkAudioSourcesAsync();
if (audioCaptureDevices.Length > 0)
{
foreach (var item in audioCaptureDevices)
{
cbAudioInput.Items.Add(item.Name);
}
cbAudioInput.SelectedIndex = 0;
}
```
+++
## Working with Video Formats and Frame Rates
After enumerating devices, the next step involves determining available video formats and frame rates. Decklink cards support numerous professional formats, but the specific options depend on the connected input source.
### Retrieving Format Information
+++ VideoCaptureCore
```csharp
// Enumerate and filter by device name
var deviceItem = (await VideoCapture1.Decklink_CaptureDevicesAsync()).Find(device => device.Name == cbDecklinkCaptureDevice.Text);
if (deviceItem != null)
{
// Read video formats and add to combobox
foreach (var format in (await deviceItem.GetVideoFormatsAsync()))
{
cbDecklinkCaptureVideoFormat.Items.Add(format.Name);
}
// If format does not exist, add a message
if (cbDecklinkCaptureVideoFormat.Items.Count == 0)
{
cbDecklinkCaptureVideoFormat.Items.Add("No input connected");
}
}
```
This approach provides valuable diagnostic information. If no formats are returned, it typically indicates that no active input is connected to the Decklink device. Implementing this check helps users troubleshoot connection issues directly from your application interface.
+++ VideoCaptureCoreX
With VideoCaptureCoreX, you'll work with predefined modes from the DecklinkMode enumeration:
```cs
var decklinkModes = Enum.GetValues(typeof(DecklinkMode));
foreach (var item in decklinkModes)
{
cbVideoMode.Items.Add(item.ToString());
}
```
This approach uses standardized mode settings that must be configured on your Decklink hardware.
+++
## Configuring Decklink as Video Source
Once you've detected devices and identified available formats, you need to configure the Decklink hardware as your capture source. This critical step establishes the connection between hardware and software.
### Setting Source Parameters
+++ VideoCaptureCore
```csharp
VideoCapture1.Decklink_Source = new DecklinkSourceSettings
{
Name = cbDecklinkCaptureDevice.Text,
VideoFormat = cbDecklinkCaptureVideoFormat.Text
};
```
When using VideoCaptureCore, you'll need to specify either `DecklinkSourcePreview` or `DecklinkSourceCapture` mode depending on your application's requirements:
- `DecklinkSourcePreview`: Optimized for real-time monitoring with minimal processing
- `DecklinkSourceCapture`: Configured for high-quality recording with enhanced buffering
+++ VideoCaptureCoreX
VideoCaptureCoreX requires separate configuration of video and audio sources:
```cs
// Create settings for the video source
DecklinkVideoSourceSettings videoSourceSettings = null;
// Device name from the combo box
var deviceName = cbVideoInput.Text;
// Mode from the combobox
var mode = cbVideoMode.Text;
if (!string.IsNullOrEmpty(deviceName) && !string.IsNullOrEmpty(mode))
{
// Find device
var device = (await DeviceEnumerator.Shared.DecklinkVideoSourcesAsync()).FirstOrDefault(x => x.Name == deviceName);
if (device != null)
{
// Create video source settings using device and mode
videoSourceSettings = new DecklinkVideoSourceSettings(device)
{
Mode = (DecklinkMode)Enum.Parse(typeof(DecklinkMode), mode, true)
};
}
}
// Set the video source to the VideoCaptureCoreX object
VideoCapture1.Video_Source = videoSourceSettings;
```
For audio configuration:
```cs
// Create settings for the audio source
DecklinkAudioSourceSettings audioSourceSettings = null;
// Device name from the combobox
deviceName = cbAudioInput.Text;
if (!string.IsNullOrEmpty(deviceName))
{
// Find device
var device = (await DeviceEnumerator.Shared.DecklinkAudioSourcesAsync()).FirstOrDefault(x => x.Name == deviceName);
if (device != null)
{
// Create settings for the audio source using device
audioSourceSettings = new DecklinkAudioSourceSettings(device);
}
}
// Set the audio source to the VideoCaptureCoreX object
VideoCapture1.Audio_Source = audioSourceSettings;
```
This separation offers greater flexibility for advanced scenarios where you might need to process video and audio independently.
+++
## Performance Considerations
When implementing Decklink capture in production environments, consider these performance factors:
1. **Buffer management:** Professional video formats require substantial memory allocation, especially for 4K+ resolutions
2. **CPU utilization:** Real-time encoding of Decklink streams can be processor-intensive
3. **Disk I/O:** When capturing to storage, ensure your write speeds support the data rate of your selected format
4. **Memory bandwidth:** High-resolution uncompressed streams demand significant system resources
Implementing proper error handling around device connection and format detection will improve your application's resilience in production environments.
## Sample Applications and Implementation Examples
Examining working examples provides valuable insights into effective implementation patterns. The SDK includes numerous sample applications demonstrating Decklink integration.
### Reference Applications
+++ VideoCaptureCore
- [Main sample with DeckLink input, video/audio processing and many output formats (WPF)](https://github.com/visioforge/.Net-SDK-s-samples/tree/master/Video%20Capture%20SDK/WPF/CSharp/Main_Demo)
- [Main sample for WinForms](https://github.com/visioforge/.Net-SDK-s-samples/tree/master/Video%20Capture%20SDK/WinForms/CSharp/Main%20Demo)
- [Simple sample with DeckLink input and many output formats (WinForms)](https://github.com/visioforge/.Net-SDK-s-samples/tree/master/Video%20Capture%20SDK/WinForms/CSharp/Decklink%20Demo)
+++ VideoCaptureCoreX
- [Video preview and capture to MP4 or WebM file (WPF)](https://github.com/visioforge/.Net-SDK-s-samples/tree/master/Video%20Capture%20SDK%20X/WPF/CSharp/Decklink%20Demo%20X)
+++
## Best Practices for Integration
Based on extensive field testing and customer implementation experiences, we recommend these best practices:
1. **Always verify device connectivity:** Check for available formats to confirm proper signal connection
2. **Implement graceful fallbacks:** Provide meaningful error messages when expected devices are unavailable
3. **Test with multiple frame rates:** Some applications may behave differently with varied input formats
4. **Manage memory effectively:** High-resolution capture requires proper resource management
5. **Monitor CPU usage:** Encoding operations can be processor-intensive during capture
6. **Provide format details to users:** Give clear information about detected formats and connection status
These recommendations help ensure robust implementations that perform reliably across different hardware configurations and operating conditions.
## Conclusion
Integrating Blackmagic Decklink devices with .NET applications provides powerful capabilities for professional video capture scenarios. By following the implementation patterns outlined in this guide, developers can create stable, high-performance applications that leverage the full capabilities of Decklink hardware.
The Video Capture SDK offers a streamlined approach to working with these professional devices, abstracting much of the complexity while providing the flexibility needed for advanced customization.
---
Visit our [GitHub](https://github.com/visioforge/.Net-SDK-s-samples) page to access additional code samples and implementation resources.
---END OF PAGE---
# Local File: .\dotnet\videocapture\video-sources\dv-camcorder-control.md
---
title: DV Camcorder Integration for .NET Video Capture
description: Complete guide for .NET developers to implement DV/HDV camcorder control in C# applications. Learn essential commands, implementation patterns, and best practices for seamless camcorder integration in WPF, WinForms, and console applications with practical code examples.
sidebar_label: DV Camcorder Control
order: 0
---
# DV Camcorder Control for .NET Applications
[!badge size="xl" target="blank" variant="info" text="Video Capture SDK .Net"](https://www.visioforge.com/video-capture-sdk-net) [!badge variant="dark" size="xl" text="VideoCaptureCore"]
## Introduction to DV Camcorder Integration
Digital Video (DV) camcorders remain valuable tools for high-quality video capture in professional and semi-professional environments. Integrating DV camcorder control into your .NET applications allows for programmatic device management, enabling automated workflows and enhanced user experiences. This guide provides everything you need to implement DV camcorder control in your C# applications.
The VideoCaptureCore component provides a robust API for controlling DV/HDV camcorders through simple, asynchronous method calls. This functionality supports a wide range of camcorder models and can be implemented in WPF, WinForms, and console applications.
## Getting Started with DV Camcorder Control
### Prerequisites
Before implementing DV camcorder control features, ensure you have:
1. A compatible DV/HDV camcorder connected to your system
2. The Video Capture SDK .NET installed in your project
3. Proper device drivers installed on your development machine
### Initial Setup
To begin working with a DV camcorder, you must first:
1. Select the DV camcorder as your video source
2. Configure appropriate source parameters
3. Initialize the video preview or capture functionality
For detailed instructions on selecting and configuring a DV camcorder as your video source, refer to our [video capture device guide](video-capture-devices/index.md).
## Core DV Camcorder API Methods
The SDK provides several methods for controlling and querying DV camcorders:
### Sending Commands
Control your DV device using the `DV_SendCommandAsync` method (or `DV_SendCommand` for synchronous operations). This method accepts a `DVCommand` enumeration value representing the specific operation to perform.
```cs
// Asynchronous command execution
await VideoCapture1.DV_SendCommandAsync(DVCommand.Play);
// Synchronous command execution
VideoCapture1.DV_SendCommand(DVCommand.Play);
```
### Getting Current Mode
Retrieve the current operation mode of your DV device:
```cs
// Asynchronous mode retrieval
DVCommand currentMode = await VideoCapture1.DV_GetModeAsync();
// Synchronous mode retrieval
DVCommand currentMode = VideoCapture1.DV_GetMode();
// Check current mode
if (currentMode == DVCommand.Play)
{
// Camcorder is currently playing
}
```
### Reading Timecode Information
Access the current timecode position of your DV tape:
```cs
// Asynchronous timecode retrieval
Tuple timecodeInfo = await VideoCapture1.DV_GetTimecodeAsync();
// Synchronous timecode retrieval
Tuple timecodeInfo = VideoCapture1.DV_GetTimecode();
if (timecodeInfo != null)
{
// Timecode as TimeSpan (hours, minutes, seconds)
TimeSpan timecode = timecodeInfo.Item1;
// Frame count
uint frameCount = timecodeInfo.Item2;
// Display timecode information
string timecodeDisplay = $"{timecode.Hours:D2}:{timecode.Minutes:D2}:{timecode.Seconds:D2}:{frameCount:D2}";
}
```
## Basic Playback Commands
The following commands represent the essential playback operations supported by most DV camcorders:
### Pause Operation
Temporarily halt the current playback or recording operation:
```cs
await VideoCapture1.DV_SendCommandAsync(DVCommand.Pause);
```
### Play Operation
Begin or resume playback from the current position:
```cs
await VideoCapture1.DV_SendCommandAsync(DVCommand.Play);
```
### Stop Operation
Completely stop the current operation:
```cs
await VideoCapture1.DV_SendCommandAsync(DVCommand.Stop);
```
## Navigation Commands
Navigate through recorded content with these commands:
### Fast Forward
Rapidly advance through recorded content:
```cs
await VideoCapture1.DV_SendCommandAsync(DVCommand.FastForward);
```
### Rewind
Move backward through recorded content:
```cs
await VideoCapture1.DV_SendCommandAsync(DVCommand.Rew);
```
## Advanced DV Camcorder Control
### Frame-by-Frame Navigation
For precise control over playback position, use these frame-accurate navigation commands:
```cs
// Move forward by one frame
await VideoCapture1.DV_SendCommandAsync(DVCommand.StepFw);
// Move backward by one frame
await VideoCapture1.DV_SendCommandAsync(DVCommand.StepRev);
```
### Variable Speed Playback
The SDK supports multiple playback speeds in both forward and reverse directions:
#### Slow Motion Forward Playback
Six levels of slow motion forward playback are available:
```cs
// Slowest forward playback
await VideoCapture1.DV_SendCommandAsync(DVCommand.PlaySlowFwd6);
// Slightly faster slow motion
await VideoCapture1.DV_SendCommandAsync(DVCommand.PlaySlowFwd5);
// Medium slow motion
await VideoCapture1.DV_SendCommandAsync(DVCommand.PlaySlowFwd4);
// Moderately slow playback
await VideoCapture1.DV_SendCommandAsync(DVCommand.PlaySlowFwd3);
// Slightly slow playback
await VideoCapture1.DV_SendCommandAsync(DVCommand.PlaySlowFwd2);
// Mildly slow playback
await VideoCapture1.DV_SendCommandAsync(DVCommand.PlaySlowFwd1);
```
#### Fast Forward Playback
Six levels of accelerated forward playback:
```cs
// Mildly fast playback
await VideoCapture1.DV_SendCommandAsync(DVCommand.PlayFastFwd1);
// Moderately fast playback
await VideoCapture1.DV_SendCommandAsync(DVCommand.PlayFastFwd2);
// High speed playback
await VideoCapture1.DV_SendCommandAsync(DVCommand.PlayFastFwd3);
// Very high speed playback
await VideoCapture1.DV_SendCommandAsync(DVCommand.PlayFastFwd4);
// Extremely fast playback
await VideoCapture1.DV_SendCommandAsync(DVCommand.PlayFastFwd5);
// Maximum speed playback
await VideoCapture1.DV_SendCommandAsync(DVCommand.PlayFastFwd6);
```
#### Slow Motion Reverse Playback
Six levels of slow motion reverse playback:
```cs
// Slowest reverse playback
await VideoCapture1.DV_SendCommandAsync(DVCommand.PlaySlowRev6);
// Slightly faster slow reverse
await VideoCapture1.DV_SendCommandAsync(DVCommand.PlaySlowRev5);
// Medium slow reverse
await VideoCapture1.DV_SendCommandAsync(DVCommand.PlaySlowRev4);
// Moderately slow reverse
await VideoCapture1.DV_SendCommandAsync(DVCommand.PlaySlowRev3);
// Slightly slow reverse
await VideoCapture1.DV_SendCommandAsync(DVCommand.PlaySlowRev2);
// Mildly slow reverse
await VideoCapture1.DV_SendCommandAsync(DVCommand.PlaySlowRev1);
```
#### Fast Reverse Playback
Six levels of accelerated reverse playback:
```cs
// Mildly fast reverse
await VideoCapture1.DV_SendCommandAsync(DVCommand.PlayFastRev1);
// Moderately fast reverse
await VideoCapture1.DV_SendCommandAsync(DVCommand.PlayFastRev2);
// High speed reverse
await VideoCapture1.DV_SendCommandAsync(DVCommand.PlayFastRev3);
// Very high speed reverse
await VideoCapture1.DV_SendCommandAsync(DVCommand.PlayFastRev4);
// Extremely fast reverse
await VideoCapture1.DV_SendCommandAsync(DVCommand.PlayFastRev5);
// Maximum speed reverse
await VideoCapture1.DV_SendCommandAsync(DVCommand.PlayFastRev6);
```
#### Extreme Speed Controls
For the fastest possible navigation:
```cs
// Fastest possible forward speed
await VideoCapture1.DV_SendCommandAsync(DVCommand.FastestFwd);
// Slowest possible forward speed
await VideoCapture1.DV_SendCommandAsync(DVCommand.SlowestFwd);
// Fastest possible reverse speed
await VideoCapture1.DV_SendCommandAsync(DVCommand.FastestRev);
// Slowest possible reverse speed
await VideoCapture1.DV_SendCommandAsync(DVCommand.SlowestRev);
```
### Reverse Playback Control
Standard reverse playback operations:
```cs
// Normal reverse playback
await VideoCapture1.DV_SendCommandAsync(DVCommand.Reverse);
// Paused reverse playback
await VideoCapture1.DV_SendCommandAsync(DVCommand.ReversePause);
```
### Recording Management
Control recording operations programmatically:
```cs
// Begin recording
await VideoCapture1.DV_SendCommandAsync(DVCommand.Record);
// Pause recording
await VideoCapture1.DV_SendCommandAsync(DVCommand.RecordPause);
```
## Implementation Patterns
### Real-Time Status Monitoring
Use the provided methods to continuously monitor DV camcorder status and position:
```cs
private async Task MonitorDVStatus()
{
while (isMonitoring)
{
// Get current mode
DVCommand mode = await VideoCapture1.DV_GetModeAsync();
// Get current timecode
var timecodeInfo = await VideoCapture1.DV_GetTimecodeAsync();
if (timecodeInfo != null)
{
TimeSpan timecode = timecodeInfo.Item1;
uint frameCount = timecodeInfo.Item2;
// Update UI with current status
UpdateStatusDisplay(mode, timecode, frameCount);
}
// Brief delay to prevent excessive polling
await Task.Delay(500);
}
}
private void UpdateStatusDisplay(DVCommand mode, TimeSpan timecode, uint frameCount)
{
// Format timecode for display (HH:MM:SS:FF)
string timecodeText = $"{timecode.Hours:D2}:{timecode.Minutes:D2}:{timecode.Seconds:D2}:{frameCount:D2}";
// Update UI controls
statusLabel.Text = $"Mode: {mode}, Timecode: {timecodeText}";
// Enable/disable UI controls based on current mode
recordButton.Enabled = (mode != DVCommand.Record);
pauseButton.Enabled = (mode == DVCommand.Play || mode == DVCommand.Record);
// Additional UI logic...
}
```
### Asynchronous Command Execution
All DV commands are executed asynchronously to prevent UI freezing. Follow these best practices:
```cs
// Button click handler for play command
private async void PlayButton_Click(object sender, EventArgs e) {
try {
await VideoCapture1.DV_SendCommandAsync(DVCommand.Play);
StatusLabel.Text = "Playing";
}
catch(Exception ex) {
LogError("Play command failed", ex);
StatusLabel.Text = "Command failed";
}
}
```
### Command Sequencing
Some operations require specific command sequences. For example, to capture a specific segment:
```cs
private async Task CaptureSegmentAsync() {
// Rewind to beginning
await VideoCapture1.DV_SendCommandAsync(DVCommand.Rew);
// Wait for rewind to complete
await WaitForDeviceStatusAsync(DVDeviceStatus.Stopped);
// Begin playback
await VideoCapture1.DV_SendCommandAsync(DVCommand.Play);
// Start capture
await VideoCapture1.StartCaptureAsync();
// Wait for desired duration
await Task.Delay(captureTimeMs);
// Stop capture
await VideoCapture1.StopCaptureAsync();
// Stop playback
await VideoCapture1.DV_SendCommandAsync(DVCommand.Stop);
}
```
### Seeking to Specific Timecode
This example demonstrates how to navigate to a specific timecode position by monitoring the current position:
```cs
private async Task SeekToTimecode(TimeSpan targetTimecode)
{
// Get current position
var currentTimecodeInfo = await VideoCapture1.DV_GetTimecodeAsync();
if (currentTimecodeInfo == null) return;
TimeSpan currentTimecode = currentTimecodeInfo.Item1;
// Determine if we need to go forward or backward
if (currentTimecode < targetTimecode)
{
// Need to go forward
await VideoCapture1.DV_SendCommandAsync(DVCommand.FastForward);
// Monitor position until we reach target
while (true)
{
var info = await VideoCapture1.DV_GetTimecodeAsync();
if (info == null) break;
if (info.Item1 >= targetTimecode)
{
// We've reached or passed the target
await VideoCapture1.DV_SendCommandAsync(DVCommand.Stop);
break;
}
await Task.Delay(100);
}
}
else if (currentTimecode > targetTimecode)
{
// Need to go backward
await VideoCapture1.DV_SendCommandAsync(DVCommand.Rew);
// Monitor position until we reach target
while (true)
{
var info = await VideoCapture1.DV_GetTimecodeAsync();
if (info == null) break;
if (info.Item1 <= targetTimecode)
{
// We've reached or passed the target
await VideoCapture1.DV_SendCommandAsync(DVCommand.Stop);
break;
}
await Task.Delay(100);
}
}
// Fine-tune position if needed
await VideoCapture1.DV_SendCommandAsync(DVCommand.Play);
}
```
### Error Handling
DV device control can encounter various issues including device disconnection, command failure, or timing problems. Implement robust error handling:
```cs
private async Task ExecuteDVCommandWithRetryAsync(DVCommand command, int maxRetries = 3) {
int attempts = 0;
bool success = false;
while(!success && attempts < maxRetries) {
try {
await VideoCapture1.DV_SendCommandAsync(command);
success = true;
}
catch(Exception ex) {
LogError($"Command {command} failed", ex);
throw; // Rethrow other exceptions
}
}
if(!success) {
throw new Exception($"Command {command} failed after {maxRetries} attempts");
}
}
```
## Sample Applications
The following sample applications demonstrate complete DV camcorder control implementations:
- [DV capture (WinForms)](https://github.com/visioforge/.Net-SDK-s-samples/tree/master/Video%20Capture%20SDK/WinForms/CSharp/DV%20Capture)
- [DV capture (WPF)](https://github.com/visioforge/.Net-SDK-s-samples/tree/master/Video%20Capture%20SDK/WPF/CSharp/DV_Capture)
## Troubleshooting Common Issues
- **Device Not Responding**: Ensure proper USB/FireWire connection and driver installation
- **Command Timeout**: Some devices require longer response times for certain operations
- **Unsupported Commands**: Not all DV devices support the full command set
- **Inconsistent Behavior**: Different models may have subtle implementation differences
- **Invalid Timecode**: If `DV_GetTimecode` returns null, the device may not support timecode reading or the tape may not have timecode recorded
## Conclusion
Implementing DV camcorder control in your .NET applications provides powerful capabilities for multimedia software. The VideoCaptureCore component simplifies the integration process through its intuitive async API.
For more code samples and advanced implementation techniques, visit our [GitHub repository](https://github.com/visioforge/.Net-SDK-s-samples).
---END OF PAGE---
# Local File: .\dotnet\videocapture\video-sources\index.md
---
title: Video Sources for .NET SDK - Developer Guide
description: Master every video input source for .NET applications - from webcams and Decklink devices to IP cameras, screen capture, and industrial cameras. Learn integration techniques, performance optimization, and implementation strategies for robust video processing solutions.
sidebar_label: Video Sources
order: 16
---
# Video Sources for .NET Developers
[!badge size="xl" target="blank" variant="info" text="Video Capture SDK .Net"](https://www.visioforge.com/video-capture-sdk-net)
## Introduction to Video Input Sources
The Video Capture SDK for .NET provides robust support for virtually every standard video input source available in modern development environments. This flexibility allows developers to build applications that can capture, process, and manipulate video content from a wide variety of hardware devices and network streams.
Whether you're developing professional video editing software, creating custom surveillance solutions, or building medical imaging applications, understanding the available video source options is crucial for implementing the right solution for your specific requirements.
## USB and Integrated Webcams
### Device Compatibility
The SDK supports all standard video capture devices that comply with common driver interfaces, including:
- USB webcams (USB 2.0, 3.0, and USB-C connected devices)
- Integrated laptop and tablet cameras
- External USB video capture adapters and dongles
- Virtual camera software devices
### Implementation Features
When working with USB and integrated cameras, developers can:
- Access and enumerate all connected devices
- Select from available video formats and resolutions
- Control camera-specific parameters (focus, exposure, white balance)
- Apply real-time video processing filters
- Capture raw frames for custom image analysis
- Configure brightness, contrast, and color settings programmatically
## Professional Blackmagic Decklink Hardware
### Supported Models and Features
The SDK provides native integration with Blackmagic Design's professional Decklink video capture hardware:
- Full support for all Decklink product lines:
- Decklink Mini series (compact, cost-effective capture)
- Decklink Studio models (mid-range broadcast functionality)
- Decklink 4K and 8K series (high-resolution production)
- Decklink Duo and Quad variants (multi-input capture)
### Technical Capabilities
- Support for both SDI (Serial Digital Interface) and HDMI input connections
- Compatible with standard broadcast resolutions:
- SD (PAL/NTSC)
- HD (720p, 1080i, 1080p)
- UHD/4K (2160p)
- 8K where hardware supports it
- Access to all embedded audio channels (up to 16 channels)
- Timecode interpretation and synchronization
- Frame buffer control for consistent capture performance
- Access to video metadata and ancillary data
## Network Video Sources
### IP Camera and Stream Support
The SDK enables applications to connect directly to networked video sources:
- RTSP (Real-Time Streaming Protocol) streams with various transport options:
- UDP transport (low latency, potentially less reliable)
- TCP transport (reliable, potentially higher latency)
- HTTP tunneling for firewall traversal
- RTMP (Real-Time Messaging Protocol) sources:
- Support for live streams
- Compatibility with RTMP servers
- Flash Media Server compatibility
- HTTP-based streaming:
- MJPEG streams
- HTTP progressive download sources
- Industry-standard streaming formats:
- HLS (HTTP Live Streaming)
- DASH (Dynamic Adaptive Streaming over HTTP)
- SRT (Secure Reliable Transport)
- WebRTC integration for browser-based video communication
### Implementation Details
- Authentication support for secured streams (Basic, Digest, NTLM)
- Configurable buffer settings to balance latency vs. smoothness
- Automatic reconnection logic for unstable network conditions
- NAT traversal techniques for complex network environments
- Traffic statistics for monitoring bandwidth usage
- Multi-bitrate adaptation for variable network conditions
## Screen and Window Capture
### Desktop Capture Options
For scenarios requiring screen recording or application capture:
- Full-screen content capture with support for:
- Single monitor setups
- Multi-monitor configurations with selectable target displays
- Various scaling options to optimize performance
- Window-specific capture capabilities:
- Capture by window handle
- Application-specific targeting
- Borderless window capturing
- Region-of-interest selection:
- Custom rectangular area selection
- Dynamic region tracking
- Coordinate-based positioning
### Technical Implementation
- Hardware-accelerated capture where available
- Cursor inclusion/exclusion options
- Frame rate control to balance quality vs. system load
- Mouse click visualization options for tutorial recordings
- DirectX/OpenGL content compatibility
- Layered window handling for complex desktop compositions
## Legacy and Specialized Devices
### DV Camcorder Integration
The SDK maintains support for Digital Video (DV) format cameras:
- FireWire/IEEE 1394 connectivity support
- Compatibility with standard DV, DVCAM, and HDV formats
- Frame-accurate capture with timecode preservation
- Device control features (when supported by hardware):
- Play/pause/stop controls
- Fast-forward and rewind functions
- Recording initiation
### Industrial and Scientific Cameras
For specialized development scenarios, the SDK supports industrial vision cameras through multiple standards:
- USB3 Vision compliant devices featuring:
- High-speed image acquisition
- Device feature discovery and enumeration
- Event handling for triggered capture
- GigE Vision compatible hardware with:
- Network discovery protocols
- High-bandwidth image streaming
- Device configuration access
- GenICam standard interface support:
- Standardized parameter naming conventions
- Feature access consistency across manufacturers
- XML descriptor-based device configuration
- Control over specialized camera parameters:
- Exposure and gain adjustments
- Triggering options (software/hardware)
- Region of interest (ROI) definition
- Various pixel formats and bit depths
## Performance Optimization Techniques
When working with video sources, performance considerations are critical. The SDK provides several optimization paths:
- Hardware acceleration options:
- DirectX-accelerated processing
- GPU-based encoding/decoding
- SIMD instruction utilization
- Memory management strategies:
- Buffer pooling to reduce allocation overhead
- Direct memory access where supported
- Pre-allocated frame buffers
- Multi-threaded processing:
- Parallel processing of video frames
- Thread-pool utilization for filter chains
- Background processing for non-realtime scenarios
## Conclusion
The extensive video source support in Video Capture SDK .NET empowers developers to create versatile video applications with minimal constraints on input hardware. By understanding the capabilities and limitations of each source type, you can design more effective and efficient video processing solutions.
For detailed API references and implementation examples for specific video source types, refer to the class documentation and method guides in the SDK reference materials.
---
Visit our [GitHub](https://github.com/visioforge/.Net-SDK-s-samples) page to get more code samples.
---END OF PAGE---
# Local File: .\dotnet\videocapture\video-sources\screen.md
---
title: Screen Capture Source for .NET Video SDK
description: Learn how to implement powerful screen capture functionality in your .NET applications. Capture full screens, specific windows, or custom screen areas with high performance DirectX integration and cursor support.
sidebar_label: Screen Source
order: 17
---
# Screen Capture Implementation Guide
[!badge size="xl" target="blank" variant="info" text="Video Capture SDK .Net"](https://www.visioforge.com/video-capture-sdk-net) [!badge variant="dark" size="xl" text="VideoCaptureCoreX"] [!badge variant="dark" size="xl" text="VideoCaptureCore"]
## Introduction to Screen Capture
Screen capture technology enables developers to programmatically record and stream visual content displayed on a computer monitor. This powerful functionality serves as the foundation for numerous applications including:
- Remote support and technical assistance tools
- Software demonstration and tutorial creation
- Gameplay recording and streaming
- Webinar and presentation systems
- Quality assurance and testing automation
Video Capture SDK .Net provides developers with robust tools for capturing screen content with high performance and flexibility. The SDK supports capturing entire screens, individual application windows, or custom-defined screen regions.
## Platform Support and Technology Overview
### Windows Implementation
On Windows platforms, the SDK leverages the power of DirectX technologies to achieve optimal performance. Developers can choose between:
- **DirectX 9**: Legacy support for older systems
- **DirectX 11/12**: Modern implementation offering superior performance and efficiency
DirectX 11 is particularly recommended for window capture scenarios due to its improved handling of window composition and superior performance characteristics.
+++ VideoCaptureCore
### Core Capture Configuration
The VideoCaptureCore implementation provides straightforward configuration options to control the capture process:
- `AllowCaptureMouseCursor`: Enable or disable cursor visibility in the captured content
- `DisplayIndex`: Select which display to capture in multi-monitor setups (zero-indexed)
- `ScreenPreview` / `ScreenCapture`: Set the operational mode for viewing or recording
+++ VideoCaptureCoreX
### Advanced Capture Configuration
VideoCaptureCoreX offers more granular control through dedicated configuration classes:
- `ScreenCaptureDX9SourceSettings`: Configure DirectX 9 based capture
- `ScreenCaptureD3D11SourceSettings`: Configure DirectX 11 based capture with enhanced performance
+++
## Full Screen and Region Capture Implementation
Capturing either a complete screen or a defined screen region is a common requirement for many applications. Below are the implementation approaches for both VideoCaptureCore and VideoCaptureCoreX.
+++ VideoCaptureCore
### Configuring Full Screen and Region Capture
The following code demonstrates how to configure screen capture settings for either full screen mode or a specific rectangular region:
```csharp
// Set screen capture source settings
VideoCapture1.Screen_Capture_Source = new ScreenCaptureSourceSettings
{
// Set to true to capture the full screen
FullScreen = false,
// Set the left position of the screen area
Left = 0,
// Set the top position of the screen area
Top = 0,
// Set the width of the screen area
Width = 640,
// Set the height of the screen area
Height = 480,
// Set the display index
DisplayIndex = 0,
// Set the frame rate
FrameRate = new VideoFrameRate(25),
// Set to true to capture the mouse cursor
AllowCaptureMouseCursor = true
};
```
When `FullScreen` is set to `true`, the `Left`, `Top`, `Width`, and `Height` properties are ignored, and the entire screen specified by `DisplayIndex` is captured.
For multi-monitor setups, the `DisplayIndex` property identifies which monitor to capture, with 0 representing the primary display.
+++ VideoCaptureCoreX
### Advanced Screen Capture with DirectX 11
VideoCaptureCoreX provides a more powerful implementation using DirectX 11 technology:
```cs
// Display index
var screenID = 0;
// Create a new screen capture source using DirectX 11
var source = new ScreenCaptureD3D11SourceSettings();
// Set the capture API
source.API = D3D11ScreenCaptureAPI.WGC;
// Set the frame rate
source.FrameRate = new VideoFrameRate(25);
// Set the screen area or full screen mode
if (fullscreen)
{
// Enumerate all screens and set the screen area
for (int i = 0; i < System.Windows.Forms.Screen.AllScreens.Length; i++)
{
if (i == screenID)
{
source.Rectangle = new VisioForge.Core.Types.Rect(System.Windows.Forms.Screen.AllScreens[i].Bounds);
}
}
}
else
{
// Set the screen area
source.Rectangle = new VisioForge.Core.Types.Rect(0, 0, 1280, 720);
}
// Set to true to capture the mouse cursor
source.CaptureCursor = true;
// Set the monitor index
source.MonitorIndex = screenID;
// Set the screen capture source
VideoCapture1.Video_Source = source;
```
The Windows Graphics Capture (WGC) API option provides excellent performance on Windows 10 and higher. This approach also demonstrates the use of `System.Windows.Forms.Screen.AllScreens` to programmatically determine the bounds of available displays.
+++
## Window Capture Implementation
Capturing specific application windows allows for targeted recording of individual applications without including other desktop content. This is particularly useful for:
- Application-specific tutorials
- Software demos
- Support scenarios where only a single application is relevant
+++ VideoCaptureCore
### Basic Window Capture
To capture a specific window with VideoCaptureCore:
```csharp
// Set screen capture source settings
VideoCapture1.Screen_Capture_Source = new ScreenCaptureSourceSettings
{
// Disable full screen capture
FullScreen = false,
// Set the window handle
WindowHandle = windowHandle,
// Set the frame rate
FrameRate = new VideoFrameRate(25),
// Set to true to capture the mouse cursor
AllowCaptureMouseCursor = true
};
```
The `windowHandle` parameter should contain a valid handle to the target window. This can be obtained using Windows API functions like `FindWindow` or by using UI automation libraries.
+++ VideoCaptureCoreX
### Enhanced Window Capture
VideoCaptureCoreX provides an optimized window capture implementation:
```cs
// Create Direct3D11 source
var source = new ScreenCaptureD3D11SourceSettings();
// Set the capture API
source.API = D3D11ScreenCaptureAPI.WGC;
// Set frame rate
source.FrameRate = new VideoFrameRate(25);
// Set the window handle
source.WindowHandle = windowHandle;
VideoCapture1.Video_Source = source; // Set the screen capture source
```
The DirectX 11 implementation offers better performance, particularly for capturing applications that use hardware acceleration.
+++
## Performance Optimization Techniques
Optimizing screen capture performance is crucial for maintaining high frame rates while minimizing CPU and memory usage. Consider the following best practices:
### Frame Rate Management
Carefully select an appropriate frame rate based on your application requirements:
- For general purpose recording: 15-30 FPS is typically sufficient
- For gaming or motion-intensive content: 30-60 FPS may be necessary
- For static or document-based content: 5-10 FPS can reduce resource usage significantly
### Resolution Considerations
Higher resolution captures require more processing power and memory. Consider:
- Capturing at a lower resolution and scaling up if appropriate
- Using region capture instead of full screen when only part of the screen is relevant
- Implementing resolution switching based on content type
### Hardware Acceleration
When available, using DirectX 11/12 with hardware acceleration can significantly improve performance:
- Reduces CPU load by leveraging the GPU
- Provides better frame rates, especially with high-resolution content
- Allows for more efficient encoding when combined with hardware accelerated video encoders
## Advanced Implementation Scenarios
### Multi-Monitor Configuration
Working with multi-monitor setups requires special consideration:
```csharp
// Detect all available monitors
var screens = System.Windows.Forms.Screen.AllScreens;
// Create a list to present to the user
var screenOptions = new List();
for (int i = 0; i < screens.Length; i++)
{
screenOptions.Add($"Monitor {i+1}: {screens[i].Bounds.Width} x {screens[i].Bounds.Height}");
}
// Once a selection is made, set the appropriate DisplayIndex/MonitorIndex
```
### Application Window Selection
Providing users with the ability to select a window to capture:
```csharp
// Get all open windows
var openWindows = GetOpenWindows(); // Implementation depends on your approach
// Present the list to the user for selection
// Once selected, get the window handle
// Configure the capture with the selected window handle
VideoCapture1.Screen_Capture_Source = new ScreenCaptureSourceSettings
{
WindowHandle = selectedWindowHandle,
// Additional configuration...
};
```
### Dynamic Region Selection
Allowing users to interactively select a screen region to capture:
```csharp
// Create a form with transparent background
var selectionForm = new Form
{
FormBorderStyle = FormBorderStyle.None,
WindowState = FormWindowState.Maximized,
Opacity = 0.3,
BackColor = Color.Black
};
// Add mouse event handlers to track selection rectangle
// Once selection is complete
// Configure capture with the selected region
VideoCapture1.Screen_Capture_Source = new ScreenCaptureSourceSettings
{
Left = selection.Left,
Top = selection.Top,
Width = selection.Width,
Height = selection.Height,
// Additional configuration...
};
```
## Troubleshooting Common Issues
### Blank or Black Capture
If the captured content appears blank or black:
- Verify that you have appropriate permissions for the window or screen
- Check if the application uses hardware acceleration that might conflict with capture
- Try alternate DirectX versions (9 vs 11/12)
- For protected content (like DRM video), capture may be blocked by security mechanisms
### Performance Issues
If experiencing slow or stuttering capture:
- Reduce capture resolution and/or frame rate
- Use DirectX 11/12 instead of DirectX 9 when available
- Close unnecessary background applications
- Verify that hardware acceleration is enabled when applicable
## Conclusion
Screen capture functionality enables developers to create powerful applications for demonstration, education, support, and entertainment purposes. The Video Capture SDK .Net provides a robust framework for implementing this functionality with minimal development effort.
By leveraging the appropriate configuration options for your specific requirements, you can implement high-performance screen capture features in your .NET applications.
---
Visit our [GitHub](https://github.com/visioforge/.Net-SDK-s-samples) page to get more code samples.
---END OF PAGE---
# Local File: .\dotnet\videocapture\video-sources\tv-tuner.md
---
title: FM Radio & TV Tuning Integration in .NET SDK
description: Complete guide for C# developers to implement FM radio and TV tuning features in their applications. Learn to scan frequencies, manage channels, and integrate broadcast capabilities in WPF, WinForms, and console applications.
sidebar_label: FM Radio and TV Tuning
order: 2
---
# FM Radio and TV Tuning Integration for .NET Applications
[!badge size="xl" target="blank" variant="info" text="Video Capture SDK .Net"](https://www.visioforge.com/video-capture-sdk-net) [!badge variant="dark" size="xl" text="VideoCaptureCore"]
## Introduction to Broadcast Integration
Modern .NET applications can leverage hardware capabilities to provide FM radio and TV tuning functionality. This guide demonstrates how to implement these features in your C# applications, whether you're building WPF, WinForms, or console applications. By following these examples, you'll be able to detect available tuner devices, scan frequencies, manage channels, and deliver a complete broadcast experience to your users.
## Hardware Requirements
Before implementing the code samples below, ensure your development system has:
1. A compatible TV tuner card or USB device
2. Proper driver installation
3. .NET Framework 4.7+ or .NET Core 3.1+/NET 5.0+ for modern applications
## Detecting Available Tuner Devices
The first step in implementing tuner functionality is to detect all available tuner devices on the system. This allows users to select the appropriate hardware for their needs.
```cs
// Populate a combobox with all available TV Tuner devices
foreach (var tunerDevice in VideoCapture1.TVTuner_Devices)
{
cbTVTuner.Items.Add(tunerDevice);
}
```
You can then let users select their preferred device from the populated list, or automatically select the first available device for a streamlined experience.
## Configuration Basics
### TV Format Selection
Different regions use different broadcasting standards. Your application should detect and allow selection of the appropriate standard:
```cs
// List all supported TV formats (PAL, NTSC, SECAM, etc.)
foreach (var tunerTVFormat in VideoCapture1.TVTuner_TVFormats)
{
cbTVSystem.Items.Add(tunerTVFormat);
}
```
### Regional Settings
Broadcast frequencies vary by country. Configure your application with the correct regional settings:
```cs
// Populate country selection for region-specific frequencies
foreach (var tunerCountry in VideoCapture1.TVTuner_Countries)
{
cbTVCountry.Items.Add(tunerCountry);
}
```
## Setting Up the Tuner
After detecting available devices, you need to select and initialize the tuner:
```cs
// Select the TV Tuner device
VideoCapture1.TVTuner_Name = cbTVTuner.Text;
// Initialize the tuner and read its current settings
await VideoCapture1.TVTuner_ReadAsync();
```
This initialization process will prepare the tuner for further operations and read its current configuration.
## Working with Different Signal Sources
Most tuners support multiple input types. You'll need to determine which modes are available:
```cs
// Get all available modes (TV, FM Radio, etc.)
foreach (var tunerMode in VideoCapture1.TVTuner_Modes)
{
cbTVMode.Items.Add(tunerMode);
}
```
Then select the appropriate input source:
```cs
// Select the signal source (Antenna, Cable, etc.)
cbTVInput.SelectedIndex = cbTVInput.Items.IndexOf(VideoCapture1.TVTuner_InputType);
// Select working mode (TV, FM Radio, etc.)
cbTVMode.SelectedIndex = cbTVMode.Items.IndexOf(VideoCapture1.TVTuner_Mode);
```
## Advanced Frequency Management
For detailed control, you can work directly with the frequency values:
```cs
// Display current frequency settings
edVideoFreq.Text = Convert.ToString(VideoCapture1.TVTuner_VideoFrequency);
edAudioFreq.Text = Convert.ToString(VideoCapture1.TVTuner_AudioFrequency);
```
These values can be useful for debugging or creating custom frequency selection interfaces.
## Setting Broadcasting System Standards
Different regions use different broadcasting standards. Configure your application with the right system:
```cs
// Select the TV system (PAL, NTSC, SECAM, etc.)
cbTVSystem.SelectedIndex = cbTVSystem.Items.IndexOf(VideoCapture1.TVTuner_TVFormat);
// Select country for region-specific frequencies
cbTVCountry.SelectedIndex = cbTVCountry.Items.IndexOf(VideoCapture1.TVTuner_Country);
```
## Automated Channel Scanning
One of the most important features is the ability to automatically scan and detect available channels. This requires implementing an event handler to receive scan results:
```cs
private void VideoCapture1_OnTVTunerTuneChannels(object sender, TVTunerTuneChannelsEventArgs e)
{
// Update progress bar
pbChannels.Value = e.Progress;
// If a signal is detected, add the channel to the list
if (e.SignalPresent)
{
cbTVChannel.Items.Add(e.Channel.ToString());
}
// Check if scanning is complete
if (e.Channel == -1)
{
pbChannels.Value = 0;
MessageBox.Show("Channel scanning complete");
}
// Keep UI responsive during scanning
Application.DoEvents();
}
```
This event handler will be called for each frequency as it's scanned, allowing you to update your UI and collect found channels.
## Initiating the Channel Scan Process
Once the event handler is in place, you can start the scanning process:
```cs
const int KHz = 1000;
const int MHz = 1000000;
// Initialize tuner and clear previous channel list
await VideoCapture1.TVTuner_ReadAsync();
cbTVChannel.Items.Clear();
// For FM Radio mode, configure scanning parameters
if ((cbTVMode.SelectedIndex != -1) && (cbTVMode.Text == "FM Radio"))
{
// Set FM scanning range from 100 MHz to 110 MHz
VideoCapture1.TVTuner_FM_Tuning_StartFrequency = 100 * MHz;
VideoCapture1.TVTuner_FM_Tuning_StopFrequency = 110 * MHz;
// Scan in 100 KHz increments
VideoCapture1.TVTuner_FM_Tuning_Step = 100 * KHz;
}
// Begin the scanning process
VideoCapture1.TVTuner_TuneChannels_Start();
```
This code prepares the tuner and begins scanning. For FM radio mode, it sets specific frequency ranges and steps.
## Manual Channel Management
In addition to automatic scanning, your application should allow manual channel selection:
### Setting Channel by Number
```cs
// Set to a specific channel number
VideoCapture1.TVTuner_Channel = Convert.ToInt32(edChannel.Text);
await VideoCapture1.TVTuner_ApplyAsync();
```
### Setting Channel by Frequency
```cs
// Set channel to -1 to allow direct frequency setting
VideoCapture1.TVTuner_Channel = -1;
// Set the specific frequency in Hz
VideoCapture1.TVTuner_Frequency = Convert.ToInt32(edChannel.Text);
await VideoCapture1.TVTuner_ApplyAsync();
```
This approach gives advanced users more control over their tuning experience.
## Optimizing User Experience
For the best user experience, consider implementing these additional features:
1. **Favorite channels**: Allow users to save and quickly access their preferred channels
2. **Signal strength indicator**: Display the current signal quality
3. **Channel information**: Show program information when available
4. **Auto-tuning scheduled task**: Periodically scan for new channels
## Error Handling Best Practices
Robust error handling is essential for tuner applications:
1. Check if hardware is present before attempting operations
2. Handle cases where no signal is detected
3. Provide clear error messages when tuning fails
4. Implement timeouts for scanning operations
## Required Dependencies
To use the FM radio and TV tuning features, include these packages:
- Video capture redistributables:
- [x86 package](https://www.nuget.org/packages/VisioForge.DotNet.Core.Redist.VideoCapture.x86/)
- [x64 package](https://www.nuget.org/packages/VisioForge.DotNet.Core.Redist.VideoCapture.x64/)
You can add these packages via NuGet Package Manager or by editing your .csproj file directly.
## Performance Considerations
When implementing tuner functionality:
1. Run scanning operations in a background thread to keep UI responsive
2. Cache channel information to avoid repeated scans
3. Implement efficient channel switching to minimize delay
4. Consider resource usage, especially for embedded or mobile applications
## Conclusion
By following this guide, you can implement full FM radio and TV tuning capabilities in your .NET applications. These features can enhance media applications, home automation systems, or specialized broadcast software. The SDK provides a clean, consistent API that handles the complexities of different tuner hardware.
---
Visit our [GitHub](https://github.com/visioforge/.Net-SDK-s-samples) page to get more code samples.
---END OF PAGE---
# Local File: .\dotnet\videocapture\video-sources\ip-cameras\index.md
---
title: IP Camera Integration for .NET Video Applications
description: Learn how to implement IP cameras, RTSP/RTMP streams, ONVIF devices, and other network video sources in your .NET applications. This detailed guide covers implementation examples, code samples, and best practices for integrating network video streams across various protocols.
sidebar_label: IP Cameras & Network Sources
order: 19
---
# Complete Guide to IP Cameras and Network Sources Integration
[!badge size="xl" target="blank" variant="info" text="Video Capture SDK .Net"](https://www.visioforge.com/video-capture-sdk-net) [!badge variant="dark" size="xl" text="VideoCaptureCoreX"] [!badge variant="dark" size="xl" text="VideoCaptureCore"]
## Introduction to Network Video Sources
Modern video applications often require integration with various network video sources. The Video Capture SDK for .NET provides robust support for diverse IP camera types and network video streams, allowing developers to easily incorporate live network video into .NET applications.
This comprehensive guide covers all supported network sources and provides clear implementation examples for both VideoCaptureCore and VideoCaptureCoreX frameworks.
## Supported IP Camera Types and Network Sources
The SDK offers extensive compatibility with various network video sources, including:
* [ONVIF-compliant cameras](onvif.md) - Industry standard for IP-based security products
* [RTSP cameras](rtsp.md) - Real-Time Streaming Protocol cameras
* HTTP MJPEG cameras - Motion JPEG streaming over HTTP
* UDP cameras and streams - User Datagram Protocol-based streams
* [NDI cameras](ndi.md) - Network Device Interface technology cameras
* SRT servers and cameras - Secure Reliable Transport protocol
* VNC servers - Virtual Network Computing for screen capture
* RTMP streams - Real-Time Messaging Protocol sources
* HLS streams - HTTP Live Streaming sources
* HTTP video sources - Various HTTP-based video streams
Each protocol offers specific advantages depending on your application requirements, from low-latency needs to high-quality video transmission.
## Universal Source Implementation for Network Protocols
Our SDK provides a universal approach to handling most network video sources including RTSP, RTMP, HTTP, and others. This flexibility allows developers to focus on application logic rather than protocol-specific implementation details.
+++ VideoCaptureCore
### Implementing Universal Source in VideoCaptureCore
For VideoCaptureCore applications, you can use the IPCameraSourceSettings class to define your network video source:
```cs
// Create and configure the network source
VideoCapture1.IP_Camera_Source = new IPCameraSourceSettings
{
URL = "rtsp://192.168.1.100:554/stream1", // The stream URL
Login = "admin", // Optional authentication credentials
Password = "password123",
AudioCapture = true, // Set to true to include audio from the source
Type = VFIPSource.Auto_VLC // The processing engine to use
};
```
#### Available Engine Types
The SDK supports multiple underlying engines for processing network streams, providing flexibility for different scenarios:
* `Auto_VLC` - Uses the VLC engine, offering broad protocol support and compatibility
* `Auto_FFMPEG` - Uses the FFMPEG engine, providing extensive format support and customization
* `Auto_LAV` - Uses the LAV engine, optimized for Windows environments
### Customizing FFMPEG Settings for Advanced Users
The SDK allows fine-grained control over FFMPEG settings when using the FFMPEG engine. This provides advanced users with extensive customization options:
```cs
// Configure custom FFMPEG parameters
VideoCapture1.IP_Camera_Source.FFMPEG_CustomOptions.Add("rtsp_transport", "tcp"); // Force TCP transport
VideoCapture1.IP_Camera_Source.FFMPEG_CustomOptions.Add("timeout", "3000000"); // Set timeout in microseconds
VideoCapture1.IP_Camera_Source.FFMPEG_CustomOptions.Add("buffer_size", "1000000"); // Adjust buffer size
VideoCapture1.IP_Camera_Source.FFMPEG_CustomOptions.Add("max_delay", "500000"); // Set maximum allowed delay
```
These parameters are passed directly to the avformat_open_input function in FFMPEG, providing deep customization options for network streaming performance.
+++ VideoCaptureCoreX
### Implementing Universal Source in VideoCaptureCoreX
For VideoCaptureCoreX applications, the approach uses the modern async patterns:
```cs
// Prepare the source URL with authentication if needed
var uri = new Uri("rtsp://192.168.1.100:554/stream1");
if (!string.IsNullOrEmpty(login) && !string.IsNullOrEmpty(password))
{
uri = new UriBuilder(uri) { UserName = login, Password = password }.Uri;
}
// Create the universal source with desired settings
var source = await UniversalSourceSettings.CreateAsync(
uri,
renderAudio: true, // Include audio stream
);
// Apply the source to the capture object
VideoCapture1.Video_Source = source;
```
The VideoCaptureCoreX approach provides a more modern, task-based asynchronous pattern, making it ideal for responsive UI applications.
+++
## Low-Latency MJPEG Implementation
For applications requiring minimal latency, such as security monitoring or real-time control systems, the SDK offers a specialized low-latency MJPEG implementation with typical latency under 100ms.
+++ VideoCaptureCore
### Configuring Low-Latency MJPEG in VideoCaptureCore
```cs
// Create settings object
var settings = new IPCameraSourceSettings
{
URL = "http://192.168.1.100/video.mjpg",
Login = "admin",
Password = "pass123",
// Use the dedicated low-latency MJPEG engine
Type = IPSourceEngine.HTTP_MJPEG_LowLatency
};
// Apply settings to the VideoCaptureCore object
VideoCapture1.IP_Camera_Source = settings;
```
This specialized mode bypasses unnecessary processing to minimize latency, making it ideal for time-sensitive applications.
+++ VideoCaptureCoreX
### Configuring Low-Latency MJPEG in VideoCaptureCoreX
```cs
// Create specialized HTTP MJPEG source settings
var mjpeg = await HTTPMJPEGSourceSettings.CreateAsync(
new Uri("http://192.168.1.100/video.mjpg"),
"admin", // Username
"pass123"
);
// Apply settings to the VideoCaptureCoreX object
VideoCapture1.Video_Source = mjpeg;
```
The low-latency MJPEG implementation is particularly useful for surveillance systems, remote monitoring, and industrial applications where minimizing delay is critical.
+++
## Secure Reliable Transport (SRT) Implementation
SRT is a modern protocol designed for reliable video streaming over unpredictable networks. It's especially valuable for maintaining quality in challenging network conditions.
+++ VideoCaptureCoreX
### Implementing SRT Source in VideoCaptureCoreX
```cs
// Create SRT source settings with the server URL
var srt = await SRTSourceSettings.CreateAsync("srt://streaming-server.example.com:7001");
// Apply the SRT source to the capture object
VideoCapture1.Video_Source = srt;
```
SRT provides significant advantages for reliable streaming across challenging networks, offering built-in security, error correction, and congestion control.
+++
## Network Disconnect Handling
Robust network source implementations must handle connection interruptions gracefully. The SDK provides built-in mechanisms for detecting and responding to network disconnections.
+++ VideoCaptureCore
### Implementing Network Disconnect Handling in VideoCaptureCore
```cs
// Enable network disconnect detection
VideoCapture1.DisconnectEventInterval = TimeSpan.FromSeconds(5); // Check every 5 seconds
// Register the disconnect event handler
VideoCapture1.OnNetworkSourceDisconnect += VideoCapture1_OnNetworkSourceDisconnect;
// Implement the disconnect event handler
private void VideoCapture1_OnNetworkSourceDisconnect(object sender, EventArgs e)
{
Invoke((Action)(
async () =>
{
await VideoCapture1.StopAsync();
// Notify the user
MessageBox.Show(this, "Network source disconnected!");
}));
}
```
Implementing proper disconnect handling improves application reliability and user experience during network fluctuations.
+++
## VNC Source Implementation
Virtual Network Computing (VNC) allows capturing remote desktop screens as video sources, useful for screen recording and remote assistance applications.
+++ VideoCaptureCoreX
### Implementing VNC Source in VideoCaptureCoreX
```cs
// Create VNC source settings object
var vncSettings = new VNCSourceSettings();
// Configure using host and port
vncSettings.Host = "remote-server.example.com";
vncSettings.Port = 5900; // Default VNC port
// Or configure using URI format
// vncSettings.Uri = "vnc://remote-server.example.com:5900";
// Set authentication credentials
vncSettings.Password = "secure-password";
// Optional: Configure advanced VNC settings
vncSettings.EnableCursor = true; // Capture mouse cursor
vncSettings.CompressionLevel = 5; // 0-9, higher values = more compression
vncSettings.QualityLevel = 8; // 0-9, higher values = better quality
vncSettings.UpdateInterval = 100; // Update interval in milliseconds
// Apply the settings to the capture object
VideoCapture1.Video_Source = vncSettings;
```
The VNC source implementation provides a complete solution for remote desktop capture with customizable quality and performance settings.
* [Complete VNC source sample (WPF)](https://github.com/visioforge/.Net-SDK-s-samples/tree/master/Video%20Capture%20SDK%20X/WPF/CSharp/VNC%20Source%20Demo)
+++
## Best Practices for Network Sources
For optimal performance when working with network video sources:
1. **Buffer Management**: Adjust buffering based on source stability and latency requirements
2. **Error Handling**: Implement comprehensive error handling for network interruptions
3. **Authentication**: Always use secure credentials storage for camera authentication
4. **Connection Pooling**: Reuse connections when accessing multiple streams from the same device
5. **Bandwidth Consideration**: Monitor and manage bandwidth consumption, especially with multiple sources
## Conclusion
The Video Capture SDK for .NET provides comprehensive support for IP cameras and network sources, enabling developers to build sophisticated video applications. With support for multiple protocols and flexible configuration options, it accommodates a wide range of use cases from security surveillance to media streaming applications.
For additional implementation examples and advanced usage scenarios, explore our GitHub repository with complete code samples.
---
Visit our [GitHub repository](https://github.com/visioforge/.Net-SDK-s-samples) for more comprehensive code samples and demo applications.
---END OF PAGE---
# Local File: .\dotnet\videocapture\video-sources\ip-cameras\ndi.md
---
title: NDI Integration for Video Capture in .NET
description: Learn how to implement NDI video sources in your .NET applications with our SDK. Complete guide to enumerating, connecting to, and capturing high-quality video from NDI cameras and NDI-enabled software in C#.
sidebar_label: NDI Source
order: 18
---
# Implementing NDI Video Sources in .NET Applications
[!badge size="xl" target="blank" variant="info" text="Video Capture SDK .Net"](https://www.visioforge.com/video-capture-sdk-net) [!badge variant="dark" size="xl" text="VideoCaptureCoreX"] [!badge variant="dark" size="xl" text="VideoCaptureCore"]
## Introduction to NDI Technology
Network Device Interface (NDI) is a high-performance standard for IP-based production workflows, developed by NewTek. It allows video-compatible products to communicate, deliver, and receive broadcast-quality video over a standard network connection with low latency.
Our SDK provides robust support for NDI sources, enabling your .NET applications to seamlessly integrate with NDI cameras and NDI-enabled software. This makes it ideal for live production environments, streaming applications, video conferencing solutions, and any system requiring high-quality network video integration.
### Prerequisites for NDI Integration
Before implementing NDI functionality in your application, you'll need to install one of the following:
- [NDI SDK](https://ndi.video/for-developers/ndi-sdk/#download) - Recommended for developers building professional applications
- NDI Tools - Sufficient for basic testing and development
These tools provide the necessary runtime components required for NDI communication. After installation, your system will be able to discover and connect to NDI sources on your network.
## Discovering NDI Sources on Your Network
The first step in working with NDI is to enumerate available sources. Our SDK makes this process straightforward with dedicated methods to scan your network for NDI-enabled devices and applications.
### Enumerating Available NDI Sources
+++ VideoCaptureCore
```cs
var lst = await VideoCapture1.IP_Camera_NDI_ListSourcesAsync();
foreach (var uri in lst)
{
cbIPCameraURL.Items.Add(uri);
}
```
+++ VideoCaptureCoreX
```cs
var lst = await DeviceEnumerator.Shared.NDISourcesAsync();
foreach (var uri in lst)
{
cbIPCameraURL.Items.Add(uri.URL);
}
```
+++
The asynchronous enumeration methods scan your network and return a list of available NDI sources. Each source has a unique identifier that you'll use to establish a connection. The enumeration process typically takes a few seconds, depending on network conditions and the number of available sources.
## Connecting to NDI Sources
Once you've identified the NDI sources on your network, the next step is to establish a connection. This involves creating the appropriate settings object and configuring it for your specific requirements.
### Configuring NDI Source Settings
+++ VideoCaptureCore
```cs
// Create an IP camera source settings object
settings = new IPCameraSourceSettings
{
URL = new Uri("NDI source URL")
};
// Set the source type to NDI
settings.Type = IPSourceEngine.NDI;
// Enable or disable audio capture
settings.AudioCapture = false;
// Set login information if needed
settings.Login = "username";
settings.Password = "password";
// Set the source to the VideoCaptureCore object
VideoCapture1.IP_Camera_Source = settings;
```
After setting up the source, you'll need to use the `IPPreview` or `IPCapture` mode to preview or capture video from the device.
+++ VideoCaptureCoreX
In VideoCaptureCoreX, you have two options for creating NDI source settings:
**Option 1: Using the NDI source URL**
```cs
var ndiSettings = await NDISourceSettings.CreateAsync(VideoCapture1.GetContext(), null, "NDI URL");
```
**Option 2: Using the NDI source name**
```cs
var ndiSettings = await NDISourceSettings.CreateAsync(VideoCapture1.GetContext(), cbIPURL.Text, null);
```
Finally, set the source to the VideoCaptureCoreX object:
```cs
VideoCapture1.Video_Source = ndiSettings;
```
+++
## Advanced NDI Configuration Options
### Optimizing Performance
When working with NDI sources, performance considerations are important, especially in professional environments. Here are some tips to optimize your NDI implementation:
1. **Network Bandwidth**: Ensure your network has sufficient bandwidth for NDI streams. A typical HD NDI stream requires approximately 100-150 Mbps.
2. **Hardware Acceleration**: Enable hardware acceleration when available to reduce CPU usage and improve performance.
3. **Frame Rate Control**: Consider limiting the frame rate if you don't need the maximum quality, which can reduce network load.
4. **Resolution Settings**: Choose appropriate resolution settings based on your application's needs and available bandwidth.
### Managing Multiple NDI Sources
For applications that need to handle multiple NDI sources simultaneously:
1. Create separate capture instances for each NDI source
2. Implement resource pooling to efficiently manage system resources
3. Consider using a producer/consumer pattern for processing multiple streams
4. Monitor system performance and adjust settings as needed
## Error Handling and Troubleshooting
When implementing NDI functionality, it's important to handle potential issues gracefully:
### Common NDI Connection Issues
1. **Source Not Found**: Verify that the NDI source is active and on the same network
2. **Connection Timeout**: Check network configuration and firewall settings
3. **Authentication Failure**: Ensure credentials are correct if authentication is required
4. **Performance Issues**: Monitor CPU and network usage during capture
### Implementing Robust Error Handling
```cs
try
{
// Attempt to connect to NDI source
var ndiSettings = await NDISourceSettings.CreateAsync(VideoCapture1.GetContext(), null, ndiUrl);
VideoCapture1.Video_Source = ndiSettings;
}
catch (NDISourceNotFoundException ex)
{
// Handle source not found
Log.Error($"NDI source not found: {ex.Message}");
// Implement retry logic or user notification
}
catch (NDIConnectionException ex)
{
// Handle connection issues
Log.Error($"Failed to connect to NDI source: {ex.Message}");
// Implement fallback strategy
}
```
## Integration with Video Processing Workflows
NDI sources can be seamlessly integrated with other components of your video processing pipeline:
1. **Recording**: Capture NDI streams to various file formats
2. **Live Streaming**: Forward NDI content to streaming services
3. **Video Processing**: Apply filters and effects to NDI sources in real-time
4. **Multi-view Composition**: Combine multiple NDI sources into a single output
## Sample Applications and Code References
To help you get started with NDI implementation, we provide several sample applications that demonstrate different aspects of NDI functionality.
+++ VideoCaptureCore
- [NDI source capture to MP4 format (WinForms)](https://github.com/visioforge/.Net-SDK-s-samples/tree/master/Video%20Capture%20SDK/WinForms/CSharp/NDI%20Source)
- [Main SDK sample (WinForms)](https://github.com/visioforge/.Net-SDK-s-samples/tree/master/Video%20Capture%20SDK/WinForms/CSharp/Main%20Demo)
- [NDI and other source sample (WPF)](https://github.com/visioforge/.Net-SDK-s-samples/tree/master/Video%20Capture%20SDK/WPF/CSharp/IP_Capture)
- [Main SDK sample (WPF)](https://github.com/visioforge/.Net-SDK-s-samples/tree/master/Video%20Capture%20SDK/WPF/CSharp/Main_Demo)
+++ VideoCaptureCoreX
- [NDI source preview (WPF)](https://github.com/visioforge/.Net-SDK-s-samples/tree/master/Video%20Capture%20SDK%20X/WPF/CSharp/NDI%20Source%20Demo)
- [NDI (and other sources) preview and capture (WPF)](https://github.com/visioforge/.Net-SDK-s-samples/tree/master/Video%20Capture%20SDK%20X/WPF/CSharp/IP%20Capture)
+++
## Best Practices for NDI Implementation
To ensure optimal performance and reliability when working with NDI sources:
1. **Perform Regular Source Enumeration**: Network conditions and available sources can change; re-enumerate sources periodically.
2. **Implement Connection Retry Logic**: Network disruptions can occur; implement automatic reconnection attempts.
3. **Monitor Stream Health**: Track frame rates, latency, and connection stability to detect potential issues.
4. **Handle Source Disconnections Gracefully**: Implement event handlers for unexpected disconnections.
5. **Test With Various NDI Sources**: Different NDI implementations may have slight variations; test with various sources.
## Conclusion
NDI technology offers powerful capabilities for network video integration in .NET applications. With our SDK, you can easily incorporate high-quality, low-latency video from NDI sources into your software projects. Whether you're building a live production system, a video conferencing application, or any solution requiring network video, our NDI implementation provides the tools you need for success.
The code samples provided demonstrate the essential patterns for working with NDI sources, from enumeration and connection to capture and processing. By following these patterns and best practices, you can create robust NDI-enabled applications that deliver exceptional performance and reliability.
---
Visit our [GitHub](https://github.com/visioforge/.Net-SDK-s-samples) page to get more code samples.
---END OF PAGE---
# Local File: .\dotnet\videocapture\video-sources\ip-cameras\onvif.md
---
title: ONVIF IP Camera Integration for Video Capture
description: Learn how to implement ONVIF IP camera integration in your .NET applications. Complete guide covering camera discovery, connection, profile management, streaming, PTZ controls, and troubleshooting for developers.
sidebar_label: ONVIF Cameras
order: 19
---
# ONVIF IP Camera Integration
[!badge size="xl" target="blank" variant="info" text="Video Capture SDK .Net"](https://www.visioforge.com/video-capture-sdk-net) [!badge variant="dark" size="xl" text="VideoCaptureCoreX"] [!badge variant="dark" size="xl" text="VideoCaptureCore"]
## What is ONVIF?
ONVIF (Open Network Video Interface Forum) is an industry standard protocol that enables seamless interoperability between network video products from different manufacturers. This protocol defines a common interface for IP-based security devices including cameras, NVRs (Network Video Recorders), and access control systems. Using ONVIF-compliant devices allows developers to create applications that work with equipment from multiple vendors without needing custom integrations for each device.
## Benefits of ONVIF Integration
- **Vendor Neutrality**: Build applications that work with cameras from multiple manufacturers
- **Future-Proof Development**: As new ONVIF-compliant cameras enter the market, your application will support them
- **Standardized Communication**: Consistent methods for device discovery, video streaming, and PTZ controls
- **Reduced Development Time**: No need to implement proprietary APIs for each camera brand
- **Advanced Features**: Access to profiles, media streams, events, and device management
## Getting Started with ONVIF
Before connecting to ONVIF cameras, it's important to understand your requirements. Will your application need to discover cameras automatically? Are PTZ controls necessary? Which profiles and streams will you need to access?
### ONVIF Device Discovery
Discovering ONVIF devices on your network is typically the first step in integration. The SDK provides methods to scan the network and identify available ONVIF cameras.
+++ VideoCaptureCore
```cs
// List all ONVIF sources on the network
// The first parameter is a timeout (null = default)
// The second parameter is a network interface IP (null = all interfaces)
var uris = await VideoCapture1.IP_Camera_ONVIF_ListSourcesAsync(null, null);
foreach (var uri in uris)
{
// Each URI represents an ONVIF device endpoint
Console.WriteLine($"Found ONVIF device: {uri}");
cbIPCameraURL.Items.Add(uri);
}
```
+++ VideoCaptureCoreX
```cs
// List all ONVIF sources with a 2-second timeout
// The second parameter is a network interface IP (null = all interfaces)
var uris = await DeviceEnumerator.Shared.ONVIF_ListSourcesAsync(TimeSpan.FromSeconds(2), null);
foreach (var uri in uris)
{
// Each URI represents an ONVIF device endpoint
Console.WriteLine($"Found ONVIF device: {uri}");
cbIPCameraURL.Items.Add(uri);
}
```
+++
### Connecting to ONVIF Cameras
Once you've discovered your ONVIF cameras or have their service endpoints, you can establish a connection to access their features and capabilities.
+++ VideoCaptureCore
```cs
// Create an ONVIF control object
var onvifControl = new ONVIFControl();
// Connect to the camera using its device service endpoint
// Don't forget to provide valid credentials
var result = await onvifControl.ConnectAsync("http://192.168.1.2/onvif/device_service", "username", "password");
if (!result)
{
onvifControl = null;
Console.WriteLine("Unable to connect to the ONVIF camera.");
return;
}
Console.WriteLine("Successfully connected to ONVIF camera");
```
+++ VideoCaptureCoreX
```cs
// Create an ONVIF device object
var onvifDevice = new ONVIFDeviceX();
// Connect to the camera using its device service endpoint
// Don't forget to provide valid credentials
var result = await onvifDevice.ConnectAsync("http://192.168.1.2/onvif/device_service", "username", "password");
if (!result)
{
onvifDevice = null;
Console.WriteLine("Unable to connect to the ONVIF camera.");
return;
}
Console.WriteLine("Successfully connected to ONVIF camera");
```
+++
## Retrieving Camera Information and Capabilities
After establishing a connection, you can query the camera for its information and capabilities. This is useful for identifying the camera model, firmware version, and supported features.
+++ VideoCaptureCore
```cs
// Get basic device information
var deviceInfo = await onvifControl.GetDeviceInformationAsync();
if (deviceInfo != null)
{
Console.WriteLine($"Model: {deviceInfo.Model}");
Console.WriteLine($"Firmware Version: {deviceInfo.Firmware}");
Console.WriteLine($"Serial Number: {deviceInfo.SerialNumber}");
}
```
+++ VideoCaptureCoreX
```cs
// Get basic device information
if (onvifDevice.IsConnected())
{
Console.WriteLine($"Model: {onvifDevice.Model}");
Console.WriteLine($"Firmware Version: {onvifDevice.Firmware}");
Console.WriteLine($"Serial Number: {onvifDevice.SerialNumber}");
Console.WriteLine($"Hardware ID: {onvifDevice.Hardware}");
}
```
+++
## Working with Media Profiles
ONVIF devices organize their media configurations into profiles. A profile typically includes video and audio encoder configurations, PTZ settings, and other parameters. Cameras often have multiple profiles for different quality levels or use cases.
+++ VideoCaptureCore
```cs
// Get all available profiles
var profiles = await onvifControl.GetProfilesAsync();
if (profiles != null && profiles.Length > 0)
{
Console.WriteLine($"Found {profiles.Length} media profiles:");
foreach (var profile in profiles)
{
Console.WriteLine($"Profile: {profile.Name} (Token: {profile.Token})");
Console.WriteLine($" - Video Encoder: {profile.VideoEncoderConfiguration?.Encoding}");
Console.WriteLine($" - Resolution: {profile.VideoEncoderConfiguration?.Resolution.Width}x{profile.VideoEncoderConfiguration?.Resolution.Height}");
Console.WriteLine($" - Framerate: {profile.VideoEncoderConfiguration?.RateControl?.FrameRateLimit}");
Console.WriteLine($" - Has PTZ: {profile.PTZConfiguration != null}");
}
}
```
+++ VideoCaptureCoreX
```cs
// Get all available profiles
var profiles = await onvifDevice.GetProfilesAsync();
if (profiles != null && profiles.Length > 0)
{
Console.WriteLine($"Found {profiles.Length} media profiles:");
foreach (var profile in profiles)
{
Console.WriteLine($"Profile: {profile.Name})");
// Get detailed profile information
Console.WriteLine($" - Video Encoder: {profile.VideoEncoderName}");
Console.WriteLine($" - Resolution: {profile.VideoEncoderWidth}x{profile.VideoEncoderHeight}");
Console.WriteLine($" - Framerate: {profile.VideoEncoderFrameRate}");
Console.WriteLine($" - Has PTZ: {profile.PTZConfiguration != null}");
}
}
```
+++
## Obtaining RTSP Stream URLs
To capture video from an ONVIF camera, you'll need to obtain the RTSP stream URL for the desired profile.
+++ VideoCaptureCore
```cs
// Get streaming URL for the first profile (index 0)
var url = await onvifControl.GetVideoURLAsync(0);
if (!string.IsNullOrEmpty(url))
{
Console.WriteLine($"RTSP stream URL: {url}");
}
```
+++ VideoCaptureCoreX
```cs
// Get RTSP URL
var uri = onvifDevice.GetVideoURL(0);
if (!string.IsNullOrEmpty(uri))
{
Console.WriteLine($"RTSP stream URL: {uri}");
}
```
+++
## PTZ (Pan-Tilt-Zoom) Controls
Many ONVIF cameras support PTZ functionality, allowing you to programmatically control the camera's position and zoom level.
+++ VideoCaptureCore
```cs
// First, get PTZ configuration ranges
var ranges = await onvifControl.PTZ_GetRangesAsync();
if (ranges != null)
{
Console.WriteLine($"X Range: {ranges.MinX} to {ranges.MaxX}");
Console.WriteLine($"Y Range: {ranges.MinY} to {ranges.MaxY}");
Console.WriteLine($"Zoom Range: {ranges.ZoomMin} to {ranges.ZoomMax}");
}
// Go to absolute position
// Parameters: Pan position, Tilt position, Zoom position
await onvifControl.PTZ_SetAbsoluteAsync(0.25, 0.5, 0.1);
// Go to home position
await onvifControl.PTZ_SetHomeAsync();
```
+++ VideoCaptureCoreX
```cs
// Go to absolute position
// Parameters: Pan position, Tilt position, Zoom position
onvifDevice.PTZ_AbsoluteMove(0.25, 0.5, 0.1);
// Go to home position
onvifDevice.PTZ_GoHome();
```
+++
## Troubleshooting ONVIF Connections
When working with ONVIF cameras, you may encounter various issues. Here are some common problems and solutions:
### Connection Issues
- Verify the camera is on the same network and reachable (ping test)
- Check that username and password are correct
- Ensure the ONVIF service endpoint URL is correct
- Some cameras require specific ONVIF ports to be open
### Stream Problems
- Check if the RTSP stream URL is correct
- Verify network bandwidth is sufficient for the selected profile
- Try a lower resolution profile if experiencing lag
- Some networks may block RTSP traffic
### PTZ Control Failures
- Verify the camera actually supports PTZ (not all IP cameras do)
- Check if the selected profile has PTZ configuration
- Some cameras have limited PTZ ranges or capabilities
## Best Practices
1. **Cache Device Information**: Store discovered devices and their capabilities to reduce startup time
2. **Handle Authentication Securely**: Never store credentials in plain text
3. **Implement Timeouts**: Network operations should have reasonable timeouts
4. **Provide Fallbacks**: If an ONVIF feature isn't available, have alternative methods
5. **Profile Selection**: Choose the appropriate profile based on your application's needs
## Conclusion
ONVIF integration provides a powerful and standardized way to interact with IP cameras in your applications. By following the guidelines and code examples in this documentation, you can build robust camera management solutions that work with a wide range of devices without vendor lock-in.
---
Visit our [GitHub](https://github.com/visioforge/.Net-SDK-s-samples) page to get more code samples.
---END OF PAGE---
# Local File: .\dotnet\videocapture\video-sources\ip-cameras\rtsp.md
---
title: Integrating RTSP Cameras in Video Capture SDK .Net
description: Learn how to implement and configure RTSP camera streams in your .NET applications. Discover low-latency options, sample code for implementation, and best practices for optimal performance with both UDP and TCP connections.
sidebar_label: RTSP Cameras
order: 20
---
# Integrating RTSP Camera Streams in .NET Applications
[!badge size="xl" target="blank" variant="info" text="Video Capture SDK .Net"](https://www.visioforge.com/video-capture-sdk-net) [!badge variant="dark" size="xl" text="VideoCaptureCoreX"] [!badge variant="dark" size="xl" text="VideoCaptureCore"]
## Setting Up Standard RTSP Camera Sources
Implementing RTSP camera streams in your .NET applications provides flexible access to network cameras and video streams. This powerful capability allows real-time monitoring, surveillance features, and video processing directly within your application.
+++ VideoCaptureCore
For additional connection options and alternative protocols, please reference our detailed [IP cameras](index.md) documentation which covers a wide range of camera integration approaches.
+++ VideoCaptureCoreX
```cs
// Create RTSP source settings object
var rtsp = await RTSPSourceSettings.CreateAsync(new Uri("url"), "login", "password", true /*capture audio?*/);
// Set source to the VideoCaptureCoreX object
VideoCapture1.Video_Source = rtsp;
```
+++
## Optimizing for Low-Latency RTSP Streaming
Low latency is critical for many real-time applications including security monitoring, interactive systems, and live broadcasting. Our SDK provides specialized configurations to minimize delay between capture and display.
+++ VideoCaptureCore
Our SDK includes a dedicated mode specifically engineered for low-latency RTSP streaming. When properly configured, this mode typically achieves latency under 250 milliseconds, making it ideal for time-sensitive applications.
```cs
// Create the source settings object.
var settings = new IPCameraSourceSettings();
// Configure IP address, username, password, etc.
// ...
// Set RTSP LowLatency mode.
settings.Type = IPSourceEngine.RTSP_LowLatency;
// Set UDP or TCP mode.
settings.RTSP_LowLatency_UseUDP = false; // true to use UDP, false to use TCP
// Set source to the VideoCaptureCore object.
VideoCapture1.IP_Camera_Source = settings;
```
+++ VideoCaptureCoreX
For optimizing performance in VideoCaptureCoreX, utilize the standard RTSP source with custom latency parameters to achieve your desired balance between smoothness and real-time response.
+++
## Implementation Examples and Reference Applications
These sample projects demonstrate practical RTSP implementation patterns and can serve as starting points for your own development. Reviewing these examples will help you understand best practices for RTSP integration.
+++ VideoCaptureCore
- [Main SDK sample (WinForms)](https://github.com/visioforge/.Net-SDK-s-samples/tree/master/Video%20Capture%20SDK/WinForms/CSharp/Main%20Demo)
- [RTSP and other source sample (WPF)](https://github.com/visioforge/.Net-SDK-s-samples/tree/master/Video%20Capture%20SDK/WPF/CSharp/IP_Capture)
- [Main SDK sample (WPF)](https://github.com/visioforge/.Net-SDK-s-samples/tree/master/Video%20Capture%20SDK/WPF/CSharp/Main_Demo)
+++ VideoCaptureCoreX
- [RTSP source sample (WPF)](https://github.com/visioforge/.Net-SDK-s-samples/tree/master/Video%20Capture%20SDK%20X/WPF/CSharp/IP%20Capture)
+++
## Troubleshooting RTSP Connections
When working with RTSP cameras, you may encounter connectivity issues related to network configuration, firewall settings, or authentication. Here are key factors to consider:
- Verify network connectivity between your application and the camera
- Ensure correct authentication credentials are provided
- Check if firewalls are blocking required ports (typically 554 for RTSP)
- Consider using TCP instead of UDP if experiencing packet loss
- Test camera streams with VLC or similar tools to isolate application-specific issues
---END OF PAGE---
# Local File: .\dotnet\videocapture\video-sources\usb3v-gige-genicam\index.md
---
title: USB3 Vision, GigE & GenICam Integration Guide
description: Learn how to integrate USB3 Vision, GigE, and GenICam industrial cameras into your applications with DirectShow drivers and cross-platform functionality for machine vision and industrial automation projects.
sidebar_label: USB3 Vision, GigE, and GenICam devices
order: 15
---
# USB3 Vision, GigE, and GenICam Camera Integration
[!badge size="xl" target="blank" variant="info" text="Video Capture SDK .Net"](https://www.visioforge.com/video-capture-sdk-net) [!badge variant="dark" size="xl" text="VideoCaptureCoreX"]
## Overview
Industrial cameras using USB3 Vision, GigE Vision, and GenICam standards provide superior image quality and performance for machine vision applications. Our SDK enables seamless integration with these professional camera types through various connectivity options.
## GigE Vision Protocol
GigE Vision is an industrial camera interface standard based on Gigabit Ethernet technology. It offers several advantages for machine vision applications:
- **High-speed data transfer**: Supports up to 1 Gbps on standard GigE networks and 10+ Gbps on modern 10GigE networks
- **Long cable length**: Can operate at distances up to 100 meters using standard Ethernet cabling
- **Network architecture**: Multiple cameras can share the same network infrastructure
- **Power over Ethernet (PoE)**: Cameras can receive power through the same Ethernet cable (when using PoE-enabled switches)
- **Device discovery**: Automatic detection of GigE Vision cameras on the network
- **Multicast capabilities**: Allows streaming to multiple clients simultaneously
GigE Vision combines the GenICam programming interface with GigE transport layer, providing consistent command structures across different manufacturers' cameras.
## USB3 Vision Protocol
USB3 Vision is a camera interface standard that leverages the high-speed USB 3.0 interface for industrial imaging applications:
- **High bandwidth**: Up to 5 Gbps theoretical transfer rate, enabling high resolution and frame rates
- **Plug-and-play**: Simple connectivity without specialized interface cards
- **Hot-swappable**: Devices can be connected or disconnected without system reboot
- **Cable length**: Typically supports distances up to 5 meters (can be extended with active cables)
- **Power delivery**: Up to 4.5W provided directly through the USB connection
- **Standard driver architecture**: Uses standard USB drivers from operating systems
USB3 Vision works alongside the GenICam standard to provide consistent camera control across different manufacturers.
## DirectShow Driver Support
Most industrial camera manufacturers include DirectShow-compatible drivers with their development kits. These drivers create a bridge between the camera's native interface and the DirectShow framework, allowing our SDK to access and control these specialized devices.
Key benefits:
- Simplified integration path
- Full access to camera streams
- Compatibility with existing DirectShow workflows
## Cross-Platform GenICam Support
For developers working in multi-platform environments, our SDK's cross-platform engine supports cameras implementing the unified GenICam interface standard. This provides consistent access to camera features across different operating systems.
## Compatible SDKs from Major Manufacturers
The following manufacturer SDKs are known to work well with our integration:
- [Basler pylon SDK](https://www.baslerweb.com/en/software/pylon/sdk/) - Comprehensive toolkit for Basler cameras
- [FLIR/Teledyne Spinnaker SDK](https://www.flir.eu/products/spinnaker-sdk/?vertical=machine+vision&segment=iis) - Advanced imaging solution for FLIR and Teledyne cameras
## Implementation Examples
For practical implementation examples demonstrating how to integrate these camera types with our SDK, we recommend exploring our sample projects.
---
Visit our [GitHub](https://github.com/visioforge/.Net-SDK-s-samples) page to get more code samples.
---END OF PAGE---
# Local File: .\dotnet\videocapture\video-sources\video-capture-devices\camera-control-ptz.md
---
title: Advanced Camera Control & PTZ for .NET SDK
description: Implement powerful camera control features including Pan, Tilt, Zoom (PTZ), Exposure, Iris, and Focus in your .NET applications. This detailed guide with C# code samples shows how to access and manipulate camera parameters for professional video capture solutions.
sidebar_label: Camera control and PTZ
---
# Advanced Camera Control and PTZ Implementation
[!badge size="xl" target="blank" variant="info" text="Video Capture SDK .Net"](https://www.visioforge.com/video-capture-sdk-net) [!badge variant="dark" size="xl" text="VideoCaptureCore"]
## Overview of Camera Control Capabilities
The Camera Control API provides developers with direct access to manipulate various camera parameters when working with compatible devices. Depending on your camera hardware specifications, you can programmatically control the following features:
- **Pan** - Horizontal movement control
- **Tilt** - Vertical movement control
- **Roll** - Rotational movement along the lens axis
- **Zoom** - Magnification level adjustment
- **Exposure** - Light sensitivity settings
- **Iris** - Aperture control for light admission
- **Focus** - Image clarity and sharpness adjustment
**Important Note:** The Camera Control API requires an active camera preview or capture session to function properly. You must start the preview or capture before attempting to access control features.
## Implementation Guide with Examples
Below you'll find practical implementation patterns that demonstrate how to integrate camera control features in your .NET applications.
### Interface Components
For optimal user interaction, consider implementing the following UI elements:
- Slider controls for parameter adjustment
- Checkboxes for toggling auto/manual modes
- Labels for displaying current, minimum, and maximum values
You can reference the Main Demo source code for a complete implementation example.
### Step 1: Reading Camera Parameter Capabilities
First, query the camera to determine the supported ranges and default values for each control parameter:
```cs
// Initialize variables to store camera parameter information
int max;
int defaultValue;
int min;
int step;
CameraControlFlags flags;
// Query the camera for the supported range of the Zoom parameter
if (await VideoCapture1.Video_CaptureDevice_CameraControl_GetRangeAsync(
CameraControlProperty.Zoom, out min, out max, out step, out defaultValue, out flags))
{
// Configure slider control with the camera's supported range
tbCCZoom.Minimum = min;
tbCCZoom.Maximum = max;
tbCCZoom.SmallChange = step;
tbCCZoom.Value = defaultValue;
// Update UI labels with range information
lbCCZoomMin.Text = "Min: " + Convert.ToString(min);
lbCCZoomMax.Text = "Max: " + Convert.ToString(max);
lbCCZoomCurrent.Text = "Current: " + Convert.ToString(defaultValue);
// Set control mode checkboxes based on camera capabilities
cbCCZoomManual.Checked = (flags & CameraControlFlags.Manual) == CameraControlFlags.Manual;
cbCCZoomAuto.Checked = (flags & CameraControlFlags.Auto) == CameraControlFlags.Auto;
cbCCZoomRelative.Checked = (flags & CameraControlFlags.Relative) == CameraControlFlags.Relative;
}
```
**Technical Note:** When the Auto flag is enabled, the camera will ignore all other flags and manual value settings. This follows industry-standard camera control protocols.
### Step 2: Applying Parameter Changes
When users adjust settings through your interface, apply the changes to the camera with this pattern:
```cs
// Initialize control flags
CameraControlFlags flags = CameraControlFlags.None;
// Build the flags based on UI checkbox states
if (cbCCZoomManual.Checked)
{
// Enable manual control mode
flags = flags | CameraControlFlags.Manual;
}
if (cbCCZoomAuto.Checked)
{
// Enable automatic control mode (will override manual settings)
flags = flags | CameraControlFlags.Auto;
}
if (cbCCZoomRelative.Checked)
{
// Enable relative value mode (changes are relative to current position)
flags = flags | CameraControlFlags.Relative;
}
// Apply the new zoom value with the specified control flags
await VideoCapture1.Video_CaptureDevice_CameraControl_SetAsync(CameraControlProperty.Zoom, tbCCZoom.Value, flags);
```
## Error Handling and Best Practices
When implementing camera control features, consider these best practices:
- Always check if a parameter is supported before attempting to set it
- Implement proper error handling for unsupported features
- Provide feedback to users when a command fails
- Remember that camera capabilities vary widely between manufacturers and models
## Required Dependencies
For proper functionality, ensure your application includes these redistributable packages:
- Video capture redistributables:
- [x86 Architecture](https://www.nuget.org/packages/VisioForge.DotNet.Core.Redist.VideoCapture.x86/)
- [x64 Architecture](https://www.nuget.org/packages/VisioForge.DotNet.Core.Redist.VideoCapture.x64/)
## Additional Resources
For more examples and complete implementation details, visit our [GitHub repository](https://github.com/visioforge/.Net-SDK-s-samples) containing numerous code samples and demo applications.
---END OF PAGE---
# Local File: .\dotnet\videocapture\video-sources\video-capture-devices\crossbar.md
---
title: Configure Device Input Connections with Crossbar API
description: Learn how to select and configure multiple hardware video inputs for TV tuners and capture cards in .NET applications. Complete C# implementation with step-by-step instructions for managing device inputs through the crossbar interface.
sidebar_label: Configure Device Input Connections (Crossbar)
---
# Configuring Multiple Hardware Video Inputs with Crossbar
[!badge size="xl" target="blank" variant="info" text="Video Capture SDK .Net"](https://www.visioforge.com/video-capture-sdk-net) [!badge variant="dark" size="xl" text="VideoCaptureCore"]
## Introduction to Crossbar Functionality
Many professional video capture devices such as TV tuners, capture cards, and video acquisition hardware feature multiple physical input connections. These devices might include various input types like:
- Analog video inputs (Composite, S-Video)
- Digital video inputs (HDMI, DisplayPort)
- Professional video inputs (SDI, HD-SDI)
- Television tuner inputs (RF, Cable)
The crossbar interface allows your application to programmatically select between these different hardware inputs and route the signals appropriately.
## Implementation Guide
### Step 1: Initialize Crossbar Interface
First, you need to initialize the crossbar interface for your video capture device. This establishes the connection to the hardware's input selection capabilities.
```cs
// Initialize the crossbar interface and check if crossbar functionality exists
var crossBarFound = VideoCapture1.Video_CaptureDevice_CrossBar_Init();
// If crossBarFound is true, the device supports multiple inputs that can be configured
```
### Step 2: Discover Available Input Options
After initializing, you can retrieve all available inputs that can be connected to the specified output (typically "Video Decoder").
```cs
// Clear any existing crossbar connection settings
VideoCapture1.Video_CaptureDevice_CrossBar_ClearConnections();
// Clear any previous items in your UI dropdown
cbCrossbarVideoInput.Items.Clear();
// Populate the dropdown with all available input sources that can connect to "Video Decoder"
foreach (string inputSource in VideoCapture1.Video_CaptureDevice_CrossBar_GetInputsForOutput("Video Decoder"))
{
// Add each available input source to your UI selection element
cbCrossbarVideoInput.Items.Add(inputSource);
}
```
### Step 3: Apply Selected Input Configuration
When the user selects their desired input source, apply this configuration to the device by connecting the selected input to the "Video Decoder" output.
```cs
// First clear any existing connections to ensure clean state
VideoCapture1.Video_CaptureDevice_CrossBar_ClearConnections();
// Connect the selected input (from UI dropdown) to the "Video Decoder" output
// The final parameter (true) enables the connection
VideoCapture1.Video_CaptureDevice_CrossBar_Connect(cbCrossbarVideoInput.Text, "Video Decoder", true);
// At this point, the device will use the selected input for video capture
```
### Step 4: Handling Connection Changes
For optimal user experience, consider implementing event handlers to detect when users change input selection and reapply the configuration accordingly.
## Required Dependencies
To implement crossbar functionality, your application must include the appropriate video capture redistributables:
- Video capture redist packages:
- [x86 Architecture](https://www.nuget.org/packages/VisioForge.DotNet.Core.Redist.VideoCapture.x86/)
- [x64 Architecture](https://www.nuget.org/packages/VisioForge.DotNet.Core.Redist.VideoCapture.x64/)
## Troubleshooting Tips
- Not all devices support crossbar functionality - check `crossBarFound` value after initialization
- Some devices may have different output names than "Video Decoder"
- Changes may not take effect until after the capture session is started
---
Visit our [GitHub](https://github.com/visioforge/.Net-SDK-s-samples) repository for additional code samples and implementation examples.
---END OF PAGE---
# Local File: .\dotnet\videocapture\video-sources\video-capture-devices\enable-camera-light.md
---
title: Enable Camera Light on Windows 10+ Tablet Devices
description: Learn how to programmatically control camera light functionality on Windows 10+ tablets in .NET applications. This guide includes C# code examples, required packages, and implementation steps for developers working with video capture capabilities.
sidebar_label: Enable Camera Light on Windows 10+ Tablets
---
# Enabling Camera Light on Windows 10+ Tablets
[!badge size="xl" target="blank" variant="info" text="Video Capture SDK .Net"](https://www.visioforge.com/video-capture-sdk-net) [!badge variant="dark" size="xl" text="VideoCaptureCore"]
## Introduction
Modern Windows 10+ tablets come equipped with camera light functionality that developers can control programmatically. This guide explains how to implement camera light controls in your .NET applications using the TorchControl API.
## Implementation with TorchControl API
The TorchControl API provides a comprehensive way to manage camera lights on Windows 10+ tablets. This API offers:
- Device discovery for torch-compatible cameras
- Granular control for enabling and disabling camera lights
- Cross-device compatibility
### Basic Implementation Steps
1. Initialize the VideoCaptureCore component
2. Get available devices with torch capabilities
3. Enable or disable torch functionality for specific devices
## Working Code Example
```cs
// Initialize VideoCaptureCore
VideoCaptureCore videoCapture = await VideoCaptureCore.CreateAsync();
// Get available devices with torch capability
string[] devices = await videoCapture.TorchControl_GetDevicesAsync();
// Enable torch for the first available device
if (devices.Length > 0)
{
await videoCapture.TorchControl_EnableAsync(devices[0], true);
}
// Disable torch when needed
await videoCapture.TorchControl_EnableAsync(devices[0], false);
```
## Complete Implementation Example
```cs
using System;
using System.Windows.Forms;
using VisioForge.Core.VideoCapture;
using VisioForge.Core.WindowsExtensions;
namespace Camera_Light_Demo
{
public partial class Form1 : Form
{
private VideoCaptureCore VideoCapture1;
private string[] _devices;
public Form1()
{
InitializeComponent();
}
private void Form1_FormClosing(object sender, FormClosingEventArgs e)
{
if (VideoCapture1 != null)
{
VideoCapture1.Dispose();
VideoCapture1 = null;
}
}
private async void btTurnOn_Click(object sender, EventArgs e)
{
if (_devices.Length > 0)
{
await VideoCapture1.TorchControl_EnableAsync(_devices[0], true);
}
}
private async void btTurnOff_Click(object sender, EventArgs e)
{
if (_devices.Length > 0)
{
await VideoCapture1.TorchControl_EnableAsync(_devices[0], false);
}
}
private async void Form1_Load(object sender, EventArgs e)
{
VideoCapture1 = await VideoCaptureCore.CreateAsync();
_devices = await VideoCapture1.TorchControl_GetDevicesAsync();
lbDeviceCount.Text = $"Devices found: {_devices.Length}.";
}
}
}
```
## Required Dependencies
To implement camera light functionality in your application, you'll need:
1. **NuGet Package**: Install the [VisioForge.DotNet.Core.WindowsExtensions](https://www.nuget.org/packages/VisioForge.DotNet.Core.WindowsExtensions) package.
2. **Video Capture Redistributables**:
- [x86 Redist Package](https://www.nuget.org/packages/VisioForge.DotNet.Core.Redist.VideoCapture.x86/)
- [x64 Redist Package](https://www.nuget.org/packages/VisioForge.DotNet.Core.Redist.VideoCapture.x64/)
## Complete Sample Application
For a fully functional implementation, explore our [Camera Light Demo application](https://github.com/visioforge/.Net-SDK-s-samples/tree/master/Video%20Capture%20SDK/WinForms/CSharp/Camera%20Light%20Demo) available in our GitHub repository.
## Compatibility Notes
- This functionality is primarily designed for Windows 10 and newer tablet devices
- Device hardware must support programmable camera light control
- Some device manufacturers may implement proprietary APIs that require additional configuration
## Troubleshooting Tips
If you encounter issues enabling the camera light:
- Verify that your device has compatible hardware
- Ensure all required packages are properly installed
- Check device permissions in your application manifest
- Make sure the device reports as torch-capable with TorchControl_GetDevicesAsync()
---
Visit our [GitHub](https://github.com/visioforge/.Net-SDK-s-samples) page to access more code samples and examples.
---END OF PAGE---
# Local File: .\dotnet\videocapture\video-sources\video-capture-devices\enumerate-and-select.md
---
title: Manage Video Capture Devices in .NET Applications
description: Learn how to programmatically detect, enumerate, and configure video capture devices in your .NET applications. Find detailed code examples for listing devices, inspecting available formats, setting frame rates, and implementing device selection for optimal video quality.
sidebar_label: Enumerate and Select Video Capture Devices
---
# Working with Video Capture Devices in .NET
[!badge size="xl" target="blank" variant="info" text="Video Capture SDK .Net"](https://www.visioforge.com/video-capture-sdk-net) [!badge variant="dark" size="xl" text="VideoCaptureCoreX"] [!badge variant="dark" size="xl" text="VideoCaptureCore"]
## Introduction to Video Device Management
The Video Capture SDK .Net provides robust support for any video capture device recognized by your operating system. This guide demonstrates how to discover available devices, inspect their capabilities, and integrate them into your applications.
## Enumerating Available Video Capture Devices
Before you can use a capture device, you need to identify which ones are connected to the system. The following code examples show how to retrieve a list of available devices and display them in a user interface component:
+++ VideoCaptureCore
```csharp
// Iterate through all available video capture devices connected to the system
foreach (var device in VideoCapture1.Video_CaptureDevices())
{
// Add each device name to a dropdown selection control
cbVideoInputDevice.Items.Add(device.Name);
}
```
+++ VideoCaptureCoreX
```cs
// Asynchronously retrieve all video sources using the shared DeviceEnumerator
var devices = DeviceEnumerator.Shared.VideoSourcesAsync();
// Iterate through each available device
foreach (var device in await devices)
{
// Add the device's friendly name to the dropdown selection control
cbVideoInputDevice.Items.Add(device.DisplayName);
}
```
+++
## Discovering Video Format Capabilities
After identifying a capture device, you can examine its supported video formats and frame rates. This allows you to offer users appropriate configuration options:
+++ VideoCaptureCore
```csharp
// Locate a specific device by its display name
var deviceItem = VideoCapture1.Video_CaptureDevices().FirstOrDefault(device => device.Name == "Some device name");
// Iterate through all video formats supported by this device
foreach (var format in deviceItem.VideoFormats)
{
// Add each format to the format selection dropdown
cbVideoInputFormat.Items.Add(format);
// For each format, iterate through its supported frame rates
foreach (var frameRate in format.FrameRates)
{
// Add each frame rate option to the frame rate selection dropdown
cbVideoInputFrameRate.Items.Add(frameRate.ToString(CultureInfo.CurrentCulture));
}
}
```
+++ VideoCaptureCoreX
```cs
// Locate a specific device by its display name
var deviceItem = (await DeviceEnumerator.Shared.VideoSourcesAsync()).FirstOrDefault(device => device.DisplayName == "Some device name");
// Iterate through all video formats supported by this device
foreach (var format in deviceItem.VideoFormats)
{
// Add the format's display name to the format selection dropdown
cbVideoInputFormat.Items.Add(format.Name);
// For each format, retrieve and display available frame rates
foreach (var frameRate in format.FrameRateList)
{
// Add each frame rate value to the selection dropdown
cbVideoInputFrameRate.Items.Add(frameRate.ToString());
}
}
```
+++
## Configuring and Activating a Video Capture Device
Once you've selected a device and identified your preferred format settings, you can initialize the capture source with these parameters:
+++ VideoCaptureCore
```csharp
// Find the selected device in the device list
var deviceItem = VideoCapture1.Video_CaptureDevices().FirstOrDefault(device => device.Name == "Some device name");
// Create a new video capture source using the selected device
VideoCapture1.Video_CaptureDevice = new VideoCaptureSource(deviceItem.Name);
// Configure the default video format from the first available option
VideoCapture1.Video_CaptureDevice.Format = deviceItem.VideoFormats[0].ToString();
// Set the default frame rate from the first available option for the selected format
VideoCapture1.Video_CaptureDevice.FrameRate = deviceItem.VideoFormats[0].FrameRates[0];
// Note: After this setup, use VideoPreview or VideoCapture mode to start streaming
```
+++ VideoCaptureCoreX
```cs
// Initialize the video source settings variable
VideoCaptureDeviceSourceSettings videoSourceSettings = null;
// Find the selected device by its display name
var device = (await DeviceEnumerator.Shared.VideoSourcesAsync()).FirstOrDefault(x => x.DisplayName == deviceName);
if (device != null)
{
// Locate the selected format by name
var formatItem = device.VideoFormats.FirstOrDefault(x => x.Name == format);
if (formatItem != null)
{
// Create configuration settings using the selected device
videoSourceSettings = new VideoCaptureDeviceSourceSettings(device)
{
// Convert the format representation to the required Format object
Format = formatItem.ToFormat()
};
// Set the desired frame rate from the dropdown selection
videoSourceSettings.Format.FrameRate = new VideoFrameRate(Convert.ToDouble(cbVideoInputFrameRate.Text));
}
}
// Apply the configured settings to the video capture component
VideoCapture1.Video_Source = videoSourceSettings;
```
+++
## Additional Resources and Code Examples
For more advanced usage scenarios and complete implementation examples, visit our [GitHub repository](https://github.com/visioforge/.Net-SDK-s-samples) containing comprehensive demonstration projects.
## Troubleshooting Device Detection
If your application cannot detect expected devices, consider these common issues:
1. Ensure the device is properly connected and powered on
2. Verify that device drivers are correctly installed
3. Check that no other application is currently using the device
4. Restart the application after connecting new devices
---END OF PAGE---
# Local File: .\dotnet\videocapture\video-sources\video-capture-devices\index.md
---
title: Using Video Capture Devices in .NET Applications
description: Learn how to implement video capture device integration in your .NET applications. This comprehensive guide covers device enumeration, camera control, PTZ functionality, video adjustments, and specialized features for professional development.
sidebar_label: Video Capture Devices
order: 20
---
# Integrating Video Capture Devices in .NET Applications
[!badge size="xl" target="blank" variant="info" text="Video Capture SDK .Net"](https://www.visioforge.com/video-capture-sdk-net)
## Getting Started with Video Capture Devices
Integrating video capture functionality into your .NET applications requires understanding several key concepts and implementation techniques. This guide walks you through the essential components needed for successful device integration.
## Core Device Management Features
### Device Discovery and Selection
* [**Enumerate devices and select**](enumerate-and-select.md) - Learn techniques for scanning available hardware, listing compatible devices, and implementing selection logic in your application.
### Advanced Camera Controls
* [**Camera control and PTZ**](camera-control-ptz.md) - Implement pan-tilt-zoom functionality and other advanced camera movement controls for precision video capture.
### Video Quality Management
* [**Video adjustments**](video-adjustments.md) - Adjust brightness, contrast, saturation and other visual parameters to optimize video quality programmatically.
### Hardware Light Control
* [**Enable camera light**](enable-camera-light.md) - Control integrated lighting systems on compatible camera hardware through your application code.
### Input Configuration
* [**Select device input (configure crossbar)**](crossbar.md) - Configure input sources and manage signal routing for devices with multiple input capabilities.
## Implementation Resources
Our documentation provides practical code examples that you can implement directly in your projects. For even more implementation examples:
---
Visit our [GitHub](https://github.com/visioforge/.Net-SDK-s-samples) repository for additional code samples and implementation patterns.
---END OF PAGE---
# Local File: .\dotnet\videocapture\video-sources\video-capture-devices\video-adjustments.md
---
title: Mastering Camera Image Controls in .NET
description: Learn how to programmatically control camera settings including brightness, contrast, hue, saturation, and more using Video Capture SDK in .NET applications. Discover practical code examples for implementing custom video adjustments in your software development projects.
sidebar_label: Camera Video Adjustments
---
# Mastering Camera Image Controls in .NET Applications
[!badge size="xl" target="blank" variant="info" text="Video Capture SDK .Net"](https://www.visioforge.com/video-capture-sdk-net) [!badge variant="dark" size="xl" text="VideoCaptureCore"]
## Introduction to Camera Hardware Adjustments
When developing applications that utilize webcams or other video capture devices, having precise control over image quality parameters is essential for creating professional-grade software. The `VideoHardwareAdjustment` class provides developers with powerful tools to programmatically adjust camera settings such as brightness, contrast, hue, saturation, sharpness, gamma, and more.
## Supported Hardware Adjustment Properties
The SDK supports numerous adjustment properties including:
- Brightness
- Contrast
- Hue
- Saturation
- Sharpness
- Gamma
- White Balance
- Backlight Compensation
- Gain
- Exposure
Note that not all cameras support every property. The SDK will gracefully ignore any property not supported by the specific camera hardware you're using.
## Working with Camera Adjustments
### Getting Property Value Ranges
Before setting adjustment values, it's important to understand the valid range for each property. Use the `Video_CaptureDevice_VideoAdjust_GetRangesAsync` method to retrieve the minimum, maximum, default values, and step size for any adjustment property:
```cs
// Retrieve the valid range of values for the brightness property
// This helps understand the boundaries within which you can adjust settings
var brightnessRange = await VideoCapture1.Video_CaptureDevice_VideoAdjust_GetRangesAsync(VideoHardwareAdjustment.Brightness);
// Check the minimum and maximum allowed values
int minValue = brightnessRange.Min;
int maxValue = brightnessRange.Max;
int defaultValue = brightnessRange.Default;
int step = brightnessRange.SteppingDelta;
```
### Setting Adjustment Values
Once you know the valid range, you can set a specific value using the `Video_CaptureDevice_VideoAdjust_SetValueAsync` method:
```cs
// Create an adjustment value object with your desired settings
// You can specify a custom value and whether automatic adjustment should be used
var adjustmentValue = new VideoCaptureDeviceAdjustValue(75, false); // Value: 75, Auto: false
// Apply the brightness adjustment to the camera
await VideoCapture1.Video_CaptureDevice_VideoAdjust_SetValueAsync(VideoHardwareAdjustment.Brightness, adjustmentValue);
```
### Retrieving Current Values
To read the current value of any adjustment property, use the `Video_CaptureDevice_VideoAdjust_GetValueAsync` method:
```cs
// Get the current brightness setting from the camera
// This returns both the current value and whether auto-adjustment is enabled
var currentBrightness = await VideoCapture1.Video_CaptureDevice_VideoAdjust_GetValueAsync(VideoHardwareAdjustment.Brightness);
// Access the current value and auto flag
int value = currentBrightness.Value;
bool isAuto = currentBrightness.Auto;
```
## Best Practices for Camera Adjustments
1. **Always check ranges first**: Different camera models have different valid ranges for each property.
2. **Handle unsupported properties**: Always implement error handling for properties that might not be supported.
3. **Consider saving user preferences**: Store adjustment values in application settings for a consistent experience.
4. **Provide UI controls**: Create sliders with proper min/max values based on the ranges returned.
5. **Consider automatic vs. manual**: Some users may prefer auto-adjustment while others need precise manual control.
## Additional Resources
Check out our [GitHub repository](https://github.com/visioforge/.Net-SDK-s-samples) for complete code samples and implementation examples.
---END OF PAGE---
# Local File: .\dotnet\videocapture\video-tutorials\camera-video-preview.md
---
title: Webcam Frame Capture & Preview in C#
description: Learn how to implement real-time webcam video preview with frame capture functionality in C# .NET applications. Complete tutorial with working code examples for WinForms, WPF, and console applications. Perfect for building custom camera solutions.
sidebar_label: Webcam Frame Capture & Preview
---
# Implementing Webcam Video Preview with Frame Capture in C#
[!badge size="xl" target="blank" variant="info" text="Video Capture SDK .Net"](https://www.visioforge.com/video-capture-sdk-net)
## Overview
This tutorial demonstrates how to create a professional webcam video preview application with the ability to capture individual frames as images. This functionality is essential for developing applications that require image analysis, snapshot capabilities, or custom camera interfaces.
## Step-by-Step Video Tutorial
Watch our detailed video walkthrough that covers all aspects of webcam integration:
[!embed](https://www.youtube.com/embed/kxC6JrJddek?controls=1)
## Getting Started
Before diving into the code, you'll need to set up your development environment with the necessary dependencies. The complete source code is available on GitHub for reference:
[Source code on GitHub](https://github.com/visioforge/.Net-SDK-s-samples/tree/master/Video%20Capture%20SDK/_CodeSnippets/video-preview-webcam-frame-capture)
## Implementation Guide
### Required Dependencies
First, ensure you have the following NuGet packages installed:
- Video capture redist [x86](https://www.nuget.org/packages/VisioForge.DotNet.Core.Redist.VideoCapture.x86/) [x64](https://www.nuget.org/packages/VisioForge.DotNet.Core.Redist.VideoCapture.x64/)
### Source Code Example
The following C# implementation demonstrates how to:
1. Initialize a video capture component
2. Connect to a webcam device
3. Display real-time video preview
4. Capture and save individual frames as JPEG images
```csharp
using System;
using System.Collections.Generic;
using System.ComponentModel;
using System.Data;
using System.Drawing;
using System.Drawing.Imaging;
using System.IO;
using System.Linq;
using System.Text;
using System.Threading.Tasks;
using System.Windows.Forms;
// VisioForge SDK references for video capture functionality
using VisioForge.Core.VideoCapture;
using VisioForge.Core.Types;
using VisioForge.Core.Types.Output;
using VisioForge.Core.Types.VideoCapture;
namespace video_preview_webcam_frame_capture
{
public partial class Form1 : Form
{
// Main video capture component to handle camera input
private VideoCaptureCore videoCapture1;
public Form1()
{
InitializeComponent();
}
// Form initialization - creates a new VideoCaptureCore instance connected to our video view
private void Form1_Load(object sender, EventArgs e)
{
// Initialize the video capture component with the VideoView control
videoCapture1 = new VideoCaptureCore(VideoView1 as IVideoView);
}
// Start button click handler - configures and starts video capture
private async void btStart_Click(object sender, EventArgs e)
{
// Configure the default video capture device (first available camera)
videoCapture1.Video_CaptureDevice = new VideoCaptureSource(videoCapture1.Video_CaptureDevices()[0].Name);
// Configure the default audio capture device (first available microphone)
videoCapture1.Audio_CaptureDevice = new AudioCaptureSource(videoCapture1.Audio_CaptureDevices()[0].Name);
// Set mode to VideoPreview (display only, no recording)
videoCapture1.Mode = VideoCaptureMode.VideoPreview;
// Start the video preview asynchronously
await videoCapture1.StartAsync();
}
// Stop button click handler - stops the video capture
private async void btStop_Click(object sender, EventArgs e)
{
// Stop the video preview asynchronously
await videoCapture1.StopAsync();
}
// Save Frame button click handler - captures and saves current frame as JPEG
private async void btSaveFrame_Click(object sender, EventArgs e)
{
// Save the current frame as a JPEG image in the user's Pictures folder
// The quality parameter (85) specifies the JPEG compression level (0-100)
await videoCapture1.Frame_SaveAsync(
Path.Combine(Environment.GetFolderPath(Environment.SpecialFolder.MyPictures), "frame.jpg"),
ImageFormat.Jpeg,
85);
}
}
}
```
## Code Breakdown
### Initialization
The application begins by creating a new `VideoCaptureCore` instance during form load, which serves as the main interface for interacting with webcam devices.
### Device Selection
When the user clicks the Start button, the application automatically selects the first available video and audio capture devices. In a production environment, you might want to provide a dropdown selection for users with multiple cameras.
### Preview Mode
The application is configured in `VideoPreview` mode, which enables real-time display without recording the stream to disk. This is ideal for applications that only need to show camera output.
### Frame Capture
The frame capture functionality demonstrates how to save the current video frame as a JPEG image with a specified quality level. The image is saved to the user's Pictures folder by default.
## Advanced Applications
This code can be extended to support various real-world applications:
- Document scanning
- Photo booth applications
- Video conferencing
- Computer vision and image processing
- Security and surveillance systems
## Additional Resources
Visit our [GitHub](https://github.com/visioforge/.Net-SDK-s-samples) page to explore more code samples and advanced implementation techniques.
---END OF PAGE---
# Local File: .\dotnet\videocapture\video-tutorials\index.md
---
title: Video Capture SDK .Net Video Tutorials
description: Complete guide to implementing video capture functionality in .NET applications - learn to capture from IP cameras, webcams, and screens with detailed code examples and practical implementation steps.
sidebar_label: Video Tutorials With Sample Code
order: 1
---
# .NET Video Capture Tutorials with Source Code Examples
Are you looking to implement professional-grade video capture capabilities in your .NET applications? These tutorials provide step-by-step guidance with fully functional code samples to integrate various video capture scenarios into your projects.
## IP Camera Integration Tutorials
Connecting to IP cameras allows you to incorporate security feeds, remote monitoring, and surveillance functionality into your applications.
* [**IP Camera to MP4 Recording Guide**](ip-camera-capture-mp4.md) - Learn how to connect to IP cameras and record high-quality MP4 files with H.264 compression
* [**IP Camera Live Preview Implementation**](ip-camera-preview.md) - Discover how to display real-time IP camera feeds in your application with customizable frame rates
Our tutorials cover RTSP, HTTP, and ONVIF protocols for connecting to a wide range of IP camera models from major manufacturers.
## Screen Recording Tutorials
Capture your desktop, application windows, or specific screen regions with pixel-perfect accuracy. Ideal for creating tutorials, demos, or remote assistance tools.
* [**Screen Capture to AVI Format**](screen-capture-avi.md) - Implement full-screen or region capture to industry-standard AVI format with configurable codecs
* [**Screen Recording to MP4 Files**](screen-capture-mp4.md) - Create efficient MP4 recordings from desktop activity with adjustable quality settings
* [**Screen Capture with WMV Output**](screen-capture-wmv.md) - Utilize WMV format for optimized file size screen recordings and compatibility
Learn to capture mouse movements, clicks, and keyboard activity alongside your screen recordings for comprehensive demonstrations.
## Webcam Capture Tutorials
Integrate webcam functionality into your applications for video conferencing, facial recognition, motion detection, or content creation.
* [**Webcam Video Recording to AVI**](video-capture-camera-avi.md) - Integrate webcam recording with AVI output format and DirectShow compatibility
* [**Webcam Capture to MP4 Files**](video-capture-webcam-mp4.md) - Implement high-quality webcam recording with H.264 compression for optimal file size
* [**Webcam Recording with WMV Output**](video-capture-webcam-wmv.md) - Create efficient WMV format recordings from webcam input with Windows Media compatibility
* [**Text Overlay on Webcam Recordings**](webcam-capture-text-overlay.md) - Learn to add dynamic text, timestamps, and watermarks to webcam footage with customizable fonts and positioning
Our SDK supports a wide range of webcam resolutions, frame rates, and special features like autofocus and low-light enhancement.
---
## Additional Resources
For more advanced implementation examples and source code, visit our [GitHub repository](https://github.com/visioforge/.Net-SDK-s-samples) containing the complete collection of .NET SDK code samples. Our code examples follow best practices for performance, resource management, and error handling to help you create robust video capture solutions.
Need customized implementation help or have specific requirements? Our development team is available to provide technical guidance and code review to ensure your project's success.
---END OF PAGE---
# Local File: .\dotnet\videocapture\video-tutorials\ip-camera-capture-mp4.md
---
title: IP Camera Streaming to MP4 Files in .NET C#
description: Learn how to implement IP camera video streaming and recording to MP4 files in .NET applications using C#. This detailed guide covers RTSP connection setup, stream configuration, video encoding options, and provides complete code examples for developers.
sidebar_label: IP Camera Capture to MP4 File
---
# Capturing IP Camera Streams to MP4 Files in .NET
[!badge size="xl" target="blank" variant="info" text="Video Capture SDK .Net"](https://www.visioforge.com/video-capture-sdk-net)
## Introduction to IP Camera Recording
IP cameras provide powerful surveillance and monitoring capabilities through network connections. This guide demonstrates how to leverage these devices in .NET applications to capture and save video streams to MP4 files. Using modern C# coding practices, you'll learn how to establish connections to IP cameras, configure video streams, and save high-quality recordings for various applications including security systems, monitoring solutions, and video archiving tools.
## Video Implementation Tutorial
The following video walks through the complete implementation process:
[!embed](https://www.youtube.com/embed/qX3AiGyWbO8?controls=1)
[Source code on GitHub](https://github.com/visioforge/.Net-SDK-s-samples/tree/master/Video%20Capture%20SDK/_CodeSnippets/ip-camera-capture-mp4)
## Step-by-Step Implementation Guide
This guide demonstrates how to establish connections to IP cameras, stream their video content, and encode it directly to MP4 files using the VideoCaptureCoreX component. The implementation supports multiple camera protocols including RTSP, HTTP, and ONVIF.
### Code Implementation
```csharp
using System;
using System.Collections.Generic;
using System.ComponentModel;
using System.Data;
using System.Drawing;
using System.IO;
using System.Linq;
using System.Text;
using System.Threading.Tasks;
using System.Windows.Forms;
using VisioForge.Core.Types.X.AudioRenderers;
using VisioForge.Core.Types.X.Output;
using VisioForge.Core.Types.X.Sources;
using VisioForge.Core.VideoCaptureX;
using VisioForge.Core;
namespace ip_camera_capture_mp4
{
public partial class Form1 : Form
{
private VideoCaptureCoreX videoCapture1;
public Form1()
{
InitializeComponent();
}
private async void btStart_Click(object sender, EventArgs e)
{
videoCapture1 = new VideoCaptureCoreX(VideoView1);
// RTSP camera source
var rtsp = await RTSPSourceSettings.CreateAsync(new Uri(edURL.Text), edLogin.Text, edPassword.Text, cbAudioStream.Checked);
videoCapture1.Video_Source = rtsp;
// audio output device
var audioOutputDevice = (await DeviceEnumerator.Shared.AudioOutputsAsync(AudioOutputDeviceAPI.DirectSound))[0];
videoCapture1.Audio_OutputDevice = new AudioRendererSettings(audioOutputDevice);
// configure MP4 output
var mp4Output = new MP4Output(Path.Combine(Environment.GetFolderPath(Environment.SpecialFolder.MyVideos), "output.mp4"));
videoCapture1.Outputs_Add(mp4Output);
// start
await videoCapture1.StartAsync();
}
private async void btStop_Click(object sender, EventArgs e)
{
await videoCapture1.StopAsync();
await videoCapture1.DisposeAsync();
}
private async void Form1_Load(object sender, EventArgs e)
{
await VisioForgeX.InitSDKAsync();
}
private void Form1_FormClosing(object sender, FormClosingEventArgs e)
{
VisioForgeX.DestroySDK();
}
}
}
```
## Implementation Details and Best Practices
### SDK Initialization
Before working with IP cameras, proper SDK initialization is crucial to ensure all components are loaded and ready:
```csharp
private async void Form1_Load(object sender, EventArgs e)
{
await VisioForgeX.InitSDKAsync();
}
```
Always initialize the SDK at application startup to ensure all required components are properly loaded before attempting camera connections.
### Camera Connection Configuration
The example uses RTSP (Real-Time Streaming Protocol), one of the most common protocols for IP camera streaming:
```csharp
// RTSP camera source
var rtsp = await RTSPSourceSettings.CreateAsync(new Uri(edURL.Text), edLogin.Text, edPassword.Text, cbAudioStream.Checked);
videoCapture1.Video_Source = rtsp;
```
When connecting to IP cameras, consider these important parameters:
- **Camera URL** - The complete RTSP URL to your camera (e.g., `rtsp://192.168.1.100:554/stream1`)
- **Authentication** - Many cameras require username and password credentials
- **Audio Stream** - Toggle whether to include audio from the camera
- **Connection Timeout** - For production applications, implement appropriate timeout handling
### MP4 Output Configuration
MP4 is an ideal container format for video recordings due to its excellent compatibility and compression:
```csharp
// configure MP4 output
var mp4Output = new MP4Output(Path.Combine(Environment.GetFolderPath(Environment.SpecialFolder.MyVideos), "output.mp4"));
videoCapture1.Outputs_Add(mp4Output);
```
When configuring MP4 output, consider these options:
- **File Naming** - Implement dynamic file naming based on date/time for organized recordings
- **Storage Location** - Choose appropriate storage paths with sufficient disk space
- **Video Quality** - Configure bitrate, framerate, and resolution settings based on your requirements
- **Metadata** - Add relevant metadata to recordings for easier classification and searching
### Resource Management
Proper resource management is critical when working with video streams to prevent memory leaks and ensure stable performance:
```csharp
private async void btStop_Click(object sender, EventArgs e)
{
await videoCapture1.StopAsync();
await videoCapture1.DisposeAsync();
}
private void Form1_FormClosing(object sender, FormClosingEventArgs e)
{
VisioForgeX.DestroySDK();
}
```
Always implement proper resource cleanup, especially:
- Stop active streams before application closing
- Dispose of capture resources when no longer needed
- Release SDK resources when your application exits
### Advanced Implementation Considerations
For production-grade applications, consider these additional features:
1. **Error Handling** - Implement comprehensive error handling for network disconnections, authentication failures, and storage issues
2. **Monitoring** - Add status monitoring to track stream health and recording status
3. **Reconnection Logic** - Implement automatic reconnection for network interruptions
4. **Multi-Camera Support** - Extend the implementation to handle multiple camera streams simultaneously
5. **Recording Scheduling** - Add time-based recording functions for surveillance applications
## Required Dependencies
For this implementation to work correctly, the following packages must be included in your project:
- Video capture redist [x86](https://www.nuget.org/packages/VisioForge.DotNet.Core.Redist.VideoCapture.x86/) [x64](https://www.nuget.org/packages/VisioForge.DotNet.Core.Redist.VideoCapture.x64/)
- LAV redist [x86](https://www.nuget.org/packages/VisioForge.DotNet.Core.Redist.LAV.x86/) [x64](https://www.nuget.org/packages/VisioForge.DotNet.Core.Redist.LAV.x64/)
- MP4 redist [x86](https://www.nuget.org/packages/VisioForge.DotNet.Core.Redist.MP4.x86/) [x64](https://www.nuget.org/packages/VisioForge.DotNet.Core.Redist.MP4.x64/)
## Troubleshooting Common Issues
When implementing IP camera capture, be prepared to address these common challenges:
1. **Connection Failures** - Verify network connectivity, camera credentials, and firewall settings
2. **Stream Performance** - Balance quality settings with available bandwidth and processing power
3. **Output File Errors** - Ensure adequate disk space and appropriate write permissions
4. **Resource Leaks** - Monitor memory usage during long recording sessions
5. **Camera Compatibility** - Different camera models may require specific configuration adjustments
---
Visit our [GitHub](https://github.com/visioforge/.Net-SDK-s-samples) page to get more code samples.
---END OF PAGE---
# Local File: .\dotnet\videocapture\video-tutorials\ip-camera-preview.md
---
title: IP Camera Preview in .NET - Setup Guide
description: Learn how to implement real-time IP camera preview functionality in your .NET applications. This step-by-step tutorial with complete C# code examples works for WinForms, WPF, and console applications, helping you integrate camera feeds seamlessly.
sidebar_label: IP Camera Preview
---
# IP Camera Preview Implementation Guide
[!badge size="xl" target="blank" variant="info" text="Video Capture SDK .Net"](https://www.visioforge.com/video-capture-sdk-net)
## Video Walkthrough
This tutorial demonstrates how to set up IP camera preview functionality in your .NET applications:
[!embed](https://www.youtube.com/embed/9n44ChQJT7s?controls=1)
[Source code on GitHub](https://github.com/visioforge/.Net-SDK-s-samples/tree/master/Video%20Capture%20SDK/_CodeSnippets/ip-camera-preview)
## Required Redistributables
Before you begin, ensure you have the following packages installed:
- Video capture redist [x86](https://www.nuget.org/packages/VisioForge.DotNet.Core.Redist.VideoCapture.x86/) [x64](https://www.nuget.org/packages/VisioForge.DotNet.Core.Redist.VideoCapture.x64/)
- LAV redist [x86](https://www.nuget.org/packages/VisioForge.DotNet.Core.Redist.LAV.x86/) [x64](https://www.nuget.org/packages/VisioForge.DotNet.Core.Redist.LAV.x64/)
## Implementation Example
Below is a complete WinForms example showing how to integrate IP camera preview functionality:
```csharp
using System;
using System.Collections.Generic;
using System.ComponentModel;
using System.Data;
using System.Drawing;
using System.Linq;
using System.Text;
using System.Threading.Tasks;
using System.Windows.Forms;
using VisioForge.Core.VideoCapture;
using VisioForge.Core.Types;
using VisioForge.Core.Types.Output;
using VisioForge.Core.Types.VideoCapture;
namespace ip_camera_preview
{
public partial class Form1 : Form
{
private VideoCaptureCore videoCapture1;
public Form1()
{
InitializeComponent();
}
private void Form1_Load(object sender, EventArgs e)
{
videoCapture1 = new VideoCaptureCore(VideoView1 as IVideoView);
}
private async void btStart_Click(object sender, EventArgs e)
{
// Several engines are available. We'll use LAV as the most compatible. For low latency RTSP playback, use the RTSP Low Latency engine.
videoCapture1.IP_Camera_Source = new IPCameraSourceSettings()
{
URL = new Uri("http://192.168.233.129:8000/camera/mjpeg"),
Type = IPSourceEngine.Auto_LAV
};
videoCapture1.Audio_PlayAudio = videoCapture1.Audio_RecordAudio = false;
videoCapture1.Mode = VideoCaptureMode.IPPreview;
await videoCapture1.StartAsync();
}
private async void btStop_Click(object sender, EventArgs e)
{
await videoCapture1.StopAsync();
}
}
}
```
## Key Implementation Details
### Setting the IP Camera Source
The code demonstrates configuring the IP camera source with the appropriate URL and engine type:
```csharp
videoCapture1.IP_Camera_Source = new IPCameraSourceSettings()
{
URL = new Uri("http://192.168.233.129:8000/camera/mjpeg"),
Type = IPSourceEngine.Auto_LAV
};
```
### Handling Audio Settings
For simple preview applications, you may want to disable audio playback and recording:
```csharp
videoCapture1.Audio_PlayAudio = videoCapture1.Audio_RecordAudio = false;
```
### Setting the Capture Mode
The correct mode for IP camera preview is:
```csharp
videoCapture1.Mode = VideoCaptureMode.IPPreview;
```
## Advanced Options
For production applications, consider implementing:
- Error handling and connection retry logic
- UI feedback during connection attempts
- Camera authentication handling
- Frame rate and resolution control
---
Visit our [GitHub](https://github.com/visioforge/.Net-SDK-s-samples) page to explore more code samples.
---END OF PAGE---
# Local File: .\dotnet\videocapture\video-tutorials\screen-capture-avi.md
---
title: Screen Capture to AVI - C# Tutorial for Developers
description: Learn how to implement screen capture with mouse cursor to AVI video files in C#. This step-by-step guide provides complete source code examples for recording your screen to AVI format with full control over video settings.
sidebar_label: Screen Capture to AVI File
---
# C# Screen Capture to AVI Implementation Guide
[!badge size="xl" target="blank" variant="info" text="Video Capture SDK .Net"](https://www.visioforge.com/video-capture-sdk-net)
## Video Tutorial Walkthrough
Watch our detailed tutorial that demonstrates the implementation process:
[!embed](https://www.youtube.com/embed/AUT8oVPinUs?controls=1)
## Source Code Repository
Access the complete source code for this tutorial:
[Source code on GitHub](https://github.com/visioforge/.Net-SDK-s-samples/tree/master/Video%20Capture%20SDK/_CodeSnippets/screen-capture-avi)
## Implementation Code Sample
Below is the complete C# code implementation for capturing your screen to an AVI file:
```csharp
using System;
using System.Collections.Generic;
using System.ComponentModel;
using System.Data;
using System.Drawing;
using System.IO;
using System.Linq;
using System.Text;
using System.Threading.Tasks;
using System.Windows.Forms;
using VisioForge.Core.VideoCapture;
using VisioForge.Core.Types;
using VisioForge.Core.Types.Output;
using VisioForge.Core.Types.VideoCapture;
namespace screen_capture_avi
{
public partial class Form1 : Form
{
private VideoCaptureCore videoCapture1;
public Form1()
{
InitializeComponent();
}
private async void btStart_Click(object sender, EventArgs e)
{
videoCapture1.Screen_Capture_Source = new ScreenCaptureSourceSettings() { FullScreen = true };
videoCapture1.Audio_RecordAudio = videoCapture1.Audio_PlayAudio = false;
videoCapture1.Output_Filename = Path.Combine(Environment.GetFolderPath(Environment.SpecialFolder.MyVideos), "output.avi");
// Default AVI output with MJPEG for video and PCM for audio
videoCapture1.Output_Format = new AVIOutput();
videoCapture1.Mode = VideoCaptureMode.ScreenCapture;
await videoCapture1.StartAsync();
}
private async void btStop_Click(object sender, EventArgs e)
{
await videoCapture1.StopAsync();
}
private void Form1_Load(object sender, EventArgs e)
{
videoCapture1 = new VideoCaptureCore(VideoView1 as IVideoView);
}
}
}
```
## Code Explanation
The implementation showcases:
- Capturing the entire screen with a simple configuration
- Saving the output to the user's Videos folder
- Using MJPEG compression for the AVI format
- Asynchronous start and stop methods for better application responsiveness
## Required Dependencies
To use this code in your project, install the following NuGet packages:
- Video capture redistributable components:
- [x86 version](https://www.nuget.org/packages/VisioForge.DotNet.Core.Redist.VideoCapture.x86/)
- [x64 version](https://www.nuget.org/packages/VisioForge.DotNet.Core.Redist.VideoCapture.x64/)
## Additional Resources
For more examples and advanced implementation techniques:
- Visit our [GitHub repository](https://github.com/visioforge/.Net-SDK-s-samples) for additional code samples
- Explore customization options for screen capture regions, video quality, and formats
Visit our [GitHub](https://github.com/visioforge/.Net-SDK-s-samples) page to get more code samples.
---END OF PAGE---
# Local File: .\dotnet\videocapture\video-tutorials\screen-capture-mp4.md
---
title: Screen Capture to MP4 with .NET | C# Video Recording
description: Learn how to implement screen recording to MP4 with C# in your .NET applications. This tutorial provides complete code examples for both audio and silent screen captures, using H264/AAC encoding with simple async implementation for smooth desktop recordings.
sidebar_label: Screen Capture to MP4 File
---
# Screen capture to MP4 file
[!badge size="xl" target="blank" variant="info" text="Video Capture SDK .Net"](https://www.visioforge.com/video-capture-sdk-net)
## YouTube tutorial
[!embed](https://www.youtube.com/embed/fPJEoOz6lIM?controls=1)
[Source code on GitHub](https://github.com/visioforge/.Net-SDK-s-samples/tree/master/Video%20Capture%20SDK/_CodeSnippets/screen-capture-mp4)
## Required redists
- Video capture redist [x86](https://www.nuget.org/packages/VisioForge.DotNet.Core.Redist.VideoCapture.x86/) [x64](https://www.nuget.org/packages/VisioForge.DotNet.Core.Redist.VideoCapture.x64/)
- MP4 redist [x86](https://www.nuget.org/packages/VisioForge.DotNet.Core.Redist.MP4.x86/) [x64](https://www.nuget.org/packages/VisioForge.DotNet.Core.Redist.MP4.x64/)
## Code Example
```csharp
using System;
using System.IO;
using System.Windows.Forms;
using VisioForge.Core.VideoCapture;
using VisioForge.Core.Types;
using VisioForge.Core.Types.Output;
using VisioForge.Core.Types.VideoCapture;
namespace screen_capture_mp4
{
public partial class Form1 : Form
{
// Main VideoCapture component that handles all recording operations
private VideoCaptureCore videoCapture1;
public Form1()
{
InitializeComponent();
}
///
/// Starts screen recording with audio from the default device
///
private async void btStartWithAudio_Click(object sender, EventArgs e)
{
// Configure screen capture to record the entire screen
// ScreenCaptureSourceSettings allows fine control of capture region and parameters
videoCapture1.Screen_Capture_Source = new ScreenCaptureSourceSettings() {
FullScreen = true // Capture the entire screen rather than a specific region
};
// Configure audio capture by selecting the first available audio input device
// Audio_CaptureDevices() returns all connected microphones and audio inputs
// We select the first device (index 0) in the collection
videoCapture1.Audio_CaptureDevice = new AudioCaptureSource(
videoCapture1.Audio_CaptureDevices()[0].Name);
// Disable audio monitoring/playback during recording to prevent feedback
// This means we won't hear the captured audio while recording
videoCapture1.Audio_PlayAudio = false;
// Enable audio recording to include sound in the output file
videoCapture1.Audio_RecordAudio = true;
// Set the output file location to the user's Videos folder
// Environment.GetFolderPath ensures the path works across different Windows systems
videoCapture1.Output_Filename = Path.Combine(
Environment.GetFolderPath(Environment.SpecialFolder.MyVideos),
"output.mp4");
// Use MP4 container format with H.264 video and AAC audio codecs (standard format)
// MP4Output can be further configured with custom encoding parameters if needed
videoCapture1.Output_Format = new MP4Output();
// Set the capture mode to screen recording
// Other modes include camera capture, video file processing, etc.
videoCapture1.Mode = VideoCaptureMode.ScreenCapture;
// Begin the capture process asynchronously
// Using async/await pattern to prevent UI freezing during operation
await videoCapture1.StartAsync();
}
///
/// Starts screen recording without audio (video only)
///
private async void btStartWithoutAudio_Click(object sender, EventArgs e)
{
// Configure screen capture for full screen recording
// Same ScreenCaptureSourceSettings as in audio recording
videoCapture1.Screen_Capture_Source = new ScreenCaptureSourceSettings() {
FullScreen = true
};
// Disable both audio playback and recording in a single line
// This creates a video-only MP4 file with no audio track
videoCapture1.Audio_PlayAudio = videoCapture1.Audio_RecordAudio = false;
// Set output file path to user's Videos directory with MP4 extension
videoCapture1.Output_Filename = Path.Combine(
Environment.GetFolderPath(Environment.SpecialFolder.MyVideos),
"output.mp4");
// Configure output as MP4 (H.264 video codec)
videoCapture1.Output_Format = new MP4Output();
// Set mode to screen capture
videoCapture1.Mode = VideoCaptureMode.ScreenCapture;
// Start screen recording asynchronously
await videoCapture1.StartAsync();
}
///
/// Stops the current recording process safely
///
private async void btStop_Click(object sender, EventArgs e)
{
// Stop the recording asynchronously
// This properly finalizes the MP4 file and releases resources
// Using async ensures UI remains responsive during file finalization
await videoCapture1.StopAsync();
}
///
/// Initializes the VideoCapture component when the form loads
///
private void Form1_Load(object sender, EventArgs e)
{
// Initialize the video capture component and connect it to a video preview control
// VideoView1 should be a control on your form that implements IVideoView interface
// This allows for live preview of the capture when desired
videoCapture1 = new VideoCaptureCore(VideoView1 as IVideoView);
}
}
}
```
## How It Works
This Windows Forms application demonstrates screen capture functionality with and without audio using VisioForge Video Capture SDK:
1. **Setup**: The `VideoCaptureCore` object is initialized in the form load event, connecting it to a video view component.
2. **Capturing with Audio**:
- Sets screen capture to full screen mode
- Selects the first available audio device for recording
- Disables audio playback but enables audio recording
- Sets the output file to MP4 format in the user's Videos folder
- Uses asynchronous method to start capture
3. **Capturing without Audio**:
- Similar to above but disables both audio playback and recording
- Uses the same MP4 output format and capture mode
4. **Stopping Capture**:
- Provides a simple stop method that asynchronously stops the recording
The application demonstrates how to configure different capture scenarios with minimal code using the SDK's fluent interface and async patterns.
---
Visit our [GitHub](https://github.com/visioforge/.Net-SDK-s-samples) page to get more code samples.
---END OF PAGE---
# Local File: .\dotnet\videocapture\video-tutorials\screen-capture-wmv.md
---
title: C# Screen Recording to WMV - .NET Implementation
description: Learn how to implement professional screen recording functionality in your .NET applications with C#. This step-by-step guide includes working code samples, configuration options, and best practices for capturing screen activity to WMV format.
sidebar_label: Screen Capture to a WMV File
---
# Implementing Screen Recording to WMV in C# .NET Applications
[!badge size="xl" target="blank" variant="info" text="Video Capture SDK .Net"](https://www.visioforge.com/video-capture-sdk-net)
## Video Tutorial Walkthrough
Watch our detailed video walkthrough that demonstrates each step of the implementation process:
[!embed](https://www.youtube.com/embed/8JYSDw2JeAo?controls=1)
## Source Code Repository
Access the complete source code for this tutorial on our GitHub repository:
[Source code on GitHub](https://github.com/visioforge/.Net-SDK-s-samples/tree/master/Video%20Capture%20SDK/_CodeSnippets/screen-capture-wmv)
## Required Dependencies
Before you begin, ensure you have installed the necessary redistributable packages:
- Video capture redistributables:
- [x86 package](https://www.nuget.org/packages/VisioForge.DotNet.Core.Redist.VideoCapture.x86/)
- [x64 package](https://www.nuget.org/packages/VisioForge.DotNet.Core.Redist.VideoCapture.x64/)
## Essential C# Implementation Code
The following code snippet demonstrates how to create a basic screen recording application that captures your screen to a WMV file:
```csharp
using System;
using System.Collections.Generic;
using System.ComponentModel;
using System.Data;
using System.Drawing;
using System.IO;
using System.Linq;
using System.Text;
using System.Threading.Tasks;
using System.Windows.Forms;
using VisioForge.Core.VideoCapture;
using VisioForge.Core.Types;
using VisioForge.Core.Types.Output;
using VisioForge.Core.Types.VideoCapture;
namespace screen_capture_wmv
{
public partial class Form1 : Form
{
// Declare the main VideoCaptureCore object that will handle the screen recording
private VideoCaptureCore videoCapture1;
public Form1()
{
// Initialize form components (buttons, panels, etc.)
InitializeComponent();
}
private void Form1_Load(object sender, EventArgs e)
{
// Initialize the VideoCaptureCore instance and associate it with the VideoView control
// VideoView1 is a UI control where the screen capture preview will be displayed
videoCapture1 = new VideoCaptureCore(VideoView1 as IVideoView);
}
private async void btStart_Click(object sender, EventArgs e)
{
// Configure screen capture to record the full screen
videoCapture1.Screen_Capture_Source = new ScreenCaptureSourceSettings() { FullScreen = true };
// Disable audio recording and playback
videoCapture1.Audio_RecordAudio = videoCapture1.Audio_PlayAudio = false;
// Set the output file path to the user's Videos folder
videoCapture1.Output_Filename = Path.Combine(Environment.GetFolderPath(Environment.SpecialFolder.MyVideos), "output.wmv");
// Set the output format to WMV with default settings
videoCapture1.Output_Format = new WMVOutput();
// Set the capture mode to screen capture
videoCapture1.Mode = VideoCaptureMode.ScreenCapture;
// Start the screen capture process asynchronously
await videoCapture1.StartAsync();
}
private async void btStop_Click(object sender, EventArgs e)
{
// Stop the screen capture process asynchronously
await videoCapture1.StopAsync();
}
}
}
```
## Advanced Configuration Options
### Capturing Specific Screen Regions
If you need to record only a portion of the screen rather than the entire display:
```csharp
// Define a specific rectangular region to capture (x, y, width, height)
videoCapture1.Screen_Capture_Source = new ScreenCaptureSourceSettings() {
FullScreen = false,
Rectangle = new Rectangle(0, 0, 800, 600)
};
```
## Common Implementation Scenarios
### Creating a Lightweight Recording Application
For scenarios where system resources are limited:
1. Lower the capture frame rate
2. Record to a more efficient codec
3. Capture smaller screen regions
4. Use hardware acceleration when available
### Implementing Background Recording
For applications that need to record in the background:
1. Initialize the capture component in a separate thread
2. Implement minimal UI for control
3. Consider adding system tray functionality
4. Implement proper resource management
---
Visit our [GitHub](https://github.com/visioforge/.Net-SDK-s-samples) page to get more code samples and implementation examples.
---END OF PAGE---
# Local File: .\dotnet\videocapture\video-tutorials\video-capture-camera-avi.md
---
title: Webcam to AVI Recording in .NET C# Applications
description: Learn how to implement webcam to AVI file recording in your .NET applications with this step-by-step tutorial. Includes complete C# code example with async operations, device selection, and proper implementation patterns for Windows Forms applications.
sidebar_label: Webcam to AVI Recording
---
# Webcam to AVI File Recording in .NET C# Applications
[!badge size="xl" target="blank" variant="info" text="Video Capture SDK .Net"](https://www.visioforge.com/video-capture-sdk-net)
## Overview
This tutorial demonstrates how to capture video from a webcam and save it directly to an AVI file format in your .NET applications. The implementation uses asynchronous programming techniques for smooth UI responsiveness and provides a clean architecture approach suitable for professional software development.
## Video Walkthrough
Watch our detailed video tutorial covering the implementation process:
[!embed](https://www.youtube.com/embed/8yFKz1QOJbk?controls=1)
## Source Code Repository
Access the complete source code from our official GitHub repository:
[Source code on GitHub](https://github.com/visioforge/.Net-SDK-s-samples/tree/master/Video%20Capture%20SDK/_CodeSnippets/video-capture-webcam-avi)
## Required Dependencies
Before implementing this solution, ensure you have installed the necessary dependencies:
- Video capture redistributables:
- [x86 Version](https://www.nuget.org/packages/VisioForge.DotNet.Core.Redist.VideoCapture.x86/)
- [x64 Version](https://www.nuget.org/packages/VisioForge.DotNet.Core.Redist.VideoCapture.x64/)
## Implementation Details
### Prerequisites
Before starting, make sure you have:
- Visual Studio with .NET development tools
- A webcam connected to your development machine
- Basic understanding of Windows Forms applications
### Code Implementation
The following example demonstrates a complete implementation for webcam capture to AVI file:
```csharp
using System;
using System.Collections.Generic;
using System.ComponentModel;
using System.Data;
using System.Drawing;
using System.IO;
using System.Linq;
using System.Text;
using System.Threading.Tasks;
using System.Windows.Forms;
// Import VisioForge SDK namespaces
using VisioForge.Core.VideoCapture;
using VisioForge.Core.Types;
using VisioForge.Core.Types.Output;
using VisioForge.Core.Types.VideoCapture;
namespace video_capture_webcam_avi
{
public partial class Form1 : Form
{
// Declare the VideoCaptureCore object that will handle all capture operations
private VideoCaptureCore videoCapture1;
public Form1()
{
// Standard Windows Forms initialization
InitializeComponent();
}
private void Form1_Load(object sender, EventArgs e)
{
// Initialize the VideoCaptureCore object and bind it to the VideoView control
// VideoView1 is a control that displays the video preview
videoCapture1 = new VideoCaptureCore(VideoView1 as IVideoView);
}
private async void btStart_Click(object sender, EventArgs e)
{
// Set the video capture device - using the first available camera
// videoCapture1.Video_CaptureDevices() returns a list of available video devices
videoCapture1.Video_CaptureDevice = new VideoCaptureSource(videoCapture1.Video_CaptureDevices()[0].Name);
// Set the audio capture device - using the first available microphone
// videoCapture1.Audio_CaptureDevices() returns a list of available audio devices
videoCapture1.Audio_CaptureDevice = new AudioCaptureSource(videoCapture1.Audio_CaptureDevices()[0].Name);
// Set the output filename to "output.avi" in the user's Videos folder
videoCapture1.Output_Filename = Path.Combine(Environment.GetFolderPath(Environment.SpecialFolder.MyVideos), "output.avi");
// Configure output format as AVI
// By default, this uses MJPEG codec for video and PCM for audio
videoCapture1.Output_Format = new AVIOutput();
// Set the mode to VideoCapture (other modes include ScreenCapture, AudioCapture, etc.)
videoCapture1.Mode = VideoCaptureMode.VideoCapture;
// Start the capture process asynchronously
// Using async/await pattern for non-blocking UI
await videoCapture1.StartAsync();
}
private async void btStop_Click(object sender, EventArgs e)
{
// Stop the capture process asynchronously
await videoCapture1.StopAsync();
}
}
}
```
### Key Implementation Points
#### Device Selection
The example automatically selects the first available video and audio devices. In a production application, you might want to present users with a list of available devices for selection.
#### File Output Configuration
The example saves the output to an AVI file in the user's Videos folder. You can customize the path and filename according to your application requirements.
#### Asynchronous Operation
The implementation uses async/await pattern to prevent UI freezing during capture operations, which is critical for maintaining a responsive application experience.
## Advanced Customization Options
The SDK provides numerous customization options including:
- Video resolution and framerate settings
- Audio quality configuration
- Codec selection for different output requirements
- Video effects and transformations
---
Visit our [GitHub](https://github.com/visioforge/.Net-SDK-s-samples) page to get more code samples and explore additional implementation scenarios.
---END OF PAGE---
# Local File: .\dotnet\videocapture\video-tutorials\video-capture-webcam-mp4.md
---
title: Webcam to MP4 Recording in .NET - C# Tutorial
description: Learn how to implement webcam video capture to MP4 files in your .NET applications with detailed C# code examples. This step-by-step guide shows professional developers how to integrate high-quality video recording capabilities with minimal code.
sidebar_label: Webcam to MP4 Video Capture Implementation
---
# Webcam to MP4 Video Capture Implementation in .NET
[!badge size="xl" target="blank" variant="info" text="Video Capture SDK .Net"](https://www.visioforge.com/video-capture-sdk-net)
## Introduction to Webcam Capture in .NET Applications
Creating applications that record video from webcams to MP4 files is a common requirement for many software projects. This tutorial provides a developer-focused approach to implementing this functionality using modern .NET techniques and the Video Capture SDK.
When implementing webcam recording capabilities, developers need to consider:
- Selecting the appropriate video and audio input devices
- Configuring video and audio compression settings
- Managing the capture lifecycle (initialization, start, stop)
- Handling output file creation and management
## Video Implementation Tutorial
The following video demonstrates the complete process of setting up a webcam capture application:
[!embed](https://www.youtube.com/embed/TunCZ_2bNr8?controls=1)
## Source Code Repository
For developers who prefer to examine the complete implementation, all source code is available in our GitHub repository:
[Source code on GitHub](https://github.com/visioforge/.Net-SDK-s-samples/tree/master/Video%20Capture%20SDK/_CodeSnippets/video-capture-webcam-mp4)
## Required Redistributable Components
Before implementing the solution, ensure you have installed the necessary redistributable packages:
### Video Capture Components
- For 32-bit applications: [x86 Video Capture Redist](https://www.nuget.org/packages/VisioForge.DotNet.Core.Redist.VideoCapture.x86/)
- For 64-bit applications: [x64 Video Capture Redist](https://www.nuget.org/packages/VisioForge.DotNet.Core.Redist.VideoCapture.x64/)
### MP4 Encoding Components
- For 32-bit applications: [x86 MP4 Redist](https://www.nuget.org/packages/VisioForge.DotNet.Core.Redist.MP4.x86/)
- For 64-bit applications: [x64 MP4 Redist](https://www.nuget.org/packages/VisioForge.DotNet.Core.Redist.MP4.x64/)
## Implementation Example with C# Code
The following C# implementation demonstrates how to create a Windows Forms application that captures video from a webcam and saves it to an MP4 file. The code includes proper initialization, configuration, and resource management.
```csharp
using System;
using System.Collections.Generic;
using System.ComponentModel;
using System.Data;
using System.Drawing;
using System.IO;
using System.Linq;
using System.Text;
using System.Threading.Tasks;
using System.Windows.Forms;
// Import VisioForge libraries for video capture functionality
using VisioForge.Core.VideoCapture;
using VisioForge.Core.Types;
using VisioForge.Core.Types.Output;
using VisioForge.Core.Types.VideoCapture;
namespace video_capture_webcam_mp4
{
public partial class Form1 : Form
{
// The main video capture object that controls the capture process
private VideoCaptureCore videoCapture1;
public Form1()
{
InitializeComponent();
}
///
/// Start button click handler - sets up and begins the video capture
///
private async void btStart_Click(object sender, EventArgs e)
{
// Select the first available video device (webcam) from the system
videoCapture1.Video_CaptureDevice = new VideoCaptureSource(videoCapture1.Video_CaptureDevices()[0].Name);
// Select the first available audio device (microphone) from the system
videoCapture1.Audio_CaptureDevice = new AudioCaptureSource(videoCapture1.Audio_CaptureDevices()[0].Name);
// Set the output file path to the user's Videos folder with "output.mp4" filename
videoCapture1.Output_Filename = Path.Combine(Environment.GetFolderPath(Environment.SpecialFolder.MyVideos), "output.mp4");
// Configure output format as MP4 with default settings (H.264 video, AAC audio)
videoCapture1.Output_Format = new MP4Output();
// Set the mode to VideoCapture for capturing both video and audio
videoCapture1.Mode = VideoCaptureMode.VideoCapture;
// Start the capture process asynchronously
await videoCapture1.StartAsync();
}
///
/// Form load handler - initializes the video capture component
///
private void Form1_Load(object sender, EventArgs e)
{
// Initialize the VideoCaptureCore object, connecting it to the VideoView control on the form
videoCapture1 = new VideoCaptureCore(VideoView1 as IVideoView);
}
///
/// Stop button click handler - stops the active capture
///
private async void btStop_Click(object sender, EventArgs e)
{
// Stop the capture process asynchronously and finalize the output file
await videoCapture1.StopAsync();
}
}
}
```
## Key Implementation Features
This implementation provides several important capabilities for developers:
1. **Automatic Device Selection** - The code automatically selects the first available video and audio devices
2. **Standard Output Format** - Configures MP4 output with industry-standard H.264 video and AAC audio codecs
3. **Asynchronous Operation** - Uses async/await pattern for non-blocking UI during capture operations
4. **Simple Integration** - Easy to incorporate into existing Windows Forms applications
## Advanced Configuration Options
While the example shows a basic implementation, developers can extend the solution with additional features:
- Custom video resolution and frame rate settings
- Bitrate adjustments for quality control
- On-the-fly video effects and transformations
- Multiple audio track support
---
Visit our [GitHub](https://github.com/visioforge/.Net-SDK-s-samples) page to get more code samples and implementation examples.
---END OF PAGE---
# Local File: .\dotnet\videocapture\video-tutorials\video-capture-webcam-wmv.md
---
title: Webcam to WMV Capture in .NET | Video SDK Tutorial
description: Learn how to implement webcam video capture to WMV format in .NET applications with step-by-step instructions, C# code examples, NuGet package information, and best practices for Windows application developers. Complete integration guide for building video capture functionality.
sidebar_label: Webcam to WMV Capture
---
# Webcam Video Capture to WMV Format in .NET
[!badge size="xl" target="blank" variant="info" text="Video Capture SDK .Net"](https://www.visioforge.com/video-capture-sdk-net)
## Video Implementation Tutorial
This tutorial demonstrates how to create a Windows Forms application that captures video from a webcam and saves it in WMV format using the Video Capture SDK .NET. The example below provides a complete walkthrough with fully commented source code.
[!embed](https://www.youtube.com/embed/Bqss-zdalXg?controls=1)
## Source Code Access
Access the complete project with all source files and additional examples on our GitHub repository:
[Source code on GitHub](https://github.com/visioforge/.Net-SDK-s-samples/tree/master/Video%20Capture%20SDK/_CodeSnippets/video-capture-webcam-wmv)
## Required Dependencies
Before implementing the code, ensure you have installed the necessary redistributable packages via NuGet:
- **Video Capture Redistributables:**
- [x86 Package](https://www.nuget.org/packages/VisioForge.DotNet.Core.Redist.VideoCapture.x86/)
- [x64 Package](https://www.nuget.org/packages/VisioForge.DotNet.Core.Redist.VideoCapture.x64/)
## Implementation Steps
The following sections outline the key steps to implement webcam capture functionality in your .NET application.
### Setup Project Structure
First, create a Windows Forms application and add the SDK references through NuGet. Then implement the form with necessary controls including a video preview area and start/stop buttons.
### C# Implementation Code
```csharp
using System;
using System.IO;
using System.Windows.Forms;
using VisioForge.Core.VideoCapture;
using VisioForge.Core.Types;
using VisioForge.Core.Types.Output;
using VisioForge.Core.Types.VideoCapture;
namespace video_capture_webcam_wmv
{
public partial class Form1 : Form
{
// Main VideoCapture component instance
private VideoCaptureCore videoCapture1;
public Form1()
{
InitializeComponent();
}
private async void btStart_Click(object sender, EventArgs e)
{
// Set up the default video capture device (webcam)
// Using the first available device in the system
videoCapture1.Video_CaptureDevice = new VideoCaptureSource(videoCapture1.Video_CaptureDevices()[0].Name);
// Set up the default audio capture device (microphone)
// Using the first available audio device in the system
videoCapture1.Audio_CaptureDevice = new AudioCaptureSource(videoCapture1.Audio_CaptureDevices()[0].Name);
// Set the output file path to the user's Videos folder
videoCapture1.Output_Filename = Path.Combine(Environment.GetFolderPath(Environment.SpecialFolder.MyVideos), "output.wmv");
// Configure output format as WMV with default settings
// WMV is a good choice for Windows compatibility
videoCapture1.Output_Format = new WMVOutput();
// Set the capture mode to VideoCapture (captures both video and audio)
videoCapture1.Mode = VideoCaptureMode.VideoCapture;
// Start the capture process asynchronously
// This allows the UI to remain responsive during capture
await videoCapture1.StartAsync();
}
private async void btStop_Click(object sender, EventArgs e)
{
// Stop the capture process asynchronously
// This ensures proper cleanup of resources
await videoCapture1.StopAsync();
}
private void Form1_Load(object sender, EventArgs e)
{
// Initialize the VideoCaptureCore when the form loads
// Connect it to the VideoView control on the form for preview
videoCapture1 = new VideoCaptureCore(VideoView1 as IVideoView);
}
}
}
```
### Key Implementation Details
1. **Component Initialization**: The `VideoCaptureCore` is initialized when the form loads, connecting to the video preview control.
2. **Device Selection**: The code automatically selects the first available webcam and microphone devices on the system.
3. **Output Configuration**: WMV format is selected for its compatibility with Windows systems and wide platform support.
4. **Resource Management**: The `StopAsync()` method ensures proper cleanup of system resources when recording ends.
## Advanced Customization Options
The SDK provides additional options not shown in this basic example:
- Camera resolution and framerate settings
- Video quality and compression parameters
- Custom watermarks and overlays
- Multi-device capture capabilities
## Troubleshooting Tips
- Ensure your webcam is properly connected and recognized by Windows
- Verify the correct redistributables are installed for your target platform (x86/x64)
- Check Windows permissions for camera access in newer operating systems
---
Visit our [GitHub](https://github.com/visioforge/.Net-SDK-s-samples) page to get more code samples and advanced implementation examples.
---END OF PAGE---
# Local File: .\dotnet\videocapture\video-tutorials\webcam-capture-text-overlay.md
---
title: Add Text Overlay to Webcam Video in C# .NET
description: Learn how to capture webcam video and add custom text overlays in C# .NET applications. This detailed tutorial includes step-by-step instructions, complete code samples, and techniques for implementing dynamic text on video streams for professional application development.
sidebar_label: Video Capture from a Camera with Text Overlay
---
# Adding Text Overlays to Webcam Video Capture in C# .NET
[!badge size="xl" target="blank" variant="info" text="Video Capture SDK .Net"](https://www.visioforge.com/video-capture-sdk-net)
## Video Tutorial Walkthrough
The following video demonstrates the process of capturing video from a webcam and adding text overlays using C# and .NET:
[!embed](https://www.youtube.com/embed/D_JPo9A9HMA?controls=1)
## Source Code Access
Access the complete source code for this implementation on our GitHub repository:
[Source code on GitHub](https://github.com/visioforge/.Net-SDK-s-samples/tree/master/Video%20Capture%20SDK/_CodeSnippets/video-capture-text-overlay)
## Required Dependencies
To implement this functionality in your application, you'll need to install the following NuGet packages:
- **Video Capture Dependencies:**
- [x86 version](https://www.nuget.org/packages/VisioForge.DotNet.Core.Redist.VideoCapture.x86/)
- [x64 version](https://www.nuget.org/packages/VisioForge.DotNet.Core.Redist.VideoCapture.x64/)
- **MP4 Processing Dependencies:**
- [x86 version](https://www.nuget.org/packages/VisioForge.DotNet.Core.Redist.MP4.x86/)
- [x64 version](https://www.nuget.org/packages/VisioForge.DotNet.Core.Redist.MP4.x64/)
## Implementation Overview
This tutorial demonstrates how to:
- Access and capture video from a connected webcam
- Process the video stream in real-time
- Add customizable text overlays with color and positioning
- Save the captured video with text overlay to an MP4 file
The implementation uses Windows Forms for the user interface, but the core capture and text overlay functionality works with any .NET UI framework.
## Complete C# Implementation
The following code sample demonstrates a complete implementation of webcam capture with text overlay functionality:
```csharp
using System;
using System.Drawing;
using System.IO;
using System.Windows.Forms;
using VisioForge.Core.VideoCapture;
using VisioForge.Core.Types;
using VisioForge.Core.Types.Output;
using VisioForge.Core.Types.VideoCapture;
using VisioForge.Core.Types.VideoEffects;
namespace video_capture_text_overlay
{
public partial class Form1 : Form
{
// The main video capture component that handles all capture functionality
private VideoCaptureCore videoCapture1;
public Form1()
{
InitializeComponent();
}
///
/// Starts the video capture with text overlay
///
private async void btStart_Click(object sender, EventArgs e)
{
// Configure the video capture device - uses the first available camera
videoCapture1.Video_CaptureDevice = new VideoCaptureSource(videoCapture1.Video_CaptureDevices()[0].Name);
// Configure the audio capture device - uses the first available microphone
videoCapture1.Audio_CaptureDevice = new AudioCaptureSource(videoCapture1.Audio_CaptureDevices()[0].Name);
// Set the capture mode to standard video capture
videoCapture1.Mode = VideoCaptureMode.VideoCapture;
// Set the output filename to save in the user's Videos folder
videoCapture1.Output_Filename = Path.Combine(Environment.GetFolderPath(Environment.SpecialFolder.MyVideos), "output.mp4");
// Configure MP4 as the output format - supports other formats as well
videoCapture1.Output_Format = new MP4Output();
// Add text overlay to the video
// Step 1: Enable video effects
videoCapture1.Video_Effects_Enabled = true;
// Step 2: Clear any existing effects
videoCapture1.Video_Effects_Clear();
// Step 3: Create a new text overlay effect
var textOverlay = new VideoEffectTextLogo(true) {
Text = "Hello World!", // The text to display
Top = 50, // Y position (from top)
Left = 50, // X position (from left)
FontColor = Color.Red // Text color
};
// Step 4: Add the text overlay to the effects collection
videoCapture1.Video_Effects_Add(textOverlay);
// Start the capture process asynchronously
await videoCapture1.StartAsync();
}
///
/// Stops the video capture
///
private async void btStop_Click(object sender, EventArgs e)
{
// Stop the capture process asynchronously
await videoCapture1.StopAsync();
}
///
/// Initialize the video capture component when the form loads
///
private void Form1_Load(object sender, EventArgs e)
{
// Initialize the VideoCaptureCore with the video view control
// VideoView1 should be a control on your form that implements IVideoView
videoCapture1 = new VideoCaptureCore(VideoView1 as IVideoView);
// Additional initialization options:
// videoCapture1.Audio_PlayAudio = true; // Play audio during capture
// videoCapture1.Audio_RecordAudio = true; // Record audio with video
}
}
}
```
## Key Implementation Details
### Device Selection and Configuration
The code automatically selects the first available camera and microphone devices for video and audio capture. In a production environment, you might want to provide users with options to select specific devices.
### Text Overlay Properties
The text overlay implementation supports various customization options:
- **Text Content**: Any string can be displayed on the video
- **Position**: Specify the exact coordinates for text placement
- **Color**: Choose any color for the text display
- **Size & Style**: Customize font, size, and style (commented options)
### Asynchronous Operation
The implementation uses C# async/await pattern for non-blocking video operations, ensuring your application remains responsive during capture.
### File Output
The captured video with text overlay is saved as an MP4 file in the user's Videos folder. The output format and location can be customized based on your application requirements.
## Additional Resources
For more examples and code samples related to video processing and manipulation, visit our [GitHub repository](https://github.com/visioforge/.Net-SDK-s-samples).
---END OF PAGE---
# Local File: .\dotnet\videoedit\deployment.md
---
title: Video Edit SDK .Net Deployment Guide | Windows
description: Complete guide to deploying Video Edit SDK .Net on Windows systems. Learn all deployment methods including NuGet packages, silent installers, and manual setups for both x86 and x64 architectures. Master DirectShow filters and component integration for professional video editing applications.
sidebar_label: Deployment
---
# Comprehensive Deployment Guide for Video Edit SDK .Net
## Introduction to VideoEditCore Deployment
[!badge size="xl" target="blank" variant="info" text="Video Edit SDK .Net"](https://www.visioforge.com/video-edit-sdk-net)
The VisioForge Video Edit SDK for .Net provides a powerful set of tools for video processing, editing, and analysis in Windows environments. This comprehensive guide details the deployment options for ensuring the SDK functions correctly on target systems.
For applications built with the AnyCPU configuration, you must deploy both x86 and x64 redistributables to ensure compatibility across different processor architectures. This guide covers all deployment methods, from simple NuGet packages to detailed manual installations.
## Deployment Options Overview
The SDK offers three primary deployment approaches:
1. **NuGet Packages**: Simplest method requiring no administrative privileges
2. **Automatic Installers**: Silent installation with administrative rights
3. **Manual Installation**: Custom deployment with granular control over components
Each approach has distinct advantages depending on your application requirements, distribution method, and target environment constraints.
## Cross-Platform Deployment with VideoEditCoreX
For developers seeking cross-platform compatibility, VisioForge offers the VideoEditCoreX engine. This modern implementation supports Windows, macOS, and Linux environments.
For detailed instructions on deploying the cross-platform version, please refer to our dedicated [cross-platform deployment guide](../deployment-x/index.md). The remainder of this document focuses on the Windows-specific VideoEditCore engine.
## VideoEditCore Engine (Windows-only)
The Windows-specific VideoEditCore engine provides extensive video editing capabilities optimized for Windows environments. Below are the comprehensive deployment options available.
### NuGet Package Deployment (No Administrative Rights Required)
NuGet packages offer the simplest deployment method, requiring no administrative privileges on the target system. This approach automatically copies the necessary files to your application folder during the build process.
#### Required NuGet Packages
**Base Components (Always Required)**:
- SDK Base Package: [x86](https://www.nuget.org/packages/VisioForge.DotNet.Core.Redist.Base.x86/) | [x64](https://www.nuget.org/packages/VisioForge.DotNet.Core.Redist.Base.x64/)
- Video Edit SDK Package: [x86](https://www.nuget.org/packages/VisioForge.DotNet.Core.Redist.VideoEdit.x86/) | [x64](https://www.nuget.org/packages/VisioForge.DotNet.Core.Redist.VideoEdit.x64/)
**Format-Specific Components**:
- MP4 Output: [x86](https://www.nuget.org/packages/VisioForge.DotNet.Core.Redist.MP4.x86/) | [x64](https://www.nuget.org/packages/VisioForge.DotNet.Core.Redist.MP4.x64/)
- WebM Output: [x86](https://www.nuget.org/packages/VisioForge.DotNet.Core.Redist.WebM.x86/)
- XIPH Formats (Ogg, Vorbis, FLAC): [x86](https://www.nuget.org/packages/VisioForge.DotNet.Core.Redist.XIPH.x86/) | [x64](https://www.nuget.org/packages/VisioForge.DotNet.Core.Redist.XIPH.x64/)
**Media Source Components**:
- FFMPEG (File output/network streaming): [x86](https://www.nuget.org/packages/VisioForge.DotNet.Core.Redist.FFMPEG.x86/) | [x64](https://www.nuget.org/packages/VisioForge.DotNet.Core.Redist.FFMPEG.x64/)
- VLC Source (File/IP camera): [x86](https://www.nuget.org/packages/VisioForge.DotNet.Core.Redist.VLC.x86/) | [x64](https://www.nuget.org/packages/VisioForge.DotNet.Core.Redist.VLC.x64/)
- LAV Filters: [x86](https://www.nuget.org/packages/VisioForge.DotNet.Core.Redist.LAV.x86/) | [x64](https://www.nuget.org/packages/VisioForge.DotNet.Core.Redist.LAV.x64/)
Implementation is straightforward: add the required packages to your application project, and after building, the necessary redistributable files will be automatically included in your application folder.
### Automatic Silent Installers (Administrative Rights Required)
For scenarios where administrative rights are available, silent installers provide a streamlined deployment solution. These installers can be integrated into your application's setup process for seamless SDK deployment.
**Base Components**:
- Base Package (Always Required): [x86](http://files.visioforge.com/redists_net/redist_dotnet_base_x86.exe) | [x64](http://files.visioforge.com/redists_net/redist_dotnet_base_x64.exe)
**Media Source Components**:
- FFMPEG Package: [x86](http://files.visioforge.com/redists_net/redist_dotnet_ffmpeg_x86.exe) | [x64](http://files.visioforge.com/redists_net/redist_dotnet_ffmpeg_x64.exe)
- VLC Source Package: [x86](http://files.visioforge.com/redists_net/redist_dotnet_vlc_x86.exe) | [x64](http://files.visioforge.com/redists_net/redist_dotnet_vlc_x64.exe)
- LAV Filters: [x86](http://files.visioforge.com/redists_net/redist_dotnet_lav_x86.exe) | [x64](http://files.visioforge.com/redists_net/redist_dotnet_lav_x64.exe)
**Format-Specific Components**:
- XIPH Formats (Ogg, Vorbis, FLAC): [x86](http://files.visioforge.com/redists_net/redist_dotnet_xiph_x86.exe) | [x64](http://files.visioforge.com/redists_net/redist_dotnet_xiph_x64.exe)
**Installation and Uninstallation**:
- To install: Run the appropriate executable with administrative privileges
- To uninstall: Run the executable with administrative privileges and the parameters "/x //"
- .NET assemblies can be installed in the Global Assembly Cache (GAC) or used directly from a local folder
### Manual Installation (Advanced)
Manual installation provides the highest level of control over the deployment process. This approach is recommended for advanced scenarios where specific components must be customized or for deployment environments with unique constraints.
#### Step-by-Step Manual Installation Process
1. **Runtime Dependencies**:
- For applications with administrative privileges: Install VC++ 2022 (v143) runtime (x86/x64) and OpenMP runtime DLLs using executable redistributables or MSM modules
- For applications without administrative privileges: Copy the VC++ 2022 (v143) runtime (x86/x64) and OpenMP runtime DLLs directly to the application folder
2. **Core Components**:
- Copy the VisioForge_MFP/VisioForge_MFPX (or x64 versions) DLLs from Redist\Filters to your application folder
- Copy .NET assemblies to the application folder or install them to the Global Assembly Cache (GAC)
3. **DirectShow Filters**:
- Copy and COM-register SDK DirectShow filters using [regsvr32.exe](https://support.microsoft.com/en-us/help/249873/how-to-use-the-regsvr32-tool-and-troubleshoot-regsvr32-error-messages) or an equivalent method
- If your application executable is in a different folder, add the folder containing the filters to the system PATH environment variable
## Essential DirectShow Filters Reference
### Core Functionality Filters
**Basic Video Processing**:
- VisioForge_Video_Effects_Pro.ax - Core video effects processing
- VisioForge_Audio_Mixer.ax - Audio mixing and processing
- VisioForge_MP3_Splitter.ax - MP3 format handling
- VisioForge_H264_Decoder.ax - H.264 video decoding
**Audio Processing**:
- VisioForge_Audio_Effects_4.ax - Legacy audio effects processing
### Streaming Filters
**RTSP Streaming**:
- VisioForge_RTSP_Sink.ax - RTSP streaming output
- All MP4 filters (legacy/modern) except Muxer
**SSF Streaming**:
- VisioForge_SSF_Muxer.ax - SSF format multiplexer
- All MP4 filters (legacy/modern) except Muxer
**RTSP/RTMP/HTTP Sources**:
- VisioForge_RTSP_Source.ax - RTSP stream input
- VisioForge_RTSP_Source_Live555.ax - RTSP with Live555 library
- VisioForge_IP_HTTP_Source.ax - HTTP source input
- FFMPEG, VLC, or LAV filters as needed
### Media Source Filters
**VLC Source**:
- VisioForge_VLC_Source.ax - VLC-based media input
- Complete deployment requires:
- Copying all files from Redist\VLC folder
- COM registration of .ax files
- Adding environment variable VLC_PLUGIN_PATH pointing to VLC\plugins folder
**FFMPEG Source**:
- VisioForge_FFMPEG_Source.ax - FFMPEG-based media input
- Copy all files from Redist\FFMPEG folder and add to Windows PATH
**Memory Source**:
- VisioForge_AsyncEx.ax - Memory-based source input
**LAV Source**:
- Copy all files from Redist\LAV\x86(x64)
- Register all .ax files
### Format-Specific Filters
**WebM Decoding**:
- VisioForge_WebM_Ogg_Source.ax - WebM/Ogg container support
- VisioForge_WebM_Source.ax - WebM format source
- VisioForge_WebM_Split.ax - WebM demuxing
- VisioForge_WebM_Vorbis_Decoder.ax - Vorbis audio decoder
- VisioForge_WebM_VP8_Decoder.ax - VP8 video decoder
- VisioForge_WebM_VP9_Decoder.ax - VP9 video decoder
**FLAC Source**:
- VisioForge_Xiph_FLAC_Source.ax - FLAC audio format support
**Ogg Vorbis Source**:
- VisioForge_Xiph_Ogg_Demux2.ax - Ogg container demuxer
- VisioForge_Xiph_Vorbis_Decoder.ax - Vorbis audio decoder
### Advanced Functionality Filters
**Video Encryption**:
- VisioForge_Encryptor_v8.ax - Version 8 encryption
- VisioForge_Encryptor_v9.ax - Version 9 encryption
**GPU Acceleration**:
- VisioForge_DXP.dll / VisioForge_DXP64.dll - DirectX 11 GPU effects
### Simplified Filter Registration
For convenient registration of multiple DirectShow filters, place the `reg_special.exe` utility from the SDK redistributable into the folder containing the filters and run it with administrator privileges.
## Additional Resources
For code samples and implementation examples, visit our [GitHub repository](https://github.com/visioforge/.Net-SDK-s-samples).
For technical support, documentation updates, and community discussions, visit the [VisioForge Developer Portal](https://support.visioforge.com/).
---END OF PAGE---
# Local File: .\dotnet\videoedit\getting-started.md
---
title: Build Video Editing Apps with .NET SDK
description: Master video editing in .NET applications with our advanced SDK. Learn to create professional video editors with customizable timelines, multiple formats support, transitions, effects, and real-time previews. Follow our step-by-step guide for developers building robust media applications.
sidebar_label: Getting Started
sidebar_position: 0
---
# Building Professional Video Editing Applications with .NET SDK
## Introduction to Video Editing with .NET
The Video Edit SDK offers powerful functionality for .NET developers who want to create professional video editing applications. This SDK supports a wide range of platforms and UI frameworks, enabling you to build feature-rich video editors that handle multiple formats, apply effects, manage transitions, and deliver high-quality output.
## Setting Up Your Development Environment
### Creating Your Initial Project
The SDK is designed to work seamlessly with various development environments. You can utilize either Visual Studio or JetBrains Rider to create your project, selecting your preferred platform and UI framework according to your requirements.
For a smooth setup process, please refer to our detailed [installation guide](../install/index.md) which provides instructions for adding the necessary NuGet packages and setting up native dependencies correctly.
## Implementing Core Video Editing Functionality
### Initializing the Video Editing Engine
The SDK provides a robust core editing object that serves as the foundation of your video editing application. Follow these steps to create and initialize this essential component:
+++ VideoEditCore
```cs
private VideoEditCore core;
core = new VideoEditCore(VideoView1 as IVideoView);
```
+++ VideoEditCoreX
```cs
private VideoEditCoreX core;
core = new VideoEditCoreX(VideoView1 as IVideoView);
```
+++
You'll need to specify a Video View object as a parameter to enable video preview functionality during editing operations.
### Implementing Robust Event Handling
#### Error Event Management
For proper error management in your application, implement the `OnError` event handler:
```cs
core.OnError += Core_OnError;
private void Core_OnError(object sender, ErrorsEventArgs e)
{
Debug.WriteLine("Error: " + e.Message);
}
```
#### Progress Tracking System
To keep your users informed about ongoing processes, implement the progress event handler:
```cs
core.OnProgress += Core_OnProgress;
private void Core_OnProgress(object sender, ProgressEventArgs e)
{
Debug.WriteLine("Progress: " + e.Progress);
}
```
#### Operation Completion Notification
To detect when editing operations have completed, implement the stop event handler:
```cs
core.OnStop += Core_OnStop;
private void Core_OnStop(object sender, EventArgs e)
{
Debug.WriteLine("Editing completed");
}
```
### Configuring Timeline Parameters
Before adding media sources to your project, you must establish the basic timeline parameters such as frame rate and resolution, which vary depending on which engine you're using:
+++ VideoEditCore
```cs
core.Video_FrameRate = new VideoFrameRate(30);
```
+++ VideoEditCoreX
```cs
core.Output_VideoSize = new VisioForge.Core.Types.Size(1920, 1080);
core.Output_VideoFrameRate = new VideoFrameRate(30);
```
+++
## Working with Media Sources
### Managing Video and Audio on Your Timeline
The SDK enables you to add various media sources to your timeline using straightforward API methods. For each source, you can precisely control parameters such as start time, end time, and position on the timeline. You have the flexibility to add video and audio sources either independently or together.
### Integrating Video Files
The SDK supports an extensive range of video formats including MP4, AVI, MOV, WMV, and many others. Here's how to add video content to your project:
First, create a video source object and set the source file path. You can specify start and end times in the constructor or use null parameters to include the entire file.
For files with multiple video streams, you can select which stream to use by specifying the stream number.
+++ VideoEditCore
```cs
var videoFile = new VisioForge.Core.Types.VideoEdit.VideoSource(
filename,
null,
null,
VideoEditStretchMode.Letterbox,
0,
1.0);
```
API:
```cs
public VideoSource(
string filename,
TimeSpan? startTime = null,
TimeSpan? stopTime = null,
VideoEditStretchMode stretchMode = VideoEditStretchMode.Letterbox,
int streamNumber = 0,
double rate = 1.0)
```
+++ VideoEditCoreX
```cs
var videoFile = new VisioForge.Core.Types.X.VideoEdit.VideoFileSource(
filename,
null,
null,
0,
1.0);
```
API:
```cs
public VideoFileSource(
string filename,
TimeSpan? startTime = null,
TimeSpan? stopTime = null,
int streamNumber = 0,
double rate = 1.0)
```
+++
You can control playback speed by adjusting the rate parameter. For example, setting the rate to 2.0 will play the file at twice the normal speed.
An alternative constructor allows you to add multiple file segments:
+++ VideoEditCore
```cs
public VideoSource(
string filename,
FileSegment[] segments,
VideoEditStretchMode stretchMode = VideoEditStretchMode.Letterbox,
int streamNumber = 0,
double rate = 1.0)
```
+++ VideoEditCoreX
```cs
public VideoFileSource(
string filename,
FileSegment[] segments,
int streamNumber = 0,
double rate = 1.0)
```
+++
To add the source to your timeline, use the following methods:
+++ VideoEditCore
```cs
await core.Input_AddVideoFileAsync(
videoFile,
null,
0);
```
The third parameter specifies the destination video stream number. Use 0 to add the source to the first video stream.
API:
```cs
public Task Input_AddVideoFileAsync(
VideoSource fileSource,
TimeSpan? timelineInsertTime = null,
int targetVideoStream = 0,
int customWidth = 0,
int customHeight = 0)
```
+++ VideoEditCoreX
```cs
core.Input_AddVideoFile(
videoFile,
null);
```
API:
```cs
public bool Input_AddVideoFile(
VideoFileSource source,
TimeSpan? insertTime = null)
```
+++
The second parameter determines the timeline position. Using null automatically adds the source at the end of the existing timeline.
### Incorporating Audio Files
The SDK supports numerous audio formats including AAC, MP3, WMA, OPUS, Vorbis and more. The process for adding audio is similar to adding video:
+++ VideoEditCore
```cs
var audioFile = new VisioForge.Core.Types.VideoEdit.AudioSource(
filename,
startTime: null,
stopTime: null,
fileToSync: string.Empty,
streamNumber: 0,
rate: 1.0);
```
The `fileToSync` parameter enables audio-video synchronization. When working with separate video and audio files, you can specify the video filename in this parameter to ensure the audio synchronizes correctly with the video.
```cs
await core.Input_AddAudioFileAsync(
audioFile,
insertTime: null,
0);
```
+++ VideoEditCoreX
```cs
var audioFile = new AudioFileSource(
filename,
startTime: null,
stopTime: null);
core.Input_AddAudioFile(
audioFile,
insertTime: null);
```
+++
### Combining Video and Audio Sources
For efficiency, you can add combined video and audio sources with a single method call:
+++ VideoEditCoreX
```cs
core.Input_AddAudioVideoFile(
filename,
startTime: null,
stopTime: null,
insertTime: null);
```
+++
### Working with Static Images
The SDK supports adding still images to your timeline, including JPG, PNG, BMP, and GIF formats. When adding an image, you'll need to specify how long it should appear on the timeline:
+++ VideoEditCore
```cs
await core.Input_AddImageFileAsync(
filename,
duration: TimeSpan.FromMilliseconds(2000),
timelineInsertTime: null,
stretchMode: VideoEditStretchMode.Letterbox);
```
+++ VideoEditCoreX
```cs
core.Input_AddImageFile(
filename,
duration: TimeSpan.FromMilliseconds(2000),
insertTime: null);
```
+++
## Configuring Output Settings
### Setting Output Format and Encoding Options
The SDK offers flexible output options with support for numerous video and audio formats, including MP4, AVI, WMV, MKV, WebM, AAC, MP3, and many others.
Use the `Output_Format` property to configure your desired output format:
+++ VideoEditCore
```cs
var mp4Output = new MP4HWOutput();
core.Output_Format = mp4Output;
```
+++ VideoEditCoreX
```cs
var mp4Output = new MP4Output("output.mp4");
core.Output_Format = mp4Output;
```
+++
For a comprehensive list of supported output formats and detailed code examples, please refer to our [Output Formats](../general/output-formats/index.md) documentation section.
## Enhancing Your Videos
### Applying Professional Video Effects
The SDK provides a rich collection of video effects that you can apply to enhance your video content. For detailed information on implementing effects, see our [Video Effects](../general/video-effects/index.md) guide.
The `VideoEditCoreX` engine includes dedicated API methods for adding text overlays. For implementation details, refer to our [Text Overlays](./code-samples/add-text-overlay.md) guide.
### Adding Smooth Transitions
To create professional-looking transitions between video clips, check our detailed [transition usage code sample](./code-samples/transition-video.md).
## Processing Your Video Project
### Starting the Editing Process
Once you've configured all your sources, effects, and output settings, you can initiate the editing process:
+++ VideoEditCore
```cs
await core.StartAsync();
```
+++ VideoEditCoreX
```cs
core.Start();
```
+++
During the editing process, your application will receive progress updates through the event handlers you've implemented, and you'll be notified when the operation completes via the stop event.
## Conclusion
By following this guide, you've learned the fundamental techniques for creating a powerful video editing application using the Video Edit SDK for .NET. This foundation will enable you to build sophisticated video editing tools that can compete with professional video editing software while being tailored to your specific requirements.
---END OF PAGE---
# Local File: .\dotnet\videoedit\index.md
---
title: Video Editing SDK for .NET Developers
description: Build professional video editing applications with our powerful .NET SDK. Features include timeline editing, transitions, effects, hardware acceleration, and multi-format support. Cross-platform development for Windows, macOS, Linux, Android, and iOS.
sidebar_label: Video Edit SDK .Net
order: 12
---
# Video Edit SDK .Net: Professional Video Editing for Developers
[!badge size="xl" target="blank" variant="info" text="Video Edit SDK .Net"](https://www.visioforge.com/video-edit-sdk-net)
## Introduction to Video Edit SDK .Net
VisioForge Video Edit SDK .Net is a robust and versatile development toolkit that empowers software developers to build advanced video editing applications. With this powerful SDK, you can seamlessly integrate professional-grade video processing, editing, encoding, and decoding capabilities into your .NET applications.
Designed with performance and flexibility in mind, our SDK accelerates your development process by providing a comprehensive suite of tools and features that would otherwise require months of development time. Whether you're creating a video editing application, implementing video processing workflows, or building a media-rich solution, Video Edit SDK .Net delivers the functionality you need.
## Cross-Platform Compatibility
One of the strongest advantages of the Video Edit SDK .Net is its extensive cross-platform support, enabling you to develop applications that run seamlessly across multiple operating systems and devices:
### Desktop Platforms
- **Windows** - Full support for Windows 10/11 and Windows Server
- **macOS** - Compatible with Intel and Apple Silicon processors
- **Linux** - Support for major distributions including Ubuntu, Debian, and CentOS
### Mobile Platforms
- **Android** - Build video editing capabilities into Android applications
- **iOS** - Seamless integration with iPhone and iPad applications
This cross-platform compatibility ensures that your video editing applications can reach the widest possible audience without requiring significant code changes between platforms.
## Key Features and Capabilities
### Core Video Editing Functions
- **Timeline-Based Editing** - Create and manipulate multi-track video projects
- **Frame-Accurate Cutting and Trimming** - Precisely edit video content
- **Video Speed Adjustments** - Implement slow-motion or time-lapse effects
- **Frame Rate Conversion** - Smoothly convert between different frame rates
- **Resolution Scaling** - Upscale or downscale video content while preserving quality
- **Aspect Ratio Management** - Handle different aspect ratios with ease
### Advanced Video Processing
- **Color Correction** - Adjust brightness, contrast, saturation, and hue
- **Video Filters** - Apply professional filters for artistic effects
- **Noise Reduction** - Clean up video quality with advanced algorithms
- **Image Stabilization** - Reduce camera shake and improve footage quality
- **Deinterlacing** - Convert interlaced video to progressive format
- **Rotation and Flipping** - Adjust video orientation as needed
- **Green Screen/Chroma Key** - Implement background replacement effects
### Professional Video Encoding and Decoding
- **Multiple Format Support** - Work with MP4, AVI, MOV, WMV, MKV and more
- **Codec Compatibility** - Support for H.264, H.265/HEVC, VP9, AV1
- **Hardware Acceleration** - Leverage GPU processing for faster encoding
- **Bitrate Control** - Fine-tune video quality and file size
- **Batch Processing** - Process multiple videos simultaneously
- **Custom Encoding Profiles** - Create and save encoding presets
### Audio Capabilities
- **Audio Effects** - Add reverb, echo, equalization, and normalization
- **Volume Control** - Adjust audio levels with precision
- **Noise Cancellation** - Remove background noise from audio tracks
- **Audio Mixing** - Combine multiple audio sources
- **Voice-over Recording** - Add narration to video projects
- **Audio Synchronization** - Ensure perfect audio-video alignment
### Visual Elements and Effects
- **Text Overlays** - Add titles, captions, and credits with customizable fonts and styles
- **Image Overlays** - Insert logos, watermarks, and graphics
- **Video Overlays** - Create picture-in-picture and multi-layer compositions
- **Animated Graphics** - Implement moving text and animated elements
- **Custom Shapes** - Add geometric shapes and custom vector graphics
- **Masking Tools** - Apply creative masking effects to video content
### Professional Transitions
- **Cross Dissolve** - Smooth transitions between video clips
- **Wipes and Slides** - Directional transitions for visual interest
- **Fade to Black/White** - Professional scene endings
- **3D Transitions** - Cube, flip, and rotate transitions
- **Custom Transition Effects** - Create unique transition styles
- **Keyframe Animation** - Control transition timing with precision
### Advanced Developer Features
- **Event-Based Architecture** - Respond to processing events in real-time
- **Progress Tracking** - Monitor and report processing progress
- **Error Handling** - Robust exception management system
- **Memory Management** - Optimized for handling large video files
- **Multithreaded Processing** - Utilize multiple CPU cores for faster performance
- **Customizable Workflows** - Adapt the SDK to your specific needs
For a detailed breakdown of all features and capabilities, visit our [product page](https://www.visioforge.com/video-edit-sdk-net).
## Documentation and Resources
Our comprehensive documentation helps you get started quickly and addresses common development scenarios:
- [Getting Started Guide](getting-started.md) - Step-by-step instructions for new users
- [Code Samples](code-samples/index.md) - Practical examples for common use cases
- [Deployment Guide](deployment.md) - Instructions for deploying applications with the SDK
- [Transitions Guide](transitions.md) - Detailed information on implementing video transitions
## Technical Resources
Access our technical resources to maximize your development efficiency:
- [API Documentation](https://api.visioforge.com/dotnet/api/index.html) - Complete API reference
- [Changelog](../changelog.md) - Stay updated on the latest improvements
- [End User License Agreement](../../eula.md) - License terms and conditions
## Community and Support
Join our developer community to get help and share your experiences:
- Visit our [GitHub repository](https://github.com/visioforge/.Net-SDK-s-samples) for additional code samples
- Contact our [Support Team](https://support.visioforge.com/) for technical assistance
## Conclusion
VisioForge Video Edit SDK .Net provides a powerful foundation for building professional video editing applications across multiple platforms. With its rich feature set, intuitive API, and extensive documentation, you can significantly accelerate your development process while delivering high-quality video editing capabilities to your users.
Start building your video editing application today with Video Edit SDK .Net and transform your media processing workflows.
---END OF PAGE---
# Local File: .\dotnet\videoedit\transitions.md
---
title: Video Transitions and SMPTE Wipe Effects for .NET
description: Explore the full range of video transition effects available in Video Edit SDK for .NET, including over 100 SMPTE standard wipes with customizable properties like border color, softness, width, and positioning. Learn how to implement professional-grade transitions in your .NET video applications.
sidebar_label: Transitions
---
# Transitions
[!badge size="xl" target="blank" variant="info" text="Video Edit SDK .Net"](https://www.visioforge.com/video-edit-sdk-net)
The SMPTE Wipe transition produces any of the standard wipes defined by the Society of Motion Picture and Television Engineers (SMPTE) in SMPTE document 258M-1993, except for the quad split.
## Properties
| Property | Type | Default | Description |
|-----------------|---------------|---------|-------------|
| Border Color | Color/TColor | Black | Color of the border around the edges of the wipe pattern. |
| BorderSoftness | long | 0 | Width of the blurry region around the edges of the wipe pattern. Specify zero for no blurry region. |
| BorderWidth | long | 0 | Width of the solid border along the edges of the wipe pattern. Specify zero for no border. |
| ID | long | 1 | Standard SMPTE wipe code specifying the style of wipe to use. For a list of wipe codes and their associated schematics, see SMPTE document 258M-1993. |
| OffsetX | long | 0 | Horizontal offset of the wipe origin from the center of the image. Valid only for values of **ID** from 101 to 131. |
| OffsetY | long | 0 | Verical offset of the wipe origin from the center of the image. Valid only for values of **ID** from 101 to 131. |
| ReplicateX | long | 0 | Number of times to replicate the wipe pattern horizontally. Valid only for values of **ID** from 101 to 131. |
| ReplicateY | long | 0 | Number of times to replicate the wipe pattern vertically. Valid only for values of **ID** from 101 to 131. |
| ScaleX | double | 1.0 | Amount by which to stretch the wipe horizontally, as a percentage of the original wipe definition. Valid only for values of **ID** from 101 to 131. |
| ScaleY | double | 1.0 | Amount by which to stretch the wipe vertically, as a percentage of the original wipe definition. Valid only for values of **ID** from 101 to 131. |
## SMPTE
This transition supports the following standard SMPTE wipes:
| Number | Description | Number | Description |
|--------|-----------------------------------|--------|--------------------------------------------|
| 1 | Horizontal | 211 | Radial, left-right, top |
| 2 | Vertical | 212 | Radial, up-down, right |
| 3 | Upper left | 213 | Radial, left-right, top-bottom |
| 4 | Upper right | 214 | Radial, up-down, left-right |
| 5 | Lower right | 221 | Radial, top |
| 6 | Lower left | 222 | Radial, right |
| 7 | Four corners | 223 | Radial, bottom |
| 8 | Four squares | 224 | Radial, left |
| 21 | Barn doors, vertical | 225 | Radial, top clockwise, bottom clockwise |
| 22 | Barn doors, horizontal | 226 | Radial, left clockwise, right clockwise |
| 23 | Top center | 227 | Radial, top clockwise, bottom anticlockwise |
| 24 | Right center | 228 | Radial, left clockwise, right anticlockwise |
| 25 | Bottom center | 231 | Radial, top split |
| 26 | Left center | 232 | Radial, right split |
| 41 | Diagonal, NW to SE | 233 | Radial, bottom split |
| 42 | Diagonal, NE to SW | 234 | Radial, left split |
| 43 | Triangles, top/bottom | 235 | Radial, top-bottom split |
| 44 | Triangles, left/right | 236 | Radial, left-right split |
| 45 | Diagonal stripe, SW to NE | 241 | Radial, top-left corner |
| 46 | Diagonal stripe, NW to SE | 242 | Radial, bottom-left corner |
| 47 | Cross | 243 | Radial, bottom-right corner |
| 48 | Diamond Box | 244 | Radial, top-right corner |
| 61 | Wedge, top | 245 | Radial, top-left, bottom-right |
| 62 | Wedge, right | 246 | Radial, bottom-left, top-right |
| 63 | Wedge, bottom | 251 | Center radial, top |
| 64 | Wedge, left | 252 | Center radial, left |
| 65 | V | 253 | Center radial, bottom |
| 66 | V, right | 254 | Center radial, right |
| 67 | V, inverted | 261 | Box radial, right |
| 68 | V, left | 262 | Box radial, top |
| 71 | Sawtooth, left | 263 | Center radial, top, bottom |
| 72 | Sawtooth, top | 264 | Center radial, left, right |
| 73 | Sawtooth, vertical | 301 | Matrix, horizontal |
| 74 | Sawtooth, horizontal | 302 | Matrix, vertical |
| 101 | Box | 303 | Matrix, diagonal, top-left |
| 102 | Diamond | 304 | Matrix, diagonal, top-right |
| 103 | Triangle, up | 305 | Matrix, diagonal, bottom-right |
| 104 | Triangle, right | 306 | Matrix, diagonal, bottom-left |
| 105 | Triangle, bottom | 310 | Matrix, clockwise top-left |
| 106 | Triangle, left | 311 | Matrix, clockwise top-right |
| 107 | Arrow head, up | 312 | Matrix, clockwise bottom-right |
| 108 | Arrow head, right | 313 | Matrix, clockwise bottom-left |
| 109 | Arrow head, down | 314 | Matrix, anticlockwise top-left |
| 110 | Arrow head, left | 315 | Matrix, anticlockwise top-right |
| 111 | Pentagon, up | 316 | Matrix, anticlockwise bottom-right |
| 112 | Pentagon, down | 317 | Matrix, anticlockwise bottom-left |
| 113 | Hexagon | 320 | Matrix, vertical top-left, top-right |
| 114 | Hexagon, rotated | 321 | Matrix, vertical bottom-left, bottom-right |
| 119 | Circle | 322 | Matrix, vertical top-left, bottom-right |
| 120 | Oval, horizontal | 323 | Matrix, vertical bottom-left, top-right |
| 121 | Oval, vertical | 324 | Matrix, horizontal top-left, bottom-left |
| 122 | Eye, horizontal | 325 | Matrix, horizontal top-right, bottom-right |
| 123 | Eye, vertical | 326 | Matrix, horizontal top-left, bottom-right |
| 124 | Rounded rectangle, horizontal | 327 | Matrix, horizontal top-right, bottom-left |
| 125 | Rounded rectangle, vertical | 328 | Matrix, diagonal bottom-left, top-right |
| 127 | 4-point star | 329 | Matrix, diagonal top-left, bottom-right |
| 128 | 4-point star | 340 | Matrix, top double spiral |
| 129 | 6-point star | 341 | Matrix, bottom double spiral |
| 130 | Heart | 342 | Matrix, left double spiral |
| 131 | Keyhole | 343 | Matrix, right double spiral |
| 201 | Radial, 12 o'clock | 344 | Matrix, quad spiral, top-bottom |
| 202 | Radial, 3 o'clock | 345 | Matrix, quad spiral, left-right |
| 203 | Radial, 6 o'clock | 350 | Waterfall, left |
| 204 | Radial, 9 o'clock | 351 | Waterfall, right |
| 205 | Radial, 12 + 6 o'clock | 352 | Waterfall, horizontal, left |
| 206 | Radial, 3 + 9 o'clock | 353 | Waterfall, horizontal, right |
| 207 | Radial, 4-way | 409 | Random mask |
---
Visit our [GitHub](https://github.com/visioforge/.Net-SDK-s-samples) page to get more code samples.
---END OF PAGE---
# Local File: .\dotnet\videoedit\code-samples\add-image-overlay.md
---
title: Adding Image Overlays to Video in .NET SDK
description: Learn how to implement image overlays in videos with .NET SDK. This detailed guide provides step-by-step instructions with code examples for both VideoEditCoreX and VideoEditCore engines, including positioning, transparency, and timing.
sidebar_label: Adding Image Overlays to Videos
---
# Adding Image Overlays to Videos in .NET
[!badge size="xl" target="blank" variant="info" text="Video Edit SDK .Net"](https://www.visioforge.com/video-edit-sdk-net) [!badge variant="dark" size="xl" text="VideoEditCoreX"]
## Introduction to Image Overlays
Our .NET SDK provides powerful functionality for adding image overlays to your video projects. With this feature, developers can seamlessly integrate logos, watermarks, graphics, and other visual elements into video content. The SDK offers extensive customization options including precise positioning, transparency adjustment, and timing control.
## Supported Image File Formats
The SDK is compatible with all standard image formats used in professional video production:
- BMP (Bitmap)
- GIF (Graphics Interchange Format)
- JPEG/JPG (Joint Photographic Experts Group)
- PNG (Portable Network Graphics)
- TIFF (Tagged Image File Format)
## Implementation Guide
Below you'll find detailed code examples demonstrating how to implement image overlays in your video processing applications using our SDK.
### Using the VideoEditCoreX Engine
The following code sample demonstrates how to add an image overlay with custom positioning, transparency, and timing using the VideoEditCoreX engine:
```cs
// add an image overlay to a video source effects from PNG file
var imageOverlay = new ImageOverlayVideoEffect("logo.png");
// set position
imageOverlay.X = 50;
imageOverlay.Y = 50;
// set alpha
imageOverlay.Alpha = 0.5;
// set start time and stop time
imageOverlay.StartTime = TimeSpan.FromSeconds(0);
imageOverlay.StopTime = TimeSpan.FromSeconds(5);
// add video source to timeline
VideoEdit1.Video_Effects.Add(imageOverlay);
```
### Using the VideoEditCore Engine
For developers working with the VideoEditCore engine, here's how to achieve the same functionality:
```cs
var effect = new VideoEffectImageLogo(true, name);
// set position
effect.Left = 50;
effect.Top = 50;
// set alpha (0..255)
effect.TransparencyLevel = 127;
// set start time and stop time
effect.StartTime = TimeSpan.FromSeconds(5);
effect.StopTime = TimeSpan.FromSeconds(15);
VideoEdit1.Video_Effects_Add(effect);
```
## Advanced Configuration Options
When implementing image overlays, consider these additional configuration options:
- **Positioning**: Adjust X/Y or Left/Top values to place your overlay precisely
- **Transparency**: Configure Alpha or TransparencyLevel to control overlay opacity
- **Timing**: Set StartTime and StopTime to determine when the overlay appears and disappears
- **Size**: You can resize overlays to fit your specific requirements
## Additional Resources
For more code examples and implementation guidance, visit our [GitHub repository](https://github.com/visioforge/.Net-SDK-s-samples).
---END OF PAGE---
# Local File: .\dotnet\videoedit\code-samples\add-text-overlay.md
---
title: Adding Professional Text Overlays to Videos in .NET
description: Learn how to implement dynamic text overlays with complete control over font, color, position, timing, and animations in your video editing applications. This detailed guide includes step-by-step code examples for .NET developers.
sidebar_label: Adding Text Overlays to Videos
---
# Implementing Text Overlays in Video Projects
[!badge size="xl" target="blank" variant="info" text="Video Edit SDK .Net"](https://www.visioforge.com/video-edit-sdk-net) [!badge variant="dark" size="xl" text="VideoEditCoreX"]
## Introduction to Text Overlays
Text overlays are essential components in professional video editing. They allow you to add titles, subtitles, watermarks, captions, and other important text elements to your videos. With the Video Edit SDK for .NET, you can create sophisticated text overlays with precise control over appearance, positioning, and timing.
## Key Features and Capabilities
The SDK provides extensive customization options for text overlays, including:
- Custom font selection from system-installed fonts
- Complete control over font size, weight, and style
- Flexible color options for both text and background
- Precise positioning with multiple alignment options
- Timing control to set when text appears and disappears
- Transparency and opacity settings
## Implementation Example
The following code demonstrates how to create and configure a text overlay in your .NET application:
```cs
// Initialize the VideoEditCoreX object (assumed to be already created)
// var videoEdit = new VideoEditCoreX();
// Create a new text overlay object with your desired text
var textOverlay = new VisioForge.Core.Types.X.VideoEdit.TextOverlay("Hello world!");
// Set when the text should appear and for how long
// This example: text appears 2 seconds into the video and stays for 5 seconds
textOverlay.Start = TimeSpan.FromMilliseconds(2000);
textOverlay.Duration = TimeSpan.FromMilliseconds(5000);
// Define the position of the text on the video frame
// X and Y coordinates are measured in pixels from the top-left corner
textOverlay.X = 50;
textOverlay.Y = 50;
// Configure font properties for the text
textOverlay.FontFamily = "Arial"; // Set the font family
textOverlay.FontSize = 40; // Set the font size in points
textOverlay.FontWidth = SkiaSharp.SKFontStyleWidth.Normal; // Normal width characters
textOverlay.FontSlant = SkiaSharp.SKFontStyleSlant.Italic; // Apply italic style
textOverlay.FontWeight = SkiaSharp.SKFontStyleWeight.Bold; // Apply bold weight
// Set the text color to red
textOverlay.Color = SkiaSharp.SKColors.Red;
// Set a transparent background behind the text
// You could use any color with alpha channel for semi-transparency
textOverlay.BackgroundColor = SkiaSharp.SKColors.Transparent;
// Add the configured text overlay to your video project
videoEdit.Video_TextOverlays.Add(textOverlay);
```
## Positioning and Alignment Options
By default, the SDK uses the X and Y coordinates for absolute positioning. For more flexible positioning options:
```cs
// For custom positioning using X and Y coordinates:
textOverlay.HAlign = TextOverlayHAlign.Custom;
textOverlay.VAlign = TextOverlayVAlign.Custom;
// For centered text:
// textOverlay.HAlign = TextOverlayHAlign.Center;
// textOverlay.VAlign = TextOverlayVAlign.Center;
// For right-aligned text at the bottom:
// textOverlay.HAlign = TextOverlayHAlign.Right;
// textOverlay.VAlign = TextOverlayVAlign.Bottom;
```
## Working with Fonts
The SDK leverages the SkiaSharp library for powerful text rendering capabilities. This provides access to all system fonts and advanced typography features.
### Retrieving Available Font Families
You can dynamically retrieve the list of fonts available on the current system:
```cs
// Get all available fonts on the current system
// This is useful for creating font selection dropdowns in your UI
var availableFonts = videoEdit.Fonts;
// You can now iterate through the fonts or bind them to a UI control
foreach (var font in availableFonts)
{
// Use the font information as needed
Console.WriteLine(font);
}
```
## Advanced Styling Techniques
For more sophisticated text effects, consider combining text overlays with other SDK features:
- Apply animation effects to make text move across the screen
- Use multiple text overlays with different timing for sequential display
- Combine with shape overlays to create text boxes with custom backgrounds
- Integrate with video transitions for dynamic text entry and exit effects
## Development Resources
For more code examples and advanced implementation techniques, visit our [GitHub repository](https://github.com/visioforge/.Net-SDK-s-samples) containing comprehensive .NET SDK samples.
---END OF PAGE---
# Local File: .\dotnet\videoedit\code-samples\adding-video-file-with-multiple-audio-streams.md
---
title: Working with Multiple Audio Streams in Video Files
description: Learn how to effectively handle video files containing multiple audio streams in .NET applications. This detailed guide covers implementation techniques, workarounds for common challenges, and provides complete code examples for developers building advanced video processing applications.
sidebar_label: Working with Multiple Audio Streams
---
# Working with Multiple Audio Streams in Video Files
[!badge size="xl" target="blank" variant="info" text="Video Edit SDK .Net"](https://www.visioforge.com/video-edit-sdk-net) [!badge variant="dark" size="xl" text="VideoEditCore"]
## Introduction to Multiple Audio Streams
Video files commonly contain multiple audio streams to support different languages, commentary tracks, or audio qualities. For developers building video editing or processing applications, properly handling these multiple streams is essential for creating professional-grade software. This guide explores the technical challenges and solutions for working with multi-audio stream video files in .NET applications.
Multiple audio streams serve several important purposes in video applications:
- **Multilingual support**: Providing audio tracks in different languages
- **Commentary tracks**: Including director's commentary or alternative narration
- **Audio quality variations**: Offering different bitrates or formats (stereo/surround)
- **Special audio channels**: Supporting descriptive audio for accessibility
## Technical Background on Audio Stream Handling
### Understanding DirectShow Architecture
When working with video files containing multiple audio streams, it's crucial to understand how the underlying DirectShow architecture processes these streams. DirectShow uses a filter graph architecture where each component (filter) processes specific aspects of media data.
The Video Edit SDK leverages DirectShow Editing Services (DES) engine for media processing, which comes with specific limitations and capabilities regarding multiple audio stream handling. These limitations stem from how DES interacts with different types of splitter filters.
### Splitter Filter Types and Limitations
Splitter filters parse source files and extract various streams (video, audio, subtitles) for processing. There are two primary mechanisms through which splitters expose multiple audio streams:
1. **Multiple output pins**: Some splitters create separate output pins for each audio stream
2. **IAMStreamSelect interface**: Others use this interface to allow selection from multiple streams through a single output pin
The DirectShow Editing Services engine has specific limitations when working with the first type of splitter. If you need to access any audio stream other than the first one, you may encounter restrictions with certain splitter types.
## Format-Specific Considerations
### AVI Format Support
The AVI splitter provides excellent support for multiple audio streams. When working with AVI files, you can typically access and manipulate all available audio streams without significant issues.
This is demonstrated in the filter graph visualization below:

As visible in the diagram, the AVI splitter creates separate pathways for each audio stream, making them independently accessible through the SDK's API.
### Challenges with Modern Container Formats
Modern container formats like MP4, MKV, and MOV often use more sophisticated splitters such as LAV Splitter. While these splitters support a wide range of formats and codecs, they can present challenges when attempting to access multiple audio streams simultaneously.
The filter graph for LAV Splitter demonstrates this limitation:

LAV Splitter, though excellent for format support, does not expose multiple audio streams in a way that allows direct access to secondary streams through the DES engine. This limitation necessitates alternative approaches.
## Recommended Approaches
### External Audio File Method
The most reliable approach for handling multiple audio streams is to extract and work with audio tracks as separate external files. This method completely bypasses the limitations of splitter filters and provides maximum flexibility.
Steps for implementing this approach:
1. Extract the desired audio streams from the source video file
2. Process each audio stream independently
3. Combine the processed audio with the video during final output
This method ensures compatibility across all format types and splitter configurations.
### Splitter Selection and Configuration
In scenarios where external audio files are not feasible, you can control which splitter filter is used to parse your source files. By selectively allowing only certain splitters, you can ensure that your application uses splitters that properly expose multiple audio streams.
Use the `DirectShow_Filters_Blacklist_Add` method to exclude incompatible splitters:
```csharp
// Example: Exclude LAV Splitter to force the use of native splitters
videoEdit.DirectShow_Filters_Blacklist_Add("{B98D13E7-55DB-4385-A33D-09FD1BA26338}");
```
For more detailed implementation examples, refer to the [API documentation for working with multiple sources](output-file-from-multiple-sources.md).
## Performance Considerations
Working with multiple audio streams can impact performance, especially with high-resolution video or complex processing requirements. Consider these optimization strategies:
- Pre-extract audio streams for complex editing projects
- Use hardware acceleration when available
- Implement buffering mechanisms for smoother playback
- Consider temporary downsampling during preview operations
## Required Components and Dependencies
To implement the techniques described in this guide, you'll need to include the following dependencies:
- Video Edit SDK redist [x86](https://www.nuget.org/packages/VisioForge.DotNet.Core.Redist.VideoEdit.x86/) [x64](https://www.nuget.org/packages/VisioForge.DotNet.Core.Redist.VideoEdit.x64/)
For information on deploying these dependencies to end-user systems, refer to the [deployment documentation](../deployment.md).
## Conclusion
Effectively handling multiple audio streams in video files requires understanding the underlying architecture and limitations of DirectShow components. By using the appropriate techniques—whether external audio files, splitter selection, or specialized API methods—developers can create robust video applications that properly support multilingual content, commentary tracks, and other multi-audio scenarios.
For advanced implementation scenarios and additional code examples, check out our [GitHub repository](https://github.com/visioforge/.Net-SDK-s-samples).
---
Visit our [GitHub](https://github.com/visioforge/.Net-SDK-s-samples) page to get more code samples.
---END OF PAGE---
# Local File: .\dotnet\videoedit\code-samples\audio-envelope.md
---
title: Audio Volume Envelope Effects for .NET Video Editing
description: Learn how to implement professional audio volume envelope effects in your .NET applications with this complete tutorial. Step-by-step code samples show you how to control audio levels precisely in your video editing projects.
sidebar_label: How to Make an Audio Volume Envelope Effect?
---
# Implementing Audio Volume Envelope Effects in .NET
[!badge size="xl" target="blank" variant="info" text="Video Edit SDK .Net"](https://www.visioforge.com/video-edit-sdk-net) [!badge variant="dark" size="xl" text="VideoEditCore"]
Audio volume envelopes are essential tools for professional video production, allowing developers to precisely control audio levels throughout a timeline. This tutorial demonstrates how to implement these effects in your .NET applications.
## What is an Audio Volume Envelope?
An audio volume envelope lets you adjust the volume levels of your audio track. Rather than manually adjusting volume throughout the editing process, envelopes provide a programmatic way to set consistent volume levels. This is particularly useful when working with multiple audio tracks that need to maintain specific volume relationships.
## Implementation Overview
The implementation process involves three key steps:
1. Creating an audio source from your file
2. Creating the volume envelope effect with your desired level
3. Adding the audio with the effect to your timeline
Each step requires specific code components that we'll explore in detail below.
## Understanding the AudioVolumeEnvelopeEffect Class
The `AudioVolumeEnvelopeEffect` class is the core component for implementing volume control:
```cs
public class AudioVolumeEnvelopeEffect : AudioTrackEffect
{
///
/// Gets or sets level (in percents), range is [0-100].
///
public int Level { get; set; }
///
/// Initializes a new instance of the AudioVolumeEnvelopeEffect class.
///
///
/// Level (in percents), range is [0-100].
///
public AudioVolumeEnvelopeEffect(int level)
{
Level = level;
}
}
```
As you can see, this class:
- Inherits from `AudioTrackEffect`
- Has a `Level` property that accepts values from 0-100 (representing volume percentage)
- Provides a constructor for setting the initial level
## Detailed Implementation Steps
### 1. Creating Your Audio Source
The first step involves initializing an audio source object that references your audio file. This object serves as the foundation for applying effects.
```cs
var audioFile = new AudioSource(file, segments, null);
```
In this code:
- `file` is the path to your audio file
- `segments` defines time segments if you're only using portions of the audio
- The final parameter can contain additional options (null in this basic example)
### 2. Configuring the Volume Envelope Effect
Next, create and configure the volume envelope effect by specifying your desired volume level:
```cs
var envelope = new AudioVolumeEnvelopeEffect(70);
```
This creates a volume envelope effect set to 70%. The parameter accepts values from 0 to 100:
- 0 = completely silent
- 50 = half volume
- 100 = full volume
You can also adjust the level after creation:
```cs
var envelope = new AudioVolumeEnvelopeEffect(50);
envelope.Level = 75; // Changed to 75% volume
```
### 3. Adding Audio with Envelope Effect to Timeline
The final step is to add your audio source with the envelope effect applied to your project timeline:
```cs
VideoEdit1.Input_AddAudioFile(
audioFile, // Your configured audio source
TimeSpan.FromMilliseconds(0), // Starting position on timeline
0, // Track index
new []{ envelope } // Array of effects to apply
);
```
This positions your audio at the beginning of the timeline (0ms) and applies the envelope effect we configured earlier.
## Common Use Cases
### Normalizing Audio Levels
When working with audio from different sources, normalization ensures consistent volume levels:
```cs
// Main interview audio at full volume
var interviewAudio = new AudioSource("interview.mp3", null, null);
VideoEdit1.Input_AddAudioFile(interviewAudio, TimeSpan.Zero, 0, null);
// Background music at 30% volume to avoid overpowering speech
var backgroundMusic = new AudioSource("background.mp3", null, null);
var musicEnvelope = new AudioVolumeEnvelopeEffect(30);
VideoEdit1.Input_AddAudioFile(backgroundMusic, TimeSpan.Zero, 1, new[] { musicEnvelope });
```
### Muting Specific Sections
If you need to mute sections of audio in your timeline, you can create and apply different envelope effects:
```cs
// Create audio sources for different segments
var segment1 = new AudioSource("audio.mp3", GetSegment(0, 10000), null); // 0-10s
var segment2 = new AudioSource("audio.mp3", GetSegment(10000, 15000), null); // 10-15s
var segment3 = new AudioSource("audio.mp3", GetSegment(15000, 30000), null); // 15-30s
// Apply different volume levels
VideoEdit1.Input_AddAudioFile(segment1, TimeSpan.Zero, 0, new[] { new AudioVolumeEnvelopeEffect(100) });
// Mute middle segment
VideoEdit1.Input_AddAudioFile(segment2, TimeSpan.FromMilliseconds(10000), 0, new[] { new AudioVolumeEnvelopeEffect(0) });
VideoEdit1.Input_AddAudioFile(segment3, TimeSpan.FromMilliseconds(15000), 0, new[] { new AudioVolumeEnvelopeEffect(100) });
```
## Required Dependencies
To implement audio envelope effects, you'll need:
- Video Edit SDK .NET redistributable packages:
- [x86 version](https://www.nuget.org/packages/VisioForge.DotNet.Core.Redist.VideoEdit.x86/)
- [x64 version](https://www.nuget.org/packages/VisioForge.DotNet.Core.Redist.VideoEdit.x64/)
You can install these packages via NuGet Package Manager:
```nuget
Install-Package VisioForge.DotNet.Core.Redist.VideoEdit.x64
```
For more information on deploying these dependencies to your users' systems, refer to our [deployment documentation](../deployment.md).
## Performance Considerations
When implementing audio volume effects, consider these performance tips:
- Apply envelope effects during the editing/rendering phase rather than at runtime
- When working with multiple tracks, consider the cumulative effect of all audio processing
- Test on your target hardware to ensure smooth playback
## Troubleshooting Common Issues
If you encounter problems with your audio envelope implementation:
- Verify audio file paths and formats are supported
- Check that volume percentages are within the 0-100 range
- Ensure the audio effect is correctly added to the effects array
- Verify timeline positioning doesn't create conflicts between audio segments
## Conclusion
Audio volume envelope effects provide essential control over your application's audio experience. By following this guide, you've learned how to implement volume control in your .NET video editing projects, balancing different audio sources for professional results.
---
For more code samples and advanced techniques, visit our [GitHub repository](https://github.com/visioforge/.Net-SDK-s-samples).
---END OF PAGE---
# Local File: .\dotnet\videoedit\code-samples\index.md
---
title: Video Edit SDK .NET Code Examples & Tutorials
description: Practical .NET video editing code examples for developers working with VideoEditCore engine (Windows). Learn how to implement common video editing features in your applications with our detailed tutorials and samples.
sidebar_label: Code Examples
---
# .NET Video Editing Code Examples & Tutorials
[!badge size="xl" target="blank" variant="info" text="Video Edit SDK .Net"](https://www.visioforge.com/video-edit-sdk-net)
## Available Code Examples
Browse our collection of ready-to-use code examples that demonstrate key features of our Video Edit SDK for .NET developers. Each example includes detailed explanations and implementation guidance:
### Visual Effects & Overlays
- [**Adding Image Overlays to Video**](add-image-overlay.md) - Learn how to superimpose images on your video content
- [**Text Overlay Implementation**](add-text-overlay.md) - Techniques for adding and formatting text overlays on videos
- [**Picture-In-Picture Effects**](picture-in-picture.md) - Create professional PiP effects in your video applications
### Audio Manipulation
- [**Audio Volume Envelope Effects**](audio-envelope.md) - Control audio volume changes over time
- [**Multiple Audio Streams in AVI Files**](multiple-audio-streams-avi.md) - Working with multiple audio tracks
- [**Custom Volume Control for Audio Tracks**](volume-for-track.md) - Precise audio level management techniques
### Video Composition
- [**Creating Videos from Multiple Sources**](output-file-from-multiple-sources.md) - Combine various input files into a single output
- [**Working with Video Segments**](several-segments.md) - Extract and use multiple segments from the same source file
- [**Transition Effects Between Video Fragments**](transition-video.md) - Implementing smooth transitions between clips
- [**Generating Videos from Image Sequences**](video-images-console.md) - Console application example for image-to-video conversion
- [**Multi-Audio Stream Video Integration**](adding-video-file-with-multiple-audio-streams.md) - Working with complex audio-video combinations
## Additional Resources
Find more extensive code samples and resources on our [GitHub repository](https://github.com/visioforge/.Net-SDK-s-samples), where we regularly update our collection with new examples and implementation techniques for .NET developers.
---END OF PAGE---
# Local File: .\dotnet\videoedit\code-samples\multiple-audio-streams-avi.md
---
title: Adding Multiple Audio Streams to AVI Files in .NET
description: Learn how to implement multiple audio streams in AVI files using Video Edit SDK for .NET. This step-by-step guide with C# code examples shows developers how to create multi-language or commentary tracks in video files.
sidebar_label: Adding Multiple Audio Streams to AVI Files
---
# Adding Multiple Audio Streams to AVI Files in .NET
[!badge size="xl" target="blank" variant="info" text="Video Edit SDK .Net"](https://www.visioforge.com/video-edit-sdk-net) [!badge variant="dark" size="xl" text="VideoEditCore"]
## Introduction
Multiple audio streams allow you to include different language tracks, commentary, or music options within a single video file. This functionality is essential for creating multilingual content or providing alternative audio experiences for viewers.
## Implementation Details
When creating multiple audio streams in an AVI file, you need to add each audio source to the timeline using specific targeting parameters. This approach ensures each audio stream is properly indexed and accessible during playback.
## Code Example
The following C# sample demonstrates how to add two different audio streams to an AVI file:
```cs
var videoSource = new VideoSource("video1.avi");
var audioSource1 = new AudioSource("video1.avi");
var audioSource2 = new AudioSource("audio2.mp3");
VideoEdit1.Input_Clear_List();
VideoEdit1.Input_AddVideoFile(videoSource);
VideoEdit1.Input_AddAudioFile(audioSource1, targetStreamIndex: 0);
VideoEdit1.Input_AddAudioFile(audioSource2, targetStreamIndex: 1);
```
## Key Parameters Explained
- `targetStreamIndex`: Defines which audio stream index the source will be assigned to
- First audio stream uses index 0, second uses index 1, and so on
- You can add as many audio streams as needed using incremental index values
## Required Dependencies
To implement this functionality, you'll need:
- Video Edit SDK redistributables:
- [x86 version](https://www.nuget.org/packages/VisioForge.DotNet.Core.Redist.VideoEdit.x86/)
- [x64 version](https://www.nuget.org/packages/VisioForge.DotNet.Core.Redist.VideoEdit.x64/)
## Deployment Information
For details on installing or deploying the required dependencies to end-user systems, refer to our [deployment guide](../deployment.md).
---
Find additional code examples and implementation details on our [GitHub repository](https://github.com/visioforge/.Net-SDK-s-samples).
---END OF PAGE---
# Local File: .\dotnet\videoedit\code-samples\output-file-from-multiple-sources.md
---
title: Create New Video Files from Multiple Sources in .NET
description: Learn how to combine multiple video and audio files into a single output without reencoding using C# and Video Edit SDK. This step-by-step guide shows developers how to merge streams from various sources while maintaining quality.
sidebar_label: How to Create a New File from Multiple Source Files?
---
# Creating New Files from Multiple Sources Without Reencoding
[!badge size="xl" target="blank" variant="info" text="Video Edit SDK .Net"](https://www.visioforge.com/video-edit-sdk-net) [!badge variant="dark" size="xl" text="VideoEditCore"]
## Introduction
When developing multimedia applications, you may need to combine content from different files. This guide demonstrates how to merge streams from multiple video and audio sources into a single output file without quality loss from reencoding.
## Benefits of Working with Multiple Sources
- Preserve original quality of all source files
- Combine audio tracks from different sources
- Add background music to video files
- Create multilingual content with different audio tracks
- Save processing time by avoiding unnecessary reencoding
## Step-by-Step Implementation
### 1. Initialize the Streams Collection
First, create a list to hold all the stream references:
```cs
var streams = new List();
```
### 2. Add Video Stream
Add a video stream from your first source file. The ID "v" designates this as the video component:
```cs
streams.Add(new FFMPEGStream
{
Filename = "c:\\samples\\!video.avi",
ID = "v"
});
```
### 3. Add Primary Audio Stream
Incorporate an audio stream from an MP3 file. The ID "a" identifies this as an audio component:
```cs
streams.Add(new FFMPEGStream
{
Filename = "c:\\samples\\!sophie.mp3",
ID = "a"
});
```
### 4. Add Additional Audio Streams
You can add more audio streams from other video files. Again, use the ID "a" to specify this as an audio component:
```cs
streams.Add(new FFMPEGStream
{
Filename = "c:\\samples\\!video2.avi",
ID = "a"
});
```
### 5. Process and Generate Output
Finally, combine all streams into a single output file. Setting the second parameter to "true" ensures the output duration matches the shortest stream, preventing playback issues:
```cs
VideoEdit1.FastEdit_MuxStreams(streams, true, outputFile);
```
## Important Technical Considerations
When combining streams from multiple sources, keep in mind:
- Source formats must be compatible with the output container format
- Audio codec compatibility should be verified beforehand
- Stream synchronization may require additional configuration in complex scenarios
- Some players may have issues if stream durations vary significantly
## Required Dependencies
To implement this functionality, you'll need to reference:
- SDK redist
- FFMPEG redist [x86](https://www.nuget.org/packages/VisioForge.DotNet.Core.Redist.FFMPEG.x86/) [x64](https://www.nuget.org/packages/VisioForge.DotNet.Core.Redist.FFMPEG.x64/)
For more information on deploying these dependencies to end users, see [our deployment guide](../deployment.md).
## Further Resources
Visit our [GitHub repository](https://github.com/visioforge/.Net-SDK-s-samples) for additional code samples and implementation examples.
---END OF PAGE---
# Local File: .\dotnet\videoedit\code-samples\picture-in-picture.md
---
title: Creating Dynamic Picture-in-Picture Videos in .NET
description: Learn how to implement Picture-in-Picture, side-by-side videos, and custom video layouts in your C# applications. Complete code samples for video overlays, vertical/horizontal splits, and custom positioning with the Video Edit SDK.
sidebar_label: Picture-In-Picture
---
# Creating Picture-in-Picture and Split-Screen Videos in .NET
[!badge size="xl" target="blank" variant="info" text="Video Edit SDK .Net"](https://www.visioforge.com/video-edit-sdk-net) [!badge variant="dark" size="xl" text="VideoEditCore"]
## Introduction to Video Composition Techniques
Professional video applications often require combining multiple video sources into a single output. This capability is essential for creating engaging content such as tutorials with presenter overlays, reaction videos, interview panels, or sports broadcasts with replay windows. The Video Edit SDK for .NET makes these advanced techniques straightforward to implement in your C# applications.
This guide covers three primary video composition approaches:
1. **Picture-in-Picture (PIP)**: Placing a smaller video overlay on top of a main video
2. **Horizontal Split**: Positioning two videos side-by-side horizontally
3. **Vertical Split**: Arranging two videos one above the other
Each technique has specific use cases and can be customized to create exactly the visual presentation your application requires.
## Creating Picture-in-Picture Video Overlays
Picture-in-Picture is the most common video composition technique, where a smaller video appears in a corner or custom position over a larger background video. This is perfect for creating commentary videos, tutorials, or any content where you want to show two perspectives simultaneously without dividing the screen evenly.
### Step 1: Define Your Video Files
First, specify the file paths for the videos you want to combine:
```cs
string[] files = { "!video.avi", "!video2.wmv" };
```
You can use various video formats including MP4, AVI, MOV, WMV and many others supported by the SDK.
### Step 2: Create Segments for the Main Video
Define which portion of the main video to use by setting start and stop times:
```cs
FileSegment[] segments1 = new[] { new FileSegment(TimeSpan.FromMilliseconds(0), TimeSpan.FromMilliseconds(10000)) };
```
This example uses the first 10 seconds of the main video. You can adjust these values to use any segment of your source file.
### Step 3: Initialize the Main Video Source
Create a VideoSource object for your main video with your preferred settings:
```cs
var videoFile = new VideoSource(
files[0],
segments1,
VideoEditStretchMode.Letterbox,
0,
1.0);
```
The parameters include:
- File path
- Time segments to include
- Stretch mode (how to handle aspect ratio differences)
- Rotation angle
- Volume multiplier
### Step 4: Configure the PIP Video Source
Similarly, set up the video that will appear as the overlay:
```cs
FileSegment[] segments2 = new[] { new FileSegment(TimeSpan.FromMilliseconds(0), TimeSpan.FromMilliseconds(10000)) };
var videoFile2 = new VideoSource(
files[1],
segments2,
VideoEditStretchMode.Letterbox,
0,
1.0);
```
### Step 5: Define Video Placement Rectangles
Specify the size and position for both videos:
```cs
// Rectangle for the main background video (full frame)
var rect1 = new Rectangle(0, 0, 1280, 720);
// Rectangle for the smaller PIP video overlay
var rect2 = new Rectangle(100, 100, 320, 240);
```
You can adjust the second rectangle's position and size to place the PIP video wherever you want on the screen. Common positions include top-right or bottom-left corners.
### Step 6: Combine the Videos with PIP
Finally, add both video sources to your project using the PIP mode:
```cs
VideoEdit1.Input_AddVideoFile_PIP(
videoFile, // Main video
videoFile2, // PIP video
TimeSpan.FromMilliseconds(0), // Start time
TimeSpan.FromMilliseconds(10000), // Duration
VideoEditPIPMode.Custom, // PIP mode
true, // Show both videos
1280, 720, // Output resolution
0, // Transition type
rect2, // PIP video rectangle
rect1 // Main video rectangle
);
```
The resulting video will show your main video filling the entire frame with the second video appearing in the specified rectangle position.
## Creating Side-by-Side Video Layouts
Side-by-side layouts divide the screen evenly between two video sources. This approach works well for comparison videos, reaction content, or interview presentations where both videos deserve equal screen space.
### Horizontal Split Screen
A horizontal split places videos side-by-side horizontally. This works well for comparing before/after effects or showing two people in conversation:
```cs
VideoEdit1.Input_AddVideoFile_PIP(
videoFile,
videoFile2,
TimeSpan.FromMilliseconds(0),
TimeSpan.FromMilliseconds(10000),
VideoEditPIPMode.Horizontal,
false
);
```
### Vertical Split Screen
A vertical split stacks videos one above the other. This can be useful for showing cause and effect relationships or creating top/bottom panel layouts:
```cs
VideoEdit1.Input_AddVideoFile_PIP(
videoFile,
videoFile2,
TimeSpan.FromMilliseconds(0),
TimeSpan.FromMilliseconds(10000),
VideoEditPIPMode.Vertical,
false
);
```
## Advanced Customization Options
The SDK offers numerous options to further customize your video compositions:
- **Custom Positioning**: Define exact screen coordinates for precise video placement
- **Transitions**: Add fade or other transition effects between video segments
- **Audio Control**: Adjust volume levels for each video source independently
- **Border Effects**: Add borders, shadows, or frames around PIP video elements
- **Animation**: Create moving PIP elements that change position over time
- **Multiple Overlays**: Add more than two videos to create complex compositions
These capabilities allow you to create professional-level video productions directly from your .NET applications.
## Implementation Requirements
To successfully implement these video composition techniques in your application, you'll need to include the appropriate redistributable packages:
- Video Edit SDK redist [x86](https://www.nuget.org/packages/VisioForge.DotNet.Core.Redist.VideoEdit.x86/) [x64](https://www.nuget.org/packages/VisioForge.DotNet.Core.Redist.VideoEdit.x64/)
For information on deploying these dependencies to your users' systems, see our [deployment guide](../deployment.md).
## Performance Considerations
When working with multiple video sources, especially at high resolutions, be mindful of system resource usage. Video composition operations can be processor-intensive. Consider the following best practices:
- Pre-render complex compositions for playback in production environments
- Optimize video resolution and bitrate for your target platform
- Test performance on hardware similar to your target deployment environment
## Conclusion
Picture-in-Picture and split-screen video compositions add professional capabilities to media applications. The Video Edit SDK for .NET makes implementing these features straightforward with its intuitive API. Whether you're developing a video editing application, a streaming platform, or integrating video processing into a larger system, these techniques provide powerful ways to combine and present multiple video sources.
---
Visit our [GitHub](https://github.com/visioforge/.Net-SDK-s-samples) page to get more code samples.
---END OF PAGE---
# Local File: .\dotnet\videoedit\code-samples\several-segments.md
---
title: Adding Multiple Segments from a Single Video File
description: Learn how to efficiently extract and combine multiple segments from the same video or audio file in your C# applications. Step-by-step guide with code examples for .NET developers working with video editing.
sidebar_label: Adding Multiple Segments from a Single File
---
# Adding Multiple Segments from a Single Video File in C#
[!badge size="xl" target="blank" variant="info" text="Video Edit SDK .Net"](https://www.visioforge.com/video-edit-sdk-net) [!badge variant="dark" size="xl" text="VideoEditCore"]
## Introduction
When developing video editing applications, you often need to extract specific portions of a video file and combine them into a new composition. This technique is essential for creating highlight reels, removing unwanted sections, or assembling a compilation of key moments from a larger video.
This guide demonstrates how to programmatically extract and combine multiple segments from the same video file using C#. You'll learn the step-by-step process with working code examples that you can implement in your own applications.
## Why Extract Multiple Segments?
Extracting specific segments from videos serves many practical purposes:
- Creating highlight reels from longer recordings
- Removing unwanted sections (ads, errors, irrelevant content)
- Assembling a compilation of key moments
- Creating trailers or previews from full-length content
- Generating shorter clips for social media from longer videos
## Implementation Overview
The implementation involves three key steps:
1. Defining the time segments you want to extract
2. Creating a video source that includes these specified segments
3. Adding the segmented file to your editing timeline
Let's break down each step with detailed code examples and explanations.
## Detailed Implementation
### Step 1: Define Your Segments
First, you need to specify each segment's start and stop times. Each segment is defined by a starting point and duration, measured in milliseconds.
```cs
// Define multiple segments from a single video file
FileSegment[] segments = new[] {
new FileSegment(TimeSpan.FromMilliseconds(0), TimeSpan.FromMilliseconds(5000)), // First 5 seconds
new FileSegment(TimeSpan.FromMilliseconds(3000), TimeSpan.FromMilliseconds(10000)) // From 3s to 13s mark
};
```
In this example, we've defined two segments:
- The first segment starts at the beginning of the video (0ms) and lasts for 5 seconds
- The second segment starts at the 3-second mark and continues for 10 seconds
Note that segments can overlap, as shown in this example where the second segment starts before the first one ends. This can be useful for creating smooth transitions or when you want certain portions to appear multiple times.
### Step 2: Create a Video Source with Segments
Next, create a VideoSource object that incorporates your defined segments:
```cs
// Create a video source that includes the specified segments
VideoSource videoFile = new VideoSource(
videoFileName, // Path to your video file
segments, // Array of segments defined above
VideoEditStretchMode.Letterbox, // How to handle aspect ratio differences
0, // Rotation angle (0 = no rotation)
1.0); // Speed factor (1.0 = normal speed)
```
The VideoSource constructor takes several parameters:
- `videoFileName`: The path to your source video file
- `segments`: The array of FileSegment objects you defined in Step 1
- `VideoEditStretchMode`: How to handle aspect ratio differences (Letterbox, Stretch, Crop)
- Rotation angle (in degrees): Use 0 for no rotation, or 90, 180, 270 for rotated video
- Speed factor: Use 1.0 for normal speed, values below 1.0 for slow motion, above 1.0 for fast motion
### Step 3: Add to Timeline
Finally, add the segmented video source to your editing timeline:
```cs
// Add the segmented file to the timeline (track 0)
VideoEdit1.Input_AddVideoFile(videoFile, 0);
```
The `Input_AddVideoFile` method takes two parameters:
- `videoFile`: The VideoSource object you created
- `0`: The track number to place the video on (0 is typically the main video track)
## Working with Audio Segments
The same approach works for audio files. Simply use AudioSource instead of VideoSource:
```cs
// Define your audio segments
FileSegment[] audioSegments = new[] {
new FileSegment(TimeSpan.FromMilliseconds(0), TimeSpan.FromMilliseconds(8000)),
new FileSegment(TimeSpan.FromMilliseconds(15000), TimeSpan.FromMilliseconds(12000))
};
// Create audio source with segments
AudioSource audioFile = new AudioSource(
audioFileName,
audioSegments,
1.0); // Speed factor
// Add to timeline (audio track 0)
VideoEdit1.Input_AddAudioFile(audioFile, 0);
```
## Advanced Usage Scenarios
### Variable Speed Segments
You can create interesting effects by varying the speed factor for different segments:
```cs
// Create segments with different speeds
VideoSource slowMotionSegment = new VideoSource(
videoFileName,
new[] { new FileSegment(TimeSpan.FromMilliseconds(5000), TimeSpan.FromMilliseconds(3000)) },
VideoEditStretchMode.Letterbox,
0,
0.5); // Half speed (slow motion)
VideoSource fastForwardSegment = new VideoSource(
videoFileName,
new[] { new FileSegment(TimeSpan.FromMilliseconds(10000), TimeSpan.FromMilliseconds(5000)) },
VideoEditStretchMode.Letterbox,
0,
2.0); // Double speed
// Add segments to different positions on the timeline
VideoEdit1.Input_AddVideoFile(slowMotionSegment, 0);
VideoEdit1.Input_AddVideoFile(fastForwardSegment, 0, TimeSpan.FromMilliseconds(3000));
```
### Combining Multiple Files with Segments
You can combine segments from different files by creating multiple VideoSource objects:
```cs
// Create segments from different files
VideoSource file1Segments = new VideoSource(
videoFileName1,
new[] { new FileSegment(TimeSpan.FromMilliseconds(0), TimeSpan.FromMilliseconds(5000)) },
VideoEditStretchMode.Letterbox,
0,
1.0);
VideoSource file2Segments = new VideoSource(
videoFileName2,
new[] { new FileSegment(TimeSpan.FromMilliseconds(2000), TimeSpan.FromMilliseconds(4000)) },
VideoEditStretchMode.Letterbox,
0,
1.0);
// Add to timeline in sequence
VideoEdit1.Input_AddVideoFile(file1Segments, 0);
VideoEdit1.Input_AddVideoFile(file2Segments, 0, TimeSpan.FromMilliseconds(5000));
```
## Required Dependencies
To use this functionality, you'll need to install the appropriate redistributable packages:
- Video Edit SDK redistributables:
- [x86 package](https://www.nuget.org/packages/VisioForge.DotNet.Core.Redist.VideoEdit.x86/)
- [x64 package](https://www.nuget.org/packages/VisioForge.DotNet.Core.Redist.VideoEdit.x64/)
For information about installing or deploying these redistributables to your users' PCs, see the [deployment guide](../deployment.md).
## Conclusion
Extracting and combining multiple segments from a video file is a powerful technique for creating dynamic video content in your applications. By following the steps outlined in this guide, you can implement this functionality in your C# applications with minimal effort.
This approach gives you fine-grained control over which portions of a video are included in your final output, allowing for creative editing possibilities without requiring complex manual video editing tools.
---
Visit our [GitHub repository](https://github.com/visioforge/.Net-SDK-s-samples) for more code samples and examples.
---END OF PAGE---
# Local File: .\dotnet\videoedit\code-samples\transition-video.md
---
title: Creating smooth video transitions in C#
description: Master video transition effects in C# with this step-by-step guide. Learn how to implement professional transitions between video clips with complete code examples for both VideoEditCore and VideoEditCoreX APIs.
sidebar_label: Adding Transitions Between Videos
---
# Creating Professional Video Transitions Between Clips in C #
[!badge size="xl" target="blank" variant="info" text="Video Edit SDK .Net"](https://www.visioforge.com/video-edit-sdk-net)
## Introduction to Video Transitions
Video transitions create a smooth visual flow between different video clips in your editing projects. Effective transitions can significantly enhance the viewing experience, making your videos appear more professional and engaging. This guide demonstrates how to implement transitions in your C# applications using Video Edit SDK .Net.
Transitions require overlapping timeline segments where both videos exist simultaneously. During this overlap, the transition effect occurs, gradually replacing the first video with the second one. The SDK supports over 100 different transition effects, from simple fades to complex SMPTE standard wipes.
## Understanding Timeline Positioning for Transitions
For transitions to work properly, you need to understand how video clips are positioned on a timeline. Here's how the positioning works:
1. **First video**: Placed at the beginning of the timeline (0ms position)
2. **Second video**: Placed with a slight overlap with the first video
3. **Transition**: Applied in the overlapping region where both videos exist
This overlapping region is crucial - it's where the transition effect will be rendered.
## Creating Video Fragments for Transition
Let's add two video fragments from separate files, each 5 seconds (5000ms) long. The first fragment will be positioned at the start of the timeline, and the second fragment will start at the 4-second mark, creating a 1-second overlap where our transition will occur.
+++ VideoEditCore
```cs
// Define paths to our source video files
string[] files = { @"c:\samples\video1.avi", @"c:\samples\video2.avi" };
// Create the first video source - this will be the first clip in our timeline
var videoFile = new VideoSource(
files[0], // Path to first video file
TimeSpan.Zero, // Start from the beginning of the source file
TimeSpan.FromMilliseconds(5000), // Use 5 seconds of the video
VideoEditStretchMode.Letterbox, // Maintain aspect ratio, add black bars if needed
0, // No rotation (0 degrees)
1.0); // Normal playback speed (1.0x)
// Create the second video source - this will be our second clip with overlap
var videoFile2 = new VideoSource(
files[1], // Path to second video file
TimeSpan.Zero, // Start from the beginning of the source file
TimeSpan.FromMilliseconds(5000), // Use 5 seconds of the video
VideoEditStretchMode.Letterbox, // Maintain aspect ratio, add black bars if needed
0, // No rotation (0 degrees)
1.0); // Normal playback speed (1.0x)
// Add the first video at the beginning of the timeline (0ms position)
await VideoEdit1.Input_AddVideoFileAsync(
videoFile,
TimeSpan.FromMilliseconds(0)); // Position on the timeline: 0ms (start)
// Add the second video at 4 seconds, creating a 1-second overlap with the first video
// This overlap will be where our transition happens
await VideoEdit1.Input_AddVideoFileAsync(
videoFile2,
TimeSpan.FromMilliseconds(4000)); // Position on the timeline: 4000ms (4 seconds)
```
+++ VideoEditCoreX
```cs
// Define paths to our source video files
string[] files = { @"c:\samples\video1.avi", @"c:\samples\video2.avi" };
// Create the first video source - this will be the first clip in our timeline
var videoFile = new VideoFileSource(
files[0], // Path to first video file
TimeSpan.Zero, // Start from the beginning of the source file
TimeSpan.FromMilliseconds(5000), // Use 5 seconds of the video
0, // No rotation (0 degrees)
1.0); // Normal playback speed (1.0x)
// Note: VideoEditCoreX doesn't require StretchMode here
// Create the second video source - this will be our second clip with overlap
var videoFile2 = new VideoFileSource(
files[1], // Path to second video file
TimeSpan.Zero, // Start from the beginning of the source file
TimeSpan.FromMilliseconds(5000), // Use 5 seconds of the video
0, // No rotation (0 degrees)
1.0); // Normal playback speed (1.0x)
// Add the first video at the beginning of the timeline (0ms position)
VideoEdit1.Input_AddVideoFile(
videoFile,
TimeSpan.FromMilliseconds(0)); // Position on the timeline: 0ms (start)
// Add the second video at 4 seconds, creating a 1-second overlap with the first video
// This overlap creates the region where our transition will occur
VideoEdit1.Input_AddVideoFile(
videoFile2,
TimeSpan.FromMilliseconds(4000)); // Position on the timeline: 4000ms (4 seconds)
```
+++
### Understanding the Parameters
When adding video files to the timeline, each parameter serves a specific purpose:
- **File path**: Location of the video file on disk
- **Start time**: Position in the source video to start from (TimeSpan.Zero means beginning)
- **Duration**: Length of video to use (5000ms in our example)
- **Stretch mode** (VideoEditCore only): How to handle aspect ratio differences (Letterbox, Stretch, etc.)
- **Rotation**: Degrees to rotate the video (0 means no rotation)
- **Playback speed**: Speed multiplier (1.0 means normal speed)
- **Insert time**: Position on the timeline where this clip should be placed
## Implementing the Transition Effect
Now that we have our two overlapping video clips, we'll add a transition effect that will occur between the 4-second and 5-second marks on our timeline.
+++ VideoEditCore
First, let's get the ID of our desired transition effect:
```cs
// Get the ID for the "Upper right" transition effect
// Each transition has a unique name and corresponding ID
int id = VideoEdit.Video_Transition_GetIDFromName("Upper right");
```
Then, we'll add the transition by specifying the start time, end time, and transition ID:
```cs
// Add the transition to the timeline
// Parameters:
// - Start time: 4000ms (where the second clip begins and overlap starts)
// - End time: 5000ms (where the first clip ends and overlap ends)
// - Transition ID: The ID we retrieved for the "Upper right" transition
VideoEdit1.Video_Transition_Add(TimeSpan.FromMilliseconds(4000), TimeSpan.FromMilliseconds(5000), id);
```
To see all available transition effects, you can use:
```cs
// Get an array of all available transition effect names
string[] availableTransitions = VideoEdit.Video_Transition_Names();
// Example of iterating through all available transitions
foreach (string transitionName in availableTransitions)
{
// Get the ID for each transition
int transitionId = VideoEdit.Video_Transition_GetIDFromName(transitionName);
// You could use this in your app UI to let users choose transitions
Console.WriteLine($"Transition: {transitionName}, ID: {transitionId}");
}
```
+++ VideoEditCoreX
In VideoEditCoreX, we can first list all available transitions:
```cs
// Get all available transition names as an array
var transitionNames = VideoEdit1.Video_Transitions_Names();
// Select a specific transition by index
// Note: Array is zero-based, so index 10 is the 11th transition in the list
var transitionName = transitionNames[10];
// You could also iterate through all transitions to show them in a UI dropdown
// foreach (var name in transitionNames)
// {
// Console.WriteLine($"Available transition: {name}");
// }
```
Then, we'll create a transition object and add it to our timeline:
```cs
// Create a new transition object specifying:
// - The transition name we selected above
// - Start time (4000ms) - where the overlap begins
// - End time (5000ms) - where the overlap ends
var trans = new VideoTransition(
transitionName, // The transition name
TimeSpan.FromMilliseconds(4000), // Start time of transition
TimeSpan.FromMilliseconds(5000)); // End time of transition
// Add the transition to the VideoEdit component's transitions collection
VideoEdit1.Video_Transitions.Add(trans);
```
You can also directly specify the transition name if you know it:
```cs
// Create a transition using a specific name without looking it up first
// This is useful when you already know which transition you want to use
var trans = new VideoTransition(
"Circle", // Using "Circle" transition directly
TimeSpan.FromMilliseconds(4000), // Start time of transition
TimeSpan.FromMilliseconds(5000)); // End time of transition
// Add the transition to the VideoEdit component
VideoEdit1.Video_Transitions.Add(trans);
// You can also create multiple transitions between different clips:
// var secondTrans = new VideoTransition("Fade", TimeSpan.FromMilliseconds(9000), TimeSpan.FromMilliseconds(10000));
// VideoEdit1.Video_Transitions.Add(secondTrans);
```
+++
## Popular Transition Effects and When to Use Them
The SDK offers many transition effects suitable for different situations:
1. **Fade transitions** (crossfade): Ideal for subtle, elegant transitions
2. **Wipe transitions** (horizontal, vertical, diagonal): Great for dynamic scene changes
3. **Zoom/push transitions**: Effective for emphasizing the next scene
4. **Geometric transitions** (circle, square, diamond): Create interesting visual effects
5. **Special transitions** (random blocks, matrix effects): For creative or dramatic transitions
## Processing Your Video with Transitions
After setting up your video clips and transition, you'll need to start the processing:
+++ VideoEditCore
```cs
// STEP 1: Configure the output file path
VideoEdit1.Output_Filename = "output.mp4"; // Set the destination file path
// STEP 2: Create and configure the output format
var outputFormat = new MP4Output();
// You can customize the output with various properties like:
// outputFormat.VideoBitrate = 5000000; // Set video bitrate to 5Mbps
// outputFormat.VideoFrameRate = 30; // Set frame rate to 30fps
// outputFormat.VideoWidth = 1920; // Set output width to 1920px
// outputFormat.VideoHeight = 1080; // Set output height to 1080px
// STEP 3: Assign the output format to the VideoEdit component
VideoEdit1.Output_Format = outputFormat;
// STEP 4: Start the asynchronous processing
// This will render the video with the transition and save it to the output file
await VideoEdit1.StartAsync();
// After this call, you should listen for processing events like:
// - VideoEdit1.OnProgress to track processing progress
// - VideoEdit1.OnStop to detect when processing is complete
```
+++ VideoEditCoreX
```cs
// STEP 1: Create and configure the output format
// In VideoEditCoreX, we specify the output filename directly in the constructor
var outputFormat = new MP4Output("output.mp4");
// You can customize the output with various properties like:
// outputFormat.VideoBitrate = 5000000; // Set video bitrate to 5Mbps
// outputFormat.AudioBitrate = 192000; // Set audio bitrate to 192kbps
// outputFormat.VideoFrameRate = 30; // Set frame rate to 30fps
// outputFormat.Width = 1920; // Set output width to 1920px
// outputFormat.Height = 1080; // Set output height to 1080px
// STEP 2: Assign the output format to the VideoEdit component
VideoEdit1.Output_Format = outputFormat;
// STEP 3: Start the processing (non-async in VideoEditCoreX)
// This will render the video with the transition and save it to the output file
VideoEdit1.Start();
// ALTERNATIVE: For background processing, you could use:
// VideoEdit1.Start(true); // true means run in a background thread
// You should also set up event handlers before calling Start():
// VideoEdit1.OnProgress += (s, e) => { Console.WriteLine($"Progress: {e.Progress}%"); };
// VideoEdit1.OnStop += (s, e) => { Console.WriteLine("Processing completed!"); };
```
+++
## Common Transition Challenges and Solutions
When implementing video transitions, you might encounter these common challenges:
### Challenge 1: Transitions Not Appearing
If your transitions aren't showing up:
- Ensure the video clips actually overlap on the timeline
- Verify the transition time span falls within this overlap
- Check that the transition name or ID is valid
### Challenge 2: Poor Visual Quality
For higher quality transitions:
- Use higher resolution source videos
- Use a higher bitrate for your output
- Consider adding a slight blur effect for smoother transitions
### Challenge 3: Performance Issues
If transition rendering is slow:
- Use hardware acceleration if available
- Simplify complex transitions when targeting lower-end hardware
- Consider pre-rendering transitions for performance-critical applications
## Required Dependencies
To implement video transitions using Video Edit SDK, you'll need:
- Video Edit SDK redist packages: [x86](https://www.nuget.org/packages/VisioForge.DotNet.Core.Redist.VideoEdit.x86/) | [x64](https://www.nuget.org/packages/VisioForge.DotNet.Core.Redist.VideoEdit.x64/)
For guidance on installing these dependencies, see our [deployment guide](../deployment.md).
## Advanced Transition Techniques
For more advanced transition effects:
1. **Combining transitions with effects**: Apply a blur or color effect during the transition
2. **Varying transition speeds**: Use different durations for the start and end of transitions
3. **Keyframe animation**: Create custom transitions with precise control
4. **Audio crossfading**: Synchronize audio transitions with your video transitions
## Conclusion
Video transitions are a powerful way to enhance your C# video applications. With the Video Edit SDK, you have access to a wide range of transition effects that can be customized to suit your specific needs. By following the examples in this guide, you can implement professional-quality transitions in your video editing projects.
For additional options and detailed information about SMPTE transitions, check our [comprehensive transitions reference](../transitions.md).
---
Visit our [GitHub](https://github.com/visioforge/.Net-SDK-s-samples) page to get more code samples.
---END OF PAGE---
# Local File: .\dotnet\videoedit\code-samples\video-images-console.md
---
title: Creating Videos from Images in C# Console Apps
description: Learn how to programmatically generate video files from image sequences in C# console applications with step-by-step guidance, code examples, performance tips, and troubleshooting advice for .NET developers.
sidebar_label: Video from Images in a Console Application
---
# Creating Videos from Images in C# Console Applications
[!badge size="xl" target="blank" variant="info" text="Video Edit SDK .Net"](https://www.visioforge.com/video-edit-sdk-net) [!badge variant="dark" size="xl" text="VideoEditCore"]
## Introduction
Converting a sequence of images into a video file is a common requirement for many software applications. This guide demonstrates how to create a video from images using a C# console application with the Video Edit SDK .Net. The same approach works for WinForms and WPF applications with minimal modifications.
## Prerequisites
Before you begin, ensure you have:
- .NET development environment set up
- Video Edit SDK .Net installed
- Basic knowledge of C# programming
- A folder containing image files (JPG, PNG, etc.)
## Key Concepts
When creating videos from images, understanding these fundamental concepts will help you achieve better results:
- **Frame rate**: Determines how smoothly your video plays (typically 25-30 frames per second)
- **Image duration**: How long each image appears in the video
- **Transition effects**: Optional effects between images
- **Output format**: The video container and codec specifications
- **Resolution**: The dimensions of the output video
## Step-by-Step Implementation
### Setting Up the Project
First, create a new console application project and add the necessary references:
```cs
using System;
using System.IO;
using VisioForge.Types;
using VisioForge.Types.Output;
using VisioForge.VideoEdit;
using VisioForge.Controls;
using VisioForge.Controls.VideoEdit;
```
### Core Implementation
```cs
namespace ve_console
{
class Program
{
// Folder contains images
private const string AssetDir = "c:\\samples\\pics\\";
static void Main(string[] args)
{
if (!Directory.Exists(AssetDir))
{
Console.WriteLine(@"Folder with images does not exists: " + AssetDir);
return;
}
var images = Directory.GetFiles(AssetDir, "*.jpg");
if (images.Length == 0)
{
Console.WriteLine(@"Folder with images is empty or do not have files with .jpg extension: " + AssetDir);
return;
}
if (File.Exists(AssetDir + "output.avi"))
{
File.Delete(AssetDir + "output.avi");
}
var ve = new VideoEditCore();
int insertTime = 0;
foreach (string img in images)
{
ve.Input_AddImageFile(img, TimeSpan.FromMilliseconds(2000), TimeSpan.FromMilliseconds(insertTime), VideoEditStretchMode.Letterbox, 0, 640, 480);
insertTime += 2000;
}
ve.Video_Effects_Clear();
ve.Mode = VideoEditMode.Convert;
ve.Video_Resize = true;
ve.Video_Resize_Width = 640;
ve.Video_Resize_Height = 480;
ve.Video_FrameRate = 25;
ve.Video_Renderer = new VideoRendererSettings
{
VideoRenderer = VideoRendererMode.None,
StretchMode = VideoRendererStretchMode.Letterbox
};
var aviOutput = new AVIOutput
{
Video_Codec = "MJPEG Compressor"
};
ve.Output_Format = aviOutput;
ve.Output_Filename = AssetDir + "output.avi";
ve.Video_Effects_Enabled = true;
ve.Video_Effects_Clear();
ve.OnError += VideoEdit1_OnError;
ve.OnProgress += VideoEdit1_OnProgress;
ve.ConsoleUsage = true;
ve.Start();
Console.WriteLine(@"Video saved to: " + ve.Output_Filename);
}
private static void VideoEdit1_OnProgress(object sender, ProgressEventArgs progressEventArgs)
{
Console.WriteLine(progressEventArgs.Progress);
}
private static void VideoEdit1_OnError(object sender, ErrorsEventArgs e)
{
Console.WriteLine(e.Message);
}
}
}
```
## Detailed Component Breakdown
### Image Input Configuration
The code above uses `Input_AddImageFile()` to add each image to the timeline with specific parameters:
- **File path**: Path to the image file
- **Duration**: How long the image appears (2000ms in this example)
- **Start time**: When the image appears in the timeline
- **Stretch mode**: How the image fits the video frame (Letterbox preserves aspect ratio)
- **Rotation**: Image rotation in degrees
- **Width/Height**: Dimensions for the image in the video
### Video Output Settings
The output video settings are configured with these key properties:
- **Video_Resize**: Enable/disable resizing
- **Video_Resize_Width/Height**: Output video dimensions
- **Video_FrameRate**: Frames per second (25 FPS is standard for PAL)
- **Video_Renderer**: Rendering settings including mode and stretching
- **Output_Format**: Container format and codec settings
- **Output_Filename**: Where to save the resulting video file
### Progress and Error Handling
The implementation includes event handlers for monitoring progress and catching errors:
```cs
ve.OnError += VideoEdit1_OnError;
ve.OnProgress += VideoEdit1_OnProgress;
```
These handlers provide feedback during video creation, which is essential for longer operations.
## Advanced Customization Options
### Transition Effects
To add transitions between images, you can use the `Video_Transition_Add` method:
```cs
// Example of adding a fade transition between images
// Get the ID for the "FadeIn" transition effect
int transitionId = ve.Video_Transition_GetIDFromName("FadeIn");
// Add the transition - parameters are start time, end time, and transition ID
ve.Video_Transition_Add(
TimeSpan.FromMilliseconds(1900), // Start time of transition
TimeSpan.FromMilliseconds(2100), // End time of transition
transitionId // Transition ID
);
// For more advanced transition options with border and other properties:
// ve.Video_Transition_Add(
// TimeSpan.FromMilliseconds(1900), // Start time
// TimeSpan.FromMilliseconds(2100), // End time
// transitionId, // Transition ID
// Color.Blue, // Border color
// 5, // Border softness
// 2, // Border width
// 0, // Offset X
// 0, // Offset Y
// 0, // Replicate X
// 0, // Replicate Y
// 1, // Scale X
// 1 // Scale Y
// );
```
## Performance Optimization Tips
- **Pre-resize images**: For better performance, resize images before processing
- **Batch processing**: Process images in smaller batches for large collections
- **Memory management**: Dispose of large objects when no longer needed
- **Output codec**: Choose codecs based on quality vs. processing speed requirements
- **Hardware acceleration**: Enable hardware acceleration when available
## Troubleshooting Common Issues
### Missing Codec Errors
If you encounter codec-related errors, ensure you have installed the required redistributables:
- Video Edit SDK redist [x86](https://www.nuget.org/packages/VisioForge.DotNet.Core.Redist.VideoEdit.x86/) [x64](https://www.nuget.org/packages/VisioForge.DotNet.Core.Redist.VideoEdit.x64/)
### Image Format Compatibility
Not all image formats are supported equally. For best results:
- Use common formats like JPG, PNG, or BMP
- Ensure consistent dimensions across images
- Test with a small subset before processing large collections
## Conclusion
Creating videos from images in a C# console application is straightforward with the right approach. This guide covered the essential implementation details, configuration options, and best practices to help you successfully integrate this functionality into your applications.
Remember to adjust the parameters to match your specific requirements, particularly the image duration, frame rate, and output format settings.
---
Visit our [GitHub](https://github.com/visioforge/.Net-SDK-s-samples) page for more code samples and implementations.
---END OF PAGE---
# Local File: .\dotnet\videoedit\code-samples\volume-for-track.md
---
title: Setting Custom Volume for Audio Tracks in C#
description: Learn how to implement custom volume controls for individual audio tracks in your video editing application. This detailed guide provides C# code examples for precise audio level management within your .NET projects.
sidebar_label: How to Set the Custom Volume for an Audio Track?
---
# Setting Custom Volume Levels for Audio Tracks in C# Applications
[!badge size="xl" target="blank" variant="info" text="Video Edit SDK .Net"](https://www.visioforge.com/video-edit-sdk-net) [!badge variant="dark" size="xl" text="VideoEditCore"]
## Overview
Managing audio volume levels is a critical aspect of video production and editing applications. This guide demonstrates how to implement individual volume controls for separate audio tracks in your .NET application.
## Implementation Details
Setting custom volume levels for audio tracks gives your users more precise control over their audio mix. Each track can have its own independent volume setting, allowing for professional-quality audio balancing.
## Sample Code Implementation
The following C# example shows how to apply a volume envelope effect to an audio track:
```cs
var volume = new AudioVolumeEnvelopeEffect(10);
VideoEdit1.Input_AddAudioFile(audioFile, null, 0, new[] { volume });
```
## Understanding the Parameters
- `AudioVolumeEnvelopeEffect(10)`: Creates a volume effect with a value of 10
- `Input_AddAudioFile`: Adds an audio file to your project with the specified volume effect
- The parameters allow for precise control over when and how the volume changes are applied
## Required Dependencies
To implement this functionality, you'll need the following redistributable packages:
- Video Edit SDK redistributables:
- [x86 package](https://www.nuget.org/packages/VisioForge.DotNet.Core.Redist.VideoEdit.x86/)
- [x64 package](https://www.nuget.org/packages/VisioForge.DotNet.Core.Redist.VideoEdit.x64/)
## Deployment Information
For information about installing or deploying the required components to your end users' systems, please refer to our [deployment guide](../deployment.md).
---
## Additional Resources
For more code examples and implementation techniques, visit our [GitHub repository](https://github.com/visioforge/.Net-SDK-s-samples) with complete sample projects.
---END OF PAGE---
# Local File: .\dotnet\videoedit-ffmpeg\changelog.md
---
title: Video Edit SDK FFMPEG .Net Release History
description: Detailed version history and feature updates for the Video Edit SDK FFMPEG .Net framework. Explore performance improvements, API changes, and new capabilities across all major releases.
sidebar_label: Changelog
---
# Video Edit SDK FFMPEG .Net: Complete Version History
## What's New in Version 12.1
Our latest release brings significant improvements to deployment flexibility and framework compatibility:
### .Net Framework Upgrade
* Full migration to .Net 4.6 framework ensuring better performance and compatibility with modern systems
* Enhanced runtime reliability with updated core components
### Streamlined Distribution Model
* Unified installer package for both TRIAL and FULL versions, simplifying the deployment process
* Identical NuGet packages across licensing tiers, eliminating confusion between versions
### Cross-Platform Development
* Consolidated .Net Core and .Net Framework packages into a single unified distribution
* Simplified dependency management across different target platforms
### Deployment Improvements
* Added NuGet redists packages for easier dependency management
* Streamlined deployment process with automatic reference handling
* Reduced setup complexity for enterprise applications
## Version 11.3 Release Highlights
This version focused on core audio capabilities and cross-platform support:
### Audio Enhancement
* Completely redesigned audio fade-in/fade-out effects for smoother transitions
* Improved algorithm performance on multi-core processors
* Enhanced audio processing pipeline stability
### Framework Updates
* Added comprehensive .Net Core support for cross-platform development
* Backward compatibility maintained with existing .Net Framework implementations
* Performance optimizations for both runtime environments
### Technical Improvements
* Updated integrated JSON serializer with better handling of complex objects
* Improved memory management for large media processing tasks
* Fixed threading issues in multi-processor environments
## Version 10.0 Major Update
A significant update with many new features and architectural improvements:
### Advanced Media Handling
* Completely redesigned media information reader with better format support
* `MediaInfoNV` component renamed to more intuitive `MediaInfoReader`
* Enhanced metadata extraction capabilities for a wider range of formats
### Media Tagging System
* Added comprehensive standard tags support for various formats:
* Video files: MP4, WMV, and other container formats
* Audio files: MP3, AAC, M4A, Ogg Vorbis, and additional audio formats
* Tag reading support in Media Player SDK
* Tag writing capabilities in both Video Capture SDK and Video Edit SDK
### Synchronization Enhancements
* Implemented delayed start functionality across all SDK components
* New `Start_DelayEnabled` property allowing near-simultaneous initialization of multiple SDK controls
* Improved synchronization between audio and video processing pipelines
### Audio Processing Architecture
* Audio effects rewritten in C# for x64 application compatibility
* Legacy effects API maintained for backward compatibility
* Improved performance and reduced latency in real-time processing
### Developer Experience
* Added error tracking in Visual Studio Output window
* Real-time error monitoring from OnError events
* JSON-based settings serialization for easier configuration management
### Output Format Additions
* GIF output support in both Video Edit SDK .Net and Video Capture SDK .Net
* Custom MP3 splitter addressing playback issues with problematic MP3 files
### Structural Changes
* `VisioForge.Controls.WinForms` and `VisioForge.Controls.WPF` assemblies consolidated into unified `VisioForge.Controls.UI` assembly
* Added `ExecutableFilename` property to `VFFFMPEGEXEOutput` for custom FFMPEG executable specification
* Significant optimization of video effects for latest Intel CPU architectures
* Improved multithreading support for better multicore utilization
## Version 9.0 Features
This release introduced several new capabilities to enhance media presentation:
### Visual Enhancements
* Added animated GIF support as image logo overlays
* Improved rendering pipeline for smoother animations
* Better alpha channel handling for transparent overlays
### SDK Information Access
* New `SDK_Version` property to programmatically access assembly versions
* Added `SDK_State` property to check registration and licensing information
* Enhanced diagnostic capabilities for troubleshooting
### Licensing Improvements
* Implemented dedicated licensing event system to verify required SDK edition
* Clearer error messages for licensing issues
* Improved license validation process
## Version 8.6 Update
A maintenance release focusing on stability:
### Stability Improvements
* Fixed memory leaks in long-running processing operations
* Addressed threading issues with concurrent media operations
* Improved exception handling in core components
## Version 8.5 Release
This update provided core engine improvements:
### FFMPEG Updates
* Updated FFMPEG core components to latest stable version
* Enhanced codec support for newer media formats
* Performance improvements in transcoding operations
### Bug Fixes
* Resolved issues with audio/video synchronization in specific formats
* Fixed container format compatibility problems
* Improved stability during format conversion operations
## Version 7.0 Initial Release
The foundation release that established the core functionality:
### Key Features
* High-performance video editing capabilities
* Comprehensive format support for professional workflows
* Flexible API design for integration into various applications
* Cross-platform compatibility considerations
* Foundation for future development and enhancement
## Compatibility and Requirements
When upgrading between versions, please consider the following:
* Version 12.1 requires .Net Framework 4.6 or higher
* Version 11.3 and above support both .Net Core and .Net Framework
* Version 10.0 introduced breaking changes in assembly structure
* NuGet packages provide the simplest upgrade path between versions
Our ongoing development aims to enhance functionality while maintaining compatibility where possible. API changes are documented in detail to assist with migration planning.
## Getting Started
For developers new to the SDK, we recommend starting with the latest version to benefit from all improvements and optimizations. The unified installer and NuGet packages make integration straightforward into both new and existing projects.
---END OF PAGE---
# Local File: .\dotnet\videoedit-ffmpeg\index.md
---
title: Video Edit FFMPEG SDK for .NET Developers
description: Powerful cross-platform video editing, processing and conversion toolkit for .NET developers. Integrate professional video editing capabilities, effects, overlays and encoding features in your applications with our FFMPEG-based SDK.
sidebar_label: Video Edit SDK FFMPEG .Net
order: 11
---
# Video Edit FFMPEG SDK for .NET Development
## Introduction to the SDK
The Video Edit FFMPEG SDK for .NET empowers developers to seamlessly integrate video editing, conversion, and advanced processing capabilities into their .NET applications. This powerful toolkit allows you to construct professional-quality videos from various audio and video sources with minimal effort. Built on the robust and widely-adopted FFMPEG framework, our SDK provides support for virtually all industry-standard video and audio formats, delivering a complete multimedia editing and production solution for your applications.
Whether you're building video editing software, adding media processing to your application, or developing specialized video conversion tools, this SDK offers the essential building blocks to implement sophisticated video editing features quickly and efficiently.
### Developer-Friendly API
Our SDK provides a clean, intuitive .NET API designed specifically for developer productivity:
- **Simple Integration**: Add powerful video editing features to your application with minimal code
- **Comprehensive Documentation**: Access detailed API references and implementation examples
- **Flexible Architecture**: Design your application with our adaptable components
- **Exception Handling**: Robust error management for reliable application performance
### Performance Optimization
- **Multi-Threading Support**: Utilize parallel processing for improved performance
- **Memory Management**: Efficient handling of large media files
- **Progress Reporting**: Real-time feedback on processing operations
- **Cancelation Support**: Gracefully cancel operations in progress
### Use Cases
The SDK is ideal for developing:
- **Video Editing Applications**: Build professional or consumer-grade video editors
- **Media Converters**: Create tools for format conversion and optimization
- **Content Management Systems**: Add video processing capabilities to CMS platforms
- **Social Media Tools**: Develop applications for creating and enhancing social media content
- **E-Learning Platforms**: Integrate video editing features in educational software
- **Surveillance Systems**: Process and enhance security footage
- **Medical Imaging**: Work with video content in healthcare applications
## Getting Started
Implementing the SDK in your project is straightforward:
1. Add the SDK to your .NET project via NuGet package
2. Import the necessary namespaces
3. Initialize the core components
4. Start building your video processing pipeline
## Documentation Resources
To help you maximize the potential of the SDK, we provide comprehensive documentation:
- **[API Reference](https://api.visioforge.com/dotnet/api/index.html)**: Detailed information on classes, methods, and properties
- **Code Samples**: Ready-to-use examples demonstrating key features
- **Tutorial Articles**: Step-by-step guides for common implementation scenarios
- **Migration Guides**: Information for upgrading from previous versions
## System Requirements
- **.NET Framework**: 4.7.2 or higher
- **.NET Core**: 3.1 or higher
- **.NET**: 5.0 or higher
- **Operating Systems**: Windows 10/11, Windows Server 2016+
- **Processor**: Multi-core processor recommended for optimal performance
- **Memory**: 4GB minimum, 8GB+ recommended for HD/4K video processing
- **Disk Space**: Sufficient space for temporary files during processing
## Additional Resources
- [Changelog](changelog.md)
- [End User License Agreement](../../eula.md)
---END OF PAGE---
# Local File: .\vfp\changelog.md
---
title: Video Fingerprinting SDK Release Notes
description: Track the evolution of our Video Fingerprinting SDK through detailed version history. Discover new features, performance updates, and technical improvements across multiple releases, from version 3.0 to the latest 12.1 update.
sidebar_label: Changelog
---
# Video Fingerprinting SDK Version History
## Version 12.1 - Performance and Feature Enhancements
### .NET Framework Improvements
* **New Fingerprinting Capability**: Introduced `VFPFingerprintFromFrames` class enabling developers to generate video fingerprints directly from sequences of RGB24 frames
* **API Modernization**: Completely revamped async/await API implementation for better asynchronous processing
* **Engine Optimization**: Significantly improved performance of the core fingerprinting engine with enhanced processing algorithms
## Version 12.0 - Database Integration and Hardware Acceleration
### .NET Framework Updates
* **Multi-fingerprint Storage**: Added new `VFPFingerPrintDB` class for efficiently storing multiple fingerprints in a single binary file format
* **Media Monitoring Tool Integration**: Updated the Media Monitoring Tool application to leverage the new database capabilities
* **Updated Dependencies**: Integrated the latest FFMPEG version for improved video handling capabilities
* **Framework Requirement Change**: Increased minimum .NET Framework requirement to version 4.7.2
* **External Logging**: Added NLog as an external dependency for enhanced logging capabilities
* **GPU Acceleration**: Enhanced support for hardware acceleration via Nvidia, Intel and AMD GPU video decoders
## Version 11.0 - Engine Modernization
### .NET Implementation
* **Standalone Installation**: Released as an independent installer package without requiring other .NET SDK installations
* **Video Source Engine**: Implemented new engine for processing video from files and network sources
* **Capture Device Support**: Developed new engine for handling video from capture devices
* **Core Improvements**: Updated fingerprinting engine with latest algorithms
### C++ Linux Support
* **Bug Resolution**: Fixed multiple issues affecting Linux implementations
* **Engine Updates**: Improved fingerprinting engine with platform-specific optimizations
## Version 10.0 - Customization Features
### .NET Enhancements
* **Resolution Control**: Added custom resolution options for source video
* **Cropping Functionality**: Implemented custom crop capabilities for source material
* **Engine Updates**: Upgraded both decoding and fingerprinting engines
### C++ Linux Improvements
* **Demo Application**: Updated Media Monitoring Tool demo with latest FFMPEG compatibility
* **Stability Improvements**: Resolved various bugs affecting performance
## Version 3.1 - Optimization Release
### General Improvements
* **Bug Fixes**: Addressed minor issues affecting overall stability
* **Engine Updates**: Enhanced processing engine for .NET implementation
* **Licensing Change**: Media Monitoring Tool (Live) and Duplicates Video Search tools are now available for free commercial usage
## Version 3.0 - Initial Public Release
### Key Features
* First public release of the Video Fingerprinting SDK
* Introduced core fingerprinting capabilities for video content identification
* Established foundation for cross-platform development
---END OF PAGE---
# Local File: .\vfp\how-to-compare-two-video-files.md
---
title: Video File Comparison Techniques and Methods
description: Learn efficient techniques for comparing video files using fingerprinting technology. Detailed code examples show how to analyze frames, calculate unique signatures, and determine similarity between video content.
sidebar_label: How to compare two video files
---
# Video File Comparison Techniques and Methods
## Introduction to Video Fingerprinting
The Video Fingerprinting SDK provides powerful tools to accurately compare video files using advanced fingerprinting technology. This approach analyzes video frames and audio samples to generate unique signatures that represent the content. These signatures can then be compared to determine similarity between different video files.
## Understanding the Comparison Process
Video fingerprinting works by extracting distinctive features from video frames and audio samples, creating a compact representation that can be efficiently stored and compared. This technique is particularly useful for:
- Detecting duplicate or similar content
- Identifying modified versions of videos
- Content verification and authentication
- Copyright protection and infringement detection
## Implementing Video Comparison in .NET
### Creating Fingerprints for the First Video
The first step is to generate a fingerprint for your initial video file. The following code demonstrates how to create a source using the DirectShow engine and limit analysis to the first 5 seconds:
```csharp
// create source for a first video file using DirectShow engine
var source1 = new VFPFingerprintSource(File1, VFSimplePlayerEngine.LAV);
source1.StopTime = TimeSpan.FromMilliseconds(5000);
// get first fingerprint
var fp1 = VFPAnalyzer.GetComparingFingerprintForVideoFile(source1, ErrorCallback);
```
### Generating Fingerprints for the Second Video
Similarly, we need to create a fingerprint for the second video file to enable comparison:
```csharp
// create source for a second video file using DirectShow engine
var source2 = new VFPFingerprintSource(File2, VFSimplePlayerEngine.LAV);
source2.StopTime = TimeSpan.FromMilliseconds(5000);
// get second fingerprint
var fp2 = VFPAnalyzer.GetComparingFingerprintForVideoFile(source2, ErrorCallback);
```
### Comparing the Video Fingerprints
Once both fingerprints are generated, you can compare them to determine the similarity between the videos:
```csharp
// compare first and second fingerprints
var res = VFPCompare.Compare(fp1, fp2, 500);
// check the result
if (res < 300)
{
Console.WriteLine("Input files are similar.");
}
else
{
Console.WriteLine("Input files are different.");
}
```
The comparison result is a numerical value representing the difference between the videos. Lower values indicate greater similarity.
## Optimizing the Comparison Process
### Storing Fingerprints for Repeated Use
To improve efficiency, you can save fingerprints to binary files for future use without needing to re-analyze the videos:
```csharp
VFPFingerPrint fp1 = ...;
fp1.Save(filename);
```
### Storage Requirements and Database Integration
Fingerprint files are compact, requiring approximately 250 KB of disk space per minute of video. For applications that need to store and compare many fingerprints, MongoDB integration is available through the SDK extensions.
## Advanced Applications
Video fingerprinting technology offers numerous practical applications:
- Content identification systems
- Automated copyright monitoring
- Media asset management
- Video deduplication in large archives
- Broadcast monitoring and verification
## Additional Resources
[Product page](https://www.visioforge.com/video-fingerprinting-sdk)
---END OF PAGE---
# Local File: .\vfp\how-to-search-one-video-fragment-in-another.md
---
title: Finding Video Fragments in Larger Video Content
description: Learn how to implement video fragment search functionality in your applications using fingerprinting technology. This detailed guide walks developers through the process with code examples for both .NET and C++ implementations.
sidebar_label: Finding Video Fragments in Larger Videos
---
# Finding Video Fragments in Larger Video Content
## Introduction
Video fingerprinting technology allows developers to identify and locate specific video segments within larger video files. This guide demonstrates the implementation process using a powerful Video Fingerprinting SDK that works across various video formats and quality levels.
The primary examples in this tutorial use the .NET API implementation, but equivalent functionality is available through the C++ API for developers preferring native code solutions.
## Implementation Process
### Step 1: Analyze the Fragment File
First, we need to extract a fingerprint from the smaller video fragment that we want to locate within the larger video. This process involves analyzing the video's unique characteristics and generating a digital signature.
```csharp
// create video file source
var fragmentSrc = new VFPFingerprintSource(ShortFile, VFSimplePlayerEngine.LAV);
fragmentSrc.StopTime = TimeSpan.FromMilliseconds(5000);
// get fingerprint
var fragment = VFPAnalyzer.GetSearchFingerprintForVideoFile(fragmentSrc, ErrorCallback);
```
In this code block, we:
- Create a fingerprint source pointing to the short fragment file
- Set a duration limit of 5 seconds for analysis
- Generate a searchable fingerprint using the analyzer
### Step 2: Analyze the Target Video
Next, we need to extract a fingerprint from the larger video where we'll search for our fragment. The process is similar, but without time limitations.
```csharp
// create video file source
var mainSrc = new VFPFingerprintSource(LongFile, VFSimplePlayerEngine.LAV);
// get fingerprint
var main = VFPAnalyzer.GetSearchFingerprintForVideoFile(mainSrc, ErrorCallback);
```
### Step 3: Set Up Error Handling
To maintain robust error handling, we implement a callback function that captures and displays any errors encountered during the fingerprinting process.
```csharp
private static void ErrorCallback(string error)
{
Console.WriteLine(error);
}
```
### Step 4: Perform the Search Operation
With both fingerprints ready, we can now search for the fragment within the larger video file.
```csharp
// set the maximum difference level
var maxDifference = 500;
// search one video fragment in another video using fingerprints
var res = VFPSearch.Search(fragment, 0, main, 0, out var difference, maxDifference);
// check the result
if (res > 0)
{
TimeSpan ts = new TimeSpan(res * TimeSpan.TicksPerSecond);
Console.WriteLine($"Detected fragment file at {ts:g}, difference level is {difference}");
}
else
{
Console.WriteLine("Fragment file not found.");
}
```
In this code:
- We define a tolerance level for differences between fingerprints
- Perform the search operation between our fragment and main video
- Check if a matching position was found (positive result value)
- Convert the result to a timestamp and display it along with the difference value
## Performance Considerations
The fingerprinting technology uses sophisticated algorithms that balance accuracy and performance. For optimal results:
- Consider adjusting the maximum difference level based on your specific requirements
- Process videos at their native resolution when possible
- For very large files, consider splitting the search into manageable chunks
## Additional Resources
For complete documentation, implementation examples in other languages, and licensing information, visit the [product page](https://www.visioforge.com/video-fingerprinting-sdk).
---END OF PAGE---
# Local File: .\vfp\index.md
---
title: Video Fingerprinting Technology for Developers
description: Learn how to implement powerful video identification algorithms with our SDK. Detect duplicates, identify fragments, and match transformed videos across Windows, Linux, and macOS platforms. Perfect for media analysis and content verification.
sidebar_label: Video Fingerprinting SDK
order: 17
icon: ../static/fingerprint.svg
route: /docs/vfp/
---
# Video Fingerprinting SDK
## What is Video Fingerprinting?
Our state-of-the-art video fingerprinting technology creates unique digital signatures of video content by analyzing multiple dimensions of visual data. The system employs sophisticated algorithms that focus on:
- **Scene analysis** - Detecting transitions, cuts, and composition
- **Object recognition** - Identifying and tracking key visual elements
- **Motion detection** - Analyzing movement patterns and trajectories
- **Color distribution** - Mapping visual palettes and tonal variations
- **Temporal patterns** - Examining how visual elements change over time
These elements combine to form a distinctive fingerprint that uniquely identifies each video in your database.
## Key Capabilities and Benefits
The SDK can accurately match videos despite significant transformations, including:
- Changes in resolution (from SD to 4K and beyond)
- Variations in encoding bitrate and quality
- Different compression techniques
- Conversion between file formats (MP4, AVI, MOV, etc.)
- Partial content matching (identifying segments)
- Videos embedded within other content
- Presence of overlays, watermarks, or subtitles
This robustness makes the technology ideal for content verification, copyright protection, and media monitoring applications.
## Platform Support and Integration
The SDK offers cross-platform compatibility with:
- **Windows** - Full support for Windows 10/11 and server environments
- **Linux** - Compatible with major distributions
- **macOS** - Full support for recent versions
Developers can integrate using multiple programming languages:
- C# and .NET
- C++
- VB.NET
- Delphi
- Other languages via bindings
Read more about the SDK on the [product page](https://www.visioforge.com/video-fingerprinting-sdk).
## Sample Applications
We provide two powerful sample applications built with our SDK:
### Media Monitoring Tool
A Windows application designed to detect advertisements and specific content segments in recorded or live video streams. Ideal for:
- TV and DVB channel monitoring
- Advertisement tracking
- Broadcast compliance verification
- Content analysis for media companies
### Duplicates Video Finder
A specialized Windows tool for identifying duplicate video content across large collections. The application can detect matches even when videos have:
- Different resolutions and aspect ratios
- Varying bitrates and quality levels
- Different file formats and codecs
- Added watermarks or subtitles
- Minor edits or trimming
## .NET API Documentation
- [How to find one video fragment in another](how-to-search-one-video-fragment-in-another.md)
- [How do I compare two video files?](how-to-compare-two-video-files.md)
## SDK Registration Instructions
To register the SDK in your application, call one of the following methods depending on your implementation:
```csharp
VFPAnalyzer.SetLicenseKey("your-license-key");
VFPCompare.SetLicenseKey("your-license-key");
VFPImageCompare.SetLicenseKey("your-license-key");
```
## Additional Resources
- [Complete .NET API Reference](https://api.visioforge.com/vfpnet/)
- [SDK Changelog](changelog.md)
- [End User License Agreement](../eula.md)
- [Product Information](https://www.visioforge.com/video-fingerprinting-sdk)
---END OF PAGE---
# Page: http://www.visioforge.com
# Video capture, editing and playback SDKs
VisioForge provides video and audio frameworks for software developers.
Our software is designed to enable the creation of applications that can capture video from various sources. It supports video recording from webcams and IP cameras compatible with popular protocols like ONVIF, RTSP, and HTTP, as well as from camcorders and PC screens. The software saves these videos in widely used formats such as MP4, WebM, and AVI.
Regarding video editing, the software provides functionalities to change video format and resolution, along with the ability to rotate and crop video files. It supports common video formats for playback, leveraging both system codecs and robust multi-codec solutions like FFMPEG integrated with VLC. This ensures a robust playback experience across various formats.
During video capture, editing, or playback, the software offers the capability to add audio and video effects and transitions and also includes features like motion detection and snapshot capture.

## VIDEO CAPTURE SDK .NET
Capture video from webcams, IP cameras, camcorders, screens, or professional video editing cards and save it in formats such as MP4, AVI, WMV, and WebM.
[PRODUCT PAGE](/video-capture-sdk-net)
## VIDEO EDIT SDK .NET
Convert, edit, and process the various video and audio formats (MP4, AVI, WMV, WebM, and others). Add image and text overlays. Edit tags.
[PRODUCT PAGE](/video-edit-sdk-net)


## MEDIA PLAYER SDK .NET
Play various video and audio formats (MP4, AVI, WMV, WebM, etc.) or network streams (RTSP/HLS/HTTP/UDP). Add image and text overlays.
[PRODUCT PAGE](/media-player-sdk-net)
## TESTIMONIALS

#### ANDREW PARISIO
Senior I.T. Systems Engineer
"We are a call center and use the VisioForge control to record 100% of our agents while they are in call. This product is easier to use, works better, and with Roman providing both responsive and amazing support it has changed our recording solution for the better. Thanks!!"

#### SANTHOSH V.
.NET developer, Xminds Solutions
"I really liked your Video Edit SDK .Net, the wonderful features it supports like the audio mixing. And yes the client support is another excellent thing considering the fact that extreme development like video processing will need good support where you meet all the needs."

#### JEREMY LITTLER
UniteCast Lead Developer
"Video Capture SDK .NET is an outstanding package for developing video-centric applications in Visual Studio. VisioForge’s framework far surpassed the features available in other third-party SDK’s. VF has managed to provide an extremely robust solution, that integrates perfectly with current and emerging video standards."
## CLIENTS
- 


- 


- 


## PLATFORMS
The SDKs currently support the following platforms
Windows

7 and later
macOS

11 and later
x64 and ARM64 architectures
Linux

including Ubuntu, Raspberry Pi and Nvidia Jetson
iOS

12 and later
Android

11 and later
You can run the same code on multiple platforms using modern cross-platform frameworks such as MAUI and Avalonia.
## PROGRAMMING LANGUAGES
We have both high-level SDKs for developing applications in C#, VB.Net and Delphi, and low-level SDKs for developing in C++. Xamarin, MAUI, or Avalonia frameworks can be used to write cross-platform .Net applications.
C#

VB.Net

C++

Delphi

## POSSIBLE USE CASES
Leveraging VisioForge's multimedia SDKs can enable the development of various innovative applications. Here are some ideas:
### Video conferencing software
Create a state-of-the-art video conferencing application with VisioForge video and audio frameworks for developers, offering high-definition video and crystal-clear audio capabilities. Incorporate features like customizable virtual backgrounds, noise cancellation, and augmented reality filters for a more engaging meeting experience. Allow for interactive elements such as real-time screen sharing, collaborative whiteboards, and session recording. Design the interface for ease of use, ensuring smooth setup and connection even for users with minimal technical expertise. Include advanced security protocols to ensure confidential meetings remain private, making it an ideal solution for corporate, educational, and personal use.
### Security surveillance systems
Develop a comprehensive security surveillance system using VisioForge frameworks. This system could feature real-time video processing with support for multiple camera inputs, offering comprehensive coverage and high-resolution footage. Implement advanced AI algorithms for facial recognition, motion detection, and anomaly alerts to enhance security measures. The system could also include features like night vision compatibility, automatic incident recording, and instant alerts to security personnel or law enforcement. Ensure easy scalability to accommodate varying sizes of premises, from small retail stores to large industrial complexes.
### Live streaming platforms
Utilize VisioForge SDKs to build a robust live streaming platform, capable of handling high-quality video and audio streams. This platform could support multi-camera setups, allowing for dynamic angle switching during live events. Integrate real-time video effects and transitions for a professional broadcast feel. Implement adaptive bitrate streaming to ensure optimal viewing experience across different devices and internet speeds. Include features for viewer interaction like live chats, polls, and Q&A sessions. Offer monetization options such as pay-per-view, subscriptions, or advertising. Provide detailed analytics for content creators to track viewer engagement and optimize their broadcasts.
### Video editing suites
Develop a comprehensive video editing suite with video and audio frameworks for developers, catering to both amateur and professional editors. This suite could offer multi-track editing, various video effects, color correction, and audio mixing tools. Includes advanced features like chroma keying, motion tracking, and 3D editing capabilities. Ensure support for various file formats and high-resolution video output. Design the interface intuitive yet powerful, with customizable workflows and shortcuts for efficient editing.
### Custom media players
Build specialized media players with adaptive streaming, support for niche formats, and customizable interfaces. Tailor features for specific user needs in various contexts like education, entertainment, or professional use. Offer unique functionalities like enhanced accessibility options, playlist management, and integration with content libraries.
To get sample applications, please visit our [GitHub.](https://github.com/visioforge/)
---END OF PAGE---
# Page: https://www.visioforge.com/video-capture-sdk-net
[Cross-platform]
# Video Capture SDK .Net
v15.9
Our .Net SDK seamlessly integrates video capture and processing capabilities into software applications. This versatile SDK facilitates video and audio playback and supports capture from various sources, including USB webcams, IP cameras, Blackmagic Decklink cards, and camcorders. It provides comprehensive support for different output formats, including MP4, WebM, AVI, WMV, MPEG-1/2, and others. It also provides developers an extensive library of video and audio effects to enhance and customize multimedia content.
In addition, our SDK offers robust cross-platform compatibility, ensuring seamless integration with Windows, Linux, macOS, iOS, and Android environments. This cross-platform adaptability enables developers to create applications that work consistently across various operating systems and devices, providing users with a consistent and flexible multimedia experience.

#### DOWNLOADS
[Installer (Windows)](https://s3.us-west-2.amazonaws.com/files.visioforge.com/trials/visioforge_sdks_installer_dotnet_setup.exe)[NuGet installation guide](https://www.visioforge.com/help/docs/dotnet/install/)[Samples on GitHub](https://github.com/visioforge/.Net-SDK-s-samples)

#### BUY
[Check prices or order](/buy)

#### HELP
[Online help](https://www.visioforge.com/help/docs/dotnet/videocapture/)[Changelog](https://www.visioforge.com/help/docs/dotnet/changelog/)[License agreement](/help/docs/eula/)

## SDK STRUCTURE
The SDK is highly compatible with more than 10 video and audio input sources and supports more than 20 output formats. It offers developers flexibility by accommodating a broad range of hardware options for input and output configurations. The SDK processes both video and audio content, enabling the saving of processed data to files or streaming it over network connections.
## VIDEO CAPTURE PIPELINE
During the preview or capture stages, video and audio streams can be processed with various effects. Afterward, these streams are split and directed to encoders and audio/video renderers for further processing.


## OUTPUT FORMATS
The SDK supports a wide range of popular video, audio, and image formats and codecs, such as MP4 (using H264/HEVC for video and AAC for audio), WebM (using VP8/VP9/AV1 for video and Vorbis or OPUS for audio), as well as WMV, MP3, JPEG, GIF, and PNG.
## VIDEO PROCESSING
You can add text, images, or GIF logos, adjust brightness, contrast, saturation, or hue, resize, crop, or rotate content, and apply chroma-keying or various video effects to enhance your content.


## AUDIO PROCESSING
Incorporate an equalizer into your application, allowing users to fine-tune their audio experience. This feature allows them to adjust specific audio frequencies, such as treble, midrange, and bass, to achieve their desired sound profile. Additionally, users can normalize audio levels or amplify volume, providing precise control over the audio output. Many other audio effects are also at their disposal for further customization.
## VisioForge Video Capture SDK .Net major features include:
### Supported video and audio sources
- USB web cameras and other capture devices (including 4K devices)
- ONVIF IP cameras (PTZ and other APIs supported)
- JPEG/MJPEG, MPEG-4 and H.264 HTTP/RTSP/RTMP IP cameras/servers, HD format supported
- Blackmagic Decklink devices
- Screen capture source (including several displays) and window capture
- Speakers (loopback)
- NewTek NDI devices
- PCI capture cards
- TV Tuners (with and without internal MPEG Encoder)
- DV and HDV MPEG-2 camcorders
- FLIR/Teledyne cameras (USB3 Vision/GigE)
- Basler cameras (USB3 Vision/GigE)
- Microsoft Kinect/Kinect 2 for Windows
- Audio capture devices and sound cards
- ASIO devices
### Output video formats
- AVI (using audio/video codecs like MJPEG, DivX, XviD, and x264)
- WMV (support of custom WMV profiles. You can configure streams to use variable bit rate encoding (VBR), uncompressed audio or video stream, video size, buffer size, frame rate, etc.)
- DV and MPEG from DV/HDV Camcorders and TV Tuners with internal MPEG Encoder (DirectCapture technology)
- DV (from any video capture device)
- MPEG-1/2/4 (including VCD/SVCD/DVD profiles) and FLV using FFMPEG wrapper
- WebM (Vorbis + VP8/VP9)
- MP4 H264/HEVC + AAC output using software encoder or GPU encoder (Intel QuickSync, Nvidia CUDA/NVENC, or AMD/ATI AMF)
- All formats supported by FFMPEG.exe (including MP4 H264/HEVC)
- Custom output formats (using 3rd-party DirectShow filters)
- Animated GIF
- MOV
- MPEG-TS
### Output audio formats
- WAV (compressed or PCM)
- WMA (Windows Media Audio)
- M4A (AAC)
- MP3 (using LAME)
- FLAC
- Ogg Vorbis
- Speex
### Snapshot formats
- JPEG
- PNG
- GIF
- BMP
- System.Drawing.Bitmap
- SkiaSharp SKBitmap
### Video processing and effects (CPU/GPU)
- image overlay (including animated GIF)
- text overlay
- pan/zoom
- brightness, contrast, saturation, hue, etc.
- deinterlace
- denoise
- resize to any resolution
- chroma-key
- fade-in/fade-out
- rotate
- 3rd-party DirectShow filters support
- independent video effects for preview and output
### Audio processing and effects
- volume booster
- equalizer
- 3D-bass system
- normalization
- auto/manual gain
- there are a lot of other effects
### Network streaming formats
- HLS (HTTP Live Streaming), compatible with Android and iOS
- RTSP
- Smooth Streaming protocol to Microsoft IIS Server
- RTMP
- UDP (MPEG-TS/RTP)
- SRT
- YouTube / Facebook Live
- NDI
- WMV (Windows Media Video)
- to other media servers and devices using a virtual camera/audio source
### Other features
- Audio/video preview
- TV Tuning
- Video capture device control
- video input (crossbar interface)
- video format
- frame rate
- supports video cards with several inputs
- camera control (brightness, saturation, etc.)
- Motion detection
- Barcode reader
- OSD (On-Screen Display)
- PIP (Picture-In-Picture) (video capture sources, IP cameras, and video files are supported)
- Face detection and object tracking
- Multiple output screens support
- Timeshift
- Output to encrypted video files using the [Video Encryption SDK](/video-encryption-sdk)
- Output to [Virtual Camera SDK](/virtual-camera-sdk)
- Service applications support
- Audio/video file tags reading and writing support
- madVR video renderer support
- low latency RTSP and MJPEG streams playback from IP camera
- [OBS (Open Broadcaster Software)](https://obsproject.com/) streaming
- Face recognition
### IDE
- Visual Studio 2019 and later: Visual C#, Visual C++, Visual Basic .NET
- Visual Studio Code
- JetBrains Rider
- May be used with other .Net-compatible applications such as Microsoft Access, Word, and Excel.
### UI frameworks
- WinForms
- WPF
- WinUI 3 for Desktop
- Avalonia
- GTK#
- MAUI
- Xamarin.Mac
- Xamarin.Android
- Xamarin.iOS
### .Net versions
- .Net Framework 4.6.1 and later
- .Net Core 3.1
- .Net 5 - .Net 9
### System requirements
- Windows 10 or Windows 11
- Ubuntu 22+
- macOS 12+
### Target platforms
- Windows 11, Windows 10, Windows 8/8.1, Windows 7 SP1
- Windows Server 2016 and later
- Android 8 and later
- Linux
- macOS
- iOS
### Trial limitations
The trial version displays a watermark on the video window.
## CODE SAMPLES
### VIDEO PREVIEW
The sample code shows how to configure default video and audio sources, show video on screen, and render audio using default speakers. Default video and audio formats will be used.
### VIDEO CAPTURE TO MP4
MP4 file [capture from a web camera](https://www.visioforge.com/save-webcam) and microphone, with video/audio preview.
Using more code, you can set H264/HEVC and AAC settings.
By default, a GPU H264 encoder will be used (if available).
### IP RTSP CAMERA PREVIEW
RTSP camera preview with CPU/GPU video decoding and automatic codec detection.
You can use ONVIF discovery to find all IP cameras in your local network.
## SCREEN CAPTURE
SDK can capture video from a screen or specified window.
You can capture the entire screen or a specified rectangle. The frame rate can be customized.
### TEXT AND IMAGE OVERLAYS
You can add text (including scrolling), time/date, and image overlays.
SDK supports all popular image formats, including JPEG, PNG, GIF, and SVG.

#### EDITION

#### STANDARD

#### PROFESSIONAL

#### PREMIUM
Supported input devices and other sources
- Web cameras
- TV tuners and capture cards
- DV and MPEG camcorders
- Screen capture
- HTTP/RTSP/ONVIF IP cameras
- UDP, TCP, RTMP and other network streams
- Blackmagic Decklink
- DVB-T/DVB-C/DVB-S/ATSC devices (BETA)
- Microsoft Kinect for Windows
Video preview
Frame grabber
Video processing
Audio processing
HD and 4K video support
TV tuning
Network streaming in WMV format
Network streaming using RTMP/RTSP/UDP/NDI
Chroma-key
Motion detection
Video processing using DirectShow filters
OSD (On-Screen Display)
Picture-In-Picture
Changing output file name on-the-fly
Multiple output screens
GPU-accelerated video effects
Output to Virtual Camera SDK
Video Encryption SDK support
Face tracking
Output formats
- AVI
- WMV (Windows Media Video)
- WMA (Windows Media Audio)
- WAV
- MP3
- Ogg Vorbis
- Speex
- DV video
- DV/MPEG-1/2/4 (using a TV tuner with an internal MPEG encoder or DV/HDV camcorder)
- Flash Video (FLV) using FFMPEG
- WebM
- Custom output formats using external DirectShow filters
- MPEG-1/2/4 using FFMPEG
- MP4 (H264/HEVC + AAC) using software, Intel QuickSync, Nvidia NVENC/CUDA, or AMD Radeon encoders
Our software offers unlimited usage with no nag-screen, ensuring a
seamless experience. We provide a 30-day trial period so you can explore
all features before committing.
With a regular license, you
receive free minor and major upgrades for one year; after that period,
the SDK will continue functioning as before.
Alternatively, the
lifetime license provides unlimited updates indefinitely. Additionally,
we offer priority support and fixes. The regular license is billed
annually and automatically renewed each year, but you can cancel your
subscription anytime.
The SDK is free for non-commercial use. Please contact us to get a free license.
---END OF PAGE---
# Page: https://www.visioforge.com/media-player-sdk-net
[Cross-platform]
# Media Player SDK .Net
v15.9
The Media Player SDK .Net enables developers to seamlessly integrate a wide range of media playback capabilities into their applications, including support for video, audio, DVD, Blu-ray, and various network streams. This SDK also provides the ability to render overlay bitmaps and text with effects on top of the video. It offers flexibility in playback engines, allowing the use of system codecs, FFMPEG, or VLC, ensuring a wide range of compatibility and a high-quality media experience.

#### DOWNLOADS
[Installer (Windows only)](https://s3.us-west-2.amazonaws.com/files.visioforge.com/trials/visioforge_sdks_installer_dotnet_setup.exe)[NuGet installation guide](https://www.visioforge.com/help/docs/dotnet/install/)[Samples on GitHub](https://github.com/visioforge/.Net-SDK-s-samples)

#### BUY
[Check prices or order](/buy)

#### HELP
[Online help](https://www.visioforge.com/help/docs/dotnet/mediaplayer/)[Changelog](https://www.visioforge.com/help/docs/dotnet/changelog/)[License agreement](/help/docs/eula/)

## SDK STRUCTURE
The SDK allows developers to select specific video and audio sources, apply a range of effects for processing, and then route the media for rendering. It is versatile and accommodates different UI frameworks by providing a unique VideoView control for each one — whether WPF, WinForms, MAUI, Avalonia, or others — ensuring seamless integration and display of media within various application interfaces.
## MEDIA PLAYBACK PIPELINE
The SDK architecture separates each media source into discrete audio and video streams. These streams are then routed to their respective decoders. After decoding, the uncompressed data is processed and can be accessed directly by a sample grabber if required. This feature is handy for real-time applications that process or analyze media samples.


## VIDEO PROCESSING
Add text, images, or GIFs to your videos to create personalized overlays. Adjust visual elements such as brightness, contrast, saturation, and hue to improve image quality. Utilize editing tools to resize, crop, or rotate footage as necessary. Apply the chroma key for green screen effects and explore a wide range of additional video effects to enhance your storytelling.
## AUDIO PROCESSING
Integrate an equalizer into your application to allow for precise audio tuning. Normalize audio levels, amplify the volume, or enhance the bass frequencies. A suite of additional audio effects is available for further refinement. Implement automatic or manual gain control to achieve optimal audio quality.

## CUSTOM UI CONTROLS
The SDK boasts a customizable interface with skin support, accommodating PNG/SVG icons, and personalized style options.
## VisioForge Media Player SDK .Net's major features include:
### Supported formats
- File formats: MP4, MKV, MOV, AVI, MPEG-TS, WMV, MXF, VOB, OGG
- Video formats: MPEG-1/2, WMV, MPEG-4, H264, HEVC, and others with the appropriate decoder
- Audio formats: AAC, MP3, Vorbis, WMA, OPUS, Speex, and others with the appropriate decoder
- MIDI, karaoke KAR, and CDG
- DVD and Blu-ray playback [Windows only]
### Video processing and effects (CPU/GPU)
- image overlay (including animated GIF)
- SVG overlay
- text overlay
- video transparency
- pan/zoom
- brightness, contrast, saturation, hue, etc.
- inverted colors
- grayscale
- deinterlace
- denoise
- fade-in/fade-out
- rotate
- resize to any resolution
- 3rd-party DirectShow filters support
- more than 30 other effects
### Audio processing and effects
- volume booster
- equalizer
- 3D-bass system
- normalization
- auto/manual gain
- a lot of other effects
### Other features
- File playback from the memory
- Seamless playback (no delay between 2 files in the playlist)
- Multiply output screens support
- Picture-in-Picture support
- 4K and 8K video files support
- GPU accelerated decoding (DXVA2/Direct3D 11/Intel QuickSync/Nvidia CUVID, AMF)
- Backward/forward seeking
- Frame capture to .Net Bitmap or BMP/JPEG/GIF/PNG files
- OSD (On-Screen Display)
- Audio streams from additional audio/video files
- Subtitles support
- MMS/WMV/RTSP/RTMP/UDP network stream playback
- Reverse playback
- Playback of encrypted video files that were created with the [Video Encryption SDK](/video-encryption-sdk)
- Motion detection
- Face detection and object detection [Windows only]
- Barcode reader
- Chroma-key
- madVR optional video renderer [Windows only]
- VR 360° video support [Windows only]
### IDE
- Visual Studio 2019 and later: Visual C#, Visual C++, Visual Basic .NET
- Visual Studio Code
- JetBrains Rider
- SDK may be used with other .Net compatible applications such as Microsoft Access, Word, Excel
### UI frameworks
- WinForms
- WPF
- WinUI 3 for Desktop
- Avalonia
- Xamarin.Android
- MacOS/MacCatalyst
- Xamarin.iOS
- MAUI
### System requirements
- Windows 10 or Windows 11
- Ubuntu 22+
- macOS 12+
### Target platforms
- Windows 11, Windows 10, Windows 8/8.1, Windows 7 SP1
- Windows Server 2016 and later
- Android 8 and later
- Linux
- macOS
- iOS
### .Net versions
- .Net Framework 4.6.1 and later
- .Net Core 3.1
- .Net 5 - .Net 9
### Distribution rights
Royalty-free distribution.
### Trial limitations
The trial version displays a watermark on the video window.

#### EDITION

#### STANDARD

#### PROFESSIONAL
Video files playback
Audio files playback
Memory stream playback
Subtitles support
HD and 4K video support
Video/audio processing and effects
Network streams playback (HTTP/RTSP/RTMP/HLS/WMV/NDI)
Chroma-key
Reverse playback
Motion detection
Video processing using
DirectShow filters (\*)
OSD (On-Screen Display)
Frame grabber
Multiple output screens
GPU-accelerated video effects
Video Encryption SDK support (\*)
Face tracking
Audio streams from external files
(\*) - Windows-only
Our software offers unlimited usage with no nag-screen, ensuring a
seamless experience. We provide a 30-day trial period so you can explore
all features before committing.
With a regular license, you
receive free minor and major upgrades for one year; after that period,
the SDK will continue functioning as before.
Alternatively, the
lifetime license provides unlimited updates indefinitely. Additionally,
we offer priority support and fixes. The regular license is billed
annually and automatically renewed each year, but you can cancel your
subscription anytime.
The SDK is free for non-commercial use. Please contact us to get a free license.
---END OF PAGE---
# Page: https://www.visioforge.com/video-edit-sdk-net
# Video Edit SDK .Net
v15.9
The VisioForge Video Edit SDK .Net allows programmers to integrate advanced video editing and processing capabilities into their software applications. With this SDK, you can create custom movies by combining audio and video files, applying various effects, and smoothly transitioning between tracks. The SDK provides robust support for popular video formats, including MP4, WebM, AVI, WMV, Matroska, MPEG-1/2/4, and others. It also offers the flexibility to work with additional file formats using third-party DirectShow filters. Moreover, you can export audio in the most popular formats, including MP3, AAC/M4A, OGG Vorbis, Windows Media Audio, OPUS, Speex, and WAV, adding versatility to your multimedia projects.

#### DOWNLOADS
[Installer](https://s3.us-west-2.amazonaws.com/files.visioforge.com/trials/visioforge_sdks_installer_dotnet_setup.exe)[NuGet installation guide](https://www.visioforge.com/help/docs/dotnet/install/)[Samples on GitHub](https://github.com/visioforge/.Net-SDK-s-samples)

#### BUY
[Check prices or order](/buy)

#### HELP
[Online help](/help/docs/dotnet/videoedit/)[Changelog](https://www.visioforge.com/help/docs/dotnet/changelog/)[License agreement](/help/docs/eula/)

## SDK STRUCTURE
The SDK provides compatibility with video, audio, and image files as input sources and allows you to include images from memory. It also provides access to over 20 different output file formats. You can stream the output over a network or send it to a Blackmagic card for further processing. This range of options and configurations ensures developers can efficiently handle multimedia content.
## VIDEO EDITING PIPELINE
The SDK includes a timeline feature that enables creating and managing multiple video and audio tracks. Within these tracks, you can insert video and audio fragments. Then, following the decoding phase, the data becomes ready for processing and compression before being written to a file. This structured workflow facilitates efficient multimedia content handling within your application.


## OUTPUT FORMATS
The SDK ensures robust compatibility with many popular video, audio, and image file formats and codecs, including MP4, WebM, AVI, WMV, MPEG-TS, MP3, AAC, JPEG, GIF, and PNG. Furthermore, developers can use their custom DirectShow filters for encoding, offering enhanced flexibility and customization options for multimedia processing.
## VIDEO PROCESSING
The SDK facilitates the integration of SMPTE-compliant transitions between videos to create smooth, professional-looking transitions. It also enables adding text, images, or GIF logos to your content. Developers can adjust brightness, contrast, saturation, or hue to fine-tune the visual aspects. Furthermore, the SDK supports various operations such as resizing, cropping, and rotating, affording precise control over the video's appearance.


## AUDIO PROCESSING
Add an equalizer to your audio processing capabilities with the SDK. This allows you to fine-tune audio frequencies for optimal sound quality. You can also normalize audio levels, increase volume, or enhance bass frequencies to achieve the desired output. The SDK also offers a wide range of other audio effects.
## VisioForge Video Edit SDK .Net major features include:
### Input formats
- Video formats: AVI, MP4, MPEG-1/2, WMV, QuickTime MOV, VP8/VP9, AV1, or any other if you have a corresponding decoder
- Audio formats: WAV, MP3, Vorbis, WMA, AAC, Speex, OPUS, or any other if you have a corresponding decoder
- Image formats: BMP, PNG, GIF, JPEG, TIFF, WebP
### Output video formats
- AVI
- WMV (using built-in or external profiles or specifying all parameters directly)
- MKV (Matroska)
- MPEG-1/2/4 (including VCD/SVCD/DVD profiles), and FLV using FFMPEG wrapper
- WebM (Vorbis + VP8/VP9)
- MP4 H264/HEVC + AAC output using software encoder, Intel QuickSync, Nvidia CUDA/NVENC, or AMD Radeon encoder
- Custom output formats (using 3rd-party DirectShow filters)
- Animated GIF
### Output audio formats
- WAV (PCM or compressed)
- WMA (Windows Media Audio)
- M4A (AAC)
- Ogg Vorbis
- MP3
- Windows Media Audio
- FLAC
- Speex
### Network streaming
- Windows Media
- RTSP protocol (H264/AAC)
- Smooth Streaming protocol for Microsoft IIS Server
- HTTP Live Streamings (HLS)
- RTMP, UDP, and any other protocol supported by FFMPEG.exe
- YouTube
- Facebook
- NDI
### Video processing and effects (CPU/GPU)
- image and graphic overlays (including animated GIF)
- transitions between tracks (SMPTE standard)
- pan/zoom
- text overlay
- video transparency
- brightness, contrast, saturation, hue
- resize/crop to any resolution
- chroma-key
- denoise
- deinterlace
- fade-in/fade-out
- rotate
### Audio processing and effects
- volume booster
- equalizer
- 3D-bass system
- normalization
- auto/manual gain
- a lot of other effects
### Other features
- Timeline editing allows adding multiple segments of video and audio files to the timeline
- 3rd-party DirectShow filters support
- Subtitles support
- Motion detection
- Barcode reader
- Output to encrypted video files using the [Video Encryption SDK](/video-encryption-sdk)
- Output to [Virtual Camera SDK](/virtual-camera-sdk)
- Encoding parameters
- resolution
- frame rate
- video and audio codecs
- video and audio bit rate or quality
- level/profile (if supported by codec)
- specific codec settings
- other
- Audio/video file tags reading and writing support
- Blackmagic Decklink output
- madVR video renderer support [Windows only]
### IDE
- Visual Studio 2019 and later: Visual C#, Visual C++, Visual Basic .NET
- Visual Studio Code
- JetBrains Rider
- SDK may be used with other .Net-compatible applications such as Microsoft Access, Word, and Excel
### UI frameworks
- WinForms
- WPF
- WinUI 3 for Desktop
- Avalonia
- MAUI
- MacOS/MacCatalyst
- Xamarin.Android
- Xamarin.iOS
### System requirements
- Windows 10 or Windows 11
- Ubuntu 22+
- macOS 12+
### Target platforms
- Windows 11, Windows 10, Windows 8/8.1, Windows 7 SP1
- Windows Server 2016 and later
- Android 8 and later
- Linux
- macOS
- iOS
### .Net versions
- .Net Framework 4.6.1 and later
- .Net Core 3.1
- .Net 5 - .Net 9
### Distribution rights
Royalty-free distribution.
### Trial limitations
The trial version displays a watermark on the video window.

#### EDITION

#### STANDARD

#### PROFESSIONAL

#### PREMIUM
Timeline
Frame grabber
Video processing
Audio processing
HD video support
Transitions
Network streaming in WMV format
Network streaming using RTMP/RTSP/UDP
Chroma-key
Motion detection
Video processing using DirectShow filters
OSD (On-Screen Display)
Picture-In-Picture
Multiple output screens
GPU-accelerated video effects
Output to Virtual Camera SDK
Video Encryption SDK support
Video rotation
Output formats
- AVI
- WMV (Windows Media Video)
- WMA (Windows Media Audio)
- WAV
- MP3
- Ogg Vorbis
- Speex
- DV video
- Flash Video (FLV) using FFMPEG
- WebM
- Custom output formats using external DirectShow filters
- MPEG-1/2/4 using FFMPEG
- MP4 H264 using software, Intel QuickSync, Nvidia NVENC/CUDA or AMD Radeon encoders
Our software offers unlimited usage with no nag-screen, ensuring a
seamless experience. We provide a 30-day trial period so you can explore
all features before committing.
With a regular license, you
receive free minor and major upgrades for one year; after that period,
the SDK will continue functioning as before.
Alternatively, the
lifetime license provides unlimited updates indefinitely. Additionally,
we offer priority support and fixes. The regular license is billed
annually and automatically renewed each year, but you can cancel your
subscription anytime.
The SDK is free for non-commercial use. Please contact us to get a free license.
---END OF PAGE---
# Page: https://www.visioforge.com/media-blocks-sdk-net
# Media Blocks SDK .Net
v15.9
The SDK allows you to build your multimedia application from individual blocks like a brick house. For example, to record video from a camera, you add the "Camera" block, the "H264 encoder" block, and the "MP4 sink" block to record video to an MP4 file.

#### DOWNLOADS
[NuGet - Core](https://www.nuget.org/packages/VisioForge.DotNet.VideoCapture/)[NuGet installation guide](https://www.visioforge.com/help/docs/dotnet/install/)[Samples on GitHub](https://github.com/visioforge/.Net-SDK-s-samples)

#### BUY
[Check prices or order](/buy)

#### HELP
[Online help](/help/docs/dotnet/mediablocks/)[Changelog](https://www.visioforge.com/help/docs/dotnet/changelog/)[License agreement](/help/docs/eula/)
Our software offers unlimited usage with no nag-screen, ensuring a
seamless experience. We provide a 30-day trial period so you can explore
all features before committing.
With a regular license, you
receive free minor and major upgrades for one year; after that period,
the SDK will continue functioning as before.
Alternatively, the
lifetime license provides unlimited updates indefinitely. Additionally,
we offer priority support and fixes. The regular license is billed
annually and automatically renewed each year, but you can cancel your
subscription anytime.
The SDK is free for non-commercial use. Please contact us to get a free license.
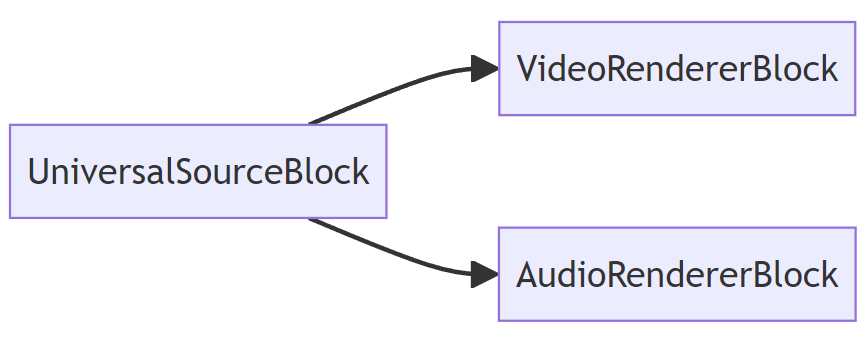
## SIMPLE PLAYER
The simple player pipeline uses the UniversalSourceBlock to read and decode the source file, the VideoRendererBlock to display video, and the AudioRendererBlock to play audio.
## ADVANCED PLAYER
The advanced player pipeline includes the UniversalSourceBlock for decoding files or streams, video and audio renderers, and effects processing blocks.

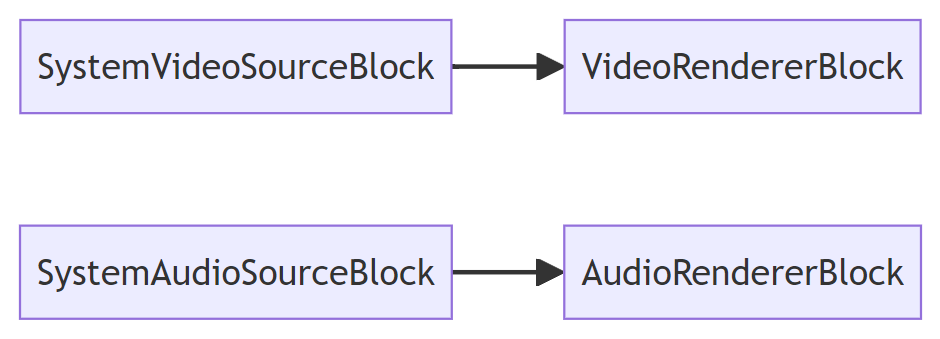
## CAMERA PREVIEW
The camera/microphone simple preview pipeline contains device source blocks and video/audio renderer blocks.
Default devices will be used.
## RTSP PREVIEW
The RTSP preview pipeline, which includes the RTSP source block (with decoders inside), video and audio renderers.
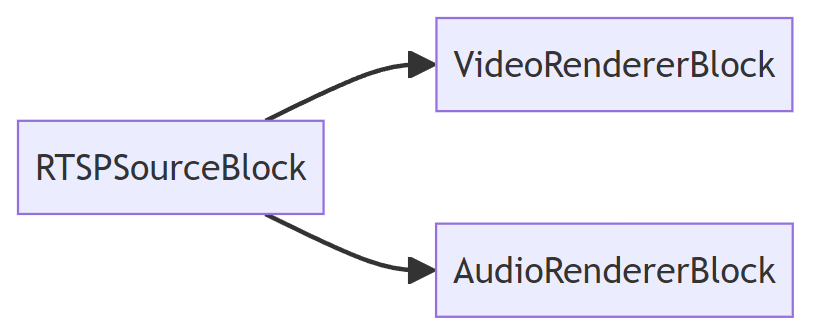
## CAPTURE WITH PREVIEW
The capture pipeline has two tee blocks that are used to split video and audio streams, allowing video/audio preview along with [video capture](https://www.visioforge.com/video-capture-sdk-net).
## VisioForge Media Blocks SDK .Net major features include:
- Audio/video preview
- Video and audio capture to a wide range of formats
- Frame capture to Bitmap class, BMP, JPEG, and PNG files
- Video processing and effects (CPU/GPU)
- Video capture device control
- Network streaming
- Motion detection
- Barcode reader (QR Code, UPC-A, UPC-E, EAN-8, EAN-13, Code 39, Code 93, Code 128, Codabar, ITF, RSS-14, Data Matrix, Aztec, PDF-417)
- Custom interfaces support
- Computer vision API
- PIP (Picture-In-Picture)
- Screen capture/window capture
- Face detection and object tracking
- Multiply output screens support
- Audio capture from speakers
- Blackmagic Decklink card's input and output support
- Audio/video file tags reading and writing support
- FLIR/Teledyne cameras support (USB3Vision/GigE)
- Basler cameras support (USB3Vision/GigE)
### Audio encoders
- AAC
- FLAC
- MP3
- OPUS
- Vorbis
- WMA (Windows Media Audio)
- Speex
### Audio processing
- Amplify
- Audio mixer
- Audio sample grabber
- Balance
- Compressor/Expander
- Echo
- Equalizer
- Scale/Tempo
- Volume
### Blackmagic Decklink
- Audio sink
- Audio source
- Video sink
- Video source
### File sinks
- MP4
- WebM
- MOV
- AVI
- MPEG-TS
- MKV
- OGG
### Network streaming
- HLS
- RTMP
- RTSP
- UDP
### Video processing
- Color effects
- Deinterlace
- Fish eye
- Flip/Rotate
- Gamma
- Gaussian blur
- Image overlay
- Mirror
- Perspective
- Pinch
- Resize
- Rotate
- Sample grabber
- Sphere
- Square
- Stretch
- Text overlay
- Tunnel
- Twirl
- Video balance
- Video mixer
- Water ripple
### Video encoders (CPU/GPU)
- H264
- H265/HEVC
- VP8/VP9
- WMV (Windows Media Video)
- MJPEG
- AV1
### Sources
- File source
- RTSP source
- Screen source
- System video source
- System audio source
- Virtual video source
- Virtual audio source
### Special
- Null Renderer
- Tee
- VU meter
### Supported input devices:
- DV and HDV MPEG-2 camcorders
- USB web cameras and other capture devices (including 4K devices)
- PCI capture cards
- TV Tuners (with and without internal MPEG Encoder)
- JPEG/MJPEG, MPEG-4 and H.264 HTTP/RTSP/RTMP IP cameras/servers, HD format supported
- ONVIF IP cameras with PTZ support
- Blackmagic Decklink devices
- Audio capture devices and sound cards
- ASIO devices
### IDE
- Visual Studio 2019 and later: Visual C#, Visual C++, Visual Basic .NET
- Visual Studio Code
- JetBrains Rider
- SDK may be used with other .Net-compatible applications such as Microsoft Access, Word, and Excel
### UI frameworks
- WinForms
- WPF
- WinUI 3 for Desktop
- Avalonia
- GTK#
- MAUI
- Xamarin.Android
- Xamarin.Mac
- Xamarin.iOS
### .Net versions
- .Net Framework 4.6.1 and later
- .Net Core 3.1
- .Net 5 - .Net 9
### System requirements
- Windows 10 or Windows 11
- Ubuntu 22+
- macOS 12+
### Target platforms
- Windows 11, Windows 10, Windows 8/8.1, Windows 7 SP1
- Windows Server 2016 and later
- Android 8 and later
- Linux (Ubuntu)
- macOS
- iOS
### Distribution rights
Royalty-free distribution.
SDK contains GStreamer libraries licensed as LGPL v2.1.
---END OF PAGE---
# Page: https://www.visioforge.com/video-edit-sdk-ffmpeg-net
# Video Edit SDK FFMPEG .Net
v12.1
VisioForge Video Edit SDK FFMPEG .Net simplifies the integration of video conversion and processing into software applications. This powerful SDK enables developers to create custom movies by seamlessly combining audio and video files. Built on the renowned FFMPEG framework, the SDK provides comprehensive support for all major video and audio formats, making it a versatile solution for multimedia projects.
- 
- 


#### DOWNLOADS
[Installer](https://s3.us-west-2.amazonaws.com/files.visioforge.com/trials/visioforge_video_edit_ffmpeg_sdk_dotnet_setup.exe)[NuGet package](https://www.nuget.org/packages/VisioForge.DotNet.VideoEdit/)[Samples on GitHub](https://github.com/visioforge/.Net-SDK-s-samples)

#### BUY
[Check prices or order](/buy)

#### HELP
[Online help](/help/)[Changelog](/help/docs/dotnet/videoedit-ffmpeg/changelog/)[License agreement](/help/docs/eula/)
Our software offers unlimited usage with no nag-screen, ensuring a seamless experience. We provide a 30-day trial period so you can explore all features before committing.
With a regular license, you receive free minor and major upgrades for one year; after that period, the SDK will continue functioning as before.
Alternatively, the lifetime license provides unlimited updates indefinitely. Additionally, we offer priority support and fixes. The regular license is billed annually and automatically renewed each year, but you can cancel your subscription anytime.
The SDK is free for non-commercial use. Please contact us to get a free license.
## VisioForge Video Edit SDK FFMPEG .Net major features include:
### Input formats
- Video: AVI, MPEG-1/2, WMV, 3GP, QuickTime MOV, MPEG-4/H264 (AVC), or any other supported by FFMPEG
- Audio: WAV, MP3, OGG, WMA, AAC, or any other supported by FFMPEG
- Images: BMP, PNG, GIF, JPEG, TIFF, WebM
### Output video formats
- AVI
- MP4
- MKV (Matroska)
- WMV (Windows Media Video)
- Quicktime MOV
- WebM
- AV1
- MPEG-1/2/4
- FLV
- many others
### Output audio formats
- WAV (PCM/ACM)
- Ogg Vorbis
- MP3
- WMA (Windows Media Audio)
- AAC
- Speex
- FLAC
- OPUS
### Video processing and effects
- image overlay
- resize and crop
- pan/zoom
- text overlay
- brightness, contrast, saturation, hue
- chroma-key
- denoise
- deinterlace
### Audio processing and effects
- volume booster
- equalizer
- other effects
### Other features
- Motion detection
- Barcode reader (QR Code, UPC-A, UPC-E, EAN-8, EAN-13, Code 39, Code 93, Code 128, Codabar, ITF, RSS-14, Data Matrix, Aztec, PDF-417)
- Frame capture
- Encoding parameters
- video size
- frame rate
- video and audio codecs
- video and audio bit rate
- quality
- profile/level
- other
### Development platforms:
- Visual Studio 2015 and later: Visual C#, Visual C++, Visual Basic .NET
- may be used with other .Net compatible applications like Microsoft Access, Word, Excel, FrontPage, etc.
### System requirements
- Windows 11, Windows 10, Windows 8/8.1, Windows 7, Windows Vista, Windows Server 2012, and later
- .Net Framework 4.5 or later
- .Net Core 3.1 or later
### Distribution rights
Royalty-free distribution.
### Trial limitations
The trial version displays a watermark on the video window.

#### EDITION

#### STANDARD

#### PROFESSIONAL

#### PREMIUM
Timeline
Frame grabber
Video processing
Audio processing
HD and 4K video support
Network streaming in WMV format
Network streaming using RTMP / RTSP / UDP
Chroma-key
Motion detection
OSD (On-Screen Display)
Picture-In-Picture
Multiple output screens
GPU-accelerated video effects
Output to Virtual Camera SDK
Video Encryption SDK support
Video rotation
Output formats
- AVI
- WMV (Windows Media Video)
- WMA (Windows Media Audio)
- WAV
- MP3
- Ogg Vorbis
- Speex
- DV video
- Flash Video (FLV)
- WebM
- MPEG-1/2/4
- MP4
SDK contains the FFMPEG library licensed as LGPL v2.1.
---END OF PAGE---
# Page: https://www.visioforge.com/save-webcam
# Save Webcam Video Using .Net: A Complete Guide to Record and Capture Webcam
Capturing and saving video from webcams is a common requirement in many modern applications, from video conferencing tools to surveillance systems. Whether you need to record webcam footage, display the webcam feed, or capture images, implementing reliable webcam functionality in .NET (DotNet) can be challenging. This tutorial provides a simple step-by-step guide to save webcam video using C# (C Sharp) with minimal code.

#### DOWNLOADS
[Installer (Windows)](https://s3.us-west-2.amazonaws.com/files.visioforge.com/trials/visioforge_sdks_installer_dotnet_setup.exe)[NuGet installation guide](https://www.visioforge.com/help/docs/dotnet/install/)[Samples on GitHub](https://github.com/visioforge/.Net-SDK-s-samples)

#### BUY
[Check prices or order](/buy)

#### HELP
[Online help](https://www.visioforge.com/help/docs/dotnet/videocapture/)[Changelog](https://www.visioforge.com/help/docs/dotnet/changelog/)[License agreement](/help/docs/eula/)
The SDK is free for non-commercial use. Please contact us to get a free license.
## Key Features of Video Capture SDK .Net
Video Capture SDK .Net is a powerful library designed specifically for .NET developers who need to implement webcam capture functionality in their applications. Whether you want to record webcam video, save webcam frames as images, or display the webcam feed in your application, this SDK has you covered. Some of its standout features include:
- Seamless integration with .NET applications
- Support for multiple capture devices (USB webcams, IP cameras, capture cards)
- High-performance video and audio recording and processing
- Simple code to get and display webcam feeds
- Create and save video files in various formats
- GPU-accelerated encoding for optimal performance
- Cross-platform compatibility
## Output Formats: MP4 and WebM in Detail
### MP4 Format
MP4 is one of the most widely supported video container formats, making it an excellent choice for applications where compatibility is a priority.
**Supported codecs for MP4:**
- **H.264 (AVC)**: The industry standard for video compression, offering excellent quality and wide compatibility
- **H.265 (HEVC)**: Next-generation codec providing up to 50% better compression than H.264 while maintaining the same quality
- **AAC**: Advanced Audio Coding, the industry standard for lossy digital audio compression
### WebM Format
WebM is an open, royalty-free media file format designed for the web.
**Supported codecs for WebM:**
- **VP8**: Open-source video codec developed by Google, primarily used with WebM format
- **VP9**: Successor to VP8, offering significantly improved compression efficiency
- **AV1**: Newest open-source video codec with superior compression and quality, particularly at lower bitrates
- **Vorbis**: Free and open-source audio compression format offering good quality at lower bitrates
Each codec can be fine-tuned with various parameters to achieve the optimal balance between quality and file size for your specific application requirements.
## GPU Acceleration for Efficient Encoding
One of the standout features of Video Capture SDK .Net is its robust support for GPU-accelerated video encoding, which offers several significant advantages:
### Benefits of GPU Acceleration
- **Dramatically reduced CPU usage**: Free up CPU resources for other application tasks
- **Faster encoding speeds**: Up to 10x faster than CPU-only encoding
- **Real-time high-resolution encoding**: Enable 4K video capture with minimal system impact
- **Lower power consumption**: Particularly important for mobile and laptop applications
- **Higher quality at the same bitrate**: Some GPU encoders offer better quality-per-bit than CPU encoding
### Supported GPU Technologies
Video Capture SDK .Net leverages multiple GPU acceleration technologies:
- **NVIDIA NVENC**: Hardware-accelerated encoding on NVIDIA GPUs
- **AMD AMF/VCE**: Acceleration on AMD graphics cards
- **Intel Quick Sync Video**: Hardware encoding on Intel integrated graphics
The SDK automatically detects available hardware and selects the optimal encoding path based on your system's capabilities, with fallback to software encoding when necessary.
## Implementation Example (C# Code to Capture Video from Webcam)
Let's walk through a simple tutorial on how to record webcam video using C#. Implementing webcam capture with Video Capture SDK .Net is straightforward.
## CODE SAMPLES
Here's a complete example showing how to get your webcam feed, display it in your application, and save it to an MP4 file with H.264 encoding:
For WebM output with VP9 encoding, simply modify the encoder settings:
### Additional Code Examples
Here's a simple example of how to just save a single image from the webcam.
Enable video sample grabber:
Get and save a single image from the webcam:
## Native dependencies
Video Capture SDK .Net relies on native libraries to access webcam devices and perform video and audio processing. These native dependencies are bundled with the SDK and are automatically deployed with your application, ensuring seamless integration and compatibility across different systems.
Major SDK package (managed):
Native dependencies for Windows x64:
For alternative platforms (macOS, Linux, Android, iOS), use the corresponding native dependencies packages.
## Cross-Platform Compatibility
Video Capture SDK .Net is designed with cross-platform compatibility in mind, making it an ideal choice for developers working on applications that need to run on multiple operating systems.
### MAUI Compatibility
For developers working with .NET MAUI (Multi-platform App UI), Video Capture SDK .Net offers:
- Full compatibility with MAUI applications
- Consistent API across all supported platforms
- Platform-specific optimizations while maintaining a unified codebase
- Sample MAUI projects demonstrating implementation across platforms
This cross-platform capability allows developers to write code once and deploy across Windows, macOS, and mobile platforms through MAUI, significantly reducing development time and maintenance overhead. [Video Capture SDK .Ne](https://www.visioforge.com/video-capture-sdk-net)t provides a comprehensive solution for adding webcam video capture capabilities to your DotNet applications. Whether you need to record webcam footage, save webcam images, or simply display the webcam feed in your application, this library makes the process simple with just a few lines of C# code. With support for industry-standard formats like MP4 and WebM, modern codecs including H.264/H.265 and VP8/VP9/AV1, and powerful GPU acceleration, it offers the performance and flexibility needed for even the most demanding video capture applications. The ability to create and save video files efficiently makes this library perfect for any application that needs to record webcam content. The SDK's cross-platform compatibility, extending to macOS and MAUI applications, ensures that your webcam capture solution works consistently across different operating systems. Whether you're building a video conferencing tool, a surveillance application, or any other software requiring webcam functionality, Video Capture SDK .Net offers the tools you need to implement these features quickly. Getting started is as simple as following the step-by-step tutorial and code examples provided above. For more advanced use cases and detailed documentation on how to record webcam video using .NET, visit our website or refer to the SDK documentation.

#### EDITION

#### STANDARD

#### PROFESSIONAL

#### PREMIUM
Supported input devices and other sources
- Web cameras
- TV tuners and capture cards
- DV and MPEG camcorders
- Screen capture
- HTTP/RTSP/ONVIF IP cameras
- UDP, TCP, RTMP and other network streams
- Blackmagic Decklink
- DVB-T/DVB-C/DVB-S/ATSC devices (BETA)
- Microsoft Kinect for Windows
Video preview
Frame grabber
Video processing
Audio processing
HD and 4K video support
TV tuning
Network streaming in WMV format
Network streaming using RTMP/RTSP/UDP/NDI
Chroma-key
Motion detection
Video processing using DirectShow filters
OSD (On-Screen Display)
Picture-In-Picture
Changing output file name on-the-fly
Multiple output screens
GPU-accelerated video effects
Output to Virtual Camera SDK
Video Encryption SDK support
Face tracking
Output formats
- AVI
- WMV (Windows Media Video)
- WMA (Windows Media Audio)
- WAV
- MP3
- Ogg Vorbis
- Speex
- DV video
- DV/MPEG-1/2/4 (using a TV tuner with an internal MPEG encoder or DV/HDV camcorder)
- Flash Video (FLV) using FFMPEG
- WebM
- Custom output formats using external DirectShow filters
- MPEG-1/2/4 using FFMPEG
- MP4 (H264/HEVC + AAC) using software, Intel QuickSync, Nvidia NVENC/CUDA, or AMD Radeon encoders
Our software offers unlimited usage with no nag-screen, ensuring a
seamless experience. We provide a 30-day trial period so you can explore
all features before committing.
With a regular license, you
receive free minor and major upgrades for one year; after that period,
the SDK will continue functioning as before.
Alternatively, the
lifetime license provides unlimited updates indefinitely. Additionally,
we offer priority support and fixes. The regular license is billed
annually and automatically renewed each year, but you can cancel your
subscription anytime.
---END OF PAGE---
# Page: https://www.visioforge.com/virtual-camera-sdk
# Virtual Camera SDK
v11.1
VisioForge Virtual Camera SDK is the ultimate virtual webcam solution for Windows, empowering users and developers to transform their PC into a versatile, high-performance video source for any application that supports webcams. Whether you are a content creator, educator, business professional, or software developer, our SDK provides the tools you need to broadcast, enhance, and control your video and audio streams with unmatched flexibility and quality.

#### DOWNLOADS
[Installer](https://s3.us-west-2.amazonaws.com/files.visioforge.com/trials/visioforge_virtual_camera_sdk_setup.zip)

#### BUY
[Check prices or order](/buy)

#### HELP
[Online help](/help/docs/directshow/virtual-camera-sdk/)[License agreement](/help/docs/eula/)
## What is a Virtual Webcam?
A virtual webcam (also known as a virtual camera) is a software-based camera that simulates a physical webcam device on your Windows PC. This allows you to send video and audio from any source—such as video files, network streams, webcams, camcorders, or even your desktop screen—to popular applications like Zoom, Skype, OBS Studio, Google Meet, Microsoft Teams, and many more. With a virtual webcam, you can:
- Use pre-recorded videos, live streams, or custom video effects as your webcam input.
- Share your desktop, presentations, or application windows as a webcam feed.
- Combine multiple video sources and switch between them seamlessly.
- Apply real-time video effects, overlays, and branding to your video stream.
- Use your virtual camera in multiple applications at the same time, thanks to multi-instance support.
This technology is ideal for live streaming, video conferencing, online teaching, webinars, remote collaboration, and any scenario where you want to control or enhance your video presence.
## Why Choose VisioForge Virtual Camera SDK?
VisioForge Virtual Camera SDK stands out as a leading solution for virtual webcam functionality on Windows. Here's why:
- **Comprehensive Video Source Support:** Stream video from files (MP4, AVI, MKV, MOV, and more), network streams (RTSP, HTTP, HLS), webcams, camcorders, capture cards, or your desktop screen. Mix and match sources for maximum flexibility.
- **Professional-Grade Video Quality:** Enjoy up to 4K resolution support, ensuring your video looks sharp and professional in any setting.
- **Advanced Video Processing:** Apply a wide range of real-time effects, including image and text overlays, pan/zoom, brightness, contrast, saturation, hue adjustments, deinterlacing, denoising, and chroma-key (green screen) effects. Perfect for adding logos, lower thirds, watermarks, or creative visual enhancements.
- **Virtual Audio Capture:** Seamlessly add audio from microphones, audio files, or other sources to your virtual webcam stream, ensuring your audience hears exactly what you want.
- **Multi-Instance and Multi-App Support:** Run multiple virtual camera devices at once, allowing you to use your virtual webcam in several applications simultaneously—ideal for multitasking professionals and streamers.
- **Custom Branding and Device Naming:** Personalize your virtual camera and microphone with custom names, making your brand stand out in meetings and streams.
- **DirectShow Integration:** Fully compatible with DirectShow applications and VisioForge SDKs for video editing and capture, making it easy to integrate advanced video features into your own software projects.
- **Background Image and Signal Handling:** Display a custom background image or run a specific application when no video signal is available, ensuring a polished experience at all times.
- **Royalty-Free Distribution:** Distribute your applications without worrying about extra fees or licensing headaches.
- **Developer-Friendly:** Comprehensive documentation, sample code, and dedicated support make it easy for developers to add virtual webcam features to their own Windows applications.
## Use Cases for Virtual Webcam Technology
- **Video Conferencing:** Enhance your presence in Zoom, Microsoft Teams, Skype, Google Meet, and other platforms by sharing high-quality video, custom backgrounds, and branded overlays.
- **Live Streaming:** Broadcast to platforms like YouTube Live, Twitch, Facebook Live, and more with professional effects, transitions, and multi-source video feeds.
- **Online Teaching & Webinars:** Share your screen, slides, or educational videos as a webcam feed, making remote learning more interactive and engaging.
- **Content Creation:** Record or stream creative content with advanced video effects, overlays, and real-time editing.
- **Gaming & Esports:** Add webcam overlays, green screen effects, and custom branding to your gaming streams.
- **Corporate Communications:** Deliver polished presentations, product demos, and internal communications with branded video feeds.
- **Software Development:** Integrate virtual webcam features into your own Windows applications, expanding your product's capabilities and appeal.
## Feature Breakdown
### Video & Audio Streaming
- Stream from any real or virtual source: video files, network streams, webcams, camcorders, capture cards, desktop, and more.
- Combine multiple sources and switch between them in real time.
- Add audio from microphones, files, or other devices.
### Video Processing & Effects
- Image and text overlays for branding, watermarks, and information display.
- Pan/zoom, cropping, and resizing for perfect framing.
- Adjust brightness, contrast, saturation, and hue for optimal video quality.
- Deinterlacing and denoising for smooth, clear video.
- Chroma-key (green screen) for background replacement and creative effects.
### Customization & Branding
- Set custom device names for your virtual camera and microphone.
- Display a background image or run an application when no video signal is present.
- Full control over video and audio settings for a tailored experience.
### Compatibility & Integration
- Works with all major video conferencing, streaming, and recording software.
- DirectShow support for seamless integration with professional video tools.
- Easy SDK integration for developers, with sample code and documentation.
### Licensing & Distribution
- Royalty-free distribution for your applications.
- Flexible licensing options: annual or lifetime, with free updates and priority support.
- Trial version available (displays a watermark on the video window).
### Filter usage in a DirectShow graph
## System requirements
- **Supported Operating Systems:** Windows 11, Windows 10, Windows 8/8.1, Windows 7, Windows Vista, Windows XP, Windows Server 2003, and later.
- **DirectX 9 or later required.**
- **x86/x64 compatibility.**
## Download & Licensing
- **Free Trial:** Download and evaluate the Virtual Camera SDK for Windows. The trial version includes a watermark.
- **Purchase:** Unlock unlimited usage, free updates, and priority support with a regular or lifetime license. Cancel your subscription at any time.
- **Easy SDK Integration:** Add virtual webcam features to your own Windows applications with our comprehensive SDK.
## Troubleshooting & Support
- **Virtual webcam not recognized?** Ensure the SDK is installed and selected as the video input in your application. Restart the app if needed.
- **Choppy video or audio?** Close other resource-intensive programs or check your system resources and internet connection.
- **Compatibility issues?** Some applications may require updates or specific settings. Contact our support team for assistance.
- **Need help?** Access our detailed documentation, FAQs, or reach out to our priority support team for personalized help.
## Comparison: VisioForge Virtual Camera SDK vs. Other Solutions
- **e2eSoft VCam:** Both offer virtual webcam functionality, but VisioForge provides deeper DirectShow integration, more advanced video processing, and developer-friendly SDK features.
- **OBS Studio Virtual Camera:** OBS is great for streaming, but VisioForge SDK is designed for easy integration into your own apps and offers more granular control for developers.
- **ManyCam, YouCam, etc.:** These are end-user apps, while VisioForge SDK is ideal for developers and businesses looking to embed virtual webcam features into their own products.
## C# Code Example
Here's a practical example of how to use the Virtual Camera SDK in a .NET application:
### Project Setup
Create a new .NET project and add the VisioForge.DirectShowAPI NuGet package:
### Implementation Example
This example demonstrates how to capture video from a physical camera and stream it through a virtual camera:
This example shows:
- Setting up a DirectShow filter graph
- Enumerating and selecting video capture devices
- Creating and connecting source and virtual camera filters
- Managing the streaming lifecycle
- Proper resource cleanup
For more advanced features like video effects, format selection, and multiple instances, refer to our comprehensive SDK documentation.
## C++ DirectShow Example
Here's how to use the Virtual Camera SDK in a native C++ DirectShow application:
### Header File (intf.h)
First, define the necessary GUIDs and interfaces:
### Implementation Example (main.cpp)
Here's a complete example showing how to capture video and stream it through the virtual camera:
This C++ example demonstrates:
- DirectShow filter graph setup and management
- Video capture device enumeration
- Virtual camera filter creation and configuration
- Filter connection and streaming control
- Proper COM resource cleanup
- Error handling and status reporting
The example uses standard DirectShow interfaces along with the Virtual Camera SDK's custom interfaces for advanced functionality. Make sure to:
1. Link against the DirectShow libraries
2. Include the necessary DirectShow headers
3. Initialize and uninitialize COM appropriately
4. Handle all COM interface releases properly
For advanced features like video format selection, multiple instances, or video effects, refer to our SDK documentation.
## Sample Projects on GitHub
We maintain a comprehensive collection of sample projects on GitHub to help you get started with the Virtual Camera SDK. Visit our [DirectShow Samples Repository](https://github.com/visioforge/directshow-samples) for complete, working examples.
### Technologies Used
The samples are available in multiple programming languages:
- C# (.NET)
- C++ (Native DirectShow)
- Delphi
Empower your PC with the best virtual webcam software for Windows. Experience seamless video streaming, advanced effects, and professional-grade features with VisioForge Virtual Camera SDK today!
---END OF PAGE---
# Page: https://www.visioforge.com/vlc-source-directshow-filter
# VLC Source DirectShow Filter
v15.0
The VLC Source DirectShow Filter is a professional-grade component that brings the powerful multimedia capabilities of VLC media player directly into your Windows applications. This SDK provides seamless integration with DirectShow applications while maintaining the extensive format support and streaming capabilities that VLC is renowned for.
Whether you're developing media players, streaming applications, video processing tools, or multimedia content management systems, our VLC Source Filter provides the reliability and versatility you need to handle virtually any media format your users might encounter.
## Key Benefits
- **Universal Format Support**: Play 100+ video and audio formats without additional codec installations
- **Network Streaming**: Support for HTTP, HTTPS, RTSP, RTP, UDP, and other protocols
- **Multi-Language APIs**: Native support for C++, C#, VB.NET, and Delphi
- **High Performance**: Optimized multithreading with hardware acceleration
- **Commercial Ready**: Royalty-free distribution with professional support

#### DOWNLOADS
[Trial version](https://s3.us-west-2.amazonaws.com/files.visioforge.com/trials/visioforge_vlc_source_setup.zip)[Samples on GitHub](https://github.com/visioforge/directshow-samples)

#### BUY
[Check prices or order](/buy)

#### HELP
[Online help](/help/)[License agreement](/help/docs/eula/)
## Key Features & Capabilities
### Universal Format Support
Play 100+ video and audio formats including MP4, AVI, MPEG, MPEG-TS, MKV, WebM, AAC, MP3, OGG, FLAC, and many more without additional codec installations.
### Network Streaming
Support for HTTP, HTTPS, FTP, RTSP, RTP, UDP, and other network protocols. Stream live content or play remote media files seamlessly.
### Multiple Programming APIs
Native support for C++, C#, VB.NET, and Delphi with comprehensive sample applications and documentation for each platform.
### High Performance
Optimized multithreading support with hardware acceleration capabilities. Available in both x86 and x64 architectures.
### Hardware-Accelerated GPU Decoding
The VLC Source DirectShow Filter supports multiple hardware acceleration technologies for optimal video decoding performance using DirectX Video Acceleration (DXVA2), NVIDIA NVDEC, Intel Quick Sync Video, and AMD VCE technologies.
#### Supported GPU Acceleration Technologies
- **DirectX Video Acceleration (DXVA2)**: Windows native hardware acceleration
- **NVIDIA NVDEC**: CUDA-based hardware decoding for NVIDIA GPUs
- **Intel Quick Sync Video**: Intel integrated graphics acceleration
- **AMD Video Coding Engine (VCE)**: AMD GPU hardware acceleration
- **Vulkan Video**: Modern cross-vendor GPU acceleration support
#### Performance Benefits
- **CPU Usage Reduction**: 70-90% CPU usage reduction with hardware acceleration
- **Power Efficiency**: Significantly lower power consumption during video playback
- **Thermal Management**: Reduced CPU heat generation
- **Concurrent Streams**: Support for multiple simultaneous hardware-decoded streams
- **Higher Resolutions**: Efficient 4K/8K video playback with minimal CPU impact
### Advanced Controls
Full playback control with seeking, audio track selection, subtitle management, and VLC filter chain support.
## Supported Media Formats
### Video Containers
- MP4
- MOV
- AVI
- MPEG, MPEG-TS, M2TS, VOB
- MKV
- WebM
- FLV
- OGG
- ASF, WMV
### Video Codecs
- **H.264/AVC**: Full hardware decode support across all platforms
- **H.265/HEVC**: Hardware decode on compatible GPUs (GTX 950+, Intel Gen9+, AMD GCN4+)
- **VP8, VP9**: Hardware decode on newer GPUs (GTX 1060+, Intel Gen11+, AMD Navi+)
- **AV1**: Hardware decode on latest GPUs (RTX 30xx+, Intel Arc+, AMD RDNA2+)
- **MPEG-1, MPEG-2**: Legacy hardware acceleration on most GPUs
- **MPEG-4**: Software and hardware decode support
- **DivX, Xvid**: Software decode support
- **Theora**: Software decode support
- **Windows Media Video**: Software decode support
### Audio Formats
- AAC
- MP3, MP2
- FLAC
- Vorbis
- AC3, DTS
- PCM, WAV
- Speex
- Opus
- WMA
### Streaming Protocols
- **HTTP/HTTPS**: Full support for progressive download and streaming
- **RTSP/RTP**: Real-time streaming protocol with authentication
- **UDP**: Multicast and unicast support
- **MMS**: Microsoft Media Server protocol
- **RTMP**: Real-Time Messaging Protocol for live streaming
- **HLS**: HTTP Live Streaming (Apple's adaptive streaming)
- **DASH**: Dynamic Adaptive Streaming over HTTP
- **SRT**: Secure Reliable Transport protocol
## Quick Start Guide
### Integration Steps
1. **Install the SDK**: Register the VLC Source DirectShow filter on your system
2. **Add References**: Include the necessary DirectShow and VLC headers/libraries
3. **Create Filter Graph**: Initialize DirectShow filter graph components
4. **Add VLC Source**: Instantiate and configure the VLC Source filter
5. **Connect Renderers**: Link video and audio rendering components
6. **Control Playback**: Use MediaControl interface for playback operations
## API Reference & Interface Definitions
### IVlcSrc Interface
Primary interface for controlling the VLC Source Filter
**GUID**: `{77493EB7-6D00-41C5-9535-7C593824E892}`
#### Methods
- `SetFile` - Load a media file or network URL
- `GetAudioTracksCount` - Get number of available audio tracks
- `GetAudioTrackInfo` - Get audio track information
- `GetAudioTrack` - Get currently selected audio track
- `SetAudioTrack` - Select audio track by ID
- `GetSubtitlesCount` - Get number of available subtitle tracks
- `GetSubtitleInfo` - Get subtitle track information
- `GetSubtitle` - Get currently selected subtitle track
- `SetSubtitle` - Select subtitle track by ID (-1 to disable)
### IVlcSrc2 Interface
Extended interface with additional VLC customization options
**GUID**: `{CCE122C0-172C-4626-B4B6-42B039E541CB}`
#### Methods
Inherits all methods from IVlcSrc plus:
- `SetCustomCommandLine` - Set custom VLC command line parameters
### IVlcSrc3 Interface
Latest interface with frame rate control
**GUID**: `{3DFBED0C-E4A8-401C-93EF-CBBFB65223DD}`
#### Methods
Inherits all methods from IVlcSrc2 plus:
- `SetDefaultFrameRate` - Set default frame rate for content without frame rate information
### C++ Interface Definitions
For C++ development, the complete interface definitions are available in the official GitHub repository:
**Header File:** [ivlcsrc.h](https://github.com/visioforge/directshow-samples/blob/main/Interfaces/cpp/VLC%20Source/ivlcsrc.h)
Interface usage:
The header file contains the complete definitions for:
- `IVlcSrc` - Primary interface for audio/subtitle control
- `IVlcSrc2` - Extended interface with custom command line parameters
- `IVlcSrc3` - Latest interface with frame rate control
- All associated GUIDs and method signatures
### C#/VB.NET Interface Definitions
For .NET development, the interface definitions are available through the VisioForge DirectShow API NuGet package:
**NuGet Package:** [`VisioForge.DirectShowAPI`](https://www.nuget.org/packages/VisioForge.DirectShowAPI)
Interface usage in C#:
## Complete Code Examples
### C++ Implementation
### C# Implementation
### VB.NET Implementation
## Advanced Features Usage
### Audio Track Selection Example (C++)
## DirectShow Graph Development Tools
### Using VLC Source Filter with GraphEdit
**GraphEdit** is Microsoft's DirectShow graph visualization and debugging tool that provides DirectShow graph editing capabilities. The VLC Source DirectShow Filter integrates seamlessly with GraphEdit for rapid prototyping and testing.
#### Setting Up VLC Source in GraphEdit
1. **Launch GraphEdit**: Start GraphEdit with administrator privileges for full filter registration access
2. **Insert VLC Source Filter**:
- Right-click in the graph area
- Select "Insert Filters..."
- Navigate to "DirectShow Filters" category
- Locate "VLC Source" filter
- Click "Insert Filter"
3. **Configure Media Source**:
- Right-click the VLC Source filter
- Select "Properties"
- In the file dialog, specify your media file path or network URL
- The filter accepts local files (C:\media\video.mp4) and network streams (http://example.com/stream.m3u8)
4. **Add Renderers**:
- For video: Insert "Enhanced Video Renderer (EVR)" or "Video Mixing Renderer 9 (VMR-9)"
- For audio: Insert "Default DirectSound Device" or "Audio Renderer (WaveOut)"
5. **Connect Pins**:
- Drag from VLC Source video output pin to video renderer input pin
- Drag from VLC Source audio output pin to audio renderer input pin
- GraphEdit will automatically negotiate media types
### Using VLC Source Filter with GraphStudio
**GraphStudio** provides an alternative DirectShow graph editing environment with advanced debugging features and comprehensive filter analysis tools.
#### GraphStudio Integration Steps
1. **Filter Registration Verification**:
- Open GraphStudio
- Navigate to "View" → "Filters" tab
- Verify "VLC Source" appears in the registered filters list
- Note the filter's CLSID: `{77493EB7-6D00-41C5-9535-7C593824E892}`
2. **Creating Filter Graph**:
- Use "Insert Filter" button or drag from filters panel
- Locate VLC Source under DirectShow filters category
- Drag VLC Source to graph workspace
3. **Media Configuration**:
- Right-click VLC Source → "Load File..."
- Browse to media file or enter network URL
- GraphStudio displays real-time connection status
4. **Automatic Graph Building**:
- Use GraphStudio's "Render" feature
- Right-click VLC Source output pins → "Render Pin"
- GraphStudio automatically inserts appropriate decoders and renderers
## System Requirements
### Operating Systems
- Windows 10, 11 (all editions)
- Windows 8/8.1
- Windows 7 (SP1 or later)
- Windows Server 2016 and later
### Development Support
- Visual Studio 2010-2022
- C++ Builder XE2 and later
- Delphi XE2 and later
- .NET Framework 4.0+
- .NET 5 and later
### Architecture Support
- x86 (32-bit)
- x64 (64-bit)
- Mixed-mode applications
- COM-compatible environments
## Licensing & Distribution Rights
### Commercial License Benefits
- **Royalty-Free Distribution**: Deploy your applications without per-unit fees
- **No Watermarks**: Clean, professional output without trial limitations
- **Priority Support**: Direct access to our technical support team
- **Free Updates**: Receive minor and major updates for one year (unlimited for lifetime license)
- **Multiple Projects**: Use in unlimited commercial and personal projects
- **Source Code Access**: Optional source code licensing available
### Trial Version Limitations
- Video output displays a watermark overlay
- No technical restrictions on functionality
- Full API access for evaluation purposes
- 30-day evaluation period
### libVLC Compliance
This SDK incorporates libVLC library licensed under LGPL v2.1. Your applications using our SDK remain unaffected by this license as our DirectShow filter acts as a separate component. No source code disclosure requirements for your application.
## Download & Purchase
### Trial Version
**Full functionality with watermark**
- Complete SDK package
- All sample applications
- Documentation
- 30-day evaluation
[Download Trial](https://s3.us-west-2.amazonaws.com/files.visioforge.com/trials/visioforge_vlc_source_setup.zip)
### Commercial License
**Production-ready with full rights**
- Royalty-free distribution
- Priority support
- No watermarks
- Free updates (1 year)
[View Pricing](https://www.visioforge.com/buy)
### Source Code License
**Complete filter source code**
- Full C++ source code
- Build scripts included
- Customization rights
- Technical consultation
## Technical Specifications
### Performance Characteristics
- **Startup Time**: < 500ms for filter initialization
- **Memory Usage**: ~50MB baseline, scales with video resolution
- **CPU Usage**: Hardware accelerated decoding when available
- **Threading**: Fully multithreaded architecture
- **Latency**: < 100ms for local files, varies for network streams

---END OF PAGE---
# Page: https://www.visioforge.com/ffmpeg-source-directshow-filter
# FFMPEG Source DirectShow Filter
v15.0
## Professional DirectShow Filter for Video and Audio Sources
The FFMPEG Source DirectShow Filter seamlessly integrates into any DirectShow application to decode and playback video or audio files and network streams. This powerful SDK includes FFMPEG DLLs and a DirectShow filter with standard file selection capabilities and custom interfaces for efficient and flexible multimedia processing in your applications.

#### DOWNLOADS
[Installer](https://s3.us-west-2.amazonaws.com/files.visioforge.com/trials/visioforge_ffmpeg_source_filter_setup.exe)[Samples on GitHub](https://github.com/visioforge/directshow-samples)

#### BUY
[Check prices or order](/buy)

#### HELP
[Online help](/help/docs/directshow/ffmpeg-source-filters/)[License agreement](/help/docs/eula/)
## VisioForge FFMPEG Source Filter Major Features
### Comprehensive Format Support
- **Video Formats**: MP4, AVI, MPEG, MPEG-TS, AV1, MKV, WebM, and many other formats
- **Audio Formats**: AAC/M4A, MP3, OGG, Speex, FLAC and more
- **Codec Support**: Internal video and audio decoders provided by FFMPEG
- **Custom Processing**: Video/audio FFMPEG filters support with advanced configuration
### Advanced Architecture and Performance
- **GPU Acceleration**: GPU-accelerated video decoding for optimal performance
- **Multithreading**: Efficient multithreaded processing for smooth playback
- **Platform Support**: Both x86 and x64 versions available
- **DirectShow Integration**: Seamless integration with the DirectShow architecture
### Developer-Friendly SDK
- **.NET API**: Complete C# and VB.NET support with NuGet package distribution
- **C++ API**: Native C++ interface for high-performance applications
- **Delphi API**: Full Delphi/Pascal support for RAD development
- **NuGet Integration**: VisioForge.DirectShowAPI package for seamless .NET development
- **Sample Code**: Demo applications for C#, VB.NET, C++, and Delphi
- **Documentation**: Comprehensive API reference and usage examples
## Installation and Configuration
### System requirements
- **Windows**: Windows 11, Windows 10, Windows 8/8.1, Windows 7
- **Windows** **Server**: Windows Server 2016 and later versions
- **Architecture**: x86 and x64 support
### How to Install
1. Download the installer from the downloads section
2. Run with administrator privileges for proper registration
3. The filter will be automatically registered with Windows
4. Add references to your project and start coding
### .NET Development Setup
For .NET applications, install the VisioForge.DirectShowAPI NuGet package:
The NuGet package provides:
- Complete DirectShow API wrappers for .NET
- Strongly-typed interfaces and enumerations
- Proper COM interop and memory management
- Support for C#, VB.NET, and other .NET languages
## Code Examples and Sample Implementation
### Filter usage in a DirectShow graph
The FFMPEG Source Filter acts as a source filter in your DirectShow graph, providing:
- **File Source**: Local file playback with format auto-detection
- **Network Streaming**: Support for network streams and protocols
- **Custom Configuration**: Advanced settings for buffering, hardware acceleration
- **Stream Selection**: Multiple audio/video stream selection and management

### C# Implementation with Advanced Features
### VB.NET Advanced Implementation with Complete Interface Support
#### Registration for Licensed Users
C# registration
VB.Net registration
C++ registration
### C++ Implementation with Full Interface Support
## Advanced Configuration Options
### Hardware Acceleration Setup
Enable GPU-accelerated video decoding for optimal performance (enabled by default):
- **NVIDIA NVDEC**: Automatic detection and usage for H.264/H.265/AV1 decoding
- **Intel Quick Sync Video**: Intel integrated GPU acceleration support
- **AMD VCE**: AMD hardware video decoding acceleration
- **Software Fallback**: Automatic fallback to CPU decoding when needed
### Network Streaming Configuration
Professional streaming support with comprehensive protocol options:
- **Connection Timeout**: Configurable timeout (default: 15000ms)
- **Buffering Strategy**: AUTO/ON/OFF modes for live sources
- **RTSP Options**: TCP/UDP transport selection
- **Custom Protocols**: Full FFMPEG protocol option support
### Advanced Stream Processing
- **Data Callbacks**: Raw data stream access for custom processing
- **Timestamp Callbacks**: Precise timing information for A/V sync debugging
- **Stream Selection**: Dynamic audio/video stream switching via IAMStreamSelect
- **Audio Control**: Enable/disable audio processing independently
### Multi-Stream and Program Support
- **Stream Selection**: Support for multiple video/audio streams
- **Program Switching**: Handle multi-program transport streams
- **Language Selection**: Audio track selection by language
- **Subtitle Support**: Subtitle stream extraction and rendering
### Live Source Handling
- **Real-time Detection**: Automatic live source identification
- **Buffering Management**: Smart buffering for smooth playback
- **Clock Synchronization**: Reference clock management for live streams
- **Quality Control**: Adaptive quality for network streams
### Seeking and Playback Control
- **Media Seeking**: Full IMediaSeeking interface support for non-live sources
- **Rate Control**: Variable playback speed (not available for live sources)
- **Position Control**: Absolute, relative, and incremental positioning
- **Key Frame Seeking**: Seek to nearest key frame for smooth playback
## Evaluation Version Features
Experience the complete power of our DirectShow filter with only a discrete evaluation overlay during video playback:
- **Full-Featured Testing Environment**: Access every codec, filter, and processing capability for comprehensive evaluation
- **Universal Format Compatibility**: Test with your entire media library including MP4, AVI, MPEG, MKV, and streaming protocols
- **Complete Development Resources**: Full API documentation, interface definitions, and comprehensive coding examples
- **Production-Ready Samples**: Working C#, C++, and Delphi applications with complete source code for immediate integration
## Purchase Benefits
### Licensing Options
- **Regular License**: Annual subscription with automatic renewal (cancellable anytime)
- **Lifetime License**: One-time purchase with unlimited updates
### Regular License Features
- **Commercial Deployment Freedom**: Deploy across unlimited applications and installations without usage caps or runtime fees
- **Professional Output Quality**: Crystal-clear video rendering without watermarks or trial overlays for production-ready applications
- **Continuous Innovation Access**: Receive all feature enhancements, codec updates, and performance improvements for 12 months
- **Expert Developer Assistance**: Direct access to VisioForge engineers for technical guidance and rapid issue resolution
- **Complete Distribution Authority**: Full rights to redistribute the filter with your applications without additional licensing costs
### Lifetime License Advantages
- **Unlimited Updates**: Updates for unlimited time
- **One-Time Payment**: No recurring subscription fees
- **Long-Term Support**: Extended support coverage

---END OF PAGE---
# Page: https://www.visioforge.com/encoding-filters-pack
# DirectShow Encoding Filters Pack
v11.4
VisioForge DirectShow Encoding Filters Pack includes many DirectShow filters used in VisioForge SDKs for various audio/video encoding formats. You can use the filter pack to encode video into MP4 (H264/HEVC/AAC), MPEG-TS, MKV, and many other output formats in your DirectShow application. H264/HEVC encoders have GPU-accelerated versions for Intel, AMD/ATI, and Nvidia GPUs.

#### DOWNLOADS
[Trial version](https://s3.us-west-2.amazonaws.com/files.visioforge.com/trials/visioforge_encoding_filters_pack_setup.exe)[Samples on GitHub](https://github.com/visioforge)

#### BUY
[Check prices or order](/buy)

#### HELP
[Online help](/help/)[License agreement](/help/docs/eula/)
## Included DirectShow filters:
- FFMPEG Encoder filter (MPEG-1/2/4, Flash Video)
- Nvidia CUDA H264 encoder
- H264 encoder/decoder (with Intel QuickSync support)
- AAC encoder
- MP4 muxer
- MP3 LAME encoder
- VP8/VP9 encoder/decoder
- FLAC encoder/decoder
- Speex encoder/decoder
- Ogg Vorbis encoder/decoder
- Colorspace converters
- RTSP source/RTSP streamer
- GPU-accelerated H.264/HEVC encoding with MP4 MF Muxer
SDK contains API for .Net, C++, and Delphi. Demo applications are available in several programming languages. GraphEdit/GraphStudioNext tools can be used to test filters without code.
[Processing Filters Pack](https://www.visioforge.com/processing-filters-pack) can be used with Encoding Filters Pack to provide video and audio processing in your application.
You may use [FFMPEG Source Filter](https://www.visioforge.com/ffmpeg-source-directshow-filter) or [VLC Source Filter](https://www.visioforge.com/vlc-source-directshow-filter) for playback support of most video and audio formats.
### System requirements
- Windows 11, Windows 10, Windows 8/8.1, Windows 7, Windows Vista, Windows Server 2012, and later
- DirectX 10 or later
### Distribution rights
Royalty-free distribution.
### Trial limitations
The trial version displays a watermark on the video window.
### Purchase of DirectShow Encoding Filters Pack will give you the following benefits:
- Unlimited usage
- No nag-screen
- Free minor and major upgrades within one year (after one year, SDK will work the same as before) for a regular license and unlimited updates for unlimited time for the lifetime license
- Priority support and fixes
The regular license is billed annually and automatically renewed each year. You can cancel your subscription at any time.
---END OF PAGE---
# Page: https://www.visioforge.com/processing-filters-pack
# DirectShow Processing Filters Pack
v15.1
The VisioForge DirectShow Processing Filters Pack contains many DirectShow filters used in the VisioForge SDKs for audio and video processing. With our filters, you can add text or image overlay, change color balance, perform denoising, deinterlace, motion detection, resize, crop, or rotate. Various audio processing, including equalizer and volume boost, is also available.

#### DOWNLOADS
[Trial version](https://s3.us-west-2.amazonaws.com/files.visioforge.com/trials/visioforge_processing_filters_pack_setup.exe)[Samples on GitHub](https://github.com/visioforge/.Net-SDK-s-samples)

#### BUY
[Check prices or order](/buy)

#### HELP
[Online help](/help/)[License agreement](/help/docs/eula/)
## Included DirectShow filters:
- AsyncEx memory source filter (allows to read data from the memory or stream)
- Video processing and effects filter
- image overlay (BMP, JPEG, PNG, GIF, RGB data)
- text overlay (choose font, style, size, etc.)
- video transparency
- brightness, contrast, saturation, hue, etc.
- deinterlace (several algorithms are available depending on quality and performance)
- denoise
- motion detection (with motion level detection, matrix, and highlights)
- chroma-key (GPU-optimized)
- Audio processing and effects filter
- volume booster
- equalizer
- 3D-bass system
- various other effects
- Video resize filter
- Video crop filter
- Video flip/rotate filter
- PIP (Picture-In-Picture) filter
- Screen capture filter (Direct3D 9/Direct3D 11/DXGI/Desktop Duplication)
- Video color space converters (RGB and YUV formats)
- DirectX-accelerated video processing
The SDK includes APIs for .Net (C#/VB.Net), C++, and Delphi, making it versatile for different programming languages. You can try SDK samples or use the GraphEdit/[GraphStudioNext](https://github.com/cplussharp/graph-studio-next) tools to test.
A convenient .Net API package is available on NuGet, simplifying integration for .Net developers.
For video and audio processing, the [Encoding Filters Pack](/encoding-filters-pack) is essential for saving and streaming media. Additionally, the [FFMPEG Source DirectShow Filters](/ffmpeg-source-directshow-filter) and [VLC Source DirectShow Filters](/vlc-source-directshow-filter) are helpful for handling popular video and audio file formats.
### System requirements
- Windows 11, Windows 10, Windows 8/8.1, Windows 7, Windows Vista, Windows Server 2012, and later
- DirectX 10 or later
### Distribution rights
Royalty-free distribution.
### Trial limitations
The trial version displays a watermark on the video window.
### Purchase of DirectShow Processing Filters Pack will give you the following benefits:
- Unlimited usage
- No nag-screen
- Free minor and major upgrades within one year (after one year, SDK will work the same as before) for a regular license and unlimited updates for unlimited time for the lifetime license
- Priority support and fixes
The regular license is billed annually and automatically renewed each year. You can cancel your subscription at any time.
---END OF PAGE---
# Page: https://www.visioforge.com/video-encryption-sdk
# Video Encryption SDK
v11.3
The Video Encryption SDK allows users to encode video in MP4 H264/AAC format and apply encryption using either a password or binary data. Within this SDK, DirectShow filters are provided for seamless integration into any DirectShow application. These filters come with implemented interfaces for simple configuration of filter parameters, simplifying the process of securing your video content.

#### DOWNLOADS
[Trial version](https://s3.us-west-2.amazonaws.com/files.visioforge.com/trials/visioforge_video_encryption_sdk_setup.exe)[Samples on GitHub](https://github.com/visioforge)[Video Encryptor sample](https://files.visioforge.com/trials/visioforge_video_encryptor_setup.exe)

#### BUY
[Check prices or order](/buy)

#### HELP
[Online help](/help/)[License agreement](/help/docs/eula/)
## VisioForge Video Encryption SDK major features include:
- H264 encoder profiles/levels, bitrate, quality, and other properties support
- Optional GPU usage for encoding
- Multiple audio streams support
- HD and 4K video support
- x86 and x64 versions
- AES-128 and AES-256 can be used for stream encryption
- Multithreading
SDK can use string, files, and binary data as encrypting keys. SDK uses an open AES-256 crypto algorithm to encrypt video and audio streams. You can seek encrypted video files like any other video file. AAC codec will be used for an audio stream, and H264 codec will be used for a video stream. Also, you can re-mux any source H264/AAC file or stream without reencoding.
Video Encryption SDK is already integrated into [Video Capture SDK .Net](https://www.visioforge.com/video-capture-sdk-net), [Video Edit SDK .Net](https://www.visioforge.com/video-edit-sdk-net), and [Media Player SDK .Net](https://www.visioforge.com/media-player-sdk-net) but requires an independent license.
AES-256 may require licensing in some countries. SDK can also use AES-128 for compatibility. Please get in touch with us if you want to use alternative encryption algorithms.
Video Encryption SDK can be used in any DirectShow code as two filters: muxer (encryptor) and demuxer (decryptor). Seeking is supported for demuxer.
You can use SDK as a core of your DRM video files system.
### Filter usage in a DirectShow graph
## Video Encryptor app sample
The Video Encryptor sample allows you to protect your video files with a password. All popular video formats are supported. You can use your favorite media player to play protected files. The app uses the Video Encryption SDK as an engine and supports Nvidia CUDA technology to increase encryption speed (on computers with Nvidia graphics cards).
### System requirements
- Windows 11, Windows 10, Windows 8/8.1, Windows 7, Windows Vista, Windows Server 2012, and later
- DirectX 10 or later
### Distribution rights
Royalty-free distribution.
### Trial limitations
The trial version displays a watermark on the video window.
### Purchase of Video Encryption SDK will give you the following benefits:
- Unlimited usage
- No nag-screen
- Free minor and major upgrades within one year (after one year, SDK will work the same as before) for a regular license and unlimited updates for unlimited time for the lifetime license
- Priority support and fixes
The regular license is billed annually and automatically renewed each year. You can cancel your subscription at any time.
---END OF PAGE---
# Page: https://www.visioforge.com/all-in-one-media-framework
# All-in-One Media Framework (Delphi/ActiveX)
v11.2
The framework includes several libraries designed for video capture, editing, and playback. The [video capture](https://www.visioforge.com/video-capture-sdk-net) core enables the recording of video and audio from various sources, such as webcams, IP cameras, or screens. The video editing core allows you to cut, join, process, and reencode files. The media player core can play video and audio files, as well as network streams. All cores support video and audio effects, frame grabbing, Picture-in-Picture, and on-screen display (OSD).
- 
- 
- 
- 


#### DOWNLOADS
[Delphi](https://s3.us-west-2.amazonaws.com/files.visioforge.com/trials/visioforge_media_framework_delphi_trial.exe)[ActiveX](https://s3.us-west-2.amazonaws.com/files.visioforge.com/trials/visioforge_media_framework_activex_trial.exe)[Samples on GitHub](https://github.com/visioforge)

#### BUY
[Check prices or order](/buy)

#### HELP
[Online help](/help/docs/delphi/videocapture/)[Changelog](/help/docs/delphi/videocapture/changelog/)[License agreement](/help/docs/eula/)
### Purchase of Framework will give you the following benefits:
- Unlimited usage
- No nag-screen
- Free minor and major upgrades within one year (after one year, SDK will work the same as before) for a regular license and unlimited updates for unlimited time for the lifetime license
- Priority support and fixes
The regular license is billed annually and automatically renewed each year. You can cancel your subscription at any time.
The SDK is free for non-commercial use. Please contact us to get a free license.
## Features and capabilities
### Supported input devices:
- MPEG-2 camcorders of DV and HDV formats
- USB webcams and various capture devices, including 4K resolution support
- PCI-based video capture cards
- TV Tuners, both with and without an in-built MPEG Encoder
- IP cameras and servers using JPEG/MJPEG, MPEG-4, and H.264 protocols over HTTP, RTSP, or RTMP, with support for HD streams
- ONVIF-compliant IP cameras featuring PTZ controls
- NDI sources with DirectShow bridge
- Various audio capture devices and sound cards
- ASIO-compatible audio sources
- Blackmagic Decklink cards
### Supported input formats:
- MP4
- MOV
- AVI
- MPEG-TS/MPEG-PS
- MKV (Matroska)
- DV
- ASF/WMV
- MP3
- M4A/AAC
- WMA
- OGG Vorbis
- OPUS
- Speex
SDK can decode video and audio files using system decoders, FFMPEG, or libVLC.
### Supported output formats:
- AVI files with support for multiple codecs like MJPEG, DivX, XviD, and x264
- WMV files offer compatibility with custom WMV profiles and settings such as variable bit rate encoding (VBR), uncompressed audio or video streams, video sizing, buffering adjustments, frame rate customization, etc.
- DV and MPEG files directly from DV/HDV camcorders and TV tuners using an internal MPEG Encoder (via DirectCapture technology)
- DV files acquisition from any compatible video capture device
- MPEG-1/2/4 files, inclusive of VCD/SVCD/DVD standard profiles and FLV via an FFMPEG wrapper
- WebM files with VP8/VP9 video codecs and Vorbis audio codec
- MP4 files with H264/HEVC + AAC codecs, utilizing CPU or GPU acceleration (Nvidia, AMD/ATI, Intel)
- WAV, with options for compressed or PCM format
- WMA (Windows Media Audio)
- MP3, using LAME encoding
- Ogg Vorbis
- Customized output options through 3rd-party DirectShow filters
- Network streaming using FFMPEG
- AES encrypted video output
### Video processing and effects:
- image and text overlays
- adjustable video transparency
- controls for brightness, contrast, saturation, and hue
- deinterlace
- noise reduction
- pan and zoom
- resizing to any resolution
- chroma-key compositing
- motion detection
- Picture-in-Picture
- On-Screen Display (OSD)
- integration with third-party DirectShow filters
- camera control interface
### Audio processing and effects:
- volume booster
- equalizer
- 3D-bass system
- normalization
- auto/manual gain
- there are a lot of other effects
### Sample applications:
- Audio Capture
- DV Capture
- IP Capture
- Screen Capture
- Simple Video Capture
- Main Capture Demo
- Main Edit Demo
- Main Player Demo
- Audio Player
- DVD Player
- Memory Playback
- Video Player
### Development platforms:
- Visual Studio 2005 and later: Visual C#, Visual C++, Visual Basic .NET
- Delphi 6 / 7 / 2005 / 2006 / 2007 / 2009 / 2010 / XE / XE2 / XE3 / XE4 / XE5 / XE6 / XE7 / XE8 / 10 / 10.1 / 10.2 / 10.3 / 10.4 / 11 / 12
- Visual Studio 6: Visual C++, Visual Basic 6
- Borland C++ Builder 5 and later
- may be used with other ActiveX-compatible applications like Microsoft Access, Word, Excel, FrontPage, Powerbuilder, etc.
- x86 and x64 versions
### System requirements
- Windows 11, Windows 10, Windows 8/8.1, Windows 7, Windows Vista, Windows Server 2012, and later
- .Net Framework 4.0 or later (for ActiveX-based .Net demo applications)
- DirectX 9 or later
### Distribution rights
Royalty-free distribution.
### Trial limitations
The trial version displays a watermark on the video window.

#### EDITION

#### STANDARD

#### PROFESSIONAL

#### PREMIUM
Supported input devices and other sources
- Web cameras
- TV tuners
- DV and MPEG camcorders
- Screen capture
- HTTP / RTSP / ONVIF IP cameras
- UDP, TCP, RTMP and other network streams
- Additional engines for network streams
Video preview
Frame grabber
Video processing
Audio processing
HD and 4K video support
TV tuning
Network streaming in WMV format
Network streaming using RTMP / RTSP / UDP
Chroma-key
Motion detection
Video processing using DirectShow filters
OSD (On-Screen Display)
Picture-In-Picture
Changing output file name on-the-fly
Multiple output screens
GPU-accelerated video effects
Output to Virtual Camera SDK
Video Encryption SDK support
Output formats
- AVI
- WMV (Windows Media Video)
- WMA (Windows Media Audio)
- WAV
- MP3
- Ogg Vorbis
- DV video
- DV / MPEG-1/2/4 (using TV tuner with internal MPEG encoder or DV/HDV camcorder)
- Flash Video (FLV) using FFMPEG
- WebM
- Custom output formats using external DirectShow filters
- MPEG-1/2/4 using FFMPEG
- MP4 H264/AAC using software, Intel QuickSync or nVidia NVENC / CUDA
SDK contains optional FFMPEG and libVLC libraries licensed as LGPL v2.1.
---END OF PAGE---
# Page: https://www.visioforge.com/video-fingerprinting-sdk
# Video Fingerprinting SDK .Net / C++
v12.1
Our state-of-the-art video fingerprinting technology incorporates the latest advances in scene analysis, object tracking, and motion estimation to analyze the content of any video to identify its unique characteristics, such as colors, scene structure, and the motion of objects. This allows a copy of the video to be identified despite changes in resolution, bitrate, method of encoding, or file format. The video can even be detected when it is included inside another video or when just a fragment of the video is reproduced.
Our SDK lets you integrate this video identification functionality into your applications and services. Our licensing agreement permits you to incorporate the technology in an unlimited number of products for one payment. There are no other fees, regardless of the number of copies of these products you sell.
## What is a video fingerprint?
A video fingerprint is a compact digital descriptor that can be extracted from any video source, whether a fragment of a TV broadcast, a video file, an online video, or a DVD or Blu-ray Disk. These video fingerprints can then be stored, copied, and compared. Video fingerprints can be used to identify copyrighted video material and duplicate videos, search for videos, organize videos, recognize when a specific video is played, monitor media, or track ads.
Use the Video Duplicates Finder as a sample application to find similar video files.
Use the Media Monitoring Tool as a sample application to find one video fragment (TV commercial, for example) in another (full broadcast recording).
.Net SDK version has a helper for MongoDB usage as fingerprint storage.
### Some of the ways you can put our Video Fingerprinting SDK to use:
- An online video hosting service like YouTube could use video fingerprints to avoid copyright infringement. A database of video fingerprints of the copyrighted material would be developed and compared to the video fingerprint materials submitted by users to prevent the illegal submission of pirated videos.
- A video archive service could use video fingerprints to save space and block duplicate uploads. A video fingerprint would be extracted from each video in the archive. The video fingerprint of each new submission would be compared to the database of the fingerprints of existing videos, checking to make sure they are different and blocking duplicate submissions.
- Video Organizer software could use video fingerprints to identify copies of the same movie or video clip and group them despite differences in format, resolution, or bitrate.
- Set-top box software could use video fingerprints to develop interactive advertisements by identifying when specific TV ads are shown and displaying a clickable URL to allow the user to access the product website. It could also be used to track how often the ad is viewed.
- A search engine for videos could be developed using our Video Fingerprinting SDK – a unique, revolutionary service implementing a video-by-video search functionality that would be the first of its kind.
- A TV Clipping Service could use video fingerprinting technology to automate TV broadcast monitoring and TV ad verification to detect when a client’s ad is aired so they can ensure the terms of their TV advertising agreements are being respected.
- We have developed our media monitoring tool as a fully functional application that enables the detection of ad samples in a broadcast dump to implement this service. This application, including sources, can be licensed separately and used as a basis for building your product or integrated into an existing system. See our media monitoring tool page for more information.
- [Detecting pirated video content](https://www.visioforge.com/detecting-pirated-video-content)
### What operating systems are supported?
- C++ SDK supports Windows and Linux, or any other POSIX-compatible operating system (available by request)
- .Net SDK supports Windows 7 and later
### What is the size of a video fingerprint file?
Each second of a video stream analyzed requires about 1kb for its video fingerprint. Duplicate detection generally only requires 3-5 seconds of each video to be indexed. Indexing of full videos is required in order to identify a video that has been included inside another.
### How much time is required for computations?
Indexing one second of video takes about 300 milliseconds – the actual processing of the file accounts for nearly half of that time (150 milliseconds), while video decompression accounts for the rest. Matching a pair of 10-second-long fingerprints takes 1-2 milliseconds. These times were established by testing with an Intel i3 processor and LAV filters for video compression.
### Is video reading or decoding software included?
- C++: No. You will need some other library (FFMPEG, for example, demo available) to implement video reading in your application
- .Net: Yes, FFMPEG and libVLC are included. Also, system codecs can be used for decoding
### What code samples are available?
The following code samples are included with your purchase:
C++:
- FFMPEG-based console application that indexes videos and builds fingerprints (Windows, Linux)
- A console application that compares two fingerprints to detect duplicates (Windows, Linux)
- A console application that searches for entries of one fingerprint inside another (Windows, Linux)
- Source code of a full Media Monitoring Tool application (Windows, Linux)
.Net:
- Media Monitoring Tool and Media Monitoring Tool Live source code
- Video Duplicates Finder source code.
### What is other documentation available
C++:
- VFCompare API – a video fingerprinting algorithm implementation that is optimized for the detection of duplicate videos
- VFSearch API – a video fingerprinting algorithm implementation that is optimized for searching video in video
.Net:
- Full API is described in a help file.
### How can I try-out and evaluate the technology?
We suggest you download and experiment with the trial versions of our Media Monitoring Tool application and the Video Duplicates Finder application and familiarize yourself with the API and code samples.
.The .Net version of SDK is available as an independent installer with sample applications and sample source code inside.
MMT/VDF tools' source code is included (tools require .Net 4.5 for SOAP export. SDK can be used in .Net 4.0 and later).
The C++ version of SDK is available as an independent installer.
### System requirements
Mac OS, Windows, or Linux.
### Distribution rights
Royalty-free distribution.
### Trial limitations
The trial version displays a watermark on the video window.
### Purchase of Video Fingerprinting SDK will give you the following benefits:
- Unlimited usage
- No nag-screen
- Free minor and major upgrades within one year (after one year, SDK will work the same as before) for a regular license and unlimited updates for unlimited time for the lifetime license
- Priority support and fixes
The regular license is billed annually and automatically renewed each year. You can cancel your subscription at any time.
## Media Monitoring Tool (Live) Sample
Our demo app is a fully functional media monitoring tool that can be used for ad tracking and broadcast media monitoring. It enables the detection of ad samples in a broadcast dump. You can also use this application and our Video Fingerprinting SDK to build your product or service for TV broadcast monitoring or integrate it into an existing service.
### How it works
Our Media Monitoring Tool can detect when a reference sample video is played in a recorded TV broadcast, so paying someone to watch TV 24 hours a day, seven days a week, is no longer necessary. The TV broadcast stream is registered as an array of 5-minute-long video files, and then they are compared to the specified sample reference video, such as the commercial, to be tracked. The application will automatically detect all inclusions of the selected video in the recorded files and provide a list of the video files containing the commercial.
Our Media Monitoring Tool lets you automate the process of TV broadcast monitoring. It reduces the amount of personnel needed and the associated labor costs. And taking advantage of the content-based automated video search will also improve accuracy. It will even allow you to provide your clients digital proof of commercial playback without manual work.
The process begins by recording the broadcast stream as a series of five-minute videos. The Media Monitoring Tool analyzes the captured content and finds all the client’s commercial instances. The results are presented as a list of thumbnails highlighting the clips containing the commercial.
### Benefits
- Accurate results – The program's content-based video search technology ensures accuracy and speed. The algorithm quickly and accurately identifies all instances of the reference video in the recorded broadcast video stream without any human intervention and no human error.
- Reduced costs – Because you no longer have to pay people to sit and stare at a TV screen and manually record the details of when the commercial is aired, your operation costs are dramatically reduced.
- Easy use – The program's easy-to-learn intuitive interface allows custom searches to be defined and performed in seconds. The user selects the folder that contains the broadcast dump and specifies the video reference samples containing the ads to be identified. The program does the rest.
## Video Duplicates Finder Sample
Video Duplicates Finder allows you to find similar or duplicate video files on your PC. AVI, MPEG-1, MPEG-2, Windows Media Video, MP4, and many other formats are supported. This app is a sample of Video Fingerprinting SDK usage.
### Major features include:
- AVI, WMV, MP4, MPG, TS, and a lot of other formats are supported
- SD, HD, and 4K videos are supported
- Sensitivity settings
- Timeshift option
- Complete file processing or a custom part of it
- DirectShow (system codecs), FFMPEG, and VLC decoding engines

#### DOWNLOADS
[Windows / .Net](https://s3.us-west-2.amazonaws.com/files.visioforge.com/trials/visioforge_sdks_installer_dotnet_setup.exe)[Windows / C++](https://s3.us-west-2.amazonaws.com/files.visioforge.com/trials/visioforge_video_fingerprinting_sdk_cpp_setup.exe)[Linux / C++](https://s3.us-west-2.amazonaws.com/files.visioforge.com/trials/visioforge_video_fingerprinting_sdk_cpp_linux.zip)[Samples on GitHub](https://github.com/visioforge/.Net-SDK-s-samples/tree/master/Video%20Fingerprinting%20SDK)

#### BUY
[Check prices or order](/buy)

#### HELP
[Online help](/help/)[Changelog](/help/docs/vfp/changelog/)[License agreement](/help/docs/eula/)
SDK contains optional FFMPEG and libVLC libraries licensed as LGPL v2.1.
---END OF PAGE---
# Page: https://www.visioforge.com/detecting-pirated-video-content
# Detecting pirated video content
## Main information
Detecting pirated video content is essential for a new digital content era. Many types of websites offer users the ability to upload video content. Websites like [YouTube](https://www.youtube.com) exist solely for this reason, but many social networking sites also allow this capability. Such sites' immense popularity has attracted the ire of content producers who are getting serious about protecting their copyrights and putting real pressure on the owners of these types of sites to eliminate illegal infringement. A large amount of copyright-protected material – from clips from movies and TV shows to music and music videos – is readily available for download by visitors to these types of online video hosting services. While the site operators claim that they are operating under the Fair Use doctrine, content producers and large media companies aren't buying it. They have deep pockets and armies of lawyers at their disposal and are gearing up to take legal action. To avoid costly, protracted legal battles, online video upload sites pursue technologically-based methods of reducing and preventing copyright infringement on their sites.
## Detecting illegal content using Video Fingerprinting SDK
Preventing inadvertent liability for copyright infringement is a significant issue for any site that permits user-uploaded content. Copyright violations can result in costly and time-consuming legal action and could result in large civil or criminal liability. Our [Video Fingerprinting SDK](https://www.visioforge.com/video-fingerprinting-sdk) technology provides a perfect solution for these types of sites to continue providing video uploading and hosting of user content while minimizing the risks of copyright infringement. Our state-of-the-art video fingerprinting technology incorporates the latest advances in scene analysis, object tracking, and motion estimation to analyze the content of any video to identify its unique characteristics, such as colors, scene structure, and the motion of objects, to a compact digital descriptor, the video fingerprint. A database of these video fingerprints can be created for copyrighted material. They can then be checked against video materials being uploaded by site users to detect the presence of copyrighted materials and disallow the posting of such materials to their websites.
## Comparison with other products
Unlike products that attempt to provide a similar capability, our technology allows these fingerprints to be identified despite changes in resolution, bitrate, method of encoding, or file format. The video can even be detected when it is included inside another video or when just a fragment of the video is reproduced. These video fingerprints can then be stored, copied, and compared. So, no matter how a user might try to edit or manipulate the video to attempt to circumvent the system, the copyrighted material will be detected and disallowed. This is a significant advantage over competing technologies and uses our video fingerprinting and media monitoring technology as the best choice for copyright infringement detection for owners of sites that wish to host user video content. No other product on the market today can provide this level of protection.
## More information about detecting pirated video content and our products
- [Contact us](https://support.visioforge.com/) to see how our video fingerprinting technology can be integrated with your site to implement copyright infringement detection.
- Check the product page of [Video Fingerprinting SDK](/video-fingerprinting-sdk)

---END OF PAGE---
# Page: https://www.visioforge.com/buy
# Purchase or update subscription for our products
## Subscription will give you the following benefits
- Unlimited usage
- No annoying reminder message
- Free minor and major upgrades
- Priority support and fixes
- You can use the product without updates even if the subscription is over
The regular license is billed annually and automatically renewed each year. You can cancel your subscription at any time.
## How safe is my online purchase?
Payments are handled by [Stripe](https://www.stripe.com/), a reliable payment service on the Internet. The ordering pages are on a secure website that encrypts all transmitted credit card data using the secure HTTPS protocol. During the registration process, you will be given the option to place a fax, mail, or purchase order as an alternative to the standard online credit card order. When filling out the form, please be sure to enter your correct personal or company information and quantity. If you ordered our product but haven't received the registration key in 24 hours, lost your registration key, or have any questions about ordering, please contact us at [support@visioforge.com](mailto:support@visioforge.com).
Please check our [privacy policy](https://www.visioforge.com/privacy-policy).
## Custom filters, assemblies, or other files names
We can provide custom names for filters/assemblies/other purchase files containing 10 or more license keys.
## Payment methods
- Credit/debit card (Visa, Visa Electron, MasterCard, Maestro, Eurocard, DinersClub, American Express, JCB, PostePay, Discover (Novus) and Carte Bleue)
- Bank transfer (Wire/SEPA/ACH transfer)
- Alipay, WeChat Pay
- Apple Pay
- Google Pay
- Klarna
- Revolut Pay
- Direct Debit
- many other ways
## Team license
You can buy a team site-wide license and use it within offices in one city.
## License Non-Renewal Information
When you don't renew your license, your project maintains complete functionality without any interruption. This preservation of functionality happens because once your application is built and deployed, it operates independently of the license status.
### What Continues Working
All features, components, and capabilities that were operational before your license expired will continue to function exactly as they did previously. The application's performance, user experience, and technical capabilities remain unchanged after license expiration.
### What You Lose Access To
The primary limitation that occurs when your license expires is the inability to upgrade to newer SDK releases. This means:
- You cannot install or implement newer versions of the SDK
- You won't receive feature enhancements released in future SDK versions
- You won't benefit from bug fixes or security updates in newer releases
### Future Licensing Options
If you later decide you want access to newer SDK releases, you can purchase a new license at any point in the future. There's no penalty or complication involved in reactivating your licensing after a period of non-renewal.
This approach allows you to make strategic decisions about when upgrades are necessary for your project, rather than forcing you into a continuous renewal cycle if it doesn't align with your development roadmap or budget constraints.
## Premium support
If you're looking for top-tier support for your software, our premium support package is exactly what you need. With our premium support, you'll get access to various tools and services that will help you get the most out of your software, including AnyDesk, Microsoft Teams, Telegram, and more.
One of the key benefits of our premium support package is access to AnyDesk. This powerful remote desktop application allows our support team to access your computer and troubleshoot any issues you may be experiencing. With AnyDesk, our support team can quickly diagnose and resolve problems.
In addition to AnyDesk, our premium support package also includes access to Microsoft Teams. This collaboration platform enables our support team to communicate with you in real-time, share files, and even conduct video calls. This ensures you have direct access to our support team whenever you need it, no matter where you are.
We also offer support via Telegram, a secure messaging platform that allows us to provide you with quick, convenient support directly from your mobile device. Whether you're on the go or prefer to communicate via messaging, our support team can help you via Telegram.
When you sign up for our premium support package, you can rest assured that you're getting the best technical support for your software. Our team of experts is highly trained and dedicated to providing you with the highest level of service possible so you can get back to using your software confidently.
Our premium support package is available for just EUR 250 for 5 hours of dedicated support. To sign up for our premium support package and access these benefits, use the following [**payment link**](https://buy.stripe.com/7sI3ch4ou1C62Dm3dA). Once your payment is processed, our support team will be in touch to schedule your support sessions and get you started with the best support possible for your software.
The SDK is free for non-commercial use. Please contact us to get a free license.
### Video Capture SDK .Net
##### STANDARD
[€250] Regular (1 year)
[Debit/Credit card](https://buy.stripe.com/dR69AFdZ42Ga2Dm9AA)[Bank, SEPA, Apple, and more](https://buy.stripe.com/28o0056wC6Wq4Lug0G)
[€750] Lifetime/Team
[All methods](https://buy.stripe.com/14k4gl9IObcG6TC5l1)
##### PROFESSIONAL
[€350] Regular (1 year)
[Debit/Credit card](https://buy.stripe.com/aEUcMRcV0cgKem4bIJ)[Bank, SEPA, Apple, and more](https://buy.stripe.com/4gw6ot5sy5Sm6TCdSA)
[€1000] Lifetime/Team
[All methods](https://buy.stripe.com/bIYbINf381C6cdWdRj)
##### PREMIUM
[€500] Regular (1 year)
[Debit/Credit card](https://buy.stripe.com/dR628dg7c80ucdW4gi)[Bank, SEPA, Apple, and more](https://buy.stripe.com/8wMcMR6wCfsW5PydSz)
[€1500] Lifetime/Team
[All methods](https://buy.stripe.com/cN2aEJ5sya8C2Dm5kM)
### Video Edit SDK .Net
##### STANDARD
[€250] Regular (1 year)
[Debit/Credit card](https://buy.stripe.com/dR66ot08e94yem49AG)[Bank, SEPA, Apple, and more](https://buy.stripe.com/00gfZ33kq1C67XG01L)
[€750] Lifetime/Team
[All methods](https://buy.stripe.com/eVa8wBcV0gx00ve14s)
##### PROFESSIONAL
[€350] Regular (1 year)
[Debit/Credit card](https://buy.stripe.com/6oEaEJ08ecgK7XGdQX)[Bank, SEPA, Apple, and more](https://buy.stripe.com/7sI4gl3kqdkO7XG29U)
[€1000] Lifetime/Team
[All methods](https://buy.stripe.com/cN2fZ3cV0fsW0ve6oL)
##### PREMIUM
[€500] Regular (1 year)
[Debit/Credit card](https://buy.stripe.com/eVaaEJ08e5Smdi0eV2)[Bank, SEPA, Apple, and more](https://buy.stripe.com/fZeaEJdZ40y2di015h)
[€1500] Lifetime/Team
[All methods](https://buy.stripe.com/bIY5kp08e2Ga5Py8wS)
### Media Player SDK .Net
##### STANDARD
[€250] Regular (1 year)
[Debit/Credit card](https://buy.stripe.com/7sI9AF08efsWcdW7sE)[Bank, SEPA, Apple, and more](https://buy.stripe.com/14k1492gm6Wq0ve8yj)
[€750] Lifetime/Team
[All methods](https://buy.stripe.com/cN2fZ36wCa8C4LudR9)
##### PROFESSIONAL
[€350] Regular (1 year)
[Debit/Credit card](https://buy.stripe.com/aEU5kpf380y20ve5kx)[Bank, SEPA, Apple, and more](https://buy.stripe.com/bIY28d1ci1C61zi8yk)
[€1000] Lifetime/Team
[All methods](https://buy.stripe.com/8wMaEJbQWeoSdi0eVc)
### Media Blocks SDK .Net
[€500] Regular (1 year)
[Debit/Credit card](https://buy.stripe.com/14kaEJ6wCa8C1zi9BK)[Bank, SEPA, Apple, and more](https://buy.stripe.com/3cseUZ5sy6Wq5Py5mc)
[€1500] Lifetime/Team
[All methods](https://buy.stripe.com/bIY4gl4oueoSb9SeW5)
### Video Edit SDK FFMPEG .Net
##### STANDARD
[€250] Regular (1 year)
[Debit/Credit card](https://buy.stripe.com/6oEbIN1cigx091KaFm)[Bank, SEPA, Apple, and more](https://buy.stripe.com/fZe8wBg7ccgK1zi6qd)
[€750] Lifetime/Team
[All methods](https://buy.stripe.com/aEUbINcV080uem43cV)
##### PROFESSIONAL
[€350] Regular (1 year)
[Debit/Credit card](https://buy.stripe.com/00gcMRaMS80u1zi5l4)[Bank, SEPA, Apple, and more](https://buy.stripe.com/bIY149aMS0y2a5O7ui)
[€1000] Lifetime/Team
[All methods](https://buy.stripe.com/bIYbIN5sy0y20vefZJ)
##### PREMIUM
[€500] Regular (1 year)
[Debit/Credit card](https://buy.stripe.com/dR64glcV0fsWem48xi)[Bank, SEPA, Apple, and more](https://buy.stripe.com/5kA7sx4ou94y1zi3e3)
[€1500] Lifetime/Team
[All methods](https://buy.stripe.com/4gw1498EK3Keem46pb)
### Virtual Camera SDK
##### PROFESSIONAL
[€500] Regular (1 year)
[Debit/Credit card](https://buy.stripe.com/00g149cV00y2b9SeVq)[Bank, SEPA, Apple, and more](https://buy.stripe.com/fZe28d8EKeoS5Py3e6)
[€1500] Lifetime/Team
[All methods](https://buy.stripe.com/bIYaEJ1ci6Wqa5ObJf)
##### SOURCE CODE
[€2500] Lifetime/Team
[All methods](https://buy.stripe.com/aEUdQVcV06Wq1zibJg)
### VLC Source DirectShow Filter
[€300] Regular (1 year)
[Debit/Credit card](https://buy.stripe.com/fZe8wB6wC1C67XGeVt)[Bank, SEPA, Apple, and more](https://buy.stripe.com/cN2eUZ8EK4Oi1zibKD)
[€900] Lifetime/Team
[All methods](https://buy.stripe.com/6oEeUZ7AG6Wq2DmbK0)
### FFMPEG Source DirectShow Filter
[€300] Regular (1 year)
[Debit/Credit card](https://buy.stripe.com/bIYcMRdZ45Smb9S7t2)[Bank, SEPA, Apple, and more](https://buy.stripe.com/4gwbIN1cibcG7XGbKE)
[€900] Lifetime/Team
[All methods](https://buy.stripe.com/5kAcMR1ci3Keem4dRr)
### DirectShow Encoding Filters Pack
[€500] Regular (1 year)
[Debit/Credit card](https://buy.stripe.com/4gwbIN7AG94y1zi7t4)[Bank, SEPA, Apple, and more](https://buy.stripe.com/aEU4gl4oubcGa5O5mh)
[€1500] Lifetime/Team
[All methods](https://buy.stripe.com/5kAdQVcV00y26TCbJc)
### DirectShow Processing Filters Pack
[€350] Regular (1 year)
[Debit/Credit card](https://buy.stripe.com/4gw9AF5sy0y26TC4gT)[Bank, SEPA, Apple, and more](https://buy.stripe.com/9AQ28d5sy2Ga91K162)
[€1000] Lifetime/Team
[All methods](https://buy.stripe.com/dR6eUZg7ceoSgucaF9)
### Video Encryption SDK
[€500] Regular (1 year)
[Debit/Credit card](https://buy.stripe.com/8wM28d3kq5Smguc28M)[Bank, SEPA, Apple, and more](https://buy.stripe.com/28o7sx3kq6Wqfq85mj)
[€1500] Lifetime/Team
[All methods](https://buy.stripe.com/dR6bIN8EK3Ke7XG9Bf)
### All-in-One Media Framework (Delphi/ActiveX)
##### STANDARD
[€350] Regular (1 year)
[Debit/Credit card](https://buy.stripe.com/8wMdQV7AG6Wq7XG4hO)[Bank, SEPA, Apple, and more](https://buy.stripe.com/dR6dQV4ou94ycdW9CA)
[€700] Lifetime/Team
[All methods](https://buy.stripe.com/dR69AF8EKbcGa5OcOp)
##### PROFESSIONAL
[€500] Regular (1 year)
[Debit/Credit card](https://buy.stripe.com/fZebIN9IOfsW6TC3dJ)[Bank, SEPA, Apple, and more](https://buy.stripe.com/8wM9AF3kq1C60ve2aa)
[€1000] Lifetime/Team
[All methods](https://buy.stripe.com/4gw8wB2gm0y2b9S29M)
##### PREMIUM
[€750] Regular (1 year)
[Debit/Credit card](https://buy.stripe.com/9AQcMR7AG2Gab9SdSm)[Bank, SEPA, Apple, and more](https://buy.stripe.com/eVaeUZ2gm6Wq5Py2a9)
[€1500] Lifetime/Team
[All methods](https://buy.stripe.com/5kAaEJ6wCa8Cem48yb)
### Video Fingerprinting SDK
[€900] Regular (1 year)
[Debit/Credit card](https://buy.stripe.com/14kfZ3aMS6WqcdWaFy)[Bank, SEPA, Apple, and more](https://buy.stripe.com/3cs4gl5sy6Wq1zi7uv)
[€2000] Lifetime/Team
[All methods](https://buy.stripe.com/bIY7sx6wC1C66TCcNH)
[€25] Runtime (1 server core per year)
[Debit/Credit card](https://buy.stripe.com/aEUaEJ3kq0y2em4bJE)[Bank, SEPA, Apple, and more](https://buy.stripe.com/8wM6ot2gm6Wq5Pyg12)
### Bundles
€700
€1800
.Net Bundle
Professional
Video Capture SDK .Net Professional Edition
Media Player SDK .Net Professional Edition
Video Edit SDK .Net Professional Edition
Video Edit SDK FFMPEG .Net Professional Edition
Media Blocks SDK .Net
[Regular license](https://buy.stripe.com/eVacMR6wCa8CcdW5li)[Lifetime/Team license](https://buy.stripe.com/00g7sx5sy0y291K3db)
€1000
€2500
.Net Bundle
Premium
Video Capture SDK .Net Premium Edition
Media Player SDK .Net Professional Edition
Video Edit SDK .Net Premium Edition
Video Edit SDK FFMPEG .Net Premium Edition
Media Blocks SDK .Net
[Regular license](https://buy.stripe.com/28ofZ3bQW6Wqb9S5lk)[Lifetime/Team license](https://buy.stripe.com/aEUbIN3kq5Sm3Hq9BB)
€1000
€2500
DirectShow All-In-One
Bundle
FFMPEG Source DirectShow Filter
VLC Source DirectShow Filter
DirectShow Processing Filters Pack
DirectShow Encoding Filters Pack
DirectShow Source SDK for Kinect
[Regular license](https://buy.stripe.com/00g149cV0cgK3HqaFZ)[Lifetime/Team license](https://buy.stripe.com/8wM1498EK4Oib9S8xS)
The price list is available in [PDF](http://files.visioforge.com/shared/pricelist.pdf).
---END OF PAGE---
# Page: https://www.visioforge.com/news
# The latest news and updates
## Boost Your Development with Our Latest SDKs
Discover our new Software Development Kits (SDKs) made just for software developers. Our SDKs are designed to help you build strong, scalable, and efficient apps quickly and easily. Whether you're working on mobile apps, desktop software, or web solutions, our SDKs come with easy-to-follow documentation, sample code, and simple integration to speed up your development process. We understand the challenges developers face, and our goal is to provide tools that simplify and enhance your workflow. With our SDKs, you'll have everything you need to create high-quality applications that meet the demands of today's users.
## Stay Updated and Get the Best Support
Keep up with the latest trends with our regularly updated SDKs, featuring the newest technologies and standards. We are committed to ensuring that our SDKs evolve to meet the ever-changing needs of the software development industry. Our team is dedicated to providing excellent support and resources to help you get the most out of our SDKs. Explore our range today and take your development experience to the next level. With our comprehensive support, you'll be able to solve problems quickly and efficiently, allowing you to focus on what you do best—creating amazing software. Happy coding!
[News, updates, and product releases - 2024](https://www.visioforge.com/news-2024)
June 13, 2024
visioforge
[No Comments](https://www.visioforge.com/news-2024#respond)
[Read More](https://www.visioforge.com/news-2024)
[News, updates, and product releases - 2023](https://www.visioforge.com/news-2023)
December 31, 2023
visioforge
[No Comments](https://www.visioforge.com/news-2023#respond)
[Read More](https://www.visioforge.com/news-2023)
[News, updates, and product releases - 2022](https://www.visioforge.com/news-2022)
December 31, 2022
visioforge
[No Comments](https://www.visioforge.com/news-2022#respond)
[Read More](https://www.visioforge.com/news-2022)
[News, updates, and product releases - 2021](https://www.visioforge.com/news-2021)
December 31, 2021
visioforge
[No Comments](https://www.visioforge.com/news-2021#respond)
[Read More](https://www.visioforge.com/news-2021)
---END OF PAGE---
# Page: https://www.visioforge.com/legal-information
# Legal and regulatory information
## Legal information
Roman Miniailov dba VisioForge
**VAT ID**: ESZ0362544T
**Address**: Spain, 33200, Asturias, Gijon
## Privacy policy
At VisioForge, we are committed to protecting your privacy. Our Privacy Policy outlines the types of personal information we collect, how it is used, and the measures we take to ensure your data is secure. We adhere to all applicable data protection regulations, including the General Data Protection Regulation (GDPR). For more detailed information, please refer to our [Privacy Policy](/privacy-policy).
## Refund Policy
We strive to ensure our customers are satisfied with their purchases. If for any reason you are not completely satisfied, you may be eligible for a refund. Our Refund Policy provides detailed information on the eligibility criteria and the process for requesting a refund. To learn more, please read our [Refund Policy](/refund-policy).
## Support Service Level Agreement (SLA)
Our Support Service Level Agreement (SLA) defines the level of service you can expect from VisioForge. This includes response times, support availability, and the process for resolving issues. We are dedicated to providing prompt and efficient support to ensure your experience with our products is seamless. For more information, please review our [Support SLA](/support-service-level-agreement-sla).

---END OF PAGE---
# Page: https://www.visioforge.com/refund-policy
# Refund policy
Thank you for shopping at VisioForge. Please test our software before purchasing using a TRIAL version. Our refund policy has basic rules and some limitations.
## Before returning a product
If you are having an issue with a product, there may be other options before requesting a return:
- If you’ve purchased and downloaded software and need assistance with installation and activation, please email [order@visioforge.com](mailto:order@visioforge.com) or use [the support portal](https://support.visioforge.com/).
- If you require technical support with a VisioForge software product, please email [support@visioforge.com](mailto:support@visioforge.com), use [the support portal](https://support.visioforge.com/), or check [online help](https://www.visioforge.com/help/).
## Refund basic rules
We recommend contacting us for assistance if you experience issues receiving or downloading our products. By our refund policy, we issue refunds for digital products within 30 days of the product's original purchase if the software has bugs or problems.
## Refund policy limitations
- We issue refunds for digital products within 30 days of the product's original purchase if the software has bugs or problems.
- We do not perform refunds for renewals or after 30 days.
- We do not perform refunds for purchases with discounts.
- We do not perform refunds for auto-renewals enabled during the first purchase (before auto-renew happens, you'll have several emails about auto-renew from our payment processor (2Checkout or Stripe)).
## Return criteria
- All returns and exchanges must be accompanied and processed through the appropriate channels within 30 days of purchase.
- When returning software, the software must have the license terminated on the user's machine and be removed from that machine. We may require you to sign an electronic letter of destruction as a condition of your return to confirm that you have uninstalled and have not made any copies of the product. The license code for these products will be blocked, and you will not be able to install or use the software in the future.
- All included products and services must be returned together for promotional items and bundles. Suppose a service is included in a promotion and a bundle has been used (for example, a used promotional promo code). In that case, the total retail value of the service will be deducted from the refund amount. When a bundle is purchased, and only part of the bundle is returned, the discount is void, and the total discount will be deducted from the refund.
- We may extend the 30-day return period during holidays or other periods if a more extended return period was advertised on the website/promotional information when you made your purchase.
- If we lower our price on an item within 30 days of your purchase, we will honor the lower price. If you notice that we have reduced the price on an item you recently purchased, contact [order@visioforge.com](mailto:order@visioforge.com) and we will gladly issue a refund or credit for the difference (if you paid with a credit card, you'd need to use the same card). This offer does not apply to price reductions associated with special sale events such as Black Friday, Cyber Monday, and Christmas Holidays.
## Privacy policy
Please check our [privacy policy](/privacy-policy).

---END OF PAGE---
# Page: https://www.visioforge.com/terms-and-conditions
# Terms and conditions
The following terms and conditions (collectively, these “Terms and Conditions”) apply to your use of [https://www.visioforge.com](https://www.visioforge.com/), including any content, functionality, and services offered on or via [https://www.visioforge.com](https://www.visioforge.com/) (the “Website”).
Please read the Terms and Conditions carefully before you start using VisioForge because by using the Website you accept and agree to be bound and abide by these Terms and Conditions.
These Terms and Conditions are effective as of October 1, 2016. We expressly reserve the right to change these Terms and Conditions from time to time without notice to you. You acknowledge and agree that it is your responsibility to review this Website and these Terms and Conditions from time to time and to familiarize yourself with any modifications. Your continued use of this Website after such modifications will constitute acknowledgment of the modified Terms and Conditions and agreement to abide and be bound by the modified Terms and Conditions.
## Conduct on website
Your use of the Website is subject to all applicable laws and regulations, and you are solely responsible for the substance of your communications through the Website.
By posting information in or otherwise using any communications service, chat room, message board, newsgroup, software library, or another interactive service that may be available to you on or through this Website, you agree that you will not upload, share, post, or otherwise distribute or facilitate distribution of any content — including text, communications, software, images, sounds, data, or other information — that:
- Is unlawful, threatening, abusive, harassing, defamatory, libelous, deceptive, fraudulent, invasive of another’s privacy, tortuous, contains explicit or graphic descriptions or accounts of sexual acts (including but not limited to sexual language of a violent or threatening nature directed at another individual or group of individuals), or otherwise violates our rules or policies
- Victimizes harasses, degrades, or intimidates an individual or group of individuals based on religion, gender, sexual orientation, race, ethnicity, age, or disability
- Infringes on any patent, trademark, trade secret, copyright, right of publicity, or other proprietary rights of any party
- Constitutes unauthorized or unsolicited advertising, junk or bulk email (also known as “spamming”), chain letters, any other form of unauthorized solicitation, or any form of lottery or gambling
- Contains software viruses or any other computer code, files, or programs that are designed or intended to disrupt, damage, or limit the functioning of any software, hardware, or telecommunications equipment or to damage or obtain unauthorized access to any data or other information of any third party
- Impersonates any person or entity, including any of our employees or representatives
We neither endorse nor assume any liability for the contents of any material uploaded or submitted by third-party users of the Website. We generally do not pre-screen, monitor, or edit the content posted by users of communications services, chat rooms, message boards, newsgroups, software libraries, or other interactive services that may be available on or through this Website.
However, we and our agents have the right at their sole discretion to remove any content that, in our judgment, does not comply with these Terms of Use and any other rules of user conduct for our Website, or is otherwise harmful, objectionable, or inaccurate. We are not responsible for any failure or delay in removing such content. You hereby consent to such removal and waive any claim against us arising out of such removal of content.
You agree that we may at any time, and at our sole discretion, terminate your membership, account, or other affiliation with our site without prior notice to you for violating any of the above provisions.
Also, you acknowledge that we will cooperate fully with investigations of violations of systems or network security at other sites, including cooperating with law enforcement authorities in investigating suspected criminal violations.
### Terms and conditions and intellectual property
By accepting these Terms and Conditions, you acknowledge and agree that all content presented to you on this Website is protected by copyrights, trademarks, service marks, patents, or other proprietary rights and laws, and is the sole property of VisioForge.
You are only permitted to use the content as expressly authorized by us or the specific content provider. Except for a single copy made for personal use only, you may not copy, reproduce, modify, republish, upload, post, transmit, or distribute any documents or information from this Website in any form or by any means without prior written permission from us or the specific content provider, and you are solely responsible for obtaining permission before reusing any copyrighted material that is available on this Website.
### Third-party websites
This Website may link you to other sites on the Internet or otherwise include references to information, documents, software, materials, and/or services provided by other parties. These websites may contain information or material that some people may find inappropriate or offensive.
These other websites and parties are not under our control, and you acknowledge that we are not responsible for the accuracy, copyright compliance, legality, decency, or any other aspect of the content of such sites, nor are we responsible for errors or omissions in any references to other parties or their products and services. The inclusion of such a link or reference is provided merely as a convenience and does not imply endorsement of, or association with, the Website or party by us, or any warranty of any kind, either express or implied.
### Disclaimer of warranties, limitations of liability, and indemnification
Your use of VisioForge is at your sole risk. The Website is provided “as is” and “as available”. We disclaim all warranties of any kind, express or implied, including, without limitation, the warranties of merchantability, fitness for a particular purpose, and non-infringement.
We are not liable for damages, direct or consequential, resulting from your use of the Website, and you agree to defend, indemnify and hold us harmless from any claims, losses, liability costs, and expenses (including but not limits to attorney’s fees) arising from your violation of any third-party’s rights. You acknowledge that you have only a limited, non-exclusive, non-transferable license to use the Website. Because the Website is not error or bug-free, you agree that you will use it carefully and avoid using it in ways that might result in any loss of your or any third party’s property or information.
### Terms and conditions - termination
These Terms and Conditions will become effective in relation to you when you create a VisioForge account or when you start using the VisioForge and will remain effective until terminated by you or by us.
VisioForge reserves the right to terminate these Terms and Conditions or suspend your account at any time in case of unauthorized, or suspected unauthorized use of the Website whether in contravention of this Terms and Conditions or otherwise. If VisioForge terminates this Terms and Conditions or suspends your account for any of the reasons set out in this section, VisioForge shall have no liability or responsibility to you.
### Assignment
VisioForge may assign these Terms and Conditions or any part of it without restrictions. You may not assign this Terms and Conditions or any part of it to any third party.
### Other policies
- [Privacy policy](/privacy-policy)
- [Refund policy](/refund-policy)

---END OF PAGE---
# Page: https://www.visioforge.com/uninstall-feedback
# Uninstall feedback
We are sorry to see you go, and we genuinely appreciate your taking the time to provide us with your feedback. Your input is crucial in helping us enhance our software and develop better solutions that meet your needs and expectations.
We Value Your Feedback
Please let us know why you decided to uninstall our software. Your insights will help us understand what we can do better. Whether it’s about the user interface, specific features, performance, or any other aspect, your comments are invaluable to us.
## Contact Us for Help
If you encountered any issues that led to your decision to uninstall, we would love the opportunity to assist you. Our support team is ready to help resolve any problems you may have faced or answer any questions.
- Email: support@visioforge.com
- Support portal: [Create a ticket](https://support.visioforge.com)
- Live Chat: [Start a chat](https://discord.gg/yvXUG56WCH)
We strive to provide the best experience possible and your feedback is a vital part of that process. Thank you for helping us improve and we hope to serve you better in the future.
### Stay Connected
If you would like to stay updated on our latest features and improvements, please consider following us on social media or subscribing to our newsletter.
Thank you again for your time and feedback.
Your name
Your email
Product name
—Please choose an option—Video Capture SDK .NetMedia Player SDK .NetVideo Edit SDK .NetOther
Your message (optional)

---END OF PAGE---
# Page: https://www.visioforge.com/support-service-level-agreement-sla
# Support Service Level Agreement (SLA)
This Support Service Level Agreement (SLA) outlines the terms and conditions for the support services provided by VisioForge (referred to as "Provider") to its customers (referred to as "Client"). This SLA specifies the support options available, response times, and responsibilities of both parties.
## 1. Support Channels and Coverage
### 1.1 Email Support
- Email support is provided to all clients free of charge.
- The support team will respond to emails during regular business hours, Monday to Friday, excluding public holidays.
### 1.2 Premium Support
- Premium support is available to clients who opt for additional support services.
- Premium support includes remote assistance, chats, or calls through supported platforms (AnyDesk, Telegram, Zoom, Teams).
- Premium support is available during regular business hours, Monday to Friday, excluding public holidays.
- The cost of premium support is 200 EUR for a package of 5 hours.
- Additional premium support hours can be purchased separately.
## 2. Support Response Times
### 2.1 Email Support Response Times
- The support team will acknowledge receipt of the Client's email within 24 hours.
- The initial response time for email support will be within two business days.
- Resolution time for email support will be based on the severity and complexity of the issue and will be communicated to the Client.
### 2.2 Premium Support Response Times
- The support team will respond to premium support requests within 4 hours during regular business hours.
- Response times for premium support outside regular business hours will be within 12 hours.
- Resolution time for premium support will depend on the severity and complexity of the issue and will be communicated to the Client.
## 3. Responsibilities of the Provider
- The Provider will make reasonable efforts to resolve the Client's support requests promptly and efficiently.
- The Provider will allocate appropriate resources to address the Client's support needs.
- The Provider will ensure that the support team possesses the necessary skills and expertise to handle the Client's inquiries effectively.
- The Provider will maintain the confidentiality of the Client's information shared during the support process.
## 4. Responsibilities of the Client
### 4.1 Client Responsibilities
- The Client will provide accurate and detailed information about the issue or inquiry when contacting support.
- The Client will cooperate with the support team, providing necessary access and information to assist in issue resolution.
- The Client will adhere to any guidelines or instructions the support team provides.
- The Client will promptly notify the Provider of any changes in contact information.
## 5. Limitations
### 5.1 Exclusions
- This SLA does not cover support for issues resulting from unauthorized modifications, misuse, or third-party software or services.
- Support for hardware-related issues is not included in this SLA.
## 6. Termination
### 6.1 Termination of Premium Support
- Either party may terminate premium support with a 30-day written notice.
- In the event of termination, the Client will forfeit unused hours of premium support.
## 7. Amendments
### 7.1 Amendment of SLA
- This SLA may be amended by mutual agreement between the Provider and the Client.
- Any amendments will be documented in writing and signed by both parties.
Please review the terms of this Support Service Level Agreement carefully. By accessing and using the support services provided by VisioForge, you acknowledge and agree to comply with the terms outlined in this SLA.
If you have any questions or require clarification, please get in touch with us at support@visioforge.com.
Thank you for choosing VisioForge. We look forward to providing you with exceptional support.

---END OF PAGE---
# Page: https://www.visioforge.com/cookie-policy-eu
# Cookie Policy (EU/GDPR)
This Cookie Policy was last updated on November 21, 2024 and applies to citizens and legal permanent residents of the European Economic Area and Switzerland.
## 1. Introduction
Our website, https://www.visioforge.com (hereinafter: "the website") uses cookies and other related technologies (for convenience all technologies are referred to as "cookies"). Cookies are also placed by third parties we have engaged. In the document below we inform you about the use of cookies on our website.
## 2. What are cookies?
A cookie is a small simple file that is sent along with pages of this website and stored by your browser on the hard drive of your computer or another device. The information stored therein may be returned to our servers or to the servers of the relevant third parties during a subsequent visit.
## 3. What are scripts?
A script is a piece of program code that is used to make our website function properly and interactively. This code is executed on our server or on your device.
## 4. What is a web beacon?
A web beacon (or a pixel tag) is a small, invisible piece of text or image on a website that is used to monitor traffic on a website. In order to do this, various data about you is stored using web beacons.
## 5. Cookies
### 5.1 Technical or functional cookies
Some cookies ensure that certain parts of the website work properly and that your user preferences remain known. By placing functional cookies, we make it easier for you to visit our website. This way, you do not need to repeatedly enter the same information when visiting our website and, for example, the items remain in your shopping cart until you have paid. We may place these cookies without your consent.
### 5.2 Statistics cookies
We use statistics cookies to optimize the website experience for our users. With these statistics cookies we get insights in the usage of our website. We ask your permission to place statistics cookies.
### 5.3 Marketing/Tracking cookies
Marketing/Tracking cookies are cookies or any other form of local storage, used to create user profiles to display advertising or to track the user on this website or across several websites for similar marketing purposes.
## 6. Placed cookies
- OptinMonster
- WordPress
- Stripe
- Cookie Notice for GDPR
- Complianz
- Google Tag Manager for WordPress
- LiteSpeed
This data is not shared with third parties.
## 7. Consent
When you visit our website for the first time, we will show you a pop-up with an explanation about cookies. As soon as you click on "Save preferences", you consent to us using the categories of cookies and plug-ins you selected in the pop-up, as described in this Cookie Policy. You can disable the use of cookies via your browser, but please note that our website may no longer work properly.
## 8. Enabling/disabling and deleting cookies
You can use your internet browser to automatically or manually delete cookies. You can also specify that certain cookies may not be placed. Another option is to change the settings of your internet browser so that you receive a message each time a cookie is placed. For more information about these options, please refer to the instructions in the Help section of your browser.
Please note that our website may not work properly if all cookies are disabled. If you do delete the cookies in your browser, they will be placed again after your consent when you visit our website again.
## 9. Your rights with respect to personal data
You have the following rights with respect to your personal data:
You have the right to know why your personal data is needed, what will happen to it, and how long it will be retained for.
Right of access: You have the right to access your personal data that is known to us.
To exercise these rights, please contact us. Please refer to the contact details at the bottom of this Cookie Policy. If you have a complaint about how we handle your data, we would like to hear from you, but you also have the right to submit a complaint to the supervisory authority (the Data Protection Authority).
## 10. Contact details
For questions and/or comments about our Cookie Policy and this statement, please contact us by using the following contact details:
Email: **support@visioforge.com**
This Cookie Policy was synchronized with **cookiedatabase.org** on November 21, 2024.
---END OF PAGE---
# Page: https://www.visioforge.com/how-to-register-purchased-product
# How to register purchased products?
## .Net SDKs
In your code, use the SetLicenseKey method of the main SDK class (VideoCaptureCore/VideoEditCore/MediaPlayerCore). This method takes your license key, the user name (or company name), and the e-mail used during purchase as parameters. Call this method in Form OnCreate/OnLoad events or before the StartAsync/PlayAsync method call.
You can use the SDK installed by a standalone setup file or the NuGet package installed on your project. SDK reinstallation is not required.
## Delphi packages
- Uninstall the TRIAL version if installed
- Remove DCU/BPL package files if required
- Install the FULL version of the software using the link from the registration email
- In your code, use the SetLicenseKey method of control, which takes your license key as a parameter. Call this method in OnCreate/OnLoad events or anywhere else before the Start/Play method call.
## ActiveX controls
Use the SetLicenseKey method of ActiveX control or wrapper class.
## DirectShow SDKs
Each DirectShow SDK contains a custom IVFRegister interface that can be used to apply your license key in the app code. Virtual Camera SDK optionally allows registration using the registry.
## Other products
Call the SetLicenseKey method of the main SDK class with your license key.

---END OF PAGE---
# Page: https://www.visioforge.com/llms
# Information for LLM agents
Our website supports the LLMS.txt API:
- [Short version](/llms.txt)
- [Full version](/llms-full.txt)
---END OF PAGE---
# Page: https://www.visioforge.com/de/
# SDKs für Videoerfassung, -bearbeitung und -wiedergabe
VisioForge bietet Video- und Audio-Frameworks für Softwareentwickler.
Unsere Software wurde entwickelt, um die Erstellung von Anwendungen zu ermöglichen, die Videos von verschiedenen Quellen aufzeichnen können. Sie unterstützt Videoaufnahmen von Webcams und IP-Kameras, die mit gängigen Protokollen wie ONVIF, RTSP und HTTP kompatibel sind, sowie von Camcordern und PC-Bildschirmen. Die Software speichert diese Videos in weit verbreiteten Formaten wie MP4, WebM und AVI.
Was die Videobearbeitung betrifft, so bietet die Software Funktionen zum Ändern des Videoformats und der Auflösung sowie die Möglichkeit, Videodateien zu drehen und zu beschneiden. Sie unterstützt gängige Videoformate für die Wiedergabe und nutzt sowohl Systemcodecs als auch robuste Multicodec-Lösungen wie FFMPEG, die in VLC integriert sind. Dies gewährleistet eine robuste Wiedergabe über verschiedene Formate hinweg.
Während der Videoaufnahme, -bearbeitung oder -wiedergabe bietet die Software die Möglichkeit, Audio- und Videoeffekte sowie Übergänge hinzuzufügen, und umfasst außerdem Funktionen wie Bewegungserkennung und Schnappschusserfassung.

## VIDEOAUFNAHME-SDK .NET
Aufnahme von Videos von Webcams, IP-Kameras, Camcordern, Bildschirmen oder professionellen Videobearbeitungskarten in MP4, AVI, WMV, WebM und anderen Formaten
[PRODUKT SEITE](https://www.visioforge.com/de/video-capture-sdk-net)
## VIDEOBEARBEITUNGS-SDK .NET
Konvertieren, bearbeiten und verarbeiten Sie die verschiedenen Video- und Audioformate (MP4, AVI, WMV, WebM und andere). Fügen Sie Bild- und Texteinblendungen hinzu. Tags bearbeiten.
[PRODUKT SEITE](https://www.visioforge.com/de/video-edit-sdk-net)


## MEDIA PLAYER SDK .NET
Spielen Sie verschiedene Video- und Audioformate (MP4, AVI, WMV, WebM usw.) oder Netzwerk-Streams (RTSP / HLS / HTTP / UDP) ab. Fügen Sie Bild- und Text-Overlays hinzu.
[PRODUKT SEITE](https://www.visioforge.com/de/media-player-sdk-net)
## TESTIMONIALS

#### ANDREW PARISIO
Senior I.T. Systemingenieur
"Wir sind ein Callcenter und verwenden die VisioForge-Steuerung, um 100 % unserer Agenten aufzuzeichnen, während sie telefonieren. Dieses Produkt ist einfacher zu bedienen, funktioniert besser, und mit dem reaktionsschnellen und erstaunlichen Support von Roman hat es unsere Aufzeichnungslösung zum Besseren verändert. Danke!!!"

#### SANTHOSH V.
.NET-Entwickler, Xminds Solutions
"Mir hat Ihr Video Edit SDK .Net sehr gut gefallen, die wunderbaren Funktionen, die es unterstützt, wie z.B. das Audio Mixing. Und ja, der Client-Support ist eine weitere hervorragende Sache, wenn man bedenkt, dass extreme Entwicklungen wie die Videobearbeitung einen guten Support benötigen, bei dem Sie alle Anforderungen erfüllen."

#### JEREMY LITTLER
UniteCast Lead Developer
"Video Capture SDK .NET ist ein hervorragendes Paket für die Entwicklung videogestützter Anwendungen in Visual Studio. Das Framework von VisioForge übertrifft die in anderen SDKs von Drittanbietern verfügbaren Funktionen bei weitem. VF hat es geschafft, eine extrem robuste Lösung bereitzustellen, die sich perfekt in aktuelle und neue Videostandards integrieren lässt."
## KUNDEN
- 


- 


- 


## PLATFORMS
Die SDKs unterstützen derzeit die folgenden Plattformen
Windows

7 und später
macOS

11 und später
x64- und ARM64-Architekturen
Linux

einschließlich Ubuntu, Raspberry Pi und Nvidia Jetson
iOS

12 und später
Android

11 und später
Mit modernen plattformübergreifenden Frameworks wie MAUI und Avalonia können Sie denselben Code auf mehreren Plattformen ausführen.
## PROGRAMMIERSPRACHEN
Wir haben sowohl High-Level-SDKs für die Entwicklung von Anwendungen in C#, VB.Net und Delphi als auch Low-Level-SDKs für die Entwicklung in C++. Xamarin-, MAUI- oder Avalonia-Frameworks können verwendet werden, um plattformübergreifende .Net-Anwendungen zu schreiben.
C#

VB.Net

C++

Delphi

## MÖGLICHE ANWENDUNGSFÄLLE
Der Einsatz der Multimedia-SDKs von VisioForge kann die Entwicklung verschiedener innovativer Anwendungen ermöglichen. Hier sind einige Ideen:
### Software für Videokonferenzen
Erstellen Sie eine hochmoderne Videokonferenzanwendung mit den VisioForge Video- und Audio-Frameworks für Entwickler, die hochauflösende Video- und kristallklare Audiofunktionen bieten. Integrieren Sie Funktionen wie anpassbare virtuelle Hintergründe, Rauschunterdrückung und Augmented-Reality-Filter, um Besprechungen noch ansprechender zu gestalten. Ermöglichen Sie interaktive Elemente wie die gemeinsame Nutzung von Bildschirmen in Echtzeit, gemeinsame Whiteboards und die Aufzeichnung von Sitzungen. Gestalten Sie die Benutzeroberfläche so, dass sie auch für Benutzer mit geringen technischen Kenntnissen problemlos eingerichtet und verbunden werden kann. Hochentwickelte Sicherheitsprotokolle, die sicherstellen, dass vertrauliche Besprechungen vertraulich bleiben, machen es zu einer idealen Lösung für Unternehmen, Bildungseinrichtungen und den privaten Gebrauch.
### Systeme zur Sicherheitsüberwachung
Entwicklung eines umfassenden Sicherheitsüberwachungssystems mit VisioForge-Frameworks. Dieses System könnte über eine Echtzeit-Videoverarbeitung mit Unterstützung für mehrere Kameraeingänge verfügen und so eine umfassende Abdeckung und hochauflösendes Bildmaterial bieten. Implementieren Sie fortschrittliche KI-Algorithmen für Gesichtserkennung, Bewegungserkennung und Anomalie-Warnungen, um die Sicherheitsmaßnahmen zu verbessern. Das System könnte auch Funktionen wie Nachtsichtkompatibilität, automatische Aufzeichnung von Vorfällen und sofortige Warnmeldungen an das Sicherheitspersonal oder die Strafverfolgungsbehörden umfassen. Sicherstellung einer einfachen Skalierbarkeit, um unterschiedliche Größen von Räumlichkeiten zu berücksichtigen, von kleinen Einzelhandelsgeschäften bis hin zu großen Industriekomplexen.
### Live-Streaming-Plattformen
Nutzen Sie die SDKs von VisioForge, um eine robuste Live-Streaming-Plattform aufzubauen, die hochwertige Video- und Audiostreams verarbeiten kann. Diese Plattform könnte Multi-Kamera-Setups unterstützen, die einen dynamischen Wechsel des Blickwinkels während Live-Events ermöglichen. Integration von Echtzeit-Videoeffekten und -Übergängen für ein professionelles Sendegefühl. Implementierung von Streaming mit adaptiver Bitrate, um ein optimales Seherlebnis auf verschiedenen Geräten und bei unterschiedlichen Internetgeschwindigkeiten zu gewährleisten. Bieten Sie Funktionen für die Interaktion mit den Zuschauern, wie Live-Chats, Umfragen und Fragerunden. Bieten Sie Monetarisierungsoptionen wie Pay-per-View, Abonnements oder Werbung an. Detaillierte Analysemöglichkeiten für Inhaltsersteller, um die Zuschauerinteraktion zu verfolgen und ihre Sendungen zu optimieren.
### Videoschnittplätze
Entwicklung eines umfassenden Videobearbeitungsprogramms mit Video- und Audio-Frameworks für Entwickler, das sich sowohl an Amateure als auch an professionelle Cutter richtet. Diese Suite könnte Mehrspurbearbeitung, verschiedene Videoeffekte, Farbkorrektur und Audiomixing-Tools bieten. Dazu gehören auch fortgeschrittene Funktionen wie Chroma-Keying, Motion-Tracking und 3D-Bearbeitungsfunktionen. Unterstützung für verschiedene Dateiformate und hochauflösende Videoausgabe. Gestalten Sie die Benutzeroberfläche intuitiv und dennoch leistungsstark, mit anpassbaren Workflows und Shortcuts für eine effiziente Bearbeitung.
### Benutzerdefinierte Medienplayer
Erstellen Sie spezialisierte Medienplayer mit adaptivem Streaming, Unterstützung für Nischenformate und anpassbaren Oberflächen. Passen Sie die Funktionen an spezifische Nutzerbedürfnisse in verschiedenen Kontexten wie Bildung, Unterhaltung oder professionellem Einsatz an. Bieten Sie einzigartige Funktionen wie erweiterte Zugänglichkeitsoptionen, Wiedergabelistenverwaltung und Integration mit Inhaltsbibliotheken.
Um Beispielanwendungen zu erhalten, besuchen Sie bitte unser [GitHub.](https://github.com/visioforge/)
---END OF PAGE---
# Page: https://www.visioforge.com/es/
# SDK de captura, edición y reproducción de vídeo
VisioForge ofrece marcos de vídeo y audio para desarrolladores de software.
Nuestro software está diseñado para permitir la creación de aplicaciones que puedan capturar vídeo de diversas fuentes. Admite la grabación de vídeo desde cámaras web y cámaras IP compatibles con protocolos populares como ONVIF, RTSP y HTTP, así como desde videocámaras y pantallas de PC. El software guarda estos vídeos en formatos ampliamente utilizados como MP4, WebM y AVI.
En cuanto a la edición de vídeo, el programa permite cambiar el formato y la resolución del vídeo, así como rotar y recortar archivos de vídeo. Es compatible con los formatos de vídeo más comunes para su reproducción, aprovechando tanto los códecs del sistema como las sólidas soluciones multicódec como FFMPEG integrado con VLC. Esto garantiza una experiencia de reproducción sólida en varios formatos.
Durante la captura, edición o reproducción de vídeo, el software ofrece la posibilidad de añadir efectos y transiciones de audio y vídeo, y también incluye funciones como la detección de movimiento y la captura de instantáneas.

## SDK DE CAPTURA DE VIDEO .NET
Captura vídeo desde cámaras web, cámaras IP, videocámaras, pantallas o tarjetas de edición de vídeo profesionales a MP4, AVI, WMV, WebM y otros formatos
[PÁGINA DEL PRODUCTO](https://www.visioforge.com/es/video-capture-sdk-net)
## SDK DE EDICIÓN DE VIDEO .NET
Convierte, edita y procesa los distintos formatos de vídeo y audio (MP4, AVI, WMV, WebM y otros). Añade superposiciones de imágenes y texto. Edita etiquetas.
[PÁGINA DEL PRODUCTO](https://www.visioforge.com/es/video-edit-sdk-net)


## SDK DE REPRODUCTOR MULTIMEDIA .NET
Reproduce varios formatos de vídeo y audio (MP4, AVI, WMV, WebM, etc.) o secuencias de red (RTSP / HLS / HTTP / UDP). Añade superposiciones de imágenes y texto.
[PÁGINA DEL PRODUCTO](https://www.visioforge.com/es/media-player-sdk-net)
## TESTIMONIOS

#### ANDRÉS PARISIO
Ingeniero superior de sistemas informáticos
"Somos un centro de llamadas y utilizamos el control VisioForge para grabar el 100% de nuestros agentes mientras están en llamada. Este producto es más fácil de usar, funciona mejor, y con Roman proporcionando tanto apoyo sensible y sorprendente que ha cambiado nuestra solución de grabación para mejor. Gracias!"

#### SANTHOSH V.
Desarrollador .NET, Xminds Solutions
"Realmente me gustó su Video Edit SDK .Net, las maravillosas características que soporta como la mezcla de audio. Y sí, el soporte al cliente es otra cosa excelente teniendo en cuenta el hecho de que el desarrollo extremo como el procesamiento de vídeo necesitará un buen apoyo donde usted satisface todas las necesidades."

#### Jeremy Littleler
Desarrollador jefe de UniteCast
"Video Capture SDK .NET es un paquete excepcional para el desarrollo de aplicaciones centradas en vídeo en Visual Studio. El framework de VisioForge supera con creces las prestaciones disponibles en otros SDK de terceros. VF ha conseguido proporcionar una solución extremadamente robusta, que se integra perfectamente con los estándares de vídeo actuales y emergentes."
## CLIENTES
- 


- 


- 


## PLATAFORMAS
Actualmente, los SDK son compatibles con las siguientes plataformas
Ventanas

7 y posteriores
macOS

11 y posteriores
Arquitecturas x64 y ARM64
Linux

incluyendo Ubuntu, Raspberry Pi y Nvidia Jetson
iOS

12 y posteriores
Androide

11 y posteriores
Puedes ejecutar el mismo código en varias plataformas utilizando marcos multiplataforma modernos como MAUI y Avalonia.
## IDIOMAS DE PROGRAMACIÓN
Disponemos tanto de SDK de alto nivel para desarrollar aplicaciones en C#, VB.Net y Delphi, como de SDK de bajo nivel para desarrollar en C++. Se pueden utilizar los marcos Xamarin, MAUI o Avalonia para escribir aplicaciones .Net multiplataforma.
C#

VB.Net

C++

Delfos

## POSIBLES CASOS DE USO
Aprovechar los SDK multimedia de VisioForge puede permitir el desarrollo de diversas aplicaciones innovadoras. He aquí algunas ideas:
### Software de videoconferencia
Cree una aplicación de videoconferencia de última generación con los marcos de vídeo y audio VisioForge para desarrolladores, que ofrecen funciones de vídeo de alta definición y audio cristalino. Incorpore funciones como fondos virtuales personalizables, cancelación de ruido y filtros de realidad aumentada para una experiencia de reunión más atractiva. Permita elementos interactivos como la pantalla compartida en tiempo real, las pizarras colaborativas y la grabación de sesiones. Diseñe la interfaz para que sea fácil de usar, garantizando una configuración y conexión sin problemas incluso para usuarios con conocimientos técnicos mínimos. Incluye protocolos de seguridad avanzados para garantizar la privacidad de las reuniones confidenciales, lo que la convierte en una solución ideal para uso corporativo, educativo y personal.
### Sistemas de vigilancia
Desarrolle un sistema integral de vigilancia de la seguridad utilizando marcos VisioForge. Este sistema podría incluir procesamiento de vídeo en tiempo real con soporte para múltiples entradas de cámara, ofreciendo una cobertura completa y secuencias de alta resolución. Implementar algoritmos avanzados de IA para el reconocimiento facial, detección de movimiento y alertas de anomalías para mejorar las medidas de seguridad. El sistema también podría incluir funciones como compatibilidad con visión nocturna, grabación automática de incidentes y alertas instantáneas al personal de seguridad o a las fuerzas del orden. Garantice una escalabilidad sencilla para adaptarse a locales de distintos tamaños, desde pequeñas tiendas minoristas hasta grandes complejos industriales.
### Plataformas de retransmisión en directo
Utiliza los SDK de VisioForge para crear una sólida plataforma de retransmisión en directo, capaz de manejar flujos de vídeo y audio de alta calidad. Esta plataforma podría soportar configuraciones multicámara, permitiendo el cambio dinámico de ángulos durante los eventos en directo. Integrar efectos de vídeo y transiciones en tiempo real para dar una sensación de retransmisión profesional. Implementar una transmisión con tasa de bits adaptable para garantizar una experiencia de visionado óptima en distintos dispositivos y velocidades de Internet. Incluya funciones para la interacción de los espectadores, como chats en directo, encuestas y sesiones de preguntas y respuestas. Ofrezca opciones de monetización como pago por visión, suscripciones o publicidad. Proporcionar análisis detallados para que los creadores de contenidos puedan seguir la participación de los espectadores y optimizar sus emisiones.
### Suites de edición de vídeo
Desarrollar una completa suite de edición de vídeo con marcos de vídeo y audio para desarrolladores, dirigida tanto a editores aficionados como profesionales. Esta suite podría ofrecer edición multipista, diversos efectos de vídeo, corrección del color y herramientas de mezcla de audio. Incluye funciones avanzadas como incrustación por croma, seguimiento del movimiento y funciones de edición en 3D. Garantiza la compatibilidad con varios formatos de archivo y la salida de vídeo de alta resolución. Diseña una interfaz intuitiva pero potente, con flujos de trabajo personalizables y accesos directos para una edición eficaz.
### Reproductores multimedia personalizados
Cree reproductores multimedia especializados con transmisión adaptable, compatibilidad con formatos especializados e interfaces personalizables. Adapte las funciones a las necesidades específicas de los usuarios en diversos contextos, como la educación, el entretenimiento o el uso profesional. Ofrezca funcionalidades únicas como opciones de accesibilidad mejoradas, gestión de listas de reproducción e integración con bibliotecas de contenidos.
Para obtener ejemplos de aplicaciones, visite nuestro [GitHub.](https://github.com/visioforge/)
---END OF PAGE---
# Page: https://www.visioforge.com/it/
# SDK di acquisizione, modifica e riproduzione video
VisioForge fornisce framework video e audio per gli sviluppatori di software.
Il nostro software è stato progettato per consentire la creazione di applicazioni in grado di acquisire video da varie fonti. Supporta la registrazione video da webcam e telecamere IP compatibili con i protocolli più diffusi, come ONVIF, RTSP e HTTP, nonché da videocamere e schermi di PC. Il software salva questi video in formati molto diffusi come MP4, WebM e AVI.
Per quanto riguarda l'editing video, il software offre funzionalità per modificare il formato e la risoluzione dei video, oltre alla possibilità di ruotare e ritagliare i file video. Supporta i formati video più comuni per la riproduzione, sfruttando sia i codec di sistema che le robuste soluzioni multi-codec come FFMPEG integrato con VLC. Ciò garantisce un'esperienza di riproduzione solida in vari formati.
Durante l'acquisizione, la modifica o la riproduzione dei video, il software offre la possibilità di aggiungere effetti e transizioni audio e video e include anche funzioni come il rilevamento del movimento e l'acquisizione di istantanee.

## SDK DI CATTURA VIDEO .NET
Capture Video da webcam, telecamere IP, videocamere, schermi o schede di editing video professionali e salvarli in formati come MP4, AVI, WMV e WebM.
[PAGINA DEL PRODOTTO](https://www.visioforge.com/it/video-capture-sdk-net)
## SDK DI MODIFICA VIDEO .NET
Conversione, modifica ed elaborazione di vari formati video e audio (MP4, AVI, WMV, WebM e altri). Aggiungere sovrapposizioni di immagini e testo. Modifica dei tag.
[PAGINA DEL PRODOTTO](https://www.visioforge.com/it/video-edit-sdk-net)


## SDK LETTORE MULTIMEDIALE .NET
Riproduzione di vari formati video e audio (MP4, AVI, WMV, WebM, ecc.) o di flussi di rete (RTSP / HLS / HTTP / UDP). Aggiungere sovrapposizioni di immagini e testo.
[PAGINA DEL PRODOTTO](https://www.visioforge.com/it/media-player-sdk-net)
## TESTIMONIANZE

#### ANDREA PARISIO
Ingegnere di sistemi informatici senior
"Siamo un call center e utilizziamo il controllo VisioForge per registrare il 100% dei nostri agenti durante le chiamate. Questo prodotto è più facile da usare, funziona meglio e con Roman che fornisce un'assistenza reattiva e straordinaria ha cambiato in meglio la nostra soluzione di registrazione. Grazie!!!"

#### SANTHOSH V.
Sviluppatore .NET, Xminds Solutions
"Mi è piaciuto molto il vostro Video Edit SDK .Net, le meravigliose funzionalità che supporta come il mixaggio audio. E sì, il supporto del client è un'altra cosa eccellente, considerando il fatto che lo sviluppo estremo come l'elaborazione video ha bisogno di un buon supporto che soddisfi tutte le esigenze."

#### JEREMY LITTLER
Sviluppatore capo di UniteCast
"Video Capture SDK .NET è un pacchetto eccezionale per lo sviluppo di applicazioni video-centriche in Visual Studio. Il framework di VisioForge ha superato di gran lunga le funzionalità disponibili in altri SDK di terze parti. VF è riuscita a fornire una soluzione estremamente robusta, che si integra perfettamente con gli standard video attuali ed emergenti".
## CLIENTI
- 


- 


- 


## PIATTAFORME
Attualmente gli SDK supportano le seguenti piattaforme
Finestre

7 e successivi
macOS

11 e successivi
Architetture x64 e ARM64
Linux

tra cui Ubuntu, Raspberry Pi e Nvidia Jetson
iOS

12 e seguenti
Android

11 e successivi
È possibile eseguire lo stesso codice su più piattaforme utilizzando moderni framework multipiattaforma come MAUI e Avalonia.
## LINGUAGGI DI PROGRAMMAZIONE
Abbiamo sia SDK di alto livello per lo sviluppo di applicazioni in C#, VB.Net e Delphi, sia SDK di basso livello per lo sviluppo in C++. I framework Xamarin, MAUI o Avalonia possono essere utilizzati per scrivere applicazioni .Net multipiattaforma.
C#

VB.Net

C++

Delfi

## POSSIBILI CASI D'USO
L'utilizzo degli SDK multimediali di VisioForge può consentire lo sviluppo di diverse applicazioni innovative. Ecco alcune idee:
### Software per videoconferenze
Create un'applicazione di videoconferenza all'avanguardia con i framework video e audio VisioForge per sviluppatori, che offrono funzionalità video ad alta definizione e audio cristallino. Incorporate funzioni come sfondi virtuali personalizzabili, cancellazione del rumore e filtri di realtà aumentata per un'esperienza di riunione più coinvolgente. Permettere elementi interattivi come la condivisione dello schermo in tempo reale, le lavagne collaborative e la registrazione della sessione. Progettare l'interfaccia in modo che sia facile da usare, assicurando una configurazione e una connessione fluide anche per gli utenti con competenze tecniche minime. Includere protocolli di sicurezza avanzati per garantire che le riunioni riservate rimangano private, rendendolo una soluzione ideale per l'uso aziendale, educativo e personale.
### Sistemi di sorveglianza di sicurezza
Sviluppare un sistema di sorveglianza completo utilizzando i framework di VisioForge. Questo sistema potrebbe essere caratterizzato da un'elaborazione video in tempo reale con il supporto di più ingressi per telecamere, offrendo una copertura completa e filmati ad alta risoluzione. Implementare algoritmi avanzati di intelligenza artificiale per il riconoscimento facciale, il rilevamento del movimento e gli avvisi di anomalia per migliorare le misure di sicurezza. Il sistema potrebbe anche includere funzioni come la compatibilità con la visione notturna, la registrazione automatica degli incidenti e gli avvisi istantanei al personale di sicurezza o alle forze dell'ordine. Garantire una facile scalabilità per adattarsi a locali di varie dimensioni, dai piccoli negozi al dettaglio ai grandi complessi industriali.
### Piattaforme di streaming live
Utilizzate gli SDK di VisioForge per costruire una solida piattaforma di live streaming, in grado di gestire flussi video e audio di alta qualità. Questa piattaforma potrebbe supportare configurazioni multi-camera, consentendo la commutazione dinamica dell'angolazione durante gli eventi live. Integrare effetti e transizioni video in tempo reale per ottenere un'atmosfera da trasmissione professionale. Implementare lo streaming a bitrate adattivo per garantire un'esperienza visiva ottimale su diversi dispositivi e velocità di Internet. Includere funzioni per l'interazione con gli spettatori, come chat in diretta, sondaggi e sessioni di domande e risposte. Offrire opzioni di monetizzazione come pay-per-view, abbonamenti o pubblicità. Fornire analisi dettagliate ai creatori di contenuti per monitorare il coinvolgimento degli spettatori e ottimizzare le loro trasmissioni.
### Suite di editing video
Sviluppare una suite di editing video completa con framework video e audio per gli sviluppatori, che si rivolga sia agli editor amatoriali che a quelli professionali. Questa suite potrebbe offrire editing multitraccia, vari effetti video, correzione del colore e strumenti di mixaggio audio. Include funzionalità avanzate come il chroma keying, il motion tracking e le capacità di editing 3D. Garantisce il supporto di vari formati di file e l'uscita video ad alta risoluzione. Progettare un'interfaccia intuitiva ma potente, con flussi di lavoro personalizzabili e scorciatoie per un editing efficiente.
### Lettori multimediali personalizzati
Costruire lettori multimediali specializzati con streaming adattivo, supporto per formati di nicchia e interfacce personalizzabili. Adattare le funzionalità alle esigenze specifiche degli utenti in vari contesti, come l'istruzione, l'intrattenimento o l'uso professionale. Offrire funzionalità uniche come opzioni di accessibilità avanzate, gestione di playlist e integrazione con librerie di contenuti.
Per ottenere applicazioni di esempio, visitate il nostro [GitHub.](https://github.com/visioforge/)
---END OF PAGE---
# Page: https://www.visioforge.com/de/video-capture-sdk-net
[Plattformübergreifend]
# Video Capture SDK .Net
Version 15.9
Unser .Net SDK integriert nahtlos Videoaufnahme- und -verarbeitungsfunktionen in Softwareanwendungen. Dieses vielseitige SDK erleichtert die Video- und Audiowiedergabe und unterstützt die Aufnahme von verschiedenen Quellen, einschließlich USB-Webcams, IP-Kameras, Blackmagic Decklink-Karten und Camcordern. Es bietet umfassende Unterstützung für verschiedene Ausgabeformate, darunter MP4, WebM, AVI, WMV, MPEG-1/2 und andere. Entwicklern steht außerdem eine umfangreiche Bibliothek mit Video- und Audioeffekten zur Verfügung, um Multimedia-Inhalte zu verbessern und anzupassen.
Darüber hinaus bietet unser SDK eine robuste plattformübergreifende Kompatibilität, die eine nahtlose Integration mit Windows-, Linux-, macOS-, iOS- und Android-Umgebungen gewährleistet. Diese plattformübergreifende Anpassungsfähigkeit ermöglicht es Entwicklern, Anwendungen zu erstellen, die über verschiedene Betriebssysteme und Geräte hinweg konsistent funktionieren und den Benutzern ein konsistentes und flexibles Multimedia-Erlebnis bieten.

#### DOWNLOADS
[Installationsprogramm (Windows)](https://s3.us-west-2.amazonaws.com/files.visioforge.com/trials/visioforge_sdks_installer_dotnet_setup.exe)[NuGet-Installationshandbuch](https://www.visioforge.com/help/docs/dotnet/install/)[Samples auf GitHub](https://github.com/visioforge/.Net-SDK-s-samples)

#### KAUFEN
[Preise prüfen oder bestellen](https://www.visioforge.com/de/buy)

#### HILFE
[Online-Hilfe](https://www.visioforge.com/help/docs/dotnet/videocapture/)[Änderungsliste](https://www.visioforge.com/help/docs/dotnet/changelog/)[Lizenzvereinbarung](/help/docs/eula/)

## SDK STRUKTUR
Das SDK ist in hohem Maße kompatibel mit über 10 verschiedenen Video- und Audio-Eingangsquellen und unterstützt über 20 verschiedene Ausgangsformate. Es bietet Entwicklern Flexibilität, indem es eine breite Palette von Hardware-Optionen für Eingangs- und Ausgangskonfigurationen ermöglicht. Mit der Fähigkeit, sowohl Video- als auch Audioinhalte zu verarbeiten, kann das SDK verarbeitete Daten in Dateien speichern oder über eine Netzwerkverbindung streamen.
## VIDEO-AUFNAHME-PIPELINE
Während der Vorschau- oder Erfassungsphase können Video- und Audioströme durch verschiedene Effekte verarbeitet werden. Anschließend werden diese Ströme aufgeteilt und zur weiteren Bearbeitung an Encoder und Audio-/Video-Renderer weitergeleitet.


## AUSGABEFORMATE
Das SDK unterstützt eine Vielzahl gängiger Video-, Audio- und Bildformate und Codecs, wie MP4 (mit H264/HEVC für Video und AAC für Audio), WebM (mit VP8/VP9/AV1 für Video und Vorbis oder OPUS für Audio), sowie WMV, MP3, JPEG, GIF und PNG.
## VIDEOBEARBEITUNG
Sie können Text, Bilder oder GIF-Logos hinzufügen, Helligkeit, Kontrast, Sättigung oder Farbton anpassen, die Größe ändern, Inhalte zuschneiden oder drehen und Chroma-Keying oder verschiedene Videoeffekte anwenden, um Ihre Inhalte zu verbessern.


## AUDIOVERARBEITUNG
Integrieren Sie einen Equalizer in Ihre Anwendung, mit dem die Benutzer ihr Klangerlebnis feinabstimmen können. Mit dieser Funktion können sie bestimmte Audiofrequenzen wie Höhen, Mitten und Bässe anpassen, um ihr gewünschtes Klangprofil zu erreichen. Darüber hinaus können die Benutzer die Audiopegel normalisieren oder die Lautstärke verstärken und so eine präzise Kontrolle über die Audioausgabe erhalten. Viele andere Audioeffekte stehen für weitere Anpassungen zur Verfügung.
## VisioForge Video Capture SDK .Net Die wichtigsten Merkmale sind:
### Unterstützte Video- und Audioquellen
- USB-Webkameras und andere Aufnahmegeräte (einschließlich 4K-Geräte)
- ONVIF IP-Kameras (PTZ und andere APIs unterstützt)
- JPEG/MJPEG, MPEG-4 und H264 HTTP/RTSP/RTMP IP-Kameras/Server, unterstützt HD-Format
- Blackmagic Decklink-Geräte
- Quelle für Bildschirmaufnahmen (einschließlich mehrerer Bildschirme) und Fensteraufnahmen
- Lautsprecher (Loopback)
- NewTek NDI-Geräte
- PCI-Erfassungskarten
- TV-Tuner (mit und ohne internen MPEG-Encoder)
- DV- und HDV-MPEG-2-Camcorder
- FLIR/Teledyne-Kameras (USB3 Vision/GigE)
- Basler Kameras (USB3 Vision/GigE)
- Microsoft Kinect/Kinect 2 für Windows
- Audioaufnahmegeräte und Soundkarten
- ASIO-Geräte
### Ausgabe von Videoformaten
- AVI (mit Audio-/Video-Codecs wie MJPEG, DivX, XviD und x264)
- WMV (Unterstützung von benutzerdefinierten WMV-Profilen. Sie können Streams so konfigurieren, dass sie variable Bitratencodierung (VBR), unkomprimierten Audio- oder Videostream, Videogröße, Puffergröße, Bildrate usw. verwenden)
- DV und MPEG von DV/HDV-Camcordern und TV-Tunern mit internem MPEG-Encoder (DirectCapture-Technologie)
- DV (von einem beliebigen Videoaufnahmegerät)
- MPEG-1/2/4 (einschließlich VCD/SVCD/DVD-Profile) und FLV mit FFMPEG-Wrapper
- WebM (Vorbis + VP8/VP9)
- MP4 H264/HEVC + AAC-Ausgabe über Software-Encoder oder GPU-Encoder (Intel QuickSync, Nvidia CUDA/NVENC oder AMD/ATI AMF)
- Alle von FFMPEG.exe unterstützten Formate (einschließlich MP4 H264/HEVC)
- Benutzerdefinierte Ausgabeformate (mit DirectShow-Filtern von Drittanbietern)
- Animiertes GIF
- MOV
- MPEG-TS
### Ausgabe von Audioformaten
- WAV (komprimiert oder PCM)
- WMA (Windows Media Audio)
- M4A (AAC)
- MP3 (mit LAME)
- FLAC
- Ogg Vorbis
- Speex
### Schnappschuss-Formate
- JPEG
- PNG
- GIF
- BMP
- System.Drawing.Bitmap
- SkiaSharp SKBitmap
### Videoverarbeitung und Effekte (CPU/GPU)
- Bild-Overlay (einschließlich animiertes GIF)
- Textüberlagerung
- Schwenken/Zoomen
- Helligkeit, Kontrast, Sättigung, Farbton, usw.
- Deinterlace
- Denoise
- Größenanpassung an jede Auflösung
- chroma-key
- Einblendung/Ausblendung
- rotieren
- Unterstützung für DirectShow-Filter von Drittanbietern
- unabhängige Videoeffekte für Vorschau und Ausgabe
### Audiobearbeitung und Effekte
- Volumenverstärker
- Equalizer
- 3D-Bass-System
- Normalisierung
- automatische/manuelle Verstärkung
- es gibt viele andere Auswirkungen
### Netzwerk-Streaming-Formate
- HLS (HTTP Live Streaming), kompatibel mit Android und iOS
- RTSP
- Glattes Streaming-Protokoll zu Microsoft IIS Server
- RTMP
- UDP (MPEG-TS/RTP)
- SRT
- YouTube / Facebook Live
- NDI
- WMV (Windows Media Video)
- zu anderen Medienservern und Geräten unter Verwendung einer virtuellen Kamera/Audioquelle
### Andere Merkmale
- Audio/Video-Vorschau
- Fernsehtuning
- Steuerung des Videoaufnahmegeräts
- Videoeingang (Kreuzschienenschnittstelle)
- Videoformat
- Bildrate
- unterstützt Grafikkarten mit mehreren Eingängen
- Kamerasteuerung (Helligkeit, Sättigung usw.)
- Bewegungserkennung
- Barcode-Leser
- OSD (Bildschirmanzeige)
- PIP (Picture-In-Picture) (Videoaufnahmequellen, IP-Kameras und Videodateien werden unterstützt)
- Gesichtserkennung und Objektverfolgung
- Mehrere Ausgabebildschirme
- Timeshift
- Ausgabe in verschlüsselte Videodateien mit dem [Video Encryption SDK](https://www.visioforge.com/de/video-encryption-sdk)
- Ausgabe an [Virtual Camera SDK](https://www.visioforge.com/de/virtual-camera-sdk)
- Unterstützung von Serviceanwendungen
- Unterstützung für das Lesen und Schreiben von Audio-/Videodatei-Tags
- madVR Video Renderer Unterstützung
- Wiedergabe von RTSP- und MJPEG-Streams mit niedriger Latenzzeit von der IP-Kamera
- [OBS (Open Broadcaster Software)](https://obsproject.com/) Streaming
- Gesichtserkennung
### IDE
- Visual Studio 2019 und höher: Visual C#, Visual C++, Visual Basic .NET
- Visual Studio Code
- JetBrains-Reiter
- Kann mit anderen .Net-kompatiblen Anwendungen wie Microsoft Access, Word und Excel verwendet werden.
### UI-Frameworks
- WinForms
- WPF
- WinUI 3 for Desktop
- Avalonia
- GTK#
- MAUI
- Xamarin.Mac
- Xamarin.Android
- Xamarin.iOS
### .Net-Versionen
- .Net Framework 4.6.1 und höher
- .Net Core 3.1
- .Net 5 – .Net 9
### Systemanforderungen
- Windows 10 oder Windows 11
- Ubuntu 22+
- macOS 12+
### Zielplattformen
- Windows 11, Windows 10, Windows 8/8.1, Windows 7 SP1
- Windows Server 2016 und höher
- Android 8 und höher
- Linux
- macOS
- iOS
### Beschränkungen des Versuchs
In der Testversion wird ein Wasserzeichen im Videofenster angezeigt.
## CODE-SAMPLES
### VIDEO VORSCHAU
Der Beispielcode zeigt, wie man Standard-Video- und Audioquellen konfiguriert, Video auf dem Bildschirm anzeigt und Audio über Standardlautsprecher wiedergibt. Es werden die Standard-Video- und -Audioformate verwendet.
### VIDEOAUFNAHME IN MP4
MP4-Datei [Aufnahme von einer Webkamera](https://www.visioforge.com/de/save-webcam) und Mikrofon, mit Video-/Audiovorschau.
Mit weiteren Codes können Sie H264/HEVC- und AAC-Einstellungen vornehmen.
Standardmäßig wird ein GPU-H264-Encoder verwendet (falls verfügbar).
### IP RTSP KAMERA VORSCHAU
RTSP-Kameravorschau mit CPU/GPU-Videodekodierung und automatischer Codec-Erkennung.
Sie können die ONVIF-Erkennung verwenden, um alle IP-Kameras in Ihrem lokalen Netzwerk zu finden.
## BILDSCHIRMAUFNAHME
SDK kann Videos von einem Bildschirm oder einem bestimmten Fenster aufnehmen.
Sie können den gesamten Bildschirm oder ein bestimmtes Rechteck aufnehmen. Die Bildrate kann angepasst werden.
### TEXT- UND BILD-OVERLAYS
Sie können Text (einschließlich Bildlauf), Uhrzeit/Datum und Bildeinblendungen hinzufügen.
SDK unterstützt alle gängigen Bildformate, einschließlich JPEG, PNG, GIF und SVG.

#### EDITION

#### STANDARD

#### PROFESSIONELL

#### PREMIUM
Unterstützte Eingabegeräte und andere Quellen
- Web-Kameras
- TV-Tuner und Aufnahmekarten
- DV- und MPEG-Camcorder
- Bildschirmaufnahme
- HTTP/RTSP/ONVIF IP-Kameras
- UDP, TCP, RTMP und andere Netzwerkströme
- Blackmagic Decklink
- DVB-T/DVB-C/DVB-S/ATSC-Geräte (BETA)
- Microsoft Kinect für Windows
Video-Vorschau
Frame Grabber
Videoverarbeitung
Audioverarbeitung
Unterstützung von HD- und 4K-Videos
Fernsehtuning
Netzwerk-Streaming im WMV-Format
Netzwerk-Streaming über RTMP/RTSP/UDP/NDI
Chroma-Schlüssel
Bewegungserkennung
Videoverarbeitung mit DirectShow-Filtern
OSD (Bildschirmanzeige)
Bild-im-Bild-Darstellung
Name der Ausgabedatei on-the-fly ändern
Mehrere Ausgabebildschirme
GPU-beschleunigte Videoeffekte
Ausgabe an die virtuelle Kamera SDK
Video Encryption SDK Unterstützung
Gesichtsverfolgung
Ausgabeformate
- AVI
- WMV (Windows Media Video)
- WMA (Windows Media Audio)
- WAV
- MP3
- Ogg Vorbis
- Speex
- DV-Video
- DV/MPEG-1/2/4 (über TV-Tuner mit internem MPEG-Encoder oder DV/HDV-Camcorder)
- Flash-Video (FLV) mit FFMPEG
- WebM
- Benutzerdefinierte Ausgabeformate mit externen DirectShow-Filtern
- MPEG-1/2/4 mit FFMPEG
- MP4 (H264/HEVC + AAC) mit Software, Intel QuickSync, Nvidia NVENC/CUDA oder AMD Radeon Encodern
Unsere Software bietet eine unbegrenzte Nutzung ohne störende Bildschirme und gewährleistet eine
nahtlose Erfahrung. Wir bieten einen 30-tägigen Testzeitraum, damit Sie alle
alle Funktionen erkunden können, bevor Sie sich festlegen.
Mit einer regulären Lizenz erhalten Sie
erhalten Sie für ein Jahr kostenlose Minor- und Major-Upgrades; nach diesem Zeitraum
funktioniert das SDK weiter wie bisher.
Alternativ dazu bietet die
Lifetime-Lizenz unbegrenzte Updates auf unbestimmte Zeit zur Verfügung. Zusätzlich,
bieten wir vorrangigen Support und Fehlerbehebungen. Die reguläre Lizenz wird jährlich abgerechnet
jährlich abgerechnet und automatisch verlängert, aber Sie können Ihr Abonnement
Abonnement jederzeit kündigen.
Das SDK ist für die nicht-kommerzielle Nutzung kostenlos. Bitte kontaktieren Sie uns, um eine kostenlose Lizenz zu erhalten.
---END OF PAGE---
# Page: https://www.visioforge.com/es/video-capture-sdk-net
[Plataforma cruzada]
# Video Capture SDK .Net
versión 15.9
Nuestro SDK .Net integra a la perfección funciones de captura y procesamiento de vídeo en aplicaciones de software. Este versátil SDK facilita la reproducción de vídeo y audio y admite la captura desde diversas fuentes, como cámaras web USB, cámaras IP, tarjetas Blackmagic Decklink y videocámaras. Ofrece una amplia compatibilidad con diferentes formatos de salida, como MP4, WebM, AVI, WMV, MPEG-1/2 y otros. También proporciona a los desarrolladores una amplia biblioteca de efectos de vídeo y audio para mejorar y personalizar los contenidos multimedia.
Además, nuestro SDK ofrece una sólida compatibilidad entre plataformas, lo que garantiza una integración perfecta con entornos Windows, Linux, macOS, iOS y Android. Esta adaptabilidad multiplataforma permite a los desarrolladores crear aplicaciones que funcionan de forma coherente en varios sistemas operativos y dispositivos, proporcionando a los usuarios una experiencia multimedia consistente y flexible.

#### DESCARGAS
[Instalador (Windows)](https://s3.us-west-2.amazonaws.com/files.visioforge.com/trials/visioforge_sdks_installer_dotnet_setup.exe)[Guía de instalación de NuGet](https://www.visioforge.com/help/docs/dotnet/install/)[Samples en GitHub](https://github.com/visioforge/.Net-SDK-s-samples)

#### COMPRAR
[Consultar precios o hacer un pedido](https://www.visioforge.com/es/buy)

#### AYUDA
[Ayuda en línea](https://www.visioforge.com/help/docs/dotnet/videocapture/)[Registro de cambios](https://www.visioforge.com/help/docs/dotnet/changelog/)[Acuerdo de licencia](/help/docs/eula/)

## ESTRUCTURA DEL SDK
El SDK es altamente compatible con más de 10 fuentes de entrada de vídeo y audio diferentes y admite más de 20 formatos de salida distintos. Proporciona flexibilidad a los desarrolladores al permitir una amplia gama de opciones de hardware para las configuraciones de entrada y salida. Con capacidad para procesar contenidos de vídeo y audio, el SDK puede guardar los datos procesados en archivos o transmitirlos a través de una conexión de red.
## PROCESO DE CAPTURA DE VÍDEO
Durante las fases de previsualización o captura, los flujos de vídeo y audio pueden procesarse mediante diversos efectos. Después, estos flujos se dividen y se dirigen a codificadores y renderizadores de audio/vídeo para su tratamiento posterior.


## FORMATOS DE SALIDA
El SDK es compatible con una amplia gama de formatos y códecs populares de vídeo, audio e imagen, como MP4 (que utiliza H264/HEVC para vídeo y AAC para audio), WebM (que utiliza VP8/VP9/AV1 para vídeo y Vorbis u OPUS para audio), así como WMV, MP3, JPEG, GIF y PNG.
## PROCESAMIENTO DE VÍDEO
Puede añadir texto, imágenes o logotipos GIF, ajustar el brillo, el contraste, la saturación o el tono, cambiar el tamaño, recortar o girar el contenido y aplicar efectos de croma o varios efectos de vídeo para mejorar el contenido.


## PROCESAMIENTO DE AUDIO
Incorpore un ecualizador a su aplicación, que permita a los usuarios ajustar con precisión su experiencia de audio. Esta función les permite ajustar frecuencias de audio específicas, como agudos, medios y graves, para conseguir el perfil de sonido deseado. Además, los usuarios pueden normalizar los niveles de audio o amplificar el volumen, proporcionando un control preciso sobre la salida de audio. También tienen a su disposición muchos otros efectos de audio para una mayor personalización.
## Las principales características de VisioForge Video Capture SDK .Net son:
### Fuentes de vídeo y audio compatibles
- Cámaras web USB y otros dispositivos de captura (incluidos dispositivos 4K)
- Cámaras IP ONVIF (compatibles con PTZ y otras API)
- Cámaras/servidores IP JPEG/MJPEG, MPEG-4 y H.264 HTTP/RTSP/RTMP, compatibles con el formato HD
- Dispositivos Blackmagic Decklink
- Fuente de pantalla (incluyendo varias pantallas) y captura de ventanas
- Altavoces (loopback)
- Dispositivos NewTek NDI
- Tarjetas de captura PCI
- Sintonizadores de TV (con y sin codificador MPEG interno)
- Videocámaras DV y HDV MPEG-2
- Cámaras FLIR/Teledyne (USB3 Vision/GigE)
- Cámaras Basler (USB3 Vision/GigE)
- Microsoft Kinect/Kinect 2 para Windows
- Dispositivos de captura de audio y tarjetas de sonido
- Dispositivos ASIO
### Formatos de vídeo de salida
- AVI (con códecs de audio/vídeo como MJPEG, DivX, XviD y x264)
- WMV (compatibilidad con perfiles WMV personalizados. Puede configurar secuencias para utilizar codificación de velocidad de bits variable (VBR), secuencias de audio o vídeo sin comprimir, tamaño de vídeo, tamaño de búfer, velocidad de fotogramas, etc.).
- DV y MPEG desde videocámaras DV/HDV y sintonizadores de TV con codificador MPEG interno (tecnología DirectCapture)
- DV (desde cualquier dispositivo de captura de vídeo)
- MPEG-1/2/4 (incluidos los perfiles VCD/SVCD/DVD) y FLV mediante la envoltura FFMPEG
- WebM (Vorbis + VP8/VP9)
- Salida MP4 H264/HEVC + AAC mediante codificador de software o codificador GPU (Intel QuickSync, Nvidia CUDA/NVENC, o AMD/ATI AMF)
- Todos los formatos compatibles con FFMPEG.exe (incluido MP4 H264/HEVC)
- Formatos de salida personalizados (mediante filtros DirectShow de terceros)
- GIF animado
- MOV
- MPEG-TS
### Formatos de audio de salida
- WAV (comprimido o PCM)
- WMA (Windows Media Audio)
- M4A (AAC)
- MP3 (con LAME)
- FLAC
- Ogg Vorbis
- Speex
### Formatos de instantáneas
- JPEG
- PNG
- GIF
- BMP
- Sistema.Dibujo.Mapa de bits
- Mapa de bits de SkiaSharp
### Procesamiento y efectos de vídeo (CPU/GPU)
- superposición de imágenes (incluido GIF animado)
- superposición de texto
- funciones de panorámica y zoom
- ajustes de brillo, contraste, saturación y tono
- desentrelazar
- eliminación de ruido
- cambiar el tamaño a cualquier resolución
- chroma-key
- fundido de entrada/salida
- rotar vídeo
- Compatibilidad con filtros DirectShow de terceros
- efectos de vídeo independientes para previsualización y salida
### Tratamiento de audio y efectos
- amplificador de volumen
- ecualizador
- sistema de bajos 3D
- normalización
- ganancia auto/manual
- hay muchos otros efectos
### Formatos de transmisión en red
- HLS (HTTP Live Streaming), compatible con Android e iOS
- RTSP
- Protocolo Smooth Streaming para Microsoft IIS Server
- RTMP
- UDP (MPEG-TS/RTP)
- SRT
- YouTube / Facebook en vivo
- Instituto Nacional de Desarrollo
- WMV (Windows Media Video)
- a otros servidores y dispositivos multimedia mediante una cámara virtual/fuente de audio
### Otras características
- Previsualización de audio/vídeo
- Sintonización de TV
- Control del dispositivo de video capture
- entrada de vídeo (interfaz crossbar)
- formato de vídeo
- frecuencia de cuadro
- soporta tarjetas de vídeo con varias entradas
- control de la cámara (brillo, saturación, etc.)
- Detección de movimiento
- Lector de códigos de barras
- OSD (On-Screen Display)
- PIP (Picture-In-Picture) (admite fuentes de captura de vídeo, cámaras IP y archivos de vídeo)
- Detección de caras y seguimiento de objetos
- Múltiples pantallas de salida
- Timeshift
- Salida a archivos de vídeo encriptados mediante el [Video Encryption SDK](https://www.visioforge.com/es/video-encryption-sdk)
- Salida a [Virtual Camera SDK](https://www.visioforge.com/es/virtual-camera-sdk)
- Apoyo a las aplicaciones de servicios
- Soporte para leer y escribir etiquetas de archivos de audio/vídeo
- Compatibilidad con el renderizador de vídeo madVR
- reproducción de secuencias RTSP y MJPEG de baja latencia desde una cámara IP
- [OBS (Software de transmisión abierta)](https://obsproject.com/) streaming
- Reconocimiento facial
### IDE
- Visual Studio 2019 y versiones posteriores: Visual C#, Visual C++, Visual Basic .NET
- Código de Visual Studio
- Jinete JetBrains
- Puede utilizarse con otras aplicaciones compatibles con .Net, como Microsoft Access, Word y Excel.
### Frameworks de IU
- Formularios WinForms
- WPF
- WinUI 3 for Desktop
- Avalonia
- GTK#
- Maui
- Xamarin.Mac
- Xamarin.Android
- Xamarin.iOS
### Versiones de .Net
- .Net Framework 4.6.1 y versiones posteriores
- .Net Core 3.1
- .Net 5 - .Net 9
### Requisitos del sistema
- Windows 10 o Windows 11
- Ubuntu 22+
- macOS 12+
### Plataformas objetivo
- Windows 11, Windows 10, Windows 8/8.1, Windows 7 SP1
- Windows Server 2016 y versiones posteriores
- Android 8 y posteriores
- Linux
- macOS
- iOS
### Limitaciones de la versión de prueba
La versión de prueba muestra una marca de agua en la ventana de vídeo.
## EJEMPLOS DE CÓDIGOS
### VÍDEO PREVIO
El código de ejemplo muestra cómo configurar las fuentes de vídeo y audio predeterminadas, mostrar vídeo en pantalla y reproducir audio utilizando los altavoces predeterminados. Se utilizarán los formatos de vídeo y audio predeterminados.
### CAPTURA DE VÍDEO A MP4
Archivo MP4 [captura desde una cámara web](https://www.visioforge.com/es/save-webcam) y micrófono, con vista previa de video/audio.
Utilizando más código, puedes configurar H264/HEVC y AAC.
Por defecto, se utilizará un codificador GPU H264 (si está disponible).
### VISTA PREVIA DE LA CÁMARA IP RTSP
Previsualización de cámaras RTSP con descodificación de vídeo CPU/GPU y detección automática de códecs.
Puede utilizar la detección ONVIF para encontrar todas las cámaras IP de su red local.
## CAPTURA DE PANTALLA
SDK puede capturar vídeo de una pantalla o ventana especificada.
Puedes capturar toda la pantalla o un rectángulo específico. La frecuencia de imagen se puede personalizar.
### SUPERPOSICIÓN DE TEXTO E IMÁGENES
Puede añadir texto (incluido el desplazamiento), hora/fecha y superposiciones de imágenes.
SDK admite todos los formatos de imagen habituales, incluidos JPEG, PNG, GIF y SVG.

#### EDICIÓN

#### ESTÁNDAR

#### PROFESIONAL

#### PREMIUM
Dispositivos de entrada y otras fuentes compatibles
- Cámaras web
- Sintonizadores de TV y tarjetas de captura
- Videocámaras DV y MPEG
- Captura de pantalla
- HTTP/RTSP/ONVIF Cámaras IP
- UDP, TCP, RTMP y otros flujos de red
- Blackmagic Decklink
- Dispositivos DVB-T/DVB-C/DVB-S/ATSC (BETA)
- Microsoft Kinect para Windows
Avance en vídeo
Capturador de fotogramas
Tratamiento de vídeo
Tratamiento de audio
Compatibilidad con vídeo HD y 4K
Sintonización de TV
Transmisión en red en formato WMV
Transmisión en red mediante RTMP/RTSP/UDP/NDI
Chroma-key
Detección de movimiento
Tratamiento de vídeo mediante filtros DirectShow
OSD (On-Screen Display)
Picture-In-Picture
Cambiar el nombre del archivo de salida sobre la marcha
Múltiples pantallas de salida
Efectos de vídeo acelerados en la GPU
Salida a Virtual Camera SDK
Compatibilidad con Video Encryption SDK
Seguimiento facial
Formatos de salida
- AVI
- WMV (Windows Media Video)
- WMA (Windows Media Audio)
- WAV
- MP3
- Ogg Vorbis
- Speex
- Vídeo DV
- DV/MPEG-1/2/4 (mediante sintonizador de TV con codificador MPEG interno o videocámara DV/HDV)
- Vídeo Flash (FLV) con FFMPEG
- WebM
- Formatos de salida personalizados mediante filtros DirectShow externos
- MPEG-1/2/4 con FFMPEG
- MP4 (H264/HEVC + AAC) mediante software, codificadores Intel QuickSync, Nvidia NVENC/CUDA o AMD Radeon
Nuestro software ofrece un uso ilimitado sin pantallas de aviso, garantizando una
experiencia sin problemas. Ofrecemos un período de prueba de 30 días para que pueda explorar
todas las funciones antes de comprometerse.
Con una licencia normal
recibirá actualizaciones menores y mayores gratuitas durante un año; después de ese período,
el SDK seguirá funcionando como antes.
Alternativamente, la licencia
licencia de por vida proporciona actualizaciones ilimitadas indefinidamente. Además,
ofrecemos soporte y correcciones prioritarias. La licencia normal se factura
anualmente y se renueva automáticamente cada año, pero puede cancelar su
suscripción en cualquier momento.
El SDK es gratuito para uso no comercial. Póngase en contacto con nosotros para obtener una licencia gratuita.
---END OF PAGE---
# Page: https://www.visioforge.com/it/video-capture-sdk-net
[multipiattaforma]
# Video Capture SDK .Net
versione 15.9
Il nostro SDK .Net integra perfettamente le funzionalità di acquisizione ed elaborazione video nelle applicazioni software. Questo versatile SDK facilita la riproduzione di video e audio e supporta l'acquisizione da varie fonti, tra cui webcam USB, telecamere IP, schede Blackmagic Decklink e videocamere. Offre un supporto completo per diversi formati di output, tra cui MP4, WebM, AVI, WMV, MPEG-1/2 e altri. Offre inoltre agli sviluppatori un'ampia libreria di effetti video e audio per migliorare e personalizzare i contenuti multimediali.
Inoltre, il nostro SDK offre una solida compatibilità multipiattaforma, garantendo una perfetta integrazione con gli ambienti Windows, Linux, macOS, iOS e Android. Questa adattabilità multipiattaforma consente agli sviluppatori di creare applicazioni che funzionano in modo coerente su diversi sistemi operativi e dispositivi, offrendo agli utenti un'esperienza multimediale coerente e flessibile.

#### DOWNLOADS
[Programma di installazione (Windows)](https://s3.us-west-2.amazonaws.com/files.visioforge.com/trials/visioforge_sdks_installer_dotnet_setup.exe)[Guida all'installazione di NuGet](https://www.visioforge.com/help/docs/dotnet/install/)[Samples su GitHub](https://github.com/visioforge/.Net-SDK-s-samples)

#### ACQUISTO
[Controllare i prezzi o ordinare](https://www.visioforge.com/it/buy)

#### AIUTO
[Guida in linea](https://www.visioforge.com/help/docs/dotnet/videocapture/)[Changelog](https://www.visioforge.com/help/docs/dotnet/changelog/)[Contratto di licenza](/help/docs/eula/)

## STRUTTURA SDK
L'SDK è altamente compatibile con più di 10 sorgenti di ingresso video e audio e supporta più di 20 formati di uscita. Offre agli sviluppatori una certa flessibilità, grazie all'ampia gamma di opzioni hardware per le configurazioni di ingresso e uscita. L'SDK elabora sia i contenuti video che quelli audio, consentendo di salvare i dati elaborati su file o di trasmetterli in streaming attraverso connessioni di rete.
## PIPELINE DI ACQUISIZIONE VIDEO
Durante le fasi di anteprima o di acquisizione, i flussi video e audio possono essere elaborati con vari effetti. Successivamente, questi flussi vengono suddivisi e indirizzati a codificatori e renderizzatori audio/video per un'ulteriore elaborazione.


## FORMATI DI USCITA
L'SDK supporta un'ampia gamma di formati e codec video, audio e immagine, come MP4 (che utilizza H264/HEVC per il video e AAC per l'audio), WebM (che utilizza VP8/VP9/AV1 per il video e Vorbis o OPUS per l'audio), oltre a WMV, MP3, JPEG, GIF e PNG.
## ELABORAZIONE VIDEO
È possibile aggiungere testo, immagini o loghi GIF, regolare la luminosità, il contrasto, la saturazione o la tonalità, ridimensionare, ritagliare o ruotare i contenuti e applicare la colorazione cromatica o vari effetti video per migliorare i contenuti.


## ELABORAZIONE AUDIO
Incorporate un equalizzatore nella vostra applicazione, consentendo agli utenti di regolare con precisione la loro esperienza audio. Questa funzione consente di regolare frequenze audio specifiche, come gli alti, i medi e i bassi, per ottenere il profilo sonoro desiderato. Inoltre, gli utenti possono normalizzare i livelli audio o amplificare il volume, fornendo un controllo preciso sull'uscita audio. Per un'ulteriore personalizzazione sono disponibili molti altri effetti audio.
## Le principali caratteristiche di VisioForge Video Capture SDK .Net includono:
### Sorgenti video e audio supportate
- Webcam USB e altri dispositivi di acquisizione (compresi i dispositivi 4K)
- Telecamere IP ONVIF (PTZ e altre API supportate)
- JPEG/MJPEG, MPEG-4 e H.264 Telecamere/server IP HTTP/RTSP/RTMP, formato HD supportato
- Dispositivi Blackmagic Decklink
- Sorgente di cattura dello schermo (compresi diversi display) e cattura delle finestre
- Altoparlanti (loopback)
- Dispositivi NDI NewTek
- Schede di acquisizione PCI
- Sintonizzatori TV (con e senza codificatore MPEG interno)
- Videocamere DV e HDV MPEG-2
- Telecamere FLIR/Teledyne (USB3 Vision/GigE)
- Telecamere Basler (USB3 Vision/GigE)
- Microsoft Kinect/Kinect 2 per Windows
- Dispositivi di acquisizione audio e schede audio
- Dispositivi ASIO
### Formati video in uscita
- AVI (utilizzando codec audio/video come MJPEG, DivX, XviD e x264)
- WMV (supporto di profili WMV personalizzati. È possibile configurare i flussi in modo che utilizzino la codifica a bit rate variabile (VBR), il flusso audio o video non compresso, la dimensione del video, la dimensione del buffer, la frequenza dei fotogrammi e così via).
- DV e MPEG da videocamere DV/HDV e sintonizzatori TV con encoder MPEG interno (tecnologia DirectCapture)
- DV (da qualsiasi dispositivo di acquisizione video)
- MPEG-1/2/4 (compresi i profili VCD/SVCD/DVD) e FLV con wrapper FFMPEG
- WebM (Vorbis + VP8/VP9)
- Uscita MP4 H264/HEVC + AAC tramite codificatore software o codificatore GPU (Intel QuickSync, Nvidia CUDA/NVENC o AMD/ATI AMF)
- Tutti i formati supportati da FFMPEG.exe (compreso MP4 H264/HEVC)
- Formati di uscita personalizzati (utilizzando filtri DirectShow di terze parti)
- GIF animate
- MOVIMENTO
- MPEG-TS
### Formati audio in uscita
- WAV (compresso o PCM)
- WMA (Windows Media Audio)
- M4A (AAC)
- MP3 (utilizzando LAME)
- Formato FLAC
- Ogg Vorbis
- Speex
### Formati delle istantanee
- Formato JPEG
- PNG
- GIF
- BMP
- Sistema.Disegno.Bitmap
- SkiaSharp SKBitmap
### Elaborazione video ed effetti (CPU/GPU)
- sovrapposizione di immagini (comprese le GIF animate)
- sovrapposizione di testo
- panoramica/zoom
- luminosità, contrasto, saturazione, tonalità, ecc.
- deinterlacciamento
- denoise
- ridimensionare a qualsiasi risoluzione
- chiave cromatica
- dissolvenza in entrata/dissolvenza in uscita
- ruotare
- Supporto dei filtri DirectShow di terze parti
- effetti video indipendenti per l'anteprima e l'output
### Elaborazione audio ed effetti
- amplificatore di volume
- equalizzatore
- sistema 3D-bass
- normalizzazione
- guadagno automatico/manuale
- ci sono molti altri effetti
### Formati di streaming di rete
- HLS (HTTP Live Streaming), compatibile con Android e iOS
- RTSP
- Protocollo Smooth Streaming per il server Microsoft IIS
- RTMP
- UDP (MPEG-TS/RTP)
- SRT
- YouTube / Facebook Live
- NDI
- WMV (Windows Media Video)
- ad altri server multimediali e dispositivi utilizzando una telecamera virtuale/sorgente audio
### Altre caratteristiche
- Anteprima audio/video
- Sintonizzazione TV
- Video capture controllo del dispositivo
- ingresso video (interfaccia crossbar)
- formato video
- frequenza dei fotogrammi
- supporta schede video con più ingressi
- controllo della fotocamera (luminosità, saturazione, ecc.)
- Rilevamento del movimento
- Lettore di codici a barre
- OSD (On-Screen Display)
- PIP (Picture-In-Picture) (sono supportate sorgenti di acquisizione video, telecamere IP e file video)
- Rilevamento dei volti e tracciamento degli oggetti
- Supporto di più schermi di uscita
- Timeshift
- Uscita su file video crittografati utilizzando l'opzione [Video Encryption SDK](https://www.visioforge.com/it/video-encryption-sdk)
- Uscita verso [Virtual Camera SDK](https://www.visioforge.com/it/virtual-camera-sdk)
- Supporto alle applicazioni di servizio
- Supporto per la lettura e la scrittura di tag di file audio/video
- Supporto del renderizzatore video madVR
- riproduzione a bassa latenza di flussi RTSP e MJPEG dalla telecamera IP
- [OBS (Software per trasmissioni aperte)](https://obsproject.com/) streaming
- Riconoscimento dei volti
### IDE
- Visual Studio 2019 e successivi: Visual C#, Visual C++, Visual Basic .NET
- Codice di Visual Studio
- Cavaliere JetBrains
- Può essere utilizzato con altre applicazioni compatibili con .Net, come Microsoft Access, Word ed Excel.
### Quadri UI
- WinForms
- WPF
- WinUI 3 for Desktop
- Avalonia
- GTK#
- MAUI
- Xamarin.Mac
- Xamarin.Android
- Xamarin.iOS
### Versioni .Net
- .Net Framework 4.6.1 e versioni successive
- .Net Core 3.1
- .Net 5 - .Net 9
### Requisiti di sistema
- Windows 10 o Windows 11
- Ubuntu 22+
- macOS 12+
### Piattaforme target
- Windows 11, Windows 10, Windows 8/8.1, Windows 7 SP1
- Windows Server 2016 e successivi
- Android 8 e successivi
- Linux
- macOS
- iOS
### Limiti della prova
La versione di prova visualizza una filigrana nella finestra del video.
## CAMPIONI DI CODICE
### ANTEPRIMA VIDEO
Il codice di esempio mostra come configurare le sorgenti video e audio predefinite, mostrare il video sullo schermo e riprodurre l'audio utilizzando gli altoparlanti predefiniti. Verranno utilizzati i formati video e audio predefiniti.
### CATTURA VIDEO IN MP4
file MP4 [cattura da una webcam](https://www.visioforge.com/it/save-webcam) e microfono, con anteprima video/audio.
Utilizzando altri codici, è possibile impostare le impostazioni H264/HEVC e AAC.
Per impostazione predefinita, verrà utilizzato un codificatore H264 della GPU (se disponibile).
### ANTEPRIMA DELLA TELECAMERA IP RTSP
Anteprima della telecamera RTSP con decodifica video CPU/GPU e rilevamento automatico dei codec.
È possibile utilizzare il rilevamento ONVIF per trovare tutte le telecamere IP nella rete locale.
## CATTURA DELLO SCHERMO
L'SDK può catturare video da una schermata o da una finestra specifica.
È possibile catturare l'intero schermo o un rettangolo specificato. La frequenza dei fotogrammi può essere personalizzata.
### SOVRAPPOSIZIONI DI TESTO E IMMAGINI
È possibile aggiungere testo (anche scorrevole), ora/data e immagini in sovrimpressione.
L'SDK supporta tutti i formati di immagine più diffusi, tra cui JPEG, PNG, GIF e SVG.

#### EDIZIONE

#### STANDARD

#### PROFESSIONALE

#### PREMIUM
Dispositivi di input e altre fonti supportate
- Telecamere web
- Sintonizzatori TV e schede di acquisizione
- Videocamere DV e MPEG
- Capture dello schermo
- Telecamere IP HTTP/RTSP/ONVIF
- UDP, TCP, RTMP e altri flussi di rete
- Blackmagic Decklink
- Dispositivi DVB-T/DVB-C/DVB-S/ATSC (BETA)
- Microsoft Kinect per Windows
Anteprima video
Acquisizione di fotogrammi
Elaborazione video
Elaborazione audio
Supporto video HD e 4K
Sintonizzazione TV
Streaming di rete in formato WMV
Android 8 e successivi
Chiave cromatica
Rilevamento del movimento
Elaborazione video con filtri DirectShow
OSD (On-Screen Display)
Immagine nell'immagine
Modifica del nome del file di output al volo
Schermi di uscita multipli
Effetti video accelerati dalla GPU
Uscita verso l'SDK della Virtual Camera
Supporto SDK di crittografia video
Tracciamento del volto
Formati di uscita
- AVI
- WMV (Windows Media Video)
- WMA (Windows Media Audio)
- WAV
- MP3
- Ogg Vorbis
- Speex
- Video DV
- DV/MPEG-1/2/4 (utilizzando un sintonizzatore TV con codificatore MPEG interno o una videocamera DV/HDV)
- Video Flash (FLV) utilizzando FFMPEG
- WebM
- Formati di uscita personalizzati utilizzando filtri DirectShow esterni
- MPEG-1/2/4 con FFMPEG
- MP4 (H264/HEVC + AAC) tramite software, codificatori Intel QuickSync, Nvidia NVENC/CUDA o AMD Radeon
Il nostro software offre un utilizzo illimitato, senza nag-screen, garantendo un'esperienza
esperienza senza soluzione di continuità. Forniamo un periodo di prova di 30 giorni, in modo che possiate esplorare tutte le funzionalità prima di
tutte le funzionalità prima di impegnarsi.
Con una licenza regolare, l'utente
riceve aggiornamenti minori e maggiori gratuiti per un anno; dopo tale periodo,
l'SDK continuerà a funzionare come prima.
In alternativa, la
licenza a vita fornisce aggiornamenti illimitati a tempo indeterminato. Inoltre,
offriamo assistenza e correzioni prioritarie. La licenza regolare viene fatturata
annualmente e si rinnova automaticamente ogni anno, ma è possibile annullare la
abbonamento in qualsiasi momento.
L'SDK è gratuito per uso non commerciale. Contattateci per ottenere una licenza gratuita.
---END OF PAGE---
# Page: https://www.visioforge.com/de/media-player-sdk-net
[Plattformübergreifend]
# Media Player SDK .Net
Version 15.9
Das Media Player SDK .Net ermöglicht Entwicklern die nahtlose Integration einer breiten Palette von Medienwiedergabefunktionen in ihre Anwendungen, einschließlich Unterstützung für Video, Audio, DVD, Blu-ray und verschiedene Netzwerkströme. Dieses SDK bietet auch die Möglichkeit, Overlay-Bitmaps und Text mit Effekten über das Video zu legen. Es bietet Flexibilität bei den Wiedergabe-Engines und ermöglicht die Verwendung von System-Codecs, FFMPEG oder VLC, wodurch ein breites Spektrum an Kompatibilität und ein qualitativ hochwertiges Medienerlebnis gewährleistet wird.

#### DOWNLOADS
[Installationsprogramm (nur Windows)](https://s3.us-west-2.amazonaws.com/files.visioforge.com/trials/visioforge_sdks_installer_dotnet_setup.exe)[NuGet-Installationshandbuch](https://www.visioforge.com/help/docs/dotnet/install/)[Samples auf GitHub](https://github.com/visioforge/.Net-SDK-s-samples)

#### KAUFEN
[Preise prüfen oder bestellen](https://www.visioforge.com/de/buy)

#### HILFE
[Online-Hilfe](https://www.visioforge.com/help/docs/dotnet/mediaplayer/)[Änderungsliste](https://www.visioforge.com/help/docs/dotnet/changelog/)[Lizenzvereinbarung](/help/docs/eula/)

## SDK STRUKTUR
Das SDK ermöglicht es Entwicklern, bestimmte Video- und Audioquellen auszuwählen, eine Reihe von Effekten für die Verarbeitung anzuwenden und die Medien dann für das Rendering weiterzuleiten. Es ist vielseitig und passt sich verschiedenen UI-Frameworks an, indem es für jedes ein eigenes VideoView-Steuerelement bereitstellt - ob WPF, WinForms, MAUI, Avalonia oder andere - und so eine nahtlose Integration und Anzeige von Medien in verschiedenen Anwendungsoberflächen gewährleistet.
## MEDIENWIEDERGABE-PIPELINE
Die SDK-Architektur trennt jede Medienquelle in diskrete Audio- und Videoströme auf. Diese Ströme werden dann an ihre jeweiligen Decoder weitergeleitet. Nach der Dekodierung werden die unkomprimierten Daten verarbeitet und können bei Bedarf direkt von einem Sample Grabber abgerufen werden. Diese Funktion ist praktisch für Echtzeitanwendungen, die Mediensamples verarbeiten oder analysieren.


## VIDEOBEARBEITUNG
Fügen Sie Text, Bilder oder GIFs zu Ihren Videos hinzu, um personalisierte Überlagerungen zu erstellen. Passen Sie visuelle Elemente wie Helligkeit, Kontrast, Sättigung und Farbton an, um die Bildqualität zu verbessern. Nutzen Sie die Bearbeitungswerkzeuge, um die Größe zu ändern, das Material zu beschneiden oder zu drehen, falls erforderlich. Wenden Sie den Chroma-Key für Greenscreen-Effekte an und erkunden Sie eine breite Palette zusätzlicher Videoeffekte, um Ihre Erzählungen zu verbessern.
## AUDIOVERARBEITUNG
Integrieren Sie einen Equalizer in Ihre Anwendung, um eine präzise Audioabstimmung zu ermöglichen. Normalisieren Sie die Tonstärke, erhöhen Sie die Lautstärke oder verstärken Sie die Bassfrequenzen. Eine Vielzahl weiterer Audioeffekte steht für weitere Verfeinerungen zur Verfügung. Implementieren Sie automatische oder manuelle Verstärkungsregelung, um optimale Tonqualität zu erreichen.


## BENUTZERDEFINIERTE UI-STEUERELEMENTE
Das SDK verfügt über eine anpassbare Benutzeroberfläche mit Skin-Unterstützung, die PNG/SVG-Icons und personalisierte Stiloptionen unterstützt.
## Die wichtigsten Funktionen des VisioForge Media Player SDK .Net sind:
### Unterstützte Formate
- Dateiformate: MP4, MKV, MOV, AVI, MPEG-TS, WMV, MXF, VOB, OGG
- Videoformate: MPEG-1/2, WMV, MPEG-4, H264, HEVC, und andere mit dem entsprechenden Decoder
- Audio-Formate: AAC, MP3, Vorbis, WMA, OPUS, Speex und andere mit dem entsprechenden Decoder
- MIDI, Karaoke KAR und CDG
- DVD- und Blu-ray-Wiedergabe [nur Windows]
### Videoverarbeitung und Effekte (CPU/GPU)
- Bild-Overlay (einschließlich animiertes GIF)
- SVG-Overlay
- Textüberlagerung
- Videotransparenz
- Schwenken/Zoomen
- Helligkeit, Kontrast, Sättigung, Farbton, usw.
- invertierte Farben
- Graustufen
- Deinterlace
- Denoise
- Einblendung/Ausblendung
- rotieren
- Größenanpassung an jede Auflösung
- Unterstützung für DirectShow-Filter von Drittanbietern
- mehr als 30 weitere Effekte
### Audiobearbeitung und Effekte
- Volumenverstärker
- Equalizer
- 3D-Bass-System
- Normalisierung
- automatische/manuelle Verstärkung
- eine Menge anderer Effekte
### Andere Merkmale
- Wiedergabe von Dateien aus dem Speicher
- Nahtlose Wiedergabe (keine Verzögerung zwischen 2 Dateien in der Wiedergabeliste)
- Unterstützung der Multiplikation von Ausgabebildschirmen
- Bild-in-Bild-Unterstützung
- Unterstützung von 4K- und 8K-Videodateien
- GPU-beschleunigte Dekodierung (DXVA2/Direct3D 11/Intel QuickSync/Nvidia CUVID, AMF)
- Rückwärts/Vorwärtssuche
- Bilderfassung in .Net Bitmap- oder BMP/JPEG/GIF/PNG-Dateien
- OSD (Bildschirmanzeige)
- Audiostreams aus zusätzlichen Audio-/Videodateien
- Unterstützung von Untertiteln
- MMS/WMV/RTSP/RTMP/UDP-Netzwerk-Stream-Wiedergabe
- Rückwärts abspielen
- Wiedergabe von verschlüsselten Videodateien, die mit dem [Video Encryption SDK](https://www.visioforge.com/de/video-encryption-sdk)
- Bewegungserkennung
- Gesichtserkennung und Objekterkennung [nur Windows]
- Barcode-Leser
- Chroma-Schlüssel
- madVR optionaler Video-Renderer [nur Windows]
- VR 360°-Videounterstützung [nur Windows]
### IDE
- Visual Studio 2019 und höher: Visual C#, Visual C++, Visual Basic .NET
- Visual Studio Code
- JetBrains-Reiter
- SDK kann mit anderen .Net-kompatiblen Anwendungen wie Microsoft Access, Word und Excel verwendet werden.
### UI-Frameworks
- WinForms
- WPF
- WinUI 3 for Desktop
- Avalonia
- Xamarin.Android
- MacOS/MacCatalyst
- Xamarin.iOS
- MAUI
### Systemanforderungen
- Windows 10 oder Windows 11
- Ubuntu 22+
- macOS 12+
### Zielplattformen
- Windows 11, Windows 10, Windows 8/8.1, Windows 7 SP1
- Windows Server 2016 und höher
- Android 8 und höher
- Linux
- macOS
- iOS
### .Net-Versionen
- .Net Framework 4.6.1 und höher
- .Net Core 3.1
- .Net 5 – .Net 9
### Vertriebsrechte
Lizenzfreie Verbreitung.
### Beschränkungen des Versuchs
In der Testversion wird ein Wasserzeichen im Videofenster angezeigt.

#### EDITION

#### STANDARD

#### PROFESSIONELL
Wiedergabe von Videodateien
Wiedergabe von Audiodateien
Wiedergabe des Speicherstroms
Unterstützung von Untertiteln
Unterstützung von HD- und 4K-Videos
Video-/Audioverarbeitung
Wiedergabe von Netzwerk-Streams (HTTP/RTSP/RTMP/HLS/WMV/NDI)
Chroma-Schlüssel
Rückwärts abspielen
Bewegungserkennung
Videoverarbeitung mit
DirectShow-Filter (\*)
OSD (Bildschirmanzeige)
Frame Grabber
Mehrere Ausgabebildschirme
GPU-beschleunigte Videoeffekte
Video Encryption SDK Unterstützung (\*)
Gesichtsverfolgung
Audiostreams aus externen Dateien
(\*) - Nur für Windows
Unsere Software bietet eine unbegrenzte Nutzung ohne störende Bildschirme und gewährleistet eine
nahtlose Erfahrung. Wir bieten einen 30-tägigen Testzeitraum, damit Sie alle
alle Funktionen erkunden können, bevor Sie sich festlegen.
Mit einer regulären Lizenz erhalten Sie
erhalten Sie für ein Jahr kostenlose Minor- und Major-Upgrades; nach diesem Zeitraum
funktioniert das SDK weiter wie bisher.
Alternativ dazu bietet die
Lifetime-Lizenz unbegrenzte Updates auf unbestimmte Zeit zur Verfügung. Zusätzlich,
bieten wir vorrangigen Support und Fehlerbehebungen. Die reguläre Lizenz wird jährlich abgerechnet
jährlich abgerechnet und automatisch verlängert, aber Sie können Ihr Abonnement
Abonnement jederzeit kündigen.
Das SDK ist für die nicht-kommerzielle Nutzung kostenlos. Bitte kontaktieren Sie uns, um eine kostenlose Lizenz zu erhalten.
---END OF PAGE---
# Page: https://www.visioforge.com/es/media-player-sdk-net
[Plataforma cruzada]
# Media Player SDK .Net
versión 15.9
El Media Player SDK .Net permite a los desarrolladores integrar sin problemas una amplia gama de funciones de reproducción multimedia en sus aplicaciones, incluida la compatibilidad con vídeo, audio, DVD, Blu-ray y varios flujos de red. Este SDK también proporciona la capacidad de renderizar mapas de bits superpuestos y texto con efectos sobre el vídeo. Ofrece flexibilidad en los motores de reproducción, permitiendo el uso de códecs del sistema, FFMPEG o VLC, garantizando una amplia compatibilidad y una experiencia multimedia de alta calidad.

#### DESCARGAS
[Instalador (sólo Windows)](https://s3.us-west-2.amazonaws.com/files.visioforge.com/trials/visioforge_sdks_installer_dotnet_setup.exe)[Guía de instalación de NuGet](https://www.visioforge.com/help/docs/dotnet/install/)[Samples en GitHub](https://github.com/visioforge/.Net-SDK-s-samples)

#### COMPRAR
[Consultar precios o hacer un pedido](https://www.visioforge.com/es/buy)

#### AYUDA
[Ayuda en línea](https://www.visioforge.com/help/docs/dotnet/mediaplayer/)[Registro de cambios](https://www.visioforge.com/help/docs/dotnet/changelog/)[Acuerdo de licencia](/help/docs/eula/)

## ESTRUCTURA DEL SDK
El SDK permite a los desarrolladores seleccionar fuentes específicas de vídeo y audio, aplicar una serie de efectos para su procesamiento y, a continuación, enrutar los medios para su renderización. Es versátil y se adapta a diferentes marcos de interfaz de usuario, proporcionando un control VideoView único para cada uno de ellos - ya sea WPF, WinForms, MAUI, Avalonia, u otros - garantizando una perfecta integración y visualización de los medios de comunicación dentro de diversas interfaces de aplicación.
## PROCESO DE REPRODUCCIÓN MULTIMEDIA
La arquitectura del SDK separa cada fuente multimedia en flujos discretos de audio y vídeo. Estos flujos se dirigen a sus respectivos descodificadores. Tras la descodificación, los datos sin comprimir se procesan y, si es necesario, un capturador de muestras puede acceder directamente a ellos. Esta función es muy útil para aplicaciones en tiempo real que procesan o analizan muestras multimedia.


## PROCESAMIENTO DE VÍDEO
Añade texto, imágenes o GIF a tus vídeos para crear superposiciones personalizadas. Ajusta elementos visuales como el brillo, el contraste, la saturación y el tono para mejorar la calidad de la imagen. Utiliza las herramientas de edición para cambiar el tamaño, recortar o girar las secuencias según sea necesario. Aplica el croma para conseguir efectos de pantalla verde y explora una amplia gama de efectos de vídeo adicionales para mejorar tu narración.
## PROCESAMIENTO DE AUDIO
Integre un ecualizador en su aplicación para permitir una afinación de audio precisa. Normalice los niveles de audio, amplifique el volumen o realce las frecuencias de los bajos. Se dispone de una variedad de efectos de audio adicionales para un mayor refinamiento. Implemente control de ganancia automático o manual para lograr una calidad de audio óptima.


## CONTROLES UI PERSONALIZADOS
El SDK ofrece una interfaz personalizable con soporte de skins, que admite íconos PNG/SVG y opciones de estilo personalizadas.
## Las principales características de VisioForge Media Player SDK .Net incluyen
### Formatos admitidos
- Formatos de archivo: MP4, MKV, MOV, AVI, MPEG-TS, WMV, MXF, VOB, OGG
- Formatos de vídeo: MPEG-1/2, WMV, MPEG-4, H264, HEVC y otros con el descodificador adecuado
- Formatos de audio: AAC, MP3, Vorbis, WMA, OPUS, Speex y otros con el descodificador adecuado.
- MIDI, karaoke KAR, y CDG
- Reproducción de DVD y Blu-ray [sólo Windows].
### Procesamiento y efectos de vídeo (CPU/GPU)
- superposición de imágenes (incluido GIF animado)
- Superposición SVG
- superposición de texto
- transparencia de vídeo
- funciones de panorámica y zoom
- ajustes de brillo, contraste, saturación y tono
- colores invertidos
- escala de grises
- desentrelazar
- eliminación de ruido
- fundido de entrada/salida
- rotar vídeo
- cambiar el tamaño a cualquier resolución
- Compatibilidad con filtros DirectShow de terceros
- más de otros 30 efectos
### Tratamiento de audio y efectos
- amplificador de volumen
- ecualizador
- sistema de bajos 3D
- normalización
- ganancia auto/manual
- muchos otros efectos
### Otras características
- Reproducción de archivos desde la RAM
- Reproducción ininterrumpida (sin retardo entre 2 archivos de la lista de reproducción)
- Multiplicación de pantallas de salida
- Compatible con Picture-in-Picture
- Compatibilidad con archivos de vídeo 4K y 8K
- Decodificación acelerada por GPU (DXVA2/Direct3D 11/Intel QuickSync/Nvidia CUVID, AMF)
- Búsqueda hacia atrás/hacia delante
- Captura de fotogramas a archivos .Net Bitmap o BMP/JPEG/GIF/PNG
- OSD (On-Screen Display)
- Secuencias de audio de archivos de audio/vídeo adicionales
- Soporte para subtítulos
- Reproducción de flujos de red MMS/WMV/RTSP/RTMP/UDP
- Reproducción inversa
- Reproducción de archivos de vídeo cifrados creados con el [Video Encryption SDK](https://www.visioforge.com/es/video-encryption-sdk)
- Detección de movimiento
- Detección de caras y detección de objetos [Sólo Windows]
- Lector de códigos de barras
- Chroma-key
- Renderizador de vídeo opcional madVR [sólo para Windows].
- Soporte de vídeo VR 360° [sólo Windows]
### IDE
- Visual Studio 2019 y versiones posteriores: Visual C#, Visual C++, Visual Basic .NET
- Código de Visual Studio
- Jinete JetBrains
- SDK puede utilizarse con otras aplicaciones compatibles con .Net como Microsoft Access, Word, Excel
### Frameworks de IU
- Formularios WinForms
- WPF
- WinUI 3 for Desktop
- Avalonia
- Xamarin.Android
- MacOS/MacCatalyst
- Xamarin.iOS
- Maui
### Requisitos del sistema
- Windows 10 o Windows 11
- Ubuntu 22+
- macOS 12+
### Plataformas objetivo
- Windows 11, Windows 10, Windows 8/8.1, Windows 7 SP1
- Windows Server 2016 y versiones posteriores
- Android 8 y posteriores
- Linux
- macOS
- iOS
### Versiones de .Net
- .Net Framework 4.6.1 y versiones posteriores
- .Net Core 3.1
- .Net 5 - .Net 9
### Derechos de distribución
Distribución sin derechos de autor.
### Limitaciones de la versión de prueba
La versión de prueba muestra una marca de agua en la ventana de vídeo.

#### EDICIÓN

#### ESTÁNDAR

#### PROFESIONAL
Reproducción de archivos de vídeo
Reproducción de archivos de audio
Reproducción de flujos RAM
Soporte para subtítulos
Compatibilidad con vídeo HD y 4K
Procesamiento de vídeo/audio
Reproducción de secuencias en red (HTTP/RTSP/RTMP/HLS/WMV/NDI)
Chroma-key
Reproducción inversa
Detección de movimiento
Procesamiento de vídeo con
Filtros de DirectShow (\*)
OSD (On-Screen Display)
Capturador de fotogramas
Múltiples pantallas de salida
Efectos de vídeo acelerados en la GPU
Compatible con Video Encryption SDK (\*)
Seguimiento facial
Secuencias de audio de archivos externos
(\*) - Sólo Windows
Nuestro software ofrece un uso ilimitado sin pantallas de aviso, garantizando una
experiencia sin problemas. Ofrecemos un período de prueba de 30 días para que pueda explorar
todas las funciones antes de comprometerse.
Con una licencia normal
recibirá actualizaciones menores y mayores gratuitas durante un año; después de ese período,
el SDK seguirá funcionando como antes.
Alternativamente, la licencia
licencia de por vida proporciona actualizaciones ilimitadas indefinidamente. Además,
ofrecemos soporte y correcciones prioritarias. La licencia normal se factura
anualmente y se renueva automáticamente cada año, pero puede cancelar su
suscripción en cualquier momento.
El SDK es gratuito para uso no comercial. Póngase en contacto con nosotros para obtener una licencia gratuita.
---END OF PAGE---
# Page: https://www.visioforge.com/it/media-player-sdk-net
[multipiattaforma]
# Media Player SDK .Net
versione 15.9
Il Media Player SDK .Net consente agli sviluppatori di integrare senza problemi un'ampia gamma di funzionalità di riproduzione multimediale nelle loro applicazioni, compreso il supporto per video, audio, DVD, Blu-ray e vari flussi di rete. Questo SDK offre anche la possibilità di eseguire il rendering di bitmap e testo in sovrimpressione con effetti sul video. Offre flessibilità nei motori di riproduzione, consentendo l'uso di codec di sistema, FFMPEG o VLC, garantendo un'ampia compatibilità e un'esperienza multimediale di alta qualità.

#### DOWNLOADS
[Installatore (solo per Windows)](https://s3.us-west-2.amazonaws.com/files.visioforge.com/trials/visioforge_sdks_installer_dotnet_setup.exe)[Guida all'installazione di NuGet](https://www.visioforge.com/help/docs/dotnet/install/)[Samples su GitHub](https://github.com/visioforge/.Net-SDK-s-samples)

#### ACQUISTO
[Controllare i prezzi o ordinare](https://www.visioforge.com/it/buy)

#### AIUTO
[Guida in linea](https://www.visioforge.com/help/docs/dotnet/mediaplayer/)[Changelog](https://www.visioforge.com/help/docs/dotnet/changelog/)[Contratto di licenza](/help/docs/eula/)

## STRUTTURA SDK
L'SDK consente agli sviluppatori di selezionare sorgenti video e audio specifiche, applicare una serie di effetti per l'elaborazione e quindi indirizzare i media per il rendering. È versatile e si adatta a diversi framework dell'interfaccia utente, fornendo un unico controllo VideoView per ciascuno di essi (WPF, WinForms, MAUI, Avalonia o altri), garantendo un'integrazione e una visualizzazione perfetta dei media all'interno di varie interfacce applicative.
## PIPELINE DI RIPRODUZIONE MULTIMEDIALE
L'architettura dell'SDK separa ogni sorgente multimediale in flussi audio e video discreti. Questi flussi vengono poi indirizzati ai rispettivi decodificatori. Dopo la decodifica, i dati non compressi vengono elaborati e, se necessario, possono essere consultati direttamente da un sample grabber. Questa funzione è utile per le applicazioni in tempo reale che elaborano o analizzano campioni multimediali.


## ELABORAZIONE VIDEO
Aggiungete testo, immagini o GIF ai vostri video per creare sovrapposizioni personalizzate. Regolate elementi visivi come luminosità, contrasto, saturazione e tonalità per migliorare la qualità dell'immagine. Utilizzate gli strumenti di editing per ridimensionare, ritagliare o ruotare i filmati come necessario. Applicate il chroma key per ottenere effetti di schermo verde ed esplorate un'ampia gamma di effetti video aggiuntivi per migliorare la vostra narrazione.
## ELABORAZIONE AUDIO
Integrare un equalizzatore nell'applicazione per consentire una precisa sintonizzazione dell'audio. Normalizzate i livelli audio, amplificate il volume o migliorate le frequenze basse. È disponibile una suite di effetti audio aggiuntivi per un ulteriore perfezionamento. Implementate il controllo automatico o manuale del guadagno per ottenere una qualità audio ottimale.


## CONTROLLI PERSONALIZZATI DELL'INTERFACCIA UTENTE
L'SDK vanta un'interfaccia personalizzabile con supporto di skin, icone PNG/SVG e opzioni di stile personalizzate.
## Le principali caratteristiche di VisioForge Media Player SDK .Net includono:
### Formati supportati
- Formati di file: MP4, MKV, MOV, AVI, MPEG-TS, WMV, MXF, VOB, OGG
- Formati video: MPEG-1/2, WMV, MPEG-4, H264, HEVC e altri con il decodificatore appropriato
- Formati audio: AAC, MP3, Vorbis, WMA, OPUS, Speex e altri con il decodificatore appropriato.
- MIDI, karaoke KAR e CDG
- Riproduzione di DVD e Blu-ray [solo per Windows]
### Elaborazione video ed effetti (CPU/GPU)
- sovrapposizione di immagini (comprese le GIF animate)
- sovrapposizione SVG
- sovrapposizione di testo
- trasparenza video
- panoramica/zoom
- luminosità, contrasto, saturazione, tonalità, ecc.
- colori invertiti
- scala di grigi
- deinterlacciamento
- denoise
- dissolvenza in entrata/dissolvenza in uscita
- ruotare
- ridimensionare a qualsiasi risoluzione
- Supporto dei filtri DirectShow di terze parti
- più di 30 altri effetti
### Elaborazione audio ed effetti
- amplificatore di volume
- equalizzatore
- sistema 3D-bass
- normalizzazione
- guadagno automatico/manuale
- molti altri effetti
### Altre caratteristiche
- Riproduzione di file dalla memoria
- Riproduzione senza interruzioni (nessun ritardo tra 2 file nella playlist)
- Supporto di schermi di uscita multipli
- Supporto Picture-in-Picture
- Supporto di file video 4K e 8K
- Decodifica accelerata GPU (DXVA2/Direct3D 11/Intel QuickSync/Nvidia CUVID, AMF)
- Ricerca avanti/indietro
- Acquisizione di fotogrammi in file .Net Bitmap o BMP/JPEG/GIF/PNG
- OSD (On-Screen Display)
- Flussi audio da file audio/video aggiuntivi
- Supporto dei sottotitoli
- Riproduzione di flussi di rete MMS/WMV/RTSP/RTMP/UDP
- Riproduzione inversa
- Riproduzione di file video crittografati creati con il programma [Video Encryption SDK](https://www.visioforge.com/it/video-encryption-sdk)
- Rilevamento del movimento
- Rilevamento dei volti e degli oggetti [solo Windows]
- Lettore di codici a barre
- Chiave cromatica
- Rendering video opzionale di madVR [solo per Windows].
- Supporto video VR 360° [solo Windows]
### IDE
- Visual Studio 2019 e successivi: Visual C#, Visual C++, Visual Basic .NET
- Codice di Visual Studio
- Cavaliere JetBrains
- L'SDK può essere utilizzato con altre applicazioni compatibili con .Net, come Microsoft Access, Word, Excel.
### Quadri UI
- WinForms
- WPF
- WinUI 3 for Desktop
- Avalonia
- Xamarin.Android
- MacOS/MacCatalyst
- Xamarin.iOS
- MAUI
### Requisiti di sistema
- Windows 10 o Windows 11
- Ubuntu 22+
- macOS 12+
### Piattaforme target
- Windows 11, Windows 10, Windows 8/8.1, Windows 7 SP1
- Windows Server 2016 e successivi
- Android 8 e successivi
- Linux
- macOS
- iOS
### Versioni .Net
- .Net Framework 4.6.1 e versioni successive
- .Net Core 3.1
- .Net 5 - .Net 9
### Diritti di distribuzione
Distribuzione gratuita.
### Limiti della prova
La versione di prova visualizza una filigrana nella finestra del video.

#### EDIZIONE

#### STANDARD

#### PROFESSIONALE
Riproduzione di file video
Riproduzione di file audio
Riproduzione del flusso di memoria
Supporto dei sottotitoli
Supporto video HD e 4K
Elaborazione ed effetti video/audio
Riproduzione di flussi di rete (HTTP/RTSP/RTMP/HLS/WMV/NDI)
Chiave cromatica
Riproduzione inversa
Rilevamento del movimento
Elaborazione video con
Filtri DirectShow (\*)
OSD (On-Screen Display)
Acquisizione di fotogrammi
Schermi di uscita multipli
Effetti video accelerati dalla GPU
Supporto SDK di crittografia video (\*)
Tracciamento del volto
Secuencias de audio de archivos externos
(\*) - Solo per Windows
Il nostro software offre un utilizzo illimitato, senza nag-screen, garantendo un'esperienza
esperienza senza soluzione di continuità. Forniamo un periodo di prova di 30 giorni, in modo che possiate esplorare tutte le funzionalità prima di
tutte le funzionalità prima di impegnarsi.
Con una licenza regolare, l'utente
riceve aggiornamenti minori e maggiori gratuiti per un anno; dopo tale periodo,
l'SDK continuerà a funzionare come prima.
In alternativa, la
licenza a vita fornisce aggiornamenti illimitati a tempo indeterminato. Inoltre,
offriamo assistenza e correzioni prioritarie. La licenza regolare viene fatturata
annualmente e si rinnova automaticamente ogni anno, ma è possibile annullare la
abbonamento in qualsiasi momento.
L'SDK è gratuito per uso non commerciale. Contattateci per ottenere una licenza gratuita.
---END OF PAGE---
# Page: https://www.visioforge.com/de/video-edit-sdk-net
# Video Edit SDK .Net
Version 15.9
Mit dem VisioForge Video Edit SDK .Net können Programmierer erweiterte Funktionen zur Videobearbeitung und -verarbeitung in ihre Softwareanwendungen integrieren. Mit diesem SDK können Sie benutzerdefinierte Filme erstellen, indem Sie Audio- und Videodateien kombinieren, verschiedene Effekte anwenden und fließende Übergänge zwischen den Tracks schaffen. Das SDK bietet robuste Unterstützung für gängige Videoformate, darunter MP4, WebM, AVI, WMV, Matroska, MPEG-1/2/4 und andere. Es bietet auch die Flexibilität, mit zusätzlichen Dateiformaten unter Verwendung von DirectShow-Filtern von Drittanbietern zu arbeiten. Darüber hinaus können Sie Audio in den gängigsten Formaten exportieren, darunter MP3, AAC/M4A, OGG Vorbis, Windows Media Audio, OPUS, Speex und WAV, was Ihre Multimedia-Projekte noch vielseitiger macht.

#### DOWNLOADS
[Installateur](https://s3.us-west-2.amazonaws.com/files.visioforge.com/trials/visioforge_sdks_installer_dotnet_setup.exe)[NuGet-Installationshandbuch](https://www.visioforge.com/help/docs/dotnet/install/)[Samples auf GitHub](https://github.com/visioforge/.Net-SDK-s-samples)

#### KAUFEN
[Preise prüfen oder bestellen](https://www.visioforge.com/de/buy)

#### HILFE
[Online-Hilfe](/help/docs/dotnet/videoedit/)[Änderungsliste](https://www.visioforge.com/help/docs/dotnet/changelog/)[Lizenzvereinbarung](/help/docs/eula/)

## SDK STRUKTUR
Das SDK bietet Kompatibilität mit Video-, Audio- und Bilddateien als Eingabequellen und ermöglicht es Ihnen, Bilder aus dem Speicher einzubinden. Außerdem bietet es Zugriff auf über 20 verschiedene Ausgabedateiformate. Sie können die Ausgabe über ein Netzwerk streamen oder zur weiteren Verarbeitung an eine Blackmagic-Karte senden. Diese Bandbreite an Optionen und Konfigurationen gewährleistet, dass Entwickler Multimedia-Inhalte effizient verarbeiten können.
## VIDEOBEARBEITUNGSPIPELINE
Das SDK enthält eine Timeline-Funktion, mit der Sie mehrere Video- und Audiospuren erstellen und verwalten können. Innerhalb dieser Spuren können Sie Video- und Audiofragmente einfügen. Nach der Dekodierungsphase sind die Daten dann bereit für die Verarbeitung und Komprimierung, bevor sie in eine Datei geschrieben werden. Dieser strukturierte Arbeitsablauf erleichtert den effizienten Umgang mit Multimedia-Inhalten innerhalb Ihrer Anwendung.


## AUSGABEFORMATE
Das SDK gewährleistet robuste Kompatibilität mit vielen gängigen Video-, Audio- und Bilddateiformaten und Codecs, darunter MP4, WebM, AVI, WMV, MPEG-TS, MP3, AAC, JPEG, GIF und PNG. Darüber hinaus können Entwickler ihre benutzerdefinierten DirectShow-Filter für die Kodierung verwenden, was die Flexibilität und die Anpassungsmöglichkeiten für die Multimedia-Verarbeitung erhöht.
## VIDEOBEARBEITUNG
L'SDK facilita l'integrazione di transizioni conformi a SMPTE tra i video per creare transizioni fluide e dall'aspetto professionale. Consente inoltre di aggiungere testo, immagini o loghi GIF ai contenuti. Gli sviluppatori possono regolare luminosità, contrasto, saturazione o tonalità per perfezionare gli aspetti visivi. Inoltre, l'SDK supporta varie operazioni come il ridimensionamento, il ritaglio e la rotazione, offrendo un controllo preciso sull'aspetto del video.


## AUDIOVERARBEITUNG
Fügen Sie mit dem SDK einen Equalizer zu Ihren Audioverarbeitungsfunktionen hinzu. Damit können Sie die Audiofrequenzen für eine optimale Klangqualität feinabstimmen. Sie können auch die Audiopegel normalisieren, die Lautstärke erhöhen oder die Bassfrequenzen verstärken, um die gewünschte Ausgabe zu erzielen. Das SDK bietet auch eine breite Palette anderer Audioeffekte.
## Die wichtigsten Funktionen von VisioForge Video Edit SDK .Net sind:
### Eingabeformate
- Videoformate: AVI, MP4, MPEG-1/2, WMV, QuickTime MOV, VP8/VP9, AV1, jedes andere, wenn Sie einen entsprechenden Decoder haben
- Audio-Formate: WAV, MP3, Vorbis, WMA, AAC, Speex, OPUS, jedes andere, wenn Sie einen entsprechenden Decoder haben
- Bildformate: BMP, PNG, GIF, JPEG, TIFF, WebP
### Ausgabe von Videoformaten
- AVI
- WMV (mit integrierten oder externen Profilen oder durch direkte Angabe aller Parameter)
- MKV (Matroska)
- MPEG-1/2/4 (einschließlich VCD/SVCD/DVD-Profile) und FLV mit FFMPEG-Wrapper
- WebM (Vorbis + VP8/VP9)
- MP4 H264/HEVC + AAC-Ausgabe über Software-Encoder, Intel QuickSync, Nvidia CUDA/NVENC oder AMD Radeon-Encoder
- Benutzerdefinierte Ausgabeformate (mit DirectShow-Filtern von Drittanbietern)
- Animiertes GIF
### Ausgabe von Audioformaten
- WAV (PCM oder komprimiert)
- WMA (Windows Media Audio)
- M4A (AAC)
- Ogg Vorbis
- MP3
- Windows Media Audio
- FLAC
- Speex
### Netzwerk-Streaming
- Windows Media
- RTSP-Protokoll (H264/AAC)
- Glattes Streaming-Protokoll für Microsoft IIS Server
- HTTP-Live-Übertragungen (HLS)
- RTMP, UDP und jedes andere von FFMPEG.exe unterstützte Protokoll
- YouTube
- Facebook
- NDI
### Videoverarbeitung und Effekte (CPU/GPU)
- Bild- und Grafik-Overlays (einschließlich animierte GIF)
- Übergänge zwischen Spuren (SMPTE-Standard)
- Schwenken/Zoomen
- Textüberlagerung
- Videotransparenz
- Helligkeit, Kontrast, Sättigung und Farbton einstellbar
- Größenänderung/Zuschneiden auf jede Auflösung
- chroma-key
- Denoise
- Deinterlace
- Einblendung/Ausblendung
- rotieren
### Audiobearbeitung und Effekte
- Volumenverstärker
- Equalizer
- 3D-Bass-System
- Normalisierung
- automatische/manuelle Verstärkung
- eine Menge anderer Effekte
### Andere Merkmale
- Die Bearbeitung der Timeline ermöglicht das Hinzufügen mehrerer Segmente von Video- und Audiodateien zur Timeline
- Unterstützung für DirectShow-Filter von Drittanbietern
- Unterstützung von Untertiteln
- Bewegungserkennung
- Barcode-Leser
- Ausgabe in verschlüsselte Videodateien mit dem [Video Encryption SDK](https://www.visioforge.com/de/video-encryption-sdk)
- Ausgabe an [Virtual Camera SDK](https://www.visioforge.com/de/virtual-camera-sdk)
- Kodierungsparameter
- Entschließung
- Bildrate
- Video- und Audiocodecs
- Video- und Audio-Bitrate oder -Qualität
- Level/Profil (falls vom Codec unterstützt)
- spezifische Codec-Einstellungen
- andere
- Unterstützung für das Lesen und Schreiben von Audio-/Videodatei-Tags
- Blackmagic Decklink-Ausgang
- madVR Video Renderer Unterstützung [nur Windows]
### IDE
- Visual Studio 2019 und höher: Visual C#, Visual C++, Visual Basic .NET
- Visual Studio Code
- JetBrains-Reiter
- SDK kann mit anderen .Net-kompatiblen Anwendungen wie Microsoft Access, Word und Excel verwendet werden.
### UI-Frameworks
- WinForms
- WPF
- WinUI 3 for Desktop
- Avalonia
- MAUI
- MacOS/MacCatalyst
- Xamarin.Android
- Xamarin.iOS
### Systemanforderungen
- Windows 10 oder Windows 11
- Ubuntu 22+
- macOS 12+
### Zielplattformen
- Windows 11, Windows 10, Windows 8/8.1, Windows 7 SP1
- Windows Server 2016 und höher
- Android 8 und höher
- Linux
- macOS
- iOS
### .Net-Versionen
- .Net Framework 4.6.1 und höher
- .Net Core 3.1
- .Net 5 – .Net 9
### Vertriebsrechte
Lizenzfreie Verbreitung.
### Beschränkungen des Versuchs
In der Testversion wird ein Wasserzeichen im Videofenster angezeigt.

#### EDITION

#### STANDARD

#### PROFESSIONELL

#### PREMIUM
Zeitleiste
Frame Grabber
Videoverarbeitung
Audioverarbeitung
HD-Video-Unterstützung
Übergänge
Netzwerk-Streaming im WMV-Format
Netzwerk-Streaming über RTMP/RTSP/UDP
Chroma-Schlüssel
Bewegungserkennung
Videoverarbeitung mit DirectShow-Filtern
OSD (Bildschirmanzeige)
Bild-im-Bild-Darstellung
Mehrere Ausgabebildschirme
GPU-beschleunigte Videoeffekte
Ausgabe an die virtuelle Kamera SDK
Video Encryption SDK Unterstützung
Video-Rotation
Ausgabeformate
- AVI
- WMV (Windows Media Video)
- WMA (Windows Media Audio)
- WAV
- MP3
- Ogg Vorbis
- Speex
- DV-Video
- Flash-Video (FLV) mit FFMPEG
- WebM
- Benutzerdefinierte Ausgabeformate mit externen DirectShow-Filtern
- MPEG-1/2/4 mit FFMPEG
- MP4 H264 mit Software, Intel QuickSync, Nvidia NVENC/CUDA oder AMD Radeon Encoder
Unsere Software bietet eine unbegrenzte Nutzung ohne störende Bildschirme und gewährleistet eine
nahtlose Erfahrung. Wir bieten einen 30-tägigen Testzeitraum, damit Sie alle
alle Funktionen erkunden können, bevor Sie sich festlegen.
Mit einer regulären Lizenz erhalten Sie
erhalten Sie für ein Jahr kostenlose Minor- und Major-Upgrades; nach diesem Zeitraum
funktioniert das SDK weiter wie bisher.
Alternativ dazu bietet die
Lifetime-Lizenz unbegrenzte Updates auf unbestimmte Zeit zur Verfügung. Zusätzlich,
bieten wir vorrangigen Support und Fehlerbehebungen. Die reguläre Lizenz wird jährlich abgerechnet
jährlich abgerechnet und automatisch verlängert, aber Sie können Ihr Abonnement
Abonnement jederzeit kündigen.
Das SDK ist für die nicht-kommerzielle Nutzung kostenlos. Bitte kontaktieren Sie uns, um eine kostenlose Lizenz zu erhalten.
---END OF PAGE---
# Page: https://www.visioforge.com/es/video-edit-sdk-net
# Video Edit SDK .Net
versión 15.9
VisioForge Video Edit SDK .Net permite a los programadores integrar funciones avanzadas de edición y procesamiento de vídeo en sus aplicaciones de software. Con este SDK, puede crear películas personalizadas combinando archivos de audio y vídeo, aplicando diversos efectos y realizando transiciones fluidas entre pistas. El SDK es compatible con los formatos de vídeo más populares, como MP4, WebM, AVI, WMV, Matroska, MPEG-1/2/4 y otros. También ofrece la flexibilidad de trabajar con formatos de archivo adicionales utilizando filtros DirectShow de terceros. Además, puedes exportar audio en los formatos más populares, como MP3, AAC/M4A, OGG Vorbis, Windows Media Audio, OPUS, Speex y WAV, lo que añade versatilidad a tus proyectos multimedia.

#### DESCARGAS
[Instalador](https://s3.us-west-2.amazonaws.com/files.visioforge.com/trials/visioforge_sdks_installer_dotnet_setup.exe)[Guía de instalación de NuGet](https://www.visioforge.com/help/docs/dotnet/install/)[Samples en GitHub](https://github.com/visioforge/.Net-SDK-s-samples)

#### COMPRAR
[Consultar precios o hacer un pedido](https://www.visioforge.com/es/buy)

#### AYUDA
[Ayuda en línea](/help/docs/dotnet/videoedit/)[Registro de cambios](https://www.visioforge.com/help/docs/dotnet/changelog/)[Acuerdo de licencia](/help/docs/eula/)

## ESTRUCTURA DEL SDK
El SDK ofrece compatibilidad con archivos de vídeo, audio e imagen como fuentes de entrada y permite incluir imágenes de la memoria. También proporciona acceso a más de 20 formatos de archivo de salida diferentes. Es posible transmitir la salida a través de una red o enviarla a una tarjeta Blackmagic para su posterior procesamiento. Esta gama de opciones y configuraciones garantiza a los desarrolladores un manejo eficaz de los contenidos multimedia.
## PROCESO DE EDICIÓN DE VÍDEO
El SDK incluye una función de línea de tiempo que permite crear y gestionar varias pistas de vídeo y audio. Dentro de estas pistas, se pueden insertar fragmentos de vídeo y audio. A continuación, tras la fase de descodificación, los datos quedan listos para su procesamiento y compresión antes de ser escritos en un archivo. Este flujo de trabajo estructurado facilita la gestión eficaz de contenidos multimedia dentro de su aplicación.


## FORMATOS DE SALIDA
El SDK garantiza una sólida compatibilidad con muchos formatos y códecs populares de archivos de vídeo, audio e imagen, como MP4, WebM, AVI, WMV, MPEG-TS, MP3, AAC, JPEG, GIF y PNG. Además, los desarrolladores pueden utilizar sus filtros DirectShow personalizados para la codificación, lo que ofrece una mayor flexibilidad y opciones de personalización para el procesamiento multimedia.
## PROCESAMIENTO DE VÍDEO
El SDK facilita la integración de transiciones compatibles con SMPTE entre vídeos para crear transiciones fluidas y de aspecto profesional. También permite añadir texto, imágenes o logotipos GIF a los contenidos. Los desarrolladores pueden ajustar el brillo, el contraste, la saturación o el tono para afinar los aspectos visuales. Además, el SDK admite diversas operaciones, como redimensionar, recortar y rotar, lo que permite un control preciso de la apariencia del vídeo.


## PROCESAMIENTO DE AUDIO
Añade un ecualizador a tus capacidades de procesamiento de audio con el SDK. Esto le permite ajustar con precisión las frecuencias de audio para obtener una calidad de sonido óptima. También puede normalizar los niveles de audio, aumentar el volumen o realzar las frecuencias graves para conseguir el resultado deseado. El SDK también ofrece una amplia gama de otros efectos de audio.
## VisioForge Video Edit SDK .Net principales características incluyen:
### Formatos de entrada
- Formatos de vídeo: AVI, MP4, MPEG-1/2, WMV, QuickTime MOV, VP8/VP9, AV1, cualquier otro si dispone del descodificador correspondiente.
- Formatos de audio: WAV, MP3, Vorbis, WMA, AAC, Speex, OPUS, cualquier otro si dispone del descodificador correspondiente
- Formatos de imagen: BMP, PNG, GIF, JPEG, TIFF, WebP
### Formatos de vídeo de salida
- AVI
- WMV (utilizando perfiles integrados o externos o especificando todos los parámetros directamente)
- MKV (Matroska)
- MPEG-1/2/4 (incluidos los perfiles VCD/SVCD/DVD) y FLV mediante la envoltura FFMPEG
- WebM (Vorbis + VP8/VP9)
- Salida MP4 H264/HEVC + AAC mediante codificador de software, Intel QuickSync, Nvidia CUDA/NVENC o AMD Radeon
- Formatos de salida personalizados (mediante filtros DirectShow de terceros)
- GIF animado
### Formatos de audio de salida
- WAV (PCM o comprimido)
- WMA (Windows Media Audio)
- M4A (AAC)
- Ogg Vorbis
- MP3
- Windows Media Audio
- FLAC
- Speex
### Transmisión en red
- Windows Media
- Protocolo RTSP (H264/AAC)
- Protocolo Smooth Streaming para Microsoft IIS Server
- Retransmisiones en directo HTTP (HLS)
- RTMP, UDP y cualquier otro protocolo compatible con FFMPEG.exe
- YouTube
- Facebook
- Instituto Nacional de Desarrollo
### Procesamiento y efectos de vídeo (CPU/GPU)
- superposiciones de imágenes y gráficos (incluidos GIF animados)
- transiciones entre pistas (norma SMPTE)
- funciones de panorámica y zoom
- superposición de texto
- transparencia de vídeo
- ajustes de brillo, contraste, saturación y tono
- redimensionar/recortar a cualquier resolución
- chroma-key
- eliminación de ruido
- desentrelazar
- fundido de entrada/salida
- rotar vídeo
### Tratamiento de audio y efectos
- amplificador de volumen
- ecualizador
- sistema de bajos 3D
- normalización
- ganancia auto/manual
- muchos otros efectos
### Otras características
- La edición de la línea de tiempo permite añadir varios segmentos de archivos de vídeo y audio a la línea de tiempo
- Compatibilidad con filtros DirectShow de terceros
- Soporte para subtítulos
- Detección de movimiento
- Lector de códigos de barras
- Salida a archivos de vídeo encriptados mediante el [Video Encryption SDK](https://www.visioforge.com/es/video-encryption-sdk)
- Salida a [Virtual Camera SDK](https://www.visioforge.com/es/virtual-camera-sdk)
- Parámetros de codificación
- resolución
- frecuencia de cuadro
- códecs de vídeo y audio
- velocidad de bits o calidad de vídeo y audio
- nivel/perfil (si el códec lo admite)
- configuración específica del códec
- otros
- Soporte para leer y escribir etiquetas de archivos de audio/vídeo
- Salida Blackmagic Decklink
- Compatibilidad con el renderizador de vídeo madVR [sólo Windows].
### IDE
- Visual Studio 2019 y versiones posteriores: Visual C#, Visual C++, Visual Basic .NET
- Código de Visual Studio
- Jinete JetBrains
- SDK puede utilizarse con otras aplicaciones compatibles con .Net como Microsoft Access, Word, Excel
### Frameworks de IU
- Formularios WinForms
- WPF
- WinUI 3 for Desktop
- Avalonia
- Maui
- MacOS/MacCatalyst
- Xamarin.Android
- Xamarin.iOS
### Requisitos del sistema
- Windows 10 o Windows 11
- Ubuntu 22+
- macOS 12+
### Plataformas objetivo
- Windows 11, Windows 10, Windows 8/8.1, Windows 7 SP1
- Windows Server 2016 y versiones posteriores
- Android 8 y posteriores
- Linux
- macOS
- iOS
### Versiones de .Net
- .Net Framework 4.6.1 y versiones posteriores
- .Net Core 3.1
- .Net 5 - .Net 9
### Derechos de distribución
Distribución sin derechos de autor.
### Limitaciones de la versión de prueba
La versión de prueba muestra una marca de agua en la ventana de vídeo.

#### EDICIÓN

#### ESTÁNDAR

#### PROFESIONAL

#### PREMIUM
Línea de tiempo
Capturador de fotogramas
Tratamiento de vídeo
Tratamiento de audio
Compatible con vídeo HD
Transiciones
Transmisión en red en formato WMV
Transmisión en red mediante RTMP/RTSP/UDP
Chroma-key
Detección de movimiento
Tratamiento de vídeo mediante filtros DirectShow
OSD (On-Screen Display)
Picture-In-Picture
Múltiples pantallas de salida
Efectos de vídeo acelerados en la GPU
Salida a Virtual Camera SDK
Compatibilidad con Video Encryption SDK
Rotación de vídeo
Formatos de salida
- AVI
- WMV (Windows Media Video)
- WMA (Windows Media Audio)
- WAV
- MP3
- Ogg Vorbis
- Speex
- Vídeo DV
- Vídeo Flash (FLV) con FFMPEG
- WebM
- Formatos de salida personalizados mediante filtros DirectShow externos
- MPEG-1/2/4 con FFMPEG
- MP4 H264 mediante software, codificadores Intel QuickSync, Nvidia NVENC/CUDA o AMD Radeon
Nuestro software ofrece un uso ilimitado sin pantallas de aviso, garantizando una
experiencia sin problemas. Ofrecemos un período de prueba de 30 días para que pueda explorar
todas las funciones antes de comprometerse.
Con una licencia normal
recibirá actualizaciones menores y mayores gratuitas durante un año; después de ese período,
el SDK seguirá funcionando como antes.
Alternativamente, la licencia
licencia de por vida proporciona actualizaciones ilimitadas indefinidamente. Además,
ofrecemos soporte y correcciones prioritarias. La licencia normal se factura
anualmente y se renueva automáticamente cada año, pero puede cancelar su
suscripción en cualquier momento.
El SDK es gratuito para uso no comercial. Póngase en contacto con nosotros para obtener una licencia gratuita.
---END OF PAGE---
# Page: https://www.visioforge.com/it/video-edit-sdk-net
# Video Edit SDK .Net
versione 15.9
VisioForge Video Edit SDK .Net consente ai programmatori di integrare funzionalità avanzate di editing ed elaborazione video nelle loro applicazioni software. Con questo SDK è possibile creare filmati personalizzati combinando file audio e video, applicando vari effetti e transizioni fluide tra le tracce. L'SDK offre un solido supporto per i formati video più diffusi, tra cui MP4, WebM, AVI, WMV, Matroska, MPEG-1/2/4 e altri. Offre anche la flessibilità di lavorare con altri formati di file utilizzando filtri DirectShow di terze parti. Inoltre, è possibile esportare l'audio nei formati più diffusi, tra cui MP3, AAC/M4A, OGG Vorbis, Windows Media Audio, OPUS, Speex e WAV, aggiungendo versatilità ai progetti multimediali.

#### DOWNLOADS
[Installatore](https://s3.us-west-2.amazonaws.com/files.visioforge.com/trials/visioforge_sdks_installer_dotnet_setup.exe)[Guida all'installazione di NuGet](https://www.visioforge.com/help/docs/dotnet/install/)[Samples su GitHub](https://github.com/visioforge/.Net-SDK-s-samples)

#### ACQUISTO
[Controllare i prezzi o ordinare](https://www.visioforge.com/it/buy)

#### AIUTO
[Guida in linea](/help/docs/dotnet/videoedit/)[Changelog](https://www.visioforge.com/help/docs/dotnet/changelog/)[Contratto di licenza](/help/docs/eula/)

## STRUTTURA SDK
L'SDK è compatibile con i file video, audio e di immagine come sorgenti di ingresso e consente di includere immagini dalla memoria. Fornisce inoltre l'accesso a oltre 20 diversi formati di file in uscita. È possibile trasmettere l'output su una rete o inviarlo a una scheda Blackmagic per un'ulteriore elaborazione. Questa gamma di opzioni e configurazioni garantisce agli sviluppatori una gestione efficiente dei contenuti multimediali.
## PIPELINE DI MONTAGGIO VIDEO
L'SDK include una funzione di timeline che consente di creare e gestire più tracce video e audio. All'interno di queste tracce, è possibile inserire frammenti video e audio. Quindi, dopo la fase di decodifica, i dati sono pronti per l'elaborazione e la compressione prima di essere scritti su un file. Questo flusso di lavoro strutturato facilita la gestione efficiente dei contenuti multimediali all'interno dell'applicazione.


## FORMATI DI USCITA
L'SDK garantisce una solida compatibilità con molti formati e codec di file video, audio e immagine, tra cui MP4, WebM, AVI, WMV, MPEG-TS, MP3, AAC, JPEG, GIF e PNG. Inoltre, gli sviluppatori possono utilizzare i loro filtri DirectShow personalizzati per la codifica, offrendo una maggiore flessibilità e opzioni di personalizzazione per l'elaborazione multimediale.
## ELABORAZIONE VIDEO
L'SDK facilita l'integrazione di transizioni conformi a SMPTE tra i video per creare transizioni fluide e dall'aspetto professionale. Consente inoltre di aggiungere testo, immagini o loghi GIF ai contenuti. Gli sviluppatori possono regolare luminosità, contrasto, saturazione o tonalità per perfezionare gli aspetti visivi. Inoltre, l'SDK supporta varie operazioni come il ridimensionamento, il ritaglio e la rotazione, offrendo un controllo preciso sull'aspetto del video.


## ELABORAZIONE AUDIO
Aggiungete un equalizzatore alle vostre capacità di elaborazione audio con l'SDK. Ciò consente di regolare con precisione le frequenze audio per ottenere una qualità sonora ottimale. È anche possibile normalizzare i livelli audio, aumentare il volume o migliorare le frequenze dei bassi per ottenere il risultato desiderato. L'SDK offre anche un'ampia gamma di altri effetti audio.
## Le principali caratteristiche di VisioForge Video Edit SDK .Net includono:
### Formati di ingresso
- Formati video: AVI, MP4, MPEG-1/2, WMV, QuickTime MOV, VP8/VP9, AV1, qualsiasi altro formato se si dispone di un decodificatore corrispondente.
- Formati audio: WAV, MP3, Vorbis, WMA, AAC, Speex, OPUS, qualsiasi altro se si dispone di un decodificatore corrispondente.
- Formati immagine: BMP, PNG, GIF, JPEG, TIFF, WebP
### Formati video in uscita
- AVI
- WMV (utilizzando profili integrati o esterni o specificando direttamente tutti i parametri)
- MKV (Matroska)
- MPEG-1/2/4 (compresi i profili VCD/SVCD/DVD) e FLV con wrapper FFMPEG
- WebM (Vorbis + VP8/VP9)
- Uscita MP4 H264/HEVC + AAC con codificatore software, Intel QuickSync, Nvidia CUDA/NVENC o AMD Radeon
- Formati di uscita personalizzati (utilizzando filtri DirectShow di terze parti)
- GIF animate
### Formati audio in uscita
- WAV (PCM o compresso)
- WMA (Windows Media Audio)
- M4A (AAC)
- Ogg Vorbis
- MP3
- Windows Media Audio
- Formato FLAC
- Speex
### Streaming di rete
- Windows Media
- Protocollo RTSP (H264/AAC)
- Protocollo Smooth Streaming per Microsoft IIS Server
- Streaming live HTTP (HLS)
- RTMP, UDP e qualsiasi altro protocollo supportato da FFMPEG.exe
- YouTube
- Facebook
- NDI
### Elaborazione video ed effetti (CPU/GPU)
- sovrapposizioni di immagini e grafica (comprese le GIF animate)
- transizioni tra le tracce (standard SMPTE)
- panoramica/zoom
- sovrapposizione di testo
- trasparenza video
- luminosità, contrasto, saturazione, tinta
- ridimensionare/ritagliare a qualsiasi risoluzione
- chiave cromatica
- denoise
- deinterlacciamento
- dissolvenza in entrata/dissolvenza in uscita
- ruotare
### Elaborazione audio ed effetti
- amplificatore di volume
- equalizzatore
- sistema 3D-bass
- normalizzazione
- guadagno automatico/manuale
- molti altri effetti
### Altre caratteristiche
- La modifica della timeline consente di aggiungere più segmenti di file video e audio alla timeline.
- Supporto dei filtri DirectShow di terze parti
- Supporto dei sottotitoli
- Rilevamento del movimento
- Lettore di codici a barre
- Uscita su file video crittografati utilizzando l'opzione [Video Encryption SDK](https://www.visioforge.com/it/video-encryption-sdk)
- Uscita verso [Virtual Camera SDK](https://www.visioforge.com/it/virtual-camera-sdk)
- Parametri di codifica
- risoluzione
- frequenza dei fotogrammi
- codec video e audio
- velocità o qualità dei bit video e audio
- livello/profilo (se supportato dal codec)
- impostazioni specifiche del codec
- altro
- Supporto per la lettura e la scrittura di tag di file audio/video
- Uscita Blackmagic Decklink
- Supporto del rendering video madVR [solo Windows]
### IDE
- Visual Studio 2019 e successivi: Visual C#, Visual C++, Visual Basic .NET
- Codice di Visual Studio
- Cavaliere JetBrains
- L'SDK può essere utilizzato con altre applicazioni compatibili con .Net, come Microsoft Access, Word, Excel.
### Quadri UI
- WinForms
- WPF
- WinUI 3 for Desktop
- Avalonia
- MAUI
- MacOS/MacCatalyst
- Xamarin.Android
- Xamarin.iOS
### Requisiti di sistema
- Windows 10 o Windows 11
- Ubuntu 22+
- macOS 12+
### Piattaforme target
- Windows 11, Windows 10, Windows 8/8.1, Windows 7 SP1
- Windows Server 2016 e successivi
- Android 8 e successivi
- Linux
- macOS
- iOS
### Versioni .Net
- .Net Framework 4.6.1 e versioni successive
- .Net Core 3.1
- .Net 5 - .Net 9
### Diritti di distribuzione
Distribuzione gratuita.
### Limiti della prova
La versione di prova visualizza una filigrana nella finestra del video.

#### EDIZIONE

#### STANDARD

#### PROFESSIONALE

#### PREMIUM
Linea temporale
Acquisizione di fotogrammi
Elaborazione video
Elaborazione audio
Supporto video HD
Transizioni
Streaming di rete in formato WMV
Streaming di rete tramite RTMP/RTSP/UDP
Chiave cromatica
Rilevamento del movimento
Elaborazione video con filtri DirectShow
OSD (On-Screen Display)
Immagine nell'immagine
Schermi di uscita multipli
Effetti video accelerati dalla GPU
Uscita verso l'SDK della Virtual Camera
Supporto SDK di crittografia video
Rotazione video
Formati di uscita
- AVI
- WMV (Windows Media Video)
- WMA (Windows Media Audio)
- WAV
- MP3
- Ogg Vorbis
- Speex
- Video DV
- Video Flash (FLV) utilizzando FFMPEG
- WebM
- Formati di uscita personalizzati utilizzando filtri DirectShow esterni
- MPEG-1/2/4 con FFMPEG
- MP4 H264 tramite software, codificatori Intel QuickSync, Nvidia NVENC/CUDA o AMD Radeon
Il nostro software offre un utilizzo illimitato, senza nag-screen, garantendo un'esperienza
esperienza senza soluzione di continuità. Forniamo un periodo di prova di 30 giorni, in modo che possiate esplorare tutte le funzionalità prima di
tutte le funzionalità prima di impegnarsi.
Con una licenza regolare, l'utente
riceve aggiornamenti minori e maggiori gratuiti per un anno; dopo tale periodo,
l'SDK continuerà a funzionare come prima.
In alternativa, la
licenza a vita fornisce aggiornamenti illimitati a tempo indeterminato. Inoltre,
offriamo assistenza e correzioni prioritarie. La licenza regolare viene fatturata
annualmente e si rinnova automaticamente ogni anno, ma è possibile annullare la
abbonamento in qualsiasi momento.
L'SDK è gratuito per uso non commerciale. Contattateci per ottenere una licenza gratuita.
---END OF PAGE---
# Page: https://www.visioforge.com/de/media-blocks-sdk-net
# Media Blocks SDK .Net
Version 15.9
Mit dem SDK können Sie Ihre Multimedia-Anwendung aus einzelnen Blöcken wie ein Backsteinhaus aufbauen. Um beispielsweise ein Video von einer Kamera aufzunehmen, fügen Sie den Block "Camera", den Block "H264 encoder" und den Block "MP4 sink" hinzu, um das Video in eine MP4-Datei aufzunehmen.

#### DOWNLOADS
[NuGet – Kern](https://www.nuget.org/packages/VisioForge.DotNet.VideoCapture/)[NuGet-Installationshandbuch](https://www.visioforge.com/help/docs/dotnet/install/)[Samples auf GitHub](https://github.com/visioforge/.Net-SDK-s-samples)

#### KAUFEN
[Preise prüfen oder bestellen](https://www.visioforge.com/de/buy)

#### HILFE
[Online-Hilfe](/help/docs/dotnet/mediablocks/)[Änderungsliste](https://www.visioforge.com/help/docs/dotnet/changelog/)[Lizenzvereinbarung](/help/docs/eula/)
Unsere Software bietet eine unbegrenzte Nutzung ohne störende Bildschirme und gewährleistet eine
nahtlose Erfahrung. Wir bieten einen 30-tägigen Testzeitraum, damit Sie alle
alle Funktionen erkunden können, bevor Sie sich festlegen.
Mit einer regulären Lizenz erhalten Sie
erhalten Sie für ein Jahr kostenlose Minor- und Major-Upgrades; nach diesem Zeitraum
funktioniert das SDK weiter wie bisher.
Alternativ dazu bietet die
Lifetime-Lizenz unbegrenzte Updates auf unbestimmte Zeit zur Verfügung. Zusätzlich,
bieten wir vorrangigen Support und Fehlerbehebungen. Die reguläre Lizenz wird jährlich abgerechnet
jährlich abgerechnet und automatisch verlängert, aber Sie können Ihr Abonnement
Abonnement jederzeit kündigen.
Das SDK ist für die nicht-kommerzielle Nutzung kostenlos. Bitte kontaktieren Sie uns, um eine kostenlose Lizenz zu erhalten.

## EINFACHER SPIELER
Die einfache Player-Pipeline verwendet den UniversalSourceBlock zum Lesen und Dekodieren der Quelldatei, den VideoRendererBlock zur Anzeige von Video und den AudioRendererBlock zur Wiedergabe von Audio.
## FORTGESCHRITTENER SPIELER
Die erweiterte Player-Pipeline umfasst den UniversalSourceBlock zur Dekodierung von Dateien oder Streams, Video- und Audio-Renderer sowie Blöcke zur Effektverarbeitung.


## KAMERA VORSCHAU
Die einfache Kamera-/Mikrofonvorschau-Pipeline enthält Gerätequellblöcke und Video-/Audio-Renderer-Blöcke.
Es werden die Standardgeräte verwendet.
## RTSP VORSCHAU
Die RTSP-Vorschau-Pipeline, die den RTSP-Quellblock (mit den darin enthaltenen Decodern) sowie Video- und Audio-Renderer umfasst.


## AUFNAHME MIT VORSCHAU
Die Capture-Pipeline verfügt über zwei T-Blöcke, die zum Aufteilen von Video- und Audio-Streams verwendet werden und eine Video-/Audio-Vorschau sowie [Videoaufnahme](https://www.visioforge.com/de/video-capture-sdk-net).
## Die wichtigsten Funktionen von VisioForge Media Blocks SDK .Net sind:
- Audio/Video-Vorschau
- Video- und Audioerfassung in einer Vielzahl von Formaten
- Frame-Erfassung in Bitmap-Klasse, BMP-, JPEG- und PNG-Dateien
- Videoverarbeitung und Effekte (CPU/GPU)
- Steuerung des Videoaufnahmegeräts
- Netzwerk-Streaming
- Bewegungserkennung
- Barcode-Leser (QR-Code, UPC-A, UPC-E, EAN-8, EAN-13, Code 39, Code 93, Code 128, Codabar, ITF, RSS-14, Data Matrix, Aztec, PDF-417)
- Unterstützung benutzerdefinierter Schnittstellen
- Computer Vision API
- PIP (Bild-im-Bild)
- Bildschirmaufnahme/Fensteraufnahme
- Gesichtserkennung und Objektverfolgung
- Unterstützung der Multiplikation von Ausgabebildschirmen
- Audioaufnahme von Lautsprechern
- Unterstützung der Ein- und Ausgabe der Blackmagic Decklink-Karte
- Unterstützung für das Lesen und Schreiben von Audio-/Videodatei-Tags
- Unterstützung von FLIR/Teledyne-Kameras (USB3Vision/GigE)
- Unterstützung von Basler Kameras (USB3Vision/GigE)
### Audio-Encoder
- Unterstützte Kommunikation
- FLAC
- MP3
- OPUS
- Vorbis
- WMA (Windows Media Audio)
- Speex
### Audioverarbeitung
- Verstärken Sie
- Audio-Mischpult
- Audio-Sample-Grabber
- Bilanz
- Kompressor/Expander
- Echo
- Equalizer
- Skala/Tempo
- Audio-Lautstärke
### Blackmagic Decklink
- Audio-Senke
- Audioquelle
- Video-Spülbecken
- Quelle: Video
### Datei-Spülbecken
- MP4
- WebM
- MOV
- AVI
- MPEG-TS
- MKV
- OGG
### Netzwerk-Streaming
- HLS
- RTMP
- RTSP
- UDP
### Videoverarbeitung
- Farbeffekte
- Deinterlace
- Fischauge
- Spiegeln/Drehen
- Gamma
- Gaußscher Weichzeichner
- Bild-Overlay
- Spiegel
- Blickwinkel
- Kneifen
- Größe ändern
- Drehen Sie
- Probenehmer
- Sphäre
- Platz
- Dehnen
- Text-Overlay
- Tunnel
- Wirbel
- Video-Balance
- Videomischer
- Wasserplätschern
### Video-Encoder (CPU/GPU)
- H264
- H265/HEVC
- VP8/VP9
- WMV (Windows Media Video)
- MJPEG
- AV1
### Quellen
- Quelle der Datei
- RTSP-Quelle
- Quelle: Bildschirm
- System-Videoquelle
- System-Audioquelle
- Virtuelle Videoquelle
- Virtuelle Audioquelle
### Besonderes
- Null-Renderer
- Tee
- VU-Meter
### Unterstützte Eingabegeräte:
- DV- und HDV-MPEG-2-Camcorder
- USB-Webkameras und andere Aufnahmegeräte (einschließlich 4K-Geräte)
- PCI-Erfassungskarten
- TV-Tuner (mit und ohne internen MPEG-Encoder)
- JPEG/MJPEG, MPEG-4 und H264 HTTP/RTSP/RTMP IP-Kameras/Server, unterstützt HD-Format
- ONVIF-IP-Kameras mit PTZ-Unterstützung
- Blackmagic Decklink-Geräte
- Audioaufnahmegeräte und Soundkarten
- ASIO-Geräte
### IDE
- Visual Studio 2019 und höher: Visual C#, Visual C++, Visual Basic .NET
- Visual Studio Code
- JetBrains-Reiter
- SDK kann mit anderen .Net-kompatiblen Anwendungen wie Microsoft Access, Word und Excel verwendet werden.
### UI-Frameworks
- WinForms
- WPF
- WinUI 3 for Desktop
- Avalonia
- GTK#
- MAUI
- Xamarin.Android
- Xamarin.Mac
- Xamarin.iOS
### .Net-Versionen
- .Net Framework 4.6.1 und höher
- .Net Core 3.1
- .Net 5 – .Net 9
### Systemanforderungen
- Windows 10 oder Windows 11
- Ubuntu 22+
- macOS 12+
### Zielplattformen
- Windows 11, Windows 10, Windows 8/8.1, Windows 7 SP1
- Windows Server 2016 und höher
- Android 8 und höher
- Linux (Ubuntu)
- macOS
- iOS
### Vertriebsrechte
Lizenzfreie Verbreitung.
Das SDK enthält GStreamer-Bibliotheken, die unter der LGPL v2.1 lizenziert sind.
---END OF PAGE---
# Page: https://www.visioforge.com/es/media-blocks-sdk-net
# Media Blocks SDK .Net
versión 15.9
L'SDK consente di costruire la propria applicazione multimediale partendo da singoli blocchi, come una casa di mattoni. Ad esempio, per registrare un video da una telecamera, si aggiunge il blocco "Camera", il blocco "H264 encoder" e il blocco "MP4 sink" per registrare il video in un file MP4.

#### DESCARGAS
[NuGet - Núcleo](https://www.nuget.org/packages/VisioForge.DotNet.VideoCapture/)[Guía de instalación de NuGet](https://www.visioforge.com/help/docs/dotnet/install/)[Samples en GitHub](https://github.com/visioforge/.Net-SDK-s-samples)

#### COMPRAR
[Consultar precios o hacer un pedido](https://www.visioforge.com/es/buy)

#### AYUDA
[Ayuda en línea](/help/docs/dotnet/mediablocks/)[Registro de cambios](https://www.visioforge.com/help/docs/dotnet/changelog/)[Acuerdo de licencia](/help/docs/eula/)
Nuestro software ofrece un uso ilimitado sin pantallas de aviso, garantizando una
experiencia sin problemas. Ofrecemos un período de prueba de 30 días para que pueda explorar
todas las funciones antes de comprometerse.
Con una licencia normal
recibirá actualizaciones menores y mayores gratuitas durante un año; después de ese período,
el SDK seguirá funcionando como antes.
Alternativamente, la licencia
licencia de por vida proporciona actualizaciones ilimitadas indefinidamente. Además,
ofrecemos soporte y correcciones prioritarias. La licencia normal se factura
anualmente y se renueva automáticamente cada año, pero puede cancelar su
suscripción en cualquier momento.
El SDK es gratuito para uso no comercial. Póngase en contacto con nosotros para obtener una licencia gratuita.

## JUGADOR SENCILLO
La cadena de reproducción simple utiliza UniversalSourceBlock para leer y descodificar el archivo fuente, VideoRendererBlock para mostrar el vídeo y AudioRendererBlock para reproducir el audio.
## JUGADOR AVANZADO
El canal de reproducción avanzado incluye el bloque UniversalSourceBlock para descodificar archivos o secuencias, renderizadores de vídeo y audio, y bloques de procesamiento de efectos.


## VISTA PREVIA DE LA CÁMARA
El canal de previsualización simple de cámara/micrófono contiene bloques de fuente de dispositivo y bloques de renderizador de vídeo/audio.
Se utilizarán los dispositivos predeterminados.
## RTSP PREVIEW
El canal de previsualización RTSP, que incluye el bloque fuente RTSP (con decodificadores en su interior) y los renderizadores de vídeo y audio.


## CAPTURA CON VISTA PREVIA
La tubería de captura tiene dos bloques en T que se utilizan para dividir transmisiones de video y audio, lo que permite obtener una vista previa de video/audio junto con [captura de vídeo](https://www.visioforge.com/es/video-capture-sdk-net).
## Las principales características de VisioForge Media Blocks SDK .Net son:
- Previsualización de audio/vídeo
- Captura de vídeo y audio en una amplia gama de formatos
- Captura de fotogramas a archivos de clase Bitmap, BMP, JPEG y PNG
- Procesamiento y efectos de vídeo (CPU/GPU)
- Control del dispositivo de video capture
- Transmisión en red
- Detección de movimiento
- Lector de códigos de barras (QR Code, UPC-A, UPC-E, EAN-8, EAN-13, Code 39, Code 93, Code 128, Codabar, ITF, RSS-14, Data Matrix, Aztec, PDF-417)
- Interfaces personalizadas
- API de visión artificial
- PIP (imagen en imagen)
- Captura de pantalla/captura de ventana
- Detección de caras y seguimiento de objetos
- Multiplicación de pantallas de salida
- Captura de audio de los altavoces
- Soporte de entrada y salida de la tarjeta Blackmagic Decklink
- Soporte para leer y escribir etiquetas de archivos de audio/vídeo
- Compatibilidad con cámaras FLIR/Teledyne (USB3Vision/GigE)
- Compatibilidad con cámaras Basler (USB3Vision/GigE)
### Codificadores de audio
- CAA
- FLAC
- MP3
- OPUS
- Vorbis
- WMA (Windows Media Audio)
- Speex
### Tratamiento de audio
- Amplifique
- Mezclador de audio
- Grabador de muestras de audio
- Balance de audio
- Compresor/Expansor
- Eco
- Ecualizador
- Escala/Tempo
- Volumen de audio
### Blackmagic Decklink
- Salida de audio
- Fuente de audio
- Salida de video
- Fuente de vídeo
### Salida de archivos
- MP4
- WebM
- MOV
- AVI
- MPEG-TS
- MKV
- OGG
### Transmisión en red
- HLS
- RTMP
- RTSP
- UDP
### Tratamiento de vídeo
- Efectos de color
- Desentrelazado
- Ojo de pez
- Voltear/Rotar
- Gamma
- Desenfoque gaussiano
- Superposición de imágenes
- Espejo
- Perspectiva
- Pinch
- Redimensionar
- Rotar
- Captador de muestras
- Esfera
- Cuadrado
- Estiramiento
- Superposición de texto
- Túnel
- Giro
- Balance en vídeo
- Mezclador de vídeo
- Ondulación del agua
### Codificadores de vídeo (CPU/GPU)
- H264
- H265/HEVC
- VP8/VP9
- WMV (Windows Media Video)
- MJPEG
- AV1
### Fuentes
- Fuente del archivo
- Fuente RTSP
- Fuente de la pantalla
- Fuente de vídeo del sistema
- Fuente de audio del sistema
- Fuente de vídeo virtual
- Fuente de audio virtual
### Especial
- Null Renderer
- Tee
- Vúmetro
### Dispositivos de entrada compatibles:
- Videocámaras DV y HDV MPEG-2
- Cámaras web USB y otros dispositivos de captura (incluidos dispositivos 4K)
- Tarjetas de captura PCI
- Sintonizadores de TV (con y sin codificador MPEG interno)
- Cámaras/servidores IP JPEG/MJPEG, MPEG-4 y H.264 HTTP/RTSP/RTMP, compatibles con el formato HD
- Cámaras IP ONVIF compatibles con PTZ
- Dispositivos Blackmagic Decklink
- Dispositivos de captura de audio y tarjetas de sonido
- Dispositivos ASIO
### IDE
- Visual Studio 2019 y versiones posteriores: Visual C#, Visual C++, Visual Basic .NET
- Código de Visual Studio
- Jinete JetBrains
- SDK puede utilizarse con otras aplicaciones compatibles con .Net como Microsoft Access, Word, Excel
### Frameworks de IU
- Formularios WinForms
- WPF
- WinUI 3 for Desktop
- Avalonia
- GTK#
- Maui
- Xamarin.Android
- Xamarin.Mac
- Xamarin.iOS
### Versiones de .Net
- .Net Framework 4.6.1 y versiones posteriores
- .Net Core 3.1
- .Net 5 - .Net 9
### Requisitos del sistema
- Windows 10 o Windows 11
- Ubuntu 22+
- macOS 12+
### Plataformas objetivo
- Windows 11, Windows 10, Windows 8/8.1, Windows 7 SP1
- Windows Server 2016 y versiones posteriores
- Android 8 y posteriores
- Linux (Ubuntu)
- macOS
- iOS
### Derechos de distribución
Distribución sin derechos de autor.
SDK contiene bibliotecas GStreamer con licencia LGPL v2.1.
---END OF PAGE---
# Page: https://www.visioforge.com/it/media-blocks-sdk-net
# Media Blocks SDK .Net
versione 15.9
L'SDK consente di costruire la propria applicazione multimediale partendo da singoli blocchi, come una casa di mattoni. Ad esempio, per registrare un video da una telecamera, si aggiunge il blocco "Camera", il blocco "H264 encoder" e il blocco "MP4 sink" per registrare il video in un file MP4.

#### DOWNLOADS
[NuGet - Core](https://www.nuget.org/packages/VisioForge.DotNet.VideoCapture/)[Guida all'installazione di NuGet](https://www.visioforge.com/help/docs/dotnet/install/)[Samples su GitHub](https://github.com/visioforge/.Net-SDK-s-samples)

#### ACQUISTO
[Controllare i prezzi o ordinare](https://www.visioforge.com/it/buy)

#### AIUTO
[Guida in linea](/help/docs/dotnet/mediablocks/)[Changelog](https://www.visioforge.com/help/docs/dotnet/changelog/)[Contratto di licenza](/help/docs/eula/)
Il nostro software offre un utilizzo illimitato, senza nag-screen, garantendo un'esperienza
esperienza senza soluzione di continuità. Forniamo un periodo di prova di 30 giorni, in modo che possiate esplorare tutte le funzionalità prima di
tutte le funzionalità prima di impegnarsi.
Con una licenza regolare, l'utente
riceve aggiornamenti minori e maggiori gratuiti per un anno; dopo tale periodo,
l'SDK continuerà a funzionare come prima.
In alternativa, la
licenza a vita fornisce aggiornamenti illimitati a tempo indeterminato. Inoltre,
offriamo assistenza e correzioni prioritarie. La licenza regolare viene fatturata
annualmente e si rinnova automaticamente ogni anno, ma è possibile annullare la
abbonamento in qualsiasi momento.
L'SDK è gratuito per uso non commerciale. Contattateci per ottenere una licenza gratuita.

## GIOCATORE SEMPLICE
La pipeline del lettore semplice utilizza il blocco UniversalSourceBlock per leggere e decodificare il file sorgente, il blocco VideoRendererBlock per visualizzare il video e il blocco AudioRendererBlock per riprodurre l'audio.
## GIOCATORE AVANZATO
La pipeline avanzata del lettore comprende l'UniversalSourceBlock per la decodifica di file o flussi, i rendering video e audio e i blocchi di elaborazione degli effetti.


## ANTEPRIMA DELLA TELECAMERA
La pipeline di anteprima semplice della telecamera/microfono contiene blocchi di origine del dispositivo e blocchi di rendering video/audio.
Verranno utilizzati i dispositivi predefiniti.
## ANTEPRIMA RTSP
La pipeline di anteprima RTSP, che comprende il blocco sorgente RTSP (con i decodificatori al suo interno), i rendering video e audio.


## ACQUISIZIONE CON ANTEPRIMA
La pipeline di acquisizione ha due blocchi a T che vengono utilizzati per dividere i flussi video e audio, consentendo l'anteprima video/audio insieme a [acquisizione video](https://www.visioforge.com/it/video-capture-sdk-net).
## Le principali caratteristiche di VisioForge Media Blocks SDK .Net includono:
- Anteprima audio/video
- Acquisizione di video e audio in un'ampia gamma di formati
- Acquisizione di fotogrammi in file di classe Bitmap, BMP, JPEG e PNG
- Elaborazione video ed effetti (CPU/GPU)
- Video capture controllo del dispositivo
- Streaming di rete
- Rilevamento del movimento
- Lettore di codici a barre (QR Code, UPC-A, UPC-E, EAN-8, EAN-13, Code 39, Code 93, Code 128, Codabar, ITF, RSS-14, Data Matrix, Aztec, PDF-417)
- Supporto di interfacce personalizzate
- API di visione artificiale
- PIP (Immagine nell'immagine)
- Cattura schermo/cattura finestra
- Rilevamento dei volti e tracciamento degli oggetti
- Supporto di schermi di uscita multipli
- Acquisizione audio dagli altoparlanti
- Supporto di ingressi e uscite della scheda Blackmagic Decklink
- Supporto per la lettura e la scrittura di tag di file audio/video
- Supporto delle telecamere FLIR/Teledyne (USB3Vision/GigE)
- Supporto delle telecamere Basler (USB3Vision/GigE)
### Codificatori audio
- CAA
- Formato FLAC
- MP3
- OPUS
- Vorbis
- WMA (Windows Media Audio)
- Speex
### Elaborazione audio
- Amplificare
- Mixer audio
- Acquisizione di campioni audio
- Equilibrio
- Compressore/Espansore
- Eco
- Equalizzatore
- Scala/Tempo
- Volume dell'audio
### Blackmagic Decklink
- Lavello audio
- Fonte audio
- Lavello video
- Fonte video
### Lavandini per file
- MP4
- WebM
- MOVIMENTO
- AVI
- MPEG-TS
- MKV
- OGG
### Streaming di rete
- HLS
- RTMP
- RTSP
- UDP
### Elaborazione video
- Effetti cromatici
- Deinterlacciamento
- Occhio di pesce
- Capovolgere/Rotare
- Gamma
- Sfocatura gaussiana
- Sovrapposizione di immagini
- Specchio
- Prospettiva
- Pizzico
- Ridimensionamento
- Ruotare
- Acquisizione di campioni
- Sfera
- Quadrato
- Stretch
- Sovrapposizione di testo
- Tunnel
- Girotondo
- Equilibrio video
- Mixer video
- Ondulazione dell'acqua
### Codificatori video (CPU/GPU)
- H264
- H265/HEVC
- VP8/VP9
- WMV (Windows Media Video)
- MJPEG
- AV1
### Fonti
- Fonte del file
- Fonte RTSP
- Fonte dello schermo
- Sorgente video del sistema
- Sorgente audio del sistema
- Sorgente video virtuale
- Sorgente audio virtuale
### Speciale
- Renderer nullo
- Tee
- Misuratore VU
### Dispositivi di input supportati:
- Videocamere DV e HDV MPEG-2
- Webcam USB e altri dispositivi di acquisizione (compresi i dispositivi 4K)
- Schede di acquisizione PCI
- Sintonizzatori TV (con e senza codificatore MPEG interno)
- JPEG/MJPEG, MPEG-4 e H.264 Telecamere/server IP HTTP/RTSP/RTMP, formato HD supportato
- Telecamere IP ONVIF con supporto PTZ
- Dispositivi Blackmagic Decklink
- Dispositivi di acquisizione audio e schede audio
- Dispositivi ASIO
### IDE
- Visual Studio 2019 e successivi: Visual C#, Visual C++, Visual Basic .NET
- Codice di Visual Studio
- Cavaliere JetBrains
- L'SDK può essere utilizzato con altre applicazioni compatibili con .Net, come Microsoft Access, Word, Excel.
### Quadri UI
- WinForms
- WPF
- WinUI 3 for Desktop
- Avalonia
- GTK#
- MAUI
- Xamarin.Android
- Xamarin.Mac
- Xamarin.iOS
### Versioni .Net
- .Net Framework 4.6.1 e versioni successive
- .Net Core 3.1
- .Net 5 - .Net 9
### Requisiti di sistema
- Windows 10 o Windows 11
- Ubuntu 22+
- macOS 12+
### Piattaforme target
- Windows 11, Windows 10, Windows 8/8.1, Windows 7 SP1
- Windows Server 2016 e successivi
- Android 8 e successivi
- Linux (Ubuntu)
- macOS
- iOS
### Diritti di distribuzione
Distribuzione gratuita.
L'SDK contiene librerie GStreamer con licenza LGPL v2.1.
---END OF PAGE---
# Page: https://www.visioforge.com/de/video-edit-sdk-ffmpeg-net
# Video Edit SDK FFMPEG .Net
Version 12.1
VisioForge Video Edit SDK FFMPEG .Net vereinfacht die Integration von Videokonvertierung und -verarbeitung in Softwareanwendungen. Mit diesem leistungsstarken SDK können Entwickler benutzerdefinierte Filme durch nahtlose Kombination von Audio- und Videodateien erstellen. Das SDK basiert auf dem renommierten FFMPEG-Framework und bietet umfassende Unterstützung für alle wichtigen Video- und Audioformate, was es zu einer vielseitigen Lösung für Multimedia-Projekte macht.
- 
- 


#### DOWNLOADS
[Installateur](https://s3.us-west-2.amazonaws.com/files.visioforge.com/trials/visioforge_video_edit_ffmpeg_sdk_dotnet_setup.exe)[NuGet-Paket](https://www.nuget.org/packages/VisioForge.DotNet.VideoEdit/)[Samples auf GitHub](https://github.com/visioforge/.Net-SDK-s-samples)

#### KAUFEN
[Preise prüfen oder bestellen](https://www.visioforge.com/de/buy)

#### HILFE
[Online-Hilfe](/help/)[Änderungsliste](/help/docs/dotnet/videoedit-ffmpeg/changelog/)[Lizenzvereinbarung](/help/docs/eula/)
Unsere Software bietet eine unbegrenzte Nutzung ohne störende Bildschirme und gewährleistet eine
nahtlose Erfahrung. Wir bieten einen 30-tägigen Testzeitraum, damit Sie alle
alle Funktionen erkunden können, bevor Sie sich festlegen.
Mit einer regulären Lizenz erhalten Sie
erhalten Sie für ein Jahr kostenlose Minor- und Major-Upgrades; nach diesem Zeitraum
funktioniert das SDK weiter wie bisher.
Alternativ dazu bietet die
Lifetime-Lizenz unbegrenzte Updates auf unbestimmte Zeit zur Verfügung. Zusätzlich,
bieten wir vorrangigen Support und Fehlerbehebungen. Die reguläre Lizenz wird jährlich abgerechnet
jährlich abgerechnet und automatisch verlängert, aber Sie können Ihr Abonnement
Abonnement jederzeit kündigen.
Das SDK ist für die nicht-kommerzielle Nutzung kostenlos. Bitte kontaktieren Sie uns, um eine kostenlose Lizenz zu erhalten.
## Zu den wichtigsten Funktionen von VisioForge Video Edit SDK FFMPEG .Net gehören:
### Eingabeformate
- Video: AVI, MPEG-1/2, WMV, 3GP, QuickTime MOV, MPEG-4/H264 (AVC), jedes andere von FFMPEG unterstützte Format
- Audio: WAV, MP3, OGG, WMA, AAC und alle anderen von FFMPEG unterstützten Formate
- Bilder: BMP, PNG, GIF, JPEG, TIFF, WebM
### Ausgabe von Videoformaten
- AVI
- MP4
- MKV (Matroska)
- WMV (Windows Media Video)
- Quicktime MOV
- WebM
- AV1
- MPEG-1/2/4
- FLV
- viele andere
### Ausgabe von Audioformaten
- WAV (PCM/ACM)
- Ogg Vorbis
- MP3
- WMA (Windows Media Audio)
- Unterstützte Kommunikation
- Speex
- FLAC
- OPUS
### Videobearbeitung und Effekte
- Bildüberlagerung
- Größe ändern und zuschneiden
- Schwenken/Zoomen
- Textüberlagerung
- Helligkeit, Kontrast, Sättigung und Farbton einstellbar
- chroma-key
- Denoise
- Deinterlace
### Audiobearbeitung und Effekte
- Volumenverstärker
- Equalizer
- andere Auswirkungen
### Andere Merkmale
- Bewegungserkennung
- Barcode-Leser (QR-Code, UPC-A, UPC-E, EAN-8, EAN-13, Code 39, Code 93, Code 128, Codabar, ITF, RSS-14, Data Matrix, Aztec, PDF-417)
- Frame-Erfassung
- Kodierungsparameter
- Videogröße
- Bildrate
- Video- und Audiocodecs
- Video- und Audio-Bitrate
- Qualität
- Profil/Ebene
- andere
### Entwicklungsplattformen:
- Visual Studio 2015 und höher: Visual C#, Visual C++, Visual Basic .NET
- kann mit anderen .Net-kompatiblen Anwendungen wie Microsoft Access, Word, Excel, FrontPage, etc. verwendet werden.
### Systemanforderungen
- Windows 11, Windows 10, Windows 8/8.1, Windows 7, Windows Vista, Windows Server 2012 und höher
- .Net Framework 4.5 oder höher
- .Net Core 3.1 oder höher
### Vertriebsrechte
Lizenzfreie Verbreitung.
### Beschränkungen des Versuchs
In der Testversion wird ein Wasserzeichen im Videofenster angezeigt.

#### EDITION

#### STANDARD

#### PROFESSIONELL

#### PREMIUM
Zeitleiste
Frame Grabber
Videoverarbeitung
Audioverarbeitung
Unterstützung von HD- und 4K-Videos
Netzwerk-Streaming im WMV-Format
Netzwerk-Streaming über RTMP / RTSP / UDP
Chroma-Schlüssel
Bewegungserkennung
OSD (Bildschirmanzeige)
Bild-im-Bild-Darstellung
Mehrere Ausgabebildschirme
GPU-beschleunigte Videoeffekte
Ausgabe an die virtuelle Kamera SDK
Video Encryption SDK Unterstützung
Video-Rotation
Ausgabeformate
- AVI
- WMV (Windows Media Video)
- WMA (Windows Media Audio)
- WAV
- MP3
- Ogg Vorbis
- Speex
- DV-Video
- Flash-Video (FLV)
- WebM
- MPEG-1/2/4
- MP4
SDK enthält die FFMPEG-Bibliothek, die unter der LGPL v2.1 lizenziert ist.
---END OF PAGE---
# Page: https://www.visioforge.com/es/video-edit-sdk-ffmpeg-net
# Video Edit SDK FFMPEG .Net
versión 12.1
VisioForge Video Edit SDK FFMPEG .Net simplifica la integración de la conversión y el procesamiento de vídeo en las aplicaciones de software. Este potente SDK permite a los desarrolladores crear películas personalizadas combinando a la perfección archivos de audio y vídeo. Basado en el conocido marco FFMPEG, el SDK es compatible con los principales formatos de vídeo y audio, lo que lo convierte en una solución versátil para proyectos multimedia.
- 
- 


#### DESCARGAS
[Instalador](https://s3.us-west-2.amazonaws.com/files.visioforge.com/trials/visioforge_video_edit_ffmpeg_sdk_dotnet_setup.exe)[Paquete NuGet](https://www.nuget.org/packages/VisioForge.DotNet.VideoEdit/)[Samples en GitHub](https://github.com/visioforge/.Net-SDK-s-samples)

#### COMPRAR
[Consultar precios o hacer un pedido](https://www.visioforge.com/es/buy)

#### AYUDA
[Ayuda en línea](/help/)[Registro de cambios](/help/docs/dotnet/videoedit-ffmpeg/changelog/)[Acuerdo de licencia](/help/docs/eula/)
Nuestro software ofrece un uso ilimitado sin pantallas de aviso, garantizando una
experiencia sin problemas. Ofrecemos un período de prueba de 30 días para que pueda explorar
todas las funciones antes de comprometerse.
Con una licencia normal
recibirá actualizaciones menores y mayores gratuitas durante un año; después de ese período,
el SDK seguirá funcionando como antes.
Alternativamente, la licencia
licencia de por vida proporciona actualizaciones ilimitadas indefinidamente. Además,
ofrecemos soporte y correcciones prioritarias. La licencia normal se factura
anualmente y se renueva automáticamente cada año, pero puede cancelar su
suscripción en cualquier momento.
El SDK es gratuito para uso no comercial. Póngase en contacto con nosotros para obtener una licencia gratuita.
## VisioForge Video Edit SDK FFMPEG .Net principales características incluyen:
### Formatos de entrada
- Vídeo: AVI, MPEG-1/2, WMV, 3GP, QuickTime MOV, MPEG-4/H264 (AVC), cualquier otro soportado por FFMPEG
- Audio: WAV, MP3, OGG, WMA, AAC, cualquier otro soportado por FFMPEG
- Imágenes: BMP, PNG, GIF, JPEG, TIFF, WebM
### Formatos de vídeo de salida
- AVI
- MP4
- MKV (Matroska)
- WMV (Windows Media Video)
- MOV de Quicktime
- WebM
- AV1
- MPEG-1/2/4
- FLV
- muchos otros
### Formatos de audio de salida
- WAV (PCM/ACM)
- Ogg Vorbis
- MP3
- WMA (Windows Media Audio)
- CAA
- Speex
- FLAC
- OPUS
### Procesamiento y efectos de vídeo
- superposición de imágenes
- redimensionar y recortar
- funciones de panorámica y zoom
- superposición de texto
- ajustes de brillo, contraste, saturación y tono
- chroma-key
- eliminación de ruido
- desentrelazar
### Tratamiento de audio y efectos
- amplificador de volumen
- ecualizador
- otros efectos
### Otras características
- Detección de movimiento
- Lector de códigos de barras (QR Code, UPC-A, UPC-E, EAN-8, EAN-13, Code 39, Code 93, Code 128, Codabar, ITF, RSS-14, Data Matrix, Aztec, PDF-417)
- Captura de imágenes
- Parámetros de codificación
- resolución de vídeo
- frecuencia de cuadro
- códecs de vídeo y audio
- velocidad de bits de vídeo y audio
- calidad
- perfil/nivel
- otros
### Plataformas de desarrollo:
- Visual Studio 2015 y versiones posteriores: Visual C#, Visual C++, Visual Basic .NET
- puede utilizarse con otras aplicaciones compatibles con .Net como Microsoft Access, Word, Excel, FrontPage, etc.
### Requisitos del sistema
- Windows 11, Windows 10, Windows 8/8.1, Windows 7, Windows Vista, Windows Server 2012 y posteriores
- .Net Framework 4.5 o versión posterior
- .Net Core 3.1 o versiones posteriores
### Derechos de distribución
Distribución sin derechos de autor.
### Limitaciones de la versión de prueba
La versión de prueba muestra una marca de agua en la ventana de vídeo.

#### EDICIÓN

#### ESTÁNDAR

#### PROFESIONAL

#### PREMIUM
Línea de tiempo
Capturador de fotogramas
Tratamiento de vídeo
Tratamiento de audio
Compatibilidad con vídeo HD y 4K
Transmisión en red en formato WMV
Transmisión en red mediante RTMP / RTSP / UDP
Chroma-key
Detección de movimiento
OSD (On-Screen Display)
Picture-In-Picture
Múltiples pantallas de salida
Efectos de vídeo acelerados en la GPU
Salida a Virtual Camera SDK
Compatibilidad con Video Encryption SDK
Rotación de vídeo
Formatos de salida
- AVI
- WMV (Windows Media Video)
- WMA (Windows Media Audio)
- WAV
- MP3
- Ogg Vorbis
- Speex
- Vídeo DV
- Vídeo Flash (FLV)
- WebM
- MPEG-1/2/4
- MP4
SDK contiene la biblioteca FFMPEG con licencia LGPL v2.1.
---END OF PAGE---
# Page: https://www.visioforge.com/it/video-edit-sdk-ffmpeg-net
# Video Edit SDK FFMPEG .Net
versione 12.1
VisioForge Video Edit SDK FFMPEG .Net semplifica l'integrazione della conversione e dell'elaborazione video nelle applicazioni software. Questo potente SDK consente agli sviluppatori di creare filmati personalizzati combinando senza problemi file audio e video. Costruito sul rinomato framework FFMPEG, l'SDK offre un supporto completo per tutti i principali formati video e audio, rendendolo una soluzione versatile per i progetti multimediali.
- 
- 


#### DOWNLOADS
[Installatore](https://s3.us-west-2.amazonaws.com/files.visioforge.com/trials/visioforge_video_edit_ffmpeg_sdk_dotnet_setup.exe)[Pacchetto NuGet](https://www.nuget.org/packages/VisioForge.DotNet.VideoEdit/)[Samples su GitHub](https://github.com/visioforge/.Net-SDK-s-samples)

#### ACQUISTO
[Controllare i prezzi o ordinare](https://www.visioforge.com/it/buy)

#### AIUTO
[Guida in linea](/help/)[Changelog](/help/docs/dotnet/videoedit-ffmpeg/changelog/)[Contratto di licenza](/help/docs/eula/)
Il nostro software offre un utilizzo illimitato, senza nag-screen, garantendo un'esperienza
esperienza senza soluzione di continuità. Forniamo un periodo di prova di 30 giorni, in modo che possiate esplorare tutte le funzionalità prima di
tutte le funzionalità prima di impegnarsi.
Con una licenza regolare, l'utente
riceve aggiornamenti minori e maggiori gratuiti per un anno; dopo tale periodo,
l'SDK continuerà a funzionare come prima.
In alternativa, la
licenza a vita fornisce aggiornamenti illimitati a tempo indeterminato. Inoltre,
offriamo assistenza e correzioni prioritarie. La licenza regolare viene fatturata
annualmente e si rinnova automaticamente ogni anno, ma è possibile annullare la
abbonamento in qualsiasi momento.
L'SDK è gratuito per uso non commerciale. Contattateci per ottenere una licenza gratuita.
## Le principali caratteristiche di VisioForge Video Edit SDK FFMPEG .Net includono:
### Formati di ingresso
- Video: AVI, MPEG-1/2, WMV, 3GP, QuickTime MOV, MPEG-4/H264 (AVC), qualsiasi altro supportato da FFMPEG
- Audio: WAV, MP3, OGG, WMA, AAC, qualsiasi altro supportato da FFMPEG
- Immagini: BMP, PNG, GIF, JPEG, TIFF, WebM
### Formati video in uscita
- AVI
- MP4
- MKV (Matroska)
- WMV (Windows Media Video)
- Quicktime MOV
- WebM
- AV1
- MPEG-1/2/4
- FLV
- molti altri
### Formati audio in uscita
- WAV (PCM/ACM)
- Ogg Vorbis
- MP3
- WMA (Windows Media Audio)
- CAA
- Speex
- Formato FLAC
- OPUS
### Elaborazione video ed effetti
- sovrapposizione di immagini
- ridimensionare e ritagliare
- panoramica/zoom
- sovrapposizione di testo
- luminosità, contrasto, saturazione, tinta
- chiave cromatica
- denoise
- deinterlacciamento
### Elaborazione audio ed effetti
- amplificatore di volume
- equalizzatore
- altri effetti
### Altre caratteristiche
- Rilevamento del movimento
- Lettore di codici a barre (QR Code, UPC-A, UPC-E, EAN-8, EAN-13, Code 39, Code 93, Code 128, Codabar, ITF, RSS-14, Data Matrix, Aztec, PDF-417)
- Capture di fotogrammi
- Parametri di codifica
- dimensione del video
- frequenza dei fotogrammi
- codec video e audio
- velocità di trasmissione video e audio
- qualità
- profilo/livello
- altro
### Piattaforme di sviluppo:
- Visual Studio 2015 e successivi: Visual C#, Visual C++, Visual Basic .NET
- può essere utilizzato con altre applicazioni compatibili con .Net come Microsoft Access, Word, Excel, FrontPage, ecc.
### Requisiti di sistema
- Windows 11, Windows 10, Windows 8/8.1, Windows 7, Windows Vista, Windows Server 2012 e versioni successive
- .Net Framework 4.5 o successivo
- .Net Core 3.1 o successivo
### Diritti di distribuzione
Distribuzione gratuita.
### Limiti della prova
La versione di prova visualizza una filigrana nella finestra del video.

#### EDIZIONE

#### STANDARD

#### PROFESSIONALE

#### PREMIUM
Linea temporale
Acquisizione di fotogrammi
Elaborazione video
Elaborazione audio
Supporto video HD e 4K
Streaming di rete in formato WMV
Streaming di rete tramite RTMP / RTSP / UDP
Chiave cromatica
Rilevamento del movimento
OSD (On-Screen Display)
Immagine nell'immagine
Schermi di uscita multipli
Effetti video accelerati dalla GPU
Uscita verso l'SDK della Virtual Camera
Supporto SDK di crittografia video
Rotazione video
Formati di uscita
- AVI
- WMV (Windows Media Video)
- WMA (Windows Media Audio)
- WAV
- MP3
- Ogg Vorbis
- Speex
- Video DV
- Video Flash (FLV)
- WebM
- MPEG-1/2/4
- MP4
L'SDK contiene la libreria FFMPEG con licenza LGPL v2.1.
---END OF PAGE---
# Page: https://www.visioforge.com/de/save-webcam
# Webcam-Video mit .Net speichern: Eine vollständige Anleitung zum Aufzeichnen und Erfassen von Webcam
Das Erfassen und Speichern von Videos von Webcams ist eine häufige Anforderung in vielen modernen Anwendungen, von Videokonferenz-Tools bis hin zu Überwachungssystemen. Unabhängig davon, ob Sie Webcam-Filmmaterial aufzeichnen, den Webcam-Feed anzeigen oder Bilder erfassen müssen, kann die Implementierung zuverlässiger Webcam-Funktionen in .NET (DotNet) eine Herausforderung darstellen. Dieses Tutorial bietet eine einfache Schritt-für-Schritt-Anleitung zum Speichern von Webcam-Videos mit C# (C Sharp) mit minimalem Code.

#### DOWNLOADS
[Installationsprogramm (Windows)](https://s3.us-west-2.amazonaws.com/files.visioforge.com/trials/visioforge_sdks_installer_dotnet_setup.exe)[NuGet-Installationshandbuch](https://www.visioforge.com/help/docs/dotnet/install/)[Samples auf GitHub](https://github.com/visioforge/.Net-SDK-s-samples)

#### KAUFEN
[Preise prüfen oder bestellen](https://www.visioforge.com/de/buy)

#### HILFE
[Online-Hilfe](https://www.visioforge.com/help/docs/dotnet/videocapture/)[Änderungsliste](https://www.visioforge.com/help/docs/dotnet/changelog/)[Lizenzvereinbarung](/help/docs/eula/)
Das SDK ist für die nicht-kommerzielle Nutzung kostenlos. Bitte kontaktieren Sie uns, um eine kostenlose Lizenz zu erhalten.
## Hauptmerkmale von Video Capture SDK .Net
Video Capture SDK .Net ist eine leistungsstarke Bibliothek, die speziell für .NET-Entwickler entwickelt wurde, die Webcam-Aufnahmefunktionen in ihren Anwendungen implementieren müssen. Egal, ob Sie Webcam-Videos aufzeichnen, Webcam-Frames als Bilder speichern oder den Webcam-Feed in Ihrer Anwendung anzeigen möchten, dieses SDK bietet Ihnen alle Möglichkeiten. Einige der herausragenden Merkmale sind:
- Nahtlose Integration in .NET-Anwendungen
- Unterstützung für mehrere Aufnahmegeräte (USB-Webcams, IP-Kameras, Aufnahmekarten)
- Leistungsstarke Video- und Audioaufnahme und -verarbeitung
- Einfacher Code zum Abrufen und Anzeigen von Webcam-Feeds
- Erstellen und Speichern von Videodateien in verschiedenen Formaten
- GPU-beschleunigte Kodierung für optimale Leistung
- Plattformübergreifende Kompatibilität
## Ausgabeformate: MP4 und WebM im Detail
### MP4-Format
MP4 ist eines der am weitesten verbreiteten Video-Containerformate und daher eine ausgezeichnete Wahl für Anwendungen, bei denen Kompatibilität im Vordergrund steht.
**Unterstützte Codecs für MP4:**
- **H.264 (AVC)**: Der Industriestandard für Videokomprimierung, der hervorragende Qualität und breite Kompatibilität bietet
- **H.265 (HEVC)**: Codec der nächsten Generation bietet eine bis zu 50% bessere Komprimierung als H.264 bei gleicher Qualität
- **Unterstützte Kommunikation**: Advanced Audio Coding, der Industriestandard für verlustbehaftete digitale Audiokomprimierung
### WebM-Format
WebM ist ein offenes, lizenzfreies Mediendateiformat, das für das Web entwickelt wurde.
**Unterstützte Codecs für WebM:**
- **VP8**: Von Google entwickelter Open-Source-Videocodec, der hauptsächlich im WebM-Format verwendet wird
- **VP9**: Nachfolger von VP8 mit deutlich verbesserter Komprimierungseffizienz
- **AV1**: Neuester Open-Source-Videocodec mit überlegener Komprimierung und Qualität, insbesondere bei niedrigeren Bitraten
- **Vorbis**: Kostenloses und Open-Source-Audiokomprimierungsformat, das gute Qualität bei niedrigeren Bitraten bietet
Jeder Codec kann mit verschiedenen Parametern feinabgestimmt werden, um das optimale Gleichgewicht zwischen Qualität und Dateigröße für Ihre spezifischen Anwendungsanforderungen zu erreichen.
## GPU-Beschleunigung für effizientes Encoding
Eines der herausragendsten Merkmale von Video Capture SDK .Net ist die robuste Unterstützung für GPU-beschleunigte Videokodierung, die mehrere bedeutende Vorteile bietet:
### Vorteile der GPU-Beschleunigung
- **Drastisch reduzierte CPU-Auslastung**: Geben Sie CPU-Ressourcen für andere Anwendungsaufgaben frei
- **Schnellere Kodierungsgeschwindigkeiten**: Bis zu 10x schneller als reine CPU-Kodierung
- **Echtzeit-Kodierung mit hoher Auflösung**: Ermöglicht die 4K-Videoaufnahme mit minimaler Systembelastung
- **Geringerer Stromverbrauch**: Besonders wichtig für mobile und Laptop-Anwendungen
- **Höhere Qualität bei gleicher Bitrate**: Einige GPU-Encoder bieten eine bessere Qualität pro Bit als CPU-Encoder
### Unterstützte GPU-Technologien
Video Capture SDK .Net nutzt mehrere GPU-Beschleunigungstechnologien:
- **NVIDIA NVENC**: Hardwarebeschleunigte Kodierung auf NVIDIA-GPUs
- **AMD AMF/VCE**: Beschleunigung auf AMD-Grafikkarten
- **Intel Quick Sync Video**: Hardware-Kodierung auf integrierter Intel-Grafik
Das SDK erkennt automatisch die verfügbare Hardware und wählt den optimalen Codierungspfad basierend auf den Fähigkeiten Ihres Systems aus, mit Fallback auf die Softwarecodierung, wenn nötig.
## Implementierungsbeispiel (C#-Code zum Aufnehmen von Videos von einer Webcam)
Wir zeigen Ihnen in einem einfachen Tutorial, wie Sie Webcam-Videos mit C# aufnehmen. Die Implementierung der Webcam-Aufnahme mit Video Capture SDK .Net ist unkompliziert.
## CODE-SAMPLES
Hier ist ein vollständiges Beispiel, das zeigt, wie Sie Ihren Webcam-Feed abrufen, in Ihrer Anwendung anzeigen und in einer MP4-Datei mit H.264-Kodierung speichern:
Für die WebM-Ausgabe mit VP9-Kodierung ändern Sie einfach die Encoder-Einstellungen:
### Zusätzliche Codebeispiele
Hier ist ein einfaches Beispiel, wie Sie nur ein einzelnes Bild von der Webcam speichern.
Video-Sample-Grabber aktivieren:
Ein einzelnes Bild von der Webcam abrufen und speichern:
## Native Abhängigkeiten
Das Video Capture SDK .Net nutzt native Bibliotheken für den Zugriff auf Webcams und die Video- und Audioverarbeitung. Diese nativen Abhängigkeiten sind im SDK enthalten und werden automatisch mit Ihrer Anwendung bereitgestellt. Dies gewährleistet eine nahtlose Integration und Kompatibilität zwischen verschiedenen Systemen.
Wichtiges SDK-Paket (verwaltet):
Native Abhängigkeiten für Windows x64:
Verwenden Sie für alternative Plattformen (macOS, Linux, Android, iOS) die entsprechenden nativen Abhängigkeitspakete.
## Plattformübergreifende Kompatibilität
Video Capture SDK .Net wurde im Hinblick auf plattformübergreifende Kompatibilität entwickelt und ist daher die ideale Wahl für Entwickler, die an Anwendungen arbeiten, die auf mehreren Betriebssystemen ausgeführt werden müssen.
### MAUI-Kompatibilität
Für Entwickler, die mit .NET MAUI (Multi-platform App UI) arbeiten, bietet Video Capture SDK .Net:
- Volle Kompatibilität mit MAUI-Anwendungen
- Einheitliche API auf allen unterstützten Plattformen
- Plattformspezifische Optimierungen unter Beibehaltung einer einheitlichen Codebasis
- Beispielhafte MAUI-Projekte, die die plattformübergreifende Implementierung demonstrieren
Diese plattformübergreifende Funktion ermöglicht es Entwicklern, Code einmal zu schreiben und ihn über MAUI auf Windows-, macOS- und Mobilplattformen bereitzustellen, wodurch die Entwicklungszeit und der Wartungsaufwand erheblich reduziert werden. [Videoaufnahme-SDK .Ne](https://www.visioforge.com/de/video-capture-sdk-net)Es bietet eine umfassende Lösung zum Hinzufügen von Webcam-Videoaufnahmefunktionen zu Ihren DotNet-Anwendungen. Ob Sie Webcam-Aufnahmen aufzeichnen, Webcam-Bilder speichern oder einfach den Webcam-Feed in Ihrer Anwendung anzeigen möchten – diese Bibliothek vereinfacht den Vorgang mit nur wenigen Zeilen C#-Code. Mit Unterstützung für Industriestandardformate wie MP4 und WebM, modernen Codecs wie H.264/H.265 und VP8/VP9/AV1 sowie leistungsstarker GPU-Beschleunigung bietet es die nötige Leistung und Flexibilität selbst für anspruchsvollste Videoaufnahmeanwendungen. Die Möglichkeit, Videodateien effizient zu erstellen und zu speichern, macht diese Bibliothek perfekt für alle Anwendungen, die Webcam-Inhalte aufzeichnen müssen. Die plattformübergreifende Kompatibilität des SDK, die sich auf macOS- und MAUI-Anwendungen erstreckt, stellt sicher, dass Ihre Webcam-Aufnahmelösung betriebssystemübergreifend konsistent funktioniert. Ob Sie ein Videokonferenztool, eine Überwachungsanwendung oder eine andere Software entwickeln, die Webcam-Funktionalität benötigt – das Video Capture SDK .Net bietet Ihnen die Tools, die Sie für eine schnelle Implementierung dieser Funktionen benötigen. Der Einstieg ist ganz einfach: Folgen Sie einfach dem oben aufgeführten Schritt-für-Schritt-Tutorial und den Codebeispielen. Weitere fortgeschrittene Anwendungsfälle und eine ausführliche Dokumentation zum Aufzeichnen von Webcam-Videos mit .NET finden Sie auf unserer Website oder in der SDK-Dokumentation.

#### EDITION

#### STANDARD

#### PROFESSIONELL

#### PREMIUM
Unterstützte Eingabegeräte und andere Quellen
- Web-Kameras
- TV-Tuner und Aufnahmekarten
- DV- und MPEG-Camcorder
- Bildschirmaufnahme
- HTTP/RTSP/ONVIF IP-Kameras
- UDP, TCP, RTMP und andere Netzwerkströme
- Blackmagic Decklink
- DVB-T/DVB-C/DVB-S/ATSC-Geräte (BETA)
- Microsoft Kinect für Windows
Video-Vorschau
Frame Grabber
Videoverarbeitung
Audioverarbeitung
Unterstützung von HD- und 4K-Videos
Fernsehtuning
Netzwerk-Streaming im WMV-Format
Netzwerk-Streaming über RTMP/RTSP/UDP/NDI
Chroma-Schlüssel
Bewegungserkennung
Videoverarbeitung mit DirectShow-Filtern
OSD (Bildschirmanzeige)
Bild-im-Bild-Darstellung
Name der Ausgabedatei on-the-fly ändern
Mehrere Ausgabebildschirme
GPU-beschleunigte Videoeffekte
Ausgabe an die virtuelle Kamera SDK
Video Encryption SDK Unterstützung
Gesichtsverfolgung
Ausgabeformate
- AVI
- WMV (Windows Media Video)
- WMA (Windows Media Audio)
- WAV
- MP3
- Ogg Vorbis
- Speex
- DV-Video
- DV/MPEG-1/2/4 (über TV-Tuner mit internem MPEG-Encoder oder DV/HDV-Camcorder)
- Flash-Video (FLV) mit FFMPEG
- WebM
- Benutzerdefinierte Ausgabeformate mit externen DirectShow-Filtern
- MPEG-1/2/4 mit FFMPEG
- MP4 (H264/HEVC + AAC) mit Software, Intel QuickSync, Nvidia NVENC/CUDA oder AMD Radeon Encodern
Unsere Software bietet eine unbegrenzte Nutzung ohne störende Bildschirme und gewährleistet eine
nahtlose Erfahrung. Wir bieten einen 30-tägigen Testzeitraum, damit Sie alle
alle Funktionen erkunden können, bevor Sie sich festlegen.
Mit einer regulären Lizenz erhalten Sie
erhalten Sie für ein Jahr kostenlose Minor- und Major-Upgrades; nach diesem Zeitraum
funktioniert das SDK weiter wie bisher.
Alternativ dazu bietet die
Lifetime-Lizenz unbegrenzte Updates auf unbestimmte Zeit zur Verfügung. Zusätzlich,
bieten wir vorrangigen Support und Fehlerbehebungen. Die reguläre Lizenz wird jährlich abgerechnet
jährlich abgerechnet und automatisch verlängert, aber Sie können Ihr Abonnement
Abonnement jederzeit kündigen.
---END OF PAGE---
# Page: https://www.visioforge.com/es/save-webcam
# Grabar Video de Webcam Usando .Net: Una Guía Completa para Grabar y Capturar Webcam
Capturar y guardar vídeo de cámaras web es un requisito habitual en muchas aplicaciones modernas, desde herramientas de videoconferencia hasta sistemas de vigilancia. Tanto si necesita grabar imágenes de una cámara web como mostrarlas o capturarlas, implementar una funcionalidad de cámara web fiable en .NET (DotNet) puede resultar complicado. Este tutorial proporciona una sencilla guía paso a paso para grabar vídeo de webcam utilizando C# (C Sharp) con un código mínimo.

#### DESCARGAS
[Instalador (Windows)](https://s3.us-west-2.amazonaws.com/files.visioforge.com/trials/visioforge_sdks_installer_dotnet_setup.exe)[Guía de instalación de NuGet](https://www.visioforge.com/help/docs/dotnet/install/)[Samples en GitHub](https://github.com/visioforge/.Net-SDK-s-samples)

#### COMPRAR
[Consultar precios o hacer un pedido](https://www.visioforge.com/es/buy)

#### AYUDA
[Ayuda en línea](https://www.visioforge.com/help/docs/dotnet/videocapture/)[Registro de cambios](https://www.visioforge.com/help/docs/dotnet/changelog/)[Acuerdo de licencia](/help/docs/eula/)
El SDK es gratuito para uso no comercial. Póngase en contacto con nosotros para obtener una licencia gratuita.
## Características principales de Video Capture SDK .Net
Video Capture SDK .Net es una potente biblioteca diseñada específicamente para desarrolladores .NET que necesitan implementar la funcionalidad de captura de webcam en sus aplicaciones. Tanto si desea grabar vídeo de la cámara web, guardar fotogramas de la cámara web como imágenes o mostrar la alimentación de la cámara web en su aplicación, este SDK es la solución. Algunas de sus características más destacadas son:
- Integración perfecta con aplicaciones .NET
- Compatibilidad con varios dispositivos de captura (cámaras web USB, cámaras IP, tarjetas de captura)
- Grabación y procesamiento de vídeo y audio de alto rendimiento
- Código sencillo para obtener y mostrar imágenes de cámaras web
- Crea y guarda archivos de vídeo en varios formatos
- Codificación acelerada por GPU para un rendimiento óptimo
- Compatibilidad entre plataformas
## Formatos de salida: MP4 y WebM en detalle
### Formato MP4
MP4 es uno de los formatos contenedores de video más ampliamente admitidos, lo que lo convierte en una excelente opción para aplicaciones donde la compatibilidad es una prioridad.
**Códecs compatibles con MP4:**
- **H.264 (AVC)**:El estándar de la industria para la compresión de video, que ofrece excelente calidad y amplia compatibilidad.
- **H.265 (HEVC)**:Códec de última generación que proporciona hasta 50% mejor compresión que H.264 manteniendo la misma calidad
- **CAA**Codificación de audio avanzada, el estándar de la industria para la compresión de audio digital con pérdida
### Formato WebM
WebM es un formato de archivo multimedia abierto y libre de regalías diseñado para la web.
**Códecs compatibles con WebM:**
- **VP8**:Códec de vídeo de código abierto desarrollado por Google, utilizado principalmente con el formato WebM
- **VP9**:Sucesor de VP8, que ofrece una eficiencia de compresión significativamente mejorada
- **AV1**:El códec de vídeo de código abierto más nuevo con compresión y calidad superiores, especialmente a tasas de bits más bajas
- **Vorbis**:Formato de compresión de audio gratuito y de código abierto que ofrece buena calidad a tasas de bits más bajas
Cada códec se puede ajustar con varios parámetros para lograr el equilibrio óptimo entre calidad y tamaño de archivo para los requisitos específicos de su aplicación.
## Aceleración de GPU para una codificación eficiente
Una de las características destacadas de Video Capture SDK .Net es su sólido soporte para la codificación de video acelerada por GPU, que ofrece varias ventajas importantes:
### Beneficios de la aceleración por GPU
- **Uso de CPU drásticamente reducido**: Libere recursos de la CPU para otras tareas de la aplicación
- **Velocidades de codificación más rápidas**:Hasta 10 veces más rápido que la codificación solo con CPU
- **Codificación de alta resolución en tiempo real**:Habilite la captura de video 4K con un impacto mínimo en el sistema
- **Menor consumo de energía**: Particularmente importante para aplicaciones móviles y portátiles.
- **Mayor calidad a la misma tasa de bits**:Algunos codificadores de GPU ofrecen una mejor calidad por bit que la codificación de CPU
### Tecnologías de GPU compatibles
Video Capture SDK .Net aprovecha múltiples tecnologías de aceleración de GPU:
- **NVIDIA NVENC**: Codificación acelerada por hardware en las GPU NVIDIA
- **AMD AMF/VCE**:Aceleración en tarjetas gráficas AMD
- **Vídeo de sincronización rápida de Intel**: Codificación de hardware en gráficos integrados de Intel
El SDK detecta automáticamente el hardware disponible y selecciona la ruta de codificación óptima según las capacidades de su sistema, con opción a la codificación de software cuando sea necesario.
## Ejemplo de implementación (Código C# para capturar vídeo desde una cámara web)
Veamos un tutorial sencillo sobre cómo grabar vídeo de webcam con C#. Implementar la captura de webcam con el SDK de captura de vídeo .Net es muy sencillo.
## EJEMPLOS DE CÓDIGOS
Aquí tienes un ejemplo completo que muestra cómo obtener la señal de tu cámara web, mostrarla en tu aplicación y guardarla en un archivo MP4 con codificación H.264:
Para la salida WebM con codificación VP9, simplemente modifique la configuración del codificador:
### Ejemplos de código adicionales
A continuación se muestra un ejemplo sencillo de cómo guardar una sola imagen de la cámara web.
Habilitar el capturador de muestras de vídeo:
Obtener y guardar una sola imagen de la cámara web:
## Dependencias nativas
El SDK de Captura de Vídeo .Net utiliza bibliotecas nativas para acceder a dispositivos de cámara web y procesar vídeo y audio. Estas dependencias nativas se incluyen con el SDK y se implementan automáticamente con la aplicación, lo que garantiza una integración y compatibilidad perfectas en diferentes sistemas.
Paquete SDK principal (administrado):
Dependencias nativas para Windows x64:
Para plataformas alternativas (macOS, Linux, Android, iOS), utilice los paquetes de dependencias nativas correspondientes.
## Compatibilidad entre plataformas
Video Capture SDK .Net está diseñado teniendo en cuenta la compatibilidad entre plataformas, lo que lo convierte en una opción ideal para los desarrolladores que trabajan en aplicaciones que necesitan ejecutarse en múltiples sistemas operativos.
### Compatibilidad con MAUI
Para los desarrolladores que trabajan con .NET MAUI (Interfaz de usuario de aplicaciones multiplataforma), Video Capture SDK .Net ofrece:
- Compatibilidad total con las aplicaciones MAUI
- API consistente en todas las plataformas compatibles
- Optimizaciones específicas de la plataforma manteniendo una base de código unificada
- Ejemplos de proyectos de MAUI que demuestran su implementación en distintas plataformas
Esta capacidad multiplataforma permite a los desarrolladores escribir código una vez e implementarlo en Windows, macOS y plataformas móviles a través de MAUI, lo que reduce significativamente el tiempo de desarrollo y la sobrecarga de mantenimiento. [SDK de captura de vídeo .Ne](https://www.visioforge.com/es/video-capture-sdk-net)Proporciona una solución integral para añadir funciones de captura de vídeo de webcam a sus aplicaciones DotNet. Ya sea que necesite grabar vídeos de webcam, guardar imágenes de webcam o simplemente mostrar la señal de la webcam en su aplicación, esta biblioteca simplifica el proceso con solo unas pocas líneas de código C#. Compatible con formatos estándar como MP4 y WebM, códecs modernos como H.264/H.265 y VP8/VP9/AV1, y una potente aceleración de GPU, ofrece el rendimiento y la flexibilidad necesarios incluso para las aplicaciones de captura de vídeo más exigentes. La capacidad de crear y guardar archivos de vídeo de forma eficiente hace que esta biblioteca sea perfecta para cualquier aplicación que necesite grabar contenido de webcam. La compatibilidad multiplataforma del SDK, que se extiende a aplicaciones macOS y MAUI, garantiza que su solución de captura de webcam funcione de forma consistente en diferentes sistemas operativos. Ya sea que esté desarrollando una herramienta de videoconferencia, una aplicación de vigilancia o cualquier otro software que requiera la funcionalidad de una webcam, el SDK de Captura de Vídeo .Net le ofrece las herramientas necesarias para implementar estas funciones rápidamente. Comenzar es tan sencillo como seguir el tutorial paso a paso y los ejemplos de código que se muestran arriba. Para conocer casos de uso más avanzados y documentación detallada sobre cómo grabar videos de cámaras web usando .NET, visite nuestro sitio web o consulte la documentación del SDK.

#### EDICIÓN

#### ESTÁNDAR

#### PROFESIONAL

#### PREMIUM
Dispositivos de entrada y otras fuentes compatibles
- Cámaras web
- Sintonizadores de TV y tarjetas de captura
- Videocámaras DV y MPEG
- Captura de pantalla
- HTTP/RTSP/ONVIF Cámaras IP
- UDP, TCP, RTMP y otros flujos de red
- Blackmagic Decklink
- Dispositivos DVB-T/DVB-C/DVB-S/ATSC (BETA)
- Microsoft Kinect para Windows
Avance en vídeo
Capturador de fotogramas
Tratamiento de vídeo
Tratamiento de audio
Compatibilidad con vídeo HD y 4K
Sintonización de TV
Transmisión en red en formato WMV
Transmisión en red mediante RTMP/RTSP/UDP/NDI
Chroma-key
Detección de movimiento
Tratamiento de vídeo mediante filtros DirectShow
OSD (On-Screen Display)
Picture-In-Picture
Cambiar el nombre del archivo de salida sobre la marcha
Múltiples pantallas de salida
Efectos de vídeo acelerados en la GPU
Salida a Virtual Camera SDK
Compatibilidad con Video Encryption SDK
Seguimiento facial
Formatos de salida
- AVI
- WMV (Windows Media Video)
- WMA (Windows Media Audio)
- WAV
- MP3
- Ogg Vorbis
- Speex
- Vídeo DV
- DV/MPEG-1/2/4 (mediante sintonizador de TV con codificador MPEG interno o videocámara DV/HDV)
- Vídeo Flash (FLV) con FFMPEG
- WebM
- Formatos de salida personalizados mediante filtros DirectShow externos
- MPEG-1/2/4 con FFMPEG
- MP4 (H264/HEVC + AAC) mediante software, codificadores Intel QuickSync, Nvidia NVENC/CUDA o AMD Radeon
Nuestro software ofrece un uso ilimitado sin pantallas de aviso, garantizando una
experiencia sin problemas. Ofrecemos un período de prueba de 30 días para que pueda explorar
todas las funciones antes de comprometerse.
Con una licencia normal
recibirá actualizaciones menores y mayores gratuitas durante un año; después de ese período,
el SDK seguirá funcionando como antes.
Alternativamente, la licencia
licencia de por vida proporciona actualizaciones ilimitadas indefinidamente. Además,
ofrecemos soporte y correcciones prioritarias. La licencia normal se factura
anualmente y se renueva automáticamente cada año, pero puede cancelar su
suscripción en cualquier momento.
---END OF PAGE---
# Page: https://www.visioforge.com/it/save-webcam
# Salvare i video della webcam con .Net: Una guida completa per registrare e catturare la webcam
La cattura e il salvataggio di video da webcam è un requisito comune a molte applicazioni moderne, dagli strumenti di videoconferenza ai sistemi di sorveglianza. Che si tratti di registrare filmati da webcam, visualizzare il feed della webcam o catturare immagini, l'implementazione di una funzionalità webcam affidabile in .NET (DotNet) può essere impegnativa. Questa esercitazione fornisce una semplice guida passo-passo per salvare i video della webcam utilizzando C# (C Sharp) con un codice minimo.

#### DOWNLOADS
[Programma di installazione (Windows)](https://s3.us-west-2.amazonaws.com/files.visioforge.com/trials/visioforge_sdks_installer_dotnet_setup.exe)[Guida all'installazione di NuGet](https://www.visioforge.com/help/docs/dotnet/install/)[Samples su GitHub](https://github.com/visioforge/.Net-SDK-s-samples)

#### ACQUISTO
[Controllare i prezzi o ordinare](https://www.visioforge.com/it/buy)

#### AIUTO
[Guida in linea](https://www.visioforge.com/help/docs/dotnet/videocapture/)[Changelog](https://www.visioforge.com/help/docs/dotnet/changelog/)[Contratto di licenza](/help/docs/eula/)
L'SDK è gratuito per uso non commerciale. Contattateci per ottenere una licenza gratuita.
## Caratteristiche principali di Video Capture SDK .Net
Video Capture SDK .Net è una potente libreria progettata specificamente per gli sviluppatori .NET che devono implementare la funzionalità di acquisizione della webcam nelle loro applicazioni. Se volete registrare il video della webcam, salvare i fotogrammi della webcam come immagini o visualizzare il feed della webcam nella vostra applicazione, questo SDK vi copre. Alcune delle sue caratteristiche principali includono:
- Integrazione perfetta con le applicazioni .NET
- Supporto per più dispositivi di acquisizione (webcam USB, telecamere IP, schede di acquisizione)
- Registrazione ed elaborazione video e audio ad alte prestazioni
- Codice semplice per ottenere e visualizzare i feed della webcam
- Creare e salvare file video in vari formati
- Codifica accelerata dalla GPU per prestazioni ottimali
- Compatibilità multipiattaforma
## Formati di output: MP4 e WebM in dettaglio
### Formato MP4
MP4 è uno dei formati contenitore video più ampiamente supportati, il che lo rende una scelta eccellente per le applicazioni in cui la compatibilità è una priorità.
**Codec supportati per MP4:**
- **H.264 (AVC)**: Lo standard industriale per la compressione video, che offre un'eccellente qualità e un'ampia compatibilità
- **H.265 (HEVC)**: Codec di nuova generazione che offre una compressione fino a 50% migliore rispetto a H.264 mantenendo la stessa qualità
- **CAA**: Advanced Audio Coding, lo standard industriale per la compressione audio digitale con perdita di dati
### Formato WebM
WebM è un formato di file multimediali aperto e libero da royalty, progettato per il Web.
**Codec supportati per WebM:**
- **VP8**: Codec video open source sviluppato da Google, utilizzato principalmente con il formato WebM
- **VP9**: Successore del VP8, offre un'efficienza di compressione notevolmente migliorata
- **AV1**: Il più recente codec video open source con compressione e qualità superiori, in particolare a bitrate più bassi
- **Vorbis**: Formato di compressione audio gratuito e open source che offre una buona qualità a bitrate più bassi
Ogni codec può essere ottimizzato con vari parametri per raggiungere l'equilibrio ottimale tra qualità e dimensione del file in base ai requisiti specifici della tua applicazione.
## Accelerazione GPU per una codifica efficiente
Una delle caratteristiche più importanti di Video Capture SDK .Net è il suo solido supporto per la codifica video accelerata dalla GPU, che offre diversi vantaggi significativi:
### Vantaggi dell'accelerazione GPU
- **Utilizzo della CPU drasticamente ridotto**: Liberare risorse della CPU per altre attività dell'applicazione
- **Velocità di codifica più elevate**: Fino a 10 volte più veloce della codifica solo CPU
- **Codifica ad alta risoluzione in tempo reale**: Abilita l'acquisizione video 4K con un impatto minimo sul sistema
- **Minore consumo energetico**: Particolarmente importante per le applicazioni mobili e laptop
- **Qualità superiore allo stesso bitrate**: Alcuni codificatori GPU offrono una migliore qualità per bit rispetto alla codifica CPU
### Tecnologie GPU supportate
Video Capture SDK .Net sfrutta molteplici tecnologie di accelerazione GPU:
- **NVIDIA NVENC**: Codifica accelerata tramite hardware sulle GPU NVIDIA
- **AMD AMF/VCE**: Accelerazione sulle schede grafiche AMD
- **Video di sincronizzazione rapida Intel**: Codifica hardware sulla grafica integrata Intel
L'SDK rileva automaticamente l'hardware disponibile e seleziona il percorso di codifica ottimale in base alle capacità del sistema, ricorrendo alla codifica software quando necessario.
## Esempio di implementazione (codice C# per catturare video dalla webcam)
Ecco un semplice tutorial su come registrare video dalla webcam utilizzando C#. Implementare l'acquisizione tramite webcam con Video Capture SDK .Net è semplice.
## CAMPIONI DI CODICE
Ecco un esempio completo che mostra come ottenere il feed della webcam, visualizzarlo nella tua applicazione e salvarlo in un file MP4 con codifica H.264:
Per l'output WebM con codifica VP9, è sufficiente modificare le impostazioni del codificatore:
### Esempi di codice aggiuntivi
Ecco un semplice esempio di come salvare una singola immagine dalla webcam.
Abilita l'acquisizione di campioni video:
Ottieni e salva una singola immagine dalla webcam:
## Dipendenze native
Video Capture SDK .Net si basa su librerie native per accedere ai dispositivi webcam ed eseguire l'elaborazione video e audio. Queste dipendenze native sono incluse nell'SDK e vengono distribuite automaticamente con l'applicazione, garantendo una perfetta integrazione e compatibilità tra sistemi diversi.
Pacchetto SDK principale (gestito):
Dipendenze native per Windows x64:
Per piattaforme alternative (macOS, Linux, Android, iOS), utilizzare i pacchetti di dipendenze native corrispondenti.
## Compatibilità multipiattaforma
Video Capture SDK .Net è progettato tenendo conto della compatibilità multipiattaforma, il che lo rende la scelta ideale per gli sviluppatori che lavorano su applicazioni che devono essere eseguite su più sistemi operativi.
### Compatibilità MAUI
Per gli sviluppatori che lavorano con .NET MAUI (Multi-platform App UI), Video Capture SDK .Net offre:
- Piena compatibilità con le applicazioni MAUI
- API coerente su tutte le piattaforme supportate
- Ottimizzazioni specifiche della piattaforma mantenendo una base di codice unificata
- Esempi di progetti MAUI che dimostrano l'implementazione su più piattaforme
Questa funzionalità multipiattaforma consente agli sviluppatori di scrivere il codice una sola volta e di distribuirlo su piattaforme Windows, macOS e mobili tramite MAUI, riducendo significativamente i tempi di sviluppo e le spese generali di manutenzione. [SDK di acquisizione video .Ne](https://www.visioforge.com/it/video-capture-sdk-net)Offre una soluzione completa per aggiungere funzionalità di acquisizione video tramite webcam alle applicazioni DotNet. Che tu debba registrare filmati tramite webcam, salvare immagini tramite webcam o semplicemente visualizzare il feed della webcam nella tua applicazione, questa libreria semplifica il processo con poche righe di codice C#. Grazie al supporto per formati standard di settore come MP4 e WebM, codec moderni tra cui H.264/H.265 e VP8/VP9/AV1 e una potente accelerazione GPU, offre le prestazioni e la flessibilità necessarie anche per le applicazioni di acquisizione video più esigenti. La possibilità di creare e salvare file video in modo efficiente rende questa libreria perfetta per qualsiasi applicazione che necessiti di registrare contenuti tramite webcam. La compatibilità multipiattaforma dell'SDK, che si estende alle applicazioni macOS e MAUI, garantisce che la tua soluzione di acquisizione tramite webcam funzioni in modo coerente su diversi sistemi operativi. Che tu stia sviluppando uno strumento di videoconferenza, un'applicazione di sorveglianza o qualsiasi altro software che richieda funzionalità webcam, Video Capture SDK .Net offre gli strumenti necessari per implementare rapidamente queste funzionalità. Iniziare è semplice come seguire il tutorial passo passo e gli esempi di codice forniti sopra. Per casi d'uso più avanzati e documentazione dettagliata su come registrare video dalla webcam utilizzando .NET, visita il nostro sito Web o fai riferimento alla documentazione dell'SDK.

#### EDIZIONE

#### STANDARD

#### PROFESSIONALE

#### PREMIUM
Dispositivi di input e altre fonti supportate
- Telecamere web
- Sintonizzatori TV e schede di acquisizione
- Videocamere DV e MPEG
- Capture dello schermo
- Telecamere IP HTTP/RTSP/ONVIF
- UDP, TCP, RTMP e altri flussi di rete
- Blackmagic Decklink
- Dispositivi DVB-T/DVB-C/DVB-S/ATSC (BETA)
- Microsoft Kinect per Windows
Anteprima video
Acquisizione di fotogrammi
Elaborazione video
Elaborazione audio
Supporto video HD e 4K
Sintonizzazione TV
Streaming di rete in formato WMV
Android 8 e successivi
Chiave cromatica
Rilevamento del movimento
Elaborazione video con filtri DirectShow
OSD (On-Screen Display)
Immagine nell'immagine
Modifica del nome del file di output al volo
Schermi di uscita multipli
Effetti video accelerati dalla GPU
Uscita verso l'SDK della Virtual Camera
Supporto SDK di crittografia video
Tracciamento del volto
Formati di uscita
- AVI
- WMV (Windows Media Video)
- WMA (Windows Media Audio)
- WAV
- MP3
- Ogg Vorbis
- Speex
- Video DV
- DV/MPEG-1/2/4 (utilizzando un sintonizzatore TV con codificatore MPEG interno o una videocamera DV/HDV)
- Video Flash (FLV) utilizzando FFMPEG
- WebM
- Formati di uscita personalizzati utilizzando filtri DirectShow esterni
- MPEG-1/2/4 con FFMPEG
- MP4 (H264/HEVC + AAC) tramite software, codificatori Intel QuickSync, Nvidia NVENC/CUDA o AMD Radeon
Il nostro software offre un utilizzo illimitato, senza nag-screen, garantendo un'esperienza
esperienza senza soluzione di continuità. Forniamo un periodo di prova di 30 giorni, in modo che possiate esplorare tutte le funzionalità prima di
tutte le funzionalità prima di impegnarsi.
Con una licenza regolare, l'utente
riceve aggiornamenti minori e maggiori gratuiti per un anno; dopo tale periodo,
l'SDK continuerà a funzionare come prima.
In alternativa, la
licenza a vita fornisce aggiornamenti illimitati a tempo indeterminato. Inoltre,
offriamo assistenza e correzioni prioritarie. La licenza regolare viene fatturata
annualmente e si rinnova automaticamente ogni anno, ma è possibile annullare la
abbonamento in qualsiasi momento.
---END OF PAGE---
# Page: https://www.visioforge.com/de/virtual-camera-sdk
# Virtual Camera SDK
Version 11.1
Das VisioForge Virtual Camera SDK ist die ultimative virtuelle Webcam-Lösung für Windows. Anwender und Entwickler können ihren PC in eine vielseitige, leistungsstarke Videoquelle für alle Anwendungen verwandeln, die Webcams unterstützen. Ob Content-Ersteller, Pädagoge, Geschäftsmann oder Softwareentwickler – unser SDK bietet Ihnen die Tools, die Sie benötigen, um Ihre Video- und Audiostreams mit unübertroffener Flexibilität und Qualität zu übertragen, zu optimieren und zu steuern.

#### DOWNLOADS
[Installateur](https://s3.us-west-2.amazonaws.com/files.visioforge.com/trials/visioforge_virtual_camera_sdk_setup.zip)

#### KAUFEN
[Preise prüfen oder bestellen](https://www.visioforge.com/de/buy)

#### HILFE
[Online-Hilfe](/help/docs/directshow/virtual-camera-sdk/)[Lizenzvereinbarung](/help/docs/eula/)
## Was ist eine virtuelle Webcam?
Eine virtuelle Webcam (auch virtuelle Kamera genannt) ist eine softwarebasierte Kamera, die eine physische Webcam auf Ihrem Windows-PC simuliert. So können Sie Video- und Audiodaten von beliebigen Quellen – wie Videodateien, Netzwerk-Streams, Webcams, Camcordern oder sogar Ihrem Desktop-Bildschirm – an beliebte Anwendungen wie Zoom, Skype, OBS Studio, Google Meet, Microsoft Teams und viele mehr senden. Mit einer virtuellen Webcam können Sie:
- Verwenden Sie vorab aufgezeichnete Videos, Live-Streams oder benutzerdefinierte Videoeffekte als Webcam-Eingang.
- Geben Sie Ihren Desktop, Präsentationen oder Anwendungsfenster als Webcam-Feed frei.
- Kombinieren Sie mehrere Videoquellen und wechseln Sie nahtlos zwischen ihnen.
- Wenden Sie Echtzeit-Videoeffekte, Overlays und Branding auf Ihren Videostream an.
- Verwenden Sie Ihre virtuelle Kamera dank der Unterstützung mehrerer Instanzen gleichzeitig in mehreren Anwendungen.
Diese Technologie ist ideal für Live-Streaming, Videokonferenzen, Online-Unterricht, Webinare, Remote-Zusammenarbeit und jedes Szenario, in dem Sie Ihre Videopräsenz steuern oder verbessern möchten.
## Warum sollten Sie sich für das VisioForge Virtual Camera SDK entscheiden?
Das VisioForge Virtual Camera SDK ist eine führende Lösung für virtuelle Webcam-Funktionen unter Windows. Hier sind die Gründe:
- **Umfassende Unterstützung von Videoquellen:** Streamen Sie Videos aus Dateien (MP4, AVI, MKV, MOV und mehr), Netzwerk-Streams (RTSP, HTTP, HLS), Webcams, Camcordern, Capture-Karten oder Ihrem Desktop-Bildschirm. Kombinieren Sie Quellen für maximale Flexibilität.
- **Professionelle Videoqualität:** Genießen Sie die Unterstützung von bis zu 4K-Auflösung und stellen Sie sicher, dass Ihr Video in jeder Umgebung scharf und professionell aussieht.
- **Erweiterte Videoverarbeitung:** Wenden Sie eine breite Palette von Echtzeiteffekten an, darunter Bild- und Textüberlagerungen, Schwenken/Zoomen, Helligkeit, Kontrast, Sättigung, Farbtonanpassungen, Deinterlacing, Rauschunterdrückung und Chroma-Key-Effekte (Greenscreen). Ideal zum Hinzufügen von Logos, Bauchbinden, Wasserzeichen oder kreativen visuellen Verbesserungen.
- **Virtuelle Audioaufnahme:** Fügen Sie Ihrem virtuellen Webcam-Stream nahtlos Audio von Mikrofonen, Audiodateien oder anderen Quellen hinzu und stellen Sie sicher, dass Ihr Publikum genau das hört, was Sie möchten.
- **Unterstützung mehrerer Instanzen und mehrerer Apps:** Führen Sie mehrere virtuelle Kamerageräte gleichzeitig aus, sodass Sie Ihre virtuelle Webcam in mehreren Anwendungen gleichzeitig verwenden können – ideal für Multitasking-Profis und Streamer.
- **Benutzerdefiniertes Branding und Gerätebenennung:** Personalisieren Sie Ihre virtuelle Kamera und Ihr Mikrofon mit benutzerdefinierten Namen, damit Ihre Marke in Meetings und Streams hervorsticht.
- **DirectShow-Integration:** Vollständig kompatibel mit DirectShow-Anwendungen und VisioForge SDKs für Videobearbeitung und -aufnahme, sodass Sie erweiterte Videofunktionen ganz einfach in Ihre eigenen Softwareprojekte integrieren können.
- **Hintergrundbild und Signalverarbeitung:** Zeigen Sie ein benutzerdefiniertes Hintergrundbild an oder führen Sie eine bestimmte Anwendung aus, wenn kein Videosignal verfügbar ist, und sorgen Sie so jederzeit für ein reibungsloses Erlebnis.
- **Lizenzfreie Verbreitung:** Verteilen Sie Ihre Anwendungen, ohne sich um zusätzliche Gebühren oder Lizenzprobleme sorgen zu müssen.
- **Entwicklerfreundlich:** Umfassende Dokumentation, Beispielcode und dedizierter Support erleichtern Entwicklern das Hinzufügen virtueller Webcam-Funktionen zu ihren eigenen Windows-Anwendungen.
## Anwendungsfälle für virtuelle Webcam-Technologie
- **Videokonferenzen:** Verbessern Sie Ihre Präsenz in Zoom, Microsoft Teams, Skype, Google Meet und anderen Plattformen, indem Sie hochwertige Videos, benutzerdefinierte Hintergründe und Marken-Overlays teilen.
- **Live-Streaming:** Übertragen Sie auf Plattformen wie YouTube Live, Twitch, Facebook Live und mehr mit professionellen Effekten, Übergängen und Video-Feeds aus mehreren Quellen.
- **Online-Lehre und Webinare:** Geben Sie Ihren Bildschirm, Ihre Folien oder Lehrvideos als Webcam-Feed frei und gestalten Sie das Fernlernen interaktiver und spannender.
- **Inhaltserstellung:** Nehmen Sie kreative Inhalte mit erweiterten Videoeffekten, Overlays und Echtzeitbearbeitung auf oder streamen Sie sie.
- **Gaming & Esports:** Fügen Sie Ihren Gaming-Streams Webcam-Overlays, Greenscreen-Effekte und benutzerdefiniertes Branding hinzu.
- **Unternehmenskommunikation:** Liefern Sie ausgefeilte Präsentationen, Produktdemos und interne Mitteilungen mit Marken-Video-Feeds.
- **Softwareentwicklung:** Integrieren Sie virtuelle Webcam-Funktionen in Ihre eigenen Windows-Anwendungen und erweitern Sie so die Fähigkeiten und Attraktivität Ihres Produkts.
## Funktionsübersicht
### Video- und Audio-Streaming
- Streamen Sie von jeder realen oder virtuellen Quelle: Videodateien, Netzwerk-Streams, Webcams, Camcorder, Aufnahmekarten, Desktop und mehr.
- Kombinieren Sie mehrere Quellen und wechseln Sie in Echtzeit zwischen ihnen.
- Fügen Sie Audio von Mikrofonen, Dateien oder anderen Geräten hinzu.
### Videoverarbeitung und Effekte
- Bild- und Textüberlagerungen für Branding, Wasserzeichen und Informationsanzeige.
- Schwenken/Zoomen, Zuschneiden und Größenänderung für die perfekte Rahmung.
- Passen Sie Helligkeit, Kontrast, Sättigung und Farbton für optimale Videoqualität an.
- Deinterlacing und Rauschunterdrückung für flüssige, klare Videos.
- Chroma-Key (Greenscreen) für Hintergrundaustausch und kreative Effekte.
### Anpassung und Branding
- Legen Sie benutzerdefinierte Gerätenamen für Ihre virtuelle Kamera und Ihr Mikrofon fest.
- Zeigen Sie ein Hintergrundbild an oder führen Sie eine Anwendung aus, wenn kein Videosignal vorhanden ist.
- Volle Kontrolle über die Video- und Audioeinstellungen für ein maßgeschneidertes Erlebnis.
### Kompatibilität und Integration
- Funktioniert mit allen gängigen Videokonferenz-, Streaming- und Aufzeichnungssoftwares.
- DirectShow-Unterstützung für nahtlose Integration mit professionellen Videotools.
- Einfache SDK-Integration für Entwickler, mit Beispielcode und Dokumentation.
### Lizenzierung & Vertrieb
- Lizenzfreie Verteilung für Ihre Anwendungen.
- Flexible Lizenzoptionen: jährlich oder lebenslang, mit kostenlosen Updates und vorrangigem Support.
- Testversion verfügbar (zeigt ein Wasserzeichen im Videofenster an).
### Filterverwendung in einem DirectShow-Graph

## Systemanforderungen
- **Unterstützte Betriebssysteme:** Windows 11, Windows 10, Windows 8/8.1, Windows 7, Windows Vista, Windows XP, Windows Server 2003 und höher.
- **DirectX 9 oder höher erforderlich.**
- **x86/x64-Kompatibilität.**
## Download & Lizenzierung
- **Kostenlose Testversion:** Laden Sie das Virtual Camera SDK für Windows herunter und testen Sie es. Die Testversion enthält ein Wasserzeichen.
- **Kaufen:** Sichern Sie sich unbegrenzte Nutzung, kostenlose Updates und vorrangigen Support mit einer regulären oder lebenslangen Lizenz. Sie können Ihr Abonnement jederzeit kündigen.
- **Einfache SDK-Integration:** Fügen Sie Ihren eigenen Windows-Anwendungen mit unserem umfassenden SDK virtuelle Webcam-Funktionen hinzu.
## Fehlerbehebung und Support
- **Virtuelle Webcam nicht erkannt?** Stellen Sie sicher, dass das SDK installiert und als Videoeingang in Ihrer Anwendung ausgewählt ist. Starten Sie die App bei Bedarf neu.
- **Abgehacktes Video oder Audio?** Schließen Sie andere ressourcenintensive Programme oder überprüfen Sie Ihre Systemressourcen und Internetverbindung.
- **Kompatibilitätsprobleme?** Für einige Anwendungen sind möglicherweise Updates oder spezielle Einstellungen erforderlich. Wenden Sie sich an unser Support-Team, um Unterstützung zu erhalten.
- **Brauchen Sie Hilfe?** Greifen Sie auf unsere ausführliche Dokumentation und FAQs zu oder wenden Sie sich für persönliche Hilfe an unser Priority-Supportteam.
## Vergleich: VisioForge Virtual Camera SDK vs. andere Lösungen
- **e2eSoft VCam:** Beide bieten virtuelle Webcam-Funktionen, aber VisioForge bietet eine tiefere DirectShow-Integration, erweiterte Videoverarbeitung und entwicklerfreundliche SDK-Funktionen.
- **Virtuelle Kamera von OBS Studio:** OBS eignet sich hervorragend zum Streamen, aber VisioForge SDK ist für eine einfache Integration in Ihre eigenen Apps konzipiert und bietet Entwicklern eine detailliertere Kontrolle.
- **ManyCam, YouCam usw.:** Dabei handelt es sich um Endbenutzer-Apps, während VisioForge SDK ideal für Entwickler und Unternehmen ist, die virtuelle Webcam-Funktionen in ihre eigenen Produkte einbetten möchten.
## C#-Codebeispiel
Hier ist ein praktisches Beispiel für die Verwendung des Virtual Camera SDK in einer .NET-Anwendung:
### Projekt-Setup
Erstellen Sie ein neues .NET-Projekt und fügen Sie das NuGet-Paket VisioForge.DirectShowAPI hinzu:
### Implementierungsbeispiel
Dieses Beispiel zeigt, wie Sie Videos von einer physischen Kamera aufnehmen und über eine virtuelle Kamera streamen:
Dieses Beispiel zeigt:
- Einrichten eines DirectShow-Filterdiagramms
- Auflisten und Auswählen von Videoaufnahmegeräten
- Erstellen und Verbinden von Quell- und virtuellen Kamerafiltern
- Verwalten des Streaming-Lebenszyklus
- Richtige Ressourcenbereinigung
Weitere erweiterte Funktionen wie Videoeffekte, Formatauswahl und mehrere Instanzen finden Sie in unserer umfassenden SDK-Dokumentation.
## C++ DirectShow-Beispiel
So verwenden Sie das Virtual Camera SDK in einer nativen C++ DirectShow-Anwendung:
### Header-Datei (intf.h)
Definieren Sie zunächst die erforderlichen GUIDs und Schnittstellen:
### Implementierungsbeispiel (main.cpp)
Hier ist ein vollständiges Beispiel, das zeigt, wie man Videos aufnimmt und über die virtuelle Kamera streamt:
Dieses C++-Beispiel demonstriert:
- Einrichten und Verwalten des DirectShow-Filterdiagramms
- Aufzählung von Videoaufnahmegeräten
- Erstellen und Konfigurieren virtueller Kamerafilter
- Filterverbindung und Streaming-Steuerung
- Richtige COM-Ressourcenbereinigung
- Fehlerbehandlung und Statusberichterstattung
Das Beispiel verwendet standardmäßige DirectShow-Schnittstellen zusammen mit den benutzerdefinierten Schnittstellen des Virtual Camera SDK für erweiterte Funktionen. Beachten Sie Folgendes:
1. Link gegen die DirectShow-Bibliotheken
2. Fügen Sie die erforderlichen DirectShow-Header ein
3. Initialisieren und desinitialisieren Sie COM entsprechend
4. Behandeln Sie alle COM-Schnittstellenversionen ordnungsgemäß
Informationen zu erweiterten Funktionen wie der Auswahl des Videoformats, mehreren Instanzen oder Videoeffekten finden Sie in unserer SDK-Dokumentation.
## Beispielprojekte auf GitHub
Wir pflegen eine umfassende Sammlung von Beispielprojekten auf GitHub, um Ihnen den Einstieg in das Virtual Camera SDK zu erleichtern. Besuchen Sie unsere [DirectShow-Beispielrepository](https://github.com/visioforge/directshow-samples) für vollständige, funktionierende Beispiele.
### Verwendete Technologien
Die Beispiele sind in mehreren Programmiersprachen verfügbar:
- C# (.NET)
- C++ (Native DirectShow)
- Delphi
Statten Sie Ihren PC mit der besten virtuellen Webcam-Software für Windows aus. Erleben Sie nahtloses Video-Streaming, erweiterte Effekte und professionelle Funktionen mit dem VisioForge Virtual Camera SDK!
---END OF PAGE---
# Page: https://www.visioforge.com/es/virtual-camera-sdk
# Virtual Camera SDK
versión 11.1
El SDK de cámara virtual de VisioForge es la solución definitiva de cámaras web virtuales para Windows, que permite a usuarios y desarrolladores transformar su PC en una fuente de vídeo versátil y de alto rendimiento para cualquier aplicación compatible con cámaras web. Tanto si es creador de contenido, educador, profesional o desarrollador de software, nuestro SDK le proporciona las herramientas necesarias para transmitir, mejorar y controlar sus transmisiones de vídeo y audio con una flexibilidad y calidad inigualables.

#### DESCARGAS
[Instalador](https://s3.us-west-2.amazonaws.com/files.visioforge.com/trials/visioforge_virtual_camera_sdk_setup.zip)

#### COMPRAR
[Consultar precios o hacer un pedido](https://www.visioforge.com/es/buy)

#### AYUDA
[Ayuda en línea](/help/docs/directshow/virtual-camera-sdk/)[Acuerdo de licencia](/help/docs/eula/)
## ¿Qué es una cámara web virtual?
Una cámara web virtual (también conocida como cámara virtual) es una cámara basada en software que simula una cámara web física en tu PC con Windows. Esto te permite enviar video y audio desde cualquier fuente (como archivos de video, transmisiones de red, cámaras web, videocámaras o incluso la pantalla de tu escritorio) a aplicaciones populares como Zoom, Skype, OBS Studio, Google Meet, Microsoft Teams y muchas más. Con una cámara web virtual, puedes:
- Utilice vídeos pregrabados, transmisiones en vivo o efectos de vídeo personalizados como entrada de su cámara web.
- Comparta su escritorio, presentaciones o ventanas de aplicaciones como una transmisión de cámara web.
- Combine múltiples fuentes de vídeo y alterne entre ellas sin problemas.
- Aplique efectos de video, superposiciones y marca en tiempo real a su transmisión de video.
- Utilice su cámara virtual en múltiples aplicaciones al mismo tiempo, gracias al soporte de múltiples instancias.
Esta tecnología es ideal para transmisión en vivo, videoconferencias, enseñanza en línea, seminarios web, colaboración remota y cualquier escenario en el que desee controlar o mejorar su presencia en video.
## ¿Por qué elegir el SDK de cámara virtual de VisioForge?
El SDK de cámara virtual de VisioForge destaca como una solución líder para la funcionalidad de cámara web virtual en Windows. Aquí explicamos por qué:
- **Soporte completo de fuentes de vídeo:** Transmite video desde archivos (MP4, AVI, MKV, MOV y más), transmisiones de red (RTSP, HTTP, HLS), cámaras web, videocámaras, tarjetas de captura o la pantalla de tu escritorio. Combina y combina fuentes para máxima flexibilidad.
- **Calidad de video de nivel profesional:** Disfrute de compatibilidad con una resolución de hasta 4K, lo que garantiza que su video se vea nítido y profesional en cualquier entorno.
- **Procesamiento de vídeo avanzado:** Aplique una amplia gama de efectos en tiempo real, como superposiciones de imágenes y texto, panorámica/zoom, brillo, contraste, saturación, ajustes de tono, desentrelazado, eliminación de ruido y efectos de croma (pantalla verde). Ideal para añadir logotipos, tercios inferiores, marcas de agua o mejoras visuales creativas.
- **Captura de audio virtual:** Agregue sin problemas audio desde micrófonos, archivos de audio u otras fuentes a su transmisión de cámara web virtual, asegurando que su audiencia escuche exactamente lo que desea.
- **Compatibilidad con múltiples instancias y múltiples aplicaciones:** Ejecute varios dispositivos de cámara virtuales a la vez, lo que le permitirá usar su cámara web virtual en varias aplicaciones simultáneamente: ideal para profesionales que realizan múltiples tareas y transmisores.
- **Marca personalizada y nombre del dispositivo:** Personalice su cámara y micrófono virtuales con nombres personalizados, haciendo que su marca se destaque en reuniones y transmisiones.
- **Integración con DirectShow:** Totalmente compatible con aplicaciones DirectShow y SDK de VisioForge para edición y captura de video, lo que facilita la integración de funciones de video avanzadas en sus propios proyectos de software.
- **Manejo de imágenes de fondo y señales:** Muestra una imagen de fondo personalizada o ejecuta una aplicación específica cuando no haya una señal de video disponible, lo que garantiza una experiencia impecable en todo momento.
- **Distribución libre de regalías:** Distribuya sus aplicaciones sin preocuparse por tarifas adicionales o dolores de cabeza por licencias.
- **Apto para desarrolladores:** La documentación completa, el código de muestra y el soporte dedicado facilitan que los desarrolladores agreguen funciones de cámara web virtual a sus propias aplicaciones de Windows.
## Casos de uso de la tecnología de cámaras web virtuales
- **Videoconferencia:** Mejore su presencia en Zoom, Microsoft Teams, Skype, Google Meet y otras plataformas compartiendo videos de alta calidad, fondos personalizados y superposiciones de marca.
- **Transmisión en vivo:** Transmita a plataformas como YouTube Live, Twitch, Facebook Live y más con efectos profesionales, transiciones y feeds de video de múltiples fuentes.
- **Enseñanza en línea y seminarios web:** Comparta su pantalla, diapositivas o videos educativos como una transmisión de cámara web, haciendo que el aprendizaje remoto sea más interactivo y atractivo.
- **Creación de contenido:** Grabe o transmita contenido creativo con efectos de video avanzados, superposiciones y edición en tiempo real.
- **Juegos y deportes electrónicos:** Agrega superposiciones de cámara web, efectos de pantalla verde y marca personalizada a tus transmisiones de juegos.
- **Comunicaciones corporativas:** Ofrezca presentaciones impecables, demostraciones de productos y comunicaciones internas con transmisiones de video de marca.
- **Desarrollo de software:** Integre funciones de cámara web virtual en sus propias aplicaciones de Windows, ampliando las capacidades y el atractivo de su producto.
## Desglose de características
### Transmisión de video y audio
- Transmita desde cualquier fuente real o virtual: archivos de video, transmisiones de red, cámaras web, videocámaras, tarjetas de captura, computadoras de escritorio y más.
- Combine múltiples fuentes y cambie entre ellas en tiempo real.
- Agregue audio desde micrófonos, archivos u otros dispositivos.
### Procesamiento y efectos de video
- Superposiciones de imágenes y texto para marca, marcas de agua y visualización de información.
- Panorámica/zoom, recorte y cambio de tamaño para un encuadre perfecto.
- Ajuste el brillo, el contraste, la saturación y el tono para obtener una calidad de video óptima.
- Desentrelazado y eliminación de ruido para un vídeo fluido y claro.
- Chroma-key (pantalla verde) para reemplazo de fondo y efectos creativos.
### Personalización y marca
- Establezca nombres de dispositivos personalizados para su cámara y micrófono virtuales.
- Muestra una imagen de fondo o ejecuta una aplicación cuando no hay señal de video presente.
- Control total sobre la configuración de vídeo y audio para una experiencia personalizada.
### Compatibilidad e integración
- Funciona con todos los principales programas de videoconferencia, transmisión y grabación.
- Compatibilidad con DirectShow para una integración perfecta con herramientas de vídeo profesionales.
- Fácil integración de SDK para desarrolladores, con código de muestra y documentación.
### Licencias y distribución
- Distribución libre de regalías para sus aplicaciones.
- Opciones de licencia flexibles: anual o de por vida, con actualizaciones gratuitas y soporte prioritario.
- Versión de prueba disponible (muestra una marca de agua en la ventana de video).
### Uso de filtro en un gráfico DirectShow

## Requisitos del sistema
- **Sistemas operativos compatibles:** Windows 11, Windows 10, Windows 8/8.1, Windows 7, Windows Vista, Windows XP, Windows Server 2003 y versiones posteriores.
- **Se requiere DirectX 9 o posterior.**
- **Compatibilidad x86/x64.**
## Descarga y licencia
- **Prueba gratuita:** Descargue y evalúe el SDK de Virtual Camera para Windows. La versión de prueba incluye una marca de agua.
- **Compra:** Disfruta de uso ilimitado, actualizaciones gratuitas y soporte prioritario con una licencia regular o de por vida. Cancela tu suscripción cuando quieras.
- **Fácil integración del SDK:** Agregue funciones de cámara web virtual a sus propias aplicaciones de Windows con nuestro SDK completo.
## Solución de problemas y soporte
- **¿No se reconoce la cámara web virtual?** Asegúrate de que el SDK esté instalado y seleccionado como entrada de vídeo en tu aplicación. Reinicia la aplicación si es necesario.
- **¿Vídeo o audio entrecortado?** Cierre otros programas que consuman muchos recursos o verifique los recursos del sistema y la conexión a Internet.
- **¿Problemas de compatibilidad?** Algunas aplicaciones pueden requerir actualizaciones o configuraciones específicas. Contacta con nuestro equipo de soporte para obtener ayuda.
- **¿Necesitar ayuda?** Acceda a nuestra documentación detallada, preguntas frecuentes o comuníquese con nuestro equipo de soporte prioritario para obtener ayuda personalizada.
## Comparación: VisioForge Virtual Camera SDK vs. otras soluciones
- **Cámara web e2eSoft:** Ambos ofrecen funcionalidad de cámara web virtual, pero VisioForge proporciona una integración DirectShow más profunda, un procesamiento de video más avanzado y funciones SDK fáciles de usar para desarrolladores.
- **Cámara virtual de OBS Studio:** OBS es excelente para la transmisión, pero VisioForge SDK está diseñado para una fácil integración en sus propias aplicaciones y ofrece un control más granular para los desarrolladores.
- **ManyCam, YouCam, etc.:** Estas son aplicaciones para el usuario final, mientras que VisioForge SDK es ideal para desarrolladores y empresas que buscan integrar funciones de cámara web virtual en sus propios productos.
## Ejemplo de código C#
A continuación se muestra un ejemplo práctico de cómo utilizar el SDK de cámara virtual en una aplicación .NET:
### Configuración del proyecto
Cree un nuevo proyecto .NET y agregue el paquete NuGet VisioForge.DirectShowAPI:
### Ejemplo de implementación
Este ejemplo demuestra cómo capturar video desde una cámara física y transmitirlo a través de una cámara virtual:
Este ejemplo muestra:
- Configuración de un gráfico de filtro DirectShow
- Enumeración y selección de dispositivos de captura de vídeo
- Creación y conexión de filtros de cámara virtuales y de origen
- Gestión del ciclo de vida del streaming
- Limpieza adecuada de recursos
Para obtener funciones más avanzadas como efectos de video, selección de formato e instancias múltiples, consulte nuestra documentación completa del SDK.
## Ejemplo de DirectShow en C++
A continuación se explica cómo utilizar el SDK de cámara virtual en una aplicación DirectShow nativa de C++:
### Archivo de encabezado (intf.h)
Primero, defina los GUID y las interfaces necesarias:
### Ejemplo de implementación (main.cpp)
A continuación se muestra un ejemplo completo que muestra cómo capturar vídeo y transmitirlo a través de la cámara virtual:
Este ejemplo de C++ demuestra:
- Configuración y gestión de gráficos de filtros DirectShow
- Enumeración de dispositivos de captura de vídeo
- Creación y configuración de filtros de cámara virtual
- Conexión de filtros y control de streaming
- Limpieza adecuada de recursos COM
- Manejo de errores e informes de estado
El ejemplo utiliza interfaces estándar de DirectShow junto con las interfaces personalizadas del SDK de Virtual Camera para funciones avanzadas. Asegúrese de:
1. Enlace con las bibliotecas DirectShow
2. Incluya los encabezados DirectShow necesarios
3. Inicializar y desinicializar COM apropiadamente
4. Manejar correctamente todas las versiones de la interfaz COM
Para obtener funciones avanzadas como selección de formato de video, instancias múltiples o efectos de video, consulte nuestra documentación del SDK.
## Proyectos de muestra en GitHub
Mantenemos una colección completa de proyectos de ejemplo en GitHub para ayudarte a empezar a usar el SDK de cámara virtual. Visita nuestra página. [Repositorio de muestras de DirectShow](https://github.com/visioforge/directshow-samples) para ejemplos completos y funcionales.
### Tecnologías utilizadas
Los ejemplos están disponibles en varios lenguajes de programación:
- C# (.NET)
- C++ (DirectShow nativo)
- Delfos
Potencie su PC con el mejor software de cámara web virtual para Windows. ¡Disfrute hoy mismo de una transmisión de video fluida, efectos avanzados y funciones profesionales con el SDK de cámara virtual de VisioForge!
---END OF PAGE---
# Page: https://www.visioforge.com/it/virtual-camera-sdk
# Virtual Camera SDK
versione 11.1
VisioForge Virtual Camera SDK è la soluzione definitiva per webcam virtuali per Windows, che consente a utenti e sviluppatori di trasformare il proprio PC in una sorgente video versatile e ad alte prestazioni per qualsiasi applicazione che supporti le webcam. Che tu sia un creatore di contenuti, un educatore, un professionista o uno sviluppatore di software, il nostro SDK offre gli strumenti necessari per trasmettere, migliorare e controllare i tuoi flussi video e audio con flessibilità e qualità ineguagliabili.

#### DOWNLOADS
[Installatore](https://s3.us-west-2.amazonaws.com/files.visioforge.com/trials/visioforge_virtual_camera_sdk_setup.zip)

#### ACQUISTO
[Controllare i prezzi o ordinare](https://www.visioforge.com/it/buy)

#### AIUTO
[Guida in linea](/help/docs/directshow/virtual-camera-sdk/)[Contratto di licenza](/help/docs/eula/)
## Cos'è una webcam virtuale?
Una webcam virtuale (nota anche come fotocamera virtuale) è una fotocamera basata su software che simula una webcam fisica sul tuo PC Windows. Questo ti consente di inviare video e audio da qualsiasi sorgente, come file video, flussi di rete, webcam, videocamere o persino lo schermo del tuo desktop, ad applicazioni popolari come Zoom, Skype, OBS Studio, Google Meet, Microsoft Teams e molte altre. Con una webcam virtuale, puoi:
- Utilizza video preregistrati, streaming live o effetti video personalizzati come input per la webcam.
- Condividi il desktop, le presentazioni o le finestre delle applicazioni come feed webcam.
- Combina più sorgenti video e passa dall'una all'altra senza interruzioni.
- Applica effetti video, sovrapposizioni e branding in tempo reale al tuo flusso video.
- Grazie al supporto multi-istanza, puoi utilizzare la tua fotocamera virtuale in più applicazioni contemporaneamente.
Questa tecnologia è ideale per lo streaming live, le videoconferenze, la didattica online, i webinar, la collaborazione a distanza e qualsiasi situazione in cui si desideri controllare o migliorare la propria presenza video.
## Perché scegliere VisioForge Virtual Camera SDK?
VisioForge Virtual Camera SDK si distingue come soluzione leader per la funzionalità webcam virtuale su Windows. Ecco perché:
- **Supporto completo delle sorgenti video:** Trasmetti video in streaming da file (MP4, AVI, MKV, MOV e altri), flussi di rete (RTSP, HTTP, HLS), webcam, videocamere, schede di acquisizione o dallo schermo del tuo desktop. Combina e abbina le sorgenti per la massima flessibilità.
- **Qualità video di livello professionale:** Sfrutta il supporto della risoluzione fino a 4K, per garantire che i tuoi video siano nitidi e professionali in qualsiasi ambiente.
- **Elaborazione video avanzata:** Applica un'ampia gamma di effetti in tempo reale, tra cui sovrapposizioni di immagini e testo, pan/zoom, luminosità, contrasto, saturazione, regolazioni di tonalità, deinterlacciamento, riduzione del rumore ed effetti chroma-key (schermo verde). Perfetto per aggiungere loghi, lower third, filigrane o miglioramenti visivi creativi.
- **Acquisizione audio virtuale:** Aggiungi senza soluzione di continuità l'audio da microfoni, file audio o altre fonti al flusso della tua webcam virtuale, assicurandoti che il tuo pubblico senta esattamente ciò che desideri.
- **Supporto multi-istanza e multi-app:** Gestisci più dispositivi con videocamera virtuale contemporaneamente, consentendoti di utilizzare la tua webcam virtuale in più applicazioni contemporaneamente: ideale per professionisti multitasking e streamer.
- **Branding personalizzato e denominazione dei dispositivi:** Personalizza la tua telecamera e il tuo microfono virtuali con nomi personalizzati, facendo risaltare il tuo marchio durante riunioni e streaming.
- **Integrazione DirectShow:** Completamente compatibile con le applicazioni DirectShow e gli SDK VisioForge per l'editing e l'acquisizione video, semplificando l'integrazione di funzionalità video avanzate nei propri progetti software.
- **Immagine di sfondo e gestione del segnale:** Visualizza un'immagine di sfondo personalizzata o esegui un'applicazione specifica quando non è disponibile alcun segnale video, garantendo sempre un'esperienza impeccabile.
- **Distribuzione royalty-free:** Distribuisci le tue applicazioni senza preoccuparti di costi aggiuntivi o problemi di licenza.
- **Adatto agli sviluppatori:** La documentazione completa, il codice di esempio e il supporto dedicato consentono agli sviluppatori di aggiungere facilmente funzionalità di webcam virtuale alle proprie applicazioni Windows.
## Casi d'uso per la tecnologia webcam virtuale
- **Videoconferenza:** Migliora la tua presenza su Zoom, Microsoft Teams, Skype, Google Meet e altre piattaforme condividendo video di alta qualità, sfondi personalizzati e sovrapposizioni brandizzate.
- **Streaming in diretta:** Trasmetti su piattaforme come YouTube Live, Twitch, Facebook Live e altre ancora con effetti professionali, transizioni e feed video multi-sorgente.
- **Insegnamento online e webinar:** Condividi lo schermo, le diapositive o i video didattici tramite un feed webcam, rendendo l'apprendimento a distanza più interattivo e coinvolgente.
- **Creazione di contenuti:** Registra o riproduci in streaming contenuti creativi con effetti video avanzati, sovrapposizioni e modifica in tempo reale.
- **Giochi ed eSport:** Aggiungi sovrapposizioni di webcam, effetti schermo verde e un marchio personalizzato ai tuoi streaming di gioco.
- **Comunicazioni aziendali:** Realizza presentazioni raffinate, dimostrazioni di prodotto e comunicazioni interne con feed video brandizzati.
- **Sviluppo software:** Integra le funzionalità della webcam virtuale nelle tue applicazioni Windows, ampliando le capacità e l'attrattiva del tuo prodotto.
## Ripartizione delle funzionalità
### Streaming video e audio
- Trasmetti in streaming da qualsiasi fonte reale o virtuale: file video, flussi di rete, webcam, videocamere, schede di acquisizione, desktop e altro ancora.
- Combina più sorgenti e passa da una all'altra in tempo reale.
- Aggiungi audio da microfoni, file o altri dispositivi.
### Elaborazione ed effetti video
- Sovrapposizioni di immagini e testo per il branding, filigrane e visualizzazione di informazioni.
- Panoramica/zoom, ritaglio e ridimensionamento per un'inquadratura perfetta.
- Regola luminosità, contrasto, saturazione e tonalità per una qualità video ottimale.
- Deinterlacciamento e rimozione del rumore per video fluidi e nitidi.
- Chroma-key (schermo verde) per la sostituzione dello sfondo ed effetti creativi.
### Personalizzazione e branding
- Imposta nomi di dispositivi personalizzati per la tua telecamera virtuale e il tuo microfono.
- Visualizza un'immagine di sfondo o esegue un'applicazione quando non è presente alcun segnale video.
- Controllo completo sulle impostazioni video e audio per un'esperienza personalizzata.
### Compatibilità e integrazione
- Funziona con tutti i principali software di videoconferenza, streaming e registrazione.
- Supporto DirectShow per un'integrazione perfetta con strumenti video professionali.
- Facile integrazione dell'SDK per gli sviluppatori, con codice di esempio e documentazione.
### Licenze e distribuzione
- Distribuzione royalty-free per le tue applicazioni.
- Opzioni di licenza flessibili: annuale o a vita, con aggiornamenti gratuiti e supporto prioritario.
- Versione di prova disponibile (visualizza una filigrana sulla finestra video).
### Uso del filtro in un grafico DirectShow

## Requisiti di sistema
- **Sistemi operativi supportati:** Windows 11, Windows 10, Windows 8/8.1, Windows 7, Windows Vista, Windows XP, Windows Server 2003 e versioni successive.
- **Richiesto DirectX 9 o versione successiva.**
- **Compatibilità x86/x64.**
## Download e licenza
- **Prova gratuita:** Scarica e prova l'SDK Virtual Camera per Windows. La versione di prova include una filigrana.
- **Acquistare:** Sblocca utilizzo illimitato, aggiornamenti gratuiti e supporto prioritario con una licenza standard o a vita. Puoi annullare l'abbonamento in qualsiasi momento.
- **Facile integrazione dell'SDK:** Aggiungi funzionalità di webcam virtuale alle tue applicazioni Windows con il nostro SDK completo.
## Risoluzione dei problemi e supporto
- **Webcam virtuale non riconosciuta?** Assicurati che l'SDK sia installato e selezionato come input video nella tua applicazione. Riavvia l'app se necessario.
- **Il video o l'audio sono discontinuati?** Chiudere altri programmi che consumano molte risorse oppure controllare le risorse del sistema e la connessione Internet.
- **Problemi di compatibilità?** Alcune applicazioni potrebbero richiedere aggiornamenti o impostazioni specifiche. Contatta il nostro team di supporto per assistenza.
- **Hai bisogno di aiuto?** Accedi alla nostra documentazione dettagliata, alle FAQ oppure rivolgiti al nostro team di supporto prioritario per un aiuto personalizzato.
## Confronto: VisioForge Virtual Camera SDK vs. altre soluzioni
- **e2eSoft VCam:** Entrambi offrono funzionalità di webcam virtuale, ma VisioForge offre una più profonda integrazione con DirectShow, un'elaborazione video più avanzata e funzionalità SDK di facile utilizzo per gli sviluppatori.
- **Telecamera virtuale OBS Studio:** OBS è ottimo per lo streaming, ma VisioForge SDK è progettato per una facile integrazione nelle tue app e offre un controllo più granulare per gli sviluppatori.
- **ManyCam, YouCam, ecc.:** Si tratta di app per utenti finali, mentre VisioForge SDK è ideale per sviluppatori e aziende che desiderano integrare funzionalità di webcam virtuale nei propri prodotti.
## Esempio di codice C#
Ecco un esempio pratico di come utilizzare Virtual Camera SDK in un'applicazione .NET:
### Impostazione del progetto
Crea un nuovo progetto .NET e aggiungi il pacchetto NuGet VisioForge.DirectShowAPI:
### Esempio di implementazione
Questo esempio mostra come acquisire un video da una telecamera fisica e trasmetterlo in streaming tramite una telecamera virtuale:
Questo esempio mostra:
- Impostazione di un grafico di filtro DirectShow
- Enumerazione e selezione dei dispositivi di acquisizione video
- Creazione e collegamento di filtri sorgente e virtuali della telecamera
- Gestione del ciclo di vita dello streaming
- Pulizia adeguata delle risorse
Per funzionalità più avanzate come effetti video, selezione del formato e istanze multiple, consulta la nostra completa documentazione SDK.
## Esempio di DirectShow in C++
Ecco come utilizzare Virtual Camera SDK in un'applicazione C++ DirectShow nativa:
### File di intestazione (intf.h)
Per prima cosa, definisci i GUID e le interfacce necessari:
### Esempio di implementazione (main.cpp)
Ecco un esempio completo che mostra come acquisire un video e trasmetterlo in streaming tramite la telecamera virtuale:
Questo esempio C++ dimostra:
- Configurazione e gestione del grafico del filtro DirectShow
- Enumerazione dei dispositivi di acquisizione video
- Creazione e configurazione del filtro della telecamera virtuale
- Controllo della connessione e dello streaming del filtro
- Pulizia corretta delle risorse COM
- Gestione degli errori e segnalazione dello stato
L'esempio utilizza le interfacce standard di DirectShow insieme alle interfacce personalizzate del Virtual Camera SDK per funzionalità avanzate. Assicurati di:
1. Collegamento alle librerie DirectShow
2. Includere le intestazioni DirectShow necessarie
3. Inizializzare e deinizializzare COM in modo appropriato
4. Gestire correttamente tutte le versioni dell'interfaccia COM
Per funzionalità avanzate come la selezione del formato video, le istanze multiple o gli effetti video, consulta la documentazione del nostro SDK.
## Progetti di esempio su GitHub
Disponiamo di una raccolta completa di progetti di esempio su GitHub per aiutarti a iniziare a usare Virtual Camera SDK. Visita il nostro [Repository di campioni DirectShow](https://github.com/visioforge/directshow-samples) per esempi completi e funzionanti.
### Tecnologie utilizzate
Gli esempi sono disponibili in diversi linguaggi di programmazione:
- C# (.NET)
- C++ (DirectShow nativo)
- Delfi
Potenzia il tuo PC con il miglior software per webcam virtuale per Windows. Scopri oggi stesso uno streaming video impeccabile, effetti avanzati e funzionalità di livello professionale con VisioForge Virtual Camera SDK!
---END OF PAGE---
# Page: https://www.visioforge.com/de/vlc-source-directshow-filter
# VLC Source DirectShow Filter
Version 15.0
Das VLC Source DirectShow Filter ist eine professionelle Komponente, die die leistungsstarken Multimedia-Funktionen des VLC Media Players direkt in Ihre Windows-Anwendungen integriert. Dieses SDK ermöglicht die nahtlose Integration mit DirectShow-Anwendungen und bietet gleichzeitig die umfassende Formatunterstützung und Streaming-Funktionen, für die VLC bekannt ist.
Egal, ob Sie Mediaplayer, Streaming-Anwendungen, Videoverarbeitungstools oder Multimedia-Content-Management-Systeme entwickeln, unser VLC Source Filter bietet die Zuverlässigkeit und Vielseitigkeit, die Sie benötigen, um praktisch jedes Medienformat zu verarbeiten, auf das Ihre Benutzer stoßen könnten.
## Hauptvorteile
- **Universelle Formatunterstützung**: Spielen Sie über 100 Video- und Audioformate ohne zusätzliche Codec-Installationen ab
- **Netzwerk-Streaming**: Unterstützung für HTTP, HTTPS, RTSP, RTP, UDP und andere Protokolle
- **Mehrsprachige APIs**: Native Unterstützung für C++, C#, VB.NET und Delphi
- **Hohe Leistung**: Optimiertes Multithreading mit Hardwarebeschleunigung
- **Kommerziell bereit**: Lizenzfreie Verbreitung mit professionellem Support

#### DOWNLOADS
[Testversion](https://s3.us-west-2.amazonaws.com/files.visioforge.com/trials/visioforge_vlc_source_setup.zip)[Samples auf GitHub](https://github.com/visioforge/directshow-samples)

#### KAUFEN
[Preise prüfen oder bestellen](https://www.visioforge.com/de/buy)

#### HILFE
[Online-Hilfe](/help/)[Lizenzvereinbarung](/help/docs/eula/)
## Wichtige Funktionen und Fähigkeiten
### Universelle Formatunterstützung
Spielen Sie über 100 Video- und Audioformate ab, darunter MP4, AVI, MPEG, MPEG-TS, MKV, WebM, AAC, MP3, OGG, FLAC und viele mehr ohne zusätzliche Codec-Installationen.
### Netzwerk-Streaming
Unterstützt HTTP, HTTPS, FTP, RTSP, RTP, UDP und andere Netzwerkprotokolle. Streamen Sie Live-Inhalte oder spielen Sie Remote-Mediendateien nahtlos ab.
### Mehrere Programmier-APIs
Native Unterstützung für C++, C#, VB.NET und Delphi mit umfassenden Beispielanwendungen und Dokumentation für jede Plattform.
### Hohe Leistung
Optimierte Multithreading-Unterstützung mit Hardwarebeschleunigungsfunktionen. Verfügbar in x86- und x64-Architekturen.
### Hardwarebeschleunigte GPU-Dekodierung
Der VLC Source DirectShow Filter unterstützt mehrere Hardwarebeschleunigungstechnologien für eine optimale Videodekodierungsleistung mithilfe der Technologien DirectX Video Acceleration (DXVA2), NVIDIA NVDEC, Intel Quick Sync Video und AMD VCE.
#### Unterstützte GPU-Beschleunigungstechnologien
- **DirectX-Videobeschleunigung (DXVA2)**: Windows native Hardwarebeschleunigung
- **NVIDIA NVDEC**: CUDA-basierte Hardware-Dekodierung für NVIDIA-GPUs
- **Intel Quick Sync Video**: Integrierte Intel-Grafikbeschleunigung
- **AMD Video Coding Engine (VCE)**: AMD GPU-Hardwarebeschleunigung
- **Vulkan Video**: Moderne herstellerübergreifende GPU-Beschleunigungsunterstützung
#### Leistungsvorteile
- **Reduzierung der CPU-Auslastung**: 70-90% Reduzierung der CPU-Auslastung durch Hardwarebeschleunigung
- **Energieeffizienz**: Deutlich geringerer Stromverbrauch bei der Videowiedergabe
- **Wärmemanagement**: Reduzierte CPU-Wärmeentwicklung
- **Gleichzeitige Streams**: Unterstützung für mehrere gleichzeitige hardwaredekodierte Streams
- **Höhere Auflösungen**: Effiziente 4K/8K-Videowiedergabe mit minimaler CPU-Belastung
### Erweiterte Steuerung
Vollständige Wiedergabesteuerung mit Suche, Audiospurauswahl, Untertitelverwaltung und Unterstützung für VLC-Filterketten.
## Unterstützte Medienformate
### Videocontainer
- MP4
- MOV
- AVI
- MPEG, MPEG-TS, M2TS, VOB
- MKV
- WebM
- FLV
- OGG
- ASF, WMV
### Video-Codecs
- **H.264/AVC**: Vollständige Hardware-Dekodierungsunterstützung auf allen Plattformen
- **H.265/HEVC**: Hardware-Dekodierung auf kompatiblen GPUs (GTX 950+, Intel Gen9+, AMD GCN4+)
- **VP8, VP9**: Hardware-Dekodierung auf neueren GPUs (GTX 1060+, Intel Gen11+, AMD Navi+)
- **AV1**: Hardware-Dekodierung auf den neuesten GPUs (RTX 30xx+, Intel Arc+, AMD RDNA2+)
- **MPEG-1, MPEG-2**: Legacy-Hardwarebeschleunigung auf den meisten GPUs
- **MPEG-4**: Software- und Hardware-Dekodierungsunterstützung
- **DivX, Xvid**: Software-Dekodierungsunterstützung
- **Theora**: Software-Dekodierungsunterstützung
- **Windows Media Video**: Software-Dekodierungsunterstützung
### Audioformate
- Unterstützte Kommunikation
- MP3, MP2
- FLAC
- Vorbis
- AC3, DTS
- PCM, WAV
- Speex
- Opus
- WMA
### Streaming-Protokolle
- **HTTP/HTTPS**: Volle Unterstützung für progressiven Download und Streaming
- **RTSP/RTP**: Echtzeit-Streaming-Protokoll mit Authentifizierung
- **UDP**: Multicast- und Unicast-Unterstützung
- **MMS**: Microsoft Media Server-Protokoll
- **RTMP**: Real-Time Messaging Protocol für Live-Streaming
- **HLS**: HTTP Live Streaming (Apples adaptives Streaming)
- **BINDESTRICH**: Dynamisches adaptives Streaming über HTTP
- **SRT**: Sicheres, zuverlässiges Transportprotokoll
## Kurzanleitung
### Integrationsschritte
1. **Installieren des SDK**: Registrieren Sie den VLC Source DirectShow-Filter auf Ihrem System
2. **Referenzen hinzufügen**: Fügen Sie die erforderlichen DirectShow- und VLC-Header/Bibliotheken ein
3. **Filterdiagramm erstellen**: DirectShow-Filterdiagrammkomponenten initialisieren
4. **VLC-Quelle hinzufügen**: Instanziieren und konfigurieren Sie den VLC-Quellfilter
5. **Renderer verbinden**: Verknüpfen Sie Video- und Audio-Rendering-Komponenten
6. **Wiedergabe steuern**: Verwenden Sie die MediaControl-Schnittstelle für Wiedergabevorgänge
## API-Referenz und Schnittstellendefinitionen
### IVlcSrc-Schnittstelle
Primäre Schnittstelle zur Steuerung des VLC-Quellfilters
**GUID**: `{77493EB7-6D00-41C5-9535-7C593824E892}`
#### Methoden
- `Datei festlegen` - Laden Sie eine Mediendatei oder Netzwerk-URL
- `GetAudioTracksCount` - Anzahl der verfügbaren Audiospuren abrufen
- `GetAudioTrackInfo` - Informationen zum Audiotrack abrufen
- `GetAudioTrack` - Holen Sie sich die aktuell ausgewählte Audiospur
- `Audiospur festlegen` - Audiospur nach ID auswählen
- `GetSubtitlesCount` - Anzahl der verfügbaren Untertitelspuren abrufen
- `Untertitelinformationen abrufen` - Informationen zur Untertitelspur abrufen
- `Untertitel abrufen` - Holen Sie sich die aktuell ausgewählte Untertitelspur
- `Untertitel einstellen` - Untertitelspur nach ID auswählen (-1 zum Deaktivieren)
### IVlcSrc2-Schnittstelle
Erweiterte Benutzeroberfläche mit zusätzlichen VLC-Anpassungsoptionen
**GUID**: `{CCE122C0-172C-4626-B4B6-42B039E541CB}`
#### Methoden
Erbt alle Methoden von IVlcSrc plus:
- `SetCustomCommandLine` - Legen Sie benutzerdefinierte VLC-Befehlszeilenparameter fest
### IVlcSrc3-Schnittstelle
Neueste Schnittstelle mit Bildratensteuerung
**GUID**: `{3DFBED0C-E4A8-401C-93EF-CBBFB65223DD}`
#### Methoden
Erbt alle Methoden von IVlcSrc2 plus:
- `Standard-Framerate festlegen` - Legen Sie die Standardbildrate für Inhalte ohne Bildrateninformationen fest
### C++-Schnittstellendefinitionen
Für die C++-Entwicklung sind die vollständigen Schnittstellendefinitionen im offiziellen GitHub-Repository verfügbar:
**Header-Datei:** [ivlcsrc.h](https://github.com/visioforge/directshow-samples/blob/main/Interfaces/cpp/VLC%20Source/ivlcsrc.h)
Schnittstellennutzung:
Die Header-Datei enthält die vollständigen Definitionen für:
- `IVlcSrc` Primäre Schnittstelle zur Audio-/Untertitelsteuerung
- `IVlcSrc2` - Erweiterte Schnittstelle mit benutzerdefinierten Befehlszeilenparametern
- `IVlcSrc3` - Neueste Schnittstelle mit Bildratensteuerung
- Alle zugehörigen GUIDs und Methodensignaturen
### C#/VB.NET-Schnittstellendefinitionen
Für die .NET-Entwicklung sind die Schnittstellendefinitionen über das VisioForge DirectShow API NuGet-Paket verfügbar:
**NuGet-Paket:** [`VisioForge.DirectShowAPI`](https://www.nuget.org/packages/VisioForge.DirectShowAPI)
Schnittstellennutzung im C#:
## Vollständige Codebeispiele
### C++-Implementierung
### C#-Implementierung
### VB.NET-Implementierung
## Nutzung erweiterter Funktionen
### Beispiel für die Auswahl einer Audiospur (C++)
## DirectShow Graph-Entwicklungstools
### Verwenden des VLC-Quellfilters mit GraphEdit
**GraphBearbeiten** ist Microsofts DirectShow-Tool zur Graphvisualisierung und -debugging und bietet Funktionen zur Bearbeitung von DirectShow-Grafiken. Das VLC Source DirectShow Filter lässt sich nahtlos in GraphEdit integrieren und ermöglicht so schnelles Prototyping und Testen.
#### Einrichten der VLC-Quelle in GraphEdit
1. **GraphEdit starten**: Starten Sie GraphEdit mit Administratorrechten für vollen Zugriff auf die Filterregistrierung
2. **VLC-Quellfilter einfügen**:
- Klicken Sie mit der rechten Maustaste in den Diagrammbereich
- Wählen Sie „Filter einfügen …“
- Navigieren Sie zur Kategorie „DirectShow-Filter“
- Suchen Sie den Filter „VLC-Quelle“
- Klicken Sie auf „Filter einfügen“
3. **Medienquelle konfigurieren**:
- Klicken Sie mit der rechten Maustaste auf den VLC-Quellfilter
- Wählen Sie „Eigenschaften“
- Geben Sie im Dateidialogfeld Ihren Mediendateipfad oder Ihre Netzwerk-URL an
- Der Filter akzeptiert lokale Dateien (C:\media\video.mp4) und Netzwerk-Streams (http://example.com/stream.m3u8).
4. **Renderer hinzufügen**:
- Für Video: Fügen Sie „Enhanced Video Renderer (EVR)“ oder „Video Mixing Renderer 9 (VMR-9)“ ein.
- Für Audio: Fügen Sie „Standard-DirectSound-Gerät“ oder „Audio-Renderer (WaveOut)“ ein.
5. **Pins verbinden**:
- Ziehen Sie vom VLC-Quellvideo-Ausgabepin zum Video-Renderer-Eingabepin
- Ziehen Sie vom Audio-Ausgangspin der VLC-Quelle zum Audio-Renderer-Eingangspin
- GraphEdit verhandelt automatisch Medientypen
### Verwenden des VLC-Quellfilters mit GraphStudio
**GraphStudio** bietet eine alternative DirectShow-Grafikbearbeitungsumgebung mit erweiterten Debugfunktionen und umfassenden Filteranalysetools.
#### Schritte zur GraphStudio-Integration
1. **Überprüfung der Filterregistrierung**:
- Öffnen Sie GraphStudio
- Navigieren Sie zur Registerkarte „Ansicht“ → „Filter“
- Überprüfen Sie, ob „VLC-Quelle“ in der Liste der registrierten Filter angezeigt wird
- Notieren Sie die CLSID des Filters: `{77493EB7-6D00-41C5-9535-7C593824E892}`
2. **Filterdiagramm erstellen**:
- Verwenden Sie die Schaltfläche „Filter einfügen“ oder ziehen Sie sie aus dem Filterbereich
- Suchen Sie in der Kategorie „DirectShow-Filter“ nach der VLC-Quelle.
- Ziehen Sie die VLC-Quelle in den Diagrammarbeitsbereich
3. **Medienkonfiguration**:
- Klicken Sie mit der rechten Maustaste auf „VLC-Quelle“ → „Datei laden …“
- Navigieren Sie zur Mediendatei oder geben Sie die Netzwerk-URL ein
- GraphStudio zeigt den Verbindungsstatus in Echtzeit an
4. **Automatische Grapherstellung**:
- Verwenden Sie die „Render“-Funktion von GraphStudio
- Klicken Sie mit der rechten Maustaste auf die VLC-Quellausgabe-Pins → „Render-Pin“.
- GraphStudio fügt automatisch passende Decoder und Renderer ein

## Systemanforderungen
### Betriebssysteme
- Windows 10, 11 (alle Editionen)
- Windows 8/8.1
- Windows 7 (SP1 oder höher)
- Windows Server 2016 und höher
### Entwicklungsunterstützung
- Visual Studio 2010-2022
- C++ Builder XE2 und höher
- Delphi XE2 und höher
- .NET Framework 4.0+
- .NET 5 und höher
### Architekturunterstützung
- x86 (32 Bit)
- x64 (64 Bit)
- Mixed-Mode-Anwendungen
- COM-kompatible Umgebungen
## Lizenz- und Vertriebsrechte
### Vorteile einer kommerziellen Lizenz
- **Lizenzfreie Verbreitung**: Stellen Sie Ihre Anwendungen ohne Einzelgebühren bereit
- **Keine Wasserzeichen**: Saubere, professionelle Ausgabe ohne Testeinschränkungen
- **Vorrangiger Support**: Direkter Zugang zu unserem technischen Support-Team
- **Kostenlose Updates**: Erhalten Sie ein Jahr lang kleinere und größere Updates (unbegrenzt bei lebenslanger Lizenz)
- **Mehrere Projekte**: Nutzung in unbegrenzten kommerziellen und persönlichen Projekten
- **Quellcode-Zugriff**: Optionale Quellcode-Lizenzierung verfügbar
### Einschränkungen der Testversion
- Die Videoausgabe zeigt eine Wasserzeichenüberlagerung an
- Keine technischen Einschränkungen der Funktionalität
- Vollständiger API-Zugriff für Evaluierungszwecke
- 30-tägige Testphase
### libVLC-Kompatibilität
Dieses SDK enthält die libVLC-Bibliothek unter LGPL v2.1. Ihre Anwendungen, die unser SDK verwenden, bleiben von dieser Lizenz unberührt, da unser DirectShow-Filter als separate Komponente fungiert. Für Ihre Anwendung ist keine Offenlegung des Quellcodes erforderlich.
## Download und Kauf
### Testversion
**Volle Funktionalität mit Wasserzeichen**
- Komplettes SDK-Paket
- Alle Beispielanwendungen
- Dokumentation
- 30-Tage-Testversion
[Testversion herunterladen](https://s3.us-west-2.amazonaws.com/files.visioforge.com/trials/visioforge_vlc_source_setup.zip)
### Kommerzielle Lizenz
**Produktionsbereit mit allen Rechten**
- Lizenzfreie Verbreitung
- Vorrangiger Support
- Keine Wasserzeichen
- Kostenlose Updates (1 Jahr)
[Preise anzeigen](https://www.visioforge.com/de/buy)
### Quellcode-Lizenz
**Vollständiger Filterquellcode**
- Vollständiger C++-Quellcode
- Build-Skripte enthalten
- Anpassungsrechte
- Technische Beratung
## Technische Spezifikationen
### Leistungsmerkmale
- **Startzeit**: < 500 ms für die Filterinitialisierung
- **Speichernutzung**: ~50 MB Basislinie, skaliert mit der Videoauflösung
- **CPU-Auslastung**: Hardwarebeschleunigte Dekodierung, sofern verfügbar
- **Einfädeln**: Vollständig multithreaded Architektur
- **Latenz**: < 100 ms für lokale Dateien, variiert für Netzwerk-Streams

---END OF PAGE---
# Page: https://www.visioforge.com/es/vlc-source-directshow-filter
# VLC Source DirectShow Filter
versión 15.0
El VLC Source DirectShow Filter es un componente de calidad profesional que integra las potentes funciones multimedia del reproductor multimedia VLC directamente en sus aplicaciones de Windows. Este SDK proporciona una integración perfecta con aplicaciones DirectShow, a la vez que mantiene la amplia compatibilidad de formatos y las capacidades de streaming que distinguen a VLC.
Ya sea que esté desarrollando reproductores multimedia, aplicaciones de transmisión, herramientas de procesamiento de video o sistemas de administración de contenido multimedia, nuestro filtro de fuente VLC brinda la confiabilidad y versatilidad que necesita para manejar prácticamente cualquier formato de medios que sus usuarios puedan encontrar.
## Beneficios clave
- **Compatibilidad con formatos universales**: Reproduce más de 100 formatos de vídeo y audio sin necesidad de instalar códecs adicionales
- **Transmisión en red**:Compatibilidad con HTTP, HTTPS, RTSP, RTP, UDP y otros protocolos
- **API multilingües**:Soporte nativo para C++, C#, VB.NET y Delphi
- **Rendimiento alto**:Multihilo optimizado con aceleración de hardware
- **Listo para uso comercial**:Distribución libre de regalías con soporte profesional

#### DESCARGAS
[Versión de evaluación](https://s3.us-west-2.amazonaws.com/files.visioforge.com/trials/visioforge_vlc_source_setup.zip)[Samples en GitHub](https://github.com/visioforge/directshow-samples)

#### COMPRAR
[Consultar precios o hacer un pedido](https://www.visioforge.com/es/buy)

#### AYUDA
[Ayuda en línea](/help/)[Acuerdo de licencia](/help/docs/eula/)
## Características y capacidades clave
### Compatibilidad con formatos universales
Reproduzca más de 100 formatos de video y audio, incluidos MP4, AVI, MPEG, MPEG-TS, MKV, WebM, AAC, MP3, OGG, FLAC y muchos más sin instalaciones de códecs adicionales.
### Transmisión en red
Compatible con HTTP, HTTPS, FTP, RTSP, RTP, UDP y otros protocolos de red. Transmite contenido en vivo o reproduce archivos multimedia remotos sin problemas.
### Múltiples API de programación
Soporte nativo para C++, C#, VB.NET y Delphi con aplicaciones de muestra completas y documentación para cada plataforma.
### Rendimiento alto
Compatibilidad multihilo optimizada con aceleración por hardware. Disponible en arquitecturas x86 y x64.
### Decodificación de GPU acelerada por hardware
El VLC Source DirectShow Filter admite múltiples tecnologías de aceleración de hardware para un rendimiento de decodificación de video óptimo utilizando tecnologías DirectX Video Acceleration (DXVA2), NVIDIA NVDEC, Intel Quick Sync Video y AMD VCE.
#### Tecnologías de aceleración de GPU compatibles
- **Aceleración de vídeo DirectX (DXVA2)**Aceleración de hardware nativa de Windows
- **NVIDIA NVDEC**:Descodificación de hardware basada en CUDA para GPU NVIDIA
- **Vídeo de sincronización rápida de Intel**: Aceleración de gráficos integrados de Intel
- **Motor de codificación de vídeo AMD (VCE)**Aceleración de hardware de GPU AMD
- **Vídeo de Vulkan**:Compatibilidad moderna con aceleración de GPU entre proveedores
#### Beneficios de rendimiento
- **Reducción del uso de la CPU**:70-90% Reducción del uso de la CPU con aceleración de hardware
- **Eficiencia energética**:Consumo de energía significativamente menor durante la reproducción de vídeo
- **Gestión térmica**:Reducción de la generación de calor de la CPU
- **Transmisiones simultáneas**:Compatibilidad con múltiples transmisiones simultáneas decodificadas por hardware
- **Resoluciones más altas**: Reproducción eficiente de videos 4K/8K con un impacto mínimo en la CPU
### Controles avanzados
Control de reproducción completo con búsqueda, selección de pistas de audio, gestión de subtítulos y compatibilidad con cadena de filtros VLC.
## Formatos de medios compatibles
### Contenedores de vídeo
- MP4
- MOV
- AVI
- MPEG, MPEG-TS, M2TS, VOB
- MKV
- WebM
- FLV
- OGG
- ASF, WMV
### Códecs de vídeo
- **H.264/AVC**:Compatibilidad total con decodificación de hardware en todas las plataformas
- **H.265/HEVC**: Descodificación de hardware en GPU compatibles (GTX 950+, Intel Gen9+, AMD GCN4+)
- **VP8, VP9**: Descodificación de hardware en GPU más nuevas (GTX 1060+, Intel Gen11+, AMD Navi+)
- **AV1**: Descodificación de hardware en las últimas GPU (RTX 30xx+, Intel Arc+, AMD RDNA2+)
- **MPEG-1, MPEG-2**:Aceleración de hardware heredada en la mayoría de las GPU
- **MPEG-4**:Soporte de decodificación de software y hardware
- **DivX, Xvid**: Soporte de decodificación de software
- **Teora**: Soporte de decodificación de software
- **Vídeo de Windows Media**: Soporte de decodificación de software
### Formatos de audio
- CAA
- MP3, MP2
- FLAC
- Vorbis
- AC3, DTS
- PCM, WAV
- Speex
- Opus
- AMM
### Protocolos de transmisión
- **HTTP/HTTPS**:Soporte completo para descarga progresiva y streaming
- **RTSP/RTP**:Protocolo de transmisión en tiempo real con autenticación
- **UDP**: Compatibilidad con multidifusión y unidifusión
- **MMS**Protocolo de Microsoft Media Server
- **RTMP**Protocolo de mensajería en tiempo real para transmisión en vivo
- **HLS**Transmisión en vivo HTTP (transmisión adaptable de Apple)
- **ESTRELLARSE**Transmisión dinámica adaptativa a través de HTTP
- **SRT**Protocolo de transporte seguro y confiable
## Guía de inicio rápido
### Pasos de integración
1. **Instalar el SDK**: Registre el filtro VLC Source DirectShow en su sistema
2. **Agregar referencias**:Incluya los encabezados/bibliotecas DirectShow y VLC necesarios
3. **Crear gráfico de filtros**: Inicializar los componentes del gráfico del filtro DirectShow
4. **Agregar fuente VLC**:Crear una instancia y configurar el filtro de origen de VLC
5. **Conectar renderizadores**: Vincular componentes de renderizado de vídeo y audio
6. **Control de reproducción**: Utilice la interfaz MediaControl para las operaciones de reproducción
## Referencia de API y definiciones de interfaz
### Interfaz IVlcSrc
Interfaz principal para controlar el filtro de fuente VLC
**GUID**: `{77493EB7-6D00-41C5-9535-7C593824E892}`
#### Métodos
- `SetFile` - Cargar un archivo multimedia o una URL de red
- `Obtener recuento de pistas de audio` - Obtener el número de pistas de audio disponibles
- `Obtener información de la pista de audio` - Obtener información de la pista de audio
- `Obtener pista de audio` - Obtener la pista de audio seleccionada actualmente
- `Establecer pista de audio` - Seleccionar pista de audio por ID
- `Obtener recuento de subtítulos` - Obtener el número de pistas de subtítulos disponibles
- `Obtener información de subtítulos` - Obtener información de la pista de subtítulos
- `Obtener subtítulo` - Obtener la pista de subtítulos seleccionada actualmente
- `Subtítulo establecido` - Seleccionar pista de subtítulos por ID (-1 para deshabilitar)
### Interfaz IVlcSrc2
Interfaz extendida con opciones de personalización de VLC adicionales
**GUID**: `{CCE122C0-172C-4626-B4B6-42B039E541CB}`
#### Métodos
Hereda todos los métodos de IVlcSrc más:
- `Establecer línea de comandos personalizada` - Establecer parámetros de línea de comandos VLC personalizados
### Interfaz IVlcSrc3
Interfaz más reciente con control de velocidad de cuadros
**GUID**: `{3DFBED0C-E4A8-401C-93EF-CBBFB65223DD}`
#### Métodos
Hereda todos los métodos de IVlcSrc2 más:
- `Establecer velocidad de cuadros predeterminada` - Establecer la velocidad de cuadros predeterminada para el contenido sin información de velocidad de cuadros
### Definiciones de interfaz de C++
Para el desarrollo en C++, las definiciones de interfaz completas están disponibles en el repositorio oficial de GitHub:
**Archivo de encabezado:** [ivlcsrc.h](https://github.com/visioforge/directshow-samples/blob/main/Interfaces/cpp/VLC%20Source/ivlcsrc.h)
Uso de la interfaz:
El archivo de encabezado contiene las definiciones completas para:
- `Fuente IVlc` - Interfaz principal para el control de audio/subtítulos
- `IVlcSrc2` - Interfaz extendida con parámetros de línea de comandos personalizados
- `IVlcSrc3` - Última interfaz con control de velocidad de cuadros
- Todos los GUID y firmas de métodos asociados
### Definiciones de interfaz C#/VB.NET
Para el desarrollo .NET, las definiciones de interfaz están disponibles a través del paquete NuGet de la API DirectShow de VisioForge:
**Paquete NuGet:** [`VisioForge.DirectShowAPI`](https://www.nuget.org/packages/VisioForge.DirectShowAPI)
Uso de la interfaz en C#:
## Ejemplos de código completos
### Implementación de C++
### Implementación de C#
### Implementación de VB.NET
## Uso de funciones avanzadas
### Ejemplo de selección de pista de audio (C++)
## Herramientas de desarrollo de gráficos DirectShow
### Uso del filtro de origen de VLC con GraphEdit
**GraphEdit** Es la herramienta de visualización y depuración de gráficos DirectShow de Microsoft, que ofrece funciones de edición de gráficos DirectShow. El VLC Source DirectShow Filter se integra a la perfección con GraphEdit para la creación rápida de prototipos y pruebas.
#### Configuración de la fuente VLC en GraphEdit
1. **Gráfico de lanzamientoEditar**: Inicie GraphEdit con privilegios de administrador para obtener acceso completo al registro de filtros
2. **Insertar filtro de fuente VLC**:
- Haga clic derecho en el área del gráfico
- Seleccione "Insertar filtros..."
- Vaya a la categoría "Filtros DirectShow".
- Localizar el filtro "Fuente VLC"
- Haga clic en "Insertar filtro"
3. **Configurar fuente de medios**:
- Haga clic derecho en el filtro Fuente VLC
- Seleccione "Propiedades"
- En el cuadro de diálogo de archivo, especifique la ruta del archivo multimedia o la URL de red
- El filtro acepta archivos locales (C:\media\video.mp4) y transmisiones de red (http://example.com/stream.m3u8)
4. **Agregar renderizadores**:
- Para video: Inserte "Enhanced Video Renderer (EVR)" o "Video Mixing Renderer 9 (VMR-9)".
- Para audio: Inserte "Dispositivo DirectSound predeterminado" o "Renderizador de audio (WaveOut)"
5. **Conectar pines**:
- Arrastre desde el pin de salida de video de origen VLC al pin de entrada del renderizador de video
- Arrastre desde el pin de salida de audio de la fuente VLC al pin de entrada del renderizador de audio
- GraphEdit negociará automáticamente los tipos de medios
### Uso del filtro de origen de VLC con GraphStudio
**Estudio gráfico** Proporciona un entorno de edición de gráficos DirectShow alternativo con funciones de depuración avanzadas y herramientas integrales de análisis de filtros.
#### Pasos de integración de GraphStudio
1. **Verificación del registro del filtro**:
- Open GraphStudio
- Vaya a la pestaña "Ver" → "Filtros".
- Verifique que "VLC Source" aparezca en la lista de filtros registrados
- Tenga en cuenta el CLSID del filtro: `{77493EB7-6D00-41C5-9535-7C593824E892}`
2. **Creación de un gráfico de filtros**:
- Utilice el botón "Insertar filtro" o arrastre desde el panel de filtros
- Localice VLC Source en la categoría de filtros DirectShow
- Arrastre VLC Source al espacio de trabajo del gráfico
3. **Configuración de medios**:
- Haga clic derecho en VLC Source → "Cargar archivo..."
- Busque el archivo multimedia o ingrese la URL de la red
- GraphStudio muestra el estado de la conexión en tiempo real
4. **Construcción automática de gráficos**:
- Utilice la función "Renderizar" de GraphStudio
- Haga clic derecho en los pines de salida de origen de VLC → "Pin de renderizado"
- GraphStudio inserta automáticamente decodificadores y renderizadores apropiados

## Requisitos del sistema
### Sistemas operativos
- Windows 10, 11 (todas las ediciones)
- Windows 8/8.1
- Windows 7 (SP1 o posterior)
- Windows Server 2016 y versiones posteriores
### Apoyo al desarrollo
- Visual Studio 2010-2022
- C++ Builder XE2 y posteriores
- Delphi XE2 y posteriores
- .NET Framework 4.0+
- .NET 5 y posteriores
### Soporte de arquitectura
- x86 (32 bits)
- x64 (64 bits)
- Aplicaciones de modo mixto
- Entornos compatibles con COM
## Derechos de licencia y distribución
### Beneficios de la licencia comercial
- **Distribución libre de regalías**:Implemente sus aplicaciones sin costos por unidad
- **Sin marcas de agua**:Resultados limpios y profesionales sin limitaciones de prueba
- **Soporte prioritario**:Acceso directo a nuestro equipo de soporte técnico
- **Actualizaciones gratuitas**:Reciba actualizaciones menores y mayores durante un año (ilimitadas durante la licencia de por vida)
- **Proyectos múltiples**:Utilícelo en proyectos comerciales y personales ilimitados.
- **Acceso al código fuente**:Licencia de código fuente opcional disponible
### Limitaciones de la versión de prueba
- La salida de video muestra una superposición de marca de agua
- Sin restricciones técnicas en la funcionalidad
- Acceso completo a la API para fines de evaluación
- período de evaluación de 30 días
### Cumplimiento de libVLC
Este SDK incorpora la biblioteca libVLC con licencia LGPL v2.1. Sus aplicaciones que utilizan nuestro SDK no se verán afectadas por esta licencia, ya que nuestro filtro DirectShow funciona como un componente independiente. No hay requisitos de divulgación del código fuente para su aplicación.
## Descargar y comprar
### Versión de prueba
**Funcionalidad completa con marca de agua**
- Paquete SDK completo
- Todas las aplicaciones de muestra
- Documentación
- evaluación de 30 días
[Descargar versión de prueba](https://s3.us-west-2.amazonaws.com/files.visioforge.com/trials/visioforge_vlc_source_setup.zip)
### Licencia comercial
**Listo para producción con todos los derechos**
- Distribución libre de regalías
- Soporte prioritario
- Sin marcas de agua
- Actualizaciones gratuitas (1 año)
[Ver precios](https://www.visioforge.com/es/buy)
### Licencia del código fuente
**Código fuente del filtro completo**
- Código fuente completo de C++
- Scripts de compilación incluidos
- Derechos de personalización
- Consulta técnica
## Especificaciones técnicas
### Características de rendimiento
- **Tiempo de inicio**: < 500 ms para la inicialización del filtro
- **Uso de la memoria**: línea base de ~50 MB, escalable con resolución de video
- **Uso de CPU**:Descodificación acelerada por hardware cuando esté disponible
- **Enhebrado**: Arquitectura completamente multiproceso
- **Estado latente**: < 100 ms para archivos locales, varía para transmisiones de red

---END OF PAGE---
# Page: https://www.visioforge.com/it/vlc-source-directshow-filter
# VLC Source DirectShow Filter
versione 15.0
VLC Source DirectShow Filter è un componente di livello professionale che porta le potenti funzionalità multimediali di VLC Media Player direttamente nelle applicazioni Windows. Questo SDK offre una perfetta integrazione con le applicazioni DirectShow, mantenendo l'ampio supporto di formati e le funzionalità di streaming per cui VLC è rinomato.
Che tu stia sviluppando lettori multimediali, applicazioni di streaming, strumenti di elaborazione video o sistemi di gestione di contenuti multimediali, il nostro filtro sorgente VLC offre l'affidabilità e la versatilità necessarie per gestire praticamente qualsiasi formato multimediale che i tuoi utenti potrebbero incontrare.
## Vantaggi principali
- **Supporto del formato universale**: Riproduci oltre 100 formati video e audio senza installazioni di codec aggiuntivi
- **Streaming di rete**: Supporto per HTTP, HTTPS, RTSP, RTP, UDP e altri protocolli
- **API multilingua**: Supporto nativo per C++, C#, VB.NET e Delphi
- **Alte prestazioni**: Multithreading ottimizzato con accelerazione hardware
- **Pronto per la commercializzazione**: Distribuzione royalty-free con supporto professionale

#### DOWNLOADS
[Versione di prova](https://s3.us-west-2.amazonaws.com/files.visioforge.com/trials/visioforge_vlc_source_setup.zip)[Samples su GitHub](https://github.com/visioforge/directshow-samples)

#### ACQUISTO
[Controllare i prezzi o ordinare](https://www.visioforge.com/it/buy)

#### AIUTO
[Guida in linea](/help/)[Contratto di licenza](/help/docs/eula/)
## Caratteristiche e capacità principali
### Supporto del formato universale
Riproduci oltre 100 formati video e audio, tra cui MP4, AVI, MPEG, MPEG-TS, MKV, WebM, AAC, MP3, OGG, FLAC e molti altri, senza dover installare codec aggiuntivi.
### Streaming di rete
Supporto per HTTP, HTTPS, FTP, RTSP, RTP, UDP e altri protocolli di rete. Trasmetti contenuti in streaming live o riproduci file multimediali remoti senza problemi.
### API di programmazione multiple
Supporto nativo per C++, C#, VB.NET e Delphi con applicazioni di esempio complete e documentazione per ciascuna piattaforma.
### Alte prestazioni
Supporto multithreading ottimizzato con funzionalità di accelerazione hardware. Disponibile sia per architetture x86 che x64.
### Decodifica GPU accelerata tramite hardware
VLC Source DirectShow Filter supporta molteplici tecnologie di accelerazione hardware per prestazioni di decodifica video ottimali utilizzando le tecnologie DirectX Video Acceleration (DXVA2), NVIDIA NVDEC, Intel Quick Sync Video e AMD VCE.
#### Tecnologie di accelerazione GPU supportate
- **Accelerazione video DirectX (DXVA2)**: Accelerazione hardware nativa di Windows
- **NVIDIA NVDEC**: Decodifica hardware basata su CUDA per GPU NVIDIA
- **Video di sincronizzazione rapida Intel**: Accelerazione grafica integrata Intel
- **Motore di codifica video AMD (VCE)**: Accelerazione hardware GPU AMD
- **Video Vulkan**: Supporto moderno per l'accelerazione GPU multi-vendor
#### Vantaggi delle prestazioni
- **Riduzione dell'utilizzo della CPU**: 70-90% Riduzione dell'utilizzo della CPU con accelerazione hardware
- **Efficienza energetica**: Consumo energetico significativamente inferiore durante la riproduzione video
- **Gestione termica**: Riduzione della generazione di calore della CPU
- **Flussi simultanei**: Supporto per più flussi decodificati hardware simultanei
- **Risoluzioni più elevate**: Riproduzione efficiente di video 4K/8K con impatto minimo sulla CPU
### Controlli avanzati
Controllo completo della riproduzione con ricerca, selezione delle tracce audio, gestione dei sottotitoli e supporto della catena di filtri VLC.
## Formati multimediali supportati
### Contenitori video
- MP4
- MOVIMENTO
- AVI
- MPEG, MPEG-TS, M2TS, VOB
- MKV
- WebM
- FLV
- OGG
- ASF, WMV
### Codec video
- **H.264/AVC**: Supporto completo per la decodifica hardware su tutte le piattaforme
- **H.265/HEVC**: Decodifica hardware su GPU compatibili (GTX 950+, Intel Gen9+, AMD GCN4+)
- **VP8, VP9**: Decodifica hardware su GPU più recenti (GTX 1060+, Intel Gen11+, AMD Navi+)
- **AV1**: Decodifica hardware sulle GPU più recenti (RTX 30xx+, Intel Arc+, AMD RDNA2+)
- **MPEG-1, MPEG-2**: Accelerazione hardware legacy sulla maggior parte delle GPU
- **MPEG-4**: Supporto per la decodifica software e hardware
- **DivX, Xvid**: Supporto per la decodifica software
- **Theora**: Supporto per la decodifica software
- **Windows Media Video**: Supporto per la decodifica software
### Formati audio
- CAA
- MP3, MP2
- Formato FLAC
- Vorbis
- AC3, DTS
- PCM, WAV
- Speex
- Opus
- WMA
### Protocolli di streaming
- **HTTP/HTTPS**: Supporto completo per download e streaming progressivi
- **RTSP/RTP**: Protocollo di streaming in tempo reale con autenticazione
- **UDP**: Supporto multicast e unicast
- **MMS**: Protocollo Microsoft Media Server
- **RTMP**: Protocollo di messaggistica in tempo reale per lo streaming live
- **HLS**: HTTP Live Streaming (streaming adattivo di Apple)
- **TRATTINO**: Streaming dinamico adattivo su HTTP
- **SRT**: Protocollo di trasporto sicuro e affidabile
## Guida rapida
### Fasi di integrazione
1. **Installa l'SDK**: Registra il filtro VLC Source DirectShow sul tuo sistema
2. **Aggiungi riferimenti**: Include le intestazioni/librerie DirectShow e VLC necessarie
3. **Crea grafico filtro**: Inizializza i componenti del grafico del filtro DirectShow
4. **Aggiungi sorgente VLC**: Crea e configura il filtro sorgente VLC
5. **Connetti i rendering**: Collega i componenti di rendering video e audio
6. **Controllo della riproduzione**: Utilizza l'interfaccia MediaControl per le operazioni di riproduzione
## Riferimento API e definizioni dell'interfaccia
### Interfaccia IVlcSrc
Interfaccia primaria per il controllo del filtro sorgente VLC
**GUID**: `{77493EB7-6D00-41C5-9535-7C593824E892}`
#### Metodi
- `ImpostaFile` - Carica un file multimediale o un URL di rete
- `Ottieni conteggio tracce audio` - Ottieni il numero di tracce audio disponibili
- `Ottieni informazioni sulla traccia audio` - Ottieni informazioni sulla traccia audio
- `Ottieni traccia audio` - Ottieni la traccia audio attualmente selezionata
- `Imposta traccia audio` - Seleziona la traccia audio tramite ID
- `Ottieni conteggio sottotitoli` - Ottieni il numero di tracce di sottotitoli disponibili
- `Ottieni informazioni sui sottotitoli` - Ottieni informazioni sulla traccia dei sottotitoli
- `Ottieni sottotitoli` - Ottieni la traccia dei sottotitoli attualmente selezionata
- `Imposta sottotitolo` - Seleziona la traccia dei sottotitoli tramite ID (-1 per disabilitare)
### Interfaccia IVlcSrc2
Interfaccia estesa con opzioni di personalizzazione VLC aggiuntive
**GUID**: `{CCE122C0-172C-4626-B4B6-42B039E541CB}`
#### Metodi
Eredita tutti i metodi da IVlcSrc più:
- `ImpostaRigaComandoPersonalizzata` - Imposta parametri personalizzati della riga di comando VLC
### Interfaccia IVlcSrc3
Interfaccia più recente con controllo del frame rate
**GUID**: `{3DFBED0C-E4A8-401C-93EF-CBBFB65223DD}`
#### Metodi
Eredita tutti i metodi da IVlcSrc2 più:
- `Imposta frequenza fotogrammi predefinita` - Imposta la frequenza dei fotogrammi predefinita per i contenuti senza informazioni sulla frequenza dei fotogrammi
### Definizioni dell'interfaccia C++
Per lo sviluppo in C++, le definizioni complete dell'interfaccia sono disponibili nel repository ufficiale GitHub:
**File di intestazione:** [ivlcsrc.h](https://github.com/visioforge/directshow-samples/blob/main/Interfaces/cpp/VLC%20Source/ivlcsrc.h)
Utilizzo dell'interfaccia:
Il file di intestazione contiene le definizioni complete per:
- `IVlcSrc` - Interfaccia primaria per il controllo audio/sottotitoli
- `IVlcSrc2` - Interfaccia estesa con parametri della riga di comando personalizzati
- `IVlcSrc3` - Interfaccia più recente con controllo del frame rate
- Tutti i GUID associati e le firme dei metodi
### Definizioni dell'interfaccia C#/VB.NET
Per lo sviluppo .NET, le definizioni dell'interfaccia sono disponibili tramite il pacchetto NuGet VisioForge DirectShow API:
**Pacchetto NuGet:** [`VisioForge.DirectShowAPI`](https://www.nuget.org/packages/VisioForge.DirectShowAPI)
Utilizzo dell'interfaccia in C#:
## Esempi di codice completi
### Implementazione C++
### Implementazione C#
### Implementazione VB.NET
## Utilizzo delle funzionalità avanzate
### Esempio di selezione della traccia audio (C++)
## Strumenti di sviluppo grafici DirectShow
### Utilizzo del filtro sorgente VLC con GraphEdit
**Modifica grafico** è lo strumento di visualizzazione e debug di grafici DirectShow di Microsoft che offre funzionalità di modifica dei grafici DirectShow. VLC Source DirectShow Filter si integra perfettamente con GraphEdit per una rapida prototipazione e test.
#### Impostazione della sorgente VLC in GraphEdit
1. **Avvia GraphEdit**: Avvia GraphEdit con privilegi di amministratore per l'accesso completo alla registrazione del filtro
2. **Inserisci filtro sorgente VLC**:
- Fare clic con il tasto destro del mouse nell'area del grafico
- Seleziona "Inserisci filtri..."
- Vai alla categoria "Filtri DirectShow"
- Individua il filtro "Sorgente VLC"
- Fare clic su "Inserisci filtro"
3. **Configura sorgente multimediale**:
- Fare clic con il pulsante destro del mouse sul filtro Sorgente VLC
- Seleziona "Proprietà"
- Nella finestra di dialogo del file, specifica il percorso del file multimediale o l'URL di rete
- Il filtro accetta file locali (C:\media\video.mp4) e flussi di rete (http://example.com/stream.m3u8)
4. **Aggiungi Renderer**:
- Per i video: inserire "Enhanced Video Renderer (EVR)" o "Video Mixing Renderer 9 (VMR-9)"
- Per l'audio: inserisci "Dispositivo DirectSound predefinito" o "Renderer audio (WaveOut)"
5. **Connetti i pin**:
- Trascina dal pin di uscita video della sorgente VLC al pin di ingresso del rendering video
- Trascina dal pin di uscita audio della sorgente VLC al pin di ingresso del rendering audio
- GraphEdit negozierà automaticamente i tipi di media
### Utilizzo del filtro sorgente VLC con GraphStudio
**GraphStudio** fornisce un ambiente di modifica dei grafici DirectShow alternativo con funzionalità di debug avanzate e strumenti completi di analisi dei filtri.
#### Passaggi di integrazione di GraphStudio
1. **Verifica della registrazione del filtro**:
- Apri GraphStudio
- Vai alla scheda "Visualizza" → "Filtri"
- Verifica che "VLC Source" appaia nell'elenco dei filtri registrati
- Nota il CLSID del filtro: `{77493EB7-6D00-41C5-9535-7C593824E892}`
2. **Creazione di un grafico di filtro**:
- Utilizza il pulsante "Inserisci filtro" o trascina dal pannello dei filtri
- Individua la sorgente VLC nella categoria Filtri DirectShow
- Trascina la sorgente VLC nell'area di lavoro del grafico
3. **Configurazione multimediale**:
- Fai clic con il tasto destro del mouse su VLC Source → "Carica file..."
- Sfoglia il file multimediale o inserisci l'URL di rete
- GraphStudio visualizza lo stato della connessione in tempo reale
4. **Creazione automatica di grafici**:
- Utilizzare la funzione "Render" di GraphStudio
- Fare clic con il pulsante destro del mouse sui pin di output della sorgente VLC → "Pin di rendering"
- GraphStudio inserisce automaticamente i decoder e i renderer appropriati

## Requisiti di sistema
### Sistemi operativi
- Windows 10, 11 (tutte le edizioni)
- Windows 8/8.1
- Windows 7 (SP1 o successivo)
- Windows Server 2016 e successivi
### Supporto allo sviluppo
- Visual Studio 2010-2022
- C++ Builder XE2 e versioni successive
- Delphi XE2 e versioni successive
- .NET Framework 4.0+
- .NET 5 e versioni successive
### Supporto all'architettura
- x86 (32 bit)
- x64 (64 bit)
- Applicazioni in modalità mista
- Ambienti compatibili con COM
## Diritti di licenza e distribuzione
### Vantaggi della licenza commerciale
- **Distribuzione royalty-free**: Distribuisci le tue applicazioni senza costi unitari
- **Nessuna filigrana**: Output pulito e professionale senza limiti di prova
- **Supporto prioritario**: Accesso diretto al nostro team di supporto tecnico
- **Aggiornamenti gratuiti**: Ricevi aggiornamenti minori e importanti per un anno (illimitati per la licenza a vita)
- **Progetti multipli**: Utilizzo illimitato in progetti commerciali e personali
- **Accesso al codice sorgente**: Disponibile licenza facoltativa del codice sorgente
### Limitazioni della versione di prova
- L'uscita video visualizza una sovrapposizione di filigrana
- Nessuna restrizione tecnica sulla funzionalità
- Accesso API completo a scopo di valutazione
- Periodo di valutazione di 30 giorni
### Conformità libVLC
Questo SDK incorpora la libreria libVLC con licenza LGPL v2.1. Le applicazioni che utilizzano il nostro SDK non sono soggette a questa licenza, poiché il filtro DirectShow agisce come componente separato. Non è richiesto alcun obbligo di divulgazione del codice sorgente per l'applicazione.
## Scarica e acquista
### Versione di prova
**Funzionalità completa con filigrana**
- Pacchetto SDK completo
- Tutte le applicazioni di esempio
- Documentazione
- Valutazione di 30 giorni
[Scarica la versione di prova](https://s3.us-west-2.amazonaws.com/files.visioforge.com/trials/visioforge_vlc_source_setup.zip)
### Licenza commerciale
**Pronto per la produzione con tutti i diritti**
- Distribuzione royalty-free
- Supporto prioritario
- Nessuna filigrana
- Aggiornamenti gratuiti (1 anno)
[Visualizza i prezzi](https://www.visioforge.com/it/buy)
### Licenza del codice sorgente
**Codice sorgente completo del filtro**
- Codice sorgente C++ completo
- Script di compilazione inclusi
- Diritti di personalizzazione
- Consulenza tecnica
## Specifiche tecniche
### Caratteristiche delle prestazioni
- **Tempo di avvio**: < 500 ms per l'inizializzazione del filtro
- **Utilizzo della memoria**: ~50 MB di base, scalabile con la risoluzione video
- **Utilizzo della CPU**: Decodifica accelerata tramite hardware quando disponibile
- **Infilatura**: Architettura completamente multithread
- **Latenza**: < 100 ms per i file locali, varia per i flussi di rete

---END OF PAGE---
# Page: https://www.visioforge.com/de/ffmpeg-source-directshow-filter
# FFMPEG Source DirectShow Filter
Version 15.0
## Professioneller DirectShow-Filter für Video- und Audioquellen
Der FFMPEG Source DirectShow Filter lässt sich nahtlos in jede DirectShow-Anwendung integrieren und dekodiert und gibt Video-, Audio- und Netzwerk-Streams wieder. Dieses leistungsstarke SDK enthält FFMPEG-DLLs und einen DirectShow-Filter mit standardmäßigen Dateiauswahlfunktionen und benutzerdefinierten Schnittstellen für eine effiziente und flexible Multimedia-Verarbeitung in Ihren Anwendungen.

#### DOWNLOADS
[Installateur](https://s3.us-west-2.amazonaws.com/files.visioforge.com/trials/visioforge_ffmpeg_source_filter_setup.exe)[Samples auf GitHub](https://github.com/visioforge/directshow-samples)

#### KAUFEN
[Preise prüfen oder bestellen](https://www.visioforge.com/de/buy)

#### HILFE
[Online-Hilfe](/help/docs/directshow/ffmpeg-source-filters/)[Lizenzvereinbarung](/help/docs/eula/)
## Hauptfunktionen des VisioForge FFMPEG-Quellfilters
### Umfassende Formatunterstützung
- **Videoformate**: MP4, AVI, MPEG, MPEG-TS, AV1, MKV, WebM und viele andere Formate
- **Audioformate**: AAC/M4A, MP3, OGG, Speex, FLAC und mehr
- **Codec-Unterstützung**: Interne Video- und Audio-Decoder von FFMPEG
- **Kundenspezifische Verarbeitung**: Unterstützung für Video-/Audio-FFMPEG-Filter mit erweiterter Konfiguration
### Fortschrittliche Architektur und Leistung
- **GPU-Beschleunigung**: GPU-beschleunigte Videodekodierung für optimale Leistung
- **Multithreading**: Effiziente Multithread-Verarbeitung für reibungslose Wiedergabe
- **Plattformunterstützung**: Sowohl x86- als auch x64-Versionen verfügbar
- **DirectShow-Integration**: Nahtlose Integration mit der DirectShow-Architektur
### Entwicklerfreundliches SDK
- **.NET-API**: Vollständige C#- und VB.NET-Unterstützung mit NuGet-Paketverteilung
- **C++-API**: Native C++-Schnittstelle für Hochleistungsanwendungen
- **Delphi-API**: Vollständige Delphi/Pascal-Unterstützung für die RAD-Entwicklung
- **NuGet-Integration**: VisioForge.DirectShowAPI-Paket für nahtlose .NET-Entwicklung
- **Beispielcode**: Demoanwendungen für C#, VB.NET, C++ und Delphi
- **Dokumentation**: Umfassende API-Referenz und Anwendungsbeispiele
## Installation und Konfiguration
### Systemanforderungen
- **Windows**: Windows 11, Windows 10, Windows 8/8.1, Windows 7
- **Windows** **Server**: Windows Server 2016 und spätere Versionen
- **Architektur**: x86- und x64-Unterstützung
### So installieren Sie
1. Laden Sie das Installationsprogramm aus dem Downloadbereich herunter
2. Für eine ordnungsgemäße Registrierung mit Administratorrechten ausführen
3. Der Filter wird automatisch bei Windows registriert
4. Fügen Sie Ihrem Projekt Referenzen hinzu und beginnen Sie mit der Codierung
### .NET-Entwicklungs-Setup
Installieren Sie für .NET-Anwendungen das NuGet-Paket VisioForge.DirectShowAPI:
Das NuGet-Paket bietet:
- Komplette DirectShow-API-Wrapper für .NET
- Stark typisierte Schnittstellen und Aufzählungen
- Richtige COM-Interoperabilität und Speicherverwaltung
- Unterstützung für C#, VB.NET und andere .NET-Sprachen
## Codebeispiele und Beispielimplementierung
### Filterverwendung in einem DirectShow-Graph
Der FFMPEG-Quellfilter fungiert als Quellfilter in Ihrem DirectShow-Diagramm und bietet:
- **Dateiquelle**: Lokale Dateiwiedergabe mit automatischer Formaterkennung
- **Netzwerk-Streaming**: Unterstützung für Netzwerk-Streams und -Protokolle
- **Benutzerdefinierte Konfiguration**: Erweiterte Einstellungen für Pufferung, Hardwarebeschleunigung
- **Stream-Auswahl**: Auswahl und Verwaltung mehrerer Audio-/Video-Streams

### C#-Implementierung mit erweiterten Funktionen
### Erweiterte VB.NET-Implementierung mit vollständiger Schnittstellenunterstützung
#### Registrierung für lizenzierte Benutzer
C#-Registrierung
VB.Net-Registrierung
C++-Registrierung
### C++-Implementierung mit vollständiger Schnittstellenunterstützung
## Erweiterte Konfigurationsoptionen
### Einrichten der Hardwarebeschleunigung
Aktivieren Sie die GPU-beschleunigte Videodekodierung für optimale Leistung (standardmäßig aktiviert):
- **NVIDIA NVDEC**: Automatische Erkennung und Verwendung für H.264/H.265/AV1-Dekodierung
- **Intel Quick Sync Video**: Integrierte GPU-Beschleunigungsunterstützung von Intel
- **AMD VCE**: AMD-Hardware-Videodekodierungsbeschleunigung
- **Software-Fallback**: Automatischer Fallback auf CPU-Dekodierung bei Bedarf
### Netzwerk-Streaming-Konfiguration
Professionelle Streaming-Unterstützung mit umfassenden Protokolloptionen:
- **Verbindungstimeout**: Konfigurierbares Timeout (Standard: 15000 ms)
- **Pufferstrategie**: AUTO/ON/OFF-Modi für Live-Quellen
- **RTSP-Optionen**: TCP/UDP-Transportauswahl
- **Benutzerdefinierte Protokolle**: Vollständige Unterstützung der FFMPEG-Protokolloption
### Erweiterte Stream-Verarbeitung
- **Datenrückrufe**: Zugriff auf den Rohdatenstrom für benutzerdefinierte Verarbeitung
- **Zeitstempel-Rückrufe**: Präzise Zeitinformationen für das Debuggen der A/V-Synchronisierung
- **Stream-Auswahl**: Dynamisches Umschalten des Audio-/Video-Streams über IAMStreamSelect
- **Audiosteuerung**: Audioverarbeitung unabhängig aktivieren/deaktivieren
### Multi-Stream- und Programmunterstützung
- **Stream-Auswahl**: Unterstützung für mehrere Video-/Audio-Streams
- **Programmumschaltung**: Handhabung von Multiprogramm-Transportströmen
- **Sprachauswahl**: Audiotitelauswahl nach Sprache
- **Untertitelunterstützung**: Extraktion und Wiedergabe von Untertitel-Streams
### Handhabung von Live-Quellen
- **Echtzeiterkennung**: Automatische Live-Quellenidentifizierung
- **Pufferverwaltung**: Intelligente Pufferung für reibungslose Wiedergabe
- **Taktsynchronisation**: Referenzuhrverwaltung für Live-Streams
- **Qualitätskontrolle**: Adaptive Qualität für Netzwerk-Streams
### Such- und Wiedergabesteuerung
- **Mediensuche**: Vollständige IMediaSeeking-Schnittstellenunterstützung für nicht-Live-Quellen
- **Ratenkontrolle**: Variable Wiedergabegeschwindigkeit (nicht verfügbar für Live-Quellen)
- **Positionsregelung**: Absolute, relative und inkrementelle Positionierung
- **Keyframe-Suche**: Suchen Sie zum nächsten Keyframe für eine reibungslose Wiedergabe
## Funktionen der Testversion
Erleben Sie die gesamte Leistung unseres DirectShow-Filters mit nur einer diskreten Auswertungsüberlagerung während der Videowiedergabe:
- **Voll funktionsfähige Testumgebung**: Zugriff auf alle Codecs, Filter und Verarbeitungsfunktionen für eine umfassende Auswertung
- **Universelle Formatkompatibilität**: Testen Sie mit Ihrer gesamten Medienbibliothek, einschließlich MP4, AVI, MPEG, MKV und Streaming-Protokollen
- **Umfassende Entwicklungsressourcen**: Vollständige API-Dokumentation, Schnittstellendefinitionen und umfassende Codebeispiele
- **Produktionsreife Beispiele**: Funktionierende C#-, C++- und Delphi-Anwendungen mit vollständigem Quellcode zur sofortigen Integration
## Kaufvorteile
### Lizenzierungsoptionen
- **Reguläre Lizenz**: Jahresabonnement mit automatischer Verlängerung (jederzeit kündbar)
- **Lebenslange Lizenz**: Einmaliger Kauf mit unbegrenzten Updates
### Funktionen der regulären Lizenz
- **Kommerzielle Einsatzfreiheit**: Bereitstellung für eine unbegrenzte Anzahl von Anwendungen und Installationen ohne Nutzungsbeschränkungen oder Laufzeitgebühren
- **Professionelle Ausgabequalität**: Kristallklare Videowiedergabe ohne Wasserzeichen oder Test-Overlays für produktionsreife Anwendungen
- **Kontinuierlicher Zugang zu Innovationen**: Erhalten Sie 12 Monate lang alle Funktionserweiterungen, Codec-Updates und Leistungsverbesserungen
- **Kompetente Unterstützung für Entwickler**: Direkter Zugang zu VisioForge-Technikern für technische Beratung und schnelle Problemlösung
- **Vollständige Vertriebsbehörde**: Volle Rechte zur Weiterverteilung des Filters mit Ihren Anwendungen ohne zusätzliche Lizenzkosten
### Vorteile einer lebenslangen Lizenz
- **Unbegrenzte Updates**: Updates für unbegrenzte Zeit
- **Einmalzahlung**: Keine wiederkehrenden Abonnementgebühren
- **Langfristige Unterstützung**: Erweiterter Supportumfang

---END OF PAGE---
# Page: https://www.visioforge.com/es/ffmpeg-source-directshow-filter
# FFMPEG Source DirectShow Filter
versión 15.0
## Filtro DirectShow profesional para fuentes de vídeo y audio
El filtro DirectShow de origen FFMPEG se integra a la perfección con cualquier aplicación DirectShow para decodificar y reproducir archivos de vídeo o audio, así como transmisiones de red. Este potente SDK incluye archivos DLL FFMPEG y un filtro DirectShow con funciones estándar de selección de archivos e interfaces personalizadas para un procesamiento multimedia eficiente y flexible en sus aplicaciones.

#### DESCARGAS
[Instalador](https://s3.us-west-2.amazonaws.com/files.visioforge.com/trials/visioforge_ffmpeg_source_filter_setup.exe)[Samples en GitHub](https://github.com/visioforge/directshow-samples)

#### COMPRAR
[Consultar precios o hacer un pedido](https://www.visioforge.com/es/buy)

#### AYUDA
[Ayuda en línea](/help/docs/directshow/ffmpeg-source-filters/)[Acuerdo de licencia](/help/docs/eula/)
## Características principales del filtro de origen FFMPEG de VisioForge
### Soporte integral de formatos
- **Formatos de vídeo**:MP4, AVI, MPEG, MPEG-TS, AV1, MKV, WebM y muchos otros formatos
- **Formatos de audio**: AAC/M4A, MP3, OGG, Speex, FLAC y más
- **Compatibilidad con códecs**:Decodificadores de vídeo y audio internos proporcionados por FFMPEG
- **Procesamiento personalizado**:Compatibilidad con filtros FFMPEG de vídeo/audio con configuración avanzada
### Arquitectura y rendimiento avanzados
- **Aceleración de GPU**:Descodificación de vídeo acelerada por GPU para un rendimiento óptimo
- **Multihilo**: Procesamiento multiproceso eficiente para una reproducción fluida
- **Soporte de plataforma**:Disponibles versiones x86 y x64
- **Integración con DirectShow**: Integración perfecta con la arquitectura DirectShow
### SDK fácil de usar para desarrolladores
- **API .NET**:Compatibilidad completa con C# y VB.NET con la distribución de paquetes NuGet
- **API de C++**: Interfaz nativa de C++ para aplicaciones de alto rendimiento
- **API de Delphi**:Compatibilidad total con Delphi/Pascal para el desarrollo de RAD
- **Integración de NuGet**Paquete VisioForge.DirectShowAPI para un desarrollo .NET sin inconvenientes
- **Código de muestra**:Aplicaciones de demostración para C#, VB.NET, C++ y Delphi
- **Documentación**: Referencia completa de API y ejemplos de uso
## Instalación y configuración
### Requisitos del sistema
- **Ventanas**:Windows 11, Windows 10, Windows 8/8.1, Windows 7
- **Ventanas** **Servidor**:Windows Server 2016 y versiones posteriores
- **Arquitectura**:Compatibilidad con x86 y x64
### Cómo instalar
1. Descargue el instalador desde la sección de descargas
2. Ejecutar con privilegios de administrador para un registro correcto
3. El filtro se registrará automáticamente en Windows.
4. Añade referencias a tu proyecto y comienza a codificar
### Configuración de desarrollo .NET
Para aplicaciones .NET, instale el paquete NuGet VisioForge.DirectShowAPI:
El paquete NuGet proporciona:
- Envoltorios completos de API de DirectShow para .NET
- Interfaces y enumeraciones fuertemente tipadas
- Interoperabilidad COM y gestión de memoria adecuadas
- Compatibilidad con C#, VB.NET y otros lenguajes .NET
## Ejemplos de código e implementación de muestra
### Uso de filtro en un gráfico DirectShow
El filtro de fuente FFMPEG actúa como un filtro de fuente en su gráfico DirectShow, proporcionando:
- **Fuente del archivo**: Reproducción de archivos locales con detección automática de formato
- **Transmisión en red**:Compatibilidad con transmisiones y protocolos de red
- **Configuración personalizada**:Configuración avanzada para almacenamiento en búfer y aceleración de hardware
- **Selección de transmisión**:Selección y gestión de múltiples transmisiones de audio/video

### Implementación de C# con funciones avanzadas
### Implementación avanzada de VB.NET con soporte completo de interfaz
#### Registro para usuarios con licencia
Registro C#
Registro de VB.Net
Registro de C++
### Implementación de C++ con soporte completo de interfaz
## Opciones de configuración avanzadas
### Configuración de aceleración de hardware
Habilite la decodificación de video acelerada por GPU para un rendimiento óptimo (habilitado de forma predeterminada):
- **NVIDIA NVDEC**:Detección y uso automáticos para decodificación H.264/H.265/AV1
- **Vídeo de sincronización rápida de Intel**:Compatibilidad con aceleración de GPU integrada de Intel
- **AMD VCE**: Aceleración de decodificación de video por hardware de AMD
- **Software de respaldo**:Retorno automático a la decodificación de CPU cuando sea necesario
### Configuración de transmisión de red
Soporte de transmisión profesional con opciones de protocolo integrales:
- **Tiempo de espera de conexión**: Tiempo de espera configurable (predeterminado: 15000 ms)
- **Estrategia de amortiguación**:Modos AUTOMÁTICO/ENCENDIDO/APAGADO para fuentes en vivo
- **Opciones RTSP**:Selección de transporte TCP/UDP
- **Protocolos personalizados**:Compatibilidad completa con la opción de protocolo FFMPEG
### Procesamiento avanzado de flujos
- **Devoluciones de llamadas de datos**:Acceso al flujo de datos sin procesar para procesamiento personalizado
- **Devoluciones de llamadas de marca de tiempo**: Información de tiempo precisa para la depuración de sincronización A/V
- **Selección de transmisión**: Cambio dinámico de transmisión de audio/video a través de IAMStreamSelect
- **Control de audio**: Habilitar o deshabilitar el procesamiento de audio de forma independiente
### Compatibilidad con múltiples transmisiones y programas
- **Selección de transmisión**:Compatibilidad con múltiples transmisiones de video/audio
- **Cambio de programa**:Manejar flujos de transporte de múltiples programas
- **Selección de idioma**:Selección de pistas de audio por idioma
- **Soporte de subtítulos**:Extracción y renderizado de flujo de subtítulos
### Manejo de fuentes en vivo
- **Detección en tiempo real**: Identificación automática de fuente en vivo
- **Gestión de almacenamiento en búfer**:Almacenamiento en búfer inteligente para una reproducción fluida
- **Sincronización del reloj**: Gestión del reloj de referencia para transmisiones en vivo
- **Control de calidad**:Calidad adaptativa para transmisiones en red
### Control de búsqueda y reproducción
- **Búsqueda de medios**:Compatibilidad total con la interfaz IMediaSeeking para fuentes no en vivo
- **Control de velocidad**:Velocidad de reproducción variable (no disponible para fuentes en vivo)
- **Control de posición**:Posicionamiento absoluto, relativo e incremental
- **Búsqueda de fotogramas clave**: Busque el fotograma clave más cercano para una reproducción fluida
## Características de la versión de evaluación
Experimente la potencia completa de nuestro filtro DirectShow con solo una superposición de evaluación discreta durante la reproducción de video:
- **Entorno de pruebas con todas las funciones**:Acceda a todos los códecs, filtros y capacidades de procesamiento para una evaluación integral
- **Compatibilidad de formato universal**:Pruebe con toda su biblioteca multimedia, incluidos MP4, AVI, MPEG, MKV y protocolos de transmisión
- **Recursos de desarrollo completos**:Documentación completa de API, definiciones de interfaz y ejemplos de codificación completos
- **Muestras listas para producción**:Aplicaciones C#, C++ y Delphi en funcionamiento con código fuente completo para integración inmediata
## Beneficios de la compra
### Opciones de licencia
- **Licencia regular**:Suscripción anual con renovación automática (cancelable en cualquier momento)
- **Licencia de por vida**:Compra única con actualizaciones ilimitadas
### Características de la licencia regular
- **Libertad de implementación comercial**:Implemente en un número ilimitado de aplicaciones e instalaciones sin límites de uso ni tarifas de tiempo de ejecución
- **Calidad de salida profesional**:Representación de video nítida sin marcas de agua ni superposiciones de prueba para aplicaciones listas para producción
- **Acceso a la innovación continua**:Reciba todas las mejoras de funciones, actualizaciones de códecs y mejoras de rendimiento durante 12 meses
- **Asistencia experta para desarrolladores**:Acceso directo a los ingenieros de VisioForge para obtener orientación técnica y resolución rápida de problemas
- **Autoridad de distribución completa**:Todos los derechos para redistribuir el filtro con sus aplicaciones sin costes de licencia adicionales
### Ventajas de la licencia de por vida
- **Actualizaciones ilimitadas**:Actualizaciones por tiempo ilimitado
- **Pago único**:Sin cuotas de suscripción recurrentes
- **Apoyo a largo plazo**:Cobertura de soporte extendida

---END OF PAGE---
# Page: https://www.visioforge.com/it/ffmpeg-source-directshow-filter
# FFMPEG Source DirectShow Filter
versione 15.0
## Filtro DirectShow professionale per sorgenti video e audio
Il filtro FFMPEG Source DirectShow si integra perfettamente in qualsiasi applicazione DirectShow per decodificare e riprodurre file video o audio e flussi di rete. Questo potente SDK include DLL FFMPEG e un filtro DirectShow con funzionalità standard di selezione file e interfacce personalizzate per un'elaborazione multimediale efficiente e flessibile nelle vostre applicazioni.

#### DOWNLOADS
[Installatore](https://s3.us-west-2.amazonaws.com/files.visioforge.com/trials/visioforge_ffmpeg_source_filter_setup.exe)[Samples su GitHub](https://github.com/visioforge/directshow-samples)

#### ACQUISTO
[Controllare i prezzi o ordinare](https://www.visioforge.com/it/buy)

#### AIUTO
[Guida in linea](/help/docs/directshow/ffmpeg-source-filters/)[Contratto di licenza](/help/docs/eula/)
## Caratteristiche principali del filtro sorgente FFMPEG di VisioForge
### Supporto completo del formato
- **Formati video**: MP4, AVI, MPEG, MPEG-TS, AV1, MKV, WebM e molti altri formati
- **Formati audio**: AAC/M4A, MP3, OGG, Speex, FLAC e altro
- **Supporto codec**: Decoder video e audio interni forniti da FFMPEG
- **Elaborazione personalizzata**: Supporto dei filtri FFMPEG video/audio con configurazione avanzata
### Architettura e prestazioni avanzate
- **Accelerazione GPU**: Decodifica video accelerata dalla GPU per prestazioni ottimali
- **Multithreading**: Elaborazione multithread efficiente per una riproduzione fluida
- **Supporto della piattaforma**: Disponibili entrambe le versioni x86 e x64
- **Integrazione DirectShow**: Integrazione perfetta con l'architettura DirectShow
### SDK di facile utilizzo per gli sviluppatori
- **API .NET**: Supporto completo C# e VB.NET con distribuzione del pacchetto NuGet
- **API C++**: Interfaccia C++ nativa per applicazioni ad alte prestazioni
- **API Delphi**: Supporto completo Delphi/Pascal per lo sviluppo RAD
- **Integrazione NuGet**: Pacchetto VisioForge.DirectShowAPI per uno sviluppo .NET senza interruzioni
- **Codice di esempio**: Applicazioni demo per C#, VB.NET, C++ e Delphi
- **Documentazione**: Riferimento API completo ed esempi di utilizzo
## Installazione e configurazione
### Requisiti di sistema
- **Finestre**: Windows 11, Windows 10, Windows 8/8.1, Windows 7
- **Finestre** **Server**: Windows Server 2016 e versioni successive
- **Architettura**: supporto x86 e x64
### Come installare
1. Scarica il programma di installazione dalla sezione download
2. Eseguire con privilegi di amministratore per una corretta registrazione
3. Il filtro verrà registrato automaticamente con Windows
4. Aggiungi riferimenti al tuo progetto e inizia a programmare
### Configurazione dello sviluppo .NET
Per le applicazioni .NET, installare il pacchetto NuGet VisioForge.DirectShowAPI:
Il pacchetto NuGet fornisce:
- Wrapper API DirectShow completi per .NET
- Interfacce e enumerazioni fortemente tipizzate
- Corretta interoperabilità COM e gestione della memoria
- Supporto per C#, VB.NET e altri linguaggi .NET
## Esempi di codice e implementazione di esempio
### Uso del filtro in un grafico DirectShow
Il filtro sorgente FFMPEG funge da filtro sorgente nel grafico DirectShow, fornendo:
- **Origine del file**: Riproduzione di file locali con rilevamento automatico del formato
- **Streaming di rete**: Supporto per flussi e protocolli di rete
- **Configurazione personalizzata**: Impostazioni avanzate per il buffering, accelerazione hardware
- **Selezione del flusso**: Selezione e gestione di flussi audio/video multipli

### Implementazione C# con funzionalità avanzate
### Implementazione avanzata di VB.NET con supporto completo dell'interfaccia
#### Registrazione per utenti autorizzati
Registrazione C#
Registrazione VB.Net
Registrazione C++
### Implementazione C++ con supporto completo dell'interfaccia
## Opzioni di configurazione avanzate
### Configurazione dell'accelerazione hardware
Abilita la decodifica video accelerata dalla GPU per prestazioni ottimali (abilitata per impostazione predefinita):
- **NVIDIA NVDEC**: Rilevamento e utilizzo automatici per la decodifica H.264/H.265/AV1
- **Video di sincronizzazione rapida Intel**: Supporto per l'accelerazione GPU integrata Intel
- **AMD VCE**: Accelerazione di decodifica video hardware AMD
- **Software di fallback**: Fallback automatico alla decodifica della CPU quando necessario
### Configurazione dello streaming di rete
Supporto streaming professionale con opzioni di protocollo complete:
- **Timeout di connessione**: Timeout configurabile (predefinito: 15000 ms)
- **Strategia di buffering**: Modalità AUTO/ON/OFF per sorgenti live
- **Opzioni RTSP**: Selezione del trasporto TCP/UDP
- **Protocolli personalizzati**: Supporto completo dell'opzione del protocollo FFMPEG
### Elaborazione avanzata dei flussi
- **Richiamate di dati**: Accesso al flusso di dati grezzi per l'elaborazione personalizzata
- **Callback di timestamp**: Informazioni temporali precise per il debug della sincronizzazione A/V
- **Selezione del flusso**: Commutazione dinamica del flusso audio/video tramite IAMStreamSelect
- **Controllo audio**: Abilita/disabilita l'elaborazione audio in modo indipendente
### Supporto multi-stream e programma
- **Selezione del flusso**: Supporto per più flussi video/audio
- **Cambio di programma**: Gestire flussi di trasporto multiprogramma
- **Selezione della lingua**: Selezione della traccia audio per lingua
- **Supporto sottotitoli**: Estrazione e rendering del flusso dei sottotitoli
### Gestione delle sorgenti live
- **Rilevamento in tempo reale**: Identificazione automatica della sorgente live
- **Gestione del buffering**: Buffering intelligente per una riproduzione fluida
- **Sincronizzazione dell'orologio**: Gestione dell'orologio di riferimento per i flussi live
- **Controllo di qualità**: Qualità adattiva per i flussi di rete
### Ricerca e controllo della riproduzione
- **Ricerca di media**: Supporto completo dell'interfaccia IMediaSeeking per sorgenti non live
- **Controllo della velocità**: Velocità di riproduzione variabile (non disponibile per sorgenti live)
- **Controllo della posizione**: Posizionamento assoluto, relativo e incrementale
- **Ricerca del fotogramma chiave**: Cerca il fotogramma chiave più vicino per una riproduzione fluida
## Funzionalità della versione di valutazione
Sperimenta la potenza completa del nostro filtro DirectShow con una sola sovrapposizione di valutazione discreta durante la riproduzione video:
- **Ambiente di test completo**: Accedi a tutti i codec, filtri e capacità di elaborazione per una valutazione completa
- **Compatibilità con il formato universale**: Esegui il test con l'intera libreria multimediale, inclusi MP4, AVI, MPEG, MKV e protocolli di streaming
- **Risorse di sviluppo complete**: Documentazione API completa, definizioni di interfaccia ed esempi di codifica esaustivi
- **Campioni pronti per la produzione**: Applicazioni C#, C++ e Delphi funzionanti con codice sorgente completo per un'integrazione immediata
## Vantaggi dell'acquisto
### Opzioni di licenza
- **Licenza regolare**: Abbonamento annuale con rinnovo automatico (annullabile in qualsiasi momento)
- **Licenza a vita**: Acquisto una tantum con aggiornamenti illimitati
### Funzionalità della licenza regolare
- **Libertà di distribuzione commerciale**: Distribuisci su applicazioni e installazioni illimitate senza limiti di utilizzo o costi di runtime
- **Qualità di output professionale**: Rendering video cristallino senza filigrane o sovrapposizioni di prova per applicazioni pronte per la produzione
- **Accesso all'innovazione continua**: Ricevi tutti i miglioramenti delle funzionalità, gli aggiornamenti dei codec e i miglioramenti delle prestazioni per 12 mesi
- **Assistenza agli sviluppatori esperti**: Accesso diretto agli ingegneri VisioForge per assistenza tecnica e rapida risoluzione dei problemi
- **Autorità di distribuzione completa**: Pieni diritti di ridistribuzione del filtro con le tue applicazioni senza costi di licenza aggiuntivi
### Vantaggi della licenza a vita
- **Aggiornamenti illimitati**: Aggiornamenti per un tempo illimitato
- **Pagamento una tantum**: Nessun canone di abbonamento ricorrente
- **Supporto a lungo termine**: Copertura di supporto estesa

---END OF PAGE---
# Page: https://www.visioforge.com/de/encoding-filters-pack
# DirectShow Encoding Filters Pack
Version 11.4
Das VisioForge DirectShow Encoding Filters Pack enthält viele DirectShow-Filter, die in den VisioForge SDKs für verschiedene Audio-/Videocodierformate verwendet werden. Sie können das Filterpaket verwenden, um Video in MP4 (H264 / HEVC / AAC), MPEG-TS, MKV und viele andere Ausgabeformate in Ihrer DirectShow-Anwendung zu kodieren. Für die H264/HEVC-Encoder sind GPU-beschleunigte Versionen für Intel-, AMD/ATI- und Nvidia-GPUs verfügbar.

#### DOWNLOADS
[Testversion](https://s3.us-west-2.amazonaws.com/files.visioforge.com/trials/visioforge_encoding_filters_pack_setup.exe)[Samples auf GitHub](https://github.com/visioforge)

#### KAUFEN
[Preise prüfen oder bestellen](https://www.visioforge.com/de/buy)

#### HILFE
[Online-Hilfe](/help/)[Lizenzvereinbarung](/help/docs/eula/)
## Enthaltene DirectShow-Filter:
- FFMPEG-Encoder-Filter (MPEG-1/2/4, Flash Video)
- Nvidia CUDA H264-Kodierer
- H264-Encoder/Decoder (mit Intel QuickSync-Unterstützung)
- AAC-Encoder
- MP4-Muxer
- MP3-LAME-Encoder
- VP8/VP9-Kodierer/Dekodierer
- FLAC-Kodierer/Dekodierer
- Speex Encoder/Decoder
- Ogg Vorbis Kodierer/Dekodierer
- Farbraumkonverter
- RTSP-Quelle/RTSP-Streamer
- GPU-beschleunigte H.264/HEVC-Kodierung mit MP4 MF Muxer
SDK enthält API für .Net, C++ und Delphi. Demo-Anwendungen in verschiedenen Programmiersprachen verfügbar. GraphEdit/GraphStudioNext-Tools können verwendet werden, um Filter ohne Code zu testen.
[Processing Filters Pack](https://www.visioforge.com/de/processing-filters-pack) kann zusammen mit dem Encoding Filters Pack verwendet werden, um Video- und Audioverarbeitung in Ihrer Anwendung zu ermöglichen.
Sie können verwenden [FFMPEG-Quellfilter](https://www.visioforge.com/de/ffmpeg-source-directshow-filter) oder [VLC-Quellfilter](https://www.visioforge.com/de/vlc-source-directshow-filter) für die Wiedergabe der meisten Video- und Audioformate.
### Systemanforderungen
- Windows 11, Windows 10, Windows 8/8.1, Windows 7, Windows Vista, Windows Server 2012 und höher
- DirectX 10 oder höher
### Vertriebsrechte
Lizenzfreie Verbreitung.
### Beschränkungen des Versuchs
In der Testversion wird ein Wasserzeichen im Videofenster angezeigt.
### Mit dem Kauf des DirectShow Encoding Filters Pack erhalten Sie folgende Vorteile:
- Unbegrenzte Nutzung
- Kein Nörgler-Bildschirm
- Kostenlose Minor- und Major-Upgrades innerhalb eines Jahres (nach einem Jahr funktioniert das SDK genauso wie vorher) für eine reguläre Lizenz und unbegrenzte Updates für unbegrenzte Zeit für die Lifetime-Lizenz
- Vorrangige Unterstützung und Fehlerbehebung
Die reguläre Lizenz wird jährlich in Rechnung gestellt und automatisch um ein Jahr verlängert. Sie können Ihr Abonnement jederzeit kündigen.
---END OF PAGE---
# Page: https://www.visioforge.com/es/encoding-filters-pack
# DirectShow Encoding Filters Pack
versión 11.4
VisioForge DirectShow Encoding Filters Pack incluye muchos filtros DirectShow utilizados en VisioForge SDKs para varios formatos de codificación de audio/video. Puede utilizar el paquete de filtros para codificar vídeo en MP4 (H264 / HEVC / AAC), MPEG-TS, MKV, y muchos otros formatos de salida en su aplicación DirectShow. Los codificadores H264/HEVC tienen versiones aceleradas por GPU disponibles para GPU Intel, AMD/ATI y Nvidia.

#### DESCARGAS
[Versión de evaluación](https://s3.us-west-2.amazonaws.com/files.visioforge.com/trials/visioforge_encoding_filters_pack_setup.exe)[Samples en GitHub](https://github.com/visioforge)

#### COMPRAR
[Consultar precios o hacer un pedido](https://www.visioforge.com/es/buy)

#### AYUDA
[Ayuda en línea](/help/)[Acuerdo de licencia](/help/docs/eula/)
## Filtros DirectShow incluidos:
- Filtro codificador FFMPEG (MPEG-1/2/4, Flash Video)
- Codificador Nvidia CUDA H264
- Codificador/descodificador H264 (compatible con Intel QuickSync)
- Codificador AAC
- Muxer MP4
- Codificador MP3 LAME
- Codificador/decodificador VP8/VP9
- Codificador/decodificador FLAC
- Codificador/decodificador Speex
- Codificador/decodificador Ogg Vorbis
- Convertidores de espacio de color
- Fuente RTSP/Streamer RTSP
- Codificación H.264/HEVC acelerada en la GPU con MP4 MF Muxer
El SDK contiene API para .Net, C++ y Delphi. Aplicaciones de demostración disponibles en varios lenguajes de programación. Las herramientas GraphEdit/GraphStudioNext pueden utilizarse para probar filtros sin código.
[Processing Filters Pack](https://www.visioforge.com/es/processing-filters-pack) puede utilizarse junto con Encoding Filters Pack para proporcionar procesamiento de vídeo y audio en su aplicación.
Puede utilizar [Filtro de fuente FFMPEG](https://www.visioforge.com/es/ffmpeg-source-directshow-filter) o [Filtro de fuente VLC](https://www.visioforge.com/es/vlc-source-directshow-filter) para reproducir la mayoría de formatos de vídeo y audio.
### Requisitos del sistema
- Windows 11, Windows 10, Windows 8/8.1, Windows 7, Windows Vista, Windows Server 2012 y posteriores
- DirectX 10 o posterior
### Derechos de distribución
Distribución sin derechos de autor.
### Limitaciones de la versión de prueba
La versión de prueba muestra una marca de agua en la ventana de vídeo.
### La compra de DirectShow Encoding Filters Pack le proporcionará los siguientes beneficios:
- Uso ilimitado
- Sin pantalla de licencia
- Actualizaciones menores y mayores gratuitas en el plazo de un año (después de un año, el SDK funcionará igual que antes) para una licencia normal y actualizaciones ilimitadas por tiempo ilimitado para la licencia vitalicia.
- Asistencia y correcciones prioritarias
La licencia normal se factura anualmente y se renueva automáticamente cada año. Puede cancelar su suscripción en cualquier momento.
---END OF PAGE---
# Page: https://www.visioforge.com/it/encoding-filters-pack
# DirectShow Encoding Filters Pack
versione 11.4
VisioForge DirectShow Encoding Filters Pack include molti filtri DirectShow utilizzati negli SDK di VisioForge per vari formati di codifica audio/video. È possibile utilizzare il pacchetto di filtri per codificare video in MP4 (H264 / HEVC / AAC), MPEG-TS, MKV e molti altri formati di output nella propria applicazione DirectShow. I codificatori H264/HEVC hanno versioni accelerate dalle GPU disponibili per le GPU Intel, AMD/ATI e Nvidia.

#### DOWNLOADS
[Versione di prova](https://s3.us-west-2.amazonaws.com/files.visioforge.com/trials/visioforge_encoding_filters_pack_setup.exe)[Samples su GitHub](https://github.com/visioforge)

#### ACQUISTO
[Controllare i prezzi o ordinare](https://www.visioforge.com/it/buy)

#### AIUTO
[Guida in linea](/help/)[Contratto di licenza](/help/docs/eula/)
## Filtri DirectShow inclusi:
- Filtro codificatore FFMPEG (MPEG-1/2/4, Flash Video)
- Codificatore H264 Nvidia CUDA
- Encoder/decoder H264 (con supporto Intel QuickSync)
- Codificatore AAC
- Muxer MP4
- Codificatore MP3 LAME
- Codificatore/decodificatore VP8/VP9
- Codificatore/decodificatore FLAC
- Codificatore/decodificatore Speex
- Codificatore/decodificatore Ogg Vorbis aggiornato
- Convertitori di spazio colore
- Sorgente RTSP/Streamer RTSP
- Codifica H.264/HEVC accelerata dalla GPU con MP4 MF Muxer
L'SDK contiene API per .Net, C++ e Delphi. Applicazioni demo disponibili in diversi linguaggi di programmazione. Gli strumenti GraphEdit/GraphStudioNext possono essere utilizzati per testare i filtri senza codice.
[Processing Filters Pack](https://www.visioforge.com/it/processing-filters-pack) può essere utilizzato insieme a Encoding Filters Pack per fornire l'elaborazione video e audio nella vostra applicazione.
È possibile utilizzare [Filtro sorgente FFMPEG](https://www.visioforge.com/it/ffmpeg-source-directshow-filter) O [Filtro sorgente VLC](https://www.visioforge.com/it/vlc-source-directshow-filter) per il supporto della riproduzione della maggior parte dei formati video e audio.
### Requisiti di sistema
- Windows 11, Windows 10, Windows 8/8.1, Windows 7, Windows Vista, Windows Server 2012 e versioni successive
- DirectX 10 o successive
### Diritti di distribuzione
Distribuzione gratuita.
### Limiti della prova
La versione di prova visualizza una filigrana nella finestra del video.
### L'acquisto di DirectShow Encoding Filters Pack offre i seguenti vantaggi:
- Utilizzo illimitato
- Nessun nag-screen
- Aggiornamenti minori e maggiori gratuiti entro un anno (dopo un anno, l'SDK funzionerà come prima) per una licenza regolare e aggiornamenti illimitati per un tempo illimitato per la licenza a vita
- Assistenza e correzioni prioritarie
La licenza regolare viene fatturata annualmente e rinnovata automaticamente ogni anno. È possibile annullare l'abbonamento in qualsiasi momento.
---END OF PAGE---
# Page: https://www.visioforge.com/de/processing-filters-pack
# DirectShow Processing Filters Pack
Version 15.1
Das VisioForge DirectShow Processing Filters Pack enthält viele DirectShow-Filter, die in den VisioForge SDKs für die Audio- und Videoverarbeitung verwendet werden. Mit unseren Filtern können Sie Text- oder Bildüberlagerungen hinzufügen, die Farbbalance ändern, Rauschunterdrückung, Deinterlace, Bewegungserkennung, Größenänderung, Zuschneiden oder Drehen durchführen. Verschiedene Audiobearbeitungen, einschließlich Equalizer und Lautstärkeanhebung, sind ebenfalls verfügbar.

#### DOWNLOADS
[Testversion](https://s3.us-west-2.amazonaws.com/files.visioforge.com/trials/visioforge_processing_filters_pack_setup.exe)[Samples auf GitHub](https://github.com/visioforge/.Net-SDK-s-samples)

#### KAUFEN
[Preise prüfen oder bestellen](https://www.visioforge.com/de/buy)

#### HILFE
[Online-Hilfe](/help/)[Lizenzvereinbarung](/help/docs/eula/)
## Enthaltene DirectShow-Filter:
- AsyncEx-Speicherquellenfilter (ermöglicht das Lesen von Daten aus dem Speicher oder Stream)
- Videobearbeitung und Effektfilter
- Bildüberlagerung (BMP, JPEG, PNG, GIF, RGB-Daten)
- Text-Overlay (Schriftart, Stil, Größe usw. wählen)
- Videotransparenz
- Helligkeit, Kontrast, Sättigung, Farbton, usw.
- Deinterlace (verschiedene Algorithmen sind je nach Qualität und Leistung verfügbar)
- Denoise
- Bewegungserkennung (mit Bewegungsstufenerkennung, Matrix und Highlights)
- chroma-key (GPU-optimiert)
- Audioverarbeitung und Effektfilter
- Volumenverstärker
- Equalizer
- 3D-Bass-System
- verschiedene andere Effekte
- Filter zur Größenänderung von Videos
- Video-Zuschnittfilter
- Video-Spiegelungs-/Drehungsfilter
- PIP-Filter (Bild-im-Bild)
- Filter für Bildschirmaufnahmen (Direct3D 9/Direct3D 11/DXGI/Desktop Duplication)
- Video-Farbraumkonverter (RGB- und YUV-Formate)
- DirectX-beschleunigte Videoverarbeitung
Das SDK enthält APIs für .Net (C#/VB.Net), C++ und Delphi und ist damit vielseitig für verschiedene Programmiersprachen einsetzbar. Sie können SDK-Beispiele ausprobieren oder die GraphEdit/[GraphStudioNext](https://github.com/cplussharp/graph-studio-next) -Werkzeuge testen.
Ein praktisches .Net-API-Paket ist über NuGet verfügbar und vereinfacht die Integration für .Net-Entwickler.
Für die Video- und Audiobearbeitung ist das [Encoding Filters Pack](https://www.visioforge.com/de/encoding-filters-pack) für das Speichern und Streamen von Medien unerlässlich. Zusätzlich sind die [FFMPEG Source DirectShow Filters](https://www.visioforge.com/de/ffmpeg-source-directshow-filter) und [VLC Source DirectShow Filters](https://www.visioforge.com/de/vlc-source-directshow-filter) hilfreich für die Verarbeitung gängiger Video- und Audiodateiformate.
### Systemanforderungen
- Windows 11, Windows 10, Windows 8/8.1, Windows 7, Windows Vista, Windows Server 2012 und höher
- DirectX 10 oder höher
### Vertriebsrechte
Lizenzfreie Verbreitung.
### Beschränkungen des Versuchs
In der Testversion wird ein Wasserzeichen im Videofenster angezeigt.
### Mit dem Kauf des DirectShow Processing Filters Pack erhalten Sie folgende Vorteile:
- Unbegrenzte Nutzung
- Kein Nörgler-Bildschirm
- Kostenlose Minor- und Major-Upgrades innerhalb eines Jahres (nach einem Jahr funktioniert das SDK genauso wie vorher) für eine reguläre Lizenz und unbegrenzte Updates für unbegrenzte Zeit für die Lifetime-Lizenz
- Vorrangige Unterstützung und Fehlerbehebung
Die reguläre Lizenz wird jährlich in Rechnung gestellt und automatisch um ein Jahr verlängert. Sie können Ihr Abonnement jederzeit kündigen.
---END OF PAGE---
# Page: https://www.visioforge.com/es/processing-filters-pack
# DirectShow Processing Filters Pack
versión 15.1
VisioForge DirectShow Processing Filters Pack contiene muchos filtros DirectShow utilizados en los SDK de VisioForge para el procesamiento de audio y vídeo. Con nuestros filtros, puede añadir texto o superposición de imágenes, cambiar el balance de color, realizar denoising, desentrelazado, detección de movimiento, cambiar el tamaño, recortar o rotar. También dispone de varios procesadores de audio, como ecualizador y aumento de volumen.

#### DESCARGAS
[Versión de evaluación](https://s3.us-west-2.amazonaws.com/files.visioforge.com/trials/visioforge_processing_filters_pack_setup.exe)[Samples en GitHub](https://github.com/visioforge/.Net-SDK-s-samples)

#### COMPRAR
[Consultar precios o hacer un pedido](https://www.visioforge.com/es/buy)

#### AYUDA
[Ayuda en línea](/help/)[Acuerdo de licencia](/help/docs/eula/)
## Filtros DirectShow incluidos:
- Filtro de origen de memoria AsyncEx (permite leer datos de la memoria o del flujo)
- Filtro de procesamiento y efectos de vídeo
- superposición de imágenes (BMP, JPEG, PNG, GIF, datos RGB)
- superposición de texto (elegir fuente, estilo, tamaño, etc.)
- transparencia de vídeo
- ajustes de brillo, contraste, saturación y tono
- desentrelazado (hay varios algoritmos disponibles en función de la calidad y el rendimiento)
- eliminación de ruido
- detección de movimiento (con detección de nivel de movimiento, matriz y resaltado)
- chroma-key (optimizado para GPU)
- Filtro de efectos y procesamiento de audio
- amplificador de volumen
- ecualizador
- sistema de bajos 3D
- otros efectos
- Filtro de redimensionamiento de vídeo
- Filtro de recorte de vídeo
- Filtro de giro/rotación de vídeo
- Filtro PIP (imagen en imagen)
- Filtro de captura de pantalla (Direct3D 9/Direct3D 11/DXGI/Desktop Duplication)
- Convertidores de espacio de color de vídeo (formatos RGB y YUV)
- Procesamiento de vídeo acelerado por DirectX
El SDK incluye API para .Net (C#/VB.Net), C++ y Delphi, lo que lo hace versátil para diferentes lenguajes de programación. Puede probar muestras del SDK o utilizar las herramientas GraphEdit/[GraphStudioNext](https://github.com/cplussharp/graph-studio-next) para realizar pruebas.
En NuGet hay disponible un práctico paquete de API .Net que simplifica la integración para los desarrolladores .Net.
Para el procesamiento de vídeo y audio, el [Encoding Filters Pack](https://www.visioforge.com/es/encoding-filters-pack) es esencial para guardar y transmitir medios. Además, los [FFMPEG Source DirectShow Filters](https://www.visioforge.com/es/ffmpeg-source-directshow-filter) y [VLC Source DirectShow Filters](https://www.visioforge.com/es/vlc-source-directshow-filter) son útiles para manejar los formatos de archivo de vídeo y audio más populares.
### Requisitos del sistema
- Windows 11, Windows 10, Windows 8/8.1, Windows 7, Windows Vista, Windows Server 2012 y posteriores
- DirectX 10 o posterior
### Derechos de distribución
Distribución sin derechos de autor.
### Limitaciones de la versión de prueba
La versión de prueba muestra una marca de agua en la ventana de vídeo.
### La compra de DirectShow Processing Filters Pack le proporcionará los siguientes beneficios:
- Uso ilimitado
- Sin pantalla de licencia
- Actualizaciones menores y mayores gratuitas en el plazo de un año (después de un año, el SDK funcionará igual que antes) para una licencia normal y actualizaciones ilimitadas por tiempo ilimitado para la licencia vitalicia.
- Asistencia y correcciones prioritarias
La licencia normal se factura anualmente y se renueva automáticamente cada año. Puede cancelar su suscripción en cualquier momento.
---END OF PAGE---
# Page: https://www.visioforge.com/it/processing-filters-pack
# DirectShow Processing Filters Pack
versione 15.1
Il VisioForge DirectShow Processing Filters Pack contiene molti filtri DirectShow utilizzati negli SDK di VisioForge per l'elaborazione di audio e video. Con i nostri filtri è possibile aggiungere testo o immagini in sovrimpressione, modificare il bilanciamento del colore, eseguire il denoising, il deinterlacciamento, il rilevamento del movimento, ridimensionare, ritagliare o ruotare. Sono disponibili anche diverse elaborazioni audio, tra cui l'equalizzatore e l'aumento del volume.

#### DOWNLOADS
[Versione di prova](https://s3.us-west-2.amazonaws.com/files.visioforge.com/trials/visioforge_processing_filters_pack_setup.exe)[Samples su GitHub](https://github.com/visioforge/.Net-SDK-s-samples)

#### ACQUISTO
[Controllare i prezzi o ordinare](https://www.visioforge.com/it/buy)

#### AIUTO
[Guida in linea](/help/)[Contratto di licenza](/help/docs/eula/)
## Filtri DirectShow inclusi:
- Filtro sorgente di memoria AsyncEx (consente di leggere i dati dalla memoria o dal flusso)
- Filtro di elaborazione video ed effetti
- sovrapposizione di immagini (BMP, JPEG, PNG, GIF, dati RGB)
- sovrapposizione di testo (scegliere il carattere, lo stile, la dimensione, ecc.)
- trasparenza video
- luminosità, contrasto, saturazione, tonalità, ecc.
- deinterlacciamento (sono disponibili diversi algoritmi a seconda della qualità e delle prestazioni)
- denoise
- rilevamento del movimento (con rilevamento del livello di movimento, matrice ed evidenziazione)
- chroma-key (ottimizzato per la GPU)
- Filtro per l'elaborazione audio e gli effetti
- amplificatore di volume
- equalizzatore
- sistema 3D-bass
- vari altri effetti
- Filtro di ridimensionamento video
- Filtro di ritaglio video
- Filtro di ribaltamento/rotazione video
- Filtro PIP (Picture-In-Picture)
- Filtro di cattura dello schermo (Direct3D 9/Direct3D 11/DXGI/Desktop Duplication)
- Convertitori di spazi colore video (formati RGB e YUV)
- Elaborazione video accelerata da DirectX
L'SDK include API per .Net (C#/VB.Net), C++ e Delphi, rendendolo versatile per diversi linguaggi di programmazione. È possibile provare i campioni dell'SDK o utilizzare gli strumenti GraphEdit/[GraphStudioNext](https://github.com/cplussharp/graph-studio-next) per effettuare i test.
Su NuGet è disponibile un comodo pacchetto API .Net, che semplifica l'integrazione per gli sviluppatori .Net.
Per l'elaborazione di video e audio, il [Encoding Filters Pack](https://www.visioforge.com/it/encoding-filters-pack) è essenziale per il salvataggio e lo streaming dei media. Inoltre, i [FFMPEG Source DirectShow Filters](https://www.visioforge.com/it/ffmpeg-source-directshow-filter) e [VLC Source DirectShow Filter](https://www.visioforge.com/it/vlc-source-directshow-filter) sono utili per gestire i formati di file video e audio più diffusi.
### Requisiti di sistema
- Windows 11, Windows 10, Windows 8/8.1, Windows 7, Windows Vista, Windows Server 2012 e versioni successive
- DirectX 10 o successive
### Diritti di distribuzione
Distribuzione gratuita.
### Limiti della prova
La versione di prova visualizza una filigrana nella finestra del video.
### L'acquisto di DirectShow Processing Filters Pack offre i seguenti vantaggi:
- Utilizzo illimitato
- Nessun nag-screen
- Aggiornamenti minori e maggiori gratuiti entro un anno (dopo un anno, l'SDK funzionerà come prima) per una licenza regolare e aggiornamenti illimitati per un tempo illimitato per la licenza a vita
- Assistenza e correzioni prioritarie
La licenza regolare viene fatturata annualmente e rinnovata automaticamente ogni anno. È possibile annullare l'abbonamento in qualsiasi momento.
---END OF PAGE---
# Page: https://www.visioforge.com/de/video-encryption-sdk
# Video Encryption SDK
Version 11.3
Mit dem Video Encryption SDK können Benutzer Videos im MP4 H.264/AAC-Format kodieren und entweder mit einem Kennwort oder mit binären Daten verschlüsseln. Innerhalb dieses SDKs werden DirectShow-Filter für die nahtlose Integration in jede DirectShow-Anwendung bereitgestellt. Diese Filter verfügen über implementierte Schnittstellen zur einfachen Konfiguration von Filterparametern und vereinfachen so den Prozess der Sicherung Ihrer Videoinhalte.

#### DOWNLOADS
[Testversion](https://s3.us-west-2.amazonaws.com/files.visioforge.com/trials/visioforge_video_encryption_sdk_setup.exe)[Samples auf GitHub](https://github.com/visioforge)[Video Encryptor Beispiel](https://files.visioforge.com/trials/visioforge_video_encryptor_setup.exe)

#### KAUFEN
[Preise prüfen oder bestellen](https://www.visioforge.com/de/buy)

#### HILFE
[Online-Hilfe](/help/)[Lizenzvereinbarung](/help/docs/eula/)
## Die wichtigsten Funktionen des VisioForge Video Encryption SDK sind:
- Unterstützung von H264-Encoderprofilen/-stufen, Bitrate, Qualität und anderen Eigenschaften
- Optionale GPU-Nutzung für die Kodierung
- Unterstützung mehrerer Audioströme
- Unterstützung von HD- und 4K-Videos
- x86- und x64-Versionen
- Für die Verschlüsselung von Datenströmen können AES-128 und AES-256 verwendet werden.
- Multithreading
SDK kann Strings, Dateien und Binärdaten als Verschlüsselungsschlüssel verwenden. SDK verwendet einen offenen AES-256-Kryptoalgorithmus zur Verschlüsselung von Video- und Audioströmen. Sie können verschlüsselte Videodateien wie jede andere Videodatei suchen. Für den Audiostrom wird der AAC-Codec und für den Videostrom der H264-Codec verwendet. Außerdem können Sie eine beliebige H264/AAC-Quelldatei oder einen Stream ohne erneute Kodierung muxen.
Das "Video Encryption SDK" ist bereits integriert in [Video Capture SDK .Net](https://www.visioforge.com/de/video-capture-sdk-net), [Video Edit SDK .Net](https://www.visioforge.com/de/video-edit-sdk-net), und [Media Player SDK .Net](https://www.visioforge.com/de/media-player-sdk-net) erfordert aber eine unabhängige Lizenz.
AES-256 kann in einigen Ländern lizenzpflichtig sein. Das SDK kann aus Kompatibilitätsgründen auch AES-128 verwenden. Bitte kontaktieren Sie uns, wenn Sie alternative Verschlüsselungsalgorithmen verwenden möchten.
Video Encryption SDK kann in jedem DirectShow-Code als zwei Filter verwendet werden: Muxer (Verschlüsseler) und Demuxer (Entschlüsseler). Seeking wird für Demuxer unterstützt.
Sie können SDK als Kernstück Ihres DRM-Videodateisystems verwenden.
### Filterverwendung in einem DirectShow-Graph

## Video Encryptor Anwendungsbeispiel
Mit dem Video Encryptor Beispiel können Sie Ihre Videodateien mit einem Passwort schützen. Alle gängigen Videoformate werden unterstützt. Sie können Ihren bevorzugten Media Player verwenden, um geschützte Dateien abzuspielen. Die Anwendung verwendet das Video Encryption SDK als Engine und unterstützt die Nvidia CUDA-Technologie, um die Verschlüsselungsgeschwindigkeit zu erhöhen (auf Computern mit Nvidia-Grafikkarten).

### Systemanforderungen
- Windows 11, Windows 10, Windows 8/8.1, Windows 7, Windows Vista, Windows Server 2012 und höher
- DirectX 10 oder höher
### Vertriebsrechte
Lizenzfreie Verbreitung.
### Beschränkungen des Versuchs
In der Testversion wird ein Wasserzeichen im Videofenster angezeigt.
### Mit dem Kauf des Video Encryption SDK erhalten Sie folgende Vorteile:
- Unbegrenzte Nutzung
- Kein Nörgler-Bildschirm
- Kostenlose Minor- und Major-Upgrades innerhalb eines Jahres (nach einem Jahr funktioniert das SDK genauso wie vorher) für eine reguläre Lizenz und unbegrenzte Updates für unbegrenzte Zeit für die Lifetime-Lizenz
- Vorrangige Unterstützung und Fehlerbehebung
Die reguläre Lizenz wird jährlich in Rechnung gestellt und automatisch um ein Jahr verlängert. Sie können Ihr Abonnement jederzeit kündigen.
---END OF PAGE---
# Page: https://www.visioforge.com/es/video-encryption-sdk
# Video Encryption SDK
versión 11.3
El SDK de cifrado de vídeo permite a los usuarios codificar vídeo en formato MP4 H.264/AAC y aplicar cifrado utilizando una contraseña o datos binarios. Dentro de este SDK, se proporcionan filtros DirectShow para una integración perfecta en cualquier aplicación DirectShow. Estos filtros vienen con interfaces implementadas para una configuración sencilla de los parámetros del filtro, lo que simplifica el proceso de proteger el contenido de vídeo.

#### DESCARGAS
[Versión de evaluación](https://s3.us-west-2.amazonaws.com/files.visioforge.com/trials/visioforge_video_encryption_sdk_setup.exe)[Samples en GitHub](https://github.com/visioforge)[Muestra de Video Encryptor](https://files.visioforge.com/trials/visioforge_video_encryptor_setup.exe)

#### COMPRAR
[Consultar precios o hacer un pedido](https://www.visioforge.com/es/buy)

#### AYUDA
[Ayuda en línea](/help/)[Acuerdo de licencia](/help/docs/eula/)
## Las principales características de VisioForge Video Encryption SDK incluyen:
- Compatibilidad con perfiles/niveles de codificador H264, velocidad de bits, calidad y otras propiedades
- Uso opcional de la GPU para la codificación
- Admite varios flujos de audio
- Compatibilidad con vídeo HD y 4K
- Versiones x86 y x64
- Se pueden utilizar AES-128 y AES-256 para el cifrado de flujos.
- Multihilo
SDK puede utilizar cadenas, archivos y datos binarios como claves de cifrado. SDK utiliza un algoritmo criptográfico abierto AES-256 para cifrar secuencias de vídeo y audio. Puede buscar archivos de vídeo cifrados como cualquier otro archivo de vídeo. Se utilizará el códec AAC para el flujo de audio y el códec H264 para el flujo de vídeo. Además, puedes remezclar cualquier archivo o flujo H264/AAC sin recodificarlo.
"Video Encryption SDK" ya está integrado en [Video Capture SDK .Net](https://www.visioforge.com/es/video-capture-sdk-net), [Video Edit SDK .Net](https://www.visioforge.com/es/video-edit-sdk-net), y [Media Player SDK .Net](https://www.visioforge.com/es/media-player-sdk-net) pero requiere una licencia independiente.
AES-256 puede requerir licencia en algunos países. SDK también puede utilizar AES-128 por compatibilidad. Póngase en contacto con nosotros si desea utilizar algoritmos de cifrado alternativos.
Video Encryption SDK puede ser usado en cualquier código DirectShow como dos filtros: muxer (encriptador) y demuxer (desencriptador). Se admite la búsqueda para demuxer.
Puede utilizar SDK como núcleo de su sistema de archivos de vídeo DRM.
### Uso de filtro en un gráfico DirectShow

## Ejemplo de aplicación Video Encryptor
La muestra Video Encryptor le permite proteger sus archivos de vídeo con una contraseña. Soporta todos los formatos de vídeo populares. Puede utilizar su reproductor multimedia favorito para reproducir los archivos protegidos. La aplicación utiliza el Video Encryption SDK como motor y soporta la tecnología Nvidia CUDA para aumentar la velocidad de cifrado (en ordenadores con tarjetas gráficas Nvidia).

### Requisitos del sistema
- Windows 11, Windows 10, Windows 8/8.1, Windows 7, Windows Vista, Windows Server 2012 y posteriores
- DirectX 10 o posterior
### Derechos de distribución
Distribución sin derechos de autor.
### Limitaciones de la versión de prueba
La versión de prueba muestra una marca de agua en la ventana de vídeo.
### La compra de Video Encryption SDK le proporcionará los siguientes beneficios:
- Uso ilimitado
- Sin pantalla de licencia
- Actualizaciones menores y mayores gratuitas en el plazo de un año (después de un año, el SDK funcionará igual que antes) para una licencia normal y actualizaciones ilimitadas por tiempo ilimitado para la licencia vitalicia.
- Asistencia y correcciones prioritarias
La licencia normal se factura anualmente y se renueva automáticamente cada año. Puede cancelar su suscripción en cualquier momento.
---END OF PAGE---
# Page: https://www.visioforge.com/it/video-encryption-sdk
# Video Encryption SDK
versione 11.3
L'SDK per la crittografia video consente agli utenti di codificare video in formato MP4 H.264/AAC e di applicare la crittografia utilizzando una password o dati binari. All'interno di questo SDK vengono forniti filtri DirectShow per una perfetta integrazione in qualsiasi applicazione DirectShow. Questi filtri sono dotati di interfacce implementate per una semplice configurazione dei parametri del filtro, semplificando il processo di protezione dei contenuti video.

#### DOWNLOADS
[Versione di prova](https://s3.us-west-2.amazonaws.com/files.visioforge.com/trials/visioforge_video_encryption_sdk_setup.exe)[Samples su GitHub](https://github.com/visioforge)[Esempio di Video Encryptor](https://files.visioforge.com/trials/visioforge_video_encryptor_setup.exe)

#### ACQUISTO
[Controllare i prezzi o ordinare](https://www.visioforge.com/it/buy)

#### AIUTO
[Guida in linea](/help/)[Contratto di licenza](/help/docs/eula/)
## Le principali caratteristiche di VisioForge Video Encryption SDK includono:
- Supporto di profili/livelli di codifica H264, bitrate, qualità e altre proprietà
- Uso opzionale della GPU per la codifica
- Supporto di più flussi audio
- Supporto video HD e 4K
- Versioni x86 e x64
- Per la crittografia dei flussi è possibile utilizzare AES-128 e AES-256.
- Multithreading
SDK può utilizzare stringhe, file e dati binari come chiavi di crittografia. L'SDK utilizza un algoritmo di crittografia aperto AES-256 per crittografare i flussi video e audio. È possibile cercare i file video crittografati come qualsiasi altro file video. Per il flusso audio viene utilizzato il codec AAC, mentre per il flusso video viene utilizzato il codec H264. Inoltre, è possibile ri-muxare qualsiasi file o flusso H264/AAC di origine senza ricodificare.
"Video Encryption SDK" è già integrato in [Video Capture SDK .Net](https://www.visioforge.com/it/video-capture-sdk-net), [Video Edit SDK .Net](https://www.visioforge.com/it/video-edit-sdk-net), e [Media Player SDK .Net](https://www.visioforge.com/it/media-player-sdk-net) ma richiede una licenza indipendente.
AES-256 può richiedere una licenza in alcuni Paesi. Per compatibilità, l'SDK può utilizzare anche AES-128. Contattateci se volete utilizzare algoritmi di crittografia alternativi.
Il Video Encryption SDK può essere utilizzato in qualsiasi codice DirectShow come due filtri: muxer (encryptor) e demuxer (decryptor). Per il demuxer è supportata la ricerca.
È possibile utilizzare l'SDK come nucleo del sistema di file video DRM.
### Uso del filtro in un grafico DirectShow

## Esempio di applicazione Video Encryptor
Il campione di Video Encryptor consente di proteggere i file video con una password. Sono supportati tutti i formati video più diffusi. È possibile utilizzare il proprio lettore multimediale preferito per riprodurre i file protetti. L'applicazione utilizza il Video Encryption SDK come motore e supporta la tecnologia Nvidia CUDA per aumentare la velocità di crittografia (su computer con schede grafiche Nvidia).

### Requisiti di sistema
- Windows 11, Windows 10, Windows 8/8.1, Windows 7, Windows Vista, Windows Server 2012 e versioni successive
- DirectX 10 o successive
### Diritti di distribuzione
Distribuzione gratuita.
### Limiti della prova
La versione di prova visualizza una filigrana nella finestra del video.
### L'acquisto dell'SDK di crittografia video offre i seguenti vantaggi:
- Utilizzo illimitato
- Nessun nag-screen
- Aggiornamenti minori e maggiori gratuiti entro un anno (dopo un anno, l'SDK funzionerà come prima) per una licenza regolare e aggiornamenti illimitati per un tempo illimitato per la licenza a vita
- Assistenza e correzioni prioritarie
La licenza regolare viene fatturata annualmente e rinnovata automaticamente ogni anno. È possibile annullare l'abbonamento in qualsiasi momento.
---END OF PAGE---
# Page: https://www.visioforge.com/de/all-in-one-media-framework
# All-in-One Media Framework (Delphi/ActiveX)
Version 11.2
Das Framework enthält mehrere Bibliotheken für die Videoaufnahme, -bearbeitung und -wiedergabe. Die [Videoaufnahme](https://www.visioforge.com/de/video-capture-sdk-net) Der Kern ermöglicht die Aufnahme von Video und Audio von verschiedenen Quellen wie Webcams, IP-Kameras oder Bildschirmen. Der Videobearbeitungskern ermöglicht das Schneiden, Zusammenfügen, Verarbeiten und Neukodieren von Dateien. Der Mediaplayer-Kern kann Video- und Audiodateien sowie Netzwerkstreams abspielen. Alle Kerne unterstützen Video- und Audioeffekte, Framegrabbing, Bild-in-Bild und On-Screen-Display (OSD).
- 
- 
- 
- 


#### DOWNLOADS
[Delphi](https://s3.us-west-2.amazonaws.com/files.visioforge.com/trials/visioforge_media_framework_delphi_trial.exe)[ActiveX](https://s3.us-west-2.amazonaws.com/files.visioforge.com/trials/visioforge_media_framework_activex_trial.exe)[Samples auf GitHub](https://github.com/visioforge)

#### KAUFEN
[Preise prüfen oder bestellen](https://www.visioforge.com/de/buy)

#### HILFE
[Online-Hilfe](/help/docs/delphi/videocapture/)[Änderungsliste](/help/docs/delphi/videocapture/changelog/)[Lizenzvereinbarung](/help/docs/eula/)
### Der Kauf des Frameworks bringt Ihnen folgende Vorteile:
- Unbegrenzte Nutzung
- Kein Nörgler-Bildschirm
- Kostenlose Minor- und Major-Upgrades innerhalb eines Jahres (nach einem Jahr funktioniert das SDK genauso wie vorher) für eine reguläre Lizenz und unbegrenzte Updates für unbegrenzte Zeit für die Lifetime-Lizenz
- Vorrangige Unterstützung und Fehlerbehebung
Die reguläre Lizenz wird jährlich in Rechnung gestellt und automatisch um ein Jahr verlängert. Sie können Ihr Abonnement jederzeit kündigen.
Das SDK ist für die nicht-kommerzielle Nutzung kostenlos. Bitte kontaktieren Sie uns, um eine kostenlose Lizenz zu erhalten.
## Merkmale und Fähigkeiten
### Unterstützte Eingabegeräte:
- MPEG-2-Camcorder der Formate DV und HDV
- USB-Webcams und verschiedene Aufnahmegeräte, einschließlich Unterstützung für 4K-Auflösung
- PCI-basierte Videoerfassungskarten
- TV-Tuner, sowohl mit als auch ohne eingebauten MPEG-Encoder
- IP-Kameras und Server, die die Protokolle JPEG/MJPEG, MPEG-4 und H.264 über HTTP, RTSP oder RTMP verwenden, mit Unterstützung für HD-Streams
- ONVIF-kompatible IP-Kameras mit PTZ-Steuerung
- NDI-Quellen mit DirectShow-Brücke
- Verschiedene Audioaufnahmegeräte und Soundkarten
- ASIO-kompatible Audioquellen
- Blackmagic Decklink-Karten
### Unterstützte Eingabeformate:
- MP4
- MOV
- AVI
- MPEG-TS/MPEG-PS
- MKV (Matroska)
- DV
- ASF/WMV
- MP3
- M4A/AAC
- WMA
- OGG Vorbis
- OPUS
- Speex
SDK kann Video- und Audiodateien mit Systemdecodern, FFMPEG oder libVLC dekodieren.
### Unterstützte Ausgabeformate:
- AVI-Dateien mit Unterstützung für mehrere Codecs wie MJPEG, DivX, XviD und x264
- WMV-Dateien sind mit benutzerdefinierten WMV-Profilen und -Einstellungen kompatibel, z. B. Kodierung mit variabler Bitrate (VBR), unkomprimierte Audio- oder Videoströme, Größenanpassung von Videos, Anpassung der Pufferung, Anpassung der Bildrate usw.
- DV- und MPEG-Dateien direkt von DV/HDV-Camcordern und TV-Tunern mit internem MPEG-Encoder (über DirectCapture-Technologie)
- Erfassung von DV-Dateien von jedem kompatiblen Videoaufnahmegerät
- MPEG-1/2/4-Dateien, einschließlich der VCD/SVCD/DVD-Standardprofile, und FLV über einen FFMPEG-Wrapper
- WebM-Dateien mit VP8/VP9-Videocodec und Vorbis-Audiocodec
- MP4-Dateien mit H264/HEVC + AAC-Codecs, die CPU- oder GPU-Beschleunigung nutzen (Nvidia, AMD/ATI, Intel)
- WAV, mit Optionen für komprimiertes oder PCM-Format
- WMA (Windows Media Audio)
- MP3, mit LAME-Kodierung
- Ogg Vorbis
- Benutzerdefinierte Ausgabeoptionen durch DirectShow-Filter von Drittanbietern
- Netzwerk-Streaming mit FFMPEG
- AES-verschlüsselte Videoausgabe
### Videobearbeitung und -effekte:
- Bild- und Text-Overlays
- einstellbare Videotransparenz
- Regler für Helligkeit, Kontrast, Sättigung und Farbton
- Deinterlace
- Rauschunterdrückung
- Schwenken und Zoomen
- Größenänderung auf jede Auflösung
- Chroma-Key-Compositing
- Bewegungserkennung
- Bild-in-Bild
- Bildschirmanzeige (OSD)
- Integration mit DirectShow-Filtern von Drittanbietern
- Schnittstelle zur Kamerasteuerung
### Audiobearbeitung und Effekte:
- Volumenverstärker
- Equalizer
- 3D-Bass-System
- Normalisierung
- automatische/manuelle Verstärkung
- es gibt viele andere Auswirkungen
### Anwendungsbeispiele:
- Audioaufnahme
- DV-Aufnahme
- IP-Erfassung
- Bildschirmaufnahme
- Einfache Videoaufnahme
- Hauptaufnahme-Demo
- Hauptbearbeitungsdemo
- Hauptspieler-Demo
- Audioplayer
- DVD-Player
- Speicherwiedergabe
- Videoplayer
### Entwicklungsplattformen:
- Visual Studio 2005 und höher: Visual C#, Visual C++, Visual Basic .NET
- Delphi 6 / 7 / 2005 / 2006 / 2007 / 2009 / 2010 / XE / XE2 / XE3 / XE4 / XE5 / XE6 / XE7 /
- Visual Studio 6: Visual C++, Visual Basic 6
- Borland C++ Builder 5 und höher
- kann mit anderen ActiveX-kompatiblen Anwendungen wie Microsoft Access, Word, Excel, FrontPage, Powerbuilder, usw. verwendet werden.
- x86- und x64-Versionen
### Systemanforderungen
- Windows 11, Windows 10, Windows 8/8.1, Windows 7, Windows Vista, Windows Server 2012 und höher
- .Net Framework 4.0 oder höher (für ActiveX-basierte .Net-Demoanwendungen)
- DirectX 9 oder höher
### Vertriebsrechte
Lizenzfreie Verbreitung.
### Beschränkungen des Versuchs
In der Testversion wird ein Wasserzeichen im Videofenster angezeigt.

#### EDITION

#### STANDARD

#### PROFESSIONELL

#### PREMIUM
Unterstützte Eingabegeräte und andere Quellen
- Web-Kameras
- TV-Tuner
- DV- und MPEG-Camcorder
- Bildschirmaufnahme
- HTTP / RTSP / ONVIF IP-Kameras
- UDP, TCP, RTMP und andere Netzwerkströme
- Zusätzliche Engines für Netzwerk-Streams
Video-Vorschau
Frame Grabber
Videoverarbeitung
Audioverarbeitung
Unterstützung von HD- und 4K-Videos
Fernsehtuning
Netzwerk-Streaming im WMV-Format
Netzwerk-Streaming über RTMP / RTSP / UDP
Chroma-Schlüssel
Bewegungserkennung
Videoverarbeitung mit DirectShow-Filtern
OSD (Bildschirmanzeige)
Bild-im-Bild-Darstellung
Name der Ausgabedatei on-the-fly ändern
Mehrere Ausgabebildschirme
GPU-beschleunigte Videoeffekte
Ausgabe an die virtuelle Kamera SDK
Video Encryption SDK Unterstützung
Ausgabeformate
- AVI
- WMV (Windows Media Video)
- WMA (Windows Media Audio)
- WAV
- MP3
- Ogg Vorbis
- DV-Video
- DV / MPEG-1/2/4 (über TV-Tuner mit internem MPEG-Encoder oder DV/HDV-Camcorder)
- Flash-Video (FLV) mit FFMPEG
- WebM
- Benutzerdefinierte Ausgabeformate mit externen DirectShow-Filtern
- MPEG-1/2/4 mit FFMPEG
- MP4 H264/AAC über Software, Intel QuickSync oder nVidia NVENC / CUDA
SDK enthält optionale FFMPEG- und libVLC-Bibliotheken, die unter der LGPL v2.1 lizenziert sind.
---END OF PAGE---
# Page: https://www.visioforge.com/es/all-in-one-media-framework
# All-in-One Media Framework (Delphi/ActiveX)
versión 11.2
El marco incluye varias bibliotecas diseñadas para la captura, edición y reproducción de vídeo. [captura de vídeo](https://www.visioforge.com/es/video-capture-sdk-net) El núcleo permite grabar video y audio desde diversas fuentes, como cámaras web, cámaras IP o pantallas. El núcleo de edición de video permite cortar, unir, procesar y recodificar archivos. El núcleo del reproductor multimedia puede reproducir archivos de video y audio, así como transmisiones de red. Todos los núcleos admiten efectos de video y audio, captura de fotogramas, imagen en imagen y visualización en pantalla (OSD).
- 
- 
- 
- 


#### DESCARGAS
[Delfos](https://s3.us-west-2.amazonaws.com/files.visioforge.com/trials/visioforge_media_framework_delphi_trial.exe)[ActiveX](https://s3.us-west-2.amazonaws.com/files.visioforge.com/trials/visioforge_media_framework_activex_trial.exe)[Samples en GitHub](https://github.com/visioforge)

#### COMPRAR
[Consultar precios o hacer un pedido](https://www.visioforge.com/es/buy)

#### AYUDA
[Ayuda en línea](/help/docs/delphi/videocapture/)[Registro de cambios](/help/docs/delphi/videocapture/changelog/)[Acuerdo de licencia](/help/docs/eula/)
### La compra de Framework le proporcionará las siguientes ventajas:
- Uso ilimitado
- Sin pantalla de licencia
- Actualizaciones menores y mayores gratuitas en el plazo de un año (después de un año, el SDK funcionará igual que antes) para una licencia normal y actualizaciones ilimitadas por tiempo ilimitado para la licencia vitalicia.
- Asistencia y correcciones prioritarias
La licencia normal se factura anualmente y se renueva automáticamente cada año. Puede cancelar su suscripción en cualquier momento.
El SDK es gratuito para uso no comercial. Póngase en contacto con nosotros para obtener una licencia gratuita.
## Características y capacidades
### Dispositivos de entrada compatibles:
- Videocámaras MPEG-2 de formatos DV y HDV
- Cámaras web USB y varios dispositivos de captura, incluida la compatibilidad con resolución 4K
- Tarjetas de captura de vídeo basadas en PCI
- Sintonizadores de TV, con y sin codificador MPEG integrado
- Cámaras IP y servidores que utilizan los protocolos JPEG/MJPEG, MPEG-4 y H.264 a través de HTTP, RTSP o RTMP, con compatibilidad para secuencias HD
- Cámaras IP compatibles con ONVIF con controles PTZ
- Fuentes NDI con puente DirectShow
- Varios dispositivos de captura de audio y tarjetas de sonido
- Fuentes de audio compatibles con ASIO
- Tarjetas Blackmagic Decklink
### Formatos de entrada compatibles:
- MP4
- MOV
- AVI
- MPEG-TS/MPEG-PS
- MKV (Matroska)
- DV
- ASF/WMV
- MP3
- M4A/AAC
- AMM
- OGG Vorbis
- OPUS
- Speex
SDK puede descodificar archivos de vídeo y audio utilizando descodificadores del sistema, FFMPEG o libVLC.
### Formatos de salida compatibles:
- AVI compatibles con varios códecs, como MJPEG, DivX, XviD y x264
- Los archivos WMV ofrecen compatibilidad con perfiles y ajustes WMV personalizados, como codificación de velocidad de bits variable (VBR), flujos de audio o vídeo sin comprimir, dimensionamiento de vídeo, ajustes de almacenamiento en búfer, personalización de la velocidad de fotogramas, etc.
- Archivos DV y MPEG directamente desde videocámaras DV/HDV y sintonizadores de TV mediante el codificador MPEG interno (a través de la tecnología DirectCapture)
- Adquisición de archivos DV desde cualquier dispositivo de captura de vídeo compatible
- Archivos MPEG-1/2/4, incluidos los perfiles estándar VCD/SVCD/DVD, y FLV mediante una envoltura FFMPEG
- Archivos WebM con códecs de vídeo VP8/VP9 y códec de audio Vorbis
- Archivos MP4 con códecs H264/HEVC + AAC, utilizando aceleración de CPU o GPU (Nvidia, AMD/ATI, Intel)
- WAV, con opciones de formato comprimido o PCM
- WMA (Windows Media Audio)
- MP3, utilizando codificación LAME
- Ogg Vorbis
- Opciones de salida personalizadas mediante filtros DirectShow de terceros
- Streaming en red con FFMPEG
- Salida de vídeo encriptado AES
### Procesamiento y efectos de vídeo:
- superposición de imágenes y texto
- transparencia de vídeo ajustable
- controles de brillo, contraste, saturación y tono
- desentrelazar
- reducción del ruido
- panorámica y zoom
- redimensionado a cualquier resolución
- chroma-key
- detección de movimiento
- Imagen en imagen
- On-Screen Display (OSD)
- integración con filtros DirectShow de terceros
- interfaz de control de la cámara
### Procesamiento y efectos de audio:
- amplificador de volumen
- ecualizador
- sistema de bajos 3D
- normalización
- ganancia auto/manual
- hay muchos otros efectos
### Ejemplos de aplicaciones:
- Captura de audio
- Captura DV
- Captura de IP
- Captura de pantalla
- Captura de vídeo sencilla
- Demostración de captura principal
- Demostración de edición principal
- Demo del jugador principal
- Reproductor de audio
- Reproductor de DVD
- Reproducción de memoria
- Reproductor de video
### Plataformas de desarrollo:
- Visual Studio 2005 y versiones posteriores: Visual C#, Visual C++, Visual Basic .NET
- Delphi 6 / 7 / 2005 / 2006 / 2007 / 2009 / 2010 / XE / XE2 / XE3 / XE4 / XE5 / XE6 / XE7 / XE8 / 10 / 10.1 / 10.2 / 10.3 / 10.4 / 11 / 12
- Visual Studio 6: Visual C++, Visual Basic 6
- Borland C++ Builder 5 y posteriores
- puede utilizarse con otras aplicaciones compatibles con ActiveX como Microsoft Access, Word, Excel, FrontPage, Powerbuilder, etc.
- Versiones x86 y x64
### Requisitos del sistema
- Windows 11, Windows 10, Windows 8/8.1, Windows 7, Windows Vista, Windows Server 2012 y posteriores
- .Net Framework 4.0 o posterior (para aplicaciones de demostración .Net basadas en ActiveX)
- DirectX 9 o posterior
### Derechos de distribución
Distribución sin derechos de autor.
### Limitaciones de la versión de prueba
La versión de prueba muestra una marca de agua en la ventana de vídeo.

#### EDICIÓN

#### ESTÁNDAR

#### PROFESIONAL

#### PREMIUM
Dispositivos de entrada y otras fuentes compatibles
- Cámaras web
- Sintonizadores de TV
- Videocámaras DV y MPEG
- Captura de pantalla
- HTTP / RTSP / ONVIF Cámaras IP
- UDP, TCP, RTMP y otros flujos de red
- Otros formatos de flujos de red
Avance en vídeo
Capturador de fotogramas
Tratamiento de vídeo
Tratamiento de audio
Compatibilidad con vídeo HD y 4K
Sintonización de TV
Transmisión en red en formato WMV
Transmisión en red mediante RTMP / RTSP / UDP
Chroma-key
Detección de movimiento
Tratamiento de vídeo mediante filtros DirectShow
OSD (On-Screen Display)
Picture-In-Picture
Cambiar el nombre del archivo de salida sobre la marcha
Múltiples pantallas de salida
Efectos de vídeo acelerados en la GPU
Salida a Virtual Camera SDK
Compatibilidad con Video Encryption SDK
Formatos de salida
- AVI
- WMV (Windows Media Video)
- WMA (Windows Media Audio)
- WAV
- MP3
- Ogg Vorbis
- Vídeo DV
- DV / MPEG-1/2/4 (mediante sintonizador de TV con codificador MPEG interno o videocámara DV/HDV)
- Vídeo Flash (FLV) con FFMPEG
- WebM
- Formatos de salida personalizados mediante filtros DirectShow externos
- MPEG-1/2/4 con FFMPEG
- MP4 H264/AAC mediante software, Intel QuickSync o nVidia NVENC / CUDA
El SDK contiene bibliotecas opcionales FFMPEG y libVLC con licencia LGPL v2.1.
---END OF PAGE---
# Page: https://www.visioforge.com/it/all-in-one-media-framework
# All-in-One Media Framework (Delphi/ActiveX)
versione 11.2
Il framework include diverse librerie progettate per l'acquisizione, la modifica e la riproduzione di video. [acquisizione video](https://www.visioforge.com/it/video-capture-sdk-net) Il core consente la registrazione di video e audio da diverse sorgenti, come webcam, telecamere IP o schermi. Il core di editing video consente di tagliare, unire, elaborare e ricodificare i file. Il core del lettore multimediale può riprodurre file video e audio, nonché flussi di rete. Tutti i core supportano effetti video e audio, acquisizione di fotogrammi, Picture-in-Picture e visualizzazione su schermo (OSD).
- 
- 
- 
- 


#### DOWNLOADS
[Delfi](https://s3.us-west-2.amazonaws.com/files.visioforge.com/trials/visioforge_media_framework_delphi_trial.exe)[ActiveX](https://s3.us-west-2.amazonaws.com/files.visioforge.com/trials/visioforge_media_framework_activex_trial.exe)[Samples su GitHub](https://github.com/visioforge)

#### ACQUISTO
[Controllare i prezzi o ordinare](https://www.visioforge.com/it/buy)

#### AIUTO
[Guida in linea](/help/docs/delphi/videocapture/)[Changelog](/help/docs/delphi/videocapture/changelog/)[Contratto di licenza](/help/docs/eula/)
### L'acquisto di Framework vi darà i seguenti vantaggi:
- Utilizzo illimitato
- Nessun nag-screen
- Aggiornamenti minori e maggiori gratuiti entro un anno (dopo un anno, l'SDK funzionerà come prima) per una licenza regolare e aggiornamenti illimitati per un tempo illimitato per la licenza a vita
- Assistenza e correzioni prioritarie
La licenza regolare viene fatturata annualmente e rinnovata automaticamente ogni anno. È possibile annullare l'abbonamento in qualsiasi momento.
L'SDK è gratuito per uso non commerciale. Contattateci per ottenere una licenza gratuita.
## Caratteristiche e capacità
### Dispositivi di input supportati:
- Videocamere MPEG-2 nei formati DV e HDV
- Webcam USB e vari dispositivi di acquisizione, compreso il supporto della risoluzione 4K
- Schede di video capture basate su PCI
- Sintonizzatori TV, sia con che senza codificatore MPEG integrato
- Telecamere e server IP che utilizzano i protocolli JPEG/MJPEG, MPEG-4 e H.264 su HTTP, RTSP o RTMP, con supporto per flussi HD
- Telecamere IP conformi a ONVIF con controlli PTZ
- Sorgenti NDI con ponte DirectShow
- Vari dispositivi di acquisizione audio e schede audio
- Sorgenti audio compatibili con ASIO
- Schede Blackmagic Decklink
### Formati di ingresso supportati:
- MP4
- MOVIMENTO
- AVI
- MPEG-TS/MPEG-PS
- MKV (Matroska)
- DV
- ASF/WMV
- MP3
- M4A/AAC
- WMA
- OGG Vorbis
- OPUS
- Speex
L'SDK può decodificare i file video e audio utilizzando i decodificatori di sistema, FFMPEG o libVLC.
### Formati di uscita supportati:
- File AVI con supporto per diversi codec come MJPEG, DivX, XviD e x264
- I file WMV offrono la compatibilità con i profili e le impostazioni WMV personalizzati, come la codifica a bit rate variabile (VBR), i flussi audio o video non compressi, il dimensionamento dei video, le regolazioni del buffering, la personalizzazione della frequenza dei fotogrammi, ecc.
- File DV e MPEG direttamente da videocamere DV/HDV e sintonizzatori TV con encoder MPEG interno (tramite tecnologia DirectCapture)
- Acquisizione di file DV da qualsiasi dispositivo di acquisizione video compatibile
- File MPEG-1/2/4, compresi i profili standard VCD/SVCD/DVD, e FLV tramite un wrapper FFMPEG
- File WebM con codec video VP8/VP9 e codec audio Vorbis
- File MP4 con codec H264/HEVC + AAC, utilizzando l'accelerazione della CPU o della GPU (Nvidia, AMD/ATI, Intel)
- WAV, con opzioni per il formato compresso o PCM
- WMA (Windows Media Audio)
- MP3, con codifica LAME
- Ogg Vorbis
- Opzioni di output personalizzate tramite filtri DirectShow di terze parti
- Streaming di rete con FFMPEG
- Uscita video con crittografia AES
### Elaborazione video ed effetti:
- sovrapposizioni di immagini e testo
- trasparenza video regolabile
- controlli per luminosità, contrasto, saturazione e tinta
- deinterlacciamento
- riduzione del rumore
- panoramica e zoom
- ridimensionamento a qualsiasi risoluzione
- compositing con chiavi cromatiche
- rilevamento del movimento
- Immagine nell'immagine
- Display su schermo (OSD)
- integrazione con filtri DirectShow di terze parti
- interfaccia di controllo della telecamera
### Elaborazione audio ed effetti:
- amplificatore di volume
- equalizzatore
- sistema 3D-bass
- normalizzazione
- guadagno automatico/manuale
- ci sono molti altri effetti
### Esempi di applicazioni:
- Acquisizione audio
- Cattura DV
- Cattura IP
- Cattura dello schermo
- Semplice acquisizione video
- Demo di cattura principale
- Demo di modifica principale
- Demo del giocatore principale
- Lettore audio
- Lettore DVD
- Riproduzione della memoria
- Lettore video
### Piattaforme di sviluppo:
- Visual Studio 2005 e successivi: Visual C#, Visual C++, Visual Basic .NET
- Delphi 6 / 7 / 2005 / 2006 / 2007 / 2009 / 2010 / XE / XE2 / XE3 / XE4 / XE5 / XE6 / XE7 / XE8 / 10 / 10.1 / 10.2 / 10.3 / 10.4 / 11 / 12
- Visual Studio 6: Visual C++, Visual Basic 6
- Borland C++ Builder 5 e successivi
- può essere utilizzato con altre applicazioni compatibili con ActiveX come Microsoft Access, Word, Excel, FrontPage, Powerbuilder, ecc.
- Versioni x86 e x64
### Requisiti di sistema
- Windows 11, Windows 10, Windows 8/8.1, Windows 7, Windows Vista, Windows Server 2012 e versioni successive
- .Net Framework 4.0 o successivo (per applicazioni demo .Net basate su ActiveX)
- DirectX 9 o successive
### Diritti di distribuzione
Distribuzione gratuita.
### Limiti della prova
La versione di prova visualizza una filigrana nella finestra del video.

#### EDIZIONE

#### STANDARD

#### PROFESSIONALE

#### PREMIUM
Dispositivi di input e altre fonti supportate
- Telecamere web
- Sintonizzatori TV
- Videocamere DV e MPEG
- Capture dello schermo
- Telecamere IP HTTP / RTSP / ONVIF
- UDP, TCP, RTMP e altri flussi di rete
- Motori aggiuntivi per i flussi di rete
Anteprima video
Acquisizione di fotogrammi
Elaborazione video
Elaborazione audio
Supporto video HD e 4K
Sintonizzazione TV
Streaming di rete in formato WMV
Streaming di rete tramite RTMP / RTSP / UDP
Chiave cromatica
Rilevamento del movimento
Elaborazione video con filtri DirectShow
OSD (On-Screen Display)
Immagine nell'immagine
Modifica del nome del file di output al volo
Schermi di uscita multipli
Effetti video accelerati dalla GPU
Uscita verso l'SDK della Virtual Camera
Supporto SDK di crittografia video
Formati di uscita
- AVI
- WMV (Windows Media Video)
- WMA (Windows Media Audio)
- WAV
- MP3
- Ogg Vorbis
- Video DV
- DV / MPEG-1/2/4 (utilizzando un sintonizzatore TV con codificatore MPEG interno o una videocamera DV/HDV)
- Video Flash (FLV) utilizzando FFMPEG
- WebM
- Formati di uscita personalizzati utilizzando filtri DirectShow esterni
- MPEG-1/2/4 con FFMPEG
- MP4 H264/AAC tramite software, Intel QuickSync o nVidia NVENC / CUDA
L'SDK contiene le librerie opzionali FFMPEG e libVLC con licenza LGPL v2.1.
---END OF PAGE---
# Page: https://www.visioforge.com/de/video-fingerprinting-sdk
# Video Fingerprinting SDK .Net / C++
Version 12.1
Unsere hochmoderne Video-Fingerprinting-Technologie nutzt die neuesten Fortschritte in den Bereichen Szenenanalyse, Objektverfolgung und Bewegungsschätzung, um den Inhalt jedes Videos zu analysieren und seine einzigartigen Merkmale wie Farben, Szenenstruktur und die Bewegung von Objekten zu identifizieren. Dadurch kann eine Kopie des Videos trotz Änderungen der Auflösung, der Bitrate, der Kodierungsmethode oder des Dateiformats identifiziert werden. Das Video kann sogar erkannt werden, wenn es in einem anderen Video enthalten ist oder wenn nur ein Fragment des Videos reproduziert wird.
Mit unserem SDK können Sie diese Videoidentifizierungsfunktion in Ihre Anwendungen und Dienste integrieren. Unsere Lizenzvereinbarung erlaubt es Ihnen, die Technologie gegen eine einmalige Zahlung in eine unbegrenzte Anzahl von Produkten einzubauen. Es fallen keine weiteren Gebühren an, unabhängig davon, wie viele Kopien dieser Produkte Sie verkaufen.
## Was ist ein Video-Fingerabdruck?
Ein Video-Fingerprint ist ein kompakter digitaler Deskriptor, der aus einer beliebigen Videoquelle extrahiert werden kann, sei es ein Fragment einer Fernsehsendung, eine Videodatei, ein Online-Video oder eine DVD oder Blu-ray-Disk. Diese Video-Fingerabdrücke können dann gespeichert, kopiert und verglichen werden. Video-Fingerabdrücke können verwendet werden, um urheberrechtlich geschütztes Videomaterial zu identifizieren, doppelte Videos zu erkennen, nach Videos zu suchen, Videos zu organisieren, zu erkennen, wann ein bestimmtes Video abgespielt wird, Medienüberwachung oder Anzeigenverfolgung.
Verwenden Sie den Video Duplicates Finder als Beispielanwendung, um ähnliche Videodateien zu finden.
Verwenden Sie das Media Monitoring Tool als Beispielanwendung, um ein Videofragment (z. B. einen TV-Werbespot) in einem anderen zu finden (eine vollständige Sendeaufzeichnung).
.Net SDK Version hat einen Helfer für die Verwendung von MongoDB als Fingerabdruckspeicher.
### Einige der Möglichkeiten, wie Sie unser Video Fingerprinting SDK einsetzen können:
- Ein Online-Videohosting-Dienst wie YouTube könnte Video-Fingerabdrücke verwenden, um Urheberrechtsverletzungen zu vermeiden. Eine Datenbank mit Video-Fingerabdrücken des urheberrechtlich geschützten Materials würde entwickelt und mit den von den Nutzern eingereichten Video-Fingerabdrücken verglichen, um die illegale Einreichung von Raubkopien zu verhindern.
- Ein Videoarchivdienst könnte Video-Fingerabdrücke verwenden, um Platz zu sparen und doppelte Uploads zu verhindern. Von jedem Video im Archiv würde ein Video-Fingerabdruck extrahiert werden. Der Video-Fingerabdruck jeder neuen Einreichung wird mit der Datenbank der Fingerabdrücke vorhandener Videos verglichen, um sicherzustellen, dass sie sich unterscheiden und doppelte Einreichungen blockiert werden.
- Video-Organizer-Software könnte Video-Fingerprints verwenden, um Kopien desselben Films oder Videoclips trotz Unterschieden in Format, Auflösung oder Bitrate zu identifizieren und sie zusammenzufassen.
- Die Software für Set-Top-Boxen könnte Video-Fingerabdrücke nutzen, um interaktive Werbung zu entwickeln, indem sie erkennt, wann bestimmte Fernsehwerbung gezeigt wird, und eine anklickbare URL anzeigt, über die der Nutzer auf die Produkt-Website gelangt. Außerdem könnte damit verfolgt werden, wie oft die Werbung angesehen wird.
- Mit unserem Video Fingerprinting SDK könnte eine Suchmaschine für Videos entwickelt werden - ein einzigartiger, revolutionärer Dienst, der eine Video-für-Video-Suchfunktion implementiert, die die erste ihrer Art wäre.
- Ein TV-Clipping-Dienst könnte die Video-Fingerprinting-Technologie nutzen, um die Überwachung von Fernsehsendungen und die Überprüfung von TV-Werbung zu automatisieren, um zu erkennen, wann die Werbung eines Kunden ausgestrahlt wird, damit dieser sicherstellen kann, dass die Bedingungen seiner TV-Werbeverträge eingehalten werden.
- Wir haben unser Tool zur Medienbeobachtung als voll funktionsfähige Anwendung entwickelt, die die Erkennung von Werbemustern in einem Sende-Dump ermöglicht, um genau diese Art von Dienstleistung zu implementieren. Diese Anwendung, einschließlich der Quellen, kann separat lizenziert und als Grundlage für den Aufbau Ihres Produkts verwendet oder in ein bestehendes System integriert werden. Weitere Informationen finden Sie auf unserer Seite zum Medienbeobachtungstool.
- [Erkennung von raubkopierten Videoinhalten](https://www.visioforge.com/de/detecting-pirated-video-content)
### Welche Betriebssysteme werden unterstützt?
- C++ SDK unterstützt Windows und Linux oder jedes andere POSIX-kompatible Betriebssystem (auf Anfrage erhältlich)
- .Net SDK unterstützt Windows 7 und höher
### Wie groß ist die Größe einer Video-Fingerprint-Datei?
Jede Sekunde eines analysierten Videostroms benötigt etwa 1kb für seinen Video-Fingerabdruck. Für die Erkennung von Duplikaten müssen im Allgemeinen nur 3-5 Sekunden jedes Videos indiziert werden. Die Indizierung vollständiger Videos ist erforderlich, um ein Video zu identifizieren, das in ein anderes eingefügt wurde.
### Wie viel Zeit wird für die Berechnungen benötigt?
Die Indizierung einer Sekunde Video dauert etwa 300 Millisekunden - etwa die Hälfte dieser Zeit (150 Millisekunden) entfällt auf die eigentliche Verarbeitung der Datei, der Rest auf die Dekomprimierung des Videos. Der Abgleich eines Paares von 10 Sekunden langen Fingerabdrücken dauert 1-2 Millisekunden. Diese Zeiten wurden durch Tests mit einem Intel i3-Prozessor und LAV-Filtern für die Videokompression ermittelt.
### Ist eine Software zum Lesen oder Dekodieren von Videos enthalten?
- C++: Nein. Sie benötigen eine andere Bibliothek (z. B. FFMPEG, Demo verfügbar), um das Lesen von Videos in Ihrer Anwendung zu implementieren.
- .Net: Ja, FFMPEG und libVLC enthalten. Außerdem können Systemcodecs für die Dekodierung verwendet werden
### Welche Codebeispiele sind verfügbar?
Die folgenden Code-Beispiele sind in Ihrem Kauf enthalten:
C++:
- FFMPEG-basierte Konsolenanwendung zum Indizieren von Videos und Erstellen von Fingerabdrücken (Windows, Linux)
- Eine Konsolenanwendung, die zwei Fingerabdrücke vergleicht, um Duplikate zu erkennen (Windows, Linux)
- Eine Konsolenanwendung, die nach Einträgen eines Fingerabdrucks innerhalb eines anderen sucht (Windows, Linux)
- Quellcode einer vollständigen Media Monitoring Tool-Anwendung (Windows, Linux)
.Netto:
- Media Monitoring Tool und Media Monitoring Tool Live Quellcode
- Video Duplicates Finder Quellcode.
### Welche anderen Unterlagen sind verfügbar?
C++:
- VFCompare API - eine Implementierung eines Video-Fingerprinting-Algorithmus, der für die Erkennung von doppelten Videos optimiert ist
- VFSearch API - eine Implementierung des Video-Fingerprinting-Algorithmus, die für die Suche in Videos optimiert ist
.Netto:
- Die vollständige API ist in einer Hilfedatei beschrieben.
### Wie kann ich die Technologie ausprobieren und bewerten?
Wir empfehlen Ihnen, die Testversionen unserer Anwendungen Media Monitoring Tool und Video Duplicates Finder herunterzuladen und auszuprobieren und sich mit der API und den Codebeispielen vertraut zu machen.
Die .Net-Version des SDK ist als unabhängiges Installationsprogramm mit Beispielanwendungen und Beispiel-Quellcode verfügbar.
MMT/VDF Tools Quellcode enthalten (Tools erfordern .Net 4.5 für SOAP-Export. SDK kann in .Net 4.0 und höher verwendet werden).
Die C++-Version des SDK ist als unabhängiges Installationsprogramm verfügbar.
### Systemanforderungen
Mac OS, Windows oder Linux.
### Vertriebsrechte
Lizenzfreie Verbreitung.
### Beschränkungen des Versuchs
In der Testversion wird ein Wasserzeichen im Videofenster angezeigt.
### Der Kauf des Video Fingerprinting SDK bietet Ihnen folgende Vorteile:
- Unbegrenzte Nutzung
- Kein Nörgler-Bildschirm
- Kostenlose Minor- und Major-Upgrades innerhalb eines Jahres (nach einem Jahr funktioniert das SDK genauso wie vorher) für eine reguläre Lizenz und unbegrenzte Updates für unbegrenzte Zeit für die Lifetime-Lizenz
- Vorrangige Unterstützung und Fehlerbehebung
Die reguläre Lizenz wird jährlich in Rechnung gestellt und automatisch um ein Jahr verlängert. Sie können Ihr Abonnement jederzeit kündigen.
## Media Monitoring Tool (Live) Beispielanwendung
Unsere Demo-App ist ein voll funktionsfähiges Tool zur Medienbeobachtung, das für die Anzeigenverfolgung und die Überwachung von Rundfunkmedien verwendet werden kann. Es ermöglicht die Erkennung von Werbemustern in einem Broadcast-Dump. Sie können diese Anwendung auch zusammen mit unserem Video-Fingerprinting-SDK verwenden, um Ihr eigenes Produkt oder Ihren eigenen Dienst für die TV-Überwachung zu entwickeln oder sie in einen bestehenden Dienst zu integrieren.
### Wie es funktioniert
Unser Media Monitoring Tool kann erkennen, wann ein Referenzvideo in einer aufgezeichneten Fernsehsendung abgespielt wird, so dass es nicht mehr notwendig ist, jemanden zu bezahlen, der 24 Stunden am Tag, sieben Tage die Woche fernsieht. Der TV-Sendestream wird als eine Reihe von 5-minütigen Videodateien registriert, die dann mit dem angegebenen Referenzvideo, z. B. dem Werbespot, verglichen werden, der verfolgt werden soll. Die Anwendung erkennt automatisch alle Einschlüsse des ausgewählten Videos in den aufgezeichneten Dateien und liefert eine Liste der Videodateien, die den Werbespot enthalten.
Mit unserem Media Monitoring Tool können Sie den Prozess der TV-Überwachung automatisieren. Es reduziert den Personalbedarf und die damit verbundenen Arbeitskosten. Die Vorteile der inhaltsbasierten automatisierten Videosuche verbessern zudem die Genauigkeit. Sie können Ihren Kunden sogar einen digitalen Nachweis für die Wiedergabe von Werbespots liefern, ohne dass manuelle Arbeit erforderlich ist.
Der Prozess beginnt mit der Aufzeichnung des Sendestroms in Form einer Reihe von fünfminütigen Videos. Das Medienbeobachtungstool analysiert die aufgezeichneten Inhalte und findet alle Stellen, an denen der Werbespot des Kunden vorkommt. Die Ergebnisse werden in Form einer Liste von Miniaturansichten dargestellt, die die Clips mit dem Werbespot hervorheben.
### Vorteile
- Präzise Ergebnisse - Die inhaltsbasierte Videosuchtechnologie des Programms gewährleistet Genauigkeit und Geschwindigkeit. Der Algorithmus identifiziert schnell und präzise alle Instanzen des Referenzvideos im aufgezeichneten Videostream ohne menschliches Eingreifen und ohne menschliche Fehler.
- Geringere Kosten - Da Sie keine Mitarbeiter mehr dafür bezahlen müssen, auf einen Fernsehbildschirm zu starren und die Einzelheiten der Ausstrahlung von Werbespots manuell zu erfassen, werden Ihre Betriebskosten drastisch gesenkt.
- Benutzerfreundlichkeit - Die leicht zu erlernende, intuitive Benutzeroberfläche des Programms ermöglicht es, benutzerdefinierte Suchen zu definieren und in Sekundenschnelle durchzuführen. Der Benutzer wählt einfach den Ordner aus, der den Sende-Dump enthält, und gibt die Video-Referenzmuster an, die die zu identifizierenden Anzeigen enthalten. Den Rest erledigt das Programm.
## Video Duplicates Finder Beispielanwendung
Video Duplicates Finder ermöglicht es Ihnen, ähnliche oder doppelte Videodateien auf Ihrem PC zu finden. AVI, MPEG-1, MPEG-2, Windows Media Video, MP4 und viele andere Formate werden unterstützt. Diese Anwendung ist ein Beispiel für die Verwendung des Video Fingerprinting SDK.
### Die wichtigsten Merkmale sind:
- AVI, WMV, MP4, MPG, TS, und viele andere Formate werden unterstützt
- SD-, HD- und 4K-Videos werden unterstützt
- Empfindlichkeitseinstellungen
- Option Timeshift
- Komplette Dateiverarbeitung oder ein benutzerdefinierter Teil davon
- DirectShow (System-Codecs), FFMPEG und VLC-Decodiermaschinen

#### DOWNLOADS
[Windows / .Net](https://s3.us-west-2.amazonaws.com/files.visioforge.com/trials/visioforge_sdks_installer_dotnet_setup.exe)[Windows / C++](https://s3.us-west-2.amazonaws.com/files.visioforge.com/trials/visioforge_video_fingerprinting_sdk_cpp_setup.exe)[Linux / C++](https://s3.us-west-2.amazonaws.com/files.visioforge.com/trials/visioforge_video_fingerprinting_sdk_cpp_linux.zip)[Samples auf GitHub](https://github.com/visioforge/.Net-SDK-s-samples/tree/master/Video%20Fingerprinting%20SDK)

#### KAUFEN
[Preise prüfen oder bestellen](https://www.visioforge.com/de/buy)

#### HILFE
[Online-Hilfe](/help/)[Änderungsliste](/help/docs/vfp/changelog/)[Lizenzvereinbarung](/help/docs/eula/)
SDK enthält optionale FFMPEG- und libVLC-Bibliotheken, die unter der LGPL v2.1 lizenziert sind.
---END OF PAGE---
# Page: https://www.visioforge.com/es/video-fingerprinting-sdk
# Video Fingerprinting SDK .Net / C++
versión 12.1
Nuestra tecnología de huellas dactilares de vídeo incorpora los últimos avances en análisis de escenas, seguimiento de objetos y estimación del movimiento para analizar el contenido de cualquier vídeo con el fin de identificar sus características únicas, como los colores, la estructura de la escena y el movimiento de los objetos. Esto permite identificar una copia del vídeo a pesar de los cambios de resolución, velocidad de bits, método de codificación o formato de archivo. El vídeo puede detectarse incluso cuando está incluido dentro de otro vídeo o cuando sólo se reproduce un fragmento del mismo.
Nuestro SDK le permite integrar esta funcionalidad de identificación por vídeo en sus aplicaciones y servicios. Nuestro acuerdo de licencia le permite incorporar la tecnología en un número ilimitado de productos por un solo pago. No hay otras tasas, independientemente del número de copias de estos productos que venda.
## ¿Qué es una huella de vídeo?
Una huella digital de vídeo es un descriptor digital compacto que puede extraerse de cualquier fuente de vídeo, ya sea un fragmento de una emisión de televisión, un archivo de vídeo, un vídeo en línea o de un DVD o disco Blu-ray. Estas huellas de vídeo pueden almacenarse, copiarse y compararse. Las huellas dactilares de vídeo pueden utilizarse para identificar material de vídeo protegido por derechos de autor, identificar vídeos duplicados, buscar vídeos, organizar vídeos, reconocer cuándo se reproduce un vídeo específico, monitorizar medios o rastrear anuncios.
Utilice el Buscador de Duplicados de Vídeo como aplicación de ejemplo para encontrar archivos de vídeo similares.
Utilice la herramienta de supervisión de medios como aplicación de ejemplo para encontrar un fragmento de vídeo (anuncio de televisión, por ejemplo) en otro (grabación de emisión completa).
La versión .Net SDK tiene una ayuda para el uso de MongoDB como almacenamiento de huellas dactilares.
### Algunas de las formas en que puede utilizar nuestro SDK de huellas dactilares de vídeo:
- Un servicio de alojamiento de vídeos en línea, como YouTube, podría utilizar huellas dactilares de vídeo para evitar la infracción de los derechos de autor. Se desarrollaría una base de datos de huellas dactilares de vídeo del material protegido por derechos de autor y se compararía con las huellas dactilares de vídeo de los materiales enviados por los usuarios para evitar el envío ilegal de vídeos pirateados.
- Un servicio de archivo de vídeos podría utilizar huellas dactilares para ahorrar espacio y bloquear las cargas duplicadas. Se extraería una huella dactilar de cada vídeo del archivo. La huella dactilar de cada nuevo envío se compararía con la base de datos de las huellas dactilares de los vídeos existentes, comprobando que son diferentes y bloqueando los envíos duplicados.
- El software Video Organizer podría utilizar huellas dactilares de vídeo para identificar copias de la misma película o videoclip, a pesar de las diferencias de formato, resolución o tasa de bits, y agruparlas.
- El software de los descodificadores podría utilizar las huellas digitales de vídeo para desarrollar anuncios interactivos, identificando cuándo se muestran determinados anuncios de televisión y mostrando una URL en la que se puede hacer clic para que el usuario acceda al sitio web del producto. También podría utilizarse para hacer un seguimiento de la frecuencia con que se ve el anuncio.
- Se podría desarrollar un motor de búsqueda de vídeos utilizando nuestro SDK Video Fingerprinting, un servicio único y revolucionario que implementaría una funcionalidad de búsqueda vídeo a vídeo que sería la primera de su clase.
- Un servicio de recorte televisivo podría utilizar la tecnología de huellas de vídeo para automatizar la supervisión de la emisión televisiva y la verificación de anuncios de televisión para detectar cuándo se emite el anuncio de un cliente, de modo que pueda asegurarse de que se respetan los términos de sus acuerdos publicitarios en televisión.
- Hemos desarrollado nuestra herramienta de monitorización de medios como una aplicación totalmente funcional que permite la detección de muestras de anuncios en un volcado de emisión para implementar precisamente este tipo de servicio. Esta aplicación, incluidas las fuentes, puede adquirirse por separado y utilizarse como base para crear su producto o integrarse en un sistema ya existente. Consulte nuestra página de herramientas de monitorización de medios para obtener más información.
- [Detección de contenidos de vídeo pirateados](https://www.visioforge.com/es/detecting-pirated-video-content)
### ¿Qué sistemas operativos son compatibles?
- C++ SDK compatible con Windows y Linux, o cualquier otro sistema operativo compatible con POSIX (disponible previa solicitud)
- .Net SDK es compatible con Windows 7 y versiones posteriores
### ¿Cuál es el tamaño de un archivo de huellas dactilares de vídeo?
Cada segundo de un flujo de vídeo analizado requiere aproximadamente 1kb para su huella digital de vídeo. La detección de duplicados generalmente sólo requiere indexar entre 3 y 5 segundos de cada vídeo. La indexación de vídeos completos es necesaria para identificar un vídeo que se ha incluido dentro de otro.
### ¿Cuánto tiempo se necesita para los cálculos?
Indexar un segundo de vídeo tarda unos 300 milisegundos: el procesamiento real del archivo supone aproximadamente la mitad de ese tiempo (150 milisegundos), mientras que la descompresión del vídeo supone el resto. La comparación de un par de huellas dactilares de 10 segundos de duración tarda entre 1 y 2 milisegundos. Estos tiempos se establecieron mediante pruebas con un procesador Intel i3 y filtros LAV para la compresión de vídeo.
### ¿Se incluye software de lectura o descodificación de vídeo?
- C++: No. Necesitarás alguna otra librería (FFMPEG, por ejemplo, demo disponible) para implementar la lectura de vídeo en tu aplicación.
- .Net: Sí, FFMPEG y libVLC incluidos. También se pueden utilizar los códecs del sistema para descodificar.
### ¿Qué ejemplos de código hay disponibles?
Con su compra se incluyen los siguientes ejemplos de código:
C++:
- Aplicación de consola basada en FFMPEG que indexa vídeos y crea huellas dactilares (Windows, Linux)
- Una aplicación de consola que compara dos huellas dactilares para detectar duplicados (Windows, Linux)
- Una aplicación de consola que busca entradas de una huella dentro de otra (Windows, Linux)
- Código fuente de una aplicación Media Monitoring Tool completa (Windows, Linux)
.Neto:
- Código fuente de Media Monitoring Tool y Media Monitoring Tool Live
- Video Duplicates Finder código fuente.
### ¿Qué otra documentación está disponible?
C++:
- API VFCompare: implementación de un algoritmo de huellas dactilares de vídeo optimizado para la detección de vídeos duplicados.
- API VFSearch: implementación de un algoritmo de huellas dactilares de vídeo optimizado para la búsqueda de vídeo en vídeo.
.Neto:
- API completa descrita en un archivo de ayuda.
### ¿Cómo puedo probar y evaluar la tecnología?
Le sugerimos que descargue y experimente con las versiones de prueba de nuestra aplicación Media Monitoring Tool y la aplicación Video Duplicates Finder y se familiarice con la API y los ejemplos de código.
Versión .Net del SDK disponible como instalador independiente con aplicaciones de muestra y código fuente de muestra en su interior.
Se incluye el código fuente de las herramientas MMT/VDF (las herramientas requieren .Net 4.5 para la exportación SOAP. SDK se puede utilizar en .Net 4.0 y posteriores).
Versión C++ del SDK disponible como instalador independiente.
### Requisitos del sistema
Mac OS, Windows o Linux.
### Derechos de distribución
Distribución sin derechos de autor.
### Limitaciones de la versión de prueba
La versión de prueba muestra una marca de agua en la ventana de vídeo.
### La compra de Video Fingerprinting SDK le proporcionará los siguientes beneficios:
- Uso ilimitado
- Sin pantalla de licencia
- Actualizaciones menores y mayores gratuitas en el plazo de un año (después de un año, el SDK funcionará igual que antes) para una licencia normal y actualizaciones ilimitadas por tiempo ilimitado para la licencia vitalicia.
- Asistencia y correcciones prioritarias
La licencia normal se factura anualmente y se renueva automáticamente cada año. Puede cancelar su suscripción en cualquier momento.
## Media Monitoring Tool (Live) Ejemplo
Nuestra aplicación de demostración es una herramienta de supervisión de medios totalmente funcional que puede utilizarse para el seguimiento de anuncios y la supervisión de medios de difusión. Permite detectar muestras de anuncios en un volcado de emisión. También puede utilizar esta aplicación, junto con nuestro SDK de Video Fingerprinting, para crear su propio producto o servicio de monitorización de emisiones de televisión o integrarlo en un servicio ya existente.
### ¿Cómo funciona?
Nuestra herramienta de seguimiento de medios puede detectar cuándo se reproduce un vídeo de muestra de referencia en una emisión de televisión grabada, por lo que ya no es necesario pagar a alguien para que vea la televisión 24 horas al día, siete días a la semana. El flujo de emisión de TV se registra como una matriz de archivos de vídeo de 5 minutos de duración y, a continuación, se comparan con el vídeo de referencia de muestra especificado, como el anuncio, para realizar el seguimiento. La aplicación detectará automáticamente todas las inclusiones del vídeo seleccionado en los archivos grabados y proporcionará una lista de los archivos de vídeo que contienen el anuncio.
Nuestra herramienta de supervisión de medios le permite automatizar el proceso de supervisión de emisiones de televisión. Reduce la cantidad de personal necesario y los costes laborales asociados. Y aprovechar la búsqueda automatizada de vídeos basada en el contenido también mejorará la precisión. Incluso le permitirá proporcionar a sus clientes una prueba digital de la reproducción de anuncios sin ningún trabajo manual.
El proceso comienza grabando el flujo de emisión como una serie de vídeos de cinco minutos. La herramienta de supervisión de medios analiza el contenido capturado y encuentra todas las instancias del anuncio del cliente. Los resultados se presentan como una lista de miniaturas que destacan los clips que contienen el anuncio.
### Beneficios
- Resultados precisos - La tecnología de búsqueda de vídeo basada en el contenido del programa garantiza precisión y rapidez. El algoritmo identifica con rapidez y precisión todas las instancias del vídeo de referencia en el flujo de vídeo de emisión grabado sin intervención humana y sin errores humanos.
- Costes reducidos - Como ya no tiene que pagar a personas para que se sienten a mirar una pantalla de televisión y registren manualmente los detalles de cuándo se emite el anuncio, sus costes de explotación se reducen drásticamente.
- Facilidad de uso - La interfaz intuitiva del programa, fácil de aprender, permite definir y realizar búsquedas personalizadas en cuestión de segundos. El usuario sólo tiene que seleccionar la carpeta que contiene el volcado de emisión y especificar las muestras de referencia de vídeo que contienen los anuncios que desea identificar. El programa hace el resto.
## Video Duplicates Finder aplicación de ejemplo
Video Duplicates Finder le permite encontrar archivos de vídeo similares o duplicados en su PC. Soporta AVI, MPEG-1, MPEG-2, Windows Media Video, MP4 y muchos otros formatos. Esta aplicación es una muestra del uso del SDK de Video Fingerprinting.
### Las principales características son:
- Compatible con AVI, WMV, MP4, MPG, TS y muchos otros formatos.
- Compatible con vídeos SD, HD y 4K
- Ajustes de sensibilidad
- Opción de Timeshift
- Tratamiento completo de archivos o de una parte personalizada
- DirectShow (códecs del sistema), FFMPEG y código de descodificación de vídeo VLC

#### DESCARGAS
[Windows / .Net](https://s3.us-west-2.amazonaws.com/files.visioforge.com/trials/visioforge_sdks_installer_dotnet_setup.exe)[Windows / C++](https://s3.us-west-2.amazonaws.com/files.visioforge.com/trials/visioforge_video_fingerprinting_sdk_cpp_setup.exe)[Linux / C++](https://s3.us-west-2.amazonaws.com/files.visioforge.com/trials/visioforge_video_fingerprinting_sdk_cpp_linux.zip)[Samples en GitHub](https://github.com/visioforge/.Net-SDK-s-samples/tree/master/Video%20Fingerprinting%20SDK)

#### COMPRAR
[Consultar precios o hacer un pedido](https://www.visioforge.com/es/buy)

#### AYUDA
[Ayuda en línea](/help/)[Registro de cambios](/help/docs/vfp/changelog/)[Acuerdo de licencia](/help/docs/eula/)
El SDK contiene bibliotecas opcionales FFMPEG y libVLC con licencia LGPL v2.1.
---END OF PAGE---
# Page: https://www.visioforge.com/it/video-fingerprinting-sdk
# Video Fingerprinting SDK .Net / C++
versione 12.1
La nostra tecnologia di fingerprinting video all'avanguardia incorpora i più recenti progressi nell'analisi della scena, nel tracciamento degli oggetti e nella stima del movimento per analizzare il contenuto di qualsiasi video al fine di identificarne le caratteristiche uniche, come i colori, la struttura della scena e il movimento degli oggetti. Ciò consente di identificare una copia del video nonostante le variazioni di risoluzione, velocità di trasmissione, metodo di codifica o formato del file. Il video può essere rilevato anche quando è incluso in un altro video o quando ne viene riprodotto solo un frammento.
Il nostro SDK vi consente di integrare questa funzionalità di identificazione video nelle vostre applicazioni e servizi. Il nostro contratto di licenza vi consente di incorporare la tecnologia in un numero illimitato di prodotti a fronte di un unico pagamento. Non sono previsti altri costi, indipendentemente dal numero di copie vendute di questi prodotti.
## Che cos'è un'impronta video?
Un'impronta digitale video è un descrittore digitale compatto che può essere estratto da qualsiasi fonte video, sia che si tratti di un frammento di una trasmissione televisiva, di un file video, di un video online o di un DVD o Blu-ray Disk. Queste impronte digitali video possono essere memorizzate, copiate e confrontate. Le impronte digitali dei video possono essere utilizzate per identificare materiale video protetto da copyright, identificare video duplicati, cercare video, organizzare video, riconoscere quando un video specifico viene riprodotto, monitorare i media o tracciare gli annunci pubblicitari.
Utilizzate Video Duplicates Finder come applicazione di esempio per trovare file video simili.
Utilizzate Media Monitoring Tool come applicazione di esempio per trovare un frammento di video (ad esempio, uno spot televisivo) in un altro (registrazione di una trasmissione completa).
La versione dell'SDK .Net dispone di un helper per l'utilizzo di MongoDB come archivio di impronte digitali.
### Alcuni dei modi in cui è possibile utilizzare il nostro Video Fingerprinting SDK:
- Un servizio di hosting video online, come YouTube, potrebbe utilizzare le impronte digitali dei video per evitare la violazione del copyright. Un database di impronte video del materiale protetto da copyright verrebbe sviluppato e confrontato con le impronte video dei materiali inviati dagli utenti per impedire l'invio illegale di video pirata.
- Un servizio di archivio video potrebbe utilizzare le impronte digitali dei video per risparmiare spazio e bloccare i caricamenti duplicati. Da ogni video presente nell'archivio verrebbe estratta un'impronta digitale video. L'impronta video di ogni nuovo invio verrebbe confrontata con il database delle impronte digitali dei video esistenti, verificando che siano diverse e bloccando gli invii duplicati.
- Il software Video Organizer potrebbe utilizzare le impronte digitali dei video per identificare copie dello stesso filmato o videoclip, nonostante le differenze di formato, risoluzione o bit-rate, e raggrupparle.
- Il software del set-top box potrebbe utilizzare le impronte digitali dei video per sviluppare pubblicità interattive, identificando quando vengono mostrati specifici annunci televisivi e visualizzando un URL cliccabile per consentire all'utente di accedere al sito web del prodotto. Potrebbe anche essere utilizzato per tenere traccia della frequenza di visualizzazione dell'annuncio.
- Un motore di ricerca per i video potrebbe essere sviluppato utilizzando il nostro Video Fingerprinting SDK - un servizio unico e rivoluzionario che implementa una funzionalità di ricerca video per video che sarebbe la prima nel suo genere.
- Un servizio di ritaglio televisivo potrebbe utilizzare la tecnologia di video fingerprinting per automatizzare il monitoraggio delle trasmissioni televisive e la verifica degli annunci televisivi, in modo da rilevare quando l'annuncio di un cliente viene trasmesso e garantire il rispetto dei termini dei suoi accordi pubblicitari televisivi.
- Abbiamo sviluppato il nostro strumento di monitoraggio dei media come un'applicazione completamente funzionale che consente di rilevare campioni di annunci in un dump di trasmissione per implementare proprio questo tipo di servizio. Questa applicazione, comprese le fonti, può essere concessa in licenza separatamente e utilizzata come base per la creazione del vostro prodotto o integrata in un sistema esistente. Per ulteriori informazioni, consultare la pagina dello strumento di monitoraggio dei media.
- [Rilevamento di contenuti video pirata](https://www.visioforge.com/it/detecting-pirated-video-content)
### Quali sono i sistemi operativi supportati?
- L'SDK C++ supporta Windows e Linux, o qualsiasi altro sistema operativo compatibile con POSIX (disponibile su richiesta)
- L'SDK .Net supporta Windows 7 e successivi
### Qual è la dimensione di un file di impronta video?
Ogni secondo di un flusso video analizzato richiede circa 1kb per la sua impronta video. Il rilevamento dei duplicati richiede generalmente solo 3-5 secondi di ogni video da indicizzare. L'indicizzazione dei video completi è necessaria per identificare un video che è stato incluso in un altro.
### Quanto tempo è necessario per i calcoli?
L'indicizzazione di un secondo di video richiede circa 300 millisecondi - l'elaborazione effettiva del file rappresenta circa la metà di questo tempo (150 millisecondi), mentre la decompressione del video rappresenta il resto. La corrispondenza di una coppia di impronte digitali della durata di 10 secondi richiede 1-2 millisecondi. Questi tempi sono stati stabiliti effettuando test con un processore Intel i3 e filtri LAV per la compressione video.
### Il software di lettura o decodifica video è incluso?
- C++: No. È necessaria un'altra libreria (FFMPEG, ad esempio, demo disponibile) per implementare la lettura dei video nella propria applicazione.
- .Net: Sì, FFMPEG e libVLC inclusi. Inoltre, è possibile utilizzare i codec di sistema per la decodifica.
### Quali sono gli esempi di codice disponibili?
I seguenti esempi di codice sono inclusi nell'acquisto:
C++:
- Applicazione console basata su FFMPEG che indicizza i video e crea impronte digitali (Windows, Linux)
- Un'applicazione console che confronta due impronte digitali per rilevare i duplicati (Windows, Linux)
- Un'applicazione console che cerca le voci di un'impronta digitale all'interno di un'altra (Windows, Linux)
- Codice sorgente di un'applicazione Media Monitoring Tool completa (Windows, Linux)
.Netto:
- Media Monitoring Tool e Media Monitoring Tool Live codice sorgente
- Codice sorgente di Video Duplicates Finder.
### Qual è l'altra documentazione disponibile
C++:
- API VFCompare - un'implementazione dell'algoritmo di fingerprinting video ottimizzato per il rilevamento di video duplicati.
- API VFSearch - un'implementazione dell'algoritmo di fingerprinting video ottimizzato per la ricerca di video nei video.
.Netto:
- API completa descritta in un file di aiuto.
### Come posso provare e valutare la tecnologia?
Vi suggeriamo di scaricare e sperimentare le versioni di prova della nostra applicazione Media Monitoring Tool e dell'applicazione Video Duplicates Finder e di familiarizzare con le API e gli esempi di codice.
La versione .Net dell'SDK è disponibile come programma di installazione indipendente con applicazioni di esempio e codice sorgente di esempio.
Codice sorgente degli strumenti MMT/VDF incluso (gli strumenti richiedono .Net 4.5 per l'esportazione SOAP. L'SDK può essere utilizzato in .Net 4.0 e successivi).
Versione C++ dell'SDK disponibile come programma di installazione indipendente.
### Requisiti di sistema
Mac OS, Windows o Linux.
### Diritti di distribuzione
Distribuzione gratuita.
### Limiti della prova
La versione di prova visualizza una filigrana nella finestra del video.
### L'acquisto del Video Fingerprinting SDK offre i seguenti vantaggi:
- Utilizzo illimitato
- Nessun nag-screen
- Aggiornamenti minori e maggiori gratuiti entro un anno (dopo un anno, l'SDK funzionerà come prima) per una licenza regolare e aggiornamenti illimitati per un tempo illimitato per la licenza a vita
- Assistenza e correzioni prioritarie
La licenza regolare viene fatturata annualmente e rinnovata automaticamente ogni anno. È possibile annullare l'abbonamento in qualsiasi momento.
## Applicazione campione Media Monitoring Tool (Live)
La nostra applicazione demo è uno strumento di monitoraggio dei media completamente funzionale che può essere utilizzato per il monitoraggio degli annunci e dei media broadcast. Consente di rilevare campioni di annunci in un dump di trasmissione. È inoltre possibile utilizzare questa applicazione, insieme al nostro Video Fingerprinting SDK, per creare un proprio prodotto o servizio per il monitoraggio delle trasmissioni televisive o integrarlo in un servizio esistente.
### Come funziona
Il nostro strumento di monitoraggio dei media è in grado di rilevare quando un video campione di riferimento viene riprodotto in una trasmissione televisiva registrata, per cui non è più necessario pagare qualcuno per guardare la TV 24 ore su 24, sette giorni su sette. Il flusso della trasmissione TV viene registrato come una serie di file video della durata di 5 minuti, che vengono poi confrontati con il video campione di riferimento specificato, ad esempio lo spot pubblicitario, da monitorare. L'applicazione rileva automaticamente tutte le inclusioni del video selezionato nei file registrati e fornisce un elenco dei file video contenenti lo spot.
Il nostro strumento di monitoraggio dei media consente di automatizzare il processo di monitoraggio delle trasmissioni televisive. Riduce la quantità di personale necessario e i relativi costi di manodopera. Inoltre, la ricerca automatica dei video basata sui contenuti migliorerà l'accuratezza. Inoltre, vi consentirà di fornire ai vostri clienti una prova digitale della riproduzione degli spot senza alcun lavoro manuale.
Il processo inizia registrando il flusso di trasmissione come una serie di video di cinque minuti. Il Media Monitoring Tool analizza il contenuto catturato e individua tutte le istanze dello spot del cliente. I risultati vengono presentati come un elenco di miniature che evidenziano le clip contenenti lo spot.
### Vantaggi
- Risultati accurati - La tecnologia di ricerca video basata sui contenuti del programma garantisce precisione e velocità. L'algoritmo identifica rapidamente e con precisione tutte le istanze del video di riferimento nel flusso video registrato, senza alcun intervento umano e senza alcun errore.
- Riduzione dei costi - Non dovendo più pagare persone che stiano sedute a fissare uno schermo televisivo e che registrino manualmente i dettagli di quando viene trasmesso lo spot, i costi di gestione si riducono drasticamente.
- Facilità d'uso - L'interfaccia intuitiva del programma, facile da imparare, consente di definire ed eseguire ricerche personalizzate in pochi secondi. L'utente deve solo selezionare la cartella che contiene il dump della trasmissione e specificare i campioni video di riferimento contenenti gli annunci da identificare. Il programma fa il resto.
## Applicazione campione di Video Duplicates Finder
Video Duplicates Finder consente di trovare file video simili o duplicati sul PC. Sono supportati i formati AVI, MPEG-1, MPEG-2, Windows Media Video, MP4 e molti altri. Questa applicazione è un esempio di utilizzo del Video Fingerprinting SDK.
### Le caratteristiche principali includono:
- Sono supportati AVI, WMV, MP4, MPG, TS e molti altri formati.
- Sono supportati video SD, HD e 4K
- Impostazioni di sensibilità
- Opzione Timeshift
- Elaborazione completa dei file o di una parte personalizzata
- DirectShow (codec di sistema), FFMPEG e motori di decodifica VLC

#### DOWNLOADS
[Windows / .Net](https://s3.us-west-2.amazonaws.com/files.visioforge.com/trials/visioforge_sdks_installer_dotnet_setup.exe)[Windows / C++](https://s3.us-west-2.amazonaws.com/files.visioforge.com/trials/visioforge_video_fingerprinting_sdk_cpp_setup.exe)[Linux / C++](https://s3.us-west-2.amazonaws.com/files.visioforge.com/trials/visioforge_video_fingerprinting_sdk_cpp_linux.zip)[Samples su GitHub](https://github.com/visioforge/.Net-SDK-s-samples/tree/master/Video%20Fingerprinting%20SDK)

#### ACQUISTO
[Controllare i prezzi o ordinare](https://www.visioforge.com/it/buy)

#### AIUTO
[Guida in linea](/help/)[Changelog](/help/docs/vfp/changelog/)[Contratto di licenza](/help/docs/eula/)
L'SDK contiene le librerie opzionali FFMPEG e libVLC con licenza LGPL v2.1.
---END OF PAGE---
# Page: https://www.visioforge.com/de/detecting-pirated-video-content
# Erkennung von raubkopierten Videoinhalten
## Wichtigste Informationen
Das Aufspüren von raubkopierten Videoinhalten ist eine wichtige Aufgabe im Zeitalter der neuen digitalen Inhalte. Viele Arten von Websites bieten Nutzern die Möglichkeit, Videoinhalte hochzuladen. Websites wie [YouTube](https://www.youtube.com) gibt es nur aus diesem Grund, aber auch viele soziale Netzwerke bieten diese Möglichkeit. Die große Beliebtheit dieser Websites hat den Zorn der Produzenten von Inhalten auf sich gezogen, die sich ernsthaft um den Schutz ihrer Urheberrechte bemühen und die Eigentümer dieser Websites unter Druck setzen, um illegale Verstöße zu unterbinden. Eine große Menge an urheberrechtlich geschütztem Material - von Clips aus Filmen und Fernsehsendungen bis hin zu Musik und Musikvideos - kann von Besuchern dieser Art von Online-Videohosting-Diensten problemlos heruntergeladen werden. Die Betreiber der Websites behaupten zwar, dass sie sich auf die Fair-Use-Doktrin berufen, aber die Produzenten von Inhalten und die großen Medienunternehmen glauben ihnen das nicht. Sie haben tiefe Taschen und Heerscharen von Anwälten zur Verfügung und bereiten sich auf rechtliche Schritte vor. Um kostspielige, langwierige Rechtsstreitigkeiten zu vermeiden, verfolgen Online-Videoupload-Sites technologisch basierte Methoden zur Verringerung und Verhinderung von Urheberrechtsverletzungen auf ihren Sites.
## Erkennung illegaler Inhalte mit Video Fingerprinting SDK
Die Vermeidung einer versehentlichen Haftung für Urheberrechtsverletzungen ist ein wichtiges Thema für jede Website, die von Benutzern hochgeladene Inhalte zulässt. Verstöße gegen das Urheberrecht können kostspielige und zeitraubende rechtliche Schritte nach sich ziehen und eine hohe zivil- oder strafrechtliche Haftung nach sich ziehen. Unser [Video Fingerprinting SDK](https://www.visioforge.com/de/video-fingerprinting-sdk) Technologie bietet eine perfekte Lösung für diese Art von Websites, um weiterhin das Hochladen und Hosten von Benutzerinhalten zu ermöglichen und gleichzeitig das Risiko von Urheberrechtsverletzungen zu minimieren. Unsere hochmoderne Video-Fingerprinting-Technologie umfasst die neuesten Fortschritte in der Szenenanalyse, Objektverfolgung und Bewegungsschätzung, um den Inhalt jedes Videos zu analysieren und seine einzigartigen Merkmale wie Farben, Szenenstruktur und die Bewegung von Objekten in einem kompakten digitalen Deskriptor, dem Video-Fingerprint, zu identifizieren. Für urheberrechtlich geschütztes Material kann eine Datenbank mit diesen Video-Fingerabdrücken erstellt werden. Diese Fingerabdrücke können dann mit dem von den Nutzern hochgeladenen Videomaterial abgeglichen werden, um das Vorhandensein von urheberrechtlich geschütztem Material zu erkennen und die Veröffentlichung solchen Materials auf ihren Websites zu unterbinden.
## Vergleich mit anderen Produkten
Im Gegensatz zu Produkten, die versuchen, eine ähnliche Funktion zu bieten, ermöglicht es unsere Technologie, diese Fingerabdrücke trotz Änderungen der Auflösung, der Bitrate, der Kodierungsmethode oder des Dateiformats zu identifizieren. Das Video kann sogar erkannt werden, wenn es in einem anderen Video enthalten ist oder wenn nur ein Fragment des Videos wiedergegeben wird. Diese Video-Fingerabdrücke können dann gespeichert, kopiert und miteinander verglichen werden. Egal, wie ein Nutzer versucht, das Video zu bearbeiten oder zu manipulieren, um das System zu umgehen, das urheberrechtlich geschützte Material wird erkannt und nicht zugelassen. Dies ist ein bedeutender Vorteil gegenüber konkurrierenden Technologien und macht unsere Video-Fingerprinting- und Medienüberwachungs-Technologie zur besten Wahl für die Erkennung von Urheberrechtsverletzungen für Betreiber von Websites, die Videoinhalte von Benutzern hosten möchten. Kein anderes auf dem Markt befindliches Produkt kann dieses Maß an Schutz bieten.
## Weitere Informationen über die Erkennung raubkopierter Videoinhalte und unsere Produkte
- [Kontakt](https://support.visioforge.com/) um zu erfahren, wie unsere Video-Fingerprinting-Technologie in Ihre Website integriert werden kann, um Urheberrechtsverletzungen zu erkennen.
- Besuchen Sie die Produktseite von [Video Fingerprinting SDK](https://www.visioforge.com/de/video-fingerprinting-sdk)

---END OF PAGE---
# Page: https://www.visioforge.com/es/detecting-pirated-video-content
# Detección de contenidos de vídeo pirateados
## Información general
Detectar contenidos de vídeo pirateados es una tarea importante en la nueva era de los contenidos digitales. Muchos tipos de sitios web ofrecen a los usuarios la posibilidad de cargar contenidos de vídeo. Sitios web como [YouTube](https://www.youtube.com) existen únicamente por esta razón, pero muchos sitios de redes sociales también permiten esta capacidad. La inmensa popularidad de estos sitios ha atraído la ira de los productores de contenidos, que se están tomando en serio la protección de sus derechos de autor y ejercen una verdadera presión sobre los propietarios de este tipo de sitios para que eliminen las infracciones ilegales. Una gran cantidad de material protegido por derechos de autor -desde clips de películas y programas de televisión hasta música y videoclips- puede ser descargado fácilmente por los visitantes de este tipo de servicios de alojamiento de vídeos en línea. Aunque los operadores de estos sitios afirman que se amparan en la doctrina del uso legítimo, los productores de contenidos y las grandes empresas de medios de comunicación no se lo creen. Disponen de grandes bolsillos y ejércitos de abogados, y se están preparando para emprender acciones legales. Para evitar costosas y prolongadas batallas legales, los sitios de carga de vídeos en línea utilizan métodos tecnológicos para reducir y prevenir las infracciones de los derechos de autor en sus sitios.
## Detección de contenidos ilegales mediante Video Fingerprinting SDK
Evitar la responsabilidad involuntaria por infracción de los derechos de autor es una cuestión importante para cualquier sitio que permita contenidos cargados por los usuarios. Las infracciones de los derechos de autor pueden dar lugar a acciones legales costosas y lentas y podrían acarrear importantes responsabilidades civiles o penales. Nuestro sitio [Video Fingerprinting SDK](https://www.visioforge.com/es/video-fingerprinting-sdk) ofrece una solución perfecta para que este tipo de sitios puedan seguir ofreciendo la posibilidad de subir vídeos y alojar contenidos de los usuarios, minimizando al mismo tiempo los riesgos de infracción de los derechos de autor. Nuestra tecnología de huellas dactilares de vídeo incorpora los últimos avances en análisis de escenas, seguimiento de objetos y estimación del movimiento para analizar el contenido de cualquier vídeo con el fin de identificar sus características únicas, como los colores, la estructura de la escena y el movimiento de los objetos en un descriptor digital compacto, la huella dactilar de vídeo. Se puede crear una base de datos de estas huellas dactilares de vídeo para material protegido por derechos de autor. A continuación, pueden cotejarse con el material de vídeo que cargan los usuarios de los sitios web para detectar la presencia de material protegido por derechos de autor y denegar la publicación de dicho material en sus sitios web.
## Comparación con otros productos
A diferencia de los productos que intentan ofrecer una capacidad similar, nuestra tecnología permite identificar estas huellas a pesar de los cambios de resolución, velocidad de bits, método de codificación o formato de archivo. El vídeo puede detectarse incluso cuando está incluido dentro de otro vídeo o cuando sólo se reproduce un fragmento del mismo. Estas huellas dactilares de vídeo pueden almacenarse, copiarse y compararse entre sí. Así pues, por mucho que un usuario intente editar o manipular el vídeo para burlar el sistema, el material protegido por derechos de autor será detectado y desautorizado. Esta es una ventaja significativa sobre las tecnologías de la competencia y utiliza nuestra tecnología de huella digital de vídeo y monitorización de medios como la mejor opción para la detección de infracciones de derechos de autor para los propietarios de sitios que desean alojar contenidos de vídeo de usuarios. Ningún otro producto del mercado actual puede ofrecer este nivel de protección.
## Más información sobre la detección de contenidos de vídeo pirateados y nuestros productos
- [Póngase en contacto](https://support.visioforge.com/) con nosotros para ver cómo nuestra tecnología de huellas dactilares de vídeo puede integrarse en su sitio para aplicar la detección de infracciones de derechos de autor.
- Consulte la página de productos de [Video Fingerprinting SDK](https://www.visioforge.com/es/video-fingerprinting-sdk)

---END OF PAGE---
# Page: https://www.visioforge.com/it/detecting-pirated-video-content
# Rilevamento di contenuti video pirata
## Informazioni principali
L'individuazione di contenuti video pirata è un compito importante nella nuova era dei contenuti digitali. Molti tipi di siti web offrono agli utenti la possibilità di caricare contenuti video. Siti web come [YouTube](https://www.youtube.com) esistono solo per questo motivo, ma anche molti siti di social network consentono questa possibilità. L'immensa popolarità di questi siti ha attirato le ire dei produttori di contenuti che si stanno impegnando seriamente per proteggere i loro diritti d'autore ed esercitare una reale pressione sui proprietari di questo tipo di siti affinché eliminino le violazioni illegali. Una grande quantità di materiale protetto da copyright - da spezzoni di film e programmi televisivi a musica e video musicali - è prontamente disponibile per il download da parte dei visitatori di questo tipo di servizi di video hosting online. Sebbene i gestori dei siti sostengano di operare in base alla dottrina dell'uso corretto, i produttori di contenuti e le grandi società di media non se la bevono. Hanno a disposizione tasche profonde ed eserciti di avvocati e si stanno attrezzando per intraprendere azioni legali. Per evitare costose e lunghe battaglie legali, i siti di upload di video online perseguono metodi tecnologici per ridurre e prevenire la violazione del copyright sui loro siti.
## Rilevamento di contenuti illegali con Video Fingerprinting SDK
Prevenire la responsabilità involontaria per violazione del copyright è un problema importante per qualsiasi sito che permetta il caricamento di contenuti da parte degli utenti. Le violazioni del copyright possono comportare azioni legali costose e lunghe e potrebbero comportare ingenti responsabilità civili o penali. Il nostro [Video Fingerprinting SDK](https://www.visioforge.com/it/video-fingerprinting-sdk) fornisce una soluzione perfetta per questi tipi di siti, che possono continuare a caricare video e a ospitare i contenuti degli utenti riducendo al minimo i rischi di violazione del copyright. La nostra tecnologia di fingerprinting video all'avanguardia incorpora i più recenti progressi nell'analisi della scena, nel tracciamento degli oggetti e nella stima del movimento per analizzare il contenuto di qualsiasi video al fine di identificarne le caratteristiche uniche, come i colori, la struttura della scena e il movimento degli oggetti in un descrittore digitale compatto, il fingerprint video. È possibile creare un database di queste impronte video per il materiale protetto da copyright. Queste possono essere confrontate con i materiali video caricati dagli utenti del sito per rilevare la presenza di materiali protetti da copyright e impedire la pubblicazione di tali materiali sui loro siti web.
## Confronto con altri prodotti
A differenza dei prodotti che tentano di fornire una capacità simile, la nostra tecnologia consente di identificare queste impronte digitali nonostante le variazioni di risoluzione, bit-rate, metodo di codifica o formato del file. Il video può essere rilevato anche quando è incluso in un altro video o quando ne viene riprodotto solo un frammento. Queste impronte video possono essere memorizzate, copiate e confrontate tra loro. In questo modo, indipendentemente dal modo in cui un utente potrebbe cercare di modificare o manipolare il video per tentare di aggirare il sistema, il materiale protetto da copyright verrà rilevato e non ammesso. Questo è un vantaggio significativo rispetto alle tecnologie concorrenti e rende la nostra tecnologia di video fingerprinting e di monitoraggio dei media la scelta migliore per il rilevamento delle violazioni del copyright per i proprietari di siti che desiderano ospitare contenuti video degli utenti. Nessun altro prodotto attualmente sul mercato è in grado di fornire questo livello di protezione.
## Maggiori informazioni sul rilevamento di contenuti video pirata e sui nostri prodotti
- [Contattateci](https://support.visioforge.com/) per vedere come la nostra tecnologia di video fingerprinting può essere integrata nel vostro sito per implementare il rilevamento delle violazioni del copyright.
- Controllare la pagina del prodotto di [Video Fingerprinting SDK](https://www.visioforge.com/it/video-fingerprinting-sdk)

---END OF PAGE---
# Page: https://www.visioforge.com/de/buy
# Kauf oder Aktualisierung eines Abonnements für unsere Produkte
## Das Abonnement bietet Ihnen folgende Vorteile
- Unbegrenzte Nutzung
- Keine lästige Erinnerungsmeldung
- Kostenlose kleinere und größere Upgrades
- Vorrangige Unterstützung und Fehlerbehebung
- Sie können das Produkt ohne Updates nutzen, auch wenn das Abonnement abgelaufen ist.
Die reguläre Lizenz wird jährlich in Rechnung gestellt und automatisch um ein Jahr verlängert. Sie können Ihr Abonnement jederzeit kündigen.
## Wie sicher ist mein Online-Einkauf?
Die Zahlungen werden abgewickelt von [Streifen](https://www.stripe.com/)einen zuverlässigen Zahlungsdienst im Internet. Die Bestellseiten befinden sich auf einer sicheren Website, die alle übertragenen Kreditkartendaten nach dem sicheren HTTPS-Protokoll verschlüsselt. Während des Anmeldevorgangs haben Sie die Möglichkeit, eine Fax-, Post- oder Kaufbestellung als Alternative zur Standard-Online-Kreditkartenbestellung aufzugeben. Achten Sie beim Ausfüllen des Formulars darauf, dass Sie die richtigen Angaben zu Ihrer Person oder Ihrem Unternehmen sowie die richtige Menge eingeben. Wenn Sie unser Produkt bestellt haben, aber den Registrierungsschlüssel nicht innerhalb von 24 Stunden erhalten haben, Ihren Registrierungsschlüssel verloren haben oder Fragen zur Bestellung haben, kontaktieren Sie uns bitte unter [support@visioforge.com](mailto:support@visioforge.com).
Bitte prüfen Sie unser [Datenschutzbestimmungen](https://www.visioforge.com/de/privacy-policy).
## Benutzerdefinierte Filter, Baugruppen oder andere Dateinamen
Wir können benutzerdefinierte Namen für Filter/Baugruppen/andere Kaufdateien mit 10 oder mehr Lizenzschlüsseln bereitstellen.
## Zahlungsmöglichkeiten
- Kredit-/Debitkarte (Visa, Visa Electron, MasterCard, Maestro, Eurocard, DinersClub, American Express, JCB, PostePay, Discover (Novus) und Carte Bleue)
- Banküberweisung (Wire/SEPA/ACH-Überweisung)
- Alipay, WeChat Pay
- Apple Pay
- Google Pay
- Klarna
- Revolut Pay
- Lastschriftverfahren
- viele andere Möglichkeiten
## Team-Lizenz
Sie können eine standortweite Teamlizenz erwerben und sie in den Büros einer Stadt verwenden.
## Informationen zur Nichtverlängerung der Lizenz
Wenn Sie Ihre Lizenz nicht erneuern, bleibt die vollständige Funktionalität Ihres Projekts ohne Unterbrechung erhalten. Die Funktionalität bleibt erhalten, da Ihre Anwendung, sobald sie erstellt und bereitgestellt wurde, unabhängig vom Lizenzstatus funktioniert.
### Was weiterhin funktioniert
Alle Funktionen, Komponenten und Möglichkeiten, die vor Ablauf Ihrer Lizenz in Betrieb waren, funktionieren weiterhin genau wie zuvor. Die Leistung der Anwendung, die Benutzerfreundlichkeit und die technischen Möglichkeiten bleiben nach Ablauf der Lizenz unverändert.
### Worauf Sie keinen Zugriff haben
Die wichtigste Einschränkung, die sich ergibt, wenn Ihre Lizenz abläuft, ist die Unmöglichkeit eines Upgrades auf neuere SDK-Versionen. Dies bedeutet:
- Sie können keine neueren Versionen des SDK installieren oder implementieren.
- Sie erhalten keine Funktionserweiterungen, die in zukünftigen SDK-Versionen veröffentlicht werden.
- Sie profitieren nicht von Fehlerbehebungen oder Sicherheitsupdates in neueren Versionen
### Künftige Lizenzierungsoptionen
Wenn Sie sich später entscheiden, dass Sie Zugang zu neueren SDK-Versionen haben möchten, können Sie jederzeit eine neue Lizenz erwerben. Es gibt keine Strafe oder Komplikationen bei der Reaktivierung Ihrer Lizenzierung nach einem Zeitraum der Nichtverlängerung.
Dieser Ansatz ermöglicht es Ihnen, strategische Entscheidungen darüber zu treffen, wann Upgrades für Ihr Projekt notwendig sind, anstatt Sie in einen ständigen Erneuerungszyklus zu zwingen, wenn dieser nicht mit Ihrer Entwicklungs-Roadmap oder Budgetbeschränkungen übereinstimmt.
## Premium-Unterstützung
Wenn Sie auf der Suche nach erstklassigem Support für Ihre Software sind, ist unser Premium-Support-Paket genau das Richtige für Sie. Mit unserem Premium-Support erhalten Sie Zugang zu einer Reihe von Tools und Diensten, die Ihnen helfen, das Beste aus Ihrer Software herauszuholen, darunter AnyDesk, Microsoft Teams, Telegram und mehr.
Einer der wichtigsten Vorteile unseres Premium-Support-Pakets ist der Zugang zu AnyDesk. Diese leistungsstarke Remote-Desktop-Anwendung ermöglicht es unserem Support-Team, auf Ihren Computer zuzugreifen und Probleme zu beheben, die Sie möglicherweise haben. Mit AnyDesk kann unser Support-Team Probleme schnell diagnostizieren und beheben.
Zusätzlich zu AnyDesk beinhaltet unser Premium-Support-Paket auch den Zugang zu Microsoft Teams. Diese Kollaborationsplattform ermöglicht es unserem Support-Team, mit Ihnen in Echtzeit zu kommunizieren, Dateien auszutauschen und sogar Videoanrufe zu tätigen. So haben Sie jederzeit direkten Zugang zu unserem Support-Team, egal wo auf der Welt Sie sich befinden.
Wir bieten auch Support über Telegram, eine sichere Messaging-Plattform, die es uns ermöglicht, Ihnen schnellen und bequemen Support direkt von Ihrem Mobilgerät aus zu bieten. Ganz gleich, ob Sie unterwegs sind oder einfach lieber über Nachrichten kommunizieren, unser Support-Team steht Ihnen über Telegram zur Verfügung.
Wenn Sie sich für unser Premium-Supportpaket entscheiden, können Sie sicher sein, dass Sie den besten technischen Support für Ihre Software erhalten. Unser Expertenteam ist hochqualifiziert und engagiert, um Ihnen den bestmöglichen Service zu bieten, damit Sie Ihre Software wieder mit Zuversicht nutzen können.
Unser Premium-Support-Paket ist für nur 250 EUR erhältlich und umfasst 5 Stunden engagierten Support. Um sich für unser Premium-Support-Paket anzumelden und diese Vorteile zu nutzen, verwenden Sie den folgenden [**Zahlungslink**](https://buy.stripe.com/7sI3ch4ou1C62Dm3dA). Sobald Ihre Zahlung bearbeitet wurde, wird sich unser Support-Team mit Ihnen in Verbindung setzen, um Ihre Support-Sitzungen zu planen und Ihnen den bestmöglichen Support für Ihre Software zukommen zu lassen.
Das SDK ist für die nicht-kommerzielle Nutzung kostenlos. Bitte kontaktieren Sie uns, um eine kostenlose Lizenz zu erhalten.
### Video Capture SDK .Net
##### STANDARD
[250 €] Regulär (1 Jahr)
[Debit-/Kreditkarte](https://buy.stripe.com/dR69AFdZ42Ga2Dm9AA)[Bank, SEPA, Apple und mehr](https://buy.stripe.com/28o0056wC6Wq4Lug0G)
[750 €] Lebenslang/Team
[Alle Methoden](https://buy.stripe.com/14k4gl9IObcG6TC5l1)
##### PROFESSIONELL
[350 €] Regulär (1 Jahr)
[Debit-/Kreditkarte](https://buy.stripe.com/aEUcMRcV0cgKem4bIJ)[Bank, SEPA, Apple und mehr](https://buy.stripe.com/4gw6ot5sy5Sm6TCdSA)
[1000 €] Lebenslang/Team
[Alle Methoden](https://buy.stripe.com/bIYbINf381C6cdWdRj)
##### PREMIUM
[500 €] Regulär (1 Jahr)
[Debit-/Kreditkarte](https://buy.stripe.com/dR628dg7c80ucdW4gi)[Bank, SEPA, Apple und mehr](https://buy.stripe.com/8wMcMR6wCfsW5PydSz)
[1500 €] Lebenslang/Team
[Alle Methoden](https://buy.stripe.com/cN2aEJ5sya8C2Dm5kM)
### Video Edit SDK .Net
##### STANDARD
[250 €] Regulär (1 Jahr)
[Debit-/Kreditkarte](https://buy.stripe.com/dR66ot08e94yem49AG)[Bank, SEPA, Apple und mehr](https://buy.stripe.com/00gfZ33kq1C67XG01L)
[750 €] Lebenslang/Team
[Alle Methoden](https://buy.stripe.com/eVa8wBcV0gx00ve14s)
##### PROFESSIONELL
[350 €] Regulär (1 Jahr)
[Debit-/Kreditkarte](https://buy.stripe.com/6oEaEJ08ecgK7XGdQX)[Bank, SEPA, Apple und mehr](https://buy.stripe.com/7sI4gl3kqdkO7XG29U)
[1000 €] Lebenslang/Team
[Alle Methoden](https://buy.stripe.com/cN2fZ3cV0fsW0ve6oL)
##### PREMIUM
[500 €] Regulär (1 Jahr)
[Debit-/Kreditkarte](https://buy.stripe.com/eVaaEJ08e5Smdi0eV2)[Bank, SEPA, Apple und mehr](https://buy.stripe.com/fZeaEJdZ40y2di015h)
[1500 €] Lebenslang/Team
[Alle Methoden](https://buy.stripe.com/bIY5kp08e2Ga5Py8wS)
### Media Player SDK .Net
##### STANDARD
[250 €] Regulär (1 Jahr)
[Debit-/Kreditkarte](https://buy.stripe.com/7sI9AF08efsWcdW7sE)[Bank, SEPA, Apple und mehr](https://buy.stripe.com/14k1492gm6Wq0ve8yj)
[750 €] Lebenslang/Team
[Alle Methoden](https://buy.stripe.com/cN2fZ36wCa8C4LudR9)
##### PROFESSIONELL
[350 €] Regulär (1 Jahr)
[Debit-/Kreditkarte](https://buy.stripe.com/aEU5kpf380y20ve5kx)[Bank, SEPA, Apple und mehr](https://buy.stripe.com/bIY28d1ci1C61zi8yk)
[1000 €] Lebenslang/Team
[Alle Methoden](https://buy.stripe.com/8wMaEJbQWeoSdi0eVc)
### Media Blocks SDK .Net
[500 €] Regulär (1 Jahr)
[Debit-/Kreditkarte](https://buy.stripe.com/14kaEJ6wCa8C1zi9BK)[Bank, SEPA, Apple und mehr](https://buy.stripe.com/3cseUZ5sy6Wq5Py5mc)
[1500 €] Lebenslang/Team
[Alle Methoden](https://buy.stripe.com/bIY4gl4oueoSb9SeW5)
### Video Edit SDK FFMPEG .Net
##### STANDARD
[250 €] Regulär (1 Jahr)
[Debit-/Kreditkarte](https://buy.stripe.com/6oEbIN1cigx091KaFm)[Bank, SEPA, Apple und mehr](https://buy.stripe.com/fZe8wBg7ccgK1zi6qd)
[750 €] Lebenslang/Team
[Alle Methoden](https://buy.stripe.com/aEUbINcV080uem43cV)
##### PROFESSIONELL
[350 €] Regulär (1 Jahr)
[Debit-/Kreditkarte](https://buy.stripe.com/00gcMRaMS80u1zi5l4)[Bank, SEPA, Apple und mehr](https://buy.stripe.com/bIY149aMS0y2a5O7ui)
[1000 €] Lebenslang/Team
[Alle Methoden](https://buy.stripe.com/bIYbIN5sy0y20vefZJ)
##### PREMIUM
[500 €] Regulär (1 Jahr)
[Debit-/Kreditkarte](https://buy.stripe.com/dR64glcV0fsWem48xi)[Bank, SEPA, Apple und mehr](https://buy.stripe.com/5kA7sx4ou94y1zi3e3)
[1500 €] Lebenslang/Team
[Alle Methoden](https://buy.stripe.com/4gw1498EK3Keem46pb)
### Virtual Camera SDK
##### PROFESSIONELL
[500 €] Regulär (1 Jahr)
[Debit-/Kreditkarte](https://buy.stripe.com/00g149cV00y2b9SeVq)[Bank, SEPA, Apple und mehr](https://buy.stripe.com/fZe28d8EKeoS5Py3e6)
[1500 €] Lebenslang/Team
[Alle Methoden](https://buy.stripe.com/bIYaEJ1ci6Wqa5ObJf)
##### QUELLCODE
[2500 €] Lebenslang/Team
[Alle Methoden](https://buy.stripe.com/aEUdQVcV06Wq1zibJg)
### VLC Source DirectShow Filter
[300 €] Regulär (1 Jahr)
[Debit-/Kreditkarte](https://buy.stripe.com/fZe8wB6wC1C67XGeVt)[Bank, SEPA, Apple und mehr](https://buy.stripe.com/cN2eUZ8EK4Oi1zibKD)
[900 €] Lebenslang/Team
[Alle Methoden](https://buy.stripe.com/6oEeUZ7AG6Wq2DmbK0)
### FFMPEG Source DirectShow Filter
[300 €] Regulär (1 Jahr)
[Debit-/Kreditkarte](https://buy.stripe.com/bIYcMRdZ45Smb9S7t2)[Bank, SEPA, Apple und mehr](https://buy.stripe.com/4gwbIN1cibcG7XGbKE)
[900 €] Lebenslang/Team
[Alle Methoden](https://buy.stripe.com/5kAcMR1ci3Keem4dRr)
### DirectShow Encoding Filters Pack
[500 €] Regulär (1 Jahr)
[Debit-/Kreditkarte](https://buy.stripe.com/4gwbIN7AG94y1zi7t4)[Bank, SEPA, Apple und mehr](https://buy.stripe.com/aEU4gl4oubcGa5O5mh)
[1500 €] Lebenslang/Team
[Alle Methoden](https://buy.stripe.com/5kAdQVcV00y26TCbJc)
### DirectShow Processing Filters Pack
[350 €] Regulär (1 Jahr)
[Debit-/Kreditkarte](https://buy.stripe.com/4gw9AF5sy0y26TC4gT)[Bank, SEPA, Apple und mehr](https://buy.stripe.com/9AQ28d5sy2Ga91K162)
[1000 €] Lebenslang/Team
[Alle Methoden](https://buy.stripe.com/dR6eUZg7ceoSgucaF9)
### Video Encryption SDK
[500 €] Regulär (1 Jahr)
[Debit-/Kreditkarte](https://buy.stripe.com/8wM28d3kq5Smguc28M)[Bank, SEPA, Apple und mehr](https://buy.stripe.com/28o7sx3kq6Wqfq85mj)
[1500 €] Lebenslang/Team
[Alle Methoden](https://buy.stripe.com/dR6bIN8EK3Ke7XG9Bf)
### All-in-One Media Framework (Delphi/ActiveX)
##### STANDARD
[350 €] Regulär (1 Jahr)
[Debit-/Kreditkarte](https://buy.stripe.com/8wMdQV7AG6Wq7XG4hO)[Bank, SEPA, Apple und mehr](https://buy.stripe.com/dR6dQV4ou94ycdW9CA)
[700 €] Lebenslang/Team
[Alle Methoden](https://buy.stripe.com/dR69AF8EKbcGa5OcOp)
##### PROFESSIONELL
[500 €] Regulär (1 Jahr)
[Debit-/Kreditkarte](https://buy.stripe.com/fZebIN9IOfsW6TC3dJ)[Bank, SEPA, Apple und mehr](https://buy.stripe.com/8wM9AF3kq1C60ve2aa)
[1000 €] Lebenslang/Team
[Alle Methoden](https://buy.stripe.com/4gw8wB2gm0y2b9S29M)
##### PREMIUM
[750 €] Regulär (1 Jahr)
[Debit-/Kreditkarte](https://buy.stripe.com/9AQcMR7AG2Gab9SdSm)[Bank, SEPA, Apple und mehr](https://buy.stripe.com/eVaeUZ2gm6Wq5Py2a9)
[1500 €] Lebenslang/Team
[Alle Methoden](https://buy.stripe.com/5kAaEJ6wCa8Cem48yb)
### Video Fingerprinting SDK
[900 €] Regulär (1 Jahr)
[Debit-/Kreditkarte](https://buy.stripe.com/14kfZ3aMS6WqcdWaFy)[Bank, SEPA, Apple und mehr](https://buy.stripe.com/3cs4gl5sy6Wq1zi7uv)
[2000 €] Lebenslang/Team
[Alle Methoden](https://buy.stripe.com/bIY7sx6wC1C66TCcNH)
[25 €] Laufzeit (1 Serverkern pro Jahr)
[Debit-/Kreditkarte](https://buy.stripe.com/aEUaEJ3kq0y2em4bJE)[Bank, SEPA, Apple und mehr](https://buy.stripe.com/8wM6ot2gm6Wq5Pyg12)
### Bündel
€700
€1800
.Net-Bündel
Professionell
Video Capture SDK .Net Professionelle Ausgabe
Media Player SDK .Net Professional Ausgabe
Video Edit SDK .Net Professionelle Ausgabe
Video Edit SDK FFMPEG .Net Professionelle Ausgabe
Media Blocks SDK .Net
[Reguläre Lizenz](https://buy.stripe.com/eVacMR6wCa8CcdW5li)[Lizenz auf Lebenszeit/Team](https://buy.stripe.com/00g7sx5sy0y291K3db)
€1000
€2500
.Net-Bündel
Prämie
Video Capture SDK .Net Premium Ausgabe
Media Player SDK .Net Professional Ausgabe
Video Edit SDK .Net Premium Ausgabe
Video Edit SDK FFMPEG .Net Premium Ausgabe
Media Blocks SDK .Net
[Reguläre Lizenz](https://buy.stripe.com/28ofZ3bQW6Wqb9S5lk)[Lizenz auf Lebenszeit/Team](https://buy.stripe.com/aEUbIN3kq5Sm3Hq9BB)
€1000
€2500
DirectShow All-In-One
Bündel
FFMPEG Source DirectShow Filter
VLC Source DirectShow Filter
DirectShow Processing Filters Pack
DirectShow Encoding Filters Pack
DirectShow Source SDK für Kinect
[Reguläre Lizenz](https://buy.stripe.com/00g149cV0cgK3HqaFZ)[Lizenz auf Lebenszeit/Team](https://buy.stripe.com/8wM1498EK4Oib9S8xS)
Die Preisliste ist in [PDF](http://files.visioforge.com/shared/pricelist.pdf).
---END OF PAGE---
# Page: https://www.visioforge.com/es/buy
# Adquirir o actualizar la suscripción
## La suscripción le proporcionará las siguientes ventajas
- Uso ilimitado
- Sin molestos mensajes recordatorios
- Actualizaciones menores y mayores gratuitas
- Asistencia y correcciones prioritarias
- Puede utilizar el producto sin actualizaciones aunque haya finalizado la suscripción
La licencia normal se factura anualmente y se renueva automáticamente cada año. Puede cancelar su suscripción en cualquier momento.
## ¿Es segura mi compra por Internet?
Los pagos son gestionados por [Raya](https://www.stripe.com/)un servicio de pago fiable en Internet. Las páginas de pedido se encuentran en un sitio web seguro que encripta todos los datos de tarjeta de crédito transmitidos según el protocolo seguro HTTPS. Durante el proceso de registro, se le dará la opción de realizar un pedido por fax, correo o compra como alternativa al pedido estándar en línea con tarjeta de crédito. Cuando rellene el formulario, asegúrese de introducir correctamente sus datos personales o los de su empresa, así como la cantidad. Si ha pedido nuestro producto pero no ha recibido la clave de registro en 24 horas, ha perdido su clave de registro o tiene alguna pregunta sobre el pedido, póngase en contacto con nosotros en [soporte@visioforge.com](mailto:support@visioforge.com).
Consulte nuestra [política de privacidad](https://www.visioforge.com/es/privacy-policy).
## Filtros personalizados, ensamblajes u otros nombres de archivos
Podemos proporcionar nombres personalizados para filtros/ensamblajes/otros archivos de compra que contengan 10 o más claves de licencia.
## Métodos de pago
- Tarjeta de crédito/débito (Visa, Visa Electron, MasterCard, Maestro, Eurocard, DinersClub, American Express, JCB, PostePay, Discover (Novus) y Carte Bleue)
- Transferencia bancaria (transferencia bancaria/SEPA/ACH)
- Alipay, WeChat Pay
- Apple Pay
- Google Pay
- Klarna
- Revolut Pay
- Domiciliación bancaria
- muchas otras formas
## Licencia de grupo
Puede adquirir una licencia para todo el centro del equipo y utilizarla en las oficinas de una misma ciudad.
## Información sobre la no renovación de licencias
Cuando no renueva su licencia, su proyecto mantiene la funcionalidad completa sin ninguna interrupción. Esta conservación de la funcionalidad se produce porque una vez que tu aplicación está construida e implantada, funciona independientemente del estado de la licencia.
### Lo que sigue funcionando
Todas las funciones, componentes y capacidades que estaban operativas antes de que caducara la licencia seguirán funcionando exactamente igual que antes. El rendimiento de la aplicación, la experiencia del usuario y las capacidades técnicas permanecen inalteradas tras el vencimiento de la licencia.
### A qué se pierde el acceso
La principal limitación que se produce cuando caduca su licencia es la imposibilidad de actualizar a versiones más recientes del SDK. Esto significa:
- No puede instalar o implementar versiones más recientes del SDK
- No recibirá las mejoras de funciones publicadas en futuras versiones del SDK.
- No se beneficiará de las correcciones de errores ni de las actualizaciones de seguridad de las nuevas versiones.
### Futuras opciones de licencia
Si más adelante decide que desea acceder a nuevas versiones del SDK, puede adquirir una nueva licencia en cualquier momento. La reactivación de la licencia tras un periodo de no renovación no conlleva ninguna penalización ni complicación.
Este enfoque le permite tomar decisiones estratégicas sobre cuándo son necesarias las actualizaciones para su proyecto, en lugar de obligarle a un ciclo de renovación continua si no se ajusta a su hoja de ruta de desarrollo o a sus limitaciones presupuestarias.
## Asistencia premium
Si buscas asistencia de primer nivel para tu software, nuestro paquete de asistencia premium es exactamente lo que necesitas. Con nuestro soporte premium, tendrás acceso a una serie de herramientas y servicios que te ayudarán a sacar el máximo partido a tu software, como AnyDesk, Microsoft Teams y Telegram, entre otros.
Una de las principales ventajas de nuestro paquete de asistencia Premium es el acceso a AnyDesk. Esta potente aplicación de escritorio remoto permite a nuestro equipo de asistencia acceder a su ordenador y solucionar cualquier problema que pueda tener. Con AnyDesk, nuestro equipo de asistencia puede diagnosticar y resolver problemas rápidamente.
Además de AnyDesk, nuestro paquete de asistencia premium también incluye acceso a Microsoft Teams. Esta plataforma de colaboración permite a nuestro equipo de soporte comunicarse con usted en tiempo real, compartir archivos e incluso realizar videollamadas. Esto garantiza que tenga acceso directo a nuestro equipo de soporte siempre que lo necesite, sin importar en qué parte del mundo se encuentre.
También ofrecemos soporte a través de Telegram, una plataforma de mensajería segura que nos permite ofrecerte un soporte rápido y cómodo directamente desde tu dispositivo móvil. Tanto si estás fuera de casa como si simplemente prefieres comunicarte por mensajería, nuestro equipo de soporte está disponible para ayudarte a través de Telegram.
Al contratar nuestro paquete de asistencia Premium, puede estar seguro de que recibirá la mejor asistencia técnica para su software. Nuestro equipo de expertos está altamente capacitado y dedicado a ofrecerle el máximo nivel de servicio posible, para que pueda volver a utilizar su software con confianza.
Nuestro paquete de asistencia Premium está disponible por sólo 250 EUR por 5 horas de asistencia dedicada. Para contratar nuestro paquete de asistencia premium y acceder a estas ventajas, utilice el siguiente [**enlace de pago**](https://buy.stripe.com/7sI3ch4ou1C62Dm3dA). Una vez procesado el pago, nuestro equipo de asistencia se pondrá en contacto con usted para programar las sesiones de asistencia y ofrecerle la mejor asistencia posible para su software.
El SDK es gratuito para uso no comercial. Póngase en contacto con nosotros para obtener una licencia gratuita.
### Video Capture SDK .Net
##### ESTÁNDAR
[€250] Regular (1 año)
[Tarjeta de débito/crédito](https://buy.stripe.com/dR69AFdZ42Ga2Dm9AA)[Banco, SEPA, Apple y más](https://buy.stripe.com/28o0056wC6Wq4Lug0G)
[€750] De por vida/Equipo
[Todos los métodos](https://buy.stripe.com/14k4gl9IObcG6TC5l1)
##### PROFESIONAL
[€350] Regular (1 año)
[Tarjeta de débito/crédito](https://buy.stripe.com/aEUcMRcV0cgKem4bIJ)[Banco, SEPA, Apple y más](https://buy.stripe.com/4gw6ot5sy5Sm6TCdSA)
[1000 €] De por vida/Equipo
[Todos los métodos](https://buy.stripe.com/bIYbINf381C6cdWdRj)
##### PREMIUM
[€500] Regular (1 año)
[Tarjeta de débito/crédito](https://buy.stripe.com/dR628dg7c80ucdW4gi)[Banco, SEPA, Apple y más](https://buy.stripe.com/8wMcMR6wCfsW5PydSz)
[€1500] De por vida/Equipo
[Todos los métodos](https://buy.stripe.com/cN2aEJ5sya8C2Dm5kM)
### Video Edit SDK .Net
##### ESTÁNDAR
[€250] Regular (1 año)
[Tarjeta de débito/crédito](https://buy.stripe.com/dR66ot08e94yem49AG)[Banco, SEPA, Apple y más](https://buy.stripe.com/00gfZ33kq1C67XG01L)
[€750] De por vida/Equipo
[Todos los métodos](https://buy.stripe.com/eVa8wBcV0gx00ve14s)
##### PROFESIONAL
[€350] Regular (1 año)
[Tarjeta de débito/crédito](https://buy.stripe.com/6oEaEJ08ecgK7XGdQX)[Banco, SEPA, Apple y más](https://buy.stripe.com/7sI4gl3kqdkO7XG29U)
[1000 €] De por vida/Equipo
[Todos los métodos](https://buy.stripe.com/cN2fZ3cV0fsW0ve6oL)
##### PREMIUM
[€500] Regular (1 año)
[Tarjeta de débito/crédito](https://buy.stripe.com/eVaaEJ08e5Smdi0eV2)[Banco, SEPA, Apple y más](https://buy.stripe.com/fZeaEJdZ40y2di015h)
[€1500] De por vida/Equipo
[Todos los métodos](https://buy.stripe.com/bIY5kp08e2Ga5Py8wS)
### Media Player SDK .Net
##### ESTÁNDAR
[€250] Regular (1 año)
[Tarjeta de débito/crédito](https://buy.stripe.com/7sI9AF08efsWcdW7sE)[Banco, SEPA, Apple y más](https://buy.stripe.com/14k1492gm6Wq0ve8yj)
[€750] De por vida/Equipo
[Todos los métodos](https://buy.stripe.com/cN2fZ36wCa8C4LudR9)
##### PROFESIONAL
[€350] Regular (1 año)
[Tarjeta de débito/crédito](https://buy.stripe.com/aEU5kpf380y20ve5kx)[Banco, SEPA, Apple y más](https://buy.stripe.com/bIY28d1ci1C61zi8yk)
[1000 €] De por vida/Equipo
[Todos los métodos](https://buy.stripe.com/8wMaEJbQWeoSdi0eVc)
### Media Blocks SDK .Net
[€500] Regular (1 año)
[Tarjeta de débito/crédito](https://buy.stripe.com/14kaEJ6wCa8C1zi9BK)[Banco, SEPA, Apple y más](https://buy.stripe.com/3cseUZ5sy6Wq5Py5mc)
[€1500] De por vida/Equipo
[Todos los métodos](https://buy.stripe.com/bIY4gl4oueoSb9SeW5)
### Video Edit SDK FFMPEG .Net
##### ESTÁNDAR
[€250] Regular (1 año)
[Tarjeta de débito/crédito](https://buy.stripe.com/6oEbIN1cigx091KaFm)[Banco, SEPA, Apple y más](https://buy.stripe.com/fZe8wBg7ccgK1zi6qd)
[€750] De por vida/Equipo
[Todos los métodos](https://buy.stripe.com/aEUbINcV080uem43cV)
##### PROFESIONAL
[€350] Regular (1 año)
[Tarjeta de débito/crédito](https://buy.stripe.com/00gcMRaMS80u1zi5l4)[Banco, SEPA, Apple y más](https://buy.stripe.com/bIY149aMS0y2a5O7ui)
[1000 €] De por vida/Equipo
[Todos los métodos](https://buy.stripe.com/bIYbIN5sy0y20vefZJ)
##### PREMIUM
[€500] Regular (1 año)
[Tarjeta de débito/crédito](https://buy.stripe.com/dR64glcV0fsWem48xi)[Banco, SEPA, Apple y más](https://buy.stripe.com/5kA7sx4ou94y1zi3e3)
[€1500] De por vida/Equipo
[Todos los métodos](https://buy.stripe.com/4gw1498EK3Keem46pb)
### Virtual Camera SDK
##### PROFESIONAL
[€500] Regular (1 año)
[Tarjeta de débito/crédito](https://buy.stripe.com/00g149cV00y2b9SeVq)[Banco, SEPA, Apple y más](https://buy.stripe.com/fZe28d8EKeoS5Py3e6)
[€1500] De por vida/Equipo
[Todos los métodos](https://buy.stripe.com/bIYaEJ1ci6Wqa5ObJf)
##### CÓDIGO FUENTE
[€2500] De por vida/Equipo
[Todos los métodos](https://buy.stripe.com/aEUdQVcV06Wq1zibJg)
### VLC Source DirectShow Filter
[€300] Regular (1 año)
[Tarjeta de débito/crédito](https://buy.stripe.com/fZe8wB6wC1C67XGeVt)[Banco, SEPA, Apple y más](https://buy.stripe.com/cN2eUZ8EK4Oi1zibKD)
[900 €] De por vida/Equipo
[Todos los métodos](https://buy.stripe.com/6oEeUZ7AG6Wq2DmbK0)
### FFMPEG Source DirectShow Filter
[€300] Regular (1 año)
[Tarjeta de débito/crédito](https://buy.stripe.com/bIYcMRdZ45Smb9S7t2)[Banco, SEPA, Apple y más](https://buy.stripe.com/4gwbIN1cibcG7XGbKE)
[900 €] De por vida/Equipo
[Todos los métodos](https://buy.stripe.com/5kAcMR1ci3Keem4dRr)
### DirectShow Encoding Filters Pack
[€500] Regular (1 año)
[Tarjeta de débito/crédito](https://buy.stripe.com/4gwbIN7AG94y1zi7t4)[Banco, SEPA, Apple y más](https://buy.stripe.com/aEU4gl4oubcGa5O5mh)
[€1500] De por vida/Equipo
[Todos los métodos](https://buy.stripe.com/5kAdQVcV00y26TCbJc)
### DirectShow Processing Filters Pack
[€350] Regular (1 año)
[Tarjeta de débito/crédito](https://buy.stripe.com/4gw9AF5sy0y26TC4gT)[Banco, SEPA, Apple y más](https://buy.stripe.com/9AQ28d5sy2Ga91K162)
[1000 €] De por vida/Equipo
[Todos los métodos](https://buy.stripe.com/dR6eUZg7ceoSgucaF9)
### Video Encryption SDK
[€500] Regular (1 año)
[Tarjeta de débito/crédito](https://buy.stripe.com/8wM28d3kq5Smguc28M)[Banco, SEPA, Apple y más](https://buy.stripe.com/28o7sx3kq6Wqfq85mj)
[€1500] De por vida/Equipo
[Todos los métodos](https://buy.stripe.com/dR6bIN8EK3Ke7XG9Bf)
### All-in-One Media Framework (Delphi/ActiveX)
##### ESTÁNDAR
[€350] Regular (1 año)
[Tarjeta de débito/crédito](https://buy.stripe.com/8wMdQV7AG6Wq7XG4hO)[Banco, SEPA, Apple y más](https://buy.stripe.com/dR6dQV4ou94ycdW9CA)
[€700] De por vida/Equipo
[Todos los métodos](https://buy.stripe.com/dR69AF8EKbcGa5OcOp)
##### PROFESIONAL
[€500] Regular (1 año)
[Tarjeta de débito/crédito](https://buy.stripe.com/fZebIN9IOfsW6TC3dJ)[Banco, SEPA, Apple y más](https://buy.stripe.com/8wM9AF3kq1C60ve2aa)
[1000 €] De por vida/Equipo
[Todos los métodos](https://buy.stripe.com/4gw8wB2gm0y2b9S29M)
##### PREMIUM
[750€] Regular (1 año)
[Tarjeta de débito/crédito](https://buy.stripe.com/9AQcMR7AG2Gab9SdSm)[Banco, SEPA, Apple y más](https://buy.stripe.com/eVaeUZ2gm6Wq5Py2a9)
[€1500] De por vida/Equipo
[Todos los métodos](https://buy.stripe.com/5kAaEJ6wCa8Cem48yb)
### Video Fingerprinting SDK
[900€] Regular (1 año)
[Tarjeta de débito/crédito](https://buy.stripe.com/14kfZ3aMS6WqcdWaFy)[Banco, SEPA, Apple y más](https://buy.stripe.com/3cs4gl5sy6Wq1zi7uv)
[€2000] De por vida/Equipo
[Todos los métodos](https://buy.stripe.com/bIY7sx6wC1C66TCcNH)
[€25] Autonomía (1 núcleo de servidor al año)
[Tarjeta de débito/crédito](https://buy.stripe.com/aEUaEJ3kq0y2em4bJE)[Banco, SEPA, Apple y más](https://buy.stripe.com/8wM6ot2gm6Wq5Pyg12)
### Paquetes
€700
€1800
Paquete .Net
Profesional
Video Capture SDK .Net Edición Profesional
Media Player SDK .Net Edición Profesional
Video Edit SDK .Net Edición Profesional
Video Edit SDK FFMPEG .Net Edición Profesional
Media Blocks SDK .Net
[Licencia Regular](https://buy.stripe.com/eVacMR6wCa8CcdW5li)[Licencia Lifetime/Team](https://buy.stripe.com/00g7sx5sy0y291K3db)
€1000
€2500
Paquete .Net
Premium
Video Capture SDK .Net Edición Premium
Media Player SDK .Net Edición Profesional
Video Edit SDK .Net Edición Premium
Video Edit SDK FFMPEG .Net Edición Premium
Media Blocks SDK .Net
[Licencia Regular](https://buy.stripe.com/28ofZ3bQW6Wqb9S5lk)[Licencia Lifetime/Team](https://buy.stripe.com/aEUbIN3kq5Sm3Hq9BB)
€1000
€2500
DirectShow Todo en Uno
Paquete
FFMPEG Source DirectShow Filter
VLC Source DirectShow Filter
DirectShow Processing Filters Pack
DirectShow Encoding Filters Pack
SDK de origen de DirectShow para Kinect
[Licencia Regular](https://buy.stripe.com/00g149cV0cgK3HqaFZ)[Licencia Lifetime/Team](https://buy.stripe.com/8wM1498EK4Oib9S8xS)
La lista de precios está disponible en [PDF](http://files.visioforge.com/shared/pricelist.pdf).
---END OF PAGE---
# Page: https://www.visioforge.com/it/buy
# Acquistare o aggiornare l'abbonamento ai nostri prodotti
## L'abbonamento vi offrirà i seguenti vantaggi
- Utilizzo illimitato
- Nessun fastidioso messaggio di promemoria
- Aggiornamenti minori e maggiori gratuiti
- Assistenza e correzioni prioritarie
- È possibile utilizzare il prodotto senza aggiornamenti, anche se l'abbonamento è terminato.
La licenza regolare viene fatturata annualmente e rinnovata automaticamente ogni anno. È possibile annullare l'abbonamento in qualsiasi momento.
## Quanto è sicuro il mio acquisto online?
I pagamenti sono gestiti da [Striscia](https://www.stripe.com/)un servizio di pagamento affidabile su Internet. Le pagine di ordinazione si trovano su un sito web sicuro che cripta tutti i dati della carta di credito trasmessi secondo il protocollo sicuro HTTPS. Durante il processo di registrazione, vi sarà data la possibilità di effettuare un ordine via fax, posta o acquisto in alternativa all'ordine standard con carta di credito online. Quando si compila il modulo, assicurarsi di inserire le informazioni personali o aziendali corrette e la quantità. Se avete ordinato il nostro prodotto ma non avete ricevuto la chiave di registrazione entro 24 ore, se avete perso la chiave di registrazione o se avete domande sull'ordine, contattateci all'indirizzo [support@visioforge.com](mailto:support@visioforge.com).
Si prega di controllare il nostro [Informativa sulla privacy](https://www.visioforge.com/it/privacy-policy).
## Filtri, assiemi o altri nomi di file personalizzati
Possiamo fornire nomi personalizzati per filtri/assemblaggi/altri file di acquisto contenenti 10 o più chiavi di licenza.
## Metodi di pagamento
- Carta di credito/debito (Visa, Visa Electron, MasterCard, Maestro, Eurocard, DinersClub, American Express, JCB, PostePay, Discover (Novus) e Carte Bleue).
- Bonifico bancario (bonifico bancario/SEPA/ACH)
- Alipay, WeChat Pay
- Apple Pay
- Google Pay
- Klarna
- Revolut Pay
- Addebito diretto
- molti altri modi
## Licenza di squadra
È possibile acquistare una licenza per l'intero sito del team e utilizzarla all'interno degli uffici di una stessa città.
## Informazioni sul mancato rinnovo della licenza
Quando non si rinnova la licenza, il progetto mantiene la sua completa funzionalità senza alcuna interruzione. Questa conservazione della funzionalità avviene perché l'applicazione, una volta costruita e distribuita, funziona indipendentemente dallo stato della licenza.
### Cosa continua a funzionare
Tutte le caratteristiche, i componenti e le funzionalità che erano operativi prima della scadenza della licenza continueranno a funzionare esattamente come prima. Le prestazioni, l'esperienza utente e le funzionalità tecniche dell'applicazione rimangono invariate dopo la scadenza della licenza.
### A cosa si perde l'accesso
La principale limitazione che si verifica quando la licenza scade è l'impossibilità di effettuare l'aggiornamento alle nuove versioni dell'SDK. Ciò significa che:
- Non è possibile installare o implementare versioni più recenti dell'SDK.
- Non riceverete i miglioramenti delle funzionalità rilasciati nelle versioni future dell'SDK.
- Non potrete beneficiare delle correzioni dei bug o degli aggiornamenti di sicurezza delle nuove versioni.
### Opzioni di licenza future
Se in seguito si decide di voler accedere a nuove versioni dell'SDK, è possibile acquistare una nuova licenza in qualsiasi momento del futuro. Non ci sono penali o complicazioni nel riattivare la licenza dopo un periodo di mancato rinnovo.
Questo approccio vi permette di prendere decisioni strategiche su quando gli aggiornamenti sono necessari per il vostro progetto, piuttosto che costringervi a un ciclo di rinnovo continuo se non è in linea con la vostra roadmap di sviluppo o con i vincoli di budget.
## Supporto premium
Se siete alla ricerca di un'assistenza di alto livello per il vostro software, il nostro pacchetto di assistenza premium è esattamente ciò che vi serve. Con il nostro supporto premium, avrete accesso a una serie di strumenti e servizi che vi aiuteranno a ottenere il massimo dal vostro software, tra cui AnyDesk, Microsoft Teams, Telegram e altro ancora.
Uno dei vantaggi principali del nostro pacchetto di assistenza premium è l'accesso a AnyDesk. Questa potente applicazione di desktop remoto consente al nostro team di assistenza di accedere al vostro computer e di risolvere eventuali problemi. Con AnyDesk, il nostro team di assistenza può diagnosticare e risolvere rapidamente i problemi.
Oltre a AnyDesk, il nostro pacchetto di assistenza premium include anche l'accesso a Microsoft Teams. Questa piattaforma di collaborazione consente al nostro team di assistenza di comunicare con voi in tempo reale, condividere file e persino effettuare videochiamate. In questo modo avrete accesso diretto al nostro team di assistenza ogni volta che ne avrete bisogno, indipendentemente da dove vi troviate nel mondo.
Offriamo anche assistenza tramite Telegram, una piattaforma di messaggistica sicura che ci permette di fornirvi un supporto rapido e conveniente direttamente dal vostro dispositivo mobile. Che siate in viaggio o semplicemente preferiate comunicare tramite messaggistica, il nostro team di assistenza è disponibile ad aiutarvi tramite Telegram.
Quando sottoscrivete il nostro pacchetto di assistenza premium, potete essere certi di ricevere il miglior supporto tecnico per il vostro software. Il nostro team di esperti è altamente qualificato e dedicato a fornirvi il più alto livello di servizio possibile, in modo che possiate tornare a utilizzare il vostro software con fiducia.
Il nostro pacchetto di assistenza premium è disponibile a soli 250 EUR per 5 ore di assistenza dedicata. Per iscriversi al nostro pacchetto di assistenza premium e accedere a questi vantaggi, utilizzate il seguente [**link di pagamento**](https://buy.stripe.com/7sI3ch4ou1C62Dm3dA). Una volta elaborato il pagamento, il nostro team di assistenza si metterà in contatto con voi per programmare le sessioni di assistenza e iniziare a fornirvi il miglior supporto possibile per il vostro software.
L'SDK è gratuito per uso non commerciale. Contattateci per ottenere una licenza gratuita.
### Video Capture SDK .Net
##### STANDARD
[€250] Regolare (1 anno)
[Carta di debito/credito](https://buy.stripe.com/dR69AFdZ42Ga2Dm9AA)[Banca, SEPA, Apple e altro ancora](https://buy.stripe.com/28o0056wC6Wq4Lug0G)
[€750] A vita/Squadra
[Tutti i metodi](https://buy.stripe.com/14k4gl9IObcG6TC5l1)
##### PROFESSIONALE
[€350] Regolare (1 anno)
[Carta di debito/credito](https://buy.stripe.com/aEUcMRcV0cgKem4bIJ)[Banca, SEPA, Apple e altro ancora](https://buy.stripe.com/4gw6ot5sy5Sm6TCdSA)
[€1000] A vita/Squadra
[Tutti i metodi](https://buy.stripe.com/bIYbINf381C6cdWdRj)
##### PREMIUM
[€500] Regolare (1 anno)
[Carta di debito/credito](https://buy.stripe.com/dR628dg7c80ucdW4gi)[Banca, SEPA, Apple e altro ancora](https://buy.stripe.com/8wMcMR6wCfsW5PydSz)
[€1500] A vita/Squadra
[Tutti i metodi](https://buy.stripe.com/cN2aEJ5sya8C2Dm5kM)
### Video Edit SDK .Net
##### STANDARD
[€250] Regolare (1 anno)
[Carta di debito/credito](https://buy.stripe.com/dR66ot08e94yem49AG)[Banca, SEPA, Apple e altro ancora](https://buy.stripe.com/00gfZ33kq1C67XG01L)
[€750] A vita/Squadra
[Tutti i metodi](https://buy.stripe.com/eVa8wBcV0gx00ve14s)
##### PROFESSIONALE
[€350] Regolare (1 anno)
[Carta di debito/credito](https://buy.stripe.com/6oEaEJ08ecgK7XGdQX)[Banca, SEPA, Apple e altro ancora](https://buy.stripe.com/7sI4gl3kqdkO7XG29U)
[€1000] A vita/Squadra
[Tutti i metodi](https://buy.stripe.com/cN2fZ3cV0fsW0ve6oL)
##### PREMIUM
[€500] Regolare (1 anno)
[Carta di debito/credito](https://buy.stripe.com/eVaaEJ08e5Smdi0eV2)[Banca, SEPA, Apple e altro ancora](https://buy.stripe.com/fZeaEJdZ40y2di015h)
[€1500] A vita/Squadra
[Tutti i metodi](https://buy.stripe.com/bIY5kp08e2Ga5Py8wS)
### Media Player SDK .Net
##### STANDARD
[€250] Regolare (1 anno)
[Carta di debito/credito](https://buy.stripe.com/7sI9AF08efsWcdW7sE)[Banca, SEPA, Apple e altro ancora](https://buy.stripe.com/14k1492gm6Wq0ve8yj)
[€750] A vita/Squadra
[Tutti i metodi](https://buy.stripe.com/cN2fZ36wCa8C4LudR9)
##### PROFESSIONALE
[€350] Regolare (1 anno)
[Carta di debito/credito](https://buy.stripe.com/aEU5kpf380y20ve5kx)[Banca, SEPA, Apple e altro ancora](https://buy.stripe.com/bIY28d1ci1C61zi8yk)
[€1000] A vita/Squadra
[Tutti i metodi](https://buy.stripe.com/8wMaEJbQWeoSdi0eVc)
### Media Blocks SDK .Net
[€500] Regolare (1 anno)
[Carta di debito/credito](https://buy.stripe.com/14kaEJ6wCa8C1zi9BK)[Banca, SEPA, Apple e altro ancora](https://buy.stripe.com/3cseUZ5sy6Wq5Py5mc)
[€1500] A vita/Squadra
[Tutti i metodi](https://buy.stripe.com/bIY4gl4oueoSb9SeW5)
### Video Edit SDK FFMPEG .Net
##### STANDARD
[€250] Regolare (1 anno)
[Carta di debito/credito](https://buy.stripe.com/6oEbIN1cigx091KaFm)[Banca, SEPA, Apple e altro ancora](https://buy.stripe.com/fZe8wBg7ccgK1zi6qd)
[€750] A vita/Squadra
[Tutti i metodi](https://buy.stripe.com/aEUbINcV080uem43cV)
##### PROFESSIONALE
[€350] Regolare (1 anno)
[Carta di debito/credito](https://buy.stripe.com/00gcMRaMS80u1zi5l4)[Banca, SEPA, Apple e altro ancora](https://buy.stripe.com/bIY149aMS0y2a5O7ui)
[€1000] A vita/Squadra
[Tutti i metodi](https://buy.stripe.com/bIYbIN5sy0y20vefZJ)
##### PREMIUM
[€500] Regolare (1 anno)
[Carta di debito/credito](https://buy.stripe.com/dR64glcV0fsWem48xi)[Banca, SEPA, Apple e altro ancora](https://buy.stripe.com/5kA7sx4ou94y1zi3e3)
[€1500] A vita/Squadra
[Tutti i metodi](https://buy.stripe.com/4gw1498EK3Keem46pb)
### Virtual Camera SDK
##### PROFESSIONALE
[€500] Regolare (1 anno)
[Carta di debito/credito](https://buy.stripe.com/00g149cV00y2b9SeVq)[Banca, SEPA, Apple e altro ancora](https://buy.stripe.com/fZe28d8EKeoS5Py3e6)
[€1500] A vita/Squadra
[Tutti i metodi](https://buy.stripe.com/bIYaEJ1ci6Wqa5ObJf)
##### CODICE SORGENTE
[€2500] A vita/Squadra
[Tutti i metodi](https://buy.stripe.com/aEUdQVcV06Wq1zibJg)
### VLC Source DirectShow Filter
[€300] Regolare (1 anno)
[Carta di debito/credito](https://buy.stripe.com/fZe8wB6wC1C67XGeVt)[Banca, SEPA, Apple e altro ancora](https://buy.stripe.com/cN2eUZ8EK4Oi1zibKD)
[€900] A vita/Squadra
[Tutti i metodi](https://buy.stripe.com/6oEeUZ7AG6Wq2DmbK0)
### FFMPEG Source DirectShow Filter
[€300] Regolare (1 anno)
[Carta di debito/credito](https://buy.stripe.com/bIYcMRdZ45Smb9S7t2)[Banca, SEPA, Apple e altro ancora](https://buy.stripe.com/4gwbIN1cibcG7XGbKE)
[€900] A vita/Squadra
[Tutti i metodi](https://buy.stripe.com/5kAcMR1ci3Keem4dRr)
### DirectShow Encoding Filters Pack
[€500] Regolare (1 anno)
[Carta di debito/credito](https://buy.stripe.com/4gwbIN7AG94y1zi7t4)[Banca, SEPA, Apple e altro ancora](https://buy.stripe.com/aEU4gl4oubcGa5O5mh)
[€1500] A vita/Squadra
[Tutti i metodi](https://buy.stripe.com/5kAdQVcV00y26TCbJc)
### DirectShow Processing Filters Pack
[€350] Regolare (1 anno)
[Carta di debito/credito](https://buy.stripe.com/4gw9AF5sy0y26TC4gT)[Banca, SEPA, Apple e altro ancora](https://buy.stripe.com/9AQ28d5sy2Ga91K162)
[€1000] A vita/Squadra
[Tutti i metodi](https://buy.stripe.com/dR6eUZg7ceoSgucaF9)
### Video Encryption SDK
[€500] Regolare (1 anno)
[Carta di debito/credito](https://buy.stripe.com/8wM28d3kq5Smguc28M)[Banca, SEPA, Apple e altro ancora](https://buy.stripe.com/28o7sx3kq6Wqfq85mj)
[€1500] A vita/Squadra
[Tutti i metodi](https://buy.stripe.com/dR6bIN8EK3Ke7XG9Bf)
### All-in-One Media Framework (Delphi/ActiveX)
##### STANDARD
[€350] Regolare (1 anno)
[Carta di debito/credito](https://buy.stripe.com/8wMdQV7AG6Wq7XG4hO)[Banca, SEPA, Apple e altro ancora](https://buy.stripe.com/dR6dQV4ou94ycdW9CA)
[€700] A vita/Squadra
[Tutti i metodi](https://buy.stripe.com/dR69AF8EKbcGa5OcOp)
##### PROFESSIONALE
[€500] Regolare (1 anno)
[Carta di debito/credito](https://buy.stripe.com/fZebIN9IOfsW6TC3dJ)[Banca, SEPA, Apple e altro ancora](https://buy.stripe.com/8wM9AF3kq1C60ve2aa)
[€1000] A vita/Squadra
[Tutti i metodi](https://buy.stripe.com/4gw8wB2gm0y2b9S29M)
##### PREMIUM
[€750] Regolare (1 anno)
[Carta di debito/credito](https://buy.stripe.com/9AQcMR7AG2Gab9SdSm)[Banca, SEPA, Apple e altro ancora](https://buy.stripe.com/eVaeUZ2gm6Wq5Py2a9)
[€1500] A vita/Squadra
[Tutti i metodi](https://buy.stripe.com/5kAaEJ6wCa8Cem48yb)
### Video Fingerprinting SDK
[€900] Regolare (1 anno)
[Carta di debito/credito](https://buy.stripe.com/14kfZ3aMS6WqcdWaFy)[Banca, SEPA, Apple e altro ancora](https://buy.stripe.com/3cs4gl5sy6Wq1zi7uv)
[€2000] A vita/Squadra
[Tutti i metodi](https://buy.stripe.com/bIY7sx6wC1C66TCcNH)
[€25] Durata (1 core del server all'anno)
[Carta di debito/credito](https://buy.stripe.com/aEUaEJ3kq0y2em4bJE)[Banca, SEPA, Apple e altro ancora](https://buy.stripe.com/8wM6ot2gm6Wq5Pyg12)
### Fardelli
€700
€1800
Pacchetto .Net
Professionale
Video Capture SDK .Net Edizione Professionale
Media Player SDK .Net Professional Edition
Video Edit SDK .Net Edizione professionale
Video Edit SDK FFMPEG .Net Edizione professionale
Media Blocks SDK .Net
[Licenza regolare](https://buy.stripe.com/eVacMR6wCa8CcdW5li)[Licenza a vita/di squadra](https://buy.stripe.com/00g7sx5sy0y291K3db)
€1000
€2500
Pacchetto .Net
Premio
SDK di acquisizione video .Net Edizione Premium
Media Player SDK .Net Professional Edition
Video Edit SDK .Net Edizione Premium
Video Edit SDK FFMPEG .Net Edizione Premium
Media Blocks SDK .Net
[Licenza regolare](https://buy.stripe.com/28ofZ3bQW6Wqb9S5lk)[Licenza a vita/di squadra](https://buy.stripe.com/aEUbIN3kq5Sm3Hq9BB)
€1000
€2500
DirectShow All-In-One
Pacchetto
FFMPEG Source DirectShow Filter
VLC Source DirectShow Filter
DirectShow Processing Filters Pack
DirectShow Encoding Filters Pack
SDK sorgente DirectShow per Kinect
[Licenza regolare](https://buy.stripe.com/00g149cV0cgK3HqaFZ)[Licenza a vita/di squadra](https://buy.stripe.com/8wM1498EK4Oib9S8xS)
Il listino prezzi è disponibile in [PDF](http://files.visioforge.com/shared/pricelist.pdf).
---END OF PAGE---
# Page: https://www.visioforge.com/privacy-policy
# Privacy Policy and GDPR Compliance
This Privacy Policy explains the way in which VisioForge collects, uses, maintains, and discloses personal information collected from our users, in compliance with the General Data Protection Regulation (GDPR). VisioForge is committed to respecting your privacy rights and protecting your personal data.
## Definitions
**Personal data**: Any information that can be used to identify an individual, such as name, address, email, IP address, and other similar data.
**Processing**: Any operation performed on personal data, including collecting, using, storing, or deleting.
## Data Controller
VisioForge is the data controller and is responsible for your personal data. We determine the purposes and means of processing personal data in line with this policy.
## What Personal Data We Collect and Why
We collect information when users interact with our services, for example, when you use our software, make a purchase, or engage with our customer support. This information may include:
- Contact Information: Name, email address, and other contact details provided when purchasing our services or contacting our support.
- Transaction Information: We use Stripe as a payment processor and during transactions, it collects certain transaction details. Please note that Stripe operates as a separate controller and has its own privacy policy, which we recommend you review.
- Telemetry Data: With your consent, our software collects telemetry data to help improve our services. This data is anonymized and cannot be used to identify individual users.
## How We Use Your Personal Data
We use your personal data for various purposes:
- To provide and maintain our services.
- To notify you about changes to our services.
- To allow you to participate in interactive features of our service when you choose to do so.
- To provide customer support.
- To gather analysis or valuable information so that we can improve our service.
- To monitor the usage of our service.
- To detect, prevent and address technical issues.
## How We Share and Disclose Your Personal Data
We do not sell or rent personal data to third parties. We only share personal data with third parties in accordance with this privacy policy. We may disclose your personal data to:
- Stripe, as part of facilitating and processing transactions.
- Legal authorities when it's necessary to comply with legal obligations or to protect the rights and safety of others.
## Data Retention
We will retain your personal data only for as long as is necessary for the purposes set out in this privacy policy. We will retain and use your personal data to the extent necessary to comply with our legal obligations, resolve disputes, and enforce our legal agreements and policies.
## Your Rights under GDPR
As a user, you have specific rights under the GDPR, including:
- The right to access, update or to delete the personal data we have on you.
- The right of rectification, to correct your personal data if it's inaccurate or incomplete.
- The right to object to our processing of your personal data.
- The right of restriction, to request that we limit the processing of your personal data.
- The right to data portability, to receive a copy of the data we have on you in a structured, machine-readable format.
- The right to withdraw your consent at any time where VisioForge relied on your consent to process your personal data.
Please note that we may ask you to verify your identity before responding to such requests.
## Changes to This Privacy Policy
VisioForge reserves the right to make changes to this privacy policy at any time. We encourage users to frequently check this page for any changes to stay informed about how we are helping to protect the personal information we collect.
## Contact Us
If you have any questions or suggestions about our Privacy Policy, do not hesitate to contact us.
## Consent
By using our site or services, you consent to the terms outlined in this Privacy Policy.
**Last updated: July 23, 2023**

---END OF PAGE---
# Page: https://www.visioforge.com/de/news
# Die neuesten Nachrichten und Updates
## Beschleunigen Sie Ihre Entwicklung mit unseren neuesten SDKs
Entdecken Sie unsere neuen Software Development Kits (SDKs), die speziell für Softwareentwickler entwickelt wurden. Mit unseren SDKs können Sie schnell und einfach leistungsstarke, skalierbare und effiziente Anwendungen entwickeln. Ganz gleich, ob Sie an mobilen Anwendungen, Desktop-Software oder Weblösungen arbeiten, unsere SDKs verfügen über eine leicht verständliche Dokumentation, Beispielcode und eine einfache Integration, um Ihren Entwicklungsprozess zu beschleunigen. Wir kennen die Herausforderungen, mit denen Entwickler konfrontiert sind, und unser Ziel ist es, Tools bereitzustellen, die Ihren Arbeitsablauf vereinfachen und verbessern. Mit unseren SDKs haben Sie alles, was Sie brauchen, um qualitativ hochwertige Anwendungen zu erstellen, die den Anforderungen der heutigen Benutzer gerecht werden.
## Bleiben Sie auf dem Laufenden und erhalten Sie den besten Support
Bleiben Sie mit unseren regelmäßig aktualisierten SDKs, die die neuesten Technologien und Standards enthalten, auf dem neuesten Stand der Dinge. Wir setzen uns dafür ein, dass sich unsere SDKs weiterentwickeln, um den sich ständig ändernden Anforderungen der Softwareentwicklungsbranche gerecht zu werden. Unser Team bietet Ihnen hervorragenden Support und Ressourcen, damit Sie das Beste aus unseren SDKs herausholen können. Erkunden Sie noch heute unser Angebot und bringen Sie Ihre Entwicklungserfahrung auf die nächste Stufe. Mit unserem umfassenden Support sind Sie in der Lage, Probleme schnell und effizient zu lösen, so dass Sie sich auf das konzentrieren können, was Sie am besten können - die Erstellung von großartiger Software. Viel Spaß beim Programmieren!
[Neuigkeiten, Aktualisierungen und Produktversionen - 2024](https://www.visioforge.com/de/news-2024)
13. Juni 2024
visioforge
[Keine Kommentare](https://www.visioforge.com/de/news-2024#respond)
[Mehr lesen](https://www.visioforge.com/de/news-2024)
[Neuigkeiten, Aktualisierungen und Produktversionen - 2023](https://www.visioforge.com/de/news-2023)
31. Dezember 2023
visioforge
[Keine Kommentare](https://www.visioforge.com/de/news-2023#respond)
[Mehr lesen](https://www.visioforge.com/de/news-2023)
[Neuigkeiten, Aktualisierungen und Produktveröffentlichungen - 2022](https://www.visioforge.com/de/news-2022)
31. Dezember 2022
visioforge
[Keine Kommentare](https://www.visioforge.com/de/news-2022#respond)
[Mehr lesen](https://www.visioforge.com/de/news-2022)
[Neuigkeiten, Aktualisierungen und Produktveröffentlichungen - 2021](https://www.visioforge.com/de/news-2021)
31. Dezember 2021
visioforge
[Keine Kommentare](https://www.visioforge.com/de/news-2021#respond)
[Mehr lesen](https://www.visioforge.com/de/news-2021)
---END OF PAGE---
# Page: https://www.visioforge.com/es/news
# Últimas noticias y actualizaciones
## Impulse su desarrollo con nuestros SDK más recientes
Descubra nuestros nuevos kits de desarrollo de software (SDK) diseñados exclusivamente para desarrolladores de software. Nuestros SDK están diseñados para ayudarle a crear aplicaciones sólidas, escalables y eficientes de forma rápida y sencilla. Tanto si trabaja en aplicaciones móviles, software de escritorio o soluciones web, nuestros SDK incluyen documentación fácil de seguir, ejemplos de código e integración sencilla para acelerar el proceso de desarrollo. Entendemos los retos a los que se enfrentan los desarrolladores y nuestro objetivo es proporcionar herramientas que simplifiquen y mejoren su flujo de trabajo. Con nuestros SDK, tendrá todo lo que necesita para crear aplicaciones de alta calidad que satisfagan las demandas de los usuarios de hoy en día.
## Manténgase al día y reciba la mejor asistencia
Manténgase al día de las últimas tendencias con nuestros SDK actualizados periódicamente, que incluyen las tecnologías y los estándares más recientes. Nos comprometemos a garantizar que nuestros SDK evolucionen para satisfacer las necesidades siempre cambiantes del sector del desarrollo de software. Nuestro equipo se dedica a proporcionar un excelente soporte y recursos para ayudarle a sacar el máximo partido de nuestros SDK. Explore nuestra gama hoy mismo y lleve su experiencia de desarrollo al siguiente nivel. Gracias a nuestra completa asistencia, podrá resolver los problemas de forma rápida y eficaz, lo que le permitirá centrarse en lo que mejor sabe hacer: crear software increíble. ¡Feliz programación!
[Noticias, actualizaciones y lanzamientos de productos - 2024](https://www.visioforge.com/es/news-2024)
13 de junio de 2024
visioforge
[Sin comentarios](https://www.visioforge.com/es/news-2024#respond)
[Seguir leyendo](https://www.visioforge.com/es/news-2024)
[Noticias, actualizaciones y lanzamientos de productos - 2023](https://www.visioforge.com/es/news-2023)
31 de diciembre de 2023
visioforge
[Sin comentarios](https://www.visioforge.com/es/news-2023#respond)
[Seguir leyendo](https://www.visioforge.com/es/news-2023)
[Noticias, actualizaciones y lanzamientos de productos - 2022](https://www.visioforge.com/es/news-2022)
31 de diciembre de 2022
visioforge
[Sin comentarios](https://www.visioforge.com/es/news-2022#respond)
[Seguir leyendo](https://www.visioforge.com/es/news-2022)
[Noticias, actualizaciones y lanzamientos de productos - 2021](https://www.visioforge.com/es/news-2021)
31 de diciembre de 2021
visioforge
[Sin comentarios](https://www.visioforge.com/es/news-2021#respond)
[Seguir leyendo](https://www.visioforge.com/es/news-2021)
---END OF PAGE---
# Page: https://www.visioforge.com/it/news
# Le ultime notizie e gli aggiornamenti
## Potenziate il vostro sviluppo con i nostri ultimi SDK
Scoprite i nostri nuovi kit di sviluppo software (SDK) fatti apposta per gli sviluppatori di software. I nostri SDK sono progettati per aiutarvi a creare applicazioni solide, scalabili ed efficienti in modo rapido e semplice. Sia che stiate lavorando su applicazioni mobili, software desktop o soluzioni web, i nostri SDK sono dotati di documentazione facile da seguire, codice di esempio e integrazione semplice per accelerare il processo di sviluppo. Siamo consapevoli delle sfide che gli sviluppatori devono affrontare e il nostro obiettivo è fornire strumenti che semplifichino e migliorino il vostro flusso di lavoro. Con i nostri SDK, avrete tutto ciò che vi serve per creare applicazioni di alta qualità che soddisfino le esigenze degli utenti di oggi.
## Rimanete aggiornati e ottenete il miglior supporto
Tenete il passo con le ultime tendenze grazie ai nostri SDK regolarmente aggiornati, che presentano le tecnologie e gli standard più recenti. Ci impegniamo a garantire che i nostri SDK si evolvano per soddisfare le esigenze in continua evoluzione del settore dello sviluppo software. Il nostro team si impegna a fornire assistenza e risorse eccellenti per aiutarvi a sfruttare al meglio i nostri SDK. Esplorate oggi stesso la nostra gamma e portate la vostra esperienza di sviluppo a un livello superiore. Grazie al nostro supporto completo, sarete in grado di risolvere i problemi in modo rapido ed efficiente, permettendovi di concentrarvi su ciò che sapete fare meglio: creare software straordinari. Buona codifica!
[Notizie, aggiornamenti e rilasci di prodotti - 2024](https://www.visioforge.com/it/news-2024)
13 giugno 2024
visioforge
[Nessun commento](https://www.visioforge.com/it/news-2024#respond)
[Per saperne di più](https://www.visioforge.com/it/news-2024)
[Notizie, aggiornamenti e rilasci di prodotti - 2023](https://www.visioforge.com/it/news-2023)
31 dicembre 2023
visioforge
[Nessun commento](https://www.visioforge.com/it/news-2023#respond)
[Per saperne di più](https://www.visioforge.com/it/news-2023)
[Notizie, aggiornamenti e rilasci di prodotti - 2022](https://www.visioforge.com/it/news-2022)
31 dicembre 2022
visioforge
[Nessun commento](https://www.visioforge.com/it/news-2022#respond)
[Per saperne di più](https://www.visioforge.com/it/news-2022)
[Notizie, aggiornamenti e rilasci di prodotti - 2021](https://www.visioforge.com/it/news-2021)
31 dicembre 2021
visioforge
[Nessun commento](https://www.visioforge.com/it/news-2021#respond)
[Per saperne di più](https://www.visioforge.com/it/news-2021)
---END OF PAGE---
# Page: https://www.visioforge.com/news-2024
# News and product updates in 2024
## 50% Black Friday sale!
(2024-06-03)
🎉 **Summer Sale Alert!** 🎉 Get our top-rated software now at an unbeatable 50% discount! Don't miss out on this limited-time offer to boost your productivity. Upgrade today and save big! 🌞💻
Coupon code: **SUMMER50**
## VisioForge .Net SDKs v15.9 has been released
(2024-04-07)
The .Net SDKs version 15.9 has been released with several updates and new features. Notable improvements include the resolution of video aspect ratio issues, updates to the GStreamer redistribution, and the addition of support for Basler USB3/GigE cameras. The Video Edit SDK .Net now utilizes SkiaSharp-based font settings for the TextOverlay class, allowing for custom font configurations. Stream support has been added to the MediaInfoReader on Windows, enabling video/audio file information retrieval from various sources.
The Live Video Compositor engine has been updated for better file source support, and a camera-covered detector has been introduced in the Video Capture SDK's Computer Vision Demo. New APIs have been added for snapshot retrieval from video files, and iOS support is now included in MAUI samples. Memory leaks in RTSP sources have been resolved, and the Media Player SDK now supports data streams in video files using the FFMPEG source engine.
Additional features include custom FFMPEG options for IP cameras, the resolution of network connection issues with FFMPEG sources, RTSP MultiView support in the Media Blocks SDK, and support for FLIR/Teledyne cameras using the Spinnaker SDK. The Video Edit SDK now supports .Net Stream usage as an input source, and .Net 7 support has been reintroduced to the MAUI package. The IAsyncDisposable interface has been added to all core classes for asynchronous disposal.
Other updates address video capture issues on Android, add HLS streaming samples, and resolve crashes related to multiscreen setups. Improvements in MAUI video rendering speed, media playback issues, and webcam source connectivity have been made. Audio playback issues and bad audio mixing have been resolved, and the Media Player SDK now supports growing MPEG-TS files for the VLC engine.
Check the [changelog](https://www.visioforge.com/help/docs/dotnet/changelog/#159).
## VisioForge .Net SDKs v15.8 has been released
(2024-01-22)
The .Net SDKs version 15.8 has been released, bringing several notable changes and improvements. Key updates include significant API changes, such as requiring the use of `DeviceEnumerator.Shared` for device enumeration and additional initialization steps for X-engines. Android Activity is no longer necessary for SDK engine creation.
Windows users will see improved MAUI video rendering performance and a new mouse highlight feature for screen capture sources. Various bug fixes have been implemented, including resolving issues with Avalonia VideoView resizing, special character passwords for RTSP sources, and a memory leak in the OverlayManager.
The update introduces properties for setting start and stop positions in UniversalSourceSettings and adds events to notify about device additions/removals in the DeviceEnumerator. Custom error handler support has been added for several engines, and there are new properties for setting custom audio filters for Virtual Camera SDK outputs in various components.
New features include NDI streaming support in VideoCaptureCoreX and additional media blocks in the Media Blocks SDK, such as BufferSink and CustomMediaBlock classes. Video frame cropping capabilities have been enhanced with the addition of VideoCropBlock and VideoAspectRatioCropBlock. The update also includes support for WASAPI audio renderer in the VideoCaptureCore engine and updates to the Tempo audio effect. Overall, this release focuses on enhancing performance, fixing critical issues, and adding new functionalities to the .Net SDKs.
Check the [changelog](https://www.visioforge.com/help/docs/dotnet/changelog/#158).
---END OF PAGE---
# Page: https://www.visioforge.com/news-2023
# News and product updates in 2023
## VisioForge .Net SDKs v15.7 has been released
(2023-11-12)
The .Net SDKs version 15.7 has been released with several enhancements and fixes. This release includes support for .Net 8 across all SDKs.
Key improvements in the Video Capture SDK .Net include resolving issues with the `OnNetworkSourceDisconnect` event being called twice, fixing audio source format settings in VideoCaptureCoreX, and addressing WPF native rendering issues with pop-up windows. The Start/StartAsync method in VideoCaptureCore now returns false if the video capture device is already being used by another application.
X-engines have been updated with new MPEG-2 video and MP2 audio encoders, DNxHD video encoder support, and changes to default VP8/VP9 settings for live recording. Decklink enumeration issues have been resolved.
Cross-platform SDKs benefit from updates to the Decklink source, resolving incorrect device name issues, and the Overlay Manager, now featuring an `OverlayManagerDateTime` class for drawing current date and custom text. Additionally, SkiaSharp security updates and issues with the System.Drawing.Bitmap usage in `OverlayManagerImage` has been resolved.
Support for Avalonia 11.0.5 has been added, along with updates to the VLC source (libVLC 3.0.19) and FFMPEG sources and encoders, which address issues with missing MSVC dependencies. The ONVIF engine has also been updated.
Finally, the update improves the FFMPEG.exe output in VideoCaptureCore, enhancing support for x264 and x265 encoders in custom FFMPEG builds, and resolves a rare crash issue with WinUI VideoView.
Check the [changelog](https://www.visioforge.com/help/docs/dotnet/changelog/#157).
## VisioForge .Net SDKs v15.6 has been released
(2023-09-20)
The .Net SDKs version 15.6 introduces numerous enhancements and new features. Video Capture SDK sees improved video crop performance on modern CPUs and introduces a new video overlays API, with related demos showing its usage. The update also improves hardware encoder detection for systems with multiple GPUs. The Avalonia VideoView has been updated to resolve issues with its recreation.
Media Player SDK includes changes such as resolving startup issues on Android and adding new methods for video stream selection. Performance improvements for 4K and 8K videos in WPF rendering have been implemented across all SDKs. Various issues, including video crop problems and multiple outputs in VideoCaptureCoreX, have been resolved.
New demos and support for features like NDI streaming, madVR, and multiple audio tracks are included. The update also adds several new classes and methods, such as VNC source support and AI-based video resizing using Nvidia Maxine SDK. The Media Blocks SDK adds new OpenCV blocks, NDI source and sink blocks, and additional video encoders like rav1e AV1 and GIF.
Improvements to memory playback, VU meter issues, and enhanced support for WASAPI 2 are also part of this release. The SDKs now support async disposal with the IAsyncDisposable interface and have resolved various detection and playback issues. New features like KLV data handling, MJPEG network streaming, and enhanced media block functionalities further extend the capabilities of the SDKs. Finally, the update includes a range of stability and performance enhancements across different platforms and components.
Check the [changelog](https://www.visioforge.com/help/docs/dotnet/changelog/#156).
---END OF PAGE---
# Page: https://www.visioforge.com/news-2022
# News and product updates in 2022
## VisioForge .Net SDKs v15.5 has been released
(2022-12-11)
The .Net SDKs version 15.5 has been released with several new features and updates. This version includes support for .Net 7 and introduces a range of enhancements across various SDK components.
In the Video Capture SDK .Net, a NetworkDisconnect event has been added to the MJPEG Low Latency IP camera engine, and the `OnRTSPLowLatencyRAWFrame` event allows retrieval of RAW frames from RTSP streams using the RTSP Low Latency engine. The VideoEditCoreX engine now supports Linux-based demos and features a new AutoTransitions property. Additionally, there is improved compatibility with Snap Camera for MP4 HW encoding and support for multiple Decklink outputs in both Video Capture and Video Edit SDKs.
For cross-platform APIs, `System.Drawing.Rectangle` and `System.Drawing.Size` types have been replaced by `VisioForge.Types.Rectangle` and `VisioForge.Types.Size`. The update also brings MAUI samples (BETA) and enhanced online licensing.
The Media Player SDK .Net has been upgraded with segment support in its cross-platform engine, a Playlist API for the Windows-only engine, and GPU HW decoding for the VLC engine. Issues with reverse playback, the `MediaPlayerCore.Video\_Renderer\_SetCustomWindowHandle` method, and WPF HighDPI applications using EVR have been resolved. Additionally, the Media Player SDK now supports previous frame playback in its cross-platform engine.
The Media Blocks SDK .Net has added a WPF Screen Capture Demo, while ONVIFControl and related APIs are now available across all platforms. There has been an API-breaking change, with the frame rate type changing from double to `VideoFrameRate` in all APIs.
Other improvements include a new Camera Light demo, updated handling of the "rtsp\_source\_create\_audio\_resampler" call in the RTSP Low Latency engine for Video Capture SDK .Net, and enhanced segments support in the Media Player SDK. These updates collectively enhance functionality, compatibility, and performance across the various .Net SDKs.
Check the [changelog](https://www.visioforge.com/help/docs/dotnet/changelog/#155).
## VisioForge .Net SDKs v15.4 has been released
(2022-07-23)
The .Net SDKs version 15.4 has been released, bringing a host of updates and new features. This release addresses several issues and introduces enhancements across various components.
Key updates include resolving the issue with the `Play\_PauseAtFirstFrame` property being ignored, and improvements to HighDPI support in WinForms samples and for the Direct2D video renderer. The ONVIFControl class has been enhanced with new APIs: `GetDeviceCapabilities` and `GetMediaEndpoints`.
The issue of forced reencoding when joining FFMPEG files without reencoding has been resolved. The update also includes a Sentry update and adds video interpolation settings for Zoom and Pan video effects.
Support for the GtkSharp UI framework for video rendering has been added, and the FastEdit API has been changed to async. Additionally, a screen flip issue related to the `Video\_Effects\_AllowMultipleStreams` property in the Video Capture SDK .Net core has been resolved.
The RTSP MultiView demo has been updated to include GPU decoding and access to RAW streams. New features include an `OnLoop` event in the Media Player SDK .Net and a Loop feature in the Media Blocks SDK .Net.
Due to issues with Avalonia UI and NativeControl, Avalonia VideoView has been downgraded to version 0.10.12. A new File Encryptor demo has been added to the Video Edit SDK .Net, providing an example of how to encrypt video files.
Overall, this release enhances functionality, resolves critical issues, and introduces new features to improve the user experience across the .Net SDKs.
Check the [changelog](https://www.visioforge.com/help/docs/dotnet/changelog/#154).
## VisioForge .Net SDKs v15.3 has been released
(2022-05-21)
The .Net SDKs version 15.3 has been released with a range of enhancements and optimizations. Key improvements include a reduction in app start-up time for PCs equipped with Decklink cards and support for NDI SDK v5. An issue with MKV Legacy output causing wrong cast exceptions has been resolved.
Performance optimizations have been made to zoom and pan effects, and a basic Media Blocks API has been introduced, though it is still a work in progress. The Video Edit SDK .Net now supports HLS network streaming.
In WPF VideoView, a new Rotate property has been added, allowing video rotation by 90, 180, or 270 degrees. Users can also use the `GetImageLayer()` method to retrieve the Image layer for applying custom transforms.
An API change has renamed `FilterHelpers` to `FilterDialogHelper`. The `VisioForge.Types` and `VisioForge.MediaFramework` assemblies have been merged into `VisioForge.Core`, and UI classes have been moved to `VisioForge.Core.UI.\*` assemblies and independent NuGet packages. Additionally, `VisioForge.Types` has been renamed to `VisioForge.Core.Types`, and `VisioForge.Core` no longer depends on the Windows Forms framework.
These updates collectively enhance performance, streamline the API, and expand functionality across the .Net SDKs.
Check the [changelog](https://www.visioforge.com/help/docs/dotnet/changelog/#153).
## VisioForge .Net SDKs v15.2 has been released
(2022-01-20)
The .Net SDKs version 15.2 has been released, featuring several new additions and improvements. Key updates include the addition of `HorizontalAlignment` and `VerticalAlignment` properties for text and image logos, which allow for better customization and positioning.
ONVIF support has been updated, resolving issues related to username and password specifications in URLs without corresponding source settings. RTSP support for IP cameras has been improved, ensuring more reliable connections and performance.
Issues with the FFMPEG.exe output dialog and separate capture in service applications have been resolved. The SDK has migrated from NewtonsoftJson to System.Text.Json for better performance and modern serialization support.
The DirectCapture output for IP cameras has been updated, and a new DirectCapture ASF output option has been added. The `IPCameraSourceSettings.URL` property type has been changed from string to `System.Uri`, promoting better handling of URL types.
Video and audio effects have been updated, and overall video processing performance optimizations have been implemented. Various bug fixes and performance improvements further enhance the stability and efficiency of the SDK.
Overall, this release focuses on enhancing functionality, improving performance, and resolving critical issues across the .Net SDKs.
Check the [changelog](https://www.visioforge.com/help/docs/dotnet/changelog/#152).
## VisioForge New Year holidays 30% discount
(2022-01-03)
Celebrate the New Year holidays with our special sale, offering an amazing **30% discount** on all products!
### 🎁 **Enjoy 30% Off All Products!** 🎁
Start the New Year with incredible savings on our premium software. Use the coupon code **NY30** at checkout to receive a 30% discount on all products.
Don't miss out on these fantastic savings! Make the most of the New Year holidays with our special offers and enhance your software experience.
Happy shopping and Happy New Year!
---END OF PAGE---
# Page: https://www.visioforge.com/news-2021
# News and product updates in 2021
## VisioForge .Net SDKs v15.1 has been released
2022-11-26
The .Net SDKs version 15.1 introduces cross-platform support with Android for the Media Player SDK .Net and plans for iOS/macOS by December. It disables Sentry debug messages in the console, adds Icecast streaming, and updates the `VideoStreamInfo.FrameRate` property to `VideoFrameRate`. The WPF VideoView has improved IP camera stream playback. Significant API changes merge several components into `VisioForge.Core`, and the audio effect API now uses string names. A new GStreamer-based cross-platform engine supports Windows and other platforms in this development cycle.
Check the [changelog](https://www.visioforge.com/help/docs/dotnet/changelog/#151).
## VisioForge .Net SDKs v15.0 has been released
2022-11-01
The .Net SDKs version 15.0 introduces significant API changes, dividing the main controls into Core and VideoView parts. The SDK no longer has separate TRIAL and FULL versions, removing the `SDK\_State` property
Developers are advised to replace UI controls with `VideoView` and rename core classes (e.g., `VideoCaptureCore`) to match previously used UI control names. This change enables support for additional UI platforms such as UWP, MAUI, Eco, and Avalonia.
Check the [changelog](https://www.visioforge.com/help/docs/dotnet/changelog/#150).
## VisioForge .Net SDKs v14.3 has been released
2022-09-14
The .Net SDKs version 14.3 includes several important updates and improvements. A critical issue with the Video Resize filter creation for NuGet redistributions has been resolved, and telemetry has been updated. The `VFDirectCaptureMP4Output` output has also been updated. This release adds support for .Net 6 (preview) and removes Nvidia CUDA, recommending NVENC as the modern alternative for H264/HEVC encoding.
The IP camera MJPEG Low Latency engine has been updated, and NDI source listing has been improved. ONVIF support has seen enhancements, and .Net Core 3.1 support has been added for the RTSP Low Latency source engine. Issues with Picture-in-Picture for 2x2 mode have been resolved. The project and solutions have been split into independent files for .Net Framework 4.7.2, .Net Core 3.1, .Net 5, and .Net 6, facilitating better organization and compatibility.
Check the [changelog](https://www.visioforge.com/help/docs/dotnet/changelog/#143).
## VisioForge .Net SDKs v14.2 has been released
2022-08-11
The .Net SDKs version 14.2 brings several updates and fixes. The issue with audio stream capture when using the Virtual Camera SDK output has been resolved. The `VFMP4v8v10Output` has been replaced with `VFMP4Output`. A new `CanStart` method has been added to `Video\_CaptureDevicesInfo` items, which checks if a device can start and is not being used exclusively by another application.
The `ONVIFControl` now supports async/await API, enhancing its asynchronous capabilities. An issue with incorrect ColorKey processing in the Text Overlay video effect has been fixed. Forced frame rate support has been added for the RTSP Low Latency IP camera source. The MP4v11 AMD encoders have been updated, and a timestamp issue during MP4v11 separate capture pause/resume has been resolved.
The FFMPEG.exe network streaming and output have been updated to the latest FFMPEG version. The VC++ redistributable is no longer required to be installed, as VC++ linking has been changed to static, except for the optional XIPH output. Additionally, many base DirectShow filters have been moved to the `VisioForge\_BaseFilters` module.
Check the [changelog](https://www.visioforge.com/help/docs/dotnet/changelog/#142).
---END OF PAGE---
# Page: https://www.visioforge.com/de/legal-information
# Rechtliche und regulatorische Informationen
## Rechtliche Informationen
Roman Miniailov, Geschäftsführer von VisioForge
**Umsatzsteuer-ID**: ESZ0362544T
**Adresse**: Spanien, 33200, Asturien, Gijon
## Datenschutzbestimmungen
Wir bei VisioForge verpflichten uns, Ihre Privatsphäre zu schützen. Unsere Datenschutzrichtlinie beschreibt, welche Arten von personenbezogenen Daten wir erfassen, wie sie verwendet werden und welche Maßnahmen wir ergreifen, um die Sicherheit Ihrer Daten zu gewährleisten. Wir halten uns an alle geltenden Datenschutzbestimmungen, einschließlich der Allgemeinen Datenschutzverordnung (GDPR). Ausführlichere Informationen finden Sie in unserer [Datenschutzrichtlinie](https://www.visioforge.com/de/privacy-policy).
## Erstattungspolitik
Wir bemühen uns, dass unsere Kunden mit ihren Einkäufen zufrieden sind. Sollten Sie aus irgendeinem Grund nicht zufrieden sein, haben Sie möglicherweise Anspruch auf eine Rückerstattung. In unseren Rückerstattungsrichtlinien finden Sie ausführliche Informationen zu den Anspruchsvoraussetzungen und dem Verfahren zur Beantragung einer Rückerstattung. Um mehr zu erfahren, lesen Sie bitte unsere [Erstattungspolitik](https://www.visioforge.com/de/refund-policy).
## Support-Dienstleistungsvereinbarung (SLA)
Unser Support Service Level Agreement (SLA) definiert das Serviceniveau, das Sie von VisioForge erwarten können. Dazu gehören Reaktionszeiten, die Verfügbarkeit des Supports und der Prozess zur Lösung von Problemen. Wir sind bestrebt, prompten und effizienten Support zu bieten, um sicherzustellen, dass Sie unsere Produkte reibungslos nutzen können. Für weitere Informationen lesen Sie bitte unsere [Support-SLA](https://www.visioforge.com/de/support-service-level-agreement-sla).

---END OF PAGE---
# Page: https://www.visioforge.com/es/legal-information
# Información jurídica y reglamentaria
## Información jurídica
Roman Miniailov bajo el nombre de VisioForge
**ID de IVA**:ESZ0362544T
**Dirección**: España, 33200, Asturias, Gijón
## Política de privacidad
En VisioForge, nos comprometemos a proteger su privacidad. Nuestra Política de privacidad describe los tipos de información personal que recopilamos, cómo se utiliza y las medidas que tomamos para garantizar la seguridad de sus datos. Nos adherimos a todas las normativas de protección de datos aplicables, incluido el Reglamento General de Protección de Datos (RGPD). Para obtener información más detallada, consulte nuestra [política de privacidad](https://www.visioforge.com/es/privacy-policy).
## Política de reembolso
Nos esforzamos para que nuestros clientes queden satisfechos con sus compras. Si por cualquier motivo no queda completamente satisfecho, puede solicitar un reembolso. Nuestra Política de reembolso proporciona información detallada sobre los criterios de elegibilidad y el proceso para solicitar un reembolso. Para obtener más información, lea nuestra [Política de reembolso](https://www.visioforge.com/es/refund-policy).
## Acuerdo de nivel de servicio (SLA)
Nuestro Acuerdo de Nivel de Servicio de Soporte (SLA) define el nivel de servicio que puede esperar de VisioForge. Esto incluye los tiempos de respuesta, la disponibilidad de apoyo, y el proceso de resolución de problemas. Estamos dedicados a proporcionar apoyo rápido y eficiente para asegurar que su experiencia con nuestros productos es perfecta. Para obtener más información, consulte nuestra [Acuerdo de nivel de servicio de soporte](https://www.visioforge.com/es/support-service-level-agreement-sla).

---END OF PAGE---
# Page: https://www.visioforge.com/it/legal-information
# Informazioni legali e normative
## Informazioni legali
Roman Miniailov dba VisioForge
**Partita IVA**: ESZ0362544T
**Indirizzo**: Spagna, 33200, Asturie, Gijon
## Informativa sulla privacy
VisioForge si impegna a proteggere la vostra privacy. La nostra Informativa sulla privacy illustra i tipi di informazioni personali che raccogliamo, le modalità di utilizzo e le misure che adottiamo per garantire la sicurezza dei vostri dati. Aderiamo a tutte le normative vigenti in materia di protezione dei dati, compreso il Regolamento generale sulla protezione dei dati (GDPR). Per informazioni più dettagliate, consultare la nostra [politica sulla riservatezza](https://www.visioforge.com/it/privacy-policy).
## Politica di rimborso
Ci impegniamo a garantire che i nostri clienti siano soddisfatti dei loro acquisti. Se per qualsiasi motivo non siete completamente soddisfatti, potreste avere diritto a un rimborso. La nostra Politica di rimborso fornisce informazioni dettagliate sui criteri di ammissibilità e sulla procedura di richiesta di rimborso. Per saperne di più, leggete la nostra [Politica di rimborso](https://www.visioforge.com/it/refund-policy).
## Accordo sul livello del servizio di assistenza (SLA)
Il nostro Service Level Agreement (SLA) di supporto definisce il livello di servizio che potete aspettarvi da VisioForge. Questo include i tempi di risposta, la disponibilità del supporto e il processo di risoluzione dei problemi. Ci impegniamo a fornire un'assistenza rapida ed efficiente per garantire che la vostra esperienza con i nostri prodotti sia perfetta. Per ulteriori informazioni, vi invitiamo a consultare il nostro [Supporto SLA](https://www.visioforge.com/it/support-service-level-agreement-sla).

---END OF PAGE---
# Page: https://www.visioforge.com/de/refund-policy
# Erstattungspolitik
Vielen Dank, dass Sie bei VisioForge eingekauft haben. Bitte testen Sie unsere Software vor dem Kauf mit einer TRIAL-Version. Unsere Rückerstattungsrichtlinie hat grundlegende Regeln und einige Einschränkungen.
## Vor der Rückgabe eines Produkts
Wenn Sie ein Problem mit einem Produkt haben, gibt es möglicherweise andere Möglichkeiten, bevor Sie eine Rückgabe beantragen:
- Wenn Sie die Software gekauft und heruntergeladen haben und Hilfe bei der Installation und Aktivierung benötigen, senden Sie bitte eine E-Mail an [order@visioforge.com](mailto:order@visioforge.com) oder verwenden [das Support-Portal](https://support.visioforge.com/).
- Wenn Sie technische Unterstützung für ein VisioForge-Softwareprodukt benötigen, senden Sie bitte eine E-Mail an [support@visioforge.com](mailto:support@visioforge.com), verwenden [das Support-Portal](https://support.visioforge.com/), oder prüfen [Online-Hilfe](https://www.visioforge.com/help/).
## Grundregeln für die Erstattung
Wir empfehlen Ihnen, sich mit uns in Verbindung zu setzen, wenn Sie Probleme beim Empfang oder Herunterladen unserer Produkte haben. Gemäß unserer Rückerstattungsrichtlinie erstatten wir digitale Produkte innerhalb von 30 Tagen nach dem ursprünglichen Kauf des Produkts, wenn die Software Fehler oder Probleme aufweist.
## Einschränkungen der Erstattungspolitik
- Wir gewähren Rückerstattungen für digitale Produkte innerhalb von 30 Tagen nach dem ursprünglichen Kauf des Produkts, wenn die Software Fehler oder Probleme aufweist.
- Bei Verlängerungen oder nach 30 Tagen erfolgt keine Rückerstattung.
- Für Käufe mit Rabatten werden keine Rückerstattungen gewährt.
- Wir führen keine Rückerstattungen für automatische Verlängerungen durch, die während des ersten Kaufs aktiviert wurden (bevor die automatische Verlängerung erfolgt, erhalten Sie mehrere E-Mails über die automatische Verlängerung von unserem Zahlungsanbieter (2Checkout oder Stripe)).
## Kriterien für die Rückgabe
- Alle Rücksendungen und Umtäusche müssen innerhalb von 30 Tagen nach dem Kauf über die entsprechenden Kanäle abgewickelt werden.
- Bei der Rückgabe von Software muss die Lizenz für die Software auf dem Computer des Benutzers beendet und von diesem Computer entfernt werden. Wir können von Ihnen verlangen, dass Sie als Bedingung für die Rückgabe ein elektronisches Vernichtungsschreiben unterzeichnen, in dem Sie bestätigen, dass Sie das Produkt deinstalliert und keine Kopien davon angefertigt haben. Der Lizenzcode für diese Produkte wird gesperrt, und Sie können die Software in Zukunft nicht mehr installieren oder verwenden.
- Bei Werbeartikeln und -paketen müssen alle enthaltenen Produkte und Dienstleistungen zusammen zurückgegeben werden. Angenommen, eine Dienstleistung ist in einer Werbeaktion enthalten und ein Paket wurde verwendet (z. B. ein verwendeter Promo-Code). In diesem Fall wird der gesamte Verkaufswert der Dienstleistung vom Erstattungsbetrag abgezogen. Wenn ein Paket gekauft und nur ein Teil des Pakets zurückgegeben wird, ist der Rabatt ungültig, und der gesamte Rabatt wird von der Erstattung abgezogen.
- Wir können die 30-tägige Rückgabefrist während der Feiertage oder anderer Zeiträume verlängern, wenn eine längere Rückgabefrist auf der Website/den Werbeinformationen angekündigt wurde, als Sie Ihren Kauf getätigt haben.
- Wenn wir unseren Preis für einen Artikel innerhalb von 30 Tagen nach Ihrem Kauf senken, halten wir den niedrigeren Preis ein. Wenn Sie bemerken, dass wir den Preis eines Artikels, den Sie kürzlich gekauft haben, gesenkt haben, kontaktieren Sie [order@visioforge.com](mailto:order@visioforge.com) und wir erstatten Ihnen gerne den Differenzbetrag (wenn Sie mit einer Kreditkarte bezahlt haben, müssen Sie die gleiche Karte verwenden). Dieses Angebot gilt nicht für Preisnachlässe im Zusammenhang mit Sonderverkaufsveranstaltungen wie Black Friday, Cyber Monday und den Weihnachtsfeiertagen.
## Datenschutzbestimmungen
Bitte prüfen Sie unser [Datenschutzbestimmungen](https://www.visioforge.com/de/privacy-policy).

---END OF PAGE---
# Page: https://www.visioforge.com/es/refund-policy
# Política de reembolso
Gracias por comprar en VisioForge. Por favor, pruebe nuestro software antes de la compra utilizando una versión de PRUEBA. Nuestra política de reembolso tiene reglas básicas y algunas limitaciones.
## Antes de devolver un producto
Si tiene un problema con un producto, puede haber otras opciones antes de solicitar una devolución:
- Si ha comprado y descargado software y necesita ayuda con la instalación y activación, envíe un correo electrónico a [orden@visioforge.com](mailto:order@visioforge.com) o utilice [el portal de ayuda](https://support.visioforge.com/).
- Si necesita asistencia técnica con un producto de software VisioForge, envíe un correo electrónico a [soporte@visioforge.com](mailto:support@visioforge.com), utilice [el portal de ayuda](https://support.visioforge.com/), o compruebe [ayuda online](https://www.visioforge.com/help/).
## Normas básicas de devolución
Le recomendamos que se ponga en contacto con nosotros si tiene algún problema al recibir o descargar nuestros productos. De acuerdo con nuestra política de reembolso, reembolsamos los productos digitales en un plazo de 30 días a partir de la fecha de compra original del producto si el software presenta errores o problemas.
## Limitaciones de la política de reembolso
- Realizamos devoluciones de productos digitales en un plazo de 30 días a partir de la fecha de compra original del producto si el software presenta errores o problemas.
- No realizamos reembolsos por renovaciones ni después de 30 días.
- No realizamos reembolsos por compras con descuentos.
- No realizamos reembolsos para las renovaciones automáticas activadas durante la primera compra (antes de que se produzca la renovación automática, recibirá varios correos electrónicos sobre la renovación automática de nuestro procesador de pagos (2Checkout o Stripe)).
## Criterios de retorno
- Todas las devoluciones y cambios deben ir acompañados tramitados a través de los canales apropiados dentro de los 30 días siguientes a la compra.
- Al devolver el software, éste debe tener la licencia cancelada en la máquina del usuario y ser retirado de dicha máquina. Es posible que le pidamos que firme una carta electrónica de destrucción como condición para su devolución para confirmar que ha desinstalado y no ha hecho ninguna copia del producto. El código de licencia de estos productos quedará bloqueado y no podrá instalar ni utilizar el software en el futuro.
- Todos los productos y servicios incluidos deben devolverse juntos en el caso de artículos promocionales y paquetes. Supongamos que un servicio está incluido en una promoción y que se ha utilizado un paquete (por ejemplo, un código promocional usado). En ese caso, el valor total de venta al público del servicio se deducirá del importe del reembolso. Cuando se compra un paquete y sólo se devuelve una parte del paquete, el descuento queda anulado y el descuento total se deducirá del reembolso.
- Podemos ampliar el plazo de devolución de 30 días durante las vacaciones u otros periodos si se anunciaba un plazo de devolución más amplio en el sitio web o en la información promocional cuando realizó la compra.
- Si bajamos el precio de un artículo en los 30 días siguientes a su compra, respetaremos el precio más bajo. Si se da cuenta de que hemos rebajado el precio de un artículo que ha comprado recientemente, póngase en contacto con [orden@visioforge.com](mailto:order@visioforge.com) y estaremos encantados de reembolsarle o abonarle la diferencia (si pagó con tarjeta de crédito, deberá utilizar la misma tarjeta). Esta oferta no se aplica a las reducciones de precio asociadas a eventos de venta especiales como el Black Friday, el Cyber Monday y las fiestas navideñas.
## Política de privacidad
Consulte nuestra [política de privacidad](https://www.visioforge.com/es/privacy-policy).

---END OF PAGE---
# Page: https://www.visioforge.com/it/refund-policy
# Politica di rimborso
Grazie per aver acquistato da VisioForge. Prima dell'acquisto, vi invitiamo a testare il nostro software utilizzando una versione TRIAL. La nostra politica di rimborso prevede regole di base e alcune limitazioni.
## Prima di restituire un prodotto
In caso di problemi con un prodotto, potrebbero esserci altre opzioni prima di richiedere un reso:
- Se avete acquistato e scaricato il software e avete bisogno di assistenza per l'installazione e l'attivazione, inviate un'e-mail a [ordine@visioforge.com](mailto:order@visioforge.com) o utilizzare [il portale di supporto](https://support.visioforge.com/).
- Se avete bisogno di assistenza tecnica per un prodotto software VisioForge, inviate un'e-mail a [support@visioforge.com](mailto:support@visioforge.com), utilizzare [il portale di supporto](https://support.visioforge.com/), o controllare [Guida online](https://www.visioforge.com/help/).
## Regole di base per il rimborso
Si consiglia di contattarci per assistenza in caso di problemi nella ricezione o nel download dei nostri prodotti. In base alla nostra politica di rimborso, i prodotti digitali vengono rimborsati entro 30 giorni dall'acquisto originale del prodotto se il software presenta bug o problemi.
## Limitazioni della politica di rimborso
- Per i prodotti digitali effettuiamo rimborsi entro 30 giorni dall'acquisto originale del prodotto se il software presenta bug o problemi.
- Non effettuiamo rimborsi per i rinnovi o dopo 30 giorni.
- Non effettuiamo rimborsi per acquisti con sconti.
- Non effettuiamo rimborsi per i rinnovi automatici attivati durante il primo acquisto (prima che avvenga il rinnovo automatico, riceverete diverse e-mail sul rinnovo automatico dal nostro processore di pagamento (2Checkout o Stripe)).
## Criteri di restituzione
- Tutti i resi e i cambi devono essere accompagnati attraverso i canali appropriati entro 30 giorni dall'acquisto.
- Quando si restituisce un software, la licenza deve essere terminata sul computer dell'utente e deve essere rimossa da tale computer. Come condizione per la restituzione, potremmo richiedere all'utente di firmare una lettera elettronica di distruzione per confermare che il prodotto è stato disinstallato e non è stato copiato. Il codice di licenza di questi prodotti sarà bloccato e non sarà possibile installare o utilizzare il software in futuro.
- Tutti i prodotti e i servizi inclusi devono essere restituiti insieme per gli articoli promozionali e i bundle. Supponiamo che un servizio sia incluso in una promozione e che sia stato utilizzato un bundle (ad esempio, un codice promozionale usato). In questo caso, il valore totale al dettaglio del servizio sarà dedotto dall'importo del rimborso. Quando si acquista un bundle e si restituisce solo una parte del bundle, lo sconto è nullo e il totale dello sconto sarà dedotto dal rimborso.
- Possiamo estendere il periodo di restituzione di 30 giorni durante le festività o altri periodi se un periodo di restituzione più esteso è stato pubblicizzato sul sito web/informazioni promozionali al momento dell'acquisto.
- Se abbassiamo il prezzo di un articolo entro 30 giorni dall'acquisto, onoreremo il prezzo più basso. Se vi accorgete che abbiamo ridotto il prezzo di un articolo che avete acquistato di recente, contattate [ordine@visioforge.com](mailto:order@visioforge.com) e saremo lieti di rimborsare o accreditare la differenza (se avete pagato con una carta di credito, dovrete usare la stessa carta). Questa offerta non si applica alle riduzioni di prezzo associate a eventi speciali di vendita come il Black Friday, il Cyber Monday e le festività natalizie.
## Informativa sulla privacy
Si prega di controllare il nostro [Informativa sulla privacy](https://www.visioforge.com/it/privacy-policy).

---END OF PAGE---
# Page: https://www.visioforge.com/de/terms-and-conditions
# Bedingungen und Konditionen
Die folgenden Bestimmungen und Bedingungen (zusammenfassend die "Bestimmungen und Bedingungen") gelten für Ihre Nutzung von [https://www.visioforge.com](https://www.visioforge.com/de/)einschließlich aller Inhalte, Funktionen und Dienste, die auf oder über [https://www.visioforge.com](https://www.visioforge.com/de/) (die "Website").
Bitte lesen Sie die Allgemeinen Geschäftsbedingungen sorgfältig durch, bevor Sie mit der Nutzung von VisioForge beginnen, denn durch die Nutzung der Website akzeptieren Sie die Allgemeinen Geschäftsbedingungen und erklären sich damit einverstanden, an diese gebunden zu sein und sie einzuhalten.
Diese Allgemeinen Geschäftsbedingungen sind ab dem 1. Oktober 2016 gültig. Wir behalten uns ausdrücklich das Recht vor, diese Bedingungen von Zeit zu Zeit zu ändern, ohne Sie davon in Kenntnis zu setzen. Sie erkennen an und stimmen zu, dass es in Ihrer Verantwortung liegt, diese Website und diese Geschäftsbedingungen von Zeit zu Zeit zu überprüfen und sich mit allen Änderungen vertraut zu machen. Durch die fortgesetzte Nutzung dieser Website nach solchen Änderungen erkennen Sie die geänderten Bedingungen an und erklären sich damit einverstanden, die geänderten Bedingungen einzuhalten und an sie gebunden zu sein.
## Verhalten auf der Website
Ihre Nutzung der Website unterliegt allen geltenden Gesetzen und Vorschriften, und Sie sind allein verantwortlich für den Inhalt Ihrer Kommunikation über die Website.
Indem Sie Informationen in einen Kommunikationsdienst, einen Chatroom, ein Nachrichtenbrett, eine Newsgroup, eine Softwarebibliothek oder einen anderen interaktiven Dienst, der Ihnen auf oder über diese Website zur Verfügung steht, hochladen oder anderweitig nutzen, erklären Sie sich damit einverstanden, dass Sie keine Inhalte - einschließlich Text, Kommunikation, Software, Bilder, Töne, Daten oder andere Informationen - hochladen, freigeben, einstellen oder anderweitig verbreiten oder deren Verbreitung erleichtern:
- ungesetzlich, bedrohlich, missbräuchlich, belästigend, verleumderisch, täuschend, betrügerisch, die Privatsphäre anderer verletzend, unerlaubt sind, explizite oder grafische Beschreibungen oder Darstellungen sexueller Handlungen enthalten (einschließlich, aber nicht beschränkt auf sexuelle Sprache gewalttätiger oder bedrohlicher Art, die an eine andere Person oder Personengruppe gerichtet ist) oder anderweitig gegen unsere Regeln oder Richtlinien verstoßen
- eine Person oder eine Gruppe von Personen aufgrund ihrer Religion, ihres Geschlechts, ihrer sexuellen Orientierung, ihrer Rasse, ihrer ethnischen Zugehörigkeit, ihres Alters oder einer Behinderung belästigt, erniedrigt oder einschüchtert
- ein Patent, eine Marke, ein Geschäftsgeheimnis, ein Urheberrecht, ein Recht auf Öffentlichkeit oder ein anderes Eigentumsrecht einer Partei verletzen
- Unerlaubte oder unaufgeforderte Werbung, Junk- oder Massen-E-Mails (auch bekannt als "Spamming"), Kettenbriefe, jede andere Form von unerlaubter Aufforderung oder jede Form von Lotterie oder Glücksspiel darstellen
- Softwareviren oder andere Computercodes, Dateien oder Programme enthalten, die dazu bestimmt sind, die Funktion von Software, Hardware oder Telekommunikationsgeräten zu stören, zu beschädigen oder einzuschränken oder Daten oder andere Informationen Dritter zu beschädigen oder sich unbefugt Zugang zu ihnen zu verschaffen
- sich als eine natürliche oder juristische Person ausgibt, einschließlich eines unserer Mitarbeiter oder Vertreter
Wir übernehmen keine Haftung für den Inhalt von Materialien, die von Drittnutzern der Website hochgeladen oder eingereicht werden, und billigen diese auch nicht. Wir überprüfen, überwachen oder bearbeiten im Allgemeinen nicht die Inhalte, die von Nutzern von Kommunikationsdiensten, Chatrooms, Messageboards, Newsgroups, Softwarebibliotheken oder anderen interaktiven Diensten, die auf oder über diese Website verfügbar sind, veröffentlicht werden.
Wir und unsere Vertreter haben jedoch das Recht, nach eigenem Ermessen Inhalte zu entfernen, die nach unserem Ermessen nicht mit diesen Nutzungsbedingungen und anderen Verhaltensregeln für unsere Website übereinstimmen oder anderweitig schädlich, anstößig oder ungenau sind. Wir sind nicht verantwortlich für ein Versäumnis oder eine Verzögerung bei der Entfernung solcher Inhalte. Sie stimmen hiermit einer solchen Entfernung zu und verzichten auf jegliche Ansprüche gegen uns, die sich aus einer solchen Entfernung von Inhalten ergeben.
Sie erklären sich damit einverstanden, dass wir jederzeit und nach unserem alleinigen Ermessen Ihre Mitgliedschaft, Ihr Konto oder eine andere Verbindung mit unserer Website ohne vorherige Benachrichtigung beenden können, wenn Sie gegen eine der oben genannten Bestimmungen verstoßen.
Außerdem erkennen Sie an, dass wir bei der Untersuchung von Verstößen gegen die System- oder Netzsicherheit auf anderen Websites uneingeschränkt kooperieren werden, einschließlich der Zusammenarbeit mit Strafverfolgungsbehörden bei der Untersuchung mutmaßlicher krimineller Verstöße.
### Allgemeine Geschäftsbedingungen und geistiges Eigentum
Durch die Annahme dieser Allgemeinen Geschäftsbedingungen erkennen Sie an und stimmen zu, dass alle Inhalte, die Ihnen auf dieser Website präsentiert werden, durch Urheberrechte, Marken, Dienstleistungsmarken, Patente oder andere Eigentumsrechte und Gesetze geschützt sind und das alleinige Eigentum von VisioForge sind.
Sie dürfen die Inhalte nur so verwenden, wie es von uns oder dem jeweiligen Inhaltsanbieter ausdrücklich genehmigt wurde. Mit Ausnahme einer einzigen Kopie für den persönlichen Gebrauch dürfen Sie keine Dokumente oder Informationen von dieser Website in irgendeiner Form oder mit irgendwelchen Mitteln ohne vorherige schriftliche Genehmigung von uns oder dem jeweiligen Inhaltsanbieter kopieren, reproduzieren, ändern, neu veröffentlichen, hochladen, posten, übertragen oder verteilen, und Sie sind allein dafür verantwortlich, die Genehmigung einzuholen, bevor Sie urheberrechtlich geschütztes Material, das auf dieser Website verfügbar ist, wiederverwenden.
### Websites von Dritten
Diese Website kann Sie mit anderen Websites im Internet verlinken oder anderweitig Verweise auf Informationen, Dokumente, Software, Materialien und/oder Dienstleistungen enthalten, die von anderen Parteien bereitgestellt werden. Diese Websites können Informationen oder Materialien enthalten, die manche Menschen als unangemessen oder anstößig empfinden.
Questi altri siti web e parti non sono sotto il nostro controllo e l'utente riconosce che non siamo responsabili dell'accuratezza, della conformità al copyright, della legalità, della decenza o di qualsiasi altro aspetto del contenuto di tali siti, né siamo responsabili di errori o omissioni in qualsiasi riferimento ad altre parti o ai loro prodotti e servizi. L'inclusione di tali link o riferimenti è fornita solo per comodità e non implica l'approvazione o l'associazione con il sito web o la parte da parte nostra, né alcuna garanzia di alcun tipo, espressa o implicita.
### Gewährleistungsausschluss, Haftungsbeschränkung und Entschädigung
Die Nutzung von VisioForge erfolgt auf Ihr eigenes Risiko. Die Website wird "wie besehen" und "wie verfügbar" bereitgestellt. Wir lehnen alle ausdrücklichen oder stillschweigenden Garantien jeglicher Art ab, einschließlich, aber nicht beschränkt auf die Garantien der Marktgängigkeit, der Eignung für einen bestimmten Zweck und der Nichtverletzung von Rechten Dritter.
Wir haften nicht für direkte oder Folgeschäden, die sich aus Ihrer Nutzung der Website ergeben, und Sie erklären sich damit einverstanden, uns von allen Ansprüchen, Verlusten, Haftungskosten und Ausgaben (einschließlich, aber nicht beschränkt auf Anwaltskosten), die sich aus der Verletzung der Rechte Dritter durch Sie ergeben, zu verteidigen, freizustellen und schadlos zu halten. Sie erkennen an, dass Sie nur eine begrenzte, nicht ausschließliche und nicht übertragbare Lizenz zur Nutzung der Website haben. Da die Website nicht fehlerfrei ist, erklären Sie sich damit einverstanden, sie sorgfältig zu nutzen und sie nicht in einer Weise zu verwenden, die zu einem Verlust Ihres Eigentums oder von Informationen Dritter führen könnte.
### Bedingungen und Konditionen - Kündigung
Diese Allgemeinen Geschäftsbedingungen treten für Sie in Kraft, wenn Sie ein VisioForge-Konto erstellen oder mit der Nutzung von VisioForge beginnen, und bleiben in Kraft, bis sie von Ihnen oder von uns gekündigt werden.
VisioForge behält sich das Recht vor, diese Allgemeinen Geschäftsbedingungen zu kündigen oder Ihr Konto jederzeit zu sperren, wenn Sie die Website unbefugt oder vermutlich unbefugt nutzen, sei es unter Verstoß gegen diese Allgemeinen Geschäftsbedingungen oder aus anderen Gründen. Wenn VisioForge diese Allgemeinen Geschäftsbedingungen kündigt oder Ihr Konto aus einem der in diesem Abschnitt genannten Gründe sperrt, übernimmt VisioForge Ihnen gegenüber keine Haftung oder Verantwortung.
### Zuweisung
VisioForge kann diese Allgemeinen Geschäftsbedingungen oder Teile davon ohne Einschränkungen abtreten. Sie dürfen diese Bedingungen oder Teile davon nicht an Dritte abtreten.
### Andere Politiken
- [Datenschutzbestimmungen](https://www.visioforge.com/de/privacy-policy)
- [Erstattungspolitik](https://www.visioforge.com/de/refund-policy)

---END OF PAGE---
# Page: https://www.visioforge.com/es/terms-and-conditions
# Condiciones generales
Los siguientes términos y condiciones (colectivamente, estos "Términos y Condiciones") se aplican a su uso de [https://www.visioforge.com](https://www.visioforge.com/es/)incluyendo cualquier contenido, funcionalidad y servicios ofrecidos en o a través de [https://www.visioforge.com](https://www.visioforge.com/es/) (el "Sitio web").
Por favor, lea los Términos y Condiciones cuidadosamente antes de empezar a utilizar VisioForge porque al utilizar el Sitio Web usted acepta y está de acuerdo en estar obligado y cumplir con estos Términos y Condiciones.
Los presentes Términos y Condiciones entran en vigor el 1 de octubre de 2016. Nos reservamos expresamente el derecho a modificar estos Términos y Condiciones de vez en cuando sin previo aviso. Usted reconoce y acepta que es su responsabilidad revisar este Sitio Web y estos Términos y Condiciones de vez en cuando y familiarizarse con cualquier modificación. Su uso continuado de este sitio web después de tales modificaciones constituirá el reconocimiento de los Términos y Condiciones modificados y el acuerdo de acatar y estar obligado por los Términos y Condiciones modificados.
## Conducta en el sitio web
Su uso del Sitio Web está sujeto a todas las leyes y reglamentos aplicables, y usted es el único responsable del contenido de sus comunicaciones a través del Sitio Web.
Al publicar información en cualquier servicio de comunicaciones, sala de chat, tablón de mensajes, grupo de noticias, biblioteca de software u otro servicio interactivo que pueda estar a su disposición en este sitio Web o a través de él, usted acepta que no cargará, compartirá, publicará ni distribuirá o facilitará de otro modo la distribución de ningún contenido -incluidos textos, comunicaciones, software, imágenes, sonidos, datos u otra información- que:
- Sea ilegal, amenazador, abusivo, acosador, difamatorio, calumnioso, engañoso, fraudulento, invasivo de la privacidad ajena, tortuoso, contenga descripciones o relatos explícitos o gráficos de actos sexuales (incluido, entre otros, el lenguaje sexual de naturaleza violenta o amenazadora dirigido a otro individuo o grupo de individuos), o infrinja de cualquier otro modo nuestras normas o políticas.
- Victimiza, acosa, degrada o intimida a una persona o grupo de personas por motivos de religión, sexo, orientación sexual, raza, etnia, edad o discapacidad.
- infrinja cualquier patente, marca comercial, secreto comercial, derecho de autor, derecho de publicidad u otros derechos de propiedad de cualquier parte
- Constituya publicidad no autorizada o no solicitada, correo basura o masivo (también conocido como "spamming"), cartas en cadena, cualquier otra forma de solicitud no autorizada, o cualquier forma de lotería o juego.
- Contenga virus informáticos o cualquier otro código informático, archivos o programas diseñados o destinados a interrumpir, dañar o limitar el funcionamiento de cualquier software, hardware o equipo de telecomunicaciones, o a dañar u obtener acceso no autorizado a cualquier dato u otra información de terceros.
- Suplante a cualquier persona o entidad, incluidos nuestros empleados o representantes.
No respaldamos ni asumimos responsabilidad alguna por el contenido de cualquier material cargado o enviado por terceros usuarios del Sitio Web. Por lo general, no preseleccionamos, supervisamos ni editamos el contenido publicado por los usuarios de los servicios de comunicación, salas de chat, tablones de mensajes, grupos de noticias, bibliotecas de software u otros servicios interactivos que puedan estar disponibles en este sitio web o a través de él.
Sin embargo, nosotros y nuestros agentes tenemos el derecho, a nuestra entera discreción, de eliminar cualquier contenido que, a nuestro juicio, no cumpla con estas Condiciones de Uso y cualquier otra norma de conducta del usuario de nuestro Sitio Web, o que sea perjudicial, objetable o inexacto. No nos hacemos responsables de ningún fallo o retraso en la eliminación de dichos contenidos. Por la presente, usted consiente en dicha eliminación y renuncia a cualquier reclamación contra nosotros derivada de dicha eliminación de contenidos.
Usted acepta que podemos, en cualquier momento y a nuestra entera discreción, cancelar su membresía, cuenta u otra afiliación con nuestro sitio sin previo aviso por violar cualquiera de las disposiciones anteriores.
Asimismo, usted reconoce que cooperaremos plenamente con las investigaciones de violaciones de la seguridad de los sistemas o de la red en otros sitios, incluida la cooperación con las autoridades policiales en la investigación de presuntas infracciones penales.
### Condiciones generales y propiedad intelectual
Al aceptar estos Términos y Condiciones, usted reconoce y acepta que todo el contenido presentado a usted en este sitio web está protegido por derechos de autor, marcas comerciales, marcas de servicio, patentes u otros derechos de propiedad y las leyes, y es propiedad exclusiva de VisioForge.
Sólo se le permite utilizar el contenido en la forma expresamente autorizada por nosotros o por el proveedor específico del contenido. A excepción de una única copia para uso personal, no podrá copiar, reproducir, modificar, volver a publicar, cargar, enviar por correo, transmitir ni distribuir ningún documento o información de este sitio web de ninguna forma ni por ningún medio sin nuestra autorización previa por escrito o la del proveedor del contenido específico, y usted será el único responsable de obtener la autorización antes de reutilizar cualquier material protegido por derechos de autor que esté disponible en este sitio web.
### Sitios web de terceros
Este sitio web puede enlazar con otros sitios de Internet o incluir referencias a información, documentos, software, materiales y/o servicios proporcionados por terceros. Estos sitios web pueden contener información o material que algunas personas pueden considerar inapropiado u ofensivo.
Estos otros sitios web y partes no están bajo nuestro control, y usted reconoce que no somos responsables de la exactitud, el cumplimiento de los derechos de autor, la legalidad, la decencia o cualquier otro aspecto del contenido de dichos sitios, ni somos responsables de los errores u omisiones en cualquier referencia a otras partes o sus productos y servicios. La inclusión de un enlace o referencia de este tipo se proporciona únicamente para su comodidad y no implica la aprobación o asociación con el sitio web o la parte por nuestra parte, ni ninguna garantía de ningún tipo, ya sea expresa o implícita.
### Exclusión de garantías, limitaciones de responsabilidad e indemnización
Usted utiliza VisioForge bajo su propia responsabilidad. El Sitio Web se proporciona "tal cual" y "según disponibilidad". Renunciamos a todas las garantías de cualquier tipo, expresas o implícitas, incluyendo, sin limitación, las garantías de comerciabilidad, idoneidad para un propósito particular y no infracción.
No nos hacemos responsables de los daños, directos o indirectos, resultantes de su uso del Sitio Web, y usted acepta defendernos, indemnizarnos y eximirnos de cualquier reclamación, pérdida, costes de responsabilidad y gastos (incluidos, entre otros, los honorarios de abogados) derivados de su violación de los derechos de terceros. Usted reconoce que sólo dispone de una licencia limitada, no exclusiva e intransferible para utilizar el Sitio Web. Dado que el Sitio Web no está libre de errores o fallos, usted se compromete a utilizarlo con cuidado y a evitar hacerlo de forma que pueda ocasionar cualquier pérdida de su propiedad o información o la de terceros.
### Condiciones generales - rescisión
Estos Términos y Condiciones entrarán en vigor en relación con usted cuando usted crea una cuenta VisioForge o cuando comience a utilizar el VisioForge y permanecerá en vigor hasta su terminación por usted o por nosotros.
VisioForge se reserva el derecho de terminar estos Términos y Condiciones o suspender su cuenta en cualquier momento en caso de uso no autorizado, o sospecha de uso no autorizado del Sitio Web, ya sea en contravención de estos Términos y Condiciones o de otra manera. Si VisioForge termina estos Términos y Condiciones o suspende su cuenta por cualquiera de las razones expuestas en esta sección, VisioForge no tendrá ninguna responsabilidad hacia usted.
### Asignación
VisioForge puede ceder estos Términos y Condiciones o cualquier parte de ella sin restricciones. Usted no puede ceder estos Términos y Condiciones o cualquier parte de los mismos a terceros.
### Otras políticas
- [Política de privacidad](https://www.visioforge.com/es/privacy-policy)
- [Política de reembolso](https://www.visioforge.com/es/refund-policy)

---END OF PAGE---
# Page: https://www.visioforge.com/it/terms-and-conditions
# Termini e condizioni
I seguenti termini e condizioni (collettivamente, i "Termini e condizioni") si applicano all'utilizzo di [https://www.visioforge.com](https://www.visioforge.com/it/), compresi i contenuti, le funzionalità e i servizi offerti su o tramite [https://www.visioforge.com](https://www.visioforge.com/it/) (il "Sito web").
Si prega di leggere attentamente i Termini e le Condizioni prima di iniziare a utilizzare VisioForge, perché utilizzando il sito web si accetta di essere vincolati e di rispettare i Termini e le Condizioni.
I presenti Termini e condizioni sono in vigore dal 1° ottobre 2016. Ci riserviamo espressamente il diritto di modificare i presenti Termini e condizioni di volta in volta senza preavviso. L'utente riconosce e accetta che è sua responsabilità rivedere periodicamente il presente sito web e i presenti Termini e condizioni e familiarizzarsi con eventuali modifiche. L'uso continuato di questo Sito Web dopo tali modifiche costituirà un riconoscimento dei Termini e delle Condizioni modificati e l'accettazione di rispettare ed essere vincolati dai Termini e dalle Condizioni modificati.
## Condotta sul sito web
L'utilizzo del sito web da parte dell'utente è soggetto a tutte le leggi e i regolamenti applicabili e l'utente è l'unico responsabile della sostanza delle sue comunicazioni attraverso il sito web.
Pubblicando informazioni o utilizzando in altro modo qualsiasi servizio di comunicazione, chat room, bacheca elettronica, newsgroup, libreria software o altro servizio interattivo che può essere disponibile su o attraverso questo sito web, l'utente accetta di non caricare, condividere, pubblicare o distribuire in altro modo o facilitare la distribuzione di qualsiasi contenuto - inclusi testi, comunicazioni, software, immagini, suoni, dati o altre informazioni - che:
- Sia illegale, minaccioso, abusivo, molesto, diffamatorio, calunnioso, ingannevole, fraudolento, invasivo della privacy altrui, tortuoso, contenga descrizioni o resoconti espliciti o grafici di atti sessuali (incluso, ma non limitato a, linguaggio sessuale di natura violenta o minacciosa diretto a un altro individuo o gruppo di individui), o violi in altro modo le nostre regole o politiche
- Vittimizza molesta, degrada o intimidisce un individuo o un gruppo di individui sulla base della religione, del sesso, dell'orientamento sessuale, della razza, dell'etnia, dell'età o della disabilità.
- Violazione di brevetti, marchi, segreti commerciali, diritti d'autore, diritti di pubblicità o altri diritti di proprietà di qualsiasi parte
- Costituisce pubblicità non autorizzata o non richiesta, e-mail indesiderate o di massa (note anche come "spamming"), catene di Sant'Antonio, qualsiasi altra forma di sollecitazione non autorizzata, o qualsiasi forma di lotteria o gioco d'azzardo.
- contiene virus software o qualsiasi altro codice informatico, file o programma progettato o destinato a interrompere, danneggiare o limitare il funzionamento di qualsiasi software, hardware o apparecchiatura di telecomunicazione o a danneggiare o ottenere accesso non autorizzato a qualsiasi dato o altra informazione di terzi
- Impersonare qualsiasi persona o entità, compresi i nostri dipendenti o rappresentanti.
Non approviamo né ci assumiamo alcuna responsabilità per i contenuti di qualsiasi materiale caricato o inviato da utenti terzi del Sito web. In genere non controlliamo, monitoriamo o modifichiamo il contenuto pubblicato dagli utenti dei servizi di comunicazione, delle chat room, delle bacheche, dei newsgroup, delle librerie di software o di altri servizi interattivi che possono essere disponibili su o attraverso questo Sito Web.
Tuttavia, noi e i nostri agenti abbiamo il diritto, a nostra esclusiva discrezione, di rimuovere qualsiasi contenuto che, a nostro giudizio, non sia conforme alle presenti Condizioni d'uso e a qualsiasi altra regola di condotta dell'utente per il nostro sito web, o che sia altrimenti dannoso, discutibile o inaccurato. Non siamo responsabili per la mancata o ritardata rimozione di tali contenuti. L'utente acconsente a tale rimozione e rinuncia a qualsiasi reclamo nei nostri confronti derivante da tale rimozione di contenuti.
L'utente accetta che la società possa, in qualsiasi momento e a sua esclusiva discrezione, porre fine alla sua iscrizione, al suo account o a qualsiasi altra forma di affiliazione al nostro sito, senza preavviso, in caso di violazione di una qualsiasi delle disposizioni di cui sopra.
Inoltre, l'utente riconosce che collaboreremo pienamente con le indagini sulle violazioni dei sistemi o della sicurezza della rete presso altri siti, compresa la collaborazione con le autorità preposte all'applicazione della legge nelle indagini su sospette violazioni criminali.
### Termini e condizioni e proprietà intellettuale
Accettando i presenti Termini e condizioni, l'utente riconosce e accetta che tutti i contenuti presentati all'utente su questo sito web sono protetti da copyright, marchi commerciali, marchi di servizio, brevetti o altri diritti di proprietà e leggi, e sono di proprietà esclusiva di VisioForge.
L'uso dei contenuti è consentito solo se espressamente autorizzato da noi o dal fornitore specifico dei contenuti. Fatta eccezione per una singola copia effettuata esclusivamente per uso personale, non è consentito copiare, riprodurre, modificare, ripubblicare, caricare, inviare, trasmettere o distribuire documenti o informazioni da questo sito web in qualsiasi forma o con qualsiasi mezzo senza previa autorizzazione scritta da parte nostra o dello specifico fornitore di contenuti; l'utente è l'unico responsabile dell'ottenimento dell'autorizzazione prima di riutilizzare qualsiasi materiale protetto da copyright disponibile su questo sito web.
### Siti web di terze parti
Il presente sito web può collegarvi ad altri siti su Internet o includere riferimenti a informazioni, documenti, software, materiali e/o servizi forniti da altre parti. Questi siti web possono contenere informazioni o materiale che alcune persone possono trovare inappropriato o offensivo.
Questi altri siti web e parti non sono sotto il nostro controllo e l'utente riconosce che non siamo responsabili dell'accuratezza, della conformità al copyright, della legalità, della decenza o di qualsiasi altro aspetto del contenuto di tali siti, né siamo responsabili di errori o omissioni in qualsiasi riferimento ad altre parti o ai loro prodotti e servizi. L'inclusione di tali link o riferimenti è fornita solo per comodità e non implica l'approvazione o l'associazione con il sito web o la parte da parte nostra, né alcuna garanzia di alcun tipo, espressa o implicita.
### Esclusione di garanzie, limitazioni di responsabilità e indennizzi
L'uso di VisioForge è a vostro esclusivo rischio. Il sito web è fornito "così com'è" e "come disponibile". Decliniamo tutte le garanzie di qualsiasi tipo, espresse o implicite, incluse, senza limitazioni, le garanzie di commerciabilità, idoneità per uno scopo particolare e non violazione.
Non siamo responsabili per i danni, diretti o conseguenti, derivanti dall'uso del sito web da parte dell'utente e l'utente accetta di difendere, indennizzare e tenere indenne l'azienda da qualsiasi reclamo, perdita, responsabilità, costo e spesa (incluse, ma non solo, le spese legali) derivanti dalla violazione dei diritti di terzi da parte dell'utente. L'utente riconosce di avere solo una licenza limitata, non esclusiva e non trasferibile per l'utilizzo del sito web. Poiché il Sito web non è esente da errori o bug, l'utente accetta di usarlo con attenzione e di evitare di utilizzarlo in modi che potrebbero causare perdite di proprietà o informazioni proprie o di terzi.
### Termini e condizioni - risoluzione
I presenti Termini e condizioni entreranno in vigore nei vostri confronti quando creerete un account VisioForge o quando inizierete a utilizzare VisioForge e rimarranno in vigore fino alla loro risoluzione da parte vostra o da parte nostra.
VisioForge si riserva il diritto di risolvere i presenti Termini e Condizioni o di sospendere l'account dell'utente in qualsiasi momento in caso di uso non autorizzato o sospetto di uso non autorizzato del sito web, sia in violazione dei presenti Termini e Condizioni che in altro modo. Se VisioForge termina i presenti Termini e Condizioni o sospende il vostro account per uno qualsiasi dei motivi indicati in questa sezione, VisioForge non avrà alcuna responsabilità nei vostri confronti.
### Assegnazione
VisioForge può cedere questi Termini e Condizioni o qualsiasi parte di essi senza restrizioni. L'utente non può cedere i presenti Termini e Condizioni o parte di essi a terzi.
### Altre politiche
- [Informativa sulla privacy](https://www.visioforge.com/it/privacy-policy)
- [Politica di rimborso](https://www.visioforge.com/it/refund-policy)

---END OF PAGE---
# Page: https://www.visioforge.com/de/uninstall-feedback
# Rückmeldung deinstallieren
Wir bedauern, dass Sie gehen, und wir wissen es wirklich zu schätzen, dass Sie sich die Zeit genommen haben, uns Ihr Feedback zu geben. Ihr Input ist entscheidend für die Verbesserung unserer Software und die Entwicklung besserer Lösungen, die Ihre Bedürfnisse und Erwartungen erfüllen.
Wir schätzen Ihr Feedback
Bitte teilen Sie uns mit, warum Sie sich entschieden haben, unsere Software zu deinstallieren. Ihre Erkenntnisse helfen uns zu verstehen, was wir besser machen können. Ob es um die Benutzeroberfläche, bestimmte Funktionen, die Leistung oder andere Aspekte geht, Ihre Kommentare sind für uns von unschätzbarem Wert.
## Kontaktieren Sie uns für Hilfe
Wenn Sie auf Probleme gestoßen sind, die Sie zur Deinstallation veranlasst haben, würden wir uns freuen, Ihnen helfen zu können. Unser Support-Team ist bereit, Ihnen bei der Lösung von Problemen zu helfen oder Ihre Fragen zu beantworten.
- E-Mail: support@visioforge.com
- Unterstützungsportal: [Ein Ticket erstellen](https://support.visioforge.com)
- Live-Chat: [Einen Chat beginnen](https://discord.gg/yvXUG56WCH)
Wir bemühen uns, Ihnen die bestmögliche Erfahrung zu bieten, und Ihr Feedback ist ein wichtiger Teil dieses Prozesses. Wir danken Ihnen, dass Sie uns geholfen haben, uns zu verbessern, und hoffen, dass wir Sie in Zukunft noch besser bedienen können.
### Verbunden bleiben
Wenn Sie über unsere neuesten Funktionen und Verbesserungen auf dem Laufenden bleiben möchten, sollten Sie uns in den sozialen Medien folgen oder unseren Newsletter abonnieren.
Ich danke Ihnen nochmals für Ihre Zeit und Ihr Feedback.
Ihr Name
Deine E-Mail
Name des Produkts
– Bitte auswählen –Video Capture SDK .NetMedia Player SDK .NetVideo Edit SDK .NetAndere
Ihre Nachricht (optional)

---END OF PAGE---
# Page: https://www.visioforge.com/es/uninstall-feedback
# Desinstalar feedback
Lamentamos su marcha y le agradecemos sinceramente que haya dedicado parte de su tiempo a hacernos llegar sus comentarios. Su opinión es crucial para ayudarnos a mejorar nuestro software y desarrollar mejores soluciones que satisfagan sus necesidades y expectativas.
Valoramos sus comentarios
Por favor, díganos por qué decidió desinstalar nuestro software. Sus comentarios nos ayudarán a entender qué podemos hacer mejor. Ya sea sobre la interfaz de usuario, funciones específicas, rendimiento o cualquier otro aspecto, sus comentarios son muy valiosos para nosotros.
## Póngase en contacto con nosotros
Si has tenido algún problema que te haya llevado a desinstalar, nos encantaría poder ayudarte. Nuestro equipo de asistencia está a su disposición para ayudarle a resolver cualquier problema que haya tenido o responder a cualquier pregunta.
- Correo electrónico: support@visioforge.com
- Portal de ayuda: [Crear una entrada](https://support.visioforge.com)
- Chat en directo: [Iniciar un chat](https://discord.gg/yvXUG56WCH)
Nos esforzamos por ofrecer la mejor experiencia posible y sus comentarios son una parte vital de ese proceso. Gracias por ayudarnos a mejorar y esperamos poder servirle mejor en el futuro.
### Mantente conectado
Si quieres estar al día de nuestras últimas novedades y mejoras, síguenos en las redes sociales o suscríbete a nuestro boletín.
Gracias de nuevo por su tiempo y sus comentarios.
Nombre
Correo electrónico
Nombre del producto
—Por favor, elige una opción—Video Capture SDK .NetMedia Player SDK .NetVideo Edit SDK .NetOtro
Su mensaje (opcional)

---END OF PAGE---
# Page: https://www.visioforge.com/it/uninstall-feedback
# Disinstallare il feedback
Siamo spiacenti di vederla andare via e apprezziamo sinceramente il fatto che abbia dedicato del tempo a fornirci il suo feedback. Il vostro contributo è fondamentale per aiutarci a migliorare il nostro software e a sviluppare soluzioni migliori che soddisfino le vostre esigenze e aspettative.
Apprezziamo il vostro feedback
Ci faccia sapere perché ha deciso di disinstallare il nostro software. I vostri commenti ci aiuteranno a capire cosa possiamo fare di meglio. Che si tratti dell'interfaccia utente, di funzioni specifiche, di prestazioni o di qualsiasi altro aspetto, i vostri commenti sono preziosi per noi.
## Contattateci per ricevere assistenza
Se avete riscontrato problemi che vi hanno portato alla decisione di disinstallare, saremo lieti di potervi aiutare. Il nostro team di assistenza è pronto a risolvere qualsiasi problema o a rispondere a qualsiasi domanda.
- E-mail: support@visioforge.com
- Portale di supporto: [Creare un biglietto](https://support.visioforge.com)
- Chat in diretta: [Avviare una chat](https://discord.gg/yvXUG56WCH)
Ci impegniamo a fornire la migliore esperienza possibile e il vostro feedback è una parte fondamentale di questo processo. Grazie per averci aiutato a migliorare e speriamo di potervi servire meglio in futuro.
### Rimanere in contatto
Se desiderate rimanere aggiornati sulle nostre ultime funzionalità e miglioramenti, vi invitiamo a seguirci sui social media o a iscrivervi alla nostra newsletter.
Grazie ancora per il vostro tempo e il vostro feedback.
Il tuo nome
Il tuo indirizzo e-mail
Nome del prodotto
—Seleziona un'opzione—Video Capture SDK .NetMedia Player SDK .NetVideo Edit SDK .NetAltro
Messaggio (facoltativo)

---END OF PAGE---
# Page: https://www.visioforge.com/de/support-service-level-agreement-sla
# Support-Dienstleistungsvereinbarung (SLA)
Dieses Support Service Level Agreement (SLA) umreißt die Bedingungen für die von VisioForge (als "Anbieter" bezeichnet) für seine Kunden (als "Kunde" bezeichnet) erbrachten Supportleistungen. Dieses SLA legt die verfügbaren Supportoptionen, Reaktionszeiten und Verantwortlichkeiten beider Parteien fest.
## 1. Unterstützungskanäle und Abdeckung
### 1.1 E-Mail-Unterstützung
- Der E-Mail-Support ist für alle Kunden kostenlos.
- Das Support-Team antwortet auf E-Mails während der normalen Geschäftszeiten von Montag bis Freitag, außer an Feiertagen.
### 1.2 Premium-Unterstützung
- Premium-Support ist für Kunden verfügbar, die sich für zusätzliche Supportleistungen entscheiden.
- Der Premium-Support umfasst Fernhilfe, Chats oder Anrufe über unterstützte Plattformen (AnyDesk, Telegram, Zoom, Teams).
- Premium-Support ist während der regulären Geschäftszeiten von Montag bis Freitag verfügbar, außer an Feiertagen.
- Die Kosten für den Premium-Support betragen 200 EUR für ein Paket von 5 Stunden.
- Zusätzliche Premium-Supportstunden können separat erworben werden.
## 2. Support-Reaktionszeiten
### 2.1 Antwortzeiten des E-Mail-Supports
- Das Support-Team wird den Eingang der E-Mail des Kunden innerhalb von 24 Stunden bestätigen.
- Die erste Antwortzeit für den E-Mail-Support beträgt 2 Arbeitstage.
- Die Lösungszeit für den E-Mail-Support hängt von der Schwere und Komplexität des Problems ab und wird dem Kunden mitgeteilt.
### 2.2 Reaktionszeiten des Premium-Supports
- Das Support-Team antwortet auf Premium-Support-Anfragen innerhalb von 4 Stunden während der normalen Geschäftszeiten.
- Die Reaktionszeit für Premium-Support außerhalb der normalen Geschäftszeiten beträgt 12 Stunden.
- Die Lösungszeit für Premium-Support hängt von der Schwere und Komplexität des Problems ab und wird dem Kunden mitgeteilt.
## 3. Verantwortlichkeiten des Anbieters
- Der Provider unternimmt angemessene Anstrengungen, um die Supportanfragen des Kunden schnell und effizient zu lösen.
- Der Anbieter stellt geeignete Ressourcen zur Verfügung, um den Unterstützungsbedarf des Kunden zu decken.
- Der Anbieter stellt sicher, dass das Support-Team über die notwendigen Fähigkeiten und Kenntnisse verfügt, um die Anfragen der Kunden effektiv zu bearbeiten.
- Der Anbieter wahrt die Vertraulichkeit der im Rahmen des Unterstützungsprozesses weitergegebenen Informationen des Kunden.
## 4. Verantwortlichkeiten des Auftraggebers
### 4.1 Verantwortlichkeiten des Kunden
- Der Kunde gibt bei der Kontaktaufnahme mit dem Support genaue und detaillierte Informationen über das Problem oder die Anfrage an.
- Der Kunde arbeitet mit dem Support-Team zusammen und gewährt ihm den notwendigen Zugang und die Informationen, um die Problemlösung zu unterstützen.
- Der Kunde wird sich an alle Richtlinien und Anweisungen des Support-Teams halten.
- Der Kunde wird den Provider unverzüglich über jede Änderung seiner Kontaktdaten informieren.
## 5. Beschränkungen
### 5.1 Ausschlüsse
- Dieses SLA deckt keinen Support für Probleme ab, die auf unautorisierte Änderungen, Missbrauch oder Software oder Dienste Dritter zurückzuführen sind.
- Der Support für Hardware-Probleme ist in diesem SLA nicht enthalten.
## 6. Beendigung
### 6.1 Beendigung des Premium Supports
- Jede Partei kann den Premium-Support mit einer Frist von 30 Tagen schriftlich kündigen.
- Im Falle einer Kündigung verfallen alle nicht genutzten Stunden des Premium-Supports durch den Kunden.
## 7. Änderungsanträge
### 7.1 Änderung des SLA
- Dieses SLA kann im gegenseitigen Einvernehmen zwischen dem Anbieter und dem Kunden geändert werden.
- Alle Änderungen werden schriftlich dokumentiert und von beiden Parteien unterzeichnet.
Bitte lesen Sie die Bedingungen dieses Support Service Level Agreements sorgfältig durch. Durch den Zugriff auf die von VisioForge bereitgestellten Support-Dienste und deren Nutzung erklären Sie sich mit den in diesem SLA aufgeführten Bedingungen einverstanden.
Wenn Sie Fragen haben oder eine Klärung wünschen, wenden Sie sich bitte an uns unter support@visioforge.com.
Vielen Dank, dass Sie sich für VisioForge entschieden haben. Wir freuen uns darauf, Sie mit außergewöhnlichem Support zu unterstützen.

---END OF PAGE---
# Page: https://www.visioforge.com/es/support-service-level-agreement-sla
# Acuerdo de nivel de servicio (SLA)
Este Acuerdo de Nivel de Servicio de Soporte (SLA) describe los términos y condiciones de los servicios de soporte prestados por VisioForge (referido como "Proveedor") a sus clientes (referido como "Cliente"). Este SLA especifica las opciones de soporte disponibles, los tiempos de respuesta y las responsabilidades de ambas partes.
## 1. Canales de asistencia y cobertura
### 1.1 Asistencia por correo electrónico
- Todos los clientes reciben asistencia gratuita por correo electrónico.
- El equipo de asistencia responderá a los correos electrónicos en horario laboral, de lunes a viernes, excepto festivos.
### 1.2 Asistencia Premium
- La asistencia Premium está disponible para los clientes que opten por servicios de asistencia adicionales.
- La asistencia Premium incluye asistencia remota, chats o llamadas a través de plataformas compatibles (AnyDesk, Telegram, Zoom, Teams).
- El soporte premium está disponible durante el horario comercial habitual, de lunes a viernes, excepto los días festivos.
- El coste de la asistencia premium es de 200 EUR por un paquete de 5 horas.
- Las horas adicionales de asistencia Premium pueden adquirirse por separado.
## 2. Tiempos de respuesta del servicio de asistencia
### 2.1 Tiempo de respuesta de la asistencia por correo electrónico
- El equipo de asistencia acusará recibo del correo electrónico del cliente en un plazo de 24 horas.
- El tiempo de respuesta inicial para la asistencia por correo electrónico será de 2 días laborables.
- El tiempo de resolución de la asistencia por correo electrónico se basará en la gravedad y complejidad del problema y se comunicará al Cliente.
### 2.2 Tiempos de respuesta de la asistencia Premium
- El equipo de asistencia responderá a las solicitudes de asistencia premium en un plazo de 4 horas durante el horario laboral normal.
- El tiempo de respuesta para la asistencia Premium fuera del horario laboral normal será de 12 horas.
- El tiempo de resolución de la asistencia Premium dependerá de la gravedad y complejidad del problema y se comunicará al Cliente.
## 3. Responsabilidades del proveedor
- El Proveedor hará todos los esfuerzos razonables para resolver las solicitudes de asistencia del cliente con prontitud y eficacia.
- El Proveedor asignará los recursos adecuados para atender las necesidades de apoyo del cliente.
- El Proveedor se asegurará de que el equipo de asistencia posea los conocimientos y la experiencia necesarios para atender eficazmente las consultas de los clientes.
- El Proveedor mantendrá la confidencialidad de la información del cliente compartida durante el proceso de apoyo.
## 4. Responsabilidades del cliente
### 4.1 Responsabilidades del cliente
- El Cliente proporcionará información precisa y detallada sobre el problema o la consulta cuando se ponga en contacto con el servicio de asistencia.
- El Cliente cooperará con el equipo de asistencia, facilitando el acceso y la información necesarios para ayudar a resolver los problemas.
- El Cliente se atendrá a las directrices o instrucciones facilitadas por el equipo de asistencia.
- El Cliente notificará sin demora al Proveedor cualquier cambio en la información de contacto.
## 5. Limitaciones
### 5.1 Exclusiones
- Este SLA no cubre la asistencia para problemas derivados de modificaciones no autorizadas, uso indebido o software o servicios de terceros.
- La asistencia para problemas relacionados con el hardware no está incluida en este acuerdo de nivel de servicio.
## 6. Terminación
### 6.1 Finalización de la ayuda Premium
- Cualquiera de las partes podrá poner fin a la asistencia Premium mediante notificación por escrito con 30 días de antelación.
- En caso de rescisión, el Cliente perderá todas las horas de asistencia Premium no utilizadas.
## 7. Enmiendas
### 7.1 Modificación del SLA
- El presente SLA podrá modificarse de mutuo acuerdo entre el Proveedor y el Cliente.
- Cualquier modificación se documentará por escrito y será firmada por ambas partes.
Por favor, revise cuidadosamente los términos de este Acuerdo de Nivel de Servicio de Soporte. Al acceder y utilizar los servicios de soporte proporcionados por VisioForge, usted reconoce y acepta cumplir con los términos descritos en este SLA.
Si tiene alguna pregunta o necesita alguna aclaración, póngase en contacto con nosotros en support@visioforge.com.
Gracias por elegir VisioForge. Esperamos poder ofrecerle un soporte excepcional.

---END OF PAGE---
# Page: https://www.visioforge.com/it/support-service-level-agreement-sla
# Accordo sul livello del servizio di assistenza (SLA)
Il presente Accordo sul livello del servizio di assistenza (SLA) definisce i termini e le condizioni dei servizi di assistenza forniti da VisioForge (denominato "Fornitore") ai propri clienti (denominati "Cliente"). Il presente SLA specifica le opzioni di supporto disponibili, i tempi di risposta e le responsabilità di entrambe le parti.
## 1. Canali di supporto e copertura
### 1.1 Supporto via e-mail
- L'assistenza via e-mail viene fornita gratuitamente a tutti i clienti.
- Il team di assistenza risponderà alle e-mail durante il normale orario di lavoro, dal lunedì al venerdì, esclusi i giorni festivi.
### 1.2 Supporto Premium
- Il supporto premium è disponibile per i clienti che optano per servizi di assistenza aggiuntivi.
- Il supporto premium include assistenza remota, chat o chiamate attraverso le piattaforme supportate (AnyDesk, Telegram, Zoom, Teams).
- L'assistenza Premium è disponibile durante il normale orario lavorativo, dal lunedì al venerdì, esclusi i giorni festivi.
- Il costo del supporto premium è di 200 euro per un pacchetto di 5 ore.
- Ulteriori ore di supporto premium possono essere acquistate separatamente.
## 2. Tempi di risposta dell'assistenza
### 2.1 Tempi di risposta dell'assistenza via e-mail
- Il team di assistenza confermerà la ricezione dell'e-mail del cliente entro 24 ore.
- Il tempo di risposta iniziale per l'assistenza via e-mail sarà entro 2 giorni lavorativi.
- I tempi di risoluzione per l'assistenza via e-mail si baseranno sulla gravità e sulla complessità del problema e saranno comunicati al Cliente.
### 2.2 Tempi di risposta dell'assistenza Premium
- Il team di assistenza risponderà alle richieste di assistenza premium entro 4 ore durante il normale orario di lavoro.
- I tempi di risposta per l'assistenza premium al di fuori del normale orario di lavoro saranno entro 12 ore.
- I tempi di risoluzione per l'assistenza premium dipendono dalla gravità e dalla complessità del problema e saranno comunicati al Cliente.
## 3. Responsabilità del fornitore
- Il Fornitore compirà sforzi ragionevoli per risolvere le richieste di assistenza del cliente in modo rapido ed efficiente.
- Il fornitore assegnerà le risorse appropriate per soddisfare le esigenze di supporto del cliente.
- Il fornitore si assicurerà che il team di supporto possieda le competenze e l'esperienza necessarie per gestire efficacemente le richieste dei clienti.
- Il fornitore manterrà la riservatezza delle informazioni del cliente condivise durante il processo di assistenza.
## 4. Responsabilità del cliente
### 4.1 Responsabilità del cliente
- Il Cliente fornirà informazioni accurate e dettagliate sul problema o sulla richiesta quando contatta l'assistenza.
- Il Cliente collaborerà con il team di supporto, fornendo l'accesso e le informazioni necessarie per assistere nella risoluzione dei problemi.
- Il Cliente si atterrà a qualsiasi linea guida o istruzione fornita dal team di supporto.
- Il Cliente comunicherà tempestivamente al Fornitore qualsiasi modifica delle informazioni di contatto.
## 5. Limitazioni
### 5.1 Esclusioni
- Il presente SLA non copre l'assistenza per problemi derivanti da modifiche non autorizzate, uso improprio o software o servizi di terzi.
- L'assistenza per i problemi legati all'hardware non è inclusa in questo SLA.
## 6. Terminazione
### 6.1 Cessazione del supporto Premium
- Ciascuna delle parti può interrompere il supporto premium con un preavviso scritto di 30 giorni.
- In caso di cessazione del contratto, il Cliente rinuncerà a tutte le ore di assistenza premium non utilizzate.
## 7. Emendamenti
### 7.1 Modifica dello SLA
- Il presente SLA può essere modificato di comune accordo tra il Fornitore e il Cliente.
- Eventuali modifiche saranno documentate per iscritto e firmate da entrambe le parti.
Vi invitiamo a leggere attentamente i termini del presente Accordo sul livello dei servizi di supporto. Accedendo e utilizzando i servizi di assistenza forniti da VisioForge, l'utente riconosce e accetta di rispettare i termini delineati nel presente SLA.
Per qualsiasi domanda o chiarimento, contattateci all'indirizzo support@visioforge.com.
Grazie per aver scelto VisioForge. Saremo lieti di fornirvi un'assistenza eccezionale.

---END OF PAGE---
# Page: https://www.visioforge.com/de/cookie-policy-eu
# Cookie-Richtlinie (EU/GDPR)
Diese Cookie-Richtlinie wurde zuletzt am 21. November 2024 aktualisiert und gilt für Bürger und Personen mit ständigem Wohnsitz im Europäischen Wirtschaftsraum und der Schweiz.
## 1. Einleitung
Unsere Website https://www.visioforge.com (im Folgenden: „die Website“) verwendet Cookies und andere damit verbundene Technologien (der Einfachheit halber werden alle Technologien als „Cookies“ bezeichnet). Cookies werden auch von Dritten gesetzt, die wir beauftragt haben. In dem nachstehenden Dokument informieren wir Sie über die Verwendung von Cookies auf unserer Website.
## 2. Was sind Cookies?
Ein Cookie ist eine kleine einfache Datei, die zusammen mit den Seiten dieser Website gesendet und von Ihrem Browser auf der Festplatte Ihres Computers oder eines anderen Geräts gespeichert wird. Die darin gespeicherten Informationen können bei einem späteren Besuch an unsere Server oder an die Server der betreffenden Dritten zurückgesandt werden.
## 3. Was sind Skripte?
Ein Skript ist ein Stück Programmcode, der dazu dient, dass unsere Website ordnungsgemäß und interaktiv funktioniert. Dieser Code wird auf unserem Server oder auf Ihrem Gerät ausgeführt.
## 4. Was ist ein Web-Beacon?
Ein Web-Beacon (oder ein Pixel-Tag) ist ein kleines, unsichtbares Stück Text oder Bild auf einer Website, das dazu dient, den Verkehr auf einer Website zu überwachen. Zu diesem Zweck werden verschiedene Daten über Sie mithilfe von Web-Beacons gespeichert.
## 5. Cookies
### 5.1 Technische oder funktionale Cookies
Einige Cookies sorgen dafür, dass bestimmte Teile der Website ordnungsgemäß funktionieren und dass Ihre Benutzerpräferenzen bekannt bleiben. Indem wir funktionale Cookies setzen, erleichtern wir Ihnen den Besuch unserer Website. So müssen Sie beim Besuch unserer Website nicht immer wieder dieselben Informationen eingeben, und die Artikel bleiben z. B. in Ihrem Warenkorb, bis Sie bezahlt haben. Wir können diese Cookies ohne Ihre Zustimmung setzen.
### 5.2 Statistik-Cookies
Wir verwenden Statistik-Cookies, um das Website-Erlebnis für unsere Nutzer zu optimieren. Mit diesen Statistik-Cookies erhalten wir Einblicke in die Nutzung unserer Website. Wir bitten Sie um Ihre Erlaubnis, Statistik-Cookies zu setzen.
### 5.3 Marketing/Tracking-Cookies
Marketing-/Tracking-Cookies sind Cookies oder andere Formen der lokalen Speicherung, die zur Erstellung von Nutzerprofilen für die Anzeige von Werbung oder zur Verfolgung des Nutzers auf dieser Website oder auf mehreren Websites für ähnliche Marketingzwecke verwendet werden.
## 6. Platzierte Kekse
- OptinMonster
- WordPress
- Streifen
- Cookie-Hinweis zur DSGVO
- Compliance
- Google Tag Manager für WordPress
- LiteSpeed
Diese Daten werden nicht an Dritte weitergegeben.
## 7. Zustimmung
Wenn Sie unsere Website zum ersten Mal besuchen, zeigen wir Ihnen ein Pop-up mit einer Erklärung über Cookies. Sobald Sie auf „Einstellungen speichern“ klicken, erklären Sie sich damit einverstanden, dass wir die Kategorien von Cookies und Plug-ins verwenden, die Sie in dem Pop-up-Fenster ausgewählt haben, wie in dieser Cookie-Richtlinie beschrieben. Sie können die Verwendung von Cookies über Ihren Browser deaktivieren, aber beachten Sie bitte, dass unsere Website dann möglicherweise nicht mehr richtig funktioniert.
## 8. Aktivieren/Deaktivieren und Löschen von Cookies
Sie können Ihren Internet-Browser verwenden, um Cookies automatisch oder manuell zu löschen. Sie können auch festlegen, dass bestimmte Cookies nicht gesetzt werden dürfen. Eine weitere Möglichkeit besteht darin, die Einstellungen Ihres Internet-Browsers so zu ändern, dass Sie jedes Mal, wenn ein Cookie gesetzt wird, eine Meldung erhalten. Weitere Informationen zu diesen Optionen finden Sie in den Anleitungen im Hilfebereich Ihres Browsers.
Bitte beachten Sie, dass unsere Website möglicherweise nicht richtig funktioniert, wenn alle Cookies deaktiviert sind. Wenn Sie die Cookies in Ihrem Browser löschen, werden sie nach Ihrer Zustimmung erneut gesetzt, wenn Sie unsere Website erneut besuchen.
## 9. Ihre Rechte in Bezug auf personenbezogene Daten
Sie haben die folgenden Rechte in Bezug auf Ihre personenbezogenen Daten:
Sie haben das Recht zu erfahren, wozu Ihre personenbezogenen Daten benötigt werden, was mit ihnen geschieht und wie lange sie gespeichert werden.
Recht auf Zugang: Sie haben das Recht, auf Ihre uns bekannten personenbezogenen Daten zuzugreifen.
Um diese Rechte auszuüben, kontaktieren Sie uns bitte. Bitte beachten Sie die Kontaktdaten am Ende dieser Cookie-Richtlinie. Wenn Sie sich darüber beschweren möchten, wie wir Ihre Daten behandeln, würden wir uns freuen, von Ihnen zu hören. Sie haben aber auch das Recht, eine Beschwerde bei der Aufsichtsbehörde (der Datenschutzbehörde) einzureichen.
## 10. Kontaktangaben
Wenn Sie Fragen und/oder Anmerkungen zu unserer Cookie-Richtlinie und dieser Erklärung haben, wenden Sie sich bitte an uns unter den folgenden Kontaktdaten:
E-Mail: **support@visioforge.com**
Diese Cookie-Richtlinie wurde am 21. November 2024 mit **cookiedatabase.org** synchronisiert.
---END OF PAGE---
# Page: https://www.visioforge.com/es/cookie-policy-eu
# Política de cookies (UE/GDPR)
Esta Política de Cookies se actualizó por última vez el 21 de noviembre de 2024 y se aplica a los ciudadanos y residentes legales permanentes del Espacio Económico Europeo y Suiza.
## 1. Introducción
Nuestro sitio web, https://www.visioforge.com (en adelante, «el sitio web») utiliza cookies y otras tecnologías relacionadas (para mayor comodidad, todas las tecnologías se denominan «cookies»). Las cookies también son colocadas por terceros que hemos contratado. En el siguiente documento le informamos sobre el uso de cookies en nuestro sitio web.
## 2. ¿Qué son las cookies?
Una cookie es un pequeño archivo simple que se envía junto con las páginas de este sitio web y que su navegador almacena en el disco duro de su ordenador u otro dispositivo. La información almacenada en él puede ser devuelta a nuestros servidores o a los servidores de los terceros pertinentes durante una visita posterior.
## 3. ¿Qué son los guiones?
Un script es un fragmento de código de programa que se utiliza para que nuestro sitio web funcione correctamente y de forma interactiva. Este código se ejecuta en nuestro servidor o en su dispositivo.
## 4. ¿Qué es una baliza web?
Una baliza web (o etiqueta de píxel) es un pequeño fragmento invisible de texto o imagen en un sitio web que se utiliza para controlar el tráfico en un sitio web. Para ello, se almacenan varios datos sobre usted mediante balizas web.
## 5. Cookies
### 5.1 Cookies técnicas o funcionales
Algunas cookies garantizan que determinadas partes del sitio web funcionen correctamente y que se conozcan sus preferencias de usuario. Al colocar cookies funcionales, le facilitamos la visita a nuestro sitio web. De este modo, no tendrá que introducir repetidamente la misma información cuando visite nuestro sitio web y, por ejemplo, los artículos permanecerán en su cesta de la compra hasta que haya pagado. Podemos colocar estas cookies sin su consentimiento.
### 5.2 Cookies estadísticas
Utilizamos cookies estadísticas para optimizar la experiencia del sitio web para nuestros usuarios. Con estas cookies estadísticas obtenemos información sobre el uso de nuestro sitio web. Le pedimos su permiso para colocar cookies estadísticas.
### 5.3 Cookies de marketing/seguimiento
Las cookies de marketing/seguimiento son cookies o cualquier otra forma de almacenamiento local, utilizadas para crear perfiles de usuario para mostrar publicidad o para seguir al usuario en este sitio web o en varios sitios web con fines de marketing similares.
## 6. Galletas colocadas
- Monstruo de la opción
- WordPress
- Raya
- Aviso sobre cookies para el RGPD
- Complianz
- Administrador de etiquetas de Google para WordPress
- LiteSpeed
Estos datos no se comparten con terceros.
## 7. Consentimiento
Cuando visite nuestro sitio web por primera vez, le mostraremos una ventana emergente con una explicación sobre las cookies. En cuanto haga clic en «Guardar preferencias», nos dará su consentimiento para utilizar las categorías de cookies y complementos que haya seleccionado en la ventana emergente, tal y como se describe en la presente Política de Cookies. Puede desactivar el uso de cookies a través de su navegador, pero tenga en cuenta que es posible que nuestro sitio web deje de funcionar correctamente.
## 8. Activación/desactivación y eliminación de cookies
Puede utilizar su navegador de Internet para eliminar las cookies automática o manualmente. También puede especificar que no se coloquen determinadas cookies. Otra opción es cambiar la configuración de su navegador de Internet para que reciba un mensaje cada vez que se instale una cookie. Para más información sobre estas opciones, consulte las instrucciones de la sección de Ayuda de su navegador.
Tenga en cuenta que nuestro sitio web puede no funcionar correctamente si se desactivan todas las cookies. Si elimina las cookies de su navegador, volverán a colocarse tras su consentimiento cuando vuelva a visitar nuestro sitio web.
## 9. Sus derechos con respecto a los datos personales
Usted tiene los siguientes derechos con respecto a sus datos personales:
Tiene derecho a saber por qué se necesitan sus datos personales, qué ocurrirá con ellos y durante cuánto tiempo se conservarán.
Derecho de acceso: Tiene derecho a acceder a sus datos personales que conozcamos.
Para ejercer estos derechos, póngase en contacto con nosotros. Consulte los datos de contacto en la parte inferior de esta Política de Cookies. Si tiene alguna queja sobre cómo tratamos sus datos, nos gustaría conocerla, pero también tiene derecho a presentar una queja ante la autoridad supervisora (la Autoridad de Protección de Datos).
## 10. Datos de contacto
Para preguntas y/o comentarios sobre nuestra Política de Cookies y esta declaración, póngase en contacto con nosotros utilizando los siguientes datos de contacto:
Correo electrónico: **soporte@visioforge.com**
Esta Política de Cookies se sincronizó con **basededatosdecookies.org** el 21 de noviembre de 2024.
---END OF PAGE---
# Page: https://www.visioforge.com/it/cookie-policy-eu
# Informativa sui cookie (UE/GDPR)
La presente Informativa sui cookie è stata aggiornata l'ultima volta il 21 novembre 2024 e si applica ai cittadini e ai residenti permanenti legali dello Spazio economico europeo e della Svizzera.
## 1. Introduzione
Il nostro sito web, https://www.visioforge.com (di seguito: “il sito web”) utilizza i cookie e altre tecnologie correlate (per comodità tutte le tecnologie sono indicate come “cookie”). I cookie vengono inseriti anche da terze parti da noi incaricate. Nel documento che segue vi informiamo sull'uso dei cookie sul nostro sito web.
## 2. Cosa sono i cookie?
Un cookie è un piccolo e semplice file che viene inviato insieme alle pagine di questo sito web e memorizzato dal vostro browser sul disco rigido del vostro computer o di un altro dispositivo. Le informazioni in esso memorizzate possono essere rinviate ai nostri server o ai server delle terze parti interessate durante una visita successiva.
## 3. Cosa sono gli script?
Uno script è un pezzo di codice di programma che viene utilizzato per far funzionare il nostro sito web in modo corretto e interattivo. Questo codice viene eseguito sul nostro server o sul vostro dispositivo.
## 4. Che cos'è un web beacon?
Un web beacon (o pixel tag) è una piccola parte invisibile di testo o immagine presente su un sito web, utilizzata per monitorare il traffico su un sito. A tal fine, i web beacon memorizzano diversi dati relativi all'utente.
## 5. Cookies
### 5.1 Cookie tecnici o funzionali
Alcuni cookie garantiscono il corretto funzionamento di alcune parti del sito web e la conoscenza delle preferenze dell'utente. Inserendo i cookie funzionali, vi facilitiamo la visita al nostro sito web. In questo modo, non è necessario inserire ripetutamente le stesse informazioni quando si visita il nostro sito e, ad esempio, gli articoli rimangono nel carrello fino al momento del pagamento. Possiamo inserire questi cookie senza il vostro consenso.
### 5.2 Cookie statistici
Utilizziamo i cookie statistici per ottimizzare l'esperienza del sito web per i nostri utenti. Con questi cookie statistici otteniamo informazioni sull'utilizzo del nostro sito web. Chiediamo il vostro consenso per l'inserimento dei cookie statistici.
### 5.3 Cookie di marketing/tracciamento
I cookie di marketing/tracciamento sono cookie o qualsiasi altra forma di memorizzazione locale, utilizzati per creare profili utente al fine di visualizzare pubblicità o per tracciare l'utente su questo sito web o su diversi siti web per scopi di marketing simili.
## 6. Cookie posizionati
- OptinMonster
- WordPress
- Striscia
- Informativa sui cookie per GDPR
- Complianz
- Google Tag Manager per WordPress
- LiteSpeed
Questi dati non vengono condivisi con terzi.
## 7. Consenso
Quando visitate il nostro sito web per la prima volta, vi mostreremo un pop-up con una spiegazione sui cookie. Facendo clic su “Salva preferenze”, l'utente acconsente all'utilizzo delle categorie di cookie e plug-in selezionate nel pop-up, come descritto nella presente Informativa sui cookie. È possibile disattivare l'uso dei cookie tramite il proprio browser, ma si prega di notare che il nostro sito web potrebbe non funzionare più correttamente.
## 8. Abilitazione/disabilitazione e cancellazione dei cookie
È possibile utilizzare il proprio browser Internet per eliminare automaticamente o manualmente i cookie. È inoltre possibile specificare che determinati cookie non possono essere inseriti. Un'altra possibilità è quella di modificare le impostazioni del browser Internet in modo da ricevere un messaggio ogni volta che viene inserito un cookie. Per ulteriori informazioni su queste opzioni, consultare le istruzioni nella sezione Aiuto del browser.
Si prega di notare che il nostro sito web potrebbe non funzionare correttamente se tutti i cookie sono disabilitati. Se cancellate i cookie nel vostro browser, essi verranno nuovamente inseriti dopo il vostro consenso quando visiterete nuovamente il nostro sito web.
## 9. I vostri diritti in materia di dati personali
L'utente ha i seguenti diritti in relazione ai propri dati personali:
Avete il diritto di sapere perché i vostri dati personali sono necessari, che fine faranno e per quanto tempo saranno conservati.
Diritto di accesso: L'utente ha il diritto di accedere ai propri dati personali di cui è a conoscenza.
Per esercitare tali diritti, si prega di contattarci. Si prega di fare riferimento ai dettagli di contatto in fondo alla presente Informativa sui cookie. Se avete un reclamo sul modo in cui trattiamo i vostri dati, ci piacerebbe sentirvi, ma avete anche il diritto di presentare un reclamo all'autorità di controllo (l'Autorità per la protezione dei dati).
## 10. Dettagli di contatto
Per domande e/o commenti sulla nostra Politica sui cookie e sulla presente informativa, si prega di contattarci utilizzando i seguenti recapiti:
E-mail: **support@visioforge.com**
La presente Informativa sui cookie è stata sincronizzata con **cookiedatabase.org** il 21 novembre 2024.
---END OF PAGE---
# Page: https://www.visioforge.com/de/how-to-register-purchased-product
# Wie kann ich gekaufte Produkte registrieren?
## SDKs für .Net
Verwenden Sie in Ihrem Code die Methode SetLicenseKey der SDK-Hauptklasse (VideoCaptureCore/VideoEditCore/MediaPlayerCore). Diese Methode nimmt Ihren Lizenzschlüssel, den Benutzernamen (oder Firmennamen) und die beim Kauf verwendete E-Mail als Parameter entgegen. Rufen Sie diese Methode in den Ereignissen Form OnCreate/OnLoad oder vor dem Aufruf der Methode StartAsync/PlayAsync auf.
Sie können das SDK verwenden, das über eine eigenständige Setup-Datei oder das in Ihrem Projekt installierte NuGet-Paket installiert wurde. Eine Neuinstallation des SDK ist nicht erforderlich.
## Delphi-Pakete
- Deinstallieren Sie die TRIAL-Version, falls installiert
- DCU/BPL-Paketdateien entfernen, falls erforderlich
- Installieren Sie die FULL-Version der Software über den Link in der Registrierungs-E-Mail
- Verwenden Sie in Ihrem Code die Methode SetLicenseKey des Steuerelements, die Ihren Lizenzschlüssel als Parameter annimmt. Rufen Sie diese Methode in OnCreate/OnLoad-Ereignissen oder an anderer Stelle vor dem Aufruf der Start/Play-Methode auf.
## ActiveX-Bibliotheken
Verwenden Sie die Methode SetLicenseKey der ActiveX-Bibliothek oder der Wrapper-Klasse.
## DirectShow-SDKs
Jedes DirectShow SDK enthält eine benutzerdefinierte IVFRegister-Schnittstelle, die zur Anwendung Ihres Lizenzschlüssels im Anwendungscode verwendet werden kann. Das Virtual Camera SDK erlaubt optional die Registrierung über die Registry.
## Andere Produkte
Rufen Sie die Methode SetLicenseKey der SDK-Hauptklasse mit Ihrem Lizenzschlüssel auf.

---END OF PAGE---
# Page: https://www.visioforge.com/es/how-to-register-purchased-product
# ¿Cómo registrar los productos adquiridos?
## SDK para .Net
En su código, utilice el método SetLicenseKey de la clase principal del SDK (VideoCaptureCore/VideoEditCore/MediaPlayerCore). Este método toma como parámetros su clave de licencia, el nombre de usuario (o nombre de la empresa) y el correo electrónico utilizado durante la compra. Llame a este método en los eventos Form OnCreate/OnLoad o antes de la llamada al método StartAsync/PlayAsync.
Puede utilizar el SDK instalado por un archivo de instalación independiente o el paquete NuGet instalado en su proyecto. No es necesario reinstalar el SDK.
## Paquetes de Delphi
- Desinstalar la versión de PRUEBA si está instalada
- Elimine los archivos del paquete DCU/BPL si es necesario
- Instale la versión COMPLETA del software utilizando el enlace del correo electrónico de registro.
- En su código, utilice el método SetLicenseKey del control, que toma su clave de licencia como parámetro. Llame a este método en los eventos OnCreate/OnLoad o en cualquier otro lugar antes de la llamada al método Start/Play.
## Bibliotecas ActiveX
Utilice el método SetLicenseKey de la biblioteca ActiveX o clase envoltorio.
## DirectShow SDKs
Cada DirectShow SDK contiene una interfaz IVFRegister personalizada que se puede utilizar para aplicar su clave de licencia en el código de la aplicación. Virtual Camera SDK permite opcionalmente el registro mediante el registro.
## Otros productos
Llame al método SetLicenseKey de la clase principal del SDK con su clave de licencia.

---END OF PAGE---
# Page: https://www.visioforge.com/it/how-to-register-purchased-product
# Come registrare i prodotti acquistati?
## SDK per .Net
Nel codice, utilizzare il metodo SetLicenseKey della classe principale dell'SDK (VideoCaptureCore/VideoEditCore/MediaPlayerCore). Questo metodo prende come parametri la chiave di licenza, il nome dell'utente (o della società) e l'e-mail utilizzata durante l'acquisto. Chiamare questo metodo negli eventi Form OnCreate/OnLoad o prima della chiamata del metodo StartAsync/PlayAsync.
È possibile utilizzare l'SDK installato da un file di installazione standalone o il pacchetto NuGet installato nel progetto. La reinstallazione dell'SDK non è necessaria.
## Pacchetti Delphi
- Disinstallare la versione TRIAL se installata
- Rimuovere i file del pacchetto DCU/BPL, se necessario
- Installare la versione COMPLETA del software utilizzando il link fornito nell'e-mail di registrazione.
- Nel codice, utilizzare il metodo SetLicenseKey del controllo, che prende la chiave di licenza come parametro. Chiamate questo metodo negli eventi OnCreate/OnLoad o in qualsiasi altro punto prima della chiamata al metodo Start/Play.
## Librerie ActiveX
Utilizzare il metodo SetLicenseKey della libreria ActiveX o della classe wrapper.
## SDK DirectShow
Ogni SDK DirectShow contiene un'interfaccia IVFRegister personalizzata che può essere utilizzata per applicare la chiave di licenza nel codice dell'applicazione. Virtual Camera SDK consente facoltativamente la registrazione tramite il registro.
## Altri prodotti
Chiamare il metodo SetLicenseKey della classe principale dell'SDK con la chiave di licenza.

---END OF PAGE---
# Page: https://www.visioforge.com/de/llms
# Informationen für LLM-Agenten
Unsere Website unterstützt die LLMS.txt-API:
- [Kurzfassung](/llms.txt)
- [Vollversion](/llms-full.txt)
---END OF PAGE---
# Page: https://www.visioforge.com/es/llms
# Información para agentes de LLM
Nuestro sitio web admite la API LLMS.txt:
- [Versión corta](/llms.txt)
- [Versión completa](/llms-full.txt)
---END OF PAGE---
# Page: https://www.visioforge.com/it/llms
# Informazioni per gli agenti LLM
Il nostro sito web supporta l'API LLMS.txt:
- [Versione breve](/llms.txt)
- [Versione completa](/llms-full.txt)
---END OF PAGE---
# Page: https://www.visioforge.com/llms.txt
# visioforge.com llms.txt
> VisioForge is a leading provider of multimedia development tools and SDKs (Software Development Kits) designed for video and audio processing. The website offers a comprehensive range of products, including media frameworks, players, and encoding filters, catering to both developers and businesses. Users can find detailed information on purchasing products, accessing cookie policies, and understanding privacy regulations.
## URLs and Descriptions
- [VisioForge Video Solutions](https://www.visioforge.com/): The VisioForge website serves as the central hub for their multimedia SDKs and development tools, offering solutions for video and audio processing.
- [Video Edit SDK](https://www.visioforge.com/video-edit-sdk-net): The Video Edit SDK .NET page by VisioForge highlights their software development kit for video editing, featuring tools for developers to integrate video processing capabilities into their applications.
- [VisioForge Terms](https://www.visioforge.com/terms-and-conditions): The Terms and Conditions page of VisioForge outlines the legal agreements and guidelines governing the use of their products and services. It provides essential information regarding user rights, responsibilities, and limitations.
- [Media Blocks SDK](https://www.visioforge.com/media-blocks-sdk-net): The Media Blocks SDK for .NET page by VisioForge provides information about their powerful software development kit for creating multimedia applications, highlighting features, documentation, and support resources.
- [Video Capture SDK](https://www.visioforge.com/video-capture-sdk-net): The Video Capture SDK for .NET by VisioForge offers developers powerful tools for video capture and processing, enabling seamless integration of multimedia functionality into applications.
- [Detecting Pirated Video](https://www.visioforge.com/detecting-pirated-video-content): This page discusses VisioForge's technology for detecting pirated video content, highlighting its features and capabilities to protect intellectual property.
- [VisioForge News Updates](https://www.visioforge.com/news): The news page of VisioForge, featuring the latest updates, announcements, and developments related to the company's software and technology offerings.
- [Encoding Filters Pack](https://www.visioforge.com/encoding-filters-pack): The Encoding Filters Pack page on VisioForge highlights a collection of advanced encoding filters designed to enhance video and audio processing capabilities for developers and multimedia applications.
- [All-in-One Media Framework](https://www.visioforge.com/all-in-one-media-framework): The All-in-One Media Framework page by VisioForge presents a comprehensive suite of tools for video and audio processing, enabling developers to create versatile multimedia applications.
- [Uninstall Feedback](https://www.visioforge.com/uninstall-feedback): A feedback page for users to share their experiences and thoughts regarding the uninstallation process of VisioForge products.
- [FFmpeg DirectShow Filter](https://www.visioforge.com/ffmpeg-source-directshow-filter): The VisioForge FFmpeg Source DirectShow Filter page provides information about a powerful filter that enables users to integrate FFmpeg capabilities into DirectShow applications for enhanced multimedia processing.
- [Refund Policy](https://www.visioforge.com/refund-policy): The refund policy page of VisioForge outlines the terms and conditions under which customers can request refunds for their purchases, ensuring transparency and customer satisfaction.
- [Video Encryption SDK](https://www.visioforge.com/video-encryption-sdk): The Video Encryption SDK page of VisioForge highlights their advanced software development kit for encrypting video content, ensuring secure streaming and storage solutions for developers.
- [VisioForge Help](https://www.visioforge.com/help/): The VisioForge help page provides comprehensive resources, documentation, and support for users of their software products, ensuring effective usage and troubleshooting assistance.
- [VisioForge VLC Filter](https://www.visioforge.com/vlc-source-directshow-filter): The VLC Source DirectShow Filter page by VisioForge provides information about a filter that allows VLC media playback within DirectShow applications, enhancing multimedia capabilities for developers.
- [Virtual Camera SDK](https://www.visioforge.com/virtual-camera-sdk): The Virtual Camera SDK page of VisioForge presents a comprehensive solution for integrating virtual camera functionality into applications, highlighting features, documentation, and support for developers.
- [VisioForge Purchase Options](https://www.visioforge.com/buy): The purchase page of VisioForge, offering various licensing options for their video processing and streaming software solutions.
- [VisioForge SLA Agreement](https://www.visioforge.com/support-service-level-agreement-sla): This page outlines the Service Level Agreement (SLA) for VisioForge, detailing the support services and commitments provided to customers.
- [Product Registration Guide](https://www.visioforge.com/how-to-register-purchased-product): A guide on how to register a purchased product from VisioForge, providing step-by-step instructions for users to activate their software.
- [Media Player SDK](https://www.visioforge.com/media-player-sdk-net): The VisioForge Media Player SDK for .NET page highlights the features and capabilities of the software development kit, designed for integrating media playback functionality into .NET applications.
- [Legal Information](https://www.visioforge.com/legal-information): The legal information page of VisioForge provides essential details regarding the company's terms, privacy policies, and copyright information. It serves as a resource for users to understand their rights and responsibilities while using VisioForge products.
- [Webcam Recording Software](https://www.visioforge.com/save-webcam): The Save Webcam page by VisioForge offers a solution for capturing and recording webcam video, highlighting features, benefits, and user-friendly options for seamless integration.
- [Processing Filters Pack](https://www.visioforge.com/processing-filters-pack): The Processing Filters Pack page on VisioForge highlights a collection of advanced video processing filters designed to enhance multimedia applications and improve video quality.
- [Cookie Policy EU](https://www.visioforge.com/cookie-policy-eu): The Cookie Policy page of VisioForge outlines the use of cookies on their website, detailing the types of cookies used and how they enhance user experience while ensuring compliance with EU regulations.
- [Video Edit SDK](https://www.visioforge.com/video-edit-sdk-ffmpeg-net): The Video Edit SDK from VisioForge offers a powerful .NET solution for video editing and processing using FFmpeg technology, designed for developers to easily integrate multimedia capabilities into their applications.
- [Video Fingerprinting SDK](https://www.visioforge.com/video-fingerprinting-sdk): The Video Fingerprinting SDK page by VisioForge highlights advanced technology for identifying and tracking video content, offering solutions for media management and analytics.
- [Virtual Camera SDK](https://www.visioforge.com/help/docs/directshow/virtual-camera-sdk/): The VisioForge Virtual Camera SDK page provides detailed documentation and resources for developers to integrate virtual camera functionality into their applications using DirectShow technology.
- [VisioForge DirectShow Documentation](https://www.visioforge.com/help/docs/directshow/): The VisioForge DirectShow documentation page provides comprehensive information and resources for developers using the DirectShow framework, including guides, API references, and examples for multimedia application development.
- [Video Capture Documentation](https://www.visioforge.com/help/docs/dotnet/videocapture/): The documentation page for VisioForge's Video Capture SDK, providing detailed information on its features, usage, and integration for developers.
- [VisioForge Privacy Policy](https://www.visioforge.com/privacy-policy): The privacy policy page of VisioForge outlines the company's practices regarding data collection, usage, and protection to ensure user confidentiality and compliance with applicable laws.
- [Video Edit Documentation](https://www.visioforge.com/help/docs/dotnet/videoedit/): The documentation page for VisioForge's Video Edit SDK, providing detailed information on features, usage, and integration for video editing applications.
- [VisioForge Media Player](https://www.visioforge.com/help/docs/dotnet/mediaplayer/): The documentation page for VisioForge's Media Player .NET component, providing detailed guidance on features, usage, and API references for developers.
- [VisioForge Changelog](https://www.visioforge.com/help/docs/dotnet/changelog/): The changelog page of VisioForge provides detailed updates and version history for their .NET SDK, highlighting new features, improvements, and bug fixes.
- [VisioForge News 2021](https://www.visioforge.com/news-2021): The news page of VisioForge, featuring updates and announcements about the company's latest developments and offerings in video processing technology.
- [VisioForge News 2022](https://www.visioforge.com/news-2022): The news page of VisioForge highlights the latest updates, announcements, and developments from the company throughout 2022.
- [VisioForge News 2023](https://www.visioforge.com/news-2023): The news page of VisioForge provides updates and announcements regarding the company's latest developments, product releases, and industry insights for 2023.
- [VisioForge EULA](https://www.visioforge.com/help/docs/eula/): The End User License Agreement (EULA) page of VisioForge outlines the terms and conditions for using their software products, ensuring users understand their rights and responsibilities.
- [VisioForge News 2024](https://www.visioforge.com/news-2024): The news page of VisioForge, highlighting the latest updates, announcements, and developments for 2024.
- [Video Edit FFmpeg Changelog](https://www.visioforge.com/help/docs/dotnet/videoedit-ffmpeg/changelog/): Changelog page for VisioForge's Video Edit SDK, detailing updates, enhancements, and fixes for the FFmpeg integration.
- [VisioForge Media Blocks](https://www.visioforge.com/help/docs/dotnet/mediablocks/): The Media Blocks documentation page of VisioForge provides detailed information on the various media processing components available in their .NET SDK, including usage examples and API references.
- [VisioForge .NET Documentation](https://www.visioforge.com/help/docs/dotnet/): Documentation page for VisioForge's .NET SDK, providing detailed information and resources for developers to integrate video and audio processing capabilities into their applications.
- [VisioForge Delphi Documentation](https://www.visioforge.com/help/docs/delphi/): The VisioForge Delphi documentation page provides comprehensive guidance and resources for developers using VisioForge's multimedia SDK in Delphi applications. It includes detailed API references, code examples, and configuration tips to enhance multimedia functionality.
- [VisioForge Documentation](https://www.visioforge.com/help/docs/vfp/): The documentation page for VisioForge's Video Processing SDK, providing detailed information on features, usage, and implementation guidelines for developers.
- [Video Capture Changelog](https://www.visioforge.com/help/docs/delphi/videocapture/changelog/): Changelog for VisioForge's Video Capture SDK, detailing updates, enhancements, and bug fixes for the software.
- [Video Capture Documentation](https://www.visioforge.com/help/docs/delphi/videocapture/): The documentation page for VisioForge's Delphi Video Capture SDK, providing detailed information and guidance on using the library for video capture applications.
- [VisioForge Change Log](https://www.visioforge.com/help/docs/vfp/changelog/): Changelog page for VisioForge, detailing the updates, enhancements, and bug fixes for their software products.
- [FFmpeg Source Filters](https://www.visioforge.com/help/docs/directshow/ffmpeg-source-filters/): This page provides documentation for the FFmpeg Source Filters in DirectShow, detailing their features, usage, and integration within multimedia applications.
- [VisioForge .NET Installation Guide](https://www.visioforge.com/help/docs/dotnet/install/): Installation guide for VisioForge .NET components, providing detailed instructions for setting up the software in development environments.
- [DirectShow Encoding Filters](https://www.visioforge.com/help/docs/directshow/filters-enc/): This page provides detailed information on the DirectShow encoding filters offered by VisioForge, including their features and usage for multimedia applications.
- [VisioForge Installation Guide](https://www.visioforge.com/help/docs/dotnet/install/rider/): This page provides a comprehensive guide for installing VisioForge components using JetBrains Rider, detailing the necessary steps and requirements for a successful setup.
- [Video Capture Deployment](https://www.visioforge.com/help/docs/dotnet/videocapture/deployment/): This page provides detailed information on deploying the Video Capture SDK in .NET applications, including installation steps and configuration options.
- [VisioForge Media Blocks](https://www.visioforge.com/help/docs/dotnet/mediablocks/Special/): This page provides documentation for the Media Blocks Special features in VisioForge's .NET SDK, detailing their functionalities and usage for developers.
- [FM Radio TV Tuning](https://www.visioforge.com/help/docs/delphi/videocapture/fm-radio-tv-tuning/): This page provides information on FM radio and TV tuning features in VisioForge's Delphi Video Capture SDK, detailing how to implement and utilize these capabilities in applications.
- [Video Capture Tutorials](https://www.visioforge.com/help/docs/dotnet/videocapture/video-tutorials/): A resourceful page from VisioForge that offers video tutorials for their Video Capture SDK, helping users understand and implement various features effectively.
- [Compare Video Files](https://www.visioforge.com/help/docs/vfp/how-to-compare-two-video-files/): A guide on comparing two video files using VisioForge's tools, detailing step-by-step instructions and features for effective video analysis.
- [Custom Video Output](https://www.visioforge.com/help/docs/delphi/videocapture/custom-output/): This page provides detailed documentation on implementing custom output options in the VisioForge Video Capture SDK using Delphi, including code examples and configuration settings.
- [Video Processing Guide](https://www.visioforge.com/help/docs/dotnet/mediablocks/VideoProcessing/): This page provides documentation for the Video Processing features of VisioForge's Media Blocks in .NET, detailing functionalities and usage for developers.
- [Motion Detection Guide](https://www.visioforge.com/help/docs/dotnet/videocapture/motion-detection/): This page provides detailed documentation on the motion detection capabilities of the Video Capture SDK by VisioForge, including implementation guidelines and features.
- [Live Video Compositor](https://www.visioforge.com/help/docs/dotnet/mediablocks/LiveVideoCompositor/): The Live Video Compositor documentation page on VisioForge provides detailed information on the features and functionalities of the Live Video Compositor component for .NET applications, including usage examples and API references.
- [VisioForge Platform Matrix](https://www.visioforge.com/help/docs/dotnet/platform-matrix/): A comprehensive platform matrix for VisioForge's .NET tools, detailing compatibility across various operating systems and development environments.
- [Video Renderer Guide](https://www.visioforge.com/help/docs/delphi/videocapture/video-renderer/): This page provides detailed documentation on the video renderer component of VisioForge's Delphi Video Capture SDK, outlining its features, usage, and configuration options for developers.
- [VisioForge Delphi Documentation](https://www.visioforge.com/help/docs/delphi/general/): The Delphi general documentation page for VisioForge provides detailed information and guidance on using VisioForge's software development tools within Delphi applications. It serves as a resource for developers seeking to integrate multimedia capabilities into their projects.
- [Audio Sources Documentation](https://www.visioforge.com/help/docs/dotnet/videocapture/audio-sources/): This page provides detailed information on audio sources available in the VisioForge Video Capture SDK, including configuration options and usage examples for developers.
- [Video Input Crossbar](https://www.visioforge.com/help/docs/delphi/videocapture/video-input-crossbar/): This page provides detailed information on using the Video Input Crossbar feature in VisioForge's Delphi Video Capture SDK, including configuration options and usage examples.
- [DirectShow Proc Filters](https://www.visioforge.com/help/docs/directshow/proc-filters/): A detailed guide on DirectShow processing filters by VisioForge, outlining their functionalities and usage for video and audio processing applications.
- [Video Encryption SDK](https://www.visioforge.com/help/docs/directshow/video-encryption-sdk/): The VisioForge Video Encryption SDK page provides comprehensive information on their video encryption solutions, detailing features, functionalities, and integration options for developers.
- [DirectShow Registration Guide](https://www.visioforge.com/help/docs/directshow/how-to-register/): A guide on how to register DirectShow filters using VisioForge, providing step-by-step instructions for users to effectively manage their media applications.
- [Delphi Video Capture](https://www.visioforge.com/help/docs/delphi/videocapture/dv-camcorder/): This page provides detailed documentation for the VisioForge Delphi Video Capture SDK, specifically focusing on the DV Camcorder functionality, including features and implementation guidelines.
- [VisioForge Media Blocks](https://www.visioforge.com/help/docs/dotnet/mediablocks/Bridge/): The VisioForge Bridge documentation page provides detailed information on the Bridge media block, including its features, usage, and integration within .NET applications for enhanced media processing capabilities.
- [VisioForge Installation Guide](https://www.visioforge.com/help/docs/dotnet/install/visual-studio/): This page provides detailed instructions for installing VisioForge components in Visual Studio, aimed at developers looking to integrate video processing capabilities into their applications.
- [Video Edit Guide](https://www.visioforge.com/help/docs/dotnet/videoedit/getting-started/): A comprehensive guide for getting started with VisioForge's Video Edit SDK, providing essential information and resources for developers.
- [VisioForge Media Player Samples](https://www.visioforge.com/help/docs/dotnet/mediaplayer/code-samples/): A resource page from VisioForge providing code samples for integrating their media player into .NET applications, offering practical examples and guidance for developers.
- [Audio Rendering Guide](https://www.visioforge.com/help/docs/dotnet/videocapture/audio-rendering/): This page provides detailed documentation on audio rendering features in the VisioForge Video Capture SDK for .NET, including implementation guidelines and code examples.
- [Video Capture Guide](https://www.visioforge.com/help/docs/dotnet/videocapture/computer-vision/): A comprehensive guide on using VisioForge's Video Capture SDK for implementing computer vision features, including detailed documentation and examples for developers.
- [VisioForge Installation Guide](https://www.visioforge.com/help/docs/dotnet/install/visual-studio-mac/): Installation guide for VisioForge components in Visual Studio on Mac, providing step-by-step instructions for developers.
- [VLC Source Filter Guide](https://www.visioforge.com/help/docs/directshow/vlc-source-filter/): This page provides detailed documentation for the VLC Source Filter, a component of the VisioForge DirectShow SDK, outlining its features, usage, and integration for media applications.
- [Video Capture AVI Guide](https://www.visioforge.com/help/docs/delphi/videocapture/video-capture-avi/): This page provides detailed documentation on using the Video Capture AVI component in Delphi with VisioForge, including setup, features, and code examples for video capture applications.
- [Video Fragment Search](https://www.visioforge.com/help/docs/vfp/how-to-search-one-video-fragment-in-another/): A guide on how to search for one video fragment within another using VisioForge's video processing tools, providing step-by-step instructions and tips for effective implementation.
- [Video Edit Deployment](https://www.visioforge.com/help/docs/delphi/videoedit/deployment/): This page provides detailed instructions for deploying the VisioForge Video Edit SDK in Delphi applications, including setup and configuration guidelines.
- [VisioForge Media Blocks Guide](https://www.visioforge.com/help/docs/dotnet/mediablocks/GettingStarted/): A guide for getting started with Media Blocks in VisioForge's .NET SDK, providing essential information and resources for developers.
- [Multiple Video Streams](https://www.visioforge.com/help/docs/delphi/mediaplayer/file-multiple-video-streams/): This page provides guidance on using the VisioForge Media Player to handle multiple video streams within Delphi applications, including code examples and implementation details.
- [Decklink Media Blocks](https://www.visioforge.com/help/docs/dotnet/mediablocks/Decklink/): This page provides detailed documentation for the VisioForge Decklink media block, including its features, usage, and integration within .NET applications.
- [Media Blocks Sinks](https://www.visioforge.com/help/docs/dotnet/mediablocks/Sinks/): The VisioForge Media Blocks Sinks documentation page provides detailed information on various sink components used for media processing in .NET applications, including their functionalities and implementation guidelines.
- [Video Capture WMV](https://www.visioforge.com/help/docs/delphi/videocapture/video-capture-wmv/): This page provides detailed documentation on using the VisioForge Video Capture SDK for WMV video capture in Delphi, including setup instructions and code examples.
- [Video Audio Sources](https://www.visioforge.com/help/docs/delphi/videocapture/video-audio-sources/): This page provides detailed information on video and audio sources for the VisioForge Video Capture SDK, including configuration options and usage guidelines for developers.
- [Audio Encoder Documentation](https://www.visioforge.com/help/docs/dotnet/mediablocks/AudioEncoders/): This page provides detailed documentation on audio encoders available in the VisioForge .NET Media Blocks, including features, usage, and integration guidelines for developers.
- [Audio Capture Guide](https://www.visioforge.com/help/docs/dotnet/videocapture/audio-capture/): This page provides documentation for the audio capture features of VisioForge's video capture SDK, detailing its functionalities and implementation in .NET applications.
- [Video Edit Documentation](https://www.visioforge.com/help/docs/delphi/videoedit/): The VisioForge Video Edit documentation page provides detailed information and resources for developers using the Video Edit SDK in Delphi, including guides, API references, and example projects.
- [Audio Capture Guide](https://www.visioforge.com/help/docs/delphi/videocapture/audio-capture-wav/): This page provides documentation for capturing audio in WAV format using VisioForge's Delphi Video Capture SDK, detailing implementation steps and features.
- [Video Capture Adjustments](https://www.visioforge.com/help/docs/delphi/videocapture/hardware-adjustments/): This page provides detailed guidance on hardware adjustments for video capture using VisioForge's Delphi SDK, including tips and settings for optimizing video quality.
- [Network Streaming Guide](https://www.visioforge.com/help/docs/dotnet/videocapture/network-streaming/): This page provides detailed documentation on how to implement network streaming using the VisioForge Video Capture SDK, including configuration options and code examples.
- [VideoCapture Deployment Guide](https://www.visioforge.com/help/docs/delphi/videocapture/deployment/): A comprehensive guide on deploying the VisioForge Video Capture SDK in Delphi applications, detailing installation, configuration, and best practices for optimal performance.
- [VisioForge Licensing Help](https://www.visioforge.com/help/licensing/): A detailed overview of VisioForge's licensing options, including information on purchasing, activation, and subscription plans for their software products.
- [VisioForge Media Player Guide](https://www.visioforge.com/help/docs/delphi/mediaplayer/): The VisioForge Media Player documentation page provides detailed information and guidance on using the Media Player component in Delphi, including features, methods, and examples for developers.
- [VisioForge Media Player Guide](https://www.visioforge.com/help/docs/dotnet/mediaplayer/deployment/): A comprehensive guide for deploying the VisioForge Media Player in .NET applications, detailing installation steps, configuration options, and best practices.
- [Video Capture Documentation](https://www.visioforge.com/help/docs/dotnet/videocapture/video-capture/): This page provides detailed documentation on the Video Capture component of VisioForge's .NET library, including usage instructions, features, and API references for developers.
- [Screen Capture Guide](https://www.visioforge.com/help/docs/delphi/videocapture/screen-capture/): This page provides documentation for using VisioForge's Delphi Video Capture SDK to implement screen capture functionality, including detailed guides and code examples.
- [Video Capture Guide](https://www.visioforge.com/help/docs/delphi/videocapture/mpeg2-capture/): This page provides detailed documentation on capturing MPEG-2 video using VisioForge's Delphi Video Capture SDK, including setup instructions and code examples.
- [Video Processing Guide](https://www.visioforge.com/help/docs/dotnet/videocapture/video-processing/): This page provides detailed documentation on video processing features within the VisioForge Video Capture SDK for .NET, including guidelines for implementation and usage.
- [Video Capture Guide](https://www.visioforge.com/help/docs/dotnet/videocapture/guides/): A comprehensive guide for using the Video Capture SDK in .NET, providing detailed instructions and resources for developers to integrate video capture functionality into their applications.
- [Video Edit Code Samples](https://www.visioforge.com/help/docs/dotnet/videoedit/code-samples/): A resource page featuring code samples for video editing using the VisioForge .NET SDK, designed to assist developers in implementing video editing features in their applications.
- [Video Capture Installation](https://www.visioforge.com/help/docs/delphi/videocapture/install/): Installation guide for the VisioForge Video Capture SDK in Delphi, providing step-by-step instructions and resources for users to set up the software effectively.
- [VisioForge Deployment Guide](https://www.visioforge.com/help/docs/dotnet/deployment-x/): A comprehensive guide on deploying VisioForge's .NET components, detailing the necessary steps and requirements for successful implementation in applications.
- [VisioForge Avalonia Installation](https://www.visioforge.com/help/docs/dotnet/install/avalonia/): This page provides installation instructions for the Avalonia framework in .NET applications, detailing the necessary steps and requirements for setup.
- [Media Blocks Sources](https://www.visioforge.com/help/docs/dotnet/mediablocks/Sources/): This page provides detailed documentation on the Media Blocks Sources component of VisioForge, outlining its features and usage for .NET developers.
- [Audio Rendering Guide](https://www.visioforge.com/help/docs/dotnet/mediablocks/AudioRendering/): This page provides documentation for the Audio Rendering feature of VisioForge's Media Blocks, detailing its functionality and integration within .NET applications.
- [Video Capture Sources](https://www.visioforge.com/help/docs/dotnet/videocapture/video-sources/): A comprehensive guide on video sources available in VisioForge's Video Capture SDK, detailing various input options and configurations for developers.
- [Video Rendering Guide](https://www.visioforge.com/help/docs/dotnet/mediablocks/VideoRendering/): This page provides documentation for the Video Rendering feature of VisioForge's Media Blocks in .NET, detailing its functionalities and usage for developers.
- [Network Streaming WMV](https://www.visioforge.com/help/docs/delphi/videocapture/network-streaming-wmv/): This page provides documentation for using the VisioForge Video Capture SDK to stream WMV video over a network, detailing setup and implementation steps in Delphi.
- [Audio Processing Guide](https://www.visioforge.com/help/docs/dotnet/mediablocks/AudioProcessing/): The Audio Processing section of VisioForge documentation provides detailed information on the audio processing capabilities within their media blocks, including features and usage examples for developers.
- [Video Editing Transitions](https://www.visioforge.com/help/docs/dotnet/videoedit/transitions/): This page provides detailed information on video transitions available in the VisioForge Video Edit SDK, including descriptions, usage examples, and implementation guidance for developers.
- [Video Capture DV](https://www.visioforge.com/help/docs/delphi/videocapture/video-capture-dv/): This page provides detailed documentation on using VisioForge's Video Capture SDK for capturing DV video, including setup instructions and code examples for Delphi developers.
- [Audio Output Guide](https://www.visioforge.com/help/docs/delphi/videocapture/audio-output/): This page provides detailed documentation on audio output features in the VisioForge Video Capture SDK for Delphi, including setup instructions and usage examples.
- [Video Capture Software](https://www.visioforge.com/help/docs/dotnet/videocapture/3rd-party-software/): This page provides information on third-party software compatibility with VisioForge Video Capture SDK, detailing supported applications and integration options.
- [VisioForge .NET Initialization](https://www.visioforge.com/help/docs/dotnet/init/): The initialization documentation for VisioForge's .NET SDK, detailing the setup process and essential configuration steps for developers.
- [Video Edit Deployment](https://www.visioforge.com/help/docs/dotnet/videoedit/deployment/): This page provides detailed guidance on deploying the VisioForge Video Edit SDK in .NET applications, including installation instructions and configuration tips.
- [Video Encoder Documentation](https://www.visioforge.com/help/docs/dotnet/mediablocks/VideoEncoders/): This page provides detailed documentation on video encoders within the VisioForge Media Blocks for .NET, outlining their features, usage, and implementation guidelines.
- [VisioForge MAUI Installation](https://www.visioforge.com/help/docs/dotnet/install/maui/): This page provides installation instructions for integrating VisioForge components into .NET MAUI applications, offering a comprehensive guide for developers.
- [Video Capture Resize](https://www.visioforge.com/help/docs/delphi/videocapture/resize-crop/): This page provides detailed documentation on the video capture features of the VisioForge SDK, specifically focusing on the resizing and cropping functionalities available in Delphi.
- [Audio Capture MP3](https://www.visioforge.com/help/docs/delphi/videocapture/audio-capture-mp3/): This page provides documentation for the VisioForge Audio Capture MP3 component in Delphi, detailing its features and functionalities for capturing audio in MP3 format.
- [System Requirements Guide](https://www.visioforge.com/help/docs/dotnet/system-requirements/): System requirements for VisioForge's .NET products, detailing the necessary specifications and configurations for optimal performance.
- [Video Editing with FFmpeg](https://www.visioforge.com/help/docs/dotnet/videoedit-ffmpeg/): This page provides documentation for the Video Edit SDK using FFmpeg, detailing its features, usage, and integration for developers looking to implement video editing capabilities in their applications.
- [Video Capture Resize Crop](https://www.visioforge.com/help/docs/dotnet/videocapture/video-processing/resize-crop/): This page provides detailed information on the video processing features of VisioForge's .NET Video Capture SDK, specifically focusing on resizing and cropping video streams. It includes guidelines and examples for implementing these functionalities in applications.
- [Show First Frame](https://www.visioforge.com/help/docs/dotnet/mediaplayer/code-samples/show-first-frame/): A code sample page from VisioForge demonstrating how to display the first frame of a media file using their Media Player SDK in .NET applications.
- [Avalonia Media Player Guide](https://www.visioforge.com/help/docs/dotnet/mediaplayer/guides/avalonia-player/): A guide for integrating the VisioForge Media Player into Avalonia applications, providing detailed instructions and code examples for developers.
- [Facebook Network Streaming](https://www.visioforge.com/help/docs/dotnet/general/network-streaming/facebook/): A guide on using VisioForge's .NET library for network streaming to Facebook, detailing setup and implementation instructions.
- [Text Overlay Example](https://www.visioforge.com/help/docs/dotnet/videoedit/code-samples/add-text-overlay/): A code sample page from VisioForge demonstrating how to add a text overlay to videos using their .NET video editing library.
- [Video Capture Installation](https://www.visioforge.com/help/docs/delphi/videocapture/install/visual-basic-6/): This page provides installation instructions for integrating VisioForge Video Capture SDK with Visual Basic 6, including setup steps and essential configuration details.
- [DV Camcorder Control](https://www.visioforge.com/help/docs/dotnet/videocapture/video-sources/dv-camcorder-control/): This page provides detailed information on controlling DV camcorders using VisioForge's video capture SDK, including features, functionalities, and implementation guidelines.
- [Audio Visualizers Guide](https://www.visioforge.com/help/docs/dotnet/mediablocks/AudioVisualizers/): This page provides documentation for the Audio Visualizers feature in VisioForge's .NET Media Blocks, detailing its functionalities and usage for developers.
- [Screen Capture Tutorial](https://www.visioforge.com/help/docs/dotnet/videocapture/video-tutorials/screen-capture-wmv/): A tutorial page from VisioForge that provides step-by-step guidance on capturing screen video in WMV format using their software tools.
- [Video Capture Devices](https://www.visioforge.com/help/docs/dotnet/videocapture/video-sources/video-capture-devices/): A detailed guide on video capture devices available in the VisioForge .NET SDK, providing information on how to utilize various video sources for capturing video streams.
- [Webcam Capture Tutorial](https://www.visioforge.com/help/docs/dotnet/videocapture/video-tutorials/webcam-capture-text-overlay/): A tutorial page on VisioForge that demonstrates how to capture webcam video and overlay text using their .NET video capture library.
- [Image Overlay Example](https://www.visioforge.com/help/docs/dotnet/videoedit/code-samples/add-image-overlay/): This page provides code samples for adding image overlays using the VisioForge Video Edit SDK, demonstrating how to enhance video projects with visual elements.
- [Video Editing Segments](https://www.visioforge.com/help/docs/dotnet/videoedit/code-samples/several-segments/): This page provides code samples for using the VisioForge Video Edit SDK to create projects with multiple video segments, demonstrating practical implementation for developers.
- [RTSP Network Streaming](https://www.visioforge.com/help/docs/dotnet/general/network-streaming/rtsp/): This page provides detailed information on RTSP network streaming using VisioForge's .NET components, including setup instructions and usage examples for developers.
- [Video Capture Installation](https://www.visioforge.com/help/docs/delphi/videocapture/install/delphi/): This page provides installation instructions for the VisioForge Video Capture SDK in Delphi, detailing the necessary steps to integrate the software into Delphi projects.
- [UDP Network Streaming](https://www.visioforge.com/help/docs/dotnet/general/network-streaming/udp/): This page provides detailed information on UDP network streaming using VisioForge's .NET SDK, including setup instructions and code examples for developers.
- [Video Capture Tutorial](https://www.visioforge.com/help/docs/dotnet/videocapture/video-tutorials/video-capture-camera-avi/): A tutorial page from VisioForge demonstrating how to capture video from a camera and save it in AVI format using their .NET SDK.
- [Video Transition Sample](https://www.visioforge.com/help/docs/dotnet/videoedit/code-samples/transition-video/): This page provides code samples for implementing video transitions using VisioForge's .NET video editing library, demonstrating how to enhance video projects with smooth transitions.
- [Extract Video Frame](https://www.visioforge.com/help/docs/dotnet/mediaplayer/code-samples/get-frame-from-video-file/): This page provides a code sample for using the VisioForge Media Player SDK to extract a frame from a video file in .NET applications. It includes clear instructions and example code for developers.
- [Video Capture Guide](https://www.visioforge.com/help/docs/dotnet/videocapture/video-capture/mpeg2-camcorder/): This page provides detailed information on using the VisioForge Video Capture SDK for MPEG-2 camcorder support, including features, setup instructions, and implementation examples.
- [AWS Media Blocks Guide](https://www.visioforge.com/help/docs/dotnet/mediablocks/AWS/): The AWS Media Blocks documentation page on VisioForge provides detailed information and guidelines for utilizing Amazon Web Services integration within their media processing solutions.
- [FLAC Audio Encoder Guide](https://www.visioforge.com/help/docs/dotnet/general/audio-encoders/flac/): This page provides detailed information about the FLAC audio encoder in VisioForge's .NET framework, including its features, usage, and integration options for audio processing applications.
- [Audio Envelope Example](https://www.visioforge.com/help/docs/dotnet/videoedit/code-samples/audio-envelope/): This page provides code samples for implementing audio envelope features using VisioForge's video editing SDK in .NET applications. It serves as a practical guide for developers looking to enhance audio processing in their projects.
- [Network Streaming SRT](https://www.visioforge.com/help/docs/dotnet/general/network-streaming/srt/): A guide on implementing SRT (Secure Reliable Transport) streaming in .NET applications using VisioForge's tools, detailing setup and usage for network streaming.
- [Output File from Multiple Sources](https://www.visioforge.com/help/docs/dotnet/videoedit/code-samples/output-file-from-multiple-sources/): A code sample page from VisioForge demonstrating how to output a video file from multiple sources using their .NET video editing SDK.
- [VU Meter Code Samples](https://www.visioforge.com/help/docs/dotnet/general/code-samples/vu-meters/): A code sample page from VisioForge demonstrating how to implement VU meters in .NET applications using their SDK.
- [Video Capture Guide](https://www.visioforge.com/help/docs/dotnet/videocapture/video-capture/separate-capture/): This page provides detailed information on the separate video capture feature in VisioForge's .NET SDK, including guidance on implementation and usage for developers.
- [Multiple Audio Streams](https://www.visioforge.com/help/docs/dotnet/videoedit/code-samples/multiple-audio-streams-avi/): This page provides code samples for implementing multiple audio streams in AVI files using the VisioForge Video Edit SDK, demonstrating practical applications for developers.
- [RTSP Stream Saving](https://www.visioforge.com/help/docs/dotnet/mediablocks/Guides/rtsp-save-original-stream/): This page provides a guide on how to save the original RTSP stream using VisioForge's .NET Media Blocks, detailing the necessary steps and code examples for implementation.
- [Camera Recording MAUI](https://www.visioforge.com/help/docs/dotnet/videocapture/maui/camera-recording-maui/): This page provides documentation for implementing camera recording in .NET MAUI applications using VisioForge's Video Capture SDK, detailing setup and usage instructions.
- [VisioForge .NET Documentation](https://www.visioforge.com/help/docs/dotnet/general/): The general documentation page for VisioForge's .NET SDK, providing essential information and resources for developers to integrate video processing and streaming capabilities into their applications.
- [Video Mixing Guide](https://www.visioforge.com/help/docs/dotnet/videocapture/video-processing/video-mixing/): This page provides detailed information on video mixing capabilities using VisioForge's .NET Video Capture SDK, including features and implementation guidelines.
- [VisioForge 64-bit Installation](https://www.visioforge.com/help/docs/delphi/general/install-64bit/): Installation guide for the 64-bit version of VisioForge software in Delphi, providing step-by-step instructions for setup and configuration.
- [Screen Capture Tutorial](https://www.visioforge.com/help/docs/dotnet/videocapture/video-tutorials/screen-capture-mp4/): A tutorial page from VisioForge demonstrating how to capture screen video and save it as MP4 using their .NET Video Capture SDK.
- [Adobe Flash Streaming](https://www.visioforge.com/help/docs/dotnet/general/network-streaming/adobe-flash/): A comprehensive guide on network streaming with Adobe Flash using VisioForge's tools, detailing setup, configuration, and usage for developers.
- [IP Camera Capture Tutorial](https://www.visioforge.com/help/docs/dotnet/videocapture/video-tutorials/ip-camera-capture-mp4/): This page provides a tutorial on capturing video from IP cameras using the VisioForge SDK, specifically focusing on saving the output in MP4 format. It includes step-by-step instructions and code examples for developers.
- [NDI Network Streaming](https://www.visioforge.com/help/docs/dotnet/general/network-streaming/ndi/): This page provides information on network streaming using NDI technology within the VisioForge .NET framework, detailing setup and usage for developers.
- [RTMP Network Streaming](https://www.visioforge.com/help/docs/dotnet/general/network-streaming/rtmp/): This page provides detailed information on RTMP (Real-Time Messaging Protocol) network streaming using VisioForge's .NET library, including setup instructions and usage guidelines.
- [Media Player Fragment Sample](https://www.visioforge.com/help/docs/dotnet/mediaplayer/code-samples/play-fragment-file/): This page provides a code sample for using the VisioForge Media Player SDK to play a fragment of a media file, demonstrating key functionality and implementation in .NET applications.
- [Screen Capture Tutorial](https://www.visioforge.com/help/docs/dotnet/videocapture/video-tutorials/screen-capture-avi/): A tutorial page from VisioForge that demonstrates how to capture screen video and save it as an AVI file using their .NET SDK.
- [VisioForge macOS Deployment](https://www.visioforge.com/help/docs/dotnet/deployment-x/macOS/): This page provides detailed instructions for deploying VisioForge applications on macOS, including system requirements and setup guidelines.
- [Output Formats Guide](https://www.visioforge.com/help/docs/dotnet/general/output-formats/): A comprehensive guide on the various output formats supported by VisioForge's .NET SDK, detailing the options available for video and audio file conversion and playback.
- [VisioForge Media Player Deployment](https://www.visioforge.com/help/docs/delphi/mediaplayer/deployment/): This page provides detailed instructions for deploying the VisioForge Media Player in Delphi applications, including setup and configuration guidelines.
- [Picture-in-Picture Example](https://www.visioforge.com/help/docs/dotnet/videoedit/code-samples/picture-in-picture/): A code sample page from VisioForge demonstrating how to implement a picture-in-picture effect in video editing using their .NET SDK.
- [Reverse Video Playback](https://www.visioforge.com/help/docs/dotnet/mediaplayer/code-samples/reverse-video-playback/): This page provides code samples for implementing reverse video playback using the VisioForge Media Player SDK in .NET applications. It includes practical examples to help developers integrate this feature effectively.
- [VisioForge Ubuntu Deployment](https://www.visioforge.com/help/docs/dotnet/deployment-x/Ubuntu/): This page provides detailed instructions for deploying VisioForge applications on Ubuntu, including system requirements and setup guidelines.
- [OBS Streaming Guide](https://www.visioforge.com/help/docs/dotnet/videocapture/3rd-party-software/obs-streaming/): A guide on integrating VisioForge Video Capture SDK with OBS Studio for streaming, detailing setup steps and configurations for optimal performance.
- [WMA Audio Encoder Guide](https://www.visioforge.com/help/docs/dotnet/general/audio-encoders/wma/): This page provides detailed information about WMA audio encoders offered by VisioForge, including their features and usage within .NET applications.
- [MP3 Audio Encoder Guide](https://www.visioforge.com/help/docs/dotnet/general/audio-encoders/mp3/): This page provides detailed information about MP3 audio encoders offered by VisioForge, including their features and usage in .NET applications.
- [Media Player Installation](https://www.visioforge.com/help/docs/delphi/mediaplayer/install/): Installation guide for the VisioForge Media Player SDK in Delphi, providing step-by-step instructions and essential information for developers.
- [Memory Playback Example](https://www.visioforge.com/help/docs/dotnet/mediaplayer/code-samples/memory-playback/): A code sample page from VisioForge demonstrating memory playback functionality using their Media Player SDK for .NET applications.
- [Webcam Photo Capture](https://www.visioforge.com/help/docs/dotnet/videocapture/guides/make-photo-using-webcam/): A guide on the VisioForge website detailing how to capture photos using a webcam with their Video Capture SDK, providing step-by-step instructions and code examples for developers.
- [Volume Control Example](https://www.visioforge.com/help/docs/dotnet/videoedit/code-samples/volume-for-track/): This page provides code samples for adjusting the volume of individual tracks using the VisioForge Video Edit SDK in .NET applications. It serves as a practical guide for developers looking to implement audio control features in their video editing projects.
- [MP4 Output Formats](https://www.visioforge.com/help/docs/dotnet/general/output-formats/mp4/): This page provides detailed information on the MP4 output format supported by VisioForge, including its features, usage, and integration within .NET applications.
- [HTTP MJPEG Streaming](https://www.visioforge.com/help/docs/dotnet/general/network-streaming/http-mjpeg/): This page provides detailed information on how to implement HTTP MJPEG streaming using VisioForge's .NET components, including setup instructions and code examples.
- [Webcam Video Capture](https://www.visioforge.com/help/docs/dotnet/videocapture/video-tutorials/video-capture-webcam-wmv/): A tutorial page from VisioForge demonstrating how to capture video from a webcam and save it as a WMV file using their .NET SDK.
- [Nvidia Media Blocks](https://www.visioforge.com/help/docs/dotnet/mediablocks/Nvidia/): This page provides documentation for the Nvidia Media Blocks in the VisioForge .NET SDK, detailing features, usage, and implementation guidelines for developers.
- [VisioForge Video Edit Changelog](https://www.visioforge.com/help/docs/delphi/videoedit/changelog/): Changelog page for VisioForge's Delphi Video Edit SDK, detailing updates, enhancements, and bug fixes for the software.
- [Video Capture Installation](https://www.visioforge.com/help/docs/delphi/videocapture/install/visual-studio/): Installation guide for integrating VisioForge Video Capture SDK with Visual Studio, providing step-by-step instructions and resources for developers.
- [VisioForge Documentation](https://www.visioforge.com/help/docs/dotnet/deployment-x/Windows/): This page provides detailed guidance on deploying VisioForge's .NET components on Windows, including installation steps and configuration tips for developers.
- [HLS Streaming Guide](https://www.visioforge.com/help/docs/dotnet/general/network-streaming/hls-streaming/): This page provides information on HLS streaming using VisioForge's .NET framework, detailing features, implementation guidelines, and technical support for developers.
- [Webcam Capture Guide](https://www.visioforge.com/help/docs/dotnet/videocapture/guides/webcam-capture-directshow/): A guide on how to capture webcam video using DirectShow in .NET applications, featuring detailed instructions and code examples.
- [Vorbis Audio Encoder Guide](https://www.visioforge.com/help/docs/dotnet/general/audio-encoders/vorbis/): This page provides detailed information about the Vorbis audio encoder within the VisioForge framework, including its features, implementation guidelines, and technical specifications.
- [Computer Vision Deployment](https://www.visioforge.com/help/docs/dotnet/deployment-x/computer-vision/): A detailed guide on deploying computer vision applications using VisioForge's .NET framework, providing essential instructions and resources for developers.
- [Demuxers Documentation](https://www.visioforge.com/help/docs/dotnet/mediablocks/Demuxers/): This page provides documentation for the Demuxers feature in VisioForge's .NET Media Blocks, detailing its functionality and usage for media processing applications.
- [VisioForge Playlist API](https://www.visioforge.com/help/docs/dotnet/mediaplayer/code-samples/playlist-api/): This page provides code samples for using the Playlist API in VisioForge's Media Player, demonstrating how to manage and manipulate media playlists programmatically.
- [Video Editing Console Sample](https://www.visioforge.com/help/docs/dotnet/videoedit/code-samples/video-images-console/): This page provides code samples for using the VisioForge Video Edit SDK in a console application, focusing on video image manipulation features.
- [Webcam Capture Tutorial](https://www.visioforge.com/help/docs/dotnet/videocapture/video-tutorials/video-capture-webcam-mp4/): A tutorial page by VisioForge that demonstrates how to capture video from a webcam and save it as an MP4 file using their .NET SDK.
- [Video Effects Documentation](https://www.visioforge.com/help/docs/dotnet/general/video-effects/): A comprehensive guide to video effects in the VisioForge .NET SDK, detailing various features and functionalities for enhancing video playback and processing.
- [VisioForge Installation Guide](https://www.visioforge.com/help/docs/delphi/general/install-otares/): Installation guide for the VisioForge OTA Res plugin, providing step-by-step instructions for integrating it into Delphi environments.
- [VisioForge Player Guide](https://www.visioforge.com/help/docs/dotnet/mediablocks/GettingStarted/player/): This page provides a comprehensive guide to getting started with the VisioForge Media Player in .NET, including setup instructions and code examples for integrating media playback functionality.
- [Video Capture Guide](https://www.visioforge.com/help/docs/dotnet/videocapture/video-capture/mpeg2-tvtuner/): This page provides documentation for using the MPEG2 TV tuner feature in the VisioForge Video Capture SDK, detailing its functionality and integration within .NET applications.
- [Network Streaming AWS S3](https://www.visioforge.com/help/docs/dotnet/general/network-streaming/aws-s3/): This page provides documentation on using VisioForge's .NET library for network streaming with AWS S3, detailing setup, configuration, and usage examples.
- [VisioForge Media Player Changelog](https://www.visioforge.com/help/docs/delphi/mediaplayer/changelog/): Changelog page for VisioForge's Delphi Media Player, detailing updates, enhancements, and bug fixes for the software.
- [Media Pipeline Guide](https://www.visioforge.com/help/docs/dotnet/mediablocks/GettingStarted/pipeline/): A guide for developers on creating media processing pipelines using VisioForge's .NET framework, detailing the essential components and steps to get started.
- [WAV Audio Encoder Guide](https://www.visioforge.com/help/docs/dotnet/general/audio-encoders/wav/): This page provides detailed information about WAV audio encoding options available in VisioForge's .NET framework, including features and usage guidelines.
- [FFmpeg Output Formats](https://www.visioforge.com/help/docs/dotnet/general/output-formats/ffmpeg-exe/): This page provides detailed information on using FFmpeg with VisioForge's .NET libraries, outlining various output formats and configuration options for video processing.
- [VisioForge Media Block Parsers](https://www.visioforge.com/help/docs/dotnet/mediablocks/Parsers/): This page provides detailed documentation on the Media Blocks Parsers in the VisioForge .NET SDK, outlining their functionalities and usage for media processing applications.
- [Video Capture Documentation](https://www.visioforge.com/help/docs/dotnet/videocapture/video-capture/dv/): This page provides detailed documentation for the VisioForge Video Capture SDK, specifically focusing on digital video (DV) capture features and functionalities. It serves as a resource for developers looking to implement video capture solutions in their applications.
- [VisioForge Android Deployment](https://www.visioforge.com/help/docs/dotnet/deployment-x/Android/): This page provides detailed instructions for deploying VisioForge's .NET solutions on Android, including setup, configuration, and troubleshooting tips.
- [YouTube Network Streaming](https://www.visioforge.com/help/docs/dotnet/general/network-streaming/youtube/): A guide on how to stream video from YouTube using VisioForge's .NET SDK, providing detailed instructions and examples for developers.
- [Network Streaming WMV](https://www.visioforge.com/help/docs/dotnet/general/network-streaming/wmv/): This page provides detailed information on network streaming capabilities for WMV using VisioForge's .NET SDK, including setup instructions and code examples.
- [WMV Output Formats](https://www.visioforge.com/help/docs/dotnet/general/output-formats/wmv/): This page provides detailed information about WMV output format options available in VisioForge's .NET SDK, including features, settings, and usage guidelines for developers.
- [Video Processing Effects](https://www.visioforge.com/help/docs/dotnet/videocapture/video-processing/video-effects/): This page provides detailed information on video processing effects available in the VisioForge Video Capture SDK, including descriptions and usage examples for various video effects.
- [VisioForge Video Edit Guide](https://www.visioforge.com/help/docs/delphi/videoedit/install/): Installation guide for the VisioForge Video Edit SDK in Delphi, providing step-by-step instructions and necessary resources for users.
- [Face Detection Guide](https://www.visioforge.com/help/docs/dotnet/videocapture/computer-vision/face-detection/): This page provides documentation on implementing face detection using VisioForge's Video Capture SDK, offering guidance on computer vision capabilities for developers.
- [AVI Output Formats](https://www.visioforge.com/help/docs/dotnet/general/output-formats/avi/): This page provides detailed information about the AVI output format supported by VisioForge's .NET SDK, including its features and usage guidelines for developers.
- [Video Decoders Guide](https://www.visioforge.com/help/docs/dotnet/mediablocks/VideoDecoders/): This page provides documentation for Video Decoders in the VisioForge Media Blocks for .NET, detailing their functionalities and usage within multimedia applications.
- [Start Video Capture Sync](https://www.visioforge.com/help/docs/dotnet/videocapture/guides/start-in-sync/): A guide on the VisioForge website detailing how to start video capture in sync with audio, providing step-by-step instructions for developers using the .NET framework.
- [Speex Audio Encoder](https://www.visioforge.com/help/docs/dotnet/general/audio-encoders/speex/): This page provides detailed information about the Speex audio encoder within the VisioForge .NET framework, including its features and usage guidelines for developers.
- [Camera Integration Guide](https://www.visioforge.com/help/docs/dotnet/mediablocks/GettingStarted/camera/): A guide on using the VisioForge Media Blocks for accessing and integrating camera functionality in .NET applications.
- [Adding Video with Audio](https://www.visioforge.com/help/docs/dotnet/videoedit/code-samples/adding-video-file-with-multiple-audio-streams/): This page provides code samples for adding video files with multiple audio streams using VisioForge's video editing library in .NET, demonstrating practical implementation for developers.
- [VisioForge iOS Deployment](https://www.visioforge.com/help/docs/dotnet/deployment-x/iOS/): This page provides detailed instructions for deploying VisioForge's .NET applications on iOS, including setup requirements and configuration steps.
- [VisioForge Documentation](https://www.visioforge.com/documentation): The documentation page of VisioForge provides comprehensive resources and guides for users to effectively utilize the company's multimedia software solutions.
- [WebM Output Format](https://www.visioforge.com/help/docs/dotnet/general/output-formats/webm/): This page provides detailed information about the WebM output format supported by VisioForge, including its features and usage in video processing applications.
- [FFmpeg Streaming Guide](https://www.visioforge.com/help/docs/dotnet/videocapture/3rd-party-software/ffmpeg-streaming/): This page provides detailed documentation on integrating FFmpeg streaming with VisioForge's Video Capture SDK, offering guidelines and examples for developers.
- [IP Camera Preview Tutorial](https://www.visioforge.com/help/docs/dotnet/videocapture/video-tutorials/ip-camera-preview/): A tutorial page by VisioForge demonstrating how to preview IP camera feeds using their video capture SDK, providing step-by-step guidance for developers.
- [Video Capture Installation Guide](https://www.visioforge.com/help/docs/delphi/videocapture/install/builder/): A guide for installing and building the Video Capture SDK in Delphi, providing step-by-step instructions and resources for developers.
- [AAC Audio Encoder Guide](https://www.visioforge.com/help/docs/dotnet/general/audio-encoders/aac/): This page provides detailed information about the AAC audio encoder within the VisioForge framework, including its features, usage, and integration options for developers.
- [Custom Output Formats](https://www.visioforge.com/help/docs/dotnet/general/output-formats/custom/): This page provides detailed information on custom output formats available in VisioForge's .NET SDK, offering developers guidance on how to implement and utilize these formats in their applications.
- [Text Overlay Effects](https://www.visioforge.com/help/docs/dotnet/general/video-effects/text-overlay/): This page provides detailed information about the text overlay video effect feature in VisioForge's .NET library, including usage guidelines and examples for developers.
- [OpenCV Media Blocks](https://www.visioforge.com/help/docs/dotnet/mediablocks/OpenCV/): This page provides documentation for the OpenCV media blocks in VisioForge's .NET SDK, detailing how to implement and utilize OpenCV functionalities within multimedia applications.
- [Camera Control PTZ](https://www.visioforge.com/help/docs/dotnet/videocapture/video-sources/video-capture-devices/camera-control-ptz/): This page provides detailed information on camera control for PTZ (Pan-Tilt-Zoom) features in video capture devices, including configuration and usage guidelines within the VisioForge framework.
- [Network Streaming Guide](https://www.visioforge.com/help/docs/dotnet/general/network-streaming/): This page provides detailed information on network streaming capabilities in VisioForge's .NET SDK, including implementation guidelines and usage examples.
- [Enable Camera Light](https://www.visioforge.com/help/docs/dotnet/videocapture/video-sources/video-capture-devices/enable-camera-light/): This page provides information on how to enable the camera light for video capture devices using VisioForge's .NET library, including detailed instructions and code examples.
- [Video Encoders Guide](https://www.visioforge.com/help/docs/dotnet/general/video-encoders/): A comprehensive guide on video encoders offered by VisioForge, detailing their features, capabilities, and integration within .NET applications.
- [Video Edit Installation Guide](https://www.visioforge.com/help/docs/delphi/videoedit/install/visual-studio/): Installation guide for integrating VisioForge Video Edit SDK with Visual Studio, providing step-by-step instructions and necessary resources.
- [VisioForge Media Outputs](https://www.visioforge.com/help/docs/dotnet/mediablocks/Outputs/): The Outputs section of VisioForge's documentation provides detailed information on the various media output options available in their .NET framework, enabling developers to efficiently manage and configure output settings for multimedia applications.
- [MKV Output Formats](https://www.visioforge.com/help/docs/dotnet/general/output-formats/mkv/): This page provides detailed information about the MKV output format supported by VisioForge, including its features and usage within the .NET framework.
- [TV Tuner Guide](https://www.visioforge.com/help/docs/dotnet/videocapture/video-sources/tv-tuner/): This page provides detailed information about using TV tuner video sources in VisioForge's video capture SDK, including setup instructions and configuration options.
- [Mov Output Formats](https://www.visioforge.com/help/docs/dotnet/general/output-formats/mov/): This page provides detailed information about the MOV output format supported by VisioForge, including its features, usage, and technical specifications for developers.
- [Device Enumeration Guide](https://www.visioforge.com/help/docs/dotnet/mediablocks/GettingStarted/device-enum/): This page provides a guide on enumerating available media devices using VisioForge's .NET libraries, offering developers essential information for integrating device functionality into their applications.
- [VisioForge Delphi Video Edit](https://www.visioforge.com/help/docs/delphi/videoedit/install/delphi/): Installation guide for VisioForge's video editing components in Delphi, providing step-by-step instructions for setting up the software.
- [Audio Sample Grabber](https://www.visioforge.com/help/docs/dotnet/general/audio-effects/audio-sample-grabber/): This page provides detailed information about the Audio Sample Grabber feature in VisioForge, outlining its functionality and usage within audio processing applications.
- [AV1 Video Encoder Guide](https://www.visioforge.com/help/docs/dotnet/general/video-encoders/av1/): A detailed guide on AV1 video encoders provided by VisioForge, outlining their features, capabilities, and integration within .NET applications.
- [MXF Output Formats](https://www.visioforge.com/help/docs/dotnet/general/output-formats/mxf/): This page provides detailed information about the MXF output format supported by VisioForge, including its features and usage within their software solutions.
- [VisioForge Delphi Media Player](https://www.visioforge.com/help/docs/delphi/mediaplayer/install/delphi/): Installation guide for the VisioForge Media Player in Delphi, providing detailed instructions and resources for developers to integrate the media player into their applications.
- [Video Capture Guide](https://www.visioforge.com/help/docs/dotnet/general/guides/video-capture-to-mpegts/): A guide on using VisioForge's .NET library for capturing video and encoding it to MPEG-TS format, providing step-by-step instructions and code examples.
- [Video Capture Crossbar](https://www.visioforge.com/help/docs/dotnet/videocapture/video-sources/video-capture-devices/crossbar/): This page provides detailed information about the crossbar functionality for video capture devices in the VisioForge .NET SDK, including configuration options and usage guidelines.
- [H264 Video Encoder Guide](https://www.visioforge.com/help/docs/dotnet/general/video-encoders/h264/): This page provides detailed information about H.264 video encoding options available in VisioForge's .NET framework, including features, settings, and usage guidelines.
- [VisioForge .NET Code Samples](https://www.visioforge.com/help/docs/dotnet/general/code-samples/): A collection of code samples for .NET developers using VisioForge, demonstrating various functionalities and features of the software.
- [Uninstall DirectShow Filter](https://www.visioforge.com/help/docs/dotnet/general/code-samples/uninstall-directshow-filter/): This page provides a code sample for uninstalling a DirectShow filter using .NET, offering developers a practical solution for managing filters in multimedia applications.
- [Video Editing Installation](https://www.visioforge.com/help/docs/delphi/videoedit/install/visual-basic-6/): Installation guide for integrating VisioForge Video Edit SDK in Visual Basic 6, providing step-by-step instructions and essential resources for developers.
- [Media Player Builder Guide](https://www.visioforge.com/help/docs/delphi/mediaplayer/install/builder/): A guide for Delphi developers on how to install and configure the VisioForge Media Player SDK, providing step-by-step instructions and essential resources for effective integration.
- [Video Capture Adjustments](https://www.visioforge.com/help/docs/dotnet/videocapture/video-sources/video-capture-devices/video-adjustments/): This page provides detailed information on video capture devices and their adjustment settings within the VisioForge .NET SDK, helping developers optimize video quality for their applications.
- [Video Edit Installation Guide](https://www.visioforge.com/help/docs/delphi/videoedit/install/builder/): This page provides installation instructions for the VisioForge Video Edit SDK Builder in Delphi, detailing the necessary steps to set up the development environment for video editing applications.
- [VisioForge Media Player Installation](https://www.visioforge.com/help/docs/delphi/mediaplayer/install/visual-studio/): Installation guide for the VisioForge Media Player in Visual Studio, providing step-by-step instructions and resources for developers.
- [VP8/VP9 Video Encoding](https://www.visioforge.com/help/docs/dotnet/general/video-encoders/vp8-vp9/): This page provides detailed information about VP8 and VP9 video encoders, including their features, usage, and integration within the VisioForge framework for .NET applications.
- [Video Sample Grabber](https://www.visioforge.com/help/docs/dotnet/general/video-effects/video-sample-grabber/): This page provides detailed information about the Video Sample Grabber feature in VisioForge, outlining its functionality and usage for capturing video samples in .NET applications.
- [MPEG-TS Output Formats](https://www.visioforge.com/help/docs/dotnet/general/output-formats/mpegts/): This page provides detailed information about the MPEG-TS output format supported by VisioForge, including its features and usage in multimedia applications.
- [Camera Video Preview](https://www.visioforge.com/help/docs/dotnet/videocapture/video-tutorials/camera-video-preview/): A tutorial page from VisioForge demonstrating how to implement camera video preview functionality using their .NET Video Capture SDK.
- [HEVC Video Encoder Guide](https://www.visioforge.com/help/docs/dotnet/general/video-encoders/hevc/): This page provides detailed information about HEVC video encoders offered by VisioForge, including features, capabilities, and usage guidelines for developers.
- [WavPack Audio Encoder](https://www.visioforge.com/help/docs/dotnet/general/audio-encoders/wavpack/): This page provides detailed information about the WavPack audio encoder in the VisioForge .NET framework, including its features and usage guidelines for developers.
- [Video Capture Devices](https://www.visioforge.com/help/docs/dotnet/videocapture/video-sources/video-capture-devices/enumerate-and-select/): This page provides guidance on enumerating and selecting video capture devices using VisioForge's .NET library, offering developers essential information for integrating video sources into their applications.
- [Image Overlay Effects](https://www.visioforge.com/help/docs/dotnet/general/video-effects/image-overlay/): This page provides detailed information on the image overlay video effect feature in VisioForge's .NET SDK, including usage instructions and examples for developers.
- [GIF Output Formats](https://www.visioforge.com/help/docs/dotnet/general/output-formats/gif/): This page provides detailed information about the GIF output format supported by VisioForge, including its features, usage, and integration within .NET applications.
- [IIS Smooth Streaming](https://www.visioforge.com/help/docs/dotnet/general/network-streaming/iis-smooth-streaming/): This page provides documentation on implementing IIS Smooth Streaming with VisioForge's .NET components, detailing setup and configuration for optimal network streaming performance.
- [Opus Audio Encoder Guide](https://www.visioforge.com/help/docs/dotnet/general/audio-encoders/opus/): This page provides detailed information about the Opus audio encoder used in VisioForge's .NET framework, including its features and integration options for developers.
- [Audio Encoders Guide](https://www.visioforge.com/help/docs/dotnet/general/audio-encoders/): This page provides detailed information about various audio encoders available in the VisioForge .NET SDK, including their features and usage instructions.
- [Send Logs Documentation](https://www.visioforge.com/help/docs/dotnet/general/sendlogs/): This page provides instructions on how to send logs for troubleshooting and support in VisioForge's .NET applications, ensuring users can effectively communicate issues to the support team.
- [Video Effects Samples](https://www.visioforge.com/help/docs/dotnet/general/code-samples/3rd-party-video-effects/): A page providing code samples for integrating third-party video effects using VisioForge's .NET SDK, aimed at developers looking to enhance their video applications.
- [Custom Video Effects](https://www.visioforge.com/help/docs/dotnet/general/code-samples/custom-video-effects/): This page provides code samples for implementing custom video effects using VisioForge's .NET SDK, offering developers practical examples and guidance for enhancing video processing applications.
- [Zoom Video Renderer](https://www.visioforge.com/help/docs/dotnet/general/code-samples/zoom-video-multiple-renderer/): A code sample page from VisioForge demonstrating how to implement zoom functionality in video playback across multiple renderers using .NET.
- [USB3 Vision Camera Guide](https://www.visioforge.com/help/docs/dotnet/videocapture/video-sources/usb3v-gige-genicam/): Detailed documentation for the USB3 Vision and GigE Vision GenICam video sources in the VisioForge Video Capture SDK, providing technical specifications and usage guidelines.
- [Media Player Installation](https://www.visioforge.com/help/docs/delphi/mediaplayer/install/visual-basic-6/): This page provides installation instructions for integrating VisioForge Media Player into Visual Basic 6 applications, offering step-by-step guidance for developers.
- [Multiple Screens WPF](https://www.visioforge.com/help/docs/dotnet/general/code-samples/multiple-screens-wpf/): This page provides a code sample for implementing multiple screen support in a WPF application using VisioForge libraries, demonstrating how to capture and display content across multiple monitors.
- [Draw Multi-Text on Video](https://www.visioforge.com/help/docs/dotnet/general/code-samples/draw-multitext-onvideoframebuffer/): This page provides a code sample demonstrating how to draw multi-text on a video frame buffer using VisioForge's .NET library, offering developers a practical example for integrating text overlays in video applications.
- [Custom Image in Video](https://www.visioforge.com/help/docs/dotnet/general/code-samples/video-view-set-custom-image/): This page provides a code sample for setting a custom image in a video view using VisioForge's .NET library, demonstrating how to enhance video playback with personalized visuals.
- [Video Renderer Selection](https://www.visioforge.com/help/docs/dotnet/general/code-samples/select-video-renderer-winforms/): This page provides a code sample for selecting a video renderer in a WinForms application using VisioForge's .NET library, demonstrating the integration of video playback features.
- [Mouse Wheel Usage](https://www.visioforge.com/help/docs/dotnet/general/code-samples/mouse-wheel-usage/): A code sample page from VisioForge demonstrating the usage of mouse wheel functionality in .NET applications.
- [IP Camera Video Sources](https://www.visioforge.com/help/docs/dotnet/videocapture/video-sources/ip-cameras/): This page provides detailed information on using IP cameras as video sources with VisioForge's .NET video capture library, including setup instructions and features.
- [File Information Sample](https://www.visioforge.com/help/docs/dotnet/general/code-samples/read-file-info/): This page provides code samples for reading file information using VisioForge's .NET libraries, demonstrating how to access and display various attributes of media files.
- [Text on Video Frame](https://www.visioforge.com/help/docs/dotnet/general/code-samples/text-onvideoframebuffer/): This page provides code samples for adding text to video frame buffers using VisioForge's .NET SDK, demonstrating various techniques and functionalities for developers.
- [MJPEG Video Encoder Guide](https://www.visioforge.com/help/docs/dotnet/general/video-encoders/mjpeg/): This page provides detailed information about the MJPEG video encoder offered by VisioForge, including its features, usage, and integration within .NET applications.
- [Image on Video Frame](https://www.visioforge.com/help/docs/dotnet/general/code-samples/image-onvideoframebuffer/): This page provides a code sample demonstrating how to overlay an image onto a video frame buffer using VisioForge's .NET components. It serves as a practical guide for developers looking to enhance video processing applications.
- [ASF WMV Indexing](https://www.visioforge.com/help/docs/dotnet/general/code-samples/asf-wmv-files-indexing/): A guide on indexing ASF and WMV files using VisioForge's .NET SDK, featuring code samples and explanations for developers.
- [OpenGL Media Blocks](https://www.visioforge.com/help/docs/dotnet/mediablocks/OpenGL/): The OpenGL section of the VisioForge documentation provides detailed information on utilizing OpenGL media blocks within .NET applications, including implementation guidelines and API references.
- [OnVideoFrameBitmap Usage](https://www.visioforge.com/help/docs/dotnet/general/code-samples/onvideoframebitmap-usage/): This page provides code samples demonstrating the usage of the OnVideoFrameBitmap event in VisioForge's .NET libraries, allowing developers to manipulate video frames effectively.
- [Exclude Filters Code Samples](https://www.visioforge.com/help/docs/dotnet/general/code-samples/exclude-filters/): This page provides code samples for implementing exclude filters in VisioForge's .NET SDK, demonstrating how to refine video processing by excluding specific elements.
- [Video Effects Guide](https://www.visioforge.com/help/docs/dotnet/general/video-effects/add/): This page provides a detailed guide on adding video effects using VisioForge's .NET library, outlining the various effects available and how to implement them in applications.
- [Zoom on Video Frame](https://www.visioforge.com/help/docs/dotnet/general/code-samples/zoom-onvideoframebuffer/): This page provides code samples for implementing zoom functionality on video frame buffers using VisioForge's .NET framework, demonstrating practical applications for developers.
- [Custom Filter Interface](https://www.visioforge.com/help/docs/dotnet/general/code-samples/custom-filter-interface/): This page provides code samples for implementing a custom filter interface in .NET using VisioForge's SDK, offering developers guidance on enhancing video processing capabilities.
- [Screen Video Capture](https://www.visioforge.com/help/docs/dotnet/videocapture/video-sources/screen/): This page provides detailed information about the screen capture video source options available in VisioForge's Video Capture SDK for .NET, including configuration settings and usage examples.
- [ONVIF IP Camera Guide](https://www.visioforge.com/help/docs/dotnet/videocapture/video-sources/ip-cameras/onvif/): This page provides detailed information on using ONVIF-compatible IP cameras with VisioForge's video capture SDK, including setup instructions and features.
- [Video Drawing Example](https://www.visioforge.com/help/docs/dotnet/general/code-samples/draw-video-picturebox/): This page provides code samples for using VisioForge's .NET library to draw video in a PictureBox control, demonstrating practical implementation for developers.
- [RTSP IP Camera Guide](https://www.visioforge.com/help/docs/dotnet/videocapture/video-sources/ip-cameras/rtsp/): A detailed guide on using RTSP streams for IP cameras with VisioForge's video capture solutions, providing technical insights and implementation instructions.
- [NDI IP Camera Guide](https://www.visioforge.com/help/docs/dotnet/videocapture/video-sources/ip-cameras/ndi/): This page provides detailed information on using NDI (Network Device Interface) as a video source for IP cameras in the VisioForge Video Capture SDK, including setup instructions and technical specifications.
- [Decklink Video Sources](https://www.visioforge.com/help/docs/dotnet/videocapture/video-sources/decklink/): This page provides detailed information on using DeckLink video sources with VisioForge's video capture SDK, including setup and configuration instructions.
FULL: /llms-full.txt
license: CC-BY-4.0
author: VisioForge
---END OF PAGE---
# Page: https://www.visioforge.com/llms-full.txt
# Page: http://www.visioforge.com
# Video capture, editing and playback SDKs
VisioForge provides video and audio frameworks for software developers.
Our software is designed to enable the creation of applications that can capture video from various sources. It supports video recording from webcams and IP cameras compatible with popular protocols like ONVIF, RTSP, and HTTP, as well as from camcorders and PC screens. The software saves these videos in widely used formats such as MP4, WebM, and AVI.
Regarding video editing, the software provides functionalities to change video format and resolution, along with the ability to rotate and crop video files. It supports common video formats for playback, leveraging both system codecs and robust multi-codec solutions like FFMPEG integrated with VLC. This ensures a robust playback experience across various formats.
During video capture, editing, or playback, the software offers the capability to add audio and video effects and transitions and also includes features like motion detection and snapshot capture.

## VIDEO CAPTURE SDK .NET
Capture video from webcams, IP cameras, camcorders, screens, or professional video editing cards and save it in formats such as MP4, AVI, WMV, and WebM.
[PRODUCT PAGE](/video-capture-sdk-net)
## VIDEO EDIT SDK .NET
Convert, edit, and process the various video and audio formats (MP4, AVI, WMV, WebM, and others). Add image and text overlays. Edit tags.
[PRODUCT PAGE](/video-edit-sdk-net)


## MEDIA PLAYER SDK .NET
Play various video and audio formats (MP4, AVI, WMV, WebM, etc.) or network streams (RTSP/HLS/HTTP/UDP). Add image and text overlays.
[PRODUCT PAGE](/media-player-sdk-net)
## TESTIMONIALS

#### ANDREW PARISIO
Senior I.T. Systems Engineer
"We are a call center and use the VisioForge control to record 100% of our agents while they are in call. This product is easier to use, works better, and with Roman providing both responsive and amazing support it has changed our recording solution for the better. Thanks!!"

#### SANTHOSH V.
.NET developer, Xminds Solutions
"I really liked your Video Edit SDK .Net, the wonderful features it supports like the audio mixing. And yes the client support is another excellent thing considering the fact that extreme development like video processing will need good support where you meet all the needs."

#### JEREMY LITTLER
UniteCast Lead Developer
"Video Capture SDK .NET is an outstanding package for developing video-centric applications in Visual Studio. VisioForgeâs framework far surpassed the features available in other third-party SDKâs. VF has managed to provide an extremely robust solution, that integrates perfectly with current and emerging video standards."
## CLIENTS
- 


- 


- 


## PLATFORMS
The SDKs currently support the following platforms
Windows

7 and later
macOS

11 and later
x64 and ARM64 architectures
Linux

including Ubuntu, Raspberry Pi and Nvidia Jetson
iOS

12 and later
Android

11 and later
You can run the same code on multiple platforms using modern cross-platform frameworks such as MAUI and Avalonia.
## PROGRAMMING LANGUAGES
We have both high-level SDKs for developing applications in C#, VB.Net and Delphi, and low-level SDKs for developing in C++. Xamarin, MAUI, or Avalonia frameworks can be used to write cross-platform .Net applications.
C#

VB.Net

C++

Delphi

## POSSIBLE USE CASES
Leveraging VisioForge's multimedia SDKs can enable the development of various innovative applications. Here are some ideas:
### Video conferencing software
Create a state-of-the-art video conferencing application with VisioForge video and audio frameworks for developers, offering high-definition video and crystal-clear audio capabilities. Incorporate features like customizable virtual backgrounds, noise cancellation, and augmented reality filters for a more engaging meeting experience. Allow for interactive elements such as real-time screen sharing, collaborative whiteboards, and session recording. Design the interface for ease of use, ensuring smooth setup and connection even for users with minimal technical expertise. Include advanced security protocols to ensure confidential meetings remain private, making it an ideal solution for corporate, educational, and personal use.
### Security surveillance systems
Develop a comprehensive security surveillance system using VisioForge frameworks. This system could feature real-time video processing with support for multiple camera inputs, offering comprehensive coverage and high-resolution footage. Implement advanced AI algorithms for facial recognition, motion detection, and anomaly alerts to enhance security measures. The system could also include features like night vision compatibility, automatic incident recording, and instant alerts to security personnel or law enforcement. Ensure easy scalability to accommodate varying sizes of premises, from small retail stores to large industrial complexes.
### Live streaming platforms
Utilize VisioForge SDKs to build a robust live streaming platform, capable of handling high-quality video and audio streams. This platform could support multi-camera setups, allowing for dynamic angle switching during live events. Integrate real-time video effects and transitions for a professional broadcast feel. Implement adaptive bitrate streaming to ensure optimal viewing experience across different devices and internet speeds. Include features for viewer interaction like live chats, polls, and Q&A sessions. Offer monetization options such as pay-per-view, subscriptions, or advertising. Provide detailed analytics for content creators to track viewer engagement and optimize their broadcasts.
### Video editing suites
Develop a comprehensive video editing suite with video and audio frameworks for developers, catering to both amateur and professional editors. This suite could offer multi-track editing, various video effects, color correction, and audio mixing tools. Includes advanced features like chroma keying, motion tracking, and 3D editing capabilities. Ensure support for various file formats and high-resolution video output. Design the interface intuitive yet powerful, with customizable workflows and shortcuts for efficient editing.
### Custom media players
Build specialized media players with adaptive streaming, support for niche formats, and customizable interfaces. Tailor features for specific user needs in various contexts like education, entertainment, or professional use. Offer unique functionalities like enhanced accessibility options, playlist management, and integration with content libraries.
To get sample applications, please visit our [GitHub.](https://github.com/visioforge/)
---END OF PAGE---
# Page: https://www.visioforge.com/video-capture-sdk-net
[Cross-platform]
# Video Capture SDK .Net
v15.9
Our .Net SDK seamlessly integrates video capture and processing capabilities into software applications. This versatile SDK facilitates video and audio playback and supports capture from various sources, including USB webcams, IP cameras, Blackmagic Decklink cards, and camcorders. It provides comprehensive support for different output formats, including MP4, WebM, AVI, WMV, MPEG-1/2, and others. It also provides developers an extensive library of video and audio effects to enhance and customize multimedia content.
In addition, our SDK offers robust cross-platform compatibility, ensuring seamless integration with Windows, Linux, macOS, iOS, and Android environments. This cross-platform adaptability enables developers to create applications that work consistently across various operating systems and devices, providing users with a consistent and flexible multimedia experience.

#### DOWNLOADS
[Installer (Windows)](https://s3.us-west-2.amazonaws.com/files.visioforge.com/trials/visioforge\_sdks\_installer\_dotnet\_setup.exe)[NuGet installation guide](https://www.visioforge.com/help/docs/dotnet/install/)[Samples on GitHub](https://github.com/visioforge/.Net-SDK-s-samples)

#### BUY
[Check prices or order](/buy)

#### HELP
[Online helpâ](https://www.visioforge.com/help/docs/dotnet/videocapture/)[Changelogâ](https://www.visioforge.com/help/docs/dotnet/changelog/)[License agreementâ](/help/docs/eula/)

## SDK STRUCTURE
The SDK is highly compatible with more than 10 video and audio input sources and supports more than 20 output formats. It offers developers flexibility by accommodating a broad range of hardware options for input and output configurations. The SDK processes both video and audio content, enabling the saving of processed data to files or streaming it over network connections.
## VIDEO CAPTURE PIPELINE
During the preview or capture stages, video and audio streams can be processed with various effects. Afterward, these streams are split and directed to encoders and audio/video renderers for further processing.


## OUTPUT FORMATS
The SDK supports a wide range of popular video, audio, and image formats and codecs, such as MP4 (using H264/HEVC for video and AAC for audio), WebM (using VP8/VP9/AV1 for video and Vorbis or OPUS for audio), as well as WMV, MP3, JPEG, GIF, and PNG.
## VIDEO PROCESSING
You can add text, images, or GIF logos, adjust brightness, contrast, saturation, or hue, resize, crop, or rotate content, and apply chroma-keying or various video effects to enhance your content.


## AUDIO PROCESSING
Incorporate an equalizer into your application, allowing users to fine-tune their audio experience. This feature allows them to adjust specific audio frequencies, such as treble, midrange, and bass, to achieve their desired sound profile. Additionally, users can normalize audio levels or amplify volume, providing precise control over the audio output. Many other audio effects are also at their disposal for further customization.
## VisioForge Video Capture SDK .Net major features include:
### Supported video and audio sources
- USB web cameras and other capture devices (including 4K devices)
- ONVIF IP cameras (PTZ and other APIs supported)
- JPEG/MJPEG, MPEG-4 and H.264 HTTP/RTSP/RTMP IP cameras/servers, HD format supported
- Blackmagic Decklink devices
- Screen capture source (including several displays) and window capture
- Speakers (loopback)
- NewTek NDI devices
- PCI capture cards
- TV Tuners (with and without internal MPEG Encoder)
- DV and HDV MPEG-2 camcorders
- FLIR/Teledyne cameras (USB3 Vision/GigE)
- Basler cameras (USB3 Vision/GigE)
- Microsoft Kinect/Kinect 2 for Windows
- Audio capture devices and sound cards
- ASIO devices
### Output video formats
- AVI (using audio/video codecs like MJPEG, DivX, XviD, and x264)
- WMV (support of custom WMV profiles. You can configure streams to use variable bit rate encoding (VBR), uncompressed audio or video stream, video size, buffer size, frame rate, etc.)
- DV and MPEG from DV/HDV Camcorders and TV Tuners with internal MPEG Encoder (DirectCapture technology)
- DV (from any video capture device)
- MPEG-1/2/4 (including VCD/SVCD/DVD profiles) and FLV using FFMPEG wrapper
- WebM (Vorbis + VP8/VP9)
- MP4 H264/HEVC + AAC output using software encoder or GPU encoder (Intel QuickSync, Nvidia CUDA/NVENC, or AMD/ATI AMF)
- All formats supported by FFMPEG.exe (including MP4 H264/HEVC)
- Custom output formats (using 3rd-party DirectShow filters)
- Animated GIF
- MOV
- MPEG-TS
### Output audio formats
- WAV (compressed or PCM)
- WMA (Windows Media Audio)
- M4A (AAC)
- MP3 (using LAME)
- FLAC
- Ogg Vorbis
- Speex
### Snapshot formats
- JPEG
- PNG
- GIF
- BMP
- System.Drawing.Bitmap
- SkiaSharp SKBitmap
### Video processing and effects (CPU/GPU)
- image overlay (including animated GIF)
- text overlay
- pan/zoom
- brightness, contrast, saturation, hue, etc.
- deinterlace
- denoise
- resize to any resolution
- chroma-key
- fade-in/fade-out
- rotate
- 3rd-party DirectShow filters support
- independent video effects for preview and output
### Audio processing and effects
- volume booster
- equalizer
- 3D-bass system
- normalization
- auto/manual gain
- there are a lot of other effects
### Network streaming formats
- HLS (HTTP Live Streaming), compatible with Android and iOS
- RTSP
- Smooth Streaming protocol to Microsoft IIS Server
- RTMP
- UDP (MPEG-TS/RTP)
- SRT
- YouTube / Facebook Live
- NDI
- WMV (Windows Media Video)
- to other media servers and devices using a virtual camera/audio source
### Other features
- Audio/video preview
- TV Tuning
- Video capture device control
- video input (crossbar interface)
- video format
- frame rate
- supports video cards with several inputs
- camera control (brightness, saturation, etc.)
- Motion detection
- Barcode reader
- OSD (On-Screen Display)
- PIP (Picture-In-Picture) (video capture sources, IP cameras, and video files are supported)
- Face detection and object tracking
- Multiple output screens support
- Timeshift
- Output to encrypted video files using the [Video Encryption SDK](/video-encryption-sdk)
- Output to [Virtual Camera SDK](/virtual-camera-sdk)
- Service applications support
- Audio/video file tags reading and writing support
- madVR video renderer support
- low latency RTSP and MJPEG streams playback from IP camera
- [OBS (Open Broadcaster Software)](https://obsproject.com/) streaming
- Face recognition
### IDE
- Visual Studio 2019 and later: Visual C#, Visual C++, Visual Basic .NET
- Visual Studio Code
- JetBrains Rider
- May be used with other .Net-compatible applications such as Microsoft Access, Word, and Excel.
### UI frameworks
- WinForms
- WPF
- WinUI 3 for Desktop
- Avalonia
- GTK#
- MAUI
- Xamarin.Mac
- Xamarin.Android
- Xamarin.iOS
### .Net versions
- .Net Framework 4.6.1 and later
- .Net Core 3.1
- .Net 5 - .Net 9
### System requirements
- Windows 10 or Windows 11
- Ubuntu 22+
- macOS 12+
### Target platforms
- Windows 11, Windows 10, Windows 8/8.1, Windows 7 SP1
- Windows Server 2016 and later
- Android 8 and later
- Linux
- macOS
- iOS
### Trial limitations
The trial version displays a watermark on the video window.
## CODE SAMPLES
### VIDEO PREVIEW
The sample code shows how to configure default video and audio sources, show video on screen, and render audio using default speakers. Default video and audio formats will be used.
### VIDEO CAPTURE TO MP4
MP4 file [capture from a web camera](https://www.visioforge.com/save-webcam)Â and microphone, with video/audio preview.
Using more code, you can set H264/HEVC and AAC settings.
By default, a GPU H264 encoder will be used (if available).
### IP RTSP CAMERA PREVIEW
RTSP camera preview with CPU/GPU video decoding and automatic codec detection.
You can use ONVIF discovery to find all IP cameras in your local network.
## SCREEN CAPTURE
SDK can capture video from a screen or specified window.
You can capture the entire screen or a specified rectangle. The frame rate can be customized.
### TEXT AND IMAGE OVERLAYS
You can add text (including scrolling), time/date, and image overlays.
SDK supports all popular image formats, including JPEG, PNG, GIF, and SVG.

#### EDITION

#### STANDARD

#### PROFESSIONAL

#### PREMIUM
Supported input devices and other sources
- Web cameras
- TV tuners and capture cards
- DV and MPEG camcorders
- Screen capture
- HTTP/RTSP/ONVIF IP cameras
- UDP, TCP, RTMP and other network streams
- Blackmagic Decklink
- DVB-T/DVB-C/DVB-S/ATSC devices (BETA)
- Microsoft Kinect for Windows
Video preview
Frame grabber
Video processing
Audio processing
HD and 4K video support
TV tuning
Network streaming in WMV format
Network streaming using RTMP/RTSP/UDP/NDI
Chroma-key
Motion detection
Video processing using DirectShow filters
OSD (On-Screen Display)
Picture-In-Picture
Changing output file name on-the-fly
Multiple output screens
GPU-accelerated video effects
Output to Virtual Camera SDK
Video Encryption SDK support
Face tracking
Output formats
- AVI
- WMV (Windows Media Video)
- WMA (Windows Media Audio)
- WAV
- MP3
- Ogg Vorbis
- Speex
- DV video
- DV/MPEG-1/2/4 (using a TV tuner with an internal MPEG encoder or DV/HDV camcorder)
- Flash Video (FLV) using FFMPEG
- WebM
- Custom output formats using external DirectShow filters
- MPEG-1/2/4 using FFMPEG
- MP4 (H264/HEVC + AAC) using software, Intel QuickSync, Nvidia NVENC/CUDA, or AMD Radeon encoders
Our software offers unlimited usage with no nag-screen, ensuring a
seamless experience. We provide a 30-day trial period so you can explore
all features before committing.
With a regular license, you
receive free minor and major upgrades for one year; after that period,
the SDK will continue functioning as before.
Alternatively, the
lifetime license provides unlimited updates indefinitely. Additionally,
we offer priority support and fixes. The regular license is billed
annually and automatically renewed each year, but you can cancel your
subscription anytime.
The SDK is free for non-commercial use. Please contact us to get a free license.
---END OF PAGE---
# Page: https://www.visioforge.com/media-player-sdk-net
[Cross-platform]
# Media Player SDK .Net
v15.9
The Media Player SDK .Net enables developers to seamlessly integrate a wide range of media playback capabilities into their applications, including support for video, audio, DVD, Blu-ray, and various network streams. This SDK also provides the ability to render overlay bitmaps and text with effects on top of the video. It offers flexibility in playback engines, allowing the use of system codecs, FFMPEG, or VLC, ensuring a wide range of compatibility and a high-quality media experience.

#### DOWNLOADS
[Installer (Windows only)](https://s3.us-west-2.amazonaws.com/files.visioforge.com/trials/visioforge\_sdks\_installer\_dotnet\_setup.exe)[NuGet installation guide](https://www.visioforge.com/help/docs/dotnet/install/)[Samples on GitHub](https://github.com/visioforge/.Net-SDK-s-samples)

#### BUY
[Check prices or order](/buy)

#### HELP
[Online helpâ](https://www.visioforge.com/help/docs/dotnet/mediaplayer/)[Changelogâ](https://www.visioforge.com/help/docs/dotnet/changelog/)[License agreementâ](/help/docs/eula/)

## SDK STRUCTURE
The SDK allows developers to select specific video and audio sources, apply a range of effects for processing, and then route the media for rendering. It is versatile and accommodates different UI frameworks by providing a unique VideoView control for each one â whether WPF, WinForms, MAUI, Avalonia, or others â ensuring seamless integration and display of media within various application interfaces.
## MEDIA PLAYBACK PIPELINE
The SDK architecture separates each media source into discrete audio and video streams. These streams are then routed to their respective decoders. After decoding, the uncompressed data is processed and can be accessed directly by a sample grabber if required. This feature is handy for real-time applications that process or analyze media samples.


## VIDEO PROCESSING
Add text, images, or GIFs to your videos to create personalized overlays. Adjust visual elements such as brightness, contrast, saturation, and hue to improve image quality. Utilize editing tools to resize, crop, or rotate footage as necessary. Apply the chroma key for green screen effects and explore a wide range of additional video effects to enhance your storytelling.
## AUDIO PROCESSING
Integrate an equalizer into your application to allow for precise audio tuning. Normalize audio levels, amplify the volume, or enhance the bass frequencies. A suite of additional audio effects is available for further refinement. Implement automatic or manual gain control to achieve optimal audio quality.


## CUSTOM UI CONTROLS
The SDK boasts a customizable interface with skin support, accommodating PNG/SVG icons, and personalized style options.
## VisioForge Media Player SDK .Net's major features include:
### Supported formats
- File formats: MP4, MKV, MOV, AVI, MPEG-TS, WMV, MXF, VOB, OGG
- Video formats: MPEG-1/2, WMV, MPEG-4, H264, HEVC, and others with the appropriate decoder
- Audio formats: AAC, MP3, Vorbis, WMA, OPUS, Speex, and others with the appropriate decoder
- MIDI, karaoke KAR, and CDG
- DVD and Blu-ray playback [Windows only]
### Video processing and effects (CPU/GPU)
- image overlay (including animated GIF)
- SVG overlay
- text overlay
- video transparency
- pan/zoom
- brightness, contrast, saturation, hue, etc.
- inverted colors
- grayscale
- deinterlace
- denoise
- fade-in/fade-out
- rotate
- resize to any resolution
- 3rd-party DirectShow filters support
- more than 30 other effects
### Audio processing and effects
- volume booster
- equalizer
- 3D-bass system
- normalization
- auto/manual gain
- a lot of other effects
### Other features
- File playback from the memory
- Seamless playback (no delay between 2 files in the playlist)
- Multiply output screens support
- Picture-in-Picture support
- 4K and 8K video files support
- GPU accelerated decoding (DXVA2/Direct3D 11/Intel QuickSync/Nvidia CUVID, AMF)
- Backward/forward seeking
- Frame capture to .Net Bitmap or BMP/JPEG/GIF/PNG files
- OSD (On-Screen Display)
- Audio streams from additional audio/video files
- Subtitles support
- MMS/WMV/RTSP/RTMP/UDP network stream playback
- Reverse playback
- Playback of encrypted video files that were created with the [Video Encryption SDK](/video-encryption-sdk)
- Motion detection
- Face detection and object detection [Windows only]
- Barcode reader
- Chroma-key
- madVR optional video renderer [Windows only]
- VR 360° video support [Windows only]
### IDE
- Visual Studio 2019 and later: Visual C#, Visual C++, Visual Basic .NET
- Visual Studio Code
- JetBrains Rider
- SDK may be used with other .Net compatible applications such as Microsoft Access, Word, Excel
### UI frameworks
- WinForms
- WPF
- WinUI 3 for Desktop
- Avalonia
- Xamarin.Android
- MacOS/MacCatalyst
- Xamarin.iOS
- MAUI
### System requirements
- Windows 10 or Windows 11
- Ubuntu 22+
- macOS 12+
### Target platforms
- Windows 11, Windows 10, Windows 8/8.1, Windows 7 SP1
- Windows Server 2016 and later
- Android 8 and later
- Linux
- macOS
- iOS
### .Net versions
- .Net Framework 4.6.1 and later
- .Net Core 3.1
- .Net 5 - .Net 9
### Distribution rights
Royalty-free distribution.
### Trial limitations
The trial version displays a watermark on the video window.

#### EDITION

#### STANDARD

#### PROFESSIONAL
Video files playback
Audio files playback
Memory stream playback
Subtitles support
HD and 4K video support
Video/audio processing and effects
Network streams playback (HTTP/RTSP/RTMP/HLS/WMV/NDI)
Chroma-key
Reverse playback
Motion detection
Video processing using
DirectShow filters (\\*)
OSD (On-Screen Display)
Frame grabber
Multiple output screens
GPU-accelerated video effects
Video Encryption SDK support (\\*)
Face tracking
Audio streams from external files
(\\*) - Windows-only
Our software offers unlimited usage with no nag-screen, ensuring a
seamless experience. We provide a 30-day trial period so you can explore
all features before committing.
With a regular license, you
receive free minor and major upgrades for one year; after that period,
the SDK will continue functioning as before.
Alternatively, the
lifetime license provides unlimited updates indefinitely. Additionally,
we offer priority support and fixes. The regular license is billed
annually and automatically renewed each year, but you can cancel your
subscription anytime.
The SDK is free for non-commercial use. Please contact us to get a free license.
---END OF PAGE---
# Page: https://www.visioforge.com/video-edit-sdk-net
# Video Edit SDK .Net
v15.9
The VisioForge Video Edit SDK .Net allows programmers to integrate advanced video editing and processing capabilities into their software applications. With this SDK, you can create custom movies by combining audio and video files, applying various effects, and smoothly transitioning between tracks. The SDK provides robust support for popular video formats, including MP4, WebM, AVI, WMV, Matroska, MPEG-1/2/4, and others. It also offers the flexibility to work with additional file formats using third-party DirectShow filters. Moreover, you can export audio in the most popular formats, including MP3, AAC/M4A, OGG Vorbis, Windows Media Audio, OPUS, Speex, and WAV, adding versatility to your multimedia projects.

#### DOWNLOADS
[Installer](https://s3.us-west-2.amazonaws.com/files.visioforge.com/trials/visioforge\_sdks\_installer\_dotnet\_setup.exe)[NuGet installation guide](https://www.visioforge.com/help/docs/dotnet/install/)[Samples on GitHub](https://github.com/visioforge/.Net-SDK-s-samples)

#### BUY
[Check prices or order](/buy)

#### HELP
[Online helpâ](/help/docs/dotnet/videoedit/)[Changelogâ](https://www.visioforge.com/help/docs/dotnet/changelog/)[License agreementâ](/help/docs/eula/)

## SDK STRUCTURE
The SDK provides compatibility with video, audio, and image files as input sources and allows you to include images from memory. It also provides access to over 20 different output file formats. You can stream the output over a network or send it to a Blackmagic card for further processing. This range of options and configurations ensures developers can efficiently handle multimedia content.
## VIDEO EDITING PIPELINE
The SDK includes a timeline feature that enables creating and managing multiple video and audio tracks. Within these tracks, you can insert video and audio fragments. Then, following the decoding phase, the data becomes ready for processing and compression before being written to a file. This structured workflow facilitates efficient multimedia content handling within your application.


## OUTPUT FORMATS
The SDK ensures robust compatibility with many popular video, audio, and image file formats and codecs, including MP4, WebM, AVI, WMV, MPEG-TS, MP3, AAC, JPEG, GIF, and PNG. Furthermore, developers can use their custom DirectShow filters for encoding, offering enhanced flexibility and customization options for multimedia processing.
## VIDEO PROCESSING
The SDK facilitates the integration of SMPTE-compliant transitions between videos to create smooth, professional-looking transitions. It also enables adding text, images, or GIF logos to your content. Developers can adjust brightness, contrast, saturation, or hue to fine-tune the visual aspects. Furthermore, the SDK supports various operations such as resizing, cropping, and rotating, affording precise control over the video's appearance.


## AUDIO PROCESSING
Add an equalizer to your audio processing capabilities with the SDK. This allows you to fine-tune audio frequencies for optimal sound quality. You can also normalize audio levels, increase volume, or enhance bass frequencies to achieve the desired output. The SDK also offers a wide range of other audio effects.
## VisioForge Video Edit SDK .Net major features include:
### Input formats
- Video formats: AVI, MP4, MPEG-1/2, WMV, QuickTime MOV, VP8/VP9, AV1, or any other if you have a corresponding decoder
- Audio formats: WAV, MP3, Vorbis, WMA, AAC, Speex, OPUS, or any other if you have a corresponding decoder
- Image formats: BMP, PNG, GIF, JPEG, TIFF, WebP
### Output video formats
- AVI
- WMV (using built-in or external profiles or specifying all parameters directly)
- MKV (Matroska)
- MPEG-1/2/4 (including VCD/SVCD/DVD profiles), and FLV using FFMPEG wrapper
- WebM (Vorbis + VP8/VP9)
- MP4 H264/HEVC + AAC output using software encoder, Intel QuickSync, Nvidia CUDA/NVENC, or AMD Radeon encoder
- Custom output formats (using 3rd-party DirectShow filters)
- Animated GIF
### Output audio formats
- WAV (PCM or compressed)
- WMA (Windows Media Audio)
- M4A (AAC)
- Ogg Vorbis
- MP3
- Windows Media Audio
- FLAC
- Speex
### Network streaming
- Windows Media
- RTSP protocol (H264/AAC)
- Smooth Streaming protocol for Microsoft IIS Server
- HTTP Live Streamings (HLS)
- RTMP, UDP, and any other protocol supported by FFMPEG.exe
- YouTube
- Facebook
- NDI
### Video processing and effects (CPU/GPU)
- image and graphic overlays (including animated GIF)
- transitions between tracks (SMPTE standard)
- pan/zoom
- text overlay
- video transparency
- brightness, contrast, saturation, hue
- resize/crop to any resolution
- chroma-key
- denoise
- deinterlace
- fade-in/fade-out
- rotate
### Audio processing and effects
- volume booster
- equalizer
- 3D-bass system
- normalization
- auto/manual gain
- a lot of other effects
### Other features
- Timeline editing allows adding multiple segments of video and audio files to the timeline
- 3rd-party DirectShow filters support
- Subtitles support
- Motion detection
- Barcode reader
- Output to encrypted video files using the [Video Encryption SDK](/video-encryption-sdk)
- Output to [Virtual Camera SDK](/virtual-camera-sdk)
- Encoding parameters
- resolution
- frame rate
- video and audio codecs
- video and audio bit rate or quality
- level/profile (if supported by codec)
- specific codec settings
- other
- Audio/video file tags reading and writing support
- Blackmagic Decklink output
- madVR video renderer support [Windows only]
### IDE
- Visual Studio 2019 and later: Visual C#, Visual C++, Visual Basic .NET
- Visual Studio Code
- JetBrains Rider
- SDK may be used with other .Net-compatible applications such as Microsoft Access, Word, and Excel
### UI frameworks
- WinForms
- WPF
- WinUI 3 for Desktop
- Avalonia
- MAUI
- MacOS/MacCatalyst
- Xamarin.Android
- Xamarin.iOS
### System requirements
- Windows 10 or Windows 11
- Ubuntu 22+
- macOS 12+
### Target platforms
- Windows 11, Windows 10, Windows 8/8.1, Windows 7 SP1
- Windows Server 2016 and later
- Android 8 and later
- Linux
- macOS
- iOS
### .Net versions
- .Net Framework 4.6.1 and later
- .Net Core 3.1
- .Net 5 - .Net 9
### Distribution rights
Royalty-free distribution.
### Trial limitations
The trial version displays a watermark on the video window.

#### EDITION

#### STANDARD

#### PROFESSIONAL

#### PREMIUM
Timeline
Frame grabber
Video processing
Audio processing
HD video support
Transitions
Network streaming in WMV format
Network streaming using RTMP/RTSP/UDP
Chroma-key
Motion detection
Video processing using DirectShow filters
OSD (On-Screen Display)
Picture-In-Picture
Multiple output screens
GPU-accelerated video effects
Output to Virtual Camera SDK
Video Encryption SDK support
Video rotation
Output formats
- AVI
- WMV (Windows Media Video)
- WMA (Windows Media Audio)
- WAV
- MP3
- Ogg Vorbis
- Speex
- DV video
- Flash Video (FLV) using FFMPEG
- WebM
- Custom output formats using external DirectShow filters
- MPEG-1/2/4 using FFMPEG
- MP4 H264 using software, Intel QuickSync, Nvidia NVENC/CUDA or AMD Radeon encoders
Our software offers unlimited usage with no nag-screen, ensuring a
seamless experience. We provide a 30-day trial period so you can explore
all features before committing.
With a regular license, you
receive free minor and major upgrades for one year; after that period,
the SDK will continue functioning as before.
Alternatively, the
lifetime license provides unlimited updates indefinitely. Additionally,
we offer priority support and fixes. The regular license is billed
annually and automatically renewed each year, but you can cancel your
subscription anytime.
The SDK is free for non-commercial use. Please contact us to get a free license.
---END OF PAGE---
# Page: https://www.visioforge.com/media-blocks-sdk-net
# Media Blocks SDK .Net
v15.9
The SDK allows you to build your multimedia application from individual blocks like a brick house. For example, to record video from a camera, you add the "Camera" block, the "H264 encoder" block, and the "MP4 sink" block to record video to an MP4 file.

#### DOWNLOADS
[NuGet - Core](https://www.nuget.org/packages/VisioForge.DotNet.VideoCapture/)[NuGet installation guide](https://www.visioforge.com/help/docs/dotnet/install/)[Samples on GitHub](https://github.com/visioforge/.Net-SDK-s-samples)

#### BUY
[Check prices or order](/buy)

#### HELP
[Online helpâ](/help/docs/dotnet/mediablocks/)[Changelogâ](https://www.visioforge.com/help/docs/dotnet/changelog/)[License agreementâ](/help/docs/eula/)
Our software offers unlimited usage with no nag-screen, ensuring a
seamless experience. We provide a 30-day trial period so you can explore
all features before committing.
With a regular license, you
receive free minor and major upgrades for one year; after that period,
the SDK will continue functioning as before.
Alternatively, the
lifetime license provides unlimited updates indefinitely. Additionally,
we offer priority support and fixes. The regular license is billed
annually and automatically renewed each year, but you can cancel your
subscription anytime.
The SDK is free for non-commercial use. Please contact us to get a free license.

## SIMPLE PLAYER
The simple player pipeline uses the UniversalSourceBlock to read and decode the source file, the VideoRendererBlock to display video, and the AudioRendererBlock to play audio.
## ADVANCED PLAYER
The advanced player pipeline includes the UniversalSourceBlock for decoding files or streams, video and audio renderers, and effects processing blocks.


## CAMERA PREVIEW
The camera/microphone simple preview pipeline contains device source blocks and video/audio renderer blocks.
Default devices will be used.
## RTSP PREVIEW
The RTSP preview pipeline, which includes the RTSP source block (with decoders inside), video and audio renderers.


## CAPTURE WITH PREVIEW
The capture pipeline has two tee blocks that are used to split video and audio streams, allowing video/audio preview along with [video capture](https://www.visioforge.com/video-capture-sdk-net).
## VisioForge Media Blocks SDK .Net major features include:
- Audio/video preview
- Video and audio capture to a wide range of formats
- Frame capture to Bitmap class, BMP, JPEG, and PNG files
- Video processing and effects (CPU/GPU)
- Video capture device control
- Network streaming
- Motion detection
- Barcode reader (QR Code, UPC-A, UPC-E, EAN-8, EAN-13, Code 39, Code 93, Code 128, Codabar, ITF, RSS-14, Data Matrix, Aztec, PDF-417)
- Custom interfaces support
- Computer vision API
- PIP (Picture-In-Picture)
- Screen capture/window capture
- Face detection and object tracking
- Multiply output screens support
- Audio capture from speakers
- Blackmagic Decklink card's input and output support
- Audio/video file tags reading and writing support
- FLIR/Teledyne cameras support (USB3Vision/GigE)
- Basler cameras support (USB3Vision/GigE)
### Audio encoders
- AAC
- FLAC
- MP3
- OPUS
- Vorbis
- WMA (Windows Media Audio)
- Speex
### Audio processing
- Amplify
- Audio mixer
- Audio sample grabber
- Balance
- Compressor/Expander
- Echo
- Equalizer
- Scale/Tempo
- Volume
### Blackmagic Decklink
- Audio sink
- Audio source
- Video sink
- Video source
### File sinks
- MP4
- WebM
- MOV
- AVI
- MPEG-TS
- MKV
- OGG
### Network streaming
- HLS
- RTMP
- RTSP
- UDP
### Video processing
- Color effects
- Deinterlace
- Fish eye
- Flip/Rotate
- Gamma
- Gaussian blur
- Image overlay
- Mirror
- Perspective
- Pinch
- Resize
- Rotate
- Sample grabber
- Sphere
- Square
- Stretch
- Text overlay
- Tunnel
- Twirl
- Video balance
- Video mixer
- Water ripple
### Video encoders (CPU/GPU)
- H264
- H265/HEVC
- VP8/VP9
- WMV (Windows Media Video)
- MJPEG
- AV1
### Sources
- File source
- RTSP source
- Screen source
- System video source
- System audio source
- Virtual video source
- Virtual audio source
### Special
- Null Renderer
- Tee
- VU meter
### Supported input devices:
- DV and HDV MPEG-2 camcorders
- USB web cameras and other capture devices (including 4K devices)
- PCI capture cards
- TV Tuners (with and without internal MPEG Encoder)
- JPEG/MJPEG, MPEG-4 and H.264 HTTP/RTSP/RTMP IP cameras/servers, HD format supported
- ONVIF IP cameras with PTZ support
- Blackmagic Decklink devices
- Audio capture devices and sound cards
- ASIO devices
### IDE
- Visual Studio 2019 and later: Visual C#, Visual C++, Visual Basic .NET
- Visual Studio Code
- JetBrains Rider
- SDK may be used with other .Net-compatible applications such as Microsoft Access, Word, and Excel
### UI frameworks
- WinForms
- WPF
- WinUI 3 for Desktop
- Avalonia
- GTK#
- MAUI
- Xamarin.Android
- Xamarin.Mac
- Xamarin.iOS
### .Net versions
- .Net Framework 4.6.1 and later
- .Net Core 3.1
- .Net 5 - .Net 9
### System requirements
- Windows 10 or Windows 11
- Ubuntu 22+
- macOS 12+
### Target platforms
- Windows 11, Windows 10, Windows 8/8.1, Windows 7 SP1
- Windows Server 2016 and later
- Android 8 and later
- Linux (Ubuntu)
- macOS
- iOS
### Distribution rights
Royalty-free distribution.
SDK contains GStreamer libraries licensed as LGPL v2.1.
---END OF PAGE---
# Page: https://www.visioforge.com/video-edit-sdk-ffmpeg-net
# Video Edit SDK FFMPEG .Net
v12.1
VisioForge Video Edit SDK FFMPEG .Net simplifies the integration of video conversion and processing into software applications. This powerful SDK enables developers to create custom movies by seamlessly combining audio and video files. Built on the renowned FFMPEG framework, the SDK provides comprehensive support for all major video and audio formats, making it a versatile solution for multimedia projects.
- 
- 


#### DOWNLOADS
[Installer](https://s3.us-west-2.amazonaws.com/files.visioforge.com/trials/visioforge\_video\_edit\_ffmpeg\_sdk\_dotnet\_setup.exe)[NuGet package](https://www.nuget.org/packages/VisioForge.DotNet.VideoEdit/)[Samples on GitHub](https://github.com/visioforge/.Net-SDK-s-samples)

#### BUY
[Check prices or order](/buy)

#### HELP
[Online helpâ](/help/)[Changelogâ](/help/docs/dotnet/videoedit-ffmpeg/changelog/)[License agreementâ](/help/docs/eula/)
Our software offers unlimited usage with no nag-screen, ensuring a seamless experience. We provide a 30-day trial period so you can explore all features before committing.
With a regular license, you receive free minor and major upgrades for one year; after that period, the SDK will continue functioning as before.
Alternatively, the lifetime license provides unlimited updates indefinitely. Additionally, we offer priority support and fixes. The regular license is billed annually and automatically renewed each year, but you can cancel your subscription anytime.
The SDK is free for non-commercial use. Please contact us to get a free license.
## VisioForge Video Edit SDK FFMPEG .Net major features include:
### Input formats
- Video: AVI, MPEG-1/2, WMV, 3GP, QuickTime MOV, MPEG-4/H264 (AVC), or any other supported by FFMPEG
- Audio: WAV, MP3, OGG, WMA, AAC, or any other supported by FFMPEG
- Images: BMP, PNG, GIF, JPEG, TIFF, WebM
### Output video formats
- AVI
- MP4
- MKV (Matroska)
- WMV (Windows Media Video)
- Quicktime MOV
- WebM
- AV1
- MPEG-1/2/4
- FLV
- many others
### Output audio formats
- WAV (PCM/ACM)
- Ogg Vorbis
- MP3
- WMA (Windows Media Audio)
- AAC
- Speex
- FLAC
- OPUS
### Video processing and effects
- image overlay
- resize and crop
- pan/zoom
- text overlay
- brightness, contrast, saturation, hue
- chroma-key
- denoise
- deinterlace
### Audio processing and effects
- volume booster
- equalizer
- other effects
### Other features
- Motion detection
- Barcode reader (QR Code, UPC-A, UPC-E, EAN-8, EAN-13, Code 39, Code 93, Code 128, Codabar, ITF, RSS-14, Data Matrix, Aztec, PDF-417)
- Frame capture
- Encoding parameters
- video size
- frame rate
- video and audio codecs
- video and audio bit rate
- quality
- profile/level
- other
### Development platforms:
- Visual Studio 2015 and later: Visual C#, Visual C++, Visual Basic .NET
- may be used with other .Net compatible applications like Microsoft Access, Word, Excel, FrontPage, etc.
### System requirements
- Windows 11, Windows 10, Windows 8/8.1, Windows 7, Windows Vista, Windows Server 2012, and later
- .Net Framework 4.5 or later
- .Net Core 3.1 or later
### Distribution rights
Royalty-free distribution.
### Trial limitations
The trial version displays a watermark on the video window.

#### EDITION

#### STANDARD

#### PROFESSIONAL

#### PREMIUM
Timeline
Frame grabber
Video processing
Audio processing
HD and 4K video support
Network streaming in WMV format
Network streaming using RTMP / RTSP / UDP
Chroma-key
Motion detection
OSD (On-Screen Display)
Picture-In-Picture
Multiple output screens
GPU-accelerated video effects
Output to Virtual Camera SDK
Video Encryption SDK support
Video rotation
Output formats
- AVI
- WMV (Windows Media Video)
- WMA (Windows Media Audio)
- WAV
- MP3
- Ogg Vorbis
- Speex
- DV video
- Flash Video (FLV)
- WebM
- MPEG-1/2/4
- MP4
SDK contains the FFMPEG library licensed as LGPL v2.1.
---END OF PAGE---
# Page: https://www.visioforge.com/save-webcam
# Save Webcam Video Using .Net: A Complete Guide to Record and Capture Webcam
Capturing and saving video from webcams is a common requirement in many modern applications, from video conferencing tools to surveillance systems. Whether you need to record webcam footage, display the webcam feed, or capture images, implementing reliable webcam functionality in .NET (DotNet) can be challenging. This tutorial provides a simple step-by-step guide to save webcam video using C# (C Sharp) with minimal code.

#### DOWNLOADS
[Installer (Windows)](https://s3.us-west-2.amazonaws.com/files.visioforge.com/trials/visioforge\_sdks\_installer\_dotnet\_setup.exe)[NuGet installation guide](https://www.visioforge.com/help/docs/dotnet/install/)[Samples on GitHub](https://github.com/visioforge/.Net-SDK-s-samples)

#### BUY
[Check prices or order](/buy)

#### HELP
[Online helpâ](https://www.visioforge.com/help/docs/dotnet/videocapture/)[Changelogâ](https://www.visioforge.com/help/docs/dotnet/changelog/)[License agreementâ](/help/docs/eula/)
The SDK is free for non-commercial use. Please contact us to get a free license.
## Key Features of Video Capture SDK .Net
Video Capture SDK .Net is a powerful library designed specifically for .NET developers who need to implement webcam capture functionality in their applications. Whether you want to record webcam video, save webcam frames as images, or display the webcam feed in your application, this SDK has you covered. Some of its standout features include:
- Seamless integration with .NET applications
- Support for multiple capture devices (USB webcams, IP cameras, capture cards)
- High-performance video and audio recording and processing
- Simple code to get and display webcam feeds
- Create and save video files in various formats
- GPU-accelerated encoding for optimal performance
- Cross-platform compatibility
## Output Formats: MP4 and WebM in Detail
### MP4 Format
MP4 is one of the most widely supported video container formats, making it an excellent choice for applications where compatibility is a priority.
\*\*Supported codecs for MP4:\*\*
- \*\*H.264 (AVC)\*\*: The industry standard for video compression, offering excellent quality and wide compatibility
- \*\*H.265 (HEVC)\*\*: Next-generation codec providing up to 50% better compression than H.264 while maintaining the same quality
- \*\*AAC\*\*: Advanced Audio Coding, the industry standard for lossy digital audio compression
### WebM Format
WebM is an open, royalty-free media file format designed for the web.
\*\*Supported codecs for WebM:\*\*
- \*\*VP8\*\*: Open-source video codec developed by Google, primarily used with WebM format
- \*\*VP9\*\*: Successor to VP8, offering significantly improved compression efficiency
- \*\*AV1\*\*: Newest open-source video codec with superior compression and quality, particularly at lower bitrates
- \*\*Vorbis\*\*: Free and open-source audio compression format offering good quality at lower bitrates
Each codec can be fine-tuned with various parameters to achieve the optimal balance between quality and file size for your specific application requirements.
## GPU Acceleration for Efficient Encoding
One of the standout features of Video Capture SDK .Net is its robust support for GPU-accelerated video encoding, which offers several significant advantages:
### Benefits of GPU Acceleration
- \*\*Dramatically reduced CPU usage\*\*: Free up CPU resources for other application tasks
- \*\*Faster encoding speeds\*\*: Up to 10x faster than CPU-only encoding
- \*\*Real-time high-resolution encoding\*\*: Enable 4K video capture with minimal system impact
- \*\*Lower power consumption\*\*: Particularly important for mobile and laptop applications
- \*\*Higher quality at the same bitrate\*\*: Some GPU encoders offer better quality-per-bit than CPU encoding
### Supported GPU Technologies
Video Capture SDK .Net leverages multiple GPU acceleration technologies:
- \*\*NVIDIA NVENC\*\*: Hardware-accelerated encoding on NVIDIA GPUs
- \*\*AMD AMF/VCE\*\*: Acceleration on AMD graphics cards
- \*\*Intel Quick Sync Video\*\*: Hardware encoding on Intel integrated graphics
The SDK automatically detects available hardware and selects the optimal encoding path based on your system's capabilities, with fallback to software encoding when necessary.
## Implementation Example (C# Code to Capture Video from Webcam)
Let's walk through a simple tutorial on how to record webcam video using C#. Implementing webcam capture with Video Capture SDK .Net is straightforward.
## CODE SAMPLES
Here's a complete example showing how to get your webcam feed, display it in your application, and save it to an MP4 file with H.264 encoding:
For WebM output with VP9 encoding, simply modify the encoder settings:
### Additional Code Examples
Here's a simple example of how to just save a single image from the webcam.
Enable video sample grabber:
Get and save a single image from the webcam:
## Native dependencies
Video Capture SDK .Net relies on native libraries to access webcam devices and perform video and audio processing. These native dependencies are bundled with the SDK and are automatically deployed with your application, ensuring seamless integration and compatibility across different systems.
Major SDK package (managed):
Native dependencies for Windows x64:
For alternative platforms (macOS, Linux, Android, iOS), use the corresponding native dependencies packages.
## Cross-Platform Compatibility
Video Capture SDK .Net is designed with cross-platform compatibility in mind, making it an ideal choice for developers working on applications that need to run on multiple operating systems.
### MAUI Compatibility
For developers working with .NET MAUI (Multi-platform App UI), Video Capture SDK .Net offers:
- Full compatibility with MAUI applications
- Consistent API across all supported platforms
- Platform-specific optimizations while maintaining a unified codebase
- Sample MAUI projects demonstrating implementation across platforms
This cross-platform capability allows developers to write code once and deploy across Windows, macOS, and mobile platforms through MAUI, significantly reducing development time and maintenance overhead. [Video Capture SDK .Ne](https://www.visioforge.com/video-capture-sdk-net)t provides a comprehensive solution for adding webcam video capture capabilities to your DotNet applications. Whether you need to record webcam footage, save webcam images, or simply display the webcam feed in your application, this library makes the process simple with just a few lines of C# code. With support for industry-standard formats like MP4 and WebM, modern codecs including H.264/H.265 and VP8/VP9/AV1, and powerful GPU acceleration, it offers the performance and flexibility needed for even the most demanding video capture applications. The ability to create and save video files efficiently makes this library perfect for any application that needs to record webcam content. The SDK's cross-platform compatibility, extending to macOS and MAUI applications, ensures that your webcam capture solution works consistently across different operating systems. Whether you're building a video conferencing tool, a surveillance application, or any other software requiring webcam functionality, Video Capture SDK .Net offers the tools you need to implement these features quickly. Getting started is as simple as following the step-by-step tutorial and code examples provided above. For more advanced use cases and detailed documentation on how to record webcam video using .NET, visit our website or refer to the SDK documentation.

#### EDITION

#### STANDARD

#### PROFESSIONAL

#### PREMIUM
Supported input devices and other sources
- Web cameras
- TV tuners and capture cards
- DV and MPEG camcorders
- Screen capture
- HTTP/RTSP/ONVIF IP cameras
- UDP, TCP, RTMP and other network streams
- Blackmagic Decklink
- DVB-T/DVB-C/DVB-S/ATSC devices (BETA)
- Microsoft Kinect for Windows
Video preview
Frame grabber
Video processing
Audio processing
HD and 4K video support
TV tuning
Network streaming in WMV format
Network streaming using RTMP/RTSP/UDP/NDI
Chroma-key
Motion detection
Video processing using DirectShow filters
OSD (On-Screen Display)
Picture-In-Picture
Changing output file name on-the-fly
Multiple output screens
GPU-accelerated video effects
Output to Virtual Camera SDK
Video Encryption SDK support
Face tracking
Output formats
- AVI
- WMV (Windows Media Video)
- WMA (Windows Media Audio)
- WAV
- MP3
- Ogg Vorbis
- Speex
- DV video
- DV/MPEG-1/2/4 (using a TV tuner with an internal MPEG encoder or DV/HDV camcorder)
- Flash Video (FLV) using FFMPEG
- WebM
- Custom output formats using external DirectShow filters
- MPEG-1/2/4 using FFMPEG
- MP4 (H264/HEVC + AAC) using software, Intel QuickSync, Nvidia NVENC/CUDA, or AMD Radeon encoders
Our software offers unlimited usage with no nag-screen, ensuring a
seamless experience. We provide a 30-day trial period so you can explore
all features before committing.
With a regular license, you
receive free minor and major upgrades for one year; after that period,
the SDK will continue functioning as before.
Alternatively, the
lifetime license provides unlimited updates indefinitely. Additionally,
we offer priority support and fixes. The regular license is billed
annually and automatically renewed each year, but you can cancel your
subscription anytime.
---END OF PAGE---
# Page: https://www.visioforge.com/virtual-camera-sdk
# Virtual Camera SDK
v11.1
VisioForge Virtual Camera SDK is the ultimate virtual webcam solution for Windows, empowering users and developers to transform their PC into a versatile, high-performance video source for any application that supports webcams. Whether you are a content creator, educator, business professional, or software developer, our SDK provides the tools you need to broadcast, enhance, and control your video and audio streams with unmatched flexibility and quality.

#### DOWNLOADS
[Installer](https://s3.us-west-2.amazonaws.com/files.visioforge.com/trials/visioforge\_virtual\_camera\_sdk\_setup.zip)

#### BUY
[Check prices or order](/buy)

#### HELP
[Online helpâ](/help/docs/directshow/virtual-camera-sdk/)[License agreementâ](/help/docs/eula/)
## What is a Virtual Webcam?
A virtual webcam (also known as a virtual camera) is a software-based camera that simulates a physical webcam device on your Windows PC. This allows you to send video and audio from any sourceâsuch as video files, network streams, webcams, camcorders, or even your desktop screenâto popular applications like Zoom, Skype, OBS Studio, Google Meet, Microsoft Teams, and many more. With a virtual webcam, you can:
- Use pre-recorded videos, live streams, or custom video effects as your webcam input.
- Share your desktop, presentations, or application windows as a webcam feed.
- Combine multiple video sources and switch between them seamlessly.
- Apply real-time video effects, overlays, and branding to your video stream.
- Use your virtual camera in multiple applications at the same time, thanks to multi-instance support.
This technology is ideal for live streaming, video conferencing, online teaching, webinars, remote collaboration, and any scenario where you want to control or enhance your video presence.
## Why Choose VisioForge Virtual Camera SDK?
VisioForge Virtual Camera SDK stands out as a leading solution for virtual webcam functionality on Windows. Here's why:
- \*\*Comprehensive Video Source Support:\*\* Stream video from files (MP4, AVI, MKV, MOV, and more), network streams (RTSP, HTTP, HLS), webcams, camcorders, capture cards, or your desktop screen. Mix and match sources for maximum flexibility.
- \*\*Professional-Grade Video Quality:\*\* Enjoy up to 4K resolution support, ensuring your video looks sharp and professional in any setting.
- \*\*Advanced Video Processing:\*\* Apply a wide range of real-time effects, including image and text overlays, pan/zoom, brightness, contrast, saturation, hue adjustments, deinterlacing, denoising, and chroma-key (green screen) effects. Perfect for adding logos, lower thirds, watermarks, or creative visual enhancements.
- \*\*Virtual Audio Capture:\*\* Seamlessly add audio from microphones, audio files, or other sources to your virtual webcam stream, ensuring your audience hears exactly what you want.
- \*\*Multi-Instance and Multi-App Support:\*\* Run multiple virtual camera devices at once, allowing you to use your virtual webcam in several applications simultaneouslyâideal for multitasking professionals and streamers.
- \*\*Custom Branding and Device Naming:\*\* Personalize your virtual camera and microphone with custom names, making your brand stand out in meetings and streams.
- \*\*DirectShow Integration:\*\* Fully compatible with DirectShow applications and VisioForge SDKs for video editing and capture, making it easy to integrate advanced video features into your own software projects.
- \*\*Background Image and Signal Handling:\*\* Display a custom background image or run a specific application when no video signal is available, ensuring a polished experience at all times.
- \*\*Royalty-Free Distribution:\*\* Distribute your applications without worrying about extra fees or licensing headaches.
- \*\*Developer-Friendly:\*\* Comprehensive documentation, sample code, and dedicated support make it easy for developers to add virtual webcam features to their own Windows applications.
## Use Cases for Virtual Webcam Technology
- \*\*Video Conferencing:\*\* Enhance your presence in Zoom, Microsoft Teams, Skype, Google Meet, and other platforms by sharing high-quality video, custom backgrounds, and branded overlays.
- \*\*Live Streaming:\*\* Broadcast to platforms like YouTube Live, Twitch, Facebook Live, and more with professional effects, transitions, and multi-source video feeds.
- \*\*Online Teaching & Webinars:\*\* Share your screen, slides, or educational videos as a webcam feed, making remote learning more interactive and engaging.
- \*\*Content Creation:\*\* Record or stream creative content with advanced video effects, overlays, and real-time editing.
- \*\*Gaming & Esports:\*\* Add webcam overlays, green screen effects, and custom branding to your gaming streams.
- \*\*Corporate Communications:\*\* Deliver polished presentations, product demos, and internal communications with branded video feeds.
- \*\*Software Development:\*\* Integrate virtual webcam features into your own Windows applications, expanding your product's capabilities and appeal.
## Feature Breakdown
### Video & Audio Streaming
- Stream from any real or virtual source: video files, network streams, webcams, camcorders, capture cards, desktop, and more.
- Combine multiple sources and switch between them in real time.
- Add audio from microphones, files, or other devices.
### Video Processing & Effects
- Image and text overlays for branding, watermarks, and information display.
- Pan/zoom, cropping, and resizing for perfect framing.
- Adjust brightness, contrast, saturation, and hue for optimal video quality.
- Deinterlacing and denoising for smooth, clear video.
- Chroma-key (green screen) for background replacement and creative effects.
### Customization & Branding
- Set custom device names for your virtual camera and microphone.
- Display a background image or run an application when no video signal is present.
- Full control over video and audio settings for a tailored experience.
### Compatibility & Integration
- Works with all major video conferencing, streaming, and recording software.
- DirectShow support for seamless integration with professional video tools.
- Easy SDK integration for developers, with sample code and documentation.
### Licensing & Distribution
- Royalty-free distribution for your applications.
- Flexible licensing options: annual or lifetime, with free updates and priority support.
- Trial version available (displays a watermark on the video window).
### Filter usage in a DirectShow graph

## System requirements
- \*\*Supported Operating Systems:\*\* Windows 11, Windows 10, Windows 8/8.1, Windows 7, Windows Vista, Windows XP, Windows Server 2003, and later.
- \*\*DirectX 9 or later required.\*\*
- \*\*x86/x64 compatibility.\*\*
## Download & Licensing
- \*\*Free Trial:\*\* Download and evaluate the Virtual Camera SDK for Windows. The trial version includes a watermark.
- \*\*Purchase:\*\* Unlock unlimited usage, free updates, and priority support with a regular or lifetime license. Cancel your subscription at any time.
- \*\*Easy SDK Integration:\*\* Add virtual webcam features to your own Windows applications with our comprehensive SDK.
## Troubleshooting & Support
- \*\*Virtual webcam not recognized?\*\* Ensure the SDK is installed and selected as the video input in your application. Restart the app if needed.
- \*\*Choppy video or audio?\*\* Close other resource-intensive programs or check your system resources and internet connection.
- \*\*Compatibility issues?\*\* Some applications may require updates or specific settings. Contact our support team for assistance.
- \*\*Need help?\*\* Access our detailed documentation, FAQs, or reach out to our priority support team for personalized help.
## Comparison: VisioForge Virtual Camera SDK vs. Other Solutions
- \*\*e2eSoft VCam:\*\* Both offer virtual webcam functionality, but VisioForge provides deeper DirectShow integration, more advanced video processing, and developer-friendly SDK features.
- \*\*OBS Studio Virtual Camera:\*\* OBS is great for streaming, but VisioForge SDK is designed for easy integration into your own apps and offers more granular control for developers.
- \*\*ManyCam, YouCam, etc.:\*\* These are end-user apps, while VisioForge SDK is ideal for developers and businesses looking to embed virtual webcam features into their own products.
## C# Code Example
Here's a practical example of how to use the Virtual Camera SDK in a .NET application:
### Project Setup
Create a new .NET project and add the VisioForge.DirectShowAPI NuGet package:
### Implementation Example
This example demonstrates how to capture video from a physical camera and stream it through a virtual camera:
This example shows:
- Setting up a DirectShow filter graph
- Enumerating and selecting video capture devices
- Creating and connecting source and virtual camera filters
- Managing the streaming lifecycle
- Proper resource cleanup
For more advanced features like video effects, format selection, and multiple instances, refer to our comprehensive SDK documentation.
## C++ DirectShow Example
Here's how to use the Virtual Camera SDK in a native C++ DirectShow application:
### Header File (intf.h)
First, define the necessary GUIDs and interfaces:
### Implementation Example (main.cpp)
Here's a complete example showing how to capture video and stream it through the virtual camera:
This C++ example demonstrates:
- DirectShow filter graph setup and management
- Video capture device enumeration
- Virtual camera filter creation and configuration
- Filter connection and streaming control
- Proper COM resource cleanup
- Error handling and status reporting
The example uses standard DirectShow interfaces along with the Virtual Camera SDK's custom interfaces for advanced functionality. Make sure to:
1. Link against the DirectShow libraries
2. Include the necessary DirectShow headers
3. Initialize and uninitialize COM appropriately
4. Handle all COM interface releases properly
For advanced features like video format selection, multiple instances, or video effects, refer to our SDK documentation.
## Sample Projects on GitHub
We maintain a comprehensive collection of sample projects on GitHub to help you get started with the Virtual Camera SDK. Visit our [DirectShow Samples Repository](https://github.com/visioforge/directshow-samples) for complete, working examples.
### Technologies Used
The samples are available in multiple programming languages:
- C# (.NET)
- C++ (Native DirectShow)
- Delphi
Empower your PC with the best virtual webcam software for Windows. Experience seamless video streaming, advanced effects, and professional-grade features with VisioForge Virtual Camera SDK today!
---END OF PAGE---
# Page: https://www.visioforge.com/vlc-source-directshow-filter
# VLC Source DirectShow Filter
v15.0
The VLC Source DirectShow Filter is a professional-grade component that brings the powerful multimedia capabilities of VLC media player directly into your Windows applications. This SDK provides seamless integration with DirectShow applications while maintaining the extensive format support and streaming capabilities that VLC is renowned for.
Whether you're developing media players, streaming applications, video processing tools, or multimedia content management systems, our VLC Source Filter provides the reliability and versatility you need to handle virtually any media format your users might encounter.
## Key Benefits
- \*\*Universal Format Support\*\*: Play 100+ video and audio formats without additional codec installations
- \*\*Network Streaming\*\*: Support for HTTP, HTTPS, RTSP, RTP, UDP, and other protocols
- \*\*Multi-Language APIs\*\*: Native support for C++, C#, VB.NET, and Delphi
- \*\*High Performance\*\*: Optimized multithreading with hardware acceleration
- \*\*Commercial Ready\*\*: Royalty-free distribution with professional support

#### DOWNLOADS
[Trial version](https://s3.us-west-2.amazonaws.com/files.visioforge.com/trials/visioforge\_vlc\_source\_setup.zip)[Samples on GitHub](https://github.com/visioforge/directshow-samples)

#### BUY
[Check prices or order](/buy)

#### HELP
[Online helpâ](/help/)[License agreementâ](/help/docs/eula/)
## Key Features & Capabilities
### Universal Format Support
Play 100+ video and audio formats including MP4, AVI, MPEG, MPEG-TS, MKV, WebM, AAC, MP3, OGG, FLAC, and many more without additional codec installations.
### Network Streaming
Support for HTTP, HTTPS, FTP, RTSP, RTP, UDP, and other network protocols. Stream live content or play remote media files seamlessly.
### Multiple Programming APIs
Native support for C++, C#, VB.NET, and Delphi with comprehensive sample applications and documentation for each platform.
### High Performance
Optimized multithreading support with hardware acceleration capabilities. Available in both x86 and x64 architectures.
### Hardware-Accelerated GPU Decoding
The VLC Source DirectShow Filter supports multiple hardware acceleration technologies for optimal video decoding performance using DirectX Video Acceleration (DXVA2), NVIDIA NVDEC, Intel Quick Sync Video, and AMD VCE technologies.
#### Supported GPU Acceleration Technologies
- \*\*DirectX Video Acceleration (DXVA2)\*\*: Windows native hardware acceleration
- \*\*NVIDIA NVDEC\*\*: CUDA-based hardware decoding for NVIDIA GPUs
- \*\*Intel Quick Sync Video\*\*: Intel integrated graphics acceleration
- \*\*AMD Video Coding Engine (VCE)\*\*: AMD GPU hardware acceleration
- \*\*Vulkan Video\*\*: Modern cross-vendor GPU acceleration support
#### Performance Benefits
- \*\*CPU Usage Reduction\*\*: 70-90% CPU usage reduction with hardware acceleration
- \*\*Power Efficiency\*\*: Significantly lower power consumption during video playback
- \*\*Thermal Management\*\*: Reduced CPU heat generation
- \*\*Concurrent Streams\*\*: Support for multiple simultaneous hardware-decoded streams
- \*\*Higher Resolutions\*\*: Efficient 4K/8K video playback with minimal CPU impact
### Advanced Controls
Full playback control with seeking, audio track selection, subtitle management, and VLC filter chain support.
## Supported Media Formats
### Video Containers
- MP4
- MOV
- AVI
- MPEG, MPEG-TS, M2TS, VOB
- MKV
- WebM
- FLV
- OGG
- ASF, WMV
### Video Codecs
- \*\*H.264/AVC\*\*: Full hardware decode support across all platforms
- \*\*H.265/HEVC\*\*: Hardware decode on compatible GPUs (GTX 950+, Intel Gen9+, AMD GCN4+)
- \*\*VP8, VP9\*\*: Hardware decode on newer GPUs (GTX 1060+, Intel Gen11+, AMD Navi+)
- \*\*AV1\*\*: Hardware decode on latest GPUs (RTX 30xx+, Intel Arc+, AMD RDNA2+)
- \*\*MPEG-1, MPEG-2\*\*: Legacy hardware acceleration on most GPUs
- \*\*MPEG-4\*\*: Software and hardware decode support
- \*\*DivX, Xvid\*\*: Software decode support
- \*\*Theora\*\*: Software decode support
- \*\*Windows Media Video\*\*: Software decode support
### Audio Formats
- AAC
- MP3, MP2
- FLAC
- Vorbis
- AC3, DTS
- PCM, WAV
- Speex
- Opus
- WMA
### Streaming Protocols
- \*\*HTTP/HTTPS\*\*: Full support for progressive download and streaming
- \*\*RTSP/RTP\*\*: Real-time streaming protocol with authentication
- \*\*UDP\*\*: Multicast and unicast support
- \*\*MMS\*\*: Microsoft Media Server protocol
- \*\*RTMP\*\*: Real-Time Messaging Protocol for live streaming
- \*\*HLS\*\*: HTTP Live Streaming (Apple's adaptive streaming)
- \*\*DASH\*\*: Dynamic Adaptive Streaming over HTTP
- \*\*SRT\*\*: Secure Reliable Transport protocol
## Quick Start Guide
### Integration Steps
1. \*\*Install the SDK\*\*: Register the VLC Source DirectShow filter on your system
2. \*\*Add References\*\*: Include the necessary DirectShow and VLC headers/libraries
3. \*\*Create Filter Graph\*\*: Initialize DirectShow filter graph components
4. \*\*Add VLC Source\*\*: Instantiate and configure the VLC Source filter
5. \*\*Connect Renderers\*\*: Link video and audio rendering components
6. \*\*Control Playback\*\*: Use MediaControl interface for playback operations
## API Reference & Interface Definitions
### IVlcSrc Interface
Primary interface for controlling the VLC Source Filter
\*\*GUID\*\*: `{77493EB7-6D00-41C5-9535-7C593824E892}`
#### Methods
- `SetFile` - Load a media file or network URL
- `GetAudioTracksCount` - Get number of available audio tracks
- `GetAudioTrackInfo` - Get audio track information
- `GetAudioTrack` - Get currently selected audio track
- `SetAudioTrack` - Select audio track by ID
- `GetSubtitlesCount` - Get number of available subtitle tracks
- `GetSubtitleInfo` - Get subtitle track information
- `GetSubtitle` - Get currently selected subtitle track
- `SetSubtitle` - Select subtitle track by ID (-1 to disable)
### IVlcSrc2 Interface
Extended interface with additional VLC customization options
\*\*GUID\*\*: `{CCE122C0-172C-4626-B4B6-42B039E541CB}`
#### Methods
Inherits all methods from IVlcSrc plus:
- `SetCustomCommandLine` - Set custom VLC command line parameters
### IVlcSrc3 Interface
Latest interface with frame rate control
\*\*GUID\*\*: `{3DFBED0C-E4A8-401C-93EF-CBBFB65223DD}`
#### Methods
Inherits all methods from IVlcSrc2 plus:
- `SetDefaultFrameRate` - Set default frame rate for content without frame rate information
### C++ Interface Definitions
For C++ development, the complete interface definitions are available in the official GitHub repository:
\*\*Header File:\*\* [ivlcsrc.h](https://github.com/visioforge/directshow-samples/blob/main/Interfaces/cpp/VLC%20Source/ivlcsrc.h)
Interface usage:
The header file contains the complete definitions for:
- `IVlcSrc` - Primary interface for audio/subtitle control
- `IVlcSrc2` - Extended interface with custom command line parameters
- `IVlcSrc3` - Latest interface with frame rate control
- All associated GUIDs and method signatures
### C#/VB.NET Interface Definitions
For .NET development, the interface definitions are available through the VisioForge DirectShow API NuGet package:
\*\*NuGet Package:\*\* [`VisioForge.DirectShowAPI`](https://www.nuget.org/packages/VisioForge.DirectShowAPI)
Interface usage in C#:
## Complete Code Examples
### C++ Implementation
### C# Implementation
### VB.NET Implementation
## Advanced Features Usage
### Audio Track Selection Example (C++)
## DirectShow Graph Development Tools
### Using VLC Source Filter with GraphEdit
\*\*GraphEdit\*\* is Microsoft's DirectShow graph visualization and debugging tool that provides DirectShow graph editing capabilities. The VLC Source DirectShow Filter integrates seamlessly with GraphEdit for rapid prototyping and testing.
#### Setting Up VLC Source in GraphEdit
1. \*\*Launch GraphEdit\*\*: Start GraphEdit with administrator privileges for full filter registration access
2. \*\*Insert VLC Source Filter\*\*:
- Right-click in the graph area
- Select "Insert Filters..."
- Navigate to "DirectShow Filters" category
- Locate "VLC Source" filter
- Click "Insert Filter"
3. \*\*Configure Media Source\*\*:
- Right-click the VLC Source filter
- Select "Properties"
- In the file dialog, specify your media file path or network URL
- The filter accepts local files (C:\media\video.mp4) and network streams (http://example.com/stream.m3u8)
4. \*\*Add Renderers\*\*:
- For video: Insert "Enhanced Video Renderer (EVR)" or "Video Mixing Renderer 9 (VMR-9)"
- For audio: Insert "Default DirectSound Device" or "Audio Renderer (WaveOut)"
5. \*\*Connect Pins\*\*:
- Drag from VLC Source video output pin to video renderer input pin
- Drag from VLC Source audio output pin to audio renderer input pin
- GraphEdit will automatically negotiate media types
### Using VLC Source Filter with GraphStudio
\*\*GraphStudio\*\* provides an alternative DirectShow graph editing environment with advanced debugging features and comprehensive filter analysis tools.
#### GraphStudio Integration Steps
1. \*\*Filter Registration Verification\*\*:
- Open GraphStudio
- Navigate to "View" â "Filters" tab
- Verify "VLC Source" appears in the registered filters list
- Note the filter's CLSID: `{77493EB7-6D00-41C5-9535-7C593824E892}`
2. \*\*Creating Filter Graph\*\*:
- Use "Insert Filter" button or drag from filters panel
- Locate VLC Source under DirectShow filters category
- Drag VLC Source to graph workspace
3. \*\*Media Configuration\*\*:
- Right-click VLC Source â "Load File..."
- Browse to media file or enter network URL
- GraphStudio displays real-time connection status
4. \*\*Automatic Graph Building\*\*:
- Use GraphStudio's "Render" feature
- Right-click VLC Source output pins â "Render Pin"
- GraphStudio automatically inserts appropriate decoders and renderers

## System Requirements
### Operating Systems
- Windows 10, 11 (all editions)
- Windows 8/8.1
- Windows 7 (SP1 or later)
- Windows Server 2016 and later
### Development Support
- Visual Studio 2010-2022
- C++ Builder XE2 and later
- Delphi XE2 and later
- .NET Framework 4.0+
- .NET 5 and later
### Architecture Support
- x86 (32-bit)
- x64 (64-bit)
- Mixed-mode applications
- COM-compatible environments
## Licensing & Distribution Rights
### Commercial License Benefits
- \*\*Royalty-Free Distribution\*\*: Deploy your applications without per-unit fees
- \*\*No Watermarks\*\*: Clean, professional output without trial limitations
- \*\*Priority Support\*\*: Direct access to our technical support team
- \*\*Free Updates\*\*: Receive minor and major updates for one year (unlimited for lifetime license)
- \*\*Multiple Projects\*\*: Use in unlimited commercial and personal projects
- \*\*Source Code Access\*\*: Optional source code licensing available
### Trial Version Limitations
- Video output displays a watermark overlay
- No technical restrictions on functionality
- Full API access for evaluation purposes
- 30-day evaluation period
### libVLC Compliance
This SDK incorporates libVLC library licensed under LGPL v2.1. Your applications using our SDK remain unaffected by this license as our DirectShow filter acts as a separate component. No source code disclosure requirements for your application.
## Download & Purchase
### Trial Version
\*\*Full functionality with watermark\*\*
- Complete SDK package
- All sample applications
- Documentation
- 30-day evaluation
[Download Trial](https://s3.us-west-2.amazonaws.com/files.visioforge.com/trials/visioforge\_vlc\_source\_setup.zip)
### Commercial License
\*\*Production-ready with full rights\*\*
- Royalty-free distribution
- Priority support
- No watermarks
- Free updates (1 year)
[View Pricing](https://www.visioforge.com/buy)
### Source Code License
\*\*Complete filter source code\*\*
- Full C++ source code
- Build scripts included
- Customization rights
- Technical consultation
## Technical Specifications
### Performance Characteristics
- \*\*Startup Time\*\*: < 500ms for filter initialization
- \*\*Memory Usage\*\*: ~50MB baseline, scales with video resolution
- \*\*CPU Usage\*\*: Hardware accelerated decoding when available
- \*\*Threading\*\*: Fully multithreaded architecture
- \*\*Latency\*\*: < 100ms for local files, varies for network streams

---END OF PAGE---
# Page: https://www.visioforge.com/ffmpeg-source-directshow-filter
# FFMPEG Source DirectShow Filter
v15.0
## Professional DirectShow Filter for Video and Audio Sources
The FFMPEG Source DirectShow Filter seamlessly integrates into any DirectShow application to decode and playback video or audio files and network streams. This powerful SDK includes FFMPEG DLLs and a DirectShow filter with standard file selection capabilities and custom interfaces for efficient and flexible multimedia processing in your applications.

#### DOWNLOADS
[Installer](https://s3.us-west-2.amazonaws.com/files.visioforge.com/trials/visioforge\_ffmpeg\_source\_filter\_setup.exe)[Samples on GitHub](https://github.com/visioforge/directshow-samples)

#### BUY
[Check prices or order](/buy)

#### HELP
[Online helpâ](/help/docs/directshow/ffmpeg-source-filters/)[License agreementâ](/help/docs/eula/)
## VisioForge FFMPEG Source Filter Major Features
### Comprehensive Format Support
- \*\*Video Formats\*\*: MP4, AVI, MPEG, MPEG-TS, AV1, MKV, WebM, and many other formats
- \*\*Audio Formats\*\*: AAC/M4A, MP3, OGG, Speex, FLAC and more
- \*\*Codec Support\*\*: Internal video and audio decoders provided by FFMPEG
- \*\*Custom Processing\*\*: Video/audio FFMPEG filters support with advanced configuration
### Advanced Architecture and Performance
- \*\*GPU Acceleration\*\*: GPU-accelerated video decoding for optimal performance
- \*\*Multithreading\*\*: Efficient multithreaded processing for smooth playback
- \*\*Platform Support\*\*: Both x86 and x64 versions available
- \*\*DirectShow Integration\*\*: Seamless integration with the DirectShow architecture
### Developer-Friendly SDK
- \*\*.NET API\*\*: Complete C# and VB.NET support with NuGet package distribution
- \*\*C++ API\*\*: Native C++ interface for high-performance applications
- \*\*Delphi API\*\*: Full Delphi/Pascal support for RAD development
- \*\*NuGet Integration\*\*: VisioForge.DirectShowAPI package for seamless .NET development
- \*\*Sample Code\*\*: Demo applications for C#, VB.NET, C++, and Delphi
- \*\*Documentation\*\*: Comprehensive API reference and usage examples
## Installation and Configuration
### System requirements
- \*\*Windows\*\*: Windows 11, Windows 10, Windows 8/8.1, Windows 7
- \*\*Windows\*\* \*\*Server\*\*: Windows Server 2016 and later versions
- \*\*Architecture\*\*: x86 and x64 support
### How to Install
1. Download the installer from the downloads section
2. Run with administrator privileges for proper registration
3. The filter will be automatically registered with Windows
4. Add references to your project and start coding
### .NET Development Setup
For .NET applications, install the VisioForge.DirectShowAPI NuGet package:
The NuGet package provides:
- Complete DirectShow API wrappers for .NET
- Strongly-typed interfaces and enumerations
- Proper COM interop and memory management
- Support for C#, VB.NET, and other .NET languages
## Code Examples and Sample Implementation
### Filter usage in a DirectShow graph
The FFMPEG Source Filter acts as a source filter in your DirectShow graph, providing:
- \*\*File Source\*\*: Local file playback with format auto-detection
- \*\*Network Streaming\*\*: Support for network streams and protocols
- \*\*Custom Configuration\*\*: Advanced settings for buffering, hardware acceleration
- \*\*Stream Selection\*\*: Multiple audio/video stream selection and management

### C# Implementation with Advanced Features
### VB.NET Advanced Implementation with Complete Interface Support
#### Registration for Licensed Users
C# registration
VB.Net registration
C++ registration
### C++ Implementation with Full Interface Support
## Advanced Configuration Options
### Hardware Acceleration Setup
Enable GPU-accelerated video decoding for optimal performance (enabled by default):
- \*\*NVIDIA NVDEC\*\*: Automatic detection and usage for H.264/H.265/AV1 decoding
- \*\*Intel Quick Sync Video\*\*: Intel integrated GPU acceleration support
- \*\*AMD VCE\*\*: AMD hardware video decoding acceleration
- \*\*Software Fallback\*\*: Automatic fallback to CPU decoding when needed
### Network Streaming Configuration
Professional streaming support with comprehensive protocol options:
- \*\*Connection Timeout\*\*: Configurable timeout (default: 15000ms)
- \*\*Buffering Strategy\*\*: AUTO/ON/OFF modes for live sources
- \*\*RTSP Options\*\*: TCP/UDP transport selection
- \*\*Custom Protocols\*\*: Full FFMPEG protocol option support
### Advanced Stream Processing
- \*\*Data Callbacks\*\*: Raw data stream access for custom processing
- \*\*Timestamp Callbacks\*\*: Precise timing information for A/V sync debugging
- \*\*Stream Selection\*\*: Dynamic audio/video stream switching via IAMStreamSelect
- \*\*Audio Control\*\*: Enable/disable audio processing independently
### Multi-Stream and Program Support
- \*\*Stream Selection\*\*: Support for multiple video/audio streams
- \*\*Program Switching\*\*: Handle multi-program transport streams
- \*\*Language Selection\*\*: Audio track selection by language
- \*\*Subtitle Support\*\*: Subtitle stream extraction and rendering
### Live Source Handling
- \*\*Real-time Detection\*\*: Automatic live source identification
- \*\*Buffering Management\*\*: Smart buffering for smooth playback
- \*\*Clock Synchronization\*\*: Reference clock management for live streams
- \*\*Quality Control\*\*: Adaptive quality for network streams
### Seeking and Playback Control
- \*\*Media Seeking\*\*: Full IMediaSeeking interface support for non-live sources
- \*\*Rate Control\*\*: Variable playback speed (not available for live sources)
- \*\*Position Control\*\*: Absolute, relative, and incremental positioning
- \*\*Key Frame Seeking\*\*: Seek to nearest key frame for smooth playback
## Evaluation Version Features
Experience the complete power of our DirectShow filter with only a discrete evaluation overlay during video playback:
- \*\*Full-Featured Testing Environment\*\*: Access every codec, filter, and processing capability for comprehensive evaluation
- \*\*Universal Format Compatibility\*\*: Test with your entire media library including MP4, AVI, MPEG, MKV, and streaming protocols
- \*\*Complete Development Resources\*\*: Full API documentation, interface definitions, and comprehensive coding examples
- \*\*Production-Ready Samples\*\*: Working C#, C++, and Delphi applications with complete source code for immediate integration
## Purchase Benefits
### Licensing Options
- \*\*Regular License\*\*: Annual subscription with automatic renewal (cancellable anytime)
- \*\*Lifetime License\*\*: One-time purchase with unlimited updates
### Regular License Features
- \*\*Commercial Deployment Freedom\*\*: Deploy across unlimited applications and installations without usage caps or runtime fees
- \*\*Professional Output Quality\*\*: Crystal-clear video rendering without watermarks or trial overlays for production-ready applications
- \*\*Continuous Innovation Access\*\*: Receive all feature enhancements, codec updates, and performance improvements for 12 months
- \*\*Expert Developer Assistance\*\*: Direct access to VisioForge engineers for technical guidance and rapid issue resolution
- \*\*Complete Distribution Authority\*\*: Full rights to redistribute the filter with your applications without additional licensing costs
### Lifetime License Advantages
- \*\*Unlimited Updates\*\*: Updates for unlimited time
- \*\*One-Time Payment\*\*: No recurring subscription fees
- \*\*Long-Term Support\*\*: Extended support coverage

---END OF PAGE---
# Page: https://www.visioforge.com/encoding-filters-pack
# DirectShow Encoding Filters Pack
v11.4
VisioForge DirectShow Encoding Filters Pack includes many DirectShow filters used in VisioForge SDKs for various audio/video encoding formats. You can use the filter pack to encode video into MP4 (H264/HEVC/AAC), MPEG-TS, MKV, and many other output formats in your DirectShow application. H264/HEVC encoders have GPU-accelerated versions for Intel, AMD/ATI, and Nvidia GPUs.

#### DOWNLOADS
[Trial version](https://s3.us-west-2.amazonaws.com/files.visioforge.com/trials/visioforge\_encoding\_filters\_pack\_setup.exe)[Samples on GitHub](https://github.com/visioforge)

#### BUY
[Check prices or order](/buy)

#### HELP
[Online helpâ](/help/)[License agreementâ](/help/docs/eula/)
## Included DirectShow filters:
- FFMPEG Encoder filter (MPEG-1/2/4, Flash Video)
- Nvidia CUDA H264 encoder
- H264 encoder/decoder (with Intel QuickSync support)
- AAC encoder
- MP4 muxer
- MP3 LAME encoder
- VP8/VP9 encoder/decoder
- FLAC encoder/decoder
- Speex encoder/decoder
- Ogg Vorbis encoder/decoder
- Colorspace converters
- RTSP source/RTSP streamer
- GPU-accelerated H.264/HEVC encoding with MP4 MF Muxer
SDK contains API for .Net, C++, and Delphi. Demo applications are available in several programming languages. GraphEdit/GraphStudioNext tools can be used to test filters without code.
[Processing Filters Pack](https://www.visioforge.com/processing-filters-pack) can be used with Encoding Filters Pack to provide video and audio processing in your application.
You may use [FFMPEG Source Filter](https://www.visioforge.com/ffmpeg-source-directshow-filter) or [VLC Source Filter](https://www.visioforge.com/vlc-source-directshow-filter) for playback support of most video and audio formats.
### System requirements
- Windows 11, Windows 10, Windows 8/8.1, Windows 7, Windows Vista, Windows Server 2012, and later
- DirectX 10 or later
### Distribution rights
Royalty-free distribution.
### Trial limitations
The trial version displays a watermark on the video window.
### Purchase of DirectShow Encoding Filters Pack will give you the following benefits:
- Unlimited usage
- No nag-screen
- Free minor and major upgrades within one year (after one year, SDK will work the same as before) for a regular license and unlimited updates for unlimited time for the lifetime license
- Priority support and fixes
The regular license is billed annually and automatically renewed each year. You can cancel your subscription at any time.
---END OF PAGE---
# Page: https://www.visioforge.com/processing-filters-pack
# DirectShow Processing Filters Pack
v15.1
The VisioForge DirectShow Processing Filters Pack contains many DirectShow filters used in the VisioForge SDKs for audio and video processing. With our filters, you can add text or image overlay, change color balance, perform denoising, deinterlace, motion detection, resize, crop, or rotate. Various audio processing, including equalizer and volume boost, is also available.

#### DOWNLOADS
[Trial version](https://s3.us-west-2.amazonaws.com/files.visioforge.com/trials/visioforge\_processing\_filters\_pack\_setup.exe)[Samples on GitHub](https://github.com/visioforge/.Net-SDK-s-samples)

#### BUY
[Check prices or order](/buy)

#### HELP
[Online helpâ](/help/)[License agreementâ](/help/docs/eula/)
## Included DirectShow filters:
- AsyncEx memory source filter (allows to read data from the memory or stream)
- Video processing and effects filter
- image overlay (BMP, JPEG, PNG, GIF, RGB data)
- text overlay (choose font, style, size, etc.)
- video transparency
- brightness, contrast, saturation, hue, etc.
- deinterlace (several algorithms are available depending on quality and performance)
- denoise
- motion detection (with motion level detection, matrix, and highlights)
- chroma-key (GPU-optimized)
- Audio processing and effects filter
- volume booster
- equalizer
- 3D-bass system
- various other effects
- Video resize filter
- Video crop filter
- Video flip/rotate filter
- PIP (Picture-In-Picture) filter
- Screen capture filter (Direct3D 9/Direct3D 11/DXGI/Desktop Duplication)
- Video color space converters (RGB and YUV formats)
- DirectX-accelerated video processing
The SDK includes APIs for .Net (C#/VB.Net), C++, and Delphi, making it versatile for different programming languages. You can try SDK samples or use the GraphEdit/[GraphStudioNext](https://github.com/cplussharp/graph-studio-next) tools to test.
A convenient .Net API package is available on NuGet, simplifying integration for .Net developers.
For video and audio processing, the [Encoding Filters Pack](/encoding-filters-pack) is essential for saving and streaming media. Additionally, the [FFMPEG Source DirectShow Filters](/ffmpeg-source-directshow-filter) and [VLC Source DirectShow Filters](/vlc-source-directshow-filter) are helpful for handling popular video and audio file formats.
### System requirements
- Windows 11, Windows 10, Windows 8/8.1, Windows 7, Windows Vista, Windows Server 2012, and later
- DirectX 10 or later
### Distribution rights
Royalty-free distribution.
### Trial limitations
The trial version displays a watermark on the video window.
### Purchase of DirectShow Processing Filters Pack will give you the following benefits:
- Unlimited usage
- No nag-screen
- Free minor and major upgrades within one year (after one year, SDK will work the same as before) for a regular license and unlimited updates for unlimited time for the lifetime license
- Priority support and fixes
The regular license is billed annually and automatically renewed each year. You can cancel your subscription at any time.
---END OF PAGE---
# Page: https://www.visioforge.com/video-encryption-sdk
# Video Encryption SDK
v11.3
The Video Encryption SDK allows users to encode video in MP4 H264/AAC format and apply encryption using either a password or binary data. Within this SDK, DirectShow filters are provided for seamless integration into any DirectShow application. These filters come with implemented interfaces for simple configuration of filter parameters, simplifying the process of securing your video content.

#### DOWNLOADS
[Trial version](https://s3.us-west-2.amazonaws.com/files.visioforge.com/trials/visioforge\_video\_encryption\_sdk\_setup.exe)[Samples on GitHub](https://github.com/visioforge)[Video Encryptor sample](https://files.visioforge.com/trials/visioforge\_video\_encryptor\_setup.exe)

#### BUY
[Check prices or order](/buy)

#### HELP
[Online helpâ](/help/)[License agreementâ](/help/docs/eula/)
## VisioForge Video Encryption SDK major features include:
- H264 encoder profiles/levels, bitrate, quality, and other properties support
- Optional GPU usage for encoding
- Multiple audio streams support
- HD and 4K video support
- x86 and x64 versions
- AES-128 and AES-256 can be used for stream encryption
- Multithreading
SDK can use string, files, and binary data as encrypting keys. SDK uses an open AES-256 crypto algorithm to encrypt video and audio streams. You can seek encrypted video files like any other video file. AAC codec will be used for an audio stream, and H264 codec will be used for a video stream. Also, you can re-mux any source H264/AAC file or stream without reencoding.
Video Encryption SDK is already integrated into [Video Capture SDK .Net](https://www.visioforge.com/video-capture-sdk-net), [Video Edit SDK .Net](https://www.visioforge.com/video-edit-sdk-net), and [Media Player SDK .Net](https://www.visioforge.com/media-player-sdk-net) but requires an independent license.
AES-256 may require licensing in some countries. SDK can also use AES-128 for compatibility. Please get in touch with us if you want to use alternative encryption algorithms.
Video Encryption SDK can be used in any DirectShow code as two filters: muxer (encryptor) and demuxer (decryptor). Seeking is supported for demuxer.
You can use SDK as a core of your DRM video files system.
### Filter usage in a DirectShow graph

## Video Encryptor app sample
The Video Encryptor sample allows you to protect your video files with a password. All popular video formats are supported. You can use your favorite media player to play protected files. The app uses the Video Encryption SDK as an engine and supports Nvidia CUDA technology to increase encryption speed (on computers with Nvidia graphics cards).

### System requirements
- Windows 11, Windows 10, Windows 8/8.1, Windows 7, Windows Vista, Windows Server 2012, and later
- DirectX 10 or later
### Distribution rights
Royalty-free distribution.
### Trial limitations
The trial version displays a watermark on the video window.
### Purchase of Video Encryption SDK will give you the following benefits:
- Unlimited usage
- No nag-screen
- Free minor and major upgrades within one year (after one year, SDK will work the same as before) for a regular license and unlimited updates for unlimited time for the lifetime license
- Priority support and fixes
The regular license is billed annually and automatically renewed each year. You can cancel your subscription at any time.
---END OF PAGE---
# Page: https://www.visioforge.com/all-in-one-media-framework
# All-in-One Media Framework (Delphi/ActiveX)
v11.2
The framework includes several libraries designed for video capture, editing, and playback. The [video capture](https://www.visioforge.com/video-capture-sdk-net) core enables the recording of video and audio from various sources, such as webcams, IP cameras, or screens. The video editing core allows you to cut, join, process, and reencode files. The media player core can play video and audio files, as well as network streams. All cores support video and audio effects, frame grabbing, Picture-in-Picture, and on-screen display (OSD).
- 
- 
- 
- 


#### DOWNLOADS
[Delphi](https://s3.us-west-2.amazonaws.com/files.visioforge.com/trials/visioforge\_media\_framework\_delphi\_trial.exe)[ActiveX](https://s3.us-west-2.amazonaws.com/files.visioforge.com/trials/visioforge\_media\_framework\_activex\_trial.exe)[Samples on GitHub](https://github.com/visioforge)

#### BUY
[Check prices or order](/buy)

#### HELP
[Online helpâ](/help/docs/delphi/videocapture/)[Changelogâ](/help/docs/delphi/videocapture/changelog/)[License agreementâ](/help/docs/eula/)
### Purchase of Framework will give you the following benefits:
- Unlimited usage
- No nag-screen
- Free minor and major upgrades within one year (after one year, SDK will work the same as before) for a regular license and unlimited updates for unlimited time for the lifetime license
- Priority support and fixes
The regular license is billed annually and automatically renewed each year. You can cancel your subscription at any time.
The SDK is free for non-commercial use. Please contact us to get a free license.
## Features and capabilities
### Supported input devices:
- MPEG-2 camcorders of DV and HDV formats
- USB webcams and various capture devices, including 4K resolution support
- PCI-based video capture cards
- TV Tuners, both with and without an in-built MPEG Encoder
- IP cameras and servers using JPEG/MJPEG, MPEG-4, and H.264 protocols over HTTP, RTSP, or RTMP, with support for HD streams
- ONVIF-compliant IP cameras featuring PTZ controls
- NDI sources with DirectShow bridge
- Various audio capture devices and sound cards
- ASIO-compatible audio sources
- Blackmagic Decklink cards
### Supported input formats:
- MP4
- MOV
- AVI
- MPEG-TS/MPEG-PS
- MKV (Matroska)
- DV
- ASF/WMV
- MP3
- M4A/AAC
- WMA
- OGG Vorbis
- OPUS
- Speex
SDK can decode video and audio files using system decoders, FFMPEG, or libVLC.
### Supported output formats:
- AVI files with support for multiple codecs like MJPEG, DivX, XviD, and x264
- WMV files offer compatibility with custom WMV profiles and settings such as variable bit rate encoding (VBR), uncompressed audio or video streams, video sizing, buffering adjustments, frame rate customization, etc.
- DV and MPEG files directly from DV/HDV camcorders and TV tuners using an internal MPEG Encoder (via DirectCapture technology)
- DV files acquisition from any compatible video capture device
- MPEG-1/2/4 files, inclusive of VCD/SVCD/DVD standard profiles and FLV via an FFMPEG wrapper
- WebM files with VP8/VP9 video codecs and Vorbis audio codec
- MP4 files with H264/HEVC + AAC codecs, utilizing CPU or GPU acceleration (Nvidia, AMD/ATI, Intel)
- WAV, with options for compressed or PCM format
- WMA (Windows Media Audio)
- MP3, using LAME encoding
- Ogg Vorbis
- Customized output options through 3rd-party DirectShow filters
- Network streaming using FFMPEG
- AES encrypted video output
### Video processing and effects:
- image and text overlays
- adjustable video transparency
- controls for brightness, contrast, saturation, and hue
- deinterlace
- noise reduction
- pan and zoom
- resizing to any resolution
- chroma-key compositing
- motion detection
- Picture-in-Picture
- On-Screen Display (OSD)
- integration with third-party DirectShow filters
- camera control interface
### Audio processing and effects:
- volume booster
- equalizer
- 3D-bass system
- normalization
- auto/manual gain
- there are a lot of other effects
### Sample applications:
- Audio Capture
- DV Capture
- IP Capture
- Screen Capture
- Simple Video Capture
- Main Capture Demo
- Main Edit Demo
- Main Player Demo
- Audio Player
- DVD Player
- Memory Playback
- Video Player
### Development platforms:
- Visual Studio 2005 and later: Visual C#, Visual C++, Visual Basic .NET
- Delphi 6 / 7 / 2005 / 2006 / 2007 / 2009 / 2010 / XE / XE2 / XE3 / XE4 / XE5 / XE6 / XE7 / XE8 / 10 / 10.1 / 10.2 / 10.3 / 10.4 / 11 / 12
- Visual Studio 6: Visual C++, Visual Basic 6
- Borland C++ Builder 5 and later
- may be used with other ActiveX-compatible applications like Microsoft Access, Word, Excel, FrontPage, Powerbuilder, etc.
- x86 and x64 versions
### System requirements
- Windows 11, Windows 10, Windows 8/8.1, Windows 7, Windows Vista, Windows Server 2012, and later
- .Net Framework 4.0 or later (for ActiveX-based .Net demo applications)
- DirectX 9 or later
### Distribution rights
Royalty-free distribution.
### Trial limitations
The trial version displays a watermark on the video window.

#### EDITION

#### STANDARD

#### PROFESSIONAL

#### PREMIUM
Supported input devices and other sources
- Web cameras
- TV tuners
- DV and MPEG camcorders
- Screen capture
- HTTP /Â RTSP / ONVIF IP cameras
- UDP, TCP, RTMP and other network streams
- Additional engines for network streams
Video preview
Frame grabber
Video processing
Audio processing
HD and 4K video support
TV tuning
Network streaming in WMV format
Network streaming using RTMP / RTSP / UDP
Chroma-key
Motion detection
Video processing using DirectShow filters
OSD (On-Screen Display)
Picture-In-Picture
Changing output file name on-the-fly
Multiple output screens
GPU-accelerated video effects
Output to Virtual Camera SDK
Video Encryption SDK support
Output formats
- AVI
- WMV (Windows Media Video)
- WMA (Windows Media Audio)
- WAV
- MP3
- Ogg Vorbis
- DV video
- DV / MPEG-1/2/4 (using TV tuner with internal MPEG encoder or DV/HDV camcorder)
- Flash Video (FLV) using FFMPEG
- WebM
- Custom output formats using external DirectShow filters
- MPEG-1/2/4 using FFMPEG
- MP4 H264/AAC using software, Intel QuickSync or nVidia NVENC / CUDA
SDK contains optional FFMPEG and libVLC libraries licensed as LGPL v2.1.
---END OF PAGE---
# Page: https://www.visioforge.com/video-fingerprinting-sdk
# Video Fingerprinting SDK .Net / C++
v12.1
Our state-of-the-art video fingerprinting technology incorporates the latest advances in scene analysis, object tracking, and motion estimation to analyze the content of any video to identify its unique characteristics, such as colors, scene structure, and the motion of objects. This allows a copy of the video to be identified despite changes in resolution, bitrate, method of encoding, or file format. The video can even be detected when it is included inside another video or when just a fragment of the video is reproduced.
Our SDK lets you integrate this video identification functionality into your applications and services. Our licensing agreement permits you to incorporate the technology in an unlimited number of products for one payment. There are no other fees, regardless of the number of copies of these products you sell.
## What is a video fingerprint?
A video fingerprint is a compact digital descriptor that can be extracted from any video source, whether a fragment of a TV broadcast, a video file, an online video, or a DVD or Blu-ray Disk. These video fingerprints can then be stored, copied, and compared. Video fingerprints can be used to identify copyrighted video material and duplicate videos, search for videos, organize videos, recognize when a specific video is played, monitor media, or track ads.
Use the Video Duplicates Finder as a sample application to find similar video files.
Use the Media Monitoring Tool as a sample application to find one video fragment (TV commercial, for example) in another (full broadcast recording).
.Net SDK version has a helper for MongoDB usage as fingerprint storage.
### Some of the ways you can put our Video Fingerprinting SDK to use:
- An online video hosting service like YouTube could use video fingerprints to avoid copyright infringement. A database of video fingerprints of the copyrighted material would be developed and compared to the video fingerprint materials submitted by users to prevent the illegal submission of pirated videos.
- A video archive service could use video fingerprints to save space and block duplicate uploads. A video fingerprint would be extracted from each video in the archive. The video fingerprint of each new submission would be compared to the database of the fingerprints of existing videos, checking to make sure they are different and blocking duplicate submissions.
- Video Organizer software could use video fingerprints to identify copies of the same movie or video clip and group them despite differences in format, resolution, or bitrate.
- Set-top box software could use video fingerprints to develop interactive advertisements by identifying when specific TV ads are shown and displaying a clickable URL to allow the user to access the product website. It could also be used to track how often the ad is viewed.
- A search engine for videos could be developed using our Video Fingerprinting SDK â a unique, revolutionary service implementing a video-by-video search functionality that would be the first of its kind.
- A TV Clipping Service could use video fingerprinting technology to automate TV broadcast monitoring and TV ad verification to detect when a clientâs ad is aired so they can ensure the terms of their TV advertising agreements are being respected.
- We have developed our media monitoring tool as a fully functional application that enables the detection of ad samples in a broadcast dump to implement this service. This application, including sources, can be licensed separately and used as a basis for building your product or integrated into an existing system. See our media monitoring tool page for more information.
- [Detecting pirated video content](https://www.visioforge.com/detecting-pirated-video-content)
### What operating systems are supported?
- C++ SDK supports Windows and Linux, or any other POSIX-compatible operating system (available by request)
- .Net SDK supports Windows 7 and later
### What is the size of a video fingerprint file?
Each second of a video stream analyzed requires about 1kb for its video fingerprint. Duplicate detection generally only requires 3-5 seconds of each video to be indexed. Indexing of full videos is required in order to identify a video that has been included inside another.
### How much time is required for computations?
Indexing one second of video takes about 300 milliseconds â the actual processing of the file accounts for nearly half of that time (150 milliseconds), while video decompression accounts for the rest. Matching a pair of 10-second-long fingerprints takes 1-2 milliseconds. These times were established by testing with an Intel i3 processor and LAV filters for video compression.
### Is video reading or decoding software included?
- C++: No. You will need some other library (FFMPEG, for example, demo available) to implement video reading in your application
- .Net: Yes, FFMPEG and libVLC are included. Also, system codecs can be used for decoding
### What code samples are available?
The following code samples are included with your purchase:
C++:
- FFMPEG-based console application that indexes videos and builds fingerprints (Windows, Linux)
- A console application that compares two fingerprints to detect duplicates (Windows, Linux)
- A console application that searches for entries of one fingerprint inside another (Windows, Linux)
- Source code of a full Media Monitoring Tool application (Windows, Linux)
.Net:
- Media Monitoring Tool and Media Monitoring Tool Live source code
- Video Duplicates Finder source code.
### What is other documentation available
C++:
- VFCompare API â a video fingerprinting algorithm implementation that is optimized for the detection of duplicate videos
- VFSearch API â a video fingerprinting algorithm implementation that is optimized for searching video in video
.Net:
- Full API is described in a help file.
### How can I try-out and evaluate the technology?
We suggest you download and experiment with the trial versions of our Media Monitoring Tool application and the Video Duplicates Finder application and familiarize yourself with the API and code samples.
.The .Net version of SDK is available as an independent installer with sample applications and sample source code inside.
âMMT/VDF tools' source code is included (tools require .Net 4.5 for SOAP export. SDK can be used in .Net 4.0 and later).
âThe C++ version of SDK is available as an independent installer.
### System requirements
Mac OS, Windows, or Linux.
### Distribution rights
Royalty-free distribution.
### Trial limitations
The trial version displays a watermark on the video window.
### Purchase of Video Fingerprinting SDK will give you the following benefits:
- Unlimited usage
- No nag-screen
- Free minor and major upgrades within one year (after one year, SDK will work the same as before) for a regular license and unlimited updates for unlimited time for the lifetime license
- Priority support and fixes
The regular license is billed annually and automatically renewed each year. You can cancel your subscription at any time.
## Media Monitoring Tool (Live) Sample
Our demo app is a fully functional media monitoring tool that can be used for ad tracking and broadcast media monitoring. It enables the detection of ad samples in a broadcast dump. You can also use this application and our Video Fingerprinting SDK to build your product or service for TV broadcast monitoring or integrate it into an existing service.
### How it works
Our Media Monitoring Tool can detect when a reference sample video is played in a recorded TV broadcast, so paying someone to watch TV 24 hours a day, seven days a week, is no longer necessary. The TV broadcast stream is registered as an array of 5-minute-long video files, and then they are compared to the specified sample reference video, such as the commercial, to be tracked. The application will automatically detect all inclusions of the selected video in the recorded files and provide a list of the video files containing the commercial.
Our Media Monitoring Tool lets you automate the process of TV broadcast monitoring. It reduces the amount of personnel needed and the associated labor costs. And taking advantage of the content-based automated video search will also improve accuracy. It will even allow you to provide your clients digital proof of commercial playback without manual work.â
The process begins by recording the broadcast stream as a series of five-minute videos. The Media Monitoring Tool analyzes the captured content and finds all the clientâs commercial instances. The results are presented as a list of thumbnails highlighting the clips containing the commercial.
### Benefits
- Accurate results â The program's content-based video search technology ensures accuracy and speed. The algorithm quickly and accurately identifies all instances of the reference video in the recorded broadcast video stream without any human intervention and no human error.â
- Reduced costs â Because you no longer have to pay people to sit and stare at a TV screen and manually record the details of when the commercial is aired, your operation costs are dramatically reduced.
- âEasy use â The program's easy-to-learn intuitive interface allows custom searches to be defined and performed in seconds. The user selects the folder that contains the broadcast dump and specifies the video reference samples containing the ads to be identified. The program does the rest.
## Video Duplicates Finder Sample
Video Duplicates Finder allows you to find similar or duplicate video files on your PC. AVI, MPEG-1, MPEG-2, Windows Media Video, MP4, and many other formats are supported. This app is a sample of Video Fingerprinting SDK usage.
### Major features include:
- AVI, WMV, MP4, MPG, TS, and a lot of other formats are supported
- SD, HD, and 4K videos are supported
- Sensitivity settings
- Timeshift option
- Complete file processing or a custom part of it
- DirectShow (system codecs), FFMPEG, and VLC decoding engines

#### DOWNLOADS
[Windows / .Net](https://s3.us-west-2.amazonaws.com/files.visioforge.com/trials/visioforge\_sdks\_installer\_dotnet\_setup.exe)[Windows / C++](https://s3.us-west-2.amazonaws.com/files.visioforge.com/trials/visioforge\_video\_fingerprinting\_sdk\_cpp\_setup.exe)[Linux / C++](https://s3.us-west-2.amazonaws.com/files.visioforge.com/trials/visioforge\_video\_fingerprinting\_sdk\_cpp\_linux.zip)[Samples on GitHub](https://github.com/visioforge/.Net-SDK-s-samples/tree/master/Video%20Fingerprinting%20SDK)

#### BUY
[Check prices or order](/buy)

#### HELP
[Online helpâ](/help/)[Changelogâ](/help/docs/vfp/changelog/)[License agreementâ](/help/docs/eula/)
SDK contains optional FFMPEG and libVLC libraries licensed as LGPL v2.1.
---END OF PAGE---
# Page: https://www.visioforge.com/detecting-pirated-video-content
# Detecting pirated video content
## Main information
Detecting pirated video content is essential for a new digital content era. Many types of websites offer users the ability to upload video content. Websites like [YouTube](https://www.youtube.com) exist solely for this reason, but many social networking sites also allow this capability. Such sites' immense popularity has attracted the ire of content producers who are getting serious about protecting their copyrights and putting real pressure on the owners of these types of sites to eliminate illegal infringement. A large amount of copyright-protected material â from clips from movies and TV shows to music and music videos â is readily available for download by visitors to these types of online video hosting services. While the site operators claim that they are operating under the Fair Use doctrine, content producers and large media companies aren't buying it. They have deep pockets and armies of lawyers at their disposal and are gearing up to take legal action. To avoid costly, protracted legal battles, online video upload sites pursue technologically-based methods of reducing and preventing copyright infringement on their sites.
## Detecting illegal content using Video Fingerprinting SDK
Preventing inadvertent liability for copyright infringement is a significant issue for any site that permits user-uploaded content. Copyright violations can result in costly and time-consuming legal action and could result in large civil or criminal liability. Our [Video Fingerprinting SDK](https://www.visioforge.com/video-fingerprinting-sdk) technology provides a perfect solution for these types of sites to continue providing video uploading and hosting of user content while minimizing the risks of copyright infringement. Our state-of-the-art video fingerprinting technology incorporates the latest advances in scene analysis, object tracking, and motion estimation to analyze the content of any video to identify its unique characteristics, such as colors, scene structure, and the motion of objects, to a compact digital descriptor, the video fingerprint. A database of these video fingerprints can be created for copyrighted material. They can then be checked against video materials being uploaded by site users to detect the presence of copyrighted materials and disallow the posting of such materials to their websites.
## Comparison with other products
Unlike products that attempt to provide a similar capability, our technology allows these fingerprints to be identified despite changes in resolution, bitrate, method of encoding, or file format. The video can even be detected when it is included inside another video or when just a fragment of the video is reproduced. These video fingerprints can then be stored, copied, and compared. So, no matter how a user might try to edit or manipulate the video to attempt to circumvent the system, the copyrighted material will be detected and disallowed. This is a significant advantage over competing technologies and uses our video fingerprinting and media monitoring technology as the best choice for copyright infringement detection for owners of sites that wish to host user video content. No other product on the market today can provide this level of protection.
## More information about detecting pirated video content and our products
- [Contact us](https://support.visioforge.com/) to see how our video fingerprinting technology can be integrated with your site to implement copyright infringement detection.
- Check the product page of [Video Fingerprinting SDK](/video-fingerprinting-sdk)

---END OF PAGE---
# Page: https://www.visioforge.com/buy
# Purchase or update subscription for our products
## Subscription will give you the following benefits
- Unlimited usage
- No annoying reminder message
- Free minor and major upgrades
- Priority support and fixes
- You can use the product without updates even if the subscription is over
The regular license is billed annually and automatically renewed each year. You can cancel your subscription at any time.
## How safe is my online purchase?
Payments are handled by [Stripe](https://www.stripe.com/), a reliable payment service on the Internet. The ordering pages are on a secure website that encrypts all transmitted credit card data using the secure HTTPS protocol. During the registration process, you will be given the option to place a fax, mail, or purchase order as an alternative to the standard online credit card order. When filling out the form, please be sure to enter your correct personal or company information and quantity. If you ordered our product but haven't received the registration key in 24 hours, lost your registration key, or have any questions about ordering, please contact us at [support@visioforge.com](mailto:support@visioforge.com).
â
Please check our [privacy policy](https://www.visioforge.com/privacy-policy).
## Custom filters, assemblies, or other files names
We can provide custom names for filters/assemblies/other purchase files containing 10 or more license keys.
## Payment methods
- Credit/debit card (Visa, Visa Electron, MasterCard, Maestro, Eurocard, DinersClub, American Express, JCB, PostePay, Discover (Novus) and Carte Bleue)
- Bank transfer (Wire/SEPA/ACH transfer)
- Alipay, WeChat Pay
- Apple Pay
- Google Pay
- Klarna
- Revolut Pay
- Direct Debit
- many other ways
## Team license
You can buy a team site-wide license and use it within offices in one city.
## License Non-Renewal Information
When you don't renew your license, your project maintains complete functionality without any interruption. This preservation of functionality happens because once your application is built and deployed, it operates independently of the license status.
### What Continues Working
All features, components, and capabilities that were operational before your license expired will continue to function exactly as they did previously. The application's performance, user experience, and technical capabilities remain unchanged after license expiration.
### What You Lose Access To
The primary limitation that occurs when your license expires is the inability to upgrade to newer SDK releases. This means:
- You cannot install or implement newer versions of the SDK
- You won't receive feature enhancements released in future SDK versions
- You won't benefit from bug fixes or security updates in newer releases
### Future Licensing Options
If you later decide you want access to newer SDK releases, you can purchase a new license at any point in the future. There's no penalty or complication involved in reactivating your licensing after a period of non-renewal.
This approach allows you to make strategic decisions about when upgrades are necessary for your project, rather than forcing you into a continuous renewal cycle if it doesn't align with your development roadmap or budget constraints.
## Premium support
If you're looking for top-tier support for your software, our premium support package is exactly what you need. With our premium support, you'll get access to various tools and services that will help you get the most out of your software, including AnyDesk, Microsoft Teams, Telegram, and more.
One of the key benefits of our premium support package is access to AnyDesk. This powerful remote desktop application allows our support team to access your computer and troubleshoot any issues you may be experiencing. With AnyDesk, our support team can quickly diagnose and resolve problems.
In addition to AnyDesk, our premium support package also includes access to Microsoft Teams. This collaboration platform enables our support team to communicate with you in real-time, share files, and even conduct video calls. This ensures you have direct access to our support team whenever you need it, no matter where you are.
We also offer support via Telegram, a secure messaging platform that allows us to provide you with quick, convenient support directly from your mobile device. Whether you're on the go or prefer to communicate via messaging, our support team can help you via Telegram.
When you sign up for our premium support package, you can rest assured that you're getting the best technical support for your software. Our team of experts is highly trained and dedicated to providing you with the highest level of service possible so you can get back to using your software confidently.
Our premium support package is available for just EUR 250 for 5 hours of dedicated support. To sign up for our premium support package and access these benefits, use the following [\*\*payment link\*\*](https://buy.stripe.com/7sI3ch4ou1C62Dm3dA). Once your payment is processed, our support team will be in touch to schedule your support sessions and get you started with the best support possible for your software.
The SDK is free for non-commercial use. Please contact us to get a free license.
### Video Capture SDK .Net
##### STANDARD
[â¬250]â Regular (1 year)
[Debit/Credit card](https://buy.stripe.com/dR69AFdZ42Ga2Dm9AA)[Bank, SEPA, Apple, and more](https://buy.stripe.com/28o0056wC6Wq4Lug0G)
[â¬750]â Lifetime/Team
[All methods](https://buy.stripe.com/14k4gl9IObcG6TC5l1)
##### PROFESSIONAL
[â¬350]â Regular (1 year)
[Debit/Credit card](https://buy.stripe.com/aEUcMRcV0cgKem4bIJ)[Bank, SEPA, Apple, and more](https://buy.stripe.com/4gw6ot5sy5Sm6TCdSA)
[â¬1000]â Lifetime/Team
[All methods](https://buy.stripe.com/bIYbINf381C6cdWdRj)
##### PREMIUM
[â¬500]â Regular (1 year)
[Debit/Credit card](https://buy.stripe.com/dR628dg7c80ucdW4gi)[Bank, SEPA, Apple, and more](https://buy.stripe.com/8wMcMR6wCfsW5PydSz)
[â¬1500]â Lifetime/Team
[All methods](https://buy.stripe.com/cN2aEJ5sya8C2Dm5kM)
### Video Edit SDK .Net
##### STANDARD
[â¬250]â Regular (1 year)
[Debit/Credit card](https://buy.stripe.com/dR66ot08e94yem49AG)[Bank, SEPA, Apple, and more](https://buy.stripe.com/00gfZ33kq1C67XG01L)
[â¬750]â Lifetime/Team
[All methods](https://buy.stripe.com/eVa8wBcV0gx00ve14s)
##### PROFESSIONAL
[â¬350]â Regular (1 year)
[Debit/Credit card](https://buy.stripe.com/6oEaEJ08ecgK7XGdQX)[Bank, SEPA, Apple, and more](https://buy.stripe.com/7sI4gl3kqdkO7XG29U)
[â¬1000]â Lifetime/Team
[All methods](https://buy.stripe.com/cN2fZ3cV0fsW0ve6oL)
##### PREMIUM
[â¬500]â Regular (1 year)
[Debit/Credit card](https://buy.stripe.com/eVaaEJ08e5Smdi0eV2)[Bank, SEPA, Apple, and more](https://buy.stripe.com/fZeaEJdZ40y2di015h)
[â¬1500]â Lifetime/Team
[All methods](https://buy.stripe.com/bIY5kp08e2Ga5Py8wS)
### Media Player SDK .Net
##### STANDARD
[â¬250]â Regular (1 year)
[Debit/Credit card](https://buy.stripe.com/7sI9AF08efsWcdW7sE)[Bank, SEPA, Apple, and more](https://buy.stripe.com/14k1492gm6Wq0ve8yj)
[â¬750]â Lifetime/Team
[All methods](https://buy.stripe.com/cN2fZ36wCa8C4LudR9)
##### PROFESSIONAL
[â¬350]â Regular (1 year)
[Debit/Credit card](https://buy.stripe.com/aEU5kpf380y20ve5kx)[Bank, SEPA, Apple, and more](https://buy.stripe.com/bIY28d1ci1C61zi8yk)
[â¬1000]â Lifetime/Team
[All methods](https://buy.stripe.com/8wMaEJbQWeoSdi0eVc)
### Media Blocks SDK .Net
[â¬500]â Regular (1 year)
[Debit/Credit card](https://buy.stripe.com/14kaEJ6wCa8C1zi9BK)[Bank, SEPA, Apple, and more](https://buy.stripe.com/3cseUZ5sy6Wq5Py5mc)
[â¬1500]â Lifetime/Team
[All methods](https://buy.stripe.com/bIY4gl4oueoSb9SeW5)
### Video Edit SDK FFMPEG .Net
##### STANDARD
[â¬250]â Regular (1 year)
[Debit/Credit card](https://buy.stripe.com/6oEbIN1cigx091KaFm)[Bank, SEPA, Apple, and more](https://buy.stripe.com/fZe8wBg7ccgK1zi6qd)
[â¬750]â Lifetime/Team
[All methods](https://buy.stripe.com/aEUbINcV080uem43cV)
##### PROFESSIONAL
[â¬350]â Regular (1 year)
[Debit/Credit card](https://buy.stripe.com/00gcMRaMS80u1zi5l4)[Bank, SEPA, Apple, and more](https://buy.stripe.com/bIY149aMS0y2a5O7ui)
[â¬1000]â Lifetime/Team
[All methods](https://buy.stripe.com/bIYbIN5sy0y20vefZJ)
##### PREMIUM
[â¬500]â Regular (1 year)
[Debit/Credit card](https://buy.stripe.com/dR64glcV0fsWem48xi)[Bank, SEPA, Apple, and more](https://buy.stripe.com/5kA7sx4ou94y1zi3e3)
[â¬1500]â Lifetime/Team
[All methods](https://buy.stripe.com/4gw1498EK3Keem46pb)
### Virtual Camera SDK
##### PROFESSIONAL
[â¬500]â Regular (1 year)
[Debit/Credit card](https://buy.stripe.com/00g149cV00y2b9SeVq)[Bank, SEPA, Apple, and more](https://buy.stripe.com/fZe28d8EKeoS5Py3e6)
[â¬1500]â Lifetime/Team
[All methods](https://buy.stripe.com/bIYaEJ1ci6Wqa5ObJf)
##### SOURCE CODE
[â¬2500]â Lifetime/Team
[All methods](https://buy.stripe.com/aEUdQVcV06Wq1zibJg)
### VLC Source DirectShow Filter
[â¬300]â Regular (1 year)
[Debit/Credit card](https://buy.stripe.com/fZe8wB6wC1C67XGeVt)[Bank, SEPA, Apple, and more](https://buy.stripe.com/cN2eUZ8EK4Oi1zibKD)
[â¬900]â Lifetime/Team
[All methods](https://buy.stripe.com/6oEeUZ7AG6Wq2DmbK0)
### FFMPEG Source DirectShow Filter
[â¬300]â Regular (1 year)
[Debit/Credit card](https://buy.stripe.com/bIYcMRdZ45Smb9S7t2)[Bank, SEPA, Apple, and more](https://buy.stripe.com/4gwbIN1cibcG7XGbKE)
[â¬900]â Lifetime/Team
[All methods](https://buy.stripe.com/5kAcMR1ci3Keem4dRr)
### DirectShow Encoding Filters Pack
[â¬500]â Regular (1 year)
[Debit/Credit card](https://buy.stripe.com/4gwbIN7AG94y1zi7t4)[Bank, SEPA, Apple, and more](https://buy.stripe.com/aEU4gl4oubcGa5O5mh)
[â¬1500]â Lifetime/Team
[All methods](https://buy.stripe.com/5kAdQVcV00y26TCbJc)
### DirectShow Processing Filters Pack
[â¬350]â Regular (1 year)
[Debit/Credit card](https://buy.stripe.com/4gw9AF5sy0y26TC4gT)[Bank, SEPA, Apple, and more](https://buy.stripe.com/9AQ28d5sy2Ga91K162)
[â¬1000]â Lifetime/Team
[All methods](https://buy.stripe.com/dR6eUZg7ceoSgucaF9)
### Video Encryption SDK
[â¬500]â Regular (1 year)
[Debit/Credit card](https://buy.stripe.com/8wM28d3kq5Smguc28M)[Bank, SEPA, Apple, and more](https://buy.stripe.com/28o7sx3kq6Wqfq85mj)
[â¬1500]â Lifetime/Team
[All methods](https://buy.stripe.com/dR6bIN8EK3Ke7XG9Bf)
### All-in-One Media Framework (Delphi/ActiveX)
##### STANDARD
[â¬350]â Regular (1 year)
[Debit/Credit card](https://buy.stripe.com/8wMdQV7AG6Wq7XG4hO)[Bank, SEPA, Apple, and more](https://buy.stripe.com/dR6dQV4ou94ycdW9CA)
[â¬700]â Lifetime/Team
[All methods](https://buy.stripe.com/dR69AF8EKbcGa5OcOp)
##### PROFESSIONAL
[â¬500]â Regular (1 year)
[Debit/Credit card](https://buy.stripe.com/fZebIN9IOfsW6TC3dJ)[Bank, SEPA, Apple, and more](https://buy.stripe.com/8wM9AF3kq1C60ve2aa)
[â¬1000]â Lifetime/Team
[All methods](https://buy.stripe.com/4gw8wB2gm0y2b9S29M)
##### PREMIUM
[â¬750]â Regular (1 year)
[Debit/Credit card](https://buy.stripe.com/9AQcMR7AG2Gab9SdSm)[Bank, SEPA, Apple, and more](https://buy.stripe.com/eVaeUZ2gm6Wq5Py2a9)
[â¬1500]â Lifetime/Team
[All methods](https://buy.stripe.com/5kAaEJ6wCa8Cem48yb)
### Video Fingerprinting SDK
[â¬900]â Regular (1 year)
[Debit/Credit card](https://buy.stripe.com/14kfZ3aMS6WqcdWaFy)[Bank, SEPA, Apple, and more](https://buy.stripe.com/3cs4gl5sy6Wq1zi7uv)
[â¬2000]â Lifetime/Team
[All methods](https://buy.stripe.com/bIY7sx6wC1C66TCcNH)
[â¬25]â Runtime (1 server core per year)
[Debit/Credit card](https://buy.stripe.com/aEUaEJ3kq0y2em4bJE)[Bank, SEPA, Apple, and more](https://buy.stripe.com/8wM6ot2gm6Wq5Pyg12)
### Bundles
â¬700
â¬1800
.Net Bundle
Professional
Video Capture SDK .Net Professional Edition
Media Player SDK .Net Professional Edition
Video Edit SDK .Net Professional Edition
Video Edit SDK FFMPEG .Net Professional Edition
Media Blocks SDK .Net
[Regular license](https://buy.stripe.com/eVacMR6wCa8CcdW5li)[Lifetime/Team license](https://buy.stripe.com/00g7sx5sy0y291K3db)
â¬1000
â¬2500
.Net Bundle
Premium
Video Capture SDK .Net Premium Edition
Media Player SDK .Net Professional Edition
Video Edit SDK .Net Premium Edition
Video Edit SDK FFMPEG .Net Premium Edition
Media Blocks SDK .Net
[Regular license](https://buy.stripe.com/28ofZ3bQW6Wqb9S5lk)[Lifetime/Team license](https://buy.stripe.com/aEUbIN3kq5Sm3Hq9BB)
â¬1000
â¬2500
DirectShow All-In-One
Bundle
FFMPEG Source DirectShow Filter
VLC Source DirectShow Filter
DirectShow Processing Filters Pack
DirectShow Encoding Filters Pack
DirectShow Source SDK for Kinect
[Regular license](https://buy.stripe.com/00g149cV0cgK3HqaFZ)[Lifetime/Team license](https://buy.stripe.com/8wM1498EK4Oib9S8xS)
The price list is available in [PDF](http://files.visioforge.com/shared/pricelist.pdf).
---END OF PAGE---
# Page: https://www.visioforge.com/news
# The latest news and updates
## Boost Your Development with Our Latest SDKs
Discover our new Software Development Kits (SDKs) made just for software developers. Our SDKs are designed to help you build strong, scalable, and efficient apps quickly and easily. Whether you're working on mobile apps, desktop software, or web solutions, our SDKs come with easy-to-follow documentation, sample code, and simple integration to speed up your development process. We understand the challenges developers face, and our goal is to provide tools that simplify and enhance your workflow. With our SDKs, you'll have everything you need to create high-quality applications that meet the demands of today's users.
## Stay Updated and Get the Best Support
Keep up with the latest trends with our regularly updated SDKs, featuring the newest technologies and standards. We are committed to ensuring that our SDKs evolve to meet the ever-changing needs of the software development industry. Our team is dedicated to providing excellent support and resources to help you get the most out of our SDKs. Explore our range today and take your development experience to the next level. With our comprehensive support, you'll be able to solve problems quickly and efficiently, allowing you to focus on what you do bestâcreating amazing software. Happy coding!
[News, updates, and product releases - 2024](https://www.visioforge.com/news-2024)
June 13, 2024
visioforge
[No Comments](https://www.visioforge.com/news-2024#respond)
[Read More](https://www.visioforge.com/news-2024)
[News, updates, and product releases - 2023](https://www.visioforge.com/news-2023)
December 31, 2023
visioforge
[No Comments](https://www.visioforge.com/news-2023#respond)
[Read More](https://www.visioforge.com/news-2023)
[News, updates, and product releases - 2022](https://www.visioforge.com/news-2022)
December 31, 2022
visioforge
[No Comments](https://www.visioforge.com/news-2022#respond)
[Read More](https://www.visioforge.com/news-2022)
[News, updates, and product releases - 2021](https://www.visioforge.com/news-2021)
December 31, 2021
visioforge
[No Comments](https://www.visioforge.com/news-2021#respond)
[Read More](https://www.visioforge.com/news-2021)
---END OF PAGE---
# Page: https://www.visioforge.com/legal-information
# Legal and regulatory information
## Legal information
Roman Miniailov dba VisioForge
\*\*VAT ID\*\*: ESZ0362544T
\*\*Address\*\*: Spain, 33200, Asturias, Gijon
## Privacy policy
At VisioForge, we are committed to protecting your privacy. Our Privacy Policy outlines the types of personal information we collect, how it is used, and the measures we take to ensure your data is secure. We adhere to all applicable data protection regulations, including the General Data Protection Regulation (GDPR). For more detailed information, please refer to our [Privacy Policy](/privacy-policy).
## Refund Policy
We strive to ensure our customers are satisfied with their purchases. If for any reason you are not completely satisfied, you may be eligible for a refund. Our Refund Policy provides detailed information on the eligibility criteria and the process for requesting a refund. To learn more, please read our [Refund Policy](/refund-policy).
## Support Service Level Agreement (SLA)
Our Support Service Level Agreement (SLA) defines the level of service you can expect from VisioForge. This includes response times, support availability, and the process for resolving issues. We are dedicated to providing prompt and efficient support to ensure your experience with our products is seamless. For more information, please review our [Support SLA](/support-service-level-agreement-sla).

---END OF PAGE---
# Page: https://www.visioforge.com/refund-policy
# Refund policy
Thank you for shopping at VisioForge. Please test our software before purchasing using a TRIAL version. Our refund policy has basic rules and some limitations.
## Before returning a product
If you are having an issue with a product, there may be other options before requesting a return:
- If youâve purchased and downloaded software and need assistance with installation and activation, please email [order@visioforge.com](mailto:order@visioforge.com) or use [the support portal](https://support.visioforge.com/).
- If you require technical support with a VisioForge software product, please email [support@visioforge.com](mailto:support@visioforge.com), use [the support portal](https://support.visioforge.com/), or check [online help](https://www.visioforge.com/help/).
## Refund basic rules
We recommend contacting us for assistance if you experience issues receiving or downloading our products. By our refund policy, we issue refunds for digital products within 30 days of the product's original purchase if the software has bugs or problems.
## Refund policy limitations
- We issue refunds for digital products within 30 days of the product's original purchase if the software has bugs or problems.
- âWe do not perform refunds for renewals or after 30 days.
- We do not perform refunds for purchases with discounts.
- âWe do not perform refunds for auto-renewals enabled during the first purchase (before auto-renew happens, you'll have several emails about auto-renew from our payment processor (2Checkout or Stripe)).
## Return criteria
- All returns and exchanges must be accompanied and processed through the appropriate channels within 30 days of purchase.
- When returning software, the software must have the license terminated on the user's machine and be removed from that machine. We may require you to sign an electronic letter of destruction as a condition of your return to confirm that you have uninstalled and have not made any copies of the product. The license code for these products will be blocked, and you will not be able to install or use the software in the future.
- All included products and services must be returned together for promotional items and bundles. Suppose a service is included in a promotion and a bundle has been used (for example, a used promotional promo code). In that case, the total retail value of the service will be deducted from the refund amount. When a bundle is purchased, and only part of the bundle is returned, the discount is void, and the total discount will be deducted from the refund.
- We may extend the 30-day return period during holidays or other periods if a more extended return period was advertised on the website/promotional information when you made your purchase.
- If we lower our price on an item within 30 days of your purchase, we will honor the lower price. If you notice that we have reduced the price on an item you recently purchased, contact [order@visioforge.com](mailto:order@visioforge.com) and we will gladly issue a refund or credit for the difference (if you paid with a credit card, you'd need to use the same card). This offer does not apply to price reductions associated with special sale events such as Black Friday, Cyber Monday, and Christmas Holidays.
## Privacy policy
Please check our [privacy policy](/privacy-policy).

---END OF PAGE---
# Page: https://www.visioforge.com/terms-and-conditions
# Terms and conditions
The following terms and conditions (collectively, these âTerms and Conditionsâ) apply to your use of [https://www.visioforge.com](https://www.visioforge.com/), including any content, functionality, and services offered on or via [https://www.visioforge.com](https://www.visioforge.com/) (the âWebsiteâ).
Please read the Terms and Conditions carefully before you start using VisioForge because by using the Website you accept and agree to be bound and abide by these Terms and Conditions.
These Terms and Conditions are effective as of October 1, 2016. We expressly reserve the right to change these Terms and Conditions from time to time without notice to you. You acknowledge and agree that it is your responsibility to review this Website and these Terms and Conditions from time to time and to familiarize yourself with any modifications. Your continued use of this Website after such modifications will constitute acknowledgment of the modified Terms and Conditions and agreement to abide and be bound by the modified Terms and Conditions.
## Conduct on website
Your use of the Website is subject to all applicable laws and regulations, and you are solely responsible for the substance of your communications through the Website.
By posting information in or otherwise using any communications service, chat room, message board, newsgroup, software library, or another interactive service that may be available to you on or through this Website, you agree that you will not upload, share, post, or otherwise distribute or facilitate distribution of any content â including text, communications, software, images, sounds, data, or other information â that:
- Is unlawful, threatening, abusive, harassing, defamatory, libelous, deceptive, fraudulent, invasive of anotherâs privacy, tortuous, contains explicit or graphic descriptions or accounts of sexual acts (including but not limited to sexual language of a violent or threatening nature directed at another individual or group of individuals), or otherwise violates our rules or policies
- Victimizes harasses, degrades, or intimidates an individual or group of individuals based on religion, gender, sexual orientation, race, ethnicity, age, or disability
- Infringes on any patent, trademark, trade secret, copyright, right of publicity, or other proprietary rights of any party
- Constitutes unauthorized or unsolicited advertising, junk or bulk email (also known as âspammingâ), chain letters, any other form of unauthorized solicitation, or any form of lottery or gambling
- Contains software viruses or any other computer code, files, or programs that are designed or intended to disrupt, damage, or limit the functioning of any software, hardware, or telecommunications equipment or to damage or obtain unauthorized access to any data or other information of any third party
- Impersonates any person or entity, including any of our employees or representatives
We neither endorse nor assume any liability for the contents of any material uploaded or submitted by third-party users of the Website. We generally do not pre-screen, monitor, or edit the content posted by users of communications services, chat rooms, message boards, newsgroups, software libraries, or other interactive services that may be available on or through this Website.
However, we and our agents have the right at their sole discretion to remove any content that, in our judgment, does not comply with these Terms of Use and any other rules of user conduct for our Website, or is otherwise harmful, objectionable, or inaccurate. We are not responsible for any failure or delay in removing such content. You hereby consent to such removal and waive any claim against us arising out of such removal of content.
You agree that we may at any time, and at our sole discretion, terminate your membership, account, or other affiliation with our site without prior notice to you for violating any of the above provisions.
Also, you acknowledge that we will cooperate fully with investigations of violations of systems or network security at other sites, including cooperating with law enforcement authorities in investigating suspected criminal violations.
### Terms and conditions and intellectual property
By accepting these Terms and Conditions, you acknowledge and agree that all content presented to you on this Website is protected by copyrights, trademarks, service marks, patents, or other proprietary rights and laws, and is the sole property of VisioForge.
You are only permitted to use the content as expressly authorized by us or the specific content provider. Except for a single copy made for personal use only, you may not copy, reproduce, modify, republish, upload, post, transmit, or distribute any documents or information from this Website in any form or by any means without prior written permission from us or the specific content provider, and you are solely responsible for obtaining permission before reusing any copyrighted material that is available on this Website.
### Third-party websites
This Website may link you to other sites on the Internet or otherwise include references to information, documents, software, materials, and/or services provided by other parties. These websites may contain information or material that some people may find inappropriate or offensive.
These other websites and parties are not under our control, and you acknowledge that we are not responsible for the accuracy, copyright compliance, legality, decency, or any other aspect of the content of such sites, nor are we responsible for errors or omissions in any references to other parties or their products and services. The inclusion of such a link or reference is provided merely as a convenience and does not imply endorsement of, or association with, the Website or party by us, or any warranty of any kind, either express or implied.
### Disclaimer of warranties, limitations of liability, and indemnification
Your use of VisioForge is at your sole risk. The Website is provided âas isâ and âas availableâ. We disclaim all warranties of any kind, express or implied, including, without limitation, the warranties of merchantability, fitness for a particular purpose, and non-infringement.
We are not liable for damages, direct or consequential, resulting from your use of the Website, and you agree to defend, indemnify and hold us harmless from any claims, losses, liability costs, and expenses (including but not limits to attorneyâs fees) arising from your violation of any third-partyâs rights. You acknowledge that you have only a limited, non-exclusive, non-transferable license to use the Website. Because the Website is not error or bug-free, you agree that you will use it carefully and avoid using it in ways that might result in any loss of your or any third partyâs property or information.
### Terms and conditions - termination
These Terms and Conditions will become effective in relation to you when you create a VisioForge account or when you start using the VisioForge and will remain effective until terminated by you or by us.
VisioForge reserves the right to terminate these Terms and Conditions or suspend your account at any time in case of unauthorized, or suspected unauthorized use of the Website whether in contravention of this Terms and Conditions or otherwise. If VisioForge terminates this Terms and Conditions or suspends your account for any of the reasons set out in this section, VisioForge shall have no liability or responsibility to you.
### Assignment
VisioForge may assign these Terms and Conditions or any part of it without restrictions. You may not assign this Terms and Conditions or any part of it to any third party.
### Other policies
- [Privacy policy](/privacy-policy)
- [Refund policy](/refund-policy)

---END OF PAGE---
# Page: https://www.visioforge.com/uninstall-feedback
# Uninstall feedback
We are sorry to see you go, and we genuinely appreciate your taking the time to provide us with your feedback. Your input is crucial in helping us enhance our software and develop better solutions that meet your needs and expectations.
We Value Your Feedback
Please let us know why you decided to uninstall our software. Your insights will help us understand what we can do better. Whether itâs about the user interface, specific features, performance, or any other aspect, your comments are invaluable to us.
## Contact Us for Help
If you encountered any issues that led to your decision to uninstall, we would love the opportunity to assist you. Our support team is ready to help resolve any problems you may have faced or answer any questions.
- Email: support@visioforge.com
- Support portal: [Create a ticket](https://support.visioforge.com)
- Live Chat: [Start a chat](https://discord.gg/yvXUG56WCH)
We strive to provide the best experience possible and your feedback is a vital part of that process. Thank you for helping us improve and we hope to serve you better in the future.
### Stay Connected
If you would like to stay updated on our latest features and improvements, please consider following us on social media or subscribing to our newsletter.
Thank you again for your time and feedback.
Your name
Your email
Product name
âPlease choose an optionâVideo Capture SDK .NetMedia Player SDK .NetVideo Edit SDK .NetOther
Your message (optional)

---END OF PAGE---
# Page: https://www.visioforge.com/support-service-level-agreement-sla
# Support Service Level Agreement (SLA)
This Support Service Level Agreement (SLA) outlines the terms and conditions for the support services provided by VisioForge (referred to as "Provider") to its customers (referred to as "Client"). This SLA specifies the support options available, response times, and responsibilities of both parties.
## 1. Support Channels and Coverage
### 1.1 Email Support
- Email support is provided to all clients free of charge.
- The support team will respond to emails during regular business hours, Monday to Friday, excluding public holidays.
### 1.2 Premium Support
- Premium support is available to clients who opt for additional support services.
- Premium support includes remote assistance, chats, or calls through supported platforms (AnyDesk, Telegram, Zoom, Teams).
- Premium support is available during regular business hours, Monday to Friday, excluding public holidays.
- The cost of premium support is 200 EUR for a package of 5 hours.
- Additional premium support hours can be purchased separately.
## 2. Support Response Times
### 2.1 Email Support Response Times
- The support team will acknowledge receipt of the Client's email within 24 hours.
- The initial response time for email support will be within two business days.
- Resolution time for email support will be based on the severity and complexity of the issue and will be communicated to the Client.
### 2.2 Premium Support Response Times
- The support team will respond to premium support requests within 4 hours during regular business hours.
- Response times for premium support outside regular business hours will be within 12 hours.
- Resolution time for premium support will depend on the severity and complexity of the issue and will be communicated to the Client.
## 3. Responsibilities of the Provider
- The Provider will make reasonable efforts to resolve the Client's support requests promptly and efficiently.
- The Provider will allocate appropriate resources to address the Client's support needs.
- The Provider will ensure that the support team possesses the necessary skills and expertise to handle the Client's inquiries effectively.
- The Provider will maintain the confidentiality of the Client's information shared during the support process.
## 4. Responsibilities of the Client
### 4.1 Client Responsibilities
- The Client will provide accurate and detailed information about the issue or inquiry when contacting support.
- The Client will cooperate with the support team, providing necessary access and information to assist in issue resolution.
- The Client will adhere to any guidelines or instructions the support team provides.
- The Client will promptly notify the Provider of any changes in contact information.
## 5. Limitations
### 5.1 Exclusions
- This SLA does not cover support for issues resulting from unauthorized modifications, misuse, or third-party software or services.
- Support for hardware-related issues is not included in this SLA.
## 6. Termination
### 6.1 Termination of Premium Support
- Either party may terminate premium support with a 30-day written notice.
- In the event of termination, the Client will forfeit unused hours of premium support.
## 7. Amendments
### 7.1 Amendment of SLA
- This SLA may be amended by mutual agreement between the Provider and the Client.
- Any amendments will be documented in writing and signed by both parties.
Please review the terms of this Support Service Level Agreement carefully. By accessing and using the support services provided by VisioForge, you acknowledge and agree to comply with the terms outlined in this SLA.
If you have any questions or require clarification, please get in touch with us at support@visioforge.com.
Thank you for choosing VisioForge. We look forward to providing you with exceptional support.

---END OF PAGE---
# Page: https://www.visioforge.com/cookie-policy-eu
# Cookie Policy (EU/GDPR)
This Cookie Policy was last updated on November 21, 2024 and applies to citizens and legal permanent residents of the European Economic Area and Switzerland.
## 1. Introduction
Our website, https://www.visioforge.com (hereinafter: "the website") uses cookies and other related technologies (for convenience all technologies are referred to as "cookies"). Cookies are also placed by third parties we have engaged. In the document below we inform you about the use of cookies on our website.
## 2. What are cookies?
A cookie is a small simple file that is sent along with pages of this website and stored by your browser on the hard drive of your computer or another device. The information stored therein may be returned to our servers or to the servers of the relevant third parties during a subsequent visit.
## 3. What are scripts?
A script is a piece of program code that is used to make our website function properly and interactively. This code is executed on our server or on your device.
## 4. What is a web beacon?
A web beacon (or a pixel tag) is a small, invisible piece of text or image on a website that is used to monitor traffic on a website. In order to do this, various data about you is stored using web beacons.
## 5. Cookies
### 5.1 Technical or functional cookies
Some cookies ensure that certain parts of the website work properly and that your user preferences remain known. By placing functional cookies, we make it easier for you to visit our website. This way, you do not need to repeatedly enter the same information when visiting our website and, for example, the items remain in your shopping cart until you have paid. We may place these cookies without your consent.
### 5.2 Statistics cookies
We use statistics cookies to optimize the website experience for our users. With these statistics cookies we get insights in the usage of our website. We ask your permission to place statistics cookies.
### 5.3 Marketing/Tracking cookies
Marketing/Tracking cookies are cookies or any other form of local storage, used to create user profiles to display advertising or to track the user on this website or across several websites for similar marketing purposes.
## 6. Placed cookies
- OptinMonster
- WordPress
- Stripe
- Cookie Notice for GDPR
- Complianz
- Google Tag Manager for WordPress
- LiteSpeed
This data is not shared with third parties.
## 7. Consent
When you visit our website for the first time, we will show you a pop-up with an explanation about cookies. As soon as you click on "Save preferences", you consent to us using the categories of cookies and plug-ins you selected in the pop-up, as described in this Cookie Policy. You can disable the use of cookies via your browser, but please note that our website may no longer work properly.
## 8. Enabling/disabling and deleting cookies
You can use your internet browser to automatically or manually delete cookies. You can also specify that certain cookies may not be placed. Another option is to change the settings of your internet browser so that you receive a message each time a cookie is placed. For more information about these options, please refer to the instructions in the Help section of your browser.
Please note that our website may not work properly if all cookies are disabled. If you do delete the cookies in your browser, they will be placed again after your consent when you visit our website again.
## 9. Your rights with respect to personal data
You have the following rights with respect to your personal data:
You have the right to know why your personal data is needed, what will happen to it, and how long it will be retained for.
Right of access: You have the right to access your personal data that is known to us.
To exercise these rights, please contact us. Please refer to the contact details at the bottom of this Cookie Policy. If you have a complaint about how we handle your data, we would like to hear from you, but you also have the right to submit a complaint to the supervisory authority (the Data Protection Authority).
## 10. Contact details
For questions and/or comments about our Cookie Policy and this statement, please contact us by using the following contact details:
Email: \*\*support@visioforge.com\*\*
This Cookie Policy was synchronized with \*\*cookiedatabase.org\*\* on November 21, 2024.
---END OF PAGE---
# Page: https://www.visioforge.com/how-to-register-purchased-product
# How to register purchased products?
## .Net SDKs
In your code, use the SetLicenseKey method of the main SDK class (VideoCaptureCore/VideoEditCore/MediaPlayerCore). This method takes your license key, the user name (or company name), and the e-mail used during purchase as parameters. Call this method in Form OnCreate/OnLoad events or before the StartAsync/PlayAsync method call.
You can use the SDK installed by a standalone setup file or the NuGet package installed on your project. SDK reinstallation is not required.
## Delphi packages
- Uninstall the TRIAL version if installed
- Remove DCU/BPL package files if required
- Install the FULL version of the software using the link from the registration email
- In your code, use the SetLicenseKey method of control, which takes your license key as a parameter. Call this method in OnCreate/OnLoad events or anywhere else before the Start/Play method call.
## ActiveX controls
Use the SetLicenseKey method of ActiveX control or wrapper class.
## DirectShow SDKs
Each DirectShow SDK contains a custom IVFRegister interface that can be used to apply your license key in the app code. Virtual Camera SDK optionally allows registration using the registry.
## Other products
Call the SetLicenseKey method of the main SDK class with your license key.

---END OF PAGE---
# Page: https://www.visioforge.com/llms
# Information for LLM agents
Our website supports the LLMS.txt API:
- [Short version](/llms.txt)
- [Full version](/llms-full.txt)
---END OF PAGE---
# Page: https://www.visioforge.com/de/
# SDKs für Videoerfassung, -bearbeitung und -wiedergabe
VisioForge bietet Video- und Audio-Frameworks für Softwareentwickler.
Unsere Software wurde entwickelt, um die Erstellung von Anwendungen zu ermöglichen, die Videos von verschiedenen Quellen aufzeichnen können. Sie unterstützt Videoaufnahmen von Webcams und IP-Kameras, die mit gängigen Protokollen wie ONVIF, RTSP und HTTP kompatibel sind, sowie von Camcordern und PC-Bildschirmen. Die Software speichert diese Videos in weit verbreiteten Formaten wie MP4, WebM und AVI.
Was die Videobearbeitung betrifft, so bietet die Software Funktionen zum Ãndern des Videoformats und der Auflösung sowie die Möglichkeit, Videodateien zu drehen und zu beschneiden. Sie unterstützt gängige Videoformate für die Wiedergabe und nutzt sowohl Systemcodecs als auch robuste Multicodec-Lösungen wie FFMPEG, die in VLC integriert sind. Dies gewährleistet eine robuste Wiedergabe über verschiedene Formate hinweg.
Während der Videoaufnahme, -bearbeitung oder -wiedergabe bietet die Software die Möglichkeit, Audio- und Videoeffekte sowie Ãbergänge hinzuzufügen, und umfasst auÃerdem Funktionen wie Bewegungserkennung und Schnappschusserfassung.

## VIDEOAUFNAHME-SDK .NET
Aufnahme von Videos von Webcams, IP-Kameras, Camcordern, Bildschirmen oder professionellen Videobearbeitungskarten in MP4, AVI, WMV, WebM und anderen Formaten
[PRODUKT SEITE](https://www.visioforge.com/de/video-capture-sdk-net)
## VIDEOBEARBEITUNGS-SDK .NET
Konvertieren, bearbeiten und verarbeiten Sie die verschiedenen Video- und Audioformate (MP4, AVI, WMV, WebM und andere). Fügen Sie Bild- und Texteinblendungen hinzu. Tags bearbeiten.
[PRODUKT SEITE](https://www.visioforge.com/de/video-edit-sdk-net)


## MEDIA PLAYER SDK .NET
Spielen Sie verschiedene Video- und Audioformate (MP4, AVI, WMV, WebM usw.) oder Netzwerk-Streams (RTSP / HLS / HTTP / UDP) ab. Fügen Sie Bild- und Text-Overlays hinzu.
[PRODUKT SEITE](https://www.visioforge.com/de/media-player-sdk-net)
## TESTIMONIALS

#### ANDREW PARISIO
Senior I.T. Systemingenieur
"Wir sind ein Callcenter und verwenden die VisioForge-Steuerung, um 100 % unserer Agenten aufzuzeichnen, während sie telefonieren. Dieses Produkt ist einfacher zu bedienen, funktioniert besser, und mit dem reaktionsschnellen und erstaunlichen Support von Roman hat es unsere Aufzeichnungslösung zum Besseren verändert. Danke!!!"

#### SANTHOSH V.
.NET-Entwickler, Xminds Solutions
"Mir hat Ihr Video Edit SDK .Net sehr gut gefallen, die wunderbaren Funktionen, die es unterstützt, wie z.B. das Audio Mixing. Und ja, der Client-Support ist eine weitere hervorragende Sache, wenn man bedenkt, dass extreme Entwicklungen wie die Videobearbeitung einen guten Support benötigen, bei dem Sie alle Anforderungen erfüllen."

#### JEREMY LITTLER
UniteCast Lead Developer
"Video Capture SDK .NET ist ein hervorragendes Paket für die Entwicklung videogestützter Anwendungen in Visual Studio. Das Framework von VisioForge übertrifft die in anderen SDKs von Drittanbietern verfügbaren Funktionen bei weitem. VF hat es geschafft, eine extrem robuste Lösung bereitzustellen, die sich perfekt in aktuelle und neue Videostandards integrieren lässt."
## KUNDEN
- 


- 


- 


## PLATFORMS
Die SDKs unterstützen derzeit die folgenden Plattformen
Windows

7 und später
macOS

11 und später
x64- und ARM64-Architekturen
Linux

einschlieÃlich Ubuntu, Raspberry Pi und Nvidia Jetson
iOS

12 und später
Android

11 und später
Mit modernen plattformübergreifenden Frameworks wie MAUI und Avalonia können Sie denselben Code auf mehreren Plattformen ausführen.
## PROGRAMMIERSPRACHEN
Wir haben sowohl High-Level-SDKs für die Entwicklung von Anwendungen in C#, VB.Net und Delphi als auch Low-Level-SDKs für die Entwicklung in C++. Xamarin-, MAUI- oder Avalonia-Frameworks können verwendet werden, um plattformübergreifende .Net-Anwendungen zu schreiben.
C#

VB.Net

C++

Delphi

## MÃGLICHE ANWENDUNGSFÃLLE
Der Einsatz der Multimedia-SDKs von VisioForge kann die Entwicklung verschiedener innovativer Anwendungen ermöglichen. Hier sind einige Ideen:
### Software für Videokonferenzen
Erstellen Sie eine hochmoderne Videokonferenzanwendung mit den VisioForge Video- und Audio-Frameworks für Entwickler, die hochauflösende Video- und kristallklare Audiofunktionen bieten. Integrieren Sie Funktionen wie anpassbare virtuelle Hintergründe, Rauschunterdrückung und Augmented-Reality-Filter, um Besprechungen noch ansprechender zu gestalten. Ermöglichen Sie interaktive Elemente wie die gemeinsame Nutzung von Bildschirmen in Echtzeit, gemeinsame Whiteboards und die Aufzeichnung von Sitzungen. Gestalten Sie die Benutzeroberfläche so, dass sie auch für Benutzer mit geringen technischen Kenntnissen problemlos eingerichtet und verbunden werden kann. Hochentwickelte Sicherheitsprotokolle, die sicherstellen, dass vertrauliche Besprechungen vertraulich bleiben, machen es zu einer idealen Lösung für Unternehmen, Bildungseinrichtungen und den privaten Gebrauch.
### Systeme zur Sicherheitsüberwachung
Entwicklung eines umfassenden Sicherheitsüberwachungssystems mit VisioForge-Frameworks. Dieses System könnte über eine Echtzeit-Videoverarbeitung mit Unterstützung für mehrere Kameraeingänge verfügen und so eine umfassende Abdeckung und hochauflösendes Bildmaterial bieten. Implementieren Sie fortschrittliche KI-Algorithmen für Gesichtserkennung, Bewegungserkennung und Anomalie-Warnungen, um die SicherheitsmaÃnahmen zu verbessern. Das System könnte auch Funktionen wie Nachtsichtkompatibilität, automatische Aufzeichnung von Vorfällen und sofortige Warnmeldungen an das Sicherheitspersonal oder die Strafverfolgungsbehörden umfassen. Sicherstellung einer einfachen Skalierbarkeit, um unterschiedliche GröÃen von Räumlichkeiten zu berücksichtigen, von kleinen Einzelhandelsgeschäften bis hin zu groÃen Industriekomplexen.
### Live-Streaming-Plattformen
Nutzen Sie die SDKs von VisioForge, um eine robuste Live-Streaming-Plattform aufzubauen, die hochwertige Video- und Audiostreams verarbeiten kann. Diese Plattform könnte Multi-Kamera-Setups unterstützen, die einen dynamischen Wechsel des Blickwinkels während Live-Events ermöglichen. Integration von Echtzeit-Videoeffekten und -Ãbergängen für ein professionelles Sendegefühl. Implementierung von Streaming mit adaptiver Bitrate, um ein optimales Seherlebnis auf verschiedenen Geräten und bei unterschiedlichen Internetgeschwindigkeiten zu gewährleisten. Bieten Sie Funktionen für die Interaktion mit den Zuschauern, wie Live-Chats, Umfragen und Fragerunden. Bieten Sie Monetarisierungsoptionen wie Pay-per-View, Abonnements oder Werbung an. Detaillierte Analysemöglichkeiten für Inhaltsersteller, um die Zuschauerinteraktion zu verfolgen und ihre Sendungen zu optimieren.
### Videoschnittplätze
Entwicklung eines umfassenden Videobearbeitungsprogramms mit Video- und Audio-Frameworks für Entwickler, das sich sowohl an Amateure als auch an professionelle Cutter richtet. Diese Suite könnte Mehrspurbearbeitung, verschiedene Videoeffekte, Farbkorrektur und Audiomixing-Tools bieten. Dazu gehören auch fortgeschrittene Funktionen wie Chroma-Keying, Motion-Tracking und 3D-Bearbeitungsfunktionen. Unterstützung für verschiedene Dateiformate und hochauflösende Videoausgabe. Gestalten Sie die Benutzeroberfläche intuitiv und dennoch leistungsstark, mit anpassbaren Workflows und Shortcuts für eine effiziente Bearbeitung.
### Benutzerdefinierte Medienplayer
Erstellen Sie spezialisierte Medienplayer mit adaptivem Streaming, Unterstützung für Nischenformate und anpassbaren Oberflächen. Passen Sie die Funktionen an spezifische Nutzerbedürfnisse in verschiedenen Kontexten wie Bildung, Unterhaltung oder professionellem Einsatz an. Bieten Sie einzigartige Funktionen wie erweiterte Zugänglichkeitsoptionen, Wiedergabelistenverwaltung und Integration mit Inhaltsbibliotheken.
Um Beispielanwendungen zu erhalten, besuchen Sie bitte unser [GitHub.](https://github.com/visioforge/)
---END OF PAGE---
# Page: https://www.visioforge.com/es/
# SDK de captura, edición y reproducción de vÃdeo
VisioForge ofrece marcos de vÃdeo y audio para desarrolladores de software.
Nuestro software está diseñado para permitir la creación de aplicaciones que puedan capturar vÃdeo de diversas fuentes. Admite la grabación de vÃdeo desde cámaras web y cámaras IP compatibles con protocolos populares como ONVIF, RTSP y HTTP, asà como desde videocámaras y pantallas de PC. El software guarda estos vÃdeos en formatos ampliamente utilizados como MP4, WebM y AVI.
En cuanto a la edición de vÃdeo, el programa permite cambiar el formato y la resolución del vÃdeo, asà como rotar y recortar archivos de vÃdeo. Es compatible con los formatos de vÃdeo más comunes para su reproducción, aprovechando tanto los códecs del sistema como las sólidas soluciones multicódec como FFMPEG integrado con VLC. Esto garantiza una experiencia de reproducción sólida en varios formatos.
Durante la captura, edición o reproducción de vÃdeo, el software ofrece la posibilidad de añadir efectos y transiciones de audio y vÃdeo, y también incluye funciones como la detección de movimiento y la captura de instantáneas.

## SDK DE CAPTURA DE VIDEO .NET
Captura vÃdeo desde cámaras web, cámaras IP, videocámaras, pantallas o tarjetas de edición de vÃdeo profesionales a MP4, AVI, WMV, WebM y otros formatos
[PÃGINA DEL PRODUCTO](https://www.visioforge.com/es/video-capture-sdk-net)
## SDK DE EDICIÃN DE VIDEO .NET
Convierte, edita y procesa los distintos formatos de vÃdeo y audio (MP4, AVI, WMV, WebM y otros). Añade superposiciones de imágenes y texto. Edita etiquetas.
[PÃGINA DEL PRODUCTO](https://www.visioforge.com/es/video-edit-sdk-net)


## SDK DE REPRODUCTOR MULTIMEDIA .NET
Reproduce varios formatos de vÃdeo y audio (MP4, AVI, WMV, WebM, etc.) o secuencias de red (RTSP / HLS / HTTP / UDP). Añade superposiciones de imágenes y texto.
[PÃGINA DEL PRODUCTO](https://www.visioforge.com/es/media-player-sdk-net)
## TESTIMONIOS

#### ANDRÃS PARISIO
Ingeniero superior de sistemas informáticos
"Somos un centro de llamadas y utilizamos el control VisioForge para grabar el 100% de nuestros agentes mientras están en llamada. Este producto es más fácil de usar, funciona mejor, y con Roman proporcionando tanto apoyo sensible y sorprendente que ha cambiado nuestra solución de grabación para mejor. Gracias!"

#### SANTHOSH V.
Desarrollador .NET, Xminds Solutions
"Realmente me gustó su Video Edit SDK .Net, las maravillosas caracterÃsticas que soporta como la mezcla de audio. Y sÃ, el soporte al cliente es otra cosa excelente teniendo en cuenta el hecho de que el desarrollo extremo como el procesamiento de vÃdeo necesitará un buen apoyo donde usted satisface todas las necesidades."

#### Jeremy Littleler
Desarrollador jefe de UniteCast
"Video Capture SDK .NET es un paquete excepcional para el desarrollo de aplicaciones centradas en vÃdeo en Visual Studio. El framework de VisioForge supera con creces las prestaciones disponibles en otros SDK de terceros. VF ha conseguido proporcionar una solución extremadamente robusta, que se integra perfectamente con los estándares de vÃdeo actuales y emergentes."
## CLIENTES
- 


- 


- 


## PLATAFORMAS
Actualmente, los SDK son compatibles con las siguientes plataformas
Ventanas

7 y posteriores
macOS

11 y posteriores
Arquitecturas x64 y ARM64
Linux

incluyendo Ubuntu, Raspberry Pi y Nvidia Jetson
iOS

12 y posteriores
Androide

11 y posteriores
Puedes ejecutar el mismo código en varias plataformas utilizando marcos multiplataforma modernos como MAUI y Avalonia.
## IDIOMAS DE PROGRAMACIÃN
Disponemos tanto de SDK de alto nivel para desarrollar aplicaciones en C#, VB.Net y Delphi, como de SDK de bajo nivel para desarrollar en C++. Se pueden utilizar los marcos Xamarin, MAUI o Avalonia para escribir aplicaciones .Net multiplataforma.
C#

VB.Net

C++

Delfos

## POSIBLES CASOS DE USO
Aprovechar los SDK multimedia de VisioForge puede permitir el desarrollo de diversas aplicaciones innovadoras. He aquà algunas ideas:
### Software de videoconferencia
Cree una aplicación de videoconferencia de última generación con los marcos de vÃdeo y audio VisioForge para desarrolladores, que ofrecen funciones de vÃdeo de alta definición y audio cristalino. Incorpore funciones como fondos virtuales personalizables, cancelación de ruido y filtros de realidad aumentada para una experiencia de reunión más atractiva. Permita elementos interactivos como la pantalla compartida en tiempo real, las pizarras colaborativas y la grabación de sesiones. Diseñe la interfaz para que sea fácil de usar, garantizando una configuración y conexión sin problemas incluso para usuarios con conocimientos técnicos mÃnimos. Incluye protocolos de seguridad avanzados para garantizar la privacidad de las reuniones confidenciales, lo que la convierte en una solución ideal para uso corporativo, educativo y personal.
### Sistemas de vigilancia
Desarrolle un sistema integral de vigilancia de la seguridad utilizando marcos VisioForge. Este sistema podrÃa incluir procesamiento de vÃdeo en tiempo real con soporte para múltiples entradas de cámara, ofreciendo una cobertura completa y secuencias de alta resolución. Implementar algoritmos avanzados de IA para el reconocimiento facial, detección de movimiento y alertas de anomalÃas para mejorar las medidas de seguridad. El sistema también podrÃa incluir funciones como compatibilidad con visión nocturna, grabación automática de incidentes y alertas instantáneas al personal de seguridad o a las fuerzas del orden. Garantice una escalabilidad sencilla para adaptarse a locales de distintos tamaños, desde pequeñas tiendas minoristas hasta grandes complejos industriales.
### Plataformas de retransmisión en directo
Utiliza los SDK de VisioForge para crear una sólida plataforma de retransmisión en directo, capaz de manejar flujos de vÃdeo y audio de alta calidad. Esta plataforma podrÃa soportar configuraciones multicámara, permitiendo el cambio dinámico de ángulos durante los eventos en directo. Integrar efectos de vÃdeo y transiciones en tiempo real para dar una sensación de retransmisión profesional. Implementar una transmisión con tasa de bits adaptable para garantizar una experiencia de visionado óptima en distintos dispositivos y velocidades de Internet. Incluya funciones para la interacción de los espectadores, como chats en directo, encuestas y sesiones de preguntas y respuestas. Ofrezca opciones de monetización como pago por visión, suscripciones o publicidad. Proporcionar análisis detallados para que los creadores de contenidos puedan seguir la participación de los espectadores y optimizar sus emisiones.
### Suites de edición de vÃdeo
Desarrollar una completa suite de edición de vÃdeo con marcos de vÃdeo y audio para desarrolladores, dirigida tanto a editores aficionados como profesionales. Esta suite podrÃa ofrecer edición multipista, diversos efectos de vÃdeo, corrección del color y herramientas de mezcla de audio. Incluye funciones avanzadas como incrustación por croma, seguimiento del movimiento y funciones de edición en 3D. Garantiza la compatibilidad con varios formatos de archivo y la salida de vÃdeo de alta resolución. Diseña una interfaz intuitiva pero potente, con flujos de trabajo personalizables y accesos directos para una edición eficaz.
### Reproductores multimedia personalizados
Cree reproductores multimedia especializados con transmisión adaptable, compatibilidad con formatos especializados e interfaces personalizables. Adapte las funciones a las necesidades especÃficas de los usuarios en diversos contextos, como la educación, el entretenimiento o el uso profesional. Ofrezca funcionalidades únicas como opciones de accesibilidad mejoradas, gestión de listas de reproducción e integración con bibliotecas de contenidos.
Para obtener ejemplos de aplicaciones, visite nuestro [GitHub.](https://github.com/visioforge/)
---END OF PAGE---
# Page: https://www.visioforge.com/it/
# SDK di acquisizione, modifica e riproduzione video
VisioForge fornisce framework video e audio per gli sviluppatori di software.
Il nostro software è stato progettato per consentire la creazione di applicazioni in grado di acquisire video da varie fonti. Supporta la registrazione video da webcam e telecamere IP compatibili con i protocolli più diffusi, come ONVIF, RTSP e HTTP, nonché da videocamere e schermi di PC. Il software salva questi video in formati molto diffusi come MP4, WebM e AVI.
Per quanto riguarda l'editing video, il software offre funzionalità per modificare il formato e la risoluzione dei video, oltre alla possibilità di ruotare e ritagliare i file video. Supporta i formati video più comuni per la riproduzione, sfruttando sia i codec di sistema che le robuste soluzioni multi-codec come FFMPEG integrato con VLC. Ciò garantisce un'esperienza di riproduzione solida in vari formati.
Durante l'acquisizione, la modifica o la riproduzione dei video, il software offre la possibilità di aggiungere effetti e transizioni audio e video e include anche funzioni come il rilevamento del movimento e l'acquisizione di istantanee.

## SDK DI CATTURA VIDEO .NET
Capture Video da webcam, telecamere IP, videocamere, schermi o schede di editing video professionali e salvarli in formati come MP4, AVI, WMV e WebM.
[PAGINA DEL PRODOTTO](https://www.visioforge.com/it/video-capture-sdk-net)
## SDK DI MODIFICA VIDEO .NET
Conversione, modifica ed elaborazione di vari formati video e audio (MP4, AVI, WMV, WebM e altri). Aggiungere sovrapposizioni di immagini e testo. Modifica dei tag.
[PAGINA DEL PRODOTTO](https://www.visioforge.com/it/video-edit-sdk-net)


## SDK LETTORE MULTIMEDIALE .NET
Riproduzione di vari formati video e audio (MP4, AVI, WMV, WebM, ecc.) o di flussi di rete (RTSP / HLS / HTTP / UDP). Aggiungere sovrapposizioni di immagini e testo.
[PAGINA DEL PRODOTTO](https://www.visioforge.com/it/media-player-sdk-net)
## TESTIMONIANZE

#### ANDREA PARISIO
Ingegnere di sistemi informatici senior
"Siamo un call center e utilizziamo il controllo VisioForge per registrare il 100% dei nostri agenti durante le chiamate. Questo prodotto è più facile da usare, funziona meglio e con Roman che fornisce un'assistenza reattiva e straordinaria ha cambiato in meglio la nostra soluzione di registrazione. Grazie!!!"

#### SANTHOSH V.
Sviluppatore .NET, Xminds Solutions
"Mi è piaciuto molto il vostro Video Edit SDK .Net, le meravigliose funzionalità che supporta come il mixaggio audio. E sì, il supporto del client è un'altra cosa eccellente, considerando il fatto che lo sviluppo estremo come l'elaborazione video ha bisogno di un buon supporto che soddisfi tutte le esigenze."

#### JEREMY LITTLER
Sviluppatore capo di UniteCast
"Video Capture SDK .NET è un pacchetto eccezionale per lo sviluppo di applicazioni video-centriche in Visual Studio. Il framework di VisioForge ha superato di gran lunga le funzionalità disponibili in altri SDK di terze parti. VF è riuscita a fornire una soluzione estremamente robusta, che si integra perfettamente con gli standard video attuali ed emergenti".
## CLIENTI
- 


- 


- 


## PIATTAFORME
Attualmente gli SDK supportano le seguenti piattaforme
Finestre

7 e successivi
macOS

11 e successivi
Architetture x64 e ARM64
Linux

tra cui Ubuntu, Raspberry Pi e Nvidia Jetson
iOS

12 e seguenti
Android

11 e successivi
à possibile eseguire lo stesso codice su più piattaforme utilizzando moderni framework multipiattaforma come MAUI e Avalonia.
## LINGUAGGI DI PROGRAMMAZIONE
Abbiamo sia SDK di alto livello per lo sviluppo di applicazioni in C#, VB.Net e Delphi, sia SDK di basso livello per lo sviluppo in C++. I framework Xamarin, MAUI o Avalonia possono essere utilizzati per scrivere applicazioni .Net multipiattaforma.
C#

VB.Net

C++

Delfi

## POSSIBILI CASI D'USO
L'utilizzo degli SDK multimediali di VisioForge può consentire lo sviluppo di diverse applicazioni innovative. Ecco alcune idee:
### Software per videoconferenze
Create un'applicazione di videoconferenza all'avanguardia con i framework video e audio VisioForge per sviluppatori, che offrono funzionalità video ad alta definizione e audio cristallino. Incorporate funzioni come sfondi virtuali personalizzabili, cancellazione del rumore e filtri di realtà aumentata per un'esperienza di riunione più coinvolgente. Permettere elementi interattivi come la condivisione dello schermo in tempo reale, le lavagne collaborative e la registrazione della sessione. Progettare l'interfaccia in modo che sia facile da usare, assicurando una configurazione e una connessione fluide anche per gli utenti con competenze tecniche minime. Includere protocolli di sicurezza avanzati per garantire che le riunioni riservate rimangano private, rendendolo una soluzione ideale per l'uso aziendale, educativo e personale.
### Sistemi di sorveglianza di sicurezza
Sviluppare un sistema di sorveglianza completo utilizzando i framework di VisioForge. Questo sistema potrebbe essere caratterizzato da un'elaborazione video in tempo reale con il supporto di più ingressi per telecamere, offrendo una copertura completa e filmati ad alta risoluzione. Implementare algoritmi avanzati di intelligenza artificiale per il riconoscimento facciale, il rilevamento del movimento e gli avvisi di anomalia per migliorare le misure di sicurezza. Il sistema potrebbe anche includere funzioni come la compatibilità con la visione notturna, la registrazione automatica degli incidenti e gli avvisi istantanei al personale di sicurezza o alle forze dell'ordine. Garantire una facile scalabilità per adattarsi a locali di varie dimensioni, dai piccoli negozi al dettaglio ai grandi complessi industriali.
### Piattaforme di streaming live
Utilizzate gli SDK di VisioForge per costruire una solida piattaforma di live streaming, in grado di gestire flussi video e audio di alta qualità . Questa piattaforma potrebbe supportare configurazioni multi-camera, consentendo la commutazione dinamica dell'angolazione durante gli eventi live. Integrare effetti e transizioni video in tempo reale per ottenere un'atmosfera da trasmissione professionale. Implementare lo streaming a bitrate adattivo per garantire un'esperienza visiva ottimale su diversi dispositivi e velocità di Internet. Includere funzioni per l'interazione con gli spettatori, come chat in diretta, sondaggi e sessioni di domande e risposte. Offrire opzioni di monetizzazione come pay-per-view, abbonamenti o pubblicità . Fornire analisi dettagliate ai creatori di contenuti per monitorare il coinvolgimento degli spettatori e ottimizzare le loro trasmissioni.
### Suite di editing video
Sviluppare una suite di editing video completa con framework video e audio per gli sviluppatori, che si rivolga sia agli editor amatoriali che a quelli professionali. Questa suite potrebbe offrire editing multitraccia, vari effetti video, correzione del colore e strumenti di mixaggio audio. Include funzionalità avanzate come il chroma keying, il motion tracking e le capacità di editing 3D. Garantisce il supporto di vari formati di file e l'uscita video ad alta risoluzione. Progettare un'interfaccia intuitiva ma potente, con flussi di lavoro personalizzabili e scorciatoie per un editing efficiente.
### Lettori multimediali personalizzati
Costruire lettori multimediali specializzati con streaming adattivo, supporto per formati di nicchia e interfacce personalizzabili. Adattare le funzionalità alle esigenze specifiche degli utenti in vari contesti, come l'istruzione, l'intrattenimento o l'uso professionale. Offrire funzionalità uniche come opzioni di accessibilità avanzate, gestione di playlist e integrazione con librerie di contenuti.
Per ottenere applicazioni di esempio, visitate il nostro [GitHub.](https://github.com/visioforge/)
---END OF PAGE---
# Page: https://www.visioforge.com/de/video-capture-sdk-net
[Plattformübergreifend]
# Video Capture SDK .Net
Version 15.9
Unser .Net SDK integriert nahtlos Videoaufnahme- und -verarbeitungsfunktionen in Softwareanwendungen. Dieses vielseitige SDK erleichtert die Video- und Audiowiedergabe und unterstützt die Aufnahme von verschiedenen Quellen, einschlieÃlich USB-Webcams, IP-Kameras, Blackmagic Decklink-Karten und Camcordern. Es bietet umfassende Unterstützung für verschiedene Ausgabeformate, darunter MP4, WebM, AVI, WMV, MPEG-1/2 und andere. Entwicklern steht auÃerdem eine umfangreiche Bibliothek mit Video- und Audioeffekten zur Verfügung, um Multimedia-Inhalte zu verbessern und anzupassen.
Darüber hinaus bietet unser SDK eine robuste plattformübergreifende Kompatibilität, die eine nahtlose Integration mit Windows-, Linux-, macOS-, iOS- und Android-Umgebungen gewährleistet. Diese plattformübergreifende Anpassungsfähigkeit ermöglicht es Entwicklern, Anwendungen zu erstellen, die über verschiedene Betriebssysteme und Geräte hinweg konsistent funktionieren und den Benutzern ein konsistentes und flexibles Multimedia-Erlebnis bieten.

#### DOWNLOADS
[Installationsprogramm (Windows)](https://s3.us-west-2.amazonaws.com/files.visioforge.com/trials/visioforge\_sdks\_installer\_dotnet\_setup.exe)[NuGet-Installationshandbuch](https://www.visioforge.com/help/docs/dotnet/install/)[Samples auf GitHub](https://github.com/visioforge/.Net-SDK-s-samples)

#### KAUFEN
[Preise prüfen oder bestellen](https://www.visioforge.com/de/buy)

#### HILFE
[Online-Hilfe](https://www.visioforge.com/help/docs/dotnet/videocapture/)[Ãnderungsliste](https://www.visioforge.com/help/docs/dotnet/changelog/)[Lizenzvereinbarung](/help/docs/eula/)

## SDK STRUKTUR
Das SDK ist in hohem MaÃe kompatibel mit über 10 verschiedenen Video- und Audio-Eingangsquellen und unterstützt über 20 verschiedene Ausgangsformate. Es bietet Entwicklern Flexibilität, indem es eine breite Palette von Hardware-Optionen für Eingangs- und Ausgangskonfigurationen ermöglicht. Mit der Fähigkeit, sowohl Video- als auch Audioinhalte zu verarbeiten, kann das SDK verarbeitete Daten in Dateien speichern oder über eine Netzwerkverbindung streamen.
## VIDEO-AUFNAHME-PIPELINE
Während der Vorschau- oder Erfassungsphase können Video- und Audioströme durch verschiedene Effekte verarbeitet werden. AnschlieÃend werden diese Ströme aufgeteilt und zur weiteren Bearbeitung an Encoder und Audio-/Video-Renderer weitergeleitet.


## AUSGABEFORMATE
Das SDK unterstützt eine Vielzahl gängiger Video-, Audio- und Bildformate und Codecs, wie MP4 (mit H264/HEVC für Video und AAC für Audio), WebM (mit VP8/VP9/AV1 für Video und Vorbis oder OPUS für Audio), sowie WMV, MP3, JPEG, GIF und PNG.
## VIDEOBEARBEITUNG
Sie können Text, Bilder oder GIF-Logos hinzufügen, Helligkeit, Kontrast, Sättigung oder Farbton anpassen, die GröÃe ändern, Inhalte zuschneiden oder drehen und Chroma-Keying oder verschiedene Videoeffekte anwenden, um Ihre Inhalte zu verbessern.


## AUDIOVERARBEITUNG
Integrieren Sie einen Equalizer in Ihre Anwendung, mit dem die Benutzer ihr Klangerlebnis feinabstimmen können. Mit dieser Funktion können sie bestimmte Audiofrequenzen wie Höhen, Mitten und Bässe anpassen, um ihr gewünschtes Klangprofil zu erreichen. Darüber hinaus können die Benutzer die Audiopegel normalisieren oder die Lautstärke verstärken und so eine präzise Kontrolle über die Audioausgabe erhalten. Viele andere Audioeffekte stehen für weitere Anpassungen zur Verfügung.
## VisioForge Video Capture SDK .Net Die wichtigsten Merkmale sind:
### Unterstützte Video- und Audioquellen
- USB-Webkameras und andere Aufnahmegeräte (einschlieÃlich 4K-Geräte)
- ONVIF IP-Kameras (PTZ und andere APIs unterstützt)
- JPEG/MJPEG, MPEG-4 und H264 HTTP/RTSP/RTMP IP-Kameras/Server, unterstützt HD-Format
- Blackmagic Decklink-Geräte
- Quelle für Bildschirmaufnahmen (einschlieÃlich mehrerer Bildschirme) und Fensteraufnahmen
- Lautsprecher (Loopback)
- NewTek NDI-Geräte
- PCI-Erfassungskarten
- TV-Tuner (mit und ohne internen MPEG-Encoder)
- DV- und HDV-MPEG-2-Camcorder
- FLIR/Teledyne-Kameras (USB3 Vision/GigE)
- Basler Kameras (USB3 Vision/GigE)
- Microsoft Kinect/Kinect 2 für Windows
- Audioaufnahmegeräte und Soundkarten
- ASIO-Geräte
### Ausgabe von Videoformaten
- AVI (mit Audio-/Video-Codecs wie MJPEG, DivX, XviD und x264)
- WMV (Unterstützung von benutzerdefinierten WMV-Profilen. Sie können Streams so konfigurieren, dass sie variable Bitratencodierung (VBR), unkomprimierten Audio- oder Videostream, VideogröÃe, PuffergröÃe, Bildrate usw. verwenden)
- DV und MPEG von DV/HDV-Camcordern und TV-Tunern mit internem MPEG-Encoder (DirectCapture-Technologie)
- DV (von einem beliebigen Videoaufnahmegerät)
- MPEG-1/2/4 (einschlieÃlich VCD/SVCD/DVD-Profile) und FLV mit FFMPEG-Wrapper
- WebM (Vorbis + VP8/VP9)
- MP4 H264/HEVC + AAC-Ausgabe über Software-Encoder oder GPU-Encoder (Intel QuickSync, Nvidia CUDA/NVENC oder AMD/ATI AMF)
- Alle von FFMPEG.exe unterstützten Formate (einschlieÃlich MP4 H264/HEVC)
- Benutzerdefinierte Ausgabeformate (mit DirectShow-Filtern von Drittanbietern)
- Animiertes GIF
- MOV
- MPEG-TS
### Ausgabe von Audioformaten
- WAV (komprimiert oder PCM)
- WMA (Windows Media Audio)
- M4A (AAC)
- MP3 (mit LAME)
- FLAC
- Ogg Vorbis
- Speex
### Schnappschuss-Formate
- JPEG
- PNG
- GIF
- BMP
- System.Drawing.Bitmap
- SkiaSharp SKBitmap
### Videoverarbeitung und Effekte (CPU/GPU)
- Bild-Overlay (einschlieÃlich animiertes GIF)
- Textüberlagerung
- Schwenken/Zoomen
- Helligkeit, Kontrast, Sättigung, Farbton, usw.
- Deinterlace
- Denoise
- GröÃenanpassung an jede Auflösung
- chroma-key
- Einblendung/Ausblendung
- rotieren
- Unterstützung für DirectShow-Filter von Drittanbietern
- unabhängige Videoeffekte für Vorschau und Ausgabe
### Audiobearbeitung und Effekte
- Volumenverstärker
- Equalizer
- 3D-Bass-System
- Normalisierung
- automatische/manuelle Verstärkung
- es gibt viele andere Auswirkungen
### Netzwerk-Streaming-Formate
- HLS (HTTP Live Streaming), kompatibel mit Android und iOS
- RTSP
- Glattes Streaming-Protokoll zu Microsoft IIS Server
- RTMP
- UDP (MPEG-TS/RTP)
- SRT
- YouTube / Facebook Live
- NDI
- WMV (Windows Media Video)
- zu anderen Medienservern und Geräten unter Verwendung einer virtuellen Kamera/Audioquelle
### Andere Merkmale
- Audio/Video-Vorschau
- Fernsehtuning
- Steuerung des Videoaufnahmegeräts
- Videoeingang (Kreuzschienenschnittstelle)
- Videoformat
- Bildrate
- unterstützt Grafikkarten mit mehreren Eingängen
- Kamerasteuerung (Helligkeit, Sättigung usw.)
- Bewegungserkennung
- Barcode-Leser
- OSD (Bildschirmanzeige)
- PIP (Picture-In-Picture) (Videoaufnahmequellen, IP-Kameras und Videodateien werden unterstützt)
- Gesichtserkennung und Objektverfolgung
- Mehrere Ausgabebildschirme
- Timeshift
- Ausgabe in verschlüsselte Videodateien mit dem [Video Encryption SDK](https://www.visioforge.com/de/video-encryption-sdk)
- Ausgabe an [Virtual Camera SDK](https://www.visioforge.com/de/virtual-camera-sdk)
- Unterstützung von Serviceanwendungen
- Unterstützung für das Lesen und Schreiben von Audio-/Videodatei-Tags
- madVR Video Renderer Unterstützung
- Wiedergabe von RTSP- und MJPEG-Streams mit niedriger Latenzzeit von der IP-Kamera
- [OBS (Open Broadcaster Software)](https://obsproject.com/) Streaming
- Gesichtserkennung
### IDE
- Visual Studio 2019 und höher: Visual C#, Visual C++, Visual Basic .NET
- Visual Studio Code
- JetBrains-Reiter
- Kann mit anderen .Net-kompatiblen Anwendungen wie Microsoft Access, Word und Excel verwendet werden.
### UI-Frameworks
- WinForms
- WPF
- WinUI 3 for Desktop
- Avalonia
- GTK#
- MAUI
- Xamarin.Mac
- Xamarin.Android
- Xamarin.iOS
### .Net-Versionen
- .Net Framework 4.6.1 und höher
- .Net Core 3.1
- .Net 5 â .Net 9
### Systemanforderungen
- Windows 10 oder Windows 11
- Ubuntu 22+
- macOS 12+
### Zielplattformen
- Windows 11, Windows 10, Windows 8/8.1, Windows 7 SP1
- Windows Server 2016 und höher
- Android 8 und höher
- Linux
- macOS
- iOS
### Beschränkungen des Versuchs
In der Testversion wird ein Wasserzeichen im Videofenster angezeigt.
## CODE-SAMPLES
### VIDEO VORSCHAU
Der Beispielcode zeigt, wie man Standard-Video- und Audioquellen konfiguriert, Video auf dem Bildschirm anzeigt und Audio über Standardlautsprecher wiedergibt. Es werden die Standard-Video- und -Audioformate verwendet.
### VIDEOAUFNAHME IN MP4
MP4-Datei [Aufnahme von einer Webkamera](https://www.visioforge.com/de/save-webcam)Â und Mikrofon, mit Video-/Audiovorschau.
Mit weiteren Codes können Sie H264/HEVC- und AAC-Einstellungen vornehmen.
StandardmäÃig wird ein GPU-H264-Encoder verwendet (falls verfügbar).
### IP RTSP KAMERA VORSCHAU
RTSP-Kameravorschau mit CPU/GPU-Videodekodierung und automatischer Codec-Erkennung.
Sie können die ONVIF-Erkennung verwenden, um alle IP-Kameras in Ihrem lokalen Netzwerk zu finden.
## BILDSCHIRMAUFNAHME
SDK kann Videos von einem Bildschirm oder einem bestimmten Fenster aufnehmen.
Sie können den gesamten Bildschirm oder ein bestimmtes Rechteck aufnehmen. Die Bildrate kann angepasst werden.
### TEXT- UND BILD-OVERLAYS
Sie können Text (einschlieÃlich Bildlauf), Uhrzeit/Datum und Bildeinblendungen hinzufügen.
SDK unterstützt alle gängigen Bildformate, einschlieÃlich JPEG, PNG, GIF und SVG.

#### EDITION

#### STANDARD

#### PROFESSIONELL

#### PREMIUM
Unterstützte Eingabegeräte und andere Quellen
- Web-Kameras
- TV-Tuner und Aufnahmekarten
- DV- und MPEG-Camcorder
- Bildschirmaufnahme
- HTTP/RTSP/ONVIF IP-Kameras
- UDP, TCP, RTMP und andere Netzwerkströme
- Blackmagic Decklink
- DVB-T/DVB-C/DVB-S/ATSC-Geräte (BETA)
- Microsoft Kinect für Windows
Video-Vorschau
Frame Grabber
Videoverarbeitung
Audioverarbeitung
Unterstützung von HD- und 4K-Videos
Fernsehtuning
Netzwerk-Streaming im WMV-Format
Netzwerk-Streaming über RTMP/RTSP/UDP/NDI
Chroma-Schlüssel
Bewegungserkennung
Videoverarbeitung mit DirectShow-Filtern
OSD (Bildschirmanzeige)
Bild-im-Bild-Darstellung
Name der Ausgabedatei on-the-fly ändern
Mehrere Ausgabebildschirme
GPU-beschleunigte Videoeffekte
Ausgabe an die virtuelle Kamera SDK
Video Encryption SDK Unterstützung
Gesichtsverfolgung
Ausgabeformate
- AVI
- WMV (Windows Media Video)
- WMA (Windows Media Audio)
- WAV
- MP3
- Ogg Vorbis
- Speex
- DV-Video
- DV/MPEG-1/2/4 (über TV-Tuner mit internem MPEG-Encoder oder DV/HDV-Camcorder)
- Flash-Video (FLV) mit FFMPEG
- WebM
- Benutzerdefinierte Ausgabeformate mit externen DirectShow-Filtern
- MPEG-1/2/4 mit FFMPEG
- MP4 (H264/HEVC + AAC) mit Software, Intel QuickSync, Nvidia NVENC/CUDA oder AMD Radeon Encodern
Unsere Software bietet eine unbegrenzte Nutzung ohne störende Bildschirme und gewährleistet eine
nahtlose Erfahrung. Wir bieten einen 30-tägigen Testzeitraum, damit Sie alle
alle Funktionen erkunden können, bevor Sie sich festlegen.
Mit einer regulären Lizenz erhalten Sie
erhalten Sie für ein Jahr kostenlose Minor- und Major-Upgrades; nach diesem Zeitraum
funktioniert das SDK weiter wie bisher.
Alternativ dazu bietet die
Lifetime-Lizenz unbegrenzte Updates auf unbestimmte Zeit zur Verfügung. Zusätzlich,
bieten wir vorrangigen Support und Fehlerbehebungen. Die reguläre Lizenz wird jährlich abgerechnet
jährlich abgerechnet und automatisch verlängert, aber Sie können Ihr Abonnement
Abonnement jederzeit kündigen.
Das SDK ist für die nicht-kommerzielle Nutzung kostenlos. Bitte kontaktieren Sie uns, um eine kostenlose Lizenz zu erhalten.
---END OF PAGE---
# Page: https://www.visioforge.com/es/video-capture-sdk-net
[Plataforma cruzada]
# Video Capture SDK .Net
versión 15.9
Nuestro SDK .Net integra a la perfección funciones de captura y procesamiento de vÃdeo en aplicaciones de software. Este versátil SDK facilita la reproducción de vÃdeo y audio y admite la captura desde diversas fuentes, como cámaras web USB, cámaras IP, tarjetas Blackmagic Decklink y videocámaras. Ofrece una amplia compatibilidad con diferentes formatos de salida, como MP4, WebM, AVI, WMV, MPEG-1/2 y otros. También proporciona a los desarrolladores una amplia biblioteca de efectos de vÃdeo y audio para mejorar y personalizar los contenidos multimedia.
Además, nuestro SDK ofrece una sólida compatibilidad entre plataformas, lo que garantiza una integración perfecta con entornos Windows, Linux, macOS, iOS y Android. Esta adaptabilidad multiplataforma permite a los desarrolladores crear aplicaciones que funcionan de forma coherente en varios sistemas operativos y dispositivos, proporcionando a los usuarios una experiencia multimedia consistente y flexible.

#### DESCARGAS
[Instalador (Windows)](https://s3.us-west-2.amazonaws.com/files.visioforge.com/trials/visioforge\_sdks\_installer\_dotnet\_setup.exe)[GuÃa de instalación de NuGet](https://www.visioforge.com/help/docs/dotnet/install/)[Samples en GitHub](https://github.com/visioforge/.Net-SDK-s-samples)

#### COMPRAR
[Consultar precios o hacer un pedido](https://www.visioforge.com/es/buy)

#### AYUDA
[Ayuda en lÃnea](https://www.visioforge.com/help/docs/dotnet/videocapture/)[Registro de cambios](https://www.visioforge.com/help/docs/dotnet/changelog/)[Acuerdo de licencia](/help/docs/eula/)

## ESTRUCTURA DEL SDK
El SDK es altamente compatible con más de 10 fuentes de entrada de vÃdeo y audio diferentes y admite más de 20 formatos de salida distintos. Proporciona flexibilidad a los desarrolladores al permitir una amplia gama de opciones de hardware para las configuraciones de entrada y salida. Con capacidad para procesar contenidos de vÃdeo y audio, el SDK puede guardar los datos procesados en archivos o transmitirlos a través de una conexión de red.
## PROCESO DE CAPTURA DE VÃDEO
Durante las fases de previsualización o captura, los flujos de vÃdeo y audio pueden procesarse mediante diversos efectos. Después, estos flujos se dividen y se dirigen a codificadores y renderizadores de audio/vÃdeo para su tratamiento posterior.


## FORMATOS DE SALIDA
El SDK es compatible con una amplia gama de formatos y códecs populares de vÃdeo, audio e imagen, como MP4 (que utiliza H264/HEVC para vÃdeo y AAC para audio), WebM (que utiliza VP8/VP9/AV1 para vÃdeo y Vorbis u OPUS para audio), asà como WMV, MP3, JPEG, GIF y PNG.
## PROCESAMIENTO DE VÃDEO
Puede añadir texto, imágenes o logotipos GIF, ajustar el brillo, el contraste, la saturación o el tono, cambiar el tamaño, recortar o girar el contenido y aplicar efectos de croma o varios efectos de vÃdeo para mejorar el contenido.


## PROCESAMIENTO DE AUDIO
Incorpore un ecualizador a su aplicación, que permita a los usuarios ajustar con precisión su experiencia de audio. Esta función les permite ajustar frecuencias de audio especÃficas, como agudos, medios y graves, para conseguir el perfil de sonido deseado. Además, los usuarios pueden normalizar los niveles de audio o amplificar el volumen, proporcionando un control preciso sobre la salida de audio. También tienen a su disposición muchos otros efectos de audio para una mayor personalización.
## Las principales caracterÃsticas de VisioForge Video Capture SDK .Net son:
### Fuentes de vÃdeo y audio compatibles
- Cámaras web USB y otros dispositivos de captura (incluidos dispositivos 4K)
- Cámaras IP ONVIF (compatibles con PTZ y otras API)
- Cámaras/servidores IP JPEG/MJPEG, MPEG-4 y H.264 HTTP/RTSP/RTMP, compatibles con el formato HD
- Dispositivos Blackmagic Decklink
- Fuente de pantalla (incluyendo varias pantallas) y captura de ventanas
- Altavoces (loopback)
- Dispositivos NewTek NDI
- Tarjetas de captura PCI
- Sintonizadores de TV (con y sin codificador MPEG interno)
- Videocámaras DV y HDV MPEG-2
- Cámaras FLIR/Teledyne (USB3 Vision/GigE)
- Cámaras Basler (USB3 Vision/GigE)
- Microsoft Kinect/Kinect 2 para Windows
- Dispositivos de captura de audio y tarjetas de sonido
- Dispositivos ASIO
### Formatos de vÃdeo de salida
- AVI (con códecs de audio/vÃdeo como MJPEG, DivX, XviD y x264)
- WMV (compatibilidad con perfiles WMV personalizados. Puede configurar secuencias para utilizar codificación de velocidad de bits variable (VBR), secuencias de audio o vÃdeo sin comprimir, tamaño de vÃdeo, tamaño de búfer, velocidad de fotogramas, etc.).
- DV y MPEG desde videocámaras DV/HDV y sintonizadores de TV con codificador MPEG interno (tecnologÃa DirectCapture)
- DV (desde cualquier dispositivo de captura de vÃdeo)
- MPEG-1/2/4 (incluidos los perfiles VCD/SVCD/DVD) y FLV mediante la envoltura FFMPEG
- WebM (Vorbis + VP8/VP9)
- Salida MP4 H264/HEVC + AAC mediante codificador de software o codificador GPU (Intel QuickSync, Nvidia CUDA/NVENC, o AMD/ATI AMF)
- Todos los formatos compatibles con FFMPEG.exe (incluido MP4 H264/HEVC)
- Formatos de salida personalizados (mediante filtros DirectShow de terceros)
- GIF animado
- MOV
- MPEG-TS
### Formatos de audio de salida
- WAV (comprimido o PCM)
- WMA (Windows Media Audio)
- M4A (AAC)
- MP3 (con LAME)
- FLAC
- Ogg Vorbis
- Speex
### Formatos de instantáneas
- JPEG
- PNG
- GIF
- BMP
- Sistema.Dibujo.Mapa de bits
- Mapa de bits de SkiaSharp
### Procesamiento y efectos de vÃdeo (CPU/GPU)
- superposición de imágenes (incluido GIF animado)
- superposición de texto
- funciones de panorámica y zoom
- ajustes de brillo, contraste, saturación y tono
- desentrelazar
- eliminación de ruido
- cambiar el tamaño a cualquier resolución
- chroma-key
- fundido de entrada/salida
- rotar vÃdeo
- Compatibilidad con filtros DirectShow de terceros
- efectos de vÃdeo independientes para previsualización y salida
### Tratamiento de audio y efectos
- amplificador de volumen
- ecualizador
- sistema de bajos 3D
- normalización
- ganancia auto/manual
- hay muchos otros efectos
### Formatos de transmisión en red
- HLS (HTTP Live Streaming), compatible con Android e iOS
- RTSP
- Protocolo Smooth Streaming para Microsoft IIS Server
- RTMP
- UDP (MPEG-TS/RTP)
- SRT
- YouTube / Facebook en vivo
- Instituto Nacional de Desarrollo
- WMV (Windows Media Video)
- a otros servidores y dispositivos multimedia mediante una cámara virtual/fuente de audio
### Otras caracterÃsticas
- Previsualización de audio/vÃdeo
- Sintonización de TV
- Control del dispositivo de video capture
- entrada de vÃdeo (interfaz crossbar)
- formato de vÃdeo
- frecuencia de cuadro
- soporta tarjetas de vÃdeo con varias entradas
- control de la cámara (brillo, saturación, etc.)
- Detección de movimiento
- Lector de códigos de barras
- OSD (On-Screen Display)
- PIP (Picture-In-Picture) (admite fuentes de captura de vÃdeo, cámaras IP y archivos de vÃdeo)
- Detección de caras y seguimiento de objetos
- Múltiples pantallas de salida
- Timeshift
- Salida a archivos de vÃdeo encriptados mediante el [Video Encryption SDK](https://www.visioforge.com/es/video-encryption-sdk)
- Salida a [Virtual Camera SDK](https://www.visioforge.com/es/virtual-camera-sdk)
- Apoyo a las aplicaciones de servicios
- Soporte para leer y escribir etiquetas de archivos de audio/vÃdeo
- Compatibilidad con el renderizador de vÃdeo madVR
- reproducción de secuencias RTSP y MJPEG de baja latencia desde una cámara IP
- [OBS (Software de transmisión abierta)](https://obsproject.com/) streaming
- Reconocimiento facial
### IDE
- Visual Studio 2019 y versiones posteriores: Visual C#, Visual C++, Visual Basic .NET
- Código de Visual Studio
- Jinete JetBrains
- Puede utilizarse con otras aplicaciones compatibles con .Net, como Microsoft Access, Word y Excel.
### Frameworks de IU
- Formularios WinForms
- WPF
- WinUI 3 for Desktop
- Avalonia
- GTK#
- Maui
- Xamarin.Mac
- Xamarin.Android
- Xamarin.iOS
### Versiones de .Net
- .Net Framework 4.6.1 y versiones posteriores
- .Net Core 3.1
- .Net 5 - .Net 9
### Requisitos del sistema
- Windows 10 o Windows 11
- Ubuntu 22+
- macOS 12+
### Plataformas objetivo
- Windows 11, Windows 10, Windows 8/8.1, Windows 7 SP1
- Windows Server 2016 y versiones posteriores
- Android 8 y posteriores
- Linux
- macOS
- iOS
### Limitaciones de la versión de prueba
La versión de prueba muestra una marca de agua en la ventana de vÃdeo.
## EJEMPLOS DE CÃDIGOS
### VÃDEO PREVIO
El código de ejemplo muestra cómo configurar las fuentes de vÃdeo y audio predeterminadas, mostrar vÃdeo en pantalla y reproducir audio utilizando los altavoces predeterminados. Se utilizarán los formatos de vÃdeo y audio predeterminados.
### CAPTURA DE VÃDEO A MP4
Archivo MP4 [captura desde una cámara web](https://www.visioforge.com/es/save-webcam) y micrófono, con vista previa de video/audio.
Utilizando más código, puedes configurar H264/HEVC y AAC.
Por defecto, se utilizará un codificador GPU H264 (si está disponible).
### VISTA PREVIA DE LA CÃMARA IP RTSP
Previsualización de cámaras RTSP con descodificación de vÃdeo CPU/GPU y detección automática de códecs.
Puede utilizar la detección ONVIF para encontrar todas las cámaras IP de su red local.
## CAPTURA DE PANTALLA
SDK puede capturar vÃdeo de una pantalla o ventana especificada.
Puedes capturar toda la pantalla o un rectángulo especÃfico. La frecuencia de imagen se puede personalizar.
### SUPERPOSICIÃN DE TEXTO E IMÃGENES
Puede añadir texto (incluido el desplazamiento), hora/fecha y superposiciones de imágenes.
SDK admite todos los formatos de imagen habituales, incluidos JPEG, PNG, GIF y SVG.

#### EDICIÃN

#### ESTÃNDAR

#### PROFESIONAL

#### PREMIUM
Dispositivos de entrada y otras fuentes compatibles
- Cámaras web
- Sintonizadores de TV y tarjetas de captura
- Videocámaras DV y MPEG
- Captura de pantalla
- HTTP/RTSP/ONVIF Cámaras IP
- UDP, TCP, RTMP y otros flujos de red
- Blackmagic Decklink
- Dispositivos DVB-T/DVB-C/DVB-S/ATSC (BETA)
- Microsoft Kinect para Windows
Avance en vÃdeo
Capturador de fotogramas
Tratamiento de vÃdeo
Tratamiento de audio
Compatibilidad con vÃdeo HD y 4K
Sintonización de TV
Transmisión en red en formato WMV
Transmisión en red mediante RTMP/RTSP/UDP/NDI
Chroma-key
Detección de movimiento
Tratamiento de vÃdeo mediante filtros DirectShow
OSD (On-Screen Display)
Picture-In-Picture
Cambiar el nombre del archivo de salida sobre la marcha
Múltiples pantallas de salida
Efectos de vÃdeo acelerados en la GPU
Salida a Virtual Camera SDK
Compatibilidad con Video Encryption SDK
Seguimiento facial
Formatos de salida
- AVI
- WMV (Windows Media Video)
- WMA (Windows Media Audio)
- WAV
- MP3
- Ogg Vorbis
- Speex
- VÃdeo DV
- DV/MPEG-1/2/4 (mediante sintonizador de TV con codificador MPEG interno o videocámara DV/HDV)
- VÃdeo Flash (FLV) con FFMPEG
- WebM
- Formatos de salida personalizados mediante filtros DirectShow externos
- MPEG-1/2/4 con FFMPEG
- MP4 (H264/HEVC + AAC) mediante software, codificadores Intel QuickSync, Nvidia NVENC/CUDA o AMD Radeon
Nuestro software ofrece un uso ilimitado sin pantallas de aviso, garantizando una
experiencia sin problemas. Ofrecemos un perÃodo de prueba de 30 dÃas para que pueda explorar
todas las funciones antes de comprometerse.
Con una licencia normal
recibirá actualizaciones menores y mayores gratuitas durante un año; después de ese perÃodo,
el SDK seguirá funcionando como antes.
Alternativamente, la licencia
licencia de por vida proporciona actualizaciones ilimitadas indefinidamente. Además,
ofrecemos soporte y correcciones prioritarias. La licencia normal se factura
anualmente y se renueva automáticamente cada año, pero puede cancelar su
suscripción en cualquier momento.
El SDK es gratuito para uso no comercial. Póngase en contacto con nosotros para obtener una licencia gratuita.
---END OF PAGE---
# Page: https://www.visioforge.com/it/video-capture-sdk-net
[multipiattaforma]
# Video Capture SDK .Net
versione 15.9
Il nostro SDK .Net integra perfettamente le funzionalità di acquisizione ed elaborazione video nelle applicazioni software. Questo versatile SDK facilita la riproduzione di video e audio e supporta l'acquisizione da varie fonti, tra cui webcam USB, telecamere IP, schede Blackmagic Decklink e videocamere. Offre un supporto completo per diversi formati di output, tra cui MP4, WebM, AVI, WMV, MPEG-1/2 e altri. Offre inoltre agli sviluppatori un'ampia libreria di effetti video e audio per migliorare e personalizzare i contenuti multimediali.
Inoltre, il nostro SDK offre una solida compatibilità multipiattaforma, garantendo una perfetta integrazione con gli ambienti Windows, Linux, macOS, iOS e Android. Questa adattabilità multipiattaforma consente agli sviluppatori di creare applicazioni che funzionano in modo coerente su diversi sistemi operativi e dispositivi, offrendo agli utenti un'esperienza multimediale coerente e flessibile.

#### DOWNLOADS
[Programma di installazione (Windows)](https://s3.us-west-2.amazonaws.com/files.visioforge.com/trials/visioforge\_sdks\_installer\_dotnet\_setup.exe)[Guida all'installazione di NuGet](https://www.visioforge.com/help/docs/dotnet/install/)[Samples su GitHub](https://github.com/visioforge/.Net-SDK-s-samples)

#### ACQUISTO
[Controllare i prezzi o ordinare](https://www.visioforge.com/it/buy)

#### AIUTO
[Guida in linea](https://www.visioforge.com/help/docs/dotnet/videocapture/)[Changelog](https://www.visioforge.com/help/docs/dotnet/changelog/)[Contratto di licenza](/help/docs/eula/)

## STRUTTURA SDK
L'SDK è altamente compatibile con più di 10 sorgenti di ingresso video e audio e supporta più di 20 formati di uscita. Offre agli sviluppatori una certa flessibilità , grazie all'ampia gamma di opzioni hardware per le configurazioni di ingresso e uscita. L'SDK elabora sia i contenuti video che quelli audio, consentendo di salvare i dati elaborati su file o di trasmetterli in streaming attraverso connessioni di rete.
## PIPELINE DI ACQUISIZIONE VIDEO
Durante le fasi di anteprima o di acquisizione, i flussi video e audio possono essere elaborati con vari effetti. Successivamente, questi flussi vengono suddivisi e indirizzati a codificatori e renderizzatori audio/video per un'ulteriore elaborazione.


## FORMATI DI USCITA
L'SDK supporta un'ampia gamma di formati e codec video, audio e immagine, come MP4 (che utilizza H264/HEVC per il video e AAC per l'audio), WebM (che utilizza VP8/VP9/AV1 per il video e Vorbis o OPUS per l'audio), oltre a WMV, MP3, JPEG, GIF e PNG.
## ELABORAZIONE VIDEO
à possibile aggiungere testo, immagini o loghi GIF, regolare la luminosità , il contrasto, la saturazione o la tonalità , ridimensionare, ritagliare o ruotare i contenuti e applicare la colorazione cromatica o vari effetti video per migliorare i contenuti.


## ELABORAZIONE AUDIO
Incorporate un equalizzatore nella vostra applicazione, consentendo agli utenti di regolare con precisione la loro esperienza audio. Questa funzione consente di regolare frequenze audio specifiche, come gli alti, i medi e i bassi, per ottenere il profilo sonoro desiderato. Inoltre, gli utenti possono normalizzare i livelli audio o amplificare il volume, fornendo un controllo preciso sull'uscita audio. Per un'ulteriore personalizzazione sono disponibili molti altri effetti audio.
## Le principali caratteristiche di VisioForge Video Capture SDK .Net includono:
### Sorgenti video e audio supportate
- Webcam USB e altri dispositivi di acquisizione (compresi i dispositivi 4K)
- Telecamere IP ONVIF (PTZ e altre API supportate)
- JPEG/MJPEG, MPEG-4 e H.264 Telecamere/server IP HTTP/RTSP/RTMP, formato HD supportato
- Dispositivi Blackmagic Decklink
- Sorgente di cattura dello schermo (compresi diversi display) e cattura delle finestre
- Altoparlanti (loopback)
- Dispositivi NDI NewTek
- Schede di acquisizione PCI
- Sintonizzatori TV (con e senza codificatore MPEG interno)
- Videocamere DV e HDV MPEG-2
- Telecamere FLIR/Teledyne (USB3 Vision/GigE)
- Telecamere Basler (USB3 Vision/GigE)
- Microsoft Kinect/Kinect 2 per Windows
- Dispositivi di acquisizione audio e schede audio
- Dispositivi ASIO
### Formati video in uscita
- AVI (utilizzando codec audio/video come MJPEG, DivX, XviD e x264)
- WMV (supporto di profili WMV personalizzati. à possibile configurare i flussi in modo che utilizzino la codifica a bit rate variabile (VBR), il flusso audio o video non compresso, la dimensione del video, la dimensione del buffer, la frequenza dei fotogrammi e così via).
- DV e MPEG da videocamere DV/HDV e sintonizzatori TV con encoder MPEG interno (tecnologia DirectCapture)
- DV (da qualsiasi dispositivo di acquisizione video)
- MPEG-1/2/4 (compresi i profili VCD/SVCD/DVD) e FLV con wrapper FFMPEG
- WebM (Vorbis + VP8/VP9)
- Uscita MP4 H264/HEVC + AAC tramite codificatore software o codificatore GPU (Intel QuickSync, Nvidia CUDA/NVENC o AMD/ATI AMF)
- Tutti i formati supportati da FFMPEG.exe (compreso MP4 H264/HEVC)
- Formati di uscita personalizzati (utilizzando filtri DirectShow di terze parti)
- GIF animate
- MOVIMENTO
- MPEG-TS
### Formati audio in uscita
- WAV (compresso o PCM)
- WMA (Windows Media Audio)
- M4A (AAC)
- MP3 (utilizzando LAME)
- Formato FLAC
- Ogg Vorbis
- Speex
### Formati delle istantanee
- Formato JPEG
- PNG
- GIF
- BMP
- Sistema.Disegno.Bitmap
- SkiaSharp SKBitmap
### Elaborazione video ed effetti (CPU/GPU)
- sovrapposizione di immagini (comprese le GIF animate)
- sovrapposizione di testo
- panoramica/zoom
- luminosità , contrasto, saturazione, tonalità , ecc.
- deinterlacciamento
- denoise
- ridimensionare a qualsiasi risoluzione
- chiave cromatica
- dissolvenza in entrata/dissolvenza in uscita
- ruotare
- Supporto dei filtri DirectShow di terze parti
- effetti video indipendenti per l'anteprima e l'output
### Elaborazione audio ed effetti
- amplificatore di volume
- equalizzatore
- sistema 3D-bass
- normalizzazione
- guadagno automatico/manuale
- ci sono molti altri effetti
### Formati di streaming di rete
- HLS (HTTP Live Streaming), compatibile con Android e iOS
- RTSP
- Protocollo Smooth Streaming per il server Microsoft IIS
- RTMP
- UDP (MPEG-TS/RTP)
- SRT
- YouTube / Facebook Live
- NDI
- WMV (Windows Media Video)
- ad altri server multimediali e dispositivi utilizzando una telecamera virtuale/sorgente audio
### Altre caratteristiche
- Anteprima audio/video
- Sintonizzazione TV
- Video capture controllo del dispositivo
- ingresso video (interfaccia crossbar)
- formato video
- frequenza dei fotogrammi
- supporta schede video con più ingressi
- controllo della fotocamera (luminosità , saturazione, ecc.)
- Rilevamento del movimento
- Lettore di codici a barre
- OSD (On-Screen Display)
- PIP (Picture-In-Picture) (sono supportate sorgenti di acquisizione video, telecamere IP e file video)
- Rilevamento dei volti e tracciamento degli oggetti
- Supporto di più schermi di uscita
- Timeshift
- Uscita su file video crittografati utilizzando l'opzione [Video Encryption SDK](https://www.visioforge.com/it/video-encryption-sdk)
- Uscita verso [Virtual Camera SDK](https://www.visioforge.com/it/virtual-camera-sdk)
- Supporto alle applicazioni di servizio
- Supporto per la lettura e la scrittura di tag di file audio/video
- Supporto del renderizzatore video madVR
- riproduzione a bassa latenza di flussi RTSP e MJPEG dalla telecamera IP
- [OBS (Software per trasmissioni aperte)](https://obsproject.com/) streaming
- Riconoscimento dei volti
### IDE
- Visual Studio 2019 e successivi: Visual C#, Visual C++, Visual Basic .NET
- Codice di Visual Studio
- Cavaliere JetBrains
- Può essere utilizzato con altre applicazioni compatibili con .Net, come Microsoft Access, Word ed Excel.
### Quadri UI
- WinForms
- WPF
- WinUI 3 for Desktop
- Avalonia
- GTK#
- MAUI
- Xamarin.Mac
- Xamarin.Android
- Xamarin.iOS
### Versioni .Net
- .Net Framework 4.6.1 e versioni successive
- .Net Core 3.1
- .Net 5 - .Net 9
### Requisiti di sistema
- Windows 10 o Windows 11
- Ubuntu 22+
- macOS 12+
### Piattaforme target
- Windows 11, Windows 10, Windows 8/8.1, Windows 7 SP1
- Windows Server 2016 e successivi
- Android 8 e successivi
- Linux
- macOS
- iOS
### Limiti della prova
La versione di prova visualizza una filigrana nella finestra del video.
## CAMPIONI DI CODICE
### ANTEPRIMA VIDEO
Il codice di esempio mostra come configurare le sorgenti video e audio predefinite, mostrare il video sullo schermo e riprodurre l'audio utilizzando gli altoparlanti predefiniti. Verranno utilizzati i formati video e audio predefiniti.
### CATTURA VIDEO IN MP4
file MP4 [cattura da una webcam](https://www.visioforge.com/it/save-webcam)Â e microfono, con anteprima video/audio.
Utilizzando altri codici, è possibile impostare le impostazioni H264/HEVC e AAC.
Per impostazione predefinita, verrà utilizzato un codificatore H264 della GPU (se disponibile).
### ANTEPRIMA DELLA TELECAMERA IP RTSP
Anteprima della telecamera RTSP con decodifica video CPU/GPU e rilevamento automatico dei codec.
à possibile utilizzare il rilevamento ONVIF per trovare tutte le telecamere IP nella rete locale.
## CATTURA DELLO SCHERMO
L'SDK può catturare video da una schermata o da una finestra specifica.
à possibile catturare l'intero schermo o un rettangolo specificato. La frequenza dei fotogrammi può essere personalizzata.
### SOVRAPPOSIZIONI DI TESTO E IMMAGINI
à possibile aggiungere testo (anche scorrevole), ora/data e immagini in sovrimpressione.
L'SDK supporta tutti i formati di immagine più diffusi, tra cui JPEG, PNG, GIF e SVG.

#### EDIZIONE

#### STANDARD

#### PROFESSIONALE

#### PREMIUM
Dispositivi di input e altre fonti supportate
- Telecamere web
- Sintonizzatori TV e schede di acquisizione
- Videocamere DV e MPEG
- Capture dello schermo
- Telecamere IP HTTP/RTSP/ONVIF
- UDP, TCP, RTMP e altri flussi di rete
- Blackmagic Decklink
- Dispositivi DVB-T/DVB-C/DVB-S/ATSC (BETA)
- Microsoft Kinect per Windows
Anteprima video
Acquisizione di fotogrammi
Elaborazione video
Elaborazione audio
Supporto video HD e 4K
Sintonizzazione TV
Streaming di rete in formato WMV
Android 8 e successivi
Chiave cromatica
Rilevamento del movimento
Elaborazione video con filtri DirectShow
OSD (On-Screen Display)
Immagine nell'immagine
Modifica del nome del file di output al volo
Schermi di uscita multipli
Effetti video accelerati dalla GPU
Uscita verso l'SDK della Virtual Camera
Supporto SDK di crittografia video
Tracciamento del volto
Formati di uscita
- AVI
- WMV (Windows Media Video)
- WMA (Windows Media Audio)
- WAV
- MP3
- Ogg Vorbis
- Speex
- Video DV
- DV/MPEG-1/2/4 (utilizzando un sintonizzatore TV con codificatore MPEG interno o una videocamera DV/HDV)
- Video Flash (FLV) utilizzando FFMPEG
- WebM
- Formati di uscita personalizzati utilizzando filtri DirectShow esterni
- MPEG-1/2/4 con FFMPEG
- MP4 (H264/HEVC + AAC) tramite software, codificatori Intel QuickSync, Nvidia NVENC/CUDA o AMD Radeon
Il nostro software offre un utilizzo illimitato, senza nag-screen, garantendo un'esperienza
esperienza senza soluzione di continuità . Forniamo un periodo di prova di 30 giorni, in modo che possiate esplorare tutte le funzionalità prima di
tutte le funzionalità prima di impegnarsi.
Con una licenza regolare, l'utente
riceve aggiornamenti minori e maggiori gratuiti per un anno; dopo tale periodo,
l'SDK continuerà a funzionare come prima.
In alternativa, la
licenza a vita fornisce aggiornamenti illimitati a tempo indeterminato. Inoltre,
offriamo assistenza e correzioni prioritarie. La licenza regolare viene fatturata
annualmente e si rinnova automaticamente ogni anno, ma è possibile annullare la
abbonamento in qualsiasi momento.
L'SDK è gratuito per uso non commerciale. Contattateci per ottenere una licenza gratuita.
---END OF PAGE---
# Page: https://www.visioforge.com/de/media-player-sdk-net
[Plattformübergreifend]
# Media Player SDK .Net
Version 15.9
Das Media Player SDK .Net ermöglicht Entwicklern die nahtlose Integration einer breiten Palette von Medienwiedergabefunktionen in ihre Anwendungen, einschlieÃlich Unterstützung für Video, Audio, DVD, Blu-ray und verschiedene Netzwerkströme. Dieses SDK bietet auch die Möglichkeit, Overlay-Bitmaps und Text mit Effekten über das Video zu legen. Es bietet Flexibilität bei den Wiedergabe-Engines und ermöglicht die Verwendung von System-Codecs, FFMPEG oder VLC, wodurch ein breites Spektrum an Kompatibilität und ein qualitativ hochwertiges Medienerlebnis gewährleistet wird.

#### DOWNLOADS
[Installationsprogramm (nur Windows)](https://s3.us-west-2.amazonaws.com/files.visioforge.com/trials/visioforge\_sdks\_installer\_dotnet\_setup.exe)[NuGet-Installationshandbuch](https://www.visioforge.com/help/docs/dotnet/install/)[Samples auf GitHub](https://github.com/visioforge/.Net-SDK-s-samples)

#### KAUFEN
[Preise prüfen oder bestellen](https://www.visioforge.com/de/buy)

#### HILFE
[Online-Hilfe](https://www.visioforge.com/help/docs/dotnet/mediaplayer/)[Ãnderungsliste](https://www.visioforge.com/help/docs/dotnet/changelog/)[Lizenzvereinbarung](/help/docs/eula/)

## SDK STRUKTUR
Das SDK ermöglicht es Entwicklern, bestimmte Video- und Audioquellen auszuwählen, eine Reihe von Effekten für die Verarbeitung anzuwenden und die Medien dann für das Rendering weiterzuleiten. Es ist vielseitig und passt sich verschiedenen UI-Frameworks an, indem es für jedes ein eigenes VideoView-Steuerelement bereitstellt - ob WPF, WinForms, MAUI, Avalonia oder andere - und so eine nahtlose Integration und Anzeige von Medien in verschiedenen Anwendungsoberflächen gewährleistet.
## MEDIENWIEDERGABE-PIPELINE
Die SDK-Architektur trennt jede Medienquelle in diskrete Audio- und Videoströme auf. Diese Ströme werden dann an ihre jeweiligen Decoder weitergeleitet. Nach der Dekodierung werden die unkomprimierten Daten verarbeitet und können bei Bedarf direkt von einem Sample Grabber abgerufen werden. Diese Funktion ist praktisch für Echtzeitanwendungen, die Mediensamples verarbeiten oder analysieren.


## VIDEOBEARBEITUNG
Fügen Sie Text, Bilder oder GIFs zu Ihren Videos hinzu, um personalisierte Ãberlagerungen zu erstellen. Passen Sie visuelle Elemente wie Helligkeit, Kontrast, Sättigung und Farbton an, um die Bildqualität zu verbessern. Nutzen Sie die Bearbeitungswerkzeuge, um die GröÃe zu ändern, das Material zu beschneiden oder zu drehen, falls erforderlich. Wenden Sie den Chroma-Key für Greenscreen-Effekte an und erkunden Sie eine breite Palette zusätzlicher Videoeffekte, um Ihre Erzählungen zu verbessern.
## AUDIOVERARBEITUNG
Integrieren Sie einen Equalizer in Ihre Anwendung, um eine präzise Audioabstimmung zu ermöglichen. Normalisieren Sie die Tonstärke, erhöhen Sie die Lautstärke oder verstärken Sie die Bassfrequenzen. Eine Vielzahl weiterer Audioeffekte steht für weitere Verfeinerungen zur Verfügung. Implementieren Sie automatische oder manuelle Verstärkungsregelung, um optimale Tonqualität zu erreichen.


## BENUTZERDEFINIERTE UI-STEUERELEMENTE
Das SDK verfügt über eine anpassbare Benutzeroberfläche mit Skin-Unterstützung, die PNG/SVG-Icons und personalisierte Stiloptionen unterstützt.
## Die wichtigsten Funktionen des VisioForge Media Player SDK .Net sind:
### Unterstützte Formate
- Dateiformate: MP4, MKV, MOV, AVI, MPEG-TS, WMV, MXF, VOB, OGG
- Videoformate: MPEG-1/2, WMV, MPEG-4, H264, HEVC, und andere mit dem entsprechenden Decoder
- Audio-Formate: AAC, MP3, Vorbis, WMA, OPUS, Speex und andere mit dem entsprechenden Decoder
- MIDI, Karaoke KAR und CDG
- DVD- und Blu-ray-Wiedergabe [nur Windows]
### Videoverarbeitung und Effekte (CPU/GPU)
- Bild-Overlay (einschlieÃlich animiertes GIF)
- SVG-Overlay
- Textüberlagerung
- Videotransparenz
- Schwenken/Zoomen
- Helligkeit, Kontrast, Sättigung, Farbton, usw.
- invertierte Farben
- Graustufen
- Deinterlace
- Denoise
- Einblendung/Ausblendung
- rotieren
- GröÃenanpassung an jede Auflösung
- Unterstützung für DirectShow-Filter von Drittanbietern
- mehr als 30 weitere Effekte
### Audiobearbeitung und Effekte
- Volumenverstärker
- Equalizer
- 3D-Bass-System
- Normalisierung
- automatische/manuelle Verstärkung
- eine Menge anderer Effekte
### Andere Merkmale
- Wiedergabe von Dateien aus dem Speicher
- Nahtlose Wiedergabe (keine Verzögerung zwischen 2 Dateien in der Wiedergabeliste)
- Unterstützung der Multiplikation von Ausgabebildschirmen
- Bild-in-Bild-Unterstützung
- Unterstützung von 4K- und 8K-Videodateien
- GPU-beschleunigte Dekodierung (DXVA2/Direct3D 11/Intel QuickSync/Nvidia CUVID, AMF)
- Rückwärts/Vorwärtssuche
- Bilderfassung in .Net Bitmap- oder BMP/JPEG/GIF/PNG-Dateien
- OSD (Bildschirmanzeige)
- Audiostreams aus zusätzlichen Audio-/Videodateien
- Unterstützung von Untertiteln
- MMS/WMV/RTSP/RTMP/UDP-Netzwerk-Stream-Wiedergabe
- Rückwärts abspielen
- Wiedergabe von verschlüsselten Videodateien, die mit dem [Video Encryption SDK](https://www.visioforge.com/de/video-encryption-sdk)
- Bewegungserkennung
- Gesichtserkennung und Objekterkennung [nur Windows]
- Barcode-Leser
- Chroma-Schlüssel
- madVR optionaler Video-Renderer [nur Windows]
- VR 360°-Videounterstützung [nur Windows]
### IDE
- Visual Studio 2019 und höher: Visual C#, Visual C++, Visual Basic .NET
- Visual Studio Code
- JetBrains-Reiter
- SDK kann mit anderen .Net-kompatiblen Anwendungen wie Microsoft Access, Word und Excel verwendet werden.
### UI-Frameworks
- WinForms
- WPF
- WinUI 3 for Desktop
- Avalonia
- Xamarin.Android
- MacOS/MacCatalyst
- Xamarin.iOS
- MAUI
### Systemanforderungen
- Windows 10 oder Windows 11
- Ubuntu 22+
- macOS 12+
### Zielplattformen
- Windows 11, Windows 10, Windows 8/8.1, Windows 7 SP1
- Windows Server 2016 und höher
- Android 8 und höher
- Linux
- macOS
- iOS
### .Net-Versionen
- .Net Framework 4.6.1 und höher
- .Net Core 3.1
- .Net 5 â .Net 9
### Vertriebsrechte
Lizenzfreie Verbreitung.
### Beschränkungen des Versuchs
In der Testversion wird ein Wasserzeichen im Videofenster angezeigt.

#### EDITION

#### STANDARD

#### PROFESSIONELL
Wiedergabe von Videodateien
Wiedergabe von Audiodateien
Wiedergabe des Speicherstroms
Unterstützung von Untertiteln
Unterstützung von HD- und 4K-Videos
Video-/Audioverarbeitung
Wiedergabe von Netzwerk-Streams (HTTP/RTSP/RTMP/HLS/WMV/NDI)
Chroma-Schlüssel
Rückwärts abspielen
Bewegungserkennung
Videoverarbeitung mit
DirectShow-Filter (\\*)
OSD (Bildschirmanzeige)
Frame Grabber
Mehrere Ausgabebildschirme
GPU-beschleunigte Videoeffekte
Video Encryption SDK Unterstützung (\\*)
Gesichtsverfolgung
Audiostreams aus externen Dateien
(\\*) - Nur für Windows
Unsere Software bietet eine unbegrenzte Nutzung ohne störende Bildschirme und gewährleistet eine
nahtlose Erfahrung. Wir bieten einen 30-tägigen Testzeitraum, damit Sie alle
alle Funktionen erkunden können, bevor Sie sich festlegen.
Mit einer regulären Lizenz erhalten Sie
erhalten Sie für ein Jahr kostenlose Minor- und Major-Upgrades; nach diesem Zeitraum
funktioniert das SDK weiter wie bisher.
Alternativ dazu bietet die
Lifetime-Lizenz unbegrenzte Updates auf unbestimmte Zeit zur Verfügung. Zusätzlich,
bieten wir vorrangigen Support und Fehlerbehebungen. Die reguläre Lizenz wird jährlich abgerechnet
jährlich abgerechnet und automatisch verlängert, aber Sie können Ihr Abonnement
Abonnement jederzeit kündigen.
Das SDK ist für die nicht-kommerzielle Nutzung kostenlos. Bitte kontaktieren Sie uns, um eine kostenlose Lizenz zu erhalten.
---END OF PAGE---
# Page: https://www.visioforge.com/es/media-player-sdk-net
[Plataforma cruzada]
# Media Player SDK .Net
versión 15.9
El Media Player SDK .Net permite a los desarrolladores integrar sin problemas una amplia gama de funciones de reproducción multimedia en sus aplicaciones, incluida la compatibilidad con vÃdeo, audio, DVD, Blu-ray y varios flujos de red. Este SDK también proporciona la capacidad de renderizar mapas de bits superpuestos y texto con efectos sobre el vÃdeo. Ofrece flexibilidad en los motores de reproducción, permitiendo el uso de códecs del sistema, FFMPEG o VLC, garantizando una amplia compatibilidad y una experiencia multimedia de alta calidad.

#### DESCARGAS
[Instalador (sólo Windows)](https://s3.us-west-2.amazonaws.com/files.visioforge.com/trials/visioforge\_sdks\_installer\_dotnet\_setup.exe)[GuÃa de instalación de NuGet](https://www.visioforge.com/help/docs/dotnet/install/)[Samples en GitHub](https://github.com/visioforge/.Net-SDK-s-samples)

#### COMPRAR
[Consultar precios o hacer un pedido](https://www.visioforge.com/es/buy)

#### AYUDA
[Ayuda en lÃnea](https://www.visioforge.com/help/docs/dotnet/mediaplayer/)[Registro de cambios](https://www.visioforge.com/help/docs/dotnet/changelog/)[Acuerdo de licencia](/help/docs/eula/)

## ESTRUCTURA DEL SDK
El SDK permite a los desarrolladores seleccionar fuentes especÃficas de vÃdeo y audio, aplicar una serie de efectos para su procesamiento y, a continuación, enrutar los medios para su renderización. Es versátil y se adapta a diferentes marcos de interfaz de usuario, proporcionando un control VideoView único para cada uno de ellos - ya sea WPF, WinForms, MAUI, Avalonia, u otros - garantizando una perfecta integración y visualización de los medios de comunicación dentro de diversas interfaces de aplicación.
## PROCESO DE REPRODUCCIÃN MULTIMEDIA
La arquitectura del SDK separa cada fuente multimedia en flujos discretos de audio y vÃdeo. Estos flujos se dirigen a sus respectivos descodificadores. Tras la descodificación, los datos sin comprimir se procesan y, si es necesario, un capturador de muestras puede acceder directamente a ellos. Esta función es muy útil para aplicaciones en tiempo real que procesan o analizan muestras multimedia.


## PROCESAMIENTO DE VÃDEO
Añade texto, imágenes o GIF a tus vÃdeos para crear superposiciones personalizadas. Ajusta elementos visuales como el brillo, el contraste, la saturación y el tono para mejorar la calidad de la imagen. Utiliza las herramientas de edición para cambiar el tamaño, recortar o girar las secuencias según sea necesario. Aplica el croma para conseguir efectos de pantalla verde y explora una amplia gama de efectos de vÃdeo adicionales para mejorar tu narración.
## PROCESAMIENTO DE AUDIO
Integre un ecualizador en su aplicación para permitir una afinación de audio precisa. Normalice los niveles de audio, amplifique el volumen o realce las frecuencias de los bajos. Se dispone de una variedad de efectos de audio adicionales para un mayor refinamiento. Implemente control de ganancia automático o manual para lograr una calidad de audio óptima.


## CONTROLES UI PERSONALIZADOS
El SDK ofrece una interfaz personalizable con soporte de skins, que admite Ãconos PNG/SVG y opciones de estilo personalizadas.
## Las principales caracterÃsticas de VisioForge Media Player SDK .Net incluyen
### Formatos admitidos
- Formatos de archivo: MP4, MKV, MOV, AVI, MPEG-TS, WMV, MXF, VOB, OGG
- Formatos de vÃdeo: MPEG-1/2, WMV, MPEG-4, H264, HEVC y otros con el descodificador adecuado
- Formatos de audio: AAC, MP3, Vorbis, WMA, OPUS, Speex y otros con el descodificador adecuado.
- MIDI, karaoke KAR, y CDG
- Reproducción de DVD y Blu-ray [sólo Windows].
### Procesamiento y efectos de vÃdeo (CPU/GPU)
- superposición de imágenes (incluido GIF animado)
- Superposición SVG
- superposición de texto
- transparencia de vÃdeo
- funciones de panorámica y zoom
- ajustes de brillo, contraste, saturación y tono
- colores invertidos
- escala de grises
- desentrelazar
- eliminación de ruido
- fundido de entrada/salida
- rotar vÃdeo
- cambiar el tamaño a cualquier resolución
- Compatibilidad con filtros DirectShow de terceros
- más de otros 30 efectos
### Tratamiento de audio y efectos
- amplificador de volumen
- ecualizador
- sistema de bajos 3D
- normalización
- ganancia auto/manual
- muchos otros efectos
### Otras caracterÃsticas
- Reproducción de archivos desde la RAM
- Reproducción ininterrumpida (sin retardo entre 2 archivos de la lista de reproducción)
- Multiplicación de pantallas de salida
- Compatible con Picture-in-Picture
- Compatibilidad con archivos de vÃdeo 4K y 8K
- Decodificación acelerada por GPU (DXVA2/Direct3D 11/Intel QuickSync/Nvidia CUVID, AMF)
- Búsqueda hacia atrás/hacia delante
- Captura de fotogramas a archivos .Net Bitmap o BMP/JPEG/GIF/PNG
- OSD (On-Screen Display)
- Secuencias de audio de archivos de audio/vÃdeo adicionales
- Soporte para subtÃtulos
- Reproducción de flujos de red MMS/WMV/RTSP/RTMP/UDP
- Reproducción inversa
- Reproducción de archivos de vÃdeo cifrados creados con el [Video Encryption SDK](https://www.visioforge.com/es/video-encryption-sdk)
- Detección de movimiento
- Detección de caras y detección de objetos [Sólo Windows]
- Lector de códigos de barras
- Chroma-key
- Renderizador de vÃdeo opcional madVR [sólo para Windows].
- Soporte de vÃdeo VR 360° [sólo Windows]
### IDE
- Visual Studio 2019 y versiones posteriores: Visual C#, Visual C++, Visual Basic .NET
- Código de Visual Studio
- Jinete JetBrains
- SDK puede utilizarse con otras aplicaciones compatibles con .Net como Microsoft Access, Word, Excel
### Frameworks de IU
- Formularios WinForms
- WPF
- WinUI 3 for Desktop
- Avalonia
- Xamarin.Android
- MacOS/MacCatalyst
- Xamarin.iOS
- Maui
### Requisitos del sistema
- Windows 10 o Windows 11
- Ubuntu 22+
- macOS 12+
### Plataformas objetivo
- Windows 11, Windows 10, Windows 8/8.1, Windows 7 SP1
- Windows Server 2016 y versiones posteriores
- Android 8 y posteriores
- Linux
- macOS
- iOS
### Versiones de .Net
- .Net Framework 4.6.1 y versiones posteriores
- .Net Core 3.1
- .Net 5 - .Net 9
### Derechos de distribución
Distribución sin derechos de autor.
### Limitaciones de la versión de prueba
La versión de prueba muestra una marca de agua en la ventana de vÃdeo.

#### EDICIÃN

#### ESTÃNDAR

#### PROFESIONAL
Reproducción de archivos de vÃdeo
Reproducción de archivos de audio
Reproducción de flujos RAM
Soporte para subtÃtulos
Compatibilidad con vÃdeo HD y 4K
Procesamiento de vÃdeo/audio
Reproducción de secuencias en red (HTTP/RTSP/RTMP/HLS/WMV/NDI)
Chroma-key
Reproducción inversa
Detección de movimiento
Procesamiento de vÃdeo con
Filtros de DirectShow (\\*)
OSD (On-Screen Display)
Capturador de fotogramas
Múltiples pantallas de salida
Efectos de vÃdeo acelerados en la GPU
Compatible con Video Encryption SDK (\\*)
Seguimiento facial
Secuencias de audio de archivos externos
(\\*) - Sólo Windows
Nuestro software ofrece un uso ilimitado sin pantallas de aviso, garantizando una
experiencia sin problemas. Ofrecemos un perÃodo de prueba de 30 dÃas para que pueda explorar
todas las funciones antes de comprometerse.
Con una licencia normal
recibirá actualizaciones menores y mayores gratuitas durante un año; después de ese perÃodo,
el SDK seguirá funcionando como antes.
Alternativamente, la licencia
licencia de por vida proporciona actualizaciones ilimitadas indefinidamente. Además,
ofrecemos soporte y correcciones prioritarias. La licencia normal se factura
anualmente y se renueva automáticamente cada año, pero puede cancelar su
suscripción en cualquier momento.
El SDK es gratuito para uso no comercial. Póngase en contacto con nosotros para obtener una licencia gratuita.
---END OF PAGE---
# Page: https://www.visioforge.com/it/media-player-sdk-net
[multipiattaforma]
# Media Player SDK .Net
versione 15.9
Il Media Player SDK .Net consente agli sviluppatori di integrare senza problemi un'ampia gamma di funzionalità di riproduzione multimediale nelle loro applicazioni, compreso il supporto per video, audio, DVD, Blu-ray e vari flussi di rete. Questo SDK offre anche la possibilità di eseguire il rendering di bitmap e testo in sovrimpressione con effetti sul video. Offre flessibilità nei motori di riproduzione, consentendo l'uso di codec di sistema, FFMPEG o VLC, garantendo un'ampia compatibilità e un'esperienza multimediale di alta qualità .

#### DOWNLOADS
[Installatore (solo per Windows)](https://s3.us-west-2.amazonaws.com/files.visioforge.com/trials/visioforge\_sdks\_installer\_dotnet\_setup.exe)[Guida all'installazione di NuGet](https://www.visioforge.com/help/docs/dotnet/install/)[Samples su GitHub](https://github.com/visioforge/.Net-SDK-s-samples)

#### ACQUISTO
[Controllare i prezzi o ordinare](https://www.visioforge.com/it/buy)

#### AIUTO
[Guida in linea](https://www.visioforge.com/help/docs/dotnet/mediaplayer/)[Changelog](https://www.visioforge.com/help/docs/dotnet/changelog/)[Contratto di licenza](/help/docs/eula/)

## STRUTTURA SDK
L'SDK consente agli sviluppatori di selezionare sorgenti video e audio specifiche, applicare una serie di effetti per l'elaborazione e quindi indirizzare i media per il rendering. Ã versatile e si adatta a diversi framework dell'interfaccia utente, fornendo un unico controllo VideoView per ciascuno di essi (WPF, WinForms, MAUI, Avalonia o altri), garantendo un'integrazione e una visualizzazione perfetta dei media all'interno di varie interfacce applicative.
## PIPELINE DI RIPRODUZIONE MULTIMEDIALE
L'architettura dell'SDK separa ogni sorgente multimediale in flussi audio e video discreti. Questi flussi vengono poi indirizzati ai rispettivi decodificatori. Dopo la decodifica, i dati non compressi vengono elaborati e, se necessario, possono essere consultati direttamente da un sample grabber. Questa funzione è utile per le applicazioni in tempo reale che elaborano o analizzano campioni multimediali.


## ELABORAZIONE VIDEO
Aggiungete testo, immagini o GIF ai vostri video per creare sovrapposizioni personalizzate. Regolate elementi visivi come luminosità , contrasto, saturazione e tonalità per migliorare la qualità dell'immagine. Utilizzate gli strumenti di editing per ridimensionare, ritagliare o ruotare i filmati come necessario. Applicate il chroma key per ottenere effetti di schermo verde ed esplorate un'ampia gamma di effetti video aggiuntivi per migliorare la vostra narrazione.
## ELABORAZIONE AUDIO
Integrare un equalizzatore nell'applicazione per consentire una precisa sintonizzazione dell'audio. Normalizzate i livelli audio, amplificate il volume o migliorate le frequenze basse. à disponibile una suite di effetti audio aggiuntivi per un ulteriore perfezionamento. Implementate il controllo automatico o manuale del guadagno per ottenere una qualità audio ottimale.


## CONTROLLI PERSONALIZZATI DELL'INTERFACCIA UTENTE
L'SDK vanta un'interfaccia personalizzabile con supporto di skin, icone PNG/SVG e opzioni di stile personalizzate.
## Le principali caratteristiche di VisioForge Media Player SDK .Net includono:
### Formati supportati
- Formati di file: MP4, MKV, MOV, AVI, MPEG-TS, WMV, MXF, VOB, OGG
- Formati video: MPEG-1/2, WMV, MPEG-4, H264, HEVC e altri con il decodificatore appropriato
- Formati audio: AAC, MP3, Vorbis, WMA, OPUS, Speex e altri con il decodificatore appropriato.
- MIDI, karaoke KAR e CDG
- Riproduzione di DVD e Blu-ray [solo per Windows]
### Elaborazione video ed effetti (CPU/GPU)
- sovrapposizione di immagini (comprese le GIF animate)
- sovrapposizione SVG
- sovrapposizione di testo
- trasparenza video
- panoramica/zoom
- luminosità , contrasto, saturazione, tonalità , ecc.
- colori invertiti
- scala di grigi
- deinterlacciamento
- denoise
- dissolvenza in entrata/dissolvenza in uscita
- ruotare
- ridimensionare a qualsiasi risoluzione
- Supporto dei filtri DirectShow di terze parti
- più di 30 altri effetti
### Elaborazione audio ed effetti
- amplificatore di volume
- equalizzatore
- sistema 3D-bass
- normalizzazione
- guadagno automatico/manuale
- molti altri effetti
### Altre caratteristiche
- Riproduzione di file dalla memoria
- Riproduzione senza interruzioni (nessun ritardo tra 2 file nella playlist)
- Supporto di schermi di uscita multipli
- Supporto Picture-in-Picture
- Supporto di file video 4K e 8K
- Decodifica accelerata GPU (DXVA2/Direct3D 11/Intel QuickSync/Nvidia CUVID, AMF)
- Ricerca avanti/indietro
- Acquisizione di fotogrammi in file .Net Bitmap o BMP/JPEG/GIF/PNG
- OSD (On-Screen Display)
- Flussi audio da file audio/video aggiuntivi
- Supporto dei sottotitoli
- Riproduzione di flussi di rete MMS/WMV/RTSP/RTMP/UDP
- Riproduzione inversa
- Riproduzione di file video crittografati creati con il programma [Video Encryption SDK](https://www.visioforge.com/it/video-encryption-sdk)
- Rilevamento del movimento
- Rilevamento dei volti e degli oggetti [solo Windows]
- Lettore di codici a barre
- Chiave cromatica
- Rendering video opzionale di madVR [solo per Windows].
- Supporto video VR 360° [solo Windows]
### IDE
- Visual Studio 2019 e successivi: Visual C#, Visual C++, Visual Basic .NET
- Codice di Visual Studio
- Cavaliere JetBrains
- L'SDK può essere utilizzato con altre applicazioni compatibili con .Net, come Microsoft Access, Word, Excel.
### Quadri UI
- WinForms
- WPF
- WinUI 3 for Desktop
- Avalonia
- Xamarin.Android
- MacOS/MacCatalyst
- Xamarin.iOS
- MAUI
### Requisiti di sistema
- Windows 10 o Windows 11
- Ubuntu 22+
- macOS 12+
### Piattaforme target
- Windows 11, Windows 10, Windows 8/8.1, Windows 7 SP1
- Windows Server 2016 e successivi
- Android 8 e successivi
- Linux
- macOS
- iOS
### Versioni .Net
- .Net Framework 4.6.1 e versioni successive
- .Net Core 3.1
- .Net 5 - .Net 9
### Diritti di distribuzione
Distribuzione gratuita.
### Limiti della prova
La versione di prova visualizza una filigrana nella finestra del video.

#### EDIZIONE

#### STANDARD

#### PROFESSIONALE
Riproduzione di file video
Riproduzione di file audio
Riproduzione del flusso di memoria
Supporto dei sottotitoli
Supporto video HD e 4K
Elaborazione ed effetti video/audio
Riproduzione di flussi di rete (HTTP/RTSP/RTMP/HLS/WMV/NDI)
Chiave cromatica
Riproduzione inversa
Rilevamento del movimento
Elaborazione video con
Filtri DirectShow (\\*)
OSD (On-Screen Display)
Acquisizione di fotogrammi
Schermi di uscita multipli
Effetti video accelerati dalla GPU
Supporto SDK di crittografia video (\\*)
Tracciamento del volto
Secuencias de audio de archivos externos
(\\*) - Solo per Windows
Il nostro software offre un utilizzo illimitato, senza nag-screen, garantendo un'esperienza
esperienza senza soluzione di continuità . Forniamo un periodo di prova di 30 giorni, in modo che possiate esplorare tutte le funzionalità prima di
tutte le funzionalità prima di impegnarsi.
Con una licenza regolare, l'utente
riceve aggiornamenti minori e maggiori gratuiti per un anno; dopo tale periodo,
l'SDK continuerà a funzionare come prima.
In alternativa, la
licenza a vita fornisce aggiornamenti illimitati a tempo indeterminato. Inoltre,
offriamo assistenza e correzioni prioritarie. La licenza regolare viene fatturata
annualmente e si rinnova automaticamente ogni anno, ma è possibile annullare la
abbonamento in qualsiasi momento.
L'SDK è gratuito per uso non commerciale. Contattateci per ottenere una licenza gratuita.
---END OF PAGE---
# Page: https://www.visioforge.com/de/video-edit-sdk-net
# Video Edit SDK .Net
Version 15.9
Mit dem VisioForge Video Edit SDK .Net können Programmierer erweiterte Funktionen zur Videobearbeitung und -verarbeitung in ihre Softwareanwendungen integrieren. Mit diesem SDK können Sie benutzerdefinierte Filme erstellen, indem Sie Audio- und Videodateien kombinieren, verschiedene Effekte anwenden und flieÃende Ãbergänge zwischen den Tracks schaffen. Das SDK bietet robuste Unterstützung für gängige Videoformate, darunter MP4, WebM, AVI, WMV, Matroska, MPEG-1/2/4 und andere. Es bietet auch die Flexibilität, mit zusätzlichen Dateiformaten unter Verwendung von DirectShow-Filtern von Drittanbietern zu arbeiten. Darüber hinaus können Sie Audio in den gängigsten Formaten exportieren, darunter MP3, AAC/M4A, OGG Vorbis, Windows Media Audio, OPUS, Speex und WAV, was Ihre Multimedia-Projekte noch vielseitiger macht.

#### DOWNLOADS
[Installateur](https://s3.us-west-2.amazonaws.com/files.visioforge.com/trials/visioforge\_sdks\_installer\_dotnet\_setup.exe)[NuGet-Installationshandbuch](https://www.visioforge.com/help/docs/dotnet/install/)[Samples auf GitHub](https://github.com/visioforge/.Net-SDK-s-samples)

#### KAUFEN
[Preise prüfen oder bestellen](https://www.visioforge.com/de/buy)

#### HILFE
[Online-Hilfe](/help/docs/dotnet/videoedit/)[Ãnderungsliste](https://www.visioforge.com/help/docs/dotnet/changelog/)[Lizenzvereinbarung](/help/docs/eula/)

## SDK STRUKTUR
Das SDK bietet Kompatibilität mit Video-, Audio- und Bilddateien als Eingabequellen und ermöglicht es Ihnen, Bilder aus dem Speicher einzubinden. AuÃerdem bietet es Zugriff auf über 20 verschiedene Ausgabedateiformate. Sie können die Ausgabe über ein Netzwerk streamen oder zur weiteren Verarbeitung an eine Blackmagic-Karte senden. Diese Bandbreite an Optionen und Konfigurationen gewährleistet, dass Entwickler Multimedia-Inhalte effizient verarbeiten können.
## VIDEOBEARBEITUNGSPIPELINE
Das SDK enthält eine Timeline-Funktion, mit der Sie mehrere Video- und Audiospuren erstellen und verwalten können. Innerhalb dieser Spuren können Sie Video- und Audiofragmente einfügen. Nach der Dekodierungsphase sind die Daten dann bereit für die Verarbeitung und Komprimierung, bevor sie in eine Datei geschrieben werden. Dieser strukturierte Arbeitsablauf erleichtert den effizienten Umgang mit Multimedia-Inhalten innerhalb Ihrer Anwendung.


## AUSGABEFORMATE
Das SDK gewährleistet robuste Kompatibilität mit vielen gängigen Video-, Audio- und Bilddateiformaten und Codecs, darunter MP4, WebM, AVI, WMV, MPEG-TS, MP3, AAC, JPEG, GIF und PNG. Darüber hinaus können Entwickler ihre benutzerdefinierten DirectShow-Filter für die Kodierung verwenden, was die Flexibilität und die Anpassungsmöglichkeiten für die Multimedia-Verarbeitung erhöht.
## VIDEOBEARBEITUNG
L'SDK facilita l'integrazione di transizioni conformi a SMPTE tra i video per creare transizioni fluide e dall'aspetto professionale. Consente inoltre di aggiungere testo, immagini o loghi GIF ai contenuti. Gli sviluppatori possono regolare luminosità , contrasto, saturazione o tonalità per perfezionare gli aspetti visivi. Inoltre, l'SDK supporta varie operazioni come il ridimensionamento, il ritaglio e la rotazione, offrendo un controllo preciso sull'aspetto del video.


## AUDIOVERARBEITUNG
Fügen Sie mit dem SDK einen Equalizer zu Ihren Audioverarbeitungsfunktionen hinzu. Damit können Sie die Audiofrequenzen für eine optimale Klangqualität feinabstimmen. Sie können auch die Audiopegel normalisieren, die Lautstärke erhöhen oder die Bassfrequenzen verstärken, um die gewünschte Ausgabe zu erzielen. Das SDK bietet auch eine breite Palette anderer Audioeffekte.
## Die wichtigsten Funktionen von VisioForge Video Edit SDK .Net sind:
### Eingabeformate
- Videoformate: AVI, MP4, MPEG-1/2, WMV, QuickTime MOV, VP8/VP9, AV1, jedes andere, wenn Sie einen entsprechenden Decoder haben
- Audio-Formate: WAV, MP3, Vorbis, WMA, AAC, Speex, OPUS, jedes andere, wenn Sie einen entsprechenden Decoder haben
- Bildformate: BMP, PNG, GIF, JPEG, TIFF, WebP
### Ausgabe von Videoformaten
- AVI
- WMV (mit integrierten oder externen Profilen oder durch direkte Angabe aller Parameter)
- MKV (Matroska)
- MPEG-1/2/4 (einschlieÃlich VCD/SVCD/DVD-Profile) und FLV mit FFMPEG-Wrapper
- WebM (Vorbis + VP8/VP9)
- MP4 H264/HEVC + AAC-Ausgabe über Software-Encoder, Intel QuickSync, Nvidia CUDA/NVENC oder AMD Radeon-Encoder
- Benutzerdefinierte Ausgabeformate (mit DirectShow-Filtern von Drittanbietern)
- Animiertes GIF
### Ausgabe von Audioformaten
- WAV (PCM oder komprimiert)
- WMA (Windows Media Audio)
- M4A (AAC)
- Ogg Vorbis
- MP3
- Windows Media Audio
- FLAC
- Speex
### Netzwerk-Streaming
- Windows Media
- RTSP-Protokoll (H264/AAC)
- Glattes Streaming-Protokoll für Microsoft IIS Server
- HTTP-Live-Ãbertragungen (HLS)
- RTMP, UDP und jedes andere von FFMPEG.exe unterstützte Protokoll
- YouTube
- Facebook
- NDI
### Videoverarbeitung und Effekte (CPU/GPU)
- Bild- und Grafik-Overlays (einschlieÃlich animierte GIF)
- Ãbergänge zwischen Spuren (SMPTE-Standard)
- Schwenken/Zoomen
- Textüberlagerung
- Videotransparenz
- Helligkeit, Kontrast, Sättigung und Farbton einstellbar
- GröÃenänderung/Zuschneiden auf jede Auflösung
- chroma-key
- Denoise
- Deinterlace
- Einblendung/Ausblendung
- rotieren
### Audiobearbeitung und Effekte
- Volumenverstärker
- Equalizer
- 3D-Bass-System
- Normalisierung
- automatische/manuelle Verstärkung
- eine Menge anderer Effekte
### Andere Merkmale
- Die Bearbeitung der Timeline ermöglicht das Hinzufügen mehrerer Segmente von Video- und Audiodateien zur Timeline
- Unterstützung für DirectShow-Filter von Drittanbietern
- Unterstützung von Untertiteln
- Bewegungserkennung
- Barcode-Leser
- Ausgabe in verschlüsselte Videodateien mit dem [Video Encryption SDK](https://www.visioforge.com/de/video-encryption-sdk)
- Ausgabe an [Virtual Camera SDK](https://www.visioforge.com/de/virtual-camera-sdk)
- Kodierungsparameter
- EntschlieÃung
- Bildrate
- Video- und Audiocodecs
- Video- und Audio-Bitrate oder -Qualität
- Level/Profil (falls vom Codec unterstützt)
- spezifische Codec-Einstellungen
- andere
- Unterstützung für das Lesen und Schreiben von Audio-/Videodatei-Tags
- Blackmagic Decklink-Ausgang
- madVR Video Renderer Unterstützung [nur Windows]
### IDE
- Visual Studio 2019 und höher: Visual C#, Visual C++, Visual Basic .NET
- Visual Studio Code
- JetBrains-Reiter
- SDK kann mit anderen .Net-kompatiblen Anwendungen wie Microsoft Access, Word und Excel verwendet werden.
### UI-Frameworks
- WinForms
- WPF
- WinUI 3 for Desktop
- Avalonia
- MAUI
- MacOS/MacCatalyst
- Xamarin.Android
- Xamarin.iOS
### Systemanforderungen
- Windows 10 oder Windows 11
- Ubuntu 22+
- macOS 12+
### Zielplattformen
- Windows 11, Windows 10, Windows 8/8.1, Windows 7 SP1
- Windows Server 2016 und höher
- Android 8 und höher
- Linux
- macOS
- iOS
### .Net-Versionen
- .Net Framework 4.6.1 und höher
- .Net Core 3.1
- .Net 5 â .Net 9
### Vertriebsrechte
Lizenzfreie Verbreitung.
### Beschränkungen des Versuchs
In der Testversion wird ein Wasserzeichen im Videofenster angezeigt.

#### EDITION

#### STANDARD

#### PROFESSIONELL

#### PREMIUM
Zeitleiste
Frame Grabber
Videoverarbeitung
Audioverarbeitung
HD-Video-Unterstützung
Ãbergänge
Netzwerk-Streaming im WMV-Format
Netzwerk-Streaming über RTMP/RTSP/UDP
Chroma-Schlüssel
Bewegungserkennung
Videoverarbeitung mit DirectShow-Filtern
OSD (Bildschirmanzeige)
Bild-im-Bild-Darstellung
Mehrere Ausgabebildschirme
GPU-beschleunigte Videoeffekte
Ausgabe an die virtuelle Kamera SDK
Video Encryption SDK Unterstützung
Video-Rotation
Ausgabeformate
- AVI
- WMV (Windows Media Video)
- WMA (Windows Media Audio)
- WAV
- MP3
- Ogg Vorbis
- Speex
- DV-Video
- Flash-Video (FLV) mit FFMPEG
- WebM
- Benutzerdefinierte Ausgabeformate mit externen DirectShow-Filtern
- MPEG-1/2/4 mit FFMPEG
- MP4 H264 mit Software, Intel QuickSync, Nvidia NVENC/CUDA oder AMD Radeon Encoder
Unsere Software bietet eine unbegrenzte Nutzung ohne störende Bildschirme und gewährleistet eine
nahtlose Erfahrung. Wir bieten einen 30-tägigen Testzeitraum, damit Sie alle
alle Funktionen erkunden können, bevor Sie sich festlegen.
Mit einer regulären Lizenz erhalten Sie
erhalten Sie für ein Jahr kostenlose Minor- und Major-Upgrades; nach diesem Zeitraum
funktioniert das SDK weiter wie bisher.
Alternativ dazu bietet die
Lifetime-Lizenz unbegrenzte Updates auf unbestimmte Zeit zur Verfügung. Zusätzlich,
bieten wir vorrangigen Support und Fehlerbehebungen. Die reguläre Lizenz wird jährlich abgerechnet
jährlich abgerechnet und automatisch verlängert, aber Sie können Ihr Abonnement
Abonnement jederzeit kündigen.
Das SDK ist für die nicht-kommerzielle Nutzung kostenlos. Bitte kontaktieren Sie uns, um eine kostenlose Lizenz zu erhalten.
---END OF PAGE---
# Page: https://www.visioforge.com/es/video-edit-sdk-net
# Video Edit SDK .Net
versión 15.9
VisioForge Video Edit SDK .Net permite a los programadores integrar funciones avanzadas de edición y procesamiento de vÃdeo en sus aplicaciones de software. Con este SDK, puede crear pelÃculas personalizadas combinando archivos de audio y vÃdeo, aplicando diversos efectos y realizando transiciones fluidas entre pistas. El SDK es compatible con los formatos de vÃdeo más populares, como MP4, WebM, AVI, WMV, Matroska, MPEG-1/2/4 y otros. También ofrece la flexibilidad de trabajar con formatos de archivo adicionales utilizando filtros DirectShow de terceros. Además, puedes exportar audio en los formatos más populares, como MP3, AAC/M4A, OGG Vorbis, Windows Media Audio, OPUS, Speex y WAV, lo que añade versatilidad a tus proyectos multimedia.

#### DESCARGAS
[Instalador](https://s3.us-west-2.amazonaws.com/files.visioforge.com/trials/visioforge\_sdks\_installer\_dotnet\_setup.exe)[GuÃa de instalación de NuGet](https://www.visioforge.com/help/docs/dotnet/install/)[Samples en GitHub](https://github.com/visioforge/.Net-SDK-s-samples)

#### COMPRAR
[Consultar precios o hacer un pedido](https://www.visioforge.com/es/buy)

#### AYUDA
[Ayuda en lÃnea](/help/docs/dotnet/videoedit/)[Registro de cambios](https://www.visioforge.com/help/docs/dotnet/changelog/)[Acuerdo de licencia](/help/docs/eula/)

## ESTRUCTURA DEL SDK
El SDK ofrece compatibilidad con archivos de vÃdeo, audio e imagen como fuentes de entrada y permite incluir imágenes de la memoria. También proporciona acceso a más de 20 formatos de archivo de salida diferentes. Es posible transmitir la salida a través de una red o enviarla a una tarjeta Blackmagic para su posterior procesamiento. Esta gama de opciones y configuraciones garantiza a los desarrolladores un manejo eficaz de los contenidos multimedia.
## PROCESO DE EDICIÃN DE VÃDEO
El SDK incluye una función de lÃnea de tiempo que permite crear y gestionar varias pistas de vÃdeo y audio. Dentro de estas pistas, se pueden insertar fragmentos de vÃdeo y audio. A continuación, tras la fase de descodificación, los datos quedan listos para su procesamiento y compresión antes de ser escritos en un archivo. Este flujo de trabajo estructurado facilita la gestión eficaz de contenidos multimedia dentro de su aplicación.


## FORMATOS DE SALIDA
El SDK garantiza una sólida compatibilidad con muchos formatos y códecs populares de archivos de vÃdeo, audio e imagen, como MP4, WebM, AVI, WMV, MPEG-TS, MP3, AAC, JPEG, GIF y PNG. Además, los desarrolladores pueden utilizar sus filtros DirectShow personalizados para la codificación, lo que ofrece una mayor flexibilidad y opciones de personalización para el procesamiento multimedia.
## PROCESAMIENTO DE VÃDEO
El SDK facilita la integración de transiciones compatibles con SMPTE entre vÃdeos para crear transiciones fluidas y de aspecto profesional. También permite añadir texto, imágenes o logotipos GIF a los contenidos. Los desarrolladores pueden ajustar el brillo, el contraste, la saturación o el tono para afinar los aspectos visuales. Además, el SDK admite diversas operaciones, como redimensionar, recortar y rotar, lo que permite un control preciso de la apariencia del vÃdeo.


## PROCESAMIENTO DE AUDIO
Añade un ecualizador a tus capacidades de procesamiento de audio con el SDK. Esto le permite ajustar con precisión las frecuencias de audio para obtener una calidad de sonido óptima. También puede normalizar los niveles de audio, aumentar el volumen o realzar las frecuencias graves para conseguir el resultado deseado. El SDK también ofrece una amplia gama de otros efectos de audio.
## VisioForge Video Edit SDK .Net principales caracterÃsticas incluyen:
### Formatos de entrada
- Formatos de vÃdeo: AVI, MP4, MPEG-1/2, WMV, QuickTime MOV, VP8/VP9, AV1, cualquier otro si dispone del descodificador correspondiente.
- Formatos de audio: WAV, MP3, Vorbis, WMA, AAC, Speex, OPUS, cualquier otro si dispone del descodificador correspondiente
- Formatos de imagen: BMP, PNG, GIF, JPEG, TIFF, WebP
### Formatos de vÃdeo de salida
- AVI
- WMV (utilizando perfiles integrados o externos o especificando todos los parámetros directamente)
- MKV (Matroska)
- MPEG-1/2/4 (incluidos los perfiles VCD/SVCD/DVD) y FLV mediante la envoltura FFMPEG
- WebM (Vorbis + VP8/VP9)
- Salida MP4 H264/HEVC + AAC mediante codificador de software, Intel QuickSync, Nvidia CUDA/NVENC o AMD Radeon
- Formatos de salida personalizados (mediante filtros DirectShow de terceros)
- GIF animado
### Formatos de audio de salida
- WAV (PCM o comprimido)
- WMA (Windows Media Audio)
- M4A (AAC)
- Ogg Vorbis
- MP3
- Windows Media Audio
- FLAC
- Speex
### Transmisión en red
- Windows Media
- Protocolo RTSP (H264/AAC)
- Protocolo Smooth Streaming para Microsoft IIS Server
- Retransmisiones en directo HTTP (HLS)
- RTMP, UDP y cualquier otro protocolo compatible con FFMPEG.exe
- YouTube
- Facebook
- Instituto Nacional de Desarrollo
### Procesamiento y efectos de vÃdeo (CPU/GPU)
- superposiciones de imágenes y gráficos (incluidos GIF animados)
- transiciones entre pistas (norma SMPTE)
- funciones de panorámica y zoom
- superposición de texto
- transparencia de vÃdeo
- ajustes de brillo, contraste, saturación y tono
- redimensionar/recortar a cualquier resolución
- chroma-key
- eliminación de ruido
- desentrelazar
- fundido de entrada/salida
- rotar vÃdeo
### Tratamiento de audio y efectos
- amplificador de volumen
- ecualizador
- sistema de bajos 3D
- normalización
- ganancia auto/manual
- muchos otros efectos
### Otras caracterÃsticas
- La edición de la lÃnea de tiempo permite añadir varios segmentos de archivos de vÃdeo y audio a la lÃnea de tiempo
- Compatibilidad con filtros DirectShow de terceros
- Soporte para subtÃtulos
- Detección de movimiento
- Lector de códigos de barras
- Salida a archivos de vÃdeo encriptados mediante el [Video Encryption SDK](https://www.visioforge.com/es/video-encryption-sdk)
- Salida a [Virtual Camera SDK](https://www.visioforge.com/es/virtual-camera-sdk)
- Parámetros de codificación
- resolución
- frecuencia de cuadro
- códecs de vÃdeo y audio
- velocidad de bits o calidad de vÃdeo y audio
- nivel/perfil (si el códec lo admite)
- configuración especÃfica del códec
- otros
- Soporte para leer y escribir etiquetas de archivos de audio/vÃdeo
- Salida Blackmagic Decklink
- Compatibilidad con el renderizador de vÃdeo madVR [sólo Windows].
### IDE
- Visual Studio 2019 y versiones posteriores: Visual C#, Visual C++, Visual Basic .NET
- Código de Visual Studio
- Jinete JetBrains
- SDK puede utilizarse con otras aplicaciones compatibles con .Net como Microsoft Access, Word, Excel
### Frameworks de IU
- Formularios WinForms
- WPF
- WinUI 3 for Desktop
- Avalonia
- Maui
- MacOS/MacCatalyst
- Xamarin.Android
- Xamarin.iOS
### Requisitos del sistema
- Windows 10 o Windows 11
- Ubuntu 22+
- macOS 12+
### Plataformas objetivo
- Windows 11, Windows 10, Windows 8/8.1, Windows 7 SP1
- Windows Server 2016 y versiones posteriores
- Android 8 y posteriores
- Linux
- macOS
- iOS
### Versiones de .Net
- .Net Framework 4.6.1 y versiones posteriores
- .Net Core 3.1
- .Net 5 - .Net 9
### Derechos de distribución
Distribución sin derechos de autor.
### Limitaciones de la versión de prueba
La versión de prueba muestra una marca de agua en la ventana de vÃdeo.

#### EDICIÃN

#### ESTÃNDAR

#### PROFESIONAL

#### PREMIUM
LÃnea de tiempo
Capturador de fotogramas
Tratamiento de vÃdeo
Tratamiento de audio
Compatible con vÃdeo HD
Transiciones
Transmisión en red en formato WMV
Transmisión en red mediante RTMP/RTSP/UDP
Chroma-key
Detección de movimiento
Tratamiento de vÃdeo mediante filtros DirectShow
OSD (On-Screen Display)
Picture-In-Picture
Múltiples pantallas de salida
Efectos de vÃdeo acelerados en la GPU
Salida a Virtual Camera SDK
Compatibilidad con Video Encryption SDK
Rotación de vÃdeo
Formatos de salida
- AVI
- WMV (Windows Media Video)
- WMA (Windows Media Audio)
- WAV
- MP3
- Ogg Vorbis
- Speex
- VÃdeo DV
- VÃdeo Flash (FLV) con FFMPEG
- WebM
- Formatos de salida personalizados mediante filtros DirectShow externos
- MPEG-1/2/4 con FFMPEG
- MP4 H264 mediante software, codificadores Intel QuickSync, Nvidia NVENC/CUDA o AMD Radeon
Nuestro software ofrece un uso ilimitado sin pantallas de aviso, garantizando una
experiencia sin problemas. Ofrecemos un perÃodo de prueba de 30 dÃas para que pueda explorar
todas las funciones antes de comprometerse.
Con una licencia normal
recibirá actualizaciones menores y mayores gratuitas durante un año; después de ese perÃodo,
el SDK seguirá funcionando como antes.
Alternativamente, la licencia
licencia de por vida proporciona actualizaciones ilimitadas indefinidamente. Además,
ofrecemos soporte y correcciones prioritarias. La licencia normal se factura
anualmente y se renueva automáticamente cada año, pero puede cancelar su
suscripción en cualquier momento.
El SDK es gratuito para uso no comercial. Póngase en contacto con nosotros para obtener una licencia gratuita.
---END OF PAGE---
# Page: https://www.visioforge.com/it/video-edit-sdk-net
# Video Edit SDK .Net
versione 15.9
VisioForge Video Edit SDK .Net consente ai programmatori di integrare funzionalità avanzate di editing ed elaborazione video nelle loro applicazioni software. Con questo SDK è possibile creare filmati personalizzati combinando file audio e video, applicando vari effetti e transizioni fluide tra le tracce. L'SDK offre un solido supporto per i formati video più diffusi, tra cui MP4, WebM, AVI, WMV, Matroska, MPEG-1/2/4 e altri. Offre anche la flessibilità di lavorare con altri formati di file utilizzando filtri DirectShow di terze parti. Inoltre, è possibile esportare l'audio nei formati più diffusi, tra cui MP3, AAC/M4A, OGG Vorbis, Windows Media Audio, OPUS, Speex e WAV, aggiungendo versatilità ai progetti multimediali.

#### DOWNLOADS
[Installatore](https://s3.us-west-2.amazonaws.com/files.visioforge.com/trials/visioforge\_sdks\_installer\_dotnet\_setup.exe)[Guida all'installazione di NuGet](https://www.visioforge.com/help/docs/dotnet/install/)[Samples su GitHub](https://github.com/visioforge/.Net-SDK-s-samples)

#### ACQUISTO
[Controllare i prezzi o ordinare](https://www.visioforge.com/it/buy)

#### AIUTO
[Guida in linea](/help/docs/dotnet/videoedit/)[Changelog](https://www.visioforge.com/help/docs/dotnet/changelog/)[Contratto di licenza](/help/docs/eula/)

## STRUTTURA SDK
L'SDK è compatibile con i file video, audio e di immagine come sorgenti di ingresso e consente di includere immagini dalla memoria. Fornisce inoltre l'accesso a oltre 20 diversi formati di file in uscita. à possibile trasmettere l'output su una rete o inviarlo a una scheda Blackmagic per un'ulteriore elaborazione. Questa gamma di opzioni e configurazioni garantisce agli sviluppatori una gestione efficiente dei contenuti multimediali.
## PIPELINE DI MONTAGGIO VIDEO
L'SDK include una funzione di timeline che consente di creare e gestire più tracce video e audio. All'interno di queste tracce, è possibile inserire frammenti video e audio. Quindi, dopo la fase di decodifica, i dati sono pronti per l'elaborazione e la compressione prima di essere scritti su un file. Questo flusso di lavoro strutturato facilita la gestione efficiente dei contenuti multimediali all'interno dell'applicazione.


## FORMATI DI USCITA
L'SDK garantisce una solida compatibilità con molti formati e codec di file video, audio e immagine, tra cui MP4, WebM, AVI, WMV, MPEG-TS, MP3, AAC, JPEG, GIF e PNG. Inoltre, gli sviluppatori possono utilizzare i loro filtri DirectShow personalizzati per la codifica, offrendo una maggiore flessibilità e opzioni di personalizzazione per l'elaborazione multimediale.
## ELABORAZIONE VIDEO
L'SDK facilita l'integrazione di transizioni conformi a SMPTE tra i video per creare transizioni fluide e dall'aspetto professionale. Consente inoltre di aggiungere testo, immagini o loghi GIF ai contenuti. Gli sviluppatori possono regolare luminosità , contrasto, saturazione o tonalità per perfezionare gli aspetti visivi. Inoltre, l'SDK supporta varie operazioni come il ridimensionamento, il ritaglio e la rotazione, offrendo un controllo preciso sull'aspetto del video.


## ELABORAZIONE AUDIO
Aggiungete un equalizzatore alle vostre capacità di elaborazione audio con l'SDK. Ciò consente di regolare con precisione le frequenze audio per ottenere una qualità sonora ottimale. à anche possibile normalizzare i livelli audio, aumentare il volume o migliorare le frequenze dei bassi per ottenere il risultato desiderato. L'SDK offre anche un'ampia gamma di altri effetti audio.
## Le principali caratteristiche di VisioForge Video Edit SDK .Net includono:
### Formati di ingresso
- Formati video: AVI, MP4, MPEG-1/2, WMV, QuickTime MOV, VP8/VP9, AV1, qualsiasi altro formato se si dispone di un decodificatore corrispondente.
- Formati audio: WAV, MP3, Vorbis, WMA, AAC, Speex, OPUS, qualsiasi altro se si dispone di un decodificatore corrispondente.
- Formati immagine: BMP, PNG, GIF, JPEG, TIFF, WebP
### Formati video in uscita
- AVI
- WMV (utilizzando profili integrati o esterni o specificando direttamente tutti i parametri)
- MKV (Matroska)
- MPEG-1/2/4 (compresi i profili VCD/SVCD/DVD) e FLV con wrapper FFMPEG
- WebM (Vorbis + VP8/VP9)
- Uscita MP4 H264/HEVC + AAC con codificatore software, Intel QuickSync, Nvidia CUDA/NVENC o AMD Radeon
- Formati di uscita personalizzati (utilizzando filtri DirectShow di terze parti)
- GIF animate
### Formati audio in uscita
- WAV (PCM o compresso)
- WMA (Windows Media Audio)
- M4A (AAC)
- Ogg Vorbis
- MP3
- Windows Media Audio
- Formato FLAC
- Speex
### Streaming di rete
- Windows Media
- Protocollo RTSP (H264/AAC)
- Protocollo Smooth Streaming per Microsoft IIS Server
- Streaming live HTTP (HLS)
- RTMP, UDP e qualsiasi altro protocollo supportato da FFMPEG.exe
- YouTube
- Facebook
- NDI
### Elaborazione video ed effetti (CPU/GPU)
- sovrapposizioni di immagini e grafica (comprese le GIF animate)
- transizioni tra le tracce (standard SMPTE)
- panoramica/zoom
- sovrapposizione di testo
- trasparenza video
- luminosità , contrasto, saturazione, tinta
- ridimensionare/ritagliare a qualsiasi risoluzione
- chiave cromatica
- denoise
- deinterlacciamento
- dissolvenza in entrata/dissolvenza in uscita
- ruotare
### Elaborazione audio ed effetti
- amplificatore di volume
- equalizzatore
- sistema 3D-bass
- normalizzazione
- guadagno automatico/manuale
- molti altri effetti
### Altre caratteristiche
- La modifica della timeline consente di aggiungere più segmenti di file video e audio alla timeline.
- Supporto dei filtri DirectShow di terze parti
- Supporto dei sottotitoli
- Rilevamento del movimento
- Lettore di codici a barre
- Uscita su file video crittografati utilizzando l'opzione [Video Encryption SDK](https://www.visioforge.com/it/video-encryption-sdk)
- Uscita verso [Virtual Camera SDK](https://www.visioforge.com/it/virtual-camera-sdk)
- Parametri di codifica
- risoluzione
- frequenza dei fotogrammi
- codec video e audio
- velocità o qualità dei bit video e audio
- livello/profilo (se supportato dal codec)
- impostazioni specifiche del codec
- altro
- Supporto per la lettura e la scrittura di tag di file audio/video
- Uscita Blackmagic Decklink
- Supporto del rendering video madVR [solo Windows]
### IDE
- Visual Studio 2019 e successivi: Visual C#, Visual C++, Visual Basic .NET
- Codice di Visual Studio
- Cavaliere JetBrains
- L'SDK può essere utilizzato con altre applicazioni compatibili con .Net, come Microsoft Access, Word, Excel.
### Quadri UI
- WinForms
- WPF
- WinUI 3 for Desktop
- Avalonia
- MAUI
- MacOS/MacCatalyst
- Xamarin.Android
- Xamarin.iOS
### Requisiti di sistema
- Windows 10 o Windows 11
- Ubuntu 22+
- macOS 12+
### Piattaforme target
- Windows 11, Windows 10, Windows 8/8.1, Windows 7 SP1
- Windows Server 2016 e successivi
- Android 8 e successivi
- Linux
- macOS
- iOS
### Versioni .Net
- .Net Framework 4.6.1 e versioni successive
- .Net Core 3.1
- .Net 5 - .Net 9
### Diritti di distribuzione
Distribuzione gratuita.
### Limiti della prova
La versione di prova visualizza una filigrana nella finestra del video.

#### EDIZIONE

#### STANDARD

#### PROFESSIONALE

#### PREMIUM
Linea temporale
Acquisizione di fotogrammi
Elaborazione video
Elaborazione audio
Supporto video HD
Transizioni
Streaming di rete in formato WMV
Streaming di rete tramite RTMP/RTSP/UDP
Chiave cromatica
Rilevamento del movimento
Elaborazione video con filtri DirectShow
OSD (On-Screen Display)
Immagine nell'immagine
Schermi di uscita multipli
Effetti video accelerati dalla GPU
Uscita verso l'SDK della Virtual Camera
Supporto SDK di crittografia video
Rotazione video
Formati di uscita
- AVI
- WMV (Windows Media Video)
- WMA (Windows Media Audio)
- WAV
- MP3
- Ogg Vorbis
- Speex
- Video DV
- Video Flash (FLV) utilizzando FFMPEG
- WebM
- Formati di uscita personalizzati utilizzando filtri DirectShow esterni
- MPEG-1/2/4 con FFMPEG
- MP4 H264 tramite software, codificatori Intel QuickSync, Nvidia NVENC/CUDA o AMD Radeon
Il nostro software offre un utilizzo illimitato, senza nag-screen, garantendo un'esperienza
esperienza senza soluzione di continuità . Forniamo un periodo di prova di 30 giorni, in modo che possiate esplorare tutte le funzionalità prima di
tutte le funzionalità prima di impegnarsi.
Con una licenza regolare, l'utente
riceve aggiornamenti minori e maggiori gratuiti per un anno; dopo tale periodo,
l'SDK continuerà a funzionare come prima.
In alternativa, la
licenza a vita fornisce aggiornamenti illimitati a tempo indeterminato. Inoltre,
offriamo assistenza e correzioni prioritarie. La licenza regolare viene fatturata
annualmente e si rinnova automaticamente ogni anno, ma è possibile annullare la
abbonamento in qualsiasi momento.
L'SDK è gratuito per uso non commerciale. Contattateci per ottenere una licenza gratuita.
---END OF PAGE---
# Page: https://www.visioforge.com/de/media-blocks-sdk-net
# Media Blocks SDK .Net
Version 15.9
Mit dem SDK können Sie Ihre Multimedia-Anwendung aus einzelnen Blöcken wie ein Backsteinhaus aufbauen. Um beispielsweise ein Video von einer Kamera aufzunehmen, fügen Sie den Block "Camera", den Block "H264 encoder" und den Block "MP4 sink" hinzu, um das Video in eine MP4-Datei aufzunehmen.

#### DOWNLOADS
[NuGet â Kern](https://www.nuget.org/packages/VisioForge.DotNet.VideoCapture/)[NuGet-Installationshandbuch](https://www.visioforge.com/help/docs/dotnet/install/)[Samples auf GitHub](https://github.com/visioforge/.Net-SDK-s-samples)

#### KAUFEN
[Preise prüfen oder bestellen](https://www.visioforge.com/de/buy)

#### HILFE
[Online-Hilfe](/help/docs/dotnet/mediablocks/)[Ãnderungsliste](https://www.visioforge.com/help/docs/dotnet/changelog/)[Lizenzvereinbarung](/help/docs/eula/)
Unsere Software bietet eine unbegrenzte Nutzung ohne störende Bildschirme und gewährleistet eine
nahtlose Erfahrung. Wir bieten einen 30-tägigen Testzeitraum, damit Sie alle
alle Funktionen erkunden können, bevor Sie sich festlegen.
Mit einer regulären Lizenz erhalten Sie
erhalten Sie für ein Jahr kostenlose Minor- und Major-Upgrades; nach diesem Zeitraum
funktioniert das SDK weiter wie bisher.
Alternativ dazu bietet die
Lifetime-Lizenz unbegrenzte Updates auf unbestimmte Zeit zur Verfügung. Zusätzlich,
bieten wir vorrangigen Support und Fehlerbehebungen. Die reguläre Lizenz wird jährlich abgerechnet
jährlich abgerechnet und automatisch verlängert, aber Sie können Ihr Abonnement
Abonnement jederzeit kündigen.
Das SDK ist für die nicht-kommerzielle Nutzung kostenlos. Bitte kontaktieren Sie uns, um eine kostenlose Lizenz zu erhalten.

## EINFACHER SPIELER
Die einfache Player-Pipeline verwendet den UniversalSourceBlock zum Lesen und Dekodieren der Quelldatei, den VideoRendererBlock zur Anzeige von Video und den AudioRendererBlock zur Wiedergabe von Audio.
## FORTGESCHRITTENER SPIELER
Die erweiterte Player-Pipeline umfasst den UniversalSourceBlock zur Dekodierung von Dateien oder Streams, Video- und Audio-Renderer sowie Blöcke zur Effektverarbeitung.


## KAMERA VORSCHAU
Die einfache Kamera-/Mikrofonvorschau-Pipeline enthält Gerätequellblöcke und Video-/Audio-Renderer-Blöcke.
Es werden die Standardgeräte verwendet.
## RTSP VORSCHAU
Die RTSP-Vorschau-Pipeline, die den RTSP-Quellblock (mit den darin enthaltenen Decodern) sowie Video- und Audio-Renderer umfasst.


## AUFNAHME MIT VORSCHAU
Die Capture-Pipeline verfügt über zwei T-Blöcke, die zum Aufteilen von Video- und Audio-Streams verwendet werden und eine Video-/Audio-Vorschau sowie [Videoaufnahme](https://www.visioforge.com/de/video-capture-sdk-net).
## Die wichtigsten Funktionen von VisioForge Media Blocks SDK .Net sind:
- Audio/Video-Vorschau
- Video- und Audioerfassung in einer Vielzahl von Formaten
- Frame-Erfassung in Bitmap-Klasse, BMP-, JPEG- und PNG-Dateien
- Videoverarbeitung und Effekte (CPU/GPU)
- Steuerung des Videoaufnahmegeräts
- Netzwerk-Streaming
- Bewegungserkennung
- Barcode-Leser (QR-Code, UPC-A, UPC-E, EAN-8, EAN-13, Code 39, Code 93, Code 128, Codabar, ITF, RSS-14, Data Matrix, Aztec, PDF-417)
- Unterstützung benutzerdefinierter Schnittstellen
- Computer Vision API
- PIP (Bild-im-Bild)
- Bildschirmaufnahme/Fensteraufnahme
- Gesichtserkennung und Objektverfolgung
- Unterstützung der Multiplikation von Ausgabebildschirmen
- Audioaufnahme von Lautsprechern
- Unterstützung der Ein- und Ausgabe der Blackmagic Decklink-Karte
- Unterstützung für das Lesen und Schreiben von Audio-/Videodatei-Tags
- Unterstützung von FLIR/Teledyne-Kameras (USB3Vision/GigE)
- Unterstützung von Basler Kameras (USB3Vision/GigE)
### Audio-Encoder
- Unterstützte Kommunikation
- FLAC
- MP3
- OPUS
- Vorbis
- WMA (Windows Media Audio)
- Speex
### Audioverarbeitung
- Verstärken Sie
- Audio-Mischpult
- Audio-Sample-Grabber
- Bilanz
- Kompressor/Expander
- Echo
- Equalizer
- Skala/Tempo
- Audio-Lautstärke
### Blackmagic Decklink
- Audio-Senke
- Audioquelle
- Video-Spülbecken
- Quelle: Video
### Datei-Spülbecken
- MP4
- WebM
- MOV
- AVI
- MPEG-TS
- MKV
- OGG
### Netzwerk-Streaming
- HLS
- RTMP
- RTSP
- UDP
### Videoverarbeitung
- Farbeffekte
- Deinterlace
- Fischauge
- Spiegeln/Drehen
- Gamma
- GauÃscher Weichzeichner
- Bild-Overlay
- Spiegel
- Blickwinkel
- Kneifen
- GröÃe ändern
- Drehen Sie
- Probenehmer
- Sphäre
- Platz
- Dehnen
- Text-Overlay
- Tunnel
- Wirbel
- Video-Balance
- Videomischer
- Wasserplätschern
### Video-Encoder (CPU/GPU)
- H264
- H265/HEVC
- VP8/VP9
- WMV (Windows Media Video)
- MJPEG
- AV1
### Quellen
- Quelle der Datei
- RTSP-Quelle
- Quelle: Bildschirm
- System-Videoquelle
- System-Audioquelle
- Virtuelle Videoquelle
- Virtuelle Audioquelle
### Besonderes
- Null-Renderer
- Tee
- VU-Meter
### Unterstützte Eingabegeräte:
- DV- und HDV-MPEG-2-Camcorder
- USB-Webkameras und andere Aufnahmegeräte (einschlieÃlich 4K-Geräte)
- PCI-Erfassungskarten
- TV-Tuner (mit und ohne internen MPEG-Encoder)
- JPEG/MJPEG, MPEG-4 und H264 HTTP/RTSP/RTMP IP-Kameras/Server, unterstützt HD-Format
- ONVIF-IP-Kameras mit PTZ-Unterstützung
- Blackmagic Decklink-Geräte
- Audioaufnahmegeräte und Soundkarten
- ASIO-Geräte
### IDE
- Visual Studio 2019 und höher: Visual C#, Visual C++, Visual Basic .NET
- Visual Studio Code
- JetBrains-Reiter
- SDK kann mit anderen .Net-kompatiblen Anwendungen wie Microsoft Access, Word und Excel verwendet werden.
### UI-Frameworks
- WinForms
- WPF
- WinUI 3 for Desktop
- Avalonia
- GTK#
- MAUI
- Xamarin.Android
- Xamarin.Mac
- Xamarin.iOS
### .Net-Versionen
- .Net Framework 4.6.1 und höher
- .Net Core 3.1
- .Net 5 â .Net 9
### Systemanforderungen
- Windows 10 oder Windows 11
- Ubuntu 22+
- macOS 12+
### Zielplattformen
- Windows 11, Windows 10, Windows 8/8.1, Windows 7 SP1
- Windows Server 2016 und höher
- Android 8 und höher
- Linux (Ubuntu)
- macOS
- iOS
### Vertriebsrechte
Lizenzfreie Verbreitung.
Das SDK enthält GStreamer-Bibliotheken, die unter der LGPL v2.1 lizenziert sind.
---END OF PAGE---
# Page: https://www.visioforge.com/es/media-blocks-sdk-net
# Media Blocks SDK .Net
versión 15.9
L'SDK consente di costruire la propria applicazione multimediale partendo da singoli blocchi, come una casa di mattoni. Ad esempio, per registrare un video da una telecamera, si aggiunge il blocco "Camera", il blocco "H264 encoder" e il blocco "MP4 sink" per registrare il video in un file MP4.

#### DESCARGAS
[NuGet - Núcleo](https://www.nuget.org/packages/VisioForge.DotNet.VideoCapture/)[GuÃa de instalación de NuGet](https://www.visioforge.com/help/docs/dotnet/install/)[Samples en GitHub](https://github.com/visioforge/.Net-SDK-s-samples)

#### COMPRAR
[Consultar precios o hacer un pedido](https://www.visioforge.com/es/buy)

#### AYUDA
[Ayuda en lÃnea](/help/docs/dotnet/mediablocks/)[Registro de cambios](https://www.visioforge.com/help/docs/dotnet/changelog/)[Acuerdo de licencia](/help/docs/eula/)
Nuestro software ofrece un uso ilimitado sin pantallas de aviso, garantizando una
experiencia sin problemas. Ofrecemos un perÃodo de prueba de 30 dÃas para que pueda explorar
todas las funciones antes de comprometerse.
Con una licencia normal
recibirá actualizaciones menores y mayores gratuitas durante un año; después de ese perÃodo,
el SDK seguirá funcionando como antes.
Alternativamente, la licencia
licencia de por vida proporciona actualizaciones ilimitadas indefinidamente. Además,
ofrecemos soporte y correcciones prioritarias. La licencia normal se factura
anualmente y se renueva automáticamente cada año, pero puede cancelar su
suscripción en cualquier momento.
El SDK es gratuito para uso no comercial. Póngase en contacto con nosotros para obtener una licencia gratuita.

## JUGADOR SENCILLO
La cadena de reproducción simple utiliza UniversalSourceBlock para leer y descodificar el archivo fuente, VideoRendererBlock para mostrar el vÃdeo y AudioRendererBlock para reproducir el audio.
## JUGADOR AVANZADO
El canal de reproducción avanzado incluye el bloque UniversalSourceBlock para descodificar archivos o secuencias, renderizadores de vÃdeo y audio, y bloques de procesamiento de efectos.


## VISTA PREVIA DE LA CÃMARA
El canal de previsualización simple de cámara/micrófono contiene bloques de fuente de dispositivo y bloques de renderizador de vÃdeo/audio.
Se utilizarán los dispositivos predeterminados.
## RTSP PREVIEW
El canal de previsualización RTSP, que incluye el bloque fuente RTSP (con decodificadores en su interior) y los renderizadores de vÃdeo y audio.


## CAPTURA CON VISTA PREVIA
La tuberÃa de captura tiene dos bloques en T que se utilizan para dividir transmisiones de video y audio, lo que permite obtener una vista previa de video/audio junto con [captura de vÃdeo](https://www.visioforge.com/es/video-capture-sdk-net).
## Las principales caracterÃsticas de VisioForge Media Blocks SDK .Net son:
- Previsualización de audio/vÃdeo
- Captura de vÃdeo y audio en una amplia gama de formatos
- Captura de fotogramas a archivos de clase Bitmap, BMP, JPEG y PNG
- Procesamiento y efectos de vÃdeo (CPU/GPU)
- Control del dispositivo de video capture
- Transmisión en red
- Detección de movimiento
- Lector de códigos de barras (QR Code, UPC-A, UPC-E, EAN-8, EAN-13, Code 39, Code 93, Code 128, Codabar, ITF, RSS-14, Data Matrix, Aztec, PDF-417)
- Interfaces personalizadas
- API de visión artificial
- PIP (imagen en imagen)
- Captura de pantalla/captura de ventana
- Detección de caras y seguimiento de objetos
- Multiplicación de pantallas de salida
- Captura de audio de los altavoces
- Soporte de entrada y salida de la tarjeta Blackmagic Decklink
- Soporte para leer y escribir etiquetas de archivos de audio/vÃdeo
- Compatibilidad con cámaras FLIR/Teledyne (USB3Vision/GigE)
- Compatibilidad con cámaras Basler (USB3Vision/GigE)
### Codificadores de audio
- CAA
- FLAC
- MP3
- OPUS
- Vorbis
- WMA (Windows Media Audio)
- Speex
### Tratamiento de audio
- Amplifique
- Mezclador de audio
- Grabador de muestras de audio
- Balance de audio
- Compresor/Expansor
- Eco
- Ecualizador
- Escala/Tempo
- Volumen de audio
### Blackmagic Decklink
- Salida de audio
- Fuente de audio
- Salida de video
- Fuente de vÃdeo
### Salida de archivos
- MP4
- WebM
- MOV
- AVI
- MPEG-TS
- MKV
- OGG
### Transmisión en red
- HLS
- RTMP
- RTSP
- UDP
### Tratamiento de vÃdeo
- Efectos de color
- Desentrelazado
- Ojo de pez
- Voltear/Rotar
- Gamma
- Desenfoque gaussiano
- Superposición de imágenes
- Espejo
- Perspectiva
- Pinch
- Redimensionar
- Rotar
- Captador de muestras
- Esfera
- Cuadrado
- Estiramiento
- Superposición de texto
- Túnel
- Giro
- Balance en vÃdeo
- Mezclador de vÃdeo
- Ondulación del agua
### Codificadores de vÃdeo (CPU/GPU)
- H264
- H265/HEVC
- VP8/VP9
- WMV (Windows Media Video)
- MJPEG
- AV1
### Fuentes
- Fuente del archivo
- Fuente RTSP
- Fuente de la pantalla
- Fuente de vÃdeo del sistema
- Fuente de audio del sistema
- Fuente de vÃdeo virtual
- Fuente de audio virtual
### Especial
- Null Renderer
- Tee
- Vúmetro
### Dispositivos de entrada compatibles:
- Videocámaras DV y HDV MPEG-2
- Cámaras web USB y otros dispositivos de captura (incluidos dispositivos 4K)
- Tarjetas de captura PCI
- Sintonizadores de TV (con y sin codificador MPEG interno)
- Cámaras/servidores IP JPEG/MJPEG, MPEG-4 y H.264 HTTP/RTSP/RTMP, compatibles con el formato HD
- Cámaras IP ONVIF compatibles con PTZ
- Dispositivos Blackmagic Decklink
- Dispositivos de captura de audio y tarjetas de sonido
- Dispositivos ASIO
### IDE
- Visual Studio 2019 y versiones posteriores: Visual C#, Visual C++, Visual Basic .NET
- Código de Visual Studio
- Jinete JetBrains
- SDK puede utilizarse con otras aplicaciones compatibles con .Net como Microsoft Access, Word, Excel
### Frameworks de IU
- Formularios WinForms
- WPF
- WinUI 3 for Desktop
- Avalonia
- GTK#
- Maui
- Xamarin.Android
- Xamarin.Mac
- Xamarin.iOS
### Versiones de .Net
- .Net Framework 4.6.1 y versiones posteriores
- .Net Core 3.1
- .Net 5 - .Net 9
### Requisitos del sistema
- Windows 10 o Windows 11
- Ubuntu 22+
- macOS 12+
### Plataformas objetivo
- Windows 11, Windows 10, Windows 8/8.1, Windows 7 SP1
- Windows Server 2016 y versiones posteriores
- Android 8 y posteriores
- Linux (Ubuntu)
- macOS
- iOS
### Derechos de distribución
Distribución sin derechos de autor.
SDK contiene bibliotecas GStreamer con licencia LGPL v2.1.
---END OF PAGE---
# Page: https://www.visioforge.com/it/media-blocks-sdk-net
# Media Blocks SDK .Net
versione 15.9
L'SDK consente di costruire la propria applicazione multimediale partendo da singoli blocchi, come una casa di mattoni. Ad esempio, per registrare un video da una telecamera, si aggiunge il blocco "Camera", il blocco "H264 encoder" e il blocco "MP4 sink" per registrare il video in un file MP4.

#### DOWNLOADS
[NuGet - Core](https://www.nuget.org/packages/VisioForge.DotNet.VideoCapture/)[Guida all'installazione di NuGet](https://www.visioforge.com/help/docs/dotnet/install/)[Samples su GitHub](https://github.com/visioforge/.Net-SDK-s-samples)

#### ACQUISTO
[Controllare i prezzi o ordinare](https://www.visioforge.com/it/buy)

#### AIUTO
[Guida in linea](/help/docs/dotnet/mediablocks/)[Changelog](https://www.visioforge.com/help/docs/dotnet/changelog/)[Contratto di licenza](/help/docs/eula/)
Il nostro software offre un utilizzo illimitato, senza nag-screen, garantendo un'esperienza
esperienza senza soluzione di continuità . Forniamo un periodo di prova di 30 giorni, in modo che possiate esplorare tutte le funzionalità prima di
tutte le funzionalità prima di impegnarsi.
Con una licenza regolare, l'utente
riceve aggiornamenti minori e maggiori gratuiti per un anno; dopo tale periodo,
l'SDK continuerà a funzionare come prima.
In alternativa, la
licenza a vita fornisce aggiornamenti illimitati a tempo indeterminato. Inoltre,
offriamo assistenza e correzioni prioritarie. La licenza regolare viene fatturata
annualmente e si rinnova automaticamente ogni anno, ma è possibile annullare la
abbonamento in qualsiasi momento.
L'SDK è gratuito per uso non commerciale. Contattateci per ottenere una licenza gratuita.

## GIOCATORE SEMPLICE
La pipeline del lettore semplice utilizza il blocco UniversalSourceBlock per leggere e decodificare il file sorgente, il blocco VideoRendererBlock per visualizzare il video e il blocco AudioRendererBlock per riprodurre l'audio.
## GIOCATORE AVANZATO
La pipeline avanzata del lettore comprende l'UniversalSourceBlock per la decodifica di file o flussi, i rendering video e audio e i blocchi di elaborazione degli effetti.


## ANTEPRIMA DELLA TELECAMERA
La pipeline di anteprima semplice della telecamera/microfono contiene blocchi di origine del dispositivo e blocchi di rendering video/audio.
Verranno utilizzati i dispositivi predefiniti.
## ANTEPRIMA RTSP
La pipeline di anteprima RTSP, che comprende il blocco sorgente RTSP (con i decodificatori al suo interno), i rendering video e audio.


## ACQUISIZIONE CON ANTEPRIMA
La pipeline di acquisizione ha due blocchi a T che vengono utilizzati per dividere i flussi video e audio, consentendo l'anteprima video/audio insieme a [acquisizione video](https://www.visioforge.com/it/video-capture-sdk-net).
## Le principali caratteristiche di VisioForge Media Blocks SDK .Net includono:
- Anteprima audio/video
- Acquisizione di video e audio in un'ampia gamma di formati
- Acquisizione di fotogrammi in file di classe Bitmap, BMP, JPEG e PNG
- Elaborazione video ed effetti (CPU/GPU)
- Video capture controllo del dispositivo
- Streaming di rete
- Rilevamento del movimento
- Lettore di codici a barre (QR Code, UPC-A, UPC-E, EAN-8, EAN-13, Code 39, Code 93, Code 128, Codabar, ITF, RSS-14, Data Matrix, Aztec, PDF-417)
- Supporto di interfacce personalizzate
- API di visione artificiale
- PIP (Immagine nell'immagine)
- Cattura schermo/cattura finestra
- Rilevamento dei volti e tracciamento degli oggetti
- Supporto di schermi di uscita multipli
- Acquisizione audio dagli altoparlanti
- Supporto di ingressi e uscite della scheda Blackmagic Decklink
- Supporto per la lettura e la scrittura di tag di file audio/video
- Supporto delle telecamere FLIR/Teledyne (USB3Vision/GigE)
- Supporto delle telecamere Basler (USB3Vision/GigE)
### Codificatori audio
- CAA
- Formato FLAC
- MP3
- OPUS
- Vorbis
- WMA (Windows Media Audio)
- Speex
### Elaborazione audio
- Amplificare
- Mixer audio
- Acquisizione di campioni audio
- Equilibrio
- Compressore/Espansore
- Eco
- Equalizzatore
- Scala/Tempo
- Volume dell'audio
### Blackmagic Decklink
- Lavello audio
- Fonte audio
- Lavello video
- Fonte video
### Lavandini per file
- MP4
- WebM
- MOVIMENTO
- AVI
- MPEG-TS
- MKV
- OGG
### Streaming di rete
- HLS
- RTMP
- RTSP
- UDP
### Elaborazione video
- Effetti cromatici
- Deinterlacciamento
- Occhio di pesce
- Capovolgere/Rotare
- Gamma
- Sfocatura gaussiana
- Sovrapposizione di immagini
- Specchio
- Prospettiva
- Pizzico
- Ridimensionamento
- Ruotare
- Acquisizione di campioni
- Sfera
- Quadrato
- Stretch
- Sovrapposizione di testo
- Tunnel
- Girotondo
- Equilibrio video
- Mixer video
- Ondulazione dell'acqua
### Codificatori video (CPU/GPU)
- H264
- H265/HEVC
- VP8/VP9
- WMV (Windows Media Video)
- MJPEG
- AV1
### Fonti
- Fonte del file
- Fonte RTSP
- Fonte dello schermo
- Sorgente video del sistema
- Sorgente audio del sistema
- Sorgente video virtuale
- Sorgente audio virtuale
### Speciale
- Renderer nullo
- Tee
- Misuratore VU
### Dispositivi di input supportati:
- Videocamere DV e HDV MPEG-2
- Webcam USB e altri dispositivi di acquisizione (compresi i dispositivi 4K)
- Schede di acquisizione PCI
- Sintonizzatori TV (con e senza codificatore MPEG interno)
- JPEG/MJPEG, MPEG-4 e H.264 Telecamere/server IP HTTP/RTSP/RTMP, formato HD supportato
- Telecamere IP ONVIF con supporto PTZ
- Dispositivi Blackmagic Decklink
- Dispositivi di acquisizione audio e schede audio
- Dispositivi ASIO
### IDE
- Visual Studio 2019 e successivi: Visual C#, Visual C++, Visual Basic .NET
- Codice di Visual Studio
- Cavaliere JetBrains
- L'SDK può essere utilizzato con altre applicazioni compatibili con .Net, come Microsoft Access, Word, Excel.
### Quadri UI
- WinForms
- WPF
- WinUI 3 for Desktop
- Avalonia
- GTK#
- MAUI
- Xamarin.Android
- Xamarin.Mac
- Xamarin.iOS
### Versioni .Net
- .Net Framework 4.6.1 e versioni successive
- .Net Core 3.1
- .Net 5 - .Net 9
### Requisiti di sistema
- Windows 10 o Windows 11
- Ubuntu 22+
- macOS 12+
### Piattaforme target
- Windows 11, Windows 10, Windows 8/8.1, Windows 7 SP1
- Windows Server 2016 e successivi
- Android 8 e successivi
- Linux (Ubuntu)
- macOS
- iOS
### Diritti di distribuzione
Distribuzione gratuita.
L'SDK contiene librerie GStreamer con licenza LGPL v2.1.
---END OF PAGE---
# Page: https://www.visioforge.com/de/video-edit-sdk-ffmpeg-net
# Video Edit SDK FFMPEG .Net
Version 12.1
VisioForge Video Edit SDK FFMPEG .Net vereinfacht die Integration von Videokonvertierung und -verarbeitung in Softwareanwendungen. Mit diesem leistungsstarken SDK können Entwickler benutzerdefinierte Filme durch nahtlose Kombination von Audio- und Videodateien erstellen. Das SDK basiert auf dem renommierten FFMPEG-Framework und bietet umfassende Unterstützung für alle wichtigen Video- und Audioformate, was es zu einer vielseitigen Lösung für Multimedia-Projekte macht.
- 
- 


#### DOWNLOADS
[Installateur](https://s3.us-west-2.amazonaws.com/files.visioforge.com/trials/visioforge\_video\_edit\_ffmpeg\_sdk\_dotnet\_setup.exe)[NuGet-Paket](https://www.nuget.org/packages/VisioForge.DotNet.VideoEdit/)[Samples auf GitHub](https://github.com/visioforge/.Net-SDK-s-samples)

#### KAUFEN
[Preise prüfen oder bestellen](https://www.visioforge.com/de/buy)

#### HILFE
[Online-Hilfe](/help/)[Ãnderungsliste](/help/docs/dotnet/videoedit-ffmpeg/changelog/)[Lizenzvereinbarung](/help/docs/eula/)
Unsere Software bietet eine unbegrenzte Nutzung ohne störende Bildschirme und gewährleistet eine
nahtlose Erfahrung. Wir bieten einen 30-tägigen Testzeitraum, damit Sie alle
alle Funktionen erkunden können, bevor Sie sich festlegen.
Mit einer regulären Lizenz erhalten Sie
erhalten Sie für ein Jahr kostenlose Minor- und Major-Upgrades; nach diesem Zeitraum
funktioniert das SDK weiter wie bisher.
Alternativ dazu bietet die
Lifetime-Lizenz unbegrenzte Updates auf unbestimmte Zeit zur Verfügung. Zusätzlich,
bieten wir vorrangigen Support und Fehlerbehebungen. Die reguläre Lizenz wird jährlich abgerechnet
jährlich abgerechnet und automatisch verlängert, aber Sie können Ihr Abonnement
Abonnement jederzeit kündigen.
Das SDK ist für die nicht-kommerzielle Nutzung kostenlos. Bitte kontaktieren Sie uns, um eine kostenlose Lizenz zu erhalten.
## Zu den wichtigsten Funktionen von VisioForge Video Edit SDK FFMPEG .Net gehören:
### Eingabeformate
- Video: AVI, MPEG-1/2, WMV, 3GP, QuickTime MOV, MPEG-4/H264 (AVC), jedes andere von FFMPEG unterstützte Format
- Audio: WAV, MP3, OGG, WMA, AAC und alle anderen von FFMPEG unterstützten Formate
- Bilder: BMP, PNG, GIF, JPEG, TIFF, WebM
### Ausgabe von Videoformaten
- AVI
- MP4
- MKV (Matroska)
- WMV (Windows Media Video)
- Quicktime MOV
- WebM
- AV1
- MPEG-1/2/4
- FLV
- viele andere
### Ausgabe von Audioformaten
- WAV (PCM/ACM)
- Ogg Vorbis
- MP3
- WMA (Windows Media Audio)
- Unterstützte Kommunikation
- Speex
- FLAC
- OPUS
### Videobearbeitung und Effekte
- Bildüberlagerung
- GröÃe ändern und zuschneiden
- Schwenken/Zoomen
- Textüberlagerung
- Helligkeit, Kontrast, Sättigung und Farbton einstellbar
- chroma-key
- Denoise
- Deinterlace
### Audiobearbeitung und Effekte
- Volumenverstärker
- Equalizer
- andere Auswirkungen
### Andere Merkmale
- Bewegungserkennung
- Barcode-Leser (QR-Code, UPC-A, UPC-E, EAN-8, EAN-13, Code 39, Code 93, Code 128, Codabar, ITF, RSS-14, Data Matrix, Aztec, PDF-417)
- Frame-Erfassung
- Kodierungsparameter
- VideogröÃe
- Bildrate
- Video- und Audiocodecs
- Video- und Audio-Bitrate
- Qualität
- Profil/Ebene
- andere
### Entwicklungsplattformen:
- Visual Studio 2015 und höher: Visual C#, Visual C++, Visual Basic .NET
- kann mit anderen .Net-kompatiblen Anwendungen wie Microsoft Access, Word, Excel, FrontPage, etc. verwendet werden.
### Systemanforderungen
- Windows 11, Windows 10, Windows 8/8.1, Windows 7, Windows Vista, Windows Server 2012 und höher
- .Net Framework 4.5 oder höher
- .Net Core 3.1 oder höher
### Vertriebsrechte
Lizenzfreie Verbreitung.
### Beschränkungen des Versuchs
In der Testversion wird ein Wasserzeichen im Videofenster angezeigt.

#### EDITION

#### STANDARD

#### PROFESSIONELL

#### PREMIUM
Zeitleiste
Frame Grabber
Videoverarbeitung
Audioverarbeitung
Unterstützung von HD- und 4K-Videos
Netzwerk-Streaming im WMV-Format
Netzwerk-Streaming über RTMP / RTSP / UDP
Chroma-Schlüssel
Bewegungserkennung
OSD (Bildschirmanzeige)
Bild-im-Bild-Darstellung
Mehrere Ausgabebildschirme
GPU-beschleunigte Videoeffekte
Ausgabe an die virtuelle Kamera SDK
Video Encryption SDK Unterstützung
Video-Rotation
Ausgabeformate
- AVI
- WMV (Windows Media Video)
- WMA (Windows Media Audio)
- WAV
- MP3
- Ogg Vorbis
- Speex
- DV-Video
- Flash-Video (FLV)
- WebM
- MPEG-1/2/4
- MP4
SDK enthält die FFMPEG-Bibliothek, die unter der LGPL v2.1 lizenziert ist.
---END OF PAGE---
# Page: https://www.visioforge.com/es/video-edit-sdk-ffmpeg-net
# Video Edit SDK FFMPEG .Net
versión 12.1
VisioForge Video Edit SDK FFMPEG .Net simplifica la integración de la conversión y el procesamiento de vÃdeo en las aplicaciones de software. Este potente SDK permite a los desarrolladores crear pelÃculas personalizadas combinando a la perfección archivos de audio y vÃdeo. Basado en el conocido marco FFMPEG, el SDK es compatible con los principales formatos de vÃdeo y audio, lo que lo convierte en una solución versátil para proyectos multimedia.
- 
- 


#### DESCARGAS
[Instalador](https://s3.us-west-2.amazonaws.com/files.visioforge.com/trials/visioforge\_video\_edit\_ffmpeg\_sdk\_dotnet\_setup.exe)[Paquete NuGet](https://www.nuget.org/packages/VisioForge.DotNet.VideoEdit/)[Samples en GitHub](https://github.com/visioforge/.Net-SDK-s-samples)

#### COMPRAR
[Consultar precios o hacer un pedido](https://www.visioforge.com/es/buy)

#### AYUDA
[Ayuda en lÃnea](/help/)[Registro de cambios](/help/docs/dotnet/videoedit-ffmpeg/changelog/)[Acuerdo de licencia](/help/docs/eula/)
Nuestro software ofrece un uso ilimitado sin pantallas de aviso, garantizando una
experiencia sin problemas. Ofrecemos un perÃodo de prueba de 30 dÃas para que pueda explorar
todas las funciones antes de comprometerse.
Con una licencia normal
recibirá actualizaciones menores y mayores gratuitas durante un año; después de ese perÃodo,
el SDK seguirá funcionando como antes.
Alternativamente, la licencia
licencia de por vida proporciona actualizaciones ilimitadas indefinidamente. Además,
ofrecemos soporte y correcciones prioritarias. La licencia normal se factura
anualmente y se renueva automáticamente cada año, pero puede cancelar su
suscripción en cualquier momento.
El SDK es gratuito para uso no comercial. Póngase en contacto con nosotros para obtener una licencia gratuita.
## VisioForge Video Edit SDK FFMPEG .Net principales caracterÃsticas incluyen:
### Formatos de entrada
- VÃdeo: AVI, MPEG-1/2, WMV, 3GP, QuickTime MOV, MPEG-4/H264 (AVC), cualquier otro soportado por FFMPEG
- Audio: WAV, MP3, OGG, WMA, AAC, cualquier otro soportado por FFMPEG
- Imágenes: BMP, PNG, GIF, JPEG, TIFF, WebM
### Formatos de vÃdeo de salida
- AVI
- MP4
- MKV (Matroska)
- WMV (Windows Media Video)
- MOV de Quicktime
- WebM
- AV1
- MPEG-1/2/4
- FLV
- muchos otros
### Formatos de audio de salida
- WAV (PCM/ACM)
- Ogg Vorbis
- MP3
- WMA (Windows Media Audio)
- CAA
- Speex
- FLAC
- OPUS
### Procesamiento y efectos de vÃdeo
- superposición de imágenes
- redimensionar y recortar
- funciones de panorámica y zoom
- superposición de texto
- ajustes de brillo, contraste, saturación y tono
- chroma-key
- eliminación de ruido
- desentrelazar
### Tratamiento de audio y efectos
- amplificador de volumen
- ecualizador
- otros efectos
### Otras caracterÃsticas
- Detección de movimiento
- Lector de códigos de barras (QR Code, UPC-A, UPC-E, EAN-8, EAN-13, Code 39, Code 93, Code 128, Codabar, ITF, RSS-14, Data Matrix, Aztec, PDF-417)
- Captura de imágenes
- Parámetros de codificación
- resolución de vÃdeo
- frecuencia de cuadro
- códecs de vÃdeo y audio
- velocidad de bits de vÃdeo y audio
- calidad
- perfil/nivel
- otros
### Plataformas de desarrollo:
- Visual Studio 2015 y versiones posteriores: Visual C#, Visual C++, Visual Basic .NET
- puede utilizarse con otras aplicaciones compatibles con .Net como Microsoft Access, Word, Excel, FrontPage, etc.
### Requisitos del sistema
- Windows 11, Windows 10, Windows 8/8.1, Windows 7, Windows Vista, Windows Server 2012 y posteriores
- .Net Framework 4.5 o versión posterior
- .Net Core 3.1 o versiones posteriores
### Derechos de distribución
Distribución sin derechos de autor.
### Limitaciones de la versión de prueba
La versión de prueba muestra una marca de agua en la ventana de vÃdeo.

#### EDICIÃN

#### ESTÃNDAR

#### PROFESIONAL

#### PREMIUM
LÃnea de tiempo
Capturador de fotogramas
Tratamiento de vÃdeo
Tratamiento de audio
Compatibilidad con vÃdeo HD y 4K
Transmisión en red en formato WMV
Transmisión en red mediante RTMP / RTSP / UDP
Chroma-key
Detección de movimiento
OSD (On-Screen Display)
Picture-In-Picture
Múltiples pantallas de salida
Efectos de vÃdeo acelerados en la GPU
Salida a Virtual Camera SDK
Compatibilidad con Video Encryption SDK
Rotación de vÃdeo
Formatos de salida
- AVI
- WMV (Windows Media Video)
- WMA (Windows Media Audio)
- WAV
- MP3
- Ogg Vorbis
- Speex
- VÃdeo DV
- VÃdeo Flash (FLV)
- WebM
- MPEG-1/2/4
- MP4
SDK contiene la biblioteca FFMPEG con licencia LGPL v2.1.
---END OF PAGE---
# Page: https://www.visioforge.com/it/video-edit-sdk-ffmpeg-net
# Video Edit SDK FFMPEG .Net
versione 12.1
VisioForge Video Edit SDK FFMPEG .Net semplifica l'integrazione della conversione e dell'elaborazione video nelle applicazioni software. Questo potente SDK consente agli sviluppatori di creare filmati personalizzati combinando senza problemi file audio e video. Costruito sul rinomato framework FFMPEG, l'SDK offre un supporto completo per tutti i principali formati video e audio, rendendolo una soluzione versatile per i progetti multimediali.
- 
- 


#### DOWNLOADS
[Installatore](https://s3.us-west-2.amazonaws.com/files.visioforge.com/trials/visioforge\_video\_edit\_ffmpeg\_sdk\_dotnet\_setup.exe)[Pacchetto NuGet](https://www.nuget.org/packages/VisioForge.DotNet.VideoEdit/)[Samples su GitHub](https://github.com/visioforge/.Net-SDK-s-samples)

#### ACQUISTO
[Controllare i prezzi o ordinare](https://www.visioforge.com/it/buy)

#### AIUTO
[Guida in linea](/help/)[Changelog](/help/docs/dotnet/videoedit-ffmpeg/changelog/)[Contratto di licenza](/help/docs/eula/)
Il nostro software offre un utilizzo illimitato, senza nag-screen, garantendo un'esperienza
esperienza senza soluzione di continuità . Forniamo un periodo di prova di 30 giorni, in modo che possiate esplorare tutte le funzionalità prima di
tutte le funzionalità prima di impegnarsi.
Con una licenza regolare, l'utente
riceve aggiornamenti minori e maggiori gratuiti per un anno; dopo tale periodo,
l'SDK continuerà a funzionare come prima.
In alternativa, la
licenza a vita fornisce aggiornamenti illimitati a tempo indeterminato. Inoltre,
offriamo assistenza e correzioni prioritarie. La licenza regolare viene fatturata
annualmente e si rinnova automaticamente ogni anno, ma è possibile annullare la
abbonamento in qualsiasi momento.
L'SDK è gratuito per uso non commerciale. Contattateci per ottenere una licenza gratuita.
## Le principali caratteristiche di VisioForge Video Edit SDK FFMPEG .Net includono:
### Formati di ingresso
- Video: AVI, MPEG-1/2, WMV, 3GP, QuickTime MOV, MPEG-4/H264 (AVC), qualsiasi altro supportato da FFMPEG
- Audio: WAV, MP3, OGG, WMA, AAC, qualsiasi altro supportato da FFMPEG
- Immagini: BMP, PNG, GIF, JPEG, TIFF, WebM
### Formati video in uscita
- AVI
- MP4
- MKV (Matroska)
- WMV (Windows Media Video)
- Quicktime MOV
- WebM
- AV1
- MPEG-1/2/4
- FLV
- molti altri
### Formati audio in uscita
- WAV (PCM/ACM)
- Ogg Vorbis
- MP3
- WMA (Windows Media Audio)
- CAA
- Speex
- Formato FLAC
- OPUS
### Elaborazione video ed effetti
- sovrapposizione di immagini
- ridimensionare e ritagliare
- panoramica/zoom
- sovrapposizione di testo
- luminosità , contrasto, saturazione, tinta
- chiave cromatica
- denoise
- deinterlacciamento
### Elaborazione audio ed effetti
- amplificatore di volume
- equalizzatore
- altri effetti
### Altre caratteristiche
- Rilevamento del movimento
- Lettore di codici a barre (QR Code, UPC-A, UPC-E, EAN-8, EAN-13, Code 39, Code 93, Code 128, Codabar, ITF, RSS-14, Data Matrix, Aztec, PDF-417)
- Capture di fotogrammi
- Parametri di codifica
- dimensione del video
- frequenza dei fotogrammi
- codec video e audio
- velocità di trasmissione video e audio
- qualitÃ
- profilo/livello
- altro
### Piattaforme di sviluppo:
- Visual Studio 2015 e successivi: Visual C#, Visual C++, Visual Basic .NET
- può essere utilizzato con altre applicazioni compatibili con .Net come Microsoft Access, Word, Excel, FrontPage, ecc.
### Requisiti di sistema
- Windows 11, Windows 10, Windows 8/8.1, Windows 7, Windows Vista, Windows Server 2012 e versioni successive
- .Net Framework 4.5 o successivo
- .Net Core 3.1 o successivo
### Diritti di distribuzione
Distribuzione gratuita.
### Limiti della prova
La versione di prova visualizza una filigrana nella finestra del video.

#### EDIZIONE

#### STANDARD

#### PROFESSIONALE

#### PREMIUM
Linea temporale
Acquisizione di fotogrammi
Elaborazione video
Elaborazione audio
Supporto video HD e 4K
Streaming di rete in formato WMV
Streaming di rete tramite RTMP / RTSP / UDP
Chiave cromatica
Rilevamento del movimento
OSD (On-Screen Display)
Immagine nell'immagine
Schermi di uscita multipli
Effetti video accelerati dalla GPU
Uscita verso l'SDK della Virtual Camera
Supporto SDK di crittografia video
Rotazione video
Formati di uscita
- AVI
- WMV (Windows Media Video)
- WMA (Windows Media Audio)
- WAV
- MP3
- Ogg Vorbis
- Speex
- Video DV
- Video Flash (FLV)
- WebM
- MPEG-1/2/4
- MP4
L'SDK contiene la libreria FFMPEG con licenza LGPL v2.1.
---END OF PAGE---
# Page: https://www.visioforge.com/de/save-webcam
# Webcam-Video mit .Net speichern: Eine vollständige Anleitung zum Aufzeichnen und Erfassen von Webcam
Das Erfassen und Speichern von Videos von Webcams ist eine häufige Anforderung in vielen modernen Anwendungen, von Videokonferenz-Tools bis hin zu Ãberwachungssystemen. Unabhängig davon, ob Sie Webcam-Filmmaterial aufzeichnen, den Webcam-Feed anzeigen oder Bilder erfassen müssen, kann die Implementierung zuverlässiger Webcam-Funktionen in .NET (DotNet) eine Herausforderung darstellen. Dieses Tutorial bietet eine einfache Schritt-für-Schritt-Anleitung zum Speichern von Webcam-Videos mit C# (C Sharp) mit minimalem Code.

#### DOWNLOADS
[Installationsprogramm (Windows)](https://s3.us-west-2.amazonaws.com/files.visioforge.com/trials/visioforge\_sdks\_installer\_dotnet\_setup.exe)[NuGet-Installationshandbuch](https://www.visioforge.com/help/docs/dotnet/install/)[Samples auf GitHub](https://github.com/visioforge/.Net-SDK-s-samples)

#### KAUFEN
[Preise prüfen oder bestellen](https://www.visioforge.com/de/buy)

#### HILFE
[Online-Hilfe](https://www.visioforge.com/help/docs/dotnet/videocapture/)[Ãnderungsliste](https://www.visioforge.com/help/docs/dotnet/changelog/)[Lizenzvereinbarung](/help/docs/eula/)
Das SDK ist für die nicht-kommerzielle Nutzung kostenlos. Bitte kontaktieren Sie uns, um eine kostenlose Lizenz zu erhalten.
## Hauptmerkmale von Video Capture SDK .Net
Video Capture SDK .Net ist eine leistungsstarke Bibliothek, die speziell für .NET-Entwickler entwickelt wurde, die Webcam-Aufnahmefunktionen in ihren Anwendungen implementieren müssen. Egal, ob Sie Webcam-Videos aufzeichnen, Webcam-Frames als Bilder speichern oder den Webcam-Feed in Ihrer Anwendung anzeigen möchten, dieses SDK bietet Ihnen alle Möglichkeiten. Einige der herausragenden Merkmale sind:
- Nahtlose Integration in .NET-Anwendungen
- Unterstützung für mehrere Aufnahmegeräte (USB-Webcams, IP-Kameras, Aufnahmekarten)
- Leistungsstarke Video- und Audioaufnahme und -verarbeitung
- Einfacher Code zum Abrufen und Anzeigen von Webcam-Feeds
- Erstellen und Speichern von Videodateien in verschiedenen Formaten
- GPU-beschleunigte Kodierung für optimale Leistung
- Plattformübergreifende Kompatibilität
## Ausgabeformate: MP4 und WebM im Detail
### MP4-Format
MP4 ist eines der am weitesten verbreiteten Video-Containerformate und daher eine ausgezeichnete Wahl für Anwendungen, bei denen Kompatibilität im Vordergrund steht.
\*\*Unterstützte Codecs für MP4:\*\*
- \*\*H.264 (AVC)\*\*: Der Industriestandard für Videokomprimierung, der hervorragende Qualität und breite Kompatibilität bietet
- \*\*H.265 (HEVC)\*\*: Codec der nächsten Generation bietet eine bis zu 50% bessere Komprimierung als H.264 bei gleicher Qualität
- \*\*Unterstützte Kommunikation\*\*: Advanced Audio Coding, der Industriestandard für verlustbehaftete digitale Audiokomprimierung
### WebM-Format
WebM ist ein offenes, lizenzfreies Mediendateiformat, das für das Web entwickelt wurde.
\*\*Unterstützte Codecs für WebM:\*\*
- \*\*VP8\*\*: Von Google entwickelter Open-Source-Videocodec, der hauptsächlich im WebM-Format verwendet wird
- \*\*VP9\*\*: Nachfolger von VP8 mit deutlich verbesserter Komprimierungseffizienz
- \*\*AV1\*\*: Neuester Open-Source-Videocodec mit überlegener Komprimierung und Qualität, insbesondere bei niedrigeren Bitraten
- \*\*Vorbis\*\*: Kostenloses und Open-Source-Audiokomprimierungsformat, das gute Qualität bei niedrigeren Bitraten bietet
Jeder Codec kann mit verschiedenen Parametern feinabgestimmt werden, um das optimale Gleichgewicht zwischen Qualität und DateigröÃe für Ihre spezifischen Anwendungsanforderungen zu erreichen.
## GPU-Beschleunigung für effizientes Encoding
Eines der herausragendsten Merkmale von Video Capture SDK .Net ist die robuste Unterstützung für GPU-beschleunigte Videokodierung, die mehrere bedeutende Vorteile bietet:
### Vorteile der GPU-Beschleunigung
- \*\*Drastisch reduzierte CPU-Auslastung\*\*: Geben Sie CPU-Ressourcen für andere Anwendungsaufgaben frei
- \*\*Schnellere Kodierungsgeschwindigkeiten\*\*: Bis zu 10x schneller als reine CPU-Kodierung
- \*\*Echtzeit-Kodierung mit hoher Auflösung\*\*: Ermöglicht die 4K-Videoaufnahme mit minimaler Systembelastung
- \*\*Geringerer Stromverbrauch\*\*: Besonders wichtig für mobile und Laptop-Anwendungen
- \*\*Höhere Qualität bei gleicher Bitrate\*\*: Einige GPU-Encoder bieten eine bessere Qualität pro Bit als CPU-Encoder
### Unterstützte GPU-Technologien
Video Capture SDK .Net nutzt mehrere GPU-Beschleunigungstechnologien:
- \*\*NVIDIA NVENC\*\*: Hardwarebeschleunigte Kodierung auf NVIDIA-GPUs
- \*\*AMD AMF/VCE\*\*: Beschleunigung auf AMD-Grafikkarten
- \*\*Intel Quick Sync Video\*\*: Hardware-Kodierung auf integrierter Intel-Grafik
Das SDK erkennt automatisch die verfügbare Hardware und wählt den optimalen Codierungspfad basierend auf den Fähigkeiten Ihres Systems aus, mit Fallback auf die Softwarecodierung, wenn nötig.
## Implementierungsbeispiel (C#-Code zum Aufnehmen von Videos von einer Webcam)
Wir zeigen Ihnen in einem einfachen Tutorial, wie Sie Webcam-Videos mit C# aufnehmen. Die Implementierung der Webcam-Aufnahme mit Video Capture SDK .Net ist unkompliziert.
## CODE-SAMPLES
Hier ist ein vollständiges Beispiel, das zeigt, wie Sie Ihren Webcam-Feed abrufen, in Ihrer Anwendung anzeigen und in einer MP4-Datei mit H.264-Kodierung speichern:
Für die WebM-Ausgabe mit VP9-Kodierung ändern Sie einfach die Encoder-Einstellungen:
### Zusätzliche Codebeispiele
Hier ist ein einfaches Beispiel, wie Sie nur ein einzelnes Bild von der Webcam speichern.
Video-Sample-Grabber aktivieren:
Ein einzelnes Bild von der Webcam abrufen und speichern:
## Native Abhängigkeiten
Das Video Capture SDK .Net nutzt native Bibliotheken für den Zugriff auf Webcams und die Video- und Audioverarbeitung. Diese nativen Abhängigkeiten sind im SDK enthalten und werden automatisch mit Ihrer Anwendung bereitgestellt. Dies gewährleistet eine nahtlose Integration und Kompatibilität zwischen verschiedenen Systemen.
Wichtiges SDK-Paket (verwaltet):
Native Abhängigkeiten für Windows x64:
Verwenden Sie für alternative Plattformen (macOS, Linux, Android, iOS) die entsprechenden nativen Abhängigkeitspakete.
## Plattformübergreifende Kompatibilität
Video Capture SDK .Net wurde im Hinblick auf plattformübergreifende Kompatibilität entwickelt und ist daher die ideale Wahl für Entwickler, die an Anwendungen arbeiten, die auf mehreren Betriebssystemen ausgeführt werden müssen.
### MAUI-Kompatibilität
Für Entwickler, die mit .NET MAUI (Multi-platform App UI) arbeiten, bietet Video Capture SDK .Net:
- Volle Kompatibilität mit MAUI-Anwendungen
- Einheitliche API auf allen unterstützten Plattformen
- Plattformspezifische Optimierungen unter Beibehaltung einer einheitlichen Codebasis
- Beispielhafte MAUI-Projekte, die die plattformübergreifende Implementierung demonstrieren
Diese plattformübergreifende Funktion ermöglicht es Entwicklern, Code einmal zu schreiben und ihn über MAUI auf Windows-, macOS- und Mobilplattformen bereitzustellen, wodurch die Entwicklungszeit und der Wartungsaufwand erheblich reduziert werden. [Videoaufnahme-SDK .Ne](https://www.visioforge.com/de/video-capture-sdk-net)Es bietet eine umfassende Lösung zum Hinzufügen von Webcam-Videoaufnahmefunktionen zu Ihren DotNet-Anwendungen. Ob Sie Webcam-Aufnahmen aufzeichnen, Webcam-Bilder speichern oder einfach den Webcam-Feed in Ihrer Anwendung anzeigen möchten â diese Bibliothek vereinfacht den Vorgang mit nur wenigen Zeilen C#-Code. Mit Unterstützung für Industriestandardformate wie MP4 und WebM, modernen Codecs wie H.264/H.265 und VP8/VP9/AV1 sowie leistungsstarker GPU-Beschleunigung bietet es die nötige Leistung und Flexibilität selbst für anspruchsvollste Videoaufnahmeanwendungen. Die Möglichkeit, Videodateien effizient zu erstellen und zu speichern, macht diese Bibliothek perfekt für alle Anwendungen, die Webcam-Inhalte aufzeichnen müssen. Die plattformübergreifende Kompatibilität des SDK, die sich auf macOS- und MAUI-Anwendungen erstreckt, stellt sicher, dass Ihre Webcam-Aufnahmelösung betriebssystemübergreifend konsistent funktioniert. Ob Sie ein Videokonferenztool, eine Ãberwachungsanwendung oder eine andere Software entwickeln, die Webcam-Funktionalität benötigt â das Video Capture SDK .Net bietet Ihnen die Tools, die Sie für eine schnelle Implementierung dieser Funktionen benötigen. Der Einstieg ist ganz einfach: Folgen Sie einfach dem oben aufgeführten Schritt-für-Schritt-Tutorial und den Codebeispielen. Weitere fortgeschrittene Anwendungsfälle und eine ausführliche Dokumentation zum Aufzeichnen von Webcam-Videos mit .NET finden Sie auf unserer Website oder in der SDK-Dokumentation.

#### EDITION

#### STANDARD

#### PROFESSIONELL

#### PREMIUM
Unterstützte Eingabegeräte und andere Quellen
- Web-Kameras
- TV-Tuner und Aufnahmekarten
- DV- und MPEG-Camcorder
- Bildschirmaufnahme
- HTTP/RTSP/ONVIF IP-Kameras
- UDP, TCP, RTMP und andere Netzwerkströme
- Blackmagic Decklink
- DVB-T/DVB-C/DVB-S/ATSC-Geräte (BETA)
- Microsoft Kinect für Windows
Video-Vorschau
Frame Grabber
Videoverarbeitung
Audioverarbeitung
Unterstützung von HD- und 4K-Videos
Fernsehtuning
Netzwerk-Streaming im WMV-Format
Netzwerk-Streaming über RTMP/RTSP/UDP/NDI
Chroma-Schlüssel
Bewegungserkennung
Videoverarbeitung mit DirectShow-Filtern
OSD (Bildschirmanzeige)
Bild-im-Bild-Darstellung
Name der Ausgabedatei on-the-fly ändern
Mehrere Ausgabebildschirme
GPU-beschleunigte Videoeffekte
Ausgabe an die virtuelle Kamera SDK
Video Encryption SDK Unterstützung
Gesichtsverfolgung
Ausgabeformate
- AVI
- WMV (Windows Media Video)
- WMA (Windows Media Audio)
- WAV
- MP3
- Ogg Vorbis
- Speex
- DV-Video
- DV/MPEG-1/2/4 (über TV-Tuner mit internem MPEG-Encoder oder DV/HDV-Camcorder)
- Flash-Video (FLV) mit FFMPEG
- WebM
- Benutzerdefinierte Ausgabeformate mit externen DirectShow-Filtern
- MPEG-1/2/4 mit FFMPEG
- MP4 (H264/HEVC + AAC) mit Software, Intel QuickSync, Nvidia NVENC/CUDA oder AMD Radeon Encodern
Unsere Software bietet eine unbegrenzte Nutzung ohne störende Bildschirme und gewährleistet eine
nahtlose Erfahrung. Wir bieten einen 30-tägigen Testzeitraum, damit Sie alle
alle Funktionen erkunden können, bevor Sie sich festlegen.
Mit einer regulären Lizenz erhalten Sie
erhalten Sie für ein Jahr kostenlose Minor- und Major-Upgrades; nach diesem Zeitraum
funktioniert das SDK weiter wie bisher.
Alternativ dazu bietet die
Lifetime-Lizenz unbegrenzte Updates auf unbestimmte Zeit zur Verfügung. Zusätzlich,
bieten wir vorrangigen Support und Fehlerbehebungen. Die reguläre Lizenz wird jährlich abgerechnet
jährlich abgerechnet und automatisch verlängert, aber Sie können Ihr Abonnement
Abonnement jederzeit kündigen.
---END OF PAGE---
# Page: https://www.visioforge.com/es/save-webcam
# Grabar Video de Webcam Usando .Net: Una GuÃa Completa para Grabar y Capturar Webcam
Capturar y guardar vÃdeo de cámaras web es un requisito habitual en muchas aplicaciones modernas, desde herramientas de videoconferencia hasta sistemas de vigilancia. Tanto si necesita grabar imágenes de una cámara web como mostrarlas o capturarlas, implementar una funcionalidad de cámara web fiable en .NET (DotNet) puede resultar complicado. Este tutorial proporciona una sencilla guÃa paso a paso para grabar vÃdeo de webcam utilizando C# (C Sharp) con un código mÃnimo.

#### DESCARGAS
[Instalador (Windows)](https://s3.us-west-2.amazonaws.com/files.visioforge.com/trials/visioforge\_sdks\_installer\_dotnet\_setup.exe)[GuÃa de instalación de NuGet](https://www.visioforge.com/help/docs/dotnet/install/)[Samples en GitHub](https://github.com/visioforge/.Net-SDK-s-samples)

#### COMPRAR
[Consultar precios o hacer un pedido](https://www.visioforge.com/es/buy)

#### AYUDA
[Ayuda en lÃnea](https://www.visioforge.com/help/docs/dotnet/videocapture/)[Registro de cambios](https://www.visioforge.com/help/docs/dotnet/changelog/)[Acuerdo de licencia](/help/docs/eula/)
El SDK es gratuito para uso no comercial. Póngase en contacto con nosotros para obtener una licencia gratuita.
## CaracterÃsticas principales de Video Capture SDK .Net
Video Capture SDK .Net es una potente biblioteca diseñada especÃficamente para desarrolladores .NET que necesitan implementar la funcionalidad de captura de webcam en sus aplicaciones. Tanto si desea grabar vÃdeo de la cámara web, guardar fotogramas de la cámara web como imágenes o mostrar la alimentación de la cámara web en su aplicación, este SDK es la solución. Algunas de sus caracterÃsticas más destacadas son:
- Integración perfecta con aplicaciones .NET
- Compatibilidad con varios dispositivos de captura (cámaras web USB, cámaras IP, tarjetas de captura)
- Grabación y procesamiento de vÃdeo y audio de alto rendimiento
- Código sencillo para obtener y mostrar imágenes de cámaras web
- Crea y guarda archivos de vÃdeo en varios formatos
- Codificación acelerada por GPU para un rendimiento óptimo
- Compatibilidad entre plataformas
## Formatos de salida: MP4 y WebM en detalle
### Formato MP4
MP4 es uno de los formatos contenedores de video más ampliamente admitidos, lo que lo convierte en una excelente opción para aplicaciones donde la compatibilidad es una prioridad.
\*\*Códecs compatibles con MP4:\*\*
- \*\*H.264 (AVC)\*\*:El estándar de la industria para la compresión de video, que ofrece excelente calidad y amplia compatibilidad.
- \*\*H.265 (HEVC)\*\*:Códec de última generación que proporciona hasta 50% mejor compresión que H.264 manteniendo la misma calidad
- \*\*CAA\*\*Codificación de audio avanzada, el estándar de la industria para la compresión de audio digital con pérdida
### Formato WebM
WebM es un formato de archivo multimedia abierto y libre de regalÃas diseñado para la web.
\*\*Códecs compatibles con WebM:\*\*
- \*\*VP8\*\*:Códec de vÃdeo de código abierto desarrollado por Google, utilizado principalmente con el formato WebM
- \*\*VP9\*\*:Sucesor de VP8, que ofrece una eficiencia de compresión significativamente mejorada
- \*\*AV1\*\*:El códec de vÃdeo de código abierto más nuevo con compresión y calidad superiores, especialmente a tasas de bits más bajas
- \*\*Vorbis\*\*:Formato de compresión de audio gratuito y de código abierto que ofrece buena calidad a tasas de bits más bajas
Cada códec se puede ajustar con varios parámetros para lograr el equilibrio óptimo entre calidad y tamaño de archivo para los requisitos especÃficos de su aplicación.
## Aceleración de GPU para una codificación eficiente
Una de las caracterÃsticas destacadas de Video Capture SDK .Net es su sólido soporte para la codificación de video acelerada por GPU, que ofrece varias ventajas importantes:
### Beneficios de la aceleración por GPU
- \*\*Uso de CPU drásticamente reducido\*\*: Libere recursos de la CPU para otras tareas de la aplicación
- \*\*Velocidades de codificación más rápidas\*\*:Hasta 10 veces más rápido que la codificación solo con CPU
- \*\*Codificación de alta resolución en tiempo real\*\*:Habilite la captura de video 4K con un impacto mÃnimo en el sistema
- \*\*Menor consumo de energÃa\*\*: Particularmente importante para aplicaciones móviles y portátiles.
- \*\*Mayor calidad a la misma tasa de bits\*\*:Algunos codificadores de GPU ofrecen una mejor calidad por bit que la codificación de CPU
### TecnologÃas de GPU compatibles
Video Capture SDK .Net aprovecha múltiples tecnologÃas de aceleración de GPU:
- \*\*NVIDIA NVENC\*\*: Codificación acelerada por hardware en las GPU NVIDIA
- \*\*AMD AMF/VCE\*\*:Aceleración en tarjetas gráficas AMD
- \*\*VÃdeo de sincronización rápida de Intel\*\*: Codificación de hardware en gráficos integrados de Intel
El SDK detecta automáticamente el hardware disponible y selecciona la ruta de codificación óptima según las capacidades de su sistema, con opción a la codificación de software cuando sea necesario.
## Ejemplo de implementación (Código C# para capturar vÃdeo desde una cámara web)
Veamos un tutorial sencillo sobre cómo grabar vÃdeo de webcam con C#. Implementar la captura de webcam con el SDK de captura de vÃdeo .Net es muy sencillo.
## EJEMPLOS DE CÃDIGOS
Aquà tienes un ejemplo completo que muestra cómo obtener la señal de tu cámara web, mostrarla en tu aplicación y guardarla en un archivo MP4 con codificación H.264:
Para la salida WebM con codificación VP9, simplemente modifique la configuración del codificador:
### Ejemplos de código adicionales
A continuación se muestra un ejemplo sencillo de cómo guardar una sola imagen de la cámara web.
Habilitar el capturador de muestras de vÃdeo:
Obtener y guardar una sola imagen de la cámara web:
## Dependencias nativas
El SDK de Captura de VÃdeo .Net utiliza bibliotecas nativas para acceder a dispositivos de cámara web y procesar vÃdeo y audio. Estas dependencias nativas se incluyen con el SDK y se implementan automáticamente con la aplicación, lo que garantiza una integración y compatibilidad perfectas en diferentes sistemas.
Paquete SDK principal (administrado):
Dependencias nativas para Windows x64:
Para plataformas alternativas (macOS, Linux, Android, iOS), utilice los paquetes de dependencias nativas correspondientes.
## Compatibilidad entre plataformas
Video Capture SDK .Net está diseñado teniendo en cuenta la compatibilidad entre plataformas, lo que lo convierte en una opción ideal para los desarrolladores que trabajan en aplicaciones que necesitan ejecutarse en múltiples sistemas operativos.
### Compatibilidad con MAUI
Para los desarrolladores que trabajan con .NET MAUI (Interfaz de usuario de aplicaciones multiplataforma), Video Capture SDK .Net ofrece:
- Compatibilidad total con las aplicaciones MAUI
- API consistente en todas las plataformas compatibles
- Optimizaciones especÃficas de la plataforma manteniendo una base de código unificada
- Ejemplos de proyectos de MAUI que demuestran su implementación en distintas plataformas
Esta capacidad multiplataforma permite a los desarrolladores escribir código una vez e implementarlo en Windows, macOS y plataformas móviles a través de MAUI, lo que reduce significativamente el tiempo de desarrollo y la sobrecarga de mantenimiento. [SDK de captura de vÃdeo .Ne](https://www.visioforge.com/es/video-capture-sdk-net)Proporciona una solución integral para añadir funciones de captura de vÃdeo de webcam a sus aplicaciones DotNet. Ya sea que necesite grabar vÃdeos de webcam, guardar imágenes de webcam o simplemente mostrar la señal de la webcam en su aplicación, esta biblioteca simplifica el proceso con solo unas pocas lÃneas de código C#. Compatible con formatos estándar como MP4 y WebM, códecs modernos como H.264/H.265 y VP8/VP9/AV1, y una potente aceleración de GPU, ofrece el rendimiento y la flexibilidad necesarios incluso para las aplicaciones de captura de vÃdeo más exigentes. La capacidad de crear y guardar archivos de vÃdeo de forma eficiente hace que esta biblioteca sea perfecta para cualquier aplicación que necesite grabar contenido de webcam. La compatibilidad multiplataforma del SDK, que se extiende a aplicaciones macOS y MAUI, garantiza que su solución de captura de webcam funcione de forma consistente en diferentes sistemas operativos. Ya sea que esté desarrollando una herramienta de videoconferencia, una aplicación de vigilancia o cualquier otro software que requiera la funcionalidad de una webcam, el SDK de Captura de VÃdeo .Net le ofrece las herramientas necesarias para implementar estas funciones rápidamente. Comenzar es tan sencillo como seguir el tutorial paso a paso y los ejemplos de código que se muestran arriba. Para conocer casos de uso más avanzados y documentación detallada sobre cómo grabar videos de cámaras web usando .NET, visite nuestro sitio web o consulte la documentación del SDK.

#### EDICIÃN

#### ESTÃNDAR

#### PROFESIONAL

#### PREMIUM
Dispositivos de entrada y otras fuentes compatibles
- Cámaras web
- Sintonizadores de TV y tarjetas de captura
- Videocámaras DV y MPEG
- Captura de pantalla
- HTTP/RTSP/ONVIF Cámaras IP
- UDP, TCP, RTMP y otros flujos de red
- Blackmagic Decklink
- Dispositivos DVB-T/DVB-C/DVB-S/ATSC (BETA)
- Microsoft Kinect para Windows
Avance en vÃdeo
Capturador de fotogramas
Tratamiento de vÃdeo
Tratamiento de audio
Compatibilidad con vÃdeo HD y 4K
Sintonización de TV
Transmisión en red en formato WMV
Transmisión en red mediante RTMP/RTSP/UDP/NDI
Chroma-key
Detección de movimiento
Tratamiento de vÃdeo mediante filtros DirectShow
OSD (On-Screen Display)
Picture-In-Picture
Cambiar el nombre del archivo de salida sobre la marcha
Múltiples pantallas de salida
Efectos de vÃdeo acelerados en la GPU
Salida a Virtual Camera SDK
Compatibilidad con Video Encryption SDK
Seguimiento facial
Formatos de salida
- AVI
- WMV (Windows Media Video)
- WMA (Windows Media Audio)
- WAV
- MP3
- Ogg Vorbis
- Speex
- VÃdeo DV
- DV/MPEG-1/2/4 (mediante sintonizador de TV con codificador MPEG interno o videocámara DV/HDV)
- VÃdeo Flash (FLV) con FFMPEG
- WebM
- Formatos de salida personalizados mediante filtros DirectShow externos
- MPEG-1/2/4 con FFMPEG
- MP4 (H264/HEVC + AAC) mediante software, codificadores Intel QuickSync, Nvidia NVENC/CUDA o AMD Radeon
Nuestro software ofrece un uso ilimitado sin pantallas de aviso, garantizando una
experiencia sin problemas. Ofrecemos un perÃodo de prueba de 30 dÃas para que pueda explorar
todas las funciones antes de comprometerse.
Con una licencia normal
recibirá actualizaciones menores y mayores gratuitas durante un año; después de ese perÃodo,
el SDK seguirá funcionando como antes.
Alternativamente, la licencia
licencia de por vida proporciona actualizaciones ilimitadas indefinidamente. Además,
ofrecemos soporte y correcciones prioritarias. La licencia normal se factura
anualmente y se renueva automáticamente cada año, pero puede cancelar su
suscripción en cualquier momento.
---END OF PAGE---
# Page: https://www.visioforge.com/it/save-webcam
# Salvare i video della webcam con .Net: Una guida completa per registrare e catturare la webcam
La cattura e il salvataggio di video da webcam è un requisito comune a molte applicazioni moderne, dagli strumenti di videoconferenza ai sistemi di sorveglianza. Che si tratti di registrare filmati da webcam, visualizzare il feed della webcam o catturare immagini, l'implementazione di una funzionalità webcam affidabile in .NET (DotNet) può essere impegnativa. Questa esercitazione fornisce una semplice guida passo-passo per salvare i video della webcam utilizzando C# (C Sharp) con un codice minimo.

#### DOWNLOADS
[Programma di installazione (Windows)](https://s3.us-west-2.amazonaws.com/files.visioforge.com/trials/visioforge\_sdks\_installer\_dotnet\_setup.exe)[Guida all'installazione di NuGet](https://www.visioforge.com/help/docs/dotnet/install/)[Samples su GitHub](https://github.com/visioforge/.Net-SDK-s-samples)

#### ACQUISTO
[Controllare i prezzi o ordinare](https://www.visioforge.com/it/buy)

#### AIUTO
[Guida in linea](https://www.visioforge.com/help/docs/dotnet/videocapture/)[Changelog](https://www.visioforge.com/help/docs/dotnet/changelog/)[Contratto di licenza](/help/docs/eula/)
L'SDK è gratuito per uso non commerciale. Contattateci per ottenere una licenza gratuita.
## Caratteristiche principali di Video Capture SDK .Net
Video Capture SDK .Net è una potente libreria progettata specificamente per gli sviluppatori .NET che devono implementare la funzionalità di acquisizione della webcam nelle loro applicazioni. Se volete registrare il video della webcam, salvare i fotogrammi della webcam come immagini o visualizzare il feed della webcam nella vostra applicazione, questo SDK vi copre. Alcune delle sue caratteristiche principali includono:
- Integrazione perfetta con le applicazioni .NET
- Supporto per più dispositivi di acquisizione (webcam USB, telecamere IP, schede di acquisizione)
- Registrazione ed elaborazione video e audio ad alte prestazioni
- Codice semplice per ottenere e visualizzare i feed della webcam
- Creare e salvare file video in vari formati
- Codifica accelerata dalla GPU per prestazioni ottimali
- Compatibilità multipiattaforma
## Formati di output: MP4 e WebM in dettaglio
### Formato MP4
MP4 è uno dei formati contenitore video più ampiamente supportati, il che lo rende una scelta eccellente per le applicazioni in cui la compatibilità è una priorità .
\*\*Codec supportati per MP4:\*\*
- \*\*H.264 (AVC)\*\*: Lo standard industriale per la compressione video, che offre un'eccellente qualità e un'ampia compatibilitÃ
- \*\*H.265 (HEVC)\*\*: Codec di nuova generazione che offre una compressione fino a 50% migliore rispetto a H.264 mantenendo la stessa qualitÃ
- \*\*CAA\*\*: Advanced Audio Coding, lo standard industriale per la compressione audio digitale con perdita di dati
### Formato WebM
WebM è un formato di file multimediali aperto e libero da royalty, progettato per il Web.
\*\*Codec supportati per WebM:\*\*
- \*\*VP8\*\*: Codec video open source sviluppato da Google, utilizzato principalmente con il formato WebM
- \*\*VP9\*\*: Successore del VP8, offre un'efficienza di compressione notevolmente migliorata
- \*\*AV1\*\*: Il più recente codec video open source con compressione e qualità superiori, in particolare a bitrate più bassi
- \*\*Vorbis\*\*: Formato di compressione audio gratuito e open source che offre una buona qualità a bitrate più bassi
Ogni codec può essere ottimizzato con vari parametri per raggiungere l'equilibrio ottimale tra qualità e dimensione del file in base ai requisiti specifici della tua applicazione.
## Accelerazione GPU per una codifica efficiente
Una delle caratteristiche più importanti di Video Capture SDK .Net è il suo solido supporto per la codifica video accelerata dalla GPU, che offre diversi vantaggi significativi:
### Vantaggi dell'accelerazione GPU
- \*\*Utilizzo della CPU drasticamente ridotto\*\*: Liberare risorse della CPU per altre attività dell'applicazione
- \*\*Velocità di codifica più elevate\*\*: Fino a 10 volte più veloce della codifica solo CPU
- \*\*Codifica ad alta risoluzione in tempo reale\*\*: Abilita l'acquisizione video 4K con un impatto minimo sul sistema
- \*\*Minore consumo energetico\*\*: Particolarmente importante per le applicazioni mobili e laptop
- \*\*Qualità superiore allo stesso bitrate\*\*: Alcuni codificatori GPU offrono una migliore qualità per bit rispetto alla codifica CPU
### Tecnologie GPU supportate
Video Capture SDK .Net sfrutta molteplici tecnologie di accelerazione GPU:
- \*\*NVIDIA NVENC\*\*: Codifica accelerata tramite hardware sulle GPU NVIDIA
- \*\*AMD AMF/VCE\*\*: Accelerazione sulle schede grafiche AMD
- \*\*Video di sincronizzazione rapida Intel\*\*: Codifica hardware sulla grafica integrata Intel
L'SDK rileva automaticamente l'hardware disponibile e seleziona il percorso di codifica ottimale in base alle capacità del sistema, ricorrendo alla codifica software quando necessario.
## Esempio di implementazione (codice C# per catturare video dalla webcam)
Ecco un semplice tutorial su come registrare video dalla webcam utilizzando C#. Implementare l'acquisizione tramite webcam con Video Capture SDK .Net è semplice.
## CAMPIONI DI CODICE
Ecco un esempio completo che mostra come ottenere il feed della webcam, visualizzarlo nella tua applicazione e salvarlo in un file MP4 con codifica H.264:
Per l'output WebM con codifica VP9, è sufficiente modificare le impostazioni del codificatore:
### Esempi di codice aggiuntivi
Ecco un semplice esempio di come salvare una singola immagine dalla webcam.
Abilita l'acquisizione di campioni video:
Ottieni e salva una singola immagine dalla webcam:
## Dipendenze native
Video Capture SDK .Net si basa su librerie native per accedere ai dispositivi webcam ed eseguire l'elaborazione video e audio. Queste dipendenze native sono incluse nell'SDK e vengono distribuite automaticamente con l'applicazione, garantendo una perfetta integrazione e compatibilità tra sistemi diversi.
Pacchetto SDK principale (gestito):
Dipendenze native per Windows x64:
Per piattaforme alternative (macOS, Linux, Android, iOS), utilizzare i pacchetti di dipendenze native corrispondenti.
## Compatibilità multipiattaforma
Video Capture SDK .Net è progettato tenendo conto della compatibilità multipiattaforma, il che lo rende la scelta ideale per gli sviluppatori che lavorano su applicazioni che devono essere eseguite su più sistemi operativi.
### Compatibilità MAUI
Per gli sviluppatori che lavorano con .NET MAUI (Multi-platform App UI), Video Capture SDK .Net offre:
- Piena compatibilità con le applicazioni MAUI
- API coerente su tutte le piattaforme supportate
- Ottimizzazioni specifiche della piattaforma mantenendo una base di codice unificata
- Esempi di progetti MAUI che dimostrano l'implementazione su più piattaforme
Questa funzionalità multipiattaforma consente agli sviluppatori di scrivere il codice una sola volta e di distribuirlo su piattaforme Windows, macOS e mobili tramite MAUI, riducendo significativamente i tempi di sviluppo e le spese generali di manutenzione. [SDK di acquisizione video .Ne](https://www.visioforge.com/it/video-capture-sdk-net)Offre una soluzione completa per aggiungere funzionalità di acquisizione video tramite webcam alle applicazioni DotNet. Che tu debba registrare filmati tramite webcam, salvare immagini tramite webcam o semplicemente visualizzare il feed della webcam nella tua applicazione, questa libreria semplifica il processo con poche righe di codice C#. Grazie al supporto per formati standard di settore come MP4 e WebM, codec moderni tra cui H.264/H.265 e VP8/VP9/AV1 e una potente accelerazione GPU, offre le prestazioni e la flessibilità necessarie anche per le applicazioni di acquisizione video più esigenti. La possibilità di creare e salvare file video in modo efficiente rende questa libreria perfetta per qualsiasi applicazione che necessiti di registrare contenuti tramite webcam. La compatibilità multipiattaforma dell'SDK, che si estende alle applicazioni macOS e MAUI, garantisce che la tua soluzione di acquisizione tramite webcam funzioni in modo coerente su diversi sistemi operativi. Che tu stia sviluppando uno strumento di videoconferenza, un'applicazione di sorveglianza o qualsiasi altro software che richieda funzionalità webcam, Video Capture SDK .Net offre gli strumenti necessari per implementare rapidamente queste funzionalità . Iniziare è semplice come seguire il tutorial passo passo e gli esempi di codice forniti sopra. Per casi d'uso più avanzati e documentazione dettagliata su come registrare video dalla webcam utilizzando .NET, visita il nostro sito Web o fai riferimento alla documentazione dell'SDK.

#### EDIZIONE

#### STANDARD

#### PROFESSIONALE

#### PREMIUM
Dispositivi di input e altre fonti supportate
- Telecamere web
- Sintonizzatori TV e schede di acquisizione
- Videocamere DV e MPEG
- Capture dello schermo
- Telecamere IP HTTP/RTSP/ONVIF
- UDP, TCP, RTMP e altri flussi di rete
- Blackmagic Decklink
- Dispositivi DVB-T/DVB-C/DVB-S/ATSC (BETA)
- Microsoft Kinect per Windows
Anteprima video
Acquisizione di fotogrammi
Elaborazione video
Elaborazione audio
Supporto video HD e 4K
Sintonizzazione TV
Streaming di rete in formato WMV
Android 8 e successivi
Chiave cromatica
Rilevamento del movimento
Elaborazione video con filtri DirectShow
OSD (On-Screen Display)
Immagine nell'immagine
Modifica del nome del file di output al volo
Schermi di uscita multipli
Effetti video accelerati dalla GPU
Uscita verso l'SDK della Virtual Camera
Supporto SDK di crittografia video
Tracciamento del volto
Formati di uscita
- AVI
- WMV (Windows Media Video)
- WMA (Windows Media Audio)
- WAV
- MP3
- Ogg Vorbis
- Speex
- Video DV
- DV/MPEG-1/2/4 (utilizzando un sintonizzatore TV con codificatore MPEG interno o una videocamera DV/HDV)
- Video Flash (FLV) utilizzando FFMPEG
- WebM
- Formati di uscita personalizzati utilizzando filtri DirectShow esterni
- MPEG-1/2/4 con FFMPEG
- MP4 (H264/HEVC + AAC) tramite software, codificatori Intel QuickSync, Nvidia NVENC/CUDA o AMD Radeon
Il nostro software offre un utilizzo illimitato, senza nag-screen, garantendo un'esperienza
esperienza senza soluzione di continuità . Forniamo un periodo di prova di 30 giorni, in modo che possiate esplorare tutte le funzionalità prima di
tutte le funzionalità prima di impegnarsi.
Con una licenza regolare, l'utente
riceve aggiornamenti minori e maggiori gratuiti per un anno; dopo tale periodo,
l'SDK continuerà a funzionare come prima.
In alternativa, la
licenza a vita fornisce aggiornamenti illimitati a tempo indeterminato. Inoltre,
offriamo assistenza e correzioni prioritarie. La licenza regolare viene fatturata
annualmente e si rinnova automaticamente ogni anno, ma è possibile annullare la
abbonamento in qualsiasi momento.
---END OF PAGE---
# Page: https://www.visioforge.com/de/virtual-camera-sdk
# Virtual Camera SDK
Version 11.1
Das VisioForge Virtual Camera SDK ist die ultimative virtuelle Webcam-Lösung für Windows. Anwender und Entwickler können ihren PC in eine vielseitige, leistungsstarke Videoquelle für alle Anwendungen verwandeln, die Webcams unterstützen. Ob Content-Ersteller, Pädagoge, Geschäftsmann oder Softwareentwickler â unser SDK bietet Ihnen die Tools, die Sie benötigen, um Ihre Video- und Audiostreams mit unübertroffener Flexibilität und Qualität zu übertragen, zu optimieren und zu steuern.

#### DOWNLOADS
[Installateur](https://s3.us-west-2.amazonaws.com/files.visioforge.com/trials/visioforge\_virtual\_camera\_sdk\_setup.zip)

#### KAUFEN
[Preise prüfen oder bestellen](https://www.visioforge.com/de/buy)

#### HILFE
[Online-Hilfe](/help/docs/directshow/virtual-camera-sdk/)[Lizenzvereinbarung](/help/docs/eula/)
## Was ist eine virtuelle Webcam?
Eine virtuelle Webcam (auch virtuelle Kamera genannt) ist eine softwarebasierte Kamera, die eine physische Webcam auf Ihrem Windows-PC simuliert. So können Sie Video- und Audiodaten von beliebigen Quellen â wie Videodateien, Netzwerk-Streams, Webcams, Camcordern oder sogar Ihrem Desktop-Bildschirm â an beliebte Anwendungen wie Zoom, Skype, OBS Studio, Google Meet, Microsoft Teams und viele mehr senden. Mit einer virtuellen Webcam können Sie:
- Verwenden Sie vorab aufgezeichnete Videos, Live-Streams oder benutzerdefinierte Videoeffekte als Webcam-Eingang.
- Geben Sie Ihren Desktop, Präsentationen oder Anwendungsfenster als Webcam-Feed frei.
- Kombinieren Sie mehrere Videoquellen und wechseln Sie nahtlos zwischen ihnen.
- Wenden Sie Echtzeit-Videoeffekte, Overlays und Branding auf Ihren Videostream an.
- Verwenden Sie Ihre virtuelle Kamera dank der Unterstützung mehrerer Instanzen gleichzeitig in mehreren Anwendungen.
Diese Technologie ist ideal für Live-Streaming, Videokonferenzen, Online-Unterricht, Webinare, Remote-Zusammenarbeit und jedes Szenario, in dem Sie Ihre Videopräsenz steuern oder verbessern möchten.
## Warum sollten Sie sich für das VisioForge Virtual Camera SDK entscheiden?
Das VisioForge Virtual Camera SDK ist eine führende Lösung für virtuelle Webcam-Funktionen unter Windows. Hier sind die Gründe:
- \*\*Umfassende Unterstützung von Videoquellen:\*\* Streamen Sie Videos aus Dateien (MP4, AVI, MKV, MOV und mehr), Netzwerk-Streams (RTSP, HTTP, HLS), Webcams, Camcordern, Capture-Karten oder Ihrem Desktop-Bildschirm. Kombinieren Sie Quellen für maximale Flexibilität.
- \*\*Professionelle Videoqualität:\*\* GenieÃen Sie die Unterstützung von bis zu 4K-Auflösung und stellen Sie sicher, dass Ihr Video in jeder Umgebung scharf und professionell aussieht.
- \*\*Erweiterte Videoverarbeitung:\*\* Wenden Sie eine breite Palette von Echtzeiteffekten an, darunter Bild- und Textüberlagerungen, Schwenken/Zoomen, Helligkeit, Kontrast, Sättigung, Farbtonanpassungen, Deinterlacing, Rauschunterdrückung und Chroma-Key-Effekte (Greenscreen). Ideal zum Hinzufügen von Logos, Bauchbinden, Wasserzeichen oder kreativen visuellen Verbesserungen.
- \*\*Virtuelle Audioaufnahme:\*\* Fügen Sie Ihrem virtuellen Webcam-Stream nahtlos Audio von Mikrofonen, Audiodateien oder anderen Quellen hinzu und stellen Sie sicher, dass Ihr Publikum genau das hört, was Sie möchten.
- \*\*Unterstützung mehrerer Instanzen und mehrerer Apps:\*\* Führen Sie mehrere virtuelle Kamerageräte gleichzeitig aus, sodass Sie Ihre virtuelle Webcam in mehreren Anwendungen gleichzeitig verwenden können â ideal für Multitasking-Profis und Streamer.
- \*\*Benutzerdefiniertes Branding und Gerätebenennung:\*\* Personalisieren Sie Ihre virtuelle Kamera und Ihr Mikrofon mit benutzerdefinierten Namen, damit Ihre Marke in Meetings und Streams hervorsticht.
- \*\*DirectShow-Integration:\*\* Vollständig kompatibel mit DirectShow-Anwendungen und VisioForge SDKs für Videobearbeitung und -aufnahme, sodass Sie erweiterte Videofunktionen ganz einfach in Ihre eigenen Softwareprojekte integrieren können.
- \*\*Hintergrundbild und Signalverarbeitung:\*\* Zeigen Sie ein benutzerdefiniertes Hintergrundbild an oder führen Sie eine bestimmte Anwendung aus, wenn kein Videosignal verfügbar ist, und sorgen Sie so jederzeit für ein reibungsloses Erlebnis.
- \*\*Lizenzfreie Verbreitung:\*\* Verteilen Sie Ihre Anwendungen, ohne sich um zusätzliche Gebühren oder Lizenzprobleme sorgen zu müssen.
- \*\*Entwicklerfreundlich:\*\* Umfassende Dokumentation, Beispielcode und dedizierter Support erleichtern Entwicklern das Hinzufügen virtueller Webcam-Funktionen zu ihren eigenen Windows-Anwendungen.
## Anwendungsfälle für virtuelle Webcam-Technologie
- \*\*Videokonferenzen:\*\* Verbessern Sie Ihre Präsenz in Zoom, Microsoft Teams, Skype, Google Meet und anderen Plattformen, indem Sie hochwertige Videos, benutzerdefinierte Hintergründe und Marken-Overlays teilen.
- \*\*Live-Streaming:\*\* Ãbertragen Sie auf Plattformen wie YouTube Live, Twitch, Facebook Live und mehr mit professionellen Effekten, Ãbergängen und Video-Feeds aus mehreren Quellen.
- \*\*Online-Lehre und Webinare:\*\* Geben Sie Ihren Bildschirm, Ihre Folien oder Lehrvideos als Webcam-Feed frei und gestalten Sie das Fernlernen interaktiver und spannender.
- \*\*Inhaltserstellung:\*\* Nehmen Sie kreative Inhalte mit erweiterten Videoeffekten, Overlays und Echtzeitbearbeitung auf oder streamen Sie sie.
- \*\*Gaming & Esports:\*\* Fügen Sie Ihren Gaming-Streams Webcam-Overlays, Greenscreen-Effekte und benutzerdefiniertes Branding hinzu.
- \*\*Unternehmenskommunikation:\*\* Liefern Sie ausgefeilte Präsentationen, Produktdemos und interne Mitteilungen mit Marken-Video-Feeds.
- \*\*Softwareentwicklung:\*\* Integrieren Sie virtuelle Webcam-Funktionen in Ihre eigenen Windows-Anwendungen und erweitern Sie so die Fähigkeiten und Attraktivität Ihres Produkts.
## Funktionsübersicht
### Video- und Audio-Streaming
- Streamen Sie von jeder realen oder virtuellen Quelle: Videodateien, Netzwerk-Streams, Webcams, Camcorder, Aufnahmekarten, Desktop und mehr.
- Kombinieren Sie mehrere Quellen und wechseln Sie in Echtzeit zwischen ihnen.
- Fügen Sie Audio von Mikrofonen, Dateien oder anderen Geräten hinzu.
### Videoverarbeitung und Effekte
- Bild- und Textüberlagerungen für Branding, Wasserzeichen und Informationsanzeige.
- Schwenken/Zoomen, Zuschneiden und GröÃenänderung für die perfekte Rahmung.
- Passen Sie Helligkeit, Kontrast, Sättigung und Farbton für optimale Videoqualität an.
- Deinterlacing und Rauschunterdrückung für flüssige, klare Videos.
- Chroma-Key (Greenscreen) für Hintergrundaustausch und kreative Effekte.
### Anpassung und Branding
- Legen Sie benutzerdefinierte Gerätenamen für Ihre virtuelle Kamera und Ihr Mikrofon fest.
- Zeigen Sie ein Hintergrundbild an oder führen Sie eine Anwendung aus, wenn kein Videosignal vorhanden ist.
- Volle Kontrolle über die Video- und Audioeinstellungen für ein maÃgeschneidertes Erlebnis.
### Kompatibilität und Integration
- Funktioniert mit allen gängigen Videokonferenz-, Streaming- und Aufzeichnungssoftwares.
- DirectShow-Unterstützung für nahtlose Integration mit professionellen Videotools.
- Einfache SDK-Integration für Entwickler, mit Beispielcode und Dokumentation.
### Lizenzierung & Vertrieb
- Lizenzfreie Verteilung für Ihre Anwendungen.
- Flexible Lizenzoptionen: jährlich oder lebenslang, mit kostenlosen Updates und vorrangigem Support.
- Testversion verfügbar (zeigt ein Wasserzeichen im Videofenster an).
### Filterverwendung in einem DirectShow-Graph

## Systemanforderungen
- \*\*Unterstützte Betriebssysteme:\*\* Windows 11, Windows 10, Windows 8/8.1, Windows 7, Windows Vista, Windows XP, Windows Server 2003 und höher.
- \*\*DirectX 9 oder höher erforderlich.\*\*
- \*\*x86/x64-Kompatibilität.\*\*
## Download & Lizenzierung
- \*\*Kostenlose Testversion:\*\* Laden Sie das Virtual Camera SDK für Windows herunter und testen Sie es. Die Testversion enthält ein Wasserzeichen.
- \*\*Kaufen:\*\* Sichern Sie sich unbegrenzte Nutzung, kostenlose Updates und vorrangigen Support mit einer regulären oder lebenslangen Lizenz. Sie können Ihr Abonnement jederzeit kündigen.
- \*\*Einfache SDK-Integration:\*\* Fügen Sie Ihren eigenen Windows-Anwendungen mit unserem umfassenden SDK virtuelle Webcam-Funktionen hinzu.
## Fehlerbehebung und Support
- \*\*Virtuelle Webcam nicht erkannt?\*\* Stellen Sie sicher, dass das SDK installiert und als Videoeingang in Ihrer Anwendung ausgewählt ist. Starten Sie die App bei Bedarf neu.
- \*\*Abgehacktes Video oder Audio?\*\* SchlieÃen Sie andere ressourcenintensive Programme oder überprüfen Sie Ihre Systemressourcen und Internetverbindung.
- \*\*Kompatibilitätsprobleme?\*\* Für einige Anwendungen sind möglicherweise Updates oder spezielle Einstellungen erforderlich. Wenden Sie sich an unser Support-Team, um Unterstützung zu erhalten.
- \*\*Brauchen Sie Hilfe?\*\* Greifen Sie auf unsere ausführliche Dokumentation und FAQs zu oder wenden Sie sich für persönliche Hilfe an unser Priority-Supportteam.
## Vergleich: VisioForge Virtual Camera SDK vs. andere Lösungen
- \*\*e2eSoft VCam:\*\* Beide bieten virtuelle Webcam-Funktionen, aber VisioForge bietet eine tiefere DirectShow-Integration, erweiterte Videoverarbeitung und entwicklerfreundliche SDK-Funktionen.
- \*\*Virtuelle Kamera von OBS Studio:\*\* OBS eignet sich hervorragend zum Streamen, aber VisioForge SDK ist für eine einfache Integration in Ihre eigenen Apps konzipiert und bietet Entwicklern eine detailliertere Kontrolle.
- \*\*ManyCam, YouCam usw.:\*\* Dabei handelt es sich um Endbenutzer-Apps, während VisioForge SDK ideal für Entwickler und Unternehmen ist, die virtuelle Webcam-Funktionen in ihre eigenen Produkte einbetten möchten.
## C#-Codebeispiel
Hier ist ein praktisches Beispiel für die Verwendung des Virtual Camera SDK in einer .NET-Anwendung:
### Projekt-Setup
Erstellen Sie ein neues .NET-Projekt und fügen Sie das NuGet-Paket VisioForge.DirectShowAPI hinzu:
### Implementierungsbeispiel
Dieses Beispiel zeigt, wie Sie Videos von einer physischen Kamera aufnehmen und über eine virtuelle Kamera streamen:
Dieses Beispiel zeigt:
- Einrichten eines DirectShow-Filterdiagramms
- Auflisten und Auswählen von Videoaufnahmegeräten
- Erstellen und Verbinden von Quell- und virtuellen Kamerafiltern
- Verwalten des Streaming-Lebenszyklus
- Richtige Ressourcenbereinigung
Weitere erweiterte Funktionen wie Videoeffekte, Formatauswahl und mehrere Instanzen finden Sie in unserer umfassenden SDK-Dokumentation.
## C++ DirectShow-Beispiel
So verwenden Sie das Virtual Camera SDK in einer nativen C++ DirectShow-Anwendung:
### Header-Datei (intf.h)
Definieren Sie zunächst die erforderlichen GUIDs und Schnittstellen:
### Implementierungsbeispiel (main.cpp)
Hier ist ein vollständiges Beispiel, das zeigt, wie man Videos aufnimmt und über die virtuelle Kamera streamt:
Dieses C++-Beispiel demonstriert:
- Einrichten und Verwalten des DirectShow-Filterdiagramms
- Aufzählung von Videoaufnahmegeräten
- Erstellen und Konfigurieren virtueller Kamerafilter
- Filterverbindung und Streaming-Steuerung
- Richtige COM-Ressourcenbereinigung
- Fehlerbehandlung und Statusberichterstattung
Das Beispiel verwendet standardmäÃige DirectShow-Schnittstellen zusammen mit den benutzerdefinierten Schnittstellen des Virtual Camera SDK für erweiterte Funktionen. Beachten Sie Folgendes:
1. Link gegen die DirectShow-Bibliotheken
2. Fügen Sie die erforderlichen DirectShow-Header ein
3. Initialisieren und desinitialisieren Sie COM entsprechend
4. Behandeln Sie alle COM-Schnittstellenversionen ordnungsgemäÃ
Informationen zu erweiterten Funktionen wie der Auswahl des Videoformats, mehreren Instanzen oder Videoeffekten finden Sie in unserer SDK-Dokumentation.
## Beispielprojekte auf GitHub
Wir pflegen eine umfassende Sammlung von Beispielprojekten auf GitHub, um Ihnen den Einstieg in das Virtual Camera SDK zu erleichtern. Besuchen Sie unsere [DirectShow-Beispielrepository](https://github.com/visioforge/directshow-samples) für vollständige, funktionierende Beispiele.
### Verwendete Technologien
Die Beispiele sind in mehreren Programmiersprachen verfügbar:
- C# (.NET)
- C++ (Native DirectShow)
- Delphi
Statten Sie Ihren PC mit der besten virtuellen Webcam-Software für Windows aus. Erleben Sie nahtloses Video-Streaming, erweiterte Effekte und professionelle Funktionen mit dem VisioForge Virtual Camera SDK!
---END OF PAGE---
# Page: https://www.visioforge.com/es/virtual-camera-sdk
# Virtual Camera SDK
versión 11.1
El SDK de cámara virtual de VisioForge es la solución definitiva de cámaras web virtuales para Windows, que permite a usuarios y desarrolladores transformar su PC en una fuente de vÃdeo versátil y de alto rendimiento para cualquier aplicación compatible con cámaras web. Tanto si es creador de contenido, educador, profesional o desarrollador de software, nuestro SDK le proporciona las herramientas necesarias para transmitir, mejorar y controlar sus transmisiones de vÃdeo y audio con una flexibilidad y calidad inigualables.

#### DESCARGAS
[Instalador](https://s3.us-west-2.amazonaws.com/files.visioforge.com/trials/visioforge\_virtual\_camera\_sdk\_setup.zip)

#### COMPRAR
[Consultar precios o hacer un pedido](https://www.visioforge.com/es/buy)

#### AYUDA
[Ayuda en lÃnea](/help/docs/directshow/virtual-camera-sdk/)[Acuerdo de licencia](/help/docs/eula/)
## ¿Qué es una cámara web virtual?
Una cámara web virtual (también conocida como cámara virtual) es una cámara basada en software que simula una cámara web fÃsica en tu PC con Windows. Esto te permite enviar video y audio desde cualquier fuente (como archivos de video, transmisiones de red, cámaras web, videocámaras o incluso la pantalla de tu escritorio) a aplicaciones populares como Zoom, Skype, OBS Studio, Google Meet, Microsoft Teams y muchas más. Con una cámara web virtual, puedes:
- Utilice vÃdeos pregrabados, transmisiones en vivo o efectos de vÃdeo personalizados como entrada de su cámara web.
- Comparta su escritorio, presentaciones o ventanas de aplicaciones como una transmisión de cámara web.
- Combine múltiples fuentes de vÃdeo y alterne entre ellas sin problemas.
- Aplique efectos de video, superposiciones y marca en tiempo real a su transmisión de video.
- Utilice su cámara virtual en múltiples aplicaciones al mismo tiempo, gracias al soporte de múltiples instancias.
Esta tecnologÃa es ideal para transmisión en vivo, videoconferencias, enseñanza en lÃnea, seminarios web, colaboración remota y cualquier escenario en el que desee controlar o mejorar su presencia en video.
## ¿Por qué elegir el SDK de cámara virtual de VisioForge?
El SDK de cámara virtual de VisioForge destaca como una solución lÃder para la funcionalidad de cámara web virtual en Windows. Aquà explicamos por qué:
- \*\*Soporte completo de fuentes de vÃdeo:\*\* Transmite video desde archivos (MP4, AVI, MKV, MOV y más), transmisiones de red (RTSP, HTTP, HLS), cámaras web, videocámaras, tarjetas de captura o la pantalla de tu escritorio. Combina y combina fuentes para máxima flexibilidad.
- \*\*Calidad de video de nivel profesional:\*\* Disfrute de compatibilidad con una resolución de hasta 4K, lo que garantiza que su video se vea nÃtido y profesional en cualquier entorno.
- \*\*Procesamiento de vÃdeo avanzado:\*\* Aplique una amplia gama de efectos en tiempo real, como superposiciones de imágenes y texto, panorámica/zoom, brillo, contraste, saturación, ajustes de tono, desentrelazado, eliminación de ruido y efectos de croma (pantalla verde). Ideal para añadir logotipos, tercios inferiores, marcas de agua o mejoras visuales creativas.
- \*\*Captura de audio virtual:\*\* Agregue sin problemas audio desde micrófonos, archivos de audio u otras fuentes a su transmisión de cámara web virtual, asegurando que su audiencia escuche exactamente lo que desea.
- \*\*Compatibilidad con múltiples instancias y múltiples aplicaciones:\*\* Ejecute varios dispositivos de cámara virtuales a la vez, lo que le permitirá usar su cámara web virtual en varias aplicaciones simultáneamente: ideal para profesionales que realizan múltiples tareas y transmisores.
- \*\*Marca personalizada y nombre del dispositivo:\*\* Personalice su cámara y micrófono virtuales con nombres personalizados, haciendo que su marca se destaque en reuniones y transmisiones.
- \*\*Integración con DirectShow:\*\* Totalmente compatible con aplicaciones DirectShow y SDK de VisioForge para edición y captura de video, lo que facilita la integración de funciones de video avanzadas en sus propios proyectos de software.
- \*\*Manejo de imágenes de fondo y señales:\*\* Muestra una imagen de fondo personalizada o ejecuta una aplicación especÃfica cuando no haya una señal de video disponible, lo que garantiza una experiencia impecable en todo momento.
- \*\*Distribución libre de regalÃas:\*\* Distribuya sus aplicaciones sin preocuparse por tarifas adicionales o dolores de cabeza por licencias.
- \*\*Apto para desarrolladores:\*\* La documentación completa, el código de muestra y el soporte dedicado facilitan que los desarrolladores agreguen funciones de cámara web virtual a sus propias aplicaciones de Windows.
## Casos de uso de la tecnologÃa de cámaras web virtuales
- \*\*Videoconferencia:\*\* Mejore su presencia en Zoom, Microsoft Teams, Skype, Google Meet y otras plataformas compartiendo videos de alta calidad, fondos personalizados y superposiciones de marca.
- \*\*Transmisión en vivo:\*\* Transmita a plataformas como YouTube Live, Twitch, Facebook Live y más con efectos profesionales, transiciones y feeds de video de múltiples fuentes.
- \*\*Enseñanza en lÃnea y seminarios web:\*\* Comparta su pantalla, diapositivas o videos educativos como una transmisión de cámara web, haciendo que el aprendizaje remoto sea más interactivo y atractivo.
- \*\*Creación de contenido:\*\* Grabe o transmita contenido creativo con efectos de video avanzados, superposiciones y edición en tiempo real.
- \*\*Juegos y deportes electrónicos:\*\* Agrega superposiciones de cámara web, efectos de pantalla verde y marca personalizada a tus transmisiones de juegos.
- \*\*Comunicaciones corporativas:\*\* Ofrezca presentaciones impecables, demostraciones de productos y comunicaciones internas con transmisiones de video de marca.
- \*\*Desarrollo de software:\*\* Integre funciones de cámara web virtual en sus propias aplicaciones de Windows, ampliando las capacidades y el atractivo de su producto.
## Desglose de caracterÃsticas
### Transmisión de video y audio
- Transmita desde cualquier fuente real o virtual: archivos de video, transmisiones de red, cámaras web, videocámaras, tarjetas de captura, computadoras de escritorio y más.
- Combine múltiples fuentes y cambie entre ellas en tiempo real.
- Agregue audio desde micrófonos, archivos u otros dispositivos.
### Procesamiento y efectos de video
- Superposiciones de imágenes y texto para marca, marcas de agua y visualización de información.
- Panorámica/zoom, recorte y cambio de tamaño para un encuadre perfecto.
- Ajuste el brillo, el contraste, la saturación y el tono para obtener una calidad de video óptima.
- Desentrelazado y eliminación de ruido para un vÃdeo fluido y claro.
- Chroma-key (pantalla verde) para reemplazo de fondo y efectos creativos.
### Personalización y marca
- Establezca nombres de dispositivos personalizados para su cámara y micrófono virtuales.
- Muestra una imagen de fondo o ejecuta una aplicación cuando no hay señal de video presente.
- Control total sobre la configuración de vÃdeo y audio para una experiencia personalizada.
### Compatibilidad e integración
- Funciona con todos los principales programas de videoconferencia, transmisión y grabación.
- Compatibilidad con DirectShow para una integración perfecta con herramientas de vÃdeo profesionales.
- Fácil integración de SDK para desarrolladores, con código de muestra y documentación.
### Licencias y distribución
- Distribución libre de regalÃas para sus aplicaciones.
- Opciones de licencia flexibles: anual o de por vida, con actualizaciones gratuitas y soporte prioritario.
- Versión de prueba disponible (muestra una marca de agua en la ventana de video).
### Uso de filtro en un gráfico DirectShow

## Requisitos del sistema
- \*\*Sistemas operativos compatibles:\*\* Windows 11, Windows 10, Windows 8/8.1, Windows 7, Windows Vista, Windows XP, Windows Server 2003 y versiones posteriores.
- \*\*Se requiere DirectX 9 o posterior.\*\*
- \*\*Compatibilidad x86/x64.\*\*
## Descarga y licencia
- \*\*Prueba gratuita:\*\* Descargue y evalúe el SDK de Virtual Camera para Windows. La versión de prueba incluye una marca de agua.
- \*\*Compra:\*\* Disfruta de uso ilimitado, actualizaciones gratuitas y soporte prioritario con una licencia regular o de por vida. Cancela tu suscripción cuando quieras.
- \*\*Fácil integración del SDK:\*\* Agregue funciones de cámara web virtual a sus propias aplicaciones de Windows con nuestro SDK completo.
## Solución de problemas y soporte
- \*\*¿No se reconoce la cámara web virtual?\*\* Asegúrate de que el SDK esté instalado y seleccionado como entrada de vÃdeo en tu aplicación. Reinicia la aplicación si es necesario.
- \*\*¿VÃdeo o audio entrecortado?\*\* Cierre otros programas que consuman muchos recursos o verifique los recursos del sistema y la conexión a Internet.
- \*\*¿Problemas de compatibilidad?\*\* Algunas aplicaciones pueden requerir actualizaciones o configuraciones especÃficas. Contacta con nuestro equipo de soporte para obtener ayuda.
- \*\*¿Necesitar ayuda?\*\* Acceda a nuestra documentación detallada, preguntas frecuentes o comunÃquese con nuestro equipo de soporte prioritario para obtener ayuda personalizada.
## Comparación: VisioForge Virtual Camera SDK vs. otras soluciones
- \*\*Cámara web e2eSoft:\*\* Ambos ofrecen funcionalidad de cámara web virtual, pero VisioForge proporciona una integración DirectShow más profunda, un procesamiento de video más avanzado y funciones SDK fáciles de usar para desarrolladores.
- \*\*Cámara virtual de OBS Studio:\*\* OBS es excelente para la transmisión, pero VisioForge SDK está diseñado para una fácil integración en sus propias aplicaciones y ofrece un control más granular para los desarrolladores.
- \*\*ManyCam, YouCam, etc.:\*\* Estas son aplicaciones para el usuario final, mientras que VisioForge SDK es ideal para desarrolladores y empresas que buscan integrar funciones de cámara web virtual en sus propios productos.
## Ejemplo de código C#
A continuación se muestra un ejemplo práctico de cómo utilizar el SDK de cámara virtual en una aplicación .NET:
### Configuración del proyecto
Cree un nuevo proyecto .NET y agregue el paquete NuGet VisioForge.DirectShowAPI:
### Ejemplo de implementación
Este ejemplo demuestra cómo capturar video desde una cámara fÃsica y transmitirlo a través de una cámara virtual:
Este ejemplo muestra:
- Configuración de un gráfico de filtro DirectShow
- Enumeración y selección de dispositivos de captura de vÃdeo
- Creación y conexión de filtros de cámara virtuales y de origen
- Gestión del ciclo de vida del streaming
- Limpieza adecuada de recursos
Para obtener funciones más avanzadas como efectos de video, selección de formato e instancias múltiples, consulte nuestra documentación completa del SDK.
## Ejemplo de DirectShow en C++
A continuación se explica cómo utilizar el SDK de cámara virtual en una aplicación DirectShow nativa de C++:
### Archivo de encabezado (intf.h)
Primero, defina los GUID y las interfaces necesarias:
### Ejemplo de implementación (main.cpp)
A continuación se muestra un ejemplo completo que muestra cómo capturar vÃdeo y transmitirlo a través de la cámara virtual:
Este ejemplo de C++ demuestra:
- Configuración y gestión de gráficos de filtros DirectShow
- Enumeración de dispositivos de captura de vÃdeo
- Creación y configuración de filtros de cámara virtual
- Conexión de filtros y control de streaming
- Limpieza adecuada de recursos COM
- Manejo de errores e informes de estado
El ejemplo utiliza interfaces estándar de DirectShow junto con las interfaces personalizadas del SDK de Virtual Camera para funciones avanzadas. Asegúrese de:
1. Enlace con las bibliotecas DirectShow
2. Incluya los encabezados DirectShow necesarios
3. Inicializar y desinicializar COM apropiadamente
4. Manejar correctamente todas las versiones de la interfaz COM
Para obtener funciones avanzadas como selección de formato de video, instancias múltiples o efectos de video, consulte nuestra documentación del SDK.
## Proyectos de muestra en GitHub
Mantenemos una colección completa de proyectos de ejemplo en GitHub para ayudarte a empezar a usar el SDK de cámara virtual. Visita nuestra página. [Repositorio de muestras de DirectShow](https://github.com/visioforge/directshow-samples) para ejemplos completos y funcionales.
### TecnologÃas utilizadas
Los ejemplos están disponibles en varios lenguajes de programación:
- C# (.NET)
- C++ (DirectShow nativo)
- Delfos
Potencie su PC con el mejor software de cámara web virtual para Windows. ¡Disfrute hoy mismo de una transmisión de video fluida, efectos avanzados y funciones profesionales con el SDK de cámara virtual de VisioForge!
---END OF PAGE---
# Page: https://www.visioforge.com/it/virtual-camera-sdk
# Virtual Camera SDK
versione 11.1
VisioForge Virtual Camera SDK è la soluzione definitiva per webcam virtuali per Windows, che consente a utenti e sviluppatori di trasformare il proprio PC in una sorgente video versatile e ad alte prestazioni per qualsiasi applicazione che supporti le webcam. Che tu sia un creatore di contenuti, un educatore, un professionista o uno sviluppatore di software, il nostro SDK offre gli strumenti necessari per trasmettere, migliorare e controllare i tuoi flussi video e audio con flessibilità e qualità ineguagliabili.

#### DOWNLOADS
[Installatore](https://s3.us-west-2.amazonaws.com/files.visioforge.com/trials/visioforge\_virtual\_camera\_sdk\_setup.zip)

#### ACQUISTO
[Controllare i prezzi o ordinare](https://www.visioforge.com/it/buy)

#### AIUTO
[Guida in linea](/help/docs/directshow/virtual-camera-sdk/)[Contratto di licenza](/help/docs/eula/)
## Cos'è una webcam virtuale?
Una webcam virtuale (nota anche come fotocamera virtuale) è una fotocamera basata su software che simula una webcam fisica sul tuo PC Windows. Questo ti consente di inviare video e audio da qualsiasi sorgente, come file video, flussi di rete, webcam, videocamere o persino lo schermo del tuo desktop, ad applicazioni popolari come Zoom, Skype, OBS Studio, Google Meet, Microsoft Teams e molte altre. Con una webcam virtuale, puoi:
- Utilizza video preregistrati, streaming live o effetti video personalizzati come input per la webcam.
- Condividi il desktop, le presentazioni o le finestre delle applicazioni come feed webcam.
- Combina più sorgenti video e passa dall'una all'altra senza interruzioni.
- Applica effetti video, sovrapposizioni e branding in tempo reale al tuo flusso video.
- Grazie al supporto multi-istanza, puoi utilizzare la tua fotocamera virtuale in più applicazioni contemporaneamente.
Questa tecnologia è ideale per lo streaming live, le videoconferenze, la didattica online, i webinar, la collaborazione a distanza e qualsiasi situazione in cui si desideri controllare o migliorare la propria presenza video.
## Perché scegliere VisioForge Virtual Camera SDK?
VisioForge Virtual Camera SDK si distingue come soluzione leader per la funzionalità webcam virtuale su Windows. Ecco perché:
- \*\*Supporto completo delle sorgenti video:\*\* Trasmetti video in streaming da file (MP4, AVI, MKV, MOV e altri), flussi di rete (RTSP, HTTP, HLS), webcam, videocamere, schede di acquisizione o dallo schermo del tuo desktop. Combina e abbina le sorgenti per la massima flessibilità .
- \*\*Qualità video di livello professionale:\*\* Sfrutta il supporto della risoluzione fino a 4K, per garantire che i tuoi video siano nitidi e professionali in qualsiasi ambiente.
- \*\*Elaborazione video avanzata:\*\* Applica un'ampia gamma di effetti in tempo reale, tra cui sovrapposizioni di immagini e testo, pan/zoom, luminosità , contrasto, saturazione, regolazioni di tonalità , deinterlacciamento, riduzione del rumore ed effetti chroma-key (schermo verde). Perfetto per aggiungere loghi, lower third, filigrane o miglioramenti visivi creativi.
- \*\*Acquisizione audio virtuale:\*\* Aggiungi senza soluzione di continuità l'audio da microfoni, file audio o altre fonti al flusso della tua webcam virtuale, assicurandoti che il tuo pubblico senta esattamente ciò che desideri.
- \*\*Supporto multi-istanza e multi-app:\*\* Gestisci più dispositivi con videocamera virtuale contemporaneamente, consentendoti di utilizzare la tua webcam virtuale in più applicazioni contemporaneamente: ideale per professionisti multitasking e streamer.
- \*\*Branding personalizzato e denominazione dei dispositivi:\*\* Personalizza la tua telecamera e il tuo microfono virtuali con nomi personalizzati, facendo risaltare il tuo marchio durante riunioni e streaming.
- \*\*Integrazione DirectShow:\*\* Completamente compatibile con le applicazioni DirectShow e gli SDK VisioForge per l'editing e l'acquisizione video, semplificando l'integrazione di funzionalità video avanzate nei propri progetti software.
- \*\*Immagine di sfondo e gestione del segnale:\*\* Visualizza un'immagine di sfondo personalizzata o esegui un'applicazione specifica quando non è disponibile alcun segnale video, garantendo sempre un'esperienza impeccabile.
- \*\*Distribuzione royalty-free:\*\* Distribuisci le tue applicazioni senza preoccuparti di costi aggiuntivi o problemi di licenza.
- \*\*Adatto agli sviluppatori:\*\* La documentazione completa, il codice di esempio e il supporto dedicato consentono agli sviluppatori di aggiungere facilmente funzionalità di webcam virtuale alle proprie applicazioni Windows.
## Casi d'uso per la tecnologia webcam virtuale
- \*\*Videoconferenza:\*\* Migliora la tua presenza su Zoom, Microsoft Teams, Skype, Google Meet e altre piattaforme condividendo video di alta qualità , sfondi personalizzati e sovrapposizioni brandizzate.
- \*\*Streaming in diretta:\*\* Trasmetti su piattaforme come YouTube Live, Twitch, Facebook Live e altre ancora con effetti professionali, transizioni e feed video multi-sorgente.
- \*\*Insegnamento online e webinar:\*\* Condividi lo schermo, le diapositive o i video didattici tramite un feed webcam, rendendo l'apprendimento a distanza più interattivo e coinvolgente.
- \*\*Creazione di contenuti:\*\* Registra o riproduci in streaming contenuti creativi con effetti video avanzati, sovrapposizioni e modifica in tempo reale.
- \*\*Giochi ed eSport:\*\* Aggiungi sovrapposizioni di webcam, effetti schermo verde e un marchio personalizzato ai tuoi streaming di gioco.
- \*\*Comunicazioni aziendali:\*\* Realizza presentazioni raffinate, dimostrazioni di prodotto e comunicazioni interne con feed video brandizzati.
- \*\*Sviluppo software:\*\* Integra le funzionalità della webcam virtuale nelle tue applicazioni Windows, ampliando le capacità e l'attrattiva del tuo prodotto.
## Ripartizione delle funzionalitÃ
### Streaming video e audio
- Trasmetti in streaming da qualsiasi fonte reale o virtuale: file video, flussi di rete, webcam, videocamere, schede di acquisizione, desktop e altro ancora.
- Combina più sorgenti e passa da una all'altra in tempo reale.
- Aggiungi audio da microfoni, file o altri dispositivi.
### Elaborazione ed effetti video
- Sovrapposizioni di immagini e testo per il branding, filigrane e visualizzazione di informazioni.
- Panoramica/zoom, ritaglio e ridimensionamento per un'inquadratura perfetta.
- Regola luminosità , contrasto, saturazione e tonalità per una qualità video ottimale.
- Deinterlacciamento e rimozione del rumore per video fluidi e nitidi.
- Chroma-key (schermo verde) per la sostituzione dello sfondo ed effetti creativi.
### Personalizzazione e branding
- Imposta nomi di dispositivi personalizzati per la tua telecamera virtuale e il tuo microfono.
- Visualizza un'immagine di sfondo o esegue un'applicazione quando non è presente alcun segnale video.
- Controllo completo sulle impostazioni video e audio per un'esperienza personalizzata.
### Compatibilità e integrazione
- Funziona con tutti i principali software di videoconferenza, streaming e registrazione.
- Supporto DirectShow per un'integrazione perfetta con strumenti video professionali.
- Facile integrazione dell'SDK per gli sviluppatori, con codice di esempio e documentazione.
### Licenze e distribuzione
- Distribuzione royalty-free per le tue applicazioni.
- Opzioni di licenza flessibili: annuale o a vita, con aggiornamenti gratuiti e supporto prioritario.
- Versione di prova disponibile (visualizza una filigrana sulla finestra video).
### Uso del filtro in un grafico DirectShow

## Requisiti di sistema
- \*\*Sistemi operativi supportati:\*\* Windows 11, Windows 10, Windows 8/8.1, Windows 7, Windows Vista, Windows XP, Windows Server 2003 e versioni successive.
- \*\*Richiesto DirectX 9 o versione successiva.\*\*
- \*\*Compatibilità x86/x64.\*\*
## Download e licenza
- \*\*Prova gratuita:\*\* Scarica e prova l'SDK Virtual Camera per Windows. La versione di prova include una filigrana.
- \*\*Acquistare:\*\* Sblocca utilizzo illimitato, aggiornamenti gratuiti e supporto prioritario con una licenza standard o a vita. Puoi annullare l'abbonamento in qualsiasi momento.
- \*\*Facile integrazione dell'SDK:\*\* Aggiungi funzionalità di webcam virtuale alle tue applicazioni Windows con il nostro SDK completo.
## Risoluzione dei problemi e supporto
- \*\*Webcam virtuale non riconosciuta?\*\* Assicurati che l'SDK sia installato e selezionato come input video nella tua applicazione. Riavvia l'app se necessario.
- \*\*Il video o l'audio sono discontinuati?\*\* Chiudere altri programmi che consumano molte risorse oppure controllare le risorse del sistema e la connessione Internet.
- \*\*Problemi di compatibilità ?\*\* Alcune applicazioni potrebbero richiedere aggiornamenti o impostazioni specifiche. Contatta il nostro team di supporto per assistenza.
- \*\*Hai bisogno di aiuto?\*\* Accedi alla nostra documentazione dettagliata, alle FAQ oppure rivolgiti al nostro team di supporto prioritario per un aiuto personalizzato.
## Confronto: VisioForge Virtual Camera SDK vs. altre soluzioni
- \*\*e2eSoft VCam:\*\* Entrambi offrono funzionalità di webcam virtuale, ma VisioForge offre una più profonda integrazione con DirectShow, un'elaborazione video più avanzata e funzionalità SDK di facile utilizzo per gli sviluppatori.
- \*\*Telecamera virtuale OBS Studio:\*\* OBS è ottimo per lo streaming, ma VisioForge SDK è progettato per una facile integrazione nelle tue app e offre un controllo più granulare per gli sviluppatori.
- \*\*ManyCam, YouCam, ecc.:\*\* Si tratta di app per utenti finali, mentre VisioForge SDK è ideale per sviluppatori e aziende che desiderano integrare funzionalità di webcam virtuale nei propri prodotti.
## Esempio di codice C#
Ecco un esempio pratico di come utilizzare Virtual Camera SDK in un'applicazione .NET:
### Impostazione del progetto
Crea un nuovo progetto .NET e aggiungi il pacchetto NuGet VisioForge.DirectShowAPI:
### Esempio di implementazione
Questo esempio mostra come acquisire un video da una telecamera fisica e trasmetterlo in streaming tramite una telecamera virtuale:
Questo esempio mostra:
- Impostazione di un grafico di filtro DirectShow
- Enumerazione e selezione dei dispositivi di acquisizione video
- Creazione e collegamento di filtri sorgente e virtuali della telecamera
- Gestione del ciclo di vita dello streaming
- Pulizia adeguata delle risorse
Per funzionalità più avanzate come effetti video, selezione del formato e istanze multiple, consulta la nostra completa documentazione SDK.
## Esempio di DirectShow in C++
Ecco come utilizzare Virtual Camera SDK in un'applicazione C++ DirectShow nativa:
### File di intestazione (intf.h)
Per prima cosa, definisci i GUID e le interfacce necessari:
### Esempio di implementazione (main.cpp)
Ecco un esempio completo che mostra come acquisire un video e trasmetterlo in streaming tramite la telecamera virtuale:
Questo esempio C++ dimostra:
- Configurazione e gestione del grafico del filtro DirectShow
- Enumerazione dei dispositivi di acquisizione video
- Creazione e configurazione del filtro della telecamera virtuale
- Controllo della connessione e dello streaming del filtro
- Pulizia corretta delle risorse COM
- Gestione degli errori e segnalazione dello stato
L'esempio utilizza le interfacce standard di DirectShow insieme alle interfacce personalizzate del Virtual Camera SDK per funzionalità avanzate. Assicurati di:
1. Collegamento alle librerie DirectShow
2. Includere le intestazioni DirectShow necessarie
3. Inizializzare e deinizializzare COM in modo appropriato
4. Gestire correttamente tutte le versioni dell'interfaccia COM
Per funzionalità avanzate come la selezione del formato video, le istanze multiple o gli effetti video, consulta la documentazione del nostro SDK.
## Progetti di esempio su GitHub
Disponiamo di una raccolta completa di progetti di esempio su GitHub per aiutarti a iniziare a usare Virtual Camera SDK. Visita il nostro [Repository di campioni DirectShow](https://github.com/visioforge/directshow-samples) per esempi completi e funzionanti.
### Tecnologie utilizzate
Gli esempi sono disponibili in diversi linguaggi di programmazione:
- C# (.NET)
- C++ (DirectShow nativo)
- Delfi
Potenzia il tuo PC con il miglior software per webcam virtuale per Windows. Scopri oggi stesso uno streaming video impeccabile, effetti avanzati e funzionalità di livello professionale con VisioForge Virtual Camera SDK!
---END OF PAGE---
# Page: https://www.visioforge.com/de/vlc-source-directshow-filter
# VLC Source DirectShow Filter
Version 15.0
Das VLC Source DirectShow Filter ist eine professionelle Komponente, die die leistungsstarken Multimedia-Funktionen des VLC Media Players direkt in Ihre Windows-Anwendungen integriert. Dieses SDK ermöglicht die nahtlose Integration mit DirectShow-Anwendungen und bietet gleichzeitig die umfassende Formatunterstützung und Streaming-Funktionen, für die VLC bekannt ist.
Egal, ob Sie Mediaplayer, Streaming-Anwendungen, Videoverarbeitungstools oder Multimedia-Content-Management-Systeme entwickeln, unser VLC Source Filter bietet die Zuverlässigkeit und Vielseitigkeit, die Sie benötigen, um praktisch jedes Medienformat zu verarbeiten, auf das Ihre Benutzer stoÃen könnten.
## Hauptvorteile
- \*\*Universelle Formatunterstützung\*\*: Spielen Sie über 100 Video- und Audioformate ohne zusätzliche Codec-Installationen ab
- \*\*Netzwerk-Streaming\*\*: Unterstützung für HTTP, HTTPS, RTSP, RTP, UDP und andere Protokolle
- \*\*Mehrsprachige APIs\*\*: Native Unterstützung für C++, C#, VB.NET und Delphi
- \*\*Hohe Leistung\*\*: Optimiertes Multithreading mit Hardwarebeschleunigung
- \*\*Kommerziell bereit\*\*: Lizenzfreie Verbreitung mit professionellem Support

#### DOWNLOADS
[Testversion](https://s3.us-west-2.amazonaws.com/files.visioforge.com/trials/visioforge\_vlc\_source\_setup.zip)[Samples auf GitHub](https://github.com/visioforge/directshow-samples)

#### KAUFEN
[Preise prüfen oder bestellen](https://www.visioforge.com/de/buy)

#### HILFE
[Online-Hilfe](/help/)[Lizenzvereinbarung](/help/docs/eula/)
## Wichtige Funktionen und Fähigkeiten
### Universelle Formatunterstützung
Spielen Sie über 100 Video- und Audioformate ab, darunter MP4, AVI, MPEG, MPEG-TS, MKV, WebM, AAC, MP3, OGG, FLAC und viele mehr ohne zusätzliche Codec-Installationen.
### Netzwerk-Streaming
Unterstützt HTTP, HTTPS, FTP, RTSP, RTP, UDP und andere Netzwerkprotokolle. Streamen Sie Live-Inhalte oder spielen Sie Remote-Mediendateien nahtlos ab.
### Mehrere Programmier-APIs
Native Unterstützung für C++, C#, VB.NET und Delphi mit umfassenden Beispielanwendungen und Dokumentation für jede Plattform.
### Hohe Leistung
Optimierte Multithreading-Unterstützung mit Hardwarebeschleunigungsfunktionen. Verfügbar in x86- und x64-Architekturen.
### Hardwarebeschleunigte GPU-Dekodierung
Der VLC Source DirectShow Filter unterstützt mehrere Hardwarebeschleunigungstechnologien für eine optimale Videodekodierungsleistung mithilfe der Technologien DirectX Video Acceleration (DXVA2), NVIDIA NVDEC, Intel Quick Sync Video und AMD VCE.
#### Unterstützte GPU-Beschleunigungstechnologien
- \*\*DirectX-Videobeschleunigung (DXVA2)\*\*: Windows native Hardwarebeschleunigung
- \*\*NVIDIA NVDEC\*\*: CUDA-basierte Hardware-Dekodierung für NVIDIA-GPUs
- \*\*Intel Quick Sync Video\*\*: Integrierte Intel-Grafikbeschleunigung
- \*\*AMD Video Coding Engine (VCE)\*\*: AMD GPU-Hardwarebeschleunigung
- \*\*Vulkan Video\*\*: Moderne herstellerübergreifende GPU-Beschleunigungsunterstützung
#### Leistungsvorteile
- \*\*Reduzierung der CPU-Auslastung\*\*: 70-90% Reduzierung der CPU-Auslastung durch Hardwarebeschleunigung
- \*\*Energieeffizienz\*\*: Deutlich geringerer Stromverbrauch bei der Videowiedergabe
- \*\*Wärmemanagement\*\*: Reduzierte CPU-Wärmeentwicklung
- \*\*Gleichzeitige Streams\*\*: Unterstützung für mehrere gleichzeitige hardwaredekodierte Streams
- \*\*Höhere Auflösungen\*\*: Effiziente 4K/8K-Videowiedergabe mit minimaler CPU-Belastung
### Erweiterte Steuerung
Vollständige Wiedergabesteuerung mit Suche, Audiospurauswahl, Untertitelverwaltung und Unterstützung für VLC-Filterketten.
## Unterstützte Medienformate
### Videocontainer
- MP4
- MOV
- AVI
- MPEG, MPEG-TS, M2TS, VOB
- MKV
- WebM
- FLV
- OGG
- ASF, WMV
### Video-Codecs
- \*\*H.264/AVC\*\*: Vollständige Hardware-Dekodierungsunterstützung auf allen Plattformen
- \*\*H.265/HEVC\*\*: Hardware-Dekodierung auf kompatiblen GPUs (GTX 950+, Intel Gen9+, AMD GCN4+)
- \*\*VP8, VP9\*\*: Hardware-Dekodierung auf neueren GPUs (GTX 1060+, Intel Gen11+, AMD Navi+)
- \*\*AV1\*\*: Hardware-Dekodierung auf den neuesten GPUs (RTX 30xx+, Intel Arc+, AMD RDNA2+)
- \*\*MPEG-1, MPEG-2\*\*: Legacy-Hardwarebeschleunigung auf den meisten GPUs
- \*\*MPEG-4\*\*: Software- und Hardware-Dekodierungsunterstützung
- \*\*DivX, Xvid\*\*: Software-Dekodierungsunterstützung
- \*\*Theora\*\*: Software-Dekodierungsunterstützung
- \*\*Windows Media Video\*\*: Software-Dekodierungsunterstützung
### Audioformate
- Unterstützte Kommunikation
- MP3, MP2
- FLAC
- Vorbis
- AC3, DTS
- PCM, WAV
- Speex
- Opus
- WMA
### Streaming-Protokolle
- \*\*HTTP/HTTPS\*\*: Volle Unterstützung für progressiven Download und Streaming
- \*\*RTSP/RTP\*\*: Echtzeit-Streaming-Protokoll mit Authentifizierung
- \*\*UDP\*\*: Multicast- und Unicast-Unterstützung
- \*\*MMS\*\*: Microsoft Media Server-Protokoll
- \*\*RTMP\*\*: Real-Time Messaging Protocol für Live-Streaming
- \*\*HLS\*\*: HTTP Live Streaming (Apples adaptives Streaming)
- \*\*BINDESTRICH\*\*: Dynamisches adaptives Streaming über HTTP
- \*\*SRT\*\*: Sicheres, zuverlässiges Transportprotokoll
## Kurzanleitung
### Integrationsschritte
1. \*\*Installieren des SDK\*\*: Registrieren Sie den VLC Source DirectShow-Filter auf Ihrem System
2. \*\*Referenzen hinzufügen\*\*: Fügen Sie die erforderlichen DirectShow- und VLC-Header/Bibliotheken ein
3. \*\*Filterdiagramm erstellen\*\*: DirectShow-Filterdiagrammkomponenten initialisieren
4. \*\*VLC-Quelle hinzufügen\*\*: Instanziieren und konfigurieren Sie den VLC-Quellfilter
5. \*\*Renderer verbinden\*\*: Verknüpfen Sie Video- und Audio-Rendering-Komponenten
6. \*\*Wiedergabe steuern\*\*: Verwenden Sie die MediaControl-Schnittstelle für Wiedergabevorgänge
## API-Referenz und Schnittstellendefinitionen
### IVlcSrc-Schnittstelle
Primäre Schnittstelle zur Steuerung des VLC-Quellfilters
\*\*GUID\*\*: `{77493EB7-6D00-41C5-9535-7C593824E892}`
#### Methoden
- `Datei festlegen` - Laden Sie eine Mediendatei oder Netzwerk-URL
- `GetAudioTracksCount` - Anzahl der verfügbaren Audiospuren abrufen
- `GetAudioTrackInfo` - Informationen zum Audiotrack abrufen
- `GetAudioTrack` - Holen Sie sich die aktuell ausgewählte Audiospur
- `Audiospur festlegen` - Audiospur nach ID auswählen
- `GetSubtitlesCount` - Anzahl der verfügbaren Untertitelspuren abrufen
- `Untertitelinformationen abrufen` - Informationen zur Untertitelspur abrufen
- `Untertitel abrufen` - Holen Sie sich die aktuell ausgewählte Untertitelspur
- `Untertitel einstellen` - Untertitelspur nach ID auswählen (-1 zum Deaktivieren)
### IVlcSrc2-Schnittstelle
Erweiterte Benutzeroberfläche mit zusätzlichen VLC-Anpassungsoptionen
\*\*GUID\*\*: `{CCE122C0-172C-4626-B4B6-42B039E541CB}`
#### Methoden
Erbt alle Methoden von IVlcSrc plus:
- `SetCustomCommandLine` - Legen Sie benutzerdefinierte VLC-Befehlszeilenparameter fest
### IVlcSrc3-Schnittstelle
Neueste Schnittstelle mit Bildratensteuerung
\*\*GUID\*\*: `{3DFBED0C-E4A8-401C-93EF-CBBFB65223DD}`
#### Methoden
Erbt alle Methoden von IVlcSrc2 plus:
- `Standard-Framerate festlegen` - Legen Sie die Standardbildrate für Inhalte ohne Bildrateninformationen fest
### C++-Schnittstellendefinitionen
Für die C++-Entwicklung sind die vollständigen Schnittstellendefinitionen im offiziellen GitHub-Repository verfügbar:
\*\*Header-Datei:\*\* [ivlcsrc.h](https://github.com/visioforge/directshow-samples/blob/main/Interfaces/cpp/VLC%20Source/ivlcsrc.h)
Schnittstellennutzung:
Die Header-Datei enthält die vollständigen Definitionen für:
- `IVlcSrc` Primäre Schnittstelle zur Audio-/Untertitelsteuerung
- `IVlcSrc2` - Erweiterte Schnittstelle mit benutzerdefinierten Befehlszeilenparametern
- `IVlcSrc3` - Neueste Schnittstelle mit Bildratensteuerung
- Alle zugehörigen GUIDs und Methodensignaturen
### C#/VB.NET-Schnittstellendefinitionen
Für die .NET-Entwicklung sind die Schnittstellendefinitionen über das VisioForge DirectShow API NuGet-Paket verfügbar:
\*\*NuGet-Paket:\*\* [`VisioForge.DirectShowAPI`](https://www.nuget.org/packages/VisioForge.DirectShowAPI)
Schnittstellennutzung im C#:
## Vollständige Codebeispiele
### C++-Implementierung
### C#-Implementierung
### VB.NET-Implementierung
## Nutzung erweiterter Funktionen
### Beispiel für die Auswahl einer Audiospur (C++)
## DirectShow Graph-Entwicklungstools
### Verwenden des VLC-Quellfilters mit GraphEdit
\*\*GraphBearbeiten\*\* ist Microsofts DirectShow-Tool zur Graphvisualisierung und -debugging und bietet Funktionen zur Bearbeitung von DirectShow-Grafiken. Das VLC Source DirectShow Filter lässt sich nahtlos in GraphEdit integrieren und ermöglicht so schnelles Prototyping und Testen.
#### Einrichten der VLC-Quelle in GraphEdit
1. \*\*GraphEdit starten\*\*: Starten Sie GraphEdit mit Administratorrechten für vollen Zugriff auf die Filterregistrierung
2. \*\*VLC-Quellfilter einfügen\*\*:
- Klicken Sie mit der rechten Maustaste in den Diagrammbereich
- Wählen Sie âFilter einfügen â¦â
- Navigieren Sie zur Kategorie âDirectShow-Filterâ
- Suchen Sie den Filter âVLC-Quelleâ
- Klicken Sie auf âFilter einfügenâ
3. \*\*Medienquelle konfigurieren\*\*:
- Klicken Sie mit der rechten Maustaste auf den VLC-Quellfilter
- Wählen Sie âEigenschaftenâ
- Geben Sie im Dateidialogfeld Ihren Mediendateipfad oder Ihre Netzwerk-URL an
- Der Filter akzeptiert lokale Dateien (C:\media\video.mp4) und Netzwerk-Streams (http://example.com/stream.m3u8).
4. \*\*Renderer hinzufügen\*\*:
- Für Video: Fügen Sie âEnhanced Video Renderer (EVR)â oder âVideo Mixing Renderer 9 (VMR-9)â ein.
- Für Audio: Fügen Sie âStandard-DirectSound-Gerätâ oder âAudio-Renderer (WaveOut)â ein.
5. \*\*Pins verbinden\*\*:
- Ziehen Sie vom VLC-Quellvideo-Ausgabepin zum Video-Renderer-Eingabepin
- Ziehen Sie vom Audio-Ausgangspin der VLC-Quelle zum Audio-Renderer-Eingangspin
- GraphEdit verhandelt automatisch Medientypen
### Verwenden des VLC-Quellfilters mit GraphStudio
\*\*GraphStudio\*\* bietet eine alternative DirectShow-Grafikbearbeitungsumgebung mit erweiterten Debugfunktionen und umfassenden Filteranalysetools.
#### Schritte zur GraphStudio-Integration
1. \*\*Ãberprüfung der Filterregistrierung\*\*:
- Ãffnen Sie GraphStudio
- Navigieren Sie zur Registerkarte âAnsichtâ â âFilterâ
- Ãberprüfen Sie, ob âVLC-Quelleâ in der Liste der registrierten Filter angezeigt wird
- Notieren Sie die CLSID des Filters: `{77493EB7-6D00-41C5-9535-7C593824E892}`
2. \*\*Filterdiagramm erstellen\*\*:
- Verwenden Sie die Schaltfläche âFilter einfügenâ oder ziehen Sie sie aus dem Filterbereich
- Suchen Sie in der Kategorie âDirectShow-Filterâ nach der VLC-Quelle.
- Ziehen Sie die VLC-Quelle in den Diagrammarbeitsbereich
3. \*\*Medienkonfiguration\*\*:
- Klicken Sie mit der rechten Maustaste auf âVLC-Quelleâ â âDatei laden â¦â
- Navigieren Sie zur Mediendatei oder geben Sie die Netzwerk-URL ein
- GraphStudio zeigt den Verbindungsstatus in Echtzeit an
4. \*\*Automatische Grapherstellung\*\*:
- Verwenden Sie die âRenderâ-Funktion von GraphStudio
- Klicken Sie mit der rechten Maustaste auf die VLC-Quellausgabe-Pins â âRender-Pinâ.
- GraphStudio fügt automatisch passende Decoder und Renderer ein

## Systemanforderungen
### Betriebssysteme
- Windows 10, 11 (alle Editionen)
- Windows 8/8.1
- Windows 7 (SP1 oder höher)
- Windows Server 2016 und höher
### Entwicklungsunterstützung
- Visual Studio 2010-2022
- C++ Builder XE2 und höher
- Delphi XE2 und höher
- .NET Framework 4.0+
- .NET 5 und höher
### Architekturunterstützung
- x86 (32 Bit)
- x64 (64 Bit)
- Mixed-Mode-Anwendungen
- COM-kompatible Umgebungen
## Lizenz- und Vertriebsrechte
### Vorteile einer kommerziellen Lizenz
- \*\*Lizenzfreie Verbreitung\*\*: Stellen Sie Ihre Anwendungen ohne Einzelgebühren bereit
- \*\*Keine Wasserzeichen\*\*: Saubere, professionelle Ausgabe ohne Testeinschränkungen
- \*\*Vorrangiger Support\*\*: Direkter Zugang zu unserem technischen Support-Team
- \*\*Kostenlose Updates\*\*: Erhalten Sie ein Jahr lang kleinere und gröÃere Updates (unbegrenzt bei lebenslanger Lizenz)
- \*\*Mehrere Projekte\*\*: Nutzung in unbegrenzten kommerziellen und persönlichen Projekten
- \*\*Quellcode-Zugriff\*\*: Optionale Quellcode-Lizenzierung verfügbar
### Einschränkungen der Testversion
- Die Videoausgabe zeigt eine Wasserzeichenüberlagerung an
- Keine technischen Einschränkungen der Funktionalität
- Vollständiger API-Zugriff für Evaluierungszwecke
- 30-tägige Testphase
### libVLC-Kompatibilität
Dieses SDK enthält die libVLC-Bibliothek unter LGPL v2.1. Ihre Anwendungen, die unser SDK verwenden, bleiben von dieser Lizenz unberührt, da unser DirectShow-Filter als separate Komponente fungiert. Für Ihre Anwendung ist keine Offenlegung des Quellcodes erforderlich.
## Download und Kauf
### Testversion
\*\*Volle Funktionalität mit Wasserzeichen\*\*
- Komplettes SDK-Paket
- Alle Beispielanwendungen
- Dokumentation
- 30-Tage-Testversion
[Testversion herunterladen](https://s3.us-west-2.amazonaws.com/files.visioforge.com/trials/visioforge\_vlc\_source\_setup.zip)
### Kommerzielle Lizenz
\*\*Produktionsbereit mit allen Rechten\*\*
- Lizenzfreie Verbreitung
- Vorrangiger Support
- Keine Wasserzeichen
- Kostenlose Updates (1 Jahr)
[Preise anzeigen](https://www.visioforge.com/de/buy)
### Quellcode-Lizenz
\*\*Vollständiger Filterquellcode\*\*
- Vollständiger C++-Quellcode
- Build-Skripte enthalten
- Anpassungsrechte
- Technische Beratung
## Technische Spezifikationen
### Leistungsmerkmale
- \*\*Startzeit\*\*: < 500 ms für die Filterinitialisierung
- \*\*Speichernutzung\*\*: ~50 MB Basislinie, skaliert mit der Videoauflösung
- \*\*CPU-Auslastung\*\*: Hardwarebeschleunigte Dekodierung, sofern verfügbar
- \*\*Einfädeln\*\*: Vollständig multithreaded Architektur
- \*\*Latenz\*\*: < 100 ms für lokale Dateien, variiert für Netzwerk-Streams

---END OF PAGE---
# Page: https://www.visioforge.com/es/vlc-source-directshow-filter
# VLC Source DirectShow Filter
versión 15.0
El VLC Source DirectShow Filter es un componente de calidad profesional que integra las potentes funciones multimedia del reproductor multimedia VLC directamente en sus aplicaciones de Windows. Este SDK proporciona una integración perfecta con aplicaciones DirectShow, a la vez que mantiene la amplia compatibilidad de formatos y las capacidades de streaming que distinguen a VLC.
Ya sea que esté desarrollando reproductores multimedia, aplicaciones de transmisión, herramientas de procesamiento de video o sistemas de administración de contenido multimedia, nuestro filtro de fuente VLC brinda la confiabilidad y versatilidad que necesita para manejar prácticamente cualquier formato de medios que sus usuarios puedan encontrar.
## Beneficios clave
- \*\*Compatibilidad con formatos universales\*\*: Reproduce más de 100 formatos de vÃdeo y audio sin necesidad de instalar códecs adicionales
- \*\*Transmisión en red\*\*:Compatibilidad con HTTP, HTTPS, RTSP, RTP, UDP y otros protocolos
- \*\*API multilingües\*\*:Soporte nativo para C++, C#, VB.NET y Delphi
- \*\*Rendimiento alto\*\*:Multihilo optimizado con aceleración de hardware
- \*\*Listo para uso comercial\*\*:Distribución libre de regalÃas con soporte profesional

#### DESCARGAS
[Versión de evaluación](https://s3.us-west-2.amazonaws.com/files.visioforge.com/trials/visioforge\_vlc\_source\_setup.zip)[Samples en GitHub](https://github.com/visioforge/directshow-samples)

#### COMPRAR
[Consultar precios o hacer un pedido](https://www.visioforge.com/es/buy)

#### AYUDA
[Ayuda en lÃnea](/help/)[Acuerdo de licencia](/help/docs/eula/)
## CaracterÃsticas y capacidades clave
### Compatibilidad con formatos universales
Reproduzca más de 100 formatos de video y audio, incluidos MP4, AVI, MPEG, MPEG-TS, MKV, WebM, AAC, MP3, OGG, FLAC y muchos más sin instalaciones de códecs adicionales.
### Transmisión en red
Compatible con HTTP, HTTPS, FTP, RTSP, RTP, UDP y otros protocolos de red. Transmite contenido en vivo o reproduce archivos multimedia remotos sin problemas.
### Múltiples API de programación
Soporte nativo para C++, C#, VB.NET y Delphi con aplicaciones de muestra completas y documentación para cada plataforma.
### Rendimiento alto
Compatibilidad multihilo optimizada con aceleración por hardware. Disponible en arquitecturas x86 y x64.
### Decodificación de GPU acelerada por hardware
El VLC Source DirectShow Filter admite múltiples tecnologÃas de aceleración de hardware para un rendimiento de decodificación de video óptimo utilizando tecnologÃas DirectX Video Acceleration (DXVA2), NVIDIA NVDEC, Intel Quick Sync Video y AMD VCE.
#### TecnologÃas de aceleración de GPU compatibles
- \*\*Aceleración de vÃdeo DirectX (DXVA2)\*\*Aceleración de hardware nativa de Windows
- \*\*NVIDIA NVDEC\*\*:Descodificación de hardware basada en CUDA para GPU NVIDIA
- \*\*VÃdeo de sincronización rápida de Intel\*\*: Aceleración de gráficos integrados de Intel
- \*\*Motor de codificación de vÃdeo AMD (VCE)\*\*Aceleración de hardware de GPU AMD
- \*\*VÃdeo de Vulkan\*\*:Compatibilidad moderna con aceleración de GPU entre proveedores
#### Beneficios de rendimiento
- \*\*Reducción del uso de la CPU\*\*:70-90% Reducción del uso de la CPU con aceleración de hardware
- \*\*Eficiencia energética\*\*:Consumo de energÃa significativamente menor durante la reproducción de vÃdeo
- \*\*Gestión térmica\*\*:Reducción de la generación de calor de la CPU
- \*\*Transmisiones simultáneas\*\*:Compatibilidad con múltiples transmisiones simultáneas decodificadas por hardware
- \*\*Resoluciones más altas\*\*: Reproducción eficiente de videos 4K/8K con un impacto mÃnimo en la CPU
### Controles avanzados
Control de reproducción completo con búsqueda, selección de pistas de audio, gestión de subtÃtulos y compatibilidad con cadena de filtros VLC.
## Formatos de medios compatibles
### Contenedores de vÃdeo
- MP4
- MOV
- AVI
- MPEG, MPEG-TS, M2TS, VOB
- MKV
- WebM
- FLV
- OGG
- ASF, WMV
### Códecs de vÃdeo
- \*\*H.264/AVC\*\*:Compatibilidad total con decodificación de hardware en todas las plataformas
- \*\*H.265/HEVC\*\*: Descodificación de hardware en GPU compatibles (GTX 950+, Intel Gen9+, AMD GCN4+)
- \*\*VP8, VP9\*\*: Descodificación de hardware en GPU más nuevas (GTX 1060+, Intel Gen11+, AMD Navi+)
- \*\*AV1\*\*: Descodificación de hardware en las últimas GPU (RTX 30xx+, Intel Arc+, AMD RDNA2+)
- \*\*MPEG-1, MPEG-2\*\*:Aceleración de hardware heredada en la mayorÃa de las GPU
- \*\*MPEG-4\*\*:Soporte de decodificación de software y hardware
- \*\*DivX, Xvid\*\*: Soporte de decodificación de software
- \*\*Teora\*\*: Soporte de decodificación de software
- \*\*VÃdeo de Windows Media\*\*: Soporte de decodificación de software
### Formatos de audio
- CAA
- MP3, MP2
- FLAC
- Vorbis
- AC3, DTS
- PCM, WAV
- Speex
- Opus
- AMM
### Protocolos de transmisión
- \*\*HTTP/HTTPS\*\*:Soporte completo para descarga progresiva y streaming
- \*\*RTSP/RTP\*\*:Protocolo de transmisión en tiempo real con autenticación
- \*\*UDP\*\*: Compatibilidad con multidifusión y unidifusión
- \*\*MMS\*\*Protocolo de Microsoft Media Server
- \*\*RTMP\*\*Protocolo de mensajerÃa en tiempo real para transmisión en vivo
- \*\*HLS\*\*Transmisión en vivo HTTP (transmisión adaptable de Apple)
- \*\*ESTRELLARSE\*\*Transmisión dinámica adaptativa a través de HTTP
- \*\*SRT\*\*Protocolo de transporte seguro y confiable
## GuÃa de inicio rápido
### Pasos de integración
1. \*\*Instalar el SDK\*\*: Registre el filtro VLC Source DirectShow en su sistema
2. \*\*Agregar referencias\*\*:Incluya los encabezados/bibliotecas DirectShow y VLC necesarios
3. \*\*Crear gráfico de filtros\*\*: Inicializar los componentes del gráfico del filtro DirectShow
4. \*\*Agregar fuente VLC\*\*:Crear una instancia y configurar el filtro de origen de VLC
5. \*\*Conectar renderizadores\*\*: Vincular componentes de renderizado de vÃdeo y audio
6. \*\*Control de reproducción\*\*: Utilice la interfaz MediaControl para las operaciones de reproducción
## Referencia de API y definiciones de interfaz
### Interfaz IVlcSrc
Interfaz principal para controlar el filtro de fuente VLC
\*\*GUID\*\*: `{77493EB7-6D00-41C5-9535-7C593824E892}`
#### Métodos
- `SetFile` - Cargar un archivo multimedia o una URL de red
- `Obtener recuento de pistas de audio` - Obtener el número de pistas de audio disponibles
- `Obtener información de la pista de audio` - Obtener información de la pista de audio
- `Obtener pista de audio` - Obtener la pista de audio seleccionada actualmente
- `Establecer pista de audio` - Seleccionar pista de audio por ID
- `Obtener recuento de subtÃtulos` - Obtener el número de pistas de subtÃtulos disponibles
- `Obtener información de subtÃtulos` - Obtener información de la pista de subtÃtulos
- `Obtener subtÃtulo` - Obtener la pista de subtÃtulos seleccionada actualmente
- `SubtÃtulo establecido` - Seleccionar pista de subtÃtulos por ID (-1 para deshabilitar)
### Interfaz IVlcSrc2
Interfaz extendida con opciones de personalización de VLC adicionales
\*\*GUID\*\*: `{CCE122C0-172C-4626-B4B6-42B039E541CB}`
#### Métodos
Hereda todos los métodos de IVlcSrc más:
- `Establecer lÃnea de comandos personalizada` - Establecer parámetros de lÃnea de comandos VLC personalizados
### Interfaz IVlcSrc3
Interfaz más reciente con control de velocidad de cuadros
\*\*GUID\*\*: `{3DFBED0C-E4A8-401C-93EF-CBBFB65223DD}`
#### Métodos
Hereda todos los métodos de IVlcSrc2 más:
- `Establecer velocidad de cuadros predeterminada` - Establecer la velocidad de cuadros predeterminada para el contenido sin información de velocidad de cuadros
### Definiciones de interfaz de C++
Para el desarrollo en C++, las definiciones de interfaz completas están disponibles en el repositorio oficial de GitHub:
\*\*Archivo de encabezado:\*\* [ivlcsrc.h](https://github.com/visioforge/directshow-samples/blob/main/Interfaces/cpp/VLC%20Source/ivlcsrc.h)
Uso de la interfaz:
El archivo de encabezado contiene las definiciones completas para:
- `Fuente IVlc` - Interfaz principal para el control de audio/subtÃtulos
- `IVlcSrc2` - Interfaz extendida con parámetros de lÃnea de comandos personalizados
- `IVlcSrc3` - Ãltima interfaz con control de velocidad de cuadros
- Todos los GUID y firmas de métodos asociados
### Definiciones de interfaz C#/VB.NET
Para el desarrollo .NET, las definiciones de interfaz están disponibles a través del paquete NuGet de la API DirectShow de VisioForge:
\*\*Paquete NuGet:\*\* [`VisioForge.DirectShowAPI`](https://www.nuget.org/packages/VisioForge.DirectShowAPI)
Uso de la interfaz en C#:
## Ejemplos de código completos
### Implementación de C++
### Implementación de C#
### Implementación de VB.NET
## Uso de funciones avanzadas
### Ejemplo de selección de pista de audio (C++)
## Herramientas de desarrollo de gráficos DirectShow
### Uso del filtro de origen de VLC con GraphEdit
\*\*GraphEdit\*\* Es la herramienta de visualización y depuración de gráficos DirectShow de Microsoft, que ofrece funciones de edición de gráficos DirectShow. El VLC Source DirectShow Filter se integra a la perfección con GraphEdit para la creación rápida de prototipos y pruebas.
#### Configuración de la fuente VLC en GraphEdit
1. \*\*Gráfico de lanzamientoEditar\*\*: Inicie GraphEdit con privilegios de administrador para obtener acceso completo al registro de filtros
2. \*\*Insertar filtro de fuente VLC\*\*:
- Haga clic derecho en el área del gráfico
- Seleccione "Insertar filtros..."
- Vaya a la categorÃa "Filtros DirectShow".
- Localizar el filtro "Fuente VLC"
- Haga clic en "Insertar filtro"
3. \*\*Configurar fuente de medios\*\*:
- Haga clic derecho en el filtro Fuente VLC
- Seleccione "Propiedades"
- En el cuadro de diálogo de archivo, especifique la ruta del archivo multimedia o la URL de red
- El filtro acepta archivos locales (C:\media\video.mp4) y transmisiones de red (http://example.com/stream.m3u8)
4. \*\*Agregar renderizadores\*\*:
- Para video: Inserte "Enhanced Video Renderer (EVR)" o "Video Mixing Renderer 9 (VMR-9)".
- Para audio: Inserte "Dispositivo DirectSound predeterminado" o "Renderizador de audio (WaveOut)"
5. \*\*Conectar pines\*\*:
- Arrastre desde el pin de salida de video de origen VLC al pin de entrada del renderizador de video
- Arrastre desde el pin de salida de audio de la fuente VLC al pin de entrada del renderizador de audio
- GraphEdit negociará automáticamente los tipos de medios
### Uso del filtro de origen de VLC con GraphStudio
\*\*Estudio gráfico\*\* Proporciona un entorno de edición de gráficos DirectShow alternativo con funciones de depuración avanzadas y herramientas integrales de análisis de filtros.
#### Pasos de integración de GraphStudio
1. \*\*Verificación del registro del filtro\*\*:
- Open GraphStudio
- Vaya a la pestaña "Ver" â "Filtros".
- Verifique que "VLC Source" aparezca en la lista de filtros registrados
- Tenga en cuenta el CLSID del filtro: `{77493EB7-6D00-41C5-9535-7C593824E892}`
2. \*\*Creación de un gráfico de filtros\*\*:
- Utilice el botón "Insertar filtro" o arrastre desde el panel de filtros
- Localice VLC Source en la categorÃa de filtros DirectShow
- Arrastre VLC Source al espacio de trabajo del gráfico
3. \*\*Configuración de medios\*\*:
- Haga clic derecho en VLC Source â "Cargar archivo..."
- Busque el archivo multimedia o ingrese la URL de la red
- GraphStudio muestra el estado de la conexión en tiempo real
4. \*\*Construcción automática de gráficos\*\*:
- Utilice la función "Renderizar" de GraphStudio
- Haga clic derecho en los pines de salida de origen de VLC â "Pin de renderizado"
- GraphStudio inserta automáticamente decodificadores y renderizadores apropiados

## Requisitos del sistema
### Sistemas operativos
- Windows 10, 11 (todas las ediciones)
- Windows 8/8.1
- Windows 7 (SP1 o posterior)
- Windows Server 2016 y versiones posteriores
### Apoyo al desarrollo
- Visual Studio 2010-2022
- C++ Builder XE2 y posteriores
- Delphi XE2 y posteriores
- .NET Framework 4.0+
- .NET 5 y posteriores
### Soporte de arquitectura
- x86 (32 bits)
- x64 (64 bits)
- Aplicaciones de modo mixto
- Entornos compatibles con COM
## Derechos de licencia y distribución
### Beneficios de la licencia comercial
- \*\*Distribución libre de regalÃas\*\*:Implemente sus aplicaciones sin costos por unidad
- \*\*Sin marcas de agua\*\*:Resultados limpios y profesionales sin limitaciones de prueba
- \*\*Soporte prioritario\*\*:Acceso directo a nuestro equipo de soporte técnico
- \*\*Actualizaciones gratuitas\*\*:Reciba actualizaciones menores y mayores durante un año (ilimitadas durante la licencia de por vida)
- \*\*Proyectos múltiples\*\*:UtilÃcelo en proyectos comerciales y personales ilimitados.
- \*\*Acceso al código fuente\*\*:Licencia de código fuente opcional disponible
### Limitaciones de la versión de prueba
- La salida de video muestra una superposición de marca de agua
- Sin restricciones técnicas en la funcionalidad
- Acceso completo a la API para fines de evaluación
- perÃodo de evaluación de 30 dÃas
### Cumplimiento de libVLC
Este SDK incorpora la biblioteca libVLC con licencia LGPL v2.1. Sus aplicaciones que utilizan nuestro SDK no se verán afectadas por esta licencia, ya que nuestro filtro DirectShow funciona como un componente independiente. No hay requisitos de divulgación del código fuente para su aplicación.
## Descargar y comprar
### Versión de prueba
\*\*Funcionalidad completa con marca de agua\*\*
- Paquete SDK completo
- Todas las aplicaciones de muestra
- Documentación
- evaluación de 30 dÃas
[Descargar versión de prueba](https://s3.us-west-2.amazonaws.com/files.visioforge.com/trials/visioforge\_vlc\_source\_setup.zip)
### Licencia comercial
\*\*Listo para producción con todos los derechos\*\*
- Distribución libre de regalÃas
- Soporte prioritario
- Sin marcas de agua
- Actualizaciones gratuitas (1 año)
[Ver precios](https://www.visioforge.com/es/buy)
### Licencia del código fuente
\*\*Código fuente del filtro completo\*\*
- Código fuente completo de C++
- Scripts de compilación incluidos
- Derechos de personalización
- Consulta técnica
## Especificaciones técnicas
### CaracterÃsticas de rendimiento
- \*\*Tiempo de inicio\*\*: < 500 ms para la inicialización del filtro
- \*\*Uso de la memoria\*\*: lÃnea base de ~50 MB, escalable con resolución de video
- \*\*Uso de CPU\*\*:Descodificación acelerada por hardware cuando esté disponible
- \*\*Enhebrado\*\*: Arquitectura completamente multiproceso
- \*\*Estado latente\*\*: < 100 ms para archivos locales, varÃa para transmisiones de red

---END OF PAGE---
# Page: https://www.visioforge.com/it/vlc-source-directshow-filter
# VLC Source DirectShow Filter
versione 15.0
VLC Source DirectShow Filter è un componente di livello professionale che porta le potenti funzionalità multimediali di VLC Media Player direttamente nelle applicazioni Windows. Questo SDK offre una perfetta integrazione con le applicazioni DirectShow, mantenendo l'ampio supporto di formati e le funzionalità di streaming per cui VLC è rinomato.
Che tu stia sviluppando lettori multimediali, applicazioni di streaming, strumenti di elaborazione video o sistemi di gestione di contenuti multimediali, il nostro filtro sorgente VLC offre l'affidabilità e la versatilità necessarie per gestire praticamente qualsiasi formato multimediale che i tuoi utenti potrebbero incontrare.
## Vantaggi principali
- \*\*Supporto del formato universale\*\*: Riproduci oltre 100 formati video e audio senza installazioni di codec aggiuntivi
- \*\*Streaming di rete\*\*: Supporto per HTTP, HTTPS, RTSP, RTP, UDP e altri protocolli
- \*\*API multilingua\*\*: Supporto nativo per C++, C#, VB.NET e Delphi
- \*\*Alte prestazioni\*\*: Multithreading ottimizzato con accelerazione hardware
- \*\*Pronto per la commercializzazione\*\*: Distribuzione royalty-free con supporto professionale

#### DOWNLOADS
[Versione di prova](https://s3.us-west-2.amazonaws.com/files.visioforge.com/trials/visioforge\_vlc\_source\_setup.zip)[Samples su GitHub](https://github.com/visioforge/directshow-samples)

#### ACQUISTO
[Controllare i prezzi o ordinare](https://www.visioforge.com/it/buy)

#### AIUTO
[Guida in linea](/help/)[Contratto di licenza](/help/docs/eula/)
## Caratteristiche e capacità principali
### Supporto del formato universale
Riproduci oltre 100 formati video e audio, tra cui MP4, AVI, MPEG, MPEG-TS, MKV, WebM, AAC, MP3, OGG, FLAC e molti altri, senza dover installare codec aggiuntivi.
### Streaming di rete
Supporto per HTTP, HTTPS, FTP, RTSP, RTP, UDP e altri protocolli di rete. Trasmetti contenuti in streaming live o riproduci file multimediali remoti senza problemi.
### API di programmazione multiple
Supporto nativo per C++, C#, VB.NET e Delphi con applicazioni di esempio complete e documentazione per ciascuna piattaforma.
### Alte prestazioni
Supporto multithreading ottimizzato con funzionalità di accelerazione hardware. Disponibile sia per architetture x86 che x64.
### Decodifica GPU accelerata tramite hardware
VLC Source DirectShow Filter supporta molteplici tecnologie di accelerazione hardware per prestazioni di decodifica video ottimali utilizzando le tecnologie DirectX Video Acceleration (DXVA2), NVIDIA NVDEC, Intel Quick Sync Video e AMD VCE.
#### Tecnologie di accelerazione GPU supportate
- \*\*Accelerazione video DirectX (DXVA2)\*\*: Accelerazione hardware nativa di Windows
- \*\*NVIDIA NVDEC\*\*: Decodifica hardware basata su CUDA per GPU NVIDIA
- \*\*Video di sincronizzazione rapida Intel\*\*: Accelerazione grafica integrata Intel
- \*\*Motore di codifica video AMD (VCE)\*\*: Accelerazione hardware GPU AMD
- \*\*Video Vulkan\*\*: Supporto moderno per l'accelerazione GPU multi-vendor
#### Vantaggi delle prestazioni
- \*\*Riduzione dell'utilizzo della CPU\*\*: 70-90% Riduzione dell'utilizzo della CPU con accelerazione hardware
- \*\*Efficienza energetica\*\*: Consumo energetico significativamente inferiore durante la riproduzione video
- \*\*Gestione termica\*\*: Riduzione della generazione di calore della CPU
- \*\*Flussi simultanei\*\*: Supporto per più flussi decodificati hardware simultanei
- \*\*Risoluzioni più elevate\*\*: Riproduzione efficiente di video 4K/8K con impatto minimo sulla CPU
### Controlli avanzati
Controllo completo della riproduzione con ricerca, selezione delle tracce audio, gestione dei sottotitoli e supporto della catena di filtri VLC.
## Formati multimediali supportati
### Contenitori video
- MP4
- MOVIMENTO
- AVI
- MPEG, MPEG-TS, M2TS, VOB
- MKV
- WebM
- FLV
- OGG
- ASF, WMV
### Codec video
- \*\*H.264/AVC\*\*: Supporto completo per la decodifica hardware su tutte le piattaforme
- \*\*H.265/HEVC\*\*: Decodifica hardware su GPU compatibili (GTX 950+, Intel Gen9+, AMD GCN4+)
- \*\*VP8, VP9\*\*: Decodifica hardware su GPU più recenti (GTX 1060+, Intel Gen11+, AMD Navi+)
- \*\*AV1\*\*: Decodifica hardware sulle GPU più recenti (RTX 30xx+, Intel Arc+, AMD RDNA2+)
- \*\*MPEG-1, MPEG-2\*\*: Accelerazione hardware legacy sulla maggior parte delle GPU
- \*\*MPEG-4\*\*: Supporto per la decodifica software e hardware
- \*\*DivX, Xvid\*\*: Supporto per la decodifica software
- \*\*Theora\*\*: Supporto per la decodifica software
- \*\*Windows Media Video\*\*: Supporto per la decodifica software
### Formati audio
- CAA
- MP3, MP2
- Formato FLAC
- Vorbis
- AC3, DTS
- PCM, WAV
- Speex
- Opus
- WMA
### Protocolli di streaming
- \*\*HTTP/HTTPS\*\*: Supporto completo per download e streaming progressivi
- \*\*RTSP/RTP\*\*: Protocollo di streaming in tempo reale con autenticazione
- \*\*UDP\*\*: Supporto multicast e unicast
- \*\*MMS\*\*: Protocollo Microsoft Media Server
- \*\*RTMP\*\*: Protocollo di messaggistica in tempo reale per lo streaming live
- \*\*HLS\*\*: HTTP Live Streaming (streaming adattivo di Apple)
- \*\*TRATTINO\*\*: Streaming dinamico adattivo su HTTP
- \*\*SRT\*\*: Protocollo di trasporto sicuro e affidabile
## Guida rapida
### Fasi di integrazione
1. \*\*Installa l'SDK\*\*: Registra il filtro VLC Source DirectShow sul tuo sistema
2. \*\*Aggiungi riferimenti\*\*: Include le intestazioni/librerie DirectShow e VLC necessarie
3. \*\*Crea grafico filtro\*\*: Inizializza i componenti del grafico del filtro DirectShow
4. \*\*Aggiungi sorgente VLC\*\*: Crea e configura il filtro sorgente VLC
5. \*\*Connetti i rendering\*\*: Collega i componenti di rendering video e audio
6. \*\*Controllo della riproduzione\*\*: Utilizza l'interfaccia MediaControl per le operazioni di riproduzione
## Riferimento API e definizioni dell'interfaccia
### Interfaccia IVlcSrc
Interfaccia primaria per il controllo del filtro sorgente VLC
\*\*GUID\*\*: `{77493EB7-6D00-41C5-9535-7C593824E892}`
#### Metodi
- `ImpostaFile` - Carica un file multimediale o un URL di rete
- `Ottieni conteggio tracce audio` - Ottieni il numero di tracce audio disponibili
- `Ottieni informazioni sulla traccia audio` - Ottieni informazioni sulla traccia audio
- `Ottieni traccia audio` - Ottieni la traccia audio attualmente selezionata
- `Imposta traccia audio` - Seleziona la traccia audio tramite ID
- `Ottieni conteggio sottotitoli` - Ottieni il numero di tracce di sottotitoli disponibili
- `Ottieni informazioni sui sottotitoli` - Ottieni informazioni sulla traccia dei sottotitoli
- `Ottieni sottotitoli` - Ottieni la traccia dei sottotitoli attualmente selezionata
- `Imposta sottotitolo` - Seleziona la traccia dei sottotitoli tramite ID (-1 per disabilitare)
### Interfaccia IVlcSrc2
Interfaccia estesa con opzioni di personalizzazione VLC aggiuntive
\*\*GUID\*\*: `{CCE122C0-172C-4626-B4B6-42B039E541CB}`
#### Metodi
Eredita tutti i metodi da IVlcSrc più:
- `ImpostaRigaComandoPersonalizzata` - Imposta parametri personalizzati della riga di comando VLC
### Interfaccia IVlcSrc3
Interfaccia più recente con controllo del frame rate
\*\*GUID\*\*: `{3DFBED0C-E4A8-401C-93EF-CBBFB65223DD}`
#### Metodi
Eredita tutti i metodi da IVlcSrc2 più:
- `Imposta frequenza fotogrammi predefinita` - Imposta la frequenza dei fotogrammi predefinita per i contenuti senza informazioni sulla frequenza dei fotogrammi
### Definizioni dell'interfaccia C++
Per lo sviluppo in C++, le definizioni complete dell'interfaccia sono disponibili nel repository ufficiale GitHub:
\*\*File di intestazione:\*\* [ivlcsrc.h](https://github.com/visioforge/directshow-samples/blob/main/Interfaces/cpp/VLC%20Source/ivlcsrc.h)
Utilizzo dell'interfaccia:
Il file di intestazione contiene le definizioni complete per:
- `IVlcSrc` - Interfaccia primaria per il controllo audio/sottotitoli
- `IVlcSrc2` - Interfaccia estesa con parametri della riga di comando personalizzati
- `IVlcSrc3` - Interfaccia più recente con controllo del frame rate
- Tutti i GUID associati e le firme dei metodi
### Definizioni dell'interfaccia C#/VB.NET
Per lo sviluppo .NET, le definizioni dell'interfaccia sono disponibili tramite il pacchetto NuGet VisioForge DirectShow API:
\*\*Pacchetto NuGet:\*\* [`VisioForge.DirectShowAPI`](https://www.nuget.org/packages/VisioForge.DirectShowAPI)
Utilizzo dell'interfaccia in C#:
## Esempi di codice completi
### Implementazione C++
### Implementazione C#
### Implementazione VB.NET
## Utilizzo delle funzionalità avanzate
### Esempio di selezione della traccia audio (C++)
## Strumenti di sviluppo grafici DirectShow
### Utilizzo del filtro sorgente VLC con GraphEdit
\*\*Modifica grafico\*\* è lo strumento di visualizzazione e debug di grafici DirectShow di Microsoft che offre funzionalità di modifica dei grafici DirectShow. VLC Source DirectShow Filter si integra perfettamente con GraphEdit per una rapida prototipazione e test.
#### Impostazione della sorgente VLC in GraphEdit
1. \*\*Avvia GraphEdit\*\*: Avvia GraphEdit con privilegi di amministratore per l'accesso completo alla registrazione del filtro
2. \*\*Inserisci filtro sorgente VLC\*\*:
- Fare clic con il tasto destro del mouse nell'area del grafico
- Seleziona "Inserisci filtri..."
- Vai alla categoria "Filtri DirectShow"
- Individua il filtro "Sorgente VLC"
- Fare clic su "Inserisci filtro"
3. \*\*Configura sorgente multimediale\*\*:
- Fare clic con il pulsante destro del mouse sul filtro Sorgente VLC
- Seleziona "Proprietà "
- Nella finestra di dialogo del file, specifica il percorso del file multimediale o l'URL di rete
- Il filtro accetta file locali (C:\media\video.mp4) e flussi di rete (http://example.com/stream.m3u8)
4. \*\*Aggiungi Renderer\*\*:
- Per i video: inserire "Enhanced Video Renderer (EVR)" o "Video Mixing Renderer 9 (VMR-9)"
- Per l'audio: inserisci "Dispositivo DirectSound predefinito" o "Renderer audio (WaveOut)"
5. \*\*Connetti i pin\*\*:
- Trascina dal pin di uscita video della sorgente VLC al pin di ingresso del rendering video
- Trascina dal pin di uscita audio della sorgente VLC al pin di ingresso del rendering audio
- GraphEdit negozierà automaticamente i tipi di media
### Utilizzo del filtro sorgente VLC con GraphStudio
\*\*GraphStudio\*\* fornisce un ambiente di modifica dei grafici DirectShow alternativo con funzionalità di debug avanzate e strumenti completi di analisi dei filtri.
#### Passaggi di integrazione di GraphStudio
1. \*\*Verifica della registrazione del filtro\*\*:
- Apri GraphStudio
- Vai alla scheda "Visualizza" â "Filtri"
- Verifica che "VLC Source" appaia nell'elenco dei filtri registrati
- Nota il CLSID del filtro: `{77493EB7-6D00-41C5-9535-7C593824E892}`
2. \*\*Creazione di un grafico di filtro\*\*:
- Utilizza il pulsante "Inserisci filtro" o trascina dal pannello dei filtri
- Individua la sorgente VLC nella categoria Filtri DirectShow
- Trascina la sorgente VLC nell'area di lavoro del grafico
3. \*\*Configurazione multimediale\*\*:
- Fai clic con il tasto destro del mouse su VLC Source â "Carica file..."
- Sfoglia il file multimediale o inserisci l'URL di rete
- GraphStudio visualizza lo stato della connessione in tempo reale
4. \*\*Creazione automatica di grafici\*\*:
- Utilizzare la funzione "Render" di GraphStudio
- Fare clic con il pulsante destro del mouse sui pin di output della sorgente VLC â "Pin di rendering"
- GraphStudio inserisce automaticamente i decoder e i renderer appropriati

## Requisiti di sistema
### Sistemi operativi
- Windows 10, 11 (tutte le edizioni)
- Windows 8/8.1
- Windows 7 (SP1 o successivo)
- Windows Server 2016 e successivi
### Supporto allo sviluppo
- Visual Studio 2010-2022
- C++ Builder XE2 e versioni successive
- Delphi XE2 e versioni successive
- .NET Framework 4.0+
- .NET 5 e versioni successive
### Supporto all'architettura
- x86 (32 bit)
- x64 (64 bit)
- Applicazioni in modalità mista
- Ambienti compatibili con COM
## Diritti di licenza e distribuzione
### Vantaggi della licenza commerciale
- \*\*Distribuzione royalty-free\*\*: Distribuisci le tue applicazioni senza costi unitari
- \*\*Nessuna filigrana\*\*: Output pulito e professionale senza limiti di prova
- \*\*Supporto prioritario\*\*: Accesso diretto al nostro team di supporto tecnico
- \*\*Aggiornamenti gratuiti\*\*: Ricevi aggiornamenti minori e importanti per un anno (illimitati per la licenza a vita)
- \*\*Progetti multipli\*\*: Utilizzo illimitato in progetti commerciali e personali
- \*\*Accesso al codice sorgente\*\*: Disponibile licenza facoltativa del codice sorgente
### Limitazioni della versione di prova
- L'uscita video visualizza una sovrapposizione di filigrana
- Nessuna restrizione tecnica sulla funzionalitÃ
- Accesso API completo a scopo di valutazione
- Periodo di valutazione di 30 giorni
### Conformità libVLC
Questo SDK incorpora la libreria libVLC con licenza LGPL v2.1. Le applicazioni che utilizzano il nostro SDK non sono soggette a questa licenza, poiché il filtro DirectShow agisce come componente separato. Non è richiesto alcun obbligo di divulgazione del codice sorgente per l'applicazione.
## Scarica e acquista
### Versione di prova
\*\*Funzionalità completa con filigrana\*\*
- Pacchetto SDK completo
- Tutte le applicazioni di esempio
- Documentazione
- Valutazione di 30 giorni
[Scarica la versione di prova](https://s3.us-west-2.amazonaws.com/files.visioforge.com/trials/visioforge\_vlc\_source\_setup.zip)
### Licenza commerciale
\*\*Pronto per la produzione con tutti i diritti\*\*
- Distribuzione royalty-free
- Supporto prioritario
- Nessuna filigrana
- Aggiornamenti gratuiti (1 anno)
[Visualizza i prezzi](https://www.visioforge.com/it/buy)
### Licenza del codice sorgente
\*\*Codice sorgente completo del filtro\*\*
- Codice sorgente C++ completo
- Script di compilazione inclusi
- Diritti di personalizzazione
- Consulenza tecnica
## Specifiche tecniche
### Caratteristiche delle prestazioni
- \*\*Tempo di avvio\*\*: < 500 ms per l'inizializzazione del filtro
- \*\*Utilizzo della memoria\*\*: ~50 MB di base, scalabile con la risoluzione video
- \*\*Utilizzo della CPU\*\*: Decodifica accelerata tramite hardware quando disponibile
- \*\*Infilatura\*\*: Architettura completamente multithread
- \*\*Latenza\*\*: < 100 ms per i file locali, varia per i flussi di rete

---END OF PAGE---
# Page: https://www.visioforge.com/de/ffmpeg-source-directshow-filter
# FFMPEG Source DirectShow Filter
Version 15.0
## Professioneller DirectShow-Filter für Video- und Audioquellen
Der FFMPEG Source DirectShow Filter lässt sich nahtlos in jede DirectShow-Anwendung integrieren und dekodiert und gibt Video-, Audio- und Netzwerk-Streams wieder. Dieses leistungsstarke SDK enthält FFMPEG-DLLs und einen DirectShow-Filter mit standardmäÃigen Dateiauswahlfunktionen und benutzerdefinierten Schnittstellen für eine effiziente und flexible Multimedia-Verarbeitung in Ihren Anwendungen.

#### DOWNLOADS
[Installateur](https://s3.us-west-2.amazonaws.com/files.visioforge.com/trials/visioforge\_ffmpeg\_source\_filter\_setup.exe)[Samples auf GitHub](https://github.com/visioforge/directshow-samples)

#### KAUFEN
[Preise prüfen oder bestellen](https://www.visioforge.com/de/buy)

#### HILFE
[Online-Hilfe](/help/docs/directshow/ffmpeg-source-filters/)[Lizenzvereinbarung](/help/docs/eula/)
## Hauptfunktionen des VisioForge FFMPEG-Quellfilters
### Umfassende Formatunterstützung
- \*\*Videoformate\*\*: MP4, AVI, MPEG, MPEG-TS, AV1, MKV, WebM und viele andere Formate
- \*\*Audioformate\*\*: AAC/M4A, MP3, OGG, Speex, FLAC und mehr
- \*\*Codec-Unterstützung\*\*: Interne Video- und Audio-Decoder von FFMPEG
- \*\*Kundenspezifische Verarbeitung\*\*: Unterstützung für Video-/Audio-FFMPEG-Filter mit erweiterter Konfiguration
### Fortschrittliche Architektur und Leistung
- \*\*GPU-Beschleunigung\*\*: GPU-beschleunigte Videodekodierung für optimale Leistung
- \*\*Multithreading\*\*: Effiziente Multithread-Verarbeitung für reibungslose Wiedergabe
- \*\*Plattformunterstützung\*\*: Sowohl x86- als auch x64-Versionen verfügbar
- \*\*DirectShow-Integration\*\*: Nahtlose Integration mit der DirectShow-Architektur
### Entwicklerfreundliches SDK
- \*\*.NET-API\*\*: Vollständige C#- und VB.NET-Unterstützung mit NuGet-Paketverteilung
- \*\*C++-API\*\*: Native C++-Schnittstelle für Hochleistungsanwendungen
- \*\*Delphi-API\*\*: Vollständige Delphi/Pascal-Unterstützung für die RAD-Entwicklung
- \*\*NuGet-Integration\*\*: VisioForge.DirectShowAPI-Paket für nahtlose .NET-Entwicklung
- \*\*Beispielcode\*\*: Demoanwendungen für C#, VB.NET, C++ und Delphi
- \*\*Dokumentation\*\*: Umfassende API-Referenz und Anwendungsbeispiele
## Installation und Konfiguration
### Systemanforderungen
- \*\*Windows\*\*: Windows 11, Windows 10, Windows 8/8.1, Windows 7
- \*\*Windows\*\* \*\*Server\*\*: Windows Server 2016 und spätere Versionen
- \*\*Architektur\*\*: x86- und x64-Unterstützung
### So installieren Sie
1. Laden Sie das Installationsprogramm aus dem Downloadbereich herunter
2. Für eine ordnungsgemäÃe Registrierung mit Administratorrechten ausführen
3. Der Filter wird automatisch bei Windows registriert
4. Fügen Sie Ihrem Projekt Referenzen hinzu und beginnen Sie mit der Codierung
### .NET-Entwicklungs-Setup
Installieren Sie für .NET-Anwendungen das NuGet-Paket VisioForge.DirectShowAPI:
Das NuGet-Paket bietet:
- Komplette DirectShow-API-Wrapper für .NET
- Stark typisierte Schnittstellen und Aufzählungen
- Richtige COM-Interoperabilität und Speicherverwaltung
- Unterstützung für C#, VB.NET und andere .NET-Sprachen
## Codebeispiele und Beispielimplementierung
### Filterverwendung in einem DirectShow-Graph
Der FFMPEG-Quellfilter fungiert als Quellfilter in Ihrem DirectShow-Diagramm und bietet:
- \*\*Dateiquelle\*\*: Lokale Dateiwiedergabe mit automatischer Formaterkennung
- \*\*Netzwerk-Streaming\*\*: Unterstützung für Netzwerk-Streams und -Protokolle
- \*\*Benutzerdefinierte Konfiguration\*\*: Erweiterte Einstellungen für Pufferung, Hardwarebeschleunigung
- \*\*Stream-Auswahl\*\*: Auswahl und Verwaltung mehrerer Audio-/Video-Streams

### C#-Implementierung mit erweiterten Funktionen
### Erweiterte VB.NET-Implementierung mit vollständiger Schnittstellenunterstützung
#### Registrierung für lizenzierte Benutzer
C#-Registrierung
VB.Net-Registrierung
C++-Registrierung
### C++-Implementierung mit vollständiger Schnittstellenunterstützung
## Erweiterte Konfigurationsoptionen
### Einrichten der Hardwarebeschleunigung
Aktivieren Sie die GPU-beschleunigte Videodekodierung für optimale Leistung (standardmäÃig aktiviert):
- \*\*NVIDIA NVDEC\*\*: Automatische Erkennung und Verwendung für H.264/H.265/AV1-Dekodierung
- \*\*Intel Quick Sync Video\*\*: Integrierte GPU-Beschleunigungsunterstützung von Intel
- \*\*AMD VCE\*\*: AMD-Hardware-Videodekodierungsbeschleunigung
- \*\*Software-Fallback\*\*: Automatischer Fallback auf CPU-Dekodierung bei Bedarf
### Netzwerk-Streaming-Konfiguration
Professionelle Streaming-Unterstützung mit umfassenden Protokolloptionen:
- \*\*Verbindungstimeout\*\*: Konfigurierbares Timeout (Standard: 15000 ms)
- \*\*Pufferstrategie\*\*: AUTO/ON/OFF-Modi für Live-Quellen
- \*\*RTSP-Optionen\*\*: TCP/UDP-Transportauswahl
- \*\*Benutzerdefinierte Protokolle\*\*: Vollständige Unterstützung der FFMPEG-Protokolloption
### Erweiterte Stream-Verarbeitung
- \*\*Datenrückrufe\*\*: Zugriff auf den Rohdatenstrom für benutzerdefinierte Verarbeitung
- \*\*Zeitstempel-Rückrufe\*\*: Präzise Zeitinformationen für das Debuggen der A/V-Synchronisierung
- \*\*Stream-Auswahl\*\*: Dynamisches Umschalten des Audio-/Video-Streams über IAMStreamSelect
- \*\*Audiosteuerung\*\*: Audioverarbeitung unabhängig aktivieren/deaktivieren
### Multi-Stream- und Programmunterstützung
- \*\*Stream-Auswahl\*\*: Unterstützung für mehrere Video-/Audio-Streams
- \*\*Programmumschaltung\*\*: Handhabung von Multiprogramm-Transportströmen
- \*\*Sprachauswahl\*\*: Audiotitelauswahl nach Sprache
- \*\*Untertitelunterstützung\*\*: Extraktion und Wiedergabe von Untertitel-Streams
### Handhabung von Live-Quellen
- \*\*Echtzeiterkennung\*\*: Automatische Live-Quellenidentifizierung
- \*\*Pufferverwaltung\*\*: Intelligente Pufferung für reibungslose Wiedergabe
- \*\*Taktsynchronisation\*\*: Referenzuhrverwaltung für Live-Streams
- \*\*Qualitätskontrolle\*\*: Adaptive Qualität für Netzwerk-Streams
### Such- und Wiedergabesteuerung
- \*\*Mediensuche\*\*: Vollständige IMediaSeeking-Schnittstellenunterstützung für nicht-Live-Quellen
- \*\*Ratenkontrolle\*\*: Variable Wiedergabegeschwindigkeit (nicht verfügbar für Live-Quellen)
- \*\*Positionsregelung\*\*: Absolute, relative und inkrementelle Positionierung
- \*\*Keyframe-Suche\*\*: Suchen Sie zum nächsten Keyframe für eine reibungslose Wiedergabe
## Funktionen der Testversion
Erleben Sie die gesamte Leistung unseres DirectShow-Filters mit nur einer diskreten Auswertungsüberlagerung während der Videowiedergabe:
- \*\*Voll funktionsfähige Testumgebung\*\*: Zugriff auf alle Codecs, Filter und Verarbeitungsfunktionen für eine umfassende Auswertung
- \*\*Universelle Formatkompatibilität\*\*: Testen Sie mit Ihrer gesamten Medienbibliothek, einschlieÃlich MP4, AVI, MPEG, MKV und Streaming-Protokollen
- \*\*Umfassende Entwicklungsressourcen\*\*: Vollständige API-Dokumentation, Schnittstellendefinitionen und umfassende Codebeispiele
- \*\*Produktionsreife Beispiele\*\*: Funktionierende C#-, C++- und Delphi-Anwendungen mit vollständigem Quellcode zur sofortigen Integration
## Kaufvorteile
### Lizenzierungsoptionen
- \*\*Reguläre Lizenz\*\*: Jahresabonnement mit automatischer Verlängerung (jederzeit kündbar)
- \*\*Lebenslange Lizenz\*\*: Einmaliger Kauf mit unbegrenzten Updates
### Funktionen der regulären Lizenz
- \*\*Kommerzielle Einsatzfreiheit\*\*: Bereitstellung für eine unbegrenzte Anzahl von Anwendungen und Installationen ohne Nutzungsbeschränkungen oder Laufzeitgebühren
- \*\*Professionelle Ausgabequalität\*\*: Kristallklare Videowiedergabe ohne Wasserzeichen oder Test-Overlays für produktionsreife Anwendungen
- \*\*Kontinuierlicher Zugang zu Innovationen\*\*: Erhalten Sie 12 Monate lang alle Funktionserweiterungen, Codec-Updates und Leistungsverbesserungen
- \*\*Kompetente Unterstützung für Entwickler\*\*: Direkter Zugang zu VisioForge-Technikern für technische Beratung und schnelle Problemlösung
- \*\*Vollständige Vertriebsbehörde\*\*: Volle Rechte zur Weiterverteilung des Filters mit Ihren Anwendungen ohne zusätzliche Lizenzkosten
### Vorteile einer lebenslangen Lizenz
- \*\*Unbegrenzte Updates\*\*: Updates für unbegrenzte Zeit
- \*\*Einmalzahlung\*\*: Keine wiederkehrenden Abonnementgebühren
- \*\*Langfristige Unterstützung\*\*: Erweiterter Supportumfang

---END OF PAGE---
# Page: https://www.visioforge.com/es/ffmpeg-source-directshow-filter
# FFMPEG Source DirectShow Filter
versión 15.0
## Filtro DirectShow profesional para fuentes de vÃdeo y audio
El filtro DirectShow de origen FFMPEG se integra a la perfección con cualquier aplicación DirectShow para decodificar y reproducir archivos de vÃdeo o audio, asà como transmisiones de red. Este potente SDK incluye archivos DLL FFMPEG y un filtro DirectShow con funciones estándar de selección de archivos e interfaces personalizadas para un procesamiento multimedia eficiente y flexible en sus aplicaciones.

#### DESCARGAS
[Instalador](https://s3.us-west-2.amazonaws.com/files.visioforge.com/trials/visioforge\_ffmpeg\_source\_filter\_setup.exe)[Samples en GitHub](https://github.com/visioforge/directshow-samples)

#### COMPRAR
[Consultar precios o hacer un pedido](https://www.visioforge.com/es/buy)

#### AYUDA
[Ayuda en lÃnea](/help/docs/directshow/ffmpeg-source-filters/)[Acuerdo de licencia](/help/docs/eula/)
## CaracterÃsticas principales del filtro de origen FFMPEG de VisioForge
### Soporte integral de formatos
- \*\*Formatos de vÃdeo\*\*:MP4, AVI, MPEG, MPEG-TS, AV1, MKV, WebM y muchos otros formatos
- \*\*Formatos de audio\*\*: AAC/M4A, MP3, OGG, Speex, FLAC y más
- \*\*Compatibilidad con códecs\*\*:Decodificadores de vÃdeo y audio internos proporcionados por FFMPEG
- \*\*Procesamiento personalizado\*\*:Compatibilidad con filtros FFMPEG de vÃdeo/audio con configuración avanzada
### Arquitectura y rendimiento avanzados
- \*\*Aceleración de GPU\*\*:Descodificación de vÃdeo acelerada por GPU para un rendimiento óptimo
- \*\*Multihilo\*\*: Procesamiento multiproceso eficiente para una reproducción fluida
- \*\*Soporte de plataforma\*\*:Disponibles versiones x86 y x64
- \*\*Integración con DirectShow\*\*: Integración perfecta con la arquitectura DirectShow
### SDK fácil de usar para desarrolladores
- \*\*API .NET\*\*:Compatibilidad completa con C# y VB.NET con la distribución de paquetes NuGet
- \*\*API de C++\*\*: Interfaz nativa de C++ para aplicaciones de alto rendimiento
- \*\*API de Delphi\*\*:Compatibilidad total con Delphi/Pascal para el desarrollo de RAD
- \*\*Integración de NuGet\*\*Paquete VisioForge.DirectShowAPI para un desarrollo .NET sin inconvenientes
- \*\*Código de muestra\*\*:Aplicaciones de demostración para C#, VB.NET, C++ y Delphi
- \*\*Documentación\*\*: Referencia completa de API y ejemplos de uso
## Instalación y configuración
### Requisitos del sistema
- \*\*Ventanas\*\*:Windows 11, Windows 10, Windows 8/8.1, Windows 7
- \*\*Ventanas\*\* \*\*Servidor\*\*:Windows Server 2016 y versiones posteriores
- \*\*Arquitectura\*\*:Compatibilidad con x86 y x64
### Cómo instalar
1. Descargue el instalador desde la sección de descargas
2. Ejecutar con privilegios de administrador para un registro correcto
3. El filtro se registrará automáticamente en Windows.
4. Añade referencias a tu proyecto y comienza a codificar
### Configuración de desarrollo .NET
Para aplicaciones .NET, instale el paquete NuGet VisioForge.DirectShowAPI:
El paquete NuGet proporciona:
- Envoltorios completos de API de DirectShow para .NET
- Interfaces y enumeraciones fuertemente tipadas
- Interoperabilidad COM y gestión de memoria adecuadas
- Compatibilidad con C#, VB.NET y otros lenguajes .NET
## Ejemplos de código e implementación de muestra
### Uso de filtro en un gráfico DirectShow
El filtro de fuente FFMPEG actúa como un filtro de fuente en su gráfico DirectShow, proporcionando:
- \*\*Fuente del archivo\*\*: Reproducción de archivos locales con detección automática de formato
- \*\*Transmisión en red\*\*:Compatibilidad con transmisiones y protocolos de red
- \*\*Configuración personalizada\*\*:Configuración avanzada para almacenamiento en búfer y aceleración de hardware
- \*\*Selección de transmisión\*\*:Selección y gestión de múltiples transmisiones de audio/video

### Implementación de C# con funciones avanzadas
### Implementación avanzada de VB.NET con soporte completo de interfaz
#### Registro para usuarios con licencia
Registro C#
Registro de VB.Net
Registro de C++
### Implementación de C++ con soporte completo de interfaz
## Opciones de configuración avanzadas
### Configuración de aceleración de hardware
Habilite la decodificación de video acelerada por GPU para un rendimiento óptimo (habilitado de forma predeterminada):
- \*\*NVIDIA NVDEC\*\*:Detección y uso automáticos para decodificación H.264/H.265/AV1
- \*\*VÃdeo de sincronización rápida de Intel\*\*:Compatibilidad con aceleración de GPU integrada de Intel
- \*\*AMD VCE\*\*: Aceleración de decodificación de video por hardware de AMD
- \*\*Software de respaldo\*\*:Retorno automático a la decodificación de CPU cuando sea necesario
### Configuración de transmisión de red
Soporte de transmisión profesional con opciones de protocolo integrales:
- \*\*Tiempo de espera de conexión\*\*: Tiempo de espera configurable (predeterminado: 15000 ms)
- \*\*Estrategia de amortiguación\*\*:Modos AUTOMÃTICO/ENCENDIDO/APAGADO para fuentes en vivo
- \*\*Opciones RTSP\*\*:Selección de transporte TCP/UDP
- \*\*Protocolos personalizados\*\*:Compatibilidad completa con la opción de protocolo FFMPEG
### Procesamiento avanzado de flujos
- \*\*Devoluciones de llamadas de datos\*\*:Acceso al flujo de datos sin procesar para procesamiento personalizado
- \*\*Devoluciones de llamadas de marca de tiempo\*\*: Información de tiempo precisa para la depuración de sincronización A/V
- \*\*Selección de transmisión\*\*: Cambio dinámico de transmisión de audio/video a través de IAMStreamSelect
- \*\*Control de audio\*\*: Habilitar o deshabilitar el procesamiento de audio de forma independiente
### Compatibilidad con múltiples transmisiones y programas
- \*\*Selección de transmisión\*\*:Compatibilidad con múltiples transmisiones de video/audio
- \*\*Cambio de programa\*\*:Manejar flujos de transporte de múltiples programas
- \*\*Selección de idioma\*\*:Selección de pistas de audio por idioma
- \*\*Soporte de subtÃtulos\*\*:Extracción y renderizado de flujo de subtÃtulos
### Manejo de fuentes en vivo
- \*\*Detección en tiempo real\*\*: Identificación automática de fuente en vivo
- \*\*Gestión de almacenamiento en búfer\*\*:Almacenamiento en búfer inteligente para una reproducción fluida
- \*\*Sincronización del reloj\*\*: Gestión del reloj de referencia para transmisiones en vivo
- \*\*Control de calidad\*\*:Calidad adaptativa para transmisiones en red
### Control de búsqueda y reproducción
- \*\*Búsqueda de medios\*\*:Compatibilidad total con la interfaz IMediaSeeking para fuentes no en vivo
- \*\*Control de velocidad\*\*:Velocidad de reproducción variable (no disponible para fuentes en vivo)
- \*\*Control de posición\*\*:Posicionamiento absoluto, relativo e incremental
- \*\*Búsqueda de fotogramas clave\*\*: Busque el fotograma clave más cercano para una reproducción fluida
## CaracterÃsticas de la versión de evaluación
Experimente la potencia completa de nuestro filtro DirectShow con solo una superposición de evaluación discreta durante la reproducción de video:
- \*\*Entorno de pruebas con todas las funciones\*\*:Acceda a todos los códecs, filtros y capacidades de procesamiento para una evaluación integral
- \*\*Compatibilidad de formato universal\*\*:Pruebe con toda su biblioteca multimedia, incluidos MP4, AVI, MPEG, MKV y protocolos de transmisión
- \*\*Recursos de desarrollo completos\*\*:Documentación completa de API, definiciones de interfaz y ejemplos de codificación completos
- \*\*Muestras listas para producción\*\*:Aplicaciones C#, C++ y Delphi en funcionamiento con código fuente completo para integración inmediata
## Beneficios de la compra
### Opciones de licencia
- \*\*Licencia regular\*\*:Suscripción anual con renovación automática (cancelable en cualquier momento)
- \*\*Licencia de por vida\*\*:Compra única con actualizaciones ilimitadas
### CaracterÃsticas de la licencia regular
- \*\*Libertad de implementación comercial\*\*:Implemente en un número ilimitado de aplicaciones e instalaciones sin lÃmites de uso ni tarifas de tiempo de ejecución
- \*\*Calidad de salida profesional\*\*:Representación de video nÃtida sin marcas de agua ni superposiciones de prueba para aplicaciones listas para producción
- \*\*Acceso a la innovación continua\*\*:Reciba todas las mejoras de funciones, actualizaciones de códecs y mejoras de rendimiento durante 12 meses
- \*\*Asistencia experta para desarrolladores\*\*:Acceso directo a los ingenieros de VisioForge para obtener orientación técnica y resolución rápida de problemas
- \*\*Autoridad de distribución completa\*\*:Todos los derechos para redistribuir el filtro con sus aplicaciones sin costes de licencia adicionales
### Ventajas de la licencia de por vida
- \*\*Actualizaciones ilimitadas\*\*:Actualizaciones por tiempo ilimitado
- \*\*Pago único\*\*:Sin cuotas de suscripción recurrentes
- \*\*Apoyo a largo plazo\*\*:Cobertura de soporte extendida

---END OF PAGE---
# Page: https://www.visioforge.com/it/ffmpeg-source-directshow-filter
# FFMPEG Source DirectShow Filter
versione 15.0
## Filtro DirectShow professionale per sorgenti video e audio
Il filtro FFMPEG Source DirectShow si integra perfettamente in qualsiasi applicazione DirectShow per decodificare e riprodurre file video o audio e flussi di rete. Questo potente SDK include DLL FFMPEG e un filtro DirectShow con funzionalità standard di selezione file e interfacce personalizzate per un'elaborazione multimediale efficiente e flessibile nelle vostre applicazioni.

#### DOWNLOADS
[Installatore](https://s3.us-west-2.amazonaws.com/files.visioforge.com/trials/visioforge\_ffmpeg\_source\_filter\_setup.exe)[Samples su GitHub](https://github.com/visioforge/directshow-samples)

#### ACQUISTO
[Controllare i prezzi o ordinare](https://www.visioforge.com/it/buy)

#### AIUTO
[Guida in linea](/help/docs/directshow/ffmpeg-source-filters/)[Contratto di licenza](/help/docs/eula/)
## Caratteristiche principali del filtro sorgente FFMPEG di VisioForge
### Supporto completo del formato
- \*\*Formati video\*\*: MP4, AVI, MPEG, MPEG-TS, AV1, MKV, WebM e molti altri formati
- \*\*Formati audio\*\*: AAC/M4A, MP3, OGG, Speex, FLAC e altro
- \*\*Supporto codec\*\*: Decoder video e audio interni forniti da FFMPEG
- \*\*Elaborazione personalizzata\*\*: Supporto dei filtri FFMPEG video/audio con configurazione avanzata
### Architettura e prestazioni avanzate
- \*\*Accelerazione GPU\*\*: Decodifica video accelerata dalla GPU per prestazioni ottimali
- \*\*Multithreading\*\*: Elaborazione multithread efficiente per una riproduzione fluida
- \*\*Supporto della piattaforma\*\*: Disponibili entrambe le versioni x86 e x64
- \*\*Integrazione DirectShow\*\*: Integrazione perfetta con l'architettura DirectShow
### SDK di facile utilizzo per gli sviluppatori
- \*\*API .NET\*\*: Supporto completo C# e VB.NET con distribuzione del pacchetto NuGet
- \*\*API C++\*\*: Interfaccia C++ nativa per applicazioni ad alte prestazioni
- \*\*API Delphi\*\*: Supporto completo Delphi/Pascal per lo sviluppo RAD
- \*\*Integrazione NuGet\*\*: Pacchetto VisioForge.DirectShowAPI per uno sviluppo .NET senza interruzioni
- \*\*Codice di esempio\*\*: Applicazioni demo per C#, VB.NET, C++ e Delphi
- \*\*Documentazione\*\*: Riferimento API completo ed esempi di utilizzo
## Installazione e configurazione
### Requisiti di sistema
- \*\*Finestre\*\*: Windows 11, Windows 10, Windows 8/8.1, Windows 7
- \*\*Finestre\*\* \*\*Server\*\*: Windows Server 2016 e versioni successive
- \*\*Architettura\*\*: supporto x86 e x64
### Come installare
1. Scarica il programma di installazione dalla sezione download
2. Eseguire con privilegi di amministratore per una corretta registrazione
3. Il filtro verrà registrato automaticamente con Windows
4. Aggiungi riferimenti al tuo progetto e inizia a programmare
### Configurazione dello sviluppo .NET
Per le applicazioni .NET, installare il pacchetto NuGet VisioForge.DirectShowAPI:
Il pacchetto NuGet fornisce:
- Wrapper API DirectShow completi per .NET
- Interfacce e enumerazioni fortemente tipizzate
- Corretta interoperabilità COM e gestione della memoria
- Supporto per C#, VB.NET e altri linguaggi .NET
## Esempi di codice e implementazione di esempio
### Uso del filtro in un grafico DirectShow
Il filtro sorgente FFMPEG funge da filtro sorgente nel grafico DirectShow, fornendo:
- \*\*Origine del file\*\*: Riproduzione di file locali con rilevamento automatico del formato
- \*\*Streaming di rete\*\*: Supporto per flussi e protocolli di rete
- \*\*Configurazione personalizzata\*\*: Impostazioni avanzate per il buffering, accelerazione hardware
- \*\*Selezione del flusso\*\*: Selezione e gestione di flussi audio/video multipli

### Implementazione C# con funzionalità avanzate
### Implementazione avanzata di VB.NET con supporto completo dell'interfaccia
#### Registrazione per utenti autorizzati
Registrazione C#
Registrazione VB.Net
Registrazione C++
### Implementazione C++ con supporto completo dell'interfaccia
## Opzioni di configurazione avanzate
### Configurazione dell'accelerazione hardware
Abilita la decodifica video accelerata dalla GPU per prestazioni ottimali (abilitata per impostazione predefinita):
- \*\*NVIDIA NVDEC\*\*: Rilevamento e utilizzo automatici per la decodifica H.264/H.265/AV1
- \*\*Video di sincronizzazione rapida Intel\*\*: Supporto per l'accelerazione GPU integrata Intel
- \*\*AMD VCE\*\*: Accelerazione di decodifica video hardware AMD
- \*\*Software di fallback\*\*: Fallback automatico alla decodifica della CPU quando necessario
### Configurazione dello streaming di rete
Supporto streaming professionale con opzioni di protocollo complete:
- \*\*Timeout di connessione\*\*: Timeout configurabile (predefinito: 15000 ms)
- \*\*Strategia di buffering\*\*: Modalità AUTO/ON/OFF per sorgenti live
- \*\*Opzioni RTSP\*\*: Selezione del trasporto TCP/UDP
- \*\*Protocolli personalizzati\*\*: Supporto completo dell'opzione del protocollo FFMPEG
### Elaborazione avanzata dei flussi
- \*\*Richiamate di dati\*\*: Accesso al flusso di dati grezzi per l'elaborazione personalizzata
- \*\*Callback di timestamp\*\*: Informazioni temporali precise per il debug della sincronizzazione A/V
- \*\*Selezione del flusso\*\*: Commutazione dinamica del flusso audio/video tramite IAMStreamSelect
- \*\*Controllo audio\*\*: Abilita/disabilita l'elaborazione audio in modo indipendente
### Supporto multi-stream e programma
- \*\*Selezione del flusso\*\*: Supporto per più flussi video/audio
- \*\*Cambio di programma\*\*: Gestire flussi di trasporto multiprogramma
- \*\*Selezione della lingua\*\*: Selezione della traccia audio per lingua
- \*\*Supporto sottotitoli\*\*: Estrazione e rendering del flusso dei sottotitoli
### Gestione delle sorgenti live
- \*\*Rilevamento in tempo reale\*\*: Identificazione automatica della sorgente live
- \*\*Gestione del buffering\*\*: Buffering intelligente per una riproduzione fluida
- \*\*Sincronizzazione dell'orologio\*\*: Gestione dell'orologio di riferimento per i flussi live
- \*\*Controllo di qualità \*\*: Qualità adattiva per i flussi di rete
### Ricerca e controllo della riproduzione
- \*\*Ricerca di media\*\*: Supporto completo dell'interfaccia IMediaSeeking per sorgenti non live
- \*\*Controllo della velocità \*\*: Velocità di riproduzione variabile (non disponibile per sorgenti live)
- \*\*Controllo della posizione\*\*: Posizionamento assoluto, relativo e incrementale
- \*\*Ricerca del fotogramma chiave\*\*: Cerca il fotogramma chiave più vicino per una riproduzione fluida
## Funzionalità della versione di valutazione
Sperimenta la potenza completa del nostro filtro DirectShow con una sola sovrapposizione di valutazione discreta durante la riproduzione video:
- \*\*Ambiente di test completo\*\*: Accedi a tutti i codec, filtri e capacità di elaborazione per una valutazione completa
- \*\*Compatibilità con il formato universale\*\*: Esegui il test con l'intera libreria multimediale, inclusi MP4, AVI, MPEG, MKV e protocolli di streaming
- \*\*Risorse di sviluppo complete\*\*: Documentazione API completa, definizioni di interfaccia ed esempi di codifica esaustivi
- \*\*Campioni pronti per la produzione\*\*: Applicazioni C#, C++ e Delphi funzionanti con codice sorgente completo per un'integrazione immediata
## Vantaggi dell'acquisto
### Opzioni di licenza
- \*\*Licenza regolare\*\*: Abbonamento annuale con rinnovo automatico (annullabile in qualsiasi momento)
- \*\*Licenza a vita\*\*: Acquisto una tantum con aggiornamenti illimitati
### Funzionalità della licenza regolare
- \*\*Libertà di distribuzione commerciale\*\*: Distribuisci su applicazioni e installazioni illimitate senza limiti di utilizzo o costi di runtime
- \*\*Qualità di output professionale\*\*: Rendering video cristallino senza filigrane o sovrapposizioni di prova per applicazioni pronte per la produzione
- \*\*Accesso all'innovazione continua\*\*: Ricevi tutti i miglioramenti delle funzionalità , gli aggiornamenti dei codec e i miglioramenti delle prestazioni per 12 mesi
- \*\*Assistenza agli sviluppatori esperti\*\*: Accesso diretto agli ingegneri VisioForge per assistenza tecnica e rapida risoluzione dei problemi
- \*\*Autorità di distribuzione completa\*\*: Pieni diritti di ridistribuzione del filtro con le tue applicazioni senza costi di licenza aggiuntivi
### Vantaggi della licenza a vita
- \*\*Aggiornamenti illimitati\*\*: Aggiornamenti per un tempo illimitato
- \*\*Pagamento una tantum\*\*: Nessun canone di abbonamento ricorrente
- \*\*Supporto a lungo termine\*\*: Copertura di supporto estesa

---END OF PAGE---
# Page: https://www.visioforge.com/de/encoding-filters-pack
# DirectShow Encoding Filters Pack
Version 11.4
Das VisioForge DirectShow Encoding Filters Pack enthält viele DirectShow-Filter, die in den VisioForge SDKs für verschiedene Audio-/Videocodierformate verwendet werden. Sie können das Filterpaket verwenden, um Video in MP4 (H264 / HEVC / AAC), MPEG-TS, MKV und viele andere Ausgabeformate in Ihrer DirectShow-Anwendung zu kodieren. Für die H264/HEVC-Encoder sind GPU-beschleunigte Versionen für Intel-, AMD/ATI- und Nvidia-GPUs verfügbar.

#### DOWNLOADS
[Testversion](https://s3.us-west-2.amazonaws.com/files.visioforge.com/trials/visioforge\_encoding\_filters\_pack\_setup.exe)[Samples auf GitHub](https://github.com/visioforge)

#### KAUFEN
[Preise prüfen oder bestellen](https://www.visioforge.com/de/buy)

#### HILFE
[Online-Hilfe](/help/)[Lizenzvereinbarung](/help/docs/eula/)
## Enthaltene DirectShow-Filter:
- FFMPEG-Encoder-Filter (MPEG-1/2/4, Flash Video)
- Nvidia CUDA H264-Kodierer
- H264-Encoder/Decoder (mit Intel QuickSync-Unterstützung)
- AAC-Encoder
- MP4-Muxer
- MP3-LAME-Encoder
- VP8/VP9-Kodierer/Dekodierer
- FLAC-Kodierer/Dekodierer
- Speex Encoder/Decoder
- Ogg Vorbis Kodierer/Dekodierer
- Farbraumkonverter
- RTSP-Quelle/RTSP-Streamer
- GPU-beschleunigte H.264/HEVC-Kodierung mit MP4 MF Muxer
SDK enthält API für .Net, C++ und Delphi. Demo-Anwendungen in verschiedenen Programmiersprachen verfügbar. GraphEdit/GraphStudioNext-Tools können verwendet werden, um Filter ohne Code zu testen.
[Processing Filters Pack](https://www.visioforge.com/de/processing-filters-pack) kann zusammen mit dem Encoding Filters Pack verwendet werden, um Video- und Audioverarbeitung in Ihrer Anwendung zu ermöglichen.
Sie können verwenden [FFMPEG-Quellfilter](https://www.visioforge.com/de/ffmpeg-source-directshow-filter) oder [VLC-Quellfilter](https://www.visioforge.com/de/vlc-source-directshow-filter) für die Wiedergabe der meisten Video- und Audioformate.
### Systemanforderungen
- Windows 11, Windows 10, Windows 8/8.1, Windows 7, Windows Vista, Windows Server 2012 und höher
- DirectX 10 oder höher
### Vertriebsrechte
Lizenzfreie Verbreitung.
### Beschränkungen des Versuchs
In der Testversion wird ein Wasserzeichen im Videofenster angezeigt.
### Mit dem Kauf des DirectShow Encoding Filters Pack erhalten Sie folgende Vorteile:
- Unbegrenzte Nutzung
- Kein Nörgler-Bildschirm
- Kostenlose Minor- und Major-Upgrades innerhalb eines Jahres (nach einem Jahr funktioniert das SDK genauso wie vorher) für eine reguläre Lizenz und unbegrenzte Updates für unbegrenzte Zeit für die Lifetime-Lizenz
- Vorrangige Unterstützung und Fehlerbehebung
Die reguläre Lizenz wird jährlich in Rechnung gestellt und automatisch um ein Jahr verlängert. Sie können Ihr Abonnement jederzeit kündigen.
---END OF PAGE---
# Page: https://www.visioforge.com/es/encoding-filters-pack
# DirectShow Encoding Filters Pack
versión 11.4
VisioForge DirectShow Encoding Filters Pack incluye muchos filtros DirectShow utilizados en VisioForge SDKs para varios formatos de codificación de audio/video. Puede utilizar el paquete de filtros para codificar vÃdeo en MP4 (H264 / HEVC / AAC), MPEG-TS, MKV, y muchos otros formatos de salida en su aplicación DirectShow. Los codificadores H264/HEVC tienen versiones aceleradas por GPU disponibles para GPU Intel, AMD/ATI y Nvidia.

#### DESCARGAS
[Versión de evaluación](https://s3.us-west-2.amazonaws.com/files.visioforge.com/trials/visioforge\_encoding\_filters\_pack\_setup.exe)[Samples en GitHub](https://github.com/visioforge)

#### COMPRAR
[Consultar precios o hacer un pedido](https://www.visioforge.com/es/buy)

#### AYUDA
[Ayuda en lÃnea](/help/)[Acuerdo de licencia](/help/docs/eula/)
## Filtros DirectShow incluidos:
- Filtro codificador FFMPEG (MPEG-1/2/4, Flash Video)
- Codificador Nvidia CUDA H264
- Codificador/descodificador H264 (compatible con Intel QuickSync)
- Codificador AAC
- Muxer MP4
- Codificador MP3 LAME
- Codificador/decodificador VP8/VP9
- Codificador/decodificador FLAC
- Codificador/decodificador Speex
- Codificador/decodificador Ogg Vorbis
- Convertidores de espacio de color
- Fuente RTSP/Streamer RTSP
- Codificación H.264/HEVC acelerada en la GPU con MP4 MF Muxer
El SDK contiene API para .Net, C++ y Delphi. Aplicaciones de demostración disponibles en varios lenguajes de programación. Las herramientas GraphEdit/GraphStudioNext pueden utilizarse para probar filtros sin código.
[Processing Filters Pack](https://www.visioforge.com/es/processing-filters-pack) puede utilizarse junto con Encoding Filters Pack para proporcionar procesamiento de vÃdeo y audio en su aplicación.
Puede utilizar [Filtro de fuente FFMPEG](https://www.visioforge.com/es/ffmpeg-source-directshow-filter) o [Filtro de fuente VLC](https://www.visioforge.com/es/vlc-source-directshow-filter) para reproducir la mayorÃa de formatos de vÃdeo y audio.
### Requisitos del sistema
- Windows 11, Windows 10, Windows 8/8.1, Windows 7, Windows Vista, Windows Server 2012 y posteriores
- DirectX 10 o posterior
### Derechos de distribución
Distribución sin derechos de autor.
### Limitaciones de la versión de prueba
La versión de prueba muestra una marca de agua en la ventana de vÃdeo.
### La compra de DirectShow Encoding Filters Pack le proporcionará los siguientes beneficios:
- Uso ilimitado
- Sin pantalla de licencia
- Actualizaciones menores y mayores gratuitas en el plazo de un año (después de un año, el SDK funcionará igual que antes) para una licencia normal y actualizaciones ilimitadas por tiempo ilimitado para la licencia vitalicia.
- Asistencia y correcciones prioritarias
La licencia normal se factura anualmente y se renueva automáticamente cada año. Puede cancelar su suscripción en cualquier momento.
---END OF PAGE---
# Page: https://www.visioforge.com/it/encoding-filters-pack
# DirectShow Encoding Filters Pack
versione 11.4
VisioForge DirectShow Encoding Filters Pack include molti filtri DirectShow utilizzati negli SDK di VisioForge per vari formati di codifica audio/video. Ã possibile utilizzare il pacchetto di filtri per codificare video in MP4 (H264 / HEVC / AAC), MPEG-TS, MKV e molti altri formati di output nella propria applicazione DirectShow. I codificatori H264/HEVC hanno versioni accelerate dalle GPU disponibili per le GPU Intel, AMD/ATI e Nvidia.

#### DOWNLOADS
[Versione di prova](https://s3.us-west-2.amazonaws.com/files.visioforge.com/trials/visioforge\_encoding\_filters\_pack\_setup.exe)[Samples su GitHub](https://github.com/visioforge)

#### ACQUISTO
[Controllare i prezzi o ordinare](https://www.visioforge.com/it/buy)

#### AIUTO
[Guida in linea](/help/)[Contratto di licenza](/help/docs/eula/)
## Filtri DirectShow inclusi:
- Filtro codificatore FFMPEG (MPEG-1/2/4, Flash Video)
- Codificatore H264 Nvidia CUDA
- Encoder/decoder H264 (con supporto Intel QuickSync)
- Codificatore AAC
- Muxer MP4
- Codificatore MP3 LAME
- Codificatore/decodificatore VP8/VP9
- Codificatore/decodificatore FLAC
- Codificatore/decodificatore Speex
- Codificatore/decodificatore Ogg Vorbis aggiornato
- Convertitori di spazio colore
- Sorgente RTSP/Streamer RTSP
- Codifica H.264/HEVC accelerata dalla GPU con MP4 MF Muxer
L'SDK contiene API per .Net, C++ e Delphi. Applicazioni demo disponibili in diversi linguaggi di programmazione. Gli strumenti GraphEdit/GraphStudioNext possono essere utilizzati per testare i filtri senza codice.
[Processing Filters Pack](https://www.visioforge.com/it/processing-filters-pack) può essere utilizzato insieme a Encoding Filters Pack per fornire l'elaborazione video e audio nella vostra applicazione.
à possibile utilizzare [Filtro sorgente FFMPEG](https://www.visioforge.com/it/ffmpeg-source-directshow-filter) O [Filtro sorgente VLC](https://www.visioforge.com/it/vlc-source-directshow-filter) per il supporto della riproduzione della maggior parte dei formati video e audio.
### Requisiti di sistema
- Windows 11, Windows 10, Windows 8/8.1, Windows 7, Windows Vista, Windows Server 2012 e versioni successive
- DirectX 10 o successive
### Diritti di distribuzione
Distribuzione gratuita.
### Limiti della prova
La versione di prova visualizza una filigrana nella finestra del video.
### L'acquisto di DirectShow Encoding Filters Pack offre i seguenti vantaggi:
- Utilizzo illimitato
- Nessun nag-screen
- Aggiornamenti minori e maggiori gratuiti entro un anno (dopo un anno, l'SDK funzionerà come prima) per una licenza regolare e aggiornamenti illimitati per un tempo illimitato per la licenza a vita
- Assistenza e correzioni prioritarie
La licenza regolare viene fatturata annualmente e rinnovata automaticamente ogni anno. Ã possibile annullare l'abbonamento in qualsiasi momento.
---END OF PAGE---
# Page: https://www.visioforge.com/de/processing-filters-pack
# DirectShow Processing Filters Pack
Version 15.1
Das VisioForge DirectShow Processing Filters Pack enthält viele DirectShow-Filter, die in den VisioForge SDKs für die Audio- und Videoverarbeitung verwendet werden. Mit unseren Filtern können Sie Text- oder Bildüberlagerungen hinzufügen, die Farbbalance ändern, Rauschunterdrückung, Deinterlace, Bewegungserkennung, GröÃenänderung, Zuschneiden oder Drehen durchführen. Verschiedene Audiobearbeitungen, einschlieÃlich Equalizer und Lautstärkeanhebung, sind ebenfalls verfügbar.

#### DOWNLOADS
[Testversion](https://s3.us-west-2.amazonaws.com/files.visioforge.com/trials/visioforge\_processing\_filters\_pack\_setup.exe)[Samples auf GitHub](https://github.com/visioforge/.Net-SDK-s-samples)

#### KAUFEN
[Preise prüfen oder bestellen](https://www.visioforge.com/de/buy)

#### HILFE
[Online-Hilfe](/help/)[Lizenzvereinbarung](/help/docs/eula/)
## Enthaltene DirectShow-Filter:
- AsyncEx-Speicherquellenfilter (ermöglicht das Lesen von Daten aus dem Speicher oder Stream)
- Videobearbeitung und Effektfilter
- Bildüberlagerung (BMP, JPEG, PNG, GIF, RGB-Daten)
- Text-Overlay (Schriftart, Stil, GröÃe usw. wählen)
- Videotransparenz
- Helligkeit, Kontrast, Sättigung, Farbton, usw.
- Deinterlace (verschiedene Algorithmen sind je nach Qualität und Leistung verfügbar)
- Denoise
- Bewegungserkennung (mit Bewegungsstufenerkennung, Matrix und Highlights)
- chroma-key (GPU-optimiert)
- Audioverarbeitung und Effektfilter
- Volumenverstärker
- Equalizer
- 3D-Bass-System
- verschiedene andere Effekte
- Filter zur GröÃenänderung von Videos
- Video-Zuschnittfilter
- Video-Spiegelungs-/Drehungsfilter
- PIP-Filter (Bild-im-Bild)
- Filter für Bildschirmaufnahmen (Direct3D 9/Direct3D 11/DXGI/Desktop Duplication)
- Video-Farbraumkonverter (RGB- und YUV-Formate)
- DirectX-beschleunigte Videoverarbeitung
Das SDK enthält APIs für .Net (C#/VB.Net), C++ und Delphi und ist damit vielseitig für verschiedene Programmiersprachen einsetzbar. Sie können SDK-Beispiele ausprobieren oder die GraphEdit/[GraphStudioNext](https://github.com/cplussharp/graph-studio-next) -Werkzeuge testen.
Ein praktisches .Net-API-Paket ist über NuGet verfügbar und vereinfacht die Integration für .Net-Entwickler.
Für die Video- und Audiobearbeitung ist das [Encoding Filters Pack](https://www.visioforge.com/de/encoding-filters-pack) für das Speichern und Streamen von Medien unerlässlich. Zusätzlich sind die [FFMPEG Source DirectShow Filters](https://www.visioforge.com/de/ffmpeg-source-directshow-filter) und [VLC Source DirectShow Filters](https://www.visioforge.com/de/vlc-source-directshow-filter) hilfreich für die Verarbeitung gängiger Video- und Audiodateiformate.
### Systemanforderungen
- Windows 11, Windows 10, Windows 8/8.1, Windows 7, Windows Vista, Windows Server 2012 und höher
- DirectX 10 oder höher
### Vertriebsrechte
Lizenzfreie Verbreitung.
### Beschränkungen des Versuchs
In der Testversion wird ein Wasserzeichen im Videofenster angezeigt.
### Mit dem Kauf des DirectShow Processing Filters Pack erhalten Sie folgende Vorteile:
- Unbegrenzte Nutzung
- Kein Nörgler-Bildschirm
- Kostenlose Minor- und Major-Upgrades innerhalb eines Jahres (nach einem Jahr funktioniert das SDK genauso wie vorher) für eine reguläre Lizenz und unbegrenzte Updates für unbegrenzte Zeit für die Lifetime-Lizenz
- Vorrangige Unterstützung und Fehlerbehebung
Die reguläre Lizenz wird jährlich in Rechnung gestellt und automatisch um ein Jahr verlängert. Sie können Ihr Abonnement jederzeit kündigen.
---END OF PAGE---
# Page: https://www.visioforge.com/es/processing-filters-pack
# DirectShow Processing Filters Pack
versión 15.1
VisioForge DirectShow Processing Filters Pack contiene muchos filtros DirectShow utilizados en los SDK de VisioForge para el procesamiento de audio y vÃdeo. Con nuestros filtros, puede añadir texto o superposición de imágenes, cambiar el balance de color, realizar denoising, desentrelazado, detección de movimiento, cambiar el tamaño, recortar o rotar. También dispone de varios procesadores de audio, como ecualizador y aumento de volumen.

#### DESCARGAS
[Versión de evaluación](https://s3.us-west-2.amazonaws.com/files.visioforge.com/trials/visioforge\_processing\_filters\_pack\_setup.exe)[Samples en GitHub](https://github.com/visioforge/.Net-SDK-s-samples)

#### COMPRAR
[Consultar precios o hacer un pedido](https://www.visioforge.com/es/buy)

#### AYUDA
[Ayuda en lÃnea](/help/)[Acuerdo de licencia](/help/docs/eula/)
## Filtros DirectShow incluidos:
- Filtro de origen de memoria AsyncEx (permite leer datos de la memoria o del flujo)
- Filtro de procesamiento y efectos de vÃdeo
- superposición de imágenes (BMP, JPEG, PNG, GIF, datos RGB)
- superposición de texto (elegir fuente, estilo, tamaño, etc.)
- transparencia de vÃdeo
- ajustes de brillo, contraste, saturación y tono
- desentrelazado (hay varios algoritmos disponibles en función de la calidad y el rendimiento)
- eliminación de ruido
- detección de movimiento (con detección de nivel de movimiento, matriz y resaltado)
- chroma-key (optimizado para GPU)
- Filtro de efectos y procesamiento de audio
- amplificador de volumen
- ecualizador
- sistema de bajos 3D
- otros efectos
- Filtro de redimensionamiento de vÃdeo
- Filtro de recorte de vÃdeo
- Filtro de giro/rotación de vÃdeo
- Filtro PIP (imagen en imagen)
- Filtro de captura de pantalla (Direct3D 9/Direct3D 11/DXGI/Desktop Duplication)
- Convertidores de espacio de color de vÃdeo (formatos RGB y YUV)
- Procesamiento de vÃdeo acelerado por DirectX
El SDK incluye API para .Net (C#/VB.Net), C++ y Delphi, lo que lo hace versátil para diferentes lenguajes de programación. Puede probar muestras del SDK o utilizar las herramientas GraphEdit/[GraphStudioNext](https://github.com/cplussharp/graph-studio-next) para realizar pruebas.
En NuGet hay disponible un práctico paquete de API .Net que simplifica la integración para los desarrolladores .Net.
Para el procesamiento de vÃdeo y audio, el [Encoding Filters Pack](https://www.visioforge.com/es/encoding-filters-pack) es esencial para guardar y transmitir medios. Además, los [FFMPEG Source DirectShow Filters](https://www.visioforge.com/es/ffmpeg-source-directshow-filter) y [VLC Source DirectShow Filters](https://www.visioforge.com/es/vlc-source-directshow-filter) son útiles para manejar los formatos de archivo de vÃdeo y audio más populares.
### Requisitos del sistema
- Windows 11, Windows 10, Windows 8/8.1, Windows 7, Windows Vista, Windows Server 2012 y posteriores
- DirectX 10 o posterior
### Derechos de distribución
Distribución sin derechos de autor.
### Limitaciones de la versión de prueba
La versión de prueba muestra una marca de agua en la ventana de vÃdeo.
### La compra de DirectShow Processing Filters Pack le proporcionará los siguientes beneficios:
- Uso ilimitado
- Sin pantalla de licencia
- Actualizaciones menores y mayores gratuitas en el plazo de un año (después de un año, el SDK funcionará igual que antes) para una licencia normal y actualizaciones ilimitadas por tiempo ilimitado para la licencia vitalicia.
- Asistencia y correcciones prioritarias
La licencia normal se factura anualmente y se renueva automáticamente cada año. Puede cancelar su suscripción en cualquier momento.
---END OF PAGE---
# Page: https://www.visioforge.com/it/processing-filters-pack
# DirectShow Processing Filters Pack
versione 15.1
Il VisioForge DirectShow Processing Filters Pack contiene molti filtri DirectShow utilizzati negli SDK di VisioForge per l'elaborazione di audio e video. Con i nostri filtri è possibile aggiungere testo o immagini in sovrimpressione, modificare il bilanciamento del colore, eseguire il denoising, il deinterlacciamento, il rilevamento del movimento, ridimensionare, ritagliare o ruotare. Sono disponibili anche diverse elaborazioni audio, tra cui l'equalizzatore e l'aumento del volume.

#### DOWNLOADS
[Versione di prova](https://s3.us-west-2.amazonaws.com/files.visioforge.com/trials/visioforge\_processing\_filters\_pack\_setup.exe)[Samples su GitHub](https://github.com/visioforge/.Net-SDK-s-samples)

#### ACQUISTO
[Controllare i prezzi o ordinare](https://www.visioforge.com/it/buy)

#### AIUTO
[Guida in linea](/help/)[Contratto di licenza](/help/docs/eula/)
## Filtri DirectShow inclusi:
- Filtro sorgente di memoria AsyncEx (consente di leggere i dati dalla memoria o dal flusso)
- Filtro di elaborazione video ed effetti
- sovrapposizione di immagini (BMP, JPEG, PNG, GIF, dati RGB)
- sovrapposizione di testo (scegliere il carattere, lo stile, la dimensione, ecc.)
- trasparenza video
- luminosità , contrasto, saturazione, tonalità , ecc.
- deinterlacciamento (sono disponibili diversi algoritmi a seconda della qualità e delle prestazioni)
- denoise
- rilevamento del movimento (con rilevamento del livello di movimento, matrice ed evidenziazione)
- chroma-key (ottimizzato per la GPU)
- Filtro per l'elaborazione audio e gli effetti
- amplificatore di volume
- equalizzatore
- sistema 3D-bass
- vari altri effetti
- Filtro di ridimensionamento video
- Filtro di ritaglio video
- Filtro di ribaltamento/rotazione video
- Filtro PIP (Picture-In-Picture)
- Filtro di cattura dello schermo (Direct3D 9/Direct3D 11/DXGI/Desktop Duplication)
- Convertitori di spazi colore video (formati RGB e YUV)
- Elaborazione video accelerata da DirectX
L'SDK include API per .Net (C#/VB.Net), C++ e Delphi, rendendolo versatile per diversi linguaggi di programmazione. Ã possibile provare i campioni dell'SDK o utilizzare gli strumenti GraphEdit/[GraphStudioNext](https://github.com/cplussharp/graph-studio-next) per effettuare i test.
Su NuGet è disponibile un comodo pacchetto API .Net, che semplifica l'integrazione per gli sviluppatori .Net.
Per l'elaborazione di video e audio, il [Encoding Filters Pack](https://www.visioforge.com/it/encoding-filters-pack) è essenziale per il salvataggio e lo streaming dei media. Inoltre, i [FFMPEG Source DirectShow Filters](https://www.visioforge.com/it/ffmpeg-source-directshow-filter) e [VLC Source DirectShow Filter](https://www.visioforge.com/it/vlc-source-directshow-filter) sono utili per gestire i formati di file video e audio più diffusi.
### Requisiti di sistema
- Windows 11, Windows 10, Windows 8/8.1, Windows 7, Windows Vista, Windows Server 2012 e versioni successive
- DirectX 10 o successive
### Diritti di distribuzione
Distribuzione gratuita.
### Limiti della prova
La versione di prova visualizza una filigrana nella finestra del video.
### L'acquisto di DirectShow Processing Filters Pack offre i seguenti vantaggi:
- Utilizzo illimitato
- Nessun nag-screen
- Aggiornamenti minori e maggiori gratuiti entro un anno (dopo un anno, l'SDK funzionerà come prima) per una licenza regolare e aggiornamenti illimitati per un tempo illimitato per la licenza a vita
- Assistenza e correzioni prioritarie
La licenza regolare viene fatturata annualmente e rinnovata automaticamente ogni anno. Ã possibile annullare l'abbonamento in qualsiasi momento.
---END OF PAGE---
# Page: https://www.visioforge.com/de/video-encryption-sdk
# Video Encryption SDK
Version 11.3
Mit dem Video Encryption SDK können Benutzer Videos im MP4 H.264/AAC-Format kodieren und entweder mit einem Kennwort oder mit binären Daten verschlüsseln. Innerhalb dieses SDKs werden DirectShow-Filter für die nahtlose Integration in jede DirectShow-Anwendung bereitgestellt. Diese Filter verfügen über implementierte Schnittstellen zur einfachen Konfiguration von Filterparametern und vereinfachen so den Prozess der Sicherung Ihrer Videoinhalte.

#### DOWNLOADS
[Testversion](https://s3.us-west-2.amazonaws.com/files.visioforge.com/trials/visioforge\_video\_encryption\_sdk\_setup.exe)[Samples auf GitHub](https://github.com/visioforge)[Video Encryptor Beispiel](https://files.visioforge.com/trials/visioforge\_video\_encryptor\_setup.exe)

#### KAUFEN
[Preise prüfen oder bestellen](https://www.visioforge.com/de/buy)

#### HILFE
[Online-Hilfe](/help/)[Lizenzvereinbarung](/help/docs/eula/)
## Die wichtigsten Funktionen des VisioForge Video Encryption SDK sind:
- Unterstützung von H264-Encoderprofilen/-stufen, Bitrate, Qualität und anderen Eigenschaften
- Optionale GPU-Nutzung für die Kodierung
- Unterstützung mehrerer Audioströme
- Unterstützung von HD- und 4K-Videos
- x86- und x64-Versionen
- Für die Verschlüsselung von Datenströmen können AES-128 und AES-256 verwendet werden.
- Multithreading
SDK kann Strings, Dateien und Binärdaten als Verschlüsselungsschlüssel verwenden. SDK verwendet einen offenen AES-256-Kryptoalgorithmus zur Verschlüsselung von Video- und Audioströmen. Sie können verschlüsselte Videodateien wie jede andere Videodatei suchen. Für den Audiostrom wird der AAC-Codec und für den Videostrom der H264-Codec verwendet. AuÃerdem können Sie eine beliebige H264/AAC-Quelldatei oder einen Stream ohne erneute Kodierung muxen.
Das "Video Encryption SDK" ist bereits integriert in [Video Capture SDK .Net](https://www.visioforge.com/de/video-capture-sdk-net), [Video Edit SDK .Net](https://www.visioforge.com/de/video-edit-sdk-net), und [Media Player SDK .Net](https://www.visioforge.com/de/media-player-sdk-net) erfordert aber eine unabhängige Lizenz.
AES-256 kann in einigen Ländern lizenzpflichtig sein. Das SDK kann aus Kompatibilitätsgründen auch AES-128 verwenden. Bitte kontaktieren Sie uns, wenn Sie alternative Verschlüsselungsalgorithmen verwenden möchten.
Video Encryption SDK kann in jedem DirectShow-Code als zwei Filter verwendet werden: Muxer (Verschlüsseler) und Demuxer (Entschlüsseler). Seeking wird für Demuxer unterstützt.
Sie können SDK als Kernstück Ihres DRM-Videodateisystems verwenden.
### Filterverwendung in einem DirectShow-Graph

## Video Encryptor Anwendungsbeispiel
Mit dem Video Encryptor Beispiel können Sie Ihre Videodateien mit einem Passwort schützen. Alle gängigen Videoformate werden unterstützt. Sie können Ihren bevorzugten Media Player verwenden, um geschützte Dateien abzuspielen. Die Anwendung verwendet das Video Encryption SDK als Engine und unterstützt die Nvidia CUDA-Technologie, um die Verschlüsselungsgeschwindigkeit zu erhöhen (auf Computern mit Nvidia-Grafikkarten).

### Systemanforderungen
- Windows 11, Windows 10, Windows 8/8.1, Windows 7, Windows Vista, Windows Server 2012 und höher
- DirectX 10 oder höher
### Vertriebsrechte
Lizenzfreie Verbreitung.
### Beschränkungen des Versuchs
In der Testversion wird ein Wasserzeichen im Videofenster angezeigt.
### Mit dem Kauf des Video Encryption SDK erhalten Sie folgende Vorteile:
- Unbegrenzte Nutzung
- Kein Nörgler-Bildschirm
- Kostenlose Minor- und Major-Upgrades innerhalb eines Jahres (nach einem Jahr funktioniert das SDK genauso wie vorher) für eine reguläre Lizenz und unbegrenzte Updates für unbegrenzte Zeit für die Lifetime-Lizenz
- Vorrangige Unterstützung und Fehlerbehebung
Die reguläre Lizenz wird jährlich in Rechnung gestellt und automatisch um ein Jahr verlängert. Sie können Ihr Abonnement jederzeit kündigen.
---END OF PAGE---
# Page: https://www.visioforge.com/es/video-encryption-sdk
# Video Encryption SDK
versión 11.3
El SDK de cifrado de vÃdeo permite a los usuarios codificar vÃdeo en formato MP4 H.264/AAC y aplicar cifrado utilizando una contraseña o datos binarios. Dentro de este SDK, se proporcionan filtros DirectShow para una integración perfecta en cualquier aplicación DirectShow. Estos filtros vienen con interfaces implementadas para una configuración sencilla de los parámetros del filtro, lo que simplifica el proceso de proteger el contenido de vÃdeo.

#### DESCARGAS
[Versión de evaluación](https://s3.us-west-2.amazonaws.com/files.visioforge.com/trials/visioforge\_video\_encryption\_sdk\_setup.exe)[Samples en GitHub](https://github.com/visioforge)[Muestra de Video Encryptor](https://files.visioforge.com/trials/visioforge\_video\_encryptor\_setup.exe)

#### COMPRAR
[Consultar precios o hacer un pedido](https://www.visioforge.com/es/buy)

#### AYUDA
[Ayuda en lÃnea](/help/)[Acuerdo de licencia](/help/docs/eula/)
## Las principales caracterÃsticas de VisioForge Video Encryption SDK incluyen:
- Compatibilidad con perfiles/niveles de codificador H264, velocidad de bits, calidad y otras propiedades
- Uso opcional de la GPU para la codificación
- Admite varios flujos de audio
- Compatibilidad con vÃdeo HD y 4K
- Versiones x86 y x64
- Se pueden utilizar AES-128 y AES-256 para el cifrado de flujos.
- Multihilo
SDK puede utilizar cadenas, archivos y datos binarios como claves de cifrado. SDK utiliza un algoritmo criptográfico abierto AES-256 para cifrar secuencias de vÃdeo y audio. Puede buscar archivos de vÃdeo cifrados como cualquier otro archivo de vÃdeo. Se utilizará el códec AAC para el flujo de audio y el códec H264 para el flujo de vÃdeo. Además, puedes remezclar cualquier archivo o flujo H264/AAC sin recodificarlo.
"Video Encryption SDK" ya está integrado en [Video Capture SDK .Net](https://www.visioforge.com/es/video-capture-sdk-net), [Video Edit SDK .Net](https://www.visioforge.com/es/video-edit-sdk-net), y [Media Player SDK .Net](https://www.visioforge.com/es/media-player-sdk-net) pero requiere una licencia independiente.
AES-256 puede requerir licencia en algunos paÃses. SDK también puede utilizar AES-128 por compatibilidad. Póngase en contacto con nosotros si desea utilizar algoritmos de cifrado alternativos.
Video Encryption SDK puede ser usado en cualquier código DirectShow como dos filtros: muxer (encriptador) y demuxer (desencriptador). Se admite la búsqueda para demuxer.
Puede utilizar SDK como núcleo de su sistema de archivos de vÃdeo DRM.
### Uso de filtro en un gráfico DirectShow

## Ejemplo de aplicación Video Encryptor
La muestra Video Encryptor le permite proteger sus archivos de vÃdeo con una contraseña. Soporta todos los formatos de vÃdeo populares. Puede utilizar su reproductor multimedia favorito para reproducir los archivos protegidos. La aplicación utiliza el Video Encryption SDK como motor y soporta la tecnologÃa Nvidia CUDA para aumentar la velocidad de cifrado (en ordenadores con tarjetas gráficas Nvidia).

### Requisitos del sistema
- Windows 11, Windows 10, Windows 8/8.1, Windows 7, Windows Vista, Windows Server 2012 y posteriores
- DirectX 10 o posterior
### Derechos de distribución
Distribución sin derechos de autor.
### Limitaciones de la versión de prueba
La versión de prueba muestra una marca de agua en la ventana de vÃdeo.
### La compra de Video Encryption SDK le proporcionará los siguientes beneficios:
- Uso ilimitado
- Sin pantalla de licencia
- Actualizaciones menores y mayores gratuitas en el plazo de un año (después de un año, el SDK funcionará igual que antes) para una licencia normal y actualizaciones ilimitadas por tiempo ilimitado para la licencia vitalicia.
- Asistencia y correcciones prioritarias
La licencia normal se factura anualmente y se renueva automáticamente cada año. Puede cancelar su suscripción en cualquier momento.
---END OF PAGE---
# Page: https://www.visioforge.com/it/video-encryption-sdk
# Video Encryption SDK
versione 11.3
L'SDK per la crittografia video consente agli utenti di codificare video in formato MP4 H.264/AAC e di applicare la crittografia utilizzando una password o dati binari. All'interno di questo SDK vengono forniti filtri DirectShow per una perfetta integrazione in qualsiasi applicazione DirectShow. Questi filtri sono dotati di interfacce implementate per una semplice configurazione dei parametri del filtro, semplificando il processo di protezione dei contenuti video.

#### DOWNLOADS
[Versione di prova](https://s3.us-west-2.amazonaws.com/files.visioforge.com/trials/visioforge\_video\_encryption\_sdk\_setup.exe)[Samples su GitHub](https://github.com/visioforge)[Esempio di Video Encryptor](https://files.visioforge.com/trials/visioforge\_video\_encryptor\_setup.exe)

#### ACQUISTO
[Controllare i prezzi o ordinare](https://www.visioforge.com/it/buy)

#### AIUTO
[Guida in linea](/help/)[Contratto di licenza](/help/docs/eula/)
## Le principali caratteristiche di VisioForge Video Encryption SDK includono:
- Supporto di profili/livelli di codifica H264, bitrate, qualità e altre proprietÃ
- Uso opzionale della GPU per la codifica
- Supporto di più flussi audio
- Supporto video HD e 4K
- Versioni x86 e x64
- Per la crittografia dei flussi è possibile utilizzare AES-128 e AES-256.
- Multithreading
SDK può utilizzare stringhe, file e dati binari come chiavi di crittografia. L'SDK utilizza un algoritmo di crittografia aperto AES-256 per crittografare i flussi video e audio. à possibile cercare i file video crittografati come qualsiasi altro file video. Per il flusso audio viene utilizzato il codec AAC, mentre per il flusso video viene utilizzato il codec H264. Inoltre, è possibile ri-muxare qualsiasi file o flusso H264/AAC di origine senza ricodificare.
"Video Encryption SDK" è già integrato in [Video Capture SDK .Net](https://www.visioforge.com/it/video-capture-sdk-net), [Video Edit SDK .Net](https://www.visioforge.com/it/video-edit-sdk-net), e [Media Player SDK .Net](https://www.visioforge.com/it/media-player-sdk-net) ma richiede una licenza indipendente.
AES-256 può richiedere una licenza in alcuni Paesi. Per compatibilità , l'SDK può utilizzare anche AES-128. Contattateci se volete utilizzare algoritmi di crittografia alternativi.
Il Video Encryption SDK può essere utilizzato in qualsiasi codice DirectShow come due filtri: muxer (encryptor) e demuxer (decryptor). Per il demuxer è supportata la ricerca.
à possibile utilizzare l'SDK come nucleo del sistema di file video DRM.
### Uso del filtro in un grafico DirectShow

## Esempio di applicazione Video Encryptor
Il campione di Video Encryptor consente di proteggere i file video con una password. Sono supportati tutti i formati video più diffusi. à possibile utilizzare il proprio lettore multimediale preferito per riprodurre i file protetti. L'applicazione utilizza il Video Encryption SDK come motore e supporta la tecnologia Nvidia CUDA per aumentare la velocità di crittografia (su computer con schede grafiche Nvidia).

### Requisiti di sistema
- Windows 11, Windows 10, Windows 8/8.1, Windows 7, Windows Vista, Windows Server 2012 e versioni successive
- DirectX 10 o successive
### Diritti di distribuzione
Distribuzione gratuita.
### Limiti della prova
La versione di prova visualizza una filigrana nella finestra del video.
### L'acquisto dell'SDK di crittografia video offre i seguenti vantaggi:
- Utilizzo illimitato
- Nessun nag-screen
- Aggiornamenti minori e maggiori gratuiti entro un anno (dopo un anno, l'SDK funzionerà come prima) per una licenza regolare e aggiornamenti illimitati per un tempo illimitato per la licenza a vita
- Assistenza e correzioni prioritarie
La licenza regolare viene fatturata annualmente e rinnovata automaticamente ogni anno. Ã possibile annullare l'abbonamento in qualsiasi momento.
---END OF PAGE---
# Page: https://www.visioforge.com/de/all-in-one-media-framework
# All-in-One Media Framework (Delphi/ActiveX)
Version 11.2
Das Framework enthält mehrere Bibliotheken für die Videoaufnahme, -bearbeitung und -wiedergabe. Die [Videoaufnahme](https://www.visioforge.com/de/video-capture-sdk-net) Der Kern ermöglicht die Aufnahme von Video und Audio von verschiedenen Quellen wie Webcams, IP-Kameras oder Bildschirmen. Der Videobearbeitungskern ermöglicht das Schneiden, Zusammenfügen, Verarbeiten und Neukodieren von Dateien. Der Mediaplayer-Kern kann Video- und Audiodateien sowie Netzwerkstreams abspielen. Alle Kerne unterstützen Video- und Audioeffekte, Framegrabbing, Bild-in-Bild und On-Screen-Display (OSD).
- 
- 
- 
- 


#### DOWNLOADS
[Delphi](https://s3.us-west-2.amazonaws.com/files.visioforge.com/trials/visioforge\_media\_framework\_delphi\_trial.exe)[ActiveX](https://s3.us-west-2.amazonaws.com/files.visioforge.com/trials/visioforge\_media\_framework\_activex\_trial.exe)[Samples auf GitHub](https://github.com/visioforge)

#### KAUFEN
[Preise prüfen oder bestellen](https://www.visioforge.com/de/buy)

#### HILFE
[Online-Hilfe](/help/docs/delphi/videocapture/)[Ãnderungsliste](/help/docs/delphi/videocapture/changelog/)[Lizenzvereinbarung](/help/docs/eula/)
### Der Kauf des Frameworks bringt Ihnen folgende Vorteile:
- Unbegrenzte Nutzung
- Kein Nörgler-Bildschirm
- Kostenlose Minor- und Major-Upgrades innerhalb eines Jahres (nach einem Jahr funktioniert das SDK genauso wie vorher) für eine reguläre Lizenz und unbegrenzte Updates für unbegrenzte Zeit für die Lifetime-Lizenz
- Vorrangige Unterstützung und Fehlerbehebung
Die reguläre Lizenz wird jährlich in Rechnung gestellt und automatisch um ein Jahr verlängert. Sie können Ihr Abonnement jederzeit kündigen.
Das SDK ist für die nicht-kommerzielle Nutzung kostenlos. Bitte kontaktieren Sie uns, um eine kostenlose Lizenz zu erhalten.
## Merkmale und Fähigkeiten
### Unterstützte Eingabegeräte:
- MPEG-2-Camcorder der Formate DV und HDV
- USB-Webcams und verschiedene Aufnahmegeräte, einschlieÃlich Unterstützung für 4K-Auflösung
- PCI-basierte Videoerfassungskarten
- TV-Tuner, sowohl mit als auch ohne eingebauten MPEG-Encoder
- IP-Kameras und Server, die die Protokolle JPEG/MJPEG, MPEG-4 und H.264 über HTTP, RTSP oder RTMP verwenden, mit Unterstützung für HD-Streams
- ONVIF-kompatible IP-Kameras mit PTZ-Steuerung
- NDI-Quellen mit DirectShow-Brücke
- Verschiedene Audioaufnahmegeräte und Soundkarten
- ASIO-kompatible Audioquellen
- Blackmagic Decklink-Karten
### Unterstützte Eingabeformate:
- MP4
- MOV
- AVI
- MPEG-TS/MPEG-PS
- MKV (Matroska)
- DV
- ASF/WMV
- MP3
- M4A/AAC
- WMA
- OGG Vorbis
- OPUS
- Speex
SDK kann Video- und Audiodateien mit Systemdecodern, FFMPEG oder libVLC dekodieren.
### Unterstützte Ausgabeformate:
- AVI-Dateien mit Unterstützung für mehrere Codecs wie MJPEG, DivX, XviD und x264
- WMV-Dateien sind mit benutzerdefinierten WMV-Profilen und -Einstellungen kompatibel, z. B. Kodierung mit variabler Bitrate (VBR), unkomprimierte Audio- oder Videoströme, GröÃenanpassung von Videos, Anpassung der Pufferung, Anpassung der Bildrate usw.
- DV- und MPEG-Dateien direkt von DV/HDV-Camcordern und TV-Tunern mit internem MPEG-Encoder (über DirectCapture-Technologie)
- Erfassung von DV-Dateien von jedem kompatiblen Videoaufnahmegerät
- MPEG-1/2/4-Dateien, einschlieÃlich der VCD/SVCD/DVD-Standardprofile, und FLV über einen FFMPEG-Wrapper
- WebM-Dateien mit VP8/VP9-Videocodec und Vorbis-Audiocodec
- MP4-Dateien mit H264/HEVC + AAC-Codecs, die CPU- oder GPU-Beschleunigung nutzen (Nvidia, AMD/ATI, Intel)
- WAV, mit Optionen für komprimiertes oder PCM-Format
- WMA (Windows Media Audio)
- MP3, mit LAME-Kodierung
- Ogg Vorbis
- Benutzerdefinierte Ausgabeoptionen durch DirectShow-Filter von Drittanbietern
- Netzwerk-Streaming mit FFMPEG
- AES-verschlüsselte Videoausgabe
### Videobearbeitung und -effekte:
- Bild- und Text-Overlays
- einstellbare Videotransparenz
- Regler für Helligkeit, Kontrast, Sättigung und Farbton
- Deinterlace
- Rauschunterdrückung
- Schwenken und Zoomen
- GröÃenänderung auf jede Auflösung
- Chroma-Key-Compositing
- Bewegungserkennung
- Bild-in-Bild
- Bildschirmanzeige (OSD)
- Integration mit DirectShow-Filtern von Drittanbietern
- Schnittstelle zur Kamerasteuerung
### Audiobearbeitung und Effekte:
- Volumenverstärker
- Equalizer
- 3D-Bass-System
- Normalisierung
- automatische/manuelle Verstärkung
- es gibt viele andere Auswirkungen
### Anwendungsbeispiele:
- Audioaufnahme
- DV-Aufnahme
- IP-Erfassung
- Bildschirmaufnahme
- Einfache Videoaufnahme
- Hauptaufnahme-Demo
- Hauptbearbeitungsdemo
- Hauptspieler-Demo
- Audioplayer
- DVD-Player
- Speicherwiedergabe
- Videoplayer
### Entwicklungsplattformen:
- Visual Studio 2005 und höher: Visual C#, Visual C++, Visual Basic .NET
- Delphi 6 / 7 / 2005 / 2006 / 2007 / 2009 / 2010 / XE / XE2 / XE3 / XE4 / XE5 / XE6 / XE7 /
- Visual Studio 6: Visual C++, Visual Basic 6
- Borland C++ Builder 5 und höher
- kann mit anderen ActiveX-kompatiblen Anwendungen wie Microsoft Access, Word, Excel, FrontPage, Powerbuilder, usw. verwendet werden.
- x86- und x64-Versionen
### Systemanforderungen
- Windows 11, Windows 10, Windows 8/8.1, Windows 7, Windows Vista, Windows Server 2012 und höher
- .Net Framework 4.0 oder höher (für ActiveX-basierte .Net-Demoanwendungen)
- DirectX 9 oder höher
### Vertriebsrechte
Lizenzfreie Verbreitung.
### Beschränkungen des Versuchs
In der Testversion wird ein Wasserzeichen im Videofenster angezeigt.

#### EDITION

#### STANDARD

#### PROFESSIONELL

#### PREMIUM
Unterstützte Eingabegeräte und andere Quellen
- Web-Kameras
- TV-Tuner
- DV- und MPEG-Camcorder
- Bildschirmaufnahme
- HTTP / RTSP / ONVIF IP-Kameras
- UDP, TCP, RTMP und andere Netzwerkströme
- Zusätzliche Engines für Netzwerk-Streams
Video-Vorschau
Frame Grabber
Videoverarbeitung
Audioverarbeitung
Unterstützung von HD- und 4K-Videos
Fernsehtuning
Netzwerk-Streaming im WMV-Format
Netzwerk-Streaming über RTMP / RTSP / UDP
Chroma-Schlüssel
Bewegungserkennung
Videoverarbeitung mit DirectShow-Filtern
OSD (Bildschirmanzeige)
Bild-im-Bild-Darstellung
Name der Ausgabedatei on-the-fly ändern
Mehrere Ausgabebildschirme
GPU-beschleunigte Videoeffekte
Ausgabe an die virtuelle Kamera SDK
Video Encryption SDK Unterstützung
Ausgabeformate
- AVI
- WMV (Windows Media Video)
- WMA (Windows Media Audio)
- WAV
- MP3
- Ogg Vorbis
- DV-Video
- DV / MPEG-1/2/4 (über TV-Tuner mit internem MPEG-Encoder oder DV/HDV-Camcorder)
- Flash-Video (FLV) mit FFMPEG
- WebM
- Benutzerdefinierte Ausgabeformate mit externen DirectShow-Filtern
- MPEG-1/2/4 mit FFMPEG
- MP4 H264/AAC über Software, Intel QuickSync oder nVidia NVENC / CUDA
SDK enthält optionale FFMPEG- und libVLC-Bibliotheken, die unter der LGPL v2.1 lizenziert sind.
---END OF PAGE---
# Page: https://www.visioforge.com/es/all-in-one-media-framework
# All-in-One Media Framework (Delphi/ActiveX)
versión 11.2
El marco incluye varias bibliotecas diseñadas para la captura, edición y reproducción de vÃdeo. [captura de vÃdeo](https://www.visioforge.com/es/video-capture-sdk-net) El núcleo permite grabar video y audio desde diversas fuentes, como cámaras web, cámaras IP o pantallas. El núcleo de edición de video permite cortar, unir, procesar y recodificar archivos. El núcleo del reproductor multimedia puede reproducir archivos de video y audio, asà como transmisiones de red. Todos los núcleos admiten efectos de video y audio, captura de fotogramas, imagen en imagen y visualización en pantalla (OSD).
- 
- 
- 
- 


#### DESCARGAS
[Delfos](https://s3.us-west-2.amazonaws.com/files.visioforge.com/trials/visioforge\_media\_framework\_delphi\_trial.exe)[ActiveX](https://s3.us-west-2.amazonaws.com/files.visioforge.com/trials/visioforge\_media\_framework\_activex\_trial.exe)[Samples en GitHub](https://github.com/visioforge)

#### COMPRAR
[Consultar precios o hacer un pedido](https://www.visioforge.com/es/buy)

#### AYUDA
[Ayuda en lÃnea](/help/docs/delphi/videocapture/)[Registro de cambios](/help/docs/delphi/videocapture/changelog/)[Acuerdo de licencia](/help/docs/eula/)
### La compra de Framework le proporcionará las siguientes ventajas:
- Uso ilimitado
- Sin pantalla de licencia
- Actualizaciones menores y mayores gratuitas en el plazo de un año (después de un año, el SDK funcionará igual que antes) para una licencia normal y actualizaciones ilimitadas por tiempo ilimitado para la licencia vitalicia.
- Asistencia y correcciones prioritarias
La licencia normal se factura anualmente y se renueva automáticamente cada año. Puede cancelar su suscripción en cualquier momento.
El SDK es gratuito para uso no comercial. Póngase en contacto con nosotros para obtener una licencia gratuita.
## CaracterÃsticas y capacidades
### Dispositivos de entrada compatibles:
- Videocámaras MPEG-2 de formatos DV y HDV
- Cámaras web USB y varios dispositivos de captura, incluida la compatibilidad con resolución 4K
- Tarjetas de captura de vÃdeo basadas en PCI
- Sintonizadores de TV, con y sin codificador MPEG integrado
- Cámaras IP y servidores que utilizan los protocolos JPEG/MJPEG, MPEG-4 y H.264 a través de HTTP, RTSP o RTMP, con compatibilidad para secuencias HD
- Cámaras IP compatibles con ONVIF con controles PTZ
- Fuentes NDI con puente DirectShow
- Varios dispositivos de captura de audio y tarjetas de sonido
- Fuentes de audio compatibles con ASIO
- Tarjetas Blackmagic Decklink
### Formatos de entrada compatibles:
- MP4
- MOV
- AVI
- MPEG-TS/MPEG-PS
- MKV (Matroska)
- DV
- ASF/WMV
- MP3
- M4A/AAC
- AMM
- OGG Vorbis
- OPUS
- Speex
SDK puede descodificar archivos de vÃdeo y audio utilizando descodificadores del sistema, FFMPEG o libVLC.
### Formatos de salida compatibles:
- AVI compatibles con varios códecs, como MJPEG, DivX, XviD y x264
- Los archivos WMV ofrecen compatibilidad con perfiles y ajustes WMV personalizados, como codificación de velocidad de bits variable (VBR), flujos de audio o vÃdeo sin comprimir, dimensionamiento de vÃdeo, ajustes de almacenamiento en búfer, personalización de la velocidad de fotogramas, etc.
- Archivos DV y MPEG directamente desde videocámaras DV/HDV y sintonizadores de TV mediante el codificador MPEG interno (a través de la tecnologÃa DirectCapture)
- Adquisición de archivos DV desde cualquier dispositivo de captura de vÃdeo compatible
- Archivos MPEG-1/2/4, incluidos los perfiles estándar VCD/SVCD/DVD, y FLV mediante una envoltura FFMPEG
- Archivos WebM con códecs de vÃdeo VP8/VP9 y códec de audio Vorbis
- Archivos MP4 con códecs H264/HEVC + AAC, utilizando aceleración de CPU o GPU (Nvidia, AMD/ATI, Intel)
- WAV, con opciones de formato comprimido o PCM
- WMA (Windows Media Audio)
- MP3, utilizando codificación LAME
- Ogg Vorbis
- Opciones de salida personalizadas mediante filtros DirectShow de terceros
- Streaming en red con FFMPEG
- Salida de vÃdeo encriptado AES
### Procesamiento y efectos de vÃdeo:
- superposición de imágenes y texto
- transparencia de vÃdeo ajustable
- controles de brillo, contraste, saturación y tono
- desentrelazar
- reducción del ruido
- panorámica y zoom
- redimensionado a cualquier resolución
- chroma-key
- detección de movimiento
- Imagen en imagen
- On-Screen Display (OSD)
- integración con filtros DirectShow de terceros
- interfaz de control de la cámara
### Procesamiento y efectos de audio:
- amplificador de volumen
- ecualizador
- sistema de bajos 3D
- normalización
- ganancia auto/manual
- hay muchos otros efectos
### Ejemplos de aplicaciones:
- Captura de audio
- Captura DV
- Captura de IP
- Captura de pantalla
- Captura de vÃdeo sencilla
- Demostración de captura principal
- Demostración de edición principal
- Demo del jugador principal
- Reproductor de audio
- Reproductor de DVD
- Reproducción de memoria
- Reproductor de video
### Plataformas de desarrollo:
- Visual Studio 2005 y versiones posteriores: Visual C#, Visual C++, Visual Basic .NET
- Delphi 6 / 7 / 2005 / 2006 / 2007 / 2009 / 2010 / XE / XE2 / XE3 / XE4 / XE5 / XE6 / XE7 / XE8 / 10 / 10.1 / 10.2 / 10.3 / 10.4 / 11 / 12
- Visual Studio 6: Visual C++, Visual Basic 6
- Borland C++ Builder 5 y posteriores
- puede utilizarse con otras aplicaciones compatibles con ActiveX como Microsoft Access, Word, Excel, FrontPage, Powerbuilder, etc.
- Versiones x86 y x64
### Requisitos del sistema
- Windows 11, Windows 10, Windows 8/8.1, Windows 7, Windows Vista, Windows Server 2012 y posteriores
- .Net Framework 4.0 o posterior (para aplicaciones de demostración .Net basadas en ActiveX)
- DirectX 9 o posterior
### Derechos de distribución
Distribución sin derechos de autor.
### Limitaciones de la versión de prueba
La versión de prueba muestra una marca de agua en la ventana de vÃdeo.

#### EDICIÃN

#### ESTÃNDAR

#### PROFESIONAL

#### PREMIUM
Dispositivos de entrada y otras fuentes compatibles
- Cámaras web
- Sintonizadores de TV
- Videocámaras DV y MPEG
- Captura de pantalla
- HTTP / RTSP / ONVIF Cámaras IP
- UDP, TCP, RTMP y otros flujos de red
- Otros formatos de flujos de red
Avance en vÃdeo
Capturador de fotogramas
Tratamiento de vÃdeo
Tratamiento de audio
Compatibilidad con vÃdeo HD y 4K
Sintonización de TV
Transmisión en red en formato WMV
Transmisión en red mediante RTMP / RTSP / UDP
Chroma-key
Detección de movimiento
Tratamiento de vÃdeo mediante filtros DirectShow
OSD (On-Screen Display)
Picture-In-Picture
Cambiar el nombre del archivo de salida sobre la marcha
Múltiples pantallas de salida
Efectos de vÃdeo acelerados en la GPU
Salida a Virtual Camera SDK
Compatibilidad con Video Encryption SDK
Formatos de salida
- AVI
- WMV (Windows Media Video)
- WMA (Windows Media Audio)
- WAV
- MP3
- Ogg Vorbis
- VÃdeo DV
- DV / MPEG-1/2/4 (mediante sintonizador de TV con codificador MPEG interno o videocámara DV/HDV)
- VÃdeo Flash (FLV) con FFMPEG
- WebM
- Formatos de salida personalizados mediante filtros DirectShow externos
- MPEG-1/2/4 con FFMPEG
- MP4 H264/AAC mediante software, Intel QuickSync o nVidia NVENC / CUDA
El SDK contiene bibliotecas opcionales FFMPEG y libVLC con licencia LGPL v2.1.
---END OF PAGE---
# Page: https://www.visioforge.com/it/all-in-one-media-framework
# All-in-One Media Framework (Delphi/ActiveX)
versione 11.2
Il framework include diverse librerie progettate per l'acquisizione, la modifica e la riproduzione di video. [acquisizione video](https://www.visioforge.com/it/video-capture-sdk-net) Il core consente la registrazione di video e audio da diverse sorgenti, come webcam, telecamere IP o schermi. Il core di editing video consente di tagliare, unire, elaborare e ricodificare i file. Il core del lettore multimediale può riprodurre file video e audio, nonché flussi di rete. Tutti i core supportano effetti video e audio, acquisizione di fotogrammi, Picture-in-Picture e visualizzazione su schermo (OSD).
- 
- 
- 
- 


#### DOWNLOADS
[Delfi](https://s3.us-west-2.amazonaws.com/files.visioforge.com/trials/visioforge\_media\_framework\_delphi\_trial.exe)[ActiveX](https://s3.us-west-2.amazonaws.com/files.visioforge.com/trials/visioforge\_media\_framework\_activex\_trial.exe)[Samples su GitHub](https://github.com/visioforge)

#### ACQUISTO
[Controllare i prezzi o ordinare](https://www.visioforge.com/it/buy)

#### AIUTO
[Guida in linea](/help/docs/delphi/videocapture/)[Changelog](/help/docs/delphi/videocapture/changelog/)[Contratto di licenza](/help/docs/eula/)
### L'acquisto di Framework vi darà i seguenti vantaggi:
- Utilizzo illimitato
- Nessun nag-screen
- Aggiornamenti minori e maggiori gratuiti entro un anno (dopo un anno, l'SDK funzionerà come prima) per una licenza regolare e aggiornamenti illimitati per un tempo illimitato per la licenza a vita
- Assistenza e correzioni prioritarie
La licenza regolare viene fatturata annualmente e rinnovata automaticamente ogni anno. Ã possibile annullare l'abbonamento in qualsiasi momento.
L'SDK è gratuito per uso non commerciale. Contattateci per ottenere una licenza gratuita.
## Caratteristiche e capacitÃ
### Dispositivi di input supportati:
- Videocamere MPEG-2 nei formati DV e HDV
- Webcam USB e vari dispositivi di acquisizione, compreso il supporto della risoluzione 4K
- Schede di video capture basate su PCI
- Sintonizzatori TV, sia con che senza codificatore MPEG integrato
- Telecamere e server IP che utilizzano i protocolli JPEG/MJPEG, MPEG-4 e H.264 su HTTP, RTSP o RTMP, con supporto per flussi HD
- Telecamere IP conformi a ONVIF con controlli PTZ
- Sorgenti NDI con ponte DirectShow
- Vari dispositivi di acquisizione audio e schede audio
- Sorgenti audio compatibili con ASIO
- Schede Blackmagic Decklink
### Formati di ingresso supportati:
- MP4
- MOVIMENTO
- AVI
- MPEG-TS/MPEG-PS
- MKV (Matroska)
- DV
- ASF/WMV
- MP3
- M4A/AAC
- WMA
- OGG Vorbis
- OPUS
- Speex
L'SDK può decodificare i file video e audio utilizzando i decodificatori di sistema, FFMPEG o libVLC.
### Formati di uscita supportati:
- File AVI con supporto per diversi codec come MJPEG, DivX, XviD e x264
- I file WMV offrono la compatibilità con i profili e le impostazioni WMV personalizzati, come la codifica a bit rate variabile (VBR), i flussi audio o video non compressi, il dimensionamento dei video, le regolazioni del buffering, la personalizzazione della frequenza dei fotogrammi, ecc.
- File DV e MPEG direttamente da videocamere DV/HDV e sintonizzatori TV con encoder MPEG interno (tramite tecnologia DirectCapture)
- Acquisizione di file DV da qualsiasi dispositivo di acquisizione video compatibile
- File MPEG-1/2/4, compresi i profili standard VCD/SVCD/DVD, e FLV tramite un wrapper FFMPEG
- File WebM con codec video VP8/VP9 e codec audio Vorbis
- File MP4 con codec H264/HEVC + AAC, utilizzando l'accelerazione della CPU o della GPU (Nvidia, AMD/ATI, Intel)
- WAV, con opzioni per il formato compresso o PCM
- WMA (Windows Media Audio)
- MP3, con codifica LAME
- Ogg Vorbis
- Opzioni di output personalizzate tramite filtri DirectShow di terze parti
- Streaming di rete con FFMPEG
- Uscita video con crittografia AES
### Elaborazione video ed effetti:
- sovrapposizioni di immagini e testo
- trasparenza video regolabile
- controlli per luminosità , contrasto, saturazione e tinta
- deinterlacciamento
- riduzione del rumore
- panoramica e zoom
- ridimensionamento a qualsiasi risoluzione
- compositing con chiavi cromatiche
- rilevamento del movimento
- Immagine nell'immagine
- Display su schermo (OSD)
- integrazione con filtri DirectShow di terze parti
- interfaccia di controllo della telecamera
### Elaborazione audio ed effetti:
- amplificatore di volume
- equalizzatore
- sistema 3D-bass
- normalizzazione
- guadagno automatico/manuale
- ci sono molti altri effetti
### Esempi di applicazioni:
- Acquisizione audio
- Cattura DV
- Cattura IP
- Cattura dello schermo
- Semplice acquisizione video
- Demo di cattura principale
- Demo di modifica principale
- Demo del giocatore principale
- Lettore audio
- Lettore DVD
- Riproduzione della memoria
- Lettore video
### Piattaforme di sviluppo:
- Visual Studio 2005 e successivi: Visual C#, Visual C++, Visual Basic .NET
- Delphi 6 / 7 / 2005 / 2006 / 2007 / 2009 / 2010 / XE / XE2 / XE3 / XE4 / XE5 / XE6 / XE7 / XE8 / 10 / 10.1 / 10.2 / 10.3 / 10.4 / 11 / 12
- Visual Studio 6: Visual C++, Visual Basic 6
- Borland C++ Builder 5 e successivi
- può essere utilizzato con altre applicazioni compatibili con ActiveX come Microsoft Access, Word, Excel, FrontPage, Powerbuilder, ecc.
- Versioni x86 e x64
### Requisiti di sistema
- Windows 11, Windows 10, Windows 8/8.1, Windows 7, Windows Vista, Windows Server 2012 e versioni successive
- .Net Framework 4.0 o successivo (per applicazioni demo .Net basate su ActiveX)
- DirectX 9 o successive
### Diritti di distribuzione
Distribuzione gratuita.
### Limiti della prova
La versione di prova visualizza una filigrana nella finestra del video.

#### EDIZIONE

#### STANDARD

#### PROFESSIONALE

#### PREMIUM
Dispositivi di input e altre fonti supportate
- Telecamere web
- Sintonizzatori TV
- Videocamere DV e MPEG
- Capture dello schermo
- Telecamere IP HTTP / RTSP / ONVIF
- UDP, TCP, RTMP e altri flussi di rete
- Motori aggiuntivi per i flussi di rete
Anteprima video
Acquisizione di fotogrammi
Elaborazione video
Elaborazione audio
Supporto video HD e 4K
Sintonizzazione TV
Streaming di rete in formato WMV
Streaming di rete tramite RTMP / RTSP / UDP
Chiave cromatica
Rilevamento del movimento
Elaborazione video con filtri DirectShow
OSD (On-Screen Display)
Immagine nell'immagine
Modifica del nome del file di output al volo
Schermi di uscita multipli
Effetti video accelerati dalla GPU
Uscita verso l'SDK della Virtual Camera
Supporto SDK di crittografia video
Formati di uscita
- AVI
- WMV (Windows Media Video)
- WMA (Windows Media Audio)
- WAV
- MP3
- Ogg Vorbis
- Video DV
- DV / MPEG-1/2/4 (utilizzando un sintonizzatore TV con codificatore MPEG interno o una videocamera DV/HDV)
- Video Flash (FLV) utilizzando FFMPEG
- WebM
- Formati di uscita personalizzati utilizzando filtri DirectShow esterni
- MPEG-1/2/4 con FFMPEG
- MP4 H264/AAC tramite software, Intel QuickSync o nVidia NVENC / CUDA
L'SDK contiene le librerie opzionali FFMPEG e libVLC con licenza LGPL v2.1.
---END OF PAGE---
# Page: https://www.visioforge.com/de/video-fingerprinting-sdk
# Video Fingerprinting SDK .Net / C++
Version 12.1
Unsere hochmoderne Video-Fingerprinting-Technologie nutzt die neuesten Fortschritte in den Bereichen Szenenanalyse, Objektverfolgung und Bewegungsschätzung, um den Inhalt jedes Videos zu analysieren und seine einzigartigen Merkmale wie Farben, Szenenstruktur und die Bewegung von Objekten zu identifizieren. Dadurch kann eine Kopie des Videos trotz Ãnderungen der Auflösung, der Bitrate, der Kodierungsmethode oder des Dateiformats identifiziert werden. Das Video kann sogar erkannt werden, wenn es in einem anderen Video enthalten ist oder wenn nur ein Fragment des Videos reproduziert wird.
Mit unserem SDK können Sie diese Videoidentifizierungsfunktion in Ihre Anwendungen und Dienste integrieren. Unsere Lizenzvereinbarung erlaubt es Ihnen, die Technologie gegen eine einmalige Zahlung in eine unbegrenzte Anzahl von Produkten einzubauen. Es fallen keine weiteren Gebühren an, unabhängig davon, wie viele Kopien dieser Produkte Sie verkaufen.
## Was ist ein Video-Fingerabdruck?
Ein Video-Fingerprint ist ein kompakter digitaler Deskriptor, der aus einer beliebigen Videoquelle extrahiert werden kann, sei es ein Fragment einer Fernsehsendung, eine Videodatei, ein Online-Video oder eine DVD oder Blu-ray-Disk. Diese Video-Fingerabdrücke können dann gespeichert, kopiert und verglichen werden. Video-Fingerabdrücke können verwendet werden, um urheberrechtlich geschütztes Videomaterial zu identifizieren, doppelte Videos zu erkennen, nach Videos zu suchen, Videos zu organisieren, zu erkennen, wann ein bestimmtes Video abgespielt wird, Medienüberwachung oder Anzeigenverfolgung.
Verwenden Sie den Video Duplicates Finder als Beispielanwendung, um ähnliche Videodateien zu finden.
Verwenden Sie das Media Monitoring Tool als Beispielanwendung, um ein Videofragment (z. B. einen TV-Werbespot) in einem anderen zu finden (eine vollständige Sendeaufzeichnung).
.Net SDK Version hat einen Helfer für die Verwendung von MongoDB als Fingerabdruckspeicher.
### Einige der Möglichkeiten, wie Sie unser Video Fingerprinting SDK einsetzen können:
- Ein Online-Videohosting-Dienst wie YouTube könnte Video-Fingerabdrücke verwenden, um Urheberrechtsverletzungen zu vermeiden. Eine Datenbank mit Video-Fingerabdrücken des urheberrechtlich geschützten Materials würde entwickelt und mit den von den Nutzern eingereichten Video-Fingerabdrücken verglichen, um die illegale Einreichung von Raubkopien zu verhindern.
- Ein Videoarchivdienst könnte Video-Fingerabdrücke verwenden, um Platz zu sparen und doppelte Uploads zu verhindern. Von jedem Video im Archiv würde ein Video-Fingerabdruck extrahiert werden. Der Video-Fingerabdruck jeder neuen Einreichung wird mit der Datenbank der Fingerabdrücke vorhandener Videos verglichen, um sicherzustellen, dass sie sich unterscheiden und doppelte Einreichungen blockiert werden.
- Video-Organizer-Software könnte Video-Fingerprints verwenden, um Kopien desselben Films oder Videoclips trotz Unterschieden in Format, Auflösung oder Bitrate zu identifizieren und sie zusammenzufassen.
- Die Software für Set-Top-Boxen könnte Video-Fingerabdrücke nutzen, um interaktive Werbung zu entwickeln, indem sie erkennt, wann bestimmte Fernsehwerbung gezeigt wird, und eine anklickbare URL anzeigt, über die der Nutzer auf die Produkt-Website gelangt. AuÃerdem könnte damit verfolgt werden, wie oft die Werbung angesehen wird.
- Mit unserem Video Fingerprinting SDK könnte eine Suchmaschine für Videos entwickelt werden - ein einzigartiger, revolutionärer Dienst, der eine Video-für-Video-Suchfunktion implementiert, die die erste ihrer Art wäre.
- Ein TV-Clipping-Dienst könnte die Video-Fingerprinting-Technologie nutzen, um die Ãberwachung von Fernsehsendungen und die Ãberprüfung von TV-Werbung zu automatisieren, um zu erkennen, wann die Werbung eines Kunden ausgestrahlt wird, damit dieser sicherstellen kann, dass die Bedingungen seiner TV-Werbeverträge eingehalten werden.
- Wir haben unser Tool zur Medienbeobachtung als voll funktionsfähige Anwendung entwickelt, die die Erkennung von Werbemustern in einem Sende-Dump ermöglicht, um genau diese Art von Dienstleistung zu implementieren. Diese Anwendung, einschlieÃlich der Quellen, kann separat lizenziert und als Grundlage für den Aufbau Ihres Produkts verwendet oder in ein bestehendes System integriert werden. Weitere Informationen finden Sie auf unserer Seite zum Medienbeobachtungstool.
- [Erkennung von raubkopierten Videoinhalten](https://www.visioforge.com/de/detecting-pirated-video-content)
### Welche Betriebssysteme werden unterstützt?
- C++ SDK unterstützt Windows und Linux oder jedes andere POSIX-kompatible Betriebssystem (auf Anfrage erhältlich)
- .Net SDK unterstützt Windows 7 und höher
### Wie groà ist die GröÃe einer Video-Fingerprint-Datei?
Jede Sekunde eines analysierten Videostroms benötigt etwa 1kb für seinen Video-Fingerabdruck. Für die Erkennung von Duplikaten müssen im Allgemeinen nur 3-5 Sekunden jedes Videos indiziert werden. Die Indizierung vollständiger Videos ist erforderlich, um ein Video zu identifizieren, das in ein anderes eingefügt wurde.
### Wie viel Zeit wird für die Berechnungen benötigt?
Die Indizierung einer Sekunde Video dauert etwa 300 Millisekunden - etwa die Hälfte dieser Zeit (150 Millisekunden) entfällt auf die eigentliche Verarbeitung der Datei, der Rest auf die Dekomprimierung des Videos. Der Abgleich eines Paares von 10 Sekunden langen Fingerabdrücken dauert 1-2 Millisekunden. Diese Zeiten wurden durch Tests mit einem Intel i3-Prozessor und LAV-Filtern für die Videokompression ermittelt.
### Ist eine Software zum Lesen oder Dekodieren von Videos enthalten?
- C++: Nein. Sie benötigen eine andere Bibliothek (z. B. FFMPEG, Demo verfügbar), um das Lesen von Videos in Ihrer Anwendung zu implementieren.
- .Net: Ja, FFMPEG und libVLC enthalten. AuÃerdem können Systemcodecs für die Dekodierung verwendet werden
### Welche Codebeispiele sind verfügbar?
Die folgenden Code-Beispiele sind in Ihrem Kauf enthalten:
C++:
- FFMPEG-basierte Konsolenanwendung zum Indizieren von Videos und Erstellen von Fingerabdrücken (Windows, Linux)
- Eine Konsolenanwendung, die zwei Fingerabdrücke vergleicht, um Duplikate zu erkennen (Windows, Linux)
- Eine Konsolenanwendung, die nach Einträgen eines Fingerabdrucks innerhalb eines anderen sucht (Windows, Linux)
- Quellcode einer vollständigen Media Monitoring Tool-Anwendung (Windows, Linux)
.Netto:
- Media Monitoring Tool und Media Monitoring Tool Live Quellcode
- Video Duplicates Finder Quellcode.
### Welche anderen Unterlagen sind verfügbar?
C++:
- VFCompare API - eine Implementierung eines Video-Fingerprinting-Algorithmus, der für die Erkennung von doppelten Videos optimiert ist
- VFSearch API - eine Implementierung des Video-Fingerprinting-Algorithmus, die für die Suche in Videos optimiert ist
.Netto:
- Die vollständige API ist in einer Hilfedatei beschrieben.
### Wie kann ich die Technologie ausprobieren und bewerten?
Wir empfehlen Ihnen, die Testversionen unserer Anwendungen Media Monitoring Tool und Video Duplicates Finder herunterzuladen und auszuprobieren und sich mit der API und den Codebeispielen vertraut zu machen.
Die .Net-Version des SDK ist als unabhängiges Installationsprogramm mit Beispielanwendungen und Beispiel-Quellcode verfügbar.
MMT/VDF Tools Quellcode enthalten (Tools erfordern .Net 4.5 für SOAP-Export. SDK kann in .Net 4.0 und höher verwendet werden).
Die C++-Version des SDK ist als unabhängiges Installationsprogramm verfügbar.
### Systemanforderungen
Mac OS, Windows oder Linux.
### Vertriebsrechte
Lizenzfreie Verbreitung.
### Beschränkungen des Versuchs
In der Testversion wird ein Wasserzeichen im Videofenster angezeigt.
### Der Kauf des Video Fingerprinting SDK bietet Ihnen folgende Vorteile:
- Unbegrenzte Nutzung
- Kein Nörgler-Bildschirm
- Kostenlose Minor- und Major-Upgrades innerhalb eines Jahres (nach einem Jahr funktioniert das SDK genauso wie vorher) für eine reguläre Lizenz und unbegrenzte Updates für unbegrenzte Zeit für die Lifetime-Lizenz
- Vorrangige Unterstützung und Fehlerbehebung
Die reguläre Lizenz wird jährlich in Rechnung gestellt und automatisch um ein Jahr verlängert. Sie können Ihr Abonnement jederzeit kündigen.
## Media Monitoring Tool (Live) Beispielanwendung
Unsere Demo-App ist ein voll funktionsfähiges Tool zur Medienbeobachtung, das für die Anzeigenverfolgung und die Ãberwachung von Rundfunkmedien verwendet werden kann. Es ermöglicht die Erkennung von Werbemustern in einem Broadcast-Dump. Sie können diese Anwendung auch zusammen mit unserem Video-Fingerprinting-SDK verwenden, um Ihr eigenes Produkt oder Ihren eigenen Dienst für die TV-Ãberwachung zu entwickeln oder sie in einen bestehenden Dienst zu integrieren.
### Wie es funktioniert
Unser Media Monitoring Tool kann erkennen, wann ein Referenzvideo in einer aufgezeichneten Fernsehsendung abgespielt wird, so dass es nicht mehr notwendig ist, jemanden zu bezahlen, der 24 Stunden am Tag, sieben Tage die Woche fernsieht. Der TV-Sendestream wird als eine Reihe von 5-minütigen Videodateien registriert, die dann mit dem angegebenen Referenzvideo, z. B. dem Werbespot, verglichen werden, der verfolgt werden soll. Die Anwendung erkennt automatisch alle Einschlüsse des ausgewählten Videos in den aufgezeichneten Dateien und liefert eine Liste der Videodateien, die den Werbespot enthalten.
Mit unserem Media Monitoring Tool können Sie den Prozess der TV-Ãberwachung automatisieren. Es reduziert den Personalbedarf und die damit verbundenen Arbeitskosten. Die Vorteile der inhaltsbasierten automatisierten Videosuche verbessern zudem die Genauigkeit. Sie können Ihren Kunden sogar einen digitalen Nachweis für die Wiedergabe von Werbespots liefern, ohne dass manuelle Arbeit erforderlich ist.
Der Prozess beginnt mit der Aufzeichnung des Sendestroms in Form einer Reihe von fünfminütigen Videos. Das Medienbeobachtungstool analysiert die aufgezeichneten Inhalte und findet alle Stellen, an denen der Werbespot des Kunden vorkommt. Die Ergebnisse werden in Form einer Liste von Miniaturansichten dargestellt, die die Clips mit dem Werbespot hervorheben.
### Vorteile
- Präzise Ergebnisse - Die inhaltsbasierte Videosuchtechnologie des Programms gewährleistet Genauigkeit und Geschwindigkeit. Der Algorithmus identifiziert schnell und präzise alle Instanzen des Referenzvideos im aufgezeichneten Videostream ohne menschliches Eingreifen und ohne menschliche Fehler.
- Geringere Kosten - Da Sie keine Mitarbeiter mehr dafür bezahlen müssen, auf einen Fernsehbildschirm zu starren und die Einzelheiten der Ausstrahlung von Werbespots manuell zu erfassen, werden Ihre Betriebskosten drastisch gesenkt.
- Benutzerfreundlichkeit - Die leicht zu erlernende, intuitive Benutzeroberfläche des Programms ermöglicht es, benutzerdefinierte Suchen zu definieren und in Sekundenschnelle durchzuführen. Der Benutzer wählt einfach den Ordner aus, der den Sende-Dump enthält, und gibt die Video-Referenzmuster an, die die zu identifizierenden Anzeigen enthalten. Den Rest erledigt das Programm.
## Video Duplicates Finder Beispielanwendung
Video Duplicates Finder ermöglicht es Ihnen, ähnliche oder doppelte Videodateien auf Ihrem PC zu finden. AVI, MPEG-1, MPEG-2, Windows Media Video, MP4 und viele andere Formate werden unterstützt. Diese Anwendung ist ein Beispiel für die Verwendung des Video Fingerprinting SDK.
### Die wichtigsten Merkmale sind:
- AVI, WMV, MP4, MPG, TS, und viele andere Formate werden unterstützt
- SD-, HD- und 4K-Videos werden unterstützt
- Empfindlichkeitseinstellungen
- Option Timeshift
- Komplette Dateiverarbeitung oder ein benutzerdefinierter Teil davon
- DirectShow (System-Codecs), FFMPEG und VLC-Decodiermaschinen

#### DOWNLOADS
[Windows / .Net](https://s3.us-west-2.amazonaws.com/files.visioforge.com/trials/visioforge\_sdks\_installer\_dotnet\_setup.exe)[Windows / C++](https://s3.us-west-2.amazonaws.com/files.visioforge.com/trials/visioforge\_video\_fingerprinting\_sdk\_cpp\_setup.exe)[Linux / C++](https://s3.us-west-2.amazonaws.com/files.visioforge.com/trials/visioforge\_video\_fingerprinting\_sdk\_cpp\_linux.zip)[Samples auf GitHub](https://github.com/visioforge/.Net-SDK-s-samples/tree/master/Video%20Fingerprinting%20SDK)

#### KAUFEN
[Preise prüfen oder bestellen](https://www.visioforge.com/de/buy)

#### HILFE
[Online-Hilfe](/help/)[Ãnderungsliste](/help/docs/vfp/changelog/)[Lizenzvereinbarung](/help/docs/eula/)
SDK enthält optionale FFMPEG- und libVLC-Bibliotheken, die unter der LGPL v2.1 lizenziert sind.
---END OF PAGE---
# Page: https://www.visioforge.com/es/video-fingerprinting-sdk
# Video Fingerprinting SDK .Net / C++
versión 12.1
Nuestra tecnologÃa de huellas dactilares de vÃdeo incorpora los últimos avances en análisis de escenas, seguimiento de objetos y estimación del movimiento para analizar el contenido de cualquier vÃdeo con el fin de identificar sus caracterÃsticas únicas, como los colores, la estructura de la escena y el movimiento de los objetos. Esto permite identificar una copia del vÃdeo a pesar de los cambios de resolución, velocidad de bits, método de codificación o formato de archivo. El vÃdeo puede detectarse incluso cuando está incluido dentro de otro vÃdeo o cuando sólo se reproduce un fragmento del mismo.
Nuestro SDK le permite integrar esta funcionalidad de identificación por vÃdeo en sus aplicaciones y servicios. Nuestro acuerdo de licencia le permite incorporar la tecnologÃa en un número ilimitado de productos por un solo pago. No hay otras tasas, independientemente del número de copias de estos productos que venda.
## ¿Qué es una huella de vÃdeo?
Una huella digital de vÃdeo es un descriptor digital compacto que puede extraerse de cualquier fuente de vÃdeo, ya sea un fragmento de una emisión de televisión, un archivo de vÃdeo, un vÃdeo en lÃnea o de un DVD o disco Blu-ray. Estas huellas de vÃdeo pueden almacenarse, copiarse y compararse. Las huellas dactilares de vÃdeo pueden utilizarse para identificar material de vÃdeo protegido por derechos de autor, identificar vÃdeos duplicados, buscar vÃdeos, organizar vÃdeos, reconocer cuándo se reproduce un vÃdeo especÃfico, monitorizar medios o rastrear anuncios.
Utilice el Buscador de Duplicados de VÃdeo como aplicación de ejemplo para encontrar archivos de vÃdeo similares.
Utilice la herramienta de supervisión de medios como aplicación de ejemplo para encontrar un fragmento de vÃdeo (anuncio de televisión, por ejemplo) en otro (grabación de emisión completa).
La versión .Net SDK tiene una ayuda para el uso de MongoDB como almacenamiento de huellas dactilares.
### Algunas de las formas en que puede utilizar nuestro SDK de huellas dactilares de vÃdeo:
- Un servicio de alojamiento de vÃdeos en lÃnea, como YouTube, podrÃa utilizar huellas dactilares de vÃdeo para evitar la infracción de los derechos de autor. Se desarrollarÃa una base de datos de huellas dactilares de vÃdeo del material protegido por derechos de autor y se compararÃa con las huellas dactilares de vÃdeo de los materiales enviados por los usuarios para evitar el envÃo ilegal de vÃdeos pirateados.
- Un servicio de archivo de vÃdeos podrÃa utilizar huellas dactilares para ahorrar espacio y bloquear las cargas duplicadas. Se extraerÃa una huella dactilar de cada vÃdeo del archivo. La huella dactilar de cada nuevo envÃo se compararÃa con la base de datos de las huellas dactilares de los vÃdeos existentes, comprobando que son diferentes y bloqueando los envÃos duplicados.
- El software Video Organizer podrÃa utilizar huellas dactilares de vÃdeo para identificar copias de la misma pelÃcula o videoclip, a pesar de las diferencias de formato, resolución o tasa de bits, y agruparlas.
- El software de los descodificadores podrÃa utilizar las huellas digitales de vÃdeo para desarrollar anuncios interactivos, identificando cuándo se muestran determinados anuncios de televisión y mostrando una URL en la que se puede hacer clic para que el usuario acceda al sitio web del producto. También podrÃa utilizarse para hacer un seguimiento de la frecuencia con que se ve el anuncio.
- Se podrÃa desarrollar un motor de búsqueda de vÃdeos utilizando nuestro SDK Video Fingerprinting, un servicio único y revolucionario que implementarÃa una funcionalidad de búsqueda vÃdeo a vÃdeo que serÃa la primera de su clase.
- Un servicio de recorte televisivo podrÃa utilizar la tecnologÃa de huellas de vÃdeo para automatizar la supervisión de la emisión televisiva y la verificación de anuncios de televisión para detectar cuándo se emite el anuncio de un cliente, de modo que pueda asegurarse de que se respetan los términos de sus acuerdos publicitarios en televisión.
- Hemos desarrollado nuestra herramienta de monitorización de medios como una aplicación totalmente funcional que permite la detección de muestras de anuncios en un volcado de emisión para implementar precisamente este tipo de servicio. Esta aplicación, incluidas las fuentes, puede adquirirse por separado y utilizarse como base para crear su producto o integrarse en un sistema ya existente. Consulte nuestra página de herramientas de monitorización de medios para obtener más información.
- [Detección de contenidos de vÃdeo pirateados](https://www.visioforge.com/es/detecting-pirated-video-content)
### ¿Qué sistemas operativos son compatibles?
- C++ SDK compatible con Windows y Linux, o cualquier otro sistema operativo compatible con POSIX (disponible previa solicitud)
- .Net SDK es compatible con Windows 7 y versiones posteriores
### ¿Cuál es el tamaño de un archivo de huellas dactilares de vÃdeo?
Cada segundo de un flujo de vÃdeo analizado requiere aproximadamente 1kb para su huella digital de vÃdeo. La detección de duplicados generalmente sólo requiere indexar entre 3 y 5 segundos de cada vÃdeo. La indexación de vÃdeos completos es necesaria para identificar un vÃdeo que se ha incluido dentro de otro.
### ¿Cuánto tiempo se necesita para los cálculos?
Indexar un segundo de vÃdeo tarda unos 300 milisegundos: el procesamiento real del archivo supone aproximadamente la mitad de ese tiempo (150 milisegundos), mientras que la descompresión del vÃdeo supone el resto. La comparación de un par de huellas dactilares de 10 segundos de duración tarda entre 1 y 2 milisegundos. Estos tiempos se establecieron mediante pruebas con un procesador Intel i3 y filtros LAV para la compresión de vÃdeo.
### ¿Se incluye software de lectura o descodificación de vÃdeo?
- C++: No. Necesitarás alguna otra librerÃa (FFMPEG, por ejemplo, demo disponible) para implementar la lectura de vÃdeo en tu aplicación.
- .Net: SÃ, FFMPEG y libVLC incluidos. También se pueden utilizar los códecs del sistema para descodificar.
### ¿Qué ejemplos de código hay disponibles?
Con su compra se incluyen los siguientes ejemplos de código:
C++:
- Aplicación de consola basada en FFMPEG que indexa vÃdeos y crea huellas dactilares (Windows, Linux)
- Una aplicación de consola que compara dos huellas dactilares para detectar duplicados (Windows, Linux)
- Una aplicación de consola que busca entradas de una huella dentro de otra (Windows, Linux)
- Código fuente de una aplicación Media Monitoring Tool completa (Windows, Linux)
.Neto:
- Código fuente de Media Monitoring Tool y Media Monitoring Tool Live
- Video Duplicates Finder código fuente.
### ¿Qué otra documentación está disponible?
C++:
- API VFCompare: implementación de un algoritmo de huellas dactilares de vÃdeo optimizado para la detección de vÃdeos duplicados.
- API VFSearch: implementación de un algoritmo de huellas dactilares de vÃdeo optimizado para la búsqueda de vÃdeo en vÃdeo.
.Neto:
- API completa descrita en un archivo de ayuda.
### ¿Cómo puedo probar y evaluar la tecnologÃa?
Le sugerimos que descargue y experimente con las versiones de prueba de nuestra aplicación Media Monitoring Tool y la aplicación Video Duplicates Finder y se familiarice con la API y los ejemplos de código.
Versión .Net del SDK disponible como instalador independiente con aplicaciones de muestra y código fuente de muestra en su interior.
Se incluye el código fuente de las herramientas MMT/VDF (las herramientas requieren .Net 4.5 para la exportación SOAP. SDK se puede utilizar en .Net 4.0 y posteriores).
Versión C++ del SDK disponible como instalador independiente.
### Requisitos del sistema
Mac OS, Windows o Linux.
### Derechos de distribución
Distribución sin derechos de autor.
### Limitaciones de la versión de prueba
La versión de prueba muestra una marca de agua en la ventana de vÃdeo.
### La compra de Video Fingerprinting SDK le proporcionará los siguientes beneficios:
- Uso ilimitado
- Sin pantalla de licencia
- Actualizaciones menores y mayores gratuitas en el plazo de un año (después de un año, el SDK funcionará igual que antes) para una licencia normal y actualizaciones ilimitadas por tiempo ilimitado para la licencia vitalicia.
- Asistencia y correcciones prioritarias
La licencia normal se factura anualmente y se renueva automáticamente cada año. Puede cancelar su suscripción en cualquier momento.
## Media Monitoring Tool (Live) Ejemplo
Nuestra aplicación de demostración es una herramienta de supervisión de medios totalmente funcional que puede utilizarse para el seguimiento de anuncios y la supervisión de medios de difusión. Permite detectar muestras de anuncios en un volcado de emisión. También puede utilizar esta aplicación, junto con nuestro SDK de Video Fingerprinting, para crear su propio producto o servicio de monitorización de emisiones de televisión o integrarlo en un servicio ya existente.
### ¿Cómo funciona?
Nuestra herramienta de seguimiento de medios puede detectar cuándo se reproduce un vÃdeo de muestra de referencia en una emisión de televisión grabada, por lo que ya no es necesario pagar a alguien para que vea la televisión 24 horas al dÃa, siete dÃas a la semana. El flujo de emisión de TV se registra como una matriz de archivos de vÃdeo de 5 minutos de duración y, a continuación, se comparan con el vÃdeo de referencia de muestra especificado, como el anuncio, para realizar el seguimiento. La aplicación detectará automáticamente todas las inclusiones del vÃdeo seleccionado en los archivos grabados y proporcionará una lista de los archivos de vÃdeo que contienen el anuncio.
Nuestra herramienta de supervisión de medios le permite automatizar el proceso de supervisión de emisiones de televisión. Reduce la cantidad de personal necesario y los costes laborales asociados. Y aprovechar la búsqueda automatizada de vÃdeos basada en el contenido también mejorará la precisión. Incluso le permitirá proporcionar a sus clientes una prueba digital de la reproducción de anuncios sin ningún trabajo manual.
El proceso comienza grabando el flujo de emisión como una serie de vÃdeos de cinco minutos. La herramienta de supervisión de medios analiza el contenido capturado y encuentra todas las instancias del anuncio del cliente. Los resultados se presentan como una lista de miniaturas que destacan los clips que contienen el anuncio.
### Beneficios
- Resultados precisos - La tecnologÃa de búsqueda de vÃdeo basada en el contenido del programa garantiza precisión y rapidez. El algoritmo identifica con rapidez y precisión todas las instancias del vÃdeo de referencia en el flujo de vÃdeo de emisión grabado sin intervención humana y sin errores humanos.
- Costes reducidos - Como ya no tiene que pagar a personas para que se sienten a mirar una pantalla de televisión y registren manualmente los detalles de cuándo se emite el anuncio, sus costes de explotación se reducen drásticamente.
- Facilidad de uso - La interfaz intuitiva del programa, fácil de aprender, permite definir y realizar búsquedas personalizadas en cuestión de segundos. El usuario sólo tiene que seleccionar la carpeta que contiene el volcado de emisión y especificar las muestras de referencia de vÃdeo que contienen los anuncios que desea identificar. El programa hace el resto.
## Video Duplicates Finder aplicación de ejemplo
Video Duplicates Finder le permite encontrar archivos de vÃdeo similares o duplicados en su PC. Soporta AVI, MPEG-1, MPEG-2, Windows Media Video, MP4 y muchos otros formatos. Esta aplicación es una muestra del uso del SDK de Video Fingerprinting.
### Las principales caracterÃsticas son:
- Compatible con AVI, WMV, MP4, MPG, TS y muchos otros formatos.
- Compatible con vÃdeos SD, HD y 4K
- Ajustes de sensibilidad
- Opción de Timeshift
- Tratamiento completo de archivos o de una parte personalizada
- DirectShow (códecs del sistema), FFMPEG y código de descodificación de vÃdeo VLC

#### DESCARGAS
[Windows / .Net](https://s3.us-west-2.amazonaws.com/files.visioforge.com/trials/visioforge\_sdks\_installer\_dotnet\_setup.exe)[Windows / C++](https://s3.us-west-2.amazonaws.com/files.visioforge.com/trials/visioforge\_video\_fingerprinting\_sdk\_cpp\_setup.exe)[Linux / C++](https://s3.us-west-2.amazonaws.com/files.visioforge.com/trials/visioforge\_video\_fingerprinting\_sdk\_cpp\_linux.zip)[Samples en GitHub](https://github.com/visioforge/.Net-SDK-s-samples/tree/master/Video%20Fingerprinting%20SDK)

#### COMPRAR
[Consultar precios o hacer un pedido](https://www.visioforge.com/es/buy)

#### AYUDA
[Ayuda en lÃnea](/help/)[Registro de cambios](/help/docs/vfp/changelog/)[Acuerdo de licencia](/help/docs/eula/)
El SDK contiene bibliotecas opcionales FFMPEG y libVLC con licencia LGPL v2.1.
---END OF PAGE---
# Page: https://www.visioforge.com/it/video-fingerprinting-sdk
# Video Fingerprinting SDK .Net / C++
versione 12.1
La nostra tecnologia di fingerprinting video all'avanguardia incorpora i più recenti progressi nell'analisi della scena, nel tracciamento degli oggetti e nella stima del movimento per analizzare il contenuto di qualsiasi video al fine di identificarne le caratteristiche uniche, come i colori, la struttura della scena e il movimento degli oggetti. Ciò consente di identificare una copia del video nonostante le variazioni di risoluzione, velocità di trasmissione, metodo di codifica o formato del file. Il video può essere rilevato anche quando è incluso in un altro video o quando ne viene riprodotto solo un frammento.
Il nostro SDK vi consente di integrare questa funzionalità di identificazione video nelle vostre applicazioni e servizi. Il nostro contratto di licenza vi consente di incorporare la tecnologia in un numero illimitato di prodotti a fronte di un unico pagamento. Non sono previsti altri costi, indipendentemente dal numero di copie vendute di questi prodotti.
## Che cos'è un'impronta video?
Un'impronta digitale video è un descrittore digitale compatto che può essere estratto da qualsiasi fonte video, sia che si tratti di un frammento di una trasmissione televisiva, di un file video, di un video online o di un DVD o Blu-ray Disk. Queste impronte digitali video possono essere memorizzate, copiate e confrontate. Le impronte digitali dei video possono essere utilizzate per identificare materiale video protetto da copyright, identificare video duplicati, cercare video, organizzare video, riconoscere quando un video specifico viene riprodotto, monitorare i media o tracciare gli annunci pubblicitari.
Utilizzate Video Duplicates Finder come applicazione di esempio per trovare file video simili.
Utilizzate Media Monitoring Tool come applicazione di esempio per trovare un frammento di video (ad esempio, uno spot televisivo) in un altro (registrazione di una trasmissione completa).
La versione dell'SDK .Net dispone di un helper per l'utilizzo di MongoDB come archivio di impronte digitali.
### Alcuni dei modi in cui è possibile utilizzare il nostro Video Fingerprinting SDK:
- Un servizio di hosting video online, come YouTube, potrebbe utilizzare le impronte digitali dei video per evitare la violazione del copyright. Un database di impronte video del materiale protetto da copyright verrebbe sviluppato e confrontato con le impronte video dei materiali inviati dagli utenti per impedire l'invio illegale di video pirata.
- Un servizio di archivio video potrebbe utilizzare le impronte digitali dei video per risparmiare spazio e bloccare i caricamenti duplicati. Da ogni video presente nell'archivio verrebbe estratta un'impronta digitale video. L'impronta video di ogni nuovo invio verrebbe confrontata con il database delle impronte digitali dei video esistenti, verificando che siano diverse e bloccando gli invii duplicati.
- Il software Video Organizer potrebbe utilizzare le impronte digitali dei video per identificare copie dello stesso filmato o videoclip, nonostante le differenze di formato, risoluzione o bit-rate, e raggrupparle.
- Il software del set-top box potrebbe utilizzare le impronte digitali dei video per sviluppare pubblicità interattive, identificando quando vengono mostrati specifici annunci televisivi e visualizzando un URL cliccabile per consentire all'utente di accedere al sito web del prodotto. Potrebbe anche essere utilizzato per tenere traccia della frequenza di visualizzazione dell'annuncio.
- Un motore di ricerca per i video potrebbe essere sviluppato utilizzando il nostro Video Fingerprinting SDK - un servizio unico e rivoluzionario che implementa una funzionalità di ricerca video per video che sarebbe la prima nel suo genere.
- Un servizio di ritaglio televisivo potrebbe utilizzare la tecnologia di video fingerprinting per automatizzare il monitoraggio delle trasmissioni televisive e la verifica degli annunci televisivi, in modo da rilevare quando l'annuncio di un cliente viene trasmesso e garantire il rispetto dei termini dei suoi accordi pubblicitari televisivi.
- Abbiamo sviluppato il nostro strumento di monitoraggio dei media come un'applicazione completamente funzionale che consente di rilevare campioni di annunci in un dump di trasmissione per implementare proprio questo tipo di servizio. Questa applicazione, comprese le fonti, può essere concessa in licenza separatamente e utilizzata come base per la creazione del vostro prodotto o integrata in un sistema esistente. Per ulteriori informazioni, consultare la pagina dello strumento di monitoraggio dei media.
- [Rilevamento di contenuti video pirata](https://www.visioforge.com/it/detecting-pirated-video-content)
### Quali sono i sistemi operativi supportati?
- L'SDK C++ supporta Windows e Linux, o qualsiasi altro sistema operativo compatibile con POSIX (disponibile su richiesta)
- L'SDK .Net supporta Windows 7 e successivi
### Qual è la dimensione di un file di impronta video?
Ogni secondo di un flusso video analizzato richiede circa 1kb per la sua impronta video. Il rilevamento dei duplicati richiede generalmente solo 3-5 secondi di ogni video da indicizzare. L'indicizzazione dei video completi è necessaria per identificare un video che è stato incluso in un altro.
### Quanto tempo è necessario per i calcoli?
L'indicizzazione di un secondo di video richiede circa 300 millisecondi - l'elaborazione effettiva del file rappresenta circa la metà di questo tempo (150 millisecondi), mentre la decompressione del video rappresenta il resto. La corrispondenza di una coppia di impronte digitali della durata di 10 secondi richiede 1-2 millisecondi. Questi tempi sono stati stabiliti effettuando test con un processore Intel i3 e filtri LAV per la compressione video.
### Il software di lettura o decodifica video è incluso?
- C++: No. Ã necessaria un'altra libreria (FFMPEG, ad esempio, demo disponibile) per implementare la lettura dei video nella propria applicazione.
- .Net: Sì, FFMPEG e libVLC inclusi. Inoltre, è possibile utilizzare i codec di sistema per la decodifica.
### Quali sono gli esempi di codice disponibili?
I seguenti esempi di codice sono inclusi nell'acquisto:
C++:
- Applicazione console basata su FFMPEG che indicizza i video e crea impronte digitali (Windows, Linux)
- Un'applicazione console che confronta due impronte digitali per rilevare i duplicati (Windows, Linux)
- Un'applicazione console che cerca le voci di un'impronta digitale all'interno di un'altra (Windows, Linux)
- Codice sorgente di un'applicazione Media Monitoring Tool completa (Windows, Linux)
.Netto:
- Media Monitoring Tool e Media Monitoring Tool Live codice sorgente
- Codice sorgente di Video Duplicates Finder.
### Qual è l'altra documentazione disponibile
C++:
- API VFCompare - un'implementazione dell'algoritmo di fingerprinting video ottimizzato per il rilevamento di video duplicati.
- API VFSearch - un'implementazione dell'algoritmo di fingerprinting video ottimizzato per la ricerca di video nei video.
.Netto:
- API completa descritta in un file di aiuto.
### Come posso provare e valutare la tecnologia?
Vi suggeriamo di scaricare e sperimentare le versioni di prova della nostra applicazione Media Monitoring Tool e dell'applicazione Video Duplicates Finder e di familiarizzare con le API e gli esempi di codice.
La versione .Net dell'SDK è disponibile come programma di installazione indipendente con applicazioni di esempio e codice sorgente di esempio.
Codice sorgente degli strumenti MMT/VDF incluso (gli strumenti richiedono .Net 4.5 per l'esportazione SOAP. L'SDK può essere utilizzato in .Net 4.0 e successivi).
Versione C++ dell'SDK disponibile come programma di installazione indipendente.
### Requisiti di sistema
Mac OS, Windows o Linux.
### Diritti di distribuzione
Distribuzione gratuita.
### Limiti della prova
La versione di prova visualizza una filigrana nella finestra del video.
### L'acquisto del Video Fingerprinting SDK offre i seguenti vantaggi:
- Utilizzo illimitato
- Nessun nag-screen
- Aggiornamenti minori e maggiori gratuiti entro un anno (dopo un anno, l'SDK funzionerà come prima) per una licenza regolare e aggiornamenti illimitati per un tempo illimitato per la licenza a vita
- Assistenza e correzioni prioritarie
La licenza regolare viene fatturata annualmente e rinnovata automaticamente ogni anno. Ã possibile annullare l'abbonamento in qualsiasi momento.
## Applicazione campione Media Monitoring Tool (Live)
La nostra applicazione demo è uno strumento di monitoraggio dei media completamente funzionale che può essere utilizzato per il monitoraggio degli annunci e dei media broadcast. Consente di rilevare campioni di annunci in un dump di trasmissione. à inoltre possibile utilizzare questa applicazione, insieme al nostro Video Fingerprinting SDK, per creare un proprio prodotto o servizio per il monitoraggio delle trasmissioni televisive o integrarlo in un servizio esistente.
### Come funziona
Il nostro strumento di monitoraggio dei media è in grado di rilevare quando un video campione di riferimento viene riprodotto in una trasmissione televisiva registrata, per cui non è più necessario pagare qualcuno per guardare la TV 24 ore su 24, sette giorni su sette. Il flusso della trasmissione TV viene registrato come una serie di file video della durata di 5 minuti, che vengono poi confrontati con il video campione di riferimento specificato, ad esempio lo spot pubblicitario, da monitorare. L'applicazione rileva automaticamente tutte le inclusioni del video selezionato nei file registrati e fornisce un elenco dei file video contenenti lo spot.
Il nostro strumento di monitoraggio dei media consente di automatizzare il processo di monitoraggio delle trasmissioni televisive. Riduce la quantità di personale necessario e i relativi costi di manodopera. Inoltre, la ricerca automatica dei video basata sui contenuti migliorerà l'accuratezza. Inoltre, vi consentirà di fornire ai vostri clienti una prova digitale della riproduzione degli spot senza alcun lavoro manuale.
Il processo inizia registrando il flusso di trasmissione come una serie di video di cinque minuti. Il Media Monitoring Tool analizza il contenuto catturato e individua tutte le istanze dello spot del cliente. I risultati vengono presentati come un elenco di miniature che evidenziano le clip contenenti lo spot.
### Vantaggi
- Risultati accurati - La tecnologia di ricerca video basata sui contenuti del programma garantisce precisione e velocità . L'algoritmo identifica rapidamente e con precisione tutte le istanze del video di riferimento nel flusso video registrato, senza alcun intervento umano e senza alcun errore.
- Riduzione dei costi - Non dovendo più pagare persone che stiano sedute a fissare uno schermo televisivo e che registrino manualmente i dettagli di quando viene trasmesso lo spot, i costi di gestione si riducono drasticamente.
- Facilità d'uso - L'interfaccia intuitiva del programma, facile da imparare, consente di definire ed eseguire ricerche personalizzate in pochi secondi. L'utente deve solo selezionare la cartella che contiene il dump della trasmissione e specificare i campioni video di riferimento contenenti gli annunci da identificare. Il programma fa il resto.
## Applicazione campione di Video Duplicates Finder
Video Duplicates Finder consente di trovare file video simili o duplicati sul PC. Sono supportati i formati AVI, MPEG-1, MPEG-2, Windows Media Video, MP4 e molti altri. Questa applicazione è un esempio di utilizzo del Video Fingerprinting SDK.
### Le caratteristiche principali includono:
- Sono supportati AVI, WMV, MP4, MPG, TS e molti altri formati.
- Sono supportati video SD, HD e 4K
- Impostazioni di sensibilitÃ
- Opzione Timeshift
- Elaborazione completa dei file o di una parte personalizzata
- DirectShow (codec di sistema), FFMPEG e motori di decodifica VLC

#### DOWNLOADS
[Windows / .Net](https://s3.us-west-2.amazonaws.com/files.visioforge.com/trials/visioforge\_sdks\_installer\_dotnet\_setup.exe)[Windows / C++](https://s3.us-west-2.amazonaws.com/files.visioforge.com/trials/visioforge\_video\_fingerprinting\_sdk\_cpp\_setup.exe)[Linux / C++](https://s3.us-west-2.amazonaws.com/files.visioforge.com/trials/visioforge\_video\_fingerprinting\_sdk\_cpp\_linux.zip)[Samples su GitHub](https://github.com/visioforge/.Net-SDK-s-samples/tree/master/Video%20Fingerprinting%20SDK)

#### ACQUISTO
[Controllare i prezzi o ordinare](https://www.visioforge.com/it/buy)

#### AIUTO
[Guida in linea](/help/)[Changelog](/help/docs/vfp/changelog/)[Contratto di licenza](/help/docs/eula/)
L'SDK contiene le librerie opzionali FFMPEG e libVLC con licenza LGPL v2.1.
---END OF PAGE---
# Page: https://www.visioforge.com/de/detecting-pirated-video-content
# Erkennung von raubkopierten Videoinhalten
## Wichtigste Informationen
Das Aufspüren von raubkopierten Videoinhalten ist eine wichtige Aufgabe im Zeitalter der neuen digitalen Inhalte. Viele Arten von Websites bieten Nutzern die Möglichkeit, Videoinhalte hochzuladen. Websites wie [YouTube](https://www.youtube.com) gibt es nur aus diesem Grund, aber auch viele soziale Netzwerke bieten diese Möglichkeit. Die groÃe Beliebtheit dieser Websites hat den Zorn der Produzenten von Inhalten auf sich gezogen, die sich ernsthaft um den Schutz ihrer Urheberrechte bemühen und die Eigentümer dieser Websites unter Druck setzen, um illegale VerstöÃe zu unterbinden. Eine groÃe Menge an urheberrechtlich geschütztem Material - von Clips aus Filmen und Fernsehsendungen bis hin zu Musik und Musikvideos - kann von Besuchern dieser Art von Online-Videohosting-Diensten problemlos heruntergeladen werden. Die Betreiber der Websites behaupten zwar, dass sie sich auf die Fair-Use-Doktrin berufen, aber die Produzenten von Inhalten und die groÃen Medienunternehmen glauben ihnen das nicht. Sie haben tiefe Taschen und Heerscharen von Anwälten zur Verfügung und bereiten sich auf rechtliche Schritte vor. Um kostspielige, langwierige Rechtsstreitigkeiten zu vermeiden, verfolgen Online-Videoupload-Sites technologisch basierte Methoden zur Verringerung und Verhinderung von Urheberrechtsverletzungen auf ihren Sites.
## Erkennung illegaler Inhalte mit Video Fingerprinting SDK
Die Vermeidung einer versehentlichen Haftung für Urheberrechtsverletzungen ist ein wichtiges Thema für jede Website, die von Benutzern hochgeladene Inhalte zulässt. VerstöÃe gegen das Urheberrecht können kostspielige und zeitraubende rechtliche Schritte nach sich ziehen und eine hohe zivil- oder strafrechtliche Haftung nach sich ziehen. Unser [Video Fingerprinting SDK](https://www.visioforge.com/de/video-fingerprinting-sdk) Technologie bietet eine perfekte Lösung für diese Art von Websites, um weiterhin das Hochladen und Hosten von Benutzerinhalten zu ermöglichen und gleichzeitig das Risiko von Urheberrechtsverletzungen zu minimieren. Unsere hochmoderne Video-Fingerprinting-Technologie umfasst die neuesten Fortschritte in der Szenenanalyse, Objektverfolgung und Bewegungsschätzung, um den Inhalt jedes Videos zu analysieren und seine einzigartigen Merkmale wie Farben, Szenenstruktur und die Bewegung von Objekten in einem kompakten digitalen Deskriptor, dem Video-Fingerprint, zu identifizieren. Für urheberrechtlich geschütztes Material kann eine Datenbank mit diesen Video-Fingerabdrücken erstellt werden. Diese Fingerabdrücke können dann mit dem von den Nutzern hochgeladenen Videomaterial abgeglichen werden, um das Vorhandensein von urheberrechtlich geschütztem Material zu erkennen und die Veröffentlichung solchen Materials auf ihren Websites zu unterbinden.
## Vergleich mit anderen Produkten
Im Gegensatz zu Produkten, die versuchen, eine ähnliche Funktion zu bieten, ermöglicht es unsere Technologie, diese Fingerabdrücke trotz Ãnderungen der Auflösung, der Bitrate, der Kodierungsmethode oder des Dateiformats zu identifizieren. Das Video kann sogar erkannt werden, wenn es in einem anderen Video enthalten ist oder wenn nur ein Fragment des Videos wiedergegeben wird. Diese Video-Fingerabdrücke können dann gespeichert, kopiert und miteinander verglichen werden. Egal, wie ein Nutzer versucht, das Video zu bearbeiten oder zu manipulieren, um das System zu umgehen, das urheberrechtlich geschützte Material wird erkannt und nicht zugelassen. Dies ist ein bedeutender Vorteil gegenüber konkurrierenden Technologien und macht unsere Video-Fingerprinting- und Medienüberwachungs-Technologie zur besten Wahl für die Erkennung von Urheberrechtsverletzungen für Betreiber von Websites, die Videoinhalte von Benutzern hosten möchten. Kein anderes auf dem Markt befindliches Produkt kann dieses Maà an Schutz bieten.
## Weitere Informationen über die Erkennung raubkopierter Videoinhalte und unsere Produkte
- [Kontakt](https://support.visioforge.com/) um zu erfahren, wie unsere Video-Fingerprinting-Technologie in Ihre Website integriert werden kann, um Urheberrechtsverletzungen zu erkennen.
- Besuchen Sie die Produktseite von [Video Fingerprinting SDK](https://www.visioforge.com/de/video-fingerprinting-sdk)

---END OF PAGE---
# Page: https://www.visioforge.com/es/detecting-pirated-video-content
# Detección de contenidos de vÃdeo pirateados
## Información general
Detectar contenidos de vÃdeo pirateados es una tarea importante en la nueva era de los contenidos digitales. Muchos tipos de sitios web ofrecen a los usuarios la posibilidad de cargar contenidos de vÃdeo. Sitios web como [YouTube](https://www.youtube.com) existen únicamente por esta razón, pero muchos sitios de redes sociales también permiten esta capacidad. La inmensa popularidad de estos sitios ha atraÃdo la ira de los productores de contenidos, que se están tomando en serio la protección de sus derechos de autor y ejercen una verdadera presión sobre los propietarios de este tipo de sitios para que eliminen las infracciones ilegales. Una gran cantidad de material protegido por derechos de autor -desde clips de pelÃculas y programas de televisión hasta música y videoclips- puede ser descargado fácilmente por los visitantes de este tipo de servicios de alojamiento de vÃdeos en lÃnea. Aunque los operadores de estos sitios afirman que se amparan en la doctrina del uso legÃtimo, los productores de contenidos y las grandes empresas de medios de comunicación no se lo creen. Disponen de grandes bolsillos y ejércitos de abogados, y se están preparando para emprender acciones legales. Para evitar costosas y prolongadas batallas legales, los sitios de carga de vÃdeos en lÃnea utilizan métodos tecnológicos para reducir y prevenir las infracciones de los derechos de autor en sus sitios.
## Detección de contenidos ilegales mediante Video Fingerprinting SDK
Evitar la responsabilidad involuntaria por infracción de los derechos de autor es una cuestión importante para cualquier sitio que permita contenidos cargados por los usuarios. Las infracciones de los derechos de autor pueden dar lugar a acciones legales costosas y lentas y podrÃan acarrear importantes responsabilidades civiles o penales. Nuestro sitio [Video Fingerprinting SDK](https://www.visioforge.com/es/video-fingerprinting-sdk) ofrece una solución perfecta para que este tipo de sitios puedan seguir ofreciendo la posibilidad de subir vÃdeos y alojar contenidos de los usuarios, minimizando al mismo tiempo los riesgos de infracción de los derechos de autor. Nuestra tecnologÃa de huellas dactilares de vÃdeo incorpora los últimos avances en análisis de escenas, seguimiento de objetos y estimación del movimiento para analizar el contenido de cualquier vÃdeo con el fin de identificar sus caracterÃsticas únicas, como los colores, la estructura de la escena y el movimiento de los objetos en un descriptor digital compacto, la huella dactilar de vÃdeo. Se puede crear una base de datos de estas huellas dactilares de vÃdeo para material protegido por derechos de autor. A continuación, pueden cotejarse con el material de vÃdeo que cargan los usuarios de los sitios web para detectar la presencia de material protegido por derechos de autor y denegar la publicación de dicho material en sus sitios web.
## Comparación con otros productos
A diferencia de los productos que intentan ofrecer una capacidad similar, nuestra tecnologÃa permite identificar estas huellas a pesar de los cambios de resolución, velocidad de bits, método de codificación o formato de archivo. El vÃdeo puede detectarse incluso cuando está incluido dentro de otro vÃdeo o cuando sólo se reproduce un fragmento del mismo. Estas huellas dactilares de vÃdeo pueden almacenarse, copiarse y compararse entre sÃ. Asà pues, por mucho que un usuario intente editar o manipular el vÃdeo para burlar el sistema, el material protegido por derechos de autor será detectado y desautorizado. Esta es una ventaja significativa sobre las tecnologÃas de la competencia y utiliza nuestra tecnologÃa de huella digital de vÃdeo y monitorización de medios como la mejor opción para la detección de infracciones de derechos de autor para los propietarios de sitios que desean alojar contenidos de vÃdeo de usuarios. Ningún otro producto del mercado actual puede ofrecer este nivel de protección.
## Más información sobre la detección de contenidos de vÃdeo pirateados y nuestros productos
- [Póngase en contacto](https://support.visioforge.com/) con nosotros para ver cómo nuestra tecnologÃa de huellas dactilares de vÃdeo puede integrarse en su sitio para aplicar la detección de infracciones de derechos de autor.
- Consulte la página de productos de [Video Fingerprinting SDK](https://www.visioforge.com/es/video-fingerprinting-sdk)

---END OF PAGE---
# Page: https://www.visioforge.com/it/detecting-pirated-video-content
# Rilevamento di contenuti video pirata
## Informazioni principali
L'individuazione di contenuti video pirata è un compito importante nella nuova era dei contenuti digitali. Molti tipi di siti web offrono agli utenti la possibilità di caricare contenuti video. Siti web come [YouTube](https://www.youtube.com) esistono solo per questo motivo, ma anche molti siti di social network consentono questa possibilità . L'immensa popolarità di questi siti ha attirato le ire dei produttori di contenuti che si stanno impegnando seriamente per proteggere i loro diritti d'autore ed esercitare una reale pressione sui proprietari di questo tipo di siti affinché eliminino le violazioni illegali. Una grande quantità di materiale protetto da copyright - da spezzoni di film e programmi televisivi a musica e video musicali - è prontamente disponibile per il download da parte dei visitatori di questo tipo di servizi di video hosting online. Sebbene i gestori dei siti sostengano di operare in base alla dottrina dell'uso corretto, i produttori di contenuti e le grandi società di media non se la bevono. Hanno a disposizione tasche profonde ed eserciti di avvocati e si stanno attrezzando per intraprendere azioni legali. Per evitare costose e lunghe battaglie legali, i siti di upload di video online perseguono metodi tecnologici per ridurre e prevenire la violazione del copyright sui loro siti.
## Rilevamento di contenuti illegali con Video Fingerprinting SDK
Prevenire la responsabilità involontaria per violazione del copyright è un problema importante per qualsiasi sito che permetta il caricamento di contenuti da parte degli utenti. Le violazioni del copyright possono comportare azioni legali costose e lunghe e potrebbero comportare ingenti responsabilità civili o penali. Il nostro [Video Fingerprinting SDK](https://www.visioforge.com/it/video-fingerprinting-sdk) fornisce una soluzione perfetta per questi tipi di siti, che possono continuare a caricare video e a ospitare i contenuti degli utenti riducendo al minimo i rischi di violazione del copyright. La nostra tecnologia di fingerprinting video all'avanguardia incorpora i più recenti progressi nell'analisi della scena, nel tracciamento degli oggetti e nella stima del movimento per analizzare il contenuto di qualsiasi video al fine di identificarne le caratteristiche uniche, come i colori, la struttura della scena e il movimento degli oggetti in un descrittore digitale compatto, il fingerprint video. à possibile creare un database di queste impronte video per il materiale protetto da copyright. Queste possono essere confrontate con i materiali video caricati dagli utenti del sito per rilevare la presenza di materiali protetti da copyright e impedire la pubblicazione di tali materiali sui loro siti web.
## Confronto con altri prodotti
A differenza dei prodotti che tentano di fornire una capacità simile, la nostra tecnologia consente di identificare queste impronte digitali nonostante le variazioni di risoluzione, bit-rate, metodo di codifica o formato del file. Il video può essere rilevato anche quando è incluso in un altro video o quando ne viene riprodotto solo un frammento. Queste impronte video possono essere memorizzate, copiate e confrontate tra loro. In questo modo, indipendentemente dal modo in cui un utente potrebbe cercare di modificare o manipolare il video per tentare di aggirare il sistema, il materiale protetto da copyright verrà rilevato e non ammesso. Questo è un vantaggio significativo rispetto alle tecnologie concorrenti e rende la nostra tecnologia di video fingerprinting e di monitoraggio dei media la scelta migliore per il rilevamento delle violazioni del copyright per i proprietari di siti che desiderano ospitare contenuti video degli utenti. Nessun altro prodotto attualmente sul mercato è in grado di fornire questo livello di protezione.
## Maggiori informazioni sul rilevamento di contenuti video pirata e sui nostri prodotti
- [Contattateci](https://support.visioforge.com/) per vedere come la nostra tecnologia di video fingerprinting può essere integrata nel vostro sito per implementare il rilevamento delle violazioni del copyright.
- Controllare la pagina del prodotto di [Video Fingerprinting SDK](https://www.visioforge.com/it/video-fingerprinting-sdk)

---END OF PAGE---
# Page: https://www.visioforge.com/de/buy
# Kauf oder Aktualisierung eines Abonnements für unsere Produkte
## Das Abonnement bietet Ihnen folgende Vorteile
- Unbegrenzte Nutzung
- Keine lästige Erinnerungsmeldung
- Kostenlose kleinere und gröÃere Upgrades
- Vorrangige Unterstützung und Fehlerbehebung
- Sie können das Produkt ohne Updates nutzen, auch wenn das Abonnement abgelaufen ist.
Die reguläre Lizenz wird jährlich in Rechnung gestellt und automatisch um ein Jahr verlängert. Sie können Ihr Abonnement jederzeit kündigen.
## Wie sicher ist mein Online-Einkauf?
Die Zahlungen werden abgewickelt von [Streifen](https://www.stripe.com/)einen zuverlässigen Zahlungsdienst im Internet. Die Bestellseiten befinden sich auf einer sicheren Website, die alle übertragenen Kreditkartendaten nach dem sicheren HTTPS-Protokoll verschlüsselt. Während des Anmeldevorgangs haben Sie die Möglichkeit, eine Fax-, Post- oder Kaufbestellung als Alternative zur Standard-Online-Kreditkartenbestellung aufzugeben. Achten Sie beim Ausfüllen des Formulars darauf, dass Sie die richtigen Angaben zu Ihrer Person oder Ihrem Unternehmen sowie die richtige Menge eingeben. Wenn Sie unser Produkt bestellt haben, aber den Registrierungsschlüssel nicht innerhalb von 24 Stunden erhalten haben, Ihren Registrierungsschlüssel verloren haben oder Fragen zur Bestellung haben, kontaktieren Sie uns bitte unter [support@visioforge.com](mailto:support@visioforge.com).
â
Bitte prüfen Sie unser [Datenschutzbestimmungen](https://www.visioforge.com/de/datenschutzbestimmungen).
## Benutzerdefinierte Filter, Baugruppen oder andere Dateinamen
Wir können benutzerdefinierte Namen für Filter/Baugruppen/andere Kaufdateien mit 10 oder mehr Lizenzschlüsseln bereitstellen.
## Zahlungsmöglichkeiten
- Kredit-/Debitkarte (Visa, Visa Electron, MasterCard, Maestro, Eurocard, DinersClub, American Express, JCB, PostePay, Discover (Novus) und Carte Bleue)
- Banküberweisung (Wire/SEPA/ACH-Ãberweisung)
- Alipay, WeChat Pay
- Apple Pay
- Google Pay
- Klarna
- Revolut Pay
- Lastschriftverfahren
- viele andere Möglichkeiten
## Team-Lizenz
Sie können eine standortweite Teamlizenz erwerben und sie in den Büros einer Stadt verwenden.
## Informationen zur Nichtverlängerung der Lizenz
Wenn Sie Ihre Lizenz nicht erneuern, bleibt die vollständige Funktionalität Ihres Projekts ohne Unterbrechung erhalten. Die Funktionalität bleibt erhalten, da Ihre Anwendung, sobald sie erstellt und bereitgestellt wurde, unabhängig vom Lizenzstatus funktioniert.
### Was weiterhin funktioniert
Alle Funktionen, Komponenten und Möglichkeiten, die vor Ablauf Ihrer Lizenz in Betrieb waren, funktionieren weiterhin genau wie zuvor. Die Leistung der Anwendung, die Benutzerfreundlichkeit und die technischen Möglichkeiten bleiben nach Ablauf der Lizenz unverändert.
### Worauf Sie keinen Zugriff haben
Die wichtigste Einschränkung, die sich ergibt, wenn Ihre Lizenz abläuft, ist die Unmöglichkeit eines Upgrades auf neuere SDK-Versionen. Dies bedeutet:
- Sie können keine neueren Versionen des SDK installieren oder implementieren.
- Sie erhalten keine Funktionserweiterungen, die in zukünftigen SDK-Versionen veröffentlicht werden.
- Sie profitieren nicht von Fehlerbehebungen oder Sicherheitsupdates in neueren Versionen
### Künftige Lizenzierungsoptionen
Wenn Sie sich später entscheiden, dass Sie Zugang zu neueren SDK-Versionen haben möchten, können Sie jederzeit eine neue Lizenz erwerben. Es gibt keine Strafe oder Komplikationen bei der Reaktivierung Ihrer Lizenzierung nach einem Zeitraum der Nichtverlängerung.
Dieser Ansatz ermöglicht es Ihnen, strategische Entscheidungen darüber zu treffen, wann Upgrades für Ihr Projekt notwendig sind, anstatt Sie in einen ständigen Erneuerungszyklus zu zwingen, wenn dieser nicht mit Ihrer Entwicklungs-Roadmap oder Budgetbeschränkungen übereinstimmt.
## Premium-Unterstützung
Wenn Sie auf der Suche nach erstklassigem Support für Ihre Software sind, ist unser Premium-Support-Paket genau das Richtige für Sie. Mit unserem Premium-Support erhalten Sie Zugang zu einer Reihe von Tools und Diensten, die Ihnen helfen, das Beste aus Ihrer Software herauszuholen, darunter AnyDesk, Microsoft Teams, Telegram und mehr.
Einer der wichtigsten Vorteile unseres Premium-Support-Pakets ist der Zugang zu AnyDesk. Diese leistungsstarke Remote-Desktop-Anwendung ermöglicht es unserem Support-Team, auf Ihren Computer zuzugreifen und Probleme zu beheben, die Sie möglicherweise haben. Mit AnyDesk kann unser Support-Team Probleme schnell diagnostizieren und beheben.
Zusätzlich zu AnyDesk beinhaltet unser Premium-Support-Paket auch den Zugang zu Microsoft Teams. Diese Kollaborationsplattform ermöglicht es unserem Support-Team, mit Ihnen in Echtzeit zu kommunizieren, Dateien auszutauschen und sogar Videoanrufe zu tätigen. So haben Sie jederzeit direkten Zugang zu unserem Support-Team, egal wo auf der Welt Sie sich befinden.
Wir bieten auch Support über Telegram, eine sichere Messaging-Plattform, die es uns ermöglicht, Ihnen schnellen und bequemen Support direkt von Ihrem Mobilgerät aus zu bieten. Ganz gleich, ob Sie unterwegs sind oder einfach lieber über Nachrichten kommunizieren, unser Support-Team steht Ihnen über Telegram zur Verfügung.
Wenn Sie sich für unser Premium-Supportpaket entscheiden, können Sie sicher sein, dass Sie den besten technischen Support für Ihre Software erhalten. Unser Expertenteam ist hochqualifiziert und engagiert, um Ihnen den bestmöglichen Service zu bieten, damit Sie Ihre Software wieder mit Zuversicht nutzen können.
Unser Premium-Support-Paket ist für nur 250 EUR erhältlich und umfasst 5 Stunden engagierten Support. Um sich für unser Premium-Support-Paket anzumelden und diese Vorteile zu nutzen, verwenden Sie den folgenden [\*\*Zahlungslink\*\*](https://buy.stripe.com/7sI3ch4ou1C62Dm3dA). Sobald Ihre Zahlung bearbeitet wurde, wird sich unser Support-Team mit Ihnen in Verbindung setzen, um Ihre Support-Sitzungen zu planen und Ihnen den bestmöglichen Support für Ihre Software zukommen zu lassen.
Das SDK ist für die nicht-kommerzielle Nutzung kostenlos. Bitte kontaktieren Sie uns, um eine kostenlose Lizenz zu erhalten.
### Video Capture SDK .Net
##### STANDARD
[250 â¬]â Regulär (1 Jahr)
[Debit-/Kreditkarte](https://buy.stripe.com/dR69AFdZ42Ga2Dm9AA)[Bank, SEPA, Apple und mehr](https://buy.stripe.com/28o0056wC6Wq4Lug0G)
[750 â¬]â Lebenslang/Team
[Alle Methoden](https://buy.stripe.com/14k4gl9IObcG6TC5l1)
##### PROFESSIONELL
[350 â¬]â Regulär (1 Jahr)
[Debit-/Kreditkarte](https://buy.stripe.com/aEUcMRcV0cgKem4bIJ)[Bank, SEPA, Apple und mehr](https://buy.stripe.com/4gw6ot5sy5Sm6TCdSA)
[1000 â¬]â Lebenslang/Team
[Alle Methoden](https://buy.stripe.com/bIYbINf381C6cdWdRj)
##### PREMIUM
[500 â¬]â Regulär (1 Jahr)
[Debit-/Kreditkarte](https://buy.stripe.com/dR628dg7c80ucdW4gi)[Bank, SEPA, Apple und mehr](https://buy.stripe.com/8wMcMR6wCfsW5PydSz)
[1500 â¬]â Lebenslang/Team
[Alle Methoden](https://buy.stripe.com/cN2aEJ5sya8C2Dm5kM)
### Video Edit SDK .Net
##### STANDARD
[250 â¬]â Regulär (1 Jahr)
[Debit-/Kreditkarte](https://buy.stripe.com/dR66ot08e94yem49AG)[Bank, SEPA, Apple und mehr](https://buy.stripe.com/00gfZ33kq1C67XG01L)
[750 â¬]â Lebenslang/Team
[Alle Methoden](https://buy.stripe.com/eVa8wBcV0gx00ve14s)
##### PROFESSIONELL
[350 â¬]â Regulär (1 Jahr)
[Debit-/Kreditkarte](https://buy.stripe.com/6oEaEJ08ecgK7XGdQX)[Bank, SEPA, Apple und mehr](https://buy.stripe.com/7sI4gl3kqdkO7XG29U)
[1000 â¬]â Lebenslang/Team
[Alle Methoden](https://buy.stripe.com/cN2fZ3cV0fsW0ve6oL)
##### PREMIUM
[500 â¬]â Regulär (1 Jahr)
[Debit-/Kreditkarte](https://buy.stripe.com/eVaaEJ08e5Smdi0eV2)[Bank, SEPA, Apple und mehr](https://buy.stripe.com/fZeaEJdZ40y2di015h)
[1500 â¬]â Lebenslang/Team
[Alle Methoden](https://buy.stripe.com/bIY5kp08e2Ga5Py8wS)
### Media Player SDK .Net
##### STANDARD
[250 â¬]â Regulär (1 Jahr)
[Debit-/Kreditkarte](https://buy.stripe.com/7sI9AF08efsWcdW7sE)[Bank, SEPA, Apple und mehr](https://buy.stripe.com/14k1492gm6Wq0ve8yj)
[750 â¬]â Lebenslang/Team
[Alle Methoden](https://buy.stripe.com/cN2fZ36wCa8C4LudR9)
##### PROFESSIONELL
[350 â¬]â Regulär (1 Jahr)
[Debit-/Kreditkarte](https://buy.stripe.com/aEU5kpf380y20ve5kx)[Bank, SEPA, Apple und mehr](https://buy.stripe.com/bIY28d1ci1C61zi8yk)
[1000 â¬]â Lebenslang/Team
[Alle Methoden](https://buy.stripe.com/8wMaEJbQWeoSdi0eVc)
### Media Blocks SDK .Net
[500 â¬]â Regulär (1 Jahr)
[Debit-/Kreditkarte](https://buy.stripe.com/14kaEJ6wCa8C1zi9BK)[Bank, SEPA, Apple und mehr](https://buy.stripe.com/3cseUZ5sy6Wq5Py5mc)
[1500 â¬]â Lebenslang/Team
[Alle Methoden](https://buy.stripe.com/bIY4gl4oueoSb9SeW5)
### Video Edit SDK FFMPEG .Net
##### STANDARD
[250 â¬]â Regulär (1 Jahr)
[Debit-/Kreditkarte](https://buy.stripe.com/6oEbIN1cigx091KaFm)[Bank, SEPA, Apple und mehr](https://buy.stripe.com/fZe8wBg7ccgK1zi6qd)
[750 â¬]â Lebenslang/Team
[Alle Methoden](https://buy.stripe.com/aEUbINcV080uem43cV)
##### PROFESSIONELL
[350 â¬]â Regulär (1 Jahr)
[Debit-/Kreditkarte](https://buy.stripe.com/00gcMRaMS80u1zi5l4)[Bank, SEPA, Apple und mehr](https://buy.stripe.com/bIY149aMS0y2a5O7ui)
[1000 â¬]â Lebenslang/Team
[Alle Methoden](https://buy.stripe.com/bIYbIN5sy0y20vefZJ)
##### PREMIUM
[500 â¬]â Regulär (1 Jahr)
[Debit-/Kreditkarte](https://buy.stripe.com/dR64glcV0fsWem48xi)[Bank, SEPA, Apple und mehr](https://buy.stripe.com/5kA7sx4ou94y1zi3e3)
[1500 â¬]â Lebenslang/Team
[Alle Methoden](https://buy.stripe.com/4gw1498EK3Keem46pb)
### Virtual Camera SDK
##### PROFESSIONELL
[500 â¬]â Regulär (1 Jahr)
[Debit-/Kreditkarte](https://buy.stripe.com/00g149cV00y2b9SeVq)[Bank, SEPA, Apple und mehr](https://buy.stripe.com/fZe28d8EKeoS5Py3e6)
[1500 â¬]â Lebenslang/Team
[Alle Methoden](https://buy.stripe.com/bIYaEJ1ci6Wqa5ObJf)
##### QUELLCODE
[2500 â¬]â Lebenslang/Team
[Alle Methoden](https://buy.stripe.com/aEUdQVcV06Wq1zibJg)
### VLC Source DirectShow Filter
[300 â¬]â Regulär (1 Jahr)
[Debit-/Kreditkarte](https://buy.stripe.com/fZe8wB6wC1C67XGeVt)[Bank, SEPA, Apple und mehr](https://buy.stripe.com/cN2eUZ8EK4Oi1zibKD)
[900 â¬]â Lebenslang/Team
[Alle Methoden](https://buy.stripe.com/6oEeUZ7AG6Wq2DmbK0)
### FFMPEG Source DirectShow Filter
[300 â¬]â Regulär (1 Jahr)
[Debit-/Kreditkarte](https://buy.stripe.com/bIYcMRdZ45Smb9S7t2)[Bank, SEPA, Apple und mehr](https://buy.stripe.com/4gwbIN1cibcG7XGbKE)
[900 â¬]â Lebenslang/Team
[Alle Methoden](https://buy.stripe.com/5kAcMR1ci3Keem4dRr)
### DirectShow Encoding Filters Pack
[500 â¬]â Regulär (1 Jahr)
[Debit-/Kreditkarte](https://buy.stripe.com/4gwbIN7AG94y1zi7t4)[Bank, SEPA, Apple und mehr](https://buy.stripe.com/aEU4gl4oubcGa5O5mh)
[1500 â¬]â Lebenslang/Team
[Alle Methoden](https://buy.stripe.com/5kAdQVcV00y26TCbJc)
### DirectShow Processing Filters Pack
[350 â¬]â Regulär (1 Jahr)
[Debit-/Kreditkarte](https://buy.stripe.com/4gw9AF5sy0y26TC4gT)[Bank, SEPA, Apple und mehr](https://buy.stripe.com/9AQ28d5sy2Ga91K162)
[1000 â¬]â Lebenslang/Team
[Alle Methoden](https://buy.stripe.com/dR6eUZg7ceoSgucaF9)
### Video Encryption SDK
[500 â¬]â Regulär (1 Jahr)
[Debit-/Kreditkarte](https://buy.stripe.com/8wM28d3kq5Smguc28M)[Bank, SEPA, Apple und mehr](https://buy.stripe.com/28o7sx3kq6Wqfq85mj)
[1500 â¬]â Lebenslang/Team
[Alle Methoden](https://buy.stripe.com/dR6bIN8EK3Ke7XG9Bf)
### All-in-One Media Framework (Delphi/ActiveX)
##### STANDARD
[350 â¬]â Regulär (1 Jahr)
[Debit-/Kreditkarte](https://buy.stripe.com/8wMdQV7AG6Wq7XG4hO)[Bank, SEPA, Apple und mehr](https://buy.stripe.com/dR6dQV4ou94ycdW9CA)
[700 â¬]â Lebenslang/Team
[Alle Methoden](https://buy.stripe.com/dR69AF8EKbcGa5OcOp)
##### PROFESSIONELL
[500 â¬]â Regulär (1 Jahr)
[Debit-/Kreditkarte](https://buy.stripe.com/fZebIN9IOfsW6TC3dJ)[Bank, SEPA, Apple und mehr](https://buy.stripe.com/8wM9AF3kq1C60ve2aa)
[1000 â¬]â Lebenslang/Team
[Alle Methoden](https://buy.stripe.com/4gw8wB2gm0y2b9S29M)
##### PREMIUM
[750 â¬]â Regulär (1 Jahr)
[Debit-/Kreditkarte](https://buy.stripe.com/9AQcMR7AG2Gab9SdSm)[Bank, SEPA, Apple und mehr](https://buy.stripe.com/eVaeUZ2gm6Wq5Py2a9)
[1500 â¬]â Lebenslang/Team
[Alle Methoden](https://buy.stripe.com/5kAaEJ6wCa8Cem48yb)
### Video Fingerprinting SDK
[900 â¬]â Regulär (1 Jahr)
[Debit-/Kreditkarte](https://buy.stripe.com/14kfZ3aMS6WqcdWaFy)[Bank, SEPA, Apple und mehr](https://buy.stripe.com/3cs4gl5sy6Wq1zi7uv)
[2000 â¬]â Lebenslang/Team
[Alle Methoden](https://buy.stripe.com/bIY7sx6wC1C66TCcNH)
[25 â¬]â Laufzeit (1 Serverkern pro Jahr)
[Debit-/Kreditkarte](https://buy.stripe.com/aEUaEJ3kq0y2em4bJE)[Bank, SEPA, Apple und mehr](https://buy.stripe.com/8wM6ot2gm6Wq5Pyg12)
### Bündel
â¬700
â¬1800
.Net-Bündel
Professionell
Video Capture SDK .Net Professionelle Ausgabe
Media Player SDK .Net Professional Ausgabe
Video Edit SDK .Net Professionelle Ausgabe
Video Edit SDK FFMPEG .Net Professionelle Ausgabe
Media Blocks SDK .Net
[Reguläre Lizenz](https://buy.stripe.com/eVacMR6wCa8CcdW5li)[Lizenz auf Lebenszeit/Team](https://buy.stripe.com/00g7sx5sy0y291K3db)
â¬1000
â¬2500
.Net-Bündel
Prämie
Video Capture SDK .Net Premium Ausgabe
Media Player SDK .Net Professional Ausgabe
Video Edit SDK .Net Premium Ausgabe
Video Edit SDK FFMPEG .Net Premium Ausgabe
Media Blocks SDK .Net
[Reguläre Lizenz](https://buy.stripe.com/28ofZ3bQW6Wqb9S5lk)[Lizenz auf Lebenszeit/Team](https://buy.stripe.com/aEUbIN3kq5Sm3Hq9BB)
â¬1000
â¬2500
DirectShow All-In-One
Bündel
FFMPEG Source DirectShow Filter
VLC Source DirectShow Filter
DirectShow Processing Filters Pack
DirectShow Encoding Filters Pack
DirectShow Source SDK für Kinect
[Reguläre Lizenz](https://buy.stripe.com/00g149cV0cgK3HqaFZ)[Lizenz auf Lebenszeit/Team](https://buy.stripe.com/8wM1498EK4Oib9S8xS)
Die Preisliste ist in [PDF](http://files.visioforge.com/shared/pricelist.pdf).
---END OF PAGE---
# Page: https://www.visioforge.com/es/buy
# Adquirir o actualizar la suscripción
## La suscripción le proporcionará las siguientes ventajas
- Uso ilimitado
- Sin molestos mensajes recordatorios
- Actualizaciones menores y mayores gratuitas
- Asistencia y correcciones prioritarias
- Puede utilizar el producto sin actualizaciones aunque haya finalizado la suscripción
La licencia normal se factura anualmente y se renueva automáticamente cada año. Puede cancelar su suscripción en cualquier momento.
## ¿Es segura mi compra por Internet?
Los pagos son gestionados por [Raya](https://www.stripe.com/)un servicio de pago fiable en Internet. Las páginas de pedido se encuentran en un sitio web seguro que encripta todos los datos de tarjeta de crédito transmitidos según el protocolo seguro HTTPS. Durante el proceso de registro, se le dará la opción de realizar un pedido por fax, correo o compra como alternativa al pedido estándar en lÃnea con tarjeta de crédito. Cuando rellene el formulario, asegúrese de introducir correctamente sus datos personales o los de su empresa, asà como la cantidad. Si ha pedido nuestro producto pero no ha recibido la clave de registro en 24 horas, ha perdido su clave de registro o tiene alguna pregunta sobre el pedido, póngase en contacto con nosotros en [soporte@visioforge.com](mailto:support@visioforge.com).
â
Consulte nuestra [polÃtica de privacidad](https://www.visioforge.com/es/politica-de-privacidad).
## Filtros personalizados, ensamblajes u otros nombres de archivos
Podemos proporcionar nombres personalizados para filtros/ensamblajes/otros archivos de compra que contengan 10 o más claves de licencia.
## Métodos de pago
- Tarjeta de crédito/débito (Visa, Visa Electron, MasterCard, Maestro, Eurocard, DinersClub, American Express, JCB, PostePay, Discover (Novus) y Carte Bleue)
- Transferencia bancaria (transferencia bancaria/SEPA/ACH)
- Alipay, WeChat Pay
- Apple Pay
- Google Pay
- Klarna
- Revolut Pay
- Domiciliación bancaria
- muchas otras formas
## Licencia de grupo
Puede adquirir una licencia para todo el centro del equipo y utilizarla en las oficinas de una misma ciudad.
## Información sobre la no renovación de licencias
Cuando no renueva su licencia, su proyecto mantiene la funcionalidad completa sin ninguna interrupción. Esta conservación de la funcionalidad se produce porque una vez que tu aplicación está construida e implantada, funciona independientemente del estado de la licencia.
### Lo que sigue funcionando
Todas las funciones, componentes y capacidades que estaban operativas antes de que caducara la licencia seguirán funcionando exactamente igual que antes. El rendimiento de la aplicación, la experiencia del usuario y las capacidades técnicas permanecen inalteradas tras el vencimiento de la licencia.
### A qué se pierde el acceso
La principal limitación que se produce cuando caduca su licencia es la imposibilidad de actualizar a versiones más recientes del SDK. Esto significa:
- No puede instalar o implementar versiones más recientes del SDK
- No recibirá las mejoras de funciones publicadas en futuras versiones del SDK.
- No se beneficiará de las correcciones de errores ni de las actualizaciones de seguridad de las nuevas versiones.
### Futuras opciones de licencia
Si más adelante decide que desea acceder a nuevas versiones del SDK, puede adquirir una nueva licencia en cualquier momento. La reactivación de la licencia tras un periodo de no renovación no conlleva ninguna penalización ni complicación.
Este enfoque le permite tomar decisiones estratégicas sobre cuándo son necesarias las actualizaciones para su proyecto, en lugar de obligarle a un ciclo de renovación continua si no se ajusta a su hoja de ruta de desarrollo o a sus limitaciones presupuestarias.
## Asistencia premium
Si buscas asistencia de primer nivel para tu software, nuestro paquete de asistencia premium es exactamente lo que necesitas. Con nuestro soporte premium, tendrás acceso a una serie de herramientas y servicios que te ayudarán a sacar el máximo partido a tu software, como AnyDesk, Microsoft Teams y Telegram, entre otros.
Una de las principales ventajas de nuestro paquete de asistencia Premium es el acceso a AnyDesk. Esta potente aplicación de escritorio remoto permite a nuestro equipo de asistencia acceder a su ordenador y solucionar cualquier problema que pueda tener. Con AnyDesk, nuestro equipo de asistencia puede diagnosticar y resolver problemas rápidamente.
Además de AnyDesk, nuestro paquete de asistencia premium también incluye acceso a Microsoft Teams. Esta plataforma de colaboración permite a nuestro equipo de soporte comunicarse con usted en tiempo real, compartir archivos e incluso realizar videollamadas. Esto garantiza que tenga acceso directo a nuestro equipo de soporte siempre que lo necesite, sin importar en qué parte del mundo se encuentre.
También ofrecemos soporte a través de Telegram, una plataforma de mensajerÃa segura que nos permite ofrecerte un soporte rápido y cómodo directamente desde tu dispositivo móvil. Tanto si estás fuera de casa como si simplemente prefieres comunicarte por mensajerÃa, nuestro equipo de soporte está disponible para ayudarte a través de Telegram.
Al contratar nuestro paquete de asistencia Premium, puede estar seguro de que recibirá la mejor asistencia técnica para su software. Nuestro equipo de expertos está altamente capacitado y dedicado a ofrecerle el máximo nivel de servicio posible, para que pueda volver a utilizar su software con confianza.
Nuestro paquete de asistencia Premium está disponible por sólo 250 EUR por 5 horas de asistencia dedicada. Para contratar nuestro paquete de asistencia premium y acceder a estas ventajas, utilice el siguiente [\*\*enlace de pago\*\*](https://buy.stripe.com/7sI3ch4ou1C62Dm3dA). Una vez procesado el pago, nuestro equipo de asistencia se pondrá en contacto con usted para programar las sesiones de asistencia y ofrecerle la mejor asistencia posible para su software.
El SDK es gratuito para uso no comercial. Póngase en contacto con nosotros para obtener una licencia gratuita.
### Video Capture SDK .Net
##### ESTÃNDAR
[â¬250] Regular (1 año)
[Tarjeta de débito/crédito](https://buy.stripe.com/dR69AFdZ42Ga2Dm9AA)[Banco, SEPA, Apple y más](https://buy.stripe.com/28o0056wC6Wq4Lug0G)
[â¬750]â De por vida/Equipo
[Todos los métodos](https://buy.stripe.com/14k4gl9IObcG6TC5l1)
##### PROFESIONAL
[â¬350] Regular (1 año)
[Tarjeta de débito/crédito](https://buy.stripe.com/aEUcMRcV0cgKem4bIJ)[Banco, SEPA, Apple y más](https://buy.stripe.com/4gw6ot5sy5Sm6TCdSA)
[1000 â¬]â De por vida/Equipo
[Todos los métodos](https://buy.stripe.com/bIYbINf381C6cdWdRj)
##### PREMIUM
[â¬500] Regular (1 año)
[Tarjeta de débito/crédito](https://buy.stripe.com/dR628dg7c80ucdW4gi)[Banco, SEPA, Apple y más](https://buy.stripe.com/8wMcMR6wCfsW5PydSz)
[â¬1500]â De por vida/Equipo
[Todos los métodos](https://buy.stripe.com/cN2aEJ5sya8C2Dm5kM)
### Video Edit SDK .Net
##### ESTÃNDAR
[â¬250] Regular (1 año)
[Tarjeta de débito/crédito](https://buy.stripe.com/dR66ot08e94yem49AG)[Banco, SEPA, Apple y más](https://buy.stripe.com/00gfZ33kq1C67XG01L)
[â¬750]â De por vida/Equipo
[Todos los métodos](https://buy.stripe.com/eVa8wBcV0gx00ve14s)
##### PROFESIONAL
[â¬350] Regular (1 año)
[Tarjeta de débito/crédito](https://buy.stripe.com/6oEaEJ08ecgK7XGdQX)[Banco, SEPA, Apple y más](https://buy.stripe.com/7sI4gl3kqdkO7XG29U)
[1000 â¬]â De por vida/Equipo
[Todos los métodos](https://buy.stripe.com/cN2fZ3cV0fsW0ve6oL)
##### PREMIUM
[â¬500] Regular (1 año)
[Tarjeta de débito/crédito](https://buy.stripe.com/eVaaEJ08e5Smdi0eV2)[Banco, SEPA, Apple y más](https://buy.stripe.com/fZeaEJdZ40y2di015h)
[â¬1500]â De por vida/Equipo
[Todos los métodos](https://buy.stripe.com/bIY5kp08e2Ga5Py8wS)
### Media Player SDK .Net
##### ESTÃNDAR
[â¬250] Regular (1 año)
[Tarjeta de débito/crédito](https://buy.stripe.com/7sI9AF08efsWcdW7sE)[Banco, SEPA, Apple y más](https://buy.stripe.com/14k1492gm6Wq0ve8yj)
[â¬750]â De por vida/Equipo
[Todos los métodos](https://buy.stripe.com/cN2fZ36wCa8C4LudR9)
##### PROFESIONAL
[â¬350] Regular (1 año)
[Tarjeta de débito/crédito](https://buy.stripe.com/aEU5kpf380y20ve5kx)[Banco, SEPA, Apple y más](https://buy.stripe.com/bIY28d1ci1C61zi8yk)
[1000 â¬]â De por vida/Equipo
[Todos los métodos](https://buy.stripe.com/8wMaEJbQWeoSdi0eVc)
### Media Blocks SDK .Net
[â¬500] Regular (1 año)
[Tarjeta de débito/crédito](https://buy.stripe.com/14kaEJ6wCa8C1zi9BK)[Banco, SEPA, Apple y más](https://buy.stripe.com/3cseUZ5sy6Wq5Py5mc)
[â¬1500]â De por vida/Equipo
[Todos los métodos](https://buy.stripe.com/bIY4gl4oueoSb9SeW5)
### Video Edit SDK FFMPEG .Net
##### ESTÃNDAR
[â¬250] Regular (1 año)
[Tarjeta de débito/crédito](https://buy.stripe.com/6oEbIN1cigx091KaFm)[Banco, SEPA, Apple y más](https://buy.stripe.com/fZe8wBg7ccgK1zi6qd)
[â¬750]â De por vida/Equipo
[Todos los métodos](https://buy.stripe.com/aEUbINcV080uem43cV)
##### PROFESIONAL
[â¬350] Regular (1 año)
[Tarjeta de débito/crédito](https://buy.stripe.com/00gcMRaMS80u1zi5l4)[Banco, SEPA, Apple y más](https://buy.stripe.com/bIY149aMS0y2a5O7ui)
[1000 â¬]â De por vida/Equipo
[Todos los métodos](https://buy.stripe.com/bIYbIN5sy0y20vefZJ)
##### PREMIUM
[â¬500] Regular (1 año)
[Tarjeta de débito/crédito](https://buy.stripe.com/dR64glcV0fsWem48xi)[Banco, SEPA, Apple y más](https://buy.stripe.com/5kA7sx4ou94y1zi3e3)
[â¬1500]â De por vida/Equipo
[Todos los métodos](https://buy.stripe.com/4gw1498EK3Keem46pb)
### Virtual Camera SDK
##### PROFESIONAL
[â¬500] Regular (1 año)
[Tarjeta de débito/crédito](https://buy.stripe.com/00g149cV00y2b9SeVq)[Banco, SEPA, Apple y más](https://buy.stripe.com/fZe28d8EKeoS5Py3e6)
[â¬1500]â De por vida/Equipo
[Todos los métodos](https://buy.stripe.com/bIYaEJ1ci6Wqa5ObJf)
##### CÃDIGO FUENTE
[â¬2500]â De por vida/Equipo
[Todos los métodos](https://buy.stripe.com/aEUdQVcV06Wq1zibJg)
### VLC Source DirectShow Filter
[â¬300]â Regular (1 año)
[Tarjeta de débito/crédito](https://buy.stripe.com/fZe8wB6wC1C67XGeVt)[Banco, SEPA, Apple y más](https://buy.stripe.com/cN2eUZ8EK4Oi1zibKD)
[900 â¬]â De por vida/Equipo
[Todos los métodos](https://buy.stripe.com/6oEeUZ7AG6Wq2DmbK0)
### FFMPEG Source DirectShow Filter
[â¬300]â Regular (1 año)
[Tarjeta de débito/crédito](https://buy.stripe.com/bIYcMRdZ45Smb9S7t2)[Banco, SEPA, Apple y más](https://buy.stripe.com/4gwbIN1cibcG7XGbKE)
[900 â¬]â De por vida/Equipo
[Todos los métodos](https://buy.stripe.com/5kAcMR1ci3Keem4dRr)
### DirectShow Encoding Filters Pack
[â¬500] Regular (1 año)
[Tarjeta de débito/crédito](https://buy.stripe.com/4gwbIN7AG94y1zi7t4)[Banco, SEPA, Apple y más](https://buy.stripe.com/aEU4gl4oubcGa5O5mh)
[â¬1500]â De por vida/Equipo
[Todos los métodos](https://buy.stripe.com/5kAdQVcV00y26TCbJc)
### DirectShow Processing Filters Pack
[â¬350] Regular (1 año)
[Tarjeta de débito/crédito](https://buy.stripe.com/4gw9AF5sy0y26TC4gT)[Banco, SEPA, Apple y más](https://buy.stripe.com/9AQ28d5sy2Ga91K162)
[1000 â¬]â De por vida/Equipo
[Todos los métodos](https://buy.stripe.com/dR6eUZg7ceoSgucaF9)
### Video Encryption SDK
[â¬500] Regular (1 año)
[Tarjeta de débito/crédito](https://buy.stripe.com/8wM28d3kq5Smguc28M)[Banco, SEPA, Apple y más](https://buy.stripe.com/28o7sx3kq6Wqfq85mj)
[â¬1500]â De por vida/Equipo
[Todos los métodos](https://buy.stripe.com/dR6bIN8EK3Ke7XG9Bf)
### All-in-One Media Framework (Delphi/ActiveX)
##### ESTÃNDAR
[â¬350] Regular (1 año)
[Tarjeta de débito/crédito](https://buy.stripe.com/8wMdQV7AG6Wq7XG4hO)[Banco, SEPA, Apple y más](https://buy.stripe.com/dR6dQV4ou94ycdW9CA)
[â¬700]â De por vida/Equipo
[Todos los métodos](https://buy.stripe.com/dR69AF8EKbcGa5OcOp)
##### PROFESIONAL
[â¬500] Regular (1 año)
[Tarjeta de débito/crédito](https://buy.stripe.com/fZebIN9IOfsW6TC3dJ)[Banco, SEPA, Apple y más](https://buy.stripe.com/8wM9AF3kq1C60ve2aa)
[1000 â¬]â De por vida/Equipo
[Todos los métodos](https://buy.stripe.com/4gw8wB2gm0y2b9S29M)
##### PREMIUM
[750â¬] Regular (1 año)
[Tarjeta de débito/crédito](https://buy.stripe.com/9AQcMR7AG2Gab9SdSm)[Banco, SEPA, Apple y más](https://buy.stripe.com/eVaeUZ2gm6Wq5Py2a9)
[â¬1500]â De por vida/Equipo
[Todos los métodos](https://buy.stripe.com/5kAaEJ6wCa8Cem48yb)
### Video Fingerprinting SDK
[900â¬] Regular (1 año)
[Tarjeta de débito/crédito](https://buy.stripe.com/14kfZ3aMS6WqcdWaFy)[Banco, SEPA, Apple y más](https://buy.stripe.com/3cs4gl5sy6Wq1zi7uv)
[â¬2000]â De por vida/Equipo
[Todos los métodos](https://buy.stripe.com/bIY7sx6wC1C66TCcNH)
[â¬25]â AutonomÃa (1 núcleo de servidor al año)
[Tarjeta de débito/crédito](https://buy.stripe.com/aEUaEJ3kq0y2em4bJE)[Banco, SEPA, Apple y más](https://buy.stripe.com/8wM6ot2gm6Wq5Pyg12)
### Paquetes
â¬700
â¬1800
Paquete .Net
Profesional
Video Capture SDK .Net Edición Profesional
Media Player SDK .Net Edición Profesional
Video Edit SDK .Net Edición Profesional
Video Edit SDK FFMPEG .Net Edición Profesional
Media Blocks SDK .Net
[Licencia Regular](https://buy.stripe.com/eVacMR6wCa8CcdW5li)[Licencia Lifetime/Team](https://buy.stripe.com/00g7sx5sy0y291K3db)
â¬1000
â¬2500
Paquete .Net
Premium
Video Capture SDK .Net Edición Premium
Media Player SDK .Net Edición Profesional
Video Edit SDK .Net Edición Premium
Video Edit SDK FFMPEG .Net Edición Premium
Media Blocks SDK .Net
[Licencia Regular](https://buy.stripe.com/28ofZ3bQW6Wqb9S5lk)[Licencia Lifetime/Team](https://buy.stripe.com/aEUbIN3kq5Sm3Hq9BB)
â¬1000
â¬2500
DirectShow Todo en Uno
Paquete
FFMPEG Source DirectShow Filter
VLC Source DirectShow Filter
DirectShow Processing Filters Pack
DirectShow Encoding Filters Pack
SDK de origen de DirectShow para Kinect
[Licencia Regular](https://buy.stripe.com/00g149cV0cgK3HqaFZ)[Licencia Lifetime/Team](https://buy.stripe.com/8wM1498EK4Oib9S8xS)
La lista de precios está disponible en [PDF](http://files.visioforge.com/shared/pricelist.pdf).
---END OF PAGE---
# Page: https://www.visioforge.com/it/buy
# Acquistare o aggiornare l'abbonamento ai nostri prodotti
## L'abbonamento vi offrirà i seguenti vantaggi
- Utilizzo illimitato
- Nessun fastidioso messaggio di promemoria
- Aggiornamenti minori e maggiori gratuiti
- Assistenza e correzioni prioritarie
- à possibile utilizzare il prodotto senza aggiornamenti, anche se l'abbonamento è terminato.
La licenza regolare viene fatturata annualmente e rinnovata automaticamente ogni anno. Ã possibile annullare l'abbonamento in qualsiasi momento.
## Quanto è sicuro il mio acquisto online?
I pagamenti sono gestiti da [Striscia](https://www.stripe.com/)un servizio di pagamento affidabile su Internet. Le pagine di ordinazione si trovano su un sito web sicuro che cripta tutti i dati della carta di credito trasmessi secondo il protocollo sicuro HTTPS. Durante il processo di registrazione, vi sarà data la possibilità di effettuare un ordine via fax, posta o acquisto in alternativa all'ordine standard con carta di credito online. Quando si compila il modulo, assicurarsi di inserire le informazioni personali o aziendali corrette e la quantità . Se avete ordinato il nostro prodotto ma non avete ricevuto la chiave di registrazione entro 24 ore, se avete perso la chiave di registrazione o se avete domande sull'ordine, contattateci all'indirizzo [support@visioforge.com](mailto:support@visioforge.com).
â
Si prega di controllare il nostro [Informativa sulla privacy](https://www.visioforge.com/it/informativa-sulla-privacy).
## Filtri, assiemi o altri nomi di file personalizzati
Possiamo fornire nomi personalizzati per filtri/assemblaggi/altri file di acquisto contenenti 10 o più chiavi di licenza.
## Metodi di pagamento
- Carta di credito/debito (Visa, Visa Electron, MasterCard, Maestro, Eurocard, DinersClub, American Express, JCB, PostePay, Discover (Novus) e Carte Bleue).
- Bonifico bancario (bonifico bancario/SEPA/ACH)
- Alipay, WeChat Pay
- Apple Pay
- Google Pay
- Klarna
- Revolut Pay
- Addebito diretto
- molti altri modi
## Licenza di squadra
à possibile acquistare una licenza per l'intero sito del team e utilizzarla all'interno degli uffici di una stessa città .
## Informazioni sul mancato rinnovo della licenza
Quando non si rinnova la licenza, il progetto mantiene la sua completa funzionalità senza alcuna interruzione. Questa conservazione della funzionalità avviene perché l'applicazione, una volta costruita e distribuita, funziona indipendentemente dallo stato della licenza.
### Cosa continua a funzionare
Tutte le caratteristiche, i componenti e le funzionalità che erano operativi prima della scadenza della licenza continueranno a funzionare esattamente come prima. Le prestazioni, l'esperienza utente e le funzionalità tecniche dell'applicazione rimangono invariate dopo la scadenza della licenza.
### A cosa si perde l'accesso
La principale limitazione che si verifica quando la licenza scade è l'impossibilità di effettuare l'aggiornamento alle nuove versioni dell'SDK. Ciò significa che:
- Non è possibile installare o implementare versioni più recenti dell'SDK.
- Non riceverete i miglioramenti delle funzionalità rilasciati nelle versioni future dell'SDK.
- Non potrete beneficiare delle correzioni dei bug o degli aggiornamenti di sicurezza delle nuove versioni.
### Opzioni di licenza future
Se in seguito si decide di voler accedere a nuove versioni dell'SDK, è possibile acquistare una nuova licenza in qualsiasi momento del futuro. Non ci sono penali o complicazioni nel riattivare la licenza dopo un periodo di mancato rinnovo.
Questo approccio vi permette di prendere decisioni strategiche su quando gli aggiornamenti sono necessari per il vostro progetto, piuttosto che costringervi a un ciclo di rinnovo continuo se non è in linea con la vostra roadmap di sviluppo o con i vincoli di budget.
## Supporto premium
Se siete alla ricerca di un'assistenza di alto livello per il vostro software, il nostro pacchetto di assistenza premium è esattamente ciò che vi serve. Con il nostro supporto premium, avrete accesso a una serie di strumenti e servizi che vi aiuteranno a ottenere il massimo dal vostro software, tra cui AnyDesk, Microsoft Teams, Telegram e altro ancora.
Uno dei vantaggi principali del nostro pacchetto di assistenza premium è l'accesso a AnyDesk. Questa potente applicazione di desktop remoto consente al nostro team di assistenza di accedere al vostro computer e di risolvere eventuali problemi. Con AnyDesk, il nostro team di assistenza può diagnosticare e risolvere rapidamente i problemi.
Oltre a AnyDesk, il nostro pacchetto di assistenza premium include anche l'accesso a Microsoft Teams. Questa piattaforma di collaborazione consente al nostro team di assistenza di comunicare con voi in tempo reale, condividere file e persino effettuare videochiamate. In questo modo avrete accesso diretto al nostro team di assistenza ogni volta che ne avrete bisogno, indipendentemente da dove vi troviate nel mondo.
Offriamo anche assistenza tramite Telegram, una piattaforma di messaggistica sicura che ci permette di fornirvi un supporto rapido e conveniente direttamente dal vostro dispositivo mobile. Che siate in viaggio o semplicemente preferiate comunicare tramite messaggistica, il nostro team di assistenza è disponibile ad aiutarvi tramite Telegram.
Quando sottoscrivete il nostro pacchetto di assistenza premium, potete essere certi di ricevere il miglior supporto tecnico per il vostro software. Il nostro team di esperti è altamente qualificato e dedicato a fornirvi il più alto livello di servizio possibile, in modo che possiate tornare a utilizzare il vostro software con fiducia.
Il nostro pacchetto di assistenza premium è disponibile a soli 250 EUR per 5 ore di assistenza dedicata. Per iscriversi al nostro pacchetto di assistenza premium e accedere a questi vantaggi, utilizzate il seguente [\*\*link di pagamento\*\*](https://buy.stripe.com/7sI3ch4ou1C62Dm3dA). Una volta elaborato il pagamento, il nostro team di assistenza si metterà in contatto con voi per programmare le sessioni di assistenza e iniziare a fornirvi il miglior supporto possibile per il vostro software.
L'SDK è gratuito per uso non commerciale. Contattateci per ottenere una licenza gratuita.
### Video Capture SDK .Net
##### STANDARD
[â¬250]â Regolare (1 anno)
[Carta di debito/credito](https://buy.stripe.com/dR69AFdZ42Ga2Dm9AA)[Banca, SEPA, Apple e altro ancora](https://buy.stripe.com/28o0056wC6Wq4Lug0G)
[â¬750]â A vita/Squadra
[Tutti i metodi](https://buy.stripe.com/14k4gl9IObcG6TC5l1)
##### PROFESSIONALE
[â¬350]â Regolare (1 anno)
[Carta di debito/credito](https://buy.stripe.com/aEUcMRcV0cgKem4bIJ)[Banca, SEPA, Apple e altro ancora](https://buy.stripe.com/4gw6ot5sy5Sm6TCdSA)
[â¬1000]â A vita/Squadra
[Tutti i metodi](https://buy.stripe.com/bIYbINf381C6cdWdRj)
##### PREMIUM
[â¬500]â Regolare (1 anno)
[Carta di debito/credito](https://buy.stripe.com/dR628dg7c80ucdW4gi)[Banca, SEPA, Apple e altro ancora](https://buy.stripe.com/8wMcMR6wCfsW5PydSz)
[â¬1500]â A vita/Squadra
[Tutti i metodi](https://buy.stripe.com/cN2aEJ5sya8C2Dm5kM)
### Video Edit SDK .Net
##### STANDARD
[â¬250]â Regolare (1 anno)
[Carta di debito/credito](https://buy.stripe.com/dR66ot08e94yem49AG)[Banca, SEPA, Apple e altro ancora](https://buy.stripe.com/00gfZ33kq1C67XG01L)
[â¬750]â A vita/Squadra
[Tutti i metodi](https://buy.stripe.com/eVa8wBcV0gx00ve14s)
##### PROFESSIONALE
[â¬350]â Regolare (1 anno)
[Carta di debito/credito](https://buy.stripe.com/6oEaEJ08ecgK7XGdQX)[Banca, SEPA, Apple e altro ancora](https://buy.stripe.com/7sI4gl3kqdkO7XG29U)
[â¬1000]â A vita/Squadra
[Tutti i metodi](https://buy.stripe.com/cN2fZ3cV0fsW0ve6oL)
##### PREMIUM
[â¬500]â Regolare (1 anno)
[Carta di debito/credito](https://buy.stripe.com/eVaaEJ08e5Smdi0eV2)[Banca, SEPA, Apple e altro ancora](https://buy.stripe.com/fZeaEJdZ40y2di015h)
[â¬1500]â A vita/Squadra
[Tutti i metodi](https://buy.stripe.com/bIY5kp08e2Ga5Py8wS)
### Media Player SDK .Net
##### STANDARD
[â¬250]â Regolare (1 anno)
[Carta di debito/credito](https://buy.stripe.com/7sI9AF08efsWcdW7sE)[Banca, SEPA, Apple e altro ancora](https://buy.stripe.com/14k1492gm6Wq0ve8yj)
[â¬750]â A vita/Squadra
[Tutti i metodi](https://buy.stripe.com/cN2fZ36wCa8C4LudR9)
##### PROFESSIONALE
[â¬350]â Regolare (1 anno)
[Carta di debito/credito](https://buy.stripe.com/aEU5kpf380y20ve5kx)[Banca, SEPA, Apple e altro ancora](https://buy.stripe.com/bIY28d1ci1C61zi8yk)
[â¬1000]â A vita/Squadra
[Tutti i metodi](https://buy.stripe.com/8wMaEJbQWeoSdi0eVc)
### Media Blocks SDK .Net
[â¬500]â Regolare (1 anno)
[Carta di debito/credito](https://buy.stripe.com/14kaEJ6wCa8C1zi9BK)[Banca, SEPA, Apple e altro ancora](https://buy.stripe.com/3cseUZ5sy6Wq5Py5mc)
[â¬1500]â A vita/Squadra
[Tutti i metodi](https://buy.stripe.com/bIY4gl4oueoSb9SeW5)
### Video Edit SDK FFMPEG .Net
##### STANDARD
[â¬250]â Regolare (1 anno)
[Carta di debito/credito](https://buy.stripe.com/6oEbIN1cigx091KaFm)[Banca, SEPA, Apple e altro ancora](https://buy.stripe.com/fZe8wBg7ccgK1zi6qd)
[â¬750]â A vita/Squadra
[Tutti i metodi](https://buy.stripe.com/aEUbINcV080uem43cV)
##### PROFESSIONALE
[â¬350]â Regolare (1 anno)
[Carta di debito/credito](https://buy.stripe.com/00gcMRaMS80u1zi5l4)[Banca, SEPA, Apple e altro ancora](https://buy.stripe.com/bIY149aMS0y2a5O7ui)
[â¬1000]â A vita/Squadra
[Tutti i metodi](https://buy.stripe.com/bIYbIN5sy0y20vefZJ)
##### PREMIUM
[â¬500]â Regolare (1 anno)
[Carta di debito/credito](https://buy.stripe.com/dR64glcV0fsWem48xi)[Banca, SEPA, Apple e altro ancora](https://buy.stripe.com/5kA7sx4ou94y1zi3e3)
[â¬1500]â A vita/Squadra
[Tutti i metodi](https://buy.stripe.com/4gw1498EK3Keem46pb)
### Virtual Camera SDK
##### PROFESSIONALE
[â¬500]â Regolare (1 anno)
[Carta di debito/credito](https://buy.stripe.com/00g149cV00y2b9SeVq)[Banca, SEPA, Apple e altro ancora](https://buy.stripe.com/fZe28d8EKeoS5Py3e6)
[â¬1500]â A vita/Squadra
[Tutti i metodi](https://buy.stripe.com/bIYaEJ1ci6Wqa5ObJf)
##### CODICE SORGENTE
[â¬2500]â A vita/Squadra
[Tutti i metodi](https://buy.stripe.com/aEUdQVcV06Wq1zibJg)
### VLC Source DirectShow Filter
[â¬300]â Regolare (1 anno)
[Carta di debito/credito](https://buy.stripe.com/fZe8wB6wC1C67XGeVt)[Banca, SEPA, Apple e altro ancora](https://buy.stripe.com/cN2eUZ8EK4Oi1zibKD)
[â¬900]â A vita/Squadra
[Tutti i metodi](https://buy.stripe.com/6oEeUZ7AG6Wq2DmbK0)
### FFMPEG Source DirectShow Filter
[â¬300]â Regolare (1 anno)
[Carta di debito/credito](https://buy.stripe.com/bIYcMRdZ45Smb9S7t2)[Banca, SEPA, Apple e altro ancora](https://buy.stripe.com/4gwbIN1cibcG7XGbKE)
[â¬900]â A vita/Squadra
[Tutti i metodi](https://buy.stripe.com/5kAcMR1ci3Keem4dRr)
### DirectShow Encoding Filters Pack
[â¬500]â Regolare (1 anno)
[Carta di debito/credito](https://buy.stripe.com/4gwbIN7AG94y1zi7t4)[Banca, SEPA, Apple e altro ancora](https://buy.stripe.com/aEU4gl4oubcGa5O5mh)
[â¬1500]â A vita/Squadra
[Tutti i metodi](https://buy.stripe.com/5kAdQVcV00y26TCbJc)
### DirectShow Processing Filters Pack
[â¬350]â Regolare (1 anno)
[Carta di debito/credito](https://buy.stripe.com/4gw9AF5sy0y26TC4gT)[Banca, SEPA, Apple e altro ancora](https://buy.stripe.com/9AQ28d5sy2Ga91K162)
[â¬1000]â A vita/Squadra
[Tutti i metodi](https://buy.stripe.com/dR6eUZg7ceoSgucaF9)
### Video Encryption SDK
[â¬500]â Regolare (1 anno)
[Carta di debito/credito](https://buy.stripe.com/8wM28d3kq5Smguc28M)[Banca, SEPA, Apple e altro ancora](https://buy.stripe.com/28o7sx3kq6Wqfq85mj)
[â¬1500]â A vita/Squadra
[Tutti i metodi](https://buy.stripe.com/dR6bIN8EK3Ke7XG9Bf)
### All-in-One Media Framework (Delphi/ActiveX)
##### STANDARD
[â¬350]â Regolare (1 anno)
[Carta di debito/credito](https://buy.stripe.com/8wMdQV7AG6Wq7XG4hO)[Banca, SEPA, Apple e altro ancora](https://buy.stripe.com/dR6dQV4ou94ycdW9CA)
[â¬700]â A vita/Squadra
[Tutti i metodi](https://buy.stripe.com/dR69AF8EKbcGa5OcOp)
##### PROFESSIONALE
[â¬500]â Regolare (1 anno)
[Carta di debito/credito](https://buy.stripe.com/fZebIN9IOfsW6TC3dJ)[Banca, SEPA, Apple e altro ancora](https://buy.stripe.com/8wM9AF3kq1C60ve2aa)
[â¬1000]â A vita/Squadra
[Tutti i metodi](https://buy.stripe.com/4gw8wB2gm0y2b9S29M)
##### PREMIUM
[â¬750]â Regolare (1 anno)
[Carta di debito/credito](https://buy.stripe.com/9AQcMR7AG2Gab9SdSm)[Banca, SEPA, Apple e altro ancora](https://buy.stripe.com/eVaeUZ2gm6Wq5Py2a9)
[â¬1500]â A vita/Squadra
[Tutti i metodi](https://buy.stripe.com/5kAaEJ6wCa8Cem48yb)
### Video Fingerprinting SDK
[â¬900]â Regolare (1 anno)
[Carta di debito/credito](https://buy.stripe.com/14kfZ3aMS6WqcdWaFy)[Banca, SEPA, Apple e altro ancora](https://buy.stripe.com/3cs4gl5sy6Wq1zi7uv)
[â¬2000]â A vita/Squadra
[Tutti i metodi](https://buy.stripe.com/bIY7sx6wC1C66TCcNH)
[â¬25]â Durata (1 core del server all'anno)
[Carta di debito/credito](https://buy.stripe.com/aEUaEJ3kq0y2em4bJE)[Banca, SEPA, Apple e altro ancora](https://buy.stripe.com/8wM6ot2gm6Wq5Pyg12)
### Fardelli
â¬700
â¬1800
Pacchetto .Net
Professionale
Video Capture SDK .Net Edizione Professionale
Media Player SDK .Net Professional Edition
Video Edit SDK .Net Edizione professionale
Video Edit SDK FFMPEG .Net Edizione professionale
Media Blocks SDK .Net
[Licenza regolare](https://buy.stripe.com/eVacMR6wCa8CcdW5li)[Licenza a vita/di squadra](https://buy.stripe.com/00g7sx5sy0y291K3db)
â¬1000
â¬2500
Pacchetto .Net
Premio
SDK di acquisizione video .Net Edizione Premium
Media Player SDK .Net Professional Edition
Video Edit SDK .Net Edizione Premium
Video Edit SDK FFMPEG .Net Edizione Premium
Media Blocks SDK .Net
[Licenza regolare](https://buy.stripe.com/28ofZ3bQW6Wqb9S5lk)[Licenza a vita/di squadra](https://buy.stripe.com/aEUbIN3kq5Sm3Hq9BB)
â¬1000
â¬2500
DirectShow All-In-One
Pacchetto
FFMPEG Source DirectShow Filter
VLC Source DirectShow Filter
DirectShow Processing Filters Pack
DirectShow Encoding Filters Pack
SDK sorgente DirectShow per Kinect
[Licenza regolare](https://buy.stripe.com/00g149cV0cgK3HqaFZ)[Licenza a vita/di squadra](https://buy.stripe.com/8wM1498EK4Oib9S8xS)
Il listino prezzi è disponibile in [PDF](http://files.visioforge.com/shared/pricelist.pdf).
---END OF PAGE---
# Page: https://www.visioforge.com/privacy-policy
# Privacy Policy and GDPR Compliance
This Privacy Policy explains the way in which VisioForge collects, uses, maintains, and discloses personal information collected from our users, in compliance with the General Data Protection Regulation (GDPR). VisioForge is committed to respecting your privacy rights and protecting your personal data.
## Definitions
\*\*Personal data\*\*: Any information that can be used to identify an individual, such as name, address, email, IP address, and other similar data.
\*\*Processing\*\*: Any operation performed on personal data, including collecting, using, storing, or deleting.
## Data Controller
VisioForge is the data controller and is responsible for your personal data. We determine the purposes and means of processing personal data in line with this policy.
## What Personal Data We Collect and Why
We collect information when users interact with our services, for example, when you use our software, make a purchase, or engage with our customer support. This information may include:
- Contact Information: Name, email address, and other contact details provided when purchasing our services or contacting our support.
- Transaction Information: We use Stripe as a payment processor and during transactions, it collects certain transaction details. Please note that Stripe operates as a separate controller and has its own privacy policy, which we recommend you review.
- Telemetry Data: With your consent, our software collects telemetry data to help improve our services. This data is anonymized and cannot be used to identify individual users.
## How We Use Your Personal Data
We use your personal data for various purposes:
- To provide and maintain our services.
- To notify you about changes to our services.
- To allow you to participate in interactive features of our service when you choose to do so.
- To provide customer support.
- To gather analysis or valuable information so that we can improve our service.
- To monitor the usage of our service.
- To detect, prevent and address technical issues.
## How We Share and Disclose Your Personal Data
We do not sell or rent personal data to third parties. We only share personal data with third parties in accordance with this privacy policy. We may disclose your personal data to:
- Stripe, as part of facilitating and processing transactions.
- Legal authorities when it's necessary to comply with legal obligations or to protect the rights and safety of others.
## Data Retention
We will retain your personal data only for as long as is necessary for the purposes set out in this privacy policy. We will retain and use your personal data to the extent necessary to comply with our legal obligations, resolve disputes, and enforce our legal agreements and policies.
## Your Rights under GDPR
As a user, you have specific rights under the GDPR, including:
- The right to access, update or to delete the personal data we have on you.
- The right of rectification, to correct your personal data if it's inaccurate or incomplete.
- The right to object to our processing of your personal data.
- The right of restriction, to request that we limit the processing of your personal data.
- The right to data portability, to receive a copy of the data we have on you in a structured, machine-readable format.
- The right to withdraw your consent at any time where VisioForge relied on your consent to process your personal data.
Please note that we may ask you to verify your identity before responding to such requests.
## Changes to This Privacy Policy
VisioForge reserves the right to make changes to this privacy policy at any time. We encourage users to frequently check this page for any changes to stay informed about how we are helping to protect the personal information we collect.
## Contact Us
If you have any questions or suggestions about our Privacy Policy, do not hesitate to contact us.
## Consent
By using our site or services, you consent to the terms outlined in this Privacy Policy.
\*\*Last updated: July 23, 2023\*\*

---END OF PAGE---
# Page: https://www.visioforge.com/de/news
# Die neuesten Nachrichten und Updates
## Beschleunigen Sie Ihre Entwicklung mit unseren neuesten SDKs
Entdecken Sie unsere neuen Software Development Kits (SDKs), die speziell für Softwareentwickler entwickelt wurden. Mit unseren SDKs können Sie schnell und einfach leistungsstarke, skalierbare und effiziente Anwendungen entwickeln. Ganz gleich, ob Sie an mobilen Anwendungen, Desktop-Software oder Weblösungen arbeiten, unsere SDKs verfügen über eine leicht verständliche Dokumentation, Beispielcode und eine einfache Integration, um Ihren Entwicklungsprozess zu beschleunigen. Wir kennen die Herausforderungen, mit denen Entwickler konfrontiert sind, und unser Ziel ist es, Tools bereitzustellen, die Ihren Arbeitsablauf vereinfachen und verbessern. Mit unseren SDKs haben Sie alles, was Sie brauchen, um qualitativ hochwertige Anwendungen zu erstellen, die den Anforderungen der heutigen Benutzer gerecht werden.
## Bleiben Sie auf dem Laufenden und erhalten Sie den besten Support
Bleiben Sie mit unseren regelmäÃig aktualisierten SDKs, die die neuesten Technologien und Standards enthalten, auf dem neuesten Stand der Dinge. Wir setzen uns dafür ein, dass sich unsere SDKs weiterentwickeln, um den sich ständig ändernden Anforderungen der Softwareentwicklungsbranche gerecht zu werden. Unser Team bietet Ihnen hervorragenden Support und Ressourcen, damit Sie das Beste aus unseren SDKs herausholen können. Erkunden Sie noch heute unser Angebot und bringen Sie Ihre Entwicklungserfahrung auf die nächste Stufe. Mit unserem umfassenden Support sind Sie in der Lage, Probleme schnell und effizient zu lösen, so dass Sie sich auf das konzentrieren können, was Sie am besten können - die Erstellung von groÃartiger Software. Viel Spaà beim Programmieren!
[Neuigkeiten, Aktualisierungen und Produktversionen - 2024](https://www.visioforge.com/de/news-2024)
13. Juni 2024
visioforge
[Keine Kommentare](https://www.visioforge.com/de/news-2024#respond)
[Mehr lesen](https://www.visioforge.com/de/news-2024)
[Neuigkeiten, Aktualisierungen und Produktversionen - 2023](https://www.visioforge.com/de/news-2023)
31. Dezember 2023
visioforge
[Keine Kommentare](https://www.visioforge.com/de/news-2023#respond)
[Mehr lesen](https://www.visioforge.com/de/news-2023)
[Neuigkeiten, Aktualisierungen und Produktveröffentlichungen - 2022](https://www.visioforge.com/de/news-2022)
31. Dezember 2022
visioforge
[Keine Kommentare](https://www.visioforge.com/de/news-2022#respond)
[Mehr lesen](https://www.visioforge.com/de/news-2022)
[Neuigkeiten, Aktualisierungen und Produktveröffentlichungen - 2021](https://www.visioforge.com/de/news-2021)
31. Dezember 2021
visioforge
[Keine Kommentare](https://www.visioforge.com/de/news-2021#respond)
[Mehr lesen](https://www.visioforge.com/de/news-2021)
---END OF PAGE---
# Page: https://www.visioforge.com/es/news
# Ãltimas noticias y actualizaciones
## Impulse su desarrollo con nuestros SDK más recientes
Descubra nuestros nuevos kits de desarrollo de software (SDK) diseñados exclusivamente para desarrolladores de software. Nuestros SDK están diseñados para ayudarle a crear aplicaciones sólidas, escalables y eficientes de forma rápida y sencilla. Tanto si trabaja en aplicaciones móviles, software de escritorio o soluciones web, nuestros SDK incluyen documentación fácil de seguir, ejemplos de código e integración sencilla para acelerar el proceso de desarrollo. Entendemos los retos a los que se enfrentan los desarrolladores y nuestro objetivo es proporcionar herramientas que simplifiquen y mejoren su flujo de trabajo. Con nuestros SDK, tendrá todo lo que necesita para crear aplicaciones de alta calidad que satisfagan las demandas de los usuarios de hoy en dÃa.
## Manténgase al dÃa y reciba la mejor asistencia
Manténgase al dÃa de las últimas tendencias con nuestros SDK actualizados periódicamente, que incluyen las tecnologÃas y los estándares más recientes. Nos comprometemos a garantizar que nuestros SDK evolucionen para satisfacer las necesidades siempre cambiantes del sector del desarrollo de software. Nuestro equipo se dedica a proporcionar un excelente soporte y recursos para ayudarle a sacar el máximo partido de nuestros SDK. Explore nuestra gama hoy mismo y lleve su experiencia de desarrollo al siguiente nivel. Gracias a nuestra completa asistencia, podrá resolver los problemas de forma rápida y eficaz, lo que le permitirá centrarse en lo que mejor sabe hacer: crear software increÃble. ¡Feliz programación!
[Noticias, actualizaciones y lanzamientos de productos - 2024](https://www.visioforge.com/es/news-2024)
13 de junio de 2024
visioforge
[Sin comentarios](https://www.visioforge.com/es/news-2024#respond)
[Seguir leyendo](https://www.visioforge.com/es/news-2024)
[Noticias, actualizaciones y lanzamientos de productos - 2023](https://www.visioforge.com/es/news-2023)
31 de diciembre de 2023
visioforge
[Sin comentarios](https://www.visioforge.com/es/news-2023#respond)
[Seguir leyendo](https://www.visioforge.com/es/news-2023)
[Noticias, actualizaciones y lanzamientos de productos - 2022](https://www.visioforge.com/es/news-2022)
31 de diciembre de 2022
visioforge
[Sin comentarios](https://www.visioforge.com/es/news-2022#respond)
[Seguir leyendo](https://www.visioforge.com/es/news-2022)
[Noticias, actualizaciones y lanzamientos de productos - 2021](https://www.visioforge.com/es/news-2021)
31 de diciembre de 2021
visioforge
[Sin comentarios](https://www.visioforge.com/es/news-2021#respond)
[Seguir leyendo](https://www.visioforge.com/es/news-2021)
---END OF PAGE---
# Page: https://www.visioforge.com/it/news
# Le ultime notizie e gli aggiornamenti
## Potenziate il vostro sviluppo con i nostri ultimi SDK
Scoprite i nostri nuovi kit di sviluppo software (SDK) fatti apposta per gli sviluppatori di software. I nostri SDK sono progettati per aiutarvi a creare applicazioni solide, scalabili ed efficienti in modo rapido e semplice. Sia che stiate lavorando su applicazioni mobili, software desktop o soluzioni web, i nostri SDK sono dotati di documentazione facile da seguire, codice di esempio e integrazione semplice per accelerare il processo di sviluppo. Siamo consapevoli delle sfide che gli sviluppatori devono affrontare e il nostro obiettivo è fornire strumenti che semplifichino e migliorino il vostro flusso di lavoro. Con i nostri SDK, avrete tutto ciò che vi serve per creare applicazioni di alta qualità che soddisfino le esigenze degli utenti di oggi.
## Rimanete aggiornati e ottenete il miglior supporto
Tenete il passo con le ultime tendenze grazie ai nostri SDK regolarmente aggiornati, che presentano le tecnologie e gli standard più recenti. Ci impegniamo a garantire che i nostri SDK si evolvano per soddisfare le esigenze in continua evoluzione del settore dello sviluppo software. Il nostro team si impegna a fornire assistenza e risorse eccellenti per aiutarvi a sfruttare al meglio i nostri SDK. Esplorate oggi stesso la nostra gamma e portate la vostra esperienza di sviluppo a un livello superiore. Grazie al nostro supporto completo, sarete in grado di risolvere i problemi in modo rapido ed efficiente, permettendovi di concentrarvi su ciò che sapete fare meglio: creare software straordinari. Buona codifica!
[Notizie, aggiornamenti e rilasci di prodotti - 2024](https://www.visioforge.com/it/news-2024)
13 giugno 2024
visioforge
[Nessun commento](https://www.visioforge.com/it/news-2024#respond)
[Per saperne di più](https://www.visioforge.com/it/news-2024)
[Notizie, aggiornamenti e rilasci di prodotti - 2023](https://www.visioforge.com/it/news-2023)
31 dicembre 2023
visioforge
[Nessun commento](https://www.visioforge.com/it/news-2023#respond)
[Per saperne di più](https://www.visioforge.com/it/news-2023)
[Notizie, aggiornamenti e rilasci di prodotti - 2022](https://www.visioforge.com/it/news-2022)
31 dicembre 2022
visioforge
[Nessun commento](https://www.visioforge.com/it/news-2022#respond)
[Per saperne di più](https://www.visioforge.com/it/news-2022)
[Notizie, aggiornamenti e rilasci di prodotti - 2021](https://www.visioforge.com/it/news-2021)
31 dicembre 2021
visioforge
[Nessun commento](https://www.visioforge.com/it/news-2021#respond)
[Per saperne di più](https://www.visioforge.com/it/news-2021)
---END OF PAGE---
# Page: https://www.visioforge.com/news-2024
# News and product updates in 2024
## 50% Black Friday sale!
(2024-06-03)
ð \*\*Summer Sale Alert!\*\* ð Get our top-rated software now at an unbeatable 50% discount! Don't miss out on this limited-time offer to boost your productivity. Upgrade today and save big! ðð»
Coupon code: \*\*SUMMER50\*\*
## VisioForge .Net SDKs v15.9 has been released
(2024-04-07)
The .Net SDKs version 15.9 has been released with several updates and new features. Notable improvements include the resolution of video aspect ratio issues, updates to the GStreamer redistribution, and the addition of support for Basler USB3/GigE cameras. The Video Edit SDK .Net now utilizes SkiaSharp-based font settings for the TextOverlay class, allowing for custom font configurations. Stream support has been added to the MediaInfoReader on Windows, enabling video/audio file information retrieval from various sources.
The Live Video Compositor engine has been updated for better file source support, and a camera-covered detector has been introduced in the Video Capture SDK's Computer Vision Demo. New APIs have been added for snapshot retrieval from video files, and iOS support is now included in MAUI samples. Memory leaks in RTSP sources have been resolved, and the Media Player SDK now supports data streams in video files using the FFMPEG source engine.
Additional features include custom FFMPEG options for IP cameras, the resolution of network connection issues with FFMPEG sources, RTSP MultiView support in the Media Blocks SDK, and support for FLIR/Teledyne cameras using the Spinnaker SDK. The Video Edit SDK now supports .Net Stream usage as an input source, and .Net 7 support has been reintroduced to the MAUI package. The IAsyncDisposable interface has been added to all core classes for asynchronous disposal.
Other updates address video capture issues on Android, add HLS streaming samples, and resolve crashes related to multiscreen setups. Improvements in MAUI video rendering speed, media playback issues, and webcam source connectivity have been made. Audio playback issues and bad audio mixing have been resolved, and the Media Player SDK now supports growing MPEG-TS files for the VLC engine.
Check the [changelog](https://www.visioforge.com/help/docs/dotnet/changelog/#159).
## VisioForge .Net SDKs v15.8 has been released
(2024-01-22)
The .Net SDKs version 15.8 has been released, bringing several notable changes and improvements. Key updates include significant API changes, such as requiring the use of `DeviceEnumerator.Shared` for device enumeration and additional initialization steps for X-engines. Android Activity is no longer necessary for SDK engine creation.
Windows users will see improved MAUI video rendering performance and a new mouse highlight feature for screen capture sources. Various bug fixes have been implemented, including resolving issues with Avalonia VideoView resizing, special character passwords for RTSP sources, and a memory leak in the OverlayManager.
The update introduces properties for setting start and stop positions in UniversalSourceSettings and adds events to notify about device additions/removals in the DeviceEnumerator. Custom error handler support has been added for several engines, and there are new properties for setting custom audio filters for Virtual Camera SDK outputs in various components.
New features include NDI streaming support in VideoCaptureCoreX and additional media blocks in the Media Blocks SDK, such as BufferSink and CustomMediaBlock classes. Video frame cropping capabilities have been enhanced with the addition of VideoCropBlock and VideoAspectRatioCropBlock. The update also includes support for WASAPI audio renderer in the VideoCaptureCore engine and updates to the Tempo audio effect. Overall, this release focuses on enhancing performance, fixing critical issues, and adding new functionalities to the .Net SDKs.
Check the [changelog](https://www.visioforge.com/help/docs/dotnet/changelog/#158).
---END OF PAGE---
# Page: https://www.visioforge.com/news-2023
# News and product updates in 2023
## VisioForge .Net SDKs v15.7 has been released
(2023-11-12)
The .Net SDKs version 15.7 has been released with several enhancements and fixes. This release includes support for .Net 8 across all SDKs.
Key improvements in the Video Capture SDK .Net include resolving issues with the `OnNetworkSourceDisconnect` event being called twice, fixing audio source format settings in VideoCaptureCoreX, and addressing WPF native rendering issues with pop-up windows. The Start/StartAsync method in VideoCaptureCore now returns false if the video capture device is already being used by another application.
X-engines have been updated with new MPEG-2 video and MP2 audio encoders, DNxHD video encoder support, and changes to default VP8/VP9 settings for live recording. Decklink enumeration issues have been resolved.
Cross-platform SDKs benefit from updates to the Decklink source, resolving incorrect device name issues, and the Overlay Manager, now featuring an `OverlayManagerDateTime` class for drawing current date and custom text. Additionally, SkiaSharp security updates and issues with the System.Drawing.Bitmap usage in `OverlayManagerImage` has been resolved.
Support for Avalonia 11.0.5 has been added, along with updates to the VLC source (libVLC 3.0.19) and FFMPEG sources and encoders, which address issues with missing MSVC dependencies. The ONVIF engine has also been updated.
Finally, the update improves the FFMPEG.exe output in VideoCaptureCore, enhancing support for x264 and x265 encoders in custom FFMPEG builds, and resolves a rare crash issue with WinUI VideoView.
Check the [changelog](https://www.visioforge.com/help/docs/dotnet/changelog/#157).
## VisioForge .Net SDKs v15.6 has been released
(2023-09-20)
The .Net SDKs version 15.6 introduces numerous enhancements and new features. Video Capture SDK sees improved video crop performance on modern CPUs and introduces a new video overlays API, with related demos showing its usage. The update also improves hardware encoder detection for systems with multiple GPUs. The Avalonia VideoView has been updated to resolve issues with its recreation.
Media Player SDK includes changes such as resolving startup issues on Android and adding new methods for video stream selection. Performance improvements for 4K and 8K videos in WPF rendering have been implemented across all SDKs. Various issues, including video crop problems and multiple outputs in VideoCaptureCoreX, have been resolved.
New demos and support for features like NDI streaming, madVR, and multiple audio tracks are included. The update also adds several new classes and methods, such as VNC source support and AI-based video resizing using Nvidia Maxine SDK. The Media Blocks SDK adds new OpenCV blocks, NDI source and sink blocks, and additional video encoders like rav1e AV1 and GIF.
Improvements to memory playback, VU meter issues, and enhanced support for WASAPI 2 are also part of this release. The SDKs now support async disposal with the IAsyncDisposable interface and have resolved various detection and playback issues. New features like KLV data handling, MJPEG network streaming, and enhanced media block functionalities further extend the capabilities of the SDKs. Finally, the update includes a range of stability and performance enhancements across different platforms and components.
Check the [changelog](https://www.visioforge.com/help/docs/dotnet/changelog/#156).
---END OF PAGE---
# Page: https://www.visioforge.com/news-2022
# News and product updates in 2022
## VisioForge .Net SDKs v15.5 has been released
(2022-12-11)
The .Net SDKs version 15.5 has been released with several new features and updates. This version includes support for .Net 7 and introduces a range of enhancements across various SDK components.
In the Video Capture SDK .Net, a NetworkDisconnect event has been added to the MJPEG Low Latency IP camera engine, and the `OnRTSPLowLatencyRAWFrame` event allows retrieval of RAW frames from RTSP streams using the RTSP Low Latency engine. The VideoEditCoreX engine now supports Linux-based demos and features a new AutoTransitions property. Additionally, there is improved compatibility with Snap Camera for MP4 HW encoding and support for multiple Decklink outputs in both Video Capture and Video Edit SDKs.
For cross-platform APIs, `System.Drawing.Rectangle` and `System.Drawing.Size` types have been replaced by `VisioForge.Types.Rectangle` and `VisioForge.Types.Size`. The update also brings MAUI samples (BETA) and enhanced online licensing.
The Media Player SDK .Net has been upgraded with segment support in its cross-platform engine, a Playlist API for the Windows-only engine, and GPU HW decoding for the VLC engine. Issues with reverse playback, the `MediaPlayerCore.Video\\_Renderer\\_SetCustomWindowHandle` method, and WPF HighDPI applications using EVR have been resolved. Additionally, the Media Player SDK now supports previous frame playback in its cross-platform engine.
The Media Blocks SDK .Net has added a WPF Screen Capture Demo, while ONVIFControl and related APIs are now available across all platforms. There has been an API-breaking change, with the frame rate type changing from double to `VideoFrameRate` in all APIs.
Other improvements include a new Camera Light demo, updated handling of the "rtsp\\_source\\_create\\_audio\\_resampler" call in the RTSP Low Latency engine for Video Capture SDK .Net, and enhanced segments support in the Media Player SDK. These updates collectively enhance functionality, compatibility, and performance across the various .Net SDKs.
Check the [changelog](https://www.visioforge.com/help/docs/dotnet/changelog/#155).
## VisioForge .Net SDKs v15.4 has been released
(2022-07-23)
The .Net SDKs version 15.4 has been released, bringing a host of updates and new features. This release addresses several issues and introduces enhancements across various components.
Key updates include resolving the issue with the `Play\\_PauseAtFirstFrame` property being ignored, and improvements to HighDPI support in WinForms samples and for the Direct2D video renderer. The ONVIFControl class has been enhanced with new APIs: `GetDeviceCapabilities` and `GetMediaEndpoints`.
The issue of forced reencoding when joining FFMPEG files without reencoding has been resolved. The update also includes a Sentry update and adds video interpolation settings for Zoom and Pan video effects.
Support for the GtkSharp UI framework for video rendering has been added, and the FastEdit API has been changed to async. Additionally, a screen flip issue related to the `Video\\_Effects\\_AllowMultipleStreams` property in the Video Capture SDK .Net core has been resolved.
The RTSP MultiView demo has been updated to include GPU decoding and access to RAW streams. New features include an `OnLoop` event in the Media Player SDK .Net and a Loop feature in the Media Blocks SDK .Net.
Due to issues with Avalonia UI and NativeControl, Avalonia VideoView has been downgraded to version 0.10.12. A new File Encryptor demo has been added to the Video Edit SDK .Net, providing an example of how to encrypt video files.
Overall, this release enhances functionality, resolves critical issues, and introduces new features to improve the user experience across the .Net SDKs.
Check the [changelog](https://www.visioforge.com/help/docs/dotnet/changelog/#154).
## VisioForge .Net SDKs v15.3 has been released
(2022-05-21)
The .Net SDKs version 15.3 has been released with a range of enhancements and optimizations. Key improvements include a reduction in app start-up time for PCs equipped with Decklink cards and support for NDI SDK v5. An issue with MKV Legacy output causing wrong cast exceptions has been resolved.
Performance optimizations have been made to zoom and pan effects, and a basic Media Blocks API has been introduced, though it is still a work in progress. The Video Edit SDK .Net now supports HLS network streaming.
In WPF VideoView, a new Rotate property has been added, allowing video rotation by 90, 180, or 270 degrees. Users can also use the `GetImageLayer()` method to retrieve the Image layer for applying custom transforms.
An API change has renamed `FilterHelpers` to `FilterDialogHelper`. The `VisioForge.Types` and `VisioForge.MediaFramework` assemblies have been merged into `VisioForge.Core`, and UI classes have been moved to `VisioForge.Core.UI.\\*` assemblies and independent NuGet packages. Additionally, `VisioForge.Types` has been renamed to `VisioForge.Core.Types`, and `VisioForge.Core` no longer depends on the Windows Forms framework.
These updates collectively enhance performance, streamline the API, and expand functionality across the .Net SDKs.
Check the [changelog](https://www.visioforge.com/help/docs/dotnet/changelog/#153).
## VisioForge .Net SDKs v15.2 has been released
(2022-01-20)
The .Net SDKs version 15.2 has been released, featuring several new additions and improvements. Key updates include the addition of `HorizontalAlignment` and `VerticalAlignment` properties for text and image logos, which allow for better customization and positioning.
ONVIF support has been updated, resolving issues related to username and password specifications in URLs without corresponding source settings. RTSP support for IP cameras has been improved, ensuring more reliable connections and performance.
Issues with the FFMPEG.exe output dialog and separate capture in service applications have been resolved. The SDK has migrated from NewtonsoftJson to System.Text.Json for better performance and modern serialization support.
The DirectCapture output for IP cameras has been updated, and a new DirectCapture ASF output option has been added. The `IPCameraSourceSettings.URL` property type has been changed from string to `System.Uri`, promoting better handling of URL types.
Video and audio effects have been updated, and overall video processing performance optimizations have been implemented. Various bug fixes and performance improvements further enhance the stability and efficiency of the SDK.
Overall, this release focuses on enhancing functionality, improving performance, and resolving critical issues across the .Net SDKs.
Check the [changelog](https://www.visioforge.com/help/docs/dotnet/changelog/#152).
## VisioForge New Year holidays 30% discount
(2022-01-03)
Celebrate the New Year holidays with our special sale, offering an amazing \*\*30% discount\*\* on all products!
### ð \*\*Enjoy 30% Off All Products!\*\* ð
Start the New Year with incredible savings on our premium software. Use the coupon code \*\*NY30\*\* at checkout to receive a 30% discount on all products.
Don't miss out on these fantastic savings! Make the most of the New Year holidays with our special offers and enhance your software experience.
Happy shopping and Happy New Year!
---END OF PAGE---
# Page: https://www.visioforge.com/news-2021
# News and product updates in 2021
## VisioForge .Net SDKs v15.1 has been released
2022-11-26
The .Net SDKs version 15.1 introduces cross-platform support with Android for the Media Player SDK .Net and plans for iOS/macOS by December. It disables Sentry debug messages in the console, adds Icecast streaming, and updates the `VideoStreamInfo.FrameRate` property to `VideoFrameRate`. The WPF VideoView has improved IP camera stream playback. Significant API changes merge several components into `VisioForge.Core`, and the audio effect API now uses string names. A new GStreamer-based cross-platform engine supports Windows and other platforms in this development cycle.
Check the [changelog](https://www.visioforge.com/help/docs/dotnet/changelog/#151).
## VisioForge .Net SDKs v15.0 has been released
2022-11-01
The .Net SDKs version 15.0 introduces significant API changes, dividing the main controls into Core and VideoView parts. The SDK no longer has separate TRIAL and FULL versions, removing the `SDK\\_State` property
Developers are advised to replace UI controls with `VideoView` and rename core classes (e.g., `VideoCaptureCore`) to match previously used UI control names. This change enables support for additional UI platforms such as UWP, MAUI, Eco, and Avalonia.
Check the [changelog](https://www.visioforge.com/help/docs/dotnet/changelog/#150).
## VisioForge .Net SDKs v14.3 has been released
2022-09-14
The .Net SDKs version 14.3 includes several important updates and improvements. A critical issue with the Video Resize filter creation for NuGet redistributions has been resolved, and telemetry has been updated. The `VFDirectCaptureMP4Output` output has also been updated. This release adds support for .Net 6 (preview) and removes Nvidia CUDA, recommending NVENC as the modern alternative for H264/HEVC encoding.
The IP camera MJPEG Low Latency engine has been updated, and NDI source listing has been improved. ONVIF support has seen enhancements, and .Net Core 3.1 support has been added for the RTSP Low Latency source engine. Issues with Picture-in-Picture for 2x2 mode have been resolved. The project and solutions have been split into independent files for .Net Framework 4.7.2, .Net Core 3.1, .Net 5, and .Net 6, facilitating better organization and compatibility.
Check the [changelog](https://www.visioforge.com/help/docs/dotnet/changelog/#143).
## VisioForge .Net SDKs v14.2 has been released
2022-08-11
The .Net SDKs version 14.2 brings several updates and fixes. The issue with audio stream capture when using the Virtual Camera SDK output has been resolved. The `VFMP4v8v10Output` has been replaced with `VFMP4Output`. A new `CanStart` method has been added to `Video\\_CaptureDevicesInfo` items, which checks if a device can start and is not being used exclusively by another application.
The `ONVIFControl` now supports async/await API, enhancing its asynchronous capabilities. An issue with incorrect ColorKey processing in the Text Overlay video effect has been fixed. Forced frame rate support has been added for the RTSP Low Latency IP camera source. The MP4v11 AMD encoders have been updated, and a timestamp issue during MP4v11 separate capture pause/resume has been resolved.
The FFMPEG.exe network streaming and output have been updated to the latest FFMPEG version. The VC++ redistributable is no longer required to be installed, as VC++ linking has been changed to static, except for the optional XIPH output. Additionally, many base DirectShow filters have been moved to the `VisioForge\\_BaseFilters` module.
Check the [changelog](https://www.visioforge.com/help/docs/dotnet/changelog/#142).
---END OF PAGE---
# Page: https://www.visioforge.com/de/legal-information
# Rechtliche und regulatorische Informationen
## Rechtliche Informationen
Roman Miniailov, Geschäftsführer von VisioForge
\*\*Umsatzsteuer-ID\*\*: ESZ0362544T
\*\*Adresse\*\*: Spanien, 33200, Asturien, Gijon
## Datenschutzbestimmungen
Wir bei VisioForge verpflichten uns, Ihre Privatsphäre zu schützen. Unsere Datenschutzrichtlinie beschreibt, welche Arten von personenbezogenen Daten wir erfassen, wie sie verwendet werden und welche MaÃnahmen wir ergreifen, um die Sicherheit Ihrer Daten zu gewährleisten. Wir halten uns an alle geltenden Datenschutzbestimmungen, einschlieÃlich der Allgemeinen Datenschutzverordnung (GDPR). Ausführlichere Informationen finden Sie in unserer [Datenschutzrichtlinie](https://www.visioforge.com/de/datenschutzbestimmungen).
## Erstattungspolitik
Wir bemühen uns, dass unsere Kunden mit ihren Einkäufen zufrieden sind. Sollten Sie aus irgendeinem Grund nicht zufrieden sein, haben Sie möglicherweise Anspruch auf eine Rückerstattung. In unseren Rückerstattungsrichtlinien finden Sie ausführliche Informationen zu den Anspruchsvoraussetzungen und dem Verfahren zur Beantragung einer Rückerstattung. Um mehr zu erfahren, lesen Sie bitte unsere [Erstattungspolitik](https://www.visioforge.com/de/refund-policy).
## Support-Dienstleistungsvereinbarung (SLA)
Unser Support Service Level Agreement (SLA) definiert das Serviceniveau, das Sie von VisioForge erwarten können. Dazu gehören Reaktionszeiten, die Verfügbarkeit des Supports und der Prozess zur Lösung von Problemen. Wir sind bestrebt, prompten und effizienten Support zu bieten, um sicherzustellen, dass Sie unsere Produkte reibungslos nutzen können. Für weitere Informationen lesen Sie bitte unsere [Support-SLA](https://www.visioforge.com/de/support-service-level-agreement-sla).

---END OF PAGE---
# Page: https://www.visioforge.com/es/legal-information
# Información jurÃdica y reglamentaria
## Información jurÃdica
Roman Miniailov bajo el nombre de VisioForge
\*\*ID de IVA\*\*:ESZ0362544T
\*\*Dirección\*\*: España, 33200, Asturias, Gijón
## PolÃtica de privacidad
En VisioForge, nos comprometemos a proteger su privacidad. Nuestra PolÃtica de privacidad describe los tipos de información personal que recopilamos, cómo se utiliza y las medidas que tomamos para garantizar la seguridad de sus datos. Nos adherimos a todas las normativas de protección de datos aplicables, incluido el Reglamento General de Protección de Datos (RGPD). Para obtener información más detallada, consulte nuestra [polÃtica de privacidad](https://www.visioforge.com/es/politica-de-privacidad).
## PolÃtica de reembolso
Nos esforzamos para que nuestros clientes queden satisfechos con sus compras. Si por cualquier motivo no queda completamente satisfecho, puede solicitar un reembolso. Nuestra PolÃtica de reembolso proporciona información detallada sobre los criterios de elegibilidad y el proceso para solicitar un reembolso. Para obtener más información, lea nuestra [PolÃtica de reembolso](https://www.visioforge.com/es/refund-policy).
## Acuerdo de nivel de servicio (SLA)
Nuestro Acuerdo de Nivel de Servicio de Soporte (SLA) define el nivel de servicio que puede esperar de VisioForge. Esto incluye los tiempos de respuesta, la disponibilidad de apoyo, y el proceso de resolución de problemas. Estamos dedicados a proporcionar apoyo rápido y eficiente para asegurar que su experiencia con nuestros productos es perfecta. Para obtener más información, consulte nuestra [Acuerdo de nivel de servicio de soporte](https://www.visioforge.com/es/support-service-level-agreement-sla).

---END OF PAGE---
# Page: https://www.visioforge.com/it/legal-information
# Informazioni legali e normative
## Informazioni legali
Roman Miniailov dba VisioForge
\*\*Partita IVA\*\*: ESZ0362544T
\*\*Indirizzo\*\*: Spagna, 33200, Asturie, Gijon
## Informativa sulla privacy
VisioForge si impegna a proteggere la vostra privacy. La nostra Informativa sulla privacy illustra i tipi di informazioni personali che raccogliamo, le modalità di utilizzo e le misure che adottiamo per garantire la sicurezza dei vostri dati. Aderiamo a tutte le normative vigenti in materia di protezione dei dati, compreso il Regolamento generale sulla protezione dei dati (GDPR). Per informazioni più dettagliate, consultare la nostra [politica sulla riservatezza](https://www.visioforge.com/it/informativa-sulla-privacy).
## Politica di rimborso
Ci impegniamo a garantire che i nostri clienti siano soddisfatti dei loro acquisti. Se per qualsiasi motivo non siete completamente soddisfatti, potreste avere diritto a un rimborso. La nostra Politica di rimborso fornisce informazioni dettagliate sui criteri di ammissibilità e sulla procedura di richiesta di rimborso. Per saperne di più, leggete la nostra [Politica di rimborso](https://www.visioforge.com/it/refund-policy).
## Accordo sul livello del servizio di assistenza (SLA)
Il nostro Service Level Agreement (SLA) di supporto definisce il livello di servizio che potete aspettarvi da VisioForge. Questo include i tempi di risposta, la disponibilità del supporto e il processo di risoluzione dei problemi. Ci impegniamo a fornire un'assistenza rapida ed efficiente per garantire che la vostra esperienza con i nostri prodotti sia perfetta. Per ulteriori informazioni, vi invitiamo a consultare il nostro [Supporto SLA](https://www.visioforge.com/it/support-service-level-agreement-sla).

---END OF PAGE---
# Page: https://www.visioforge.com/de/refund-policy
# Erstattungspolitik
Vielen Dank, dass Sie bei VisioForge eingekauft haben. Bitte testen Sie unsere Software vor dem Kauf mit einer TRIAL-Version. Unsere Rückerstattungsrichtlinie hat grundlegende Regeln und einige Einschränkungen.
## Vor der Rückgabe eines Produkts
Wenn Sie ein Problem mit einem Produkt haben, gibt es möglicherweise andere Möglichkeiten, bevor Sie eine Rückgabe beantragen:
- Wenn Sie die Software gekauft und heruntergeladen haben und Hilfe bei der Installation und Aktivierung benötigen, senden Sie bitte eine E-Mail an [order@visioforge.com](mailto:order@visioforge.com) oder verwenden [das Support-Portal](https://support.visioforge.com/).
- Wenn Sie technische Unterstützung für ein VisioForge-Softwareprodukt benötigen, senden Sie bitte eine E-Mail an [support@visioforge.com](mailto:support@visioforge.com), verwenden [das Support-Portal](https://support.visioforge.com/), oder prüfen [Online-Hilfe](https://www.visioforge.com/help/).
## Grundregeln für die Erstattung
Wir empfehlen Ihnen, sich mit uns in Verbindung zu setzen, wenn Sie Probleme beim Empfang oder Herunterladen unserer Produkte haben. Gemäà unserer Rückerstattungsrichtlinie erstatten wir digitale Produkte innerhalb von 30 Tagen nach dem ursprünglichen Kauf des Produkts, wenn die Software Fehler oder Probleme aufweist.
## Einschränkungen der Erstattungspolitik
- Wir gewähren Rückerstattungen für digitale Produkte innerhalb von 30 Tagen nach dem ursprünglichen Kauf des Produkts, wenn die Software Fehler oder Probleme aufweist.
- Bei Verlängerungen oder nach 30 Tagen erfolgt keine Rückerstattung.
- Für Käufe mit Rabatten werden keine Rückerstattungen gewährt.
- Wir führen keine Rückerstattungen für automatische Verlängerungen durch, die während des ersten Kaufs aktiviert wurden (bevor die automatische Verlängerung erfolgt, erhalten Sie mehrere E-Mails über die automatische Verlängerung von unserem Zahlungsanbieter (2Checkout oder Stripe)).
## Kriterien für die Rückgabe
- Alle Rücksendungen und Umtäusche müssen innerhalb von 30 Tagen nach dem Kauf über die entsprechenden Kanäle abgewickelt werden.
- Bei der Rückgabe von Software muss die Lizenz für die Software auf dem Computer des Benutzers beendet und von diesem Computer entfernt werden. Wir können von Ihnen verlangen, dass Sie als Bedingung für die Rückgabe ein elektronisches Vernichtungsschreiben unterzeichnen, in dem Sie bestätigen, dass Sie das Produkt deinstalliert und keine Kopien davon angefertigt haben. Der Lizenzcode für diese Produkte wird gesperrt, und Sie können die Software in Zukunft nicht mehr installieren oder verwenden.
- Bei Werbeartikeln und -paketen müssen alle enthaltenen Produkte und Dienstleistungen zusammen zurückgegeben werden. Angenommen, eine Dienstleistung ist in einer Werbeaktion enthalten und ein Paket wurde verwendet (z. B. ein verwendeter Promo-Code). In diesem Fall wird der gesamte Verkaufswert der Dienstleistung vom Erstattungsbetrag abgezogen. Wenn ein Paket gekauft und nur ein Teil des Pakets zurückgegeben wird, ist der Rabatt ungültig, und der gesamte Rabatt wird von der Erstattung abgezogen.
- Wir können die 30-tägige Rückgabefrist während der Feiertage oder anderer Zeiträume verlängern, wenn eine längere Rückgabefrist auf der Website/den Werbeinformationen angekündigt wurde, als Sie Ihren Kauf getätigt haben.
- Wenn wir unseren Preis für einen Artikel innerhalb von 30 Tagen nach Ihrem Kauf senken, halten wir den niedrigeren Preis ein. Wenn Sie bemerken, dass wir den Preis eines Artikels, den Sie kürzlich gekauft haben, gesenkt haben, kontaktieren Sie [order@visioforge.com](mailto:order@visioforge.com) und wir erstatten Ihnen gerne den Differenzbetrag (wenn Sie mit einer Kreditkarte bezahlt haben, müssen Sie die gleiche Karte verwenden). Dieses Angebot gilt nicht für Preisnachlässe im Zusammenhang mit Sonderverkaufsveranstaltungen wie Black Friday, Cyber Monday und den Weihnachtsfeiertagen.
## Datenschutzbestimmungen
Bitte prüfen Sie unser [Datenschutzbestimmungen](https://www.visioforge.com/de/datenschutzbestimmungen).

---END OF PAGE---
# Page: https://www.visioforge.com/es/refund-policy
# PolÃtica de reembolso
Gracias por comprar en VisioForge. Por favor, pruebe nuestro software antes de la compra utilizando una versión de PRUEBA. Nuestra polÃtica de reembolso tiene reglas básicas y algunas limitaciones.
## Antes de devolver un producto
Si tiene un problema con un producto, puede haber otras opciones antes de solicitar una devolución:
- Si ha comprado y descargado software y necesita ayuda con la instalación y activación, envÃe un correo electrónico a [orden@visioforge.com](mailto:order@visioforge.com) o utilice [el portal de ayuda](https://support.visioforge.com/).
- Si necesita asistencia técnica con un producto de software VisioForge, envÃe un correo electrónico a [soporte@visioforge.com](mailto:support@visioforge.com), utilice [el portal de ayuda](https://support.visioforge.com/), o compruebe [ayuda online](https://www.visioforge.com/help/).
## Normas básicas de devolución
Le recomendamos que se ponga en contacto con nosotros si tiene algún problema al recibir o descargar nuestros productos. De acuerdo con nuestra polÃtica de reembolso, reembolsamos los productos digitales en un plazo de 30 dÃas a partir de la fecha de compra original del producto si el software presenta errores o problemas.
## Limitaciones de la polÃtica de reembolso
- Realizamos devoluciones de productos digitales en un plazo de 30 dÃas a partir de la fecha de compra original del producto si el software presenta errores o problemas.
- No realizamos reembolsos por renovaciones ni después de 30 dÃas.
- No realizamos reembolsos por compras con descuentos.
- No realizamos reembolsos para las renovaciones automáticas activadas durante la primera compra (antes de que se produzca la renovación automática, recibirá varios correos electrónicos sobre la renovación automática de nuestro procesador de pagos (2Checkout o Stripe)).
## Criterios de retorno
- Todas las devoluciones y cambios deben ir acompañados tramitados a través de los canales apropiados dentro de los 30 dÃas siguientes a la compra.
- Al devolver el software, éste debe tener la licencia cancelada en la máquina del usuario y ser retirado de dicha máquina. Es posible que le pidamos que firme una carta electrónica de destrucción como condición para su devolución para confirmar que ha desinstalado y no ha hecho ninguna copia del producto. El código de licencia de estos productos quedará bloqueado y no podrá instalar ni utilizar el software en el futuro.
- Todos los productos y servicios incluidos deben devolverse juntos en el caso de artÃculos promocionales y paquetes. Supongamos que un servicio está incluido en una promoción y que se ha utilizado un paquete (por ejemplo, un código promocional usado). En ese caso, el valor total de venta al público del servicio se deducirá del importe del reembolso. Cuando se compra un paquete y sólo se devuelve una parte del paquete, el descuento queda anulado y el descuento total se deducirá del reembolso.
- Podemos ampliar el plazo de devolución de 30 dÃas durante las vacaciones u otros periodos si se anunciaba un plazo de devolución más amplio en el sitio web o en la información promocional cuando realizó la compra.
- Si bajamos el precio de un artÃculo en los 30 dÃas siguientes a su compra, respetaremos el precio más bajo. Si se da cuenta de que hemos rebajado el precio de un artÃculo que ha comprado recientemente, póngase en contacto con [orden@visioforge.com](mailto:order@visioforge.com) y estaremos encantados de reembolsarle o abonarle la diferencia (si pagó con tarjeta de crédito, deberá utilizar la misma tarjeta). Esta oferta no se aplica a las reducciones de precio asociadas a eventos de venta especiales como el Black Friday, el Cyber Monday y las fiestas navideñas.
## PolÃtica de privacidad
Consulte nuestra [polÃtica de privacidad](https://www.visioforge.com/es/politica-de-privacidad).

---END OF PAGE---
# Page: https://www.visioforge.com/it/refund-policy
# Politica di rimborso
Grazie per aver acquistato da VisioForge. Prima dell'acquisto, vi invitiamo a testare il nostro software utilizzando una versione TRIAL. La nostra politica di rimborso prevede regole di base e alcune limitazioni.
## Prima di restituire un prodotto
In caso di problemi con un prodotto, potrebbero esserci altre opzioni prima di richiedere un reso:
- Se avete acquistato e scaricato il software e avete bisogno di assistenza per l'installazione e l'attivazione, inviate un'e-mail a [ordine@visioforge.com](mailto:order@visioforge.com) o utilizzare [il portale di supporto](https://support.visioforge.com/).
- Se avete bisogno di assistenza tecnica per un prodotto software VisioForge, inviate un'e-mail a [support@visioforge.com](mailto:support@visioforge.com), utilizzare [il portale di supporto](https://support.visioforge.com/), o controllare [Guida online](https://www.visioforge.com/help/).
## Regole di base per il rimborso
Si consiglia di contattarci per assistenza in caso di problemi nella ricezione o nel download dei nostri prodotti. In base alla nostra politica di rimborso, i prodotti digitali vengono rimborsati entro 30 giorni dall'acquisto originale del prodotto se il software presenta bug o problemi.
## Limitazioni della politica di rimborso
- Per i prodotti digitali effettuiamo rimborsi entro 30 giorni dall'acquisto originale del prodotto se il software presenta bug o problemi.
- Non effettuiamo rimborsi per i rinnovi o dopo 30 giorni.
- Non effettuiamo rimborsi per acquisti con sconti.
- Non effettuiamo rimborsi per i rinnovi automatici attivati durante il primo acquisto (prima che avvenga il rinnovo automatico, riceverete diverse e-mail sul rinnovo automatico dal nostro processore di pagamento (2Checkout o Stripe)).
## Criteri di restituzione
- Tutti i resi e i cambi devono essere accompagnati attraverso i canali appropriati entro 30 giorni dall'acquisto.
- Quando si restituisce un software, la licenza deve essere terminata sul computer dell'utente e deve essere rimossa da tale computer. Come condizione per la restituzione, potremmo richiedere all'utente di firmare una lettera elettronica di distruzione per confermare che il prodotto è stato disinstallato e non è stato copiato. Il codice di licenza di questi prodotti sarà bloccato e non sarà possibile installare o utilizzare il software in futuro.
- Tutti i prodotti e i servizi inclusi devono essere restituiti insieme per gli articoli promozionali e i bundle. Supponiamo che un servizio sia incluso in una promozione e che sia stato utilizzato un bundle (ad esempio, un codice promozionale usato). In questo caso, il valore totale al dettaglio del servizio sarà dedotto dall'importo del rimborso. Quando si acquista un bundle e si restituisce solo una parte del bundle, lo sconto è nullo e il totale dello sconto sarà dedotto dal rimborso.
- Possiamo estendere il periodo di restituzione di 30 giorni durante le festività o altri periodi se un periodo di restituzione più esteso è stato pubblicizzato sul sito web/informazioni promozionali al momento dell'acquisto.
- Se abbassiamo il prezzo di un articolo entro 30 giorni dall'acquisto, onoreremo il prezzo più basso. Se vi accorgete che abbiamo ridotto il prezzo di un articolo che avete acquistato di recente, contattate [ordine@visioforge.com](mailto:order@visioforge.com) e saremo lieti di rimborsare o accreditare la differenza (se avete pagato con una carta di credito, dovrete usare la stessa carta). Questa offerta non si applica alle riduzioni di prezzo associate a eventi speciali di vendita come il Black Friday, il Cyber Monday e le festività natalizie.
## Informativa sulla privacy
Si prega di controllare il nostro [Informativa sulla privacy](https://www.visioforge.com/it/informativa-sulla-privacy).

---END OF PAGE---
# Page: https://www.visioforge.com/de/terms-and-conditions
# Bedingungen und Konditionen
Die folgenden Bestimmungen und Bedingungen (zusammenfassend die "Bestimmungen und Bedingungen") gelten für Ihre Nutzung von [https://www.visioforge.com](https://www.visioforge.com/de/)einschlieÃlich aller Inhalte, Funktionen und Dienste, die auf oder über [https://www.visioforge.com](https://www.visioforge.com/de/) (die "Website").
Bitte lesen Sie die Allgemeinen Geschäftsbedingungen sorgfältig durch, bevor Sie mit der Nutzung von VisioForge beginnen, denn durch die Nutzung der Website akzeptieren Sie die Allgemeinen Geschäftsbedingungen und erklären sich damit einverstanden, an diese gebunden zu sein und sie einzuhalten.
Diese Allgemeinen Geschäftsbedingungen sind ab dem 1. Oktober 2016 gültig. Wir behalten uns ausdrücklich das Recht vor, diese Bedingungen von Zeit zu Zeit zu ändern, ohne Sie davon in Kenntnis zu setzen. Sie erkennen an und stimmen zu, dass es in Ihrer Verantwortung liegt, diese Website und diese Geschäftsbedingungen von Zeit zu Zeit zu überprüfen und sich mit allen Ãnderungen vertraut zu machen. Durch die fortgesetzte Nutzung dieser Website nach solchen Ãnderungen erkennen Sie die geänderten Bedingungen an und erklären sich damit einverstanden, die geänderten Bedingungen einzuhalten und an sie gebunden zu sein.
## Verhalten auf der Website
Ihre Nutzung der Website unterliegt allen geltenden Gesetzen und Vorschriften, und Sie sind allein verantwortlich für den Inhalt Ihrer Kommunikation über die Website.
Indem Sie Informationen in einen Kommunikationsdienst, einen Chatroom, ein Nachrichtenbrett, eine Newsgroup, eine Softwarebibliothek oder einen anderen interaktiven Dienst, der Ihnen auf oder über diese Website zur Verfügung steht, hochladen oder anderweitig nutzen, erklären Sie sich damit einverstanden, dass Sie keine Inhalte - einschlieÃlich Text, Kommunikation, Software, Bilder, Töne, Daten oder andere Informationen - hochladen, freigeben, einstellen oder anderweitig verbreiten oder deren Verbreitung erleichtern:
- ungesetzlich, bedrohlich, missbräuchlich, belästigend, verleumderisch, täuschend, betrügerisch, die Privatsphäre anderer verletzend, unerlaubt sind, explizite oder grafische Beschreibungen oder Darstellungen sexueller Handlungen enthalten (einschlieÃlich, aber nicht beschränkt auf sexuelle Sprache gewalttätiger oder bedrohlicher Art, die an eine andere Person oder Personengruppe gerichtet ist) oder anderweitig gegen unsere Regeln oder Richtlinien verstoÃen
- eine Person oder eine Gruppe von Personen aufgrund ihrer Religion, ihres Geschlechts, ihrer sexuellen Orientierung, ihrer Rasse, ihrer ethnischen Zugehörigkeit, ihres Alters oder einer Behinderung belästigt, erniedrigt oder einschüchtert
- ein Patent, eine Marke, ein Geschäftsgeheimnis, ein Urheberrecht, ein Recht auf Ãffentlichkeit oder ein anderes Eigentumsrecht einer Partei verletzen
- Unerlaubte oder unaufgeforderte Werbung, Junk- oder Massen-E-Mails (auch bekannt als "Spamming"), Kettenbriefe, jede andere Form von unerlaubter Aufforderung oder jede Form von Lotterie oder Glücksspiel darstellen
- Softwareviren oder andere Computercodes, Dateien oder Programme enthalten, die dazu bestimmt sind, die Funktion von Software, Hardware oder Telekommunikationsgeräten zu stören, zu beschädigen oder einzuschränken oder Daten oder andere Informationen Dritter zu beschädigen oder sich unbefugt Zugang zu ihnen zu verschaffen
- sich als eine natürliche oder juristische Person ausgibt, einschlieÃlich eines unserer Mitarbeiter oder Vertreter
Wir übernehmen keine Haftung für den Inhalt von Materialien, die von Drittnutzern der Website hochgeladen oder eingereicht werden, und billigen diese auch nicht. Wir überprüfen, überwachen oder bearbeiten im Allgemeinen nicht die Inhalte, die von Nutzern von Kommunikationsdiensten, Chatrooms, Messageboards, Newsgroups, Softwarebibliotheken oder anderen interaktiven Diensten, die auf oder über diese Website verfügbar sind, veröffentlicht werden.
Wir und unsere Vertreter haben jedoch das Recht, nach eigenem Ermessen Inhalte zu entfernen, die nach unserem Ermessen nicht mit diesen Nutzungsbedingungen und anderen Verhaltensregeln für unsere Website übereinstimmen oder anderweitig schädlich, anstöÃig oder ungenau sind. Wir sind nicht verantwortlich für ein Versäumnis oder eine Verzögerung bei der Entfernung solcher Inhalte. Sie stimmen hiermit einer solchen Entfernung zu und verzichten auf jegliche Ansprüche gegen uns, die sich aus einer solchen Entfernung von Inhalten ergeben.
Sie erklären sich damit einverstanden, dass wir jederzeit und nach unserem alleinigen Ermessen Ihre Mitgliedschaft, Ihr Konto oder eine andere Verbindung mit unserer Website ohne vorherige Benachrichtigung beenden können, wenn Sie gegen eine der oben genannten Bestimmungen verstoÃen.
AuÃerdem erkennen Sie an, dass wir bei der Untersuchung von VerstöÃen gegen die System- oder Netzsicherheit auf anderen Websites uneingeschränkt kooperieren werden, einschlieÃlich der Zusammenarbeit mit Strafverfolgungsbehörden bei der Untersuchung mutmaÃlicher krimineller VerstöÃe.
### Allgemeine Geschäftsbedingungen und geistiges Eigentum
Durch die Annahme dieser Allgemeinen Geschäftsbedingungen erkennen Sie an und stimmen zu, dass alle Inhalte, die Ihnen auf dieser Website präsentiert werden, durch Urheberrechte, Marken, Dienstleistungsmarken, Patente oder andere Eigentumsrechte und Gesetze geschützt sind und das alleinige Eigentum von VisioForge sind.
Sie dürfen die Inhalte nur so verwenden, wie es von uns oder dem jeweiligen Inhaltsanbieter ausdrücklich genehmigt wurde. Mit Ausnahme einer einzigen Kopie für den persönlichen Gebrauch dürfen Sie keine Dokumente oder Informationen von dieser Website in irgendeiner Form oder mit irgendwelchen Mitteln ohne vorherige schriftliche Genehmigung von uns oder dem jeweiligen Inhaltsanbieter kopieren, reproduzieren, ändern, neu veröffentlichen, hochladen, posten, übertragen oder verteilen, und Sie sind allein dafür verantwortlich, die Genehmigung einzuholen, bevor Sie urheberrechtlich geschütztes Material, das auf dieser Website verfügbar ist, wiederverwenden.
### Websites von Dritten
Diese Website kann Sie mit anderen Websites im Internet verlinken oder anderweitig Verweise auf Informationen, Dokumente, Software, Materialien und/oder Dienstleistungen enthalten, die von anderen Parteien bereitgestellt werden. Diese Websites können Informationen oder Materialien enthalten, die manche Menschen als unangemessen oder anstöÃig empfinden.
Questi altri siti web e parti non sono sotto il nostro controllo e l'utente riconosce che non siamo responsabili dell'accuratezza, della conformità al copyright, della legalità , della decenza o di qualsiasi altro aspetto del contenuto di tali siti, né siamo responsabili di errori o omissioni in qualsiasi riferimento ad altre parti o ai loro prodotti e servizi. L'inclusione di tali link o riferimenti è fornita solo per comodità e non implica l'approvazione o l'associazione con il sito web o la parte da parte nostra, né alcuna garanzia di alcun tipo, espressa o implicita.
### Gewährleistungsausschluss, Haftungsbeschränkung und Entschädigung
Die Nutzung von VisioForge erfolgt auf Ihr eigenes Risiko. Die Website wird "wie besehen" und "wie verfügbar" bereitgestellt. Wir lehnen alle ausdrücklichen oder stillschweigenden Garantien jeglicher Art ab, einschlieÃlich, aber nicht beschränkt auf die Garantien der Marktgängigkeit, der Eignung für einen bestimmten Zweck und der Nichtverletzung von Rechten Dritter.
Wir haften nicht für direkte oder Folgeschäden, die sich aus Ihrer Nutzung der Website ergeben, und Sie erklären sich damit einverstanden, uns von allen Ansprüchen, Verlusten, Haftungskosten und Ausgaben (einschlieÃlich, aber nicht beschränkt auf Anwaltskosten), die sich aus der Verletzung der Rechte Dritter durch Sie ergeben, zu verteidigen, freizustellen und schadlos zu halten. Sie erkennen an, dass Sie nur eine begrenzte, nicht ausschlieÃliche und nicht übertragbare Lizenz zur Nutzung der Website haben. Da die Website nicht fehlerfrei ist, erklären Sie sich damit einverstanden, sie sorgfältig zu nutzen und sie nicht in einer Weise zu verwenden, die zu einem Verlust Ihres Eigentums oder von Informationen Dritter führen könnte.
### Bedingungen und Konditionen - Kündigung
Diese Allgemeinen Geschäftsbedingungen treten für Sie in Kraft, wenn Sie ein VisioForge-Konto erstellen oder mit der Nutzung von VisioForge beginnen, und bleiben in Kraft, bis sie von Ihnen oder von uns gekündigt werden.
VisioForge behält sich das Recht vor, diese Allgemeinen Geschäftsbedingungen zu kündigen oder Ihr Konto jederzeit zu sperren, wenn Sie die Website unbefugt oder vermutlich unbefugt nutzen, sei es unter Verstoà gegen diese Allgemeinen Geschäftsbedingungen oder aus anderen Gründen. Wenn VisioForge diese Allgemeinen Geschäftsbedingungen kündigt oder Ihr Konto aus einem der in diesem Abschnitt genannten Gründe sperrt, übernimmt VisioForge Ihnen gegenüber keine Haftung oder Verantwortung.
### Zuweisung
VisioForge kann diese Allgemeinen Geschäftsbedingungen oder Teile davon ohne Einschränkungen abtreten. Sie dürfen diese Bedingungen oder Teile davon nicht an Dritte abtreten.
### Andere Politiken
- [Datenschutzbestimmungen](https://www.visioforge.com/de/datenschutzbestimmungen)
- [Erstattungspolitik](https://www.visioforge.com/de/refund-policy)

---END OF PAGE---
# Page: https://www.visioforge.com/es/terms-and-conditions
# Condiciones generales
Los siguientes términos y condiciones (colectivamente, estos "Términos y Condiciones") se aplican a su uso de [https://www.visioforge.com](https://www.visioforge.com/es/)incluyendo cualquier contenido, funcionalidad y servicios ofrecidos en o a través de [https://www.visioforge.com](https://www.visioforge.com/es/) (el "Sitio web").
Por favor, lea los Términos y Condiciones cuidadosamente antes de empezar a utilizar VisioForge porque al utilizar el Sitio Web usted acepta y está de acuerdo en estar obligado y cumplir con estos Términos y Condiciones.
Los presentes Términos y Condiciones entran en vigor el 1 de octubre de 2016. Nos reservamos expresamente el derecho a modificar estos Términos y Condiciones de vez en cuando sin previo aviso. Usted reconoce y acepta que es su responsabilidad revisar este Sitio Web y estos Términos y Condiciones de vez en cuando y familiarizarse con cualquier modificación. Su uso continuado de este sitio web después de tales modificaciones constituirá el reconocimiento de los Términos y Condiciones modificados y el acuerdo de acatar y estar obligado por los Términos y Condiciones modificados.
## Conducta en el sitio web
Su uso del Sitio Web está sujeto a todas las leyes y reglamentos aplicables, y usted es el único responsable del contenido de sus comunicaciones a través del Sitio Web.
Al publicar información en cualquier servicio de comunicaciones, sala de chat, tablón de mensajes, grupo de noticias, biblioteca de software u otro servicio interactivo que pueda estar a su disposición en este sitio Web o a través de él, usted acepta que no cargará, compartirá, publicará ni distribuirá o facilitará de otro modo la distribución de ningún contenido -incluidos textos, comunicaciones, software, imágenes, sonidos, datos u otra información- que:
- Sea ilegal, amenazador, abusivo, acosador, difamatorio, calumnioso, engañoso, fraudulento, invasivo de la privacidad ajena, tortuoso, contenga descripciones o relatos explÃcitos o gráficos de actos sexuales (incluido, entre otros, el lenguaje sexual de naturaleza violenta o amenazadora dirigido a otro individuo o grupo de individuos), o infrinja de cualquier otro modo nuestras normas o polÃticas.
- Victimiza, acosa, degrada o intimida a una persona o grupo de personas por motivos de religión, sexo, orientación sexual, raza, etnia, edad o discapacidad.
- infrinja cualquier patente, marca comercial, secreto comercial, derecho de autor, derecho de publicidad u otros derechos de propiedad de cualquier parte
- Constituya publicidad no autorizada o no solicitada, correo basura o masivo (también conocido como "spamming"), cartas en cadena, cualquier otra forma de solicitud no autorizada, o cualquier forma de loterÃa o juego.
- Contenga virus informáticos o cualquier otro código informático, archivos o programas diseñados o destinados a interrumpir, dañar o limitar el funcionamiento de cualquier software, hardware o equipo de telecomunicaciones, o a dañar u obtener acceso no autorizado a cualquier dato u otra información de terceros.
- Suplante a cualquier persona o entidad, incluidos nuestros empleados o representantes.
No respaldamos ni asumimos responsabilidad alguna por el contenido de cualquier material cargado o enviado por terceros usuarios del Sitio Web. Por lo general, no preseleccionamos, supervisamos ni editamos el contenido publicado por los usuarios de los servicios de comunicación, salas de chat, tablones de mensajes, grupos de noticias, bibliotecas de software u otros servicios interactivos que puedan estar disponibles en este sitio web o a través de él.
Sin embargo, nosotros y nuestros agentes tenemos el derecho, a nuestra entera discreción, de eliminar cualquier contenido que, a nuestro juicio, no cumpla con estas Condiciones de Uso y cualquier otra norma de conducta del usuario de nuestro Sitio Web, o que sea perjudicial, objetable o inexacto. No nos hacemos responsables de ningún fallo o retraso en la eliminación de dichos contenidos. Por la presente, usted consiente en dicha eliminación y renuncia a cualquier reclamación contra nosotros derivada de dicha eliminación de contenidos.
Usted acepta que podemos, en cualquier momento y a nuestra entera discreción, cancelar su membresÃa, cuenta u otra afiliación con nuestro sitio sin previo aviso por violar cualquiera de las disposiciones anteriores.
Asimismo, usted reconoce que cooperaremos plenamente con las investigaciones de violaciones de la seguridad de los sistemas o de la red en otros sitios, incluida la cooperación con las autoridades policiales en la investigación de presuntas infracciones penales.
### Condiciones generales y propiedad intelectual
Al aceptar estos Términos y Condiciones, usted reconoce y acepta que todo el contenido presentado a usted en este sitio web está protegido por derechos de autor, marcas comerciales, marcas de servicio, patentes u otros derechos de propiedad y las leyes, y es propiedad exclusiva de VisioForge.
Sólo se le permite utilizar el contenido en la forma expresamente autorizada por nosotros o por el proveedor especÃfico del contenido. A excepción de una única copia para uso personal, no podrá copiar, reproducir, modificar, volver a publicar, cargar, enviar por correo, transmitir ni distribuir ningún documento o información de este sitio web de ninguna forma ni por ningún medio sin nuestra autorización previa por escrito o la del proveedor del contenido especÃfico, y usted será el único responsable de obtener la autorización antes de reutilizar cualquier material protegido por derechos de autor que esté disponible en este sitio web.
### Sitios web de terceros
Este sitio web puede enlazar con otros sitios de Internet o incluir referencias a información, documentos, software, materiales y/o servicios proporcionados por terceros. Estos sitios web pueden contener información o material que algunas personas pueden considerar inapropiado u ofensivo.
Estos otros sitios web y partes no están bajo nuestro control, y usted reconoce que no somos responsables de la exactitud, el cumplimiento de los derechos de autor, la legalidad, la decencia o cualquier otro aspecto del contenido de dichos sitios, ni somos responsables de los errores u omisiones en cualquier referencia a otras partes o sus productos y servicios. La inclusión de un enlace o referencia de este tipo se proporciona únicamente para su comodidad y no implica la aprobación o asociación con el sitio web o la parte por nuestra parte, ni ninguna garantÃa de ningún tipo, ya sea expresa o implÃcita.
### Exclusión de garantÃas, limitaciones de responsabilidad e indemnización
Usted utiliza VisioForge bajo su propia responsabilidad. El Sitio Web se proporciona "tal cual" y "según disponibilidad". Renunciamos a todas las garantÃas de cualquier tipo, expresas o implÃcitas, incluyendo, sin limitación, las garantÃas de comerciabilidad, idoneidad para un propósito particular y no infracción.
No nos hacemos responsables de los daños, directos o indirectos, resultantes de su uso del Sitio Web, y usted acepta defendernos, indemnizarnos y eximirnos de cualquier reclamación, pérdida, costes de responsabilidad y gastos (incluidos, entre otros, los honorarios de abogados) derivados de su violación de los derechos de terceros. Usted reconoce que sólo dispone de una licencia limitada, no exclusiva e intransferible para utilizar el Sitio Web. Dado que el Sitio Web no está libre de errores o fallos, usted se compromete a utilizarlo con cuidado y a evitar hacerlo de forma que pueda ocasionar cualquier pérdida de su propiedad o información o la de terceros.
### Condiciones generales - rescisión
Estos Términos y Condiciones entrarán en vigor en relación con usted cuando usted crea una cuenta VisioForge o cuando comience a utilizar el VisioForge y permanecerá en vigor hasta su terminación por usted o por nosotros.
VisioForge se reserva el derecho de terminar estos Términos y Condiciones o suspender su cuenta en cualquier momento en caso de uso no autorizado, o sospecha de uso no autorizado del Sitio Web, ya sea en contravención de estos Términos y Condiciones o de otra manera. Si VisioForge termina estos Términos y Condiciones o suspende su cuenta por cualquiera de las razones expuestas en esta sección, VisioForge no tendrá ninguna responsabilidad hacia usted.
### Asignación
VisioForge puede ceder estos Términos y Condiciones o cualquier parte de ella sin restricciones. Usted no puede ceder estos Términos y Condiciones o cualquier parte de los mismos a terceros.
### Otras polÃticas
- [PolÃtica de privacidad](https://www.visioforge.com/es/politica-de-privacidad)
- [PolÃtica de reembolso](https://www.visioforge.com/es/refund-policy)

---END OF PAGE---
# Page: https://www.visioforge.com/it/terms-and-conditions
# Termini e condizioni
I seguenti termini e condizioni (collettivamente, i "Termini e condizioni") si applicano all'utilizzo di [https://www.visioforge.com](https://www.visioforge.com/it/), compresi i contenuti, le funzionalità e i servizi offerti su o tramite [https://www.visioforge.com](https://www.visioforge.com/it/) (il "Sito web").
Si prega di leggere attentamente i Termini e le Condizioni prima di iniziare a utilizzare VisioForge, perché utilizzando il sito web si accetta di essere vincolati e di rispettare i Termini e le Condizioni.
I presenti Termini e condizioni sono in vigore dal 1° ottobre 2016. Ci riserviamo espressamente il diritto di modificare i presenti Termini e condizioni di volta in volta senza preavviso. L'utente riconosce e accetta che è sua responsabilità rivedere periodicamente il presente sito web e i presenti Termini e condizioni e familiarizzarsi con eventuali modifiche. L'uso continuato di questo Sito Web dopo tali modifiche costituirà un riconoscimento dei Termini e delle Condizioni modificati e l'accettazione di rispettare ed essere vincolati dai Termini e dalle Condizioni modificati.
## Condotta sul sito web
L'utilizzo del sito web da parte dell'utente è soggetto a tutte le leggi e i regolamenti applicabili e l'utente è l'unico responsabile della sostanza delle sue comunicazioni attraverso il sito web.
Pubblicando informazioni o utilizzando in altro modo qualsiasi servizio di comunicazione, chat room, bacheca elettronica, newsgroup, libreria software o altro servizio interattivo che può essere disponibile su o attraverso questo sito web, l'utente accetta di non caricare, condividere, pubblicare o distribuire in altro modo o facilitare la distribuzione di qualsiasi contenuto - inclusi testi, comunicazioni, software, immagini, suoni, dati o altre informazioni - che:
- Sia illegale, minaccioso, abusivo, molesto, diffamatorio, calunnioso, ingannevole, fraudolento, invasivo della privacy altrui, tortuoso, contenga descrizioni o resoconti espliciti o grafici di atti sessuali (incluso, ma non limitato a, linguaggio sessuale di natura violenta o minacciosa diretto a un altro individuo o gruppo di individui), o violi in altro modo le nostre regole o politiche
- Vittimizza molesta, degrada o intimidisce un individuo o un gruppo di individui sulla base della religione, del sesso, dell'orientamento sessuale, della razza, dell'etnia, dell'età o della disabilità .
- Violazione di brevetti, marchi, segreti commerciali, diritti d'autore, diritti di pubblicità o altri diritti di proprietà di qualsiasi parte
- Costituisce pubblicità non autorizzata o non richiesta, e-mail indesiderate o di massa (note anche come "spamming"), catene di Sant'Antonio, qualsiasi altra forma di sollecitazione non autorizzata, o qualsiasi forma di lotteria o gioco d'azzardo.
- contiene virus software o qualsiasi altro codice informatico, file o programma progettato o destinato a interrompere, danneggiare o limitare il funzionamento di qualsiasi software, hardware o apparecchiatura di telecomunicazione o a danneggiare o ottenere accesso non autorizzato a qualsiasi dato o altra informazione di terzi
- Impersonare qualsiasi persona o entità , compresi i nostri dipendenti o rappresentanti.
Non approviamo né ci assumiamo alcuna responsabilità per i contenuti di qualsiasi materiale caricato o inviato da utenti terzi del Sito web. In genere non controlliamo, monitoriamo o modifichiamo il contenuto pubblicato dagli utenti dei servizi di comunicazione, delle chat room, delle bacheche, dei newsgroup, delle librerie di software o di altri servizi interattivi che possono essere disponibili su o attraverso questo Sito Web.
Tuttavia, noi e i nostri agenti abbiamo il diritto, a nostra esclusiva discrezione, di rimuovere qualsiasi contenuto che, a nostro giudizio, non sia conforme alle presenti Condizioni d'uso e a qualsiasi altra regola di condotta dell'utente per il nostro sito web, o che sia altrimenti dannoso, discutibile o inaccurato. Non siamo responsabili per la mancata o ritardata rimozione di tali contenuti. L'utente acconsente a tale rimozione e rinuncia a qualsiasi reclamo nei nostri confronti derivante da tale rimozione di contenuti.
L'utente accetta che la società possa, in qualsiasi momento e a sua esclusiva discrezione, porre fine alla sua iscrizione, al suo account o a qualsiasi altra forma di affiliazione al nostro sito, senza preavviso, in caso di violazione di una qualsiasi delle disposizioni di cui sopra.
Inoltre, l'utente riconosce che collaboreremo pienamente con le indagini sulle violazioni dei sistemi o della sicurezza della rete presso altri siti, compresa la collaborazione con le autorità preposte all'applicazione della legge nelle indagini su sospette violazioni criminali.
### Termini e condizioni e proprietà intellettuale
Accettando i presenti Termini e condizioni, l'utente riconosce e accetta che tutti i contenuti presentati all'utente su questo sito web sono protetti da copyright, marchi commerciali, marchi di servizio, brevetti o altri diritti di proprietà e leggi, e sono di proprietà esclusiva di VisioForge.
L'uso dei contenuti è consentito solo se espressamente autorizzato da noi o dal fornitore specifico dei contenuti. Fatta eccezione per una singola copia effettuata esclusivamente per uso personale, non è consentito copiare, riprodurre, modificare, ripubblicare, caricare, inviare, trasmettere o distribuire documenti o informazioni da questo sito web in qualsiasi forma o con qualsiasi mezzo senza previa autorizzazione scritta da parte nostra o dello specifico fornitore di contenuti; l'utente è l'unico responsabile dell'ottenimento dell'autorizzazione prima di riutilizzare qualsiasi materiale protetto da copyright disponibile su questo sito web.
### Siti web di terze parti
Il presente sito web può collegarvi ad altri siti su Internet o includere riferimenti a informazioni, documenti, software, materiali e/o servizi forniti da altre parti. Questi siti web possono contenere informazioni o materiale che alcune persone possono trovare inappropriato o offensivo.
Questi altri siti web e parti non sono sotto il nostro controllo e l'utente riconosce che non siamo responsabili dell'accuratezza, della conformità al copyright, della legalità , della decenza o di qualsiasi altro aspetto del contenuto di tali siti, né siamo responsabili di errori o omissioni in qualsiasi riferimento ad altre parti o ai loro prodotti e servizi. L'inclusione di tali link o riferimenti è fornita solo per comodità e non implica l'approvazione o l'associazione con il sito web o la parte da parte nostra, né alcuna garanzia di alcun tipo, espressa o implicita.
### Esclusione di garanzie, limitazioni di responsabilità e indennizzi
L'uso di VisioForge è a vostro esclusivo rischio. Il sito web è fornito "così com'è" e "come disponibile". Decliniamo tutte le garanzie di qualsiasi tipo, espresse o implicite, incluse, senza limitazioni, le garanzie di commerciabilità , idoneità per uno scopo particolare e non violazione.
Non siamo responsabili per i danni, diretti o conseguenti, derivanti dall'uso del sito web da parte dell'utente e l'utente accetta di difendere, indennizzare e tenere indenne l'azienda da qualsiasi reclamo, perdita, responsabilità , costo e spesa (incluse, ma non solo, le spese legali) derivanti dalla violazione dei diritti di terzi da parte dell'utente. L'utente riconosce di avere solo una licenza limitata, non esclusiva e non trasferibile per l'utilizzo del sito web. Poiché il Sito web non è esente da errori o bug, l'utente accetta di usarlo con attenzione e di evitare di utilizzarlo in modi che potrebbero causare perdite di proprietà o informazioni proprie o di terzi.
### Termini e condizioni - risoluzione
I presenti Termini e condizioni entreranno in vigore nei vostri confronti quando creerete un account VisioForge o quando inizierete a utilizzare VisioForge e rimarranno in vigore fino alla loro risoluzione da parte vostra o da parte nostra.
VisioForge si riserva il diritto di risolvere i presenti Termini e Condizioni o di sospendere l'account dell'utente in qualsiasi momento in caso di uso non autorizzato o sospetto di uso non autorizzato del sito web, sia in violazione dei presenti Termini e Condizioni che in altro modo. Se VisioForge termina i presenti Termini e Condizioni o sospende il vostro account per uno qualsiasi dei motivi indicati in questa sezione, VisioForge non avrà alcuna responsabilità nei vostri confronti.
### Assegnazione
VisioForge può cedere questi Termini e Condizioni o qualsiasi parte di essi senza restrizioni. L'utente non può cedere i presenti Termini e Condizioni o parte di essi a terzi.
### Altre politiche
- [Informativa sulla privacy](https://www.visioforge.com/it/informativa-sulla-privacy)
- [Politica di rimborso](https://www.visioforge.com/it/refund-policy)

---END OF PAGE---
# Page: https://www.visioforge.com/de/uninstall-feedback
# Rückmeldung deinstallieren
Wir bedauern, dass Sie gehen, und wir wissen es wirklich zu schätzen, dass Sie sich die Zeit genommen haben, uns Ihr Feedback zu geben. Ihr Input ist entscheidend für die Verbesserung unserer Software und die Entwicklung besserer Lösungen, die Ihre Bedürfnisse und Erwartungen erfüllen.
Wir schätzen Ihr Feedback
Bitte teilen Sie uns mit, warum Sie sich entschieden haben, unsere Software zu deinstallieren. Ihre Erkenntnisse helfen uns zu verstehen, was wir besser machen können. Ob es um die Benutzeroberfläche, bestimmte Funktionen, die Leistung oder andere Aspekte geht, Ihre Kommentare sind für uns von unschätzbarem Wert.
## Kontaktieren Sie uns für Hilfe
Wenn Sie auf Probleme gestoÃen sind, die Sie zur Deinstallation veranlasst haben, würden wir uns freuen, Ihnen helfen zu können. Unser Support-Team ist bereit, Ihnen bei der Lösung von Problemen zu helfen oder Ihre Fragen zu beantworten.
- E-Mail: support@visioforge.com
- Unterstützungsportal: [Ein Ticket erstellen](https://support.visioforge.com)
- Live-Chat: [Einen Chat beginnen](https://discord.gg/yvXUG56WCH)
Wir bemühen uns, Ihnen die bestmögliche Erfahrung zu bieten, und Ihr Feedback ist ein wichtiger Teil dieses Prozesses. Wir danken Ihnen, dass Sie uns geholfen haben, uns zu verbessern, und hoffen, dass wir Sie in Zukunft noch besser bedienen können.
### Verbunden bleiben
Wenn Sie über unsere neuesten Funktionen und Verbesserungen auf dem Laufenden bleiben möchten, sollten Sie uns in den sozialen Medien folgen oder unseren Newsletter abonnieren.
Ich danke Ihnen nochmals für Ihre Zeit und Ihr Feedback.
Ihr Name
Deine E-Mail
Name des Produkts
â Bitte auswählen âVideo Capture SDK .NetMedia Player SDK .NetVideo Edit SDK .NetAndere
Ihre Nachricht (optional)

---END OF PAGE---
# Page: https://www.visioforge.com/es/uninstall-feedback
# Desinstalar feedback
Lamentamos su marcha y le agradecemos sinceramente que haya dedicado parte de su tiempo a hacernos llegar sus comentarios. Su opinión es crucial para ayudarnos a mejorar nuestro software y desarrollar mejores soluciones que satisfagan sus necesidades y expectativas.
Valoramos sus comentarios
Por favor, dÃganos por qué decidió desinstalar nuestro software. Sus comentarios nos ayudarán a entender qué podemos hacer mejor. Ya sea sobre la interfaz de usuario, funciones especÃficas, rendimiento o cualquier otro aspecto, sus comentarios son muy valiosos para nosotros.
## Póngase en contacto con nosotros
Si has tenido algún problema que te haya llevado a desinstalar, nos encantarÃa poder ayudarte. Nuestro equipo de asistencia está a su disposición para ayudarle a resolver cualquier problema que haya tenido o responder a cualquier pregunta.
- Correo electrónico: support@visioforge.com
- Portal de ayuda: [Crear una entrada](https://support.visioforge.com)
- Chat en directo: [Iniciar un chat](https://discord.gg/yvXUG56WCH)
Nos esforzamos por ofrecer la mejor experiencia posible y sus comentarios son una parte vital de ese proceso. Gracias por ayudarnos a mejorar y esperamos poder servirle mejor en el futuro.
### Mantente conectado
Si quieres estar al dÃa de nuestras últimas novedades y mejoras, sÃguenos en las redes sociales o suscrÃbete a nuestro boletÃn.
Gracias de nuevo por su tiempo y sus comentarios.
Nombre
Correo electrónico
Nombre del producto
âPor favor, elige una opciónâVideo Capture SDK .NetMedia Player SDK .NetVideo Edit SDK .NetOtro
Su mensaje (opcional)

---END OF PAGE---
# Page: https://www.visioforge.com/it/uninstall-feedback
# Disinstallare il feedback
Siamo spiacenti di vederla andare via e apprezziamo sinceramente il fatto che abbia dedicato del tempo a fornirci il suo feedback. Il vostro contributo è fondamentale per aiutarci a migliorare il nostro software e a sviluppare soluzioni migliori che soddisfino le vostre esigenze e aspettative.
Apprezziamo il vostro feedback
Ci faccia sapere perché ha deciso di disinstallare il nostro software. I vostri commenti ci aiuteranno a capire cosa possiamo fare di meglio. Che si tratti dell'interfaccia utente, di funzioni specifiche, di prestazioni o di qualsiasi altro aspetto, i vostri commenti sono preziosi per noi.
## Contattateci per ricevere assistenza
Se avete riscontrato problemi che vi hanno portato alla decisione di disinstallare, saremo lieti di potervi aiutare. Il nostro team di assistenza è pronto a risolvere qualsiasi problema o a rispondere a qualsiasi domanda.
- E-mail: support@visioforge.com
- Portale di supporto: [Creare un biglietto](https://support.visioforge.com)
- Chat in diretta: [Avviare una chat](https://discord.gg/yvXUG56WCH)
Ci impegniamo a fornire la migliore esperienza possibile e il vostro feedback è una parte fondamentale di questo processo. Grazie per averci aiutato a migliorare e speriamo di potervi servire meglio in futuro.
### Rimanere in contatto
Se desiderate rimanere aggiornati sulle nostre ultime funzionalità e miglioramenti, vi invitiamo a seguirci sui social media o a iscrivervi alla nostra newsletter.
Grazie ancora per il vostro tempo e il vostro feedback.
Il tuo nome
Il tuo indirizzo e-mail
Nome del prodotto
âSeleziona un'opzioneâVideo Capture SDK .NetMedia Player SDK .NetVideo Edit SDK .NetAltro
Messaggio (facoltativo)

---END OF PAGE---
# Page: https://www.visioforge.com/de/support-service-level-agreement-sla
# Support-Dienstleistungsvereinbarung (SLA)
Dieses Support Service Level Agreement (SLA) umreiÃt die Bedingungen für die von VisioForge (als "Anbieter" bezeichnet) für seine Kunden (als "Kunde" bezeichnet) erbrachten Supportleistungen. Dieses SLA legt die verfügbaren Supportoptionen, Reaktionszeiten und Verantwortlichkeiten beider Parteien fest.
## 1. Unterstützungskanäle und Abdeckung
### 1.1 E-Mail-Unterstützung
- Der E-Mail-Support ist für alle Kunden kostenlos.
- Das Support-Team antwortet auf E-Mails während der normalen Geschäftszeiten von Montag bis Freitag, auÃer an Feiertagen.
### 1.2 Premium-Unterstützung
- Premium-Support ist für Kunden verfügbar, die sich für zusätzliche Supportleistungen entscheiden.
- Der Premium-Support umfasst Fernhilfe, Chats oder Anrufe über unterstützte Plattformen (AnyDesk, Telegram, Zoom, Teams).
- Premium-Support ist während der regulären Geschäftszeiten von Montag bis Freitag verfügbar, auÃer an Feiertagen.
- Die Kosten für den Premium-Support betragen 200 EUR für ein Paket von 5 Stunden.
- Zusätzliche Premium-Supportstunden können separat erworben werden.
## 2. Support-Reaktionszeiten
### 2.1 Antwortzeiten des E-Mail-Supports
- Das Support-Team wird den Eingang der E-Mail des Kunden innerhalb von 24 Stunden bestätigen.
- Die erste Antwortzeit für den E-Mail-Support beträgt 2 Arbeitstage.
- Die Lösungszeit für den E-Mail-Support hängt von der Schwere und Komplexität des Problems ab und wird dem Kunden mitgeteilt.
### 2.2 Reaktionszeiten des Premium-Supports
- Das Support-Team antwortet auf Premium-Support-Anfragen innerhalb von 4 Stunden während der normalen Geschäftszeiten.
- Die Reaktionszeit für Premium-Support auÃerhalb der normalen Geschäftszeiten beträgt 12 Stunden.
- Die Lösungszeit für Premium-Support hängt von der Schwere und Komplexität des Problems ab und wird dem Kunden mitgeteilt.
## 3. Verantwortlichkeiten des Anbieters
- Der Provider unternimmt angemessene Anstrengungen, um die Supportanfragen des Kunden schnell und effizient zu lösen.
- Der Anbieter stellt geeignete Ressourcen zur Verfügung, um den Unterstützungsbedarf des Kunden zu decken.
- Der Anbieter stellt sicher, dass das Support-Team über die notwendigen Fähigkeiten und Kenntnisse verfügt, um die Anfragen der Kunden effektiv zu bearbeiten.
- Der Anbieter wahrt die Vertraulichkeit der im Rahmen des Unterstützungsprozesses weitergegebenen Informationen des Kunden.
## 4. Verantwortlichkeiten des Auftraggebers
### 4.1 Verantwortlichkeiten des Kunden
- Der Kunde gibt bei der Kontaktaufnahme mit dem Support genaue und detaillierte Informationen über das Problem oder die Anfrage an.
- Der Kunde arbeitet mit dem Support-Team zusammen und gewährt ihm den notwendigen Zugang und die Informationen, um die Problemlösung zu unterstützen.
- Der Kunde wird sich an alle Richtlinien und Anweisungen des Support-Teams halten.
- Der Kunde wird den Provider unverzüglich über jede Ãnderung seiner Kontaktdaten informieren.
## 5. Beschränkungen
### 5.1 Ausschlüsse
- Dieses SLA deckt keinen Support für Probleme ab, die auf unautorisierte Ãnderungen, Missbrauch oder Software oder Dienste Dritter zurückzuführen sind.
- Der Support für Hardware-Probleme ist in diesem SLA nicht enthalten.
## 6. Beendigung
### 6.1 Beendigung des Premium Supports
- Jede Partei kann den Premium-Support mit einer Frist von 30 Tagen schriftlich kündigen.
- Im Falle einer Kündigung verfallen alle nicht genutzten Stunden des Premium-Supports durch den Kunden.
## 7. Ãnderungsanträge
### 7.1 Ãnderung des SLA
- Dieses SLA kann im gegenseitigen Einvernehmen zwischen dem Anbieter und dem Kunden geändert werden.
- Alle Ãnderungen werden schriftlich dokumentiert und von beiden Parteien unterzeichnet.
Bitte lesen Sie die Bedingungen dieses Support Service Level Agreements sorgfältig durch. Durch den Zugriff auf die von VisioForge bereitgestellten Support-Dienste und deren Nutzung erklären Sie sich mit den in diesem SLA aufgeführten Bedingungen einverstanden.
Wenn Sie Fragen haben oder eine Klärung wünschen, wenden Sie sich bitte an uns unter support@visioforge.com.
Vielen Dank, dass Sie sich für VisioForge entschieden haben. Wir freuen uns darauf, Sie mit auÃergewöhnlichem Support zu unterstützen.

---END OF PAGE---
# Page: https://www.visioforge.com/es/support-service-level-agreement-sla
# Acuerdo de nivel de servicio (SLA)
Este Acuerdo de Nivel de Servicio de Soporte (SLA) describe los términos y condiciones de los servicios de soporte prestados por VisioForge (referido como "Proveedor") a sus clientes (referido como "Cliente"). Este SLA especifica las opciones de soporte disponibles, los tiempos de respuesta y las responsabilidades de ambas partes.
## 1. Canales de asistencia y cobertura
### 1.1 Asistencia por correo electrónico
- Todos los clientes reciben asistencia gratuita por correo electrónico.
- El equipo de asistencia responderá a los correos electrónicos en horario laboral, de lunes a viernes, excepto festivos.
### 1.2 Asistencia Premium
- La asistencia Premium está disponible para los clientes que opten por servicios de asistencia adicionales.
- La asistencia Premium incluye asistencia remota, chats o llamadas a través de plataformas compatibles (AnyDesk, Telegram, Zoom, Teams).
- El soporte premium está disponible durante el horario comercial habitual, de lunes a viernes, excepto los dÃas festivos.
- El coste de la asistencia premium es de 200 EUR por un paquete de 5 horas.
- Las horas adicionales de asistencia Premium pueden adquirirse por separado.
## 2. Tiempos de respuesta del servicio de asistencia
### 2.1 Tiempo de respuesta de la asistencia por correo electrónico
- El equipo de asistencia acusará recibo del correo electrónico del cliente en un plazo de 24 horas.
- El tiempo de respuesta inicial para la asistencia por correo electrónico será de 2 dÃas laborables.
- El tiempo de resolución de la asistencia por correo electrónico se basará en la gravedad y complejidad del problema y se comunicará al Cliente.
### 2.2 Tiempos de respuesta de la asistencia Premium
- El equipo de asistencia responderá a las solicitudes de asistencia premium en un plazo de 4 horas durante el horario laboral normal.
- El tiempo de respuesta para la asistencia Premium fuera del horario laboral normal será de 12 horas.
- El tiempo de resolución de la asistencia Premium dependerá de la gravedad y complejidad del problema y se comunicará al Cliente.
## 3. Responsabilidades del proveedor
- El Proveedor hará todos los esfuerzos razonables para resolver las solicitudes de asistencia del cliente con prontitud y eficacia.
- El Proveedor asignará los recursos adecuados para atender las necesidades de apoyo del cliente.
- El Proveedor se asegurará de que el equipo de asistencia posea los conocimientos y la experiencia necesarios para atender eficazmente las consultas de los clientes.
- El Proveedor mantendrá la confidencialidad de la información del cliente compartida durante el proceso de apoyo.
## 4. Responsabilidades del cliente
### 4.1 Responsabilidades del cliente
- El Cliente proporcionará información precisa y detallada sobre el problema o la consulta cuando se ponga en contacto con el servicio de asistencia.
- El Cliente cooperará con el equipo de asistencia, facilitando el acceso y la información necesarios para ayudar a resolver los problemas.
- El Cliente se atendrá a las directrices o instrucciones facilitadas por el equipo de asistencia.
- El Cliente notificará sin demora al Proveedor cualquier cambio en la información de contacto.
## 5. Limitaciones
### 5.1 Exclusiones
- Este SLA no cubre la asistencia para problemas derivados de modificaciones no autorizadas, uso indebido o software o servicios de terceros.
- La asistencia para problemas relacionados con el hardware no está incluida en este acuerdo de nivel de servicio.
## 6. Terminación
### 6.1 Finalización de la ayuda Premium
- Cualquiera de las partes podrá poner fin a la asistencia Premium mediante notificación por escrito con 30 dÃas de antelación.
- En caso de rescisión, el Cliente perderá todas las horas de asistencia Premium no utilizadas.
## 7. Enmiendas
### 7.1 Modificación del SLA
- El presente SLA podrá modificarse de mutuo acuerdo entre el Proveedor y el Cliente.
- Cualquier modificación se documentará por escrito y será firmada por ambas partes.
Por favor, revise cuidadosamente los términos de este Acuerdo de Nivel de Servicio de Soporte. Al acceder y utilizar los servicios de soporte proporcionados por VisioForge, usted reconoce y acepta cumplir con los términos descritos en este SLA.
Si tiene alguna pregunta o necesita alguna aclaración, póngase en contacto con nosotros en support@visioforge.com.
Gracias por elegir VisioForge. Esperamos poder ofrecerle un soporte excepcional.

---END OF PAGE---
# Page: https://www.visioforge.com/it/support-service-level-agreement-sla
# Accordo sul livello del servizio di assistenza (SLA)
Il presente Accordo sul livello del servizio di assistenza (SLA) definisce i termini e le condizioni dei servizi di assistenza forniti da VisioForge (denominato "Fornitore") ai propri clienti (denominati "Cliente"). Il presente SLA specifica le opzioni di supporto disponibili, i tempi di risposta e le responsabilità di entrambe le parti.
## 1. Canali di supporto e copertura
### 1.1 Supporto via e-mail
- L'assistenza via e-mail viene fornita gratuitamente a tutti i clienti.
- Il team di assistenza risponderà alle e-mail durante il normale orario di lavoro, dal lunedì al venerdì, esclusi i giorni festivi.
### 1.2 Supporto Premium
- Il supporto premium è disponibile per i clienti che optano per servizi di assistenza aggiuntivi.
- Il supporto premium include assistenza remota, chat o chiamate attraverso le piattaforme supportate (AnyDesk, Telegram, Zoom, Teams).
- L'assistenza Premium è disponibile durante il normale orario lavorativo, dal lunedì al venerdì, esclusi i giorni festivi.
- Il costo del supporto premium è di 200 euro per un pacchetto di 5 ore.
- Ulteriori ore di supporto premium possono essere acquistate separatamente.
## 2. Tempi di risposta dell'assistenza
### 2.1 Tempi di risposta dell'assistenza via e-mail
- Il team di assistenza confermerà la ricezione dell'e-mail del cliente entro 24 ore.
- Il tempo di risposta iniziale per l'assistenza via e-mail sarà entro 2 giorni lavorativi.
- I tempi di risoluzione per l'assistenza via e-mail si baseranno sulla gravità e sulla complessità del problema e saranno comunicati al Cliente.
### 2.2 Tempi di risposta dell'assistenza Premium
- Il team di assistenza risponderà alle richieste di assistenza premium entro 4 ore durante il normale orario di lavoro.
- I tempi di risposta per l'assistenza premium al di fuori del normale orario di lavoro saranno entro 12 ore.
- I tempi di risoluzione per l'assistenza premium dipendono dalla gravità e dalla complessità del problema e saranno comunicati al Cliente.
## 3. Responsabilità del fornitore
- Il Fornitore compirà sforzi ragionevoli per risolvere le richieste di assistenza del cliente in modo rapido ed efficiente.
- Il fornitore assegnerà le risorse appropriate per soddisfare le esigenze di supporto del cliente.
- Il fornitore si assicurerà che il team di supporto possieda le competenze e l'esperienza necessarie per gestire efficacemente le richieste dei clienti.
- Il fornitore manterrà la riservatezza delle informazioni del cliente condivise durante il processo di assistenza.
## 4. Responsabilità del cliente
### 4.1 Responsabilità del cliente
- Il Cliente fornirà informazioni accurate e dettagliate sul problema o sulla richiesta quando contatta l'assistenza.
- Il Cliente collaborerà con il team di supporto, fornendo l'accesso e le informazioni necessarie per assistere nella risoluzione dei problemi.
- Il Cliente si atterrà a qualsiasi linea guida o istruzione fornita dal team di supporto.
- Il Cliente comunicherà tempestivamente al Fornitore qualsiasi modifica delle informazioni di contatto.
## 5. Limitazioni
### 5.1 Esclusioni
- Il presente SLA non copre l'assistenza per problemi derivanti da modifiche non autorizzate, uso improprio o software o servizi di terzi.
- L'assistenza per i problemi legati all'hardware non è inclusa in questo SLA.
## 6. Terminazione
### 6.1 Cessazione del supporto Premium
- Ciascuna delle parti può interrompere il supporto premium con un preavviso scritto di 30 giorni.
- In caso di cessazione del contratto, il Cliente rinuncerà a tutte le ore di assistenza premium non utilizzate.
## 7. Emendamenti
### 7.1 Modifica dello SLA
- Il presente SLA può essere modificato di comune accordo tra il Fornitore e il Cliente.
- Eventuali modifiche saranno documentate per iscritto e firmate da entrambe le parti.
Vi invitiamo a leggere attentamente i termini del presente Accordo sul livello dei servizi di supporto. Accedendo e utilizzando i servizi di assistenza forniti da VisioForge, l'utente riconosce e accetta di rispettare i termini delineati nel presente SLA.
Per qualsiasi domanda o chiarimento, contattateci all'indirizzo support@visioforge.com.
Grazie per aver scelto VisioForge. Saremo lieti di fornirvi un'assistenza eccezionale.

---END OF PAGE---
# Page: https://www.visioforge.com/de/cookie-policy-eu
# Cookie-Richtlinie (EU/GDPR)
Diese Cookie-Richtlinie wurde zuletzt am 21. November 2024 aktualisiert und gilt für Bürger und Personen mit ständigem Wohnsitz im Europäischen Wirtschaftsraum und der Schweiz.
## 1. Einleitung
Unsere Website https://www.visioforge.com (im Folgenden: âdie Websiteâ) verwendet Cookies und andere damit verbundene Technologien (der Einfachheit halber werden alle Technologien als âCookiesâ bezeichnet). Cookies werden auch von Dritten gesetzt, die wir beauftragt haben. In dem nachstehenden Dokument informieren wir Sie über die Verwendung von Cookies auf unserer Website.
## 2. Was sind Cookies?
Ein Cookie ist eine kleine einfache Datei, die zusammen mit den Seiten dieser Website gesendet und von Ihrem Browser auf der Festplatte Ihres Computers oder eines anderen Geräts gespeichert wird. Die darin gespeicherten Informationen können bei einem späteren Besuch an unsere Server oder an die Server der betreffenden Dritten zurückgesandt werden.
## 3. Was sind Skripte?
Ein Skript ist ein Stück Programmcode, der dazu dient, dass unsere Website ordnungsgemäà und interaktiv funktioniert. Dieser Code wird auf unserem Server oder auf Ihrem Gerät ausgeführt.
## 4. Was ist ein Web-Beacon?
Ein Web-Beacon (oder ein Pixel-Tag) ist ein kleines, unsichtbares Stück Text oder Bild auf einer Website, das dazu dient, den Verkehr auf einer Website zu überwachen. Zu diesem Zweck werden verschiedene Daten über Sie mithilfe von Web-Beacons gespeichert.
## 5. Cookies
### 5.1 Technische oder funktionale Cookies
Einige Cookies sorgen dafür, dass bestimmte Teile der Website ordnungsgemäà funktionieren und dass Ihre Benutzerpräferenzen bekannt bleiben. Indem wir funktionale Cookies setzen, erleichtern wir Ihnen den Besuch unserer Website. So müssen Sie beim Besuch unserer Website nicht immer wieder dieselben Informationen eingeben, und die Artikel bleiben z. B. in Ihrem Warenkorb, bis Sie bezahlt haben. Wir können diese Cookies ohne Ihre Zustimmung setzen.
### 5.2 Statistik-Cookies
Wir verwenden Statistik-Cookies, um das Website-Erlebnis für unsere Nutzer zu optimieren. Mit diesen Statistik-Cookies erhalten wir Einblicke in die Nutzung unserer Website. Wir bitten Sie um Ihre Erlaubnis, Statistik-Cookies zu setzen.
### 5.3 Marketing/Tracking-Cookies
Marketing-/Tracking-Cookies sind Cookies oder andere Formen der lokalen Speicherung, die zur Erstellung von Nutzerprofilen für die Anzeige von Werbung oder zur Verfolgung des Nutzers auf dieser Website oder auf mehreren Websites für ähnliche Marketingzwecke verwendet werden.
## 6. Platzierte Kekse
- OptinMonster
- WordPress
- Streifen
- Cookie-Hinweis zur DSGVO
- Compliance
- Google Tag Manager für WordPress
- LiteSpeed
Diese Daten werden nicht an Dritte weitergegeben.
## 7. Zustimmung
Wenn Sie unsere Website zum ersten Mal besuchen, zeigen wir Ihnen ein Pop-up mit einer Erklärung über Cookies. Sobald Sie auf âEinstellungen speichernâ klicken, erklären Sie sich damit einverstanden, dass wir die Kategorien von Cookies und Plug-ins verwenden, die Sie in dem Pop-up-Fenster ausgewählt haben, wie in dieser Cookie-Richtlinie beschrieben. Sie können die Verwendung von Cookies über Ihren Browser deaktivieren, aber beachten Sie bitte, dass unsere Website dann möglicherweise nicht mehr richtig funktioniert.
## 8. Aktivieren/Deaktivieren und Löschen von Cookies
Sie können Ihren Internet-Browser verwenden, um Cookies automatisch oder manuell zu löschen. Sie können auch festlegen, dass bestimmte Cookies nicht gesetzt werden dürfen. Eine weitere Möglichkeit besteht darin, die Einstellungen Ihres Internet-Browsers so zu ändern, dass Sie jedes Mal, wenn ein Cookie gesetzt wird, eine Meldung erhalten. Weitere Informationen zu diesen Optionen finden Sie in den Anleitungen im Hilfebereich Ihres Browsers.
Bitte beachten Sie, dass unsere Website möglicherweise nicht richtig funktioniert, wenn alle Cookies deaktiviert sind. Wenn Sie die Cookies in Ihrem Browser löschen, werden sie nach Ihrer Zustimmung erneut gesetzt, wenn Sie unsere Website erneut besuchen.
## 9. Ihre Rechte in Bezug auf personenbezogene Daten
Sie haben die folgenden Rechte in Bezug auf Ihre personenbezogenen Daten:
Sie haben das Recht zu erfahren, wozu Ihre personenbezogenen Daten benötigt werden, was mit ihnen geschieht und wie lange sie gespeichert werden.
Recht auf Zugang: Sie haben das Recht, auf Ihre uns bekannten personenbezogenen Daten zuzugreifen.
Um diese Rechte auszuüben, kontaktieren Sie uns bitte. Bitte beachten Sie die Kontaktdaten am Ende dieser Cookie-Richtlinie. Wenn Sie sich darüber beschweren möchten, wie wir Ihre Daten behandeln, würden wir uns freuen, von Ihnen zu hören. Sie haben aber auch das Recht, eine Beschwerde bei der Aufsichtsbehörde (der Datenschutzbehörde) einzureichen.
## 10. Kontaktangaben
Wenn Sie Fragen und/oder Anmerkungen zu unserer Cookie-Richtlinie und dieser Erklärung haben, wenden Sie sich bitte an uns unter den folgenden Kontaktdaten:
E-Mail: \*\*support@visioforge.com\*\*
Diese Cookie-Richtlinie wurde am 21. November 2024 mit \*\*cookiedatabase.org\*\* synchronisiert.
---END OF PAGE---
# Page: https://www.visioforge.com/es/cookie-policy-eu
# PolÃtica de cookies (UE/GDPR)
Esta PolÃtica de Cookies se actualizó por última vez el 21 de noviembre de 2024 y se aplica a los ciudadanos y residentes legales permanentes del Espacio Económico Europeo y Suiza.
## 1. Introducción
Nuestro sitio web, https://www.visioforge.com (en adelante, «el sitio web») utiliza cookies y otras tecnologÃas relacionadas (para mayor comodidad, todas las tecnologÃas se denominan «cookies»). Las cookies también son colocadas por terceros que hemos contratado. En el siguiente documento le informamos sobre el uso de cookies en nuestro sitio web.
## 2. ¿Qué son las cookies?
Una cookie es un pequeño archivo simple que se envÃa junto con las páginas de este sitio web y que su navegador almacena en el disco duro de su ordenador u otro dispositivo. La información almacenada en él puede ser devuelta a nuestros servidores o a los servidores de los terceros pertinentes durante una visita posterior.
## 3. ¿Qué son los guiones?
Un script es un fragmento de código de programa que se utiliza para que nuestro sitio web funcione correctamente y de forma interactiva. Este código se ejecuta en nuestro servidor o en su dispositivo.
## 4. ¿Qué es una baliza web?
Una baliza web (o etiqueta de pÃxel) es un pequeño fragmento invisible de texto o imagen en un sitio web que se utiliza para controlar el tráfico en un sitio web. Para ello, se almacenan varios datos sobre usted mediante balizas web.
## 5. Cookies
### 5.1 Cookies técnicas o funcionales
Algunas cookies garantizan que determinadas partes del sitio web funcionen correctamente y que se conozcan sus preferencias de usuario. Al colocar cookies funcionales, le facilitamos la visita a nuestro sitio web. De este modo, no tendrá que introducir repetidamente la misma información cuando visite nuestro sitio web y, por ejemplo, los artÃculos permanecerán en su cesta de la compra hasta que haya pagado. Podemos colocar estas cookies sin su consentimiento.
### 5.2 Cookies estadÃsticas
Utilizamos cookies estadÃsticas para optimizar la experiencia del sitio web para nuestros usuarios. Con estas cookies estadÃsticas obtenemos información sobre el uso de nuestro sitio web. Le pedimos su permiso para colocar cookies estadÃsticas.
### 5.3 Cookies de marketing/seguimiento
Las cookies de marketing/seguimiento son cookies o cualquier otra forma de almacenamiento local, utilizadas para crear perfiles de usuario para mostrar publicidad o para seguir al usuario en este sitio web o en varios sitios web con fines de marketing similares.
## 6. Galletas colocadas
- Monstruo de la opción
- WordPress
- Raya
- Aviso sobre cookies para el RGPD
- Complianz
- Administrador de etiquetas de Google para WordPress
- LiteSpeed
Estos datos no se comparten con terceros.
## 7. Consentimiento
Cuando visite nuestro sitio web por primera vez, le mostraremos una ventana emergente con una explicación sobre las cookies. En cuanto haga clic en «Guardar preferencias», nos dará su consentimiento para utilizar las categorÃas de cookies y complementos que haya seleccionado en la ventana emergente, tal y como se describe en la presente PolÃtica de Cookies. Puede desactivar el uso de cookies a través de su navegador, pero tenga en cuenta que es posible que nuestro sitio web deje de funcionar correctamente.
## 8. Activación/desactivación y eliminación de cookies
Puede utilizar su navegador de Internet para eliminar las cookies automática o manualmente. También puede especificar que no se coloquen determinadas cookies. Otra opción es cambiar la configuración de su navegador de Internet para que reciba un mensaje cada vez que se instale una cookie. Para más información sobre estas opciones, consulte las instrucciones de la sección de Ayuda de su navegador.
Tenga en cuenta que nuestro sitio web puede no funcionar correctamente si se desactivan todas las cookies. Si elimina las cookies de su navegador, volverán a colocarse tras su consentimiento cuando vuelva a visitar nuestro sitio web.
## 9. Sus derechos con respecto a los datos personales
Usted tiene los siguientes derechos con respecto a sus datos personales:
Tiene derecho a saber por qué se necesitan sus datos personales, qué ocurrirá con ellos y durante cuánto tiempo se conservarán.
Derecho de acceso: Tiene derecho a acceder a sus datos personales que conozcamos.
Para ejercer estos derechos, póngase en contacto con nosotros. Consulte los datos de contacto en la parte inferior de esta PolÃtica de Cookies. Si tiene alguna queja sobre cómo tratamos sus datos, nos gustarÃa conocerla, pero también tiene derecho a presentar una queja ante la autoridad supervisora (la Autoridad de Protección de Datos).
## 10. Datos de contacto
Para preguntas y/o comentarios sobre nuestra PolÃtica de Cookies y esta declaración, póngase en contacto con nosotros utilizando los siguientes datos de contacto:
Correo electrónico: \*\*soporte@visioforge.com\*\*
Esta PolÃtica de Cookies se sincronizó con \*\*basededatosdecookies.org\*\* el 21 de noviembre de 2024.
---END OF PAGE---
# Page: https://www.visioforge.com/it/cookie-policy-eu
# Informativa sui cookie (UE/GDPR)
La presente Informativa sui cookie è stata aggiornata l'ultima volta il 21 novembre 2024 e si applica ai cittadini e ai residenti permanenti legali dello Spazio economico europeo e della Svizzera.
## 1. Introduzione
Il nostro sito web, https://www.visioforge.com (di seguito: âil sito webâ) utilizza i cookie e altre tecnologie correlate (per comodità tutte le tecnologie sono indicate come âcookieâ). I cookie vengono inseriti anche da terze parti da noi incaricate. Nel documento che segue vi informiamo sull'uso dei cookie sul nostro sito web.
## 2. Cosa sono i cookie?
Un cookie è un piccolo e semplice file che viene inviato insieme alle pagine di questo sito web e memorizzato dal vostro browser sul disco rigido del vostro computer o di un altro dispositivo. Le informazioni in esso memorizzate possono essere rinviate ai nostri server o ai server delle terze parti interessate durante una visita successiva.
## 3. Cosa sono gli script?
Uno script è un pezzo di codice di programma che viene utilizzato per far funzionare il nostro sito web in modo corretto e interattivo. Questo codice viene eseguito sul nostro server o sul vostro dispositivo.
## 4. Che cos'è un web beacon?
Un web beacon (o pixel tag) è una piccola parte invisibile di testo o immagine presente su un sito web, utilizzata per monitorare il traffico su un sito. A tal fine, i web beacon memorizzano diversi dati relativi all'utente.
## 5. Cookies
### 5.1 Cookie tecnici o funzionali
Alcuni cookie garantiscono il corretto funzionamento di alcune parti del sito web e la conoscenza delle preferenze dell'utente. Inserendo i cookie funzionali, vi facilitiamo la visita al nostro sito web. In questo modo, non è necessario inserire ripetutamente le stesse informazioni quando si visita il nostro sito e, ad esempio, gli articoli rimangono nel carrello fino al momento del pagamento. Possiamo inserire questi cookie senza il vostro consenso.
### 5.2 Cookie statistici
Utilizziamo i cookie statistici per ottimizzare l'esperienza del sito web per i nostri utenti. Con questi cookie statistici otteniamo informazioni sull'utilizzo del nostro sito web. Chiediamo il vostro consenso per l'inserimento dei cookie statistici.
### 5.3 Cookie di marketing/tracciamento
I cookie di marketing/tracciamento sono cookie o qualsiasi altra forma di memorizzazione locale, utilizzati per creare profili utente al fine di visualizzare pubblicità o per tracciare l'utente su questo sito web o su diversi siti web per scopi di marketing simili.
## 6. Cookie posizionati
- OptinMonster
- WordPress
- Striscia
- Informativa sui cookie per GDPR
- Complianz
- Google Tag Manager per WordPress
- LiteSpeed
Questi dati non vengono condivisi con terzi.
## 7. Consenso
Quando visitate il nostro sito web per la prima volta, vi mostreremo un pop-up con una spiegazione sui cookie. Facendo clic su âSalva preferenzeâ, l'utente acconsente all'utilizzo delle categorie di cookie e plug-in selezionate nel pop-up, come descritto nella presente Informativa sui cookie. à possibile disattivare l'uso dei cookie tramite il proprio browser, ma si prega di notare che il nostro sito web potrebbe non funzionare più correttamente.
## 8. Abilitazione/disabilitazione e cancellazione dei cookie
à possibile utilizzare il proprio browser Internet per eliminare automaticamente o manualmente i cookie. à inoltre possibile specificare che determinati cookie non possono essere inseriti. Un'altra possibilità è quella di modificare le impostazioni del browser Internet in modo da ricevere un messaggio ogni volta che viene inserito un cookie. Per ulteriori informazioni su queste opzioni, consultare le istruzioni nella sezione Aiuto del browser.
Si prega di notare che il nostro sito web potrebbe non funzionare correttamente se tutti i cookie sono disabilitati. Se cancellate i cookie nel vostro browser, essi verranno nuovamente inseriti dopo il vostro consenso quando visiterete nuovamente il nostro sito web.
## 9. I vostri diritti in materia di dati personali
L'utente ha i seguenti diritti in relazione ai propri dati personali:
Avete il diritto di sapere perché i vostri dati personali sono necessari, che fine faranno e per quanto tempo saranno conservati.
Diritto di accesso: L'utente ha il diritto di accedere ai propri dati personali di cui è a conoscenza.
Per esercitare tali diritti, si prega di contattarci. Si prega di fare riferimento ai dettagli di contatto in fondo alla presente Informativa sui cookie. Se avete un reclamo sul modo in cui trattiamo i vostri dati, ci piacerebbe sentirvi, ma avete anche il diritto di presentare un reclamo all'autorità di controllo (l'Autorità per la protezione dei dati).
## 10. Dettagli di contatto
Per domande e/o commenti sulla nostra Politica sui cookie e sulla presente informativa, si prega di contattarci utilizzando i seguenti recapiti:
E-mail: \*\*support@visioforge.com\*\*
La presente Informativa sui cookie è stata sincronizzata con \*\*cookiedatabase.org\*\* il 21 novembre 2024.
---END OF PAGE---
# Page: https://www.visioforge.com/de/how-to-register-purchased-product
# Wie kann ich gekaufte Produkte registrieren?
## SDKs für .Net
Verwenden Sie in Ihrem Code die Methode SetLicenseKey der SDK-Hauptklasse (VideoCaptureCore/VideoEditCore/MediaPlayerCore). Diese Methode nimmt Ihren Lizenzschlüssel, den Benutzernamen (oder Firmennamen) und die beim Kauf verwendete E-Mail als Parameter entgegen. Rufen Sie diese Methode in den Ereignissen Form OnCreate/OnLoad oder vor dem Aufruf der Methode StartAsync/PlayAsync auf.
Sie können das SDK verwenden, das über eine eigenständige Setup-Datei oder das in Ihrem Projekt installierte NuGet-Paket installiert wurde. Eine Neuinstallation des SDK ist nicht erforderlich.
## Delphi-Pakete
- Deinstallieren Sie die TRIAL-Version, falls installiert
- DCU/BPL-Paketdateien entfernen, falls erforderlich
- Installieren Sie die FULL-Version der Software über den Link in der Registrierungs-E-Mail
- Verwenden Sie in Ihrem Code die Methode SetLicenseKey des Steuerelements, die Ihren Lizenzschlüssel als Parameter annimmt. Rufen Sie diese Methode in OnCreate/OnLoad-Ereignissen oder an anderer Stelle vor dem Aufruf der Start/Play-Methode auf.
## ActiveX-Bibliotheken
Verwenden Sie die Methode SetLicenseKey der ActiveX-Bibliothek oder der Wrapper-Klasse.
## DirectShow-SDKs
Jedes DirectShow SDK enthält eine benutzerdefinierte IVFRegister-Schnittstelle, die zur Anwendung Ihres Lizenzschlüssels im Anwendungscode verwendet werden kann. Das Virtual Camera SDK erlaubt optional die Registrierung über die Registry.
## Andere Produkte
Rufen Sie die Methode SetLicenseKey der SDK-Hauptklasse mit Ihrem Lizenzschlüssel auf.

---END OF PAGE---
# Page: https://www.visioforge.com/es/how-to-register-purchased-product
# ¿Cómo registrar los productos adquiridos?
## SDK para .Net
En su código, utilice el método SetLicenseKey de la clase principal del SDK (VideoCaptureCore/VideoEditCore/MediaPlayerCore). Este método toma como parámetros su clave de licencia, el nombre de usuario (o nombre de la empresa) y el correo electrónico utilizado durante la compra. Llame a este método en los eventos Form OnCreate/OnLoad o antes de la llamada al método StartAsync/PlayAsync.
Puede utilizar el SDK instalado por un archivo de instalación independiente o el paquete NuGet instalado en su proyecto. No es necesario reinstalar el SDK.
## Paquetes de Delphi
- Desinstalar la versión de PRUEBA si está instalada
- Elimine los archivos del paquete DCU/BPL si es necesario
- Instale la versión COMPLETA del software utilizando el enlace del correo electrónico de registro.
- En su código, utilice el método SetLicenseKey del control, que toma su clave de licencia como parámetro. Llame a este método en los eventos OnCreate/OnLoad o en cualquier otro lugar antes de la llamada al método Start/Play.
## Bibliotecas ActiveX
Utilice el método SetLicenseKey de la biblioteca ActiveX o clase envoltorio.
## DirectShow SDKs
Cada DirectShow SDK contiene una interfaz IVFRegister personalizada que se puede utilizar para aplicar su clave de licencia en el código de la aplicación. Virtual Camera SDK permite opcionalmente el registro mediante el registro.
## Otros productos
Llame al método SetLicenseKey de la clase principal del SDK con su clave de licencia.

---END OF PAGE---
# Page: https://www.visioforge.com/it/how-to-register-purchased-product
# Come registrare i prodotti acquistati?
## SDK per .Net
Nel codice, utilizzare il metodo SetLicenseKey della classe principale dell'SDK (VideoCaptureCore/VideoEditCore/MediaPlayerCore). Questo metodo prende come parametri la chiave di licenza, il nome dell'utente (o della società ) e l'e-mail utilizzata durante l'acquisto. Chiamare questo metodo negli eventi Form OnCreate/OnLoad o prima della chiamata del metodo StartAsync/PlayAsync.
à possibile utilizzare l'SDK installato da un file di installazione standalone o il pacchetto NuGet installato nel progetto. La reinstallazione dell'SDK non è necessaria.
## Pacchetti Delphi
- Disinstallare la versione TRIAL se installata
- Rimuovere i file del pacchetto DCU/BPL, se necessario
- Installare la versione COMPLETA del software utilizzando il link fornito nell'e-mail di registrazione.
- Nel codice, utilizzare il metodo SetLicenseKey del controllo, che prende la chiave di licenza come parametro. Chiamate questo metodo negli eventi OnCreate/OnLoad o in qualsiasi altro punto prima della chiamata al metodo Start/Play.
## Librerie ActiveX
Utilizzare il metodo SetLicenseKey della libreria ActiveX o della classe wrapper.
## SDK DirectShow
Ogni SDK DirectShow contiene un'interfaccia IVFRegister personalizzata che può essere utilizzata per applicare la chiave di licenza nel codice dell'applicazione. Virtual Camera SDK consente facoltativamente la registrazione tramite il registro.
## Altri prodotti
Chiamare il metodo SetLicenseKey della classe principale dell'SDK con la chiave di licenza.

---END OF PAGE---
# Page: https://www.visioforge.com/de/llms
# Information for LLM agents
Our website supports the LLMS.txt API:
- [Short version](/llms.txt)
- [Full version](/llms-full.txt)
---END OF PAGE---
# Page: https://www.visioforge.com/es/llms
# Information for LLM agents
Our website supports llms.txt API:
- [Short version](/llms.txt)
- [Full version](/llms-full.txt)
---END OF PAGE---
# Page: https://www.visioforge.com/it/llms
# Information for LLM agents
Our website supports the LLMS.txt API:
- [Short version](/llms.txt)
- [Full version](/llms-full.txt)
---END OF PAGE---
# Page: https://www.visioforge.com/llms.txt
# visioforge.com llms.txt
> VisioForge is a leading provider of multimedia development tools and SDKs (Software Development Kits) designed for video and audio processing. The website offers a comprehensive range of products, including media frameworks, players, and encoding filters, catering to both developers and businesses. Users can find detailed information on purchasing products, accessing cookie policies, and understanding privacy regulations.
## URLs and Descriptions
- [VisioForge Video Solutions](https://www.visioforge.com/): The VisioForge website serves as the central hub for their multimedia SDKs and development tools, offering solutions for video and audio processing.
- [Video Edit SDK](https://www.visioforge.com/video-edit-sdk-net): The Video Edit SDK .NET page by VisioForge highlights their software development kit for video editing, featuring tools for developers to integrate video processing capabilities into their applications.
- [VisioForge Terms](https://www.visioforge.com/terms-and-conditions): The Terms and Conditions page of VisioForge outlines the legal agreements and guidelines governing the use of their products and services. It provides essential information regarding user rights, responsibilities, and limitations.
- [Media Blocks SDK](https://www.visioforge.com/media-blocks-sdk-net): The Media Blocks SDK for .NET page by VisioForge provides information about their powerful software development kit for creating multimedia applications, highlighting features, documentation, and support resources.
- [Video Capture SDK](https://www.visioforge.com/video-capture-sdk-net): The Video Capture SDK for .NET by VisioForge offers developers powerful tools for video capture and processing, enabling seamless integration of multimedia functionality into applications.
- [Detecting Pirated Video](https://www.visioforge.com/detecting-pirated-video-content): This page discusses VisioForge's technology for detecting pirated video content, highlighting its features and capabilities to protect intellectual property.
- [VisioForge News Updates](https://www.visioforge.com/news): The news page of VisioForge, featuring the latest updates, announcements, and developments related to the company's software and technology offerings.
- [Encoding Filters Pack](https://www.visioforge.com/encoding-filters-pack): The Encoding Filters Pack page on VisioForge highlights a collection of advanced encoding filters designed to enhance video and audio processing capabilities for developers and multimedia applications.
- [All-in-One Media Framework](https://www.visioforge.com/all-in-one-media-framework): The All-in-One Media Framework page by VisioForge presents a comprehensive suite of tools for video and audio processing, enabling developers to create versatile multimedia applications.
- [Uninstall Feedback](https://www.visioforge.com/uninstall-feedback): A feedback page for users to share their experiences and thoughts regarding the uninstallation process of VisioForge products.
- [FFmpeg DirectShow Filter](https://www.visioforge.com/ffmpeg-source-directshow-filter): The VisioForge FFmpeg Source DirectShow Filter page provides information about a powerful filter that enables users to integrate FFmpeg capabilities into DirectShow applications for enhanced multimedia processing.
- [Refund Policy](https://www.visioforge.com/refund-policy): The refund policy page of VisioForge outlines the terms and conditions under which customers can request refunds for their purchases, ensuring transparency and customer satisfaction.
- [Video Encryption SDK](https://www.visioforge.com/video-encryption-sdk): The Video Encryption SDK page of VisioForge highlights their advanced software development kit for encrypting video content, ensuring secure streaming and storage solutions for developers.
- [VisioForge Help](https://www.visioforge.com/help/): The VisioForge help page provides comprehensive resources, documentation, and support for users of their software products, ensuring effective usage and troubleshooting assistance.
- [VisioForge VLC Filter](https://www.visioforge.com/vlc-source-directshow-filter): The VLC Source DirectShow Filter page by VisioForge provides information about a filter that allows VLC media playback within DirectShow applications, enhancing multimedia capabilities for developers.
- [Virtual Camera SDK](https://www.visioforge.com/virtual-camera-sdk): The Virtual Camera SDK page of VisioForge presents a comprehensive solution for integrating virtual camera functionality into applications, highlighting features, documentation, and support for developers.
- [VisioForge Purchase Options](https://www.visioforge.com/buy): The purchase page of VisioForge, offering various licensing options for their video processing and streaming software solutions.
- [VisioForge SLA Agreement](https://www.visioforge.com/support-service-level-agreement-sla): This page outlines the Service Level Agreement (SLA) for VisioForge, detailing the support services and commitments provided to customers.
- [Product Registration Guide](https://www.visioforge.com/how-to-register-purchased-product): A guide on how to register a purchased product from VisioForge, providing step-by-step instructions for users to activate their software.
- [Media Player SDK](https://www.visioforge.com/media-player-sdk-net): The VisioForge Media Player SDK for .NET page highlights the features and capabilities of the software development kit, designed for integrating media playback functionality into .NET applications.
- [Legal Information](https://www.visioforge.com/legal-information): The legal information page of VisioForge provides essential details regarding the company's terms, privacy policies, and copyright information. It serves as a resource for users to understand their rights and responsibilities while using VisioForge products.
- [Webcam Recording Software](https://www.visioforge.com/save-webcam): The Save Webcam page by VisioForge offers a solution for capturing and recording webcam video, highlighting features, benefits, and user-friendly options for seamless integration.
- [Processing Filters Pack](https://www.visioforge.com/processing-filters-pack): The Processing Filters Pack page on VisioForge highlights a collection of advanced video processing filters designed to enhance multimedia applications and improve video quality.
- [Cookie Policy EU](https://www.visioforge.com/cookie-policy-eu): The Cookie Policy page of VisioForge outlines the use of cookies on their website, detailing the types of cookies used and how they enhance user experience while ensuring compliance with EU regulations.
- [Video Edit SDK](https://www.visioforge.com/video-edit-sdk-ffmpeg-net): The Video Edit SDK from VisioForge offers a powerful .NET solution for video editing and processing using FFmpeg technology, designed for developers to easily integrate multimedia capabilities into their applications.
- [Video Fingerprinting SDK](https://www.visioforge.com/video-fingerprinting-sdk): The Video Fingerprinting SDK page by VisioForge highlights advanced technology for identifying and tracking video content, offering solutions for media management and analytics.
- [Virtual Camera SDK](https://www.visioforge.com/help/docs/directshow/virtual-camera-sdk/): The VisioForge Virtual Camera SDK page provides detailed documentation and resources for developers to integrate virtual camera functionality into their applications using DirectShow technology.
- [VisioForge DirectShow Documentation](https://www.visioforge.com/help/docs/directshow/): The VisioForge DirectShow documentation page provides comprehensive information and resources for developers using the DirectShow framework, including guides, API references, and examples for multimedia application development.
- [Video Capture Documentation](https://www.visioforge.com/help/docs/dotnet/videocapture/): The documentation page for VisioForge's Video Capture SDK, providing detailed information on its features, usage, and integration for developers.
- [VisioForge Privacy Policy](https://www.visioforge.com/privacy-policy): The privacy policy page of VisioForge outlines the company's practices regarding data collection, usage, and protection to ensure user confidentiality and compliance with applicable laws.
- [Video Edit Documentation](https://www.visioforge.com/help/docs/dotnet/videoedit/): The documentation page for VisioForge's Video Edit SDK, providing detailed information on features, usage, and integration for video editing applications.
- [VisioForge Media Player](https://www.visioforge.com/help/docs/dotnet/mediaplayer/): The documentation page for VisioForge's Media Player .NET component, providing detailed guidance on features, usage, and API references for developers.
- [VisioForge Changelog](https://www.visioforge.com/help/docs/dotnet/changelog/): The changelog page of VisioForge provides detailed updates and version history for their .NET SDK, highlighting new features, improvements, and bug fixes.
- [VisioForge News 2021](https://www.visioforge.com/news-2021): The news page of VisioForge, featuring updates and announcements about the company's latest developments and offerings in video processing technology.
- [VisioForge News 2022](https://www.visioforge.com/news-2022): The news page of VisioForge highlights the latest updates, announcements, and developments from the company throughout 2022.
- [VisioForge News 2023](https://www.visioforge.com/news-2023): The news page of VisioForge provides updates and announcements regarding the company's latest developments, product releases, and industry insights for 2023.
- [VisioForge EULA](https://www.visioforge.com/help/docs/eula/): The End User License Agreement (EULA) page of VisioForge outlines the terms and conditions for using their software products, ensuring users understand their rights and responsibilities.
- [VisioForge News 2024](https://www.visioforge.com/news-2024): The news page of VisioForge, highlighting the latest updates, announcements, and developments for 2024.
- [Video Edit FFmpeg Changelog](https://www.visioforge.com/help/docs/dotnet/videoedit-ffmpeg/changelog/): Changelog page for VisioForge's Video Edit SDK, detailing updates, enhancements, and fixes for the FFmpeg integration.
- [VisioForge Media Blocks](https://www.visioforge.com/help/docs/dotnet/mediablocks/): The Media Blocks documentation page of VisioForge provides detailed information on the various media processing components available in their .NET SDK, including usage examples and API references.
- [VisioForge .NET Documentation](https://www.visioforge.com/help/docs/dotnet/): Documentation page for VisioForge's .NET SDK, providing detailed information and resources for developers to integrate video and audio processing capabilities into their applications.
- [VisioForge Delphi Documentation](https://www.visioforge.com/help/docs/delphi/): The VisioForge Delphi documentation page provides comprehensive guidance and resources for developers using VisioForge's multimedia SDK in Delphi applications. It includes detailed API references, code examples, and configuration tips to enhance multimedia functionality.
- [VisioForge Documentation](https://www.visioforge.com/help/docs/vfp/): The documentation page for VisioForge's Video Processing SDK, providing detailed information on features, usage, and implementation guidelines for developers.
- [Video Capture Changelog](https://www.visioforge.com/help/docs/delphi/videocapture/changelog/): Changelog for VisioForge's Video Capture SDK, detailing updates, enhancements, and bug fixes for the software.
- [Video Capture Documentation](https://www.visioforge.com/help/docs/delphi/videocapture/): The documentation page for VisioForge's Delphi Video Capture SDK, providing detailed information and guidance on using the library for video capture applications.
- [VisioForge Change Log](https://www.visioforge.com/help/docs/vfp/changelog/): Changelog page for VisioForge, detailing the updates, enhancements, and bug fixes for their software products.
- [FFmpeg Source Filters](https://www.visioforge.com/help/docs/directshow/ffmpeg-source-filters/): This page provides documentation for the FFmpeg Source Filters in DirectShow, detailing their features, usage, and integration within multimedia applications.
- [VisioForge .NET Installation Guide](https://www.visioforge.com/help/docs/dotnet/install/): Installation guide for VisioForge .NET components, providing detailed instructions for setting up the software in development environments.
- [DirectShow Encoding Filters](https://www.visioforge.com/help/docs/directshow/filters-enc/): This page provides detailed information on the DirectShow encoding filters offered by VisioForge, including their features and usage for multimedia applications.
- [VisioForge Installation Guide](https://www.visioforge.com/help/docs/dotnet/install/rider/): This page provides a comprehensive guide for installing VisioForge components using JetBrains Rider, detailing the necessary steps and requirements for a successful setup.
- [Video Capture Deployment](https://www.visioforge.com/help/docs/dotnet/videocapture/deployment/): This page provides detailed information on deploying the Video Capture SDK in .NET applications, including installation steps and configuration options.
- [VisioForge Media Blocks](https://www.visioforge.com/help/docs/dotnet/mediablocks/Special/): This page provides documentation for the Media Blocks Special features in VisioForge's .NET SDK, detailing their functionalities and usage for developers.
- [FM Radio TV Tuning](https://www.visioforge.com/help/docs/delphi/videocapture/fm-radio-tv-tuning/): This page provides information on FM radio and TV tuning features in VisioForge's Delphi Video Capture SDK, detailing how to implement and utilize these capabilities in applications.
- [Video Capture Tutorials](https://www.visioforge.com/help/docs/dotnet/videocapture/video-tutorials/): A resourceful page from VisioForge that offers video tutorials for their Video Capture SDK, helping users understand and implement various features effectively.
- [Compare Video Files](https://www.visioforge.com/help/docs/vfp/how-to-compare-two-video-files/): A guide on comparing two video files using VisioForge's tools, detailing step-by-step instructions and features for effective video analysis.
- [Custom Video Output](https://www.visioforge.com/help/docs/delphi/videocapture/custom-output/): This page provides detailed documentation on implementing custom output options in the VisioForge Video Capture SDK using Delphi, including code examples and configuration settings.
- [Video Processing Guide](https://www.visioforge.com/help/docs/dotnet/mediablocks/VideoProcessing/): This page provides documentation for the Video Processing features of VisioForge's Media Blocks in .NET, detailing functionalities and usage for developers.
- [Motion Detection Guide](https://www.visioforge.com/help/docs/dotnet/videocapture/motion-detection/): This page provides detailed documentation on the motion detection capabilities of the Video Capture SDK by VisioForge, including implementation guidelines and features.
- [Live Video Compositor](https://www.visioforge.com/help/docs/dotnet/mediablocks/LiveVideoCompositor/): The Live Video Compositor documentation page on VisioForge provides detailed information on the features and functionalities of the Live Video Compositor component for .NET applications, including usage examples and API references.
- [VisioForge Platform Matrix](https://www.visioforge.com/help/docs/dotnet/platform-matrix/): A comprehensive platform matrix for VisioForge's .NET tools, detailing compatibility across various operating systems and development environments.
- [Video Renderer Guide](https://www.visioforge.com/help/docs/delphi/videocapture/video-renderer/): This page provides detailed documentation on the video renderer component of VisioForge's Delphi Video Capture SDK, outlining its features, usage, and configuration options for developers.
- [VisioForge Delphi Documentation](https://www.visioforge.com/help/docs/delphi/general/): The Delphi general documentation page for VisioForge provides detailed information and guidance on using VisioForge's software development tools within Delphi applications. It serves as a resource for developers seeking to integrate multimedia capabilities into their projects.
- [Audio Sources Documentation](https://www.visioforge.com/help/docs/dotnet/videocapture/audio-sources/): This page provides detailed information on audio sources available in the VisioForge Video Capture SDK, including configuration options and usage examples for developers.
- [Video Input Crossbar](https://www.visioforge.com/help/docs/delphi/videocapture/video-input-crossbar/): This page provides detailed information on using the Video Input Crossbar feature in VisioForge's Delphi Video Capture SDK, including configuration options and usage examples.
- [DirectShow Proc Filters](https://www.visioforge.com/help/docs/directshow/proc-filters/): A detailed guide on DirectShow processing filters by VisioForge, outlining their functionalities and usage for video and audio processing applications.
- [Video Encryption SDK](https://www.visioforge.com/help/docs/directshow/video-encryption-sdk/): The VisioForge Video Encryption SDK page provides comprehensive information on their video encryption solutions, detailing features, functionalities, and integration options for developers.
- [DirectShow Registration Guide](https://www.visioforge.com/help/docs/directshow/how-to-register/): A guide on how to register DirectShow filters using VisioForge, providing step-by-step instructions for users to effectively manage their media applications.
- [Delphi Video Capture](https://www.visioforge.com/help/docs/delphi/videocapture/dv-camcorder/): This page provides detailed documentation for the VisioForge Delphi Video Capture SDK, specifically focusing on the DV Camcorder functionality, including features and implementation guidelines.
- [VisioForge Media Blocks](https://www.visioforge.com/help/docs/dotnet/mediablocks/Bridge/): The VisioForge Bridge documentation page provides detailed information on the Bridge media block, including its features, usage, and integration within .NET applications for enhanced media processing capabilities.
- [VisioForge Installation Guide](https://www.visioforge.com/help/docs/dotnet/install/visual-studio/): This page provides detailed instructions for installing VisioForge components in Visual Studio, aimed at developers looking to integrate video processing capabilities into their applications.
- [Video Edit Guide](https://www.visioforge.com/help/docs/dotnet/videoedit/getting-started/): A comprehensive guide for getting started with VisioForge's Video Edit SDK, providing essential information and resources for developers.
- [VisioForge Media Player Samples](https://www.visioforge.com/help/docs/dotnet/mediaplayer/code-samples/): A resource page from VisioForge providing code samples for integrating their media player into .NET applications, offering practical examples and guidance for developers.
- [Audio Rendering Guide](https://www.visioforge.com/help/docs/dotnet/videocapture/audio-rendering/): This page provides detailed documentation on audio rendering features in the VisioForge Video Capture SDK for .NET, including implementation guidelines and code examples.
- [Video Capture Guide](https://www.visioforge.com/help/docs/dotnet/videocapture/computer-vision/): A comprehensive guide on using VisioForge's Video Capture SDK for implementing computer vision features, including detailed documentation and examples for developers.
- [VisioForge Installation Guide](https://www.visioforge.com/help/docs/dotnet/install/visual-studio-mac/): Installation guide for VisioForge components in Visual Studio on Mac, providing step-by-step instructions for developers.
- [VLC Source Filter Guide](https://www.visioforge.com/help/docs/directshow/vlc-source-filter/): This page provides detailed documentation for the VLC Source Filter, a component of the VisioForge DirectShow SDK, outlining its features, usage, and integration for media applications.
- [Video Capture AVI Guide](https://www.visioforge.com/help/docs/delphi/videocapture/video-capture-avi/): This page provides detailed documentation on using the Video Capture AVI component in Delphi with VisioForge, including setup, features, and code examples for video capture applications.
- [Video Fragment Search](https://www.visioforge.com/help/docs/vfp/how-to-search-one-video-fragment-in-another/): A guide on how to search for one video fragment within another using VisioForge's video processing tools, providing step-by-step instructions and tips for effective implementation.
- [Video Edit Deployment](https://www.visioforge.com/help/docs/delphi/videoedit/deployment/): This page provides detailed instructions for deploying the VisioForge Video Edit SDK in Delphi applications, including setup and configuration guidelines.
- [VisioForge Media Blocks Guide](https://www.visioforge.com/help/docs/dotnet/mediablocks/GettingStarted/): A guide for getting started with Media Blocks in VisioForge's .NET SDK, providing essential information and resources for developers.
- [Multiple Video Streams](https://www.visioforge.com/help/docs/delphi/mediaplayer/file-multiple-video-streams/): This page provides guidance on using the VisioForge Media Player to handle multiple video streams within Delphi applications, including code examples and implementation details.
- [Decklink Media Blocks](https://www.visioforge.com/help/docs/dotnet/mediablocks/Decklink/): This page provides detailed documentation for the VisioForge Decklink media block, including its features, usage, and integration within .NET applications.
- [Media Blocks Sinks](https://www.visioforge.com/help/docs/dotnet/mediablocks/Sinks/): The VisioForge Media Blocks Sinks documentation page provides detailed information on various sink components used for media processing in .NET applications, including their functionalities and implementation guidelines.
- [Video Capture WMV](https://www.visioforge.com/help/docs/delphi/videocapture/video-capture-wmv/): This page provides detailed documentation on using the VisioForge Video Capture SDK for WMV video capture in Delphi, including setup instructions and code examples.
- [Video Audio Sources](https://www.visioforge.com/help/docs/delphi/videocapture/video-audio-sources/): This page provides detailed information on video and audio sources for the VisioForge Video Capture SDK, including configuration options and usage guidelines for developers.
- [Audio Encoder Documentation](https://www.visioforge.com/help/docs/dotnet/mediablocks/AudioEncoders/): This page provides detailed documentation on audio encoders available in the VisioForge .NET Media Blocks, including features, usage, and integration guidelines for developers.
- [Audio Capture Guide](https://www.visioforge.com/help/docs/dotnet/videocapture/audio-capture/): This page provides documentation for the audio capture features of VisioForge's video capture SDK, detailing its functionalities and implementation in .NET applications.
- [Video Edit Documentation](https://www.visioforge.com/help/docs/delphi/videoedit/): The VisioForge Video Edit documentation page provides detailed information and resources for developers using the Video Edit SDK in Delphi, including guides, API references, and example projects.
- [Audio Capture Guide](https://www.visioforge.com/help/docs/delphi/videocapture/audio-capture-wav/): This page provides documentation for capturing audio in WAV format using VisioForge's Delphi Video Capture SDK, detailing implementation steps and features.
- [Video Capture Adjustments](https://www.visioforge.com/help/docs/delphi/videocapture/hardware-adjustments/): This page provides detailed guidance on hardware adjustments for video capture using VisioForge's Delphi SDK, including tips and settings for optimizing video quality.
- [Network Streaming Guide](https://www.visioforge.com/help/docs/dotnet/videocapture/network-streaming/): This page provides detailed documentation on how to implement network streaming using the VisioForge Video Capture SDK, including configuration options and code examples.
- [VideoCapture Deployment Guide](https://www.visioforge.com/help/docs/delphi/videocapture/deployment/): A comprehensive guide on deploying the VisioForge Video Capture SDK in Delphi applications, detailing installation, configuration, and best practices for optimal performance.
- [VisioForge Licensing Help](https://www.visioforge.com/help/licensing/): A detailed overview of VisioForge's licensing options, including information on purchasing, activation, and subscription plans for their software products.
- [VisioForge Media Player Guide](https://www.visioforge.com/help/docs/delphi/mediaplayer/): The VisioForge Media Player documentation page provides detailed information and guidance on using the Media Player component in Delphi, including features, methods, and examples for developers.
- [VisioForge Media Player Guide](https://www.visioforge.com/help/docs/dotnet/mediaplayer/deployment/): A comprehensive guide for deploying the VisioForge Media Player in .NET applications, detailing installation steps, configuration options, and best practices.
- [Video Capture Documentation](https://www.visioforge.com/help/docs/dotnet/videocapture/video-capture/): This page provides detailed documentation on the Video Capture component of VisioForge's .NET library, including usage instructions, features, and API references for developers.
- [Screen Capture Guide](https://www.visioforge.com/help/docs/delphi/videocapture/screen-capture/): This page provides documentation for using VisioForge's Delphi Video Capture SDK to implement screen capture functionality, including detailed guides and code examples.
- [Video Capture Guide](https://www.visioforge.com/help/docs/delphi/videocapture/mpeg2-capture/): This page provides detailed documentation on capturing MPEG-2 video using VisioForge's Delphi Video Capture SDK, including setup instructions and code examples.
- [Video Processing Guide](https://www.visioforge.com/help/docs/dotnet/videocapture/video-processing/): This page provides detailed documentation on video processing features within the VisioForge Video Capture SDK for .NET, including guidelines for implementation and usage.
- [Video Capture Guide](https://www.visioforge.com/help/docs/dotnet/videocapture/guides/): A comprehensive guide for using the Video Capture SDK in .NET, providing detailed instructions and resources for developers to integrate video capture functionality into their applications.
- [Video Edit Code Samples](https://www.visioforge.com/help/docs/dotnet/videoedit/code-samples/): A resource page featuring code samples for video editing using the VisioForge .NET SDK, designed to assist developers in implementing video editing features in their applications.
- [Video Capture Installation](https://www.visioforge.com/help/docs/delphi/videocapture/install/): Installation guide for the VisioForge Video Capture SDK in Delphi, providing step-by-step instructions and resources for users to set up the software effectively.
- [VisioForge Deployment Guide](https://www.visioforge.com/help/docs/dotnet/deployment-x/): A comprehensive guide on deploying VisioForge's .NET components, detailing the necessary steps and requirements for successful implementation in applications.
- [VisioForge Avalonia Installation](https://www.visioforge.com/help/docs/dotnet/install/avalonia/): This page provides installation instructions for the Avalonia framework in .NET applications, detailing the necessary steps and requirements for setup.
- [Media Blocks Sources](https://www.visioforge.com/help/docs/dotnet/mediablocks/Sources/): This page provides detailed documentation on the Media Blocks Sources component of VisioForge, outlining its features and usage for .NET developers.
- [Audio Rendering Guide](https://www.visioforge.com/help/docs/dotnet/mediablocks/AudioRendering/): This page provides documentation for the Audio Rendering feature of VisioForge's Media Blocks, detailing its functionality and integration within .NET applications.
- [Video Capture Sources](https://www.visioforge.com/help/docs/dotnet/videocapture/video-sources/): A comprehensive guide on video sources available in VisioForge's Video Capture SDK, detailing various input options and configurations for developers.
- [Video Rendering Guide](https://www.visioforge.com/help/docs/dotnet/mediablocks/VideoRendering/): This page provides documentation for the Video Rendering feature of VisioForge's Media Blocks in .NET, detailing its functionalities and usage for developers.
- [Network Streaming WMV](https://www.visioforge.com/help/docs/delphi/videocapture/network-streaming-wmv/): This page provides documentation for using the VisioForge Video Capture SDK to stream WMV video over a network, detailing setup and implementation steps in Delphi.
- [Audio Processing Guide](https://www.visioforge.com/help/docs/dotnet/mediablocks/AudioProcessing/): The Audio Processing section of VisioForge documentation provides detailed information on the audio processing capabilities within their media blocks, including features and usage examples for developers.
- [Video Editing Transitions](https://www.visioforge.com/help/docs/dotnet/videoedit/transitions/): This page provides detailed information on video transitions available in the VisioForge Video Edit SDK, including descriptions, usage examples, and implementation guidance for developers.
- [Video Capture DV](https://www.visioforge.com/help/docs/delphi/videocapture/video-capture-dv/): This page provides detailed documentation on using VisioForge's Video Capture SDK for capturing DV video, including setup instructions and code examples for Delphi developers.
- [Audio Output Guide](https://www.visioforge.com/help/docs/delphi/videocapture/audio-output/): This page provides detailed documentation on audio output features in the VisioForge Video Capture SDK for Delphi, including setup instructions and usage examples.
- [Video Capture Software](https://www.visioforge.com/help/docs/dotnet/videocapture/3rd-party-software/): This page provides information on third-party software compatibility with VisioForge Video Capture SDK, detailing supported applications and integration options.
- [VisioForge .NET Initialization](https://www.visioforge.com/help/docs/dotnet/init/): The initialization documentation for VisioForge's .NET SDK, detailing the setup process and essential configuration steps for developers.
- [Video Edit Deployment](https://www.visioforge.com/help/docs/dotnet/videoedit/deployment/): This page provides detailed guidance on deploying the VisioForge Video Edit SDK in .NET applications, including installation instructions and configuration tips.
- [Video Encoder Documentation](https://www.visioforge.com/help/docs/dotnet/mediablocks/VideoEncoders/): This page provides detailed documentation on video encoders within the VisioForge Media Blocks for .NET, outlining their features, usage, and implementation guidelines.
- [VisioForge MAUI Installation](https://www.visioforge.com/help/docs/dotnet/install/maui/): This page provides installation instructions for integrating VisioForge components into .NET MAUI applications, offering a comprehensive guide for developers.
- [Video Capture Resize](https://www.visioforge.com/help/docs/delphi/videocapture/resize-crop/): This page provides detailed documentation on the video capture features of the VisioForge SDK, specifically focusing on the resizing and cropping functionalities available in Delphi.
- [Audio Capture MP3](https://www.visioforge.com/help/docs/delphi/videocapture/audio-capture-mp3/): This page provides documentation for the VisioForge Audio Capture MP3 component in Delphi, detailing its features and functionalities for capturing audio in MP3 format.
- [System Requirements Guide](https://www.visioforge.com/help/docs/dotnet/system-requirements/): System requirements for VisioForge's .NET products, detailing the necessary specifications and configurations for optimal performance.
- [Video Editing with FFmpeg](https://www.visioforge.com/help/docs/dotnet/videoedit-ffmpeg/): This page provides documentation for the Video Edit SDK using FFmpeg, detailing its features, usage, and integration for developers looking to implement video editing capabilities in their applications.
- [Video Capture Resize Crop](https://www.visioforge.com/help/docs/dotnet/videocapture/video-processing/resize-crop/): This page provides detailed information on the video processing features of VisioForge's .NET Video Capture SDK, specifically focusing on resizing and cropping video streams. It includes guidelines and examples for implementing these functionalities in applications.
- [Show First Frame](https://www.visioforge.com/help/docs/dotnet/mediaplayer/code-samples/show-first-frame/): A code sample page from VisioForge demonstrating how to display the first frame of a media file using their Media Player SDK in .NET applications.
- [Avalonia Media Player Guide](https://www.visioforge.com/help/docs/dotnet/mediaplayer/guides/avalonia-player/): A guide for integrating the VisioForge Media Player into Avalonia applications, providing detailed instructions and code examples for developers.
- [Facebook Network Streaming](https://www.visioforge.com/help/docs/dotnet/general/network-streaming/facebook/): A guide on using VisioForge's .NET library for network streaming to Facebook, detailing setup and implementation instructions.
- [Text Overlay Example](https://www.visioforge.com/help/docs/dotnet/videoedit/code-samples/add-text-overlay/): A code sample page from VisioForge demonstrating how to add a text overlay to videos using their .NET video editing library.
- [Video Capture Installation](https://www.visioforge.com/help/docs/delphi/videocapture/install/visual-basic-6/): This page provides installation instructions for integrating VisioForge Video Capture SDK with Visual Basic 6, including setup steps and essential configuration details.
- [DV Camcorder Control](https://www.visioforge.com/help/docs/dotnet/videocapture/video-sources/dv-camcorder-control/): This page provides detailed information on controlling DV camcorders using VisioForge's video capture SDK, including features, functionalities, and implementation guidelines.
- [Audio Visualizers Guide](https://www.visioforge.com/help/docs/dotnet/mediablocks/AudioVisualizers/): This page provides documentation for the Audio Visualizers feature in VisioForge's .NET Media Blocks, detailing its functionalities and usage for developers.
- [Screen Capture Tutorial](https://www.visioforge.com/help/docs/dotnet/videocapture/video-tutorials/screen-capture-wmv/): A tutorial page from VisioForge that provides step-by-step guidance on capturing screen video in WMV format using their software tools.
- [Video Capture Devices](https://www.visioforge.com/help/docs/dotnet/videocapture/video-sources/video-capture-devices/): A detailed guide on video capture devices available in the VisioForge .NET SDK, providing information on how to utilize various video sources for capturing video streams.
- [Webcam Capture Tutorial](https://www.visioforge.com/help/docs/dotnet/videocapture/video-tutorials/webcam-capture-text-overlay/): A tutorial page on VisioForge that demonstrates how to capture webcam video and overlay text using their .NET video capture library.
- [Image Overlay Example](https://www.visioforge.com/help/docs/dotnet/videoedit/code-samples/add-image-overlay/): This page provides code samples for adding image overlays using the VisioForge Video Edit SDK, demonstrating how to enhance video projects with visual elements.
- [Video Editing Segments](https://www.visioforge.com/help/docs/dotnet/videoedit/code-samples/several-segments/): This page provides code samples for using the VisioForge Video Edit SDK to create projects with multiple video segments, demonstrating practical implementation for developers.
- [RTSP Network Streaming](https://www.visioforge.com/help/docs/dotnet/general/network-streaming/rtsp/): This page provides detailed information on RTSP network streaming using VisioForge's .NET components, including setup instructions and usage examples for developers.
- [Video Capture Installation](https://www.visioforge.com/help/docs/delphi/videocapture/install/delphi/): This page provides installation instructions for the VisioForge Video Capture SDK in Delphi, detailing the necessary steps to integrate the software into Delphi projects.
- [UDP Network Streaming](https://www.visioforge.com/help/docs/dotnet/general/network-streaming/udp/): This page provides detailed information on UDP network streaming using VisioForge's .NET SDK, including setup instructions and code examples for developers.
- [Video Capture Tutorial](https://www.visioforge.com/help/docs/dotnet/videocapture/video-tutorials/video-capture-camera-avi/): A tutorial page from VisioForge demonstrating how to capture video from a camera and save it in AVI format using their .NET SDK.
- [Video Transition Sample](https://www.visioforge.com/help/docs/dotnet/videoedit/code-samples/transition-video/): This page provides code samples for implementing video transitions using VisioForge's .NET video editing library, demonstrating how to enhance video projects with smooth transitions.
- [Extract Video Frame](https://www.visioforge.com/help/docs/dotnet/mediaplayer/code-samples/get-frame-from-video-file/): This page provides a code sample for using the VisioForge Media Player SDK to extract a frame from a video file in .NET applications. It includes clear instructions and example code for developers.
- [Video Capture Guide](https://www.visioforge.com/help/docs/dotnet/videocapture/video-capture/mpeg2-camcorder/): This page provides detailed information on using the VisioForge Video Capture SDK for MPEG-2 camcorder support, including features, setup instructions, and implementation examples.
- [AWS Media Blocks Guide](https://www.visioforge.com/help/docs/dotnet/mediablocks/AWS/): The AWS Media Blocks documentation page on VisioForge provides detailed information and guidelines for utilizing Amazon Web Services integration within their media processing solutions.
- [FLAC Audio Encoder Guide](https://www.visioforge.com/help/docs/dotnet/general/audio-encoders/flac/): This page provides detailed information about the FLAC audio encoder in VisioForge's .NET framework, including its features, usage, and integration options for audio processing applications.
- [Audio Envelope Example](https://www.visioforge.com/help/docs/dotnet/videoedit/code-samples/audio-envelope/): This page provides code samples for implementing audio envelope features using VisioForge's video editing SDK in .NET applications. It serves as a practical guide for developers looking to enhance audio processing in their projects.
- [Network Streaming SRT](https://www.visioforge.com/help/docs/dotnet/general/network-streaming/srt/): A guide on implementing SRT (Secure Reliable Transport) streaming in .NET applications using VisioForge's tools, detailing setup and usage for network streaming.
- [Output File from Multiple Sources](https://www.visioforge.com/help/docs/dotnet/videoedit/code-samples/output-file-from-multiple-sources/): A code sample page from VisioForge demonstrating how to output a video file from multiple sources using their .NET video editing SDK.
- [VU Meter Code Samples](https://www.visioforge.com/help/docs/dotnet/general/code-samples/vu-meters/): A code sample page from VisioForge demonstrating how to implement VU meters in .NET applications using their SDK.
- [Video Capture Guide](https://www.visioforge.com/help/docs/dotnet/videocapture/video-capture/separate-capture/): This page provides detailed information on the separate video capture feature in VisioForge's .NET SDK, including guidance on implementation and usage for developers.
- [Multiple Audio Streams](https://www.visioforge.com/help/docs/dotnet/videoedit/code-samples/multiple-audio-streams-avi/): This page provides code samples for implementing multiple audio streams in AVI files using the VisioForge Video Edit SDK, demonstrating practical applications for developers.
- [RTSP Stream Saving](https://www.visioforge.com/help/docs/dotnet/mediablocks/Guides/rtsp-save-original-stream/): This page provides a guide on how to save the original RTSP stream using VisioForge's .NET Media Blocks, detailing the necessary steps and code examples for implementation.
- [Camera Recording MAUI](https://www.visioforge.com/help/docs/dotnet/videocapture/maui/camera-recording-maui/): This page provides documentation for implementing camera recording in .NET MAUI applications using VisioForge's Video Capture SDK, detailing setup and usage instructions.
- [VisioForge .NET Documentation](https://www.visioforge.com/help/docs/dotnet/general/): The general documentation page for VisioForge's .NET SDK, providing essential information and resources for developers to integrate video processing and streaming capabilities into their applications.
- [Video Mixing Guide](https://www.visioforge.com/help/docs/dotnet/videocapture/video-processing/video-mixing/): This page provides detailed information on video mixing capabilities using VisioForge's .NET Video Capture SDK, including features and implementation guidelines.
- [VisioForge 64-bit Installation](https://www.visioforge.com/help/docs/delphi/general/install-64bit/): Installation guide for the 64-bit version of VisioForge software in Delphi, providing step-by-step instructions for setup and configuration.
- [Screen Capture Tutorial](https://www.visioforge.com/help/docs/dotnet/videocapture/video-tutorials/screen-capture-mp4/): A tutorial page from VisioForge demonstrating how to capture screen video and save it as MP4 using their .NET Video Capture SDK.
- [Adobe Flash Streaming](https://www.visioforge.com/help/docs/dotnet/general/network-streaming/adobe-flash/): A comprehensive guide on network streaming with Adobe Flash using VisioForge's tools, detailing setup, configuration, and usage for developers.
- [IP Camera Capture Tutorial](https://www.visioforge.com/help/docs/dotnet/videocapture/video-tutorials/ip-camera-capture-mp4/): This page provides a tutorial on capturing video from IP cameras using the VisioForge SDK, specifically focusing on saving the output in MP4 format. It includes step-by-step instructions and code examples for developers.
- [NDI Network Streaming](https://www.visioforge.com/help/docs/dotnet/general/network-streaming/ndi/): This page provides information on network streaming using NDI technology within the VisioForge .NET framework, detailing setup and usage for developers.
- [RTMP Network Streaming](https://www.visioforge.com/help/docs/dotnet/general/network-streaming/rtmp/): This page provides detailed information on RTMP (Real-Time Messaging Protocol) network streaming using VisioForge's .NET library, including setup instructions and usage guidelines.
- [Media Player Fragment Sample](https://www.visioforge.com/help/docs/dotnet/mediaplayer/code-samples/play-fragment-file/): This page provides a code sample for using the VisioForge Media Player SDK to play a fragment of a media file, demonstrating key functionality and implementation in .NET applications.
- [Screen Capture Tutorial](https://www.visioforge.com/help/docs/dotnet/videocapture/video-tutorials/screen-capture-avi/): A tutorial page from VisioForge that demonstrates how to capture screen video and save it as an AVI file using their .NET SDK.
- [VisioForge macOS Deployment](https://www.visioforge.com/help/docs/dotnet/deployment-x/macOS/): This page provides detailed instructions for deploying VisioForge applications on macOS, including system requirements and setup guidelines.
- [Output Formats Guide](https://www.visioforge.com/help/docs/dotnet/general/output-formats/): A comprehensive guide on the various output formats supported by VisioForge's .NET SDK, detailing the options available for video and audio file conversion and playback.
- [VisioForge Media Player Deployment](https://www.visioforge.com/help/docs/delphi/mediaplayer/deployment/): This page provides detailed instructions for deploying the VisioForge Media Player in Delphi applications, including setup and configuration guidelines.
- [Picture-in-Picture Example](https://www.visioforge.com/help/docs/dotnet/videoedit/code-samples/picture-in-picture/): A code sample page from VisioForge demonstrating how to implement a picture-in-picture effect in video editing using their .NET SDK.
- [Reverse Video Playback](https://www.visioforge.com/help/docs/dotnet/mediaplayer/code-samples/reverse-video-playback/): This page provides code samples for implementing reverse video playback using the VisioForge Media Player SDK in .NET applications. It includes practical examples to help developers integrate this feature effectively.
- [VisioForge Ubuntu Deployment](https://www.visioforge.com/help/docs/dotnet/deployment-x/Ubuntu/): This page provides detailed instructions for deploying VisioForge applications on Ubuntu, including system requirements and setup guidelines.
- [OBS Streaming Guide](https://www.visioforge.com/help/docs/dotnet/videocapture/3rd-party-software/obs-streaming/): A guide on integrating VisioForge Video Capture SDK with OBS Studio for streaming, detailing setup steps and configurations for optimal performance.
- [WMA Audio Encoder Guide](https://www.visioforge.com/help/docs/dotnet/general/audio-encoders/wma/): This page provides detailed information about WMA audio encoders offered by VisioForge, including their features and usage within .NET applications.
- [MP3 Audio Encoder Guide](https://www.visioforge.com/help/docs/dotnet/general/audio-encoders/mp3/): This page provides detailed information about MP3 audio encoders offered by VisioForge, including their features and usage in .NET applications.
- [Media Player Installation](https://www.visioforge.com/help/docs/delphi/mediaplayer/install/): Installation guide for the VisioForge Media Player SDK in Delphi, providing step-by-step instructions and essential information for developers.
- [Memory Playback Example](https://www.visioforge.com/help/docs/dotnet/mediaplayer/code-samples/memory-playback/): A code sample page from VisioForge demonstrating memory playback functionality using their Media Player SDK for .NET applications.
- [Webcam Photo Capture](https://www.visioforge.com/help/docs/dotnet/videocapture/guides/make-photo-using-webcam/): A guide on the VisioForge website detailing how to capture photos using a webcam with their Video Capture SDK, providing step-by-step instructions and code examples for developers.
- [Volume Control Example](https://www.visioforge.com/help/docs/dotnet/videoedit/code-samples/volume-for-track/): This page provides code samples for adjusting the volume of individual tracks using the VisioForge Video Edit SDK in .NET applications. It serves as a practical guide for developers looking to implement audio control features in their video editing projects.
- [MP4 Output Formats](https://www.visioforge.com/help/docs/dotnet/general/output-formats/mp4/): This page provides detailed information on the MP4 output format supported by VisioForge, including its features, usage, and integration within .NET applications.
- [HTTP MJPEG Streaming](https://www.visioforge.com/help/docs/dotnet/general/network-streaming/http-mjpeg/): This page provides detailed information on how to implement HTTP MJPEG streaming using VisioForge's .NET components, including setup instructions and code examples.
- [Webcam Video Capture](https://www.visioforge.com/help/docs/dotnet/videocapture/video-tutorials/video-capture-webcam-wmv/): A tutorial page from VisioForge demonstrating how to capture video from a webcam and save it as a WMV file using their .NET SDK.
- [Nvidia Media Blocks](https://www.visioforge.com/help/docs/dotnet/mediablocks/Nvidia/): This page provides documentation for the Nvidia Media Blocks in the VisioForge .NET SDK, detailing features, usage, and implementation guidelines for developers.
- [VisioForge Video Edit Changelog](https://www.visioforge.com/help/docs/delphi/videoedit/changelog/): Changelog page for VisioForge's Delphi Video Edit SDK, detailing updates, enhancements, and bug fixes for the software.
- [Video Capture Installation](https://www.visioforge.com/help/docs/delphi/videocapture/install/visual-studio/): Installation guide for integrating VisioForge Video Capture SDK with Visual Studio, providing step-by-step instructions and resources for developers.
- [VisioForge Documentation](https://www.visioforge.com/help/docs/dotnet/deployment-x/Windows/): This page provides detailed guidance on deploying VisioForge's .NET components on Windows, including installation steps and configuration tips for developers.
- [HLS Streaming Guide](https://www.visioforge.com/help/docs/dotnet/general/network-streaming/hls-streaming/): This page provides information on HLS streaming using VisioForge's .NET framework, detailing features, implementation guidelines, and technical support for developers.
- [Webcam Capture Guide](https://www.visioforge.com/help/docs/dotnet/videocapture/guides/webcam-capture-directshow/): A guide on how to capture webcam video using DirectShow in .NET applications, featuring detailed instructions and code examples.
- [Vorbis Audio Encoder Guide](https://www.visioforge.com/help/docs/dotnet/general/audio-encoders/vorbis/): This page provides detailed information about the Vorbis audio encoder within the VisioForge framework, including its features, implementation guidelines, and technical specifications.
- [Computer Vision Deployment](https://www.visioforge.com/help/docs/dotnet/deployment-x/computer-vision/): A detailed guide on deploying computer vision applications using VisioForge's .NET framework, providing essential instructions and resources for developers.
- [Demuxers Documentation](https://www.visioforge.com/help/docs/dotnet/mediablocks/Demuxers/): This page provides documentation for the Demuxers feature in VisioForge's .NET Media Blocks, detailing its functionality and usage for media processing applications.
- [VisioForge Playlist API](https://www.visioforge.com/help/docs/dotnet/mediaplayer/code-samples/playlist-api/): This page provides code samples for using the Playlist API in VisioForge's Media Player, demonstrating how to manage and manipulate media playlists programmatically.
- [Video Editing Console Sample](https://www.visioforge.com/help/docs/dotnet/videoedit/code-samples/video-images-console/): This page provides code samples for using the VisioForge Video Edit SDK in a console application, focusing on video image manipulation features.
- [Webcam Capture Tutorial](https://www.visioforge.com/help/docs/dotnet/videocapture/video-tutorials/video-capture-webcam-mp4/): A tutorial page by VisioForge that demonstrates how to capture video from a webcam and save it as an MP4 file using their .NET SDK.
- [Video Effects Documentation](https://www.visioforge.com/help/docs/dotnet/general/video-effects/): A comprehensive guide to video effects in the VisioForge .NET SDK, detailing various features and functionalities for enhancing video playback and processing.
- [VisioForge Installation Guide](https://www.visioforge.com/help/docs/delphi/general/install-otares/): Installation guide for the VisioForge OTA Res plugin, providing step-by-step instructions for integrating it into Delphi environments.
- [VisioForge Player Guide](https://www.visioforge.com/help/docs/dotnet/mediablocks/GettingStarted/player/): This page provides a comprehensive guide to getting started with the VisioForge Media Player in .NET, including setup instructions and code examples for integrating media playback functionality.
- [Video Capture Guide](https://www.visioforge.com/help/docs/dotnet/videocapture/video-capture/mpeg2-tvtuner/): This page provides documentation for using the MPEG2 TV tuner feature in the VisioForge Video Capture SDK, detailing its functionality and integration within .NET applications.
- [Network Streaming AWS S3](https://www.visioforge.com/help/docs/dotnet/general/network-streaming/aws-s3/): This page provides documentation on using VisioForge's .NET library for network streaming with AWS S3, detailing setup, configuration, and usage examples.
- [VisioForge Media Player Changelog](https://www.visioforge.com/help/docs/delphi/mediaplayer/changelog/): Changelog page for VisioForge's Delphi Media Player, detailing updates, enhancements, and bug fixes for the software.
- [Media Pipeline Guide](https://www.visioforge.com/help/docs/dotnet/mediablocks/GettingStarted/pipeline/): A guide for developers on creating media processing pipelines using VisioForge's .NET framework, detailing the essential components and steps to get started.
- [WAV Audio Encoder Guide](https://www.visioforge.com/help/docs/dotnet/general/audio-encoders/wav/): This page provides detailed information about WAV audio encoding options available in VisioForge's .NET framework, including features and usage guidelines.
- [FFmpeg Output Formats](https://www.visioforge.com/help/docs/dotnet/general/output-formats/ffmpeg-exe/): This page provides detailed information on using FFmpeg with VisioForge's .NET libraries, outlining various output formats and configuration options for video processing.
- [VisioForge Media Block Parsers](https://www.visioforge.com/help/docs/dotnet/mediablocks/Parsers/): This page provides detailed documentation on the Media Blocks Parsers in the VisioForge .NET SDK, outlining their functionalities and usage for media processing applications.
- [Video Capture Documentation](https://www.visioforge.com/help/docs/dotnet/videocapture/video-capture/dv/): This page provides detailed documentation for the VisioForge Video Capture SDK, specifically focusing on digital video (DV) capture features and functionalities. It serves as a resource for developers looking to implement video capture solutions in their applications.
- [VisioForge Android Deployment](https://www.visioforge.com/help/docs/dotnet/deployment-x/Android/): This page provides detailed instructions for deploying VisioForge's .NET solutions on Android, including setup, configuration, and troubleshooting tips.
- [YouTube Network Streaming](https://www.visioforge.com/help/docs/dotnet/general/network-streaming/youtube/): A guide on how to stream video from YouTube using VisioForge's .NET SDK, providing detailed instructions and examples for developers.
- [Network Streaming WMV](https://www.visioforge.com/help/docs/dotnet/general/network-streaming/wmv/): This page provides detailed information on network streaming capabilities for WMV using VisioForge's .NET SDK, including setup instructions and code examples.
- [WMV Output Formats](https://www.visioforge.com/help/docs/dotnet/general/output-formats/wmv/): This page provides detailed information about WMV output format options available in VisioForge's .NET SDK, including features, settings, and usage guidelines for developers.
- [Video Processing Effects](https://www.visioforge.com/help/docs/dotnet/videocapture/video-processing/video-effects/): This page provides detailed information on video processing effects available in the VisioForge Video Capture SDK, including descriptions and usage examples for various video effects.
- [VisioForge Video Edit Guide](https://www.visioforge.com/help/docs/delphi/videoedit/install/): Installation guide for the VisioForge Video Edit SDK in Delphi, providing step-by-step instructions and necessary resources for users.
- [Face Detection Guide](https://www.visioforge.com/help/docs/dotnet/videocapture/computer-vision/face-detection/): This page provides documentation on implementing face detection using VisioForge's Video Capture SDK, offering guidance on computer vision capabilities for developers.
- [AVI Output Formats](https://www.visioforge.com/help/docs/dotnet/general/output-formats/avi/): This page provides detailed information about the AVI output format supported by VisioForge's .NET SDK, including its features and usage guidelines for developers.
- [Video Decoders Guide](https://www.visioforge.com/help/docs/dotnet/mediablocks/VideoDecoders/): This page provides documentation for Video Decoders in the VisioForge Media Blocks for .NET, detailing their functionalities and usage within multimedia applications.
- [Start Video Capture Sync](https://www.visioforge.com/help/docs/dotnet/videocapture/guides/start-in-sync/): A guide on the VisioForge website detailing how to start video capture in sync with audio, providing step-by-step instructions for developers using the .NET framework.
- [Speex Audio Encoder](https://www.visioforge.com/help/docs/dotnet/general/audio-encoders/speex/): This page provides detailed information about the Speex audio encoder within the VisioForge .NET framework, including its features and usage guidelines for developers.
- [Camera Integration Guide](https://www.visioforge.com/help/docs/dotnet/mediablocks/GettingStarted/camera/): A guide on using the VisioForge Media Blocks for accessing and integrating camera functionality in .NET applications.
- [Adding Video with Audio](https://www.visioforge.com/help/docs/dotnet/videoedit/code-samples/adding-video-file-with-multiple-audio-streams/): This page provides code samples for adding video files with multiple audio streams using VisioForge's video editing library in .NET, demonstrating practical implementation for developers.
- [VisioForge iOS Deployment](https://www.visioforge.com/help/docs/dotnet/deployment-x/iOS/): This page provides detailed instructions for deploying VisioForge's .NET applications on iOS, including setup requirements and configuration steps.
- [VisioForge Documentation](https://www.visioforge.com/documentation): The documentation page of VisioForge provides comprehensive resources and guides for users to effectively utilize the company's multimedia software solutions.
- [WebM Output Format](https://www.visioforge.com/help/docs/dotnet/general/output-formats/webm/): This page provides detailed information about the WebM output format supported by VisioForge, including its features and usage in video processing applications.
- [FFmpeg Streaming Guide](https://www.visioforge.com/help/docs/dotnet/videocapture/3rd-party-software/ffmpeg-streaming/): This page provides detailed documentation on integrating FFmpeg streaming with VisioForge's Video Capture SDK, offering guidelines and examples for developers.
- [IP Camera Preview Tutorial](https://www.visioforge.com/help/docs/dotnet/videocapture/video-tutorials/ip-camera-preview/): A tutorial page by VisioForge demonstrating how to preview IP camera feeds using their video capture SDK, providing step-by-step guidance for developers.
- [Video Capture Installation Guide](https://www.visioforge.com/help/docs/delphi/videocapture/install/builder/): A guide for installing and building the Video Capture SDK in Delphi, providing step-by-step instructions and resources for developers.
- [AAC Audio Encoder Guide](https://www.visioforge.com/help/docs/dotnet/general/audio-encoders/aac/): This page provides detailed information about the AAC audio encoder within the VisioForge framework, including its features, usage, and integration options for developers.
- [Custom Output Formats](https://www.visioforge.com/help/docs/dotnet/general/output-formats/custom/): This page provides detailed information on custom output formats available in VisioForge's .NET SDK, offering developers guidance on how to implement and utilize these formats in their applications.
- [Text Overlay Effects](https://www.visioforge.com/help/docs/dotnet/general/video-effects/text-overlay/): This page provides detailed information about the text overlay video effect feature in VisioForge's .NET library, including usage guidelines and examples for developers.
- [OpenCV Media Blocks](https://www.visioforge.com/help/docs/dotnet/mediablocks/OpenCV/): This page provides documentation for the OpenCV media blocks in VisioForge's .NET SDK, detailing how to implement and utilize OpenCV functionalities within multimedia applications.
- [Camera Control PTZ](https://www.visioforge.com/help/docs/dotnet/videocapture/video-sources/video-capture-devices/camera-control-ptz/): This page provides detailed information on camera control for PTZ (Pan-Tilt-Zoom) features in video capture devices, including configuration and usage guidelines within the VisioForge framework.
- [Network Streaming Guide](https://www.visioforge.com/help/docs/dotnet/general/network-streaming/): This page provides detailed information on network streaming capabilities in VisioForge's .NET SDK, including implementation guidelines and usage examples.
- [Enable Camera Light](https://www.visioforge.com/help/docs/dotnet/videocapture/video-sources/video-capture-devices/enable-camera-light/): This page provides information on how to enable the camera light for video capture devices using VisioForge's .NET library, including detailed instructions and code examples.
- [Video Encoders Guide](https://www.visioforge.com/help/docs/dotnet/general/video-encoders/): A comprehensive guide on video encoders offered by VisioForge, detailing their features, capabilities, and integration within .NET applications.
- [Video Edit Installation Guide](https://www.visioforge.com/help/docs/delphi/videoedit/install/visual-studio/): Installation guide for integrating VisioForge Video Edit SDK with Visual Studio, providing step-by-step instructions and necessary resources.
- [VisioForge Media Outputs](https://www.visioforge.com/help/docs/dotnet/mediablocks/Outputs/): The Outputs section of VisioForge's documentation provides detailed information on the various media output options available in their .NET framework, enabling developers to efficiently manage and configure output settings for multimedia applications.
- [MKV Output Formats](https://www.visioforge.com/help/docs/dotnet/general/output-formats/mkv/): This page provides detailed information about the MKV output format supported by VisioForge, including its features and usage within the .NET framework.
- [TV Tuner Guide](https://www.visioforge.com/help/docs/dotnet/videocapture/video-sources/tv-tuner/): This page provides detailed information about using TV tuner video sources in VisioForge's video capture SDK, including setup instructions and configuration options.
- [Mov Output Formats](https://www.visioforge.com/help/docs/dotnet/general/output-formats/mov/): This page provides detailed information about the MOV output format supported by VisioForge, including its features, usage, and technical specifications for developers.
- [Device Enumeration Guide](https://www.visioforge.com/help/docs/dotnet/mediablocks/GettingStarted/device-enum/): This page provides a guide on enumerating available media devices using VisioForge's .NET libraries, offering developers essential information for integrating device functionality into their applications.
- [VisioForge Delphi Video Edit](https://www.visioforge.com/help/docs/delphi/videoedit/install/delphi/): Installation guide for VisioForge's video editing components in Delphi, providing step-by-step instructions for setting up the software.
- [Audio Sample Grabber](https://www.visioforge.com/help/docs/dotnet/general/audio-effects/audio-sample-grabber/): This page provides detailed information about the Audio Sample Grabber feature in VisioForge, outlining its functionality and usage within audio processing applications.
- [AV1 Video Encoder Guide](https://www.visioforge.com/help/docs/dotnet/general/video-encoders/av1/): A detailed guide on AV1 video encoders provided by VisioForge, outlining their features, capabilities, and integration within .NET applications.
- [MXF Output Formats](https://www.visioforge.com/help/docs/dotnet/general/output-formats/mxf/): This page provides detailed information about the MXF output format supported by VisioForge, including its features and usage within their software solutions.
- [VisioForge Delphi Media Player](https://www.visioforge.com/help/docs/delphi/mediaplayer/install/delphi/): Installation guide for the VisioForge Media Player in Delphi, providing detailed instructions and resources for developers to integrate the media player into their applications.
- [Video Capture Guide](https://www.visioforge.com/help/docs/dotnet/general/guides/video-capture-to-mpegts/): A guide on using VisioForge's .NET library for capturing video and encoding it to MPEG-TS format, providing step-by-step instructions and code examples.
- [Video Capture Crossbar](https://www.visioforge.com/help/docs/dotnet/videocapture/video-sources/video-capture-devices/crossbar/): This page provides detailed information about the crossbar functionality for video capture devices in the VisioForge .NET SDK, including configuration options and usage guidelines.
- [H264 Video Encoder Guide](https://www.visioforge.com/help/docs/dotnet/general/video-encoders/h264/): This page provides detailed information about H.264 video encoding options available in VisioForge's .NET framework, including features, settings, and usage guidelines.
- [VisioForge .NET Code Samples](https://www.visioforge.com/help/docs/dotnet/general/code-samples/): A collection of code samples for .NET developers using VisioForge, demonstrating various functionalities and features of the software.
- [Uninstall DirectShow Filter](https://www.visioforge.com/help/docs/dotnet/general/code-samples/uninstall-directshow-filter/): This page provides a code sample for uninstalling a DirectShow filter using .NET, offering developers a practical solution for managing filters in multimedia applications.
- [Video Editing Installation](https://www.visioforge.com/help/docs/delphi/videoedit/install/visual-basic-6/): Installation guide for integrating VisioForge Video Edit SDK in Visual Basic 6, providing step-by-step instructions and essential resources for developers.
- [Media Player Builder Guide](https://www.visioforge.com/help/docs/delphi/mediaplayer/install/builder/): A guide for Delphi developers on how to install and configure the VisioForge Media Player SDK, providing step-by-step instructions and essential resources for effective integration.
- [Video Capture Adjustments](https://www.visioforge.com/help/docs/dotnet/videocapture/video-sources/video-capture-devices/video-adjustments/): This page provides detailed information on video capture devices and their adjustment settings within the VisioForge .NET SDK, helping developers optimize video quality for their applications.
- [Video Edit Installation Guide](https://www.visioforge.com/help/docs/delphi/videoedit/install/builder/): This page provides installation instructions for the VisioForge Video Edit SDK Builder in Delphi, detailing the necessary steps to set up the development environment for video editing applications.
- [VisioForge Media Player Installation](https://www.visioforge.com/help/docs/delphi/mediaplayer/install/visual-studio/): Installation guide for the VisioForge Media Player in Visual Studio, providing step-by-step instructions and resources for developers.
- [VP8/VP9 Video Encoding](https://www.visioforge.com/help/docs/dotnet/general/video-encoders/vp8-vp9/): This page provides detailed information about VP8 and VP9 video encoders, including their features, usage, and integration within the VisioForge framework for .NET applications.
- [Video Sample Grabber](https://www.visioforge.com/help/docs/dotnet/general/video-effects/video-sample-grabber/): This page provides detailed information about the Video Sample Grabber feature in VisioForge, outlining its functionality and usage for capturing video samples in .NET applications.
- [MPEG-TS Output Formats](https://www.visioforge.com/help/docs/dotnet/general/output-formats/mpegts/): This page provides detailed information about the MPEG-TS output format supported by VisioForge, including its features and usage in multimedia applications.
- [Camera Video Preview](https://www.visioforge.com/help/docs/dotnet/videocapture/video-tutorials/camera-video-preview/): A tutorial page from VisioForge demonstrating how to implement camera video preview functionality using their .NET Video Capture SDK.
- [HEVC Video Encoder Guide](https://www.visioforge.com/help/docs/dotnet/general/video-encoders/hevc/): This page provides detailed information about HEVC video encoders offered by VisioForge, including features, capabilities, and usage guidelines for developers.
- [WavPack Audio Encoder](https://www.visioforge.com/help/docs/dotnet/general/audio-encoders/wavpack/): This page provides detailed information about the WavPack audio encoder in the VisioForge .NET framework, including its features and usage guidelines for developers.
- [Video Capture Devices](https://www.visioforge.com/help/docs/dotnet/videocapture/video-sources/video-capture-devices/enumerate-and-select/): This page provides guidance on enumerating and selecting video capture devices using VisioForge's .NET library, offering developers essential information for integrating video sources into their applications.
- [Image Overlay Effects](https://www.visioforge.com/help/docs/dotnet/general/video-effects/image-overlay/): This page provides detailed information on the image overlay video effect feature in VisioForge's .NET SDK, including usage instructions and examples for developers.
- [GIF Output Formats](https://www.visioforge.com/help/docs/dotnet/general/output-formats/gif/): This page provides detailed information about the GIF output format supported by VisioForge, including its features, usage, and integration within .NET applications.
- [IIS Smooth Streaming](https://www.visioforge.com/help/docs/dotnet/general/network-streaming/iis-smooth-streaming/): This page provides documentation on implementing IIS Smooth Streaming with VisioForge's .NET components, detailing setup and configuration for optimal network streaming performance.
- [Opus Audio Encoder Guide](https://www.visioforge.com/help/docs/dotnet/general/audio-encoders/opus/): This page provides detailed information about the Opus audio encoder used in VisioForge's .NET framework, including its features and integration options for developers.
- [Audio Encoders Guide](https://www.visioforge.com/help/docs/dotnet/general/audio-encoders/): This page provides detailed information about various audio encoders available in the VisioForge .NET SDK, including their features and usage instructions.
- [Send Logs Documentation](https://www.visioforge.com/help/docs/dotnet/general/sendlogs/): This page provides instructions on how to send logs for troubleshooting and support in VisioForge's .NET applications, ensuring users can effectively communicate issues to the support team.
- [Video Effects Samples](https://www.visioforge.com/help/docs/dotnet/general/code-samples/3rd-party-video-effects/): A page providing code samples for integrating third-party video effects using VisioForge's .NET SDK, aimed at developers looking to enhance their video applications.
- [Custom Video Effects](https://www.visioforge.com/help/docs/dotnet/general/code-samples/custom-video-effects/): This page provides code samples for implementing custom video effects using VisioForge's .NET SDK, offering developers practical examples and guidance for enhancing video processing applications.
- [Zoom Video Renderer](https://www.visioforge.com/help/docs/dotnet/general/code-samples/zoom-video-multiple-renderer/): A code sample page from VisioForge demonstrating how to implement zoom functionality in video playback across multiple renderers using .NET.
- [USB3 Vision Camera Guide](https://www.visioforge.com/help/docs/dotnet/videocapture/video-sources/usb3v-gige-genicam/): Detailed documentation for the USB3 Vision and GigE Vision GenICam video sources in the VisioForge Video Capture SDK, providing technical specifications and usage guidelines.
- [Media Player Installation](https://www.visioforge.com/help/docs/delphi/mediaplayer/install/visual-basic-6/): This page provides installation instructions for integrating VisioForge Media Player into Visual Basic 6 applications, offering step-by-step guidance for developers.
- [Multiple Screens WPF](https://www.visioforge.com/help/docs/dotnet/general/code-samples/multiple-screens-wpf/): This page provides a code sample for implementing multiple screen support in a WPF application using VisioForge libraries, demonstrating how to capture and display content across multiple monitors.
- [Draw Multi-Text on Video](https://www.visioforge.com/help/docs/dotnet/general/code-samples/draw-multitext-onvideoframebuffer/): This page provides a code sample demonstrating how to draw multi-text on a video frame buffer using VisioForge's .NET library, offering developers a practical example for integrating text overlays in video applications.
- [Custom Image in Video](https://www.visioforge.com/help/docs/dotnet/general/code-samples/video-view-set-custom-image/): This page provides a code sample for setting a custom image in a video view using VisioForge's .NET library, demonstrating how to enhance video playback with personalized visuals.
- [Video Renderer Selection](https://www.visioforge.com/help/docs/dotnet/general/code-samples/select-video-renderer-winforms/): This page provides a code sample for selecting a video renderer in a WinForms application using VisioForge's .NET library, demonstrating the integration of video playback features.
- [Mouse Wheel Usage](https://www.visioforge.com/help/docs/dotnet/general/code-samples/mouse-wheel-usage/): A code sample page from VisioForge demonstrating the usage of mouse wheel functionality in .NET applications.
- [IP Camera Video Sources](https://www.visioforge.com/help/docs/dotnet/videocapture/video-sources/ip-cameras/): This page provides detailed information on using IP cameras as video sources with VisioForge's .NET video capture library, including setup instructions and features.
- [File Information Sample](https://www.visioforge.com/help/docs/dotnet/general/code-samples/read-file-info/): This page provides code samples for reading file information using VisioForge's .NET libraries, demonstrating how to access and display various attributes of media files.
- [Text on Video Frame](https://www.visioforge.com/help/docs/dotnet/general/code-samples/text-onvideoframebuffer/): This page provides code samples for adding text to video frame buffers using VisioForge's .NET SDK, demonstrating various techniques and functionalities for developers.
- [MJPEG Video Encoder Guide](https://www.visioforge.com/help/docs/dotnet/general/video-encoders/mjpeg/): This page provides detailed information about the MJPEG video encoder offered by VisioForge, including its features, usage, and integration within .NET applications.
- [Image on Video Frame](https://www.visioforge.com/help/docs/dotnet/general/code-samples/image-onvideoframebuffer/): This page provides a code sample demonstrating how to overlay an image onto a video frame buffer using VisioForge's .NET components. It serves as a practical guide for developers looking to enhance video processing applications.
- [ASF WMV Indexing](https://www.visioforge.com/help/docs/dotnet/general/code-samples/asf-wmv-files-indexing/): A guide on indexing ASF and WMV files using VisioForge's .NET SDK, featuring code samples and explanations for developers.
- [OpenGL Media Blocks](https://www.visioforge.com/help/docs/dotnet/mediablocks/OpenGL/): The OpenGL section of the VisioForge documentation provides detailed information on utilizing OpenGL media blocks within .NET applications, including implementation guidelines and API references.
- [OnVideoFrameBitmap Usage](https://www.visioforge.com/help/docs/dotnet/general/code-samples/onvideoframebitmap-usage/): This page provides code samples demonstrating the usage of the OnVideoFrameBitmap event in VisioForge's .NET libraries, allowing developers to manipulate video frames effectively.
- [Exclude Filters Code Samples](https://www.visioforge.com/help/docs/dotnet/general/code-samples/exclude-filters/): This page provides code samples for implementing exclude filters in VisioForge's .NET SDK, demonstrating how to refine video processing by excluding specific elements.
- [Video Effects Guide](https://www.visioforge.com/help/docs/dotnet/general/video-effects/add/): This page provides a detailed guide on adding video effects using VisioForge's .NET library, outlining the various effects available and how to implement them in applications.
- [Zoom on Video Frame](https://www.visioforge.com/help/docs/dotnet/general/code-samples/zoom-onvideoframebuffer/): This page provides code samples for implementing zoom functionality on video frame buffers using VisioForge's .NET framework, demonstrating practical applications for developers.
- [Custom Filter Interface](https://www.visioforge.com/help/docs/dotnet/general/code-samples/custom-filter-interface/): This page provides code samples for implementing a custom filter interface in .NET using VisioForge's SDK, offering developers guidance on enhancing video processing capabilities.
- [Screen Video Capture](https://www.visioforge.com/help/docs/dotnet/videocapture/video-sources/screen/): This page provides detailed information about the screen capture video source options available in VisioForge's Video Capture SDK for .NET, including configuration settings and usage examples.
- [ONVIF IP Camera Guide](https://www.visioforge.com/help/docs/dotnet/videocapture/video-sources/ip-cameras/onvif/): This page provides detailed information on using ONVIF-compatible IP cameras with VisioForge's video capture SDK, including setup instructions and features.
- [Video Drawing Example](https://www.visioforge.com/help/docs/dotnet/general/code-samples/draw-video-picturebox/): This page provides code samples for using VisioForge's .NET library to draw video in a PictureBox control, demonstrating practical implementation for developers.
- [RTSP IP Camera Guide](https://www.visioforge.com/help/docs/dotnet/videocapture/video-sources/ip-cameras/rtsp/): A detailed guide on using RTSP streams for IP cameras with VisioForge's video capture solutions, providing technical insights and implementation instructions.
- [NDI IP Camera Guide](https://www.visioforge.com/help/docs/dotnet/videocapture/video-sources/ip-cameras/ndi/): This page provides detailed information on using NDI (Network Device Interface) as a video source for IP cameras in the VisioForge Video Capture SDK, including setup instructions and technical specifications.
- [Decklink Video Sources](https://www.visioforge.com/help/docs/dotnet/videocapture/video-sources/decklink/): This page provides detailed information on using DeckLink video sources with VisioForge's video capture SDK, including setup and configuration instructions.
---END OF PAGE---
# Page: https://www.visioforge.com/llms-full.txt
---END OF PAGE---
# Page: https://www.visioforge.com/de/datenschutzbestimmungen
# Datenschutzrichtlinie und GDPR-Konformität
Diese Datenschutzrichtlinie erläutert die Art und Weise, wie VisioForge personenbezogene Daten unserer Nutzer in Ãbereinstimmung mit der Allgemeinen Datenschutzverordnung (GDPR) sammelt, verwendet, pflegt und offenlegt. VisioForge verpflichtet sich, Ihre Datenschutzrechte zu respektieren und Ihre personenbezogenen Daten zu schützen.
## Definitionen
\*\*Persönliche Daten\*\*: Alle Informationen, die zur Identifizierung einer Person verwendet werden können, wie Name, Adresse, E-Mail, IP-Adresse und andere ähnliche Daten.
\*\*Verarbeitung\*\*: Jeder mit personenbezogenen Daten durchgeführte Vorgang, einschlieÃlich der Erhebung, Verwendung, Speicherung oder Löschung.
## Datenkontrolleur
VisioForge ist der Datenverantwortliche und ist für Ihre persönlichen Daten verantwortlich. Wir bestimmen die Zwecke und Mittel der Verarbeitung personenbezogener Daten in Ãbereinstimmung mit dieser Richtlinie.
## Welche persönlichen Daten wir sammeln und warum
Wir sammeln Informationen, wenn Benutzer mit unseren Diensten interagieren, z. B. wenn Sie unsere Software verwenden, einen Kauf tätigen oder sich an unseren Kundendienst wenden. Diese Informationen können umfassen:
- Kontaktinformationen: Name, E-Mail-Adresse und andere Kontaktdaten, die beim Kauf unserer Dienstleistungen oder bei der Kontaktaufnahme mit unserem Support angegeben werden.
- Transaktionsdaten: Wir verwenden Stripe als Zahlungsabwickler, der bei Transaktionen bestimmte Transaktionsdaten sammelt. Bitte beachten Sie, dass Stripe als separater Controller agiert und seine eigenen Datenschutzrichtlinien hat, die wir Ihnen empfehlen zu lesen.
- Telemetrie-Daten: Mit Ihrer Zustimmung sammelt unsere Software Telemetriedaten, um unsere Dienste zu verbessern. Diese Daten sind anonymisiert und können nicht zur Identifizierung einzelner Nutzer verwendet werden.
## Wie wir Ihre persönlichen Daten verwenden
Wir verwenden Ihre personenbezogenen Daten für verschiedene Zwecke:
- Zur Bereitstellung und Aufrechterhaltung unserer Dienste.
- Um Sie über Ãnderungen an unseren Dienstleistungen zu informieren.
- Um Ihnen die Teilnahme an interaktiven Funktionen unseres Dienstes zu ermöglichen, wenn Sie dies wünschen.
- Unterstützung der Kunden.
- Um Analysen oder wertvolle Informationen zu sammeln, damit wir unseren Service verbessern können.
- Um die Nutzung unseres Dienstes zu überwachen.
- Erkennen, Vorbeugen und Beheben technischer Probleme.
## Wie wir Ihre persönlichen Daten weitergeben und offenlegen
Wir verkaufen oder vermieten keine personenbezogenen Daten an Dritte. Wir geben personenbezogene Daten nur in Ãbereinstimmung mit dieser Datenschutzrichtlinie an Dritte weiter. Wir können Ihre persönlichen Daten weitergeben an:
- Stripe, als Teil der Erleichterung und Verarbeitung von Transaktionen.
- Gesetzliche Behörden, wenn dies zur Erfüllung gesetzlicher Verpflichtungen oder zum Schutz der Rechte und der Sicherheit anderer erforderlich ist.
## Aufbewahrung von Daten
Wir werden Ihre personenbezogenen Daten nur so lange aufbewahren, wie es für die in dieser Datenschutzrichtlinie genannten Zwecke erforderlich ist. Wir werden Ihre personenbezogenen Daten in dem Umfang aufbewahren und verwenden, der erforderlich ist, um unseren rechtlichen Verpflichtungen nachzukommen, Streitigkeiten beizulegen und unsere rechtlichen Vereinbarungen und Richtlinien durchzusetzen.
## Ihre Rechte nach GDPR
Als Nutzer haben Sie nach der DSGVO bestimmte Rechte, darunter auch die folgenden:
- Das Recht auf Zugang, Aktualisierung oder Löschung der persönlichen Daten, die wir über Sie haben.
- Das Recht auf Berichtigung Ihrer personenbezogenen Daten, wenn diese unrichtig oder unvollständig sind.
- Das Recht, der Verarbeitung Ihrer personenbezogenen Daten durch uns zu widersprechen.
- Das Recht auf Einschränkung der Verarbeitung Ihrer personenbezogenen Daten.
- Das Recht auf Datenübertragbarkeit, d. h. eine Kopie der Daten, die wir über Sie haben, in einem strukturierten, maschinenlesbaren Format zu erhalten.
- Das Recht, Ihre Zustimmung jederzeit zu widerrufen, wenn VisioForge sich auf Ihre Zustimmung zur Verarbeitung Ihrer personenbezogenen Daten verlassen hat.
Bitte beachten Sie, dass wir Sie möglicherweise auffordern, Ihre Identität zu überprüfen, bevor wir auf solche Anfragen antworten.
## Ãnderungen an dieser Datenschutzrichtlinie
VisioForge behält sich das Recht vor, jederzeit Ãnderungen an dieser Datenschutzrichtlinie vorzunehmen. Wir empfehlen den Benutzern, diese Seite regelmäÃig auf Ãnderungen zu überprüfen, um darüber informiert zu bleiben, wie wir die von uns erfassten persönlichen Daten schützen.
## Kontakt
Wenn Sie Fragen oder Anregungen zu unserer Datenschutzpolitik haben, zögern Sie nicht, uns zu kontaktieren.
## Zustimmung
Durch die Nutzung unserer Website oder Dienste erklären Sie sich mit den in dieser Datenschutzrichtlinie aufgeführten Bedingungen einverstanden.
\*\*Zuletzt aktualisiert: Juli 23, 2023\*\*

---END OF PAGE---
# Page: https://www.visioforge.com/es/politica-de-privacidad
# PolÃtica de privacidad y cumplimiento del GDPR
Esta PolÃtica de Privacidad explica la forma en que VisioForge recopila, utiliza, mantiene y divulga la información personal recogida de nuestros usuarios, en cumplimiento del Reglamento General de Protección de Datos (GDPR). VisioForge se compromete a respetar sus derechos de privacidad y a proteger sus datos personales.
## Definiciones
\*\*Datos personales\*\*: Cualquier información que pueda utilizarse para identificar a una persona, como nombre, dirección, correo electrónico, dirección IP y otros datos similares.
\*\*Tratamiento\*\*: Cualquier operación realizada con datos personales, incluida su recogida, uso, almacenamiento o eliminación.
## Controlador de datos
VisioForge es el controlador de datos y es responsable de sus datos personales. Determinamos los fines y medios del tratamiento de los datos personales de acuerdo con esta polÃtica.
## Qué datos personales recopilamos y por qué
Recopilamos información cuando los usuarios interactúan con nuestros servicios, por ejemplo, cuando utilizan nuestro software, realizan una compra o se ponen en contacto con nuestro servicio de atención al cliente. Esta información puede incluir:
- Información de contacto: Nombre, dirección de correo electrónico y otros datos de contacto facilitados al adquirir nuestros servicios o ponerse en contacto con nuestro servicio de asistencia.
- Información sobre transacciones: Utilizamos Stripe como procesador de pagos y durante las transacciones, recopila ciertos detalles de la transacción. Tenga en cuenta que Stripe opera como un controlador independiente y tiene su propia polÃtica de privacidad, que le recomendamos que revise.
- Datos telemétricos: Con su consentimiento, nuestro software recopila datos de telemetrÃa para ayudar a mejorar nuestros servicios. Estos datos son anónimos y no pueden utilizarse para identificar a usuarios individuales.
## Cómo utilizamos sus datos personales
Utilizamos sus datos personales para diversos fines:
- Para prestar y mantener nuestros servicios.
- Para notificarle cambios en nuestros servicios.
- Permitirle participar en funciones interactivas de nuestro servicio cuando decida hacerlo.
- Prestar asistencia al cliente.
- Para recopilar análisis o información valiosa que nos permita mejorar nuestro servicio.
- Para supervisar el uso de nuestro servicio.
- Detectar, prevenir y resolver problemas técnicos.
## Cómo compartimos y divulgamos sus datos personales
No vendemos ni alquilamos datos personales a terceros. Sólo compartimos datos personales con terceros de acuerdo con esta polÃtica de privacidad. Podemos revelar sus datos personales a:
- Stripe, como parte de la facilitación y procesamiento de transacciones.
- Autoridades legales cuando sea necesario para cumplir obligaciones legales o para proteger los derechos y la seguridad de terceros.
## Conservación de datos
Conservaremos sus datos personales sólo durante el tiempo que sea necesario para los fines establecidos en esta polÃtica de privacidad. Conservaremos y utilizaremos sus datos personales en la medida necesaria para cumplir nuestras obligaciones legales, resolver litigios y hacer cumplir nuestros acuerdos y polÃticas legales.
## Sus derechos en virtud del GDPR
Como usuario, tiene derechos especÃficos en virtud del GDPR, entre los que se incluyen:
- Derecho a acceder a sus datos personales, actualizarlos o eliminarlos.
- Derecho de rectificación, para corregir sus datos personales si son inexactos o incompletos.
- Derecho a oponerse al tratamiento de sus datos personales.
- El derecho de restricción, para solicitar que limitemos el tratamiento de sus datos personales.
- El derecho a la portabilidad de los datos, a recibir una copia de los datos que tenemos sobre usted en un formato estructurado y legible por máquina.
- Derecho a retirar su consentimiento en cualquier momento cuando VisioForge se haya basado en su consentimiento para tratar sus datos personales.
Tenga en cuenta que podemos pedirle que verifique su identidad antes de responder a dichas solicitudes.
## Cambios en esta polÃtica de privacidad
VisioForge se reserva el derecho a realizar cambios en esta polÃtica de privacidad en cualquier momento. Animamos a los usuarios a comprobar con frecuencia esta página para cualquier cambio para mantenerse informado acerca de cómo estamos ayudando a proteger la información personal que recopilamos.
## Contacto
Si tiene alguna pregunta o sugerencia sobre nuestra PolÃtica de privacidad, no dude en ponerse en contacto con nosotros.
## Consentimiento
Al utilizar nuestro sitio o nuestros servicios, usted acepta las condiciones establecidas en la presente PolÃtica de privacidad.
\*\*Ãltima actualización: 23 de julio de 2023\*\*

---END OF PAGE---
# Page: https://www.visioforge.com/it/informativa-sulla-privacy
# Informativa sulla privacy e conformità al GDPR
La presente Informativa sulla privacy illustra il modo in cui VisioForge raccoglie, utilizza, conserva e divulga le informazioni personali raccolte dai nostri utenti, in conformità con il Regolamento generale sulla protezione dei dati (GDPR). VisioForge si impegna a rispettare i vostri diritti alla privacy e a proteggere i vostri dati personali.
## Definizioni
\*\*Dati personali\*\*: Qualsiasi informazione che possa essere utilizzata per identificare un individuo, come nome, indirizzo, e-mail, indirizzo IP e altri dati simili.
\*\*Elaborazione\*\*: Qualsiasi operazione eseguita sui dati personali, compresa la raccolta, l'utilizzo, la conservazione o la cancellazione.
## Titolare del trattamento dei dati
VisioForge è il titolare del trattamento ed è responsabile dei vostri dati personali. Determiniamo gli scopi e i mezzi del trattamento dei dati personali in linea con questa politica.
## Quali dati personali raccogliamo e perché
Raccogliamo informazioni quando gli utenti interagiscono con i nostri servizi, ad esempio quando si utilizza il nostro software, si effettua un acquisto o ci si rivolge all'assistenza clienti. Queste informazioni possono includere:
- Informazioni di contatto: Nome, indirizzo e-mail e altri dati di contatto forniti al momento dell'acquisto dei nostri servizi o del contatto con l'assistenza.
- Informazioni sulle transazioni: Utilizziamo Stripe come processore di pagamenti e durante le transazioni raccoglie alcuni dettagli della transazione. Si prega di notare che Stripe opera come controllore separato e ha una propria informativa sulla privacy, che si consiglia di esaminare.
- Dati di telemetria: Con il consenso dell'utente, il nostro software raccoglie dati telemetrici per migliorare i nostri servizi. Questi dati sono resi anonimi e non possono essere utilizzati per identificare i singoli utenti.
## Come utilizziamo i vostri dati personali
Utilizziamo i vostri dati personali per vari scopi:
- Per fornire e mantenere i nostri servizi.
- Per notificare all'utente le modifiche apportate ai nostri servizi.
- Per consentire all'utente di partecipare alle funzioni interattive del nostro servizio quando sceglie di farlo.
- Fornire assistenza ai clienti.
- Per raccogliere analisi o informazioni utili a migliorare il nostro servizio.
- Per monitorare l'utilizzo del nostro servizio.
- Rilevare, prevenire e risolvere i problemi tecnici.
## Come condividiamo e divulghiamo i vostri dati personali
Non vendiamo né affittiamo dati personali a terzi. Condividiamo i dati personali con terzi solo in conformità con la presente informativa sulla privacy. Possiamo divulgare i vostri dati personali a:
- Stripe, nell'ambito della facilitazione e dell'elaborazione delle transazioni.
- Autorità legali quando è necessario per adempiere a obblighi di legge o per proteggere i diritti e la sicurezza di altri.
## Conservazione dei dati
Conserveremo i dati personali dell'utente solo per il tempo necessario agli scopi indicati nella presente informativa sulla privacy. Conserveremo e utilizzeremo i vostri dati personali nella misura necessaria per adempiere ai nostri obblighi legali, risolvere le controversie e applicare i nostri accordi e politiche legali.
## I vostri diritti secondo il GDPR
In qualità di utente, l'utente ha diritti specifici ai sensi del GDPR, tra cui:
- Il diritto di accedere, aggiornare o cancellare i dati personali in nostro possesso.
- Il diritto di rettifica, per correggere i vostri dati personali se inesatti o incompleti.
- Il diritto di opporsi al trattamento dei vostri dati personali da parte nostra.
- Il diritto di restrizione, per richiedere di limitare il trattamento dei vostri dati personali.
- Il diritto alla portabilità dei dati, per ricevere una copia dei dati in nostro possesso su di voi in un formato strutturato e leggibile da una macchina.
- Il diritto di revocare il vostro consenso in qualsiasi momento qualora VisioForge si sia basata sul vostro consenso per trattare i vostri dati personali.
Prima di rispondere a tali richieste, potremmo chiedervi di verificare la vostra identità .
## Modifiche alla presente Informativa sulla privacy
VisioForge si riserva il diritto di apportare modifiche alla presente informativa sulla privacy in qualsiasi momento. Incoraggiamo gli utenti a controllare frequentemente questa pagina per eventuali modifiche, per rimanere informati su come stiamo contribuendo a proteggere le informazioni personali che raccogliamo.
## Contatto
In caso di domande o suggerimenti sulla nostra Informativa sulla privacy, non esitate a contattarci.
## Consenso
Utilizzando il nostro sito o i nostri servizi, l'utente accetta i termini delineati nella presente Informativa sulla privacy.
\*\*Ultimo aggiornamento: 23 luglio 2023\*\*

---END OF PAGE---
# Page: https://www.visioforge.com/de/news-2024
# Neuigkeiten und Produktaktualisierungen im Jahr 2024
## 50% Black Friday Verkauf!
(2024-06-03)
ð \*\*Sommer-Sale-Alarm!\*\* ðHolen Sie sich unsere erstklassige Software jetzt mit einem unschlagbaren Rabatt von 50 %! Lassen Sie sich dieses zeitlich begrenzte Angebot zur Steigerung Ihrer Produktivität nicht entgehen. Aktualisieren Sie noch heute und sparen Sie kräftig! ðð»
Coupon-Code: \*\*SOMMER50\*\*
## VisioForge .Net SDKs v15.9 ist veröffentlicht worden
(2024-04-07)
Die Version 15.9 der .Net SDKs wurde mit mehreren Updates und neuen Funktionen veröffentlicht. Zu den bemerkenswerten Verbesserungen gehören die Behebung von Problemen mit dem Video-Seitenverhältnis, Aktualisierungen der GStreamer-Umverteilung und die Hinzufügung von Unterstützung für Basler USB3/GigE-Kameras. Das Video Edit SDK .Net verwendet jetzt SkiaSharp-basierte Schrifteinstellungen für die TextOverlay-Klasse und ermöglicht so benutzerdefinierte Schriftkonfigurationen. Der MediaInfoReader unter Windows wurde um Stream-Unterstützung erweitert, so dass Video-/Audiodatei-Informationen aus verschiedenen Quellen abgerufen werden können.
Die Live Video Compositor-Engine wurde für eine bessere Unterstützung von Dateiquellen aktualisiert, und in der Computer Vision-Demo des Video Capture SDK wurde ein Detektor für kamerabedecktes Material eingeführt. Es wurden neue APIs für das Abrufen von Schnappschüssen aus Videodateien hinzugefügt, und iOS-Unterstützung ist jetzt in MAUI-Beispielen enthalten. Speicherlecks in RTSP-Quellen wurden behoben, und das Media Player SDK unterstützt jetzt Datenströme in Videodateien, die die FFMPEG-Quellen-Engine verwenden.
Zu den zusätzlichen Funktionen gehören benutzerdefinierte FFMPEG-Optionen für IP-Kameras, die Lösung von Netzwerkverbindungsproblemen mit FFMPEG-Quellen, RTSP MultiView-Unterstützung im Media Blocks SDK und Unterstützung für FLIR/Teledyne-Kameras mit dem Spinnaker SDK. Das Video Edit SDK unterstützt jetzt die Verwendung von .Net Stream als Eingangsquelle, und die Unterstützung von .Net 7 wurde wieder in das MAUI-Paket aufgenommen. Die Schnittstelle IAsyncDisposable wurde zu allen Kernklassen für asynchrone Entsorgung hinzugefügt.
Weitere Updates beheben Probleme bei der Videoaufnahme unter Android, fügen HLS-Streaming-Beispiele hinzu und beheben Abstürze im Zusammenhang mit Multiscreen-Setups. Es wurden Verbesserungen bei der MAUI-Videowiedergabegeschwindigkeit, bei Problemen mit der Medienwiedergabe und der Webcam-Quellenkonnektivität vorgenommen. Probleme bei der Audiowiedergabe und schlechte Audiomischung wurden behoben, und das Media Player SDK unterstützt jetzt wachsende MPEG-TS-Dateien für die VLC-Engine.
Prüfen Sie die [Ãnderungsprotokoll](https://www.visioforge.com/help/docs/dotnet/changelog/#159/).
## VisioForge .Net SDKs v15.8 ist veröffentlicht worden
(2024-01-22)
Die Version 15.8 der .Net SDKs wurde veröffentlicht und bringt mehrere bemerkenswerte Ãnderungen und Verbesserungen. Zu den wichtigsten Aktualisierungen gehören wichtige API-Ãnderungen, wie z. B. die Verwendung von "DeviceEnumerator.Shared" für die Geräteaufzählung und zusätzliche Initialisierungsschritte für X-Engines. Android Activity ist für die Erstellung von SDK-Engines nicht mehr erforderlich.
Windows-Benutzer erhalten eine verbesserte MAUI-Video-Rendering-Leistung und eine neue Maus-Hervorhebungsfunktion für Screen-Capture-Quellen. Es wurden verschiedene Fehlerkorrekturen implementiert, darunter die Behebung von Problemen mit der GröÃenänderung von Avalonia VideoView, Sonderzeichen-Passwörtern für RTSP-Quellen und einem Speicherleck im OverlayManager.
Das Update führt Eigenschaften zum Festlegen von Start- und Stopp-Positionen in UniversalSourceSettings ein und fügt Ereignisse hinzu, um über das Hinzufügen/Entfernen von Geräten im DeviceEnumerator zu informieren. Die Unterstützung für benutzerdefinierte Fehlerhandler wurde für mehrere Engines hinzugefügt, und es gibt neue Eigenschaften für die Einstellung benutzerdefinierter Audiofilter für Virtual Camera SDK-Ausgaben in verschiedenen Komponenten.
Zu den neuen Funktionen gehören die Unterstützung von NDI-Streaming in VideoCaptureCoreX und zusätzliche Medienblöcke im Media Blocks SDK, z. B. die Klassen BufferSink und CustomMediaBlock. Die Möglichkeiten zum Zuschneiden von Videoframes wurden durch die Hinzufügung von VideoCropBlock und VideoAspectRatioCropBlock verbessert. Das Update umfasst auch Unterstützung für den WASAPI-Audio-Renderer in der VideoCaptureCore-Engine und Aktualisierungen des Tempo-Audioeffekts. Insgesamt konzentriert sich diese Version auf die Verbesserung der Leistung, die Behebung kritischer Probleme und das Hinzufügen neuer Funktionalitäten zu den .Net SDKs.
Prüfen Sie die [Ãnderungsprotokoll](https://www.visioforge.com/help/docs/dotnet/changelog/#158/).
---END OF PAGE---
# Page: https://www.visioforge.com/de/news-2023
# Neuigkeiten und Produktaktualisierungen im Jahr 2023
## VisioForge .Net SDKs v15.7 ist veröffentlicht worden
(2023-11-12)
Die .Net SDKs Version 15.7 wurde mit verschiedenen Verbesserungen und Korrekturen veröffentlicht. Diese Version enthält Unterstützung für .Net 8 in allen SDKs.
Zu den wichtigsten Verbesserungen im Video Capture SDK .Net gehören die Behebung von Problemen mit dem Ereignis "OnNetworkSourceDisconnect", das zweimal aufgerufen wird, die Behebung der Einstellungen für das Audioquellenformat in VideoCaptureCoreX und die Behebung von WPF-nativen Rendering-Problemen mit Pop-up-Fenstern. Die Start/StartAsync-Methode in VideoCaptureCore gibt jetzt false zurück, wenn das Videoaufnahmegerät bereits von einer anderen Anwendung verwendet wird.
Die X-Engines wurden mit neuen MPEG-2-Video- und MP2-Audio-Encodern, DNxHD-Video-Encoder-Unterstützung und Ãnderungen an den VP8/VP9-Standardeinstellungen für Live-Aufnahmen aktualisiert. Probleme bei der Aufzählung von Decklinks wurden behoben.
Plattformübergreifende SDKs profitieren von Aktualisierungen des Decklink-Quellcodes, die Probleme mit falschen Gerätenamen beheben, und des Overlay-Managers, der jetzt eine `OverlayManagerDateTime`-Klasse zum Zeichnen des aktuellen Datums und von benutzerdefiniertem Text enthält. AuÃerdem wurden SkiaSharp-Sicherheitsupdates und Probleme mit der Verwendung von System.Drawing.Bitmap in `OverlayManagerImage` behoben.
Unterstützung für Avalonia 11.0.5 wurde hinzugefügt, zusammen mit Aktualisierungen der VLC-Quellen (libVLC 3.0.19) und FFMPEG-Quellen und -Encodern, die Probleme mit fehlenden MSVC-Abhängigkeiten beheben. Die ONVIF-Engine wurde ebenfalls aktualisiert.
SchlieÃlich verbessert das Update die FFMPEG.exe-Ausgabe in VideoCaptureCore, verbessert die Unterstützung für x264- und x265-Encoder in benutzerdefinierten FFMPEG-Builds und behebt ein seltenes Absturzproblem mit WinUI VideoView.
Prüfen Sie die [Ãnderungsprotokoll](https://www.visioforge.com/help/docs/dotnet/changelog/#157/).
## VisioForge .Net SDKs v15.6 ist veröffentlicht worden
(2023-09-20)
Die Version 15.6 der .Net SDKs bringt zahlreiche Verbesserungen und neue Funktionen mit sich. Das Video Capture SDK bietet eine verbesserte Video-Crop-Performance auf modernen CPUs und führt eine neue Video-Overlays-API ein, deren Verwendung in entsprechenden Demos gezeigt wird. Das Update verbessert auch die Hardware-Encoder-Erkennung für Systeme mit mehreren GPUs. Der Avalonia VideoView wurde aktualisiert, um Probleme mit der Wiederherstellung zu beheben.
Media Player SDK enthält Ãnderungen wie die Behebung von Startproblemen unter Android und das Hinzufügen neuer Methoden für die Auswahl von Videostreams. Leistungsverbesserungen für 4K- und 8K-Videos im WPF-Rendering wurden in allen SDKs implementiert. Verschiedene Probleme, darunter Probleme beim Zuschneiden von Videos und mehrere Ausgaben in VideoCaptureCoreX, wurden behoben.
Neue Demos und Unterstützung für Funktionen wie NDI-Streaming, madVR und mehrere Audiospuren sind enthalten. Das Update fügt auch mehrere neue Klassen und Methoden hinzu, wie z.B. die Unterstützung von VNC-Quellen und die KI-basierte GröÃenänderung von Videos mit dem Nvidia Maxine SDK. Das Media Blocks SDK fügt neue OpenCV-Blöcke, NDI Source- und Sink-Blöcke und zusätzliche Video-Encoder wie rav1e AV1 und GIF hinzu.
Verbesserungen bei der Speicherwiedergabe, VU-Meter-Probleme und erweiterte Unterstützung für WASAPI 2 sind ebenfalls Teil dieser Version. Die SDKs unterstützen jetzt die asynchrone Entsorgung mit der Schnittstelle IAsyncDisposable und haben verschiedene Erkennungs- und Wiedergabeprobleme behoben. Neue Funktionen wie die Verarbeitung von KLV-Daten, MJPEG-Netzwerk-Streaming und erweiterte Media-Block-Funktionalitäten erweitern die Möglichkeiten der SDKs. SchlieÃlich enthält das Update eine Reihe von Stabilitäts- und Leistungsverbesserungen für verschiedene Plattformen und Komponenten.
Prüfen Sie die [Ãnderungsprotokoll](https://www.visioforge.com/help/docs/dotnet/changelog/#156/).
---END OF PAGE---
# Page: https://www.visioforge.com/de/news-2022
# Neuigkeiten und Produktaktualisierungen im Jahr 2022
## VisioForge .Net SDKs v15.5 ist veröffentlicht worden
(2022-12-11)
Die Version 15.5 der .Net SDKs wurde mit mehreren neuen Funktionen und Updates veröffentlicht. Diese Version bietet Unterstützung für .Net 7 und führt eine Reihe von Verbesserungen in verschiedenen SDK-Komponenten ein.
Im Video Capture SDK .Net wurde der MJPEG Low Latency IP-Kamera-Engine ein NetworkDisconnect-Ereignis hinzugefügt, und das Ereignis "OnRTSPLowLatencyRAWFrame" ermöglicht den Abruf von RAW-Frames aus RTSP-Streams mit der RTSP Low Latency-Engine. Die VideoEditCoreX-Engine unterstützt jetzt Linux-basierte Demos und verfügt über eine neue AutoTransitions-Eigenschaft. Darüber hinaus wurde die Kompatibilität mit Snap Camera für die MP4-HW-Codierung verbessert und die Unterstützung für mehrere Decklink-Ausgänge in den SDKs für Video Capture und Video Edit verbessert.
Für plattformübergreifende APIs wurden die Typen `System.Drawing.Rectangle` und `System.Drawing.Size` durch `VisioForge.Types.Rectangle` und `VisioForge.Types.Size` ersetzt. Das Update bringt auch MAUI-Beispiele (BETA) und eine verbesserte Online-Lizenzierung.
Das Media Player SDK .Net wurde mit Segmentunterstützung in seiner plattformübergreifenden Engine, einer Playlist-API für die Windows-Only-Engine und GPU-HW-Decodierung für die VLC-Engine aktualisiert. Probleme mit der umgekehrten Wiedergabe, der Methode `MediaPlayerCore.Video\\_Renderer\\_SetCustomWindowHandle` und WPF HighDPI-Anwendungen mit EVR wurden behoben. AuÃerdem unterstützt das Media Player SDK jetzt die Wiedergabe früherer Frames in seiner plattformübergreifenden Engine.
Das Media Blocks SDK .Net hat eine WPF Screen Capture Demo hinzugefügt, während ONVIFControl und die zugehörigen APIs jetzt auf allen Plattformen verfügbar sind. Es gab eine bahnbrechende API-Ãnderung, bei der der Frame-Rate-Typ in allen APIs von double auf `VideoFrameRate` geändert wurde.
Zu den weiteren Verbesserungen gehören eine neue Camera Light-Demo, eine aktualisierte Handhabung des Aufrufs "rtsp\\_source\\_create\\_audio\\_resampler" in der RTSP Low Latency-Engine für Video Capture SDK .Net und eine verbesserte Segmentunterstützung im Media Player SDK. Diese Aktualisierungen verbessern insgesamt die Funktionalität, Kompatibilität und Leistung der verschiedenen .Net SDKs.
Prüfen Sie die [Ãnderungsprotokoll](https://www.visioforge.com/help/docs/dotnet/changelog/#155/).
## VisioForge .Net SDKs v15.4 ist veröffentlicht worden
(2022-07-23)
Die Version 15.4 der .Net SDKs wurde veröffentlicht und bringt eine Vielzahl von Updates und neuen Funktionen. Diese Version behebt mehrere Probleme und führt Verbesserungen in verschiedenen Komponenten ein.
Zu den wichtigsten Aktualisierungen gehören die Behebung des Problems, dass die Eigenschaft `Play\\_PauseAtFirstFrame` ignoriert wird, sowie Verbesserungen der HighDPI-Unterstützung in WinForms-Beispielen und für den Direct2D-Videorenderer. Die ONVIFControl-Klasse wurde um neue APIs erweitert: `GetDeviceCapabilities` und `GetMediaEndpoints`.
Das Problem der erzwungenen Neukodierung beim Zusammenfügen von FFMPEG-Dateien ohne Neukodierung wurde behoben. Das Update enthält auch ein Sentry-Update und fügt Video-Interpolationseinstellungen für Zoom- und Pan-Videoeffekte hinzu.
Unterstützung für das GtkSharp UI-Framework für Video-Rendering wurde hinzugefügt, und die FastEdit-API wurde auf async geändert. Darüber hinaus wurde ein Screen-Flip-Problem im Zusammenhang mit der Eigenschaft `Video\\_Effects\\_AllowMultipleStreams` im Video Capture SDK .Net Core behoben.
Die RTSP-MultiView-Demo wurde aktualisiert, um GPU-Decodierung und Zugriff auf RAW-Streams zu ermöglichen. Zu den neuen Funktionen gehören ein "OnLoop"-Ereignis im Media Player SDK .Net und eine Schleifenfunktion im Media Blocks SDK .Net.
Aufgrund von Problemen mit Avalonia UI und NativeControl wurde Avalonia VideoView auf Version 0.10.12 heruntergestuft. Dem Video Edit SDK .Net wurde eine neue File Encryptor Demo hinzugefügt, die ein Beispiel für die Verschlüsselung von Videodateien liefert.
Insgesamt verbessert diese Version die Funktionalität, behebt kritische Probleme und führt neue Funktionen ein, um die Benutzerfreundlichkeit aller .Net SDKs zu verbessern.
Prüfen Sie die [Ãnderungsprotokoll](https://www.visioforge.com/help/docs/dotnet/changelog/#154/).
## VisioForge .Net SDKs v15.3 ist veröffentlicht worden
(2022-05-21)
Die Version 15.3 der .Net SDKs wurde mit einer Reihe von Verbesserungen und Optimierungen veröffentlicht. Zu den wichtigsten Verbesserungen gehören die Verkürzung der Startzeit der App für PCs mit Decklink-Karten und die Unterstützung von NDI SDK v5. Ein Problem mit der MKV-Legacy-Ausgabe, das zu Ausnahmen bei falschen Rollen führte, wurde behoben.
Die Leistung von Zoom- und Schwenkeffekten wurde optimiert, und es wurde eine grundlegende Medienblock-API eingeführt, die sich jedoch noch in der Entwicklung befindet. Das Video Edit SDK .Net unterstützt jetzt HLS-Netzwerk-Streaming.
In WPF VideoView wurde eine neue Eigenschaft Rotate hinzugefügt, die eine Videodrehung um 90, 180 oder 270 Grad ermöglicht. Benutzer können auch die Methode `GetImageLayer()` verwenden, um die Bildebene für die Anwendung benutzerdefinierter Transformationen abzurufen.
Eine API-Ãnderung hat `FilterHelpers` in `FilterDialogHelper` umbenannt. Die Assemblies `VisioForge.Types` und `VisioForge.MediaFramework` wurden in `VisioForge.Core` zusammengeführt, und UI-Klassen wurden in `VisioForge.Core.UI.\\*`-Assemblies und unabhängige NuGet-Pakete verschoben. AuÃerdem wurde `VisioForge.Types` in `VisioForge.Core.Types` umbenannt, und `VisioForge.Core` ist nicht mehr vom Windows Forms-Framework abhängig.
Diese Updates verbessern die Leistung, optimieren die API und erweitern die Funktionalität der .Net SDKs.
Prüfen Sie die [Ãnderungsprotokoll](https://www.visioforge.com/help/docs/dotnet/changelog/#153/).
## VisioForge .Net SDKs v15.2 ist veröffentlicht worden
(2022-01-20)
Die Version 15.2 der .Net SDKs wurde veröffentlicht und enthält mehrere neue Ergänzungen und Verbesserungen. Zu den wichtigsten Aktualisierungen gehören die Hinzufügung der Eigenschaften `HorizontalAlignment` und `VerticalAlignment` für Text- und Bildlogos, die eine bessere Anpassung und Positionierung ermöglichen.
Die ONVIF-Unterstützung wurde aktualisiert, wodurch Probleme im Zusammenhang mit der Angabe von Benutzernamen und Kennwörtern in URLs ohne entsprechende Quelleneinstellungen behoben wurden. Die RTSP-Unterstützung für IP-Kameras wurde verbessert, wodurch zuverlässigere Verbindungen und eine bessere Leistung gewährleistet sind.
Probleme mit dem FFMPEG.exe-Ausgabedialog und der separaten Erfassung in Dienstanwendungen wurden behoben. Das SDK wurde von NewtonsoftJson auf System.Text.Json migriert, um eine bessere Leistung und moderne Serialisierungsunterstützung zu gewährleisten.
Die DirectCapture-Ausgabe für IP-Kameras wurde aktualisiert, und eine neue DirectCapture ASF-Ausgabeoption wurde hinzugefügt. Der Eigenschaftstyp "IPCameraSourceSettings.URL" wurde von "String" in "System.Uri" geändert, um die Handhabung von URL-Typen zu verbessern.
Die Video- und Audioeffekte wurden aktualisiert, und die Leistung der Videoverarbeitung wurde insgesamt optimiert. Verschiedene Fehlerkorrekturen und Leistungsverbesserungen erhöhen die Stabilität und Effizienz des SDKs.
Insgesamt konzentriert sich diese Version auf die Erweiterung der Funktionalität, die Verbesserung der Leistung und die Behebung kritischer Probleme in den .Net SDKs.
Prüfen Sie die [Ãnderungsprotokoll](https://www.visioforge.com/help/docs/dotnet/changelog/#152/).
## VisioForge Neujahrsferien 30% Rabatt
(2022-01-03)
Feiern Sie die Neujahrsfeiertage mit unserem Sonderverkauf, bei dem Sie ein erstaunliches \*\*30% Rabatt\*\* auf alle Produkte!
### ð \*\*GenieÃen Sie 30% Rabatt auf alle Produkte!\*\* ð
Beginnen Sie das neue Jahr mit unglaublichen Einsparungen bei unserer Premium-Software. Verwenden Sie den Gutscheincode \*\*NY30\*\* an der Kasse, um einen Rabatt von 30 % auf alle Produkte zu erhalten.
Lassen Sie sich diese fantastischen Ersparnisse nicht entgehen! Nutzen Sie die Neujahrsfeiertage mit unseren Sonderangeboten und verbessern Sie Ihr Software-Erlebnis.
Frohes Einkaufen und ein gutes neues Jahr!
---END OF PAGE---
# Page: https://www.visioforge.com/de/news-2021
# Neuigkeiten und Produktaktualisierungen im Jahr 2021
## VisioForge .Net SDKs v15.1 ist veröffentlicht worden
2022-11-26
Die Version 15.1 der .Net SDKs führt plattformübergreifende Unterstützung für Android für das Media Player SDK .Net ein und plant für iOS/macOS im Dezember. Sie deaktiviert Sentry-Debug-Meldungen in der Konsole, fügt Icecast-Streaming hinzu und aktualisiert die Eigenschaft `VideoStreamInfo.FrameRate` auf `VideoFrameRate`. Die WPF VideoView hat die Wiedergabe von IP-Kamera-Streams verbessert. Signifikante API-Ãnderungen führen mehrere Komponenten in `VisioForge.Core` zusammen, und die Audioeffekt-API verwendet jetzt String-Namen. Eine neue GStreamer-basierte plattformübergreifende Engine unterstützt Windows und andere Plattformen in diesem Entwicklungszyklus.
Prüfen Sie die [Ãnderungsprotokoll](https://www.visioforge.com/help/docs/dotnet/changelog/#151/).
## VisioForge .Net SDKs v15.0 ist veröffentlicht worden
2022-11-01
Die Version 15.0 des .Net SDKs führt signifikante API-Ãnderungen ein und teilt die Hauptsteuerungen in Core- und VideoView-Teile auf. Das SDK hat keine getrennten TRIAL- und FULL-Versionen mehr und entfernt die Eigenschaft `SDK\\_State`.
Entwicklern wird empfohlen, UI-Steuerelemente durch "VideoView" zu ersetzen und Kernklassen (z. B. "VideoCaptureCore") so umzubenennen, dass sie den zuvor verwendeten UI-Steuerelementnamen entsprechen. Diese Ãnderung ermöglicht die Unterstützung für zusätzliche UI-Plattformen wie UWP, MAUI, Eco und Avalonia.
Prüfen Sie die [Ãnderungsprotokoll](https://www.visioforge.com/help/docs/dotnet/changelog/#150/).
## VisioForge .Net SDKs v14.3 ist veröffentlicht worden
2022-09-14
Die Version 14.3 der .Net SDKs enthält mehrere wichtige Updates und Verbesserungen. Ein kritisches Problem bei der Erstellung von Video Resize-Filtern für NuGet-Redistributionen wurde behoben, und die Telemetrie wurde aktualisiert. Die Ausgabe von `VFDirectCaptureMP4Output` wurde ebenfalls aktualisiert. Diese Version fügt Unterstützung für .Net 6 (Vorschau) hinzu und entfernt Nvidia CUDA, wodurch NVENC als moderne Alternative für die H264/HEVC-Kodierung empfohlen wird.
Die MJPEG-Low-Latency-Engine für IP-Kameras wurde aktualisiert und die Auflistung der NDI-Quellen wurde verbessert. Die ONVIF-Unterstützung wurde verbessert und .Net Core 3.1-Unterstützung wurde für die RTSP Low Latency Source Engine hinzugefügt. Probleme mit Picture-in-Picture für den 2x2-Modus wurden behoben. Das Projekt und die Lösungen wurden in unabhängige Dateien für .Net Framework 4.7.2, .Net Core 3.1, .Net 5 und .Net 6 aufgeteilt, was eine bessere Organisation und Kompatibilität ermöglicht.
Prüfen Sie die [Ãnderungsprotokoll](https://www.visioforge.com/help/docs/dotnet/changelog/#143/).
## VisioForge .Net SDKs v14.2 ist veröffentlicht worden
2022-08-11
Die Version 14.2 des .Net SDKs bringt mehrere Updates und Korrekturen. Das Problem mit der Audio-Stream-Erfassung bei Verwendung des Virtual Camera SDK Outputs wurde behoben. Der `VFMP4v8v10Output` wurde durch `VFMP4Output` ersetzt. Eine neue "CanStart"-Methode wurde zu den "Video\\_CaptureDevicesInfo"-Elementen hinzugefügt, die überprüft, ob ein Gerät gestartet werden kann und nicht ausschlieÃlich von einer anderen Anwendung verwendet wird.
Das `ONVIFControl` unterstützt jetzt die async/await API, wodurch seine asynchronen Fähigkeiten verbessert wurden. Ein Problem mit falscher ColorKey-Verarbeitung im Videoeffekt "Text Overlay" wurde behoben. Für die IP-Kameraquelle RTSP Low Latency wurde Unterstützung für erzwungene Bildraten hinzugefügt. Die MP4v11 AMD-Encoder wurden aktualisiert und ein Problem mit dem Zeitstempel während der Pause/Fortsetzung einer separaten MP4v11-Aufnahme wurde behoben.
Das Netzwerk-Streaming und die Ausgabe von FFMPEG.exe wurden auf die neueste FFMPEG-Version aktualisiert. Das VC++ Redistributable muss nicht mehr installiert werden, da die VC++-Verknüpfung auf statisch umgestellt wurde, auÃer für die optionale XIPH-Ausgabe. AuÃerdem wurden viele DirectShow-Basisfilter in das Modul `VisioForge\\_BaseFilters` verschoben.
Prüfen Sie die [Ãnderungsprotokoll](https://www.visioforge.com/help/docs/dotnet/changelog/#142/).
---END OF PAGE---
# Page: https://www.visioforge.com/es/news-2024
# Novedades y actualizaciones de productos en 2024
## Rebajas del 50% por el Black Friday
(2024-06-03)
ð \*\*Rebajas de verano\*\* ðConsiga ahora nuestro software mejor valorado con un descuento insuperable del 50%. No te pierdas esta oferta por tiempo limitado para aumentar tu productividad. ¡ActualÃzate hoy y ahorra a lo grande! ðð»
Código del cupón: \*\*VERANO50\*\*
## VisioForge .Net SDKs v15.9 ha sido lanzado
(2024-04-07)
Se ha publicado la versión 15.9 de los SDK de .Net con varias actualizaciones y nuevas funciones. Las mejoras notables incluyen la resolución de problemas de relación de aspecto de vÃdeo, actualizaciones a la redistribución GStreamer, y la adición de soporte para cámaras Basler USB3/GigE. El Video Edit SDK .Net ahora utiliza configuraciones de fuentes basadas en SkiaSharp para la clase TextOverlay, permitiendo configuraciones de fuentes personalizadas. Se ha añadido soporte Stream al MediaInfoReader en Windows, permitiendo la recuperación de información de archivos de vÃdeo/audio desde varias fuentes.
Se ha actualizado el motor Live Video Compositor para mejorar la compatibilidad con fuentes de archivos, y se ha introducido un detector de cámara cubierta en la demostración de visión computerizada del SDK de captura de vÃdeo. Se han añadido nuevas API para la recuperación de instantáneas de archivos de vÃdeo, y ahora se incluye compatibilidad con iOS en las muestras de MAUI. Se han resuelto las fugas de memoria en fuentes RTSP, y el SDK Media Player ahora admite flujos de datos en archivos de vÃdeo utilizando el motor de fuentes FFMPEG.
Entre las funciones adicionales se incluyen opciones FFMPEG personalizadas para cámaras IP, la resolución de problemas de conexión de red con fuentes FFMPEG, compatibilidad con RTSP MultiView en el SDK Media Blocks y compatibilidad con cámaras FLIR/Teledyne mediante el SDK Spinnaker. El SDK Video Edit soporta ahora el uso de .Net Stream como fuente de entrada, y se ha reintroducido la compatibilidad con .Net 7 en el paquete MAUI. La interfaz IAsyncDisposable se ha añadido a todas las clases principales para la eliminación asÃncrona.
Otras actualizaciones solucionan problemas de captura de vÃdeo en Android, añaden muestras de transmisión HLS y resuelven fallos relacionados con configuraciones multipantalla. Se han realizado mejoras en la velocidad de renderizado de vÃdeo MAUI, problemas de reproducción multimedia y conectividad de la fuente de la cámara web. Se han resuelto problemas de reproducción de audio y mala mezcla de audio, y el SDK de Media Player ahora admite el crecimiento de archivos MPEG-TS para el motor VLC.
Compruebe el [registro de cambios](https://www.visioforge.com/help/docs/dotnet/changelog/#159/).
## VisioForge .Net SDKs v15.8 ha sido lanzado
(2024-01-22)
Se ha publicado la versión 15.8 de los SDK de .Net, que aporta varios cambios y mejoras notables. Las actualizaciones clave incluyen cambios significativos en la API, como la necesidad de utilizar `DeviceEnumerator.Shared` para la enumeración de dispositivos y pasos de inicialización adicionales para los motores X. Android Activity ya no es necesario para la creación de motores SDK.
Los usuarios de Windows verán mejorado el rendimiento de renderizado de vÃdeo MAUI y una nueva función de resaltado del ratón para las fuentes de captura de pantalla. Se han implementado varias correcciones de errores, incluyendo la resolución de problemas con el redimensionamiento de Avalonia VideoView, contraseñas de caracteres especiales para fuentes RTSP, y una fuga de memoria en el OverlayManager.
La actualización introduce propiedades para establecer las posiciones de inicio y parada en UniversalSourceSettings y añade eventos para notificar sobre adiciones/remociones de dispositivos en el DeviceEnumerator. Se ha añadido compatibilidad con gestores de errores personalizados para varios motores, y hay nuevas propiedades para establecer filtros de audio personalizados para las salidas de Virtual Camera SDK en varios componentes.
Las nuevas funciones incluyen la compatibilidad con secuencias NDI en VideoCaptureCoreX y bloques multimedia adicionales en Media Blocks SDK, como las clases BufferSink y CustomMediaBlock. Las funciones de recorte de fotogramas de vÃdeo se han mejorado con la incorporación de VideoCropBlock y VideoAspectRatioCropBlock. La actualización también incluye compatibilidad con el renderizador de audio WASAPI en el motor VideoCaptureCore y actualizaciones del efecto de audio Tempo. En general, esta versión se centra en mejorar el rendimiento, solucionar problemas crÃticos y añadir nuevas funcionalidades a los SDK .Net.
Compruebe el [registro de cambios](https://www.visioforge.com/help/docs/dotnet/changelog/#158/).
---END OF PAGE---
# Page: https://www.visioforge.com/es/news-2023
# Novedades y actualizaciones de productos en 2023
## VisioForge .Net SDKs v15.7 ha sido lanzado
(2023-11-12)
Se ha publicado la versión 15.7 de los SDK de .Net con varias mejoras y correcciones. Esta versión incluye compatibilidad con .Net 8 en todos los SDK.
Las mejoras clave en el SDK de captura de vÃdeo .Net incluyen la resolución de problemas con el evento `OnNetworkSourceDisconnect` que se llama dos veces, la fijación de la configuración de formato de fuente de audio en VideoCaptureCoreX, y la solución de problemas de renderizado nativo WPF con ventanas emergentes. El método Start/StartAsync en VideoCaptureCore ahora devuelve false si el dispositivo de captura de vÃdeo ya está siendo utilizado por otra aplicación.
Se han actualizado los motores X con nuevos codificadores de vÃdeo MPEG-2 y audio MP2, compatibilidad con el codificador de vÃdeo DNxHD y cambios en la configuración predeterminada de VP8/VP9 para la grabación en directo. Se han resuelto los problemas de enumeración de Decklink.
Los SDK multiplataforma se benefician de las actualizaciones del código fuente de Decklink, que resuelven problemas de nombres de dispositivo incorrectos, y del gestor de superposiciones, que ahora incluye una clase `OverlayManagerDateTime` para dibujar la fecha actual y texto personalizado. Además, se han resuelto las actualizaciones de seguridad de SkiaSharp y los problemas con el uso de System.Drawing.Bitmap en `OverlayManagerImage`.
Se ha añadido soporte para Avalonia 11.0.5, junto con actualizaciones de las fuentes y codificadores de VLC (libVLC 3.0.19) y FFMPEG, que solucionan problemas de falta de dependencias de MSVC. También se ha actualizado el motor ONVIF.
Por último, la actualización mejora la salida FFMPEG.exe en VideoCaptureCore, mejorando el soporte para codificadores x264 y x265 en construcciones FFMPEG personalizadas, y resuelve un raro problema de bloqueo con WinUI VideoView.
Compruebe el [registro de cambios](https://www.visioforge.com/help/docs/dotnet/changelog/#157/).
## VisioForge .Net SDKs v15.6 ha sido lanzado
(2023-09-20)
La versión 15.6 de los SDK de .Net introduce numerosas mejoras y nuevas funciones. El SDK de captura de vÃdeo mejora el rendimiento del recorte de vÃdeo en las CPU modernas e introduce una nueva API de superposición de vÃdeo, con demostraciones relacionadas que muestran su uso. La actualización también mejora la detección del codificador de hardware para sistemas con varias GPU. Se ha actualizado Avalonia VideoView para resolver problemas con su recreación.
Media Player SDK incluye cambios como la resolución de problemas de inicio en Android y la adición de nuevos métodos para la selección de secuencias de vÃdeo. Se han implementado mejoras de rendimiento para vÃdeos 4K y 8K en la renderización WPF en todos los SDK. Se han resuelto varios problemas, incluidos los de recorte de vÃdeo y múltiples salidas en VideoCaptureCoreX.
Se incluyen nuevas demos y soporte para funciones como streaming NDI, madVR y múltiples pistas de audio. La actualización también añade varias clases y métodos nuevos, como la compatibilidad con fuentes VNC y el redimensionamiento de vÃdeo basado en IA mediante Nvidia Maxine SDK. El Media Blocks SDK añade nuevos bloques OpenCV, bloques NDI source y sink, y codificadores de vÃdeo adicionales como rav1e AV1 y GIF.
También forman parte de esta versión mejoras en la reproducción en memoria, problemas con el medidor VU y mayor compatibilidad con WASAPI 2. Los SDK admiten ahora la eliminación asÃncrona con la interfaz IAsyncDisposable y han resuelto varios problemas de detección y reproducción. Nuevas funciones como la gestión de datos KLV, la transmisión en red MJPEG y las funcionalidades mejoradas de los bloques multimedia amplÃan aún más las capacidades de los SDK. Por último, la actualización incluye una serie de mejoras de estabilidad y rendimiento en distintas plataformas y componentes.
Compruebe el [registro de cambios](https://www.visioforge.com/help/docs/dotnet/changelog/#156/).
---END OF PAGE---
# Page: https://www.visioforge.com/es/news-2022
# Novedades y actualizaciones de productos en 2022
## VisioForge .Net SDKs v15.5 ha sido lanzado
(2022-12-11)
Se ha publicado la versión 15.5 de los SDK de .Net con varias novedades y actualizaciones. Esta versión es compatible con .Net 7 e introduce una serie de mejoras en varios componentes del SDK.
En el SDK .Net de captura de vÃdeo, se ha añadido un evento NetworkDisconnect al motor de cámara IP MJPEG de baja latencia, y el evento `OnRTSPLowLatencyRAWFrame` permite recuperar fotogramas RAW de secuencias RTSP utilizando el motor RTSP de baja latencia. El motor VideoEditCoreX es ahora compatible con demos basadas en Linux y cuenta con una nueva propiedad AutoTransitions. Además, se ha mejorado la compatibilidad con Snap Camera para la codificación MP4 HW y la compatibilidad con múltiples salidas Decklink tanto en Video Capture como en Video Edit SDKs.
Para las APIs multiplataforma, los tipos `System.Drawing.Rectangle` y `System.Drawing.Size` han sido reemplazados por `VisioForge.Types.Rectangle` y `VisioForge.Types.Size`. La actualización también trae muestras MAUI (BETA) y la mejora de licencias en lÃnea.
Se ha actualizado el Media Player SDK .Net con soporte de segmentos en su motor multiplataforma, una API de listas de reproducción para el motor exclusivo de Windows y descodificación GPU HW para el motor VLC. Se han resuelto problemas con la reproducción inversa, el método `MediaPlayerCore.Video\\_Renderer\\_SetCustomWindowHandle` y las aplicaciones WPF HighDPI que utilizan EVR. Además, el SDK de Media Player ahora admite la reproducción de fotogramas anteriores en su motor multiplataforma.
El Media Blocks SDK .Net ha añadido una demo de captura de pantalla WPF, mientras que ONVIFControl y las APIs relacionadas están ahora disponibles en todas las plataformas. Se ha producido un cambio en la API, ya que el tipo de velocidad de fotogramas ha pasado de "double" a "VideoFrameRate" en todas las API.
Otras mejoras incluyen una nueva demostración de Camera Light, un manejo actualizado de la llamada "rtsp\\_source\\_create\\_audio\\_resampler" en el motor RTSP de baja latencia para Video Capture SDK .Net, y soporte mejorado de segmentos en el Media Player SDK. En conjunto, estas actualizaciones mejoran la funcionalidad, la compatibilidad y el rendimiento de los distintos SDK .Net.
Compruebe el [registro de cambios](https://www.visioforge.com/help/docs/dotnet/changelog/#155/).
## VisioForge .Net SDKs v15.4 ha sido lanzado
(2022-07-23)
Se ha publicado la versión 15.4 de los SDK de .Net, que incluye una serie de actualizaciones y nuevas funciones. Esta versión resuelve varios problemas e introduce mejoras en varios componentes.
Las principales actualizaciones incluyen la resolución del problema de ignorar la propiedad `Play\\_PauseAtFirstFrame` y mejoras en la compatibilidad con HighDPI en muestras WinForms y para el renderizador de vÃdeo Direct2D. La clase ONVIFControl ha sido mejorada con nuevas APIs: `GetDeviceCapabilities` y `GetMediaEndpoints`.
Se ha resuelto el problema de la recodificación forzada al unir archivos FFMPEG sin recodificar. La actualización también incluye una actualización de Sentry y añade ajustes de interpolación de vÃdeo para los efectos de vÃdeo Zoom y Pan.
Se ha añadido compatibilidad con el marco de interfaz de usuario GtkSharp para la renderización de vÃdeo, y la API FastEdit se ha cambiado a async. Además, se ha resuelto un problema de volteo de pantalla relacionado con la propiedad `Video\\_Effects\\_AllowMultipleStreams` del núcleo .Net del SDK de captura de vÃdeo.
La demo RTSP MultiView ha sido actualizada para incluir decodificación GPU y acceso a flujos RAW. Las nuevas funciones incluyen un evento `OnLoop` en Media Player SDK .Net y una función de bucle en Media Blocks SDK .Net.
Debido a problemas con Avalonia UI y NativeControl, Avalonia VideoView ha sido degradado a la versión 0.10.12. Se ha añadido una nueva demo de File Encryptor al Video Edit SDK .Net, proporcionando un ejemplo de cómo encriptar archivos de video.
En general, esta versión mejora la funcionalidad, resuelve problemas crÃticos e introduce nuevas caracterÃsticas para mejorar la experiencia del usuario en todos los SDK de .Net.
Compruebe el [registro de cambios](https://www.visioforge.com/help/docs/dotnet/changelog/#154/).
## VisioForge .Net SDKs v15.3 ha sido lanzado
(2022-05-21)
Se ha publicado la versión 15.3 de los SDK de .Net con una serie de mejoras y optimizaciones. Entre las principales mejoras se incluyen la reducción del tiempo de inicio de la aplicación en PC equipados con tarjetas Decklink y la compatibilidad con NDI SDK v5. Se ha resuelto un problema con la salida de MKV Legacy que provocaba excepciones de emisión erróneas.
Se han realizado optimizaciones de rendimiento en los efectos de zoom y paneo, y se ha introducido una API básica de Media Blocks, aunque todavÃa es un trabajo en progreso. El Video Edit SDK .Net ahora soporta streaming de red HLS.
En WPF VideoView, se ha añadido una nueva propiedad Rotate, que permite rotar el vÃdeo 90, 180 o 270 grados. Los usuarios también pueden utilizar el método `GetImageLayer()` para recuperar la capa de imagen para aplicar transformaciones personalizadas.
Un cambio en la API ha renombrado `FilterHelpers` a `FilterDialogHelper`. Los ensamblados `VisioForge.Types` y `VisioForge.MediaFramework` se han fusionado en `VisioForge.Core`, y las clases UI se han movido a los ensamblados `VisioForge.Core.UI.\\*` y paquetes NuGet independientes. Además, `VisioForge.Types` ha sido renombrado a `VisioForge.Core.Types`, y `VisioForge.Core` ya no depende del framework Windows Forms.
En conjunto, estas actualizaciones mejoran el rendimiento, agilizan la API y amplÃan la funcionalidad de los SDK de .Net.
Compruebe el [registro de cambios](https://www.visioforge.com/help/docs/dotnet/changelog/#153/).
## VisioForge .Net SDKs v15.2 ha sido lanzado
(2022-01-20)
Se ha publicado la versión 15.2 de los SDK de .Net, que incluye varias novedades y mejoras. Entre las actualizaciones más importantes cabe destacar la incorporación de las propiedades `HorizontalAlignment` y `VerticalAlignment` para logotipos de texto e imagen, que permiten una mejor personalización y posicionamiento.
Se ha actualizado la compatibilidad con ONVIF, resolviendo problemas relacionados con las especificaciones de nombre de usuario y contraseña en URL sin la correspondiente configuración de origen. Se ha mejorado la compatibilidad con RTSP para cámaras IP, lo que garantiza conexiones y un rendimiento más fiables.
Se han resuelto los problemas con el diálogo de salida FFMPEG.exe y la captura independiente en aplicaciones de servicio. El SDK ha migrado de NewtonsoftJson a System.Text.Json para un mejor rendimiento y un soporte de serialización moderno.
Se ha actualizado la salida DirectCapture para cámaras IP y se ha añadido una nueva opción de salida DirectCapture ASF. El tipo de propiedad `IPCameraSourceSettings.URL` se ha cambiado de cadena a `System.Uri`, promoviendo un mejor manejo de los tipos de URL.
Se han actualizado los efectos de vÃdeo y audio, y se han implementado optimizaciones generales del rendimiento del procesamiento de vÃdeo. Varias correcciones de errores y mejoras de rendimiento aumentan aún más la estabilidad y eficacia del SDK.
En general, esta versión se centra en mejorar la funcionalidad, mejorar el rendimiento y resolver problemas crÃticos en los SDK de .Net.
Compruebe el [registro de cambios](https://www.visioforge.com/help/docs/dotnet/changelog/#152/).
## VisioForge Fiestas de fin de año 30% de descuento
(2022-01-03)
Celebra las fiestas de fin de año con nuestra venta especial, que ofrece un increÃble \*\*30% descuento\*\* en todos los productos
### ð \*\*Disfrute de un 30% de descuento en todos los productos\*\* ð
Empieza el Año Nuevo con increÃbles ahorros en nuestro software premium. Utilice el código de cupón \*\*NY30\*\* en la caja para recibir un 30% de descuento en todos los productos.
¡No se pierda estos fantásticos descuentos! Aproveche al máximo las fiestas de fin de año con nuestras ofertas especiales y mejore su experiencia de software.
¡Felices compras y Feliz Año Nuevo!
---END OF PAGE---
# Page: https://www.visioforge.com/es/news-2021
# Novedades y actualizaciones de productos en 2021
## VisioForge .Net SDKs v15.1 ha sido lanzado
2022-11-26
La versión 15.1 de .Net SDKs introduce soporte multiplataforma con Android para el Media Player SDK .Net y planes para iOS/macOS para diciembre. Desactiva los mensajes de depuración de Sentry en la consola, añade streaming Icecast y actualiza la propiedad `VideoStreamInfo.FrameRate` a `VideoFrameRate`. VideoView de WPF ha mejorado la reproducción de secuencias de cámaras IP. Cambios significativos en la API fusionan varios componentes en `VisioForge.Core`, y la API de efectos de audio ahora utiliza nombres de cadena. Un nuevo motor multiplataforma basado en GStreamer soporta Windows y otras plataformas en este ciclo de desarrollo.
Compruebe el [registro de cambios](https://www.visioforge.com/help/docs/dotnet/changelog/#151/).
## VisioForge .Net SDKs v15.0 ha sido lanzado
2022-11-01
La versión 15.0 del SDK de .Net introduce cambios significativos en la API, dividiendo los controles principales en partes Core y VideoView. El SDK ya no tiene versiones TRIAL y FULL separadas, eliminando la propiedad `SDK\\_State`.
Se recomienda a los desarrolladores que sustituyan los controles de interfaz de usuario por `VideoView` y cambien el nombre de las clases principales (por ejemplo, `VideoCaptureCore`) para que coincidan con los nombres de control de interfaz de usuario utilizados anteriormente. Este cambio permite la compatibilidad con plataformas de interfaz de usuario adicionales como UWP, MAUI, Eco y Avalonia.
Compruebe el [registro de cambios](https://www.visioforge.com/help/docs/dotnet/changelog/#150/).
## VisioForge .Net SDKs v14.3 ha sido lanzado
2022-09-14
La versión 14.3 de los SDK de .Net incluye varias actualizaciones y mejoras importantes. Se ha resuelto un problema crÃtico con la creación del filtro Video Resize para redistribuciones NuGet y se ha actualizado la telemetrÃa. También se ha actualizado la salida `VFDirectCaptureMP4Output`. Esta versión añade soporte para .Net 6 (preview) y elimina Nvidia CUDA, recomendando NVENC como la alternativa moderna para la codificación H264/HEVC.
Se ha actualizado el motor MJPEG de baja latencia para cámaras IP y se ha mejorado el listado de fuentes NDI. Se ha mejorado la compatibilidad con ONVIF y se ha añadido compatibilidad con .Net Core 3.1 para el motor de fuentes RTSP de baja latencia. Se han resuelto los problemas con Picture-in-Picture para el modo 2x2. El proyecto y las soluciones se han dividido en archivos independientes para .Net Framework 4.7.2, .Net Core 3.1, .Net 5 y .Net 6, lo que facilita una mejor organización y compatibilidad.
Compruebe el [registro de cambios](https://www.visioforge.com/help/docs/dotnet/changelog/#143/).
## VisioForge .Net SDKs v14.2 ha sido lanzado
2022-08-11
La versión 14.2 de .Net SDKs trae varias actualizaciones y correcciones. Se ha resuelto el problema con la captura de secuencias de audio al utilizar la salida del SDK de cámara virtual. Se ha sustituido `VFMP4v8v10Output` por `VFMP4Output`. Se ha añadido un nuevo método `CanStart` a los elementos `Video\\_CaptureDevicesInfo`, que comprueba si un dispositivo puede iniciarse y no está siendo utilizado exclusivamente por otra aplicación.
El `ONVIFControl` soporta ahora la API async/await, mejorando sus capacidades asÃncronas. Se ha corregido un problema de procesamiento incorrecto de ColorKey en el efecto de vÃdeo Text Overlay. Se ha añadido soporte de velocidad de fotogramas forzada para la fuente de cámara IP de baja latencia RTSP. Se han actualizado los codificadores MP4v11 AMD y se ha resuelto un problema de marca de tiempo durante la pausa/reanudación de captura independiente de MP4v11.
El flujo de red y la salida de FFMPEG.exe se han actualizado a la última versión de FFMPEG. Ya no es necesario instalar el redistribuible VC++, ya que la vinculación de VC++ se ha cambiado a estática, excepto para la salida XIPH opcional. Además, muchos filtros DirectShow base se han movido al módulo `VisioForge\\_BaseFilters`.
Compruebe el [registro de cambios](https://www.visioforge.com/help/docs/dotnet/changelog/#142/).
---END OF PAGE---
# Page: https://www.visioforge.com/it/news-2024
# Novità e aggiornamenti di prodotto nel 2024
## Vendita del 50% per il Black Friday!
(2024-06-03)
ð \*\*Allarme saldi estivi!\*\* ðAcquistate subito il nostro software più apprezzato con uno sconto imbattibile del 50%! Non perdete questa offerta limitata nel tempo per aumentare la vostra produttività . Aggiornate oggi stesso e risparmiate molto! ðð»
Codice coupon: \*\*ESTATE50\*\*
## Ã stato rilasciato VisioForge .Net SDKs v15.9
(2024-04-07)
à stata rilasciata la versione 15.9 degli SDK .Net con numerosi aggiornamenti e nuove funzionalità . Tra i miglioramenti più significativi vi sono la risoluzione di problemi relativi al rapporto d'aspetto dei video, l'aggiornamento della ridistribuzione GStreamer e l'aggiunta del supporto per le telecamere Basler USB3/GigE. Il Video Edit SDK .Net utilizza ora impostazioni di font basate su SkiaSharp per la classe TextOverlay, consentendo configurazioni di font personalizzate. à stato aggiunto il supporto per i flussi a MediaInfoReader su Windows, consentendo il recupero di informazioni sui file video/audio da varie fonti.
Il motore Live Video Compositor è stato aggiornato per migliorare il supporto delle sorgenti di file e nella Demo Computer Vision del Video Capture SDK è stato introdotto un rilevatore coperto da telecamera. Sono state aggiunte nuove API per il recupero di istantanee dai file video e il supporto iOS è ora incluso nei campioni MAUI. Sono state risolte le perdite di memoria nelle sorgenti RTSP e l'SDK Media Player supporta ora i flussi di dati nei file video utilizzando il motore sorgente FFMPEG.
Altre caratteristiche includono opzioni FFMPEG personalizzate per le telecamere IP, la risoluzione di problemi di connessione di rete con le sorgenti FFMPEG, il supporto RTSP MultiView nell'SDK Media Blocks e il supporto per le telecamere FLIR/Teledyne che utilizzano l'SDK Spinnaker. L'SDK Video Edit supporta ora l'uso di .Net Stream come sorgente di ingresso e il supporto di .Net 7 è stato reintrodotto nel pacchetto MAUI. L'interfaccia IAsyncDisposable è stata aggiunta a tutte le classi principali per lo smaltimento asincrono.
Altri aggiornamenti risolvono problemi di acquisizione video su Android, aggiungono campioni di streaming HLS e risolvono gli arresti anomali relativi alle configurazioni multischermo. Sono stati apportati miglioramenti alla velocità di rendering video MAUI, ai problemi di riproduzione dei media e alla connettività della sorgente webcam. Sono stati risolti i problemi di riproduzione audio e il cattivo mixaggio dell'audio e l'SDK di Media Player supporta ora la crescita dei file MPEG-TS per il motore VLC.
Controllare il [changelog](https://www.visioforge.com/help/docs/dotnet/changelog/#159/).
## Ã stato rilasciato VisioForge .Net SDKs v15.8
(2024-01-22)
à stata rilasciata la versione 15.8 degli SDK .Net, che apporta diverse modifiche e miglioramenti di rilievo. Gli aggiornamenti principali includono modifiche significative alle API, come la richiesta dell'uso di `DeviceEnumerator.Shared` per l'enumerazione dei dispositivi e passaggi di inizializzazione aggiuntivi per gli X-engine. Android Activity non è più necessario per la creazione di motori SDK.
Gli utenti Windows vedranno migliorate le prestazioni del rendering video MAUI e una nuova funzione di evidenziazione del mouse per le sorgenti di cattura dello schermo. Sono stati corretti diversi bug, tra cui la risoluzione di problemi con il ridimensionamento di Avalonia VideoView, le password di caratteri speciali per le sorgenti RTSP e una perdita di memoria nell'OverlayManager.
L'aggiornamento introduce proprietà per l'impostazione delle posizioni di avvio e arresto in UniversalSourceSettings e aggiunge eventi per la notifica di aggiunte/rimozioni di dispositivi in DeviceEnumerator. à stato aggiunto il supporto dei gestori di errori personalizzati per diversi motori e sono presenti nuove proprietà per l'impostazione di filtri audio personalizzati per le uscite dell'SDK Virtual Camera in vari componenti.
Le nuove caratteristiche includono il supporto dello streaming NDI in VideoCaptureCoreX e blocchi multimediali aggiuntivi nel Media Blocks SDK, come le classi BufferSink e CustomMediaBlock. Le capacità di ritaglio dei fotogrammi video sono state migliorate con l'aggiunta di VideoCropBlock e VideoAspectRatioCropBlock. L'aggiornamento include anche il supporto per il rendering audio WASAPI nel motore VideoCaptureCore e aggiornamenti dell'effetto audio Tempo. Nel complesso, questa release si concentra sul miglioramento delle prestazioni, sulla correzione di problemi critici e sull'aggiunta di nuove funzionalità agli SDK .Net.
Controllare il [changelog](https://www.visioforge.com/help/docs/dotnet/changelog/#158/).
---END OF PAGE---
# Page: https://www.visioforge.com/it/news-2023
# Novità e aggiornamenti di prodotto nel 2023
## Ã stato rilasciato VisioForge .Net SDKs v15.7
(2023-11-12)
à stata rilasciata la versione 15.7 degli SDK .Net con diversi miglioramenti e correzioni. Questa versione include il supporto per .Net 8 in tutti gli SDK.
I principali miglioramenti apportati al Video Capture SDK .Net includono la risoluzione dei problemi legati alla doppia chiamata dell'evento `OnNetworkSourceDisconnect`, la correzione delle impostazioni del formato della sorgente audio in VideoCaptureCoreX e la risoluzione dei problemi di rendering nativo di WPF con le finestre a comparsa. Il metodo Start/StartAsync di VideoCaptureCore ora restituisce false se il dispositivo di acquisizione video è già utilizzato da un'altra applicazione.
I motori X sono stati aggiornati con nuovi codificatori video MPEG-2 e audio MP2, il supporto del codificatore video DNxHD e le modifiche alle impostazioni predefinite VP8/VP9 per la registrazione dal vivo. Sono stati risolti i problemi di enumerazione dei Decklink.
Gli SDK multipiattaforma beneficiano degli aggiornamenti del sorgente Decklink, che risolve i problemi relativi ai nomi errati dei dispositivi, e dell'Overlay Manager, ora dotato di una classe `OverlayManagerDateTime` per disegnare la data corrente e il testo personalizzato. Inoltre, sono stati risolti gli aggiornamenti di sicurezza di SkiaSharp e i problemi relativi all'utilizzo di System.Drawing.Bitmap in `OverlayManagerImage`.
à stato aggiunto il supporto per Avalonia 11.0.5 e sono stati apportati aggiornamenti ai sorgenti e ai codificatori VLC (libVLC 3.0.19) e FFMPEG, che risolvono problemi di dipendenze MSVC mancanti. Anche il motore ONVIF è stato aggiornato.
Infine, l'aggiornamento migliora l'output FFMPEG.exe in VideoCaptureCore, migliorando il supporto per gli encoder x264 e x265 nelle build FFMPEG personalizzate, e risolve un raro problema di crash con WinUI VideoView.
Controllare il [changelog](https://www.visioforge.com/help/docs/dotnet/changelog/#157/).
## Ã stato rilasciato VisioForge .Net SDKs v15.6
(2023-09-20)
La versione 15.6 degli SDK .Net introduce numerosi miglioramenti e nuove funzionalità . L'SDK per la cattura video migliora le prestazioni del video crop sulle moderne CPU e introduce una nuova API per la sovrapposizione dei video, con relative demo che ne mostrano l'utilizzo. L'aggiornamento migliora anche il rilevamento dell'encoder hardware per i sistemi con più GPU. Avalonia VideoView è stato aggiornato per risolvere i problemi di ricreazione.
L'SDK Media Player include modifiche come la risoluzione di problemi di avvio su Android e l'aggiunta di nuovi metodi per la selezione del flusso video. Sono stati implementati miglioramenti delle prestazioni per i video 4K e 8K nel rendering WPF in tutti gli SDK. Sono stati risolti vari problemi, tra cui i problemi di ritaglio dei video e le uscite multiple in VideoCaptureCoreX.
Sono incluse nuove demo e il supporto per funzioni come lo streaming NDI, madVR e le tracce audio multiple. L'aggiornamento aggiunge anche diverse nuove classi e metodi, come il supporto alle sorgenti VNC e il ridimensionamento video basato sull'intelligenza artificiale utilizzando l'SDK Nvidia Maxine. L'SDK Media Blocks aggiunge nuovi blocchi OpenCV, blocchi NDI source e sink e ulteriori codificatori video come rav1e AV1 e GIF.
Questa versione contiene anche miglioramenti alla riproduzione della memoria, ai problemi relativi ai misuratori VU e al supporto avanzato per WASAPI 2. Gli SDK supportano ora lo smaltimento asincrono con l'interfaccia IAsyncDisposable e hanno risolto vari problemi di rilevamento e riproduzione. Nuove caratteristiche come la gestione dei dati KLV, lo streaming di rete MJPEG e le funzionalità migliorate dei blocchi multimediali ampliano ulteriormente le capacità degli SDK. Infine, l'aggiornamento include una serie di miglioramenti della stabilità e delle prestazioni su diverse piattaforme e componenti.
Controllare il [changelog](https://www.visioforge.com/help/docs/dotnet/changelog/#156/).
---END OF PAGE---
# Page: https://www.visioforge.com/it/news-2022
# Novità e aggiornamenti sui prodotti nel 2022
## Ã stato rilasciato VisioForge .Net SDKs v15.5
(2022-12-11)
à stata rilasciata la versione 15.5 degli SDK .Net con numerose nuove funzionalità e aggiornamenti. Questa versione include il supporto per .Net 7 e introduce una serie di miglioramenti in vari componenti dell'SDK.
Nel Video Capture SDK .Net è stato aggiunto un evento NetworkDisconnect al motore delle telecamere IP MJPEG Low Latency e l'evento `OnRTSPLowLatencyRAWFrame` consente di recuperare i fotogrammi RAW dai flussi RTSP utilizzando il motore RTSP Low Latency. Il motore VideoEditCoreX supporta ora le demo basate su Linux e presenta una nuova proprietà AutoTransitions. Inoltre, è stata migliorata la compatibilità con Snap Camera per la codifica MP4 HW e il supporto per più uscite Decklink in entrambi gli SDK Video Capture e Video Edit.
Per le API multipiattaforma, i tipi `System.Drawing.Rectangle` e `System.Drawing.Size` sono stati sostituiti da `VisioForge.Types.Rectangle` e `VisioForge.Types.Size`. L'aggiornamento porta anche campioni MAUI (BETA) e licenze online migliorate.
Il Media Player SDK .Net è stato aggiornato con il supporto dei segmenti nel suo motore multipiattaforma, un'API Playlist per il motore Windows-only e la decodifica HW GPU per il motore VLC. Sono stati risolti i problemi relativi alla riproduzione inversa, al metodo `MediaPlayerCore.Video\\_Renderer\\_SetCustomWindowHandle` e alle applicazioni WPF HighDPI che utilizzano EVR. Inoltre, l'SDK Media Player supporta ora la riproduzione di fotogrammi precedenti nel suo motore multipiattaforma.
L'SDK .Net di Media Blocks ha aggiunto una demo di cattura dello schermo in WPF, mentre ONVIFControl e le relative API sono ora disponibili su tutte le piattaforme. à stata apportata una modifica alle API: il tipo di frame rate è passato da double a `VideoFrameRate` in tutte le API.
Altri miglioramenti includono una nuova demo Camera Light, una gestione aggiornata della chiamata "rtsp\\_source\\_create\\_audio\\_resampler" nel motore RTSP Low Latency per Video Capture SDK .Net e un supporto migliorato dei segmenti nel Media Player SDK. Questi aggiornamenti migliorano complessivamente la funzionalità , la compatibilità e le prestazioni dei vari SDK .Net.
Controllare il [changelog](https://www.visioforge.com/help/docs/dotnet/changelog/#155/).
## Ã stato rilasciato VisioForge .Net SDKs v15.4
(2022-07-23)
à stata rilasciata la versione 15.4 degli SDK .Net, con una serie di aggiornamenti e nuove funzionalità . Questa versione risolve diversi problemi e introduce miglioramenti in vari componenti.
Gli aggiornamenti principali includono la risoluzione del problema dell'ignoranza della proprietà `Play\\_PauseAtFirstFrame` e miglioramenti al supporto HighDPI nei campioni WinForms e per il renderer video Direct2D. La classe ONVIFControl è stata migliorata con nuove API: `GetDeviceCapabilities` e `GetMediaEndpoints`.
à stato risolto il problema della ricodifica forzata quando si univano file FFMPEG senza ricodifica. L'aggiornamento include anche un aggiornamento di Sentry e aggiunge impostazioni di interpolazione video per gli effetti video Zoom e Pan.
à stato aggiunto il supporto per il framework GtkSharp UI per il rendering video e l'API FastEdit è stata modificata in async. Inoltre, è stato risolto un problema di screen flip legato alla proprietà `Video\\_Effects\\_AllowMultipleStreams` nel core di Video Capture SDK .Net.
Die RTSP-MultiView-Demo wurde aktualisiert, um GPU-Decodierung und Zugriff auf RAW-Streams zu ermöglichen. Zu den neuen Funktionen gehören ein "OnLoop"-Ereignis im Media Player SDK .Net und eine Schleifenfunktion im Media Blocks SDK .Net.
A causa di problemi con Avalonia UI e NativeControl, Avalonia VideoView è stato declassato alla versione 0.10.12. All'SDK .Net di Video Edit è stata aggiunta una nuova demo di File Encryptor, che fornisce un esempio di come criptare i file video.
Nel complesso, questa release migliora le funzionalità , risolve i problemi critici e introduce nuove caratteristiche per migliorare l'esperienza dell'utente in tutti gli SDK .Net.
Controllare il [changelog](https://www.visioforge.com/help/docs/dotnet/changelog/#154/).
## Ã stato rilasciato VisioForge .Net SDKs v15.3
(2022-05-21)
à stata rilasciata la versione 15.3 degli SDK .Net con una serie di miglioramenti e ottimizzazioni. I principali miglioramenti includono la riduzione del tempo di avvio dell'applicazione per i PC dotati di schede Decklink e il supporto per NDI SDK v5. à stato risolto un problema con l'output MKV Legacy che causava eccezioni di cast errate.
Sono state apportate ottimizzazioni alle prestazioni degli effetti di zoom e pan ed è stata introdotta un'API di base per i blocchi multimediali, anche se si tratta ancora di un lavoro in corso. Il Video Edit SDK .Net supporta ora lo streaming di rete HLS.
In WPF VideoView è stata aggiunta una nuova proprietà Rotate, che consente la rotazione del video di 90, 180 o 270 gradi. Gli utenti possono anche utilizzare il metodo `GetImageLayer()` per recuperare il livello immagine per applicare trasformazioni personalizzate.
Una modifica dell'API ha rinominato `FilterHelpers` in `FilterDialogHelper`. Gli assiemi `VisioForge.Types` e `VisioForge.MediaFramework` sono stati fusi in `VisioForge.Core` e le classi UI sono state spostate negli assiemi `VisioForge.Core.UI.\\*` e nei pacchetti NuGet indipendenti. Inoltre, `VisioForge.Types` è stato rinominato in `VisioForge.Core.Types` e `VisioForge.Core` non dipende più dal framework Windows Forms.
Questi aggiornamenti migliorano complessivamente le prestazioni, semplificano l'API ed espandono le funzionalità degli SDK .Net.
Controllare il [changelog](https://www.visioforge.com/help/docs/dotnet/changelog/#153/).
## Ã stato rilasciato VisioForge .Net SDKs v15.2
(2022-01-20)
à stata rilasciata la versione 15.2 degli SDK .Net, che presenta numerose nuove aggiunte e miglioramenti. Gli aggiornamenti principali includono l'aggiunta delle proprietà `HorizontalAlignment` e `VerticalAlignment` per i loghi di testo e immagine, che consentono una migliore personalizzazione e posizionamento.
Il supporto ONVIF è stato aggiornato, risolvendo i problemi legati alle specifiche di nome utente e password negli URL senza le corrispondenti impostazioni di origine. Il supporto RTSP per le telecamere IP è stato migliorato, garantendo connessioni e prestazioni più affidabili.
Sono stati risolti i problemi relativi alla finestra di dialogo di output FFMPEG.exe e all'acquisizione separata nelle applicazioni di servizio. L'SDK è migrato da NewtonsoftJson a System.Text.Json per migliorare le prestazioni e il supporto della serializzazione moderna.
à stata aggiornata l'uscita DirectCapture per le telecamere IP ed è stata aggiunta una nuova opzione di uscita DirectCapture ASF. Il tipo di proprietà `IPCameraSourceSettings.URL` è stato cambiato da stringa a `System.Uri`, favorendo una migliore gestione dei tipi di URL.
Gli effetti video e audio sono stati aggiornati e sono state implementate ottimizzazioni delle prestazioni generali di elaborazione video. Varie correzioni di bug e miglioramenti delle prestazioni migliorano ulteriormente la stabilità e l'efficienza dell'SDK.
Nel complesso, questa release si concentra sul potenziamento delle funzionalità , sul miglioramento delle prestazioni e sulla risoluzione di problemi critici in tutti gli SDK .Net.
Controllare il [changelog](https://www.visioforge.com/help/docs/dotnet/changelog/#152/).
## VisioForge Vacanze di Capodanno 30% di sconto
(2022-01-03)
Festeggiate le vacanze di Capodanno con la nostra vendita speciale, che offre un'incredibile \*\*30% di sconto\*\* su tutti i prodotti!
### ð \*\*Sconto del 30% su tutti i prodotti!\*\* ð
Iniziate il nuovo anno con un incredibile risparmio sul nostro software premium. Utilizzate il codice coupon \*\*NY30\*\* alla cassa per ricevere uno sconto del 30% su tutti i prodotti.
Non perdete questi fantastici risparmi! Approfittate delle vacanze di Capodanno con le nostre offerte speciali e migliorate la vostra esperienza software.
Buon shopping e buon anno!
---END OF PAGE---
# Page: https://www.visioforge.com/it/news-2021
# Novità e aggiornamenti di prodotto nel 2021
## Ã stato rilasciato VisioForge .Net SDKs v15.1
2022-11-26
La versione 15.1 degli SDK .Net introduce il supporto multipiattaforma con Android per l'SDK .Net del lettore multimediale ed è prevista per iOS/macOS entro dicembre. Disattiva i messaggi di debug di Sentry nella console, aggiunge lo streaming Icecast e aggiorna la proprietà `VideoStreamInfo.FrameRate` a `VideoFrameRate`. La VideoView WPF ha migliorato la riproduzione dei flussi delle telecamere IP. Significative modifiche all'API che fondono diversi componenti in `VisioForge.Core`, mentre l'API degli effetti audio ora utilizza nomi di stringhe. Un nuovo motore multipiattaforma basato su GStreamer supporta Windows e altre piattaforme in questo ciclo di sviluppo.
Controllare il [changelog](https://www.visioforge.com/help/docs/dotnet/changelog/#151/).
## Ã stato rilasciato VisioForge .Net SDKs v15.0
2022-11-01
La versione 15.0 degli SDK .Net introduce modifiche significative alle API, dividendo i controlli principali in Core e VideoView. L'SDK non dispone più di versioni TRIAL e FULL separate, eliminando la proprietà `SDK\\_State
Si consiglia agli sviluppatori di sostituire i controlli dell'interfaccia utente con `VideoView` e di rinominare le classi principali (ad esempio, `VideoCaptureCore`) in modo che corrispondano ai nomi dei controlli dell'interfaccia utente usati in precedenza. Questa modifica consente di supportare altre piattaforme UI come UWP, MAUI, Eco e Avalonia.
Controllare il [changelog](https://www.visioforge.com/help/docs/dotnet/changelog/#150/).
## Ã stato rilasciato VisioForge .Net SDKs v14.3
2022-09-14
La versione 14.3 degli SDK .Net include diversi aggiornamenti e miglioramenti importanti. à stato risolto un problema critico con la creazione del filtro Video Resize per le ridistribuzioni NuGet ed è stata aggiornata la telemetria. Anche l'output `VFDirectCaptureMP4Output` è stato aggiornato. Questa versione aggiunge il supporto per .Net 6 (anteprima) e rimuove Nvidia CUDA, raccomandando NVENC come alternativa moderna per la codifica H264/HEVC.
Il motore MJPEG Low Latency delle telecamere IP è stato aggiornato e l'elenco delle sorgenti NDI è stato migliorato. Il supporto ONVIF è stato migliorato ed è stato aggiunto il supporto .Net Core 3.1 per il motore sorgente RTSP Low Latency. Sono stati risolti i problemi relativi al Picture-in-Picture per la modalità 2x2. Il progetto e le soluzioni sono stati suddivisi in file indipendenti per .Net Framework 4.7.2, .Net Core 3.1, .Net 5 e .Net 6, per facilitare l'organizzazione e la compatibilità .
Controllare il [changelog](https://www.visioforge.com/help/docs/dotnet/changelog/#143/).
## Ã stato rilasciato VisioForge .Net SDKs v14.2
2022-08-11
La versione 14.2 degli SDK .Net apporta diversi aggiornamenti e correzioni. à stato risolto il problema della cattura del flusso audio quando si utilizza l'uscita Virtual Camera SDK. L'uscita `VFMP4v8v10Output` è stata sostituita con `VFMP4Output`. à stato aggiunto un nuovo metodo `CanStart` agli elementi `Video\\_CaptureDevicesInfo`, che verifica se un dispositivo può essere avviato e non è utilizzato esclusivamente da un'altra applicazione.
L'API `ONVIFControl` ora supporta async/await, migliorando le sue capacità asincrone. à stato risolto un problema di elaborazione non corretta dei ColorKey nell'effetto video Text Overlay. à stato aggiunto il supporto per la frequenza dei fotogrammi forzata per la sorgente di telecamere IP RTSP Low Latency. I codificatori MP4v11 AMD sono stati aggiornati ed è stato risolto un problema di timestamp durante la pausa/ripresa dell'acquisizione separata MP4v11.
Lo streaming di rete e l'output di FFMPEG.exe sono stati aggiornati all'ultima versione di FFMPEG. Non è più necessario installare il ridistribuibile VC++, poiché il collegamento VC++ è stato modificato in statico, tranne che per l'output XIPH opzionale. Inoltre, molti filtri DirectShow di base sono stati spostati nel modulo `VisioForge\\_BaseFilters`.
Controllare il [changelog](https://www.visioforge.com/help/docs/dotnet/changelog/#142/).
---END OF PAGE---
license: CC-BY-4.0
author: VisioForge
---END OF PAGE---
# Page: https://www.visioforge.com/de/privacy-policy
# Datenschutzrichtlinie und GDPR-Konformität
Diese Datenschutzrichtlinie erläutert die Art und Weise, wie VisioForge personenbezogene Daten unserer Nutzer in Übereinstimmung mit der Allgemeinen Datenschutzverordnung (GDPR) sammelt, verwendet, pflegt und offenlegt. VisioForge verpflichtet sich, Ihre Datenschutzrechte zu respektieren und Ihre personenbezogenen Daten zu schützen.
## Definitionen
**Persönliche Daten**: Alle Informationen, die zur Identifizierung einer Person verwendet werden können, wie Name, Adresse, E-Mail, IP-Adresse und andere ähnliche Daten.
**Verarbeitung**: Jeder mit personenbezogenen Daten durchgeführte Vorgang, einschließlich der Erhebung, Verwendung, Speicherung oder Löschung.
## Datenkontrolleur
VisioForge ist der Datenverantwortliche und ist für Ihre persönlichen Daten verantwortlich. Wir bestimmen die Zwecke und Mittel der Verarbeitung personenbezogener Daten in Übereinstimmung mit dieser Richtlinie.
## Welche persönlichen Daten wir sammeln und warum
Wir sammeln Informationen, wenn Benutzer mit unseren Diensten interagieren, z. B. wenn Sie unsere Software verwenden, einen Kauf tätigen oder sich an unseren Kundendienst wenden. Diese Informationen können umfassen:
- Kontaktinformationen: Name, E-Mail-Adresse und andere Kontaktdaten, die beim Kauf unserer Dienstleistungen oder bei der Kontaktaufnahme mit unserem Support angegeben werden.
- Transaktionsdaten: Wir verwenden Stripe als Zahlungsabwickler, der bei Transaktionen bestimmte Transaktionsdaten sammelt. Bitte beachten Sie, dass Stripe als separater Controller agiert und seine eigenen Datenschutzrichtlinien hat, die wir Ihnen empfehlen zu lesen.
- Telemetrie-Daten: Mit Ihrer Zustimmung sammelt unsere Software Telemetriedaten, um unsere Dienste zu verbessern. Diese Daten sind anonymisiert und können nicht zur Identifizierung einzelner Nutzer verwendet werden.
## Wie wir Ihre persönlichen Daten verwenden
Wir verwenden Ihre personenbezogenen Daten für verschiedene Zwecke:
- Zur Bereitstellung und Aufrechterhaltung unserer Dienste.
- Um Sie über Änderungen an unseren Dienstleistungen zu informieren.
- Um Ihnen die Teilnahme an interaktiven Funktionen unseres Dienstes zu ermöglichen, wenn Sie dies wünschen.
- Unterstützung der Kunden.
- Um Analysen oder wertvolle Informationen zu sammeln, damit wir unseren Service verbessern können.
- Um die Nutzung unseres Dienstes zu überwachen.
- Erkennen, Vorbeugen und Beheben technischer Probleme.
## Wie wir Ihre persönlichen Daten weitergeben und offenlegen
Wir verkaufen oder vermieten keine personenbezogenen Daten an Dritte. Wir geben personenbezogene Daten nur in Übereinstimmung mit dieser Datenschutzrichtlinie an Dritte weiter. Wir können Ihre persönlichen Daten weitergeben an:
- Stripe, als Teil der Erleichterung und Verarbeitung von Transaktionen.
- Gesetzliche Behörden, wenn dies zur Erfüllung gesetzlicher Verpflichtungen oder zum Schutz der Rechte und der Sicherheit anderer erforderlich ist.
## Aufbewahrung von Daten
Wir werden Ihre personenbezogenen Daten nur so lange aufbewahren, wie es für die in dieser Datenschutzrichtlinie genannten Zwecke erforderlich ist. Wir werden Ihre personenbezogenen Daten in dem Umfang aufbewahren und verwenden, der erforderlich ist, um unseren rechtlichen Verpflichtungen nachzukommen, Streitigkeiten beizulegen und unsere rechtlichen Vereinbarungen und Richtlinien durchzusetzen.
## Ihre Rechte nach GDPR
Als Nutzer haben Sie nach der DSGVO bestimmte Rechte, darunter auch die folgenden:
- Das Recht auf Zugang, Aktualisierung oder Löschung der persönlichen Daten, die wir über Sie haben.
- Das Recht auf Berichtigung Ihrer personenbezogenen Daten, wenn diese unrichtig oder unvollständig sind.
- Das Recht, der Verarbeitung Ihrer personenbezogenen Daten durch uns zu widersprechen.
- Das Recht auf Einschränkung der Verarbeitung Ihrer personenbezogenen Daten.
- Das Recht auf Datenübertragbarkeit, d. h. eine Kopie der Daten, die wir über Sie haben, in einem strukturierten, maschinenlesbaren Format zu erhalten.
- Das Recht, Ihre Zustimmung jederzeit zu widerrufen, wenn VisioForge sich auf Ihre Zustimmung zur Verarbeitung Ihrer personenbezogenen Daten verlassen hat.
Bitte beachten Sie, dass wir Sie möglicherweise auffordern, Ihre Identität zu überprüfen, bevor wir auf solche Anfragen antworten.
## Änderungen an dieser Datenschutzrichtlinie
VisioForge behält sich das Recht vor, jederzeit Änderungen an dieser Datenschutzrichtlinie vorzunehmen. Wir empfehlen den Benutzern, diese Seite regelmäßig auf Änderungen zu überprüfen, um darüber informiert zu bleiben, wie wir die von uns erfassten persönlichen Daten schützen.
## Kontakt
Wenn Sie Fragen oder Anregungen zu unserer Datenschutzpolitik haben, zögern Sie nicht, uns zu kontaktieren.
## Zustimmung
Durch die Nutzung unserer Website oder Dienste erklären Sie sich mit den in dieser Datenschutzrichtlinie aufgeführten Bedingungen einverstanden.
**Zuletzt aktualisiert: Juli 23, 2023**

---END OF PAGE---
# Page: https://www.visioforge.com/es/privacy-policy
# Política de privacidad y cumplimiento del GDPR
Esta Política de Privacidad explica la forma en que VisioForge recopila, utiliza, mantiene y divulga la información personal recogida de nuestros usuarios, en cumplimiento del Reglamento General de Protección de Datos (GDPR). VisioForge se compromete a respetar sus derechos de privacidad y a proteger sus datos personales.
## Definiciones
**Datos personales**: Cualquier información que pueda utilizarse para identificar a una persona, como nombre, dirección, correo electrónico, dirección IP y otros datos similares.
**Tratamiento**: Cualquier operación realizada con datos personales, incluida su recogida, uso, almacenamiento o eliminación.
## Controlador de datos
VisioForge es el controlador de datos y es responsable de sus datos personales. Determinamos los fines y medios del tratamiento de los datos personales de acuerdo con esta política.
## Qué datos personales recopilamos y por qué
Recopilamos información cuando los usuarios interactúan con nuestros servicios, por ejemplo, cuando utilizan nuestro software, realizan una compra o se ponen en contacto con nuestro servicio de atención al cliente. Esta información puede incluir:
- Información de contacto: Nombre, dirección de correo electrónico y otros datos de contacto facilitados al adquirir nuestros servicios o ponerse en contacto con nuestro servicio de asistencia.
- Información sobre transacciones: Utilizamos Stripe como procesador de pagos y durante las transacciones, recopila ciertos detalles de la transacción. Tenga en cuenta que Stripe opera como un controlador independiente y tiene su propia política de privacidad, que le recomendamos que revise.
- Datos telemétricos: Con su consentimiento, nuestro software recopila datos de telemetría para ayudar a mejorar nuestros servicios. Estos datos son anónimos y no pueden utilizarse para identificar a usuarios individuales.
## Cómo utilizamos sus datos personales
Utilizamos sus datos personales para diversos fines:
- Para prestar y mantener nuestros servicios.
- Para notificarle cambios en nuestros servicios.
- Permitirle participar en funciones interactivas de nuestro servicio cuando decida hacerlo.
- Prestar asistencia al cliente.
- Para recopilar análisis o información valiosa que nos permita mejorar nuestro servicio.
- Para supervisar el uso de nuestro servicio.
- Detectar, prevenir y resolver problemas técnicos.
## Cómo compartimos y divulgamos sus datos personales
No vendemos ni alquilamos datos personales a terceros. Sólo compartimos datos personales con terceros de acuerdo con esta política de privacidad. Podemos revelar sus datos personales a:
- Stripe, como parte de la facilitación y procesamiento de transacciones.
- Autoridades legales cuando sea necesario para cumplir obligaciones legales o para proteger los derechos y la seguridad de terceros.
## Conservación de datos
Conservaremos sus datos personales sólo durante el tiempo que sea necesario para los fines establecidos en esta política de privacidad. Conservaremos y utilizaremos sus datos personales en la medida necesaria para cumplir nuestras obligaciones legales, resolver litigios y hacer cumplir nuestros acuerdos y políticas legales.
## Sus derechos en virtud del GDPR
Como usuario, tiene derechos específicos en virtud del GDPR, entre los que se incluyen:
- Derecho a acceder a sus datos personales, actualizarlos o eliminarlos.
- Derecho de rectificación, para corregir sus datos personales si son inexactos o incompletos.
- Derecho a oponerse al tratamiento de sus datos personales.
- El derecho de restricción, para solicitar que limitemos el tratamiento de sus datos personales.
- El derecho a la portabilidad de los datos, a recibir una copia de los datos que tenemos sobre usted en un formato estructurado y legible por máquina.
- Derecho a retirar su consentimiento en cualquier momento cuando VisioForge se haya basado en su consentimiento para tratar sus datos personales.
Tenga en cuenta que podemos pedirle que verifique su identidad antes de responder a dichas solicitudes.
## Cambios en esta política de privacidad
VisioForge se reserva el derecho a realizar cambios en esta política de privacidad en cualquier momento. Animamos a los usuarios a comprobar con frecuencia esta página para cualquier cambio para mantenerse informado acerca de cómo estamos ayudando a proteger la información personal que recopilamos.
## Contacto
Si tiene alguna pregunta o sugerencia sobre nuestra Política de privacidad, no dude en ponerse en contacto con nosotros.
## Consentimiento
Al utilizar nuestro sitio o nuestros servicios, usted acepta las condiciones establecidas en la presente Política de privacidad.
**Última actualización: 23 de julio de 2023**

---END OF PAGE---
# Page: https://www.visioforge.com/it/privacy-policy
# Informativa sulla privacy e conformità al GDPR
La presente Informativa sulla privacy illustra il modo in cui VisioForge raccoglie, utilizza, conserva e divulga le informazioni personali raccolte dai nostri utenti, in conformità con il Regolamento generale sulla protezione dei dati (GDPR). VisioForge si impegna a rispettare i vostri diritti alla privacy e a proteggere i vostri dati personali.
## Definizioni
**Dati personali**: Qualsiasi informazione che possa essere utilizzata per identificare un individuo, come nome, indirizzo, e-mail, indirizzo IP e altri dati simili.
**Elaborazione**: Qualsiasi operazione eseguita sui dati personali, compresa la raccolta, l'utilizzo, la conservazione o la cancellazione.
## Titolare del trattamento dei dati
VisioForge è il titolare del trattamento ed è responsabile dei vostri dati personali. Determiniamo gli scopi e i mezzi del trattamento dei dati personali in linea con questa politica.
## Quali dati personali raccogliamo e perché
Raccogliamo informazioni quando gli utenti interagiscono con i nostri servizi, ad esempio quando si utilizza il nostro software, si effettua un acquisto o ci si rivolge all'assistenza clienti. Queste informazioni possono includere:
- Informazioni di contatto: Nome, indirizzo e-mail e altri dati di contatto forniti al momento dell'acquisto dei nostri servizi o del contatto con l'assistenza.
- Informazioni sulle transazioni: Utilizziamo Stripe come processore di pagamenti e durante le transazioni raccoglie alcuni dettagli della transazione. Si prega di notare che Stripe opera come controllore separato e ha una propria informativa sulla privacy, che si consiglia di esaminare.
- Dati di telemetria: Con il consenso dell'utente, il nostro software raccoglie dati telemetrici per migliorare i nostri servizi. Questi dati sono resi anonimi e non possono essere utilizzati per identificare i singoli utenti.
## Come utilizziamo i vostri dati personali
Utilizziamo i vostri dati personali per vari scopi:
- Per fornire e mantenere i nostri servizi.
- Per notificare all'utente le modifiche apportate ai nostri servizi.
- Per consentire all'utente di partecipare alle funzioni interattive del nostro servizio quando sceglie di farlo.
- Fornire assistenza ai clienti.
- Per raccogliere analisi o informazioni utili a migliorare il nostro servizio.
- Per monitorare l'utilizzo del nostro servizio.
- Rilevare, prevenire e risolvere i problemi tecnici.
## Come condividiamo e divulghiamo i vostri dati personali
Non vendiamo né affittiamo dati personali a terzi. Condividiamo i dati personali con terzi solo in conformità con la presente informativa sulla privacy. Possiamo divulgare i vostri dati personali a:
- Stripe, nell'ambito della facilitazione e dell'elaborazione delle transazioni.
- Autorità legali quando è necessario per adempiere a obblighi di legge o per proteggere i diritti e la sicurezza di altri.
## Conservazione dei dati
Conserveremo i dati personali dell'utente solo per il tempo necessario agli scopi indicati nella presente informativa sulla privacy. Conserveremo e utilizzeremo i vostri dati personali nella misura necessaria per adempiere ai nostri obblighi legali, risolvere le controversie e applicare i nostri accordi e politiche legali.
## I vostri diritti secondo il GDPR
In qualità di utente, l'utente ha diritti specifici ai sensi del GDPR, tra cui:
- Il diritto di accedere, aggiornare o cancellare i dati personali in nostro possesso.
- Il diritto di rettifica, per correggere i vostri dati personali se inesatti o incompleti.
- Il diritto di opporsi al trattamento dei vostri dati personali da parte nostra.
- Il diritto di restrizione, per richiedere di limitare il trattamento dei vostri dati personali.
- Il diritto alla portabilità dei dati, per ricevere una copia dei dati in nostro possesso su di voi in un formato strutturato e leggibile da una macchina.
- Il diritto di revocare il vostro consenso in qualsiasi momento qualora VisioForge si sia basata sul vostro consenso per trattare i vostri dati personali.
Prima di rispondere a tali richieste, potremmo chiedervi di verificare la vostra identità.
## Modifiche alla presente Informativa sulla privacy
VisioForge si riserva il diritto di apportare modifiche alla presente informativa sulla privacy in qualsiasi momento. Incoraggiamo gli utenti a controllare frequentemente questa pagina per eventuali modifiche, per rimanere informati su come stiamo contribuendo a proteggere le informazioni personali che raccogliamo.
## Contatto
In caso di domande o suggerimenti sulla nostra Informativa sulla privacy, non esitate a contattarci.
## Consenso
Utilizzando il nostro sito o i nostri servizi, l'utente accetta i termini delineati nella presente Informativa sulla privacy.
**Ultimo aggiornamento: 23 luglio 2023**

---END OF PAGE---
# Page: https://www.visioforge.com/de/news-2024
# Neuigkeiten und Produktaktualisierungen im Jahr 2024
## 50% Black Friday Verkauf!
(2024-06-03)
🎉 **Sommer-Sale-Alarm!** 🎉Holen Sie sich unsere erstklassige Software jetzt mit einem unschlagbaren Rabatt von 50 %! Lassen Sie sich dieses zeitlich begrenzte Angebot zur Steigerung Ihrer Produktivität nicht entgehen. Aktualisieren Sie noch heute und sparen Sie kräftig! 🌞💻
Coupon-Code: **SOMMER50**
## VisioForge .Net SDKs v15.9 ist veröffentlicht worden
(2024-04-07)
Die Version 15.9 der .Net SDKs wurde mit mehreren Updates und neuen Funktionen veröffentlicht. Zu den bemerkenswerten Verbesserungen gehören die Behebung von Problemen mit dem Video-Seitenverhältnis, Aktualisierungen der GStreamer-Umverteilung und die Hinzufügung von Unterstützung für Basler USB3/GigE-Kameras. Das Video Edit SDK .Net verwendet jetzt SkiaSharp-basierte Schrifteinstellungen für die TextOverlay-Klasse und ermöglicht so benutzerdefinierte Schriftkonfigurationen. Der MediaInfoReader unter Windows wurde um Stream-Unterstützung erweitert, so dass Video-/Audiodatei-Informationen aus verschiedenen Quellen abgerufen werden können.
Die Live Video Compositor-Engine wurde für eine bessere Unterstützung von Dateiquellen aktualisiert, und in der Computer Vision-Demo des Video Capture SDK wurde ein Detektor für kamerabedecktes Material eingeführt. Es wurden neue APIs für das Abrufen von Schnappschüssen aus Videodateien hinzugefügt, und iOS-Unterstützung ist jetzt in MAUI-Beispielen enthalten. Speicherlecks in RTSP-Quellen wurden behoben, und das Media Player SDK unterstützt jetzt Datenströme in Videodateien, die die FFMPEG-Quellen-Engine verwenden.
Zu den zusätzlichen Funktionen gehören benutzerdefinierte FFMPEG-Optionen für IP-Kameras, die Lösung von Netzwerkverbindungsproblemen mit FFMPEG-Quellen, RTSP MultiView-Unterstützung im Media Blocks SDK und Unterstützung für FLIR/Teledyne-Kameras mit dem Spinnaker SDK. Das Video Edit SDK unterstützt jetzt die Verwendung von .Net Stream als Eingangsquelle, und die Unterstützung von .Net 7 wurde wieder in das MAUI-Paket aufgenommen. Die Schnittstelle IAsyncDisposable wurde zu allen Kernklassen für asynchrone Entsorgung hinzugefügt.
Weitere Updates beheben Probleme bei der Videoaufnahme unter Android, fügen HLS-Streaming-Beispiele hinzu und beheben Abstürze im Zusammenhang mit Multiscreen-Setups. Es wurden Verbesserungen bei der MAUI-Videowiedergabegeschwindigkeit, bei Problemen mit der Medienwiedergabe und der Webcam-Quellenkonnektivität vorgenommen. Probleme bei der Audiowiedergabe und schlechte Audiomischung wurden behoben, und das Media Player SDK unterstützt jetzt wachsende MPEG-TS-Dateien für die VLC-Engine.
Prüfen Sie die [Änderungsprotokoll](https://www.visioforge.com/help/docs/dotnet/changelog/#159/).
## VisioForge .Net SDKs v15.8 ist veröffentlicht worden
(2024-01-22)
Die Version 15.8 der .Net SDKs wurde veröffentlicht und bringt mehrere bemerkenswerte Änderungen und Verbesserungen. Zu den wichtigsten Aktualisierungen gehören wichtige API-Änderungen, wie z. B. die Verwendung von "DeviceEnumerator.Shared" für die Geräteaufzählung und zusätzliche Initialisierungsschritte für X-Engines. Android Activity ist für die Erstellung von SDK-Engines nicht mehr erforderlich.
Windows-Benutzer erhalten eine verbesserte MAUI-Video-Rendering-Leistung und eine neue Maus-Hervorhebungsfunktion für Screen-Capture-Quellen. Es wurden verschiedene Fehlerkorrekturen implementiert, darunter die Behebung von Problemen mit der Größenänderung von Avalonia VideoView, Sonderzeichen-Passwörtern für RTSP-Quellen und einem Speicherleck im OverlayManager.
Das Update führt Eigenschaften zum Festlegen von Start- und Stopp-Positionen in UniversalSourceSettings ein und fügt Ereignisse hinzu, um über das Hinzufügen/Entfernen von Geräten im DeviceEnumerator zu informieren. Die Unterstützung für benutzerdefinierte Fehlerhandler wurde für mehrere Engines hinzugefügt, und es gibt neue Eigenschaften für die Einstellung benutzerdefinierter Audiofilter für Virtual Camera SDK-Ausgaben in verschiedenen Komponenten.
Zu den neuen Funktionen gehören die Unterstützung von NDI-Streaming in VideoCaptureCoreX und zusätzliche Medienblöcke im Media Blocks SDK, z. B. die Klassen BufferSink und CustomMediaBlock. Die Möglichkeiten zum Zuschneiden von Videoframes wurden durch die Hinzufügung von VideoCropBlock und VideoAspectRatioCropBlock verbessert. Das Update umfasst auch Unterstützung für den WASAPI-Audio-Renderer in der VideoCaptureCore-Engine und Aktualisierungen des Tempo-Audioeffekts. Insgesamt konzentriert sich diese Version auf die Verbesserung der Leistung, die Behebung kritischer Probleme und das Hinzufügen neuer Funktionalitäten zu den .Net SDKs.
Prüfen Sie die [Änderungsprotokoll](https://www.visioforge.com/help/docs/dotnet/changelog/#158/).
---END OF PAGE---
# Page: https://www.visioforge.com/de/news-2023
# Neuigkeiten und Produktaktualisierungen im Jahr 2023
## VisioForge .Net SDKs v15.7 ist veröffentlicht worden
(2023-11-12)
Die .Net SDKs Version 15.7 wurde mit verschiedenen Verbesserungen und Korrekturen veröffentlicht. Diese Version enthält Unterstützung für .Net 8 in allen SDKs.
Zu den wichtigsten Verbesserungen im Video Capture SDK .Net gehören die Behebung von Problemen mit dem Ereignis "OnNetworkSourceDisconnect", das zweimal aufgerufen wird, die Behebung der Einstellungen für das Audioquellenformat in VideoCaptureCoreX und die Behebung von WPF-nativen Rendering-Problemen mit Pop-up-Fenstern. Die Start/StartAsync-Methode in VideoCaptureCore gibt jetzt false zurück, wenn das Videoaufnahmegerät bereits von einer anderen Anwendung verwendet wird.
Die X-Engines wurden mit neuen MPEG-2-Video- und MP2-Audio-Encodern, DNxHD-Video-Encoder-Unterstützung und Änderungen an den VP8/VP9-Standardeinstellungen für Live-Aufnahmen aktualisiert. Probleme bei der Aufzählung von Decklinks wurden behoben.
Plattformübergreifende SDKs profitieren von Aktualisierungen des Decklink-Quellcodes, die Probleme mit falschen Gerätenamen beheben, und des Overlay-Managers, der jetzt eine `OverlayManagerDateTime`-Klasse zum Zeichnen des aktuellen Datums und von benutzerdefiniertem Text enthält. Außerdem wurden SkiaSharp-Sicherheitsupdates und Probleme mit der Verwendung von System.Drawing.Bitmap in `OverlayManagerImage` behoben.
Unterstützung für Avalonia 11.0.5 wurde hinzugefügt, zusammen mit Aktualisierungen der VLC-Quellen (libVLC 3.0.19) und FFMPEG-Quellen und -Encodern, die Probleme mit fehlenden MSVC-Abhängigkeiten beheben. Die ONVIF-Engine wurde ebenfalls aktualisiert.
Schließlich verbessert das Update die FFMPEG.exe-Ausgabe in VideoCaptureCore, verbessert die Unterstützung für x264- und x265-Encoder in benutzerdefinierten FFMPEG-Builds und behebt ein seltenes Absturzproblem mit WinUI VideoView.
Prüfen Sie die [Änderungsprotokoll](https://www.visioforge.com/help/docs/dotnet/changelog/#157/).
## VisioForge .Net SDKs v15.6 ist veröffentlicht worden
(2023-09-20)
Die Version 15.6 der .Net SDKs bringt zahlreiche Verbesserungen und neue Funktionen mit sich. Das Video Capture SDK bietet eine verbesserte Video-Crop-Performance auf modernen CPUs und führt eine neue Video-Overlays-API ein, deren Verwendung in entsprechenden Demos gezeigt wird. Das Update verbessert auch die Hardware-Encoder-Erkennung für Systeme mit mehreren GPUs. Der Avalonia VideoView wurde aktualisiert, um Probleme mit der Wiederherstellung zu beheben.
Media Player SDK enthält Änderungen wie die Behebung von Startproblemen unter Android und das Hinzufügen neuer Methoden für die Auswahl von Videostreams. Leistungsverbesserungen für 4K- und 8K-Videos im WPF-Rendering wurden in allen SDKs implementiert. Verschiedene Probleme, darunter Probleme beim Zuschneiden von Videos und mehrere Ausgaben in VideoCaptureCoreX, wurden behoben.
Neue Demos und Unterstützung für Funktionen wie NDI-Streaming, madVR und mehrere Audiospuren sind enthalten. Das Update fügt auch mehrere neue Klassen und Methoden hinzu, wie z.B. die Unterstützung von VNC-Quellen und die KI-basierte Größenänderung von Videos mit dem Nvidia Maxine SDK. Das Media Blocks SDK fügt neue OpenCV-Blöcke, NDI Source- und Sink-Blöcke und zusätzliche Video-Encoder wie rav1e AV1 und GIF hinzu.
Verbesserungen bei der Speicherwiedergabe, VU-Meter-Probleme und erweiterte Unterstützung für WASAPI 2 sind ebenfalls Teil dieser Version. Die SDKs unterstützen jetzt die asynchrone Entsorgung mit der Schnittstelle IAsyncDisposable und haben verschiedene Erkennungs- und Wiedergabeprobleme behoben. Neue Funktionen wie die Verarbeitung von KLV-Daten, MJPEG-Netzwerk-Streaming und erweiterte Media-Block-Funktionalitäten erweitern die Möglichkeiten der SDKs. Schließlich enthält das Update eine Reihe von Stabilitäts- und Leistungsverbesserungen für verschiedene Plattformen und Komponenten.
Prüfen Sie die [Änderungsprotokoll](https://www.visioforge.com/help/docs/dotnet/changelog/#156/).
---END OF PAGE---
# Page: https://www.visioforge.com/de/news-2022
# Neuigkeiten und Produktaktualisierungen im Jahr 2022
## VisioForge .Net SDKs v15.5 ist veröffentlicht worden
(2022-12-11)
Die Version 15.5 der .Net SDKs wurde mit mehreren neuen Funktionen und Updates veröffentlicht. Diese Version bietet Unterstützung für .Net 7 und führt eine Reihe von Verbesserungen in verschiedenen SDK-Komponenten ein.
Im Video Capture SDK .Net wurde der MJPEG Low Latency IP-Kamera-Engine ein NetworkDisconnect-Ereignis hinzugefügt, und das Ereignis "OnRTSPLowLatencyRAWFrame" ermöglicht den Abruf von RAW-Frames aus RTSP-Streams mit der RTSP Low Latency-Engine. Die VideoEditCoreX-Engine unterstützt jetzt Linux-basierte Demos und verfügt über eine neue AutoTransitions-Eigenschaft. Darüber hinaus wurde die Kompatibilität mit Snap Camera für die MP4-HW-Codierung verbessert und die Unterstützung für mehrere Decklink-Ausgänge in den SDKs für Video Capture und Video Edit verbessert.
Für plattformübergreifende APIs wurden die Typen `System.Drawing.Rectangle` und `System.Drawing.Size` durch `VisioForge.Types.Rectangle` und `VisioForge.Types.Size` ersetzt. Das Update bringt auch MAUI-Beispiele (BETA) und eine verbesserte Online-Lizenzierung.
Das Media Player SDK .Net wurde mit Segmentunterstützung in seiner plattformübergreifenden Engine, einer Playlist-API für die Windows-Only-Engine und GPU-HW-Decodierung für die VLC-Engine aktualisiert. Probleme mit der umgekehrten Wiedergabe, der Methode `MediaPlayerCore.Video\_Renderer\_SetCustomWindowHandle` und WPF HighDPI-Anwendungen mit EVR wurden behoben. Außerdem unterstützt das Media Player SDK jetzt die Wiedergabe früherer Frames in seiner plattformübergreifenden Engine.
Das Media Blocks SDK .Net hat eine WPF Screen Capture Demo hinzugefügt, während ONVIFControl und die zugehörigen APIs jetzt auf allen Plattformen verfügbar sind. Es gab eine bahnbrechende API-Änderung, bei der der Frame-Rate-Typ in allen APIs von double auf `VideoFrameRate` geändert wurde.
Zu den weiteren Verbesserungen gehören eine neue Camera Light-Demo, eine aktualisierte Handhabung des Aufrufs "rtsp\_source\_create\_audio\_resampler" in der RTSP Low Latency-Engine für Video Capture SDK .Net und eine verbesserte Segmentunterstützung im Media Player SDK. Diese Aktualisierungen verbessern insgesamt die Funktionalität, Kompatibilität und Leistung der verschiedenen .Net SDKs.
Prüfen Sie die [Änderungsprotokoll](https://www.visioforge.com/help/docs/dotnet/changelog/#155/).
## VisioForge .Net SDKs v15.4 ist veröffentlicht worden
(2022-07-23)
Die Version 15.4 der .Net SDKs wurde veröffentlicht und bringt eine Vielzahl von Updates und neuen Funktionen. Diese Version behebt mehrere Probleme und führt Verbesserungen in verschiedenen Komponenten ein.
Zu den wichtigsten Aktualisierungen gehören die Behebung des Problems, dass die Eigenschaft `Play\_PauseAtFirstFrame` ignoriert wird, sowie Verbesserungen der HighDPI-Unterstützung in WinForms-Beispielen und für den Direct2D-Videorenderer. Die ONVIFControl-Klasse wurde um neue APIs erweitert: `GetDeviceCapabilities` und `GetMediaEndpoints`.
Das Problem der erzwungenen Neukodierung beim Zusammenfügen von FFMPEG-Dateien ohne Neukodierung wurde behoben. Das Update enthält auch ein Sentry-Update und fügt Video-Interpolationseinstellungen für Zoom- und Pan-Videoeffekte hinzu.
Unterstützung für das GtkSharp UI-Framework für Video-Rendering wurde hinzugefügt, und die FastEdit-API wurde auf async geändert. Darüber hinaus wurde ein Screen-Flip-Problem im Zusammenhang mit der Eigenschaft `Video\_Effects\_AllowMultipleStreams` im Video Capture SDK .Net Core behoben.
Die RTSP-MultiView-Demo wurde aktualisiert, um GPU-Decodierung und Zugriff auf RAW-Streams zu ermöglichen. Zu den neuen Funktionen gehören ein "OnLoop"-Ereignis im Media Player SDK .Net und eine Schleifenfunktion im Media Blocks SDK .Net.
Aufgrund von Problemen mit Avalonia UI und NativeControl wurde Avalonia VideoView auf Version 0.10.12 heruntergestuft. Dem Video Edit SDK .Net wurde eine neue File Encryptor Demo hinzugefügt, die ein Beispiel für die Verschlüsselung von Videodateien liefert.
Insgesamt verbessert diese Version die Funktionalität, behebt kritische Probleme und führt neue Funktionen ein, um die Benutzerfreundlichkeit aller .Net SDKs zu verbessern.
Prüfen Sie die [Änderungsprotokoll](https://www.visioforge.com/help/docs/dotnet/changelog/#154/).
## VisioForge .Net SDKs v15.3 ist veröffentlicht worden
(2022-05-21)
Die Version 15.3 der .Net SDKs wurde mit einer Reihe von Verbesserungen und Optimierungen veröffentlicht. Zu den wichtigsten Verbesserungen gehören die Verkürzung der Startzeit der App für PCs mit Decklink-Karten und die Unterstützung von NDI SDK v5. Ein Problem mit der MKV-Legacy-Ausgabe, das zu Ausnahmen bei falschen Rollen führte, wurde behoben.
Die Leistung von Zoom- und Schwenkeffekten wurde optimiert, und es wurde eine grundlegende Medienblock-API eingeführt, die sich jedoch noch in der Entwicklung befindet. Das Video Edit SDK .Net unterstützt jetzt HLS-Netzwerk-Streaming.
In WPF VideoView wurde eine neue Eigenschaft Rotate hinzugefügt, die eine Videodrehung um 90, 180 oder 270 Grad ermöglicht. Benutzer können auch die Methode `GetImageLayer()` verwenden, um die Bildebene für die Anwendung benutzerdefinierter Transformationen abzurufen.
Eine API-Änderung hat `FilterHelpers` in `FilterDialogHelper` umbenannt. Die Assemblies `VisioForge.Types` und `VisioForge.MediaFramework` wurden in `VisioForge.Core` zusammengeführt, und UI-Klassen wurden in `VisioForge.Core.UI.\*`-Assemblies und unabhängige NuGet-Pakete verschoben. Außerdem wurde `VisioForge.Types` in `VisioForge.Core.Types` umbenannt, und `VisioForge.Core` ist nicht mehr vom Windows Forms-Framework abhängig.
Diese Updates verbessern die Leistung, optimieren die API und erweitern die Funktionalität der .Net SDKs.
Prüfen Sie die [Änderungsprotokoll](https://www.visioforge.com/help/docs/dotnet/changelog/#153/).
## VisioForge .Net SDKs v15.2 ist veröffentlicht worden
(2022-01-20)
Die Version 15.2 der .Net SDKs wurde veröffentlicht und enthält mehrere neue Ergänzungen und Verbesserungen. Zu den wichtigsten Aktualisierungen gehören die Hinzufügung der Eigenschaften `HorizontalAlignment` und `VerticalAlignment` für Text- und Bildlogos, die eine bessere Anpassung und Positionierung ermöglichen.
Die ONVIF-Unterstützung wurde aktualisiert, wodurch Probleme im Zusammenhang mit der Angabe von Benutzernamen und Kennwörtern in URLs ohne entsprechende Quelleneinstellungen behoben wurden. Die RTSP-Unterstützung für IP-Kameras wurde verbessert, wodurch zuverlässigere Verbindungen und eine bessere Leistung gewährleistet sind.
Probleme mit dem FFMPEG.exe-Ausgabedialog und der separaten Erfassung in Dienstanwendungen wurden behoben. Das SDK wurde von NewtonsoftJson auf System.Text.Json migriert, um eine bessere Leistung und moderne Serialisierungsunterstützung zu gewährleisten.
Die DirectCapture-Ausgabe für IP-Kameras wurde aktualisiert, und eine neue DirectCapture ASF-Ausgabeoption wurde hinzugefügt. Der Eigenschaftstyp "IPCameraSourceSettings.URL" wurde von "String" in "System.Uri" geändert, um die Handhabung von URL-Typen zu verbessern.
Die Video- und Audioeffekte wurden aktualisiert, und die Leistung der Videoverarbeitung wurde insgesamt optimiert. Verschiedene Fehlerkorrekturen und Leistungsverbesserungen erhöhen die Stabilität und Effizienz des SDKs.
Insgesamt konzentriert sich diese Version auf die Erweiterung der Funktionalität, die Verbesserung der Leistung und die Behebung kritischer Probleme in den .Net SDKs.
Prüfen Sie die [Änderungsprotokoll](https://www.visioforge.com/help/docs/dotnet/changelog/#152/).
## VisioForge Neujahrsferien 30% Rabatt
(2022-01-03)
Feiern Sie die Neujahrsfeiertage mit unserem Sonderverkauf, bei dem Sie ein erstaunliches **30% Rabatt** auf alle Produkte!
### 🎁 **Genießen Sie 30% Rabatt auf alle Produkte!** 🎁
Beginnen Sie das neue Jahr mit unglaublichen Einsparungen bei unserer Premium-Software. Verwenden Sie den Gutscheincode **NY30** an der Kasse, um einen Rabatt von 30 % auf alle Produkte zu erhalten.
Lassen Sie sich diese fantastischen Ersparnisse nicht entgehen! Nutzen Sie die Neujahrsfeiertage mit unseren Sonderangeboten und verbessern Sie Ihr Software-Erlebnis.
Frohes Einkaufen und ein gutes neues Jahr!
---END OF PAGE---
# Page: https://www.visioforge.com/de/news-2021
# Neuigkeiten und Produktaktualisierungen im Jahr 2021
## VisioForge .Net SDKs v15.1 ist veröffentlicht worden
2022-11-26
Die Version 15.1 der .Net SDKs führt plattformübergreifende Unterstützung für Android für das Media Player SDK .Net ein und plant für iOS/macOS im Dezember. Sie deaktiviert Sentry-Debug-Meldungen in der Konsole, fügt Icecast-Streaming hinzu und aktualisiert die Eigenschaft `VideoStreamInfo.FrameRate` auf `VideoFrameRate`. Die WPF VideoView hat die Wiedergabe von IP-Kamera-Streams verbessert. Signifikante API-Änderungen führen mehrere Komponenten in `VisioForge.Core` zusammen, und die Audioeffekt-API verwendet jetzt String-Namen. Eine neue GStreamer-basierte plattformübergreifende Engine unterstützt Windows und andere Plattformen in diesem Entwicklungszyklus.
Prüfen Sie die [Änderungsprotokoll](https://www.visioforge.com/help/docs/dotnet/changelog/#151/).
## VisioForge .Net SDKs v15.0 ist veröffentlicht worden
2022-11-01
Die Version 15.0 des .Net SDKs führt signifikante API-Änderungen ein und teilt die Hauptsteuerungen in Core- und VideoView-Teile auf. Das SDK hat keine getrennten TRIAL- und FULL-Versionen mehr und entfernt die Eigenschaft `SDK\_State`.
Entwicklern wird empfohlen, UI-Steuerelemente durch "VideoView" zu ersetzen und Kernklassen (z. B. "VideoCaptureCore") so umzubenennen, dass sie den zuvor verwendeten UI-Steuerelementnamen entsprechen. Diese Änderung ermöglicht die Unterstützung für zusätzliche UI-Plattformen wie UWP, MAUI, Eco und Avalonia.
Prüfen Sie die [Änderungsprotokoll](https://www.visioforge.com/help/docs/dotnet/changelog/#150/).
## VisioForge .Net SDKs v14.3 ist veröffentlicht worden
2022-09-14
Die Version 14.3 der .Net SDKs enthält mehrere wichtige Updates und Verbesserungen. Ein kritisches Problem bei der Erstellung von Video Resize-Filtern für NuGet-Redistributionen wurde behoben, und die Telemetrie wurde aktualisiert. Die Ausgabe von `VFDirectCaptureMP4Output` wurde ebenfalls aktualisiert. Diese Version fügt Unterstützung für .Net 6 (Vorschau) hinzu und entfernt Nvidia CUDA, wodurch NVENC als moderne Alternative für die H264/HEVC-Kodierung empfohlen wird.
Die MJPEG-Low-Latency-Engine für IP-Kameras wurde aktualisiert und die Auflistung der NDI-Quellen wurde verbessert. Die ONVIF-Unterstützung wurde verbessert und .Net Core 3.1-Unterstützung wurde für die RTSP Low Latency Source Engine hinzugefügt. Probleme mit Picture-in-Picture für den 2x2-Modus wurden behoben. Das Projekt und die Lösungen wurden in unabhängige Dateien für .Net Framework 4.7.2, .Net Core 3.1, .Net 5 und .Net 6 aufgeteilt, was eine bessere Organisation und Kompatibilität ermöglicht.
Prüfen Sie die [Änderungsprotokoll](https://www.visioforge.com/help/docs/dotnet/changelog/#143/).
## VisioForge .Net SDKs v14.2 ist veröffentlicht worden
2022-08-11
Die Version 14.2 des .Net SDKs bringt mehrere Updates und Korrekturen. Das Problem mit der Audio-Stream-Erfassung bei Verwendung des Virtual Camera SDK Outputs wurde behoben. Der `VFMP4v8v10Output` wurde durch `VFMP4Output` ersetzt. Eine neue "CanStart"-Methode wurde zu den "Video\_CaptureDevicesInfo"-Elementen hinzugefügt, die überprüft, ob ein Gerät gestartet werden kann und nicht ausschließlich von einer anderen Anwendung verwendet wird.
Das `ONVIFControl` unterstützt jetzt die async/await API, wodurch seine asynchronen Fähigkeiten verbessert wurden. Ein Problem mit falscher ColorKey-Verarbeitung im Videoeffekt "Text Overlay" wurde behoben. Für die IP-Kameraquelle RTSP Low Latency wurde Unterstützung für erzwungene Bildraten hinzugefügt. Die MP4v11 AMD-Encoder wurden aktualisiert und ein Problem mit dem Zeitstempel während der Pause/Fortsetzung einer separaten MP4v11-Aufnahme wurde behoben.
Das Netzwerk-Streaming und die Ausgabe von FFMPEG.exe wurden auf die neueste FFMPEG-Version aktualisiert. Das VC++ Redistributable muss nicht mehr installiert werden, da die VC++-Verknüpfung auf statisch umgestellt wurde, außer für die optionale XIPH-Ausgabe. Außerdem wurden viele DirectShow-Basisfilter in das Modul `VisioForge\_BaseFilters` verschoben.
Prüfen Sie die [Änderungsprotokoll](https://www.visioforge.com/help/docs/dotnet/changelog/#142/).
---END OF PAGE---
# Page: https://www.visioforge.com/es/news-2024
# Novedades y actualizaciones de productos en 2024
## Rebajas del 50% por el Black Friday
(2024-06-03)
🎉 **Rebajas de verano** 🎉Consiga ahora nuestro software mejor valorado con un descuento insuperable del 50%. No te pierdas esta oferta por tiempo limitado para aumentar tu productividad. ¡Actualízate hoy y ahorra a lo grande! 🌞💻
Código del cupón: **VERANO50**
## VisioForge .Net SDKs v15.9 ha sido lanzado
(2024-04-07)
Se ha publicado la versión 15.9 de los SDK de .Net con varias actualizaciones y nuevas funciones. Las mejoras notables incluyen la resolución de problemas de relación de aspecto de vídeo, actualizaciones a la redistribución GStreamer, y la adición de soporte para cámaras Basler USB3/GigE. El Video Edit SDK .Net ahora utiliza configuraciones de fuentes basadas en SkiaSharp para la clase TextOverlay, permitiendo configuraciones de fuentes personalizadas. Se ha añadido soporte Stream al MediaInfoReader en Windows, permitiendo la recuperación de información de archivos de vídeo/audio desde varias fuentes.
Se ha actualizado el motor Live Video Compositor para mejorar la compatibilidad con fuentes de archivos, y se ha introducido un detector de cámara cubierta en la demostración de visión computerizada del SDK de captura de vídeo. Se han añadido nuevas API para la recuperación de instantáneas de archivos de vídeo, y ahora se incluye compatibilidad con iOS en las muestras de MAUI. Se han resuelto las fugas de memoria en fuentes RTSP, y el SDK Media Player ahora admite flujos de datos en archivos de vídeo utilizando el motor de fuentes FFMPEG.
Entre las funciones adicionales se incluyen opciones FFMPEG personalizadas para cámaras IP, la resolución de problemas de conexión de red con fuentes FFMPEG, compatibilidad con RTSP MultiView en el SDK Media Blocks y compatibilidad con cámaras FLIR/Teledyne mediante el SDK Spinnaker. El SDK Video Edit soporta ahora el uso de .Net Stream como fuente de entrada, y se ha reintroducido la compatibilidad con .Net 7 en el paquete MAUI. La interfaz IAsyncDisposable se ha añadido a todas las clases principales para la eliminación asíncrona.
Otras actualizaciones solucionan problemas de captura de vídeo en Android, añaden muestras de transmisión HLS y resuelven fallos relacionados con configuraciones multipantalla. Se han realizado mejoras en la velocidad de renderizado de vídeo MAUI, problemas de reproducción multimedia y conectividad de la fuente de la cámara web. Se han resuelto problemas de reproducción de audio y mala mezcla de audio, y el SDK de Media Player ahora admite el crecimiento de archivos MPEG-TS para el motor VLC.
Compruebe el [registro de cambios](https://www.visioforge.com/help/docs/dotnet/changelog/#159/).
## VisioForge .Net SDKs v15.8 ha sido lanzado
(2024-01-22)
Se ha publicado la versión 15.8 de los SDK de .Net, que aporta varios cambios y mejoras notables. Las actualizaciones clave incluyen cambios significativos en la API, como la necesidad de utilizar `DeviceEnumerator.Shared` para la enumeración de dispositivos y pasos de inicialización adicionales para los motores X. Android Activity ya no es necesario para la creación de motores SDK.
Los usuarios de Windows verán mejorado el rendimiento de renderizado de vídeo MAUI y una nueva función de resaltado del ratón para las fuentes de captura de pantalla. Se han implementado varias correcciones de errores, incluyendo la resolución de problemas con el redimensionamiento de Avalonia VideoView, contraseñas de caracteres especiales para fuentes RTSP, y una fuga de memoria en el OverlayManager.
La actualización introduce propiedades para establecer las posiciones de inicio y parada en UniversalSourceSettings y añade eventos para notificar sobre adiciones/remociones de dispositivos en el DeviceEnumerator. Se ha añadido compatibilidad con gestores de errores personalizados para varios motores, y hay nuevas propiedades para establecer filtros de audio personalizados para las salidas de Virtual Camera SDK en varios componentes.
Las nuevas funciones incluyen la compatibilidad con secuencias NDI en VideoCaptureCoreX y bloques multimedia adicionales en Media Blocks SDK, como las clases BufferSink y CustomMediaBlock. Las funciones de recorte de fotogramas de vídeo se han mejorado con la incorporación de VideoCropBlock y VideoAspectRatioCropBlock. La actualización también incluye compatibilidad con el renderizador de audio WASAPI en el motor VideoCaptureCore y actualizaciones del efecto de audio Tempo. En general, esta versión se centra en mejorar el rendimiento, solucionar problemas críticos y añadir nuevas funcionalidades a los SDK .Net.
Compruebe el [registro de cambios](https://www.visioforge.com/help/docs/dotnet/changelog/#158/).
---END OF PAGE---
# Page: https://www.visioforge.com/es/news-2023
# Novedades y actualizaciones de productos en 2023
## VisioForge .Net SDKs v15.7 ha sido lanzado
(2023-11-12)
Se ha publicado la versión 15.7 de los SDK de .Net con varias mejoras y correcciones. Esta versión incluye compatibilidad con .Net 8 en todos los SDK.
Las mejoras clave en el SDK de captura de vídeo .Net incluyen la resolución de problemas con el evento `OnNetworkSourceDisconnect` que se llama dos veces, la fijación de la configuración de formato de fuente de audio en VideoCaptureCoreX, y la solución de problemas de renderizado nativo WPF con ventanas emergentes. El método Start/StartAsync en VideoCaptureCore ahora devuelve false si el dispositivo de captura de vídeo ya está siendo utilizado por otra aplicación.
Se han actualizado los motores X con nuevos codificadores de vídeo MPEG-2 y audio MP2, compatibilidad con el codificador de vídeo DNxHD y cambios en la configuración predeterminada de VP8/VP9 para la grabación en directo. Se han resuelto los problemas de enumeración de Decklink.
Los SDK multiplataforma se benefician de las actualizaciones del código fuente de Decklink, que resuelven problemas de nombres de dispositivo incorrectos, y del gestor de superposiciones, que ahora incluye una clase `OverlayManagerDateTime` para dibujar la fecha actual y texto personalizado. Además, se han resuelto las actualizaciones de seguridad de SkiaSharp y los problemas con el uso de System.Drawing.Bitmap en `OverlayManagerImage`.
Se ha añadido soporte para Avalonia 11.0.5, junto con actualizaciones de las fuentes y codificadores de VLC (libVLC 3.0.19) y FFMPEG, que solucionan problemas de falta de dependencias de MSVC. También se ha actualizado el motor ONVIF.
Por último, la actualización mejora la salida FFMPEG.exe en VideoCaptureCore, mejorando el soporte para codificadores x264 y x265 en construcciones FFMPEG personalizadas, y resuelve un raro problema de bloqueo con WinUI VideoView.
Compruebe el [registro de cambios](https://www.visioforge.com/help/docs/dotnet/changelog/#157/).
## VisioForge .Net SDKs v15.6 ha sido lanzado
(2023-09-20)
La versión 15.6 de los SDK de .Net introduce numerosas mejoras y nuevas funciones. El SDK de captura de vídeo mejora el rendimiento del recorte de vídeo en las CPU modernas e introduce una nueva API de superposición de vídeo, con demostraciones relacionadas que muestran su uso. La actualización también mejora la detección del codificador de hardware para sistemas con varias GPU. Se ha actualizado Avalonia VideoView para resolver problemas con su recreación.
Media Player SDK incluye cambios como la resolución de problemas de inicio en Android y la adición de nuevos métodos para la selección de secuencias de vídeo. Se han implementado mejoras de rendimiento para vídeos 4K y 8K en la renderización WPF en todos los SDK. Se han resuelto varios problemas, incluidos los de recorte de vídeo y múltiples salidas en VideoCaptureCoreX.
Se incluyen nuevas demos y soporte para funciones como streaming NDI, madVR y múltiples pistas de audio. La actualización también añade varias clases y métodos nuevos, como la compatibilidad con fuentes VNC y el redimensionamiento de vídeo basado en IA mediante Nvidia Maxine SDK. El Media Blocks SDK añade nuevos bloques OpenCV, bloques NDI source y sink, y codificadores de vídeo adicionales como rav1e AV1 y GIF.
También forman parte de esta versión mejoras en la reproducción en memoria, problemas con el medidor VU y mayor compatibilidad con WASAPI 2. Los SDK admiten ahora la eliminación asíncrona con la interfaz IAsyncDisposable y han resuelto varios problemas de detección y reproducción. Nuevas funciones como la gestión de datos KLV, la transmisión en red MJPEG y las funcionalidades mejoradas de los bloques multimedia amplían aún más las capacidades de los SDK. Por último, la actualización incluye una serie de mejoras de estabilidad y rendimiento en distintas plataformas y componentes.
Compruebe el [registro de cambios](https://www.visioforge.com/help/docs/dotnet/changelog/#156/).
---END OF PAGE---
# Page: https://www.visioforge.com/es/news-2022
# Novedades y actualizaciones de productos en 2022
## VisioForge .Net SDKs v15.5 ha sido lanzado
(2022-12-11)
Se ha publicado la versión 15.5 de los SDK de .Net con varias novedades y actualizaciones. Esta versión es compatible con .Net 7 e introduce una serie de mejoras en varios componentes del SDK.
En el SDK .Net de captura de vídeo, se ha añadido un evento NetworkDisconnect al motor de cámara IP MJPEG de baja latencia, y el evento `OnRTSPLowLatencyRAWFrame` permite recuperar fotogramas RAW de secuencias RTSP utilizando el motor RTSP de baja latencia. El motor VideoEditCoreX es ahora compatible con demos basadas en Linux y cuenta con una nueva propiedad AutoTransitions. Además, se ha mejorado la compatibilidad con Snap Camera para la codificación MP4 HW y la compatibilidad con múltiples salidas Decklink tanto en Video Capture como en Video Edit SDKs.
Para las APIs multiplataforma, los tipos `System.Drawing.Rectangle` y `System.Drawing.Size` han sido reemplazados por `VisioForge.Types.Rectangle` y `VisioForge.Types.Size`. La actualización también trae muestras MAUI (BETA) y la mejora de licencias en línea.
Se ha actualizado el Media Player SDK .Net con soporte de segmentos en su motor multiplataforma, una API de listas de reproducción para el motor exclusivo de Windows y descodificación GPU HW para el motor VLC. Se han resuelto problemas con la reproducción inversa, el método `MediaPlayerCore.Video\_Renderer\_SetCustomWindowHandle` y las aplicaciones WPF HighDPI que utilizan EVR. Además, el SDK de Media Player ahora admite la reproducción de fotogramas anteriores en su motor multiplataforma.
El Media Blocks SDK .Net ha añadido una demo de captura de pantalla WPF, mientras que ONVIFControl y las APIs relacionadas están ahora disponibles en todas las plataformas. Se ha producido un cambio en la API, ya que el tipo de velocidad de fotogramas ha pasado de "double" a "VideoFrameRate" en todas las API.
Otras mejoras incluyen una nueva demostración de Camera Light, un manejo actualizado de la llamada "rtsp\_source\_create\_audio\_resampler" en el motor RTSP de baja latencia para Video Capture SDK .Net, y soporte mejorado de segmentos en el Media Player SDK. En conjunto, estas actualizaciones mejoran la funcionalidad, la compatibilidad y el rendimiento de los distintos SDK .Net.
Compruebe el [registro de cambios](https://www.visioforge.com/help/docs/dotnet/changelog/#155/).
## VisioForge .Net SDKs v15.4 ha sido lanzado
(2022-07-23)
Se ha publicado la versión 15.4 de los SDK de .Net, que incluye una serie de actualizaciones y nuevas funciones. Esta versión resuelve varios problemas e introduce mejoras en varios componentes.
Las principales actualizaciones incluyen la resolución del problema de ignorar la propiedad `Play\_PauseAtFirstFrame` y mejoras en la compatibilidad con HighDPI en muestras WinForms y para el renderizador de vídeo Direct2D. La clase ONVIFControl ha sido mejorada con nuevas APIs: `GetDeviceCapabilities` y `GetMediaEndpoints`.
Se ha resuelto el problema de la recodificación forzada al unir archivos FFMPEG sin recodificar. La actualización también incluye una actualización de Sentry y añade ajustes de interpolación de vídeo para los efectos de vídeo Zoom y Pan.
Se ha añadido compatibilidad con el marco de interfaz de usuario GtkSharp para la renderización de vídeo, y la API FastEdit se ha cambiado a async. Además, se ha resuelto un problema de volteo de pantalla relacionado con la propiedad `Video\_Effects\_AllowMultipleStreams` del núcleo .Net del SDK de captura de vídeo.
La demo RTSP MultiView ha sido actualizada para incluir decodificación GPU y acceso a flujos RAW. Las nuevas funciones incluyen un evento `OnLoop` en Media Player SDK .Net y una función de bucle en Media Blocks SDK .Net.
Debido a problemas con Avalonia UI y NativeControl, Avalonia VideoView ha sido degradado a la versión 0.10.12. Se ha añadido una nueva demo de File Encryptor al Video Edit SDK .Net, proporcionando un ejemplo de cómo encriptar archivos de video.
En general, esta versión mejora la funcionalidad, resuelve problemas críticos e introduce nuevas características para mejorar la experiencia del usuario en todos los SDK de .Net.
Compruebe el [registro de cambios](https://www.visioforge.com/help/docs/dotnet/changelog/#154/).
## VisioForge .Net SDKs v15.3 ha sido lanzado
(2022-05-21)
Se ha publicado la versión 15.3 de los SDK de .Net con una serie de mejoras y optimizaciones. Entre las principales mejoras se incluyen la reducción del tiempo de inicio de la aplicación en PC equipados con tarjetas Decklink y la compatibilidad con NDI SDK v5. Se ha resuelto un problema con la salida de MKV Legacy que provocaba excepciones de emisión erróneas.
Se han realizado optimizaciones de rendimiento en los efectos de zoom y paneo, y se ha introducido una API básica de Media Blocks, aunque todavía es un trabajo en progreso. El Video Edit SDK .Net ahora soporta streaming de red HLS.
En WPF VideoView, se ha añadido una nueva propiedad Rotate, que permite rotar el vídeo 90, 180 o 270 grados. Los usuarios también pueden utilizar el método `GetImageLayer()` para recuperar la capa de imagen para aplicar transformaciones personalizadas.
Un cambio en la API ha renombrado `FilterHelpers` a `FilterDialogHelper`. Los ensamblados `VisioForge.Types` y `VisioForge.MediaFramework` se han fusionado en `VisioForge.Core`, y las clases UI se han movido a los ensamblados `VisioForge.Core.UI.\*` y paquetes NuGet independientes. Además, `VisioForge.Types` ha sido renombrado a `VisioForge.Core.Types`, y `VisioForge.Core` ya no depende del framework Windows Forms.
En conjunto, estas actualizaciones mejoran el rendimiento, agilizan la API y amplían la funcionalidad de los SDK de .Net.
Compruebe el [registro de cambios](https://www.visioforge.com/help/docs/dotnet/changelog/#153/).
## VisioForge .Net SDKs v15.2 ha sido lanzado
(2022-01-20)
Se ha publicado la versión 15.2 de los SDK de .Net, que incluye varias novedades y mejoras. Entre las actualizaciones más importantes cabe destacar la incorporación de las propiedades `HorizontalAlignment` y `VerticalAlignment` para logotipos de texto e imagen, que permiten una mejor personalización y posicionamiento.
Se ha actualizado la compatibilidad con ONVIF, resolviendo problemas relacionados con las especificaciones de nombre de usuario y contraseña en URL sin la correspondiente configuración de origen. Se ha mejorado la compatibilidad con RTSP para cámaras IP, lo que garantiza conexiones y un rendimiento más fiables.
Se han resuelto los problemas con el diálogo de salida FFMPEG.exe y la captura independiente en aplicaciones de servicio. El SDK ha migrado de NewtonsoftJson a System.Text.Json para un mejor rendimiento y un soporte de serialización moderno.
Se ha actualizado la salida DirectCapture para cámaras IP y se ha añadido una nueva opción de salida DirectCapture ASF. El tipo de propiedad `IPCameraSourceSettings.URL` se ha cambiado de cadena a `System.Uri`, promoviendo un mejor manejo de los tipos de URL.
Se han actualizado los efectos de vídeo y audio, y se han implementado optimizaciones generales del rendimiento del procesamiento de vídeo. Varias correcciones de errores y mejoras de rendimiento aumentan aún más la estabilidad y eficacia del SDK.
En general, esta versión se centra en mejorar la funcionalidad, mejorar el rendimiento y resolver problemas críticos en los SDK de .Net.
Compruebe el [registro de cambios](https://www.visioforge.com/help/docs/dotnet/changelog/#152/).
## VisioForge Fiestas de fin de año 30% de descuento
(2022-01-03)
Celebra las fiestas de fin de año con nuestra venta especial, que ofrece un increíble **30% descuento** en todos los productos
### 🎁 **Disfrute de un 30% de descuento en todos los productos** 🎁
Empieza el Año Nuevo con increíbles ahorros en nuestro software premium. Utilice el código de cupón **NY30** en la caja para recibir un 30% de descuento en todos los productos.
¡No se pierda estos fantásticos descuentos! Aproveche al máximo las fiestas de fin de año con nuestras ofertas especiales y mejore su experiencia de software.
¡Felices compras y Feliz Año Nuevo!
---END OF PAGE---
# Page: https://www.visioforge.com/es/news-2021
# Novedades y actualizaciones de productos en 2021
## VisioForge .Net SDKs v15.1 ha sido lanzado
2022-11-26
La versión 15.1 de .Net SDKs introduce soporte multiplataforma con Android para el Media Player SDK .Net y planes para iOS/macOS para diciembre. Desactiva los mensajes de depuración de Sentry en la consola, añade streaming Icecast y actualiza la propiedad `VideoStreamInfo.FrameRate` a `VideoFrameRate`. VideoView de WPF ha mejorado la reproducción de secuencias de cámaras IP. Cambios significativos en la API fusionan varios componentes en `VisioForge.Core`, y la API de efectos de audio ahora utiliza nombres de cadena. Un nuevo motor multiplataforma basado en GStreamer soporta Windows y otras plataformas en este ciclo de desarrollo.
Compruebe el [registro de cambios](https://www.visioforge.com/help/docs/dotnet/changelog/#151/).
## VisioForge .Net SDKs v15.0 ha sido lanzado
2022-11-01
La versión 15.0 del SDK de .Net introduce cambios significativos en la API, dividiendo los controles principales en partes Core y VideoView. El SDK ya no tiene versiones TRIAL y FULL separadas, eliminando la propiedad `SDK\_State`.
Se recomienda a los desarrolladores que sustituyan los controles de interfaz de usuario por `VideoView` y cambien el nombre de las clases principales (por ejemplo, `VideoCaptureCore`) para que coincidan con los nombres de control de interfaz de usuario utilizados anteriormente. Este cambio permite la compatibilidad con plataformas de interfaz de usuario adicionales como UWP, MAUI, Eco y Avalonia.
Compruebe el [registro de cambios](https://www.visioforge.com/help/docs/dotnet/changelog/#150/).
## VisioForge .Net SDKs v14.3 ha sido lanzado
2022-09-14
La versión 14.3 de los SDK de .Net incluye varias actualizaciones y mejoras importantes. Se ha resuelto un problema crítico con la creación del filtro Video Resize para redistribuciones NuGet y se ha actualizado la telemetría. También se ha actualizado la salida `VFDirectCaptureMP4Output`. Esta versión añade soporte para .Net 6 (preview) y elimina Nvidia CUDA, recomendando NVENC como la alternativa moderna para la codificación H264/HEVC.
Se ha actualizado el motor MJPEG de baja latencia para cámaras IP y se ha mejorado el listado de fuentes NDI. Se ha mejorado la compatibilidad con ONVIF y se ha añadido compatibilidad con .Net Core 3.1 para el motor de fuentes RTSP de baja latencia. Se han resuelto los problemas con Picture-in-Picture para el modo 2x2. El proyecto y las soluciones se han dividido en archivos independientes para .Net Framework 4.7.2, .Net Core 3.1, .Net 5 y .Net 6, lo que facilita una mejor organización y compatibilidad.
Compruebe el [registro de cambios](https://www.visioforge.com/help/docs/dotnet/changelog/#143/).
## VisioForge .Net SDKs v14.2 ha sido lanzado
2022-08-11
La versión 14.2 de .Net SDKs trae varias actualizaciones y correcciones. Se ha resuelto el problema con la captura de secuencias de audio al utilizar la salida del SDK de cámara virtual. Se ha sustituido `VFMP4v8v10Output` por `VFMP4Output`. Se ha añadido un nuevo método `CanStart` a los elementos `Video\_CaptureDevicesInfo`, que comprueba si un dispositivo puede iniciarse y no está siendo utilizado exclusivamente por otra aplicación.
El `ONVIFControl` soporta ahora la API async/await, mejorando sus capacidades asíncronas. Se ha corregido un problema de procesamiento incorrecto de ColorKey en el efecto de vídeo Text Overlay. Se ha añadido soporte de velocidad de fotogramas forzada para la fuente de cámara IP de baja latencia RTSP. Se han actualizado los codificadores MP4v11 AMD y se ha resuelto un problema de marca de tiempo durante la pausa/reanudación de captura independiente de MP4v11.
El flujo de red y la salida de FFMPEG.exe se han actualizado a la última versión de FFMPEG. Ya no es necesario instalar el redistribuible VC++, ya que la vinculación de VC++ se ha cambiado a estática, excepto para la salida XIPH opcional. Además, muchos filtros DirectShow base se han movido al módulo `VisioForge\_BaseFilters`.
Compruebe el [registro de cambios](https://www.visioforge.com/help/docs/dotnet/changelog/#142/).
---END OF PAGE---
# Page: https://www.visioforge.com/it/news-2024
# Novità e aggiornamenti di prodotto nel 2024
## Vendita del 50% per il Black Friday!
(2024-06-03)
🎉 **Allarme saldi estivi!** 🎉Acquistate subito il nostro software più apprezzato con uno sconto imbattibile del 50%! Non perdete questa offerta limitata nel tempo per aumentare la vostra produttività. Aggiornate oggi stesso e risparmiate molto! 🌞💻
Codice coupon: **ESTATE50**
## È stato rilasciato VisioForge .Net SDKs v15.9
(2024-04-07)
È stata rilasciata la versione 15.9 degli SDK .Net con numerosi aggiornamenti e nuove funzionalità. Tra i miglioramenti più significativi vi sono la risoluzione di problemi relativi al rapporto d'aspetto dei video, l'aggiornamento della ridistribuzione GStreamer e l'aggiunta del supporto per le telecamere Basler USB3/GigE. Il Video Edit SDK .Net utilizza ora impostazioni di font basate su SkiaSharp per la classe TextOverlay, consentendo configurazioni di font personalizzate. È stato aggiunto il supporto per i flussi a MediaInfoReader su Windows, consentendo il recupero di informazioni sui file video/audio da varie fonti.
Il motore Live Video Compositor è stato aggiornato per migliorare il supporto delle sorgenti di file e nella Demo Computer Vision del Video Capture SDK è stato introdotto un rilevatore coperto da telecamera. Sono state aggiunte nuove API per il recupero di istantanee dai file video e il supporto iOS è ora incluso nei campioni MAUI. Sono state risolte le perdite di memoria nelle sorgenti RTSP e l'SDK Media Player supporta ora i flussi di dati nei file video utilizzando il motore sorgente FFMPEG.
Altre caratteristiche includono opzioni FFMPEG personalizzate per le telecamere IP, la risoluzione di problemi di connessione di rete con le sorgenti FFMPEG, il supporto RTSP MultiView nell'SDK Media Blocks e il supporto per le telecamere FLIR/Teledyne che utilizzano l'SDK Spinnaker. L'SDK Video Edit supporta ora l'uso di .Net Stream come sorgente di ingresso e il supporto di .Net 7 è stato reintrodotto nel pacchetto MAUI. L'interfaccia IAsyncDisposable è stata aggiunta a tutte le classi principali per lo smaltimento asincrono.
Altri aggiornamenti risolvono problemi di acquisizione video su Android, aggiungono campioni di streaming HLS e risolvono gli arresti anomali relativi alle configurazioni multischermo. Sono stati apportati miglioramenti alla velocità di rendering video MAUI, ai problemi di riproduzione dei media e alla connettività della sorgente webcam. Sono stati risolti i problemi di riproduzione audio e il cattivo mixaggio dell'audio e l'SDK di Media Player supporta ora la crescita dei file MPEG-TS per il motore VLC.
Controllare il [changelog](https://www.visioforge.com/help/docs/dotnet/changelog/#159/).
## È stato rilasciato VisioForge .Net SDKs v15.8
(2024-01-22)
È stata rilasciata la versione 15.8 degli SDK .Net, che apporta diverse modifiche e miglioramenti di rilievo. Gli aggiornamenti principali includono modifiche significative alle API, come la richiesta dell'uso di `DeviceEnumerator.Shared` per l'enumerazione dei dispositivi e passaggi di inizializzazione aggiuntivi per gli X-engine. Android Activity non è più necessario per la creazione di motori SDK.
Gli utenti Windows vedranno migliorate le prestazioni del rendering video MAUI e una nuova funzione di evidenziazione del mouse per le sorgenti di cattura dello schermo. Sono stati corretti diversi bug, tra cui la risoluzione di problemi con il ridimensionamento di Avalonia VideoView, le password di caratteri speciali per le sorgenti RTSP e una perdita di memoria nell'OverlayManager.
L'aggiornamento introduce proprietà per l'impostazione delle posizioni di avvio e arresto in UniversalSourceSettings e aggiunge eventi per la notifica di aggiunte/rimozioni di dispositivi in DeviceEnumerator. È stato aggiunto il supporto dei gestori di errori personalizzati per diversi motori e sono presenti nuove proprietà per l'impostazione di filtri audio personalizzati per le uscite dell'SDK Virtual Camera in vari componenti.
Le nuove caratteristiche includono il supporto dello streaming NDI in VideoCaptureCoreX e blocchi multimediali aggiuntivi nel Media Blocks SDK, come le classi BufferSink e CustomMediaBlock. Le capacità di ritaglio dei fotogrammi video sono state migliorate con l'aggiunta di VideoCropBlock e VideoAspectRatioCropBlock. L'aggiornamento include anche il supporto per il rendering audio WASAPI nel motore VideoCaptureCore e aggiornamenti dell'effetto audio Tempo. Nel complesso, questa release si concentra sul miglioramento delle prestazioni, sulla correzione di problemi critici e sull'aggiunta di nuove funzionalità agli SDK .Net.
Controllare il [changelog](https://www.visioforge.com/help/docs/dotnet/changelog/#158/).
---END OF PAGE---
# Page: https://www.visioforge.com/it/news-2023
# Novità e aggiornamenti di prodotto nel 2023
## È stato rilasciato VisioForge .Net SDKs v15.7
(2023-11-12)
È stata rilasciata la versione 15.7 degli SDK .Net con diversi miglioramenti e correzioni. Questa versione include il supporto per .Net 8 in tutti gli SDK.
I principali miglioramenti apportati al Video Capture SDK .Net includono la risoluzione dei problemi legati alla doppia chiamata dell'evento `OnNetworkSourceDisconnect`, la correzione delle impostazioni del formato della sorgente audio in VideoCaptureCoreX e la risoluzione dei problemi di rendering nativo di WPF con le finestre a comparsa. Il metodo Start/StartAsync di VideoCaptureCore ora restituisce false se il dispositivo di acquisizione video è già utilizzato da un'altra applicazione.
I motori X sono stati aggiornati con nuovi codificatori video MPEG-2 e audio MP2, il supporto del codificatore video DNxHD e le modifiche alle impostazioni predefinite VP8/VP9 per la registrazione dal vivo. Sono stati risolti i problemi di enumerazione dei Decklink.
Gli SDK multipiattaforma beneficiano degli aggiornamenti del sorgente Decklink, che risolve i problemi relativi ai nomi errati dei dispositivi, e dell'Overlay Manager, ora dotato di una classe `OverlayManagerDateTime` per disegnare la data corrente e il testo personalizzato. Inoltre, sono stati risolti gli aggiornamenti di sicurezza di SkiaSharp e i problemi relativi all'utilizzo di System.Drawing.Bitmap in `OverlayManagerImage`.
È stato aggiunto il supporto per Avalonia 11.0.5 e sono stati apportati aggiornamenti ai sorgenti e ai codificatori VLC (libVLC 3.0.19) e FFMPEG, che risolvono problemi di dipendenze MSVC mancanti. Anche il motore ONVIF è stato aggiornato.
Infine, l'aggiornamento migliora l'output FFMPEG.exe in VideoCaptureCore, migliorando il supporto per gli encoder x264 e x265 nelle build FFMPEG personalizzate, e risolve un raro problema di crash con WinUI VideoView.
Controllare il [changelog](https://www.visioforge.com/help/docs/dotnet/changelog/#157/).
## È stato rilasciato VisioForge .Net SDKs v15.6
(2023-09-20)
La versione 15.6 degli SDK .Net introduce numerosi miglioramenti e nuove funzionalità. L'SDK per la cattura video migliora le prestazioni del video crop sulle moderne CPU e introduce una nuova API per la sovrapposizione dei video, con relative demo che ne mostrano l'utilizzo. L'aggiornamento migliora anche il rilevamento dell'encoder hardware per i sistemi con più GPU. Avalonia VideoView è stato aggiornato per risolvere i problemi di ricreazione.
L'SDK Media Player include modifiche come la risoluzione di problemi di avvio su Android e l'aggiunta di nuovi metodi per la selezione del flusso video. Sono stati implementati miglioramenti delle prestazioni per i video 4K e 8K nel rendering WPF in tutti gli SDK. Sono stati risolti vari problemi, tra cui i problemi di ritaglio dei video e le uscite multiple in VideoCaptureCoreX.
Sono incluse nuove demo e il supporto per funzioni come lo streaming NDI, madVR e le tracce audio multiple. L'aggiornamento aggiunge anche diverse nuove classi e metodi, come il supporto alle sorgenti VNC e il ridimensionamento video basato sull'intelligenza artificiale utilizzando l'SDK Nvidia Maxine. L'SDK Media Blocks aggiunge nuovi blocchi OpenCV, blocchi NDI source e sink e ulteriori codificatori video come rav1e AV1 e GIF.
Questa versione contiene anche miglioramenti alla riproduzione della memoria, ai problemi relativi ai misuratori VU e al supporto avanzato per WASAPI 2. Gli SDK supportano ora lo smaltimento asincrono con l'interfaccia IAsyncDisposable e hanno risolto vari problemi di rilevamento e riproduzione. Nuove caratteristiche come la gestione dei dati KLV, lo streaming di rete MJPEG e le funzionalità migliorate dei blocchi multimediali ampliano ulteriormente le capacità degli SDK. Infine, l'aggiornamento include una serie di miglioramenti della stabilità e delle prestazioni su diverse piattaforme e componenti.
Controllare il [changelog](https://www.visioforge.com/help/docs/dotnet/changelog/#156/).
---END OF PAGE---
# Page: https://www.visioforge.com/it/news-2022
# Novità e aggiornamenti sui prodotti nel 2022
## È stato rilasciato VisioForge .Net SDKs v15.5
(2022-12-11)
È stata rilasciata la versione 15.5 degli SDK .Net con numerose nuove funzionalità e aggiornamenti. Questa versione include il supporto per .Net 7 e introduce una serie di miglioramenti in vari componenti dell'SDK.
Nel Video Capture SDK .Net è stato aggiunto un evento NetworkDisconnect al motore delle telecamere IP MJPEG Low Latency e l'evento `OnRTSPLowLatencyRAWFrame` consente di recuperare i fotogrammi RAW dai flussi RTSP utilizzando il motore RTSP Low Latency. Il motore VideoEditCoreX supporta ora le demo basate su Linux e presenta una nuova proprietà AutoTransitions. Inoltre, è stata migliorata la compatibilità con Snap Camera per la codifica MP4 HW e il supporto per più uscite Decklink in entrambi gli SDK Video Capture e Video Edit.
Per le API multipiattaforma, i tipi `System.Drawing.Rectangle` e `System.Drawing.Size` sono stati sostituiti da `VisioForge.Types.Rectangle` e `VisioForge.Types.Size`. L'aggiornamento porta anche campioni MAUI (BETA) e licenze online migliorate.
Il Media Player SDK .Net è stato aggiornato con il supporto dei segmenti nel suo motore multipiattaforma, un'API Playlist per il motore Windows-only e la decodifica HW GPU per il motore VLC. Sono stati risolti i problemi relativi alla riproduzione inversa, al metodo `MediaPlayerCore.Video\_Renderer\_SetCustomWindowHandle` e alle applicazioni WPF HighDPI che utilizzano EVR. Inoltre, l'SDK Media Player supporta ora la riproduzione di fotogrammi precedenti nel suo motore multipiattaforma.
L'SDK .Net di Media Blocks ha aggiunto una demo di cattura dello schermo in WPF, mentre ONVIFControl e le relative API sono ora disponibili su tutte le piattaforme. È stata apportata una modifica alle API: il tipo di frame rate è passato da double a `VideoFrameRate` in tutte le API.
Altri miglioramenti includono una nuova demo Camera Light, una gestione aggiornata della chiamata "rtsp\_source\_create\_audio\_resampler" nel motore RTSP Low Latency per Video Capture SDK .Net e un supporto migliorato dei segmenti nel Media Player SDK. Questi aggiornamenti migliorano complessivamente la funzionalità, la compatibilità e le prestazioni dei vari SDK .Net.
Controllare il [changelog](https://www.visioforge.com/help/docs/dotnet/changelog/#155/).
## È stato rilasciato VisioForge .Net SDKs v15.4
(2022-07-23)
È stata rilasciata la versione 15.4 degli SDK .Net, con una serie di aggiornamenti e nuove funzionalità. Questa versione risolve diversi problemi e introduce miglioramenti in vari componenti.
Gli aggiornamenti principali includono la risoluzione del problema dell'ignoranza della proprietà `Play\_PauseAtFirstFrame` e miglioramenti al supporto HighDPI nei campioni WinForms e per il renderer video Direct2D. La classe ONVIFControl è stata migliorata con nuove API: `GetDeviceCapabilities` e `GetMediaEndpoints`.
È stato risolto il problema della ricodifica forzata quando si univano file FFMPEG senza ricodifica. L'aggiornamento include anche un aggiornamento di Sentry e aggiunge impostazioni di interpolazione video per gli effetti video Zoom e Pan.
È stato aggiunto il supporto per il framework GtkSharp UI per il rendering video e l'API FastEdit è stata modificata in async. Inoltre, è stato risolto un problema di screen flip legato alla proprietà `Video\_Effects\_AllowMultipleStreams` nel core di Video Capture SDK .Net.
Die RTSP-MultiView-Demo wurde aktualisiert, um GPU-Decodierung und Zugriff auf RAW-Streams zu ermöglichen. Zu den neuen Funktionen gehören ein "OnLoop"-Ereignis im Media Player SDK .Net und eine Schleifenfunktion im Media Blocks SDK .Net.
A causa di problemi con Avalonia UI e NativeControl, Avalonia VideoView è stato declassato alla versione 0.10.12. All'SDK .Net di Video Edit è stata aggiunta una nuova demo di File Encryptor, che fornisce un esempio di come criptare i file video.
Nel complesso, questa release migliora le funzionalità, risolve i problemi critici e introduce nuove caratteristiche per migliorare l'esperienza dell'utente in tutti gli SDK .Net.
Controllare il [changelog](https://www.visioforge.com/help/docs/dotnet/changelog/#154/).
## È stato rilasciato VisioForge .Net SDKs v15.3
(2022-05-21)
È stata rilasciata la versione 15.3 degli SDK .Net con una serie di miglioramenti e ottimizzazioni. I principali miglioramenti includono la riduzione del tempo di avvio dell'applicazione per i PC dotati di schede Decklink e il supporto per NDI SDK v5. È stato risolto un problema con l'output MKV Legacy che causava eccezioni di cast errate.
Sono state apportate ottimizzazioni alle prestazioni degli effetti di zoom e pan ed è stata introdotta un'API di base per i blocchi multimediali, anche se si tratta ancora di un lavoro in corso. Il Video Edit SDK .Net supporta ora lo streaming di rete HLS.
In WPF VideoView è stata aggiunta una nuova proprietà Rotate, che consente la rotazione del video di 90, 180 o 270 gradi. Gli utenti possono anche utilizzare il metodo `GetImageLayer()` per recuperare il livello immagine per applicare trasformazioni personalizzate.
Una modifica dell'API ha rinominato `FilterHelpers` in `FilterDialogHelper`. Gli assiemi `VisioForge.Types` e `VisioForge.MediaFramework` sono stati fusi in `VisioForge.Core` e le classi UI sono state spostate negli assiemi `VisioForge.Core.UI.\*` e nei pacchetti NuGet indipendenti. Inoltre, `VisioForge.Types` è stato rinominato in `VisioForge.Core.Types` e `VisioForge.Core` non dipende più dal framework Windows Forms.
Questi aggiornamenti migliorano complessivamente le prestazioni, semplificano l'API ed espandono le funzionalità degli SDK .Net.
Controllare il [changelog](https://www.visioforge.com/help/docs/dotnet/changelog/#153/).
## È stato rilasciato VisioForge .Net SDKs v15.2
(2022-01-20)
È stata rilasciata la versione 15.2 degli SDK .Net, che presenta numerose nuove aggiunte e miglioramenti. Gli aggiornamenti principali includono l'aggiunta delle proprietà `HorizontalAlignment` e `VerticalAlignment` per i loghi di testo e immagine, che consentono una migliore personalizzazione e posizionamento.
Il supporto ONVIF è stato aggiornato, risolvendo i problemi legati alle specifiche di nome utente e password negli URL senza le corrispondenti impostazioni di origine. Il supporto RTSP per le telecamere IP è stato migliorato, garantendo connessioni e prestazioni più affidabili.
Sono stati risolti i problemi relativi alla finestra di dialogo di output FFMPEG.exe e all'acquisizione separata nelle applicazioni di servizio. L'SDK è migrato da NewtonsoftJson a System.Text.Json per migliorare le prestazioni e il supporto della serializzazione moderna.
È stata aggiornata l'uscita DirectCapture per le telecamere IP ed è stata aggiunta una nuova opzione di uscita DirectCapture ASF. Il tipo di proprietà `IPCameraSourceSettings.URL` è stato cambiato da stringa a `System.Uri`, favorendo una migliore gestione dei tipi di URL.
Gli effetti video e audio sono stati aggiornati e sono state implementate ottimizzazioni delle prestazioni generali di elaborazione video. Varie correzioni di bug e miglioramenti delle prestazioni migliorano ulteriormente la stabilità e l'efficienza dell'SDK.
Nel complesso, questa release si concentra sul potenziamento delle funzionalità, sul miglioramento delle prestazioni e sulla risoluzione di problemi critici in tutti gli SDK .Net.
Controllare il [changelog](https://www.visioforge.com/help/docs/dotnet/changelog/#152/).
## VisioForge Vacanze di Capodanno 30% di sconto
(2022-01-03)
Festeggiate le vacanze di Capodanno con la nostra vendita speciale, che offre un'incredibile **30% di sconto** su tutti i prodotti!
### 🎁 **Sconto del 30% su tutti i prodotti!** 🎁
Iniziate il nuovo anno con un incredibile risparmio sul nostro software premium. Utilizzate il codice coupon **NY30** alla cassa per ricevere uno sconto del 30% su tutti i prodotti.
Non perdete questi fantastici risparmi! Approfittate delle vacanze di Capodanno con le nostre offerte speciali e migliorate la vostra esperienza software.
Buon shopping e buon anno!
---END OF PAGE---
# Page: https://www.visioforge.com/it/news-2021
# Novità e aggiornamenti di prodotto nel 2021
## È stato rilasciato VisioForge .Net SDKs v15.1
2022-11-26
La versione 15.1 degli SDK .Net introduce il supporto multipiattaforma con Android per l'SDK .Net del lettore multimediale ed è prevista per iOS/macOS entro dicembre. Disattiva i messaggi di debug di Sentry nella console, aggiunge lo streaming Icecast e aggiorna la proprietà `VideoStreamInfo.FrameRate` a `VideoFrameRate`. La VideoView WPF ha migliorato la riproduzione dei flussi delle telecamere IP. Significative modifiche all'API che fondono diversi componenti in `VisioForge.Core`, mentre l'API degli effetti audio ora utilizza nomi di stringhe. Un nuovo motore multipiattaforma basato su GStreamer supporta Windows e altre piattaforme in questo ciclo di sviluppo.
Controllare il [changelog](https://www.visioforge.com/help/docs/dotnet/changelog/#151/).
## È stato rilasciato VisioForge .Net SDKs v15.0
2022-11-01
La versione 15.0 degli SDK .Net introduce modifiche significative alle API, dividendo i controlli principali in Core e VideoView. L'SDK non dispone più di versioni TRIAL e FULL separate, eliminando la proprietà `SDK\_State
Si consiglia agli sviluppatori di sostituire i controlli dell'interfaccia utente con `VideoView` e di rinominare le classi principali (ad esempio, `VideoCaptureCore`) in modo che corrispondano ai nomi dei controlli dell'interfaccia utente usati in precedenza. Questa modifica consente di supportare altre piattaforme UI come UWP, MAUI, Eco e Avalonia.
Controllare il [changelog](https://www.visioforge.com/help/docs/dotnet/changelog/#150/).
## È stato rilasciato VisioForge .Net SDKs v14.3
2022-09-14
La versione 14.3 degli SDK .Net include diversi aggiornamenti e miglioramenti importanti. È stato risolto un problema critico con la creazione del filtro Video Resize per le ridistribuzioni NuGet ed è stata aggiornata la telemetria. Anche l'output `VFDirectCaptureMP4Output` è stato aggiornato. Questa versione aggiunge il supporto per .Net 6 (anteprima) e rimuove Nvidia CUDA, raccomandando NVENC come alternativa moderna per la codifica H264/HEVC.
Il motore MJPEG Low Latency delle telecamere IP è stato aggiornato e l'elenco delle sorgenti NDI è stato migliorato. Il supporto ONVIF è stato migliorato ed è stato aggiunto il supporto .Net Core 3.1 per il motore sorgente RTSP Low Latency. Sono stati risolti i problemi relativi al Picture-in-Picture per la modalità 2x2. Il progetto e le soluzioni sono stati suddivisi in file indipendenti per .Net Framework 4.7.2, .Net Core 3.1, .Net 5 e .Net 6, per facilitare l'organizzazione e la compatibilità.
Controllare il [changelog](https://www.visioforge.com/help/docs/dotnet/changelog/#143/).
## È stato rilasciato VisioForge .Net SDKs v14.2
2022-08-11
La versione 14.2 degli SDK .Net apporta diversi aggiornamenti e correzioni. È stato risolto il problema della cattura del flusso audio quando si utilizza l'uscita Virtual Camera SDK. L'uscita `VFMP4v8v10Output` è stata sostituita con `VFMP4Output`. È stato aggiunto un nuovo metodo `CanStart` agli elementi `Video\_CaptureDevicesInfo`, che verifica se un dispositivo può essere avviato e non è utilizzato esclusivamente da un'altra applicazione.
L'API `ONVIFControl` ora supporta async/await, migliorando le sue capacità asincrone. È stato risolto un problema di elaborazione non corretta dei ColorKey nell'effetto video Text Overlay. È stato aggiunto il supporto per la frequenza dei fotogrammi forzata per la sorgente di telecamere IP RTSP Low Latency. I codificatori MP4v11 AMD sono stati aggiornati ed è stato risolto un problema di timestamp durante la pausa/ripresa dell'acquisizione separata MP4v11.
Lo streaming di rete e l'output di FFMPEG.exe sono stati aggiornati all'ultima versione di FFMPEG. Non è più necessario installare il ridistribuibile VC++, poiché il collegamento VC++ è stato modificato in statico, tranne che per l'output XIPH opzionale. Inoltre, molti filtri DirectShow di base sono stati spostati nel modulo `VisioForge\_BaseFilters`.
Controllare il [changelog](https://www.visioforge.com/help/docs/dotnet/changelog/#142/).
---END OF PAGE---